

Page 1
1
U
SER GUIDE
USB 2.0 TO DVI-I ADAPTER
Model: 30535
All manuals and user guides at all-guides.com
all-guides.com
Page 2
1
Introduction.................................................................................................................................................2
Features......................................................................................................................................................3
System Requirements.................................................................................................................................4
Package Contents.......................................................................................................................................5
Device Overview.........................................................................................................................................6
Device Driver Installation on Windows 2000/XP
Device Installation on Windows 2000/XP..........................................................................................7
Verifying Device Driver on Windows 2000/XP.................................................................................19
Device Driver Un-Installation on Windows 2000/XP........................................................................21
Device Driver Installation on Windows Vista
Device Installation on Windows Vista..............................................................................................23
Verifying Device Driver on Windows Vista.......................................................................................29
Device Driver Un-Installation on Windows Vista..............................................................................31
Function Description
Function Description........................................................................................................................33
Supported Common Display Resolution...................................................................................................39
Technical Specifications............................................................................................................................40
Questions & Answers................................................................................................................................41
Troubleshooting Tips.................................................................................................................................42
Regulatory Compliance.............................................................................................................................43
Cables To Go One Year Warranty............................................................................................................44
Important Safety Information.....................................................................................................................45
TABLE OF CONTENTS
All manuals and user guides at all-guides.com
Page 3
2
Thank you for purchasing the USB 2.0 to DVI-I Adapter. This product will allow you to easily expand your
PC’s display capabilities via an available USB port. No need to open your computer case or install a
special graphics card – this cable-based adapter uses a simple connection to provide support for a
secondary monitor. View large spreadsheets over two screens, read email messages and attachments
on separate monitors, deliver multi-screen presentations without a second computer, or expand your
graphic design workstation. We recommend that you read this manual thoroughly and retain for
future reference.
INTRODUCTION
All manuals and user guides at all-guides.com
Page 4
3
Supports display resolutions up to VGA: 1920 x 1200 / DVI: 1600 x 1200
Supports the multiple display devices on one PC
Multi graphics display modes – Primary, Extended, Mirror and Rotation
USB 2.0 compliant and Plug-and-Play USB connectivity
VGA and DVI outputs compliant
FEATURES
All manuals and user guides at all-guides.com
Page 5
4
Pentium 4 / Celeron Family, AMD K6 / Athlon / Duron Family.
1.0GHz or higher processor
Single Display Setup: 256MB RAM or higher;
Multi-Display Setup: 512MB RAM or higher-(Higher memory recommended for optimal performance)
Available USB 2.0 port
Windows 2000 SP4 / Windows XP SP2 / Windows Vista
SYSTEM REQUIREMENTS
All manuals and user guides at all-guides.com
Page 6
5
USB 2.0 to DVI-I Adapter
USB 2.0 cable
DVI to VGA adapter (for VGA capable displays)
CD (User Manual, Driver and Utility)
Quick Installation Guide
PACKAGE CONTENTS
All manuals and user guides at all-guides.com
all-guides.com
Page 7

6
DEVICE OVERVIEW
USB Mini-B Port
Power LED Indicator
DVI-I Female Port
DVI to VGA Adapter
All manuals and user guides at all-guides.com
Page 8
7
Please note the following information before installation:
Do not plug the USB 2.0 to DVI-I Adapter to your PC or Notebook while executing the set-up or un-
installation program.
The AC power adapter is required for the external USB Hub. Please note that the driver allows up to
6 USB 2.0 to DVI-I Adapters on one PC.
Connect the display device to the DVI connector of USB 2.0 to DVI-I Adapter and switch it on before
plugging it into an available USB 2.0 port of PC or Notebook.
DO NOT reboot the computer until all of USB 2.0 to DVI-I Adapters are installed.
Installing the device driver enables your computer’s operating system to recognize the USB 2.0 to DVI-I
Adapter once it’s connected. Please check your operating system and refer to the appropriate installation
procedure to begin installing the device driver. Please make sure the USB 2.0 to DVI-I Adapter is
unplugged from your PC or Notebook before executing the setup program.
This section illustrates the
simple device driver installation procedure for computer running Windows 2000 / XP operating system.
DEVICE INSTALLATION ON WINDOWS® 2000/XP
All manuals and user guides at all-guides.com
Page 9
8
Step 1
Insert the
Driver
CD into the CD-ROM drive; the setup program
should be launched
automatically. If setup
program does not begin automatically, click Start, Run and double click “
D:\Setup.exe
” (where D: is the
path of your CD-ROM drive).
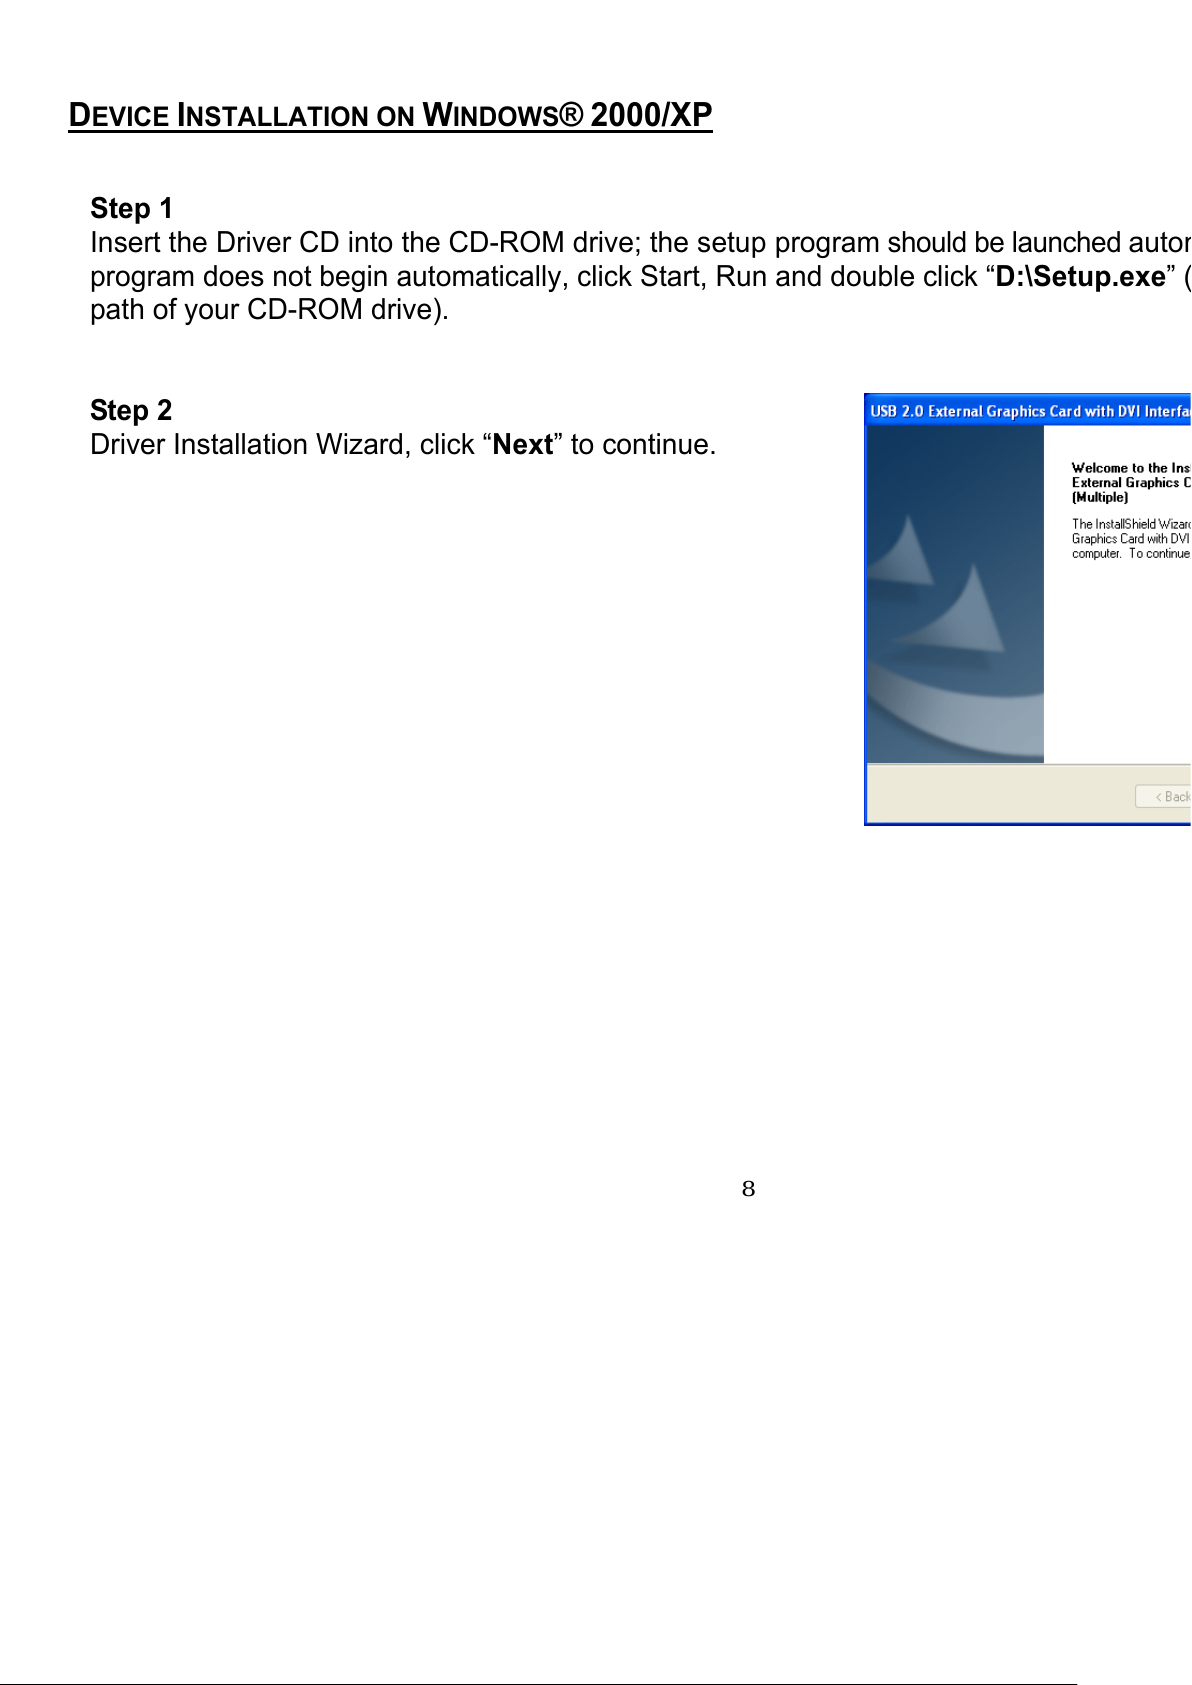
Step 2
Driver Installation Wizard, click “
Next
” to continue.
DEVICE INSTALLATION ON WINDOWS® 2000/XP
All manuals and user guides at all-guides.com
Page 10
9
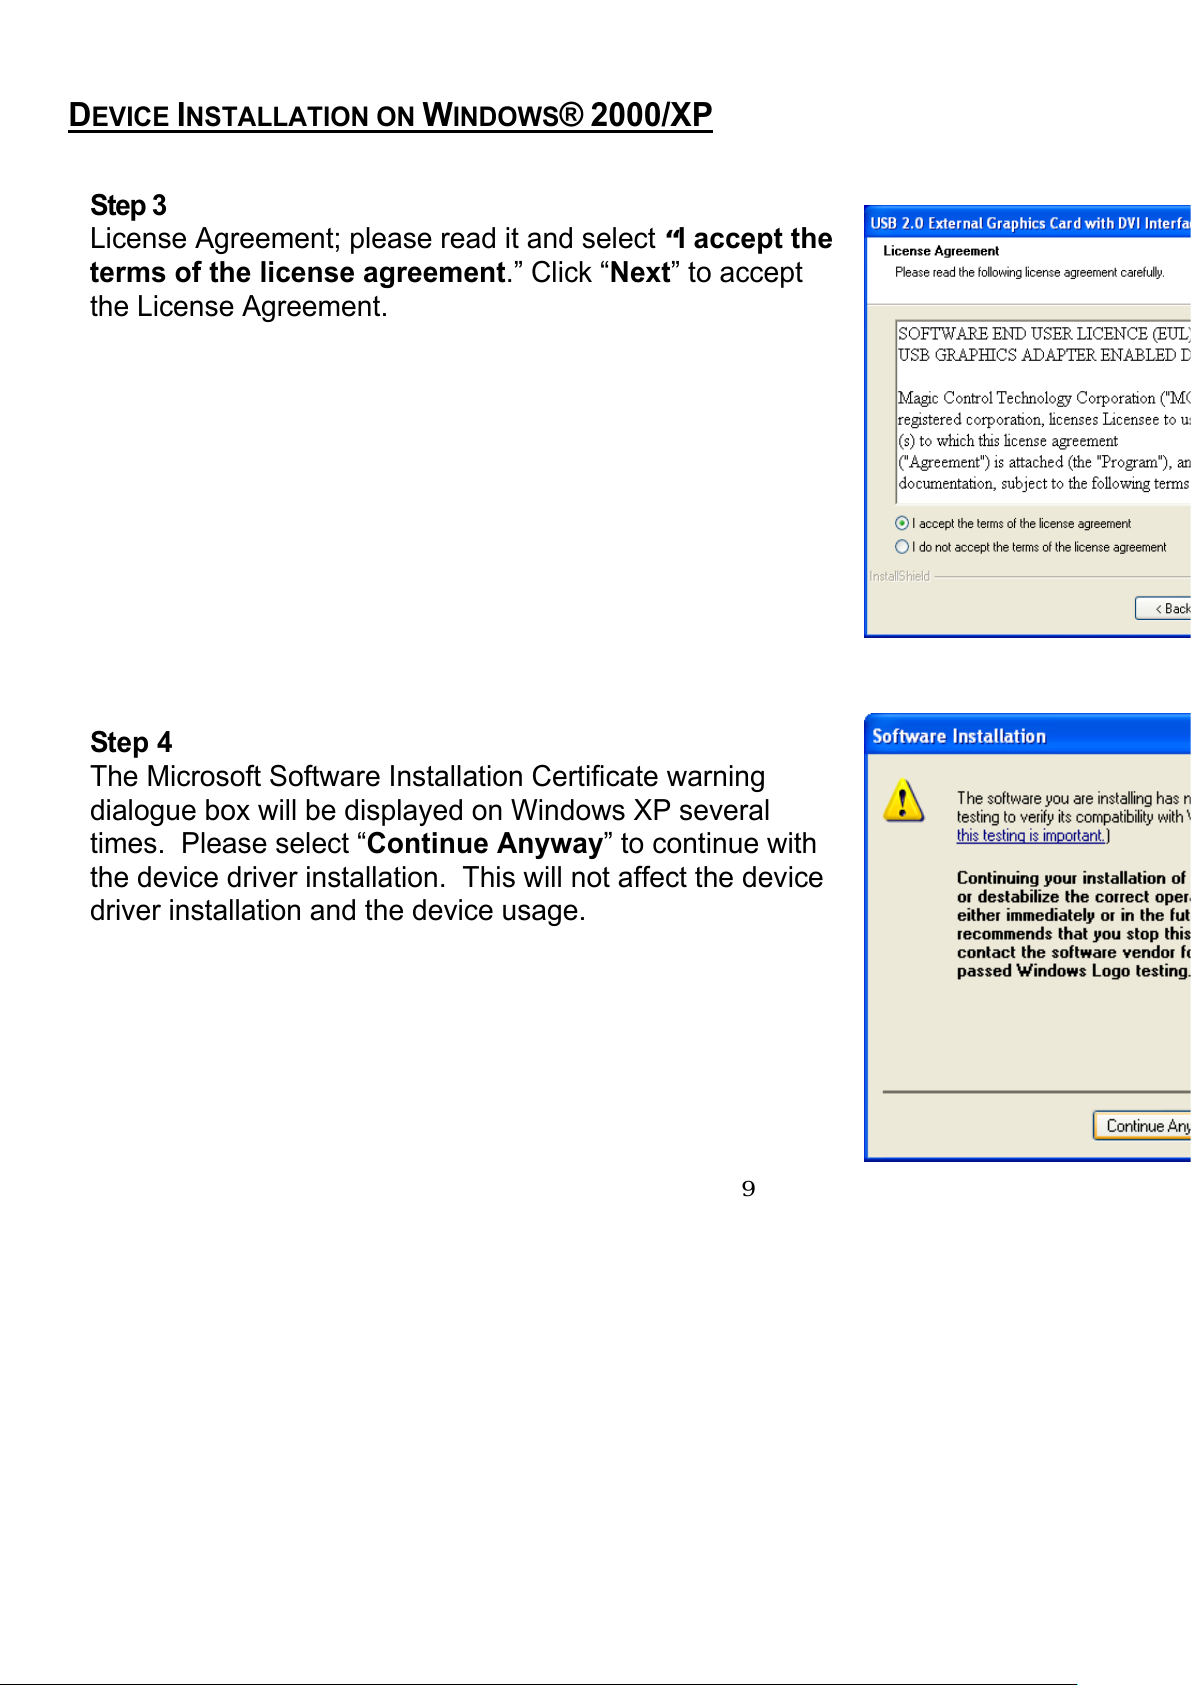
Step 3
License Agreement; please read it and select
“I accept the
terms of the license agreement
.” Click “
Next
” to accept
the License Agreement.
Step 4
The Microsoft Software Installation Certificate warning
dialogue box will be displayed on Windows XP several
times. Please select “
Continue Anyway
” to continue with
the device driver installation. This will not affect the device
driver installation and the device usage.
DEVICE INSTALLATION ON WINDOWS® 2000/XP
All manuals and user guides at all-guides.com
Page 11
10
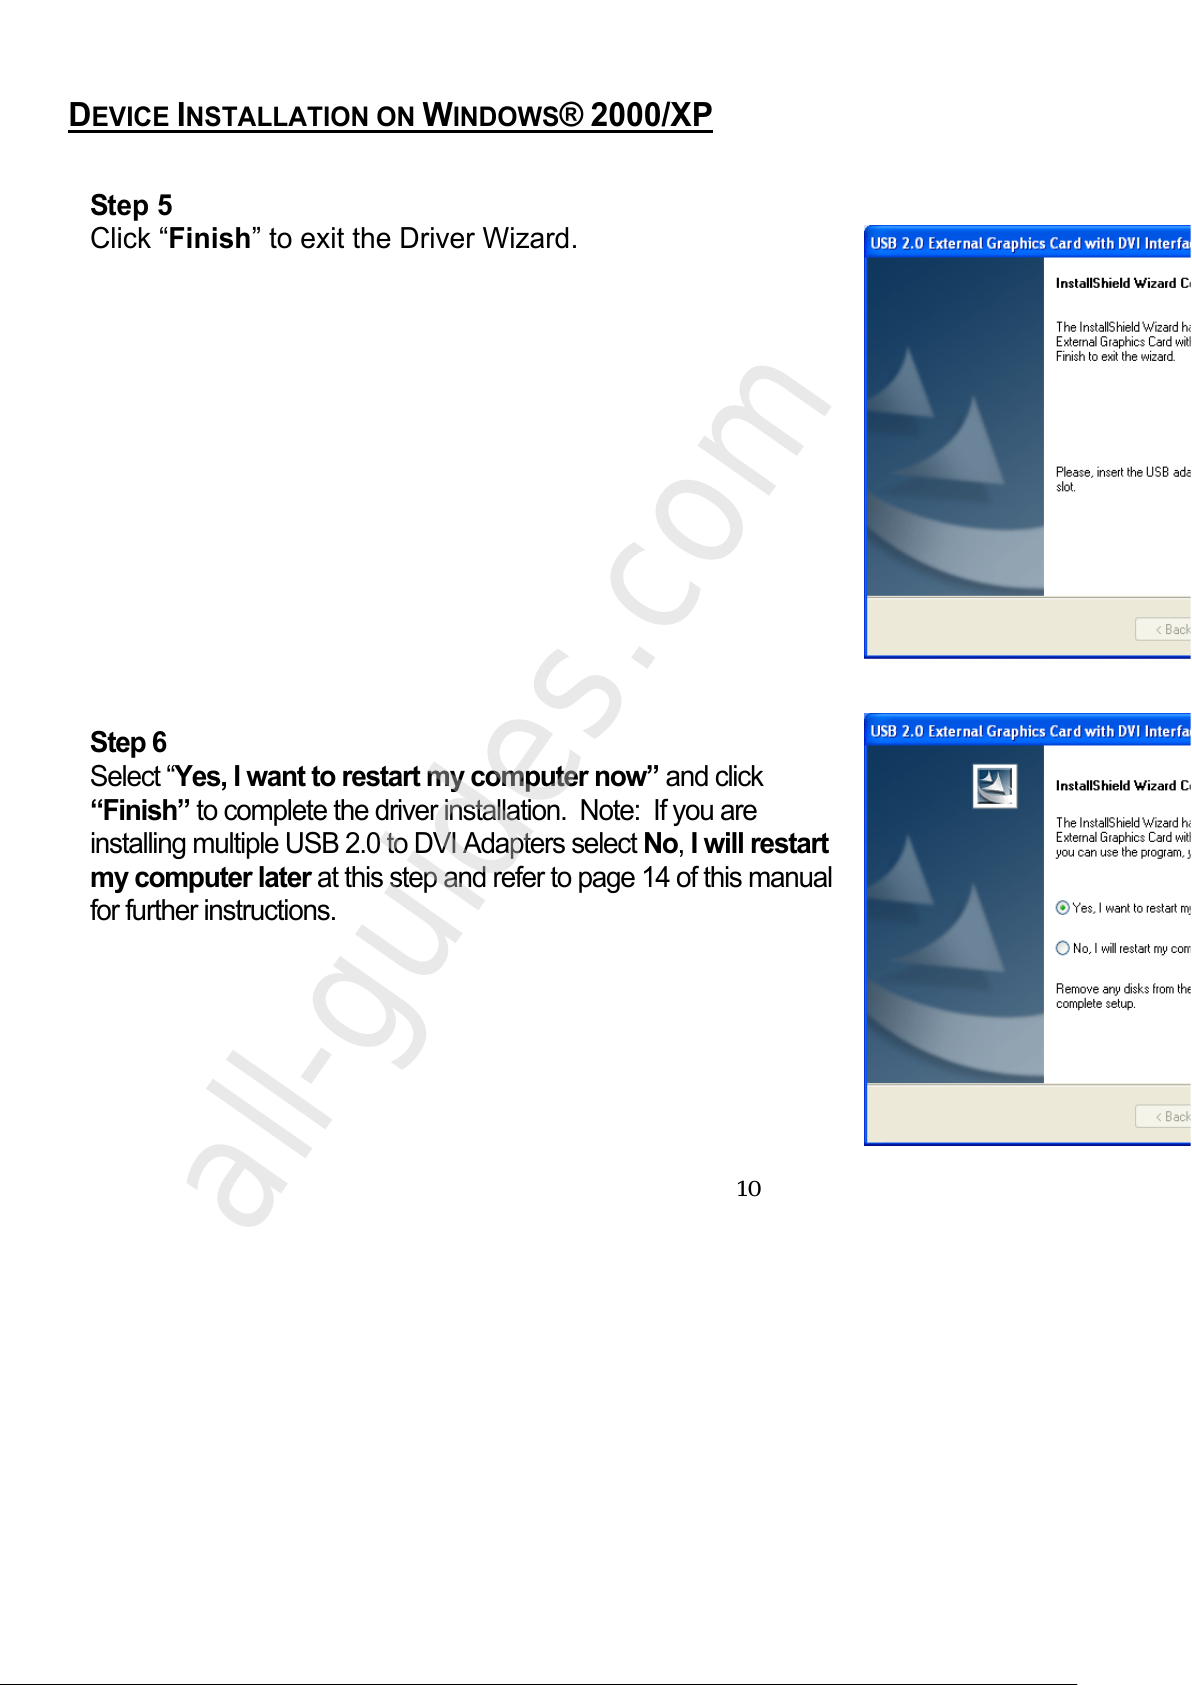
Step 5
Click “
Finish
” to exit the Driver Wizard.
Step 6
Select “Yes, I want to restart my computer now” and click
“Finish” to complete the driver installation. Note: If you are
installing multiple USB 2.0 to DVI Adapters select No, I will restart
my computer later at this step and refer to page 14 of this manual
for further instructions.
DEVICE INSTALLATION ON WINDOWS® 2000/XP
All manuals and user guides at all-guides.com
all-guides.com
Page 12
11
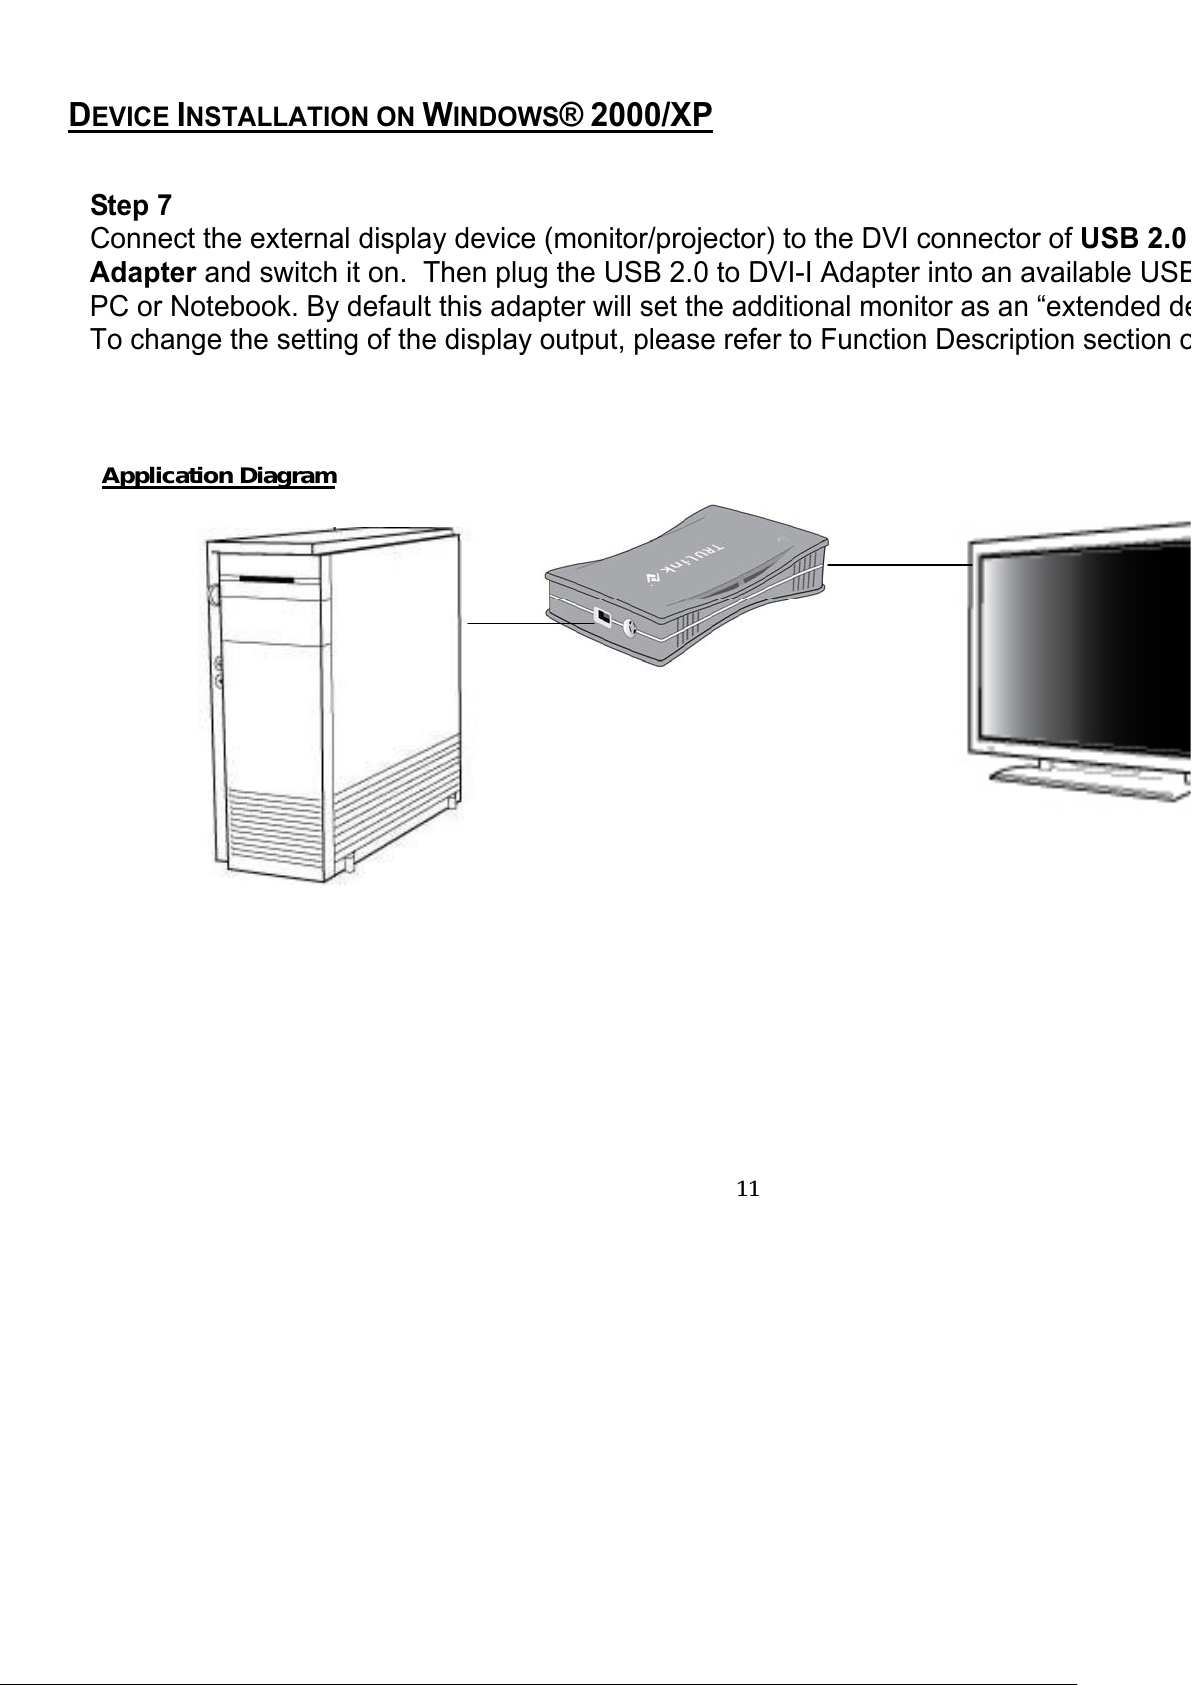
Step 7
Connect the external display device (monitor/projector) to the DVI connector of
USB 2.0 to DVI-I
Adapter
and switch it on. Then plug the USB 2.0 to DVI-I Adapter into an available USB 2.0 port of your
PC or Notebook.
By default this adapter will set the additional monitor as an “extended desktop” display.
To change the setting of the display output, please refer to Function Description section of this manual.
Application Diagram
DEVICE INSTALLATION ON WINDOWS® 2000/XP
All manuals and user guides at all-guides.com
Page 13
12
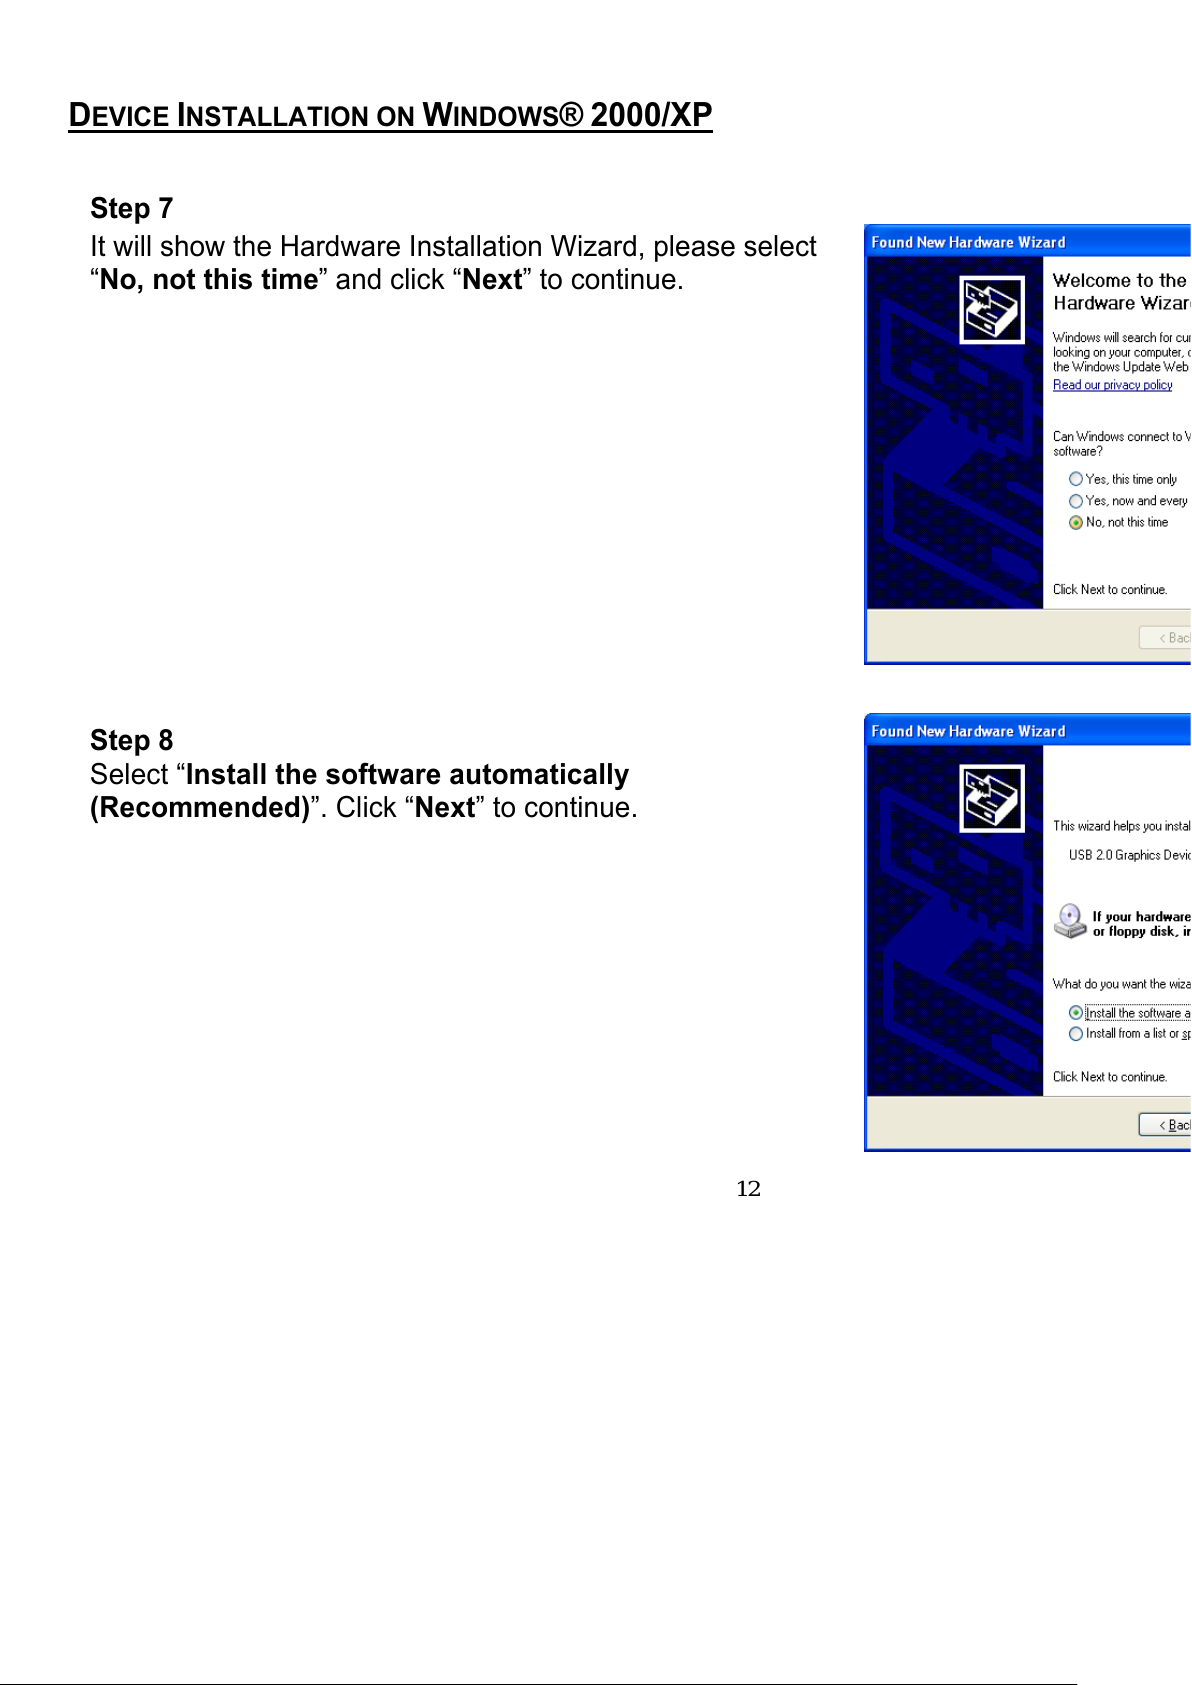
Step 7
It will show the Hardware Installation Wizard, please select
“No, not this time” and click “Next” to continue.
Step 8
Select “Install the software automatically
(Recommended)”. Click “Next” to continue.
DEVICE INSTALLATION ON WINDOWS® 2000/XP
All manuals and user guides at all-guides.com
Page 14
13
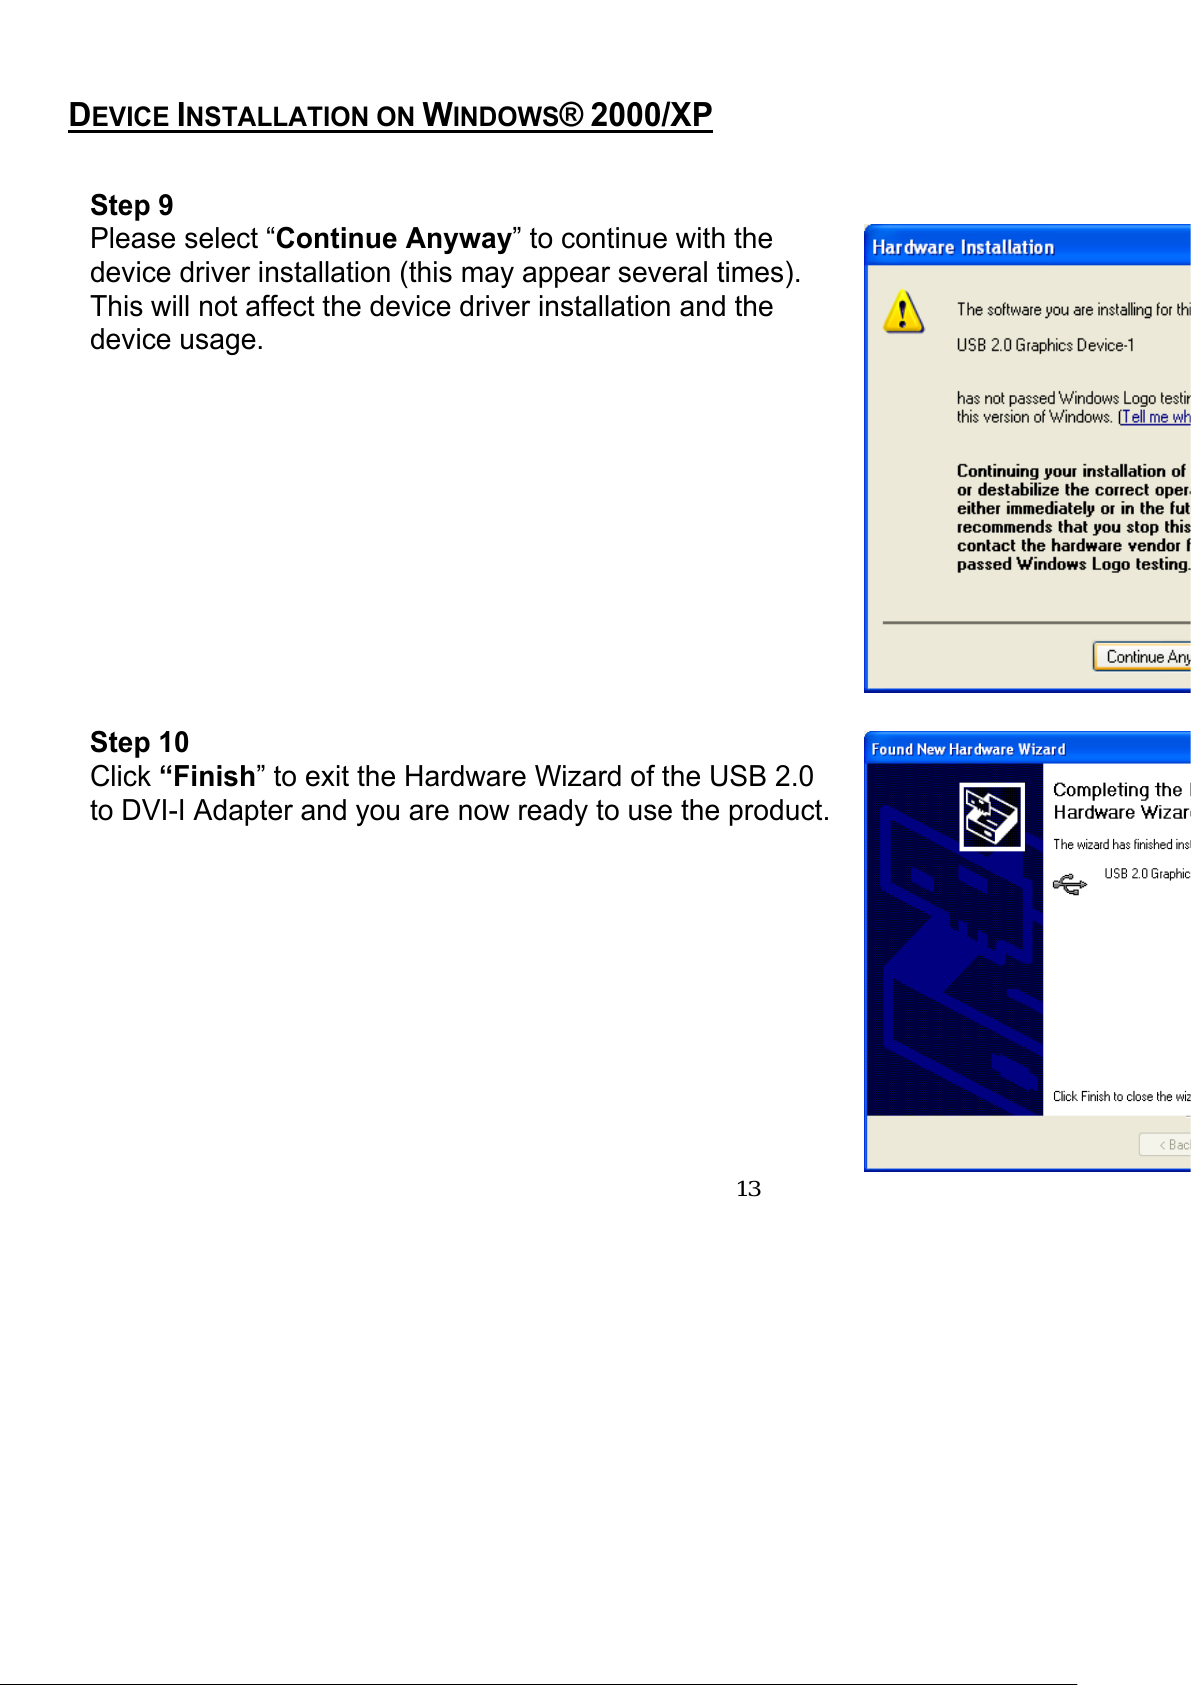
Step 9
Please select “
Continue Anyway
” to continue with the
device driver installation (this may appear several times).
This will not affect the device driver installation and the
device usage.
Step 10
Click
“Finish
” to exit the Hardware Wizard of the USB 2.0
to DVI-I Adapter and you are now ready to use the product.
DEVICE INSTALLATION ON WINDOWS® 2000/XP
All manuals and user guides at all-guides.com
Page 15
14
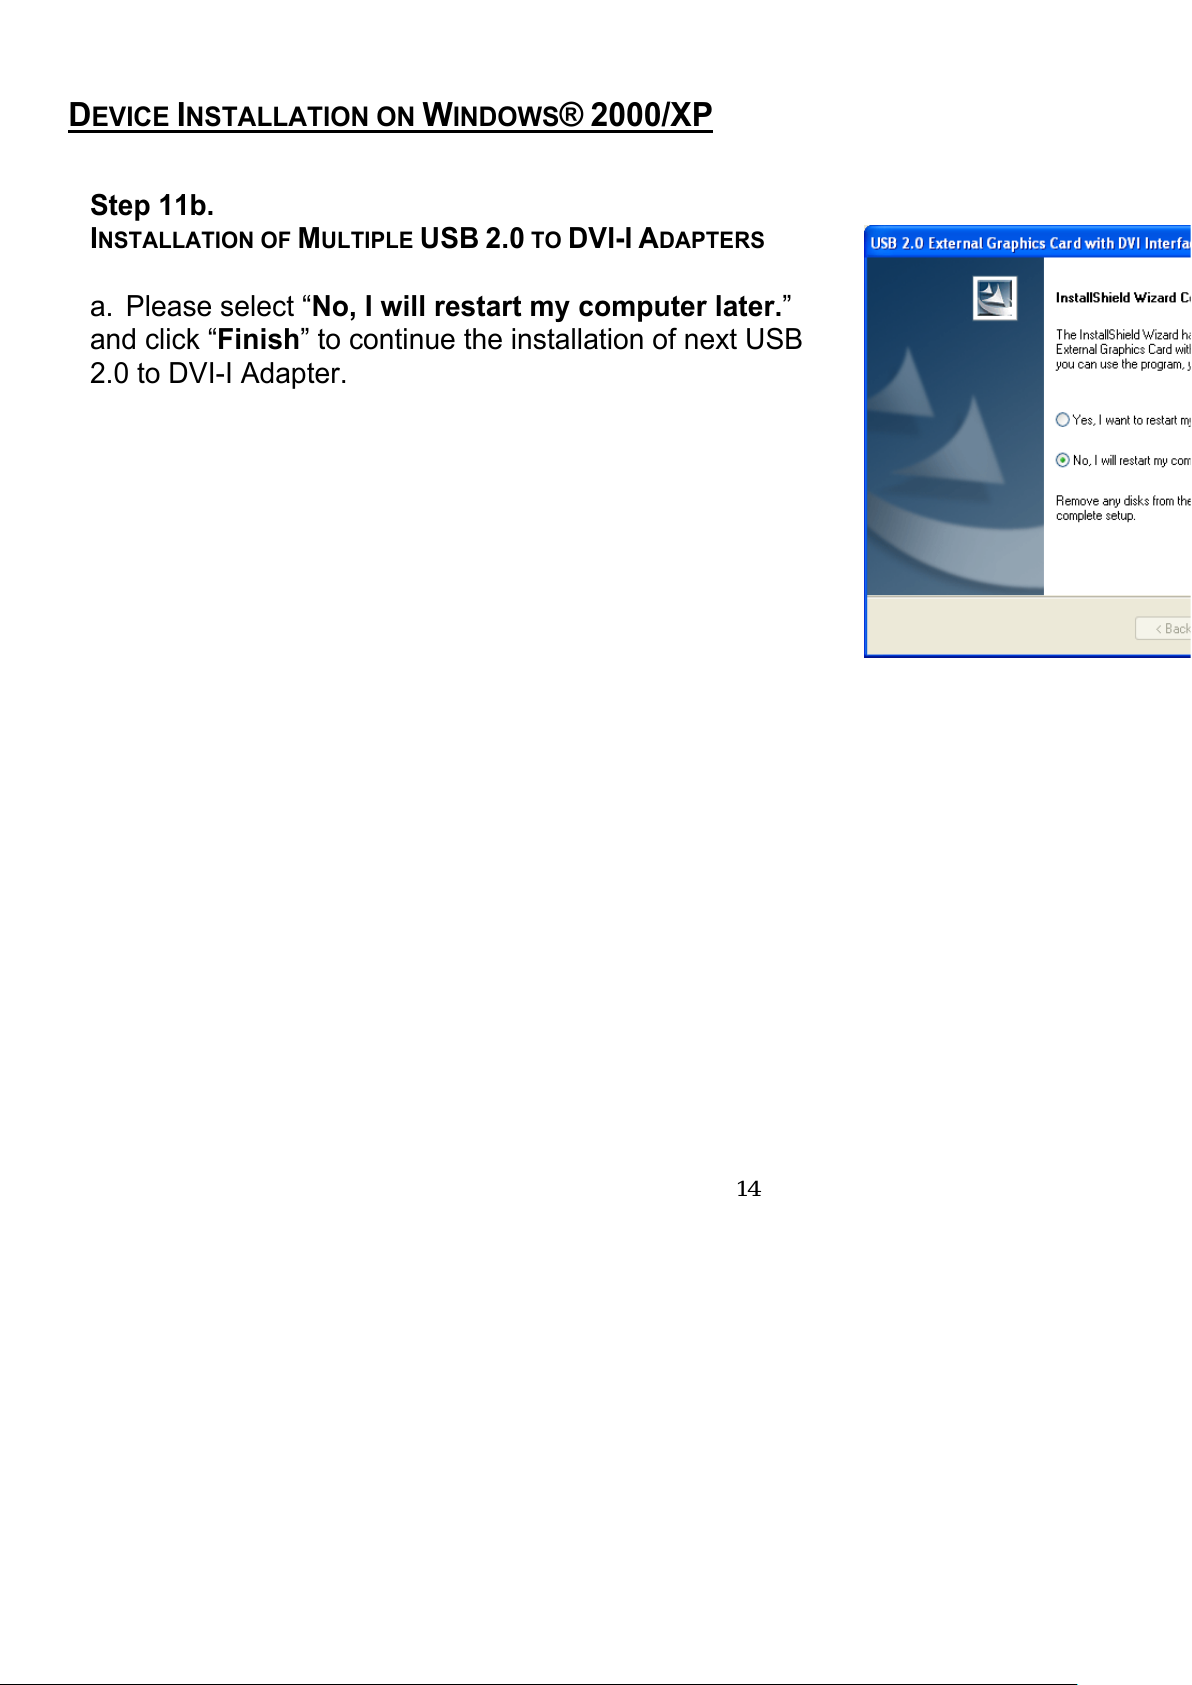
Step 11b.
I
NSTALLATION OF MULTIPLE
USB 2.0
TO
DVI-I A
DAPTERS
a. Please select “
No, I will restart my computer later.
”
and click “
Finish
” to continue the installation of next USB
2.0 to DVI-I Adapter.
DEVICE INSTALLATION ON WINDOWS® 2000/XP
All manuals and user guides at all-guides.com
Page 16
15
b. Connect another display device to the DVI connector of the next USB 2.0 to DVI-I Adapter and switch
it on. Then plug the USB 2.0 to DVI-I Adapter into next available USB 2.0 port of your PC or Notebook.
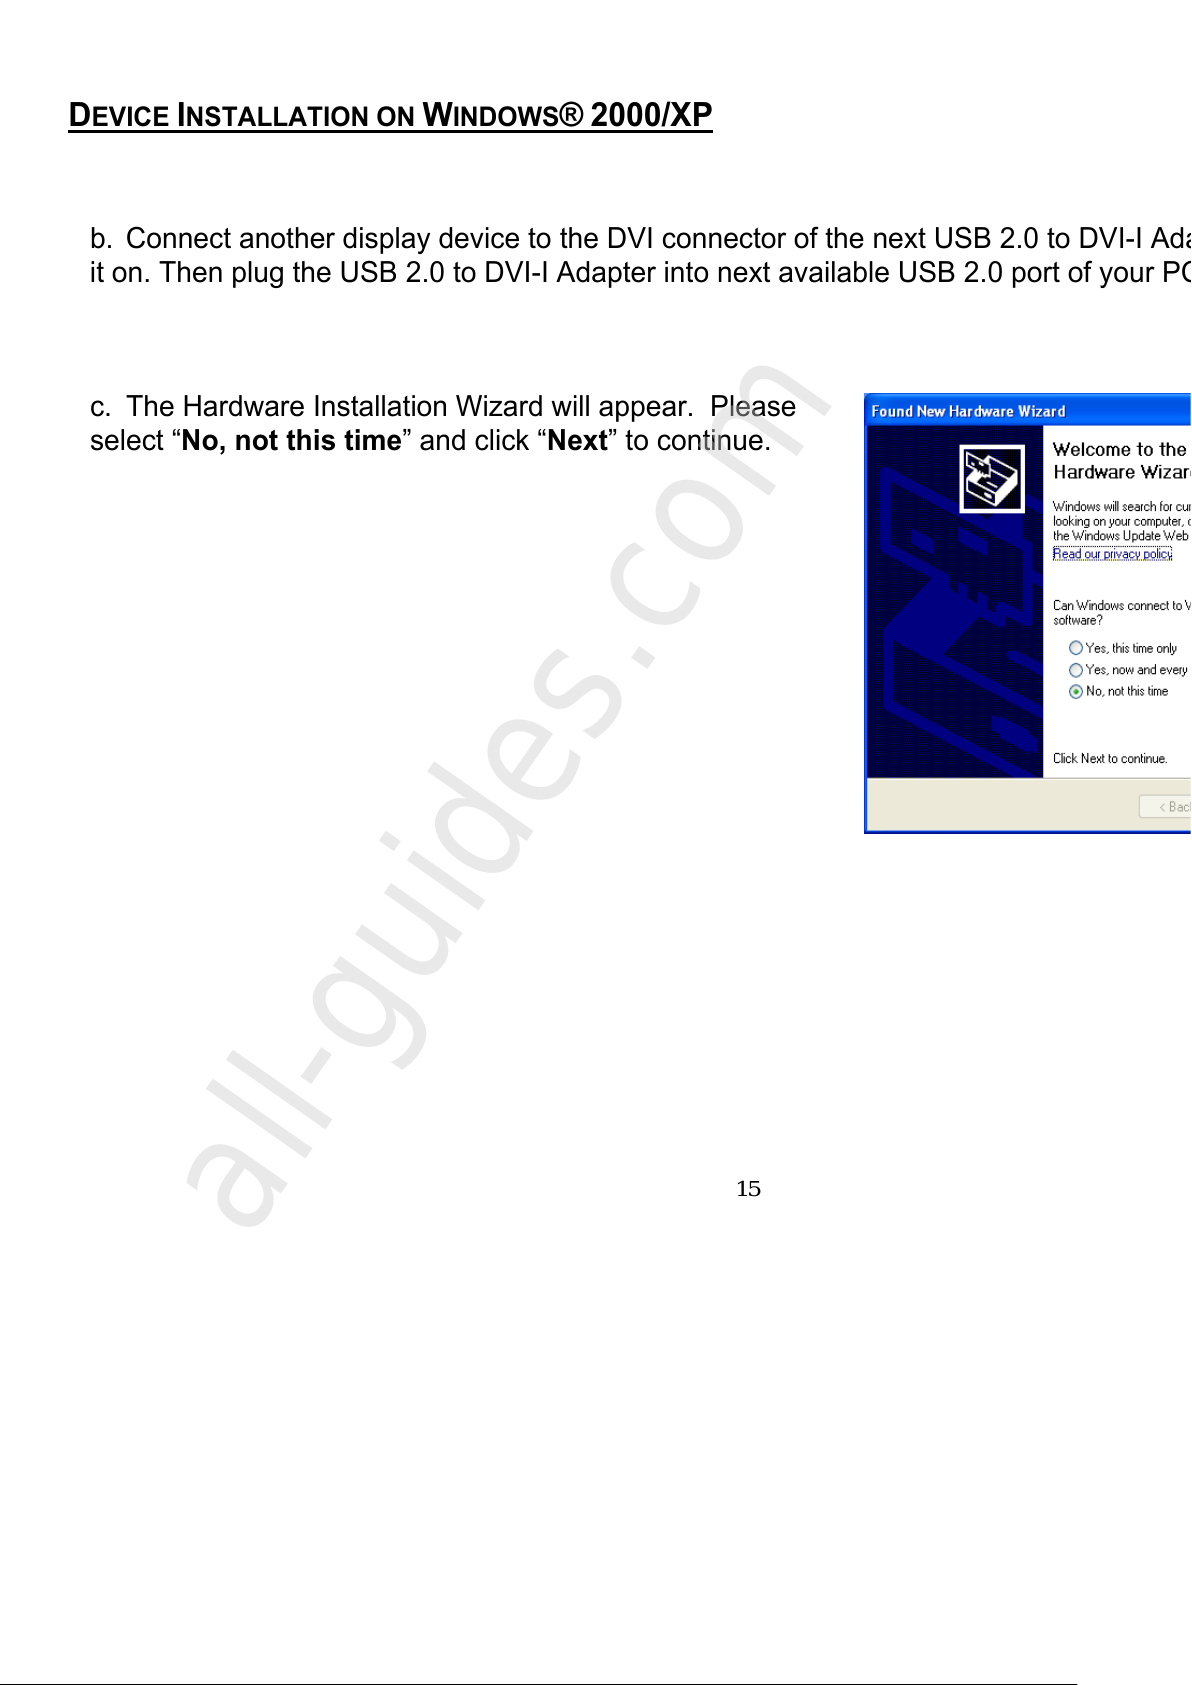
c. The Hardware Installation Wizard will appear. Please
select “
No, not this time
” and click “
Next
” to continue.
DEVICE INSTALLATION ON WINDOWS® 2000/XP
All manuals and user guides at all-guides.com
all-guides.com
Page 17
16
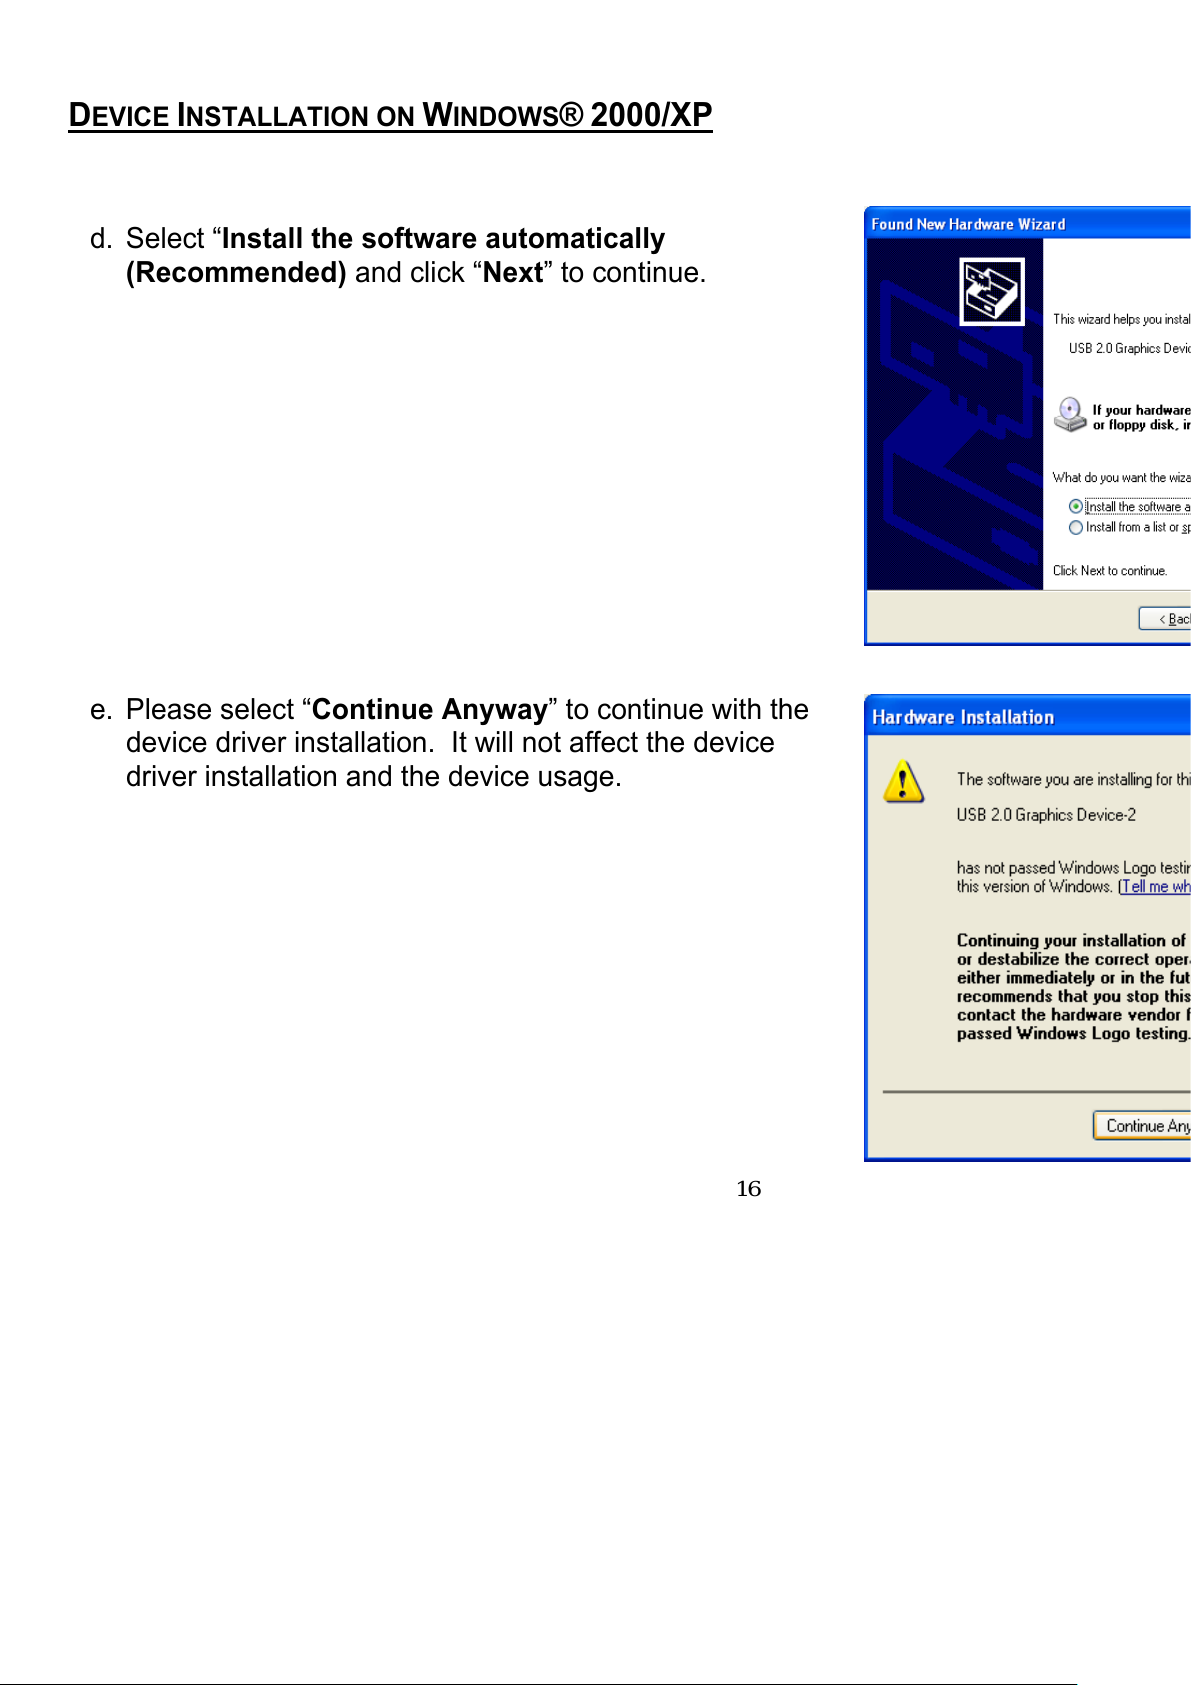
d. Select “
Install the software automatically
(Recommended)
and click “
Next
” to continue.
e. Please select “
Continue Anyway
” to continue with the
device driver installation. It will not affect the device
driver installation and the device usage.
DEVICE INSTALLATION ON WINDOWS® 2000/XP
All manuals and user guides at all-guides.com
Page 18
17
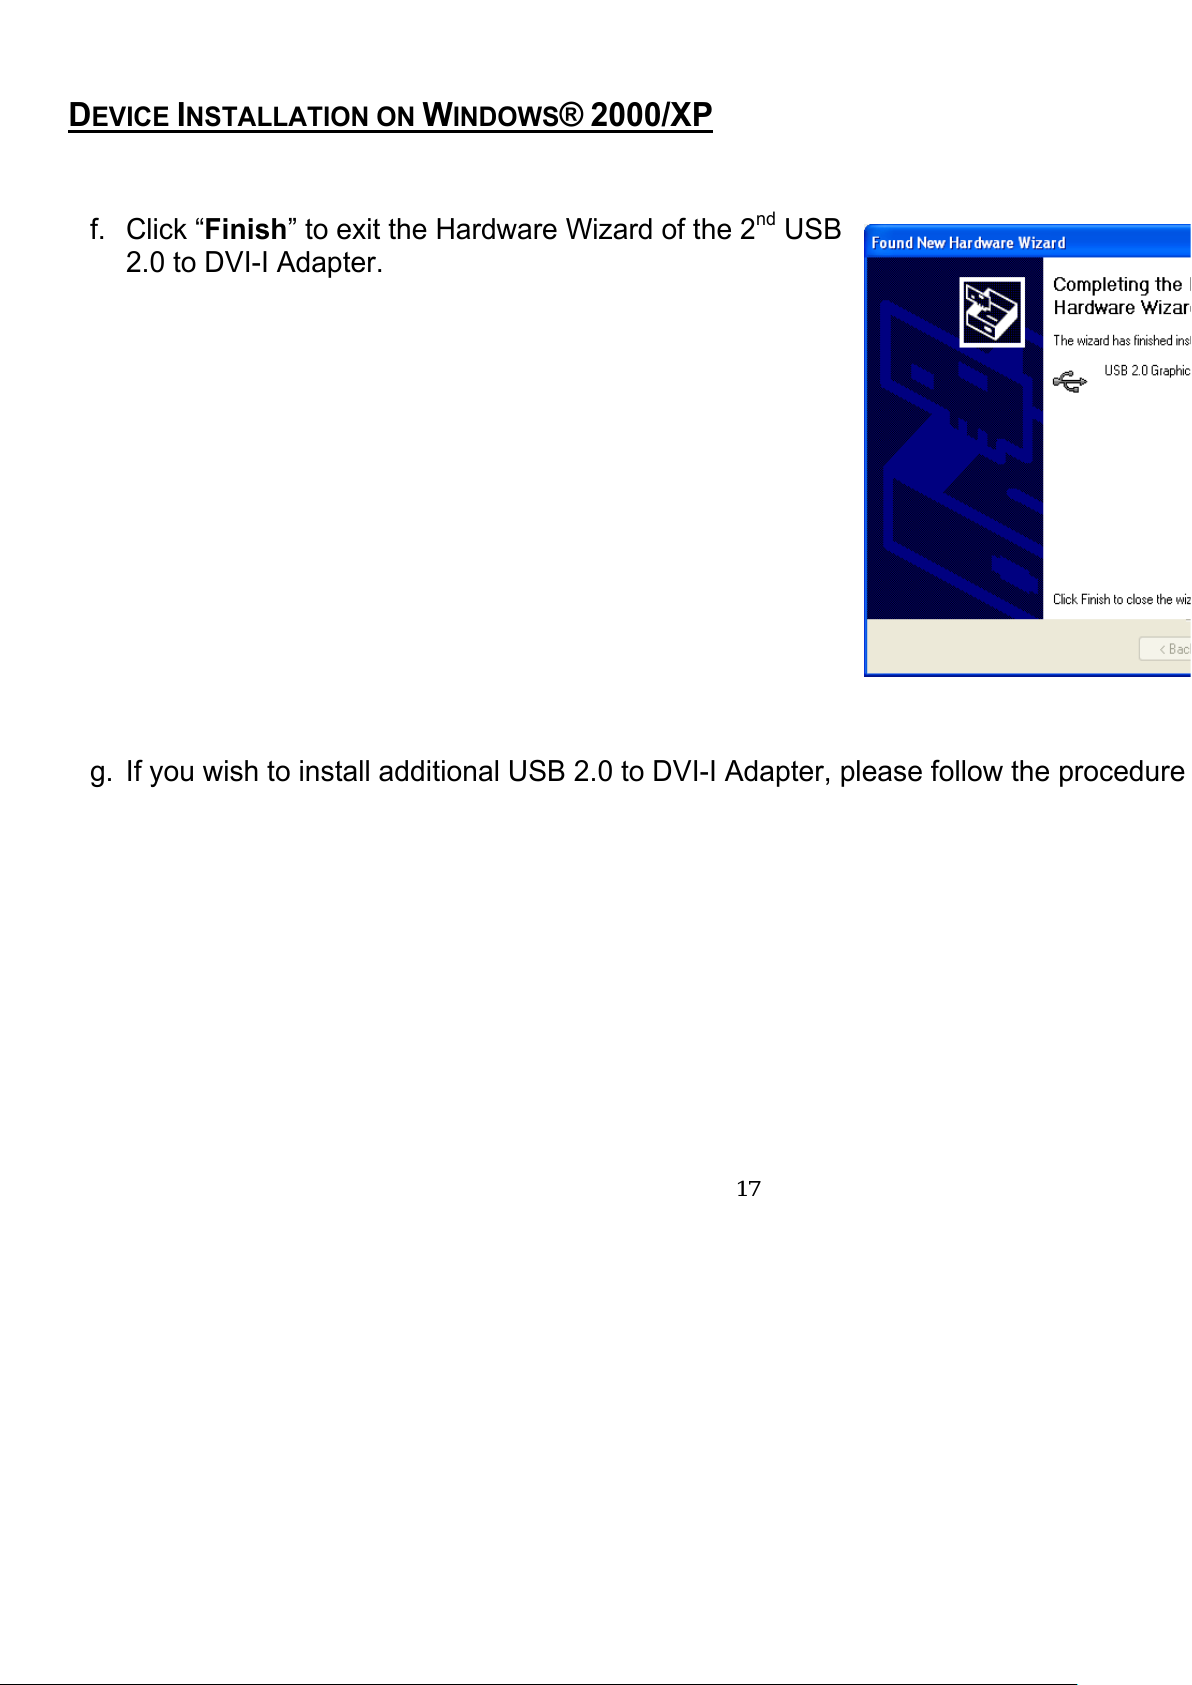
f. Click “
Finish
” to exit the Hardware Wizard of the 2nd USB
2.0 to DVI-I Adapter.
g. If you wish to install additional USB 2.0 to DVI-I Adapter, please follow the procedure of
DEVICE INSTALLATION ON WINDOWS® 2000/XP
All manuals and user guides at all-guides.com
Page 19
18
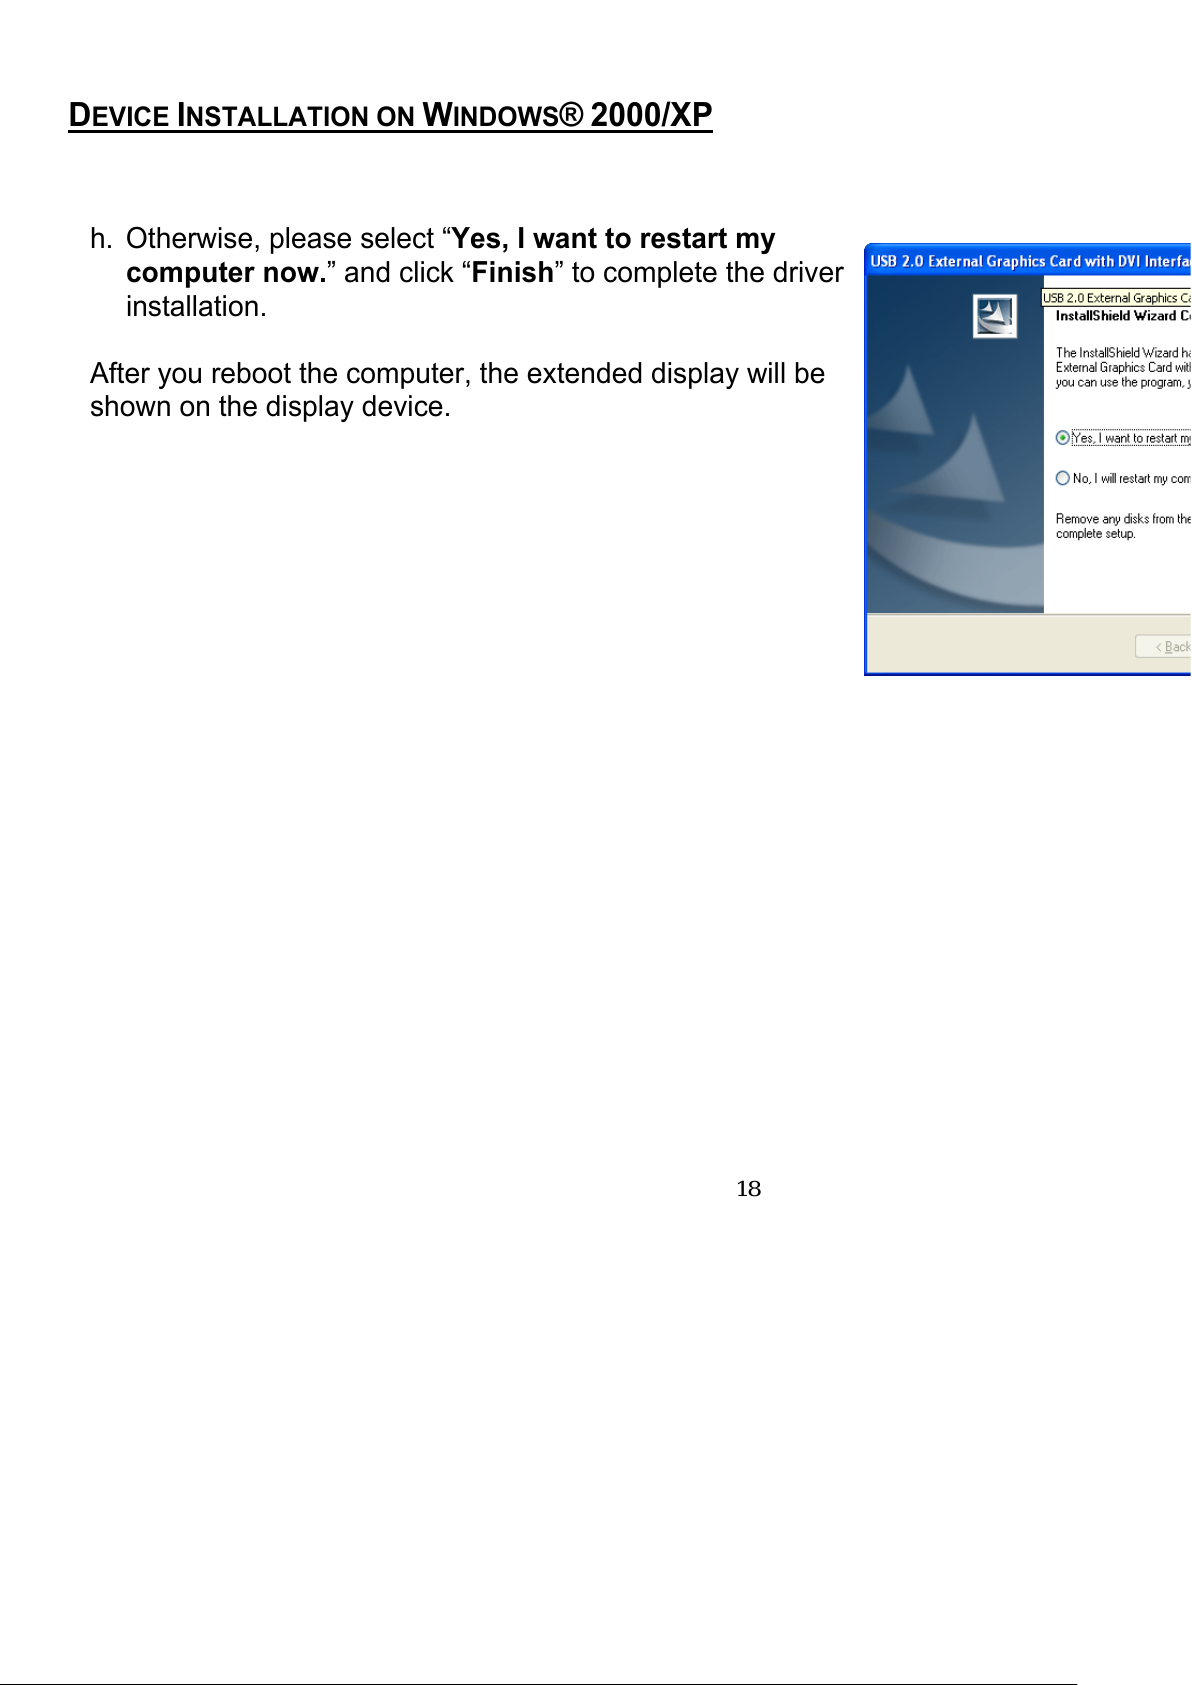
h. Otherwise, please select “
Yes, I want to restart my
computer now.
” and click “
Finish
” to complete the driver
installation.
After you reboot the computer, the extended display will be
shown on the display device.
DEVICE INSTALLATION ON WINDOWS® 2000/XP
All manuals and user guides at all-guides.com
Page 20
19
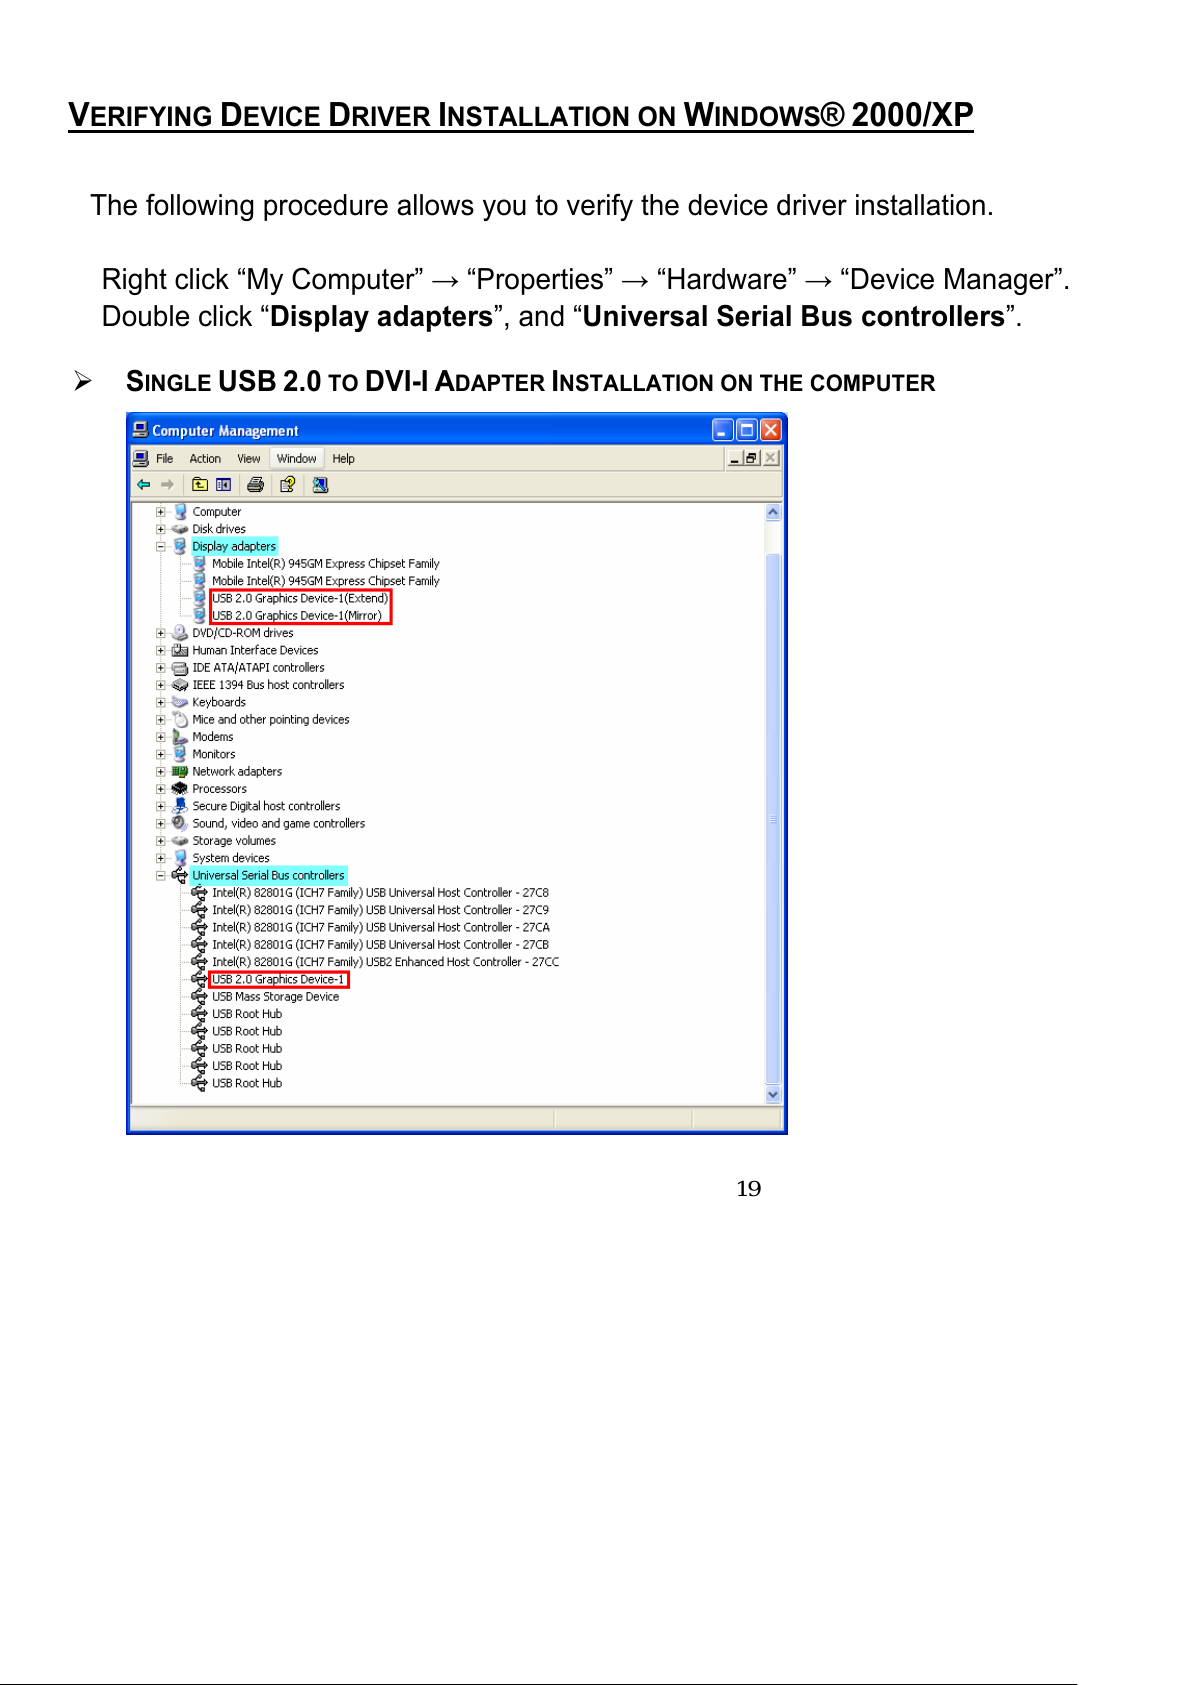
The following procedure allows you to verify the device driver installation.
Right click “My Computer” → “Properties” → “Hardware” → “Device Manager”.
Double click “Display adapters”, and “Universal Serial Bus controllers”.
¾ SINGLE USB 2.0 TO DVI-I ADAPTER INSTALLATION ON THE COMPUTER
VERIFYING DEVICE DRIVER INSTALLATION ON WINDOWS® 2000/XP
All manuals and user guides at all-guides.com
Page 21
20
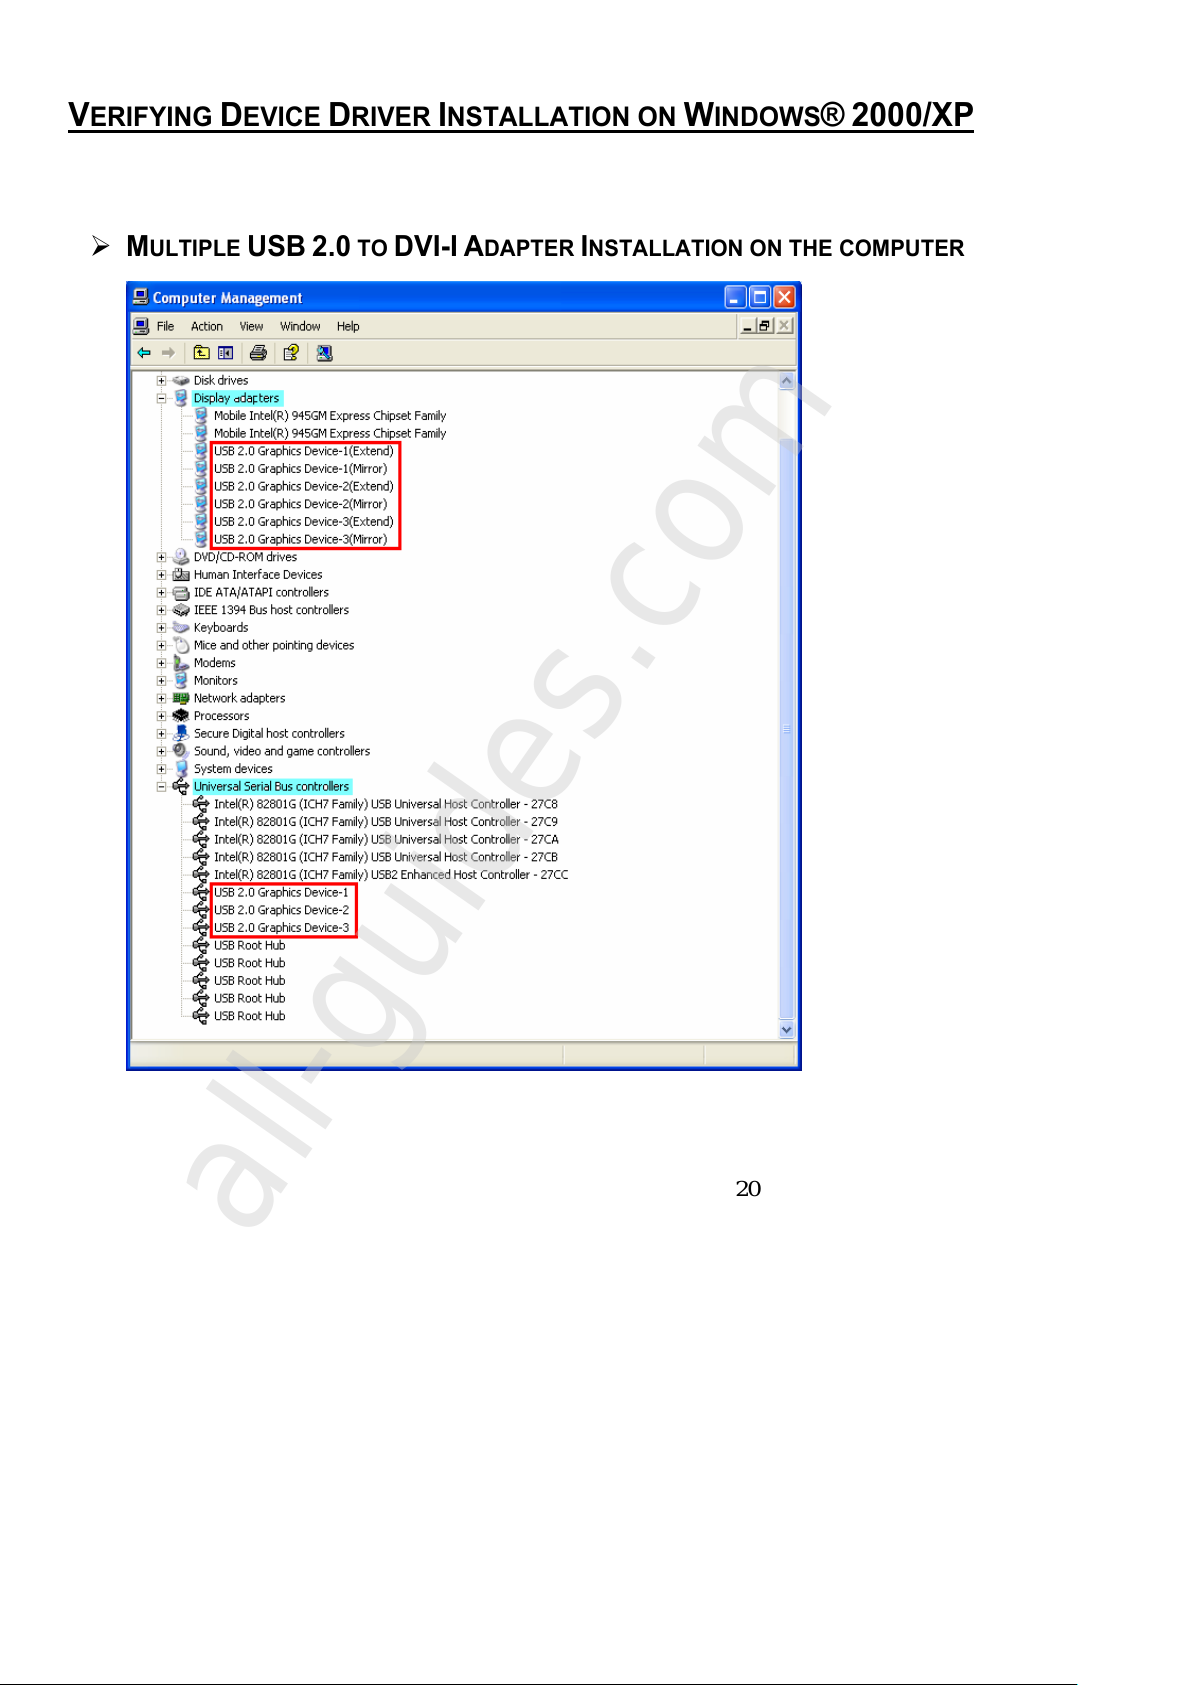
¾ M
ULTIPLE USB 2.0 TO DVI-I ADAPTER INSTALLATION ON THE COMPUTER
VERIFYING DEVICE DRIVER INSTALLATION ON WINDOWS® 2000/XP
All manuals and user guides at all-guides.com
all-guides.com
Page 22
21
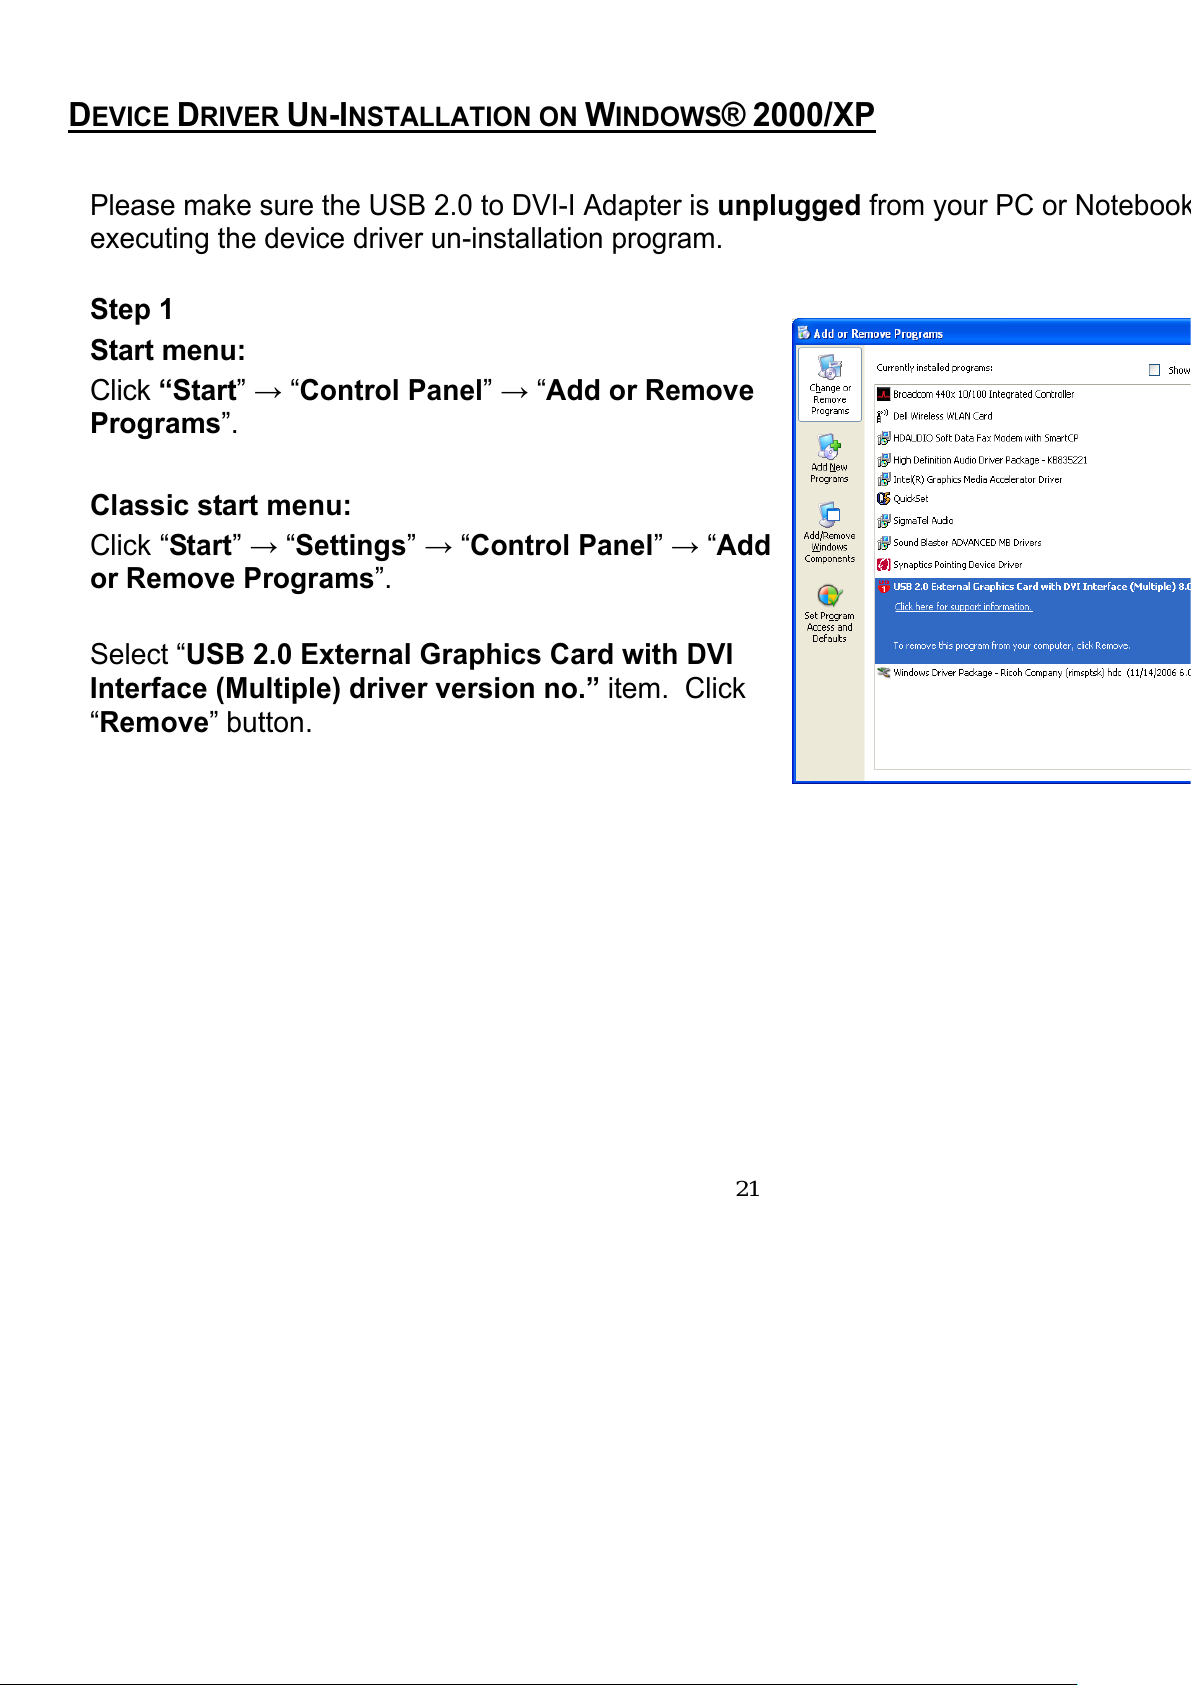
Please make sure the USB 2.0 to DVI-I Adapter is
unplugged
from your PC or Notebook before
executing the device driver un-installation program.
Step 1
Start menu:
Click
“Start” → “Control Panel” → “
Add or Remove
Programs
”.
Classic
start menu:
Click “
Start” → “Settings” → “
Control Panel” → “
Add
or Remove Programs
”.
Select
“USB 2.0 External Graphics Card with DVI
Interface (Multiple) driver version no.”
item. Click
“
Remove”
button.
DEVICE DRIVER UN-INSTALLATION ON WINDOWS® 2000/XP
All manuals and user guides at all-guides.com
Page 23
22
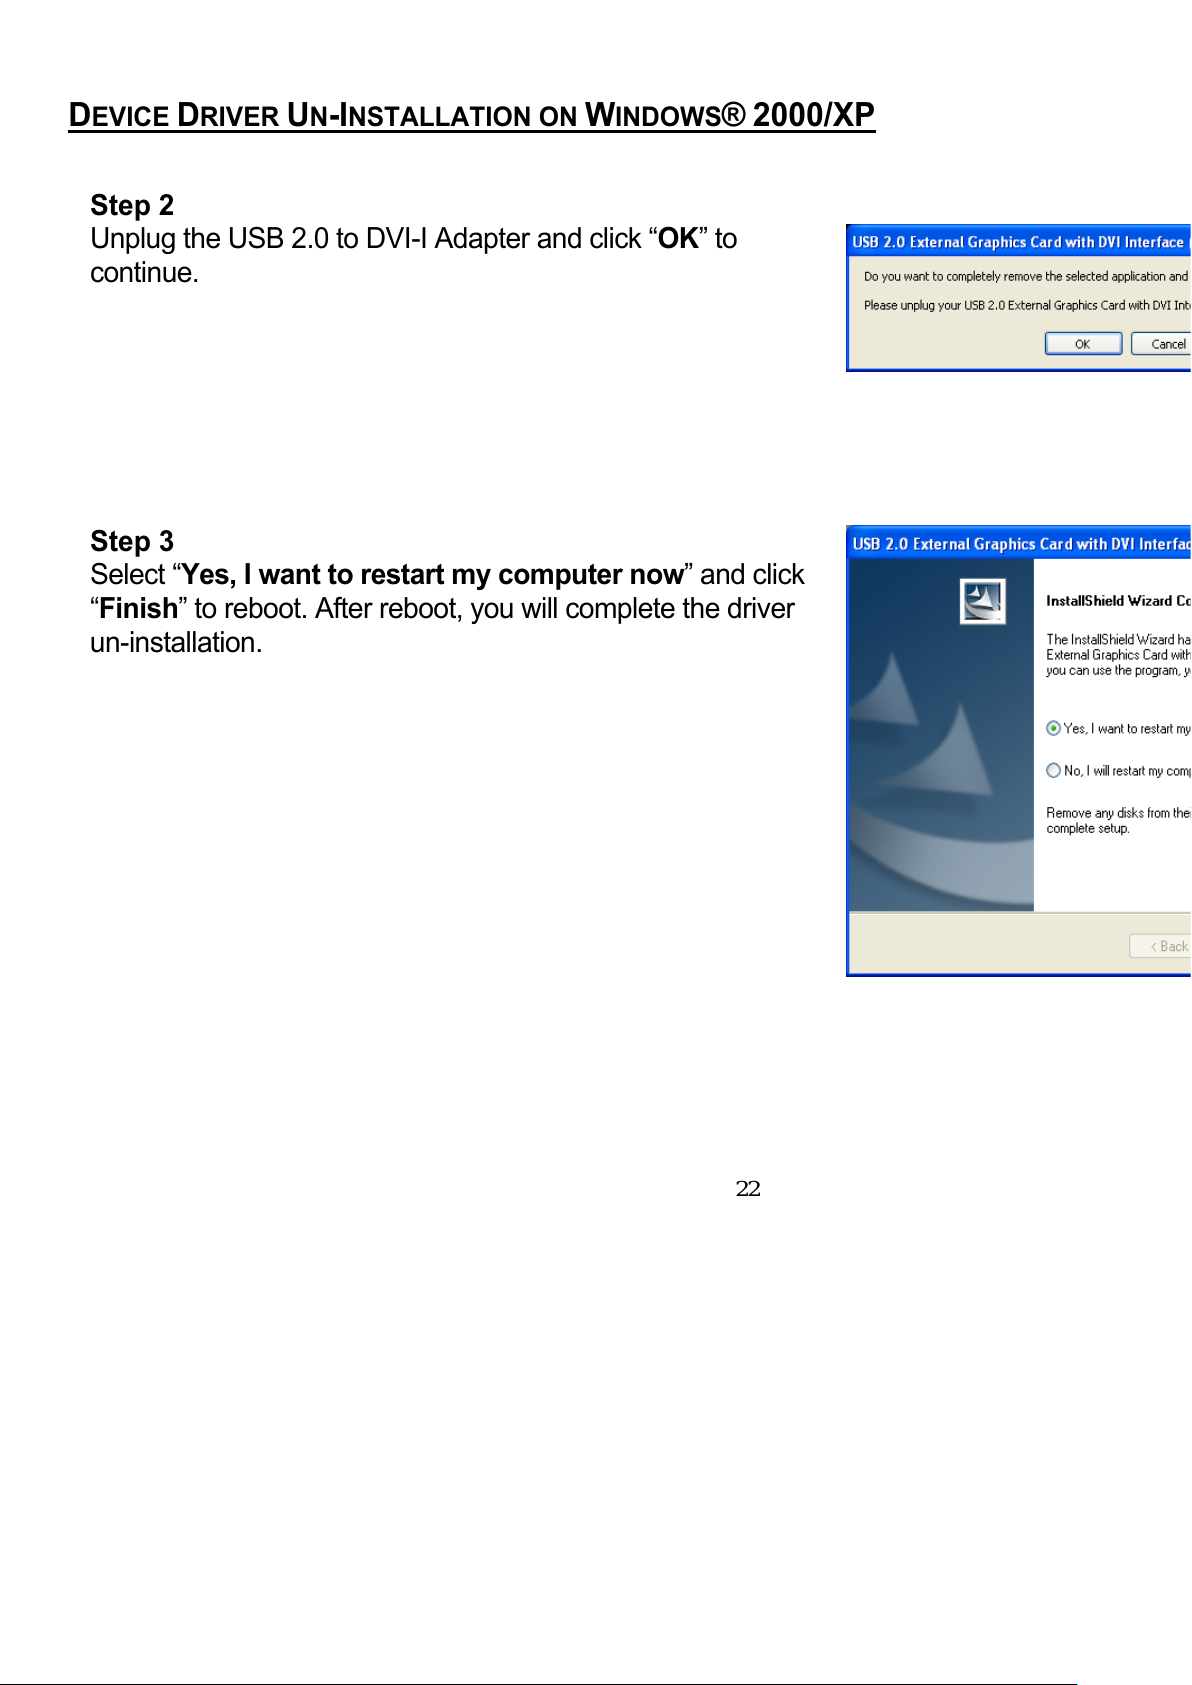
Step 2
Unplug the USB 2.0 to DVI-I Adapter and click “
OK
” to
continue.
Step 3
Select “
Yes, I want to restart my computer now
” and click
“
Finish
” to reboot. After reboot, you will complete the driver
un-installation.
DEVICE DRIVER UN-INSTALLATION ON WINDOWS® 2000/XP
All manuals and user guides at all-guides.com
Page 24
23
Please note the following information before installation:
Do not plug the USB 2.0 to DVI-I Adapter to your PC or Notebook while executing the set-up or un-
installation program.
The AC power adapter is required for the external USB Hub. Please note that the driver allows up to
6 USB 2.0 to DVI-I Adapters on one PC.
Connect the display device to the DVI connector of USB 2.0 to DVI-I Adapter and switch it on before
plugging it into an available USB 2.0 port of PC or Notebook.
DO NOT reboot the computer until all of USB 2.0 to DVI-I Adapters are installed.
Installing the device driver enables your computer’s operating system to recognize the USB 2.0 to DVI-I
Adapter once it’s connected. Please check your operating system and refer to the appropriate installation
procedure to begin installing the device driver. Please make sure the USB 2.0 to DVI-I Adapter is
unplugged from your PC or notebook before executing the setup program.
This section illustrates the
simple device driver installation procedure for a computer running Windows Vista® operating system.
DEVICE INSTALLATION ON WINDOWS® VISTA®
All manuals and user guides at all-guides.com
Page 25
24
Step 1
Insert the Driver CD into the CD-ROM drive; the setup program
should be launched
automatically. If setup
program does not begin automatically, click Start, Run and double click “
D:\Setup.exe
” (where D: is the
path of your CD-ROM drive).
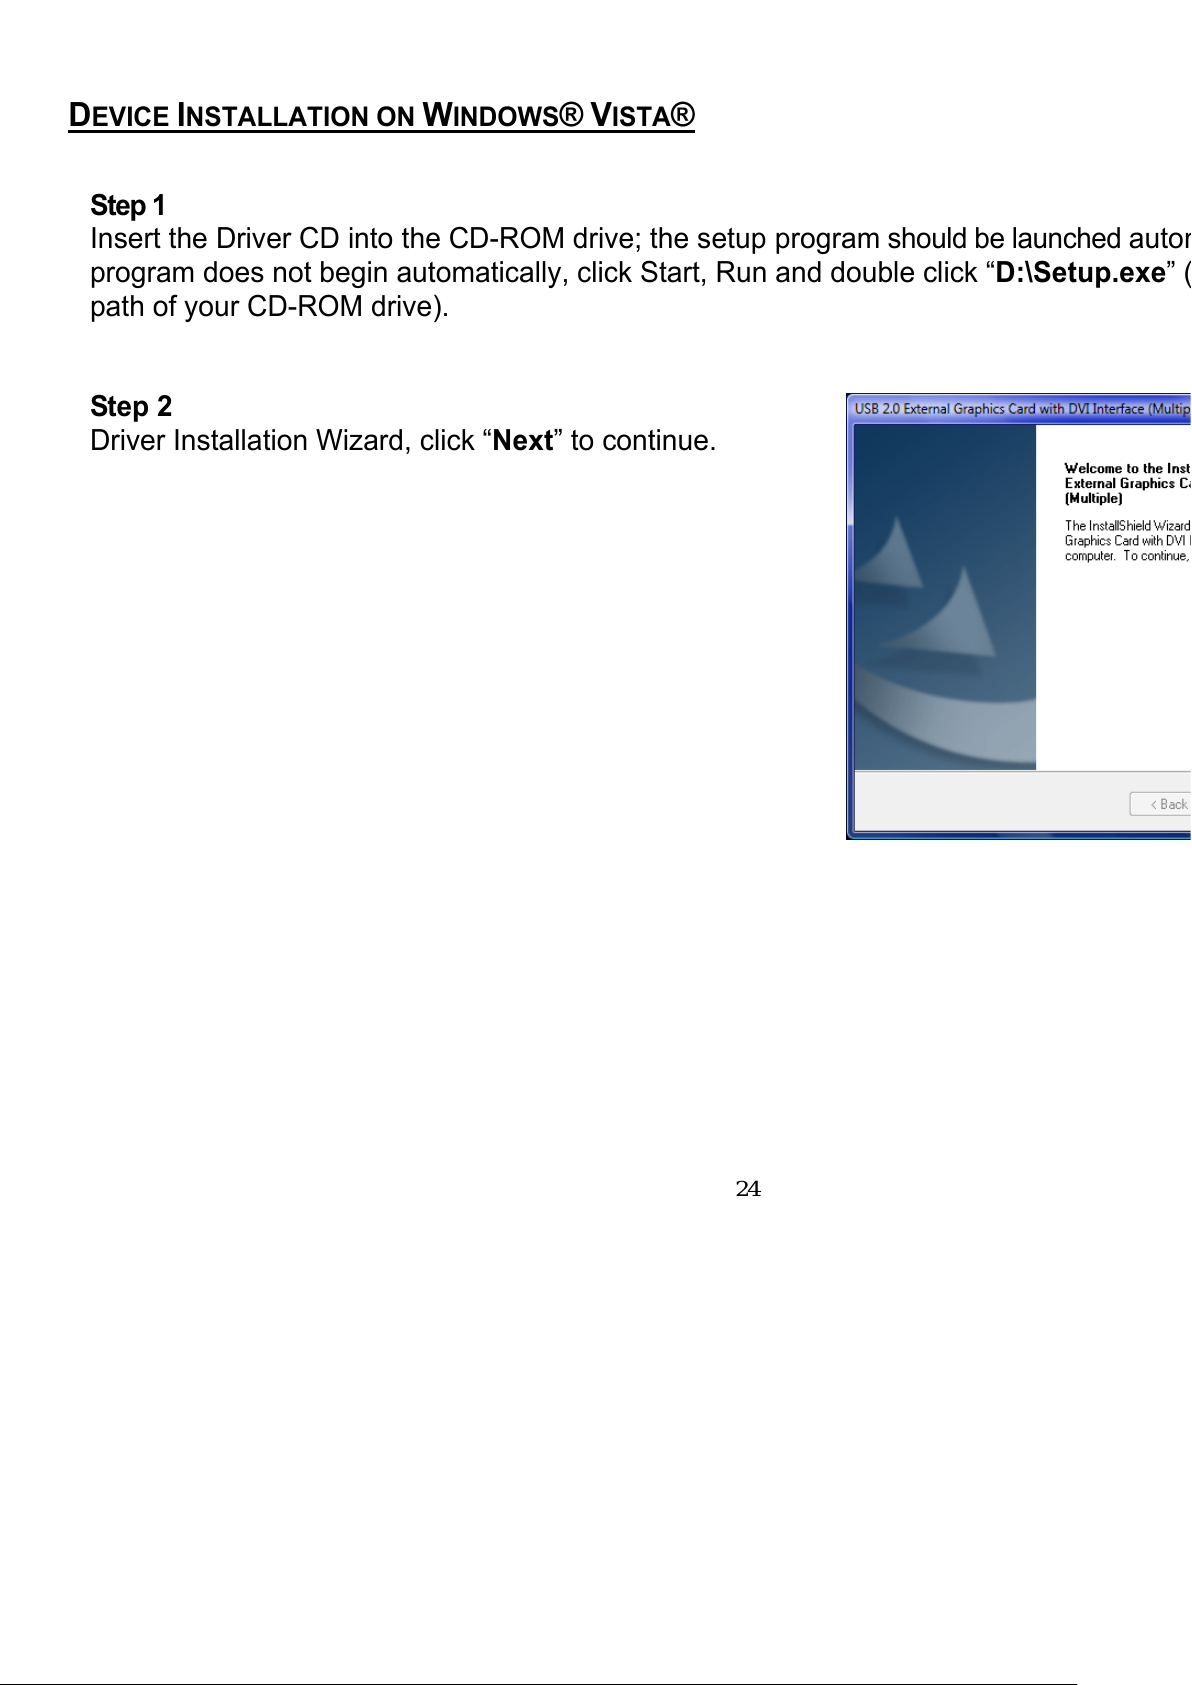
Step 2
Driver Installation Wizard, click “
Next
” to continue.
DEVICE INSTALLATION ON WINDOWS® VISTA®
All manuals and user guides at all-guides.com
Page 26
25
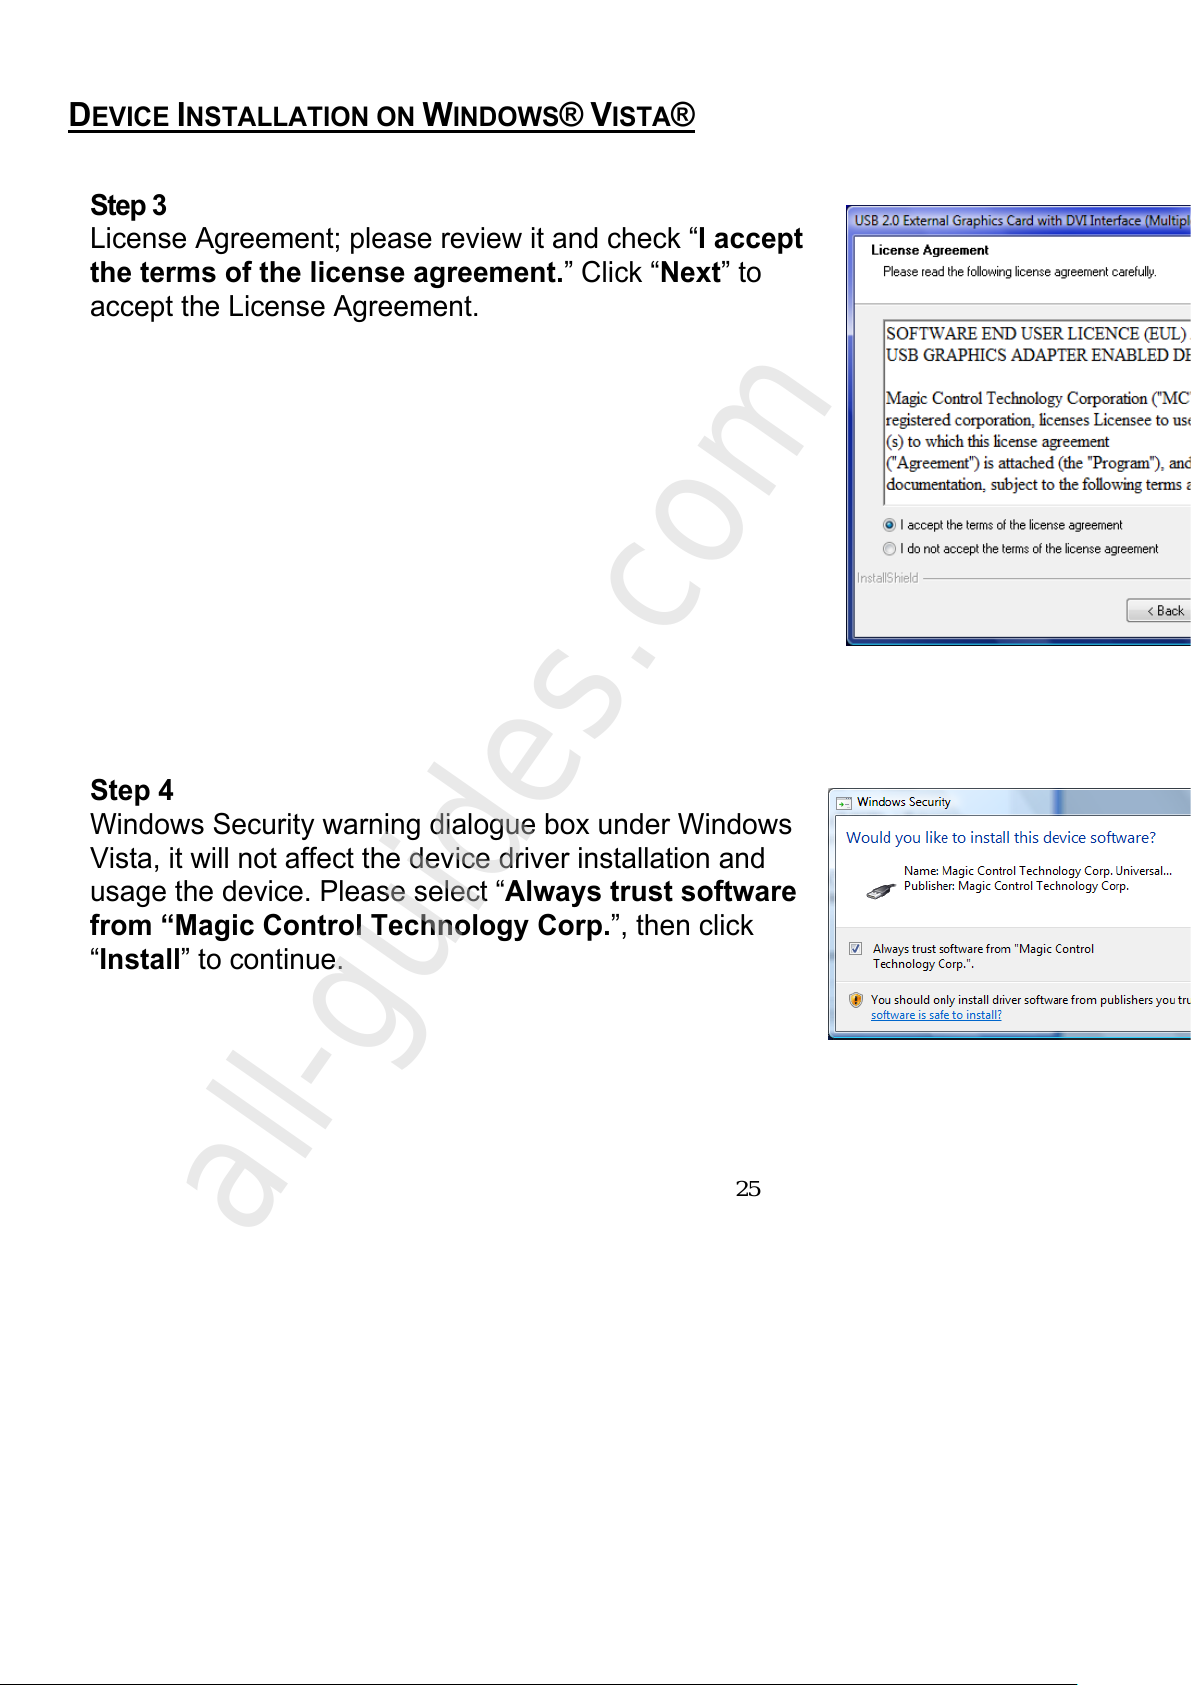
Step 3
License Agreement; please review it and check “
I accept
the terms of the license agreement.
” Click “
Next
” to
accept the License Agreement.
Step 4
Windows Security warning dialogue box under Windows
Vista, it will not affect the device driver installation and
usage the device. Please select “
Always trust software
from “Magic Control Technology Corp.
”, then click
“
Install
” to continue.
DEVICE INSTALLATION ON WINDOWS® VISTA®
All manuals and user guides at all-guides.com
all-guides.com
Page 27
26
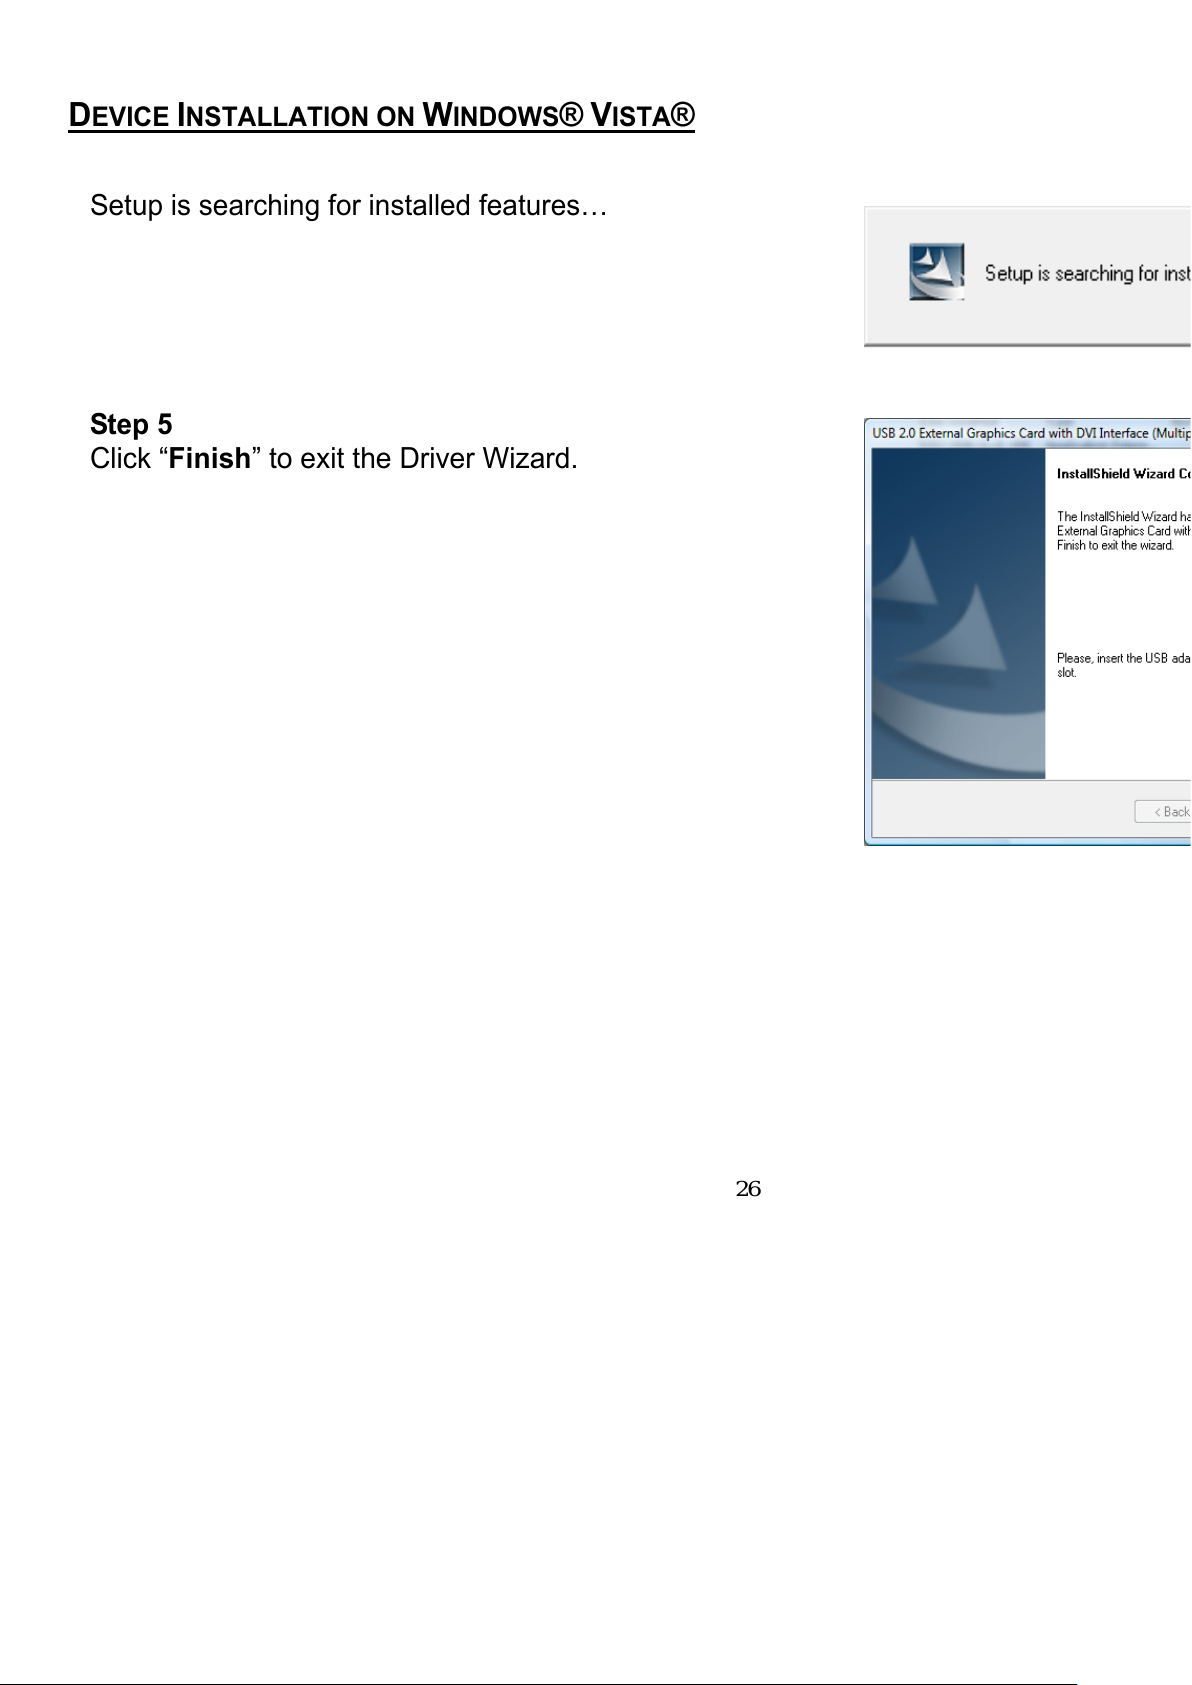
Setup is searching for installed features…
Step 5
Click “
Finish
” to exit the Driver Wizard.
DEVICE INSTALLATION ON WINDOWS® VISTA®
All manuals and user guides at all-guides.com
Page 28
27
Step 6
I
NSTALLATION OF SINGLE
USB 2.0
TO
DVI-I A
DAPTER
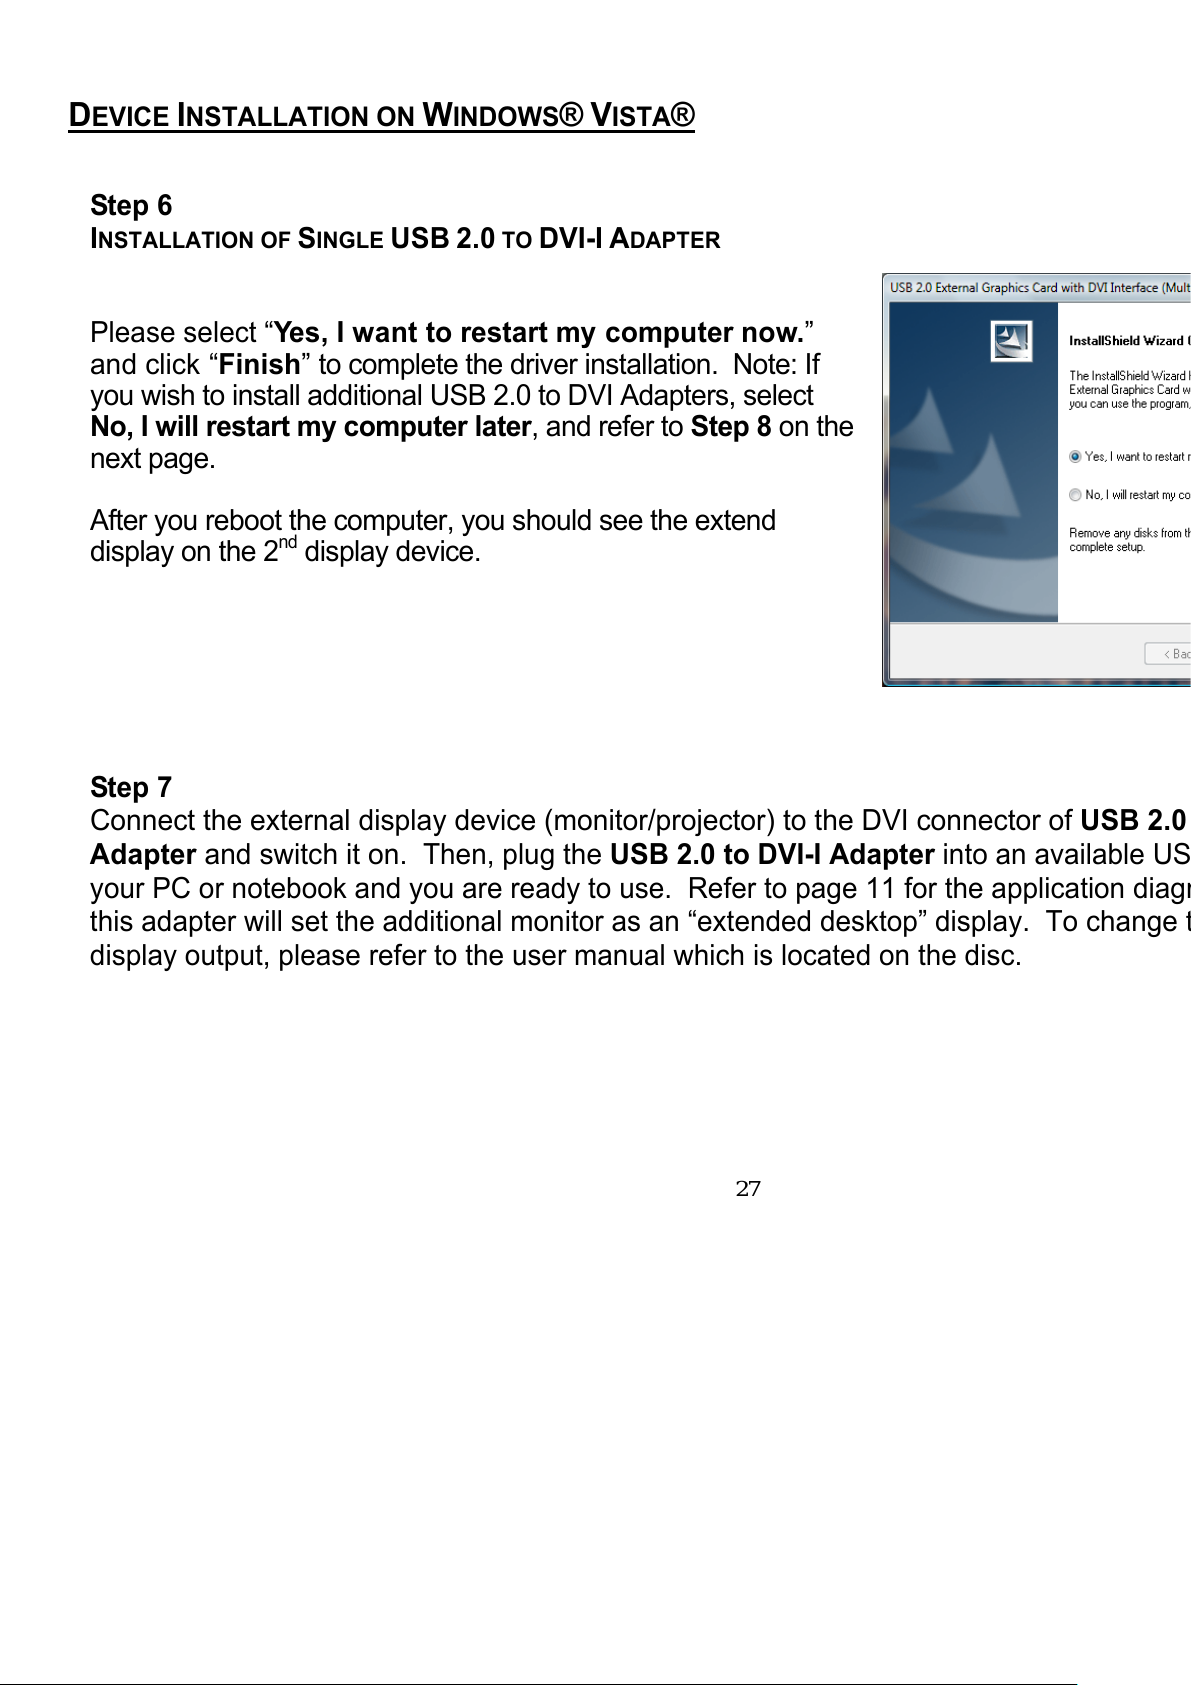
Please select
“
Yes , I want to restart my computer now.”
and click “
Finish
” to complete the driver installation. Note: If
you wish to install additional USB 2.0 to DVI Adapters, select
No, I will restart my computer later
, and refer to
Step 8
on the
next page.
After you reboot the computer, you should see the extend
display on the 2
nd
display device.
Step 7
Connect the external display device (monitor/projector) to the DVI connector of
USB 2.0 to DVI-I
Adapter
and switch it on.
Then, plug the USB 2.0 to DVI-I Adapter into an available USB 2.0 port of
your PC or notebook and you are ready to use. Refer to page 11 for the application diagram. By default
this adapter will set the additional monitor as an “extended desktop” display. To change the setting of the
display output, please refer to the user manual which is located on the disc.
DEVICE INSTALLATION ON WINDOWS® VISTA®
All manuals and user guides at all-guides.com
Page 29
28
Step 8 (optional)
I
NSTALLATION OF MULTIPLE
USB 2.0
TO
DVI-I A
DAPTERS
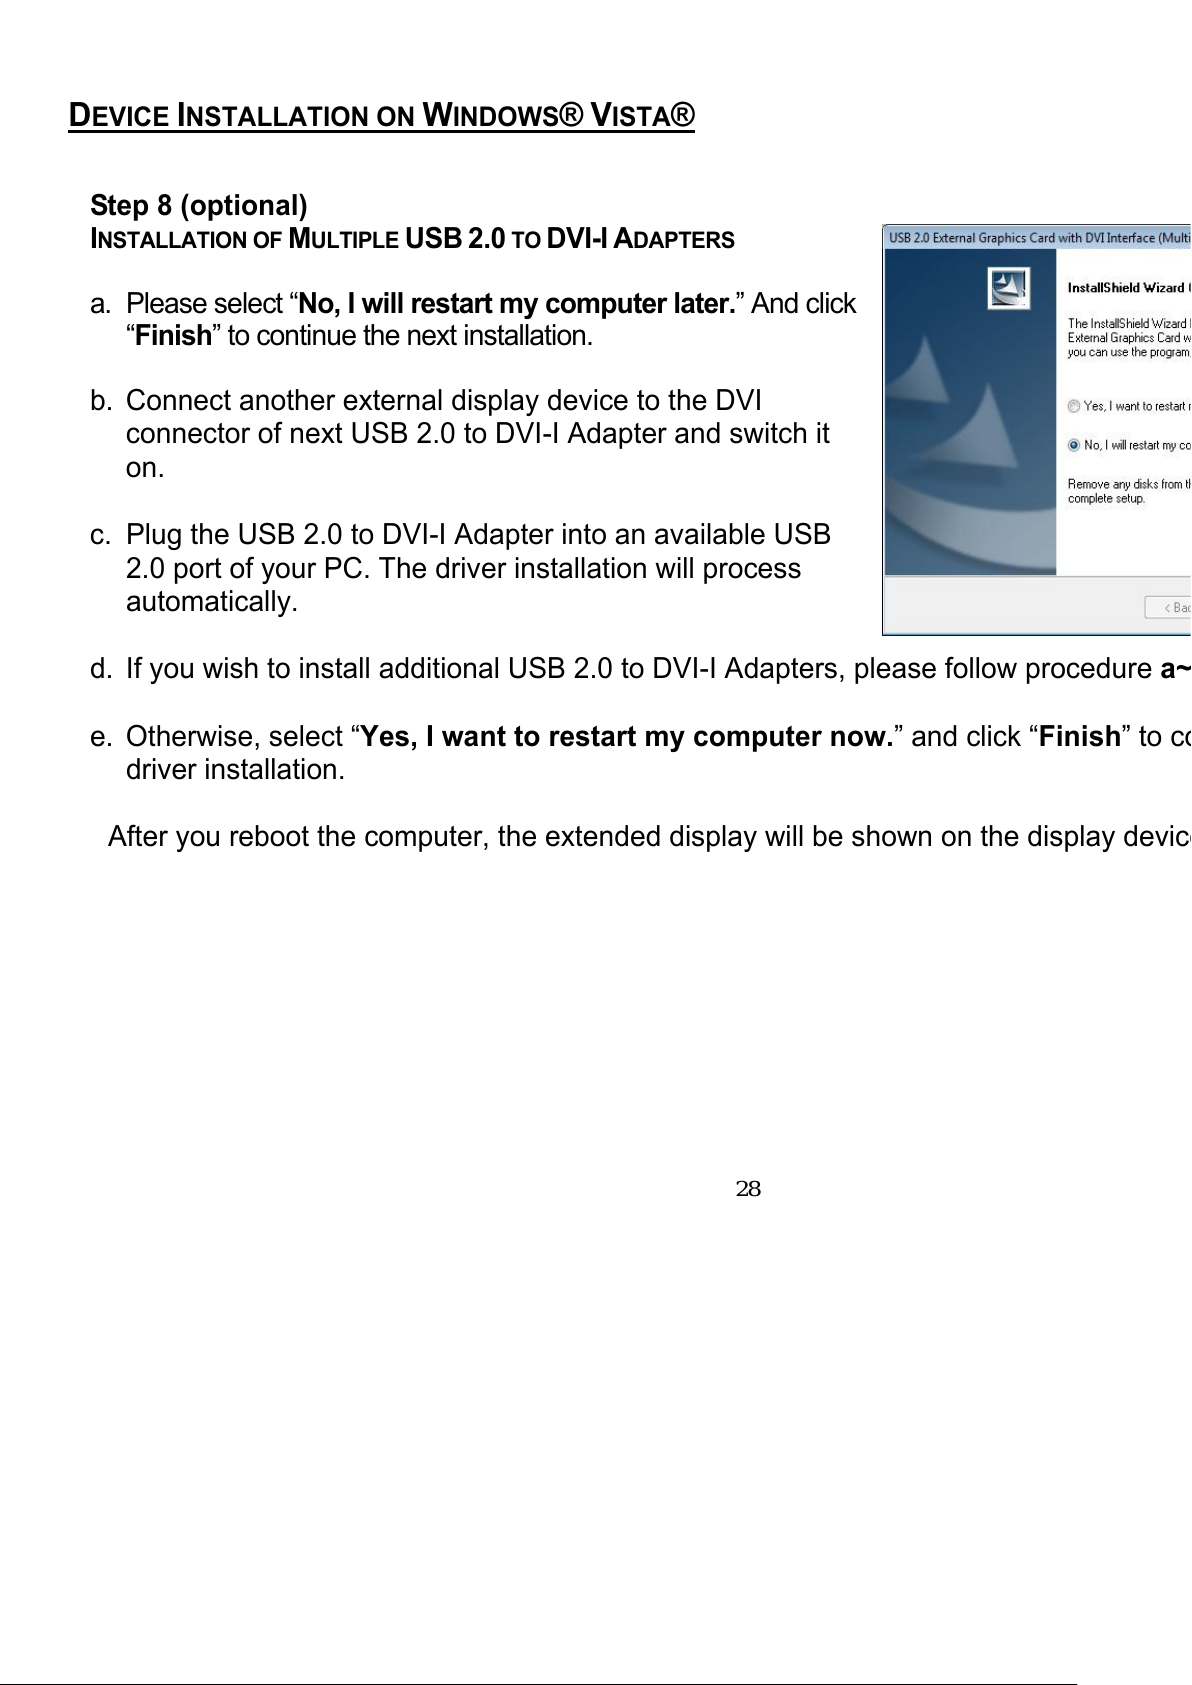
a.
Please select “
No, I will restart my computer later.
” And click
“
Finish
” to continue the next installation.
b. Connect another external display device to the DVI
connector of next USB 2.0 to DVI-I Adapter and switch it
on.
c. Plug the USB 2.0 to DVI-I Adapter into an available USB
2.0 port of your PC. The driver installation will process
automatically.
d. If you wish to install additional USB 2.0 to DVI-I Adapters, please follow procedure
a~ c again
e. Otherwise, select “
Yes, I want to restart my computer now.
” and click “
Finish
” to complete the
driver installation.
After you reboot the computer, the extended display will be shown on the display device.
DEVICE INSTALLATION ON WINDOWS® VISTA®
All manuals and user guides at all-guides.com
Page 30
29
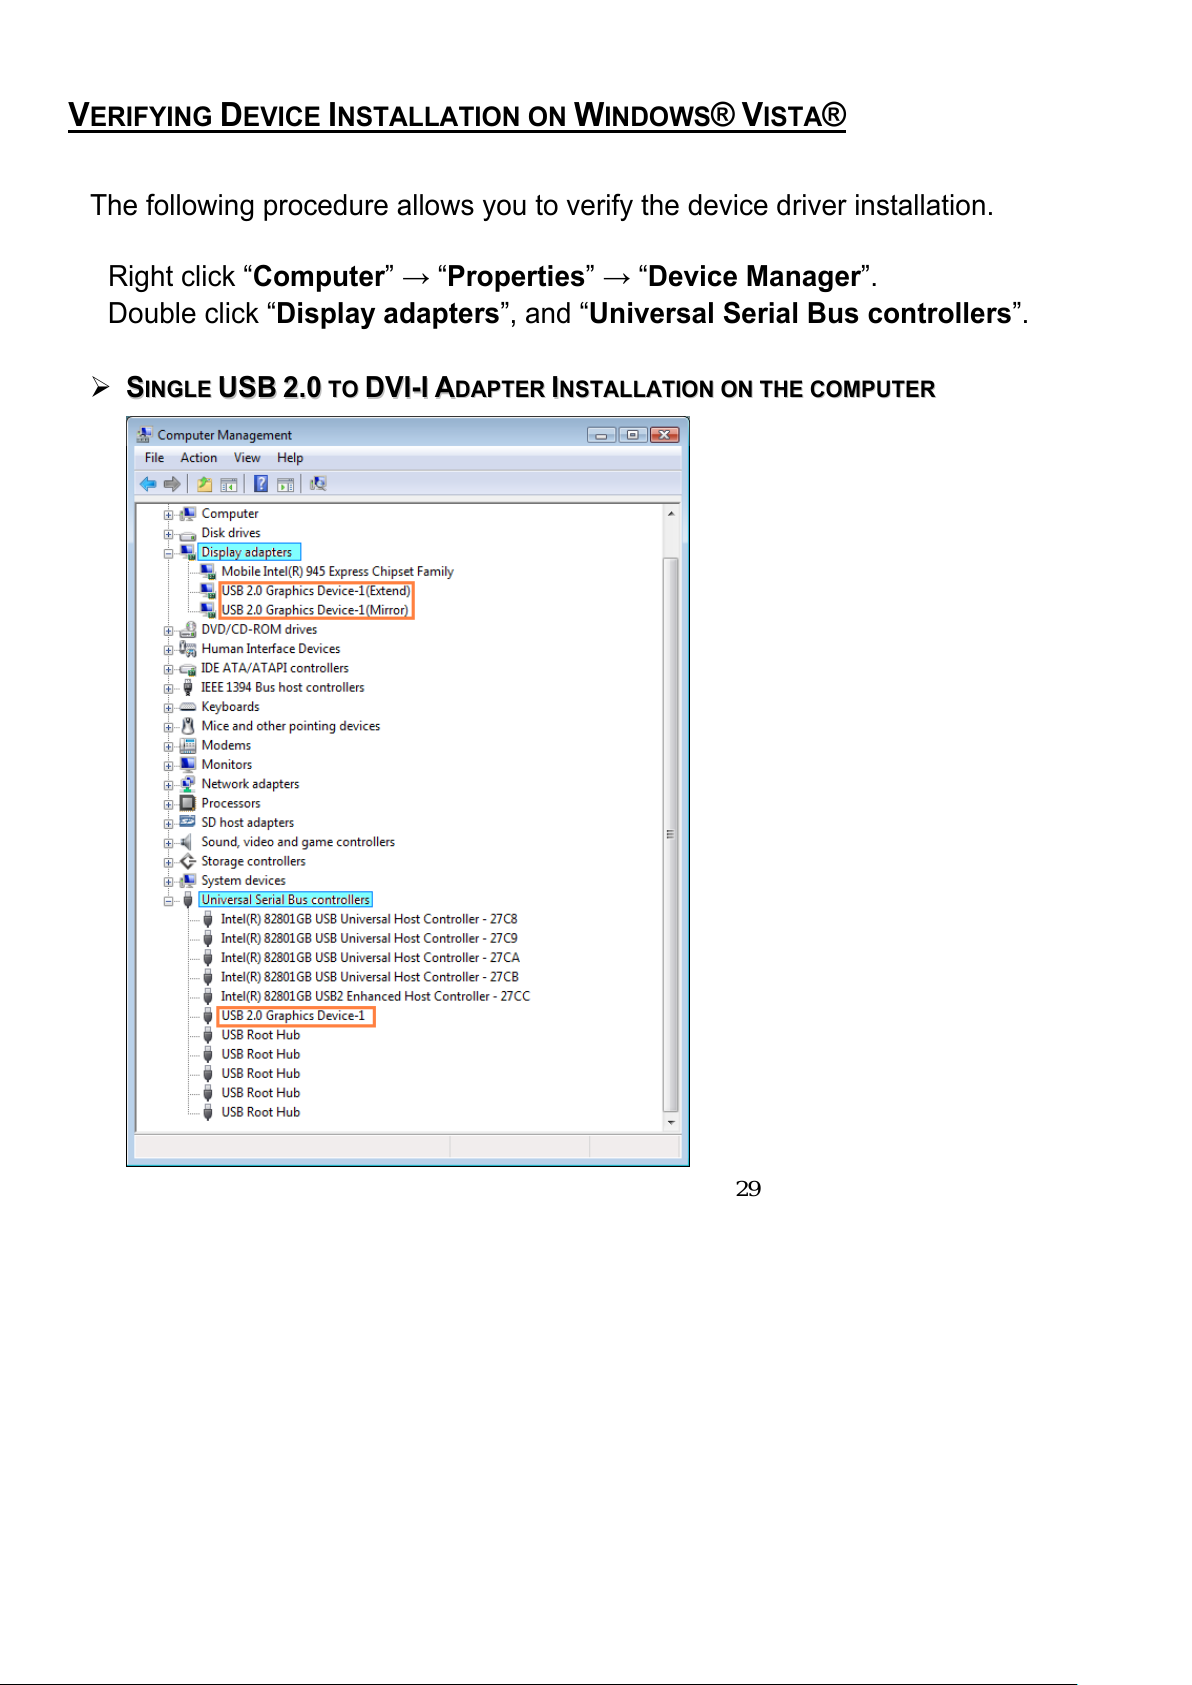
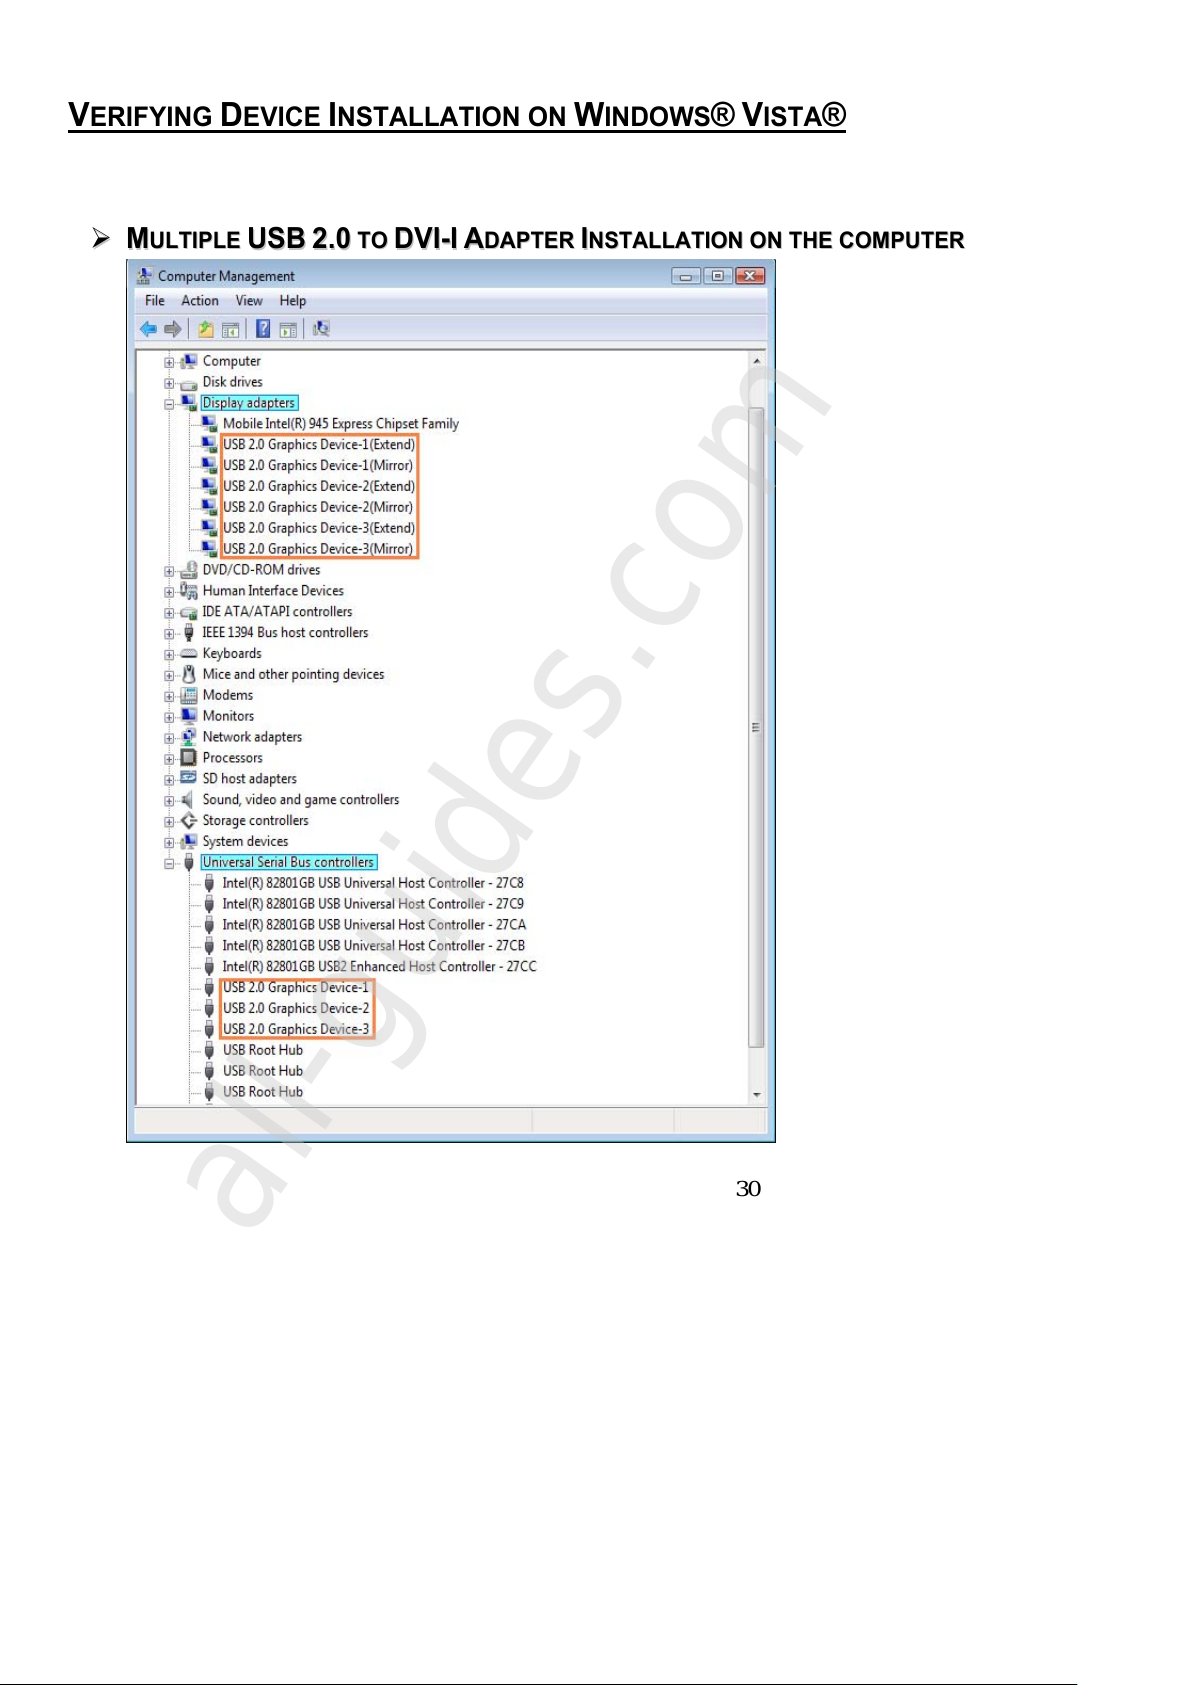
The following procedure allows you to verify the device driver installation.
Right click “Computer” → “Properties” → “Device Manager”.
Double click “Display adapters”, and “Universal Serial Bus controllers”.
¾ SS
IINNGGLLEE
UUSSB
B
22..0
0
TTOO
DDVVII--I
I
A
A
DDAAPPTTEERR
I
I
NNSSTTAALLLLAATTIIOONN OONN TTHHEE CCOOMMPPUUTTEER
R
VERIFYING DEVICE INSTALLATION ON WINDOWS® VISTA®
All manuals and user guides at all-guides.com
Page 31
30
¾¾ M
M
UULLTTIIPPLLEE
UUSSB
B
22..0
0
TTOO
DDVVII--I
I
A
A
DDAAPPTTEERR
I
I
NNSSTTAALLLLAATTIIOONN OONN TTHHEE CCOOMMPPUUTTEER
R
VERIFYING DEVICE INSTALLATION ON WINDOWS® VISTA®
All manuals and user guides at all-guides.com
all-guides.com
Page 32
31
Please make sure the USB 2.0 to DVI-I Adapter is
unplugged
to your PC or notebook before executing
the device driver un-installation program.
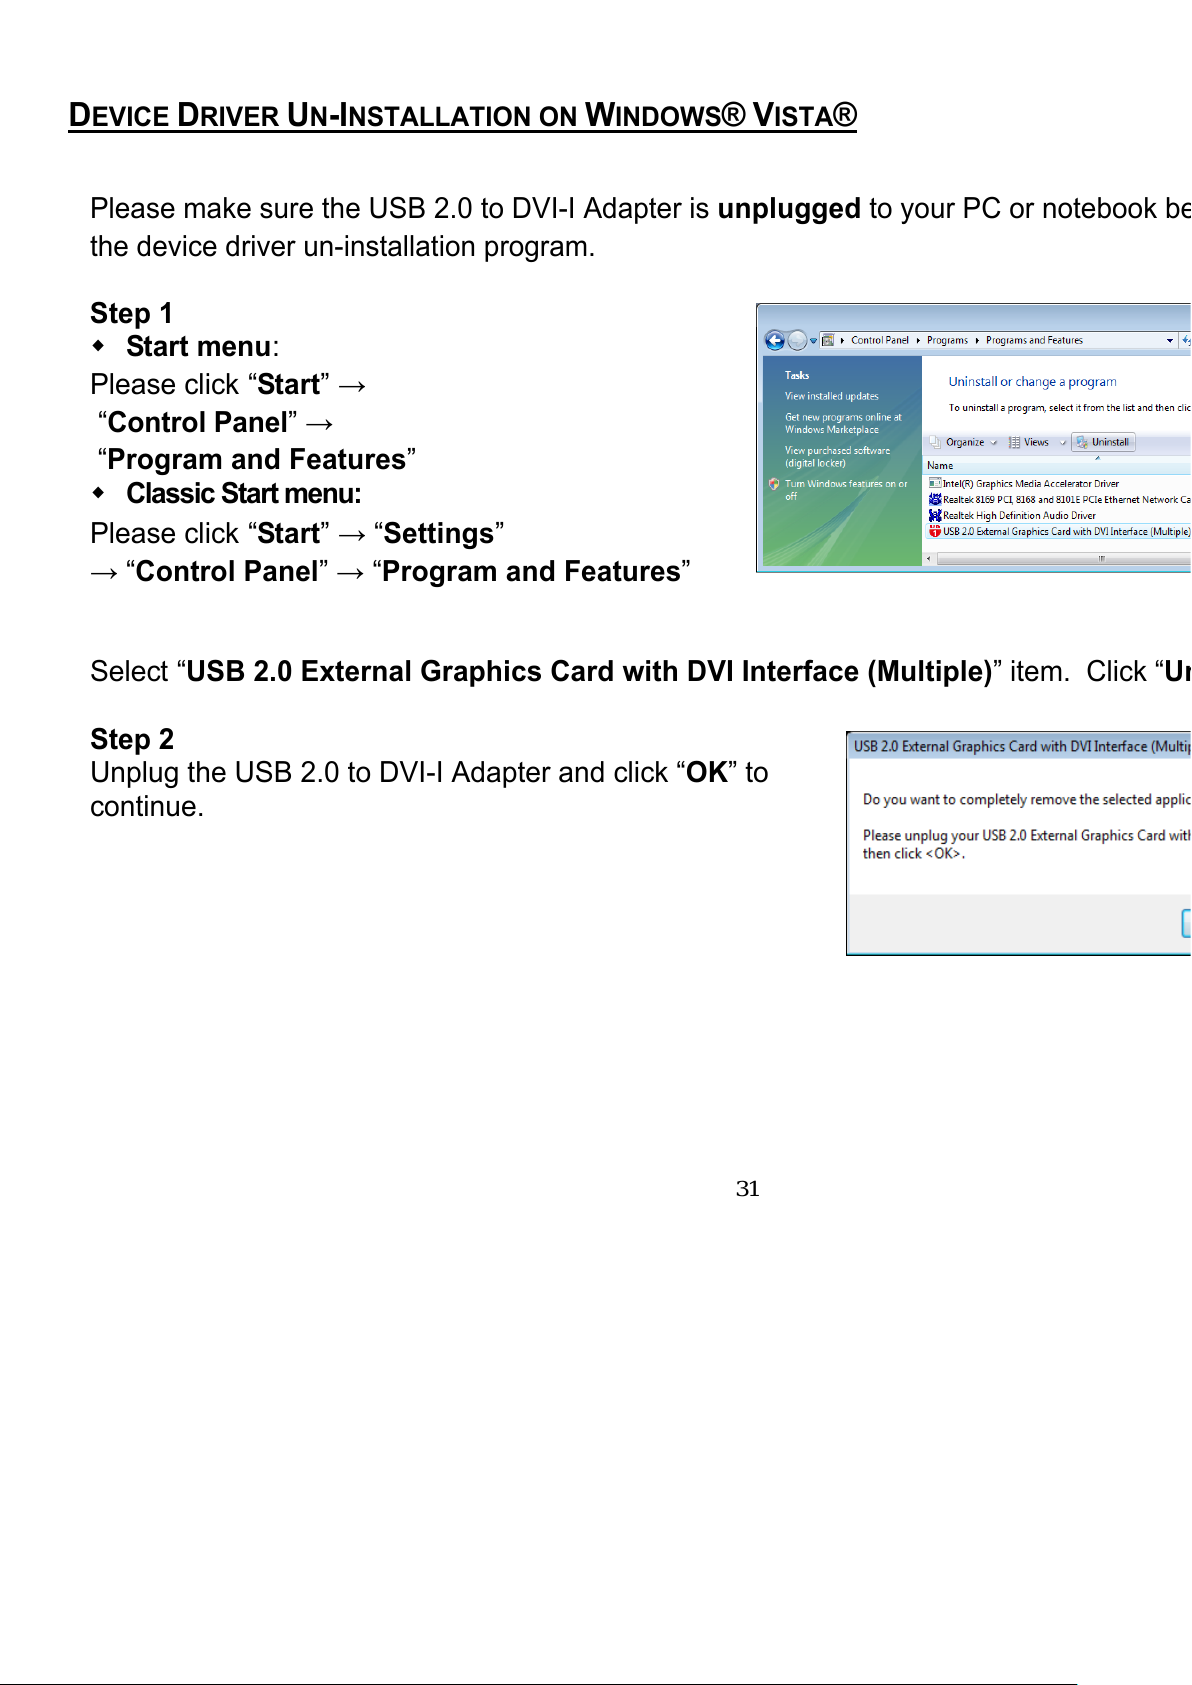
Step 1
Start menu:
Please click “
Start”
→
“Control Panel” →
“
Program and Features”
Classic Start menu:
Please click “
Start” → “Settings”
→ “
Control Panel” → “
Program and
Features”
Select “
USB 2.0 External Graphics Card with DVI Interface (Multiple)
” item. Click “Uninstall” button.
Step 2
Unplug the USB 2.0 to DVI-I Adapter and click “
OK
” to
continue.
DEVICE DRIVER UN-INSTALLATION ON WINDOWS® VISTA®
All manuals and user guides at all-guides.com
Page 33
32
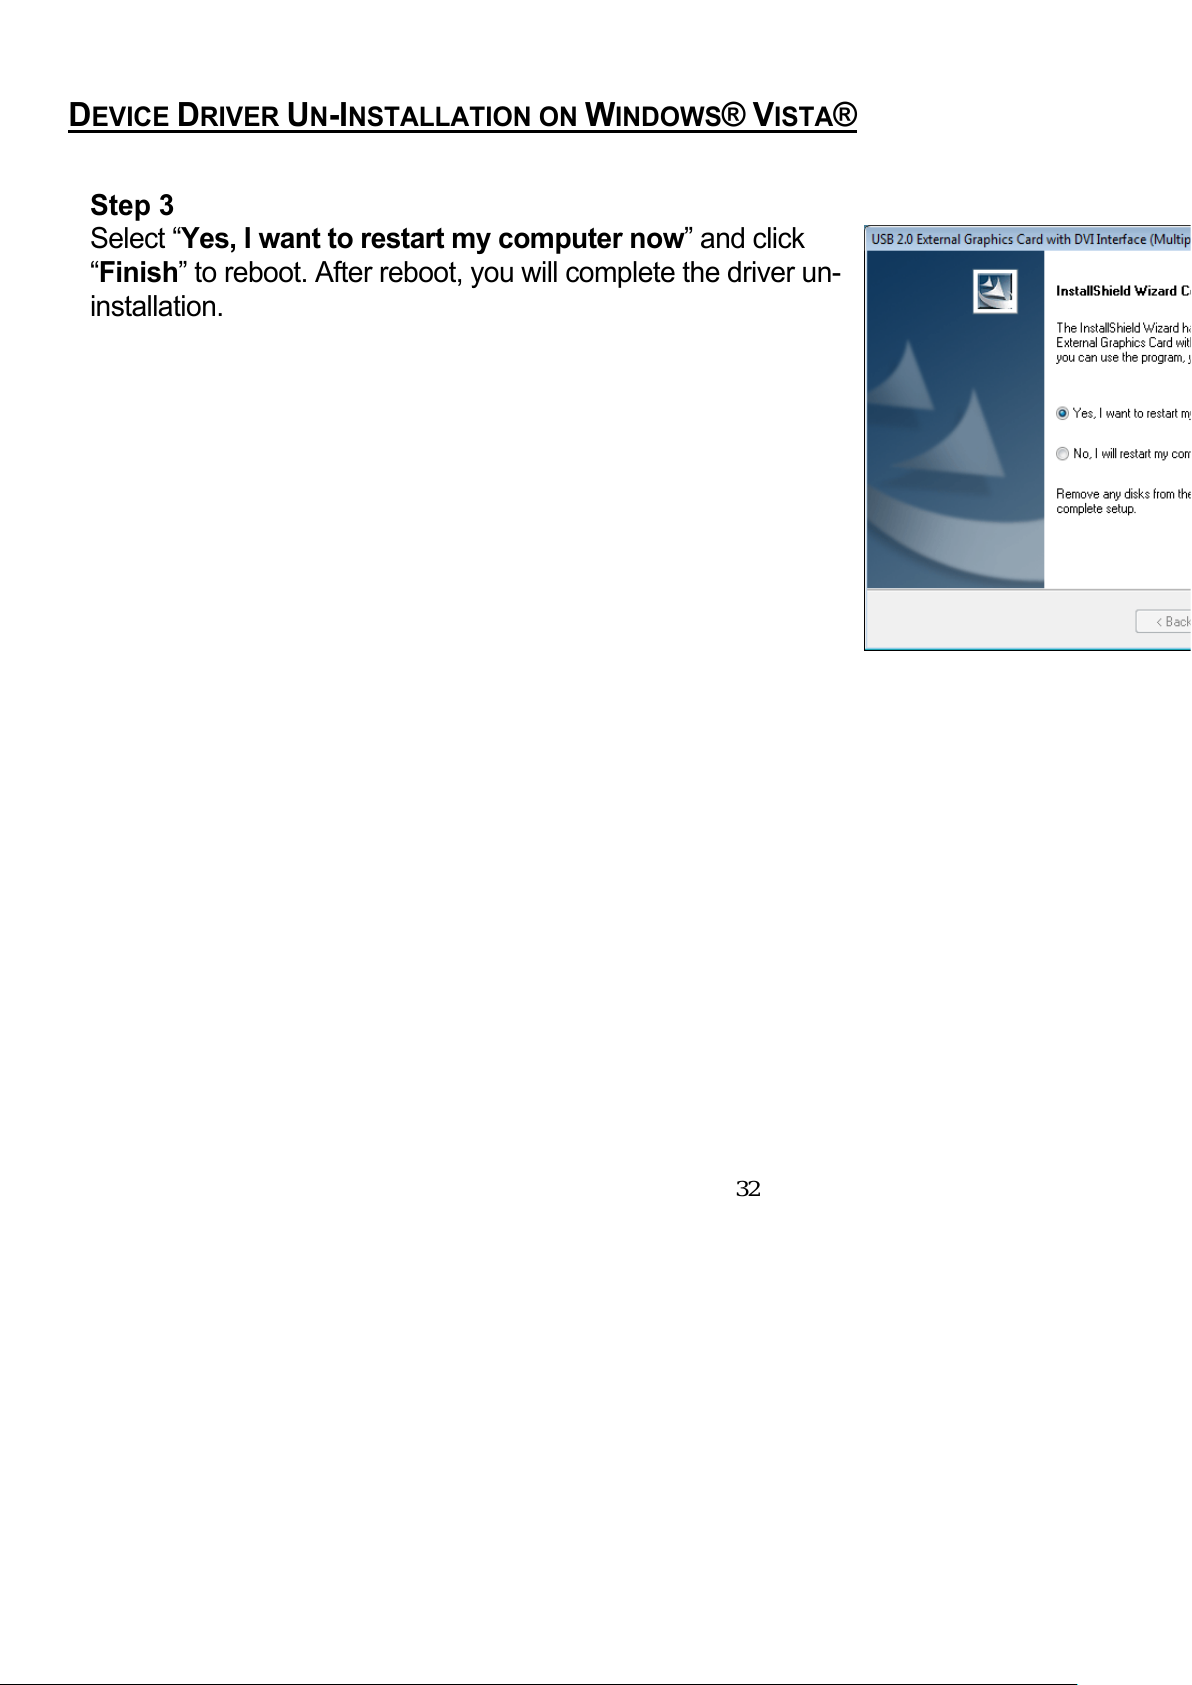
Step 3
Select “
Yes, I want to restart my computer now
” and click
“
Finish
” to reboot. After reboot, you will complete the driver un-
installation.
DEVICE DRIVER UN-INSTALLATION ON WINDOWS® VISTA®
All manuals and user guides at all-guides.com
Page 34
33
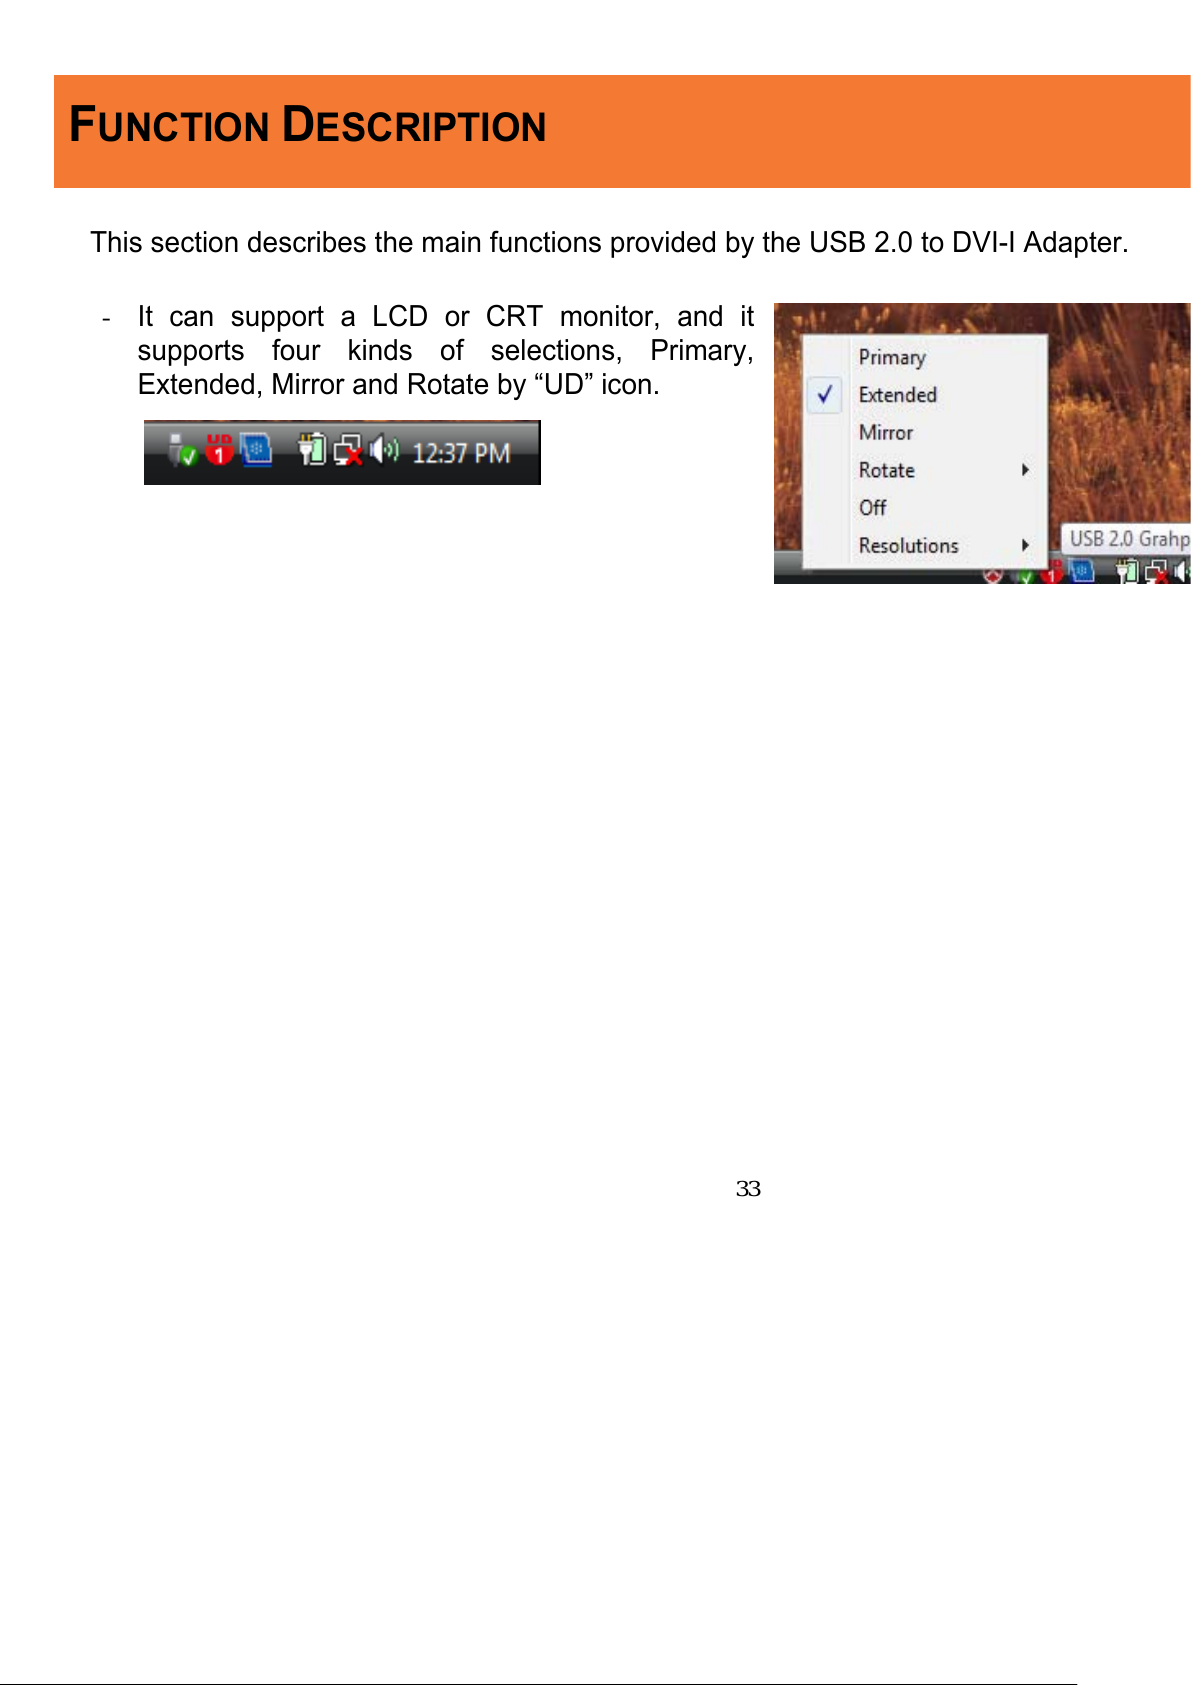
This section describes the main functions provided by the USB 2.0 to DVI-I Adapter.
- It can support a LCD or CRT monitor, and it
supports four kinds of selections, Primary,
Extended, Mirror and Rotate by “UD” icon.
FUNCTION DESCRIPTION
All manuals and user guides at all-guides.com
Page 35
34
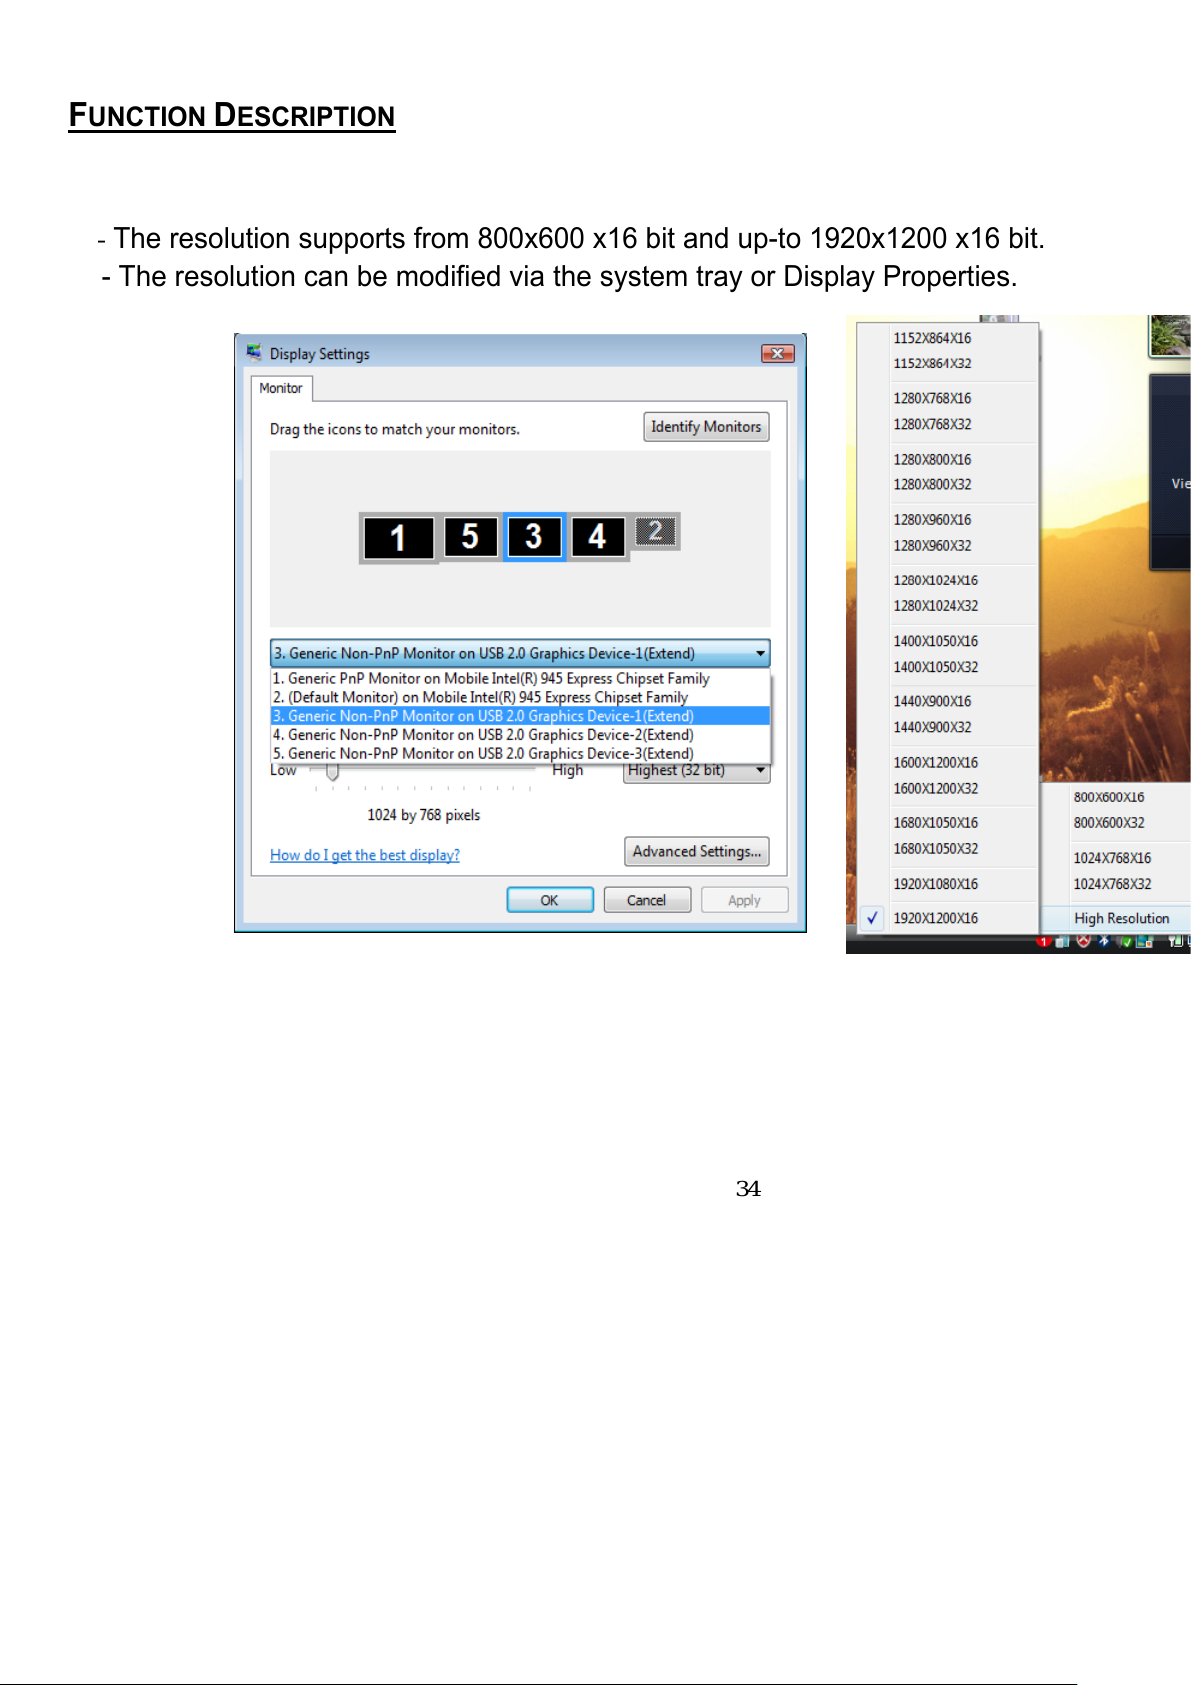
- The resolution supports from 800x600 x16 bit and up-to 1920x1200 x16 bit.
- The resolution can be modified via the system tray or Display Properties.
FUNCTION DESCRIPTION
All manuals and user guides at all-guides.com
Page 36
35
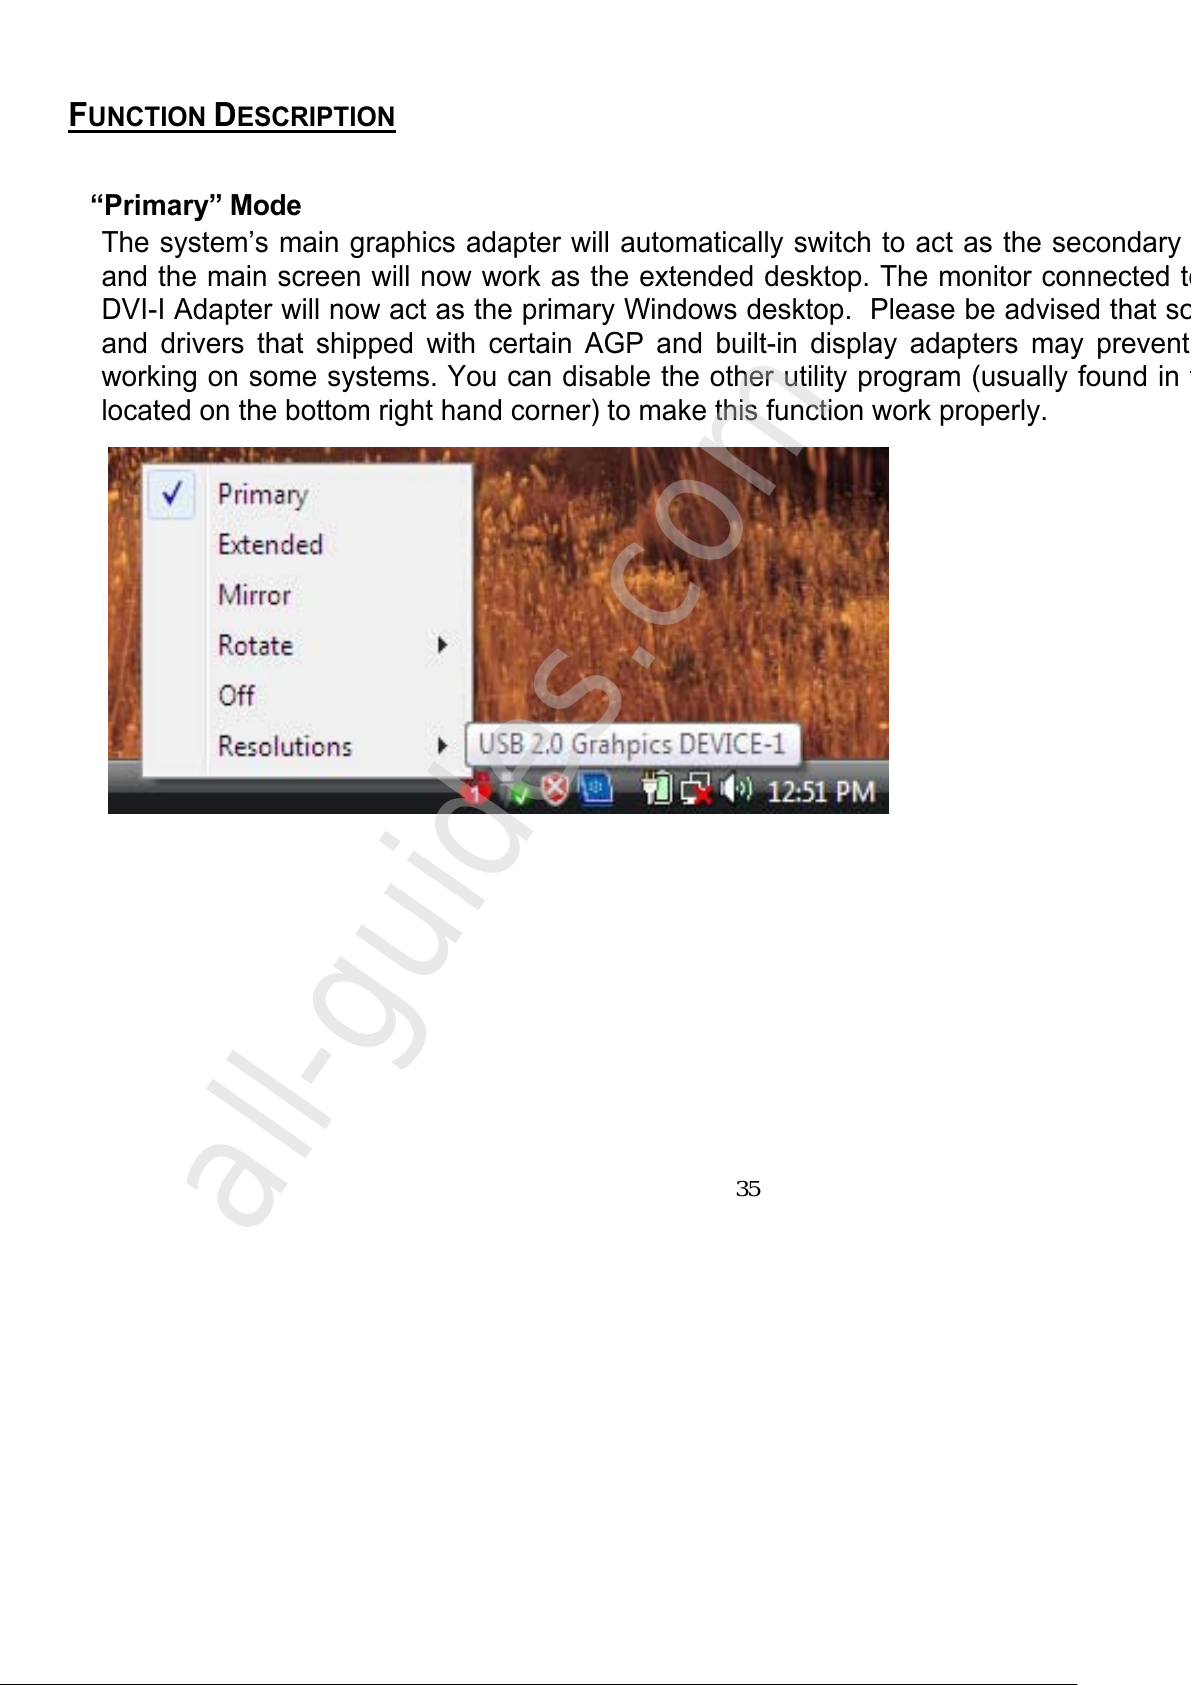
“Primary” Mode
The system’s main graphics adapter will automatically switch to act as the secondary graphics adapter
and the main screen will now work as the extended desktop. The monitor connected to the USB 2.0 to
DVI-I Adapter will now act as the primary Windows desktop. Please be advised that some display utility
and drivers that shipped with certain AGP and built-in display adapters may prevent this option from
working on some systems. You can disable the other utility program (usually found in the same toolbar
located on the bottom right hand corner) to make this function work properly.
FUNCTION DESCRIPTION
All manuals and user guides at all-guides.com
all-guides.com
Page 37
36
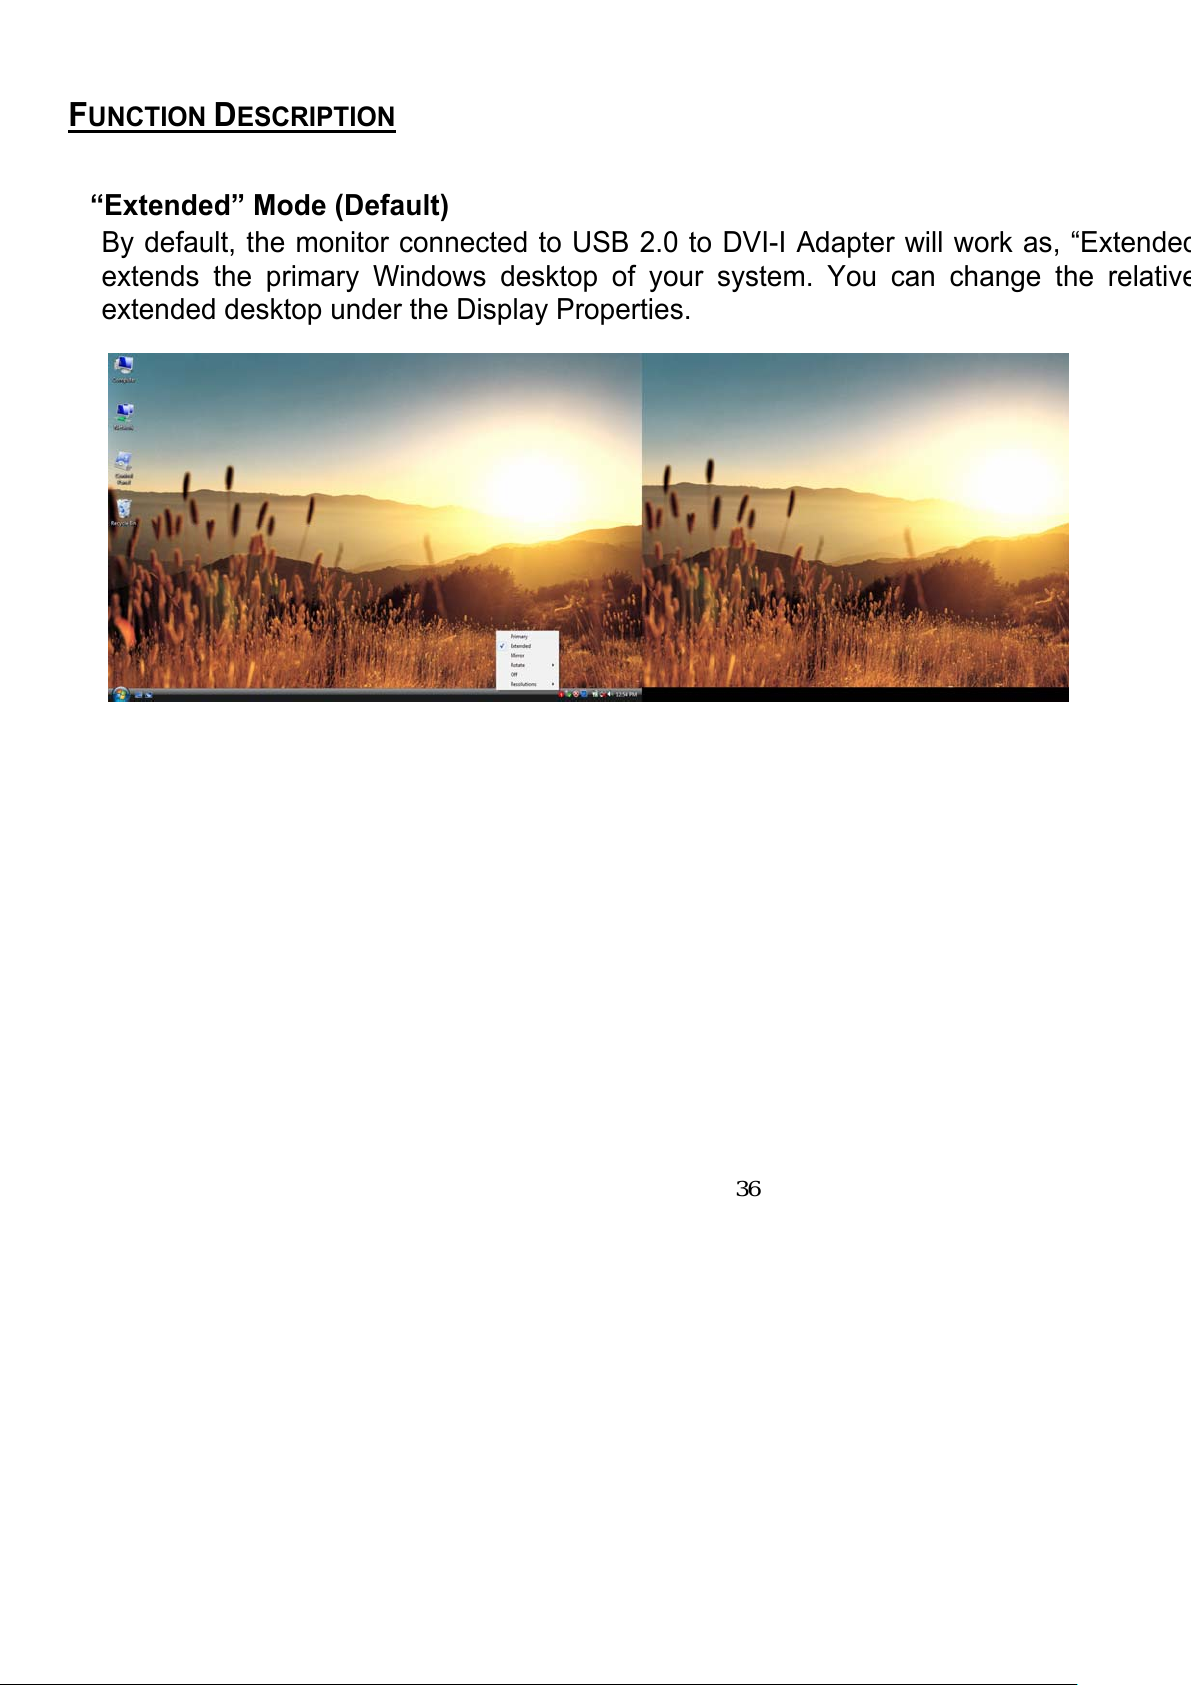
“Extended” Mode (Default)
By default, the monitor connected to USB 2.0 to DVI-I Adapter will work as, “Extended Desktop” which
extends the primary Windows desktop of your system. You can change the relative position of this
extended desktop under the Display Properties.
FUNCTION DESCRIPTION
All manuals and user guides at all-guides.com
Page 38
37
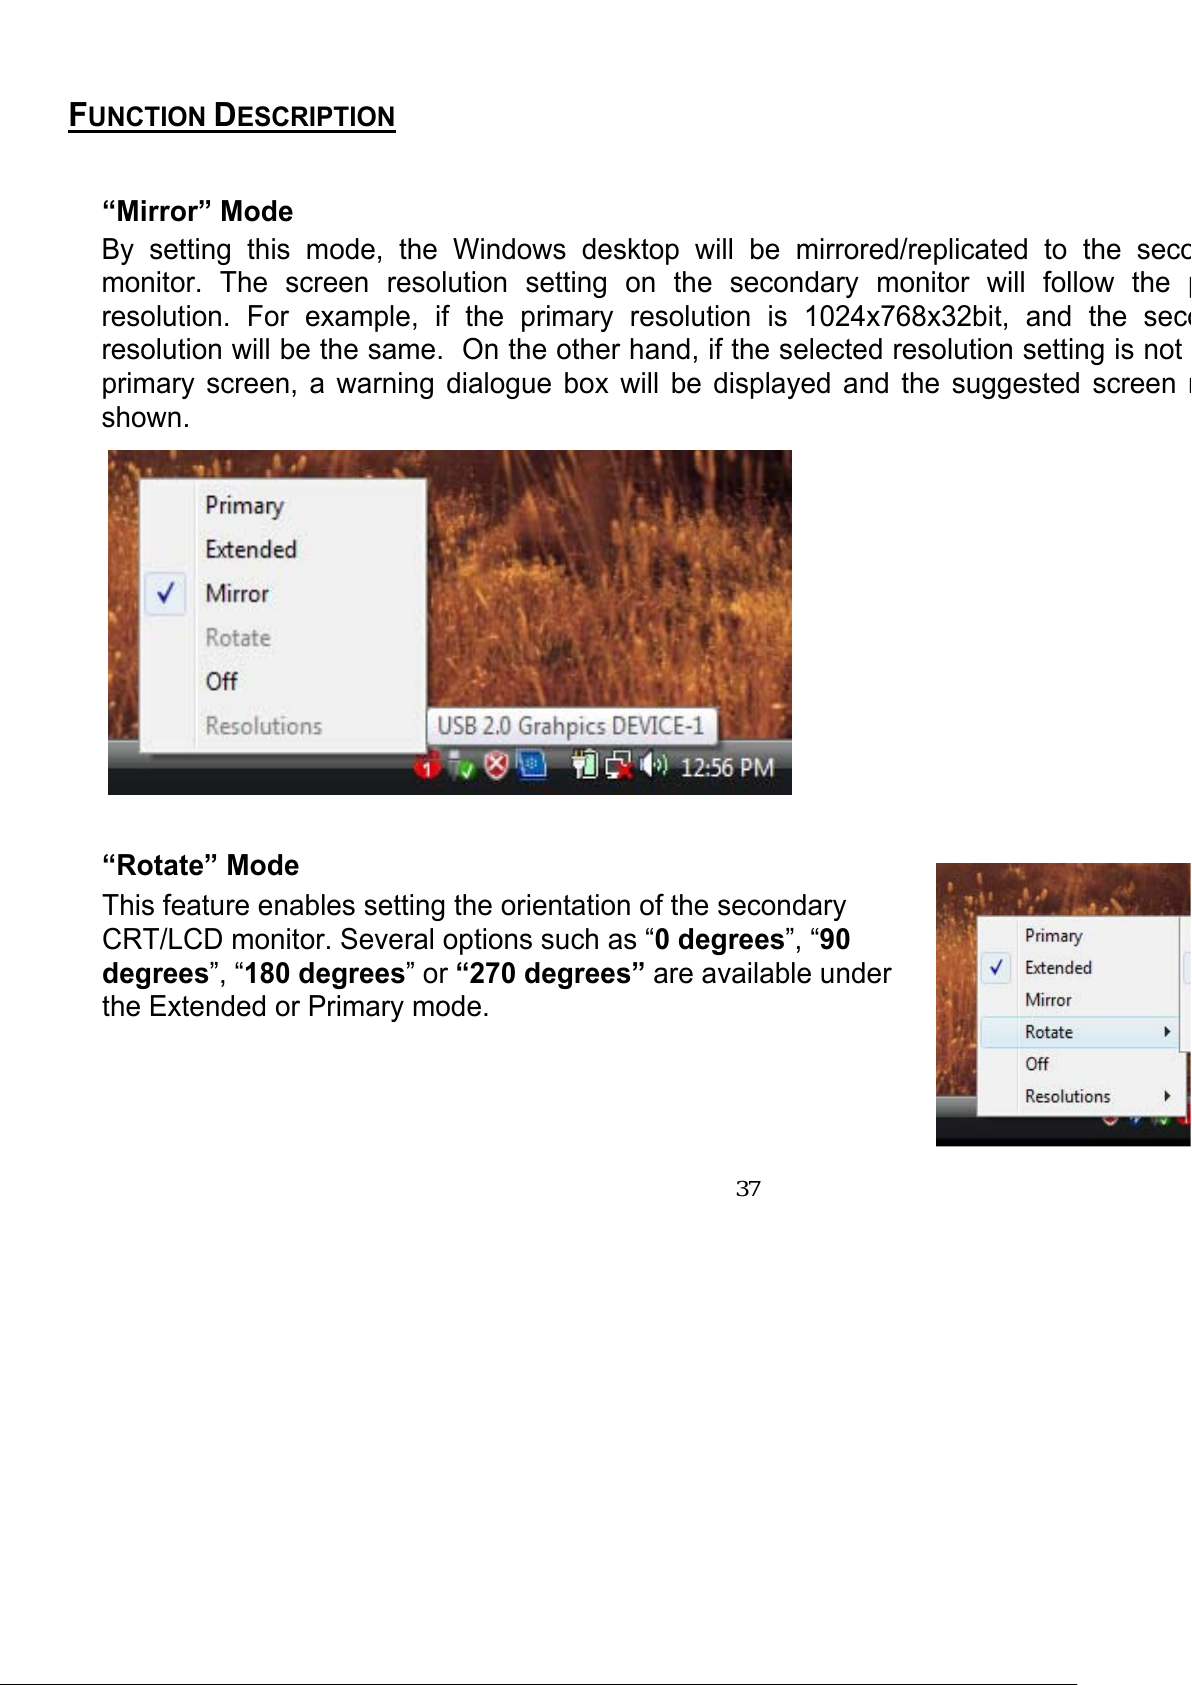
“Mirror” Mode
By setting this mode, the Windows desktop will be mirrored/replicated to the secondary CRT/LCD
monitor. The screen resolution setting on the secondary monitor will follow the primary screen’s
resolution. For example, if the primary resolution is 1024x768x32bit, and the secondary monitor’s
resolution will be the same. On the other hand, if the selected resolution setting is not supported by the
primary screen, a warning dialogue box will be displayed and the suggested screen resolution will be
shown.
“Rotate” Mode
This feature enables setting the orientation of the secondary
CRT/LCD monitor. Several options such as “0 degrees”, “90
degrees”, “180 degrees” or “270 degrees” are available under
the Extended or Primary mode.
FUNCTION DESCRIPTION
All manuals and user guides at all-guides.com
Page 39
38
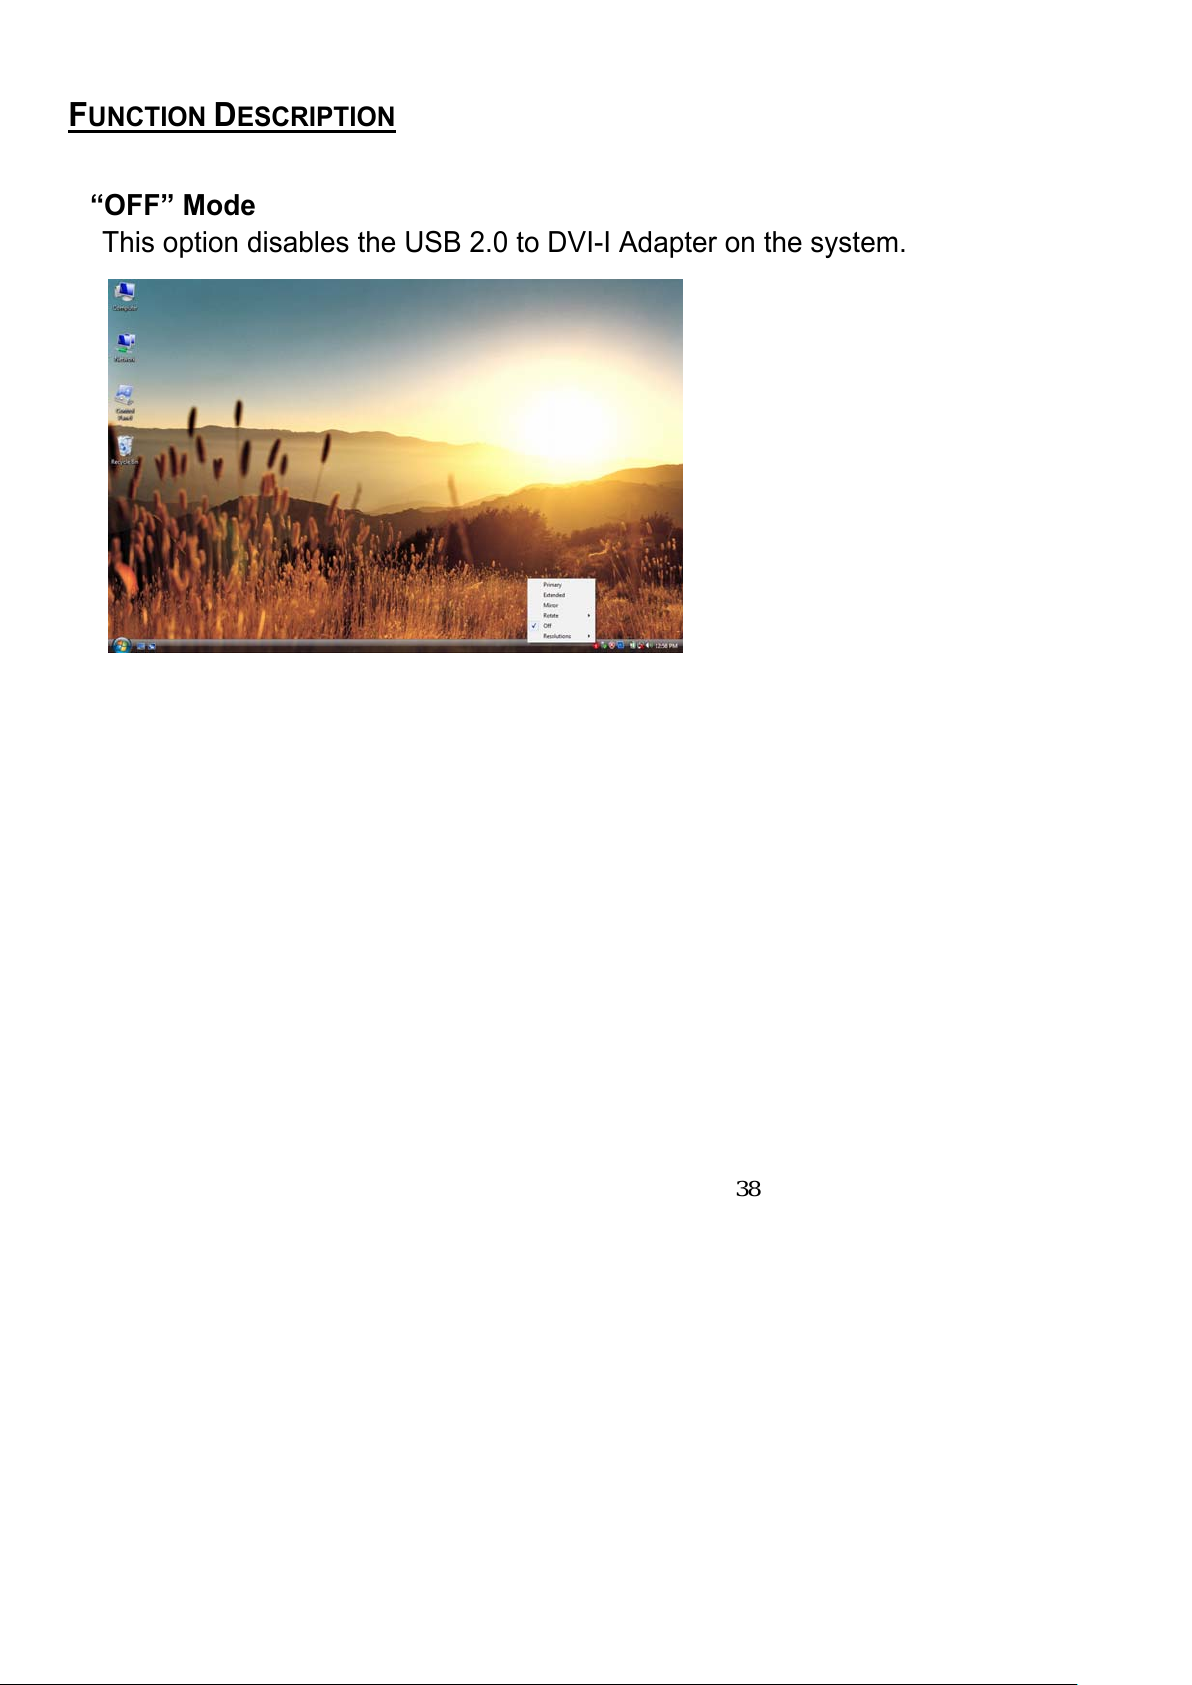
“OFF” Mode
This option disables the USB 2.0 to DVI-I Adapter on the system.
FUNCTION DESCRIPTION
All manuals and user guides at all-guides.com
Page 40
39
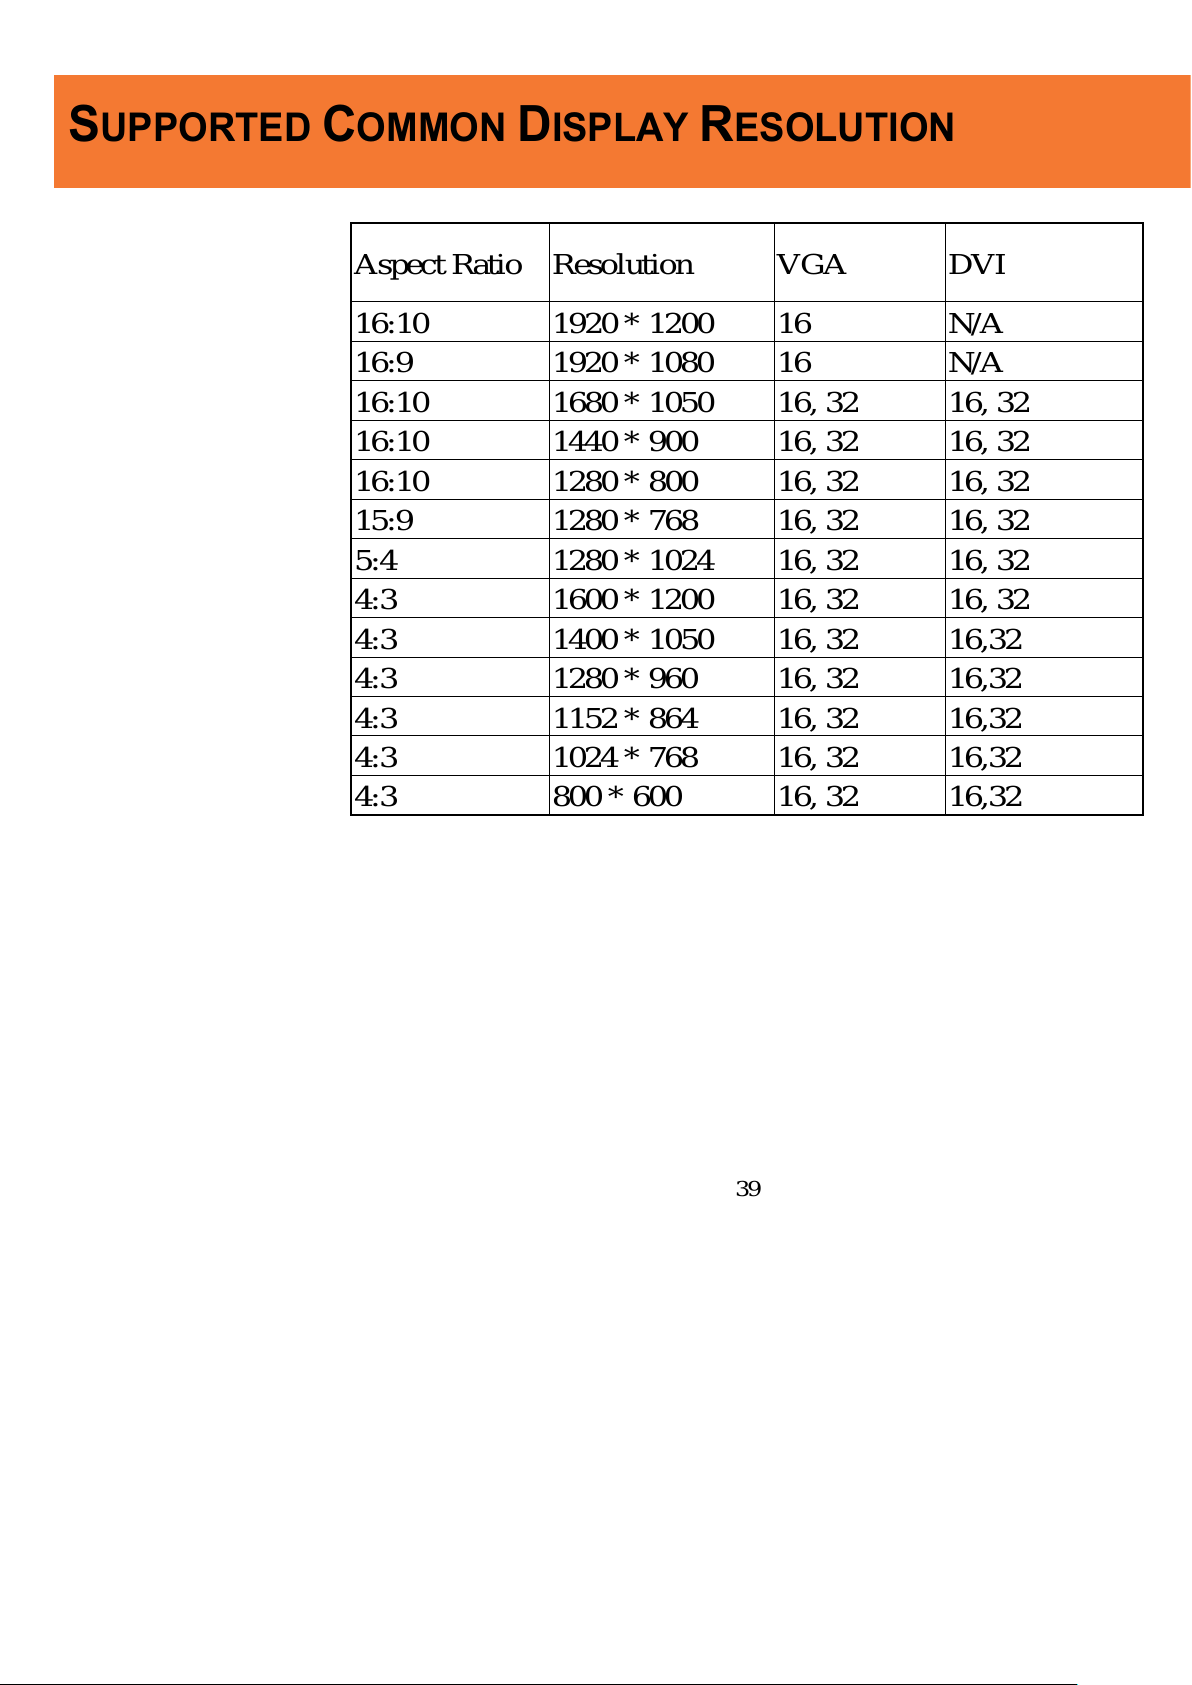
Aspect Ratio Resolution VGA DVI
16:10 1920 * 1200 16 N/A
16:9 1920 * 1080 16 N/A
16:10 1680 * 1050 16, 32 16, 32
16:10 1440 * 900 16, 32 16, 32
16:10 1280 * 800 16, 32 16, 32
15:9 1280 * 768 16, 32 16, 32
5:4 1280 * 1024 16, 32 16, 32
4:3 1600 * 1200 16, 32 16, 32
4:3 1400 * 1050 16, 32 16,32
4:3 1280 * 960 16, 32 16,32
4:3 1152 * 864 16, 32 16,32
4:3 1024 * 768 16, 32 16,32
4:3 800 * 600 16, 32 16,32
SUPPORTED COMMON DISPLAY RESOLUTION
All manuals and user guides at all-guides.com
Page 41
40
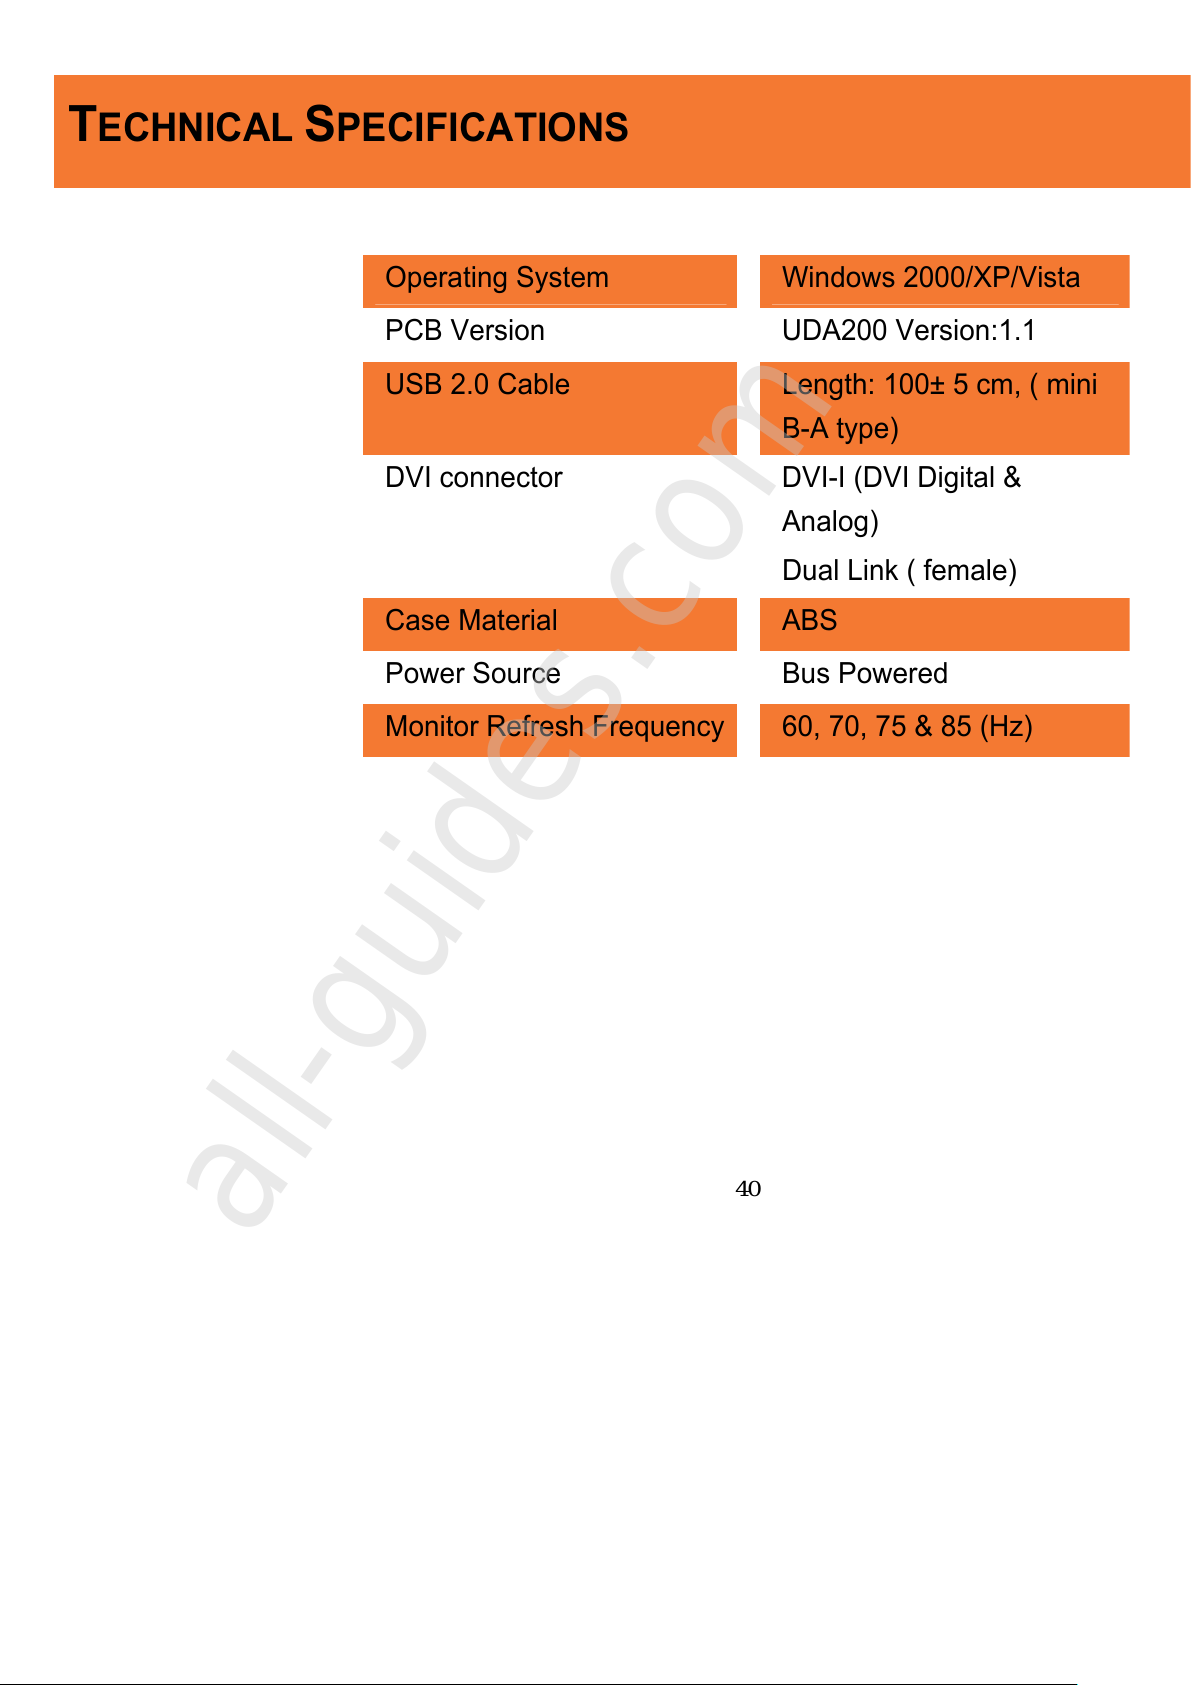
Operating System Windows 2000/XP/Vista
PCB Version UDA200 Version:1.1
USB 2.0 Cable Length: 100± 5 cm, ( mini
B-A type)
DVI connector DVI-I (DVI Digital &
Analog)
Dual Link ( female)
Case Material ABS
Power Source Bus Powered
Monitor Refresh Frequency 60, 70, 75 & 85 (Hz)
TECHNICAL SPECIFICATIONS
All manuals and user guides at all-guides.com
all-guides.com
Page 42
41
This section describes the common Q&A regarding to the installation or operation of the USB 2.0 to DVI-I Adapter.
Q: Why can’t I make the USB 2.0 DVI-I Adapter the primary display?
A: Some video cards ship their product with a utility that prevent other video cards from being set as the primary card.
Check the bottom right hand corner taskbar for the utility. Disable the utility before switching our adapter to be the
primary display.
Q: Why won’t my DVD player work when I move it over to the extended display?
A: Some DVD playback software packages do not support playing on a second display adapter of any kind. You may try
to open the program in the secondary display first before playing the DVD.
Q: Why won’t my video play on Windows Media Player if I move it over to the extended desktop?
A: Check that you have moved the Media Player window completely over to the second screen.
Q: Why does my mouse not move pass the right side of the screen as it should on extended desktop?
A: Check the display settings and make sure that your display number ‘2’ is on the right side of display number ‘1’. You
can rearrange how Windows treats each display in relation to each other in the Display Properties Settings.
Q: There are lines running horizontally up and down my screen.
A: This is due to a low refresh rate setting. You can change this in the Display Properties Settings Advanced Monitor.
Make sure you select the USB 2.0 to DVI-I Adapter first and not set the refresh rate higher than what your monitor can
support. This may damage your monitor. You can also try to reset/refresh/resynchronize your monitor.
Q: Direct3D does not work?
A: This is a current limitation of the adapter. Please check for driver updates in the future to add support for this. If your
application requires this, please use the main display adapter.
QUESTIONS & ANSWERS
All manuals and user guides at all-guides.com
Page 43
42
The following troubleshooting tips may help if you are experiencing any difficulties using our device.
- Check to make sure that all connectors are plugged in correctly.
- Make sure that the USB port that you are using is USB 2.0.
- Try a different USB 2.0 port and/or computer
- Check to see that the monitor is connected correctly and the power is ON.
- Try connecting the adapter directly to the computer instead of through a hub.
- Unplug all other USB devices from the system.
- Make sure to restart your computer after the driver installation.
- Unplug the adapter and re-insert it.
- Check the website (www.cablestogo.com) to make sure you have the latest drivers.
- Reset/refresh/resynchronize your monitor.
- Selecting Primary Mode may disable the main system display on certain Intel graphics solution
based computer system.
- If you have problems during the boot up process, start your computer in Safe Mode and uninstall the driver. Hold the
CTRL key until the Windows startup menu appears and select Safe Mode.
- To verify the driver version that you installed, please click “Control Panel” → “Add or Remove
Programs” to check the program: USB 2.0 External Graphics Card with DVI Interface (Multiple)
8.1.0.0521.0155 (this number is the driver version).
TROUBLESHOOTING TIPS
All manuals and user guides at all-guides.com
Page 44
43
REGULATORY COMPLIANCE
FCC
This equipment has been tested and found to comply with FCC rules Part 15 Subpart B
§ 15.109/15.107 Class B. Operation is subject to the following two conditions:
• This device may not cause harmful interference
• This device must accept any interference received, including interference that may
cause undesired operation.
CE
This equipment is in compliance with the requirements of the following regulations:
EN 55022 Class B (2006), EN 55024 (1998+A1:2001+ A2:2003),
IEC/EN 61000-3-2 (2006), IEC/EN 61000-3-3 (1995+A1 :2001+A2 :2005),
(IEC/EN 61000-4-2 (1995+A1 :1998+A2 :2001)/-3 (2006)/-4(2004)/-5(2006)/
-6 (1996+A1 : 2001)/-11 (2004)
C-Tick
This equipment is in compliance with the requirements of the following regulations:
EN 55022 (2006), AS/NZS CISPR22 © IEC: 2005.
VCCI
This equipment is in compliance with the requirements of the following regulations:
CISPR22 © IEC: 2005.
All manuals and user guides at all-guides.com
Page 45

44
At Cables To Go, we want you to be totally confident in your purchase. That is why we offer a one year
warranty on this device. If you experience problems due to workmanship or material defect for the
duration of this warranty, we will repair or replace this device. To request a Return Merchandise
Authorization (RMA) number, contact customer service at 1-800-506-9606 or www.cablestogo.com.
Cables To Go
3555 Kettering Blvd.
Moraine, OH 45439
1-800-506-9607
www.cablestogo.com
CABLES TO GO™ ONE YEAR WARRANTY
All manuals and user guides at all-guides.com
Page 46
45
! Do not plug the unit in any outlet that does not have enough current to allow the switch to function. Refer to the
specifications in this manual for power level of the unit.
! Liquid:
If this unit or its corresponding power adapter has had liquid spilled on or in it, do not attempt to use the unit.
Do not attempt to use this product in an outdoor environment as elements such as rain, snow, hail, etc. can damage the
product.
! In case of a storm, it is recommended that you unplug this device from the outlet.
! Avoid placing this product next to objects that produce heat such as portable heaters, space heaters, or heating ducts.
! THERE ARE NO USER SERVICEABLE PARTS
Do not attempt to open this product and expose the internal circuitry. If you feel that the product is defective, unplug the
unit and refer to the warranty information section of this manual.
©2009.Cables To Go is a trademark of Cables To Go. Microsoft and XP/Vista are either registered trademarks or trademarks of
Microsoft Corporation in the United States and/or other countries. This product is not endorsed or manufactured by Microsoft
Corporation.
IMPORTANT SAFETY INFORMATION
All manuals and user guides at all-guides.com
all-guides.com
Page 47

46
All manuals and user guides at all-guides.com
Page 48

47
For more information on this product or to check for updated drivers,
manuals or frequently asked questions please visit our website.
www.cablestogo.com
VER. 1.0.4.9.09
All manuals and user guides at all-guides.com
 Loading...