

Page 1
Wireless USB To VGA Adapter Kit
Model No. 29572
User’s Manual
Page 2

TABLE OF CONTENTS
Introduction.........................................................................................................2
Features............................................................................................................2
System Requirements.......................................................................................2
Package Contents.............................................................................................2
Device Overview .................................................................................................3
Wireless USB Host Adapter.............................................................................3
Wireless VGA Adapter.....................................................................................4
Wireless USB To VGA Software Installation.....................................................5
Using Your Wireless VGA Kit............................................................................10
Wireless VGA Display Settings.......................................................................10
Wireless USB Manager...................................................................................11
Wireless USB Host Adapter Selection............................................................15
Wireless USB Host Adapter Reset.................................................................15
Using your Wireless VGA Adapter in Wired Mode..........................................15
Frequently Asked Questions ...........................................................................16
Technical Information.......................................................................................17
General Information..........................................................................................18
TruLink One Year Warranty............................................................................18
Important Safety Information..........................................................................18
FCC Statement..............................................................................................18
Appendix.............................................................................................................19
Association with other devices........................................................................19
Association Concept.................................................................................19
Association Process..................................................................................19
Cable Association Procedure.........................................................19
Pin Association Procedure.............................................................20
Pin Change Procedure...................................................................21
1
Page 3
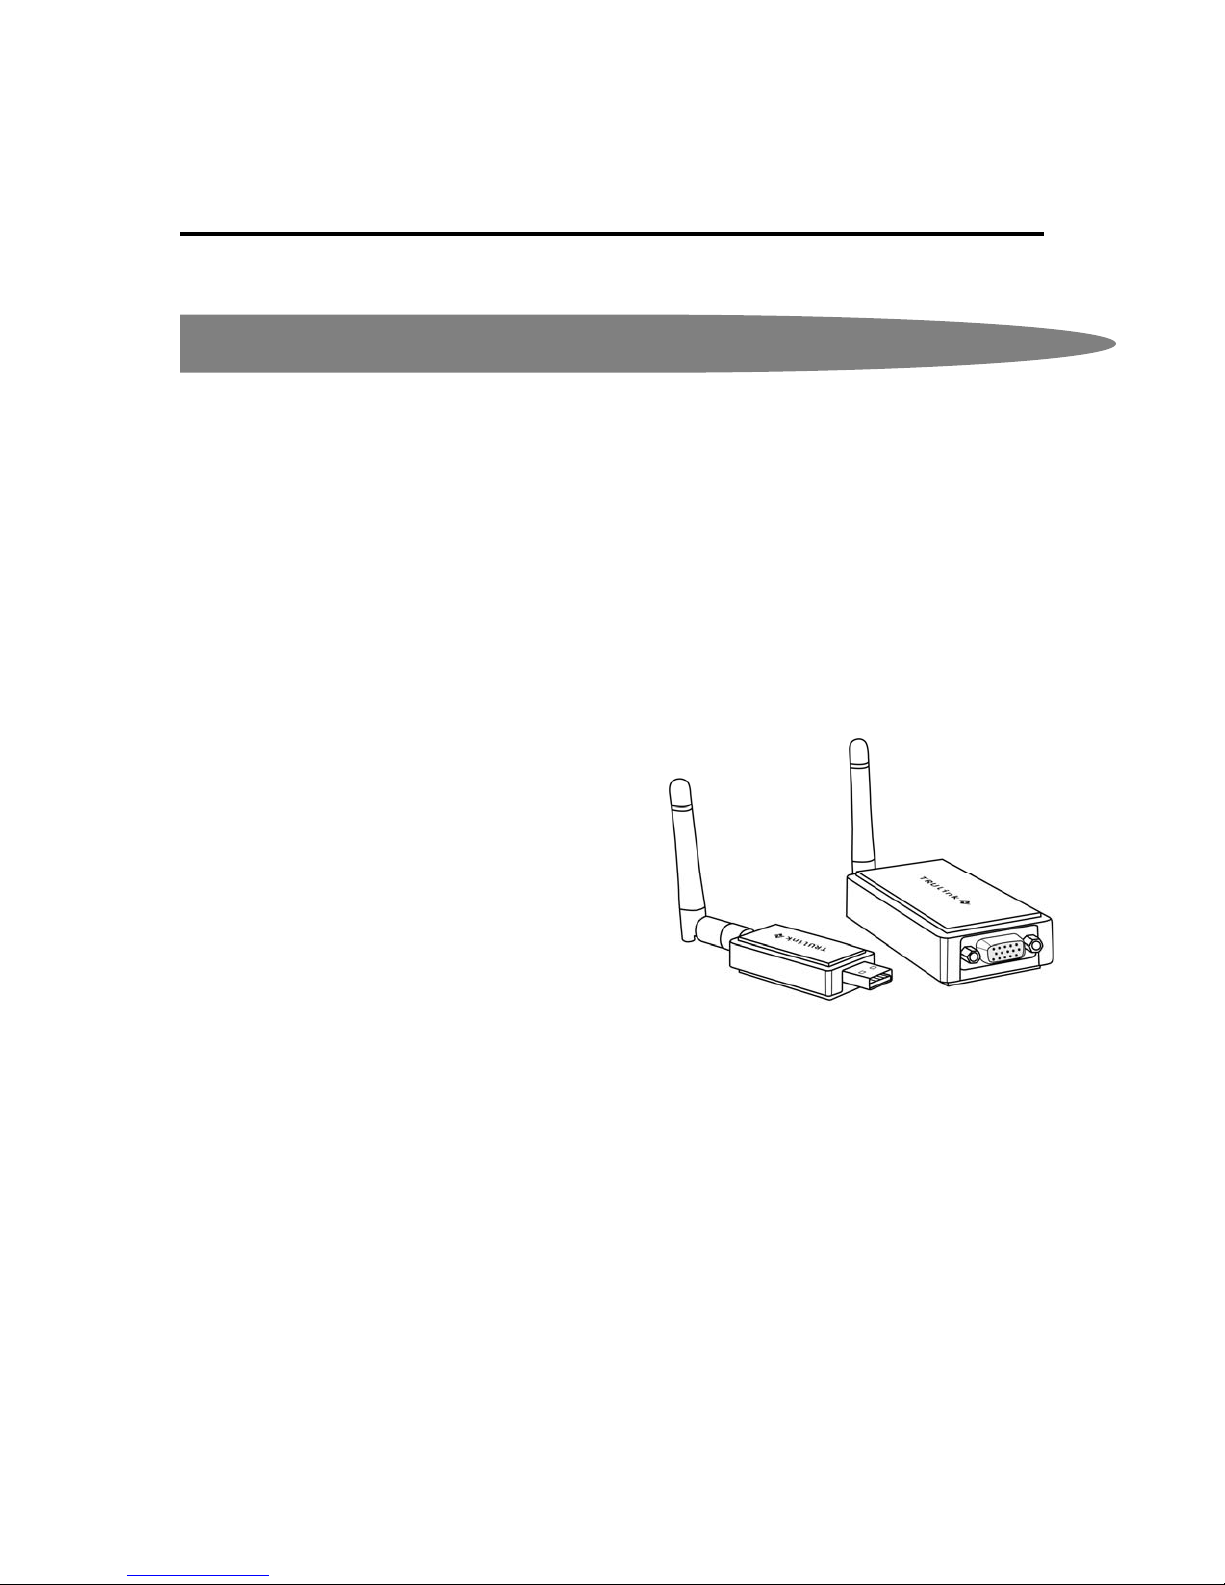
Wireless USB To VGA Adapter Kit
Model: 29572
User’s Manual
Introduction
Thank you for purchasing the TruLink™ Wireless USB To VGA Adapter Kit. This product
utilizes the latest in wireless technology, so you can display video and images on a remote
monitor, projector, or television up to 30 feet away. With a highly secure connection you can
use this product in settings such as conference rooms, classrooms, or in your home
office/entertainment system. We recommend that you read this manual thoroughly and
retain for future reference.
FEATURES
• Supports high resolution UXGA video of 1600 x 1200 at distances up to 30ft
• Works in both extended desktop and dual monitor screen modes
• Supports native mode for playback of high resolution video
• Up to six computers can share one
wireless display
• Supports video streaming at up to 720p
• Operates in WiMedia Band Group 1
frequency range (3.1GHz to 4.8GHz)
• Certified Wireless USB 1.0 compliant
• WiMedia 1.0 MAC & 1.1 PHY compliant
SYSTEM REQUIREMENTS
• Microsoft® Windows® XP or Microsoft®
Vista® 32-bit/64-bit
PACKAGE CONTENTS
• Wireless USB Host Adapter for your computer
• Wireless VGA Adapter for your display
• Two (2) Dipole Antennas (one for each adapter)
• 3ft USB A Male/Mini-B Male Cable
• USB Extender with Cradle
• One (1) Power Adapter
• User Manual
• Quick Start Guide
• Driver CD
2
Page 4
3
Device Overview
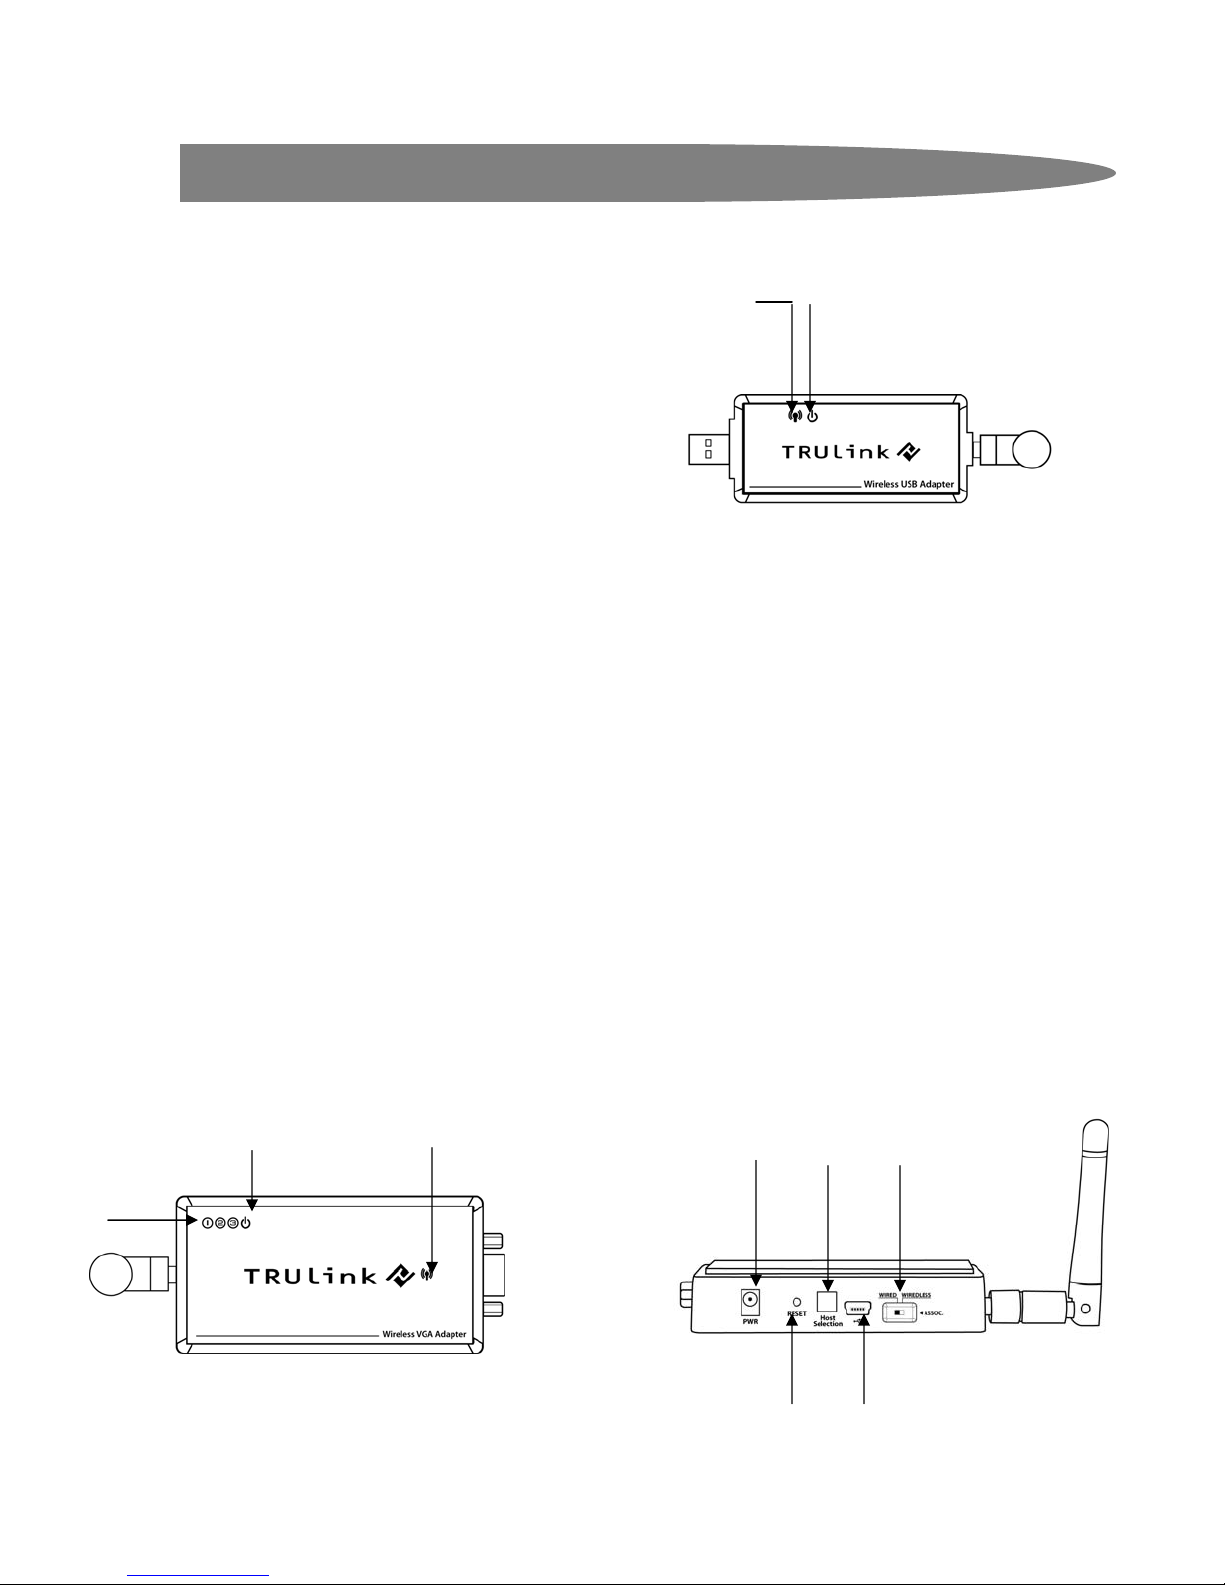
WIRELESS USB HOST ADAPTER
1. Link: Data Connection Indicator
• LED is solid when transfer device is connected
• LED blinks when data is being transferred
2. PWR: Power
• LED is solid when powered by the PC
IRELESS VGA ADAPTER
W
1. VGA : VGA Activity Indicator
• LED is solid when display cable is connected.
• LED is blinking when data is being transferred.
2. PWR: Power Indicator
• LED is solid when power is applied.
3. 1-2-3: Status Indicator
• Illuminated number/s indicates the Wireless USB Host Adapter that is currently
synced with the Wireless VGA Adapter
4. PWR plug
• Power adapter socket
5. RESET
• Association history can be erased by pressing and holding this button for 10
seconds.
6. HOST
• This button is used to select a different Wireless USB Host Adapter.
7. USB connector
• In wireless mode, this connector is used for cable association
• In wired mode, this connector is used for wired operation
8. WIRELESS/WIRED switch
• Choose from wired or wireless mode by using this switch.
1 2
1 2
4 6 8
3
5
7
Page 5
Wireless VGA Software Installation
IMPORTANT NOTE:
If installing on Windows XP, Service Pack 2 (SP2) is required. Verify that
this has been installed before installing the Wireless VGA Kit software.
Before installing the software, make sure that the Wireless USB Host
Adapter and Wireless VGA Adapter are not connected to the computer, and
the Wireless VGA Adapter is not powered.
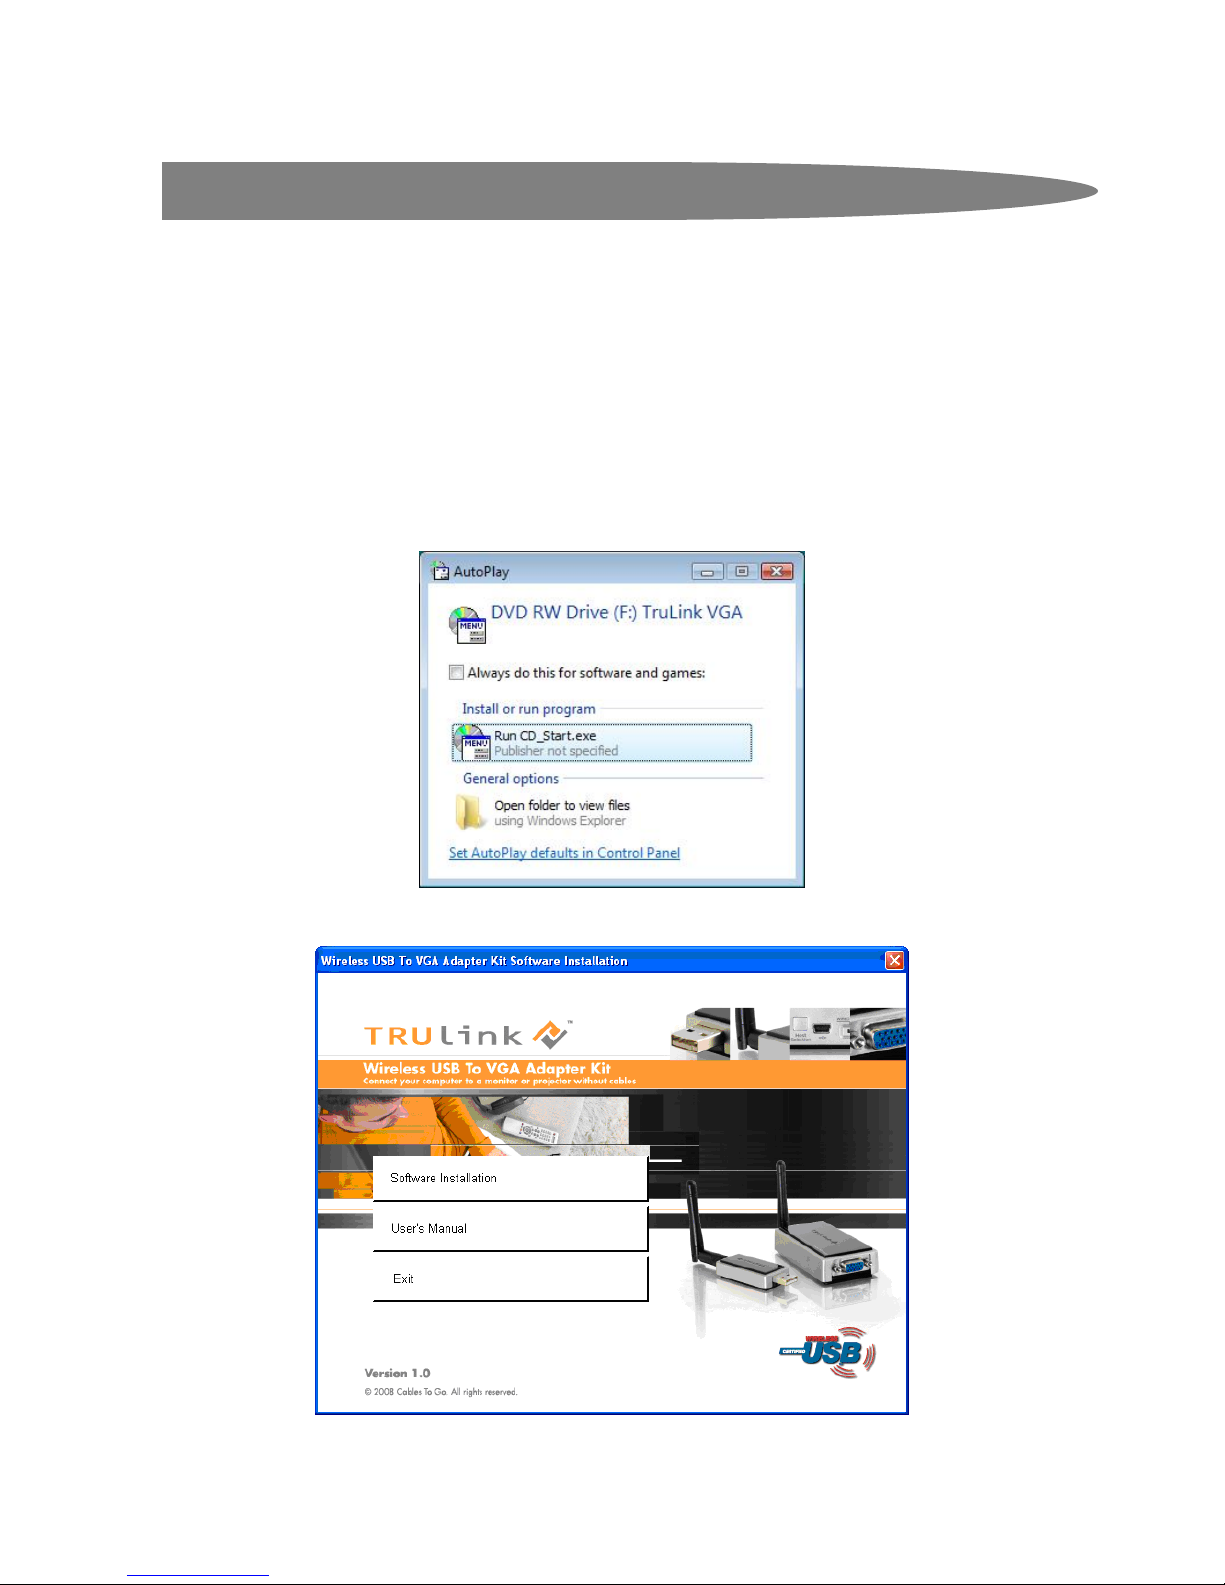
Step 1 – Insert CD into drive on your computer.
Step 2 – Select the “Software Installation” from the menu.
4
Page 6
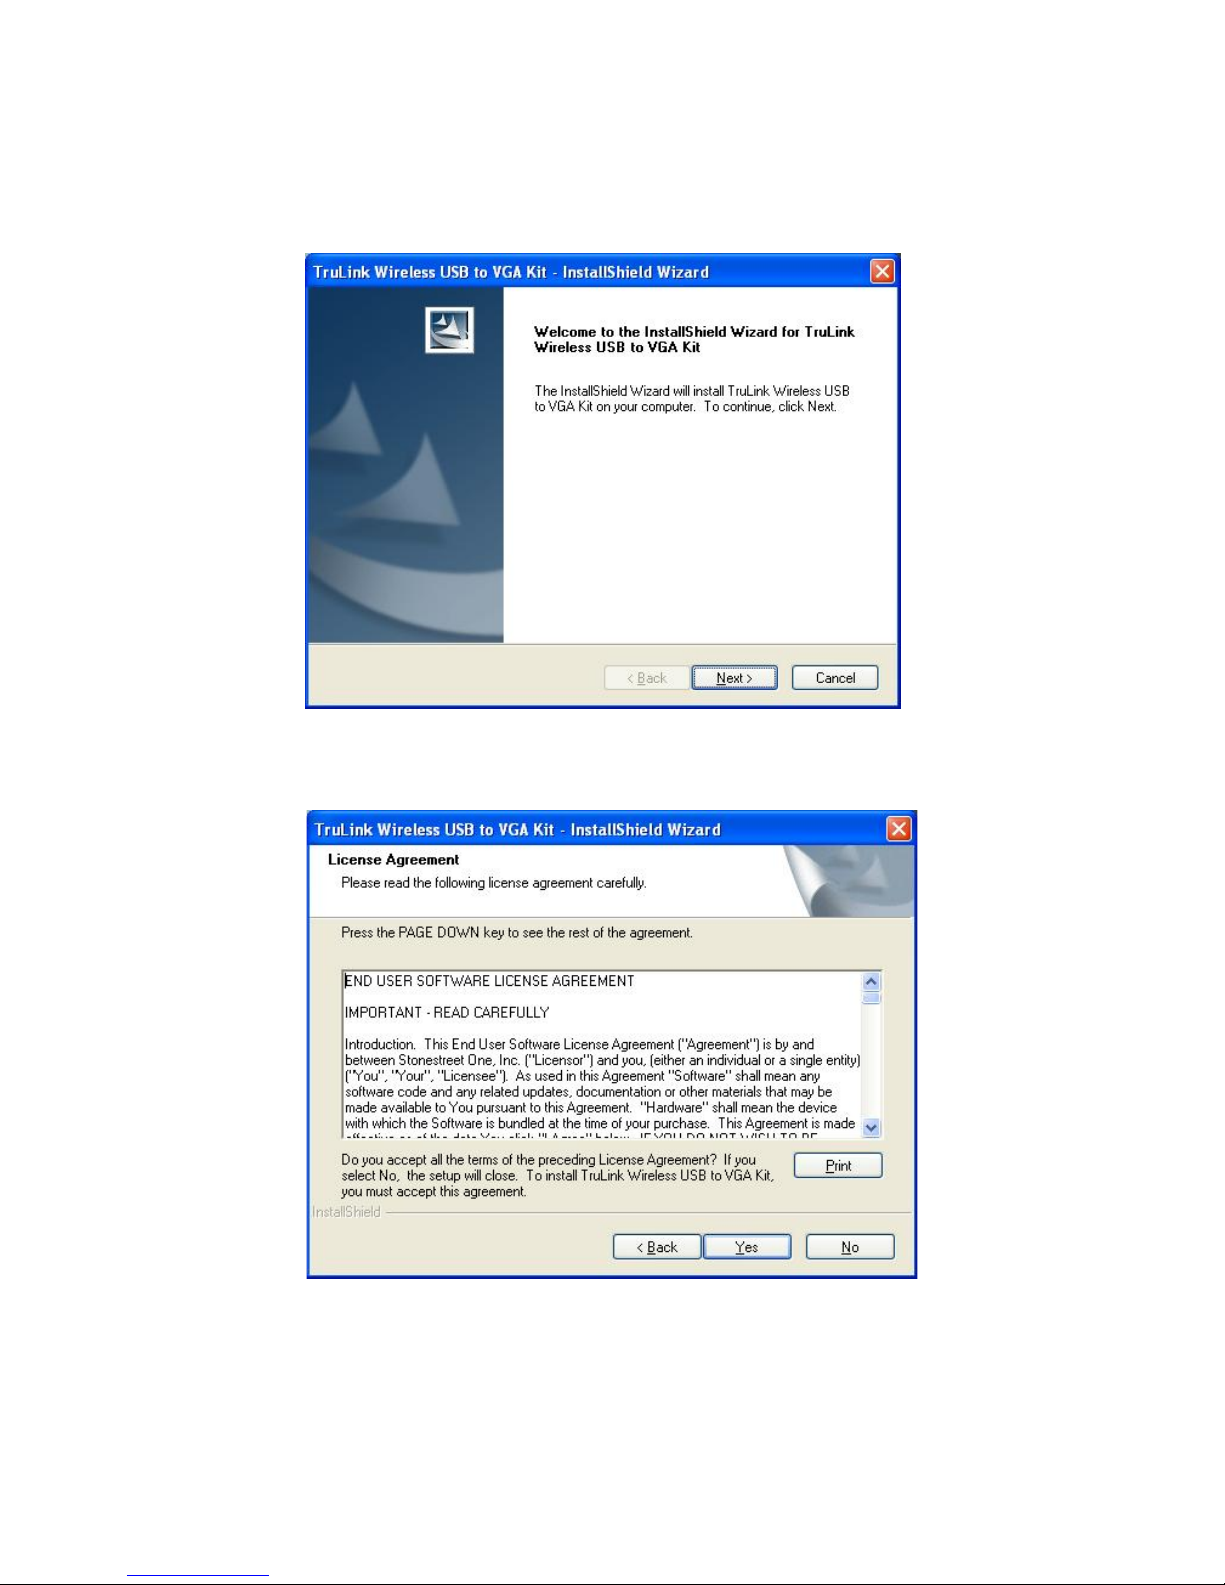
This will take you to the TruLink Wireless USB to VGA Kit InstallShield Wizard.
Click “Next” to go to proceed with the install.
Read and accept the Wireless Kit software License Agreement by clicking “Yes”.
.
5
Page 7
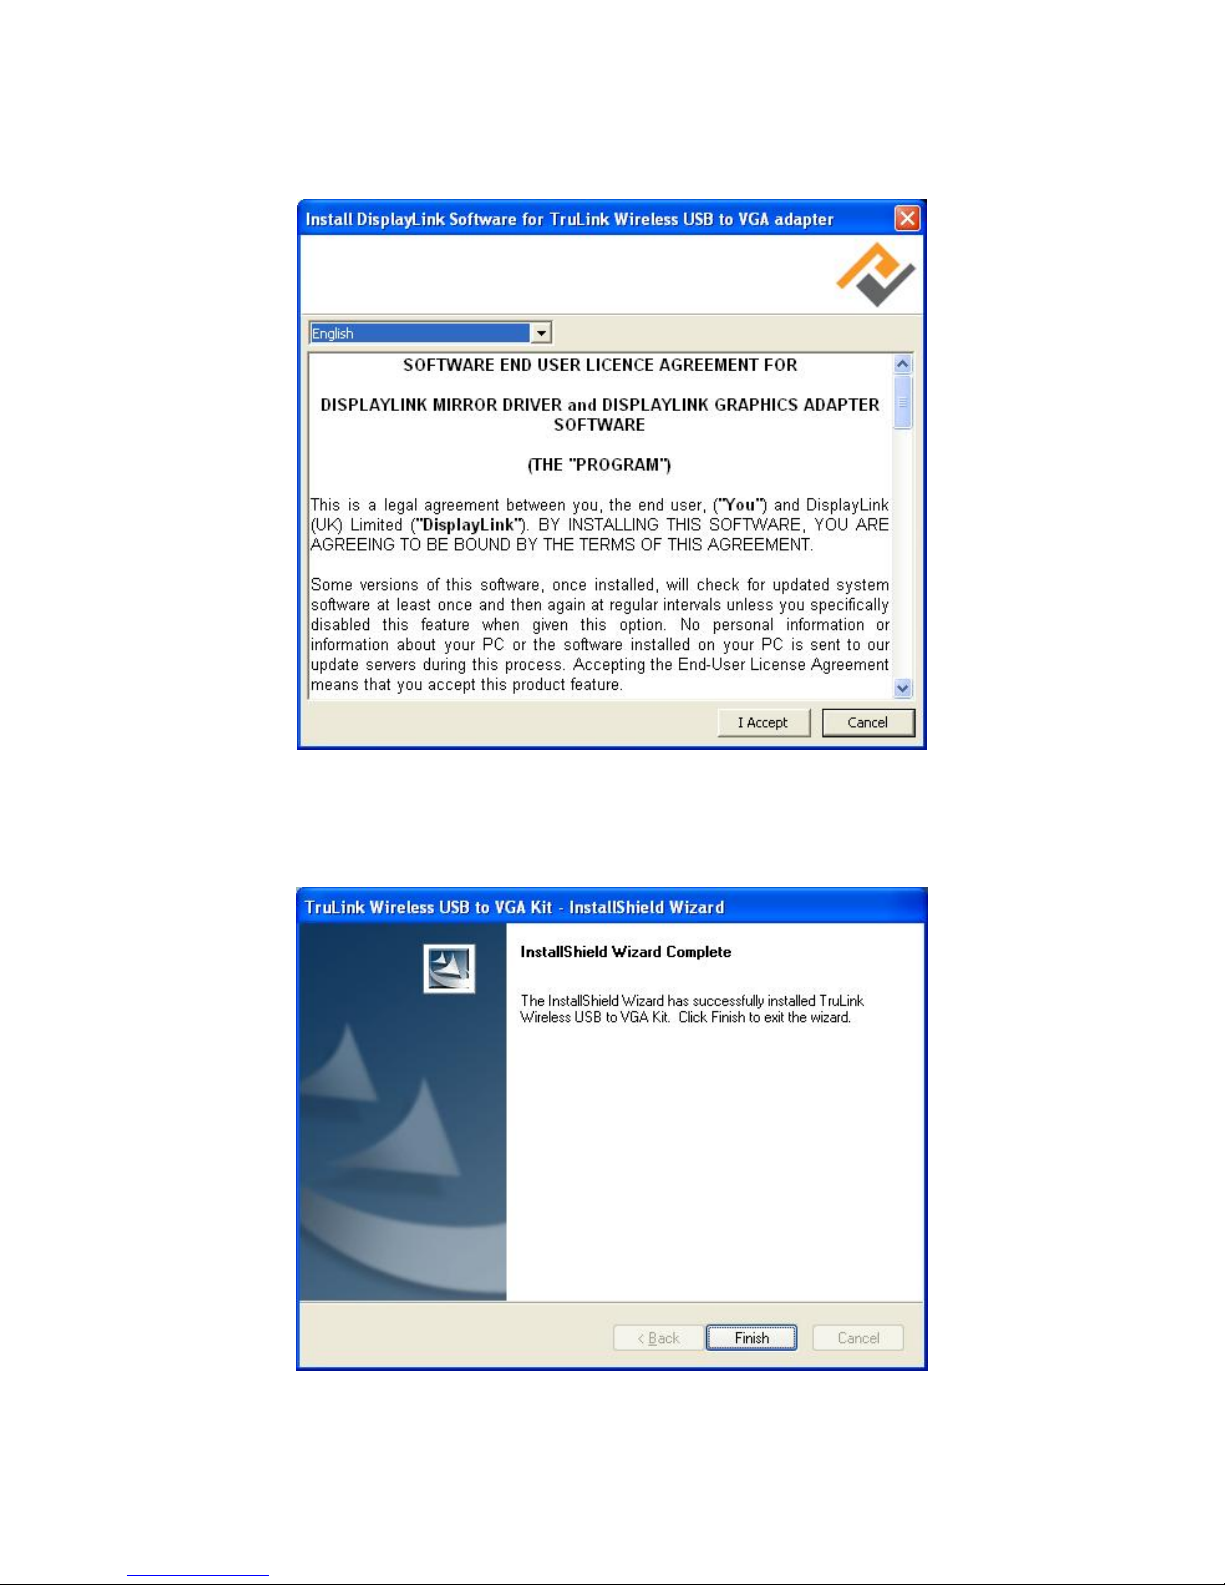
Read and accept the License Agreement for the DisplayLink software
After the software installs your installation is complete and you can hit the
“Finish” button to exit the wizard. Important: reboot if prompted.
6
Page 8
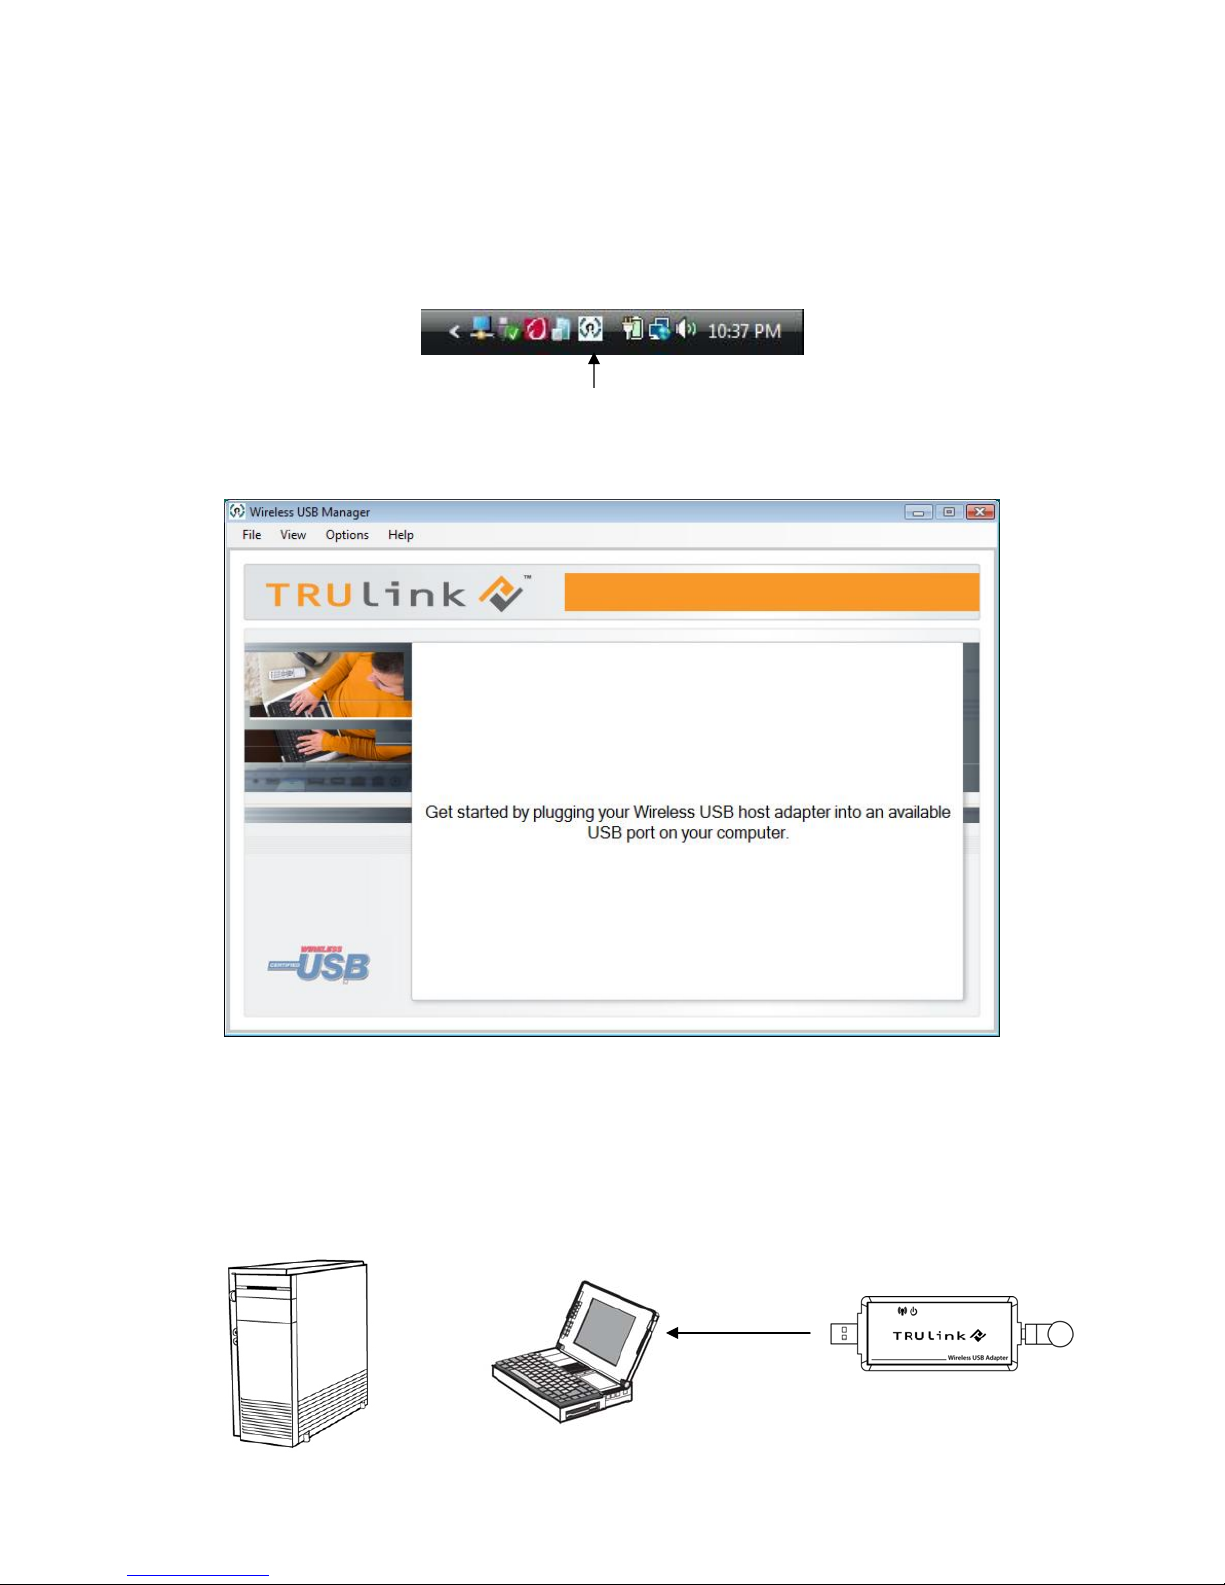
Step 3 – Driver Installation for the Wireless USB Host Adapter
1. Open the Wireless USB Manager by double-clicking the icon on the icon
tray at the bottom of your desktop.
TruLink Wireless USB Manager
The Wireless USB Manager will open and instruct you on what to do next.
2. Make sure the antenna is connected to the Wireless USB Host Adapter.
3. Plug the Wireless USB Host Adapter into any available USB port on your
computer. You also have the option to connect the Wireless USB Host
Adapter to the USB Cradle provided in the package if you need to make
the Adapter more mobile.
or
7
Page 9
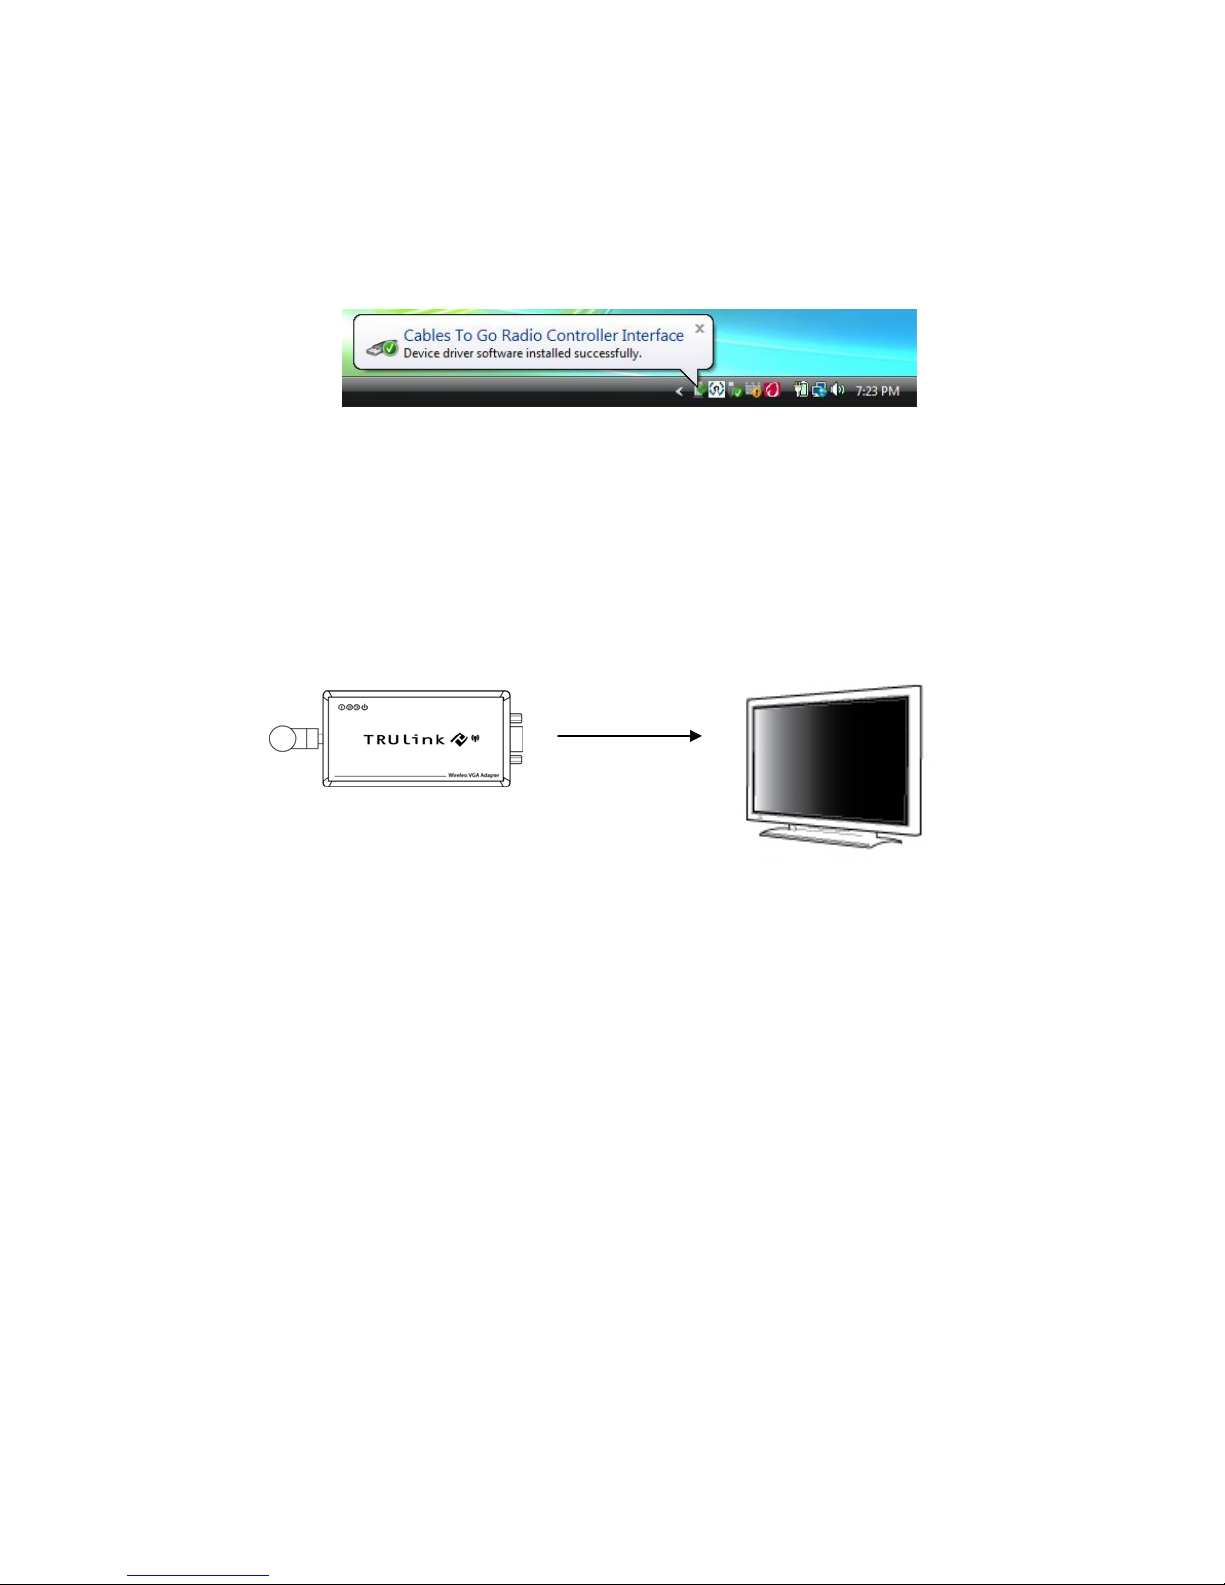
Windows will automatically install the appropriate Wireless USB Host Adapter
drivers and you will get a Successful Install message pop-up such as the
following to let you know it was successful.
Successful Install Message
Step 4 – Driver Installation for the Wireless VGA Adapter
1. Make sure the antenna is connected to the Wireless VGA Adapter.
2. Connect a VGA cable between the Wireless VGA Adapter and your
display. Plug the power cable into your Wireless VGA Adapter
Windows will automatically install the appropriate Wireless VGA Adapter drivers
and you will get another Successful Install message pop-up such as above
verifying successful installation.
8
Page 10
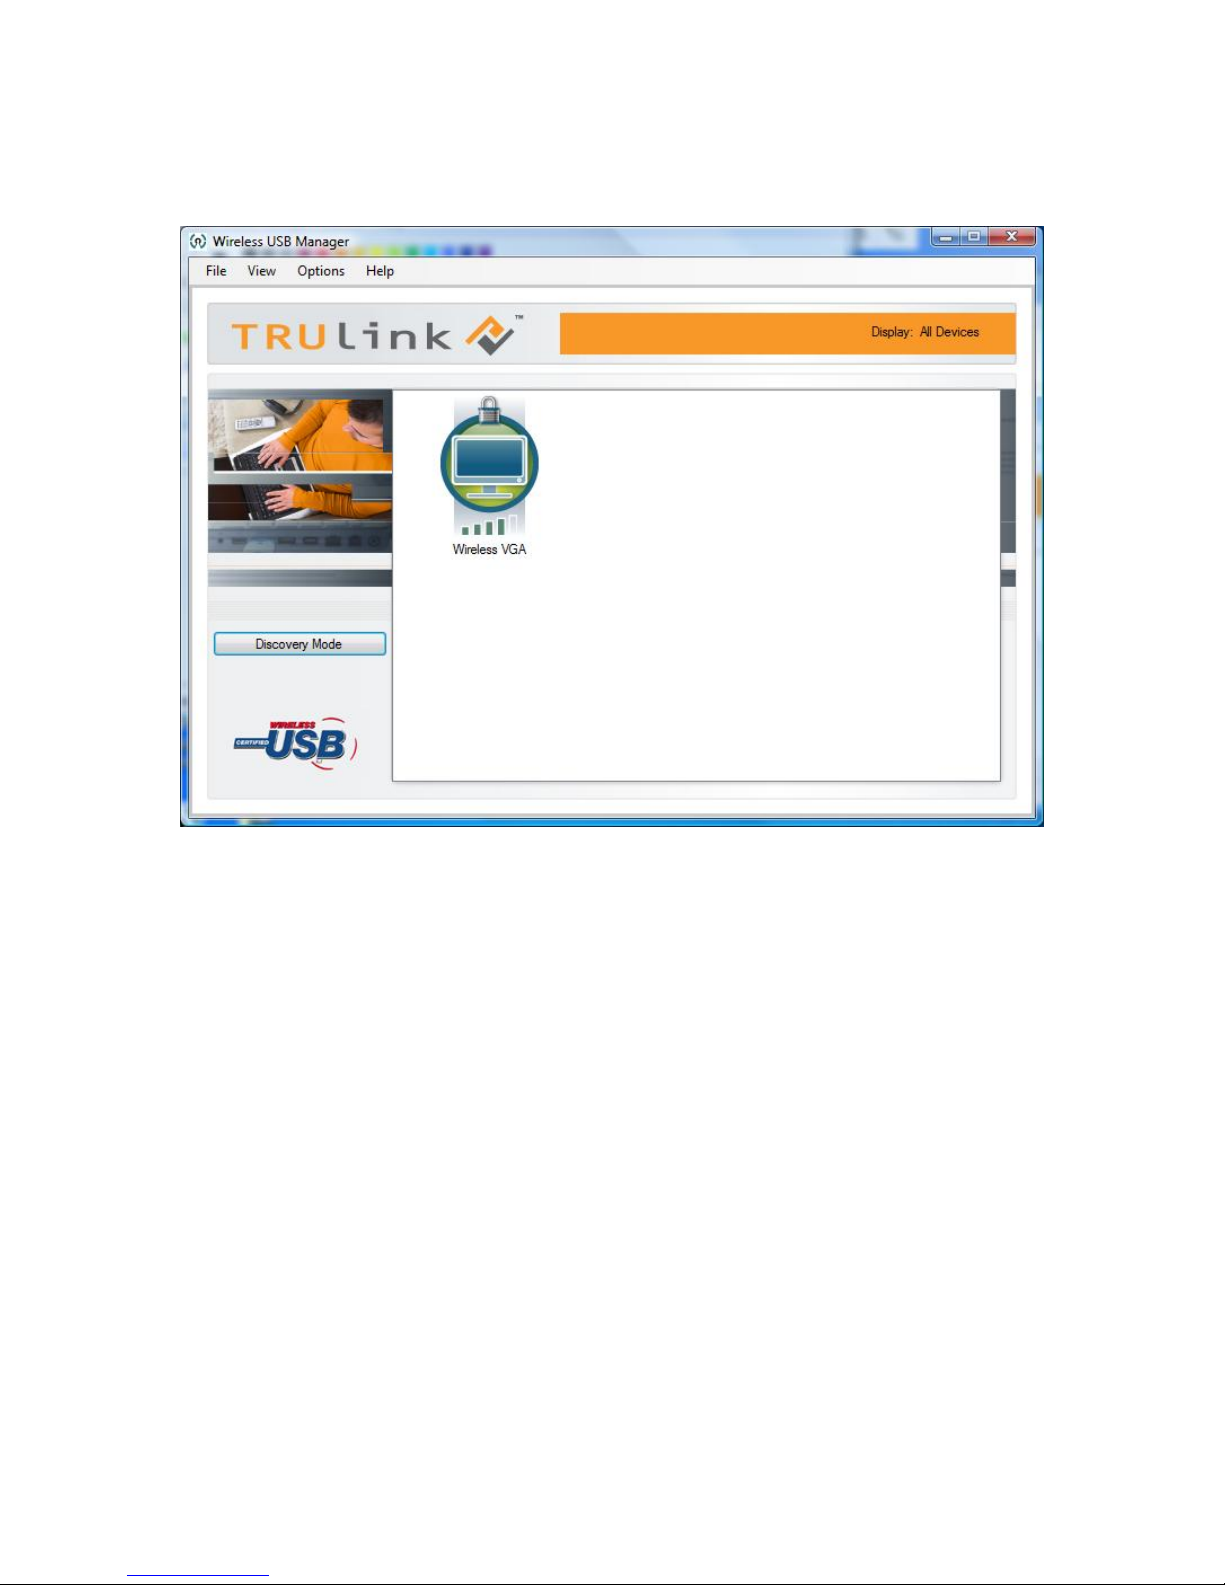
On the Devices screen of the Wireless USB Manager, the icon will be in color,
indicating the Wireless USB to VGA Adapter Kit is active and ready to use.
9
Page 11
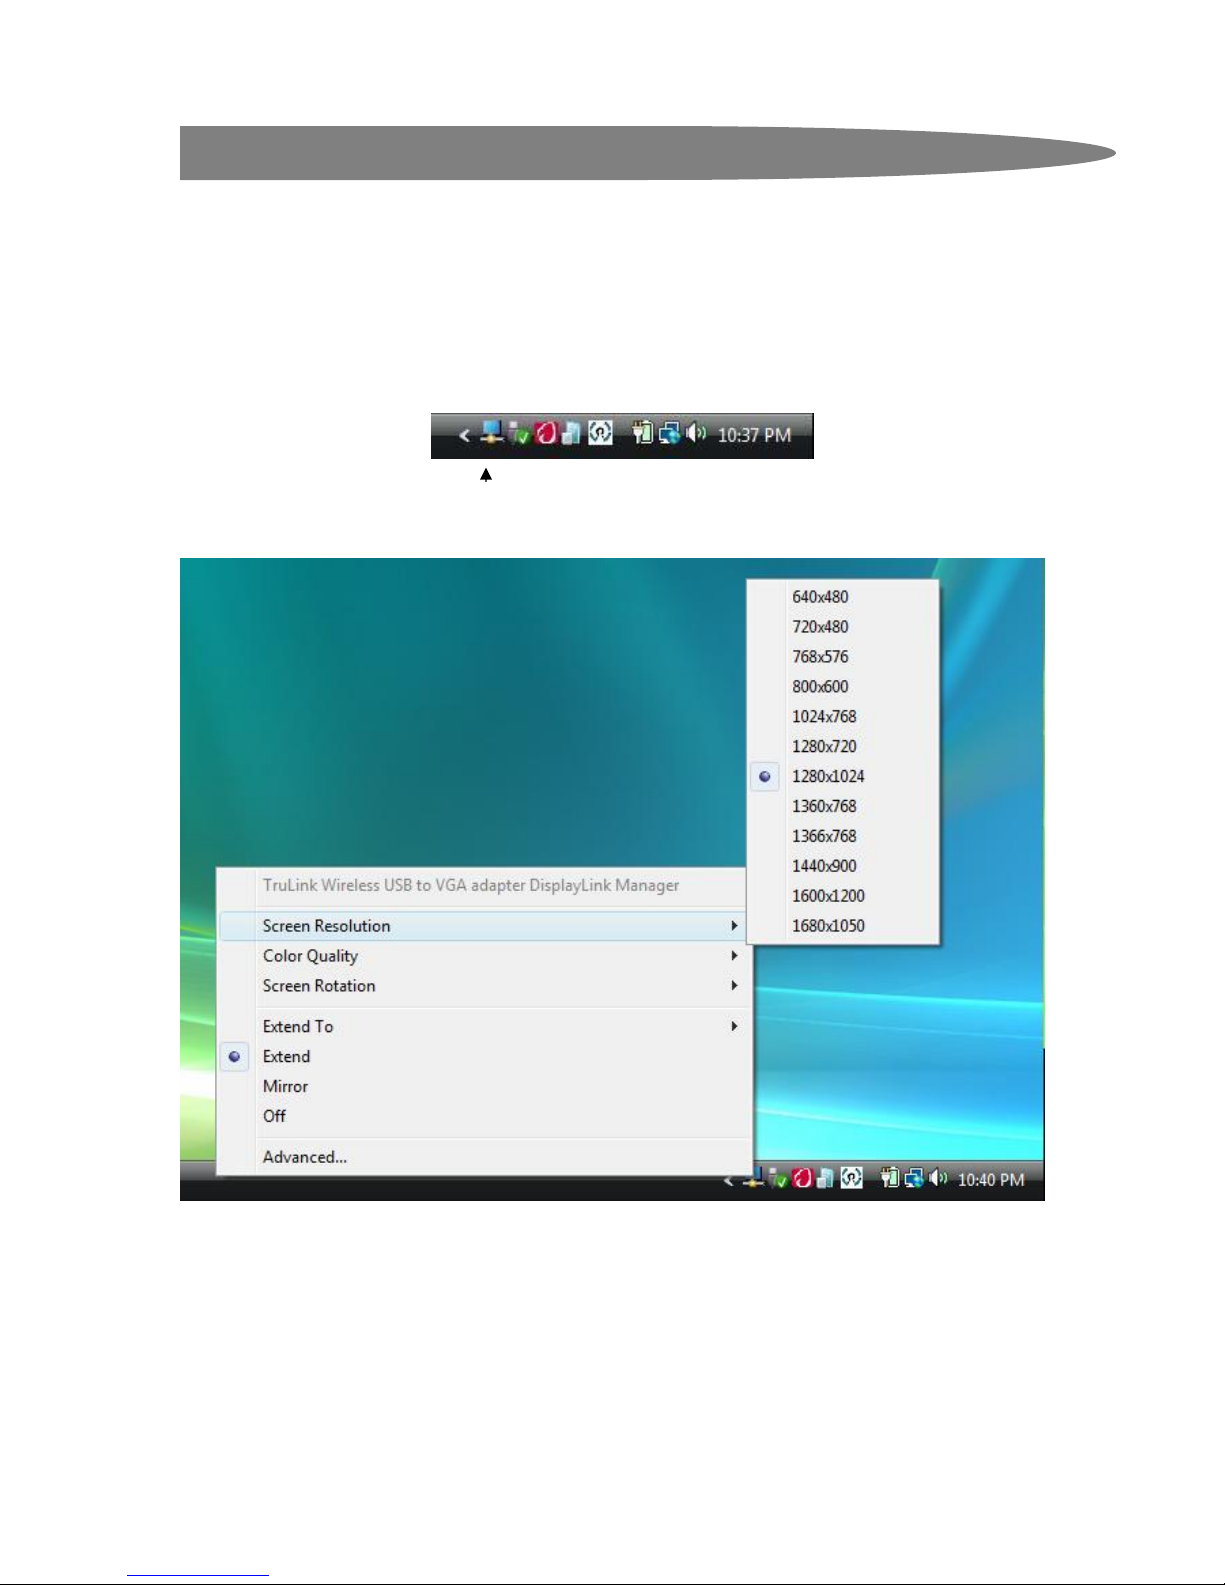
Using your Wireless VGA Kit
WIRELESS VGA DISPLAY SETTINGS
Right click on the Monitor icon in the Windows tray (Figure 1: TruLink DisplayLink Manager) to
change display settings. A menu (Figure 1: Display Settings Menu) will appear and you will have
the possibility to change parameters such as resolution, color qualit y, mirror mode or extension
mode and more.
By default, your installation will be set the best resolution for your computer and will extend your
screen to the right.
Figure 1: TruLink DisplayLink Manager
Figure 1: Display Settings Menu
10
Page 12
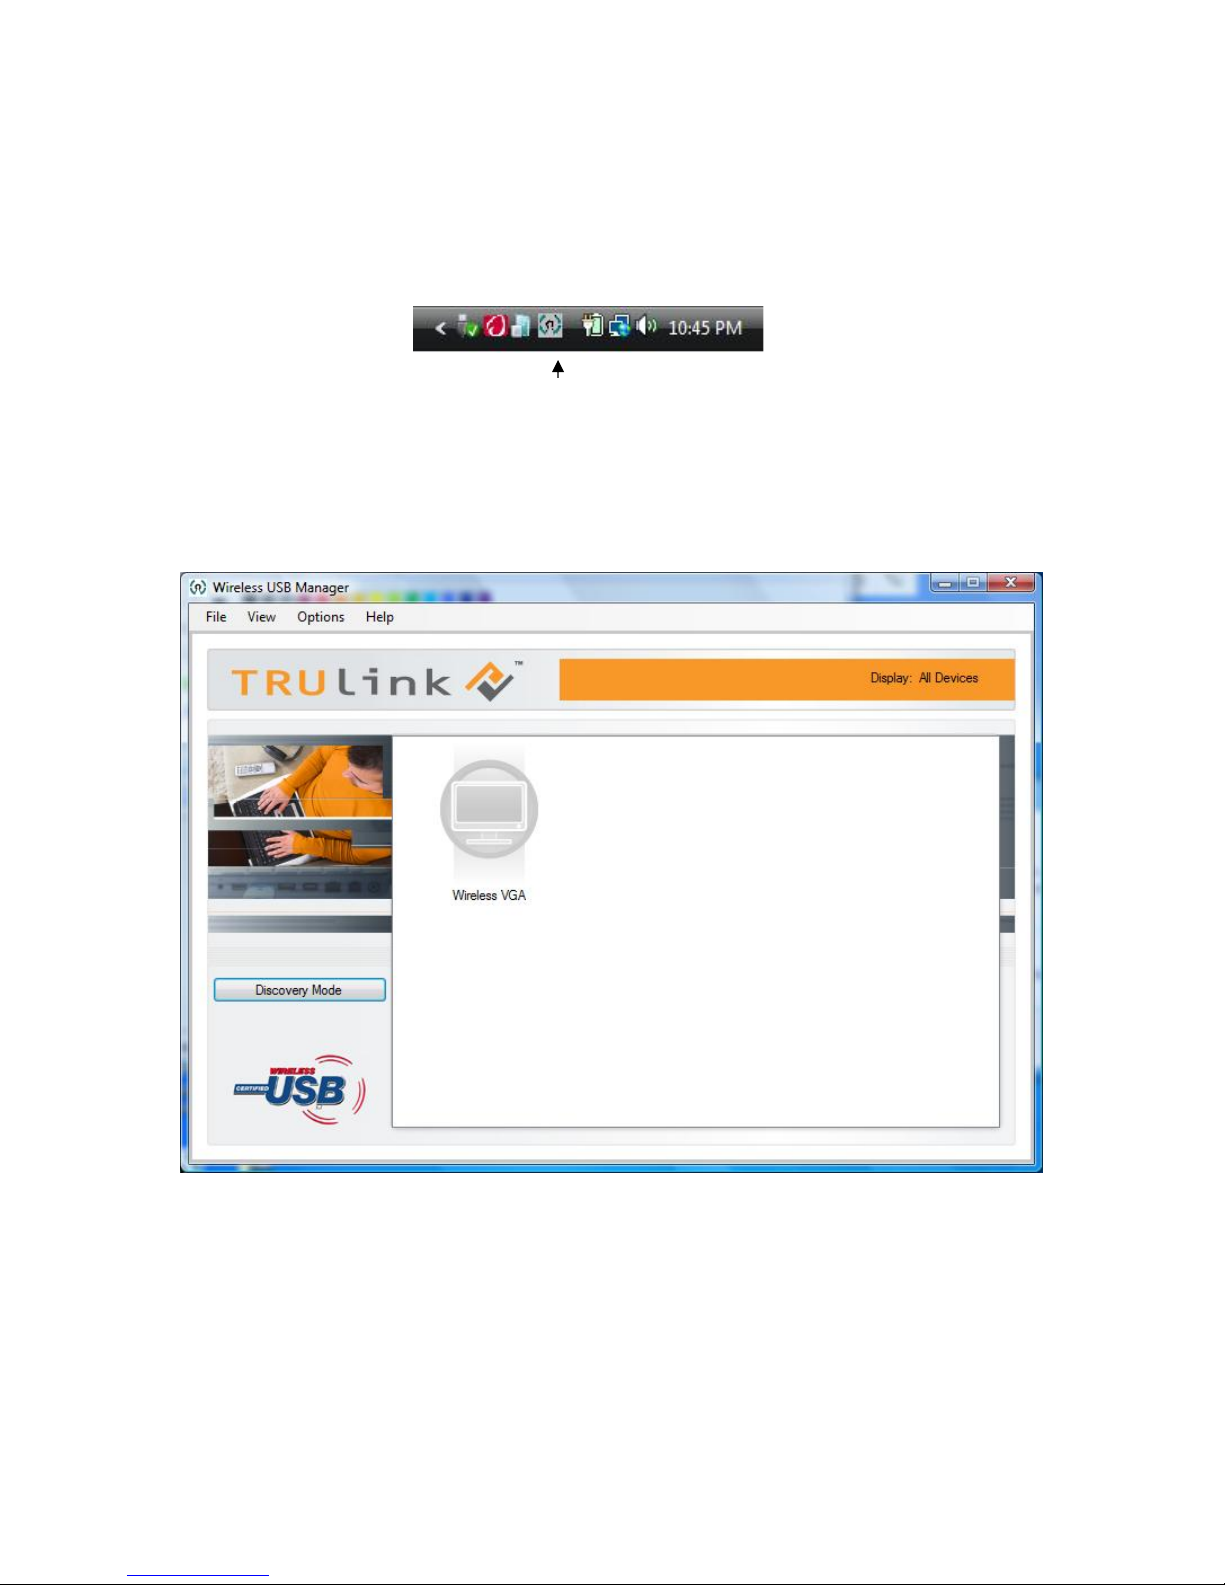
WIRELESS USB MANAGER
The Wireless USB Manager is simple and easy to use interface to manage your Wireless USB
devices and control your Wireless USB Host Adapter settings. The Wireless USB Manager can
be accessed via Wireless USB Manager Icon in the Windows tray (Figure 3: Wireless USB
Manager).
Figure 3: Wireless USB Manager
To launch the Wireless USB Manager, double click on the Wireless USB Manager icon. In the
main pane, you can find an icon representing your Wireless VGA Adapter. If your Wireless VGA
Adapter is not connected, the icon will be grayed out (Figure 4: Wireless VGA Adapter not
connected). If your Wireless VGA Adapter is connected and ready to work, the icon will change
and show signal strength (Figure 5: Wireless VGA Adapter Connected).
Figure 4: Wireless VGA Adapter not connected
11
Page 13
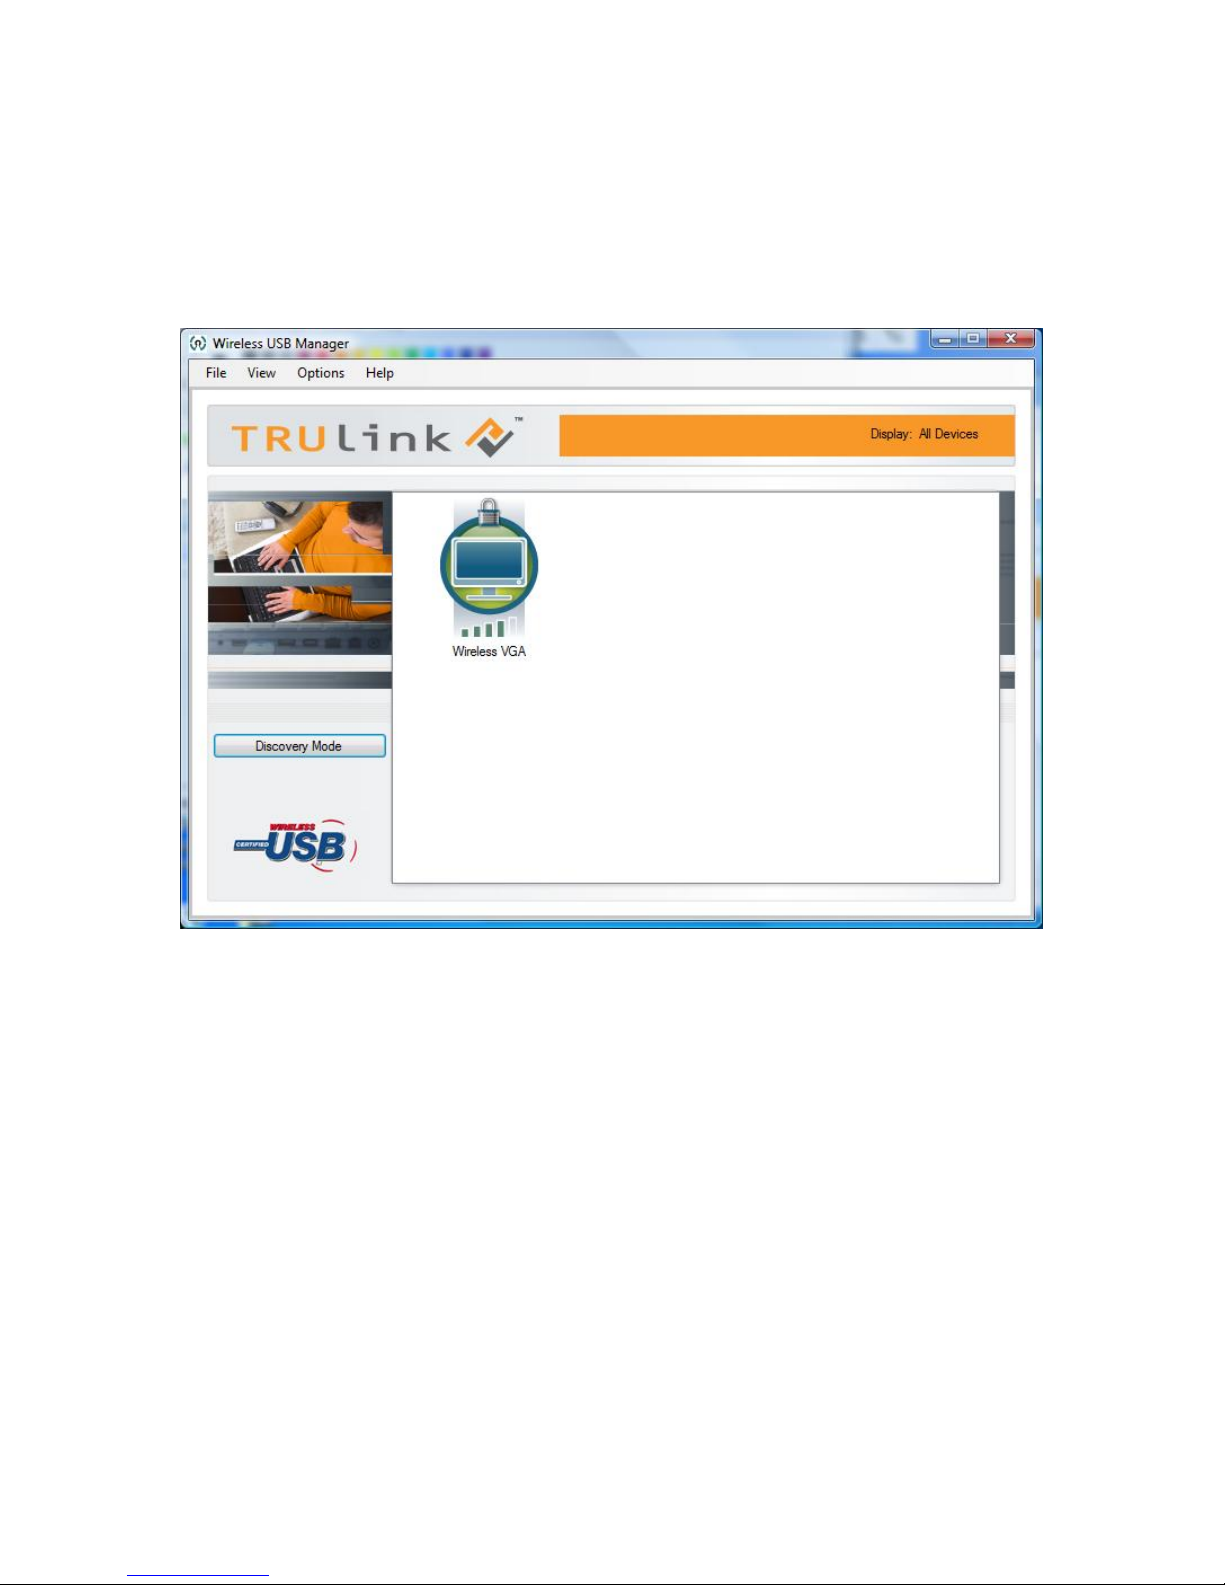
The View menu will give the option of what type of devices you wish to display (All Devices,
Connected Devices and Not Connected Devices).
The Options menu will give the option to launch Host Settings window and turn the Wireless USB
Host Adapter radio on or off.
The Help menu offers quick help on how to connect devices to your Wireless USB Host Adapter.
Figure 5: Wireless VGA Adapter connected
12
Page 14
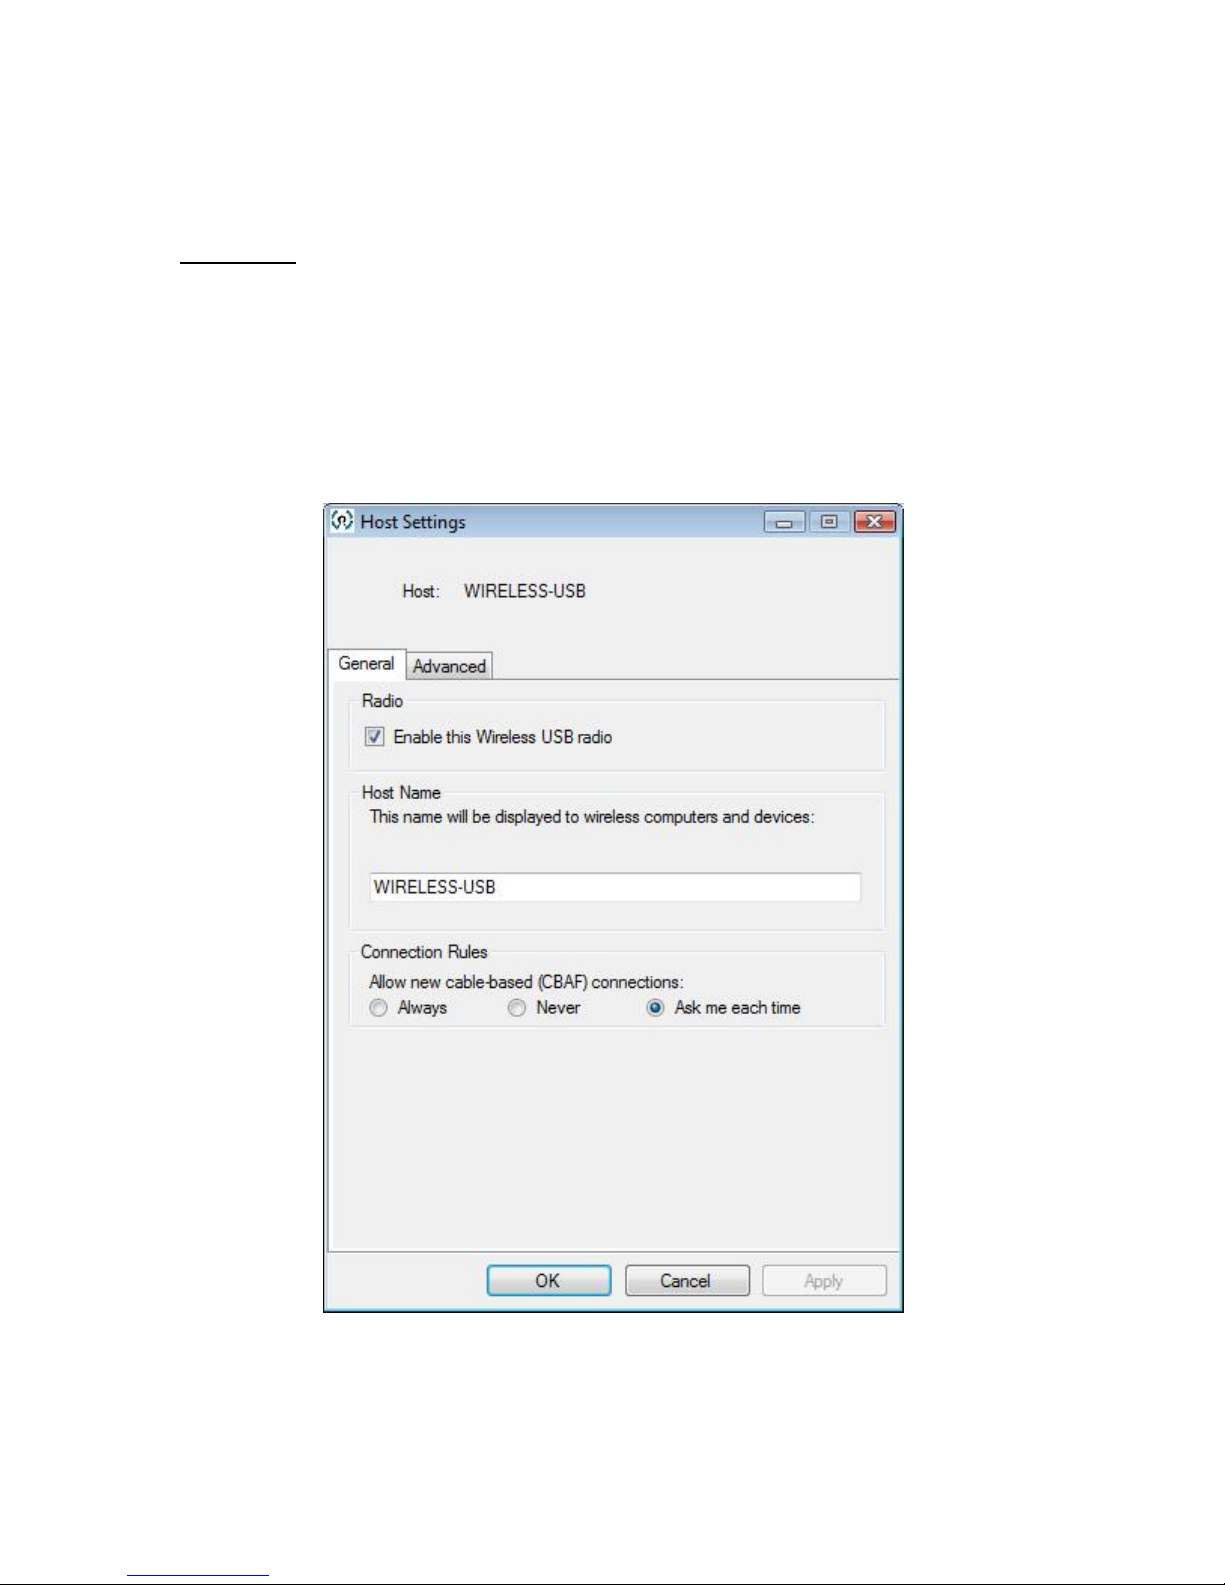
To manage the Wireless USB Host Adapter settings, either select “Host Settings” in the “Option”
menu of the Wireless USB Manager application or right click on the Wireless USB Manager icon
in the Windows tray.
General tab (Figure 6: Host Settings – General)
1. Enable this Wireless USB radio: turn on or off the Wireless USB radio.
2. Host name: Change the name of your Wireless USB Host Adapter.
3. Cable association connection rules*: Always, Never or Ask me each time. By default
Wireless USB will ask you each time you cable associate.
*Note that the cable association function is NOT needed to run your kit. This function will be
used if you purchase additional Wireless USB devices.
Figure 6: Host Settings - General
13
Page 15
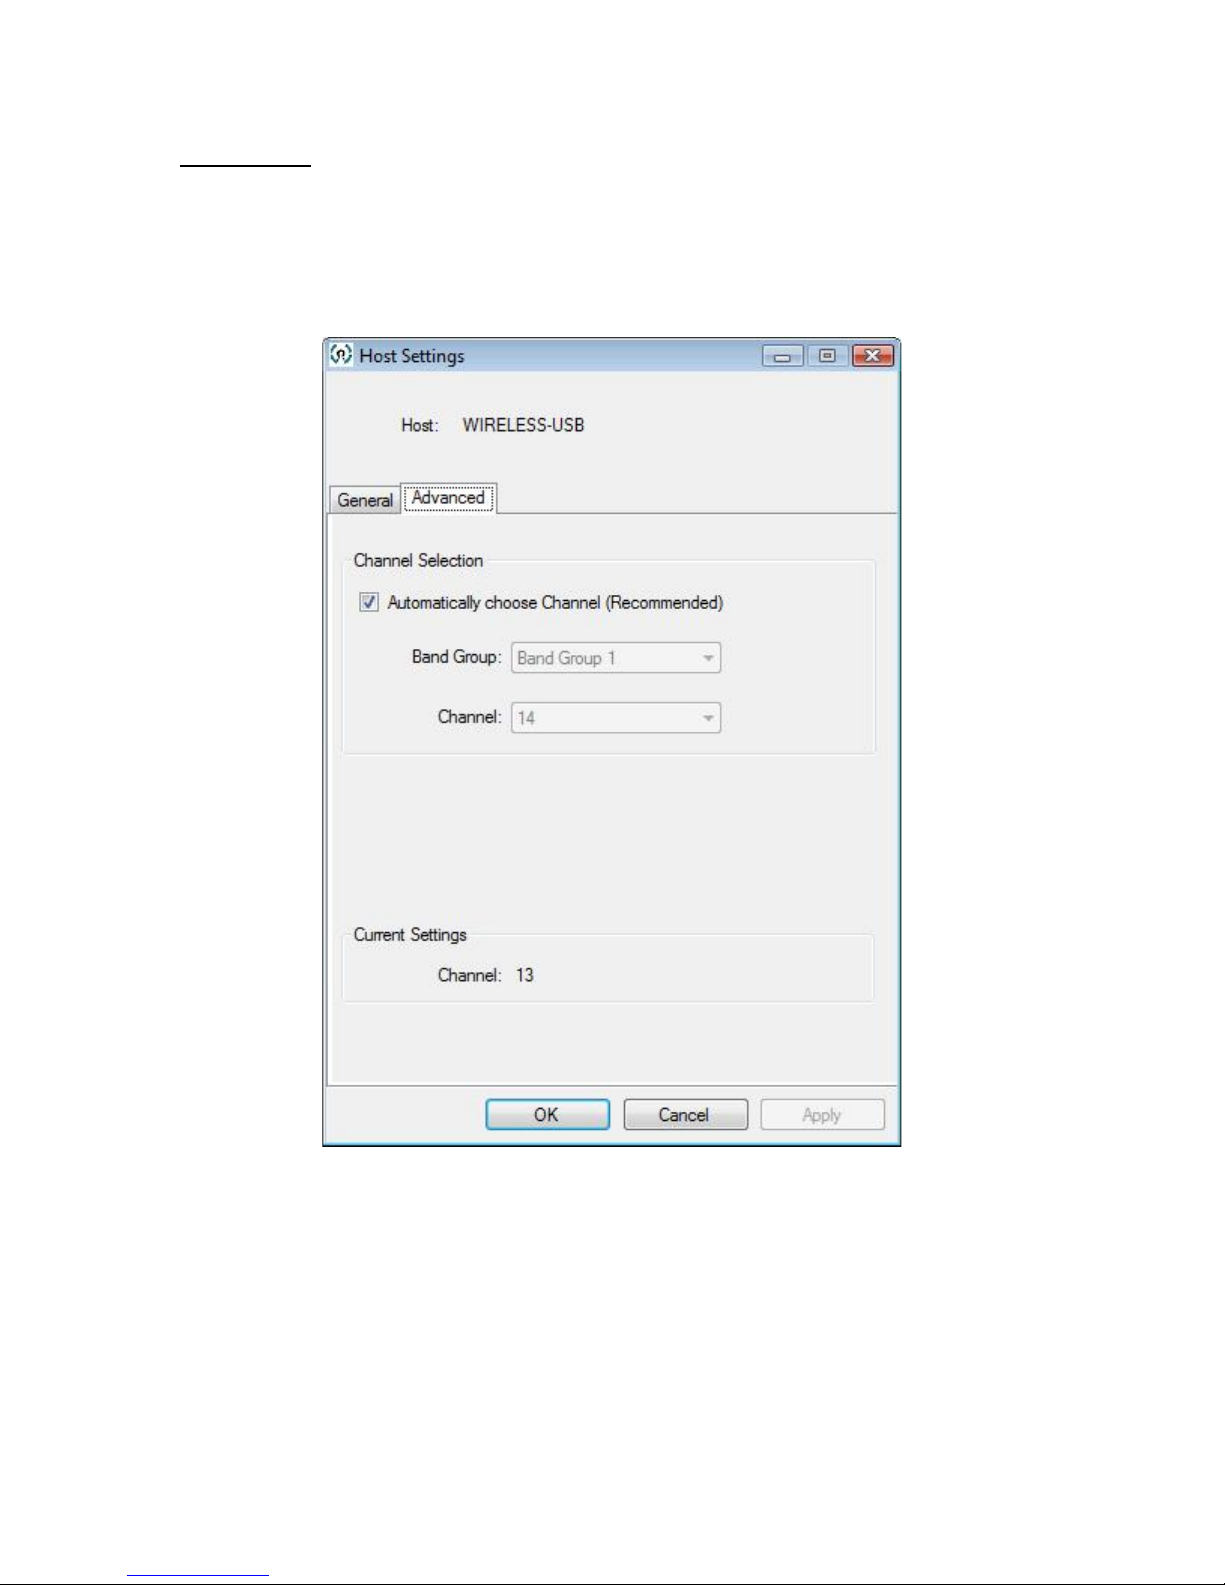
Advanced tab (Figure 7: Host Settings – Advanced)
1. Channel selection: this function allows you to set manually a radio channel for the
wireless communication (combination of Band Group and Channel). For optimal
performance, the automatic setting is recommended.
Figure 7: Host Settings - Advanced
14
Page 16

WIRELESS USB HOST ADAPTER SELECTION
To use this button, you must purchase at least one additional Wireless USB Host Adapter. The
Wireless USB Host Adapters not included in this kit will have to go through the association
process before they can be used with the Wireless VGA Adapter. For more information about the
association process, please refer to Appendix – Association with other devices.
The “HOST” button on the Wireless VGA Adapter is used to switch between Wireless USB Host
Adapters. By pressing this button, the Wireless VGA Adapter will look for the next associated
Wireless USB Host Adapter in its list and connect to it. The 1-2-3 lights will move to the next
position. The LED is scheme is as follows:
User 1 On Off Off
User 2 Off On Off
User 3 Off Off On
User 4 On On Off
User 5 Off On On
User 6 On Off On
Light Indicator: 1 Light Indicator: 2 Light Indicator: 3
IRELESS USB HOST ADAPTER RESET
W
To erase all Wireless USB Host Adapters (except the Wireless USB Host Adapter included in this
kit) associated* to your Wireless VGA Adapter, hold down the “RESET” button for 10 seconds.
This will cause the Wireless VGA Adapter to erase all Wireless USB Host Adapters that have
been associated from its list. Each Wireless USB Host Adapters will then have to be reassociated with the Wireless VGA Adapter using one of the association processes (cable or p in
association) in order to connect to the Wireless VGA Adapter again.
*For more information about the association, please refer to the Appendix – Association with
other devices.
USING YOUR WIRELESS VGA ADAPTER IN WIRED MODE
Your Wireless VGA Adapter can also be used wired mode. Make sure the position of the
WIRELESS/WIRED switch is in the WIRED position. Plug the USB cable between your computer
and the Wireless VGA Adapter. The function is the same as the wireless mode but data will be
transferred through the cable and not use the Wireless USB Host Adapter.
15
Page 17

Frequently Asked Questions
1. Why can’t I install .NET?
You may have an older version of .NET, preventing the newer one from being
installed. Using Add/Remove Programs or Programs and Features on the Control
Panel, uninstall any version of Microsoft .NET Framework™ older than version 2.0.
Then install Microsoft .NET Framework™ from the Wireless VGA kit installer.
2. My Wireless USB Host Adapter is plugged into my computer and my Wireless
VGA Adapter is powered but I do not see anything on my display. What’s
wrong?
Check the Wireless USB Manager to see if there is an icon for your Wirel ess VGA
Adapter. If there is no icon, try unplugging and then plugging in your Wireless USB
Host Adapter to reload the Wireless VGA Adapter.
If you see an icon that is grayed out in the Wireless USB Manager, try resetting the
Wireless VGA Adapter by unplugging its power and plugging it back in. You sh ould
see the icon in the Wireless USB Manager appear in color when it is connected.
Still not connected?
Double check that the radio for your Wireless USB Host Adapter is on in the Wireless
USB Manager (Figure 6: Host Settings - General).
3. Why is my video choppy?
If you are experiencing choppy video, try changing the channel (Figure 7: Host
Settings - Advanced) or move in your computer closer to the display.
16
Page 18

Technical Specifications
Operating System Support Microsoft XP 32-bit; Microsoft Vista 32/64-bit
PHY Data Rate 53.3Mbps, 80Mbps, 106.6Mbps, 160Mbps, 200Mbps,
320Mbps, 400Mbps, 480Mbps
Operating Range Up to 30 feet (10 meters)
Frequency 3.1GHz to 4.8GHz (WiMedia Band Group 1)
Number of Channel 7 channels (3 FFI + 4 TFI)
RF Modulation Type QPSK/DCM
Interface VGA
Video Resolution Up to UXGA (1600x1200) or WSXGA+ (1680x1050)
Video Streaming Up to 720p (720p only available at resolution 1280x720 or
lower)
Screen Mode Extended and Mirror mode
Color Depth 32-bit True Color
USB Specification Certified Wireless USB 1.0; USB 2.0
Association Mode Pre-Association, Cable Association and Pin Association;
Stores up to 16 Associated Hosts
Native Mode For playback of high resolution video
Antenna Type Omni directional
Reset Switch Used for erasing association history by pressing and holding
this button for 10 seconds
Power Consumption Wireless USB Host Adapter: 1.2W; Wireless VGA Adapter:
3.3W
Max Output Power -41.3 dBm/MHz
Power Adapter 5V, 2A; 100-240VAC
17
Page 19

General Information
C
ABLES TO GO™ ONE YEAR WARRANTY
At Cables To Go, we want you to be totally confident in your purchase. That is why we offer a
one year warranty on this device. If you experience problems due to workmanship or material
defect for the duration of this warranty, we will repair or replace this device. To request a
Return Merchandise Authorization (RMA) number, contact customer service at 1-800-506 -9606
or www.cablestogo.com.
IMPORTANT SAFETY INFORMATION
! Do not plug the unit in any outlet that does not have enough current to allow the switch to
function. Refer to the specifications in this manual for power level of the unit.
!
Liquid:
If this unit or its corresponding power adapter has had liquid spilled on or in it, do not attempt
to use the unit.
Do not attempt to use this product in an outdoor environment as elements such as rain,
snow, hail, etc. can damage the product.
!
In case of a storm, it is recommended that you unplug this device from the outlet.
! Avoid placing this product next to objects that produce heat such as portable heaters,
space heaters, or heating ducts.
! THERE ARE NO USER SERVICEABLE PARTS
Do not attempt to open this product and expose the internal circuitry. If you feel that the
product is defective, unplug the unit and refer to the warranty information section of this
manual.
FEDERAL COMMUNICATIONS COMMISSION (FCC) STATEMENT
This device complies with part 15 of the FCC Rules. Operation is subject to the following two
conditions: (1) this device may not cause harmful interference, and (2) this device must accept
any interference received, including interference that may cause undesired operation. This device
is authorized under 47 CFR 15.519 (the FCC Rules and Regulations). The operation of this
device is subject to the following restriction: This UWB device shall transmit only when it is
sending information to an associated receiver. This UWB device shall cease transmission within
10 seconds unless it receives an acknowledgement from the associated receive r that its
transmission is being received. An acknowledgement of reception must continue to be received
by the transmitting device at least every 10 seconds of operation or the UWB device must cease
transmitting.
Cables To Go™
3555 Kettering Blvd. • Moraine, OH 45439
800.826.7904 • www.cablestogo.com
18
Page 20
Appendix
CABLE ASSOCIATION WITH OTHER DEVICES
Association Concept
In order to establish a secure wireless connection, both the Wireless USB Host Adapter a nd the
Wireless USB devices must exchange information about each other. This is done via cable or pin
association. Note that your Wireless USB kit has been pre-associated for your convenience and
the process described below has been done for you.
Association Process
If you purchase additional Wireless USB devices, you will have to associate them with your
Wireless USB Host Adapter. Refer to your Wireless USB device documentation for more
information on its settings for association.
Cable Association Procedure – Wireless VGA Adapter example
Cable association steps:
1. Make sure that the Wireless USB Manager is running. Check your Windows tray for
the Wireless USB Manager icon (Figure 3: Wireless USB Manager).
2. Make sure the WIRELESS/WIRED switch is in the WIRELESS position)
3. Power on your Wireless USB VGA Adapter.
4. Connect the USB cable between an available USB port on your computer and your
Wireless VGA Adapter.
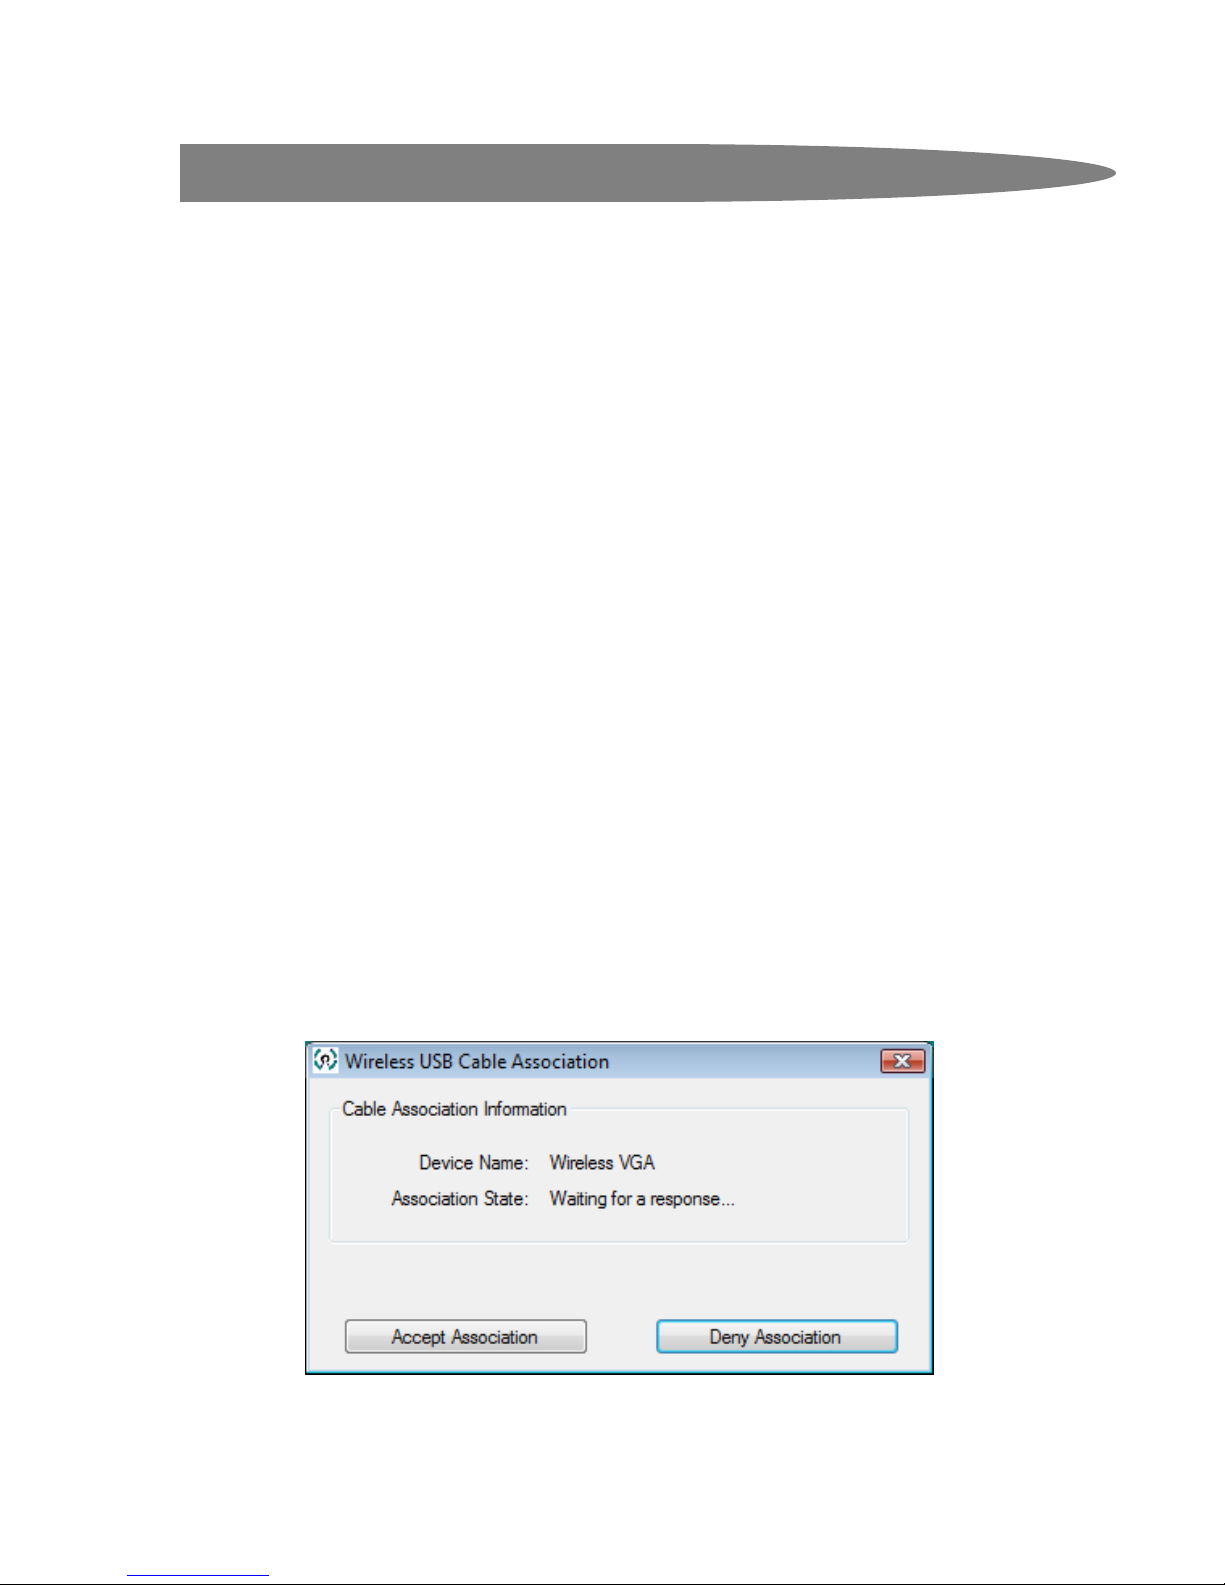
5. Complete cable association by pressing the “Accept Asso ciatio n” button when
prompted. (Figure 8: Cable Association)
6. Remove the USB cable from your Wireless VGA Adapter and computer.
Associated Wireless VGA Adapter will appear as icons in the Wireless USB Man ager (Figure 4:
Wireless VGA Adapter not connected). When the Wireless VGA Adapter is connected to your
computer, the icon will appear in color (Figure 5: Wireless VGA Adapter connected).
Figure 8: Cable Association
19
Page 21
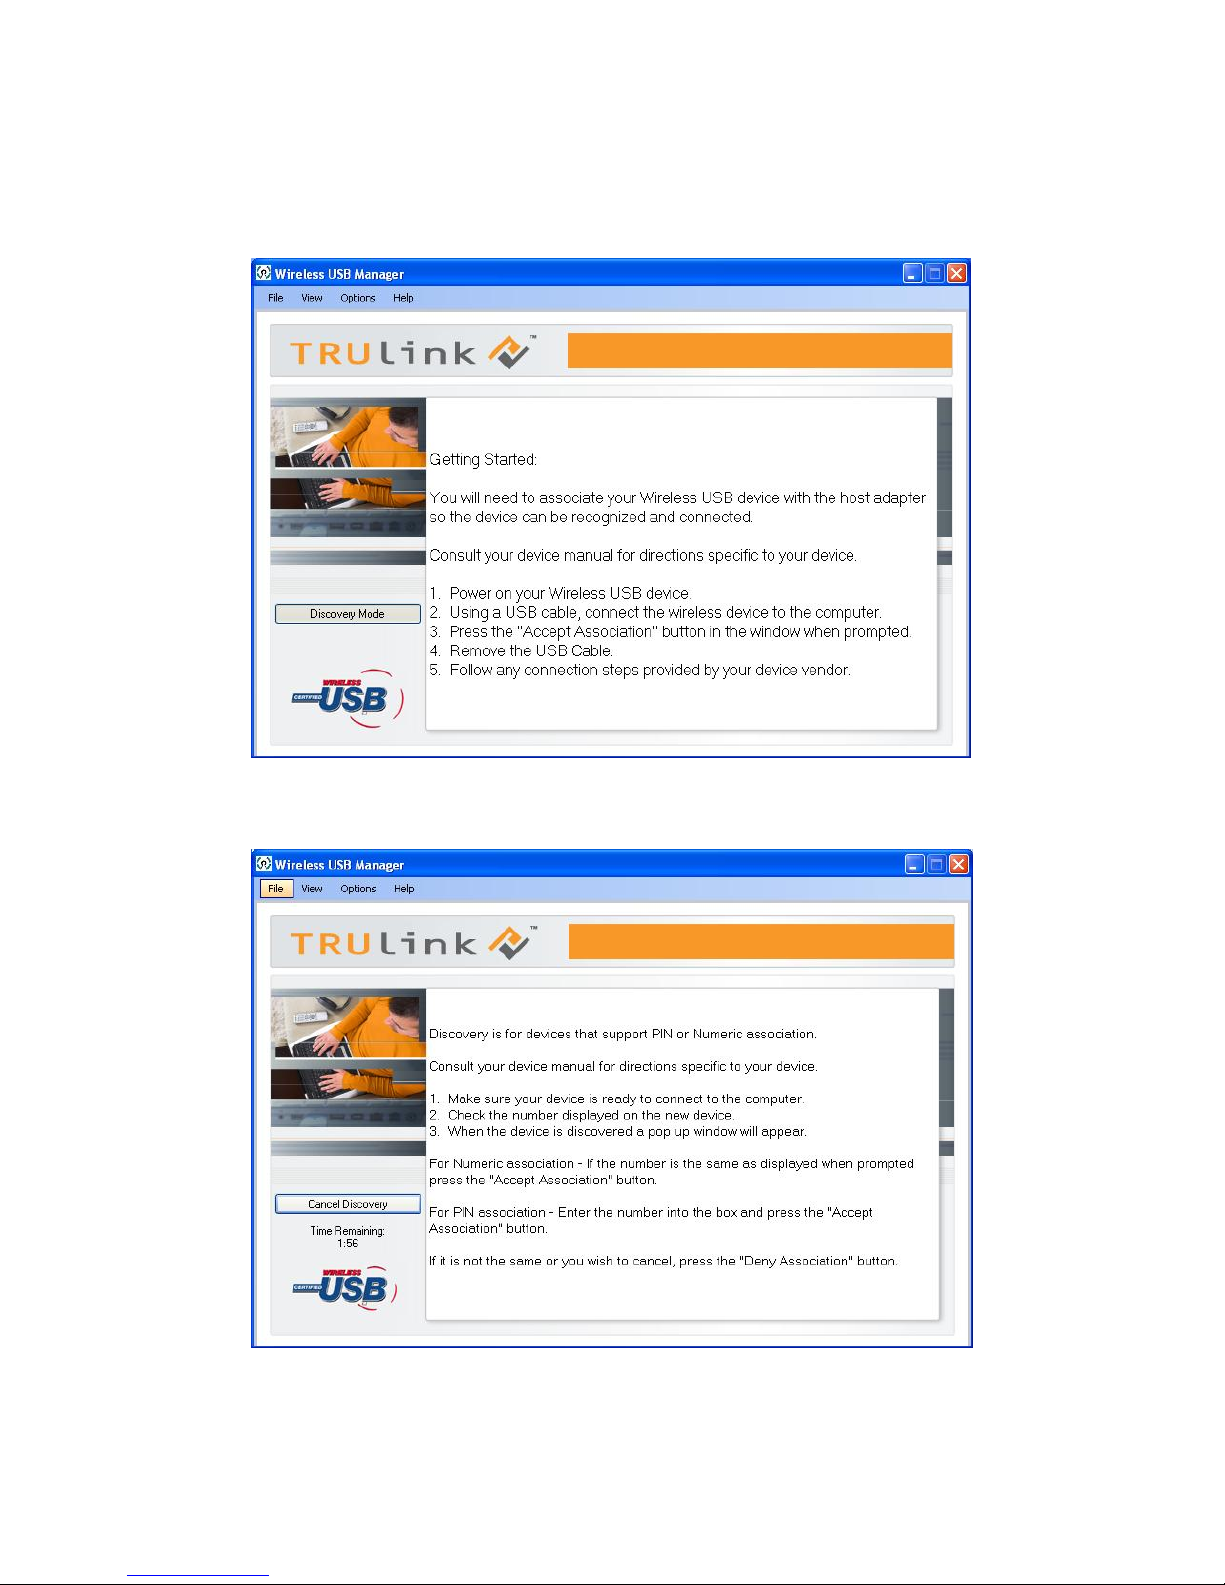
Pin Association Procedure – Wireless VGA Adapter example
1. Make sure your Wireless VGA Adapter is powered on and your Wireless USB Host
Adapter is connected to your computer. Click the “Discovery Mode” button.
2. The Wireless USB Host will search for any available Wireless VGA Adapter within its
range. Note that this operation can take up to 20 seconds.
20
Page 22
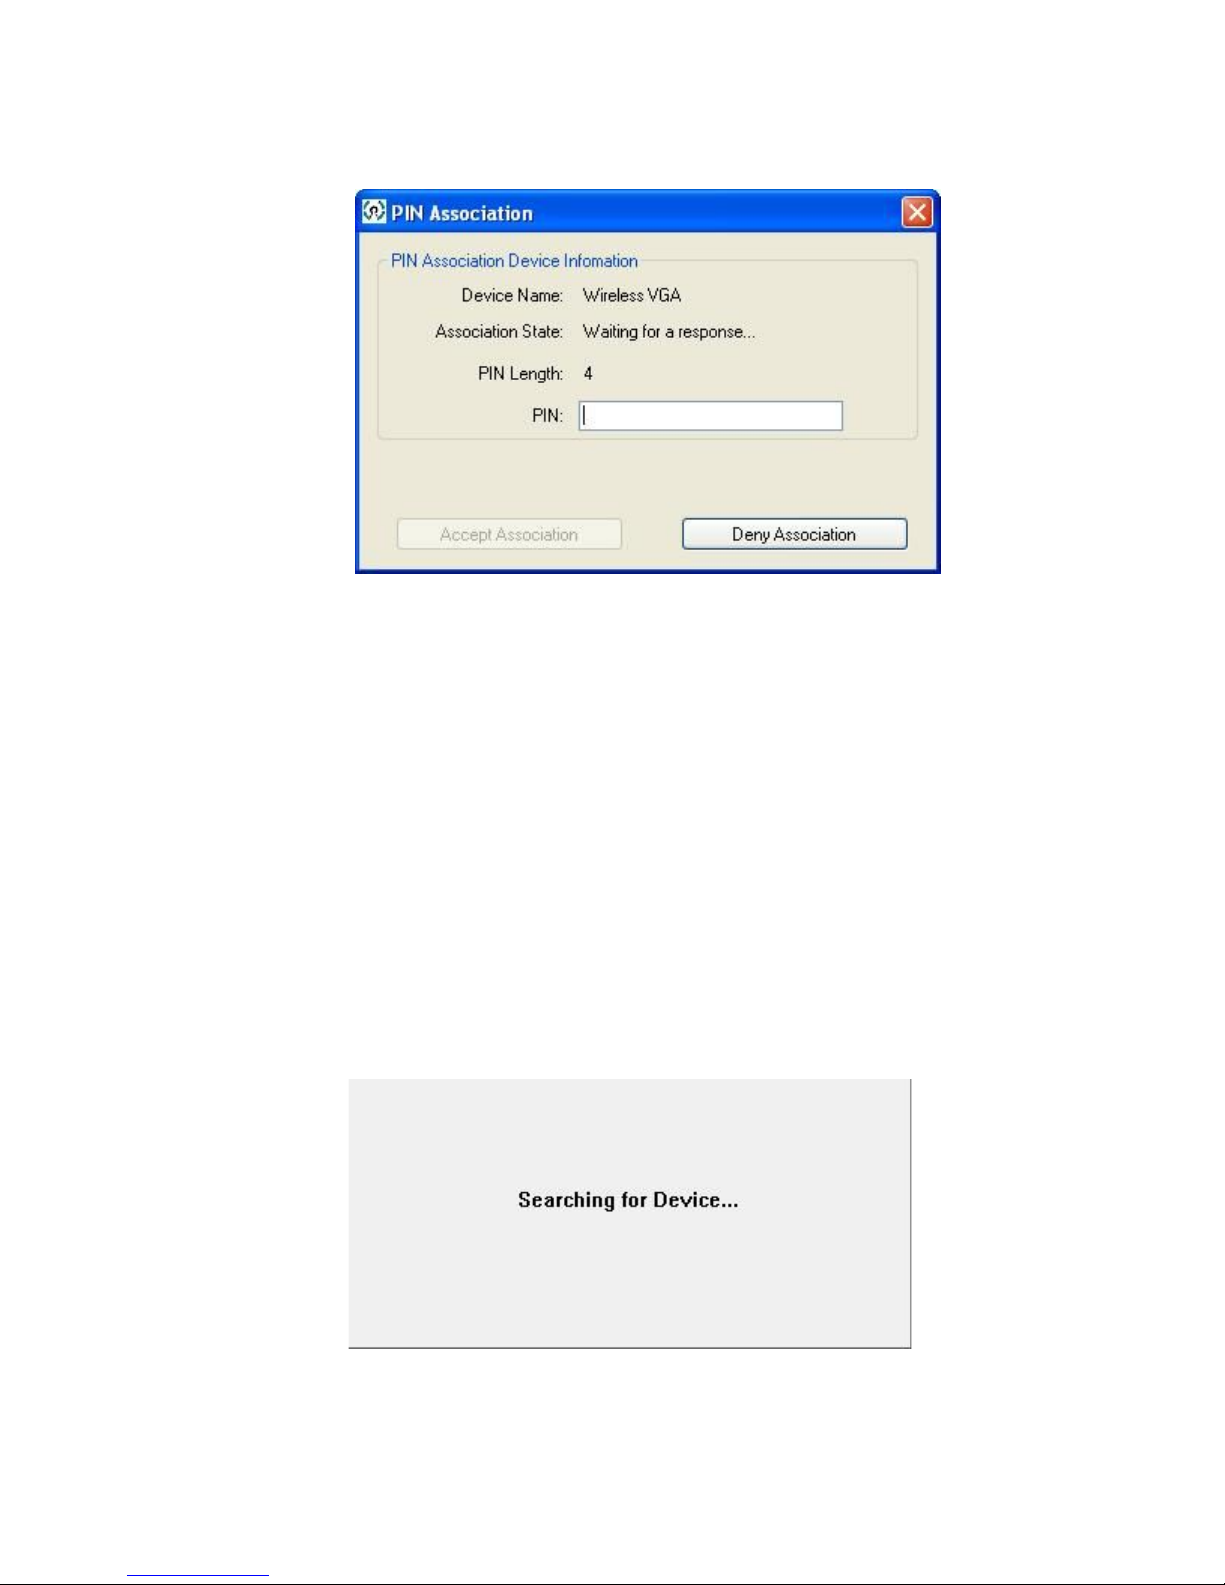
3. Once the Wireless USB Host Adapter and the Wireless VGA Adapter have exchanged
security information, the following dialog will appear
4. Enter the PIN of the Wireless VGA Adapter (4-digit PIN) and click Accept Association.
The Wireless VGA Adapter and Wireless USB Host Adapter are now associated and
ready for operation.
Pin Change Procedure
The default PIN setting for the VGA Adapter is “1234”. This section gives you the instructions to
change the PIN to another 4-Digit value.
IMPORTANT: The application used to change the PIN is not supported in Vista 64bit.
1. Make sure your Wireless USB Host Adapters and the Wireless VGA Adapter are not
connected to your computer.
2. Launch the application “Pin Update” (Start>All Programs>Wireless USB
Manager>Utility>Pin Update). The following dialog will appear:
21
Page 23
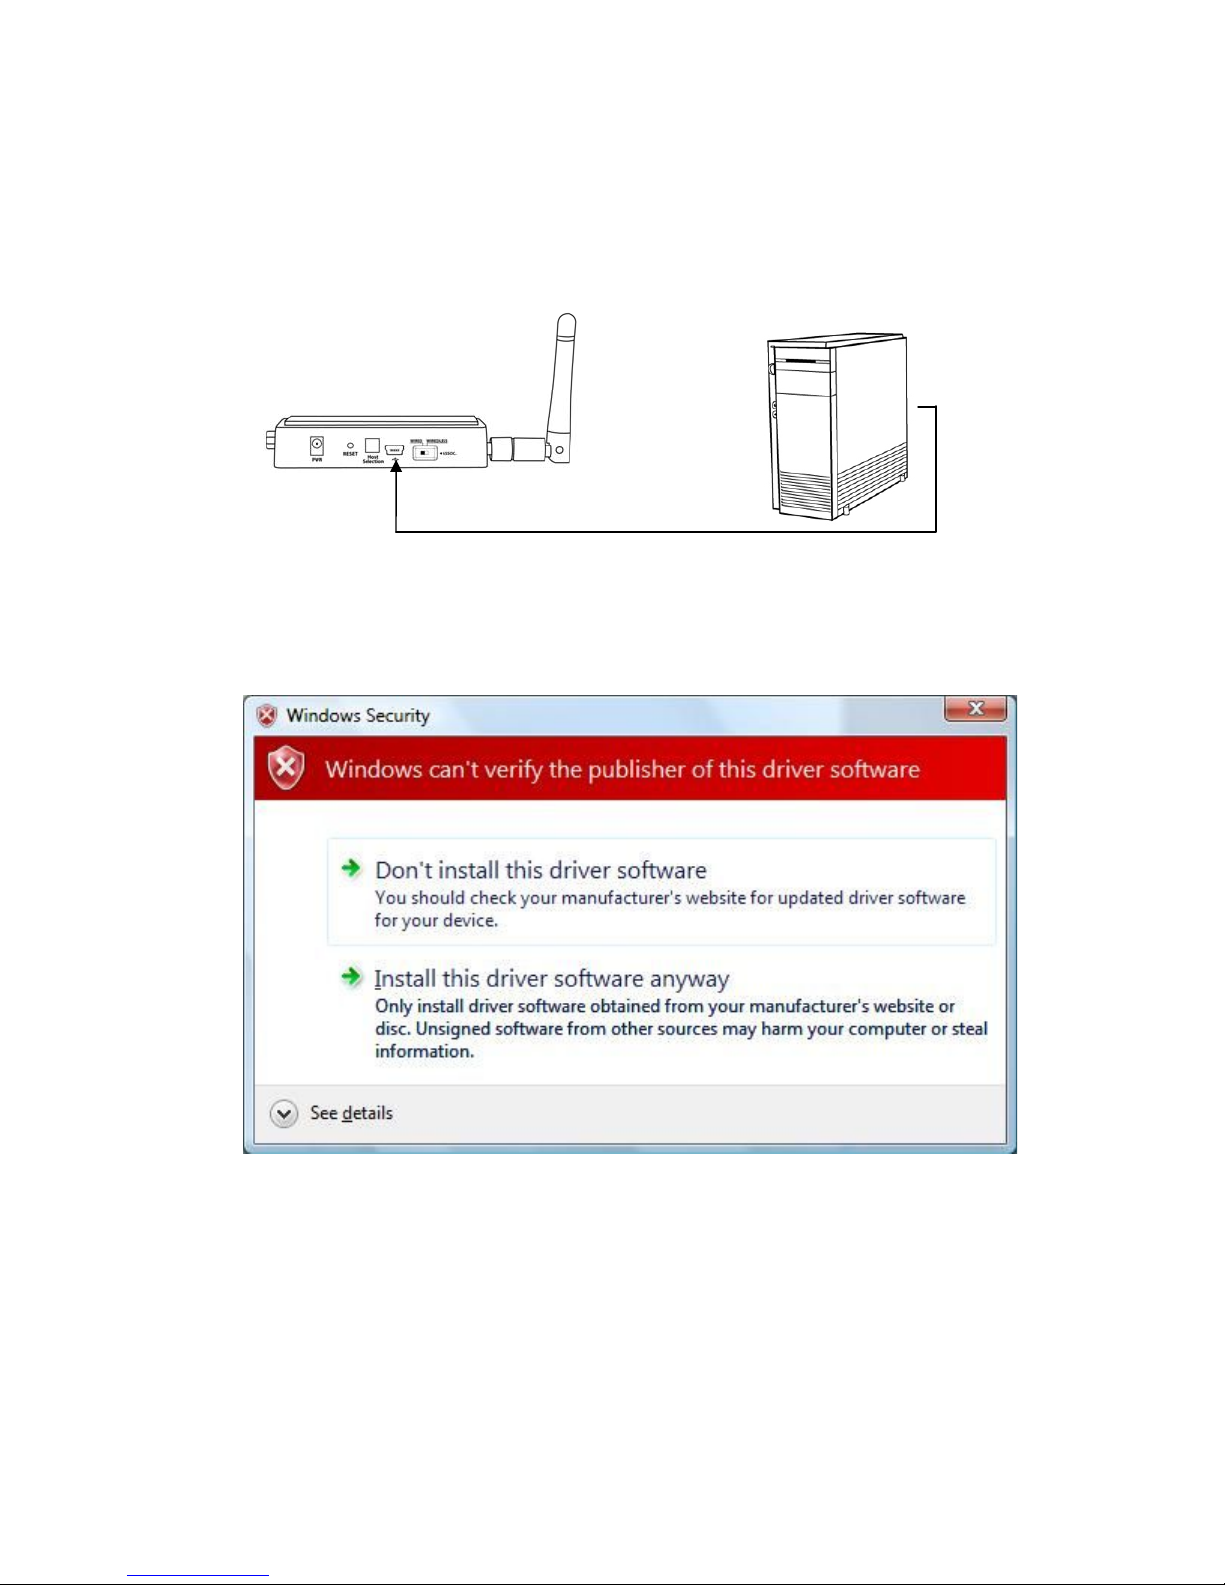
3. Make sure the WIRELESS/WIRED switch on your Wireless VGA Adapter is in the
WIRELESS position and the power cable is plugged in your Wireless VGA Adapter.
Connect the USB cable between your Wireless VGA Adapter and any available USB port
on your computer.
4. Click Install this driver software anyway.
22
Page 24
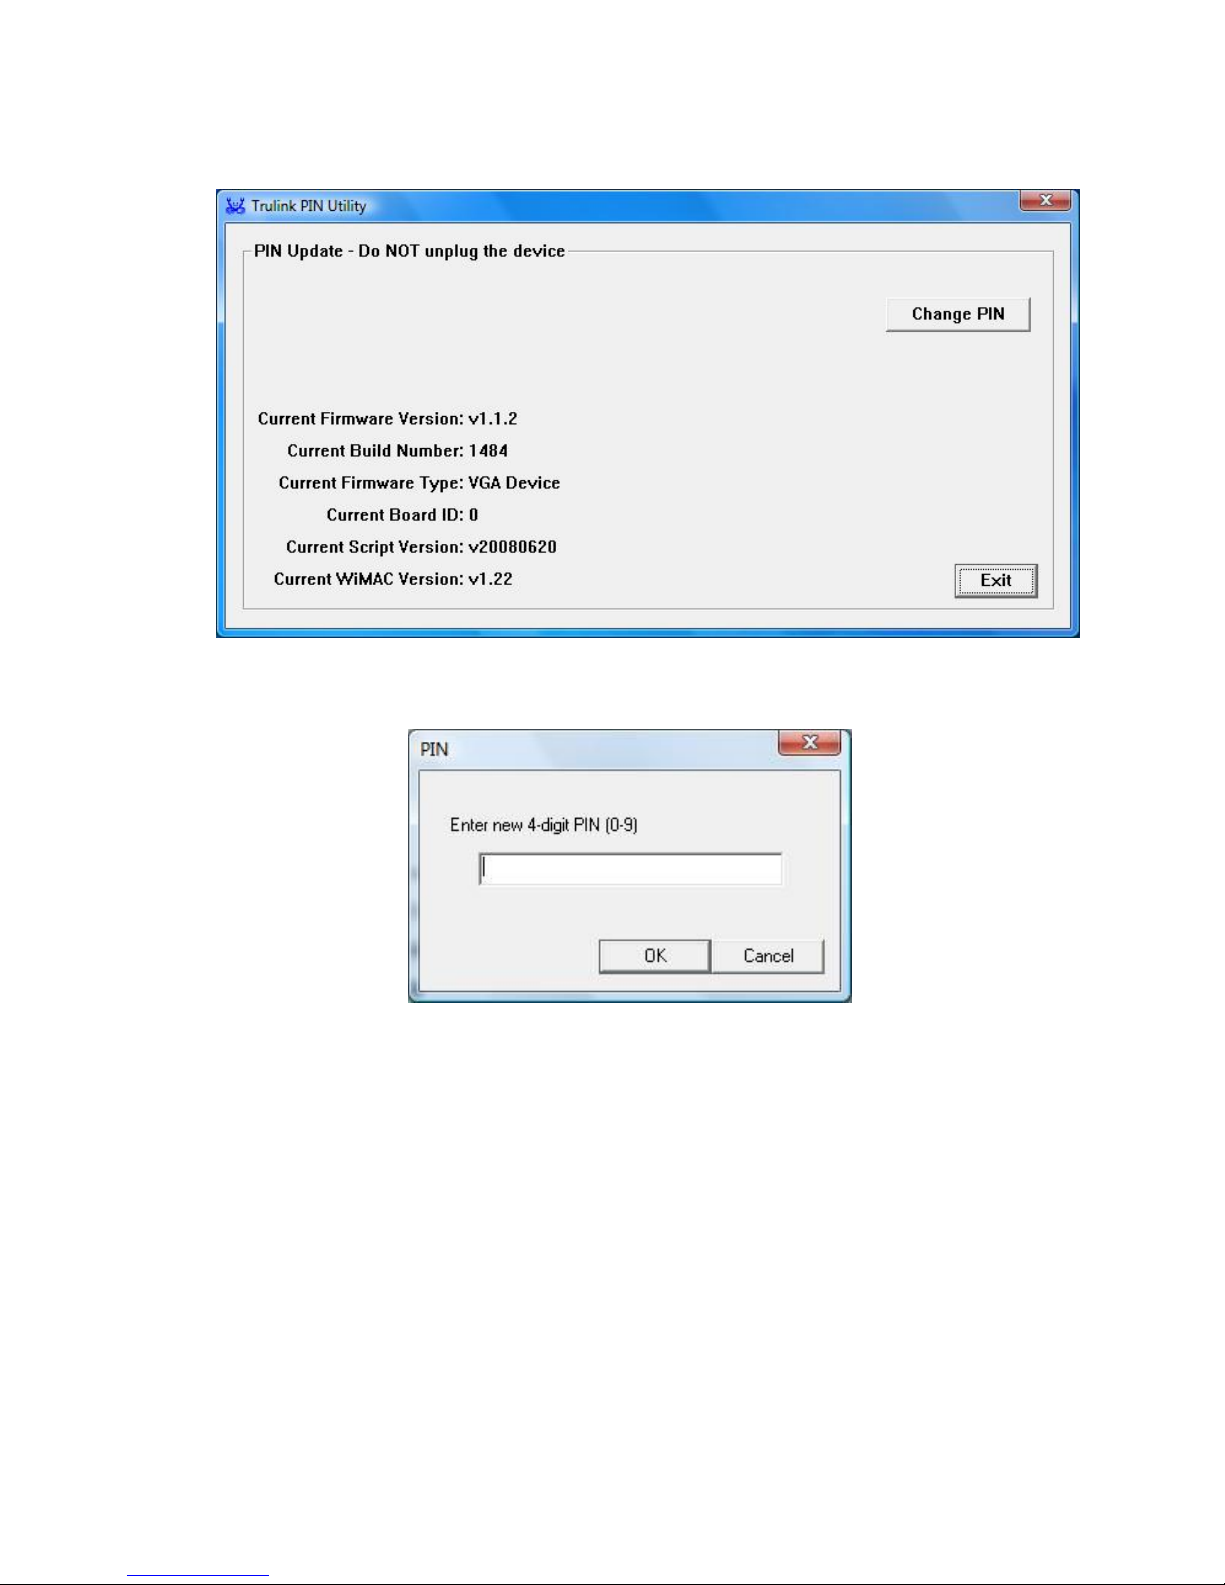
5. To change pin, click “Change PIN”
6. Enter a 4-Digit PIN (0-9) and click OK.
7. r PIN
If your PIN is valid, a Window displaying your new PIN will appear. Press OK. You
has been successfully changed. IMPORTANT: please exit the Trulink PIN Utility
application (Exit button as shown on figure in step 5) b
etween your Wireless VGA Adapter and your PC.
b
efore unplugging the USB cable
©2008.TruLink is a trademark of Cables To Go. Microsoft and XP are either registered
trademarks or trademarks of Microsoft Corporation in the United States a
nd/or other countries.
This product is not endorsed or manufactured by Microsoft Corporation.
23
 Loading...