


We’re here to help - Do not return this product !
.
If you need help with assembly
.
If you received a damaged or defective part
.
If you are missing hardware
Nous sommes là pour vous - Ne retournez pas ce produit !
Assembly instructions
Instructions d’assemblage
Appelez, écrivez ou trouvez-nous en ligne d’abord !
.
Si vous avez besoin d’aide avec l’assemblage
.
Si vous avez une pièce manquante ou endommagée
.
S’il vous manque de la quincaillerie
L
ot #
Online resources
Ressources disponibles en ligne
How-to videos
Vidéos d’aide
FAQ’s
Questions fréquentes
Order replacement parts
Commande de pièces de remplacement
VIDEO
C
How-to videos
Vidéos d’aide
A
E
A
C
VIDEO

Read these assembly instructions carefully before beginning. Verify that you have in
hands all the wood parts and hardware. Keep this document for future reference.
Lisez attentivement ce guide d’assemblage avant de débuter. Assurez vous que toutes les
composantes de bois et de quincaillerie sont présentes. Conservez ce document.
Two people are required to assemble and move this unit.
Deux personnes sont requises pour assembler et déplacer ce meuble.
Safety First ! Do not allow children to climb on or play with furniture.
Attention ! Ne permettez pas aux enfants de jouer ou grimper sur les meubles.
i
Never leave liquids or damp clothes on your furniture. Never use chemical
product to clean your furniture. Do not place your furniture in direct sunlight.
To clean your furniture, dampen a soft cloth with a mild solution of
dishwashing liquid. Squeeze excess water. Clean unit and wipe it dry.
Ne jamais laisser de liquide ou de linge humide sur votre meuble. Ne jamais
utiliser de produits chimiques pour nettoyer votre meuble. N’exposez pas
votre meuble à la lumière directe du soleil.
de liquide pour la vaisselle et d’eau. Bien essorer. Nettoyez le meuble et essuyez
soigneusement le surplus d’eau avec un linge sec.
Tools required
Outils requis
How-to videos
Vidéos d’aide
VIDEO
2

Hardware List Liste de quincaillerie
20x
# 0203
1x
# 2300
8x
# 1119
Install the 20 cam locks # 0203 into the 4 panels A and the 4 panels C
Installez les 20 excentriques # 0203 dans les 4 panneaux A et les 4 panneaux C
1
20x
# 2200
8x
# 0207
# 2192B
4x
# 2192A
8x
# 0527
4x
# 0545
VIDEO
Pressez fermement dans la cavité
A
Add a protection under
the parts on all assembly steps
Ajoutez une protection sous
les pièces à chaque étape
20x
# 0203
A
A
A
C
C
C
C
3

Install the 8 wood dowels # 0207 into the 4 panels C
Installez les 8 goujons de bois # 0207 dans les 4 panneaux C
2
C
C
C
C
8x
# 0207
Install the 20 push bolts # 2200 into the 4 panels A and the 2 panels E
Installez les 20 boulons # 2200 dans les 4 panneaux A et les 2 panneaux E
3
E
E
A
A
20x
# 2200
VIDEO
Hole here
Trou ici
A
A
4
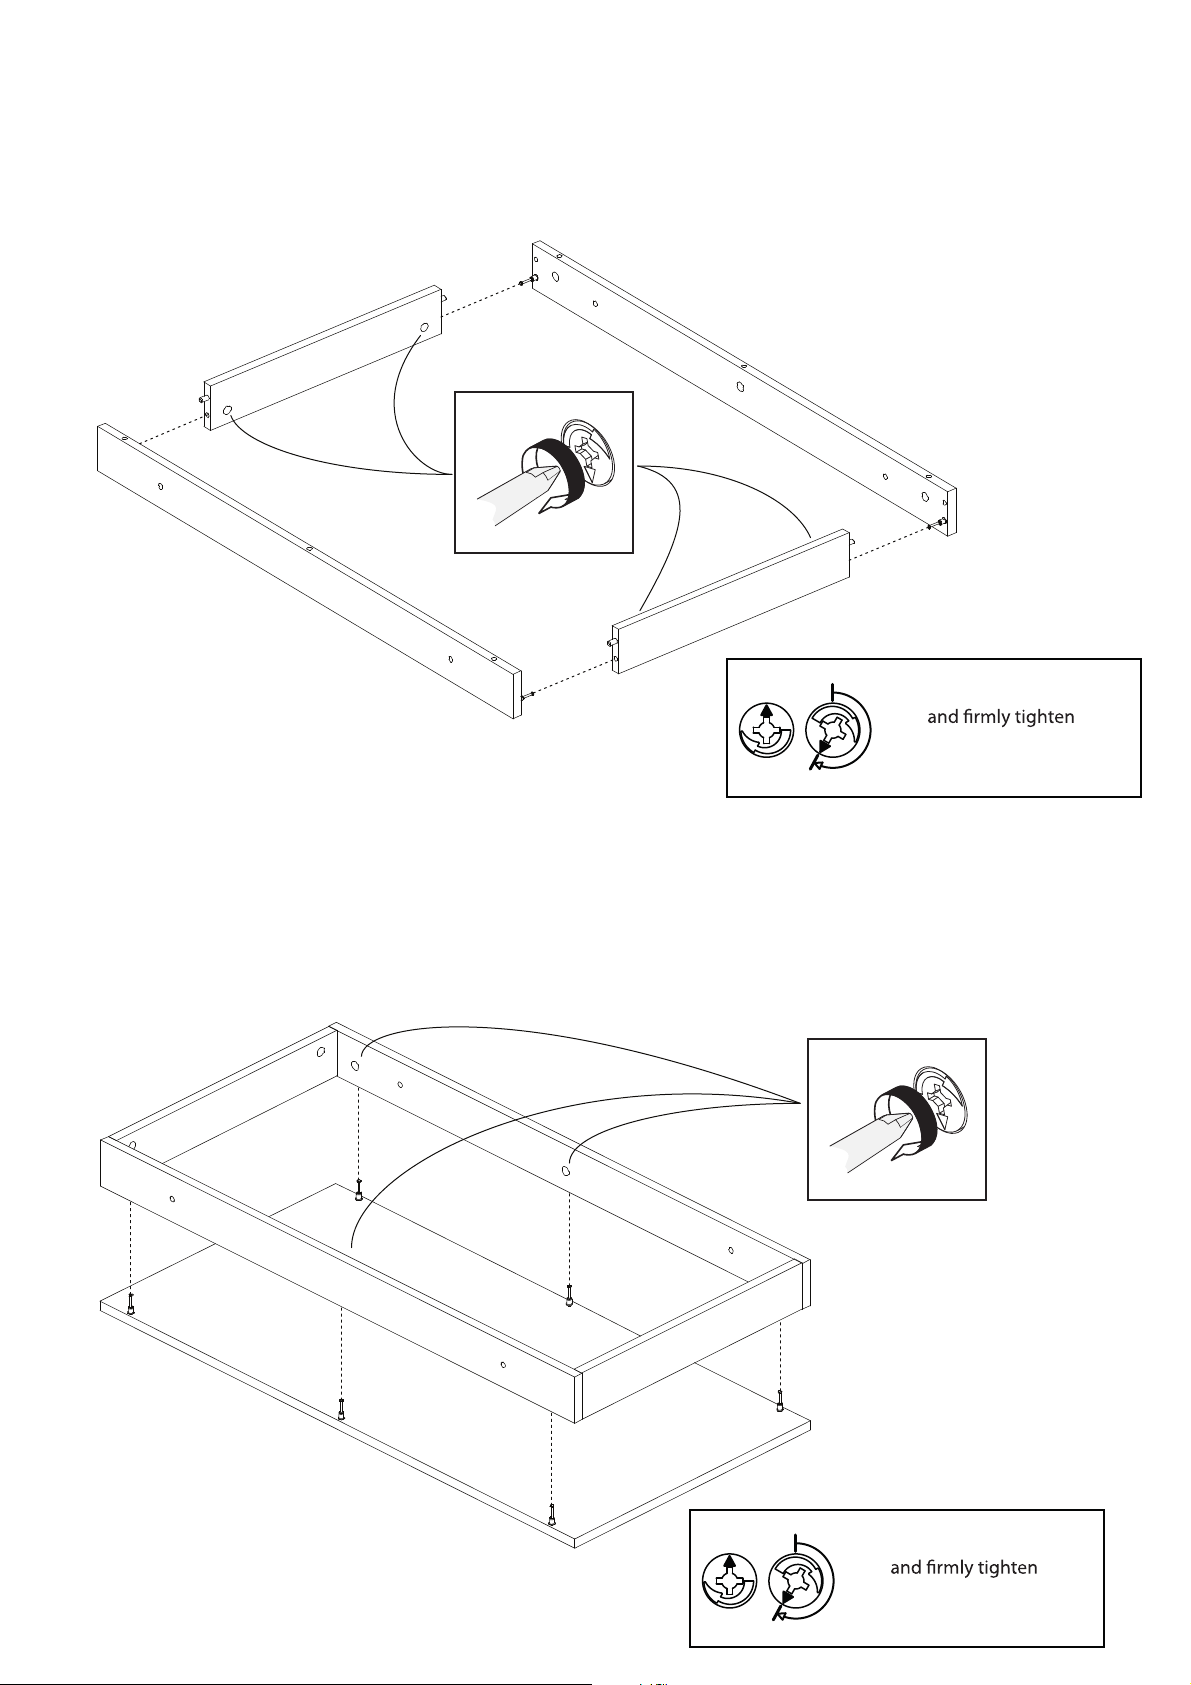
Fasten the 2 panels A to both panels C. Then, tighten the 4 cam locks # 0203 located
on both panels C. Repeat this step for the second unit
4
Assemblez les 2 panneaux A avec les 2 panneaux C. Serrez ensuite les 4 excentriques # 0203
se trouvant sur les 2 panneaux C. Répétez l’étape pour la deuxième unité
C
A
4x
A
C
IMPORTANT
Turn clockwise 2/3 of a turn
Tournez vers la droite 2/3 de tour
et serrez fermement
Fasten the panel E to the assembled unit. Then, tighten the 6 cam locks # 0203 located
on both panels A. Repeat this step for the second unit
5
Assemblez le panneau E avec l’unité déjà assemblée. Serrez ensuite les 6 excentriques # 0203
se trouvant sur les 2 panneaux A. Répétez l’étape pour la deuxième unité
C
6x
A
A
C
E
IMPORTANT
Turn clockwise 2/3 of a turn
Tournez vers la droite 2/3 de tour
et serrez fermement
5

Use a hammer to fasten 4 tack glides # 1119 to the bottom edges of both panels A and
panel E. Repeat the step for the second unit
6
Utilisez un marteau pour installer 4 patins cloutés # 1119 sur le chant inférieur des panneaux A
et E. Répétez l’étape pour la deuxième unité
C
8x
A
E
A
C
# 1119
Connection to the main headboard
Connection avec la tête de lit principale
E
E
6

Install the 8 spacers # 0527 on the 2 panels A that will be connected to the main headboard
Installez les 8 pare-chocs autocollants # 0527 sur les 2 panneaux A qui seront connectés à la tête
7
de lit principale
Rear view
Vue arrière
8x
# 0527
E
Use the 4 connecting screws # 2192 to fasten the 2 extension panels to the main headboard.
Add 4 caps # 0545 on the 4 holes located on the 2 outwards facing panels A
8
Utilisez les 4 vis connectrices # 2192 pour assembler les 2 panneaux d’extension à la tête de lit
principale. Ajoutez 4 capuchons # 0545 sur les 4 trous situés sur les 2 panneaux A extérieurs
A
E
A
# 0527
# 0527
# 2192B
4x
# 0527
# 2192A
A
2
# 2192A
# 2192B
# 2192B
A
B
A
# 2192A
A
E
A
4x
# 0545
7

Limited 1 Year Warranty
All products are warranted to the original purchaser against defects in material or workmanship for a
period of 1 y e a r from the date of purchase.
“Defects” as used in this warranty is defined as any imperfections that may impair the use of the furniture or
product for which it was intended to.
This warranty is expressly limited to the replacement of defective furniture parts and/or components, subject
to availability of stock. Assembly labor is excluded.
This warranty applies under conditions of normal use. It does not cover defects caused by improper assembly
or disassembly, product modification, intentional damage, abuse, misuse, accidents, negligence or exposure to
the elements. Our furniture products are not intended for outdoor use.
This warranty is only applicable in Canada and the USA.
This warranty is explicit on the limits of
rights. Any warranty defined by law in your state/province is limited to 1 year. Should the law in your state or
ovince di
pr
er from the above, it will not apply.
liability and entitles the original purchaser to
specific
 Loading...