

Page 1
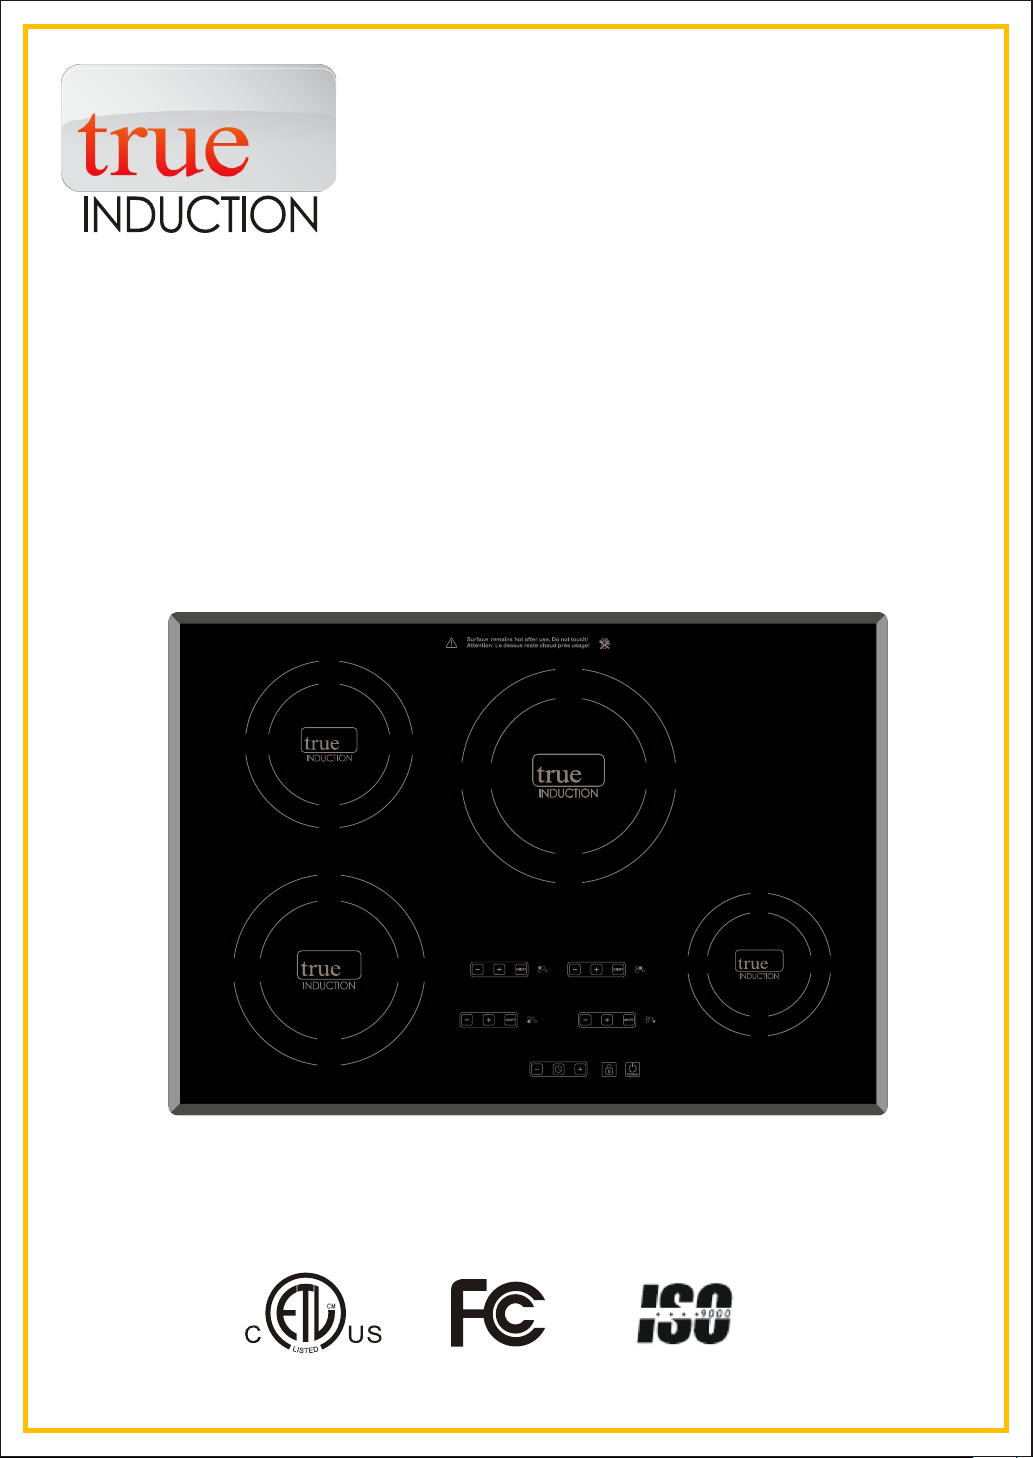
Model: TI-4B
USE AND CARE GUIDE
30 Inch Induction Cooktop
Beveled Edge
Page 2

TABLE OF CONTENTS
Important Safety Instructions........................................................................1 4 -
Cooktop Features........................................................................................ 5-7
Using ......................................................................................8 11 The Cooktop -
Operational Cooktop Noises...........................................................................12
Compatible Cookware.....................................................................................13
Cleaning Your Cooktop...................................................................................14
Troubleshooting Guide..............................................................................15 16-
Installation Instructions..............................................................................17 21-
Thank you for purchasing the True Induction 30Inch Induction Cooktop unit. Please read
the entire instruction manual prior to using your unit. If you have any questions regarding
the True Induction Cooktop, please visit TrueInduction.com or call: 1-877-862-7049
Before installation, record the model and serial
your cooktop. If you require service or call with a question, please have this
information ready.
number as found on the front of
Model:
Serial Number:
About Induction Cooking
About Induction Cooking
About Induction Cooking
Induction cooking is a safe, advanced, efficient, and economical cooking
technology. It works by electromagnetic field generating instant heat
directly in the cookware bottom, rather than indirectly through heating the
glass surface. The glass becomes hot only because the cookware warms
it up.
Our induction cooktop has been tested and complies with Part 18 of the
FCC Rules for ISM equipment. Product meets the FCC requirements to
minimize interference with other devices in residential installation.
Page 3
Important Safety Instructions
IMPORTANT Keep these instructions handy for future use.
The appliance is manufactured in compliance with the relevant safety standard.
WARNING
of the appliance.
WARNING
that causes property damage, personal injury or death. To reduce the risk of fire,
electric shock or injury, take the following precautions:
Intended Use
This appliance is designed for built-in
household use only.
Do not use outdoors.
Do not use the appliance to heat a
room.
WARNING
Do not allow aluminum foil, paper or
cloth to come in contact with a hot
element.
Avoid preparing food in aluminum foil
or plastic containers over the hot
cooking zones.
Protective liners - Do not use aluminum
foil to line cooking zone, drip bowls or
oven bottoms, except as suggested in
the manual. Improper use of these
liners may result in a risk of electric
shock or fire.
Do not allow pans to boil dry or empty.
Never leave the cooktop unattended
when in use.
Always use the proper pot and pan
size.
The use of undersized cookware will
expose a portion of the hot element,
which can result in ignition of clothing
or personal burners.
Read all instructions carefully before installation and operation
Failure to follow these warnings could result in a fire or explosion
Always remove the covers on sealed or
canned goods and before heating to
avoid explosion.
Close supervision is necessary when
any appliance is used by or near
children.
Do not touch hot surfaces. Use dry pot
holders to hold the handles of pots and
pans.
Cooking Safety
Use only dry potholders - moist or damp
potholders on hot surfaces may result
in burns from steam. Do not let the
potholder touch hot heating elements.
Do not use a towel or other bulky cloth.
Nevertheless, we strongly recommend
that a person with physical or mental
impairments not use the appliance
unless accompanied by a qualified
person. The same recommendation
applies to children.
When the unit is on, do not touch
outside the control panel as the surface
may contain residual heat. It is
important to be aware that the unit’s
surface will remain hot for a short
period of time after use. Do not touch
hot surfaces.
1
Page 4
Important Safety Instructions
WARNING
Cleaning Safety
IMPORTANT
Environment of Unit
Do not use steam cleaners or highpressure cleaners to clean the cooktop,
as this may result in electric shock.
Condition of Unit
Do not operate any
WARNING
appliance with a damaged cord or
after the appliance malfunctions or
has been damaged in any manner.
Return appliance to the nearest
authorized service facility for
examination, repair, or adjustment.
IMPORTANT
Do Not Cook on
Broken Cooktop. If cooktop break,
cleaning solutions and spillovers may
penetrate the broken cooktop and
create a risk of electric shock.
To reduce the risk of fire, do not let any
objects(glass, paper, etc.) obstruct the
inlet and outlet of your cooktop.
To reduce the risk of electric shock, do
not mount unit over a sink.
To reduce the risk of fire, do not store
anything directly on top of the
appliance surface when the appliance
is in operation.
Always have a working smoke detector
in or near the kitchen.
CAUTION
Do not leave lids or
other metal objects such as knives,
forks or spoons on the cooktop. If the
cooktop is turned on, these objects can
heat up quickly and may cause burns.
Do not place rough or uneven objects
on the units as they may damage the
surface. If the cooktop is near a
window, ensure that curtains do not
blow over or near the unit.
Do not use the
IMPORTANT
cooktop as a work surface. Certain
substances such as salt, sugar, or sand
can scratch the glass ceramic surface.
Do not store hard or pointed objects
over the cooktop as they can damage
the unit if they fall on top.
2
Page 5
Environment of Unit
Important Safety Instructions
Do not put detergents or flammable
materials in the equipment installed
under the cooktop.
While cooking any overflowed fat or oil
on the cooktop may ignite. There is a
risk of burning and fire; therefore,
control the cooking process at all times.
The use of accessory attachments not
recommended by the appliance
manufacturer may cause injuries.
Items with a magnetic field such as:
radios, televisions, credit cards,
cassette tapes etc., can affect the unit.
The marked electrical rating should be
at least as great as the electrical rating
on the appliance.
To prevent accidents and achieve
optimal ventilation, allow for sufficient
space around the cooking area.
Do not store items of
CAUTION
interest to children in cabinets above
the range or on the backguard of a
range - children climbing on the range
to reach items could get seriously
injured.
Use proper cookware size - This
appliance is equipped with four Cooking
Elements of different sizes.
Choose cookware with a flat bottom
large enough to cover the unit heating
surface. The use of undersized
cookware will expose a portion of the
heating surface where direct contact
may be made and cause serious injury.
Compatible cookware will improve
efficiency.
To reduce risk of burns, ignition of
flammable materials, and spillage due
to unintentional contact with cookware,
the cookware handles should be turned
inward and not extend over adjacent
heating surface.
Wear proper apparel - loose fitting or
hanging garments should never be
worn while using the appliance.
WARNING
To protect against
WARNING
electric shock, do not immerse cord, or
main body in water or any other liquid.
Do not let cord hang over edge of table
or counter.
Do not allow cord to touch hot surface.
A short power supply cord or
detachable power supply cord should
be used to reduce the risk of becoming
entangled in or tripping over a longer
cord.
Always attach plug to appliance first,
then plug cord into the wall outlet. To
disconnect, turn any control to off, then
remove plug from wall outlet.
The cord should be arranged so that it
will not drape over the countertop
where it can be pulled on by children or
tripped over.
Power Cord Safety
3
Page 6

Important Safety Instructions
Service and Repair Safety
WARNING
Do not repair or
replace any part of the appliance
unless specifically recommended in
the manual. All other services should
be referred to a qualified technician.
This product may not be treated as household waste. Instead it should be
handed over to the applicable collection point for the recycling of electrical
and electronic equipment. By ensuring this product is disposed of correctly,
you will help prevent potential negative consequences for the environment
and human health, which could otherwise be caused by inappropriate waste
handling of this product. For more detailed information about recycling of
this product, please contact your local city office, your household waste
disposal service or the shop where you purchased the product.
There are no user serviceable parts on
this appliance. Only an authorized
service representative should attempt
to service your cooktop.
SAVE THESE INSTRUCTIONS
4
Page 7
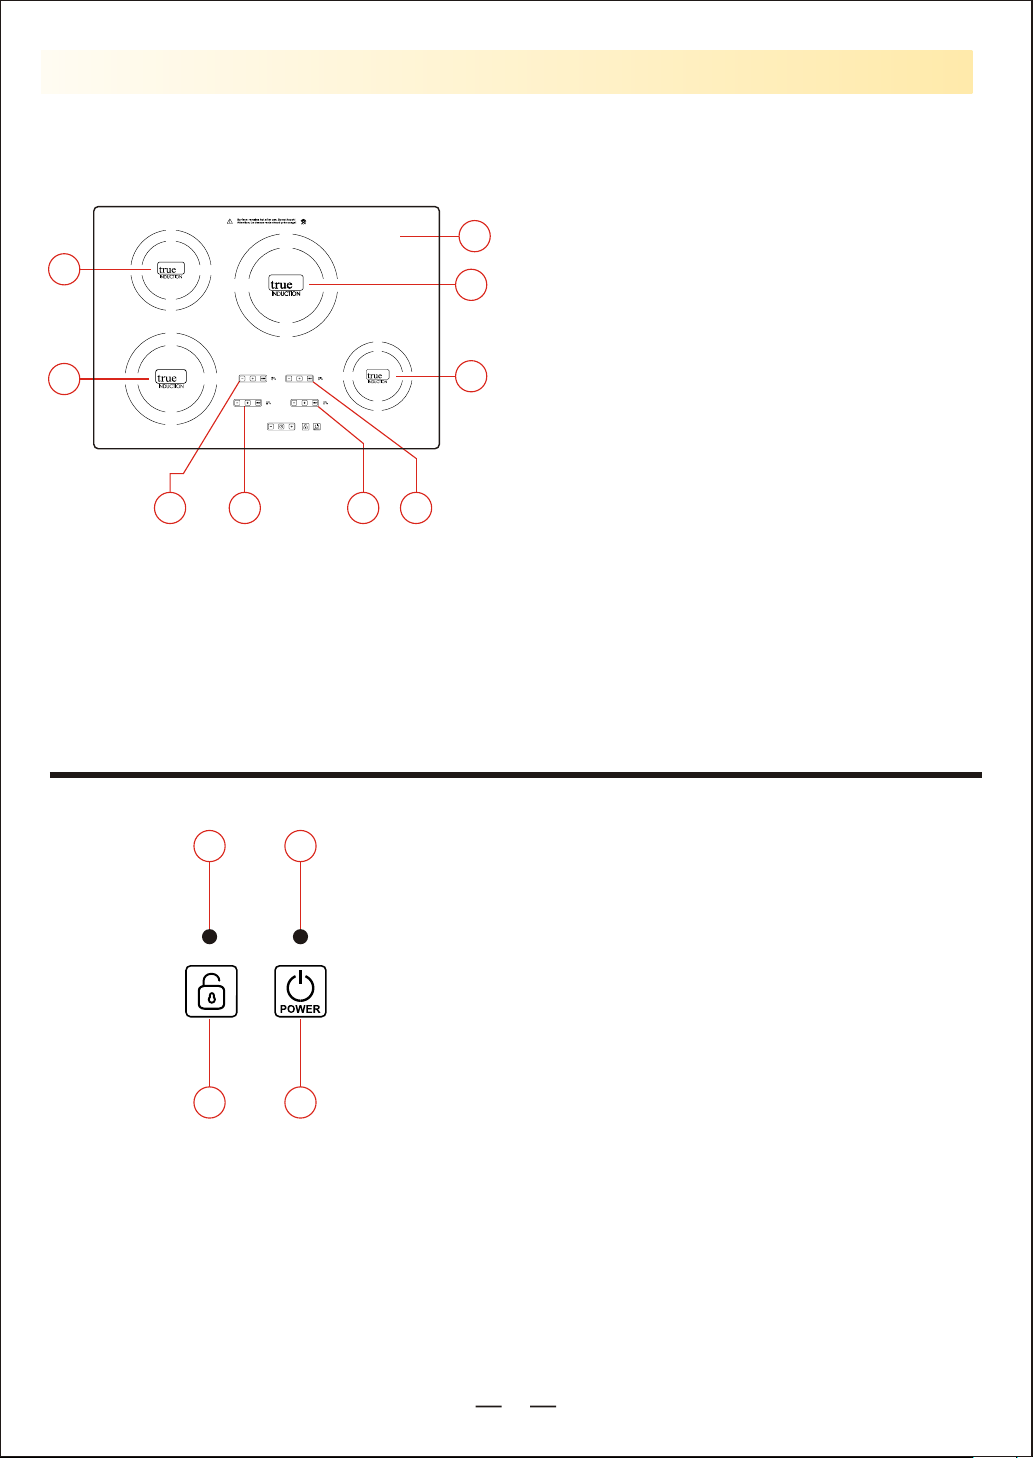
Cooktop Features
1
2
7
30" (76.2cm) Model TI-4B
1. Left rear cooking e
5
2. Left front cooking element
3
3. Right rear cooking element
4
8
96
4. Right front cooking element
5. Ceramic glass
6. Left rear cooking element control area
7. Left front cooking element control area
8. Right front cooking element control area
9.Right rear cooking element control area
lement
13
12
11
10. Main Power On/Off
11. Main Power indicator light
12. Controls Lock
13. Control Lock indicator light
10
5
Page 8
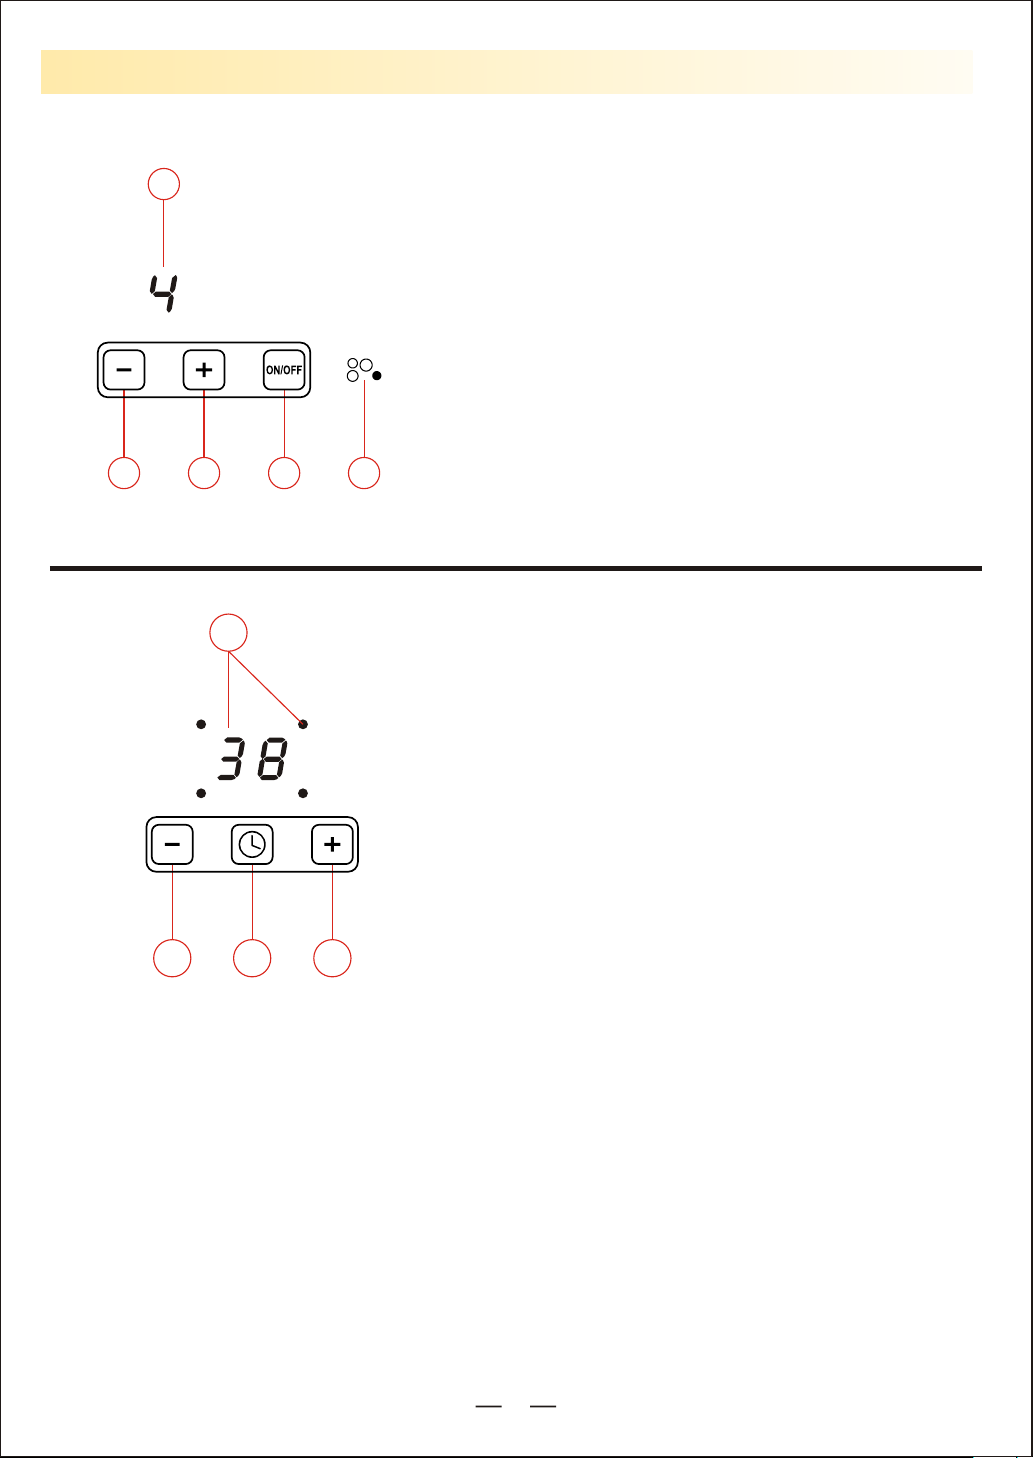
Cooktop Features
18
17
16
15 14
22
14. Cooking element symbol
15. Power On/Off
16. Increase power
17. Decrease power
18. Power level and Residual heat display
21
19
19. Minute timer
20. Minute timer setting Up
21. Minute timer setting Down
22. Minute timer display window and
cooking element symbol
20
6
Page 9
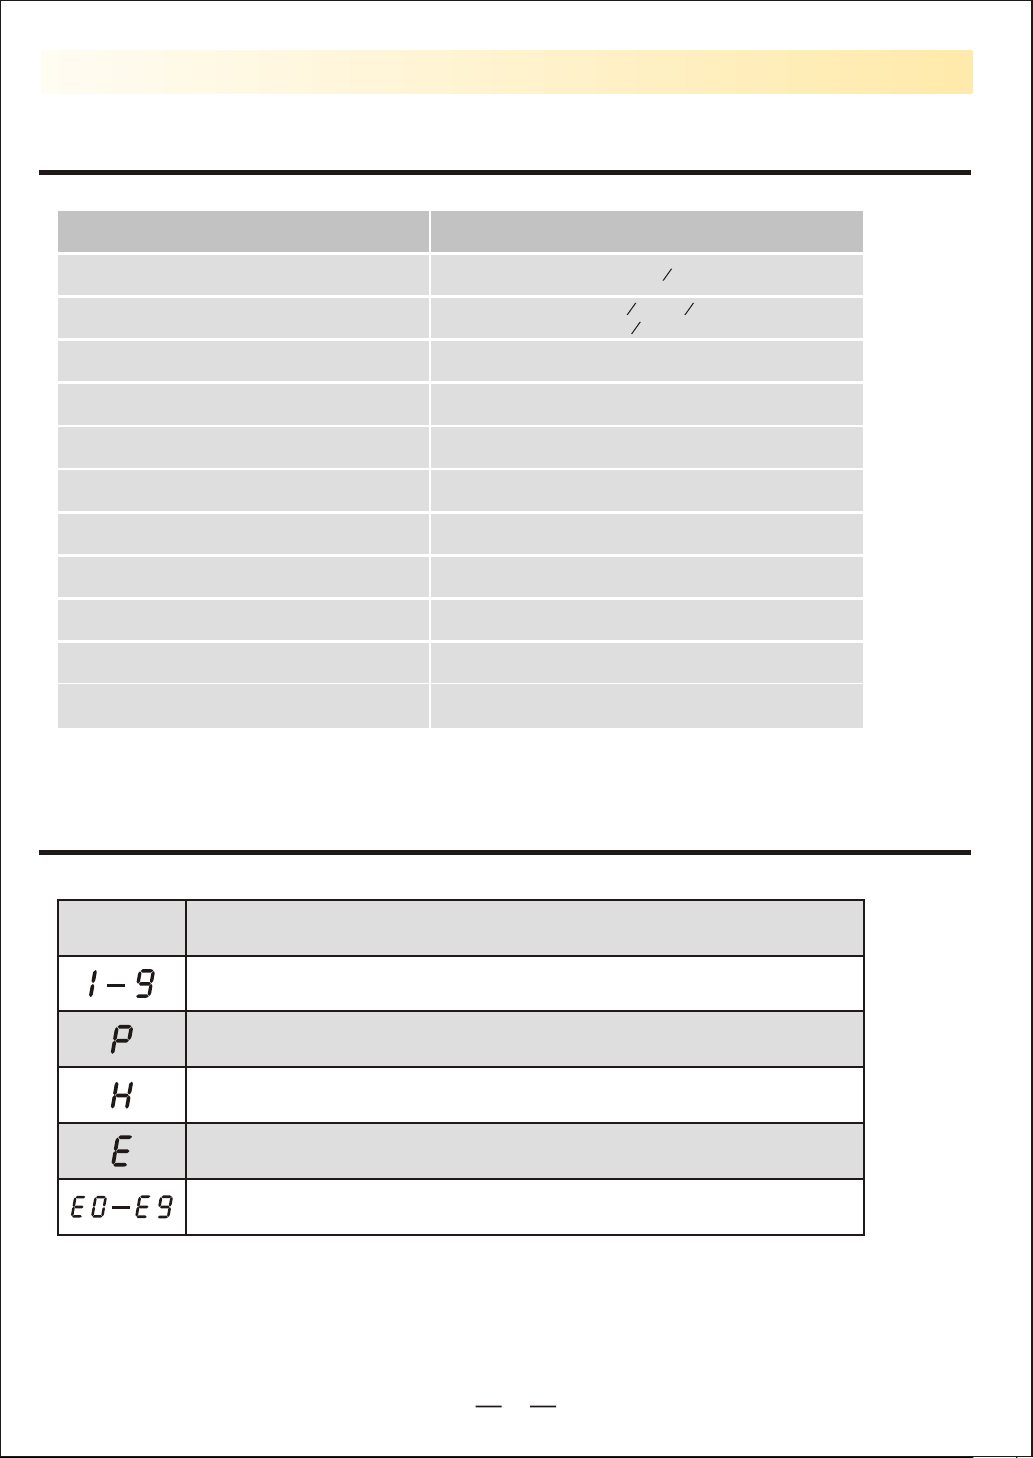
Specifications
Cooktop Features
Model
Product dimen sion wxdxh inch( )
Cut-out dimen sion(wxd) inch
Voltage ( vo lts)
Frequency (Hz)
Total power (Watts)
Minimum circu it breaker Amperage
Elements
Front Left
Rear Left
Front Right
Rear Right
TI-4B
1
28
29
2
8
3
3
19
4
1
4
4
30" x 21" x "
Min " x ".:
Max " x 20".:
240
60
7400
40
4
2100W/ 25 00W
1600W/ 20 00W
1400W/ 18 00W
2300W/ 27 00W
Heat Setting Displays
DISPLAY
DESCRIPTION
The power level
The power boost
A cooking element is still hot to touch (residual heat)
Electronics fault error message of specific cooking element
Error code
7
Page 10
Using The Cooktop
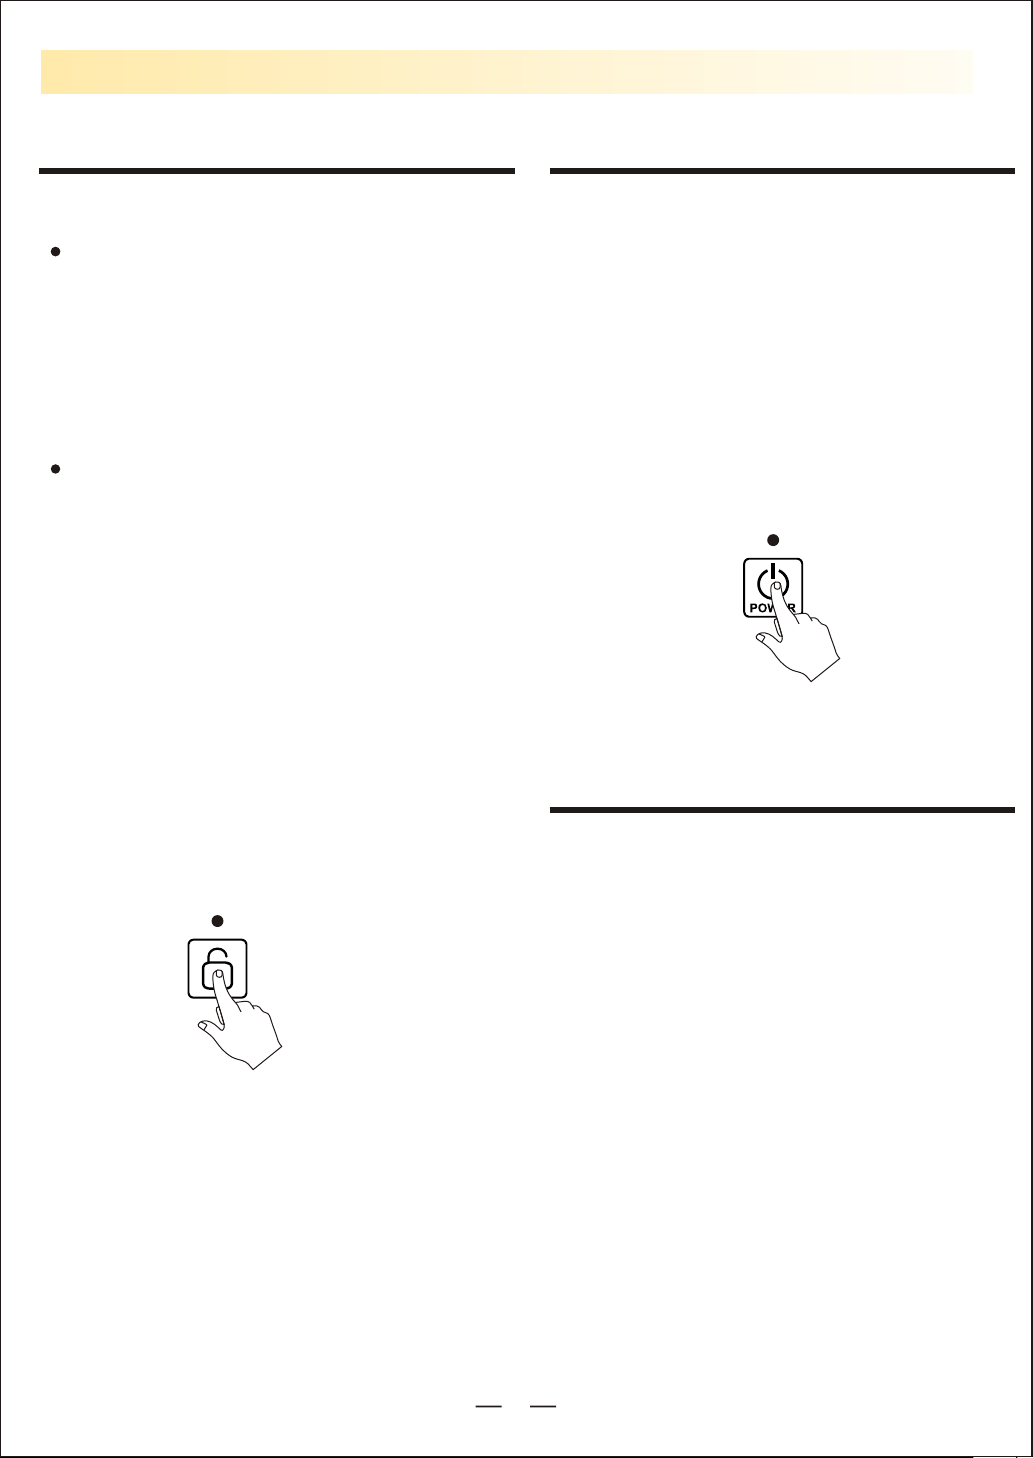
Controls Lock To Turn On The Cooktop
To Lock
Controls
cooktop is off: Controls Lock prevents
activation of any sensor key, except for
the Lock key pad, so you must
deactivate the control lock firstly, then
touch the main POWER key pad to turn
on the cooktop.
Controls Lock is activated during the
cooktop use: Controls Lock prevents
activation of any sensor key, except for
the ON/OFF, Power and Lock key pad.
Touch and Hold Lock key pad for 3
seconds, a “beep” will sound and
the indicator light above the Lock key
pad will be lit up.
Lock is activated when the
To Unlock
Touch and Hold Lock key pad for 3
seconds, a beep will sound, the
indicator light will turn OFF.
While in the Standby mode, touch the
Main Power key pad, a “beep” will
sound and the indicator light above the
Power key pad will be lit up, indicating
that the induction cooktop functions are
ready to use. The unit will automatically
return to Standby mode if no cooking
elements are set within 30 seconds.
To Turn Off The Cooktop
1. Touch the “ON/OFF” key of the
cooking element to shut off the
cooking element.
Touch and Hold for 3 seconds
2. Touch the Main Power key pad to
turn off the entire cooktop, a “beep”
will sound and all indicator lights will
turn off, indicating the cooktop enter
into the Standby mode.
8
Page 11
Using The Cooktop
Operating The Cooking Elements
To turn on one or more Cooking
Elements, place a compatible pot or
pan on the desired cooking element.
With the cooktop being ON as
mentioned above, touch the “ON/OFF”
key pad of the desired cooking
element, the Power display will show a
“5 ”, indicating the unit heat at level 5.
Power Management
Touch “- ” key or “+” key to adjust the
desired power level;
NOTE: During cooking, the unit is
equipped with safeguards against
parching.
NOTE:Heating will appear intermittent
phenomenon when cooking element is
used for frying, stir-frying, grilling and
other high temperature cooking
formats.
Power Boost
Touch “+” key to level 9, then press
once to enter into Boost mode, the
power display will show a “P”.The
'Boost' function is used to cook at
maximum power for a short period of
time (maximum 10 minutes). The
power is reduced to level 9 at the end
of the maximum boost time.
In the Boost status, touch “ ” key or
after 10 minutes the power boost
setting will switch off automatically,
Power Boost indicator light will turn off,
Power digital will switch from P to 9.
Power Boost is only
WARNING
recommended for BOILING WATER.
Do not leave a pot
WARNING
unattended while in Boost Mode or
other high power settings.
-
Automatic Power Level Control
The power level displayed may be
different from the actual power level at
the power sharing and high
temperature range. To prevent the
cooktop from overheating, the power
level is controlled automatically.
9
Page 12
Using The Cooktop
Power Sharing
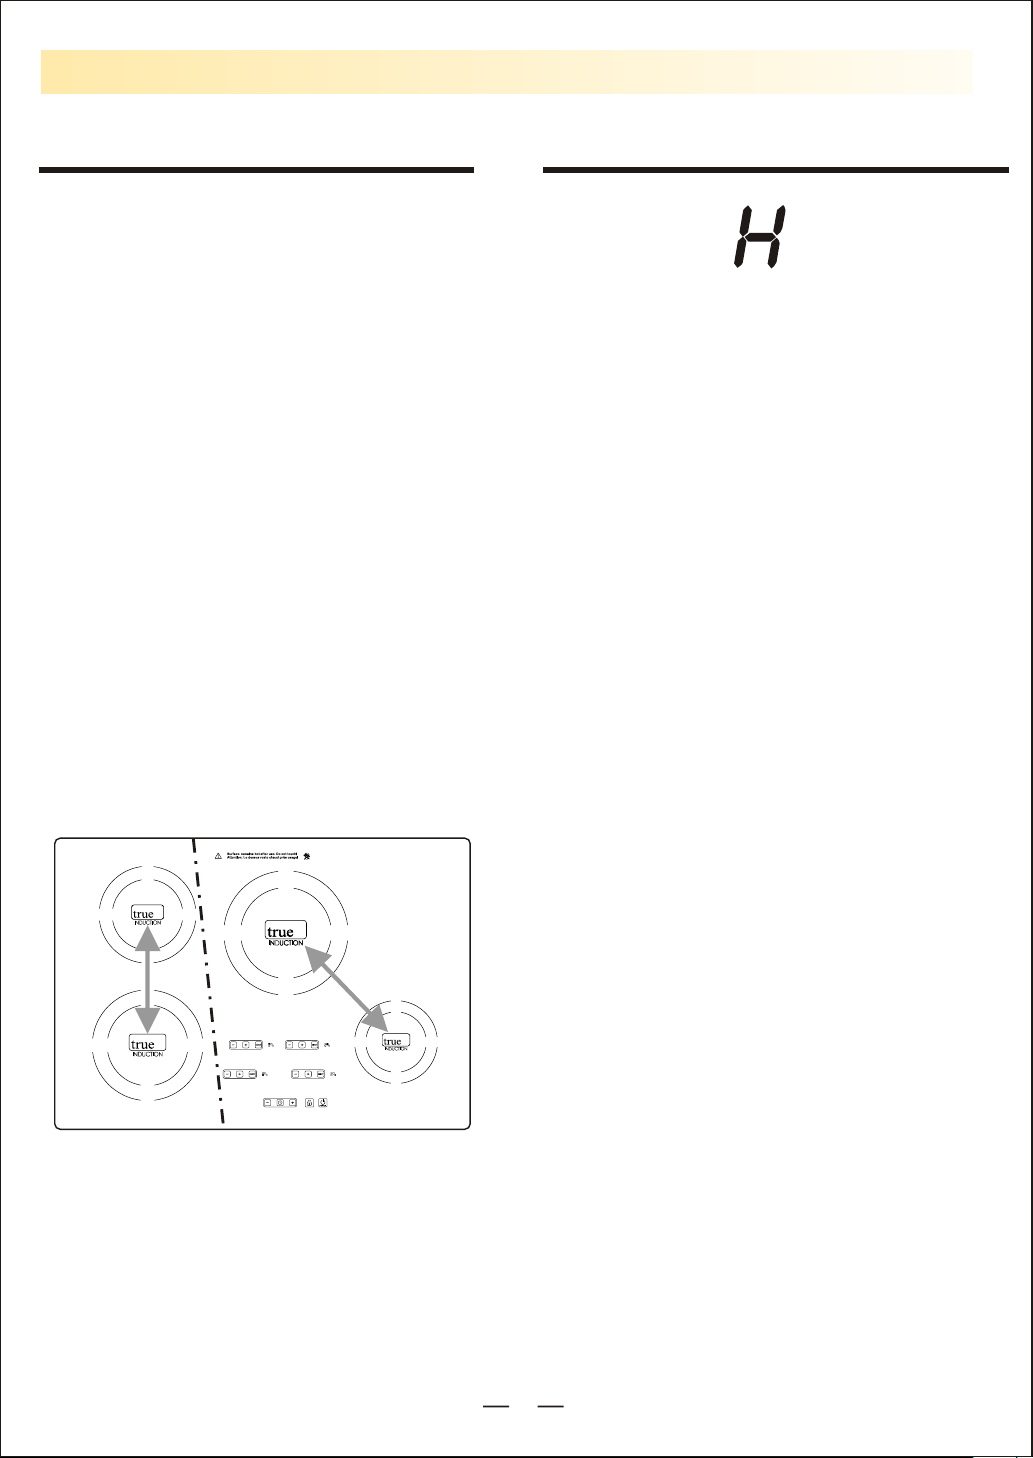
Four cooktops are divided into two
separate cooking area, the right and left
side cooking elements share power of a
inverter.
Power sharing is activated when the
cooking element in the same area are
activated; the controls adjust the power
automatically for “Power Sharing”. This
power sharing is administered by unit's
microprocessors, which will alternate
power in one area.
Power sharing tips: Remember to
select the power setting last for the
cooking element you want to maintain
at full setting heat. To maintain full
setting heat for two items, place one
item on a element in one section (left
side), and the other item on a element
in another section (right side).
Residual Heat Indicator
After using any of the Cooking
Element, the cooking area will
remain hot. Even after turning off the
entire unit, the surface of the
cooktop will remain hot for some
time. The digital display for the
Cooking Element will show an “H” to
warn the user that the surface is hot
to touch(Hot surface indicator) after
the Cooking Element switch off. Wait
until the “H” is no longer displayed to
clean the unit. You may turn the
Cooking Element back on even if the
“H” is displayed.
Left Zone Right Zone
30" (76.2cm) Model TI-4B
10
Page 13

Set Timer
Using The Cooktop
The automatic timer settings range
from 1 minute to 99 minutes. (NOTE:
There is no “seconds” and “hours”
display, only minutes.) The red dot
next to the Time symbol indicator will
illuminate indicating that the cooking
elements is selected.
While cooking, touch the Timer key
pad until time light of the desired
cooking element is ON, Time digital
display reads “00” and blinking; Touch
“+” or “- ” key to set the desired
number, Once the Timer is set and no
“+” or “- ” key are pressed for 5
seconds, the Minute Timer begins the
countdown and the timer display will
stop blinking and will stay on in the
display. Once the Minute Timer
reaches “00”, a “beep” will be sound,
indicating that the time is up, the
Particular Cooking Element will
automatically shut off.
If you want to set another burner to
switch-off automatically, touch
Timer key to until the desired time
symbol indicator blinks, repeat the
same steps above.
If you want to check the remaining
time for another Cooking Element,
touch the Timer until the Time
symbol indicator for the desired
Cooking Element blinks.
If more than one switch-off time is
programmed, the shortest time
remaining will show in the Time
digital display, the indicator for that
particular burner will be blinking.
To Cancel Timer
Touch the Timer until the Time
symbol indicator for the desired
Cooking Element blinks, then
touch the “+” or “- ” to set the timer
to 00. The Time digital display will
blink for 5 seconds and then turn
off, indicating that the timer of
selected cooking element has
been cancelled.
11
Page 14

Operational Cooktop Noises
Cookware Noise
The induction fields are generated by
electronics equipment, which are
pretty much silent but they do produce
heat at high power level. A softsounding cooling fan run when the
unit is running multiple cooking
elements at high settings at once or
when a cooking element is set at very
high power settings.
What can sometimes produce sound
with induction cooking is not the
induction equipment but the cookware
itself. Slight sounds may be produced
by different types of cookware. Some
of the possible causes include:
Heavier pans such as enameled cast
iron produce less noise than a
lighter weight multi-ply stainless
steel pan; Light weight cookware
may also vibrate. Heavy weight
quality cookware is recommended.
Cookware with irregular or warped
bottoms can vibrate audibly on the
ceramic glass surface, though again
typically only at high power settings.
A “Cracking” noise may be heard if
the cookware base is made of layer of
different material.
A low “humming” noise occurs when
cooking, which is normal particularly
at high power settings.
Whistling can occur if both elements
are being used at the same time at
the high settings, and the cookware
has bases made of layer of different
material.
Loose-fitting handles on cookware,
typically when riveted on, can vibrate
slightly.
High quality cookware of solid cast
iron including enamelware will lower
the noise.
12
Page 15
Compatible Cookware
The quality of your cooking is dependent on the cookware you use.
Because induction cooking requires a magnetic vessel for heating, only
certain materials can be used on your cooktop.
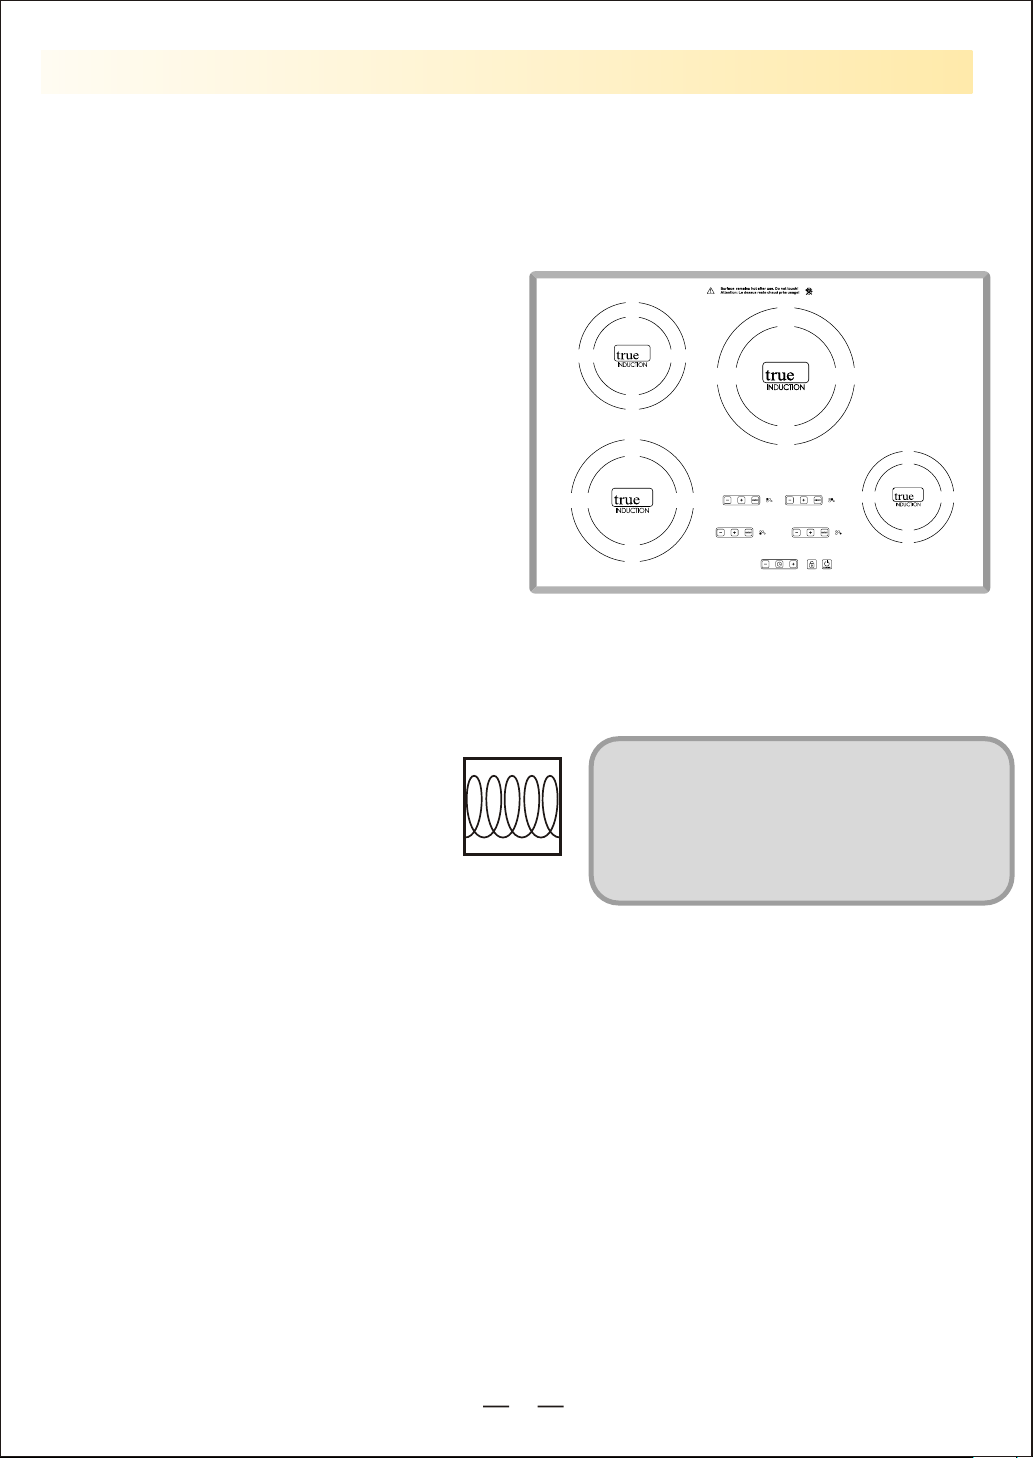
Induction requires pots and pans that are
made of ferrous(meaning ma gn etic)
materi als.
Ch eck yo ur coo kware’s retail box for the
in du ction symbol. To tell if your cu rrent
cookware is compatible with the inductio n
technolo gy, grab a magnet and see if it
hold s to the bot tom of the coo kware. If
your magnet stays on then yo ur coo kware
is rea dy to be used on the True Induction
cooktop!
Visit Truelnduction. com for more information about our compatible cookware collection.
The follo wing ar e no t compatible : heat-resist
Optimally the cookware will have this
induction image on the retail box:
In ducti on
glass, ce ramic , copper, aluminu m pan/pots,
round-b ottom ed cookware, or co okware with a
base less t han 5 inc hes.
NOTE: Some cookwares can produce noises when used on induction
cooking zones. This is not a fault in the cooktop, and its function will not
be impaired in any way as a result.
13
Page 16

Cleaning Your Cooktop
Please follow these directions along with Important Safety steps for cleaning, advised at the
beginning of the manual. Use a ceramic glass cleaner on the glass cooktop. To maintain and
protect the surface of your glass cooktop, follow these steps:
Before using the cooktop for the first time, clean it to protect the top and makes cleanup easier.
1. Daily use of ceramic glass cleaner when the cooktop is cool will keep the cooktop looking new.
2. Shake the cleaning solution well. Apply a few drops of ceramic glass cleaner directly to
the cooktop.
3. Use a paper towel or a soft cleaning pad for ceramic surface to clean the entire cooktop
surface.
4. Use a dry cloth or paper towel to remove all cleaning residue. No need to rinse. Never run
the cooktop under water.
Cleaning Burned on Residue:
NOTE: It is very important that you DO NOT use the cooktop until it has been thoroughly cleaned.
WARNING: Damage to the glass surface may occur if you use scrub pads or any other type of
abrasive cleaning materials.
1. Allow the cooktop to cool.
2. Spread a few drops of the ceramic glass cleaner on the burned residue area.
3. Using the ceramic glass cleaning pad, rub the residue area, applying pressure as needed.
4. If any residue remains, repeat the steps listed above.
5. For additional protection, after all residue has been removed, polish the entire surface with
the ceramic glass cleaner and a paper towel.
Cleaning heavy burned - on residue:
1.
Allow the cooktop to cool.
Used a single-
2.
glass surface, and scrape offtheresidue.
After scraping off the residue, apply a few drops of the ceramic glass cleaner on the entire
3.
burned residue area. Use the cleaning pad to remove any remaining residue.
For additional protection, after all residue has been removed, polish the entire surface
4.
with the ceramic glass cleaner and a paper towel.
Metal Marks and Scratches:
Be careful not to slide pots or pans across the cooktop surface. It will leave behind metal
markings. These marks are removable using the ceramic glass cleaner along with the
cleaning pad for induction cooktop.
If pots with a thin overlay of aluminum or copper boil dry, the overlay may leave a black
discoloration on the cooktop. This should be removed immediately before using the cooktop
again or the discoloration will become permanent.
NOTE:
replaced. Contact the manufacturer for assistance.
If cracks or indentations in the glass surface occurs, the cooktop glass will have to be
edge razor blade scraper approximately at a 45 degree angle against the
14
Page 17

Troubleshooting Guide
If you encounter the following problems while using your cooktop, check the
guide below to see if you can correct the problem yourself before calling for
assistance or service:
Problem Possible Cause Solutions
Cooktop does not work
Cooktop does not heat
Cooktop con trols are l ocked
Power outag e
Installat ion wire no t complete
Circuit bre aker has tr ipped or
fuse is blown
No cookware or improper
cookware placement on the
cooking element
Incorrect cookware size
for the selected cooking
element
Cookware is not properly
resting on cooking element
Incorrect cooking element
selected
No power to cooktop
Make sure Lock mode is
turned off
Check house lights to
confirm power outage
Make sure that the cookware
is centered on the co oking
element, and that cookware is
also of correct type for
induction cooki ng. See
Compatible Cookware
The bottom of the cookware
must be large enoug h to cover
cooking element c ompletely.
See Compatible Cookware
Cookware bottom s must be
flat and centered on the
cooking element . See
Compatible Cookware
Make sure the correct control
is ON for the cooking element
being used
See “Cooktop does n ot work”
above
Cooktop turns off while
cooking
Cooktop internal heat
sensor has detected high
temperature inside the
cooktop, activating
automatic shut off
Liquid or object on the
controls area
15
Make sure the cooktop vents
are not blocked
The cooktop features an
automatic shutoff feature
that turns off the entire
cooktop if any cooking
element has been on
continuously for 2 hours
The cooktop control panel
may register liquids or
objects obstructing the
panel, which can cause the
cooktop to shut off. Clean up
spills or remove objects and
restart the unit
Page 18
If you encounter the following problems while using your cooktop, check the
guide below to see if you can correct the problem yourself before calling for
assistance or service:
Problem Possible Cause Solutions
Power boost d oes not wor k
The fans keep r unning fo r one
minute afte r the cooki ng element
has been swit ched off
“E”appear s in the Powe r display
“E0”appea rs in the Time r display
“E1” appear s in the Timer d isplay
“E2” appear s in the Timer d isplay
“E3” appear s in the Timer d isplay
The electro nics are co oling down
Electroni cs fault er ror message
of particul ar cookin g element
IGBT overheating
No cookware f ound or imp roper
placement o f cookwar e on the
cooking ele ment
Supplied vo ltage to co oktop is
too low
Supplied vo ltage to co oktop is
too high
See Power Sha ring
This is a norma l occurre nce
See E0, E1, E2, E3, E7, E8,
E9, EE
Turn off unit to a llow IGBT to
cool. Resta rt unit
Make sure tha t the cookw are
is centered o n the cooki ng
element, an d that it is al so
induction c ompatib le. See
Compatible Cookwar e
This may be caused by
reduced vol tage bein g
supplied to t he house ci rcuit.
If connecti ons are cor rect and
the supplie d voltage r eturns
to normal, th e code will
disappear
This may be cau sed by
increased v oltage be ing
supplied to t he house ci rcuit.
If the connec tions are c orrect
and the suppl ied volta ge
returns to no rmal, the c ode
will disapp ear
“E7” appear s in the Timer d isplay
“E8” appear s in the Timer d isplay
“E9” appear s in the Timer d isplay
“EE” appear s in the Timer d isplay
Noise
NTC1 Break off
NTC1 Short ci rcuit
NTC2 Break off
NTC2 Short ci rcuit
Noise like hu mming,
crackling a nd buzzin g
16
Turn the cooktop O FF; then
pull plug out f or about 30
seconds. Then re-i nsert the
plug and turn t he cookto p on
using the POW ER pad. If th e
error messa ge is still
displayed , call for se rvice
This is a norma l occurre nce,
See Operati onal Cook top
Noises
Page 19
Installation Instructions
IMPORTANT SAFETY INFORMATION
Installation and service must be performed by a qualified
WARNING
installer or service technician.
IMPORTANT
Read and save these instructions for future reference.
DANGER
A
these instructions can be killed or seriously injured.
lways read and obey all safety information, failure to follow
Before Installing the cooktop
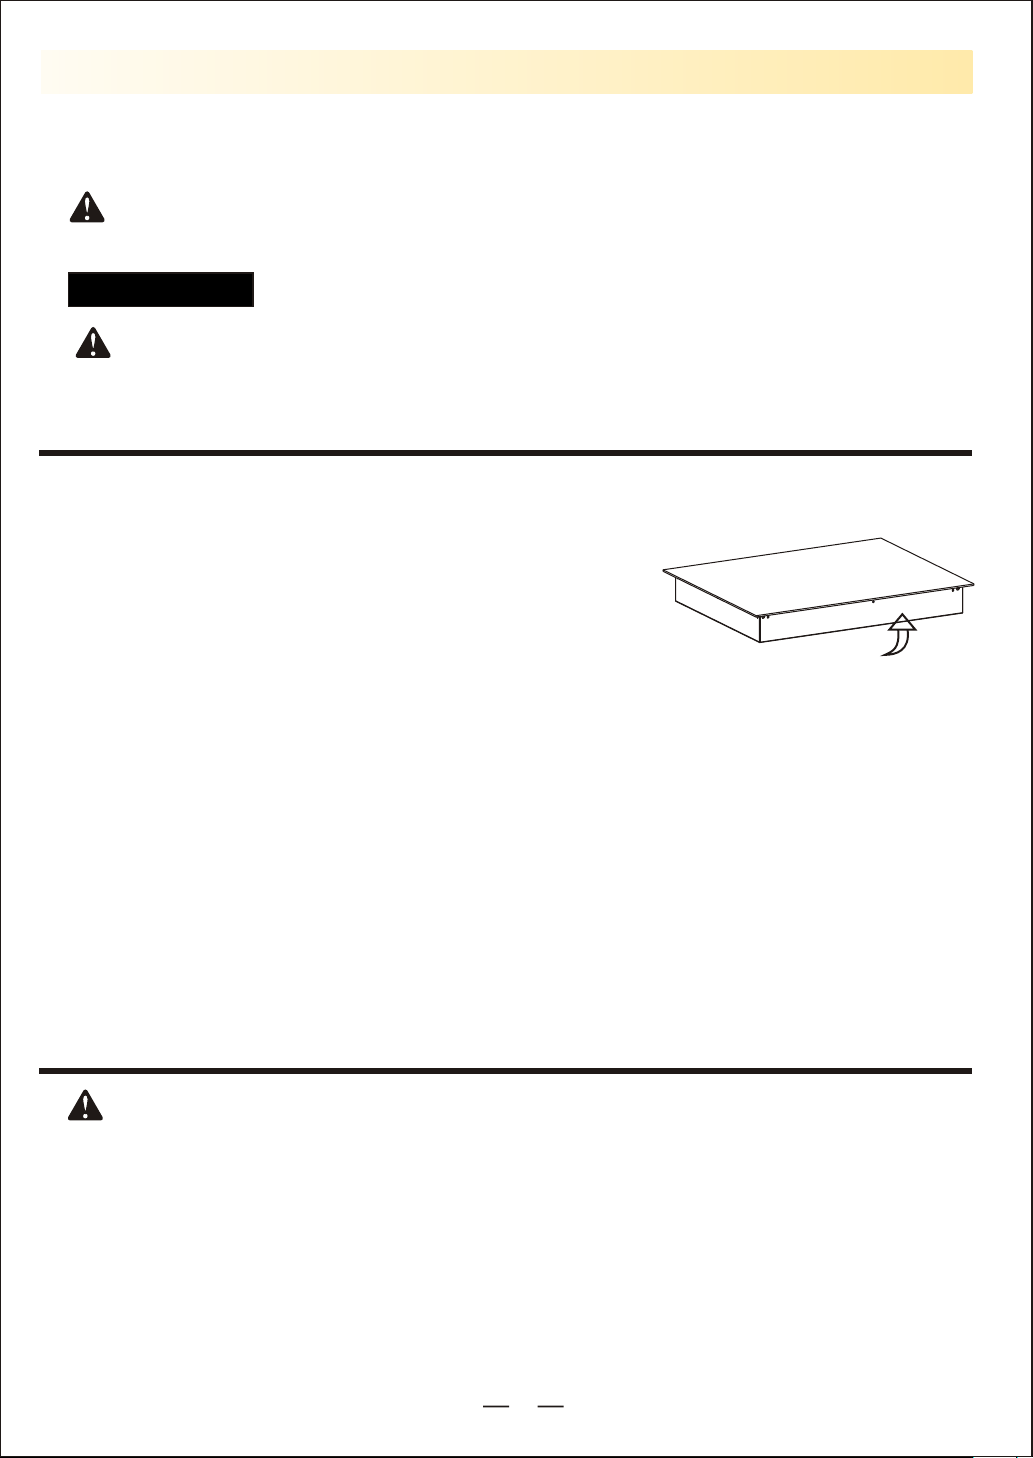
1. Visually inspect the cooktop for damage.
Also make sure all cooktop screws are on tight.
2. Record the model and serial number as found
on the bottom of your cooktop. When ordering
parts for or making inquires about your cooktop,
always be sure to include the model and serial
numbers and a lot number or letter from the serial
plate on your cooktop.
3. Cutout dimensions of the countertop.
4. Make sure the wall coverings, countertop and cabinets
around the cooktop can withstand heat (up to 200°F) generated
by the cooktop.
5. Gently lower the cooktop into the countertop cutout.
NOTE: Do not seal the cooktop to the countertop,
the cooktop must be removable if service is necessary.
Serial pl ate is lo cated
the front o f the coo ktop.
Electrical Connection
IMPORTANT
Model needs 40 Amp service.TI-4B
Maximum Connected Load
Model ......7.4 kW at 240 VAC, 6.4 kW at 208 VACTI-4B
Observe all governing codes and local ordinances.
17
Page 20
Installation Instructions
The Induction Cooktops must connect to a separate, grounded wire, single
phase, AC Only electrical supply with their own circuit breaker. These
appliances must be installed in accordance with National Electrical Codes,
as well as all state, municipal and local codes. This appliance must be
supplied with the proper voltage and frequency and amperage, which is
protected by a properly sized circuit breaker or time delay fuse.
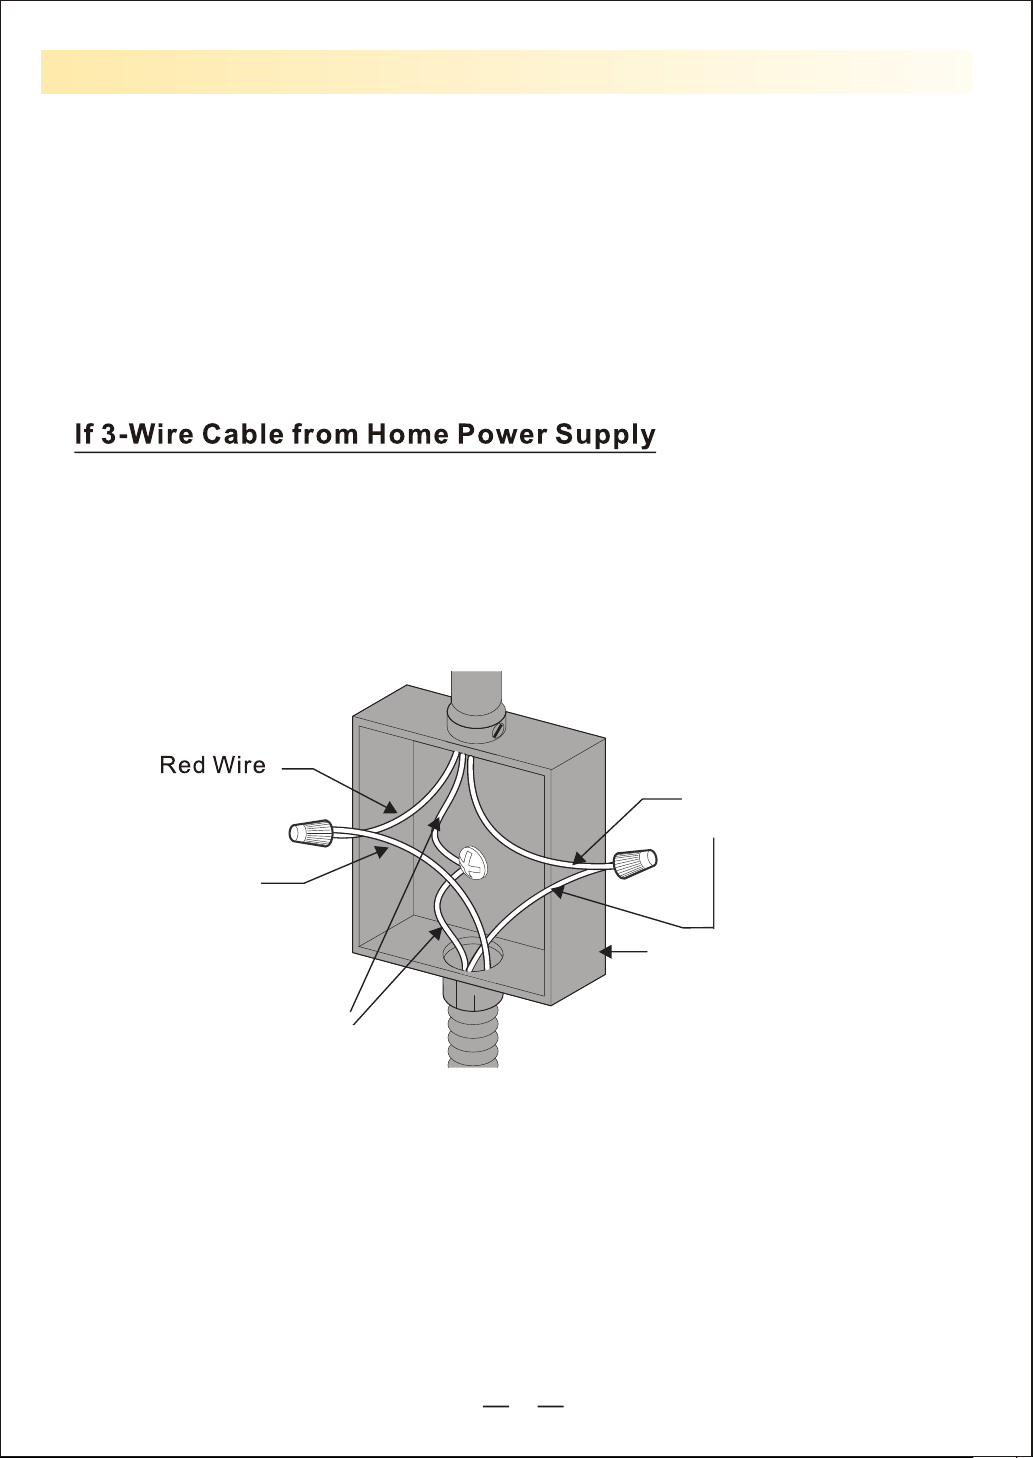
The cable from appliance is equipped with 3-wires:
IMPORTANT: Use the 3-wire cable from Home Power Supply where
local codes permit a 3-wire connection.
Cable from Power Supply
Red Wire
Green Wire
(Grounding)
3-Wire Cable from Home Power Supply
Black Wire
Junction Box
Cable from Appliance
18
Page 21
Installation Instructions
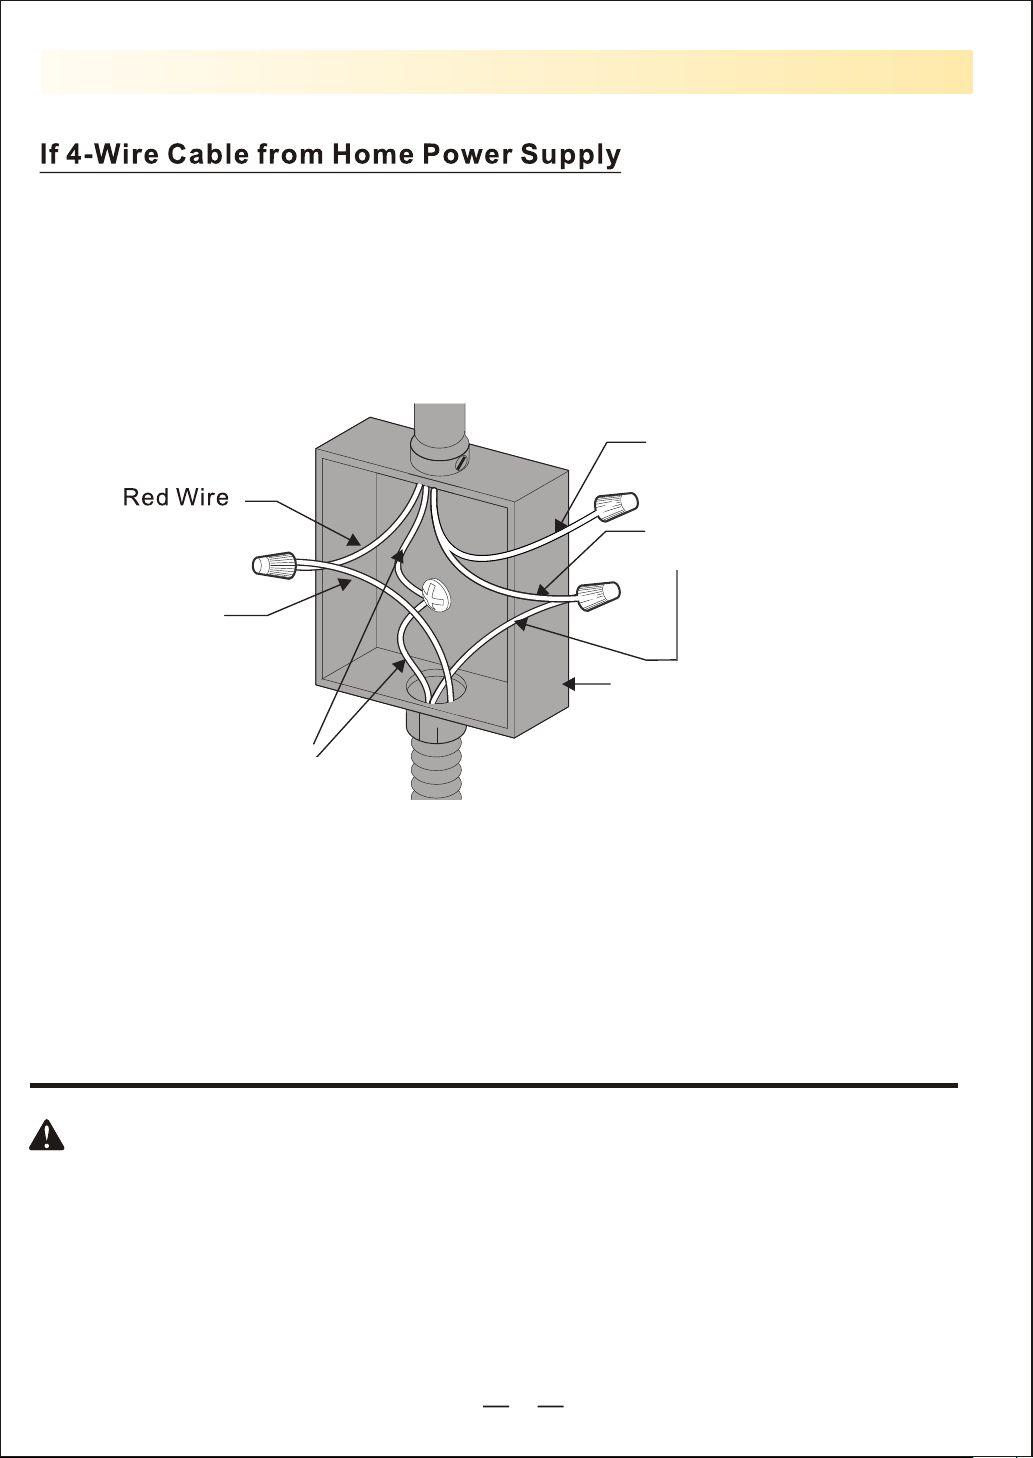
IMPORTANT: Use the 4-wire cable from Home Power Supply where
local codes do not allow grounding through neutral.
Cable from Power Supply
White Wire
Black Wire
Red Wire
Junction Box
Green Wire
(Grounding)
Cable from Appliance
4-Wire Cable from Home Power Supply
Electrical ground is required on this appliance
The cooktop conduit wiring is approved for copper wire
WARNING
connection only, if you have aluminum house wiring, use only special
connectors which are approved for joining copper and aluminum wires
conform with local codes and ordinances. Follow the electrical connector
manufacturer’s recommended procedure closely.
19
Page 22
Installation Instructions
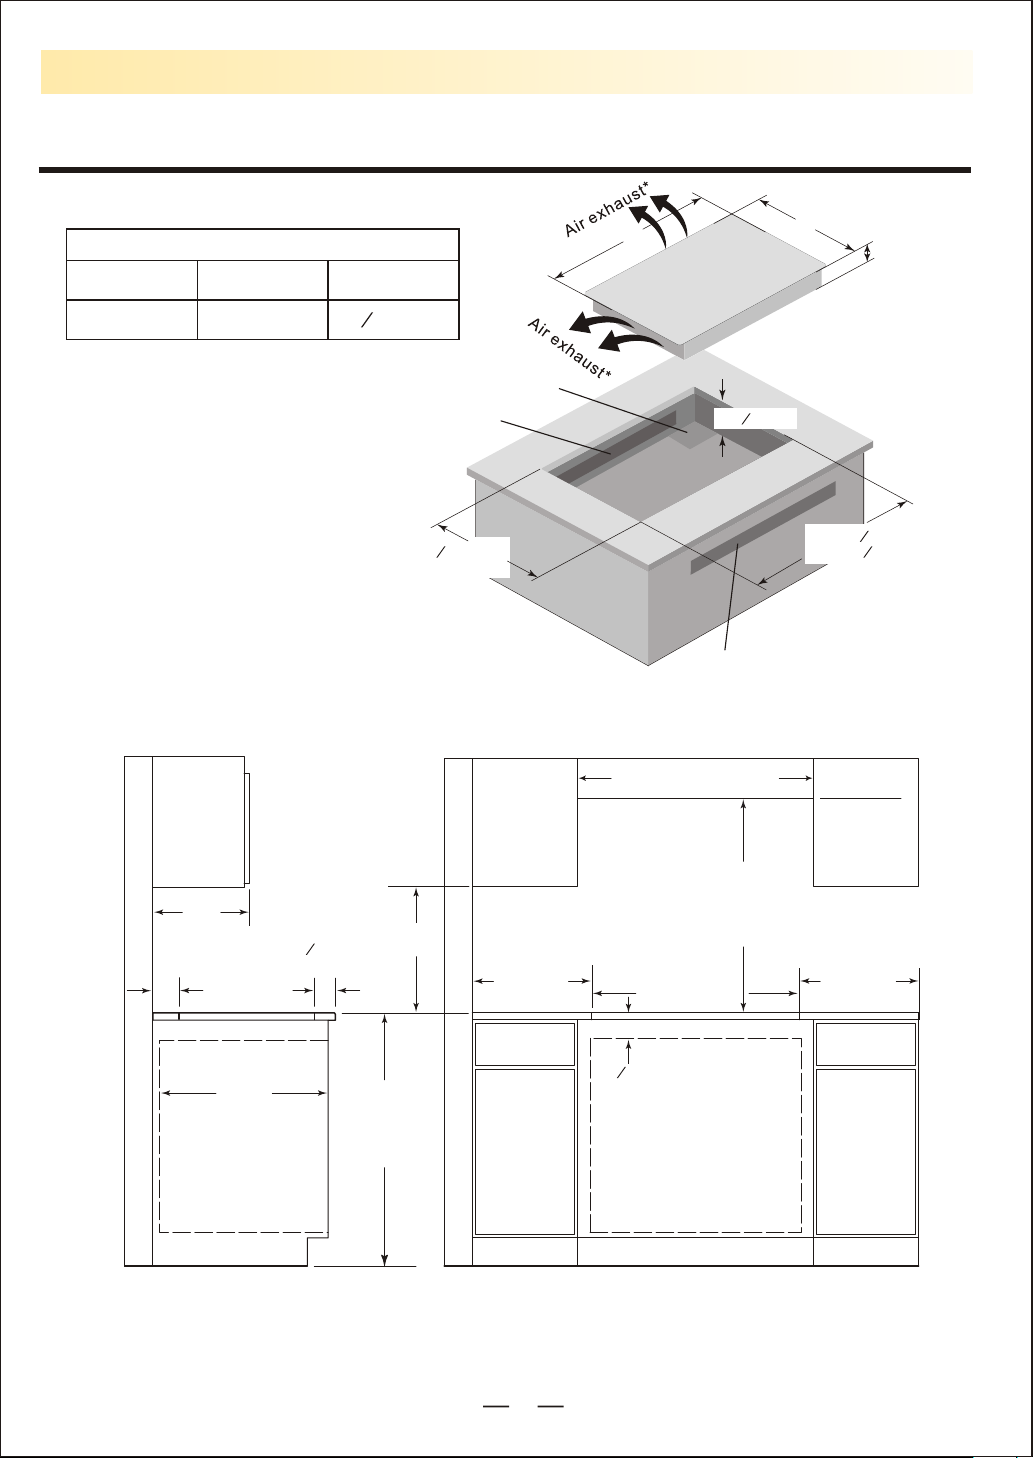
Installation — 30" (76.2cm) Model TI-4B
Cooktop Dimensions
A. Width
30"(762)
B. Depth
21"(533)
C. Height
1
2
"(55)
8
* DO NOT obstruct these areas.
IMPORTANT: For perfect
ventilation, provide a vent of
under the countertop, in the
front of the cabinet and in the
back of the cabinet. The
ventilation opening is to
extend the full length of the
cooktop cutout.
A
Junct ion box
Vent
3
Min "(500)
19
4
Max 20"(510)
TI-4B Cooktop Dimension and Cutout
33" (838) Recommended
Cabinet Width
30" min (762)
Vent
4
1
2
"(114)
B
C
3
Min "(730)
28
4
1
Max "(744)
29
4
Front
2" min
(51)
13"max
(330)
Cut-out Depth
24" min
(610)
1
2
2
(64)
"min
36"(914)
Standard
Floor To
Counter
Height
18"
(457)
2" min (51)
From Edge of
Cooktop to Nearnest
Combustible Wall
Both Sides
TI-4B Countertop Cut-Out Opening
All dimensions are stated in inches and (mm).
20
30"(762)
Countertop To
Combustible
Materials
Above Cooktop
Cut-out Width
3
"( 120) min
4
4
Height Clearance from the
countertop to the top of the drawer,
oven or other obstruction
OVEN OPENING
2" min (51)
From Edge of
Cooktop to Nearnest
Combustible Wall
Both Sides
Page 23

Installation Instructions
After Installation
1. Remove a l l the stickers a n d i t e ms from the t o p of the cookto p
surf a c e .
2. Clean c o o k t o p before use. D r y w ith a soft c l o t h . See Cleaning
Your Cook t o p f o r reference.
3. Read U s i n g The Cooktop.
4. Tu rn on the p o w e r to the cookto p .
5. Ve rify all func t i o n o peration properl y.
NOTE: If t h e c ooktop does n o t w o r k, or you m e t a n y problem in y o u r
operation, p l e a s e check that t h e c i r cuit breaker h a s n o t tripped or
the house h a s not blown. For m o r e information, p l e a s e See
Tr o u b l e shooting Guide. I f you do not s o l v e the problem b y y o u r self,
please call u s for assistance o r s ervice.
21
 Loading...