

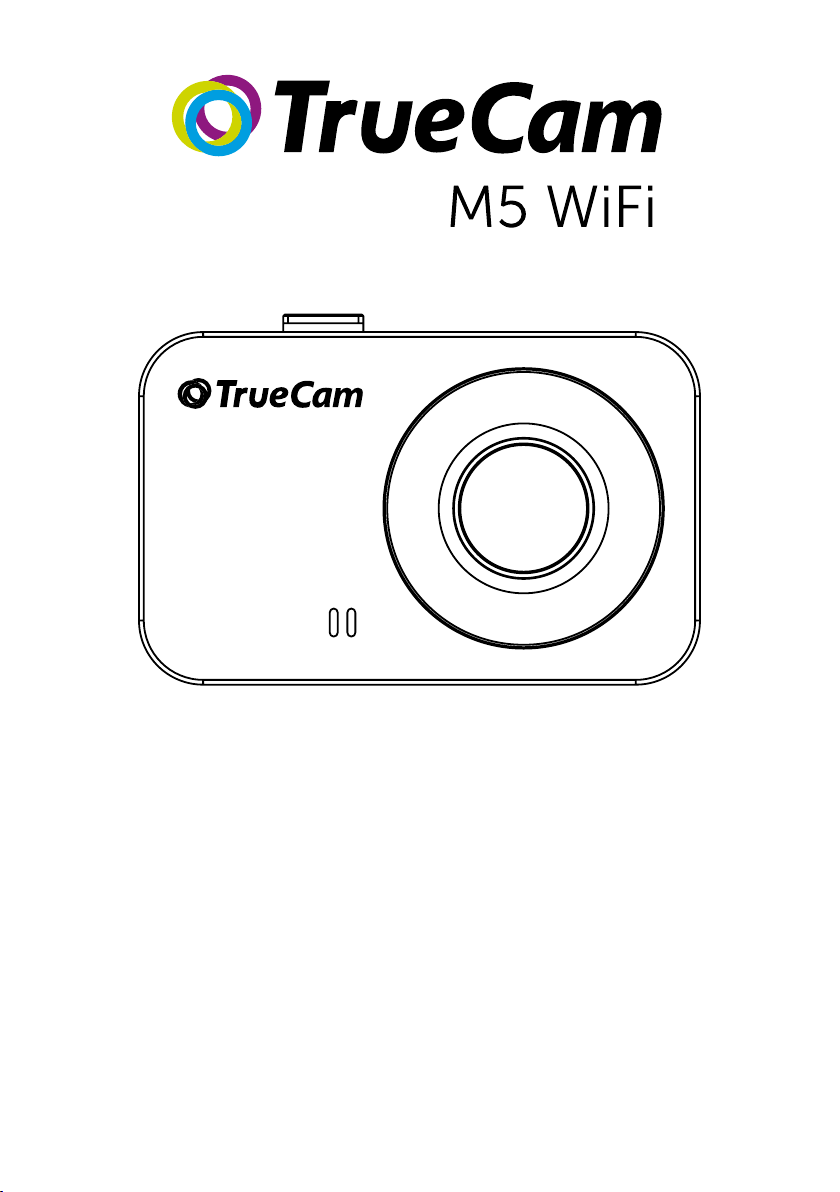
TrueCam M5 Wi-Fi, M5 GPS Wi-Fi User Manual
EN – User manual
CS – Uživatelská příručka
DE – Benutzerhandbuch
SK – Používateľská príručka
PL – Instrukcja obsługi
HU – Felhasználói kézikönyv

A dashboard camera with WiFi
and a magnetic design
EN – User manual

Contents
1. Pack contents .......................................................................................................................................2
2. Getting to know the camera ..................................................................................................................3
3. Controls .................................................................................................................................................3
4. Ikons and display ..................................................................................................................................4
5. First usage .............................................................................................................................................4
6. Basic features ........................................................................................................................................5
7. Placement on glass ...............................................................................................................................5
8. WiFi application .....................................................................................................................................6
9. Recording onto a PC .............................................................................................................................7
10. Complete settings ...............................................................................................................................8
11. Specifications ......................................................................................................................................9
12. Safety precautions ..............................................................................................................................9
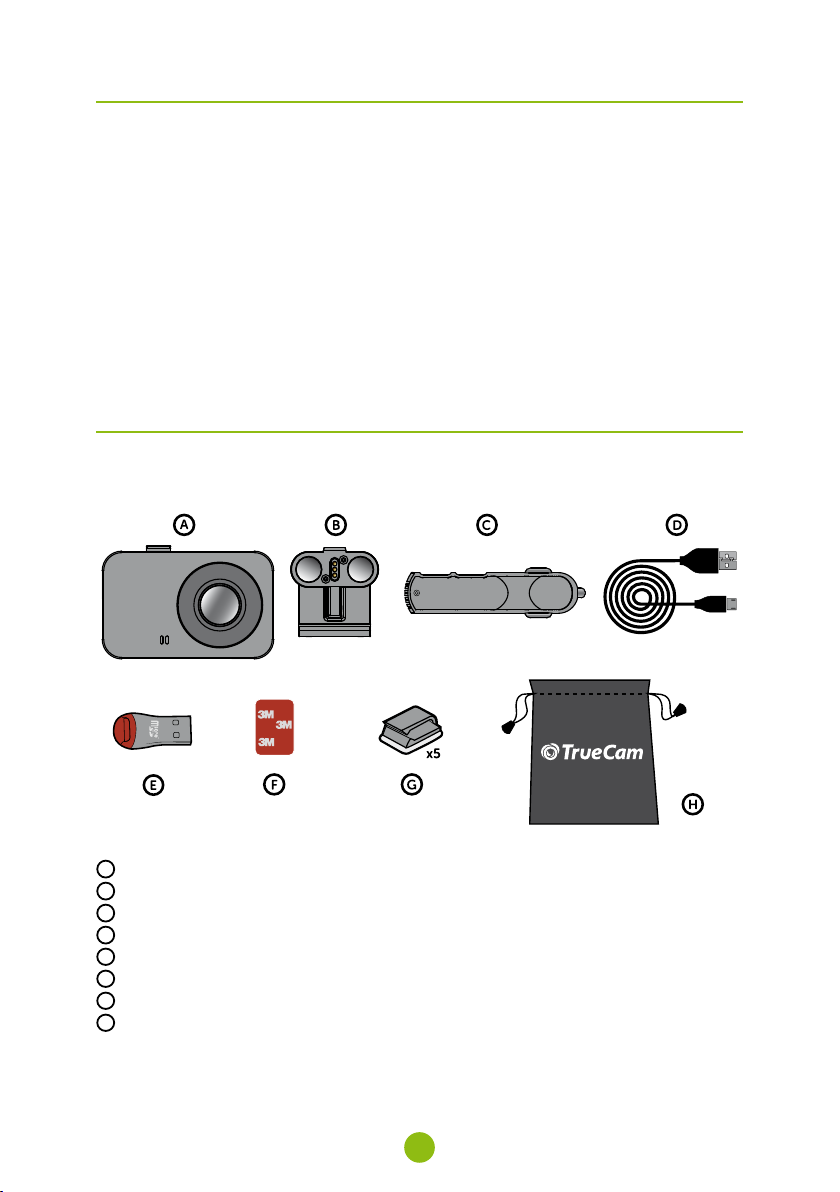
1. Pack contents
x2
A
TrueCam M5 Wi-Fi Dashcam
B
Magnetic holder with 3M adhesive pad
C
Cigarette lighter adapter with two USB outputs
D
3-metre micro USB charging cable
E
Micro SD/USB adapter to transfer files to PC
F
Spare 3M adhesive pads to attach holder to glass (2×)
G
3M adhesive power cable clips (5×)
H
Protective carry bag
2

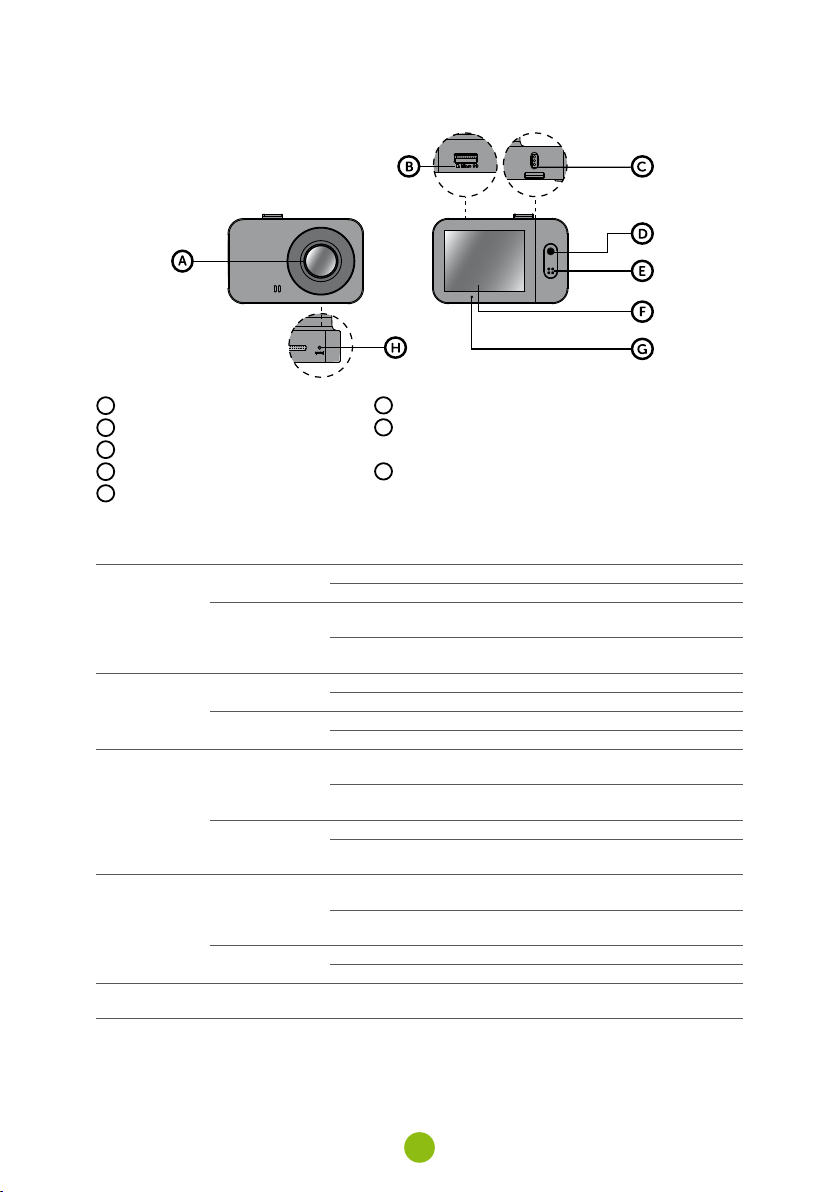
2. GettinG to know the camera
A
Wide-angle lens
B
Memory card slot
C
Magnetic holder input
D
OK / POWER button
E
MENU / MODE button
3. controls
video
mode
Photo
mode
Playback
mode
menu
anytime
OK / POWER
MENU / MODE
OK / POWER
MENU / MODE
OK / POWER
MENU / MODE
OK / POWER
MENU / MODE
RESET
F
2.0“ display
G
Status LED
(lit = camera on, blinking = recording)
H
RESET button
Press Start/stop recording
Hold Turn camera on/off
Press
Hold
Press Take p h oto
Hold Turn camera on/off
Press Open menu
Hold Switch mode
Press
Hold
Press Open menu
Hold
Press
Hold
Press Down
Hold Back
Press with
paperclip
Open menu
Whilst recording- protect recording
Switch mode
Whilst recording- mute/unmute audio recording
Start/stop playback
End fast playback
Turn camera on/off
Change playback speed during playback
Switch mode
Return to video selection during playback
Confirm
When entering characters- Up
Switch mode menu/camera menu
When entering characters- Confirm
Restart camera
3

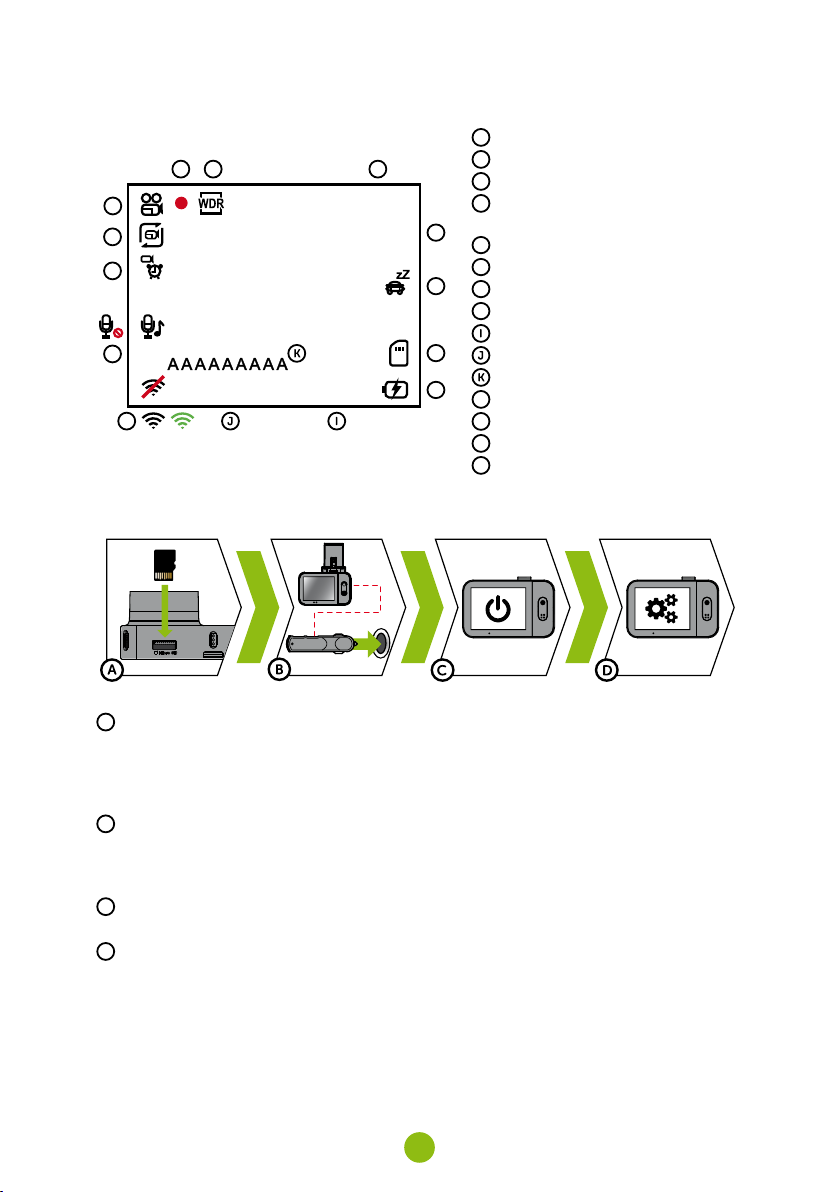
4. ikons and disPlay
B C D
A
O
3
N
M
01/01/2019
L
5. First usaGe
02:33:50
1080FHD
00:21:29
E
F
G
H
A
Mode
B
Recording started
C
WDR (wide dynamic range)
D
Remaining recording time /
length of current recording
E
Resolution
F
Parking mode
G
Memory card inserted
H
Power supply
Time
Date
Driver name
L
WiFi off / on / connected
M
Sound recording on / off
N
Motion detection
O
Loop recording length
A
Insert the microSD card as shown into the camera (card connectors facing the display)
Use Class 10 and higher branded cards up to 64 GB
›
Only remove the card, when the camera is turned off
›
When using the card for the first time, format it directly in the camera and repeat the formatting at
›
least once a month to ensure proper camera operation
B
Insert the adapter into the car cigarette lighter and connect it to the camera holder using the USB
cable
The camera is designed to operate only when connected to a power supply
›
Instead of a battery, the camera contains a supercapacitor that provides power which has several
›
times the lifespan of a conventional battery
C
Camera turns on automatically and begins recording
For some vehicles, the ignition key must be turned first
›
D
Perform basic camera settings before sticking the holder to the glass
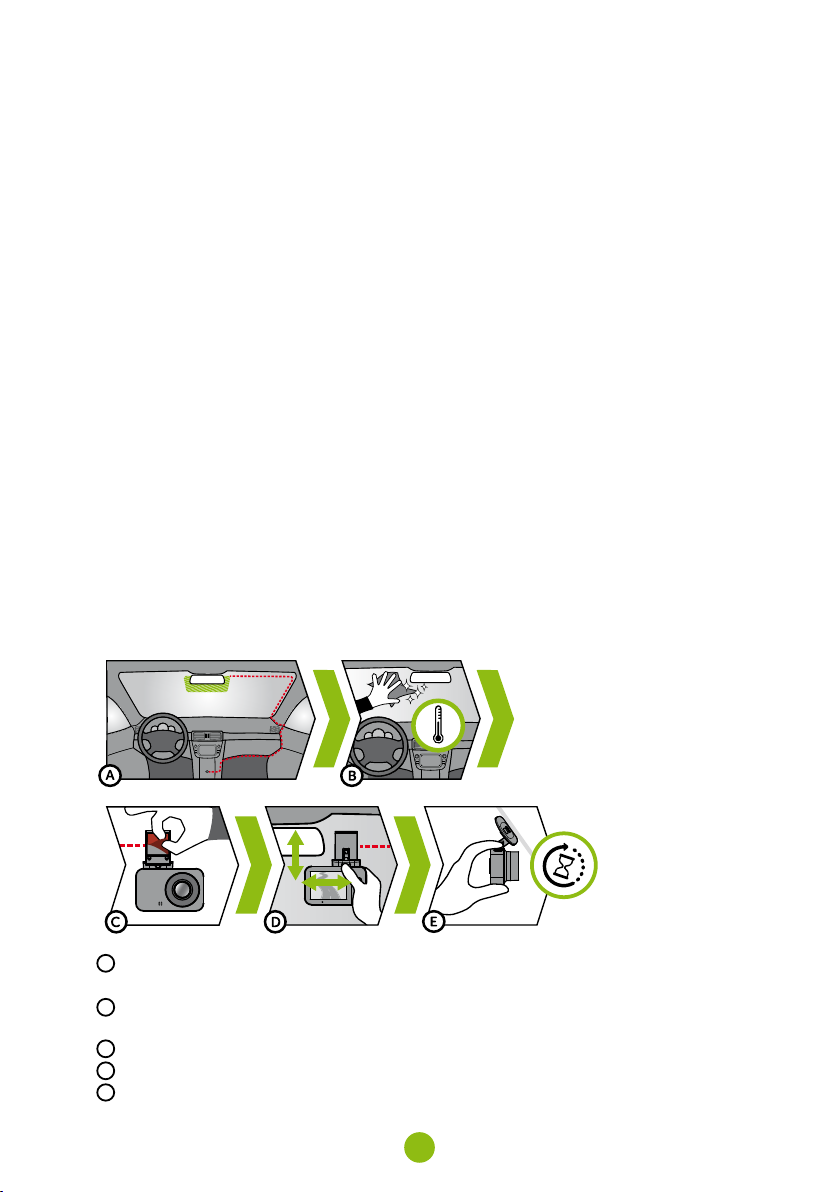
For maximum convenience, we recommend using the Wi-Fi application for settings – see section 8
›
4
6. basic Features
looP recordinG
Camera automatically splits the video into shorter files and overwrites the oldest unprotected files
›
when the SD card is full
This means you don‘t have to worry about free space on the card
›
File Protection
To protect the file from being overwritten, press MENU / MODE while recording or select Protect
›
from the playback mode menu
G-sensor
If the G-Sensor detects an impact, it automatically protects the video currently being captured
›
against being overwritten
Attention, when the settings are set to high sensitivity and you are driving over uneven surfaces this
›
can cause files to be automatically protected and the filling up of the SD card
motion detection
The camera automatically starts recording when it detects movement in the lens field of view and
›
stops recording after about 10 seconds.
If you stop recording manually or turn off the camera, motion detection is disabled
›
The function is for monitoring a parked vehicle, do not use whilst driving
›
To use the motion detection function, the camera must be turned on and connected to the power
›
supply
ParkinG mode
The camera will start recording automatically when it detects a jolt to the vehicle and if it does not
›
happen again, after about 30 seconds it stops recording and turns off
To use the parking mode function, the camera should be turned off and connected to the power
›
supply
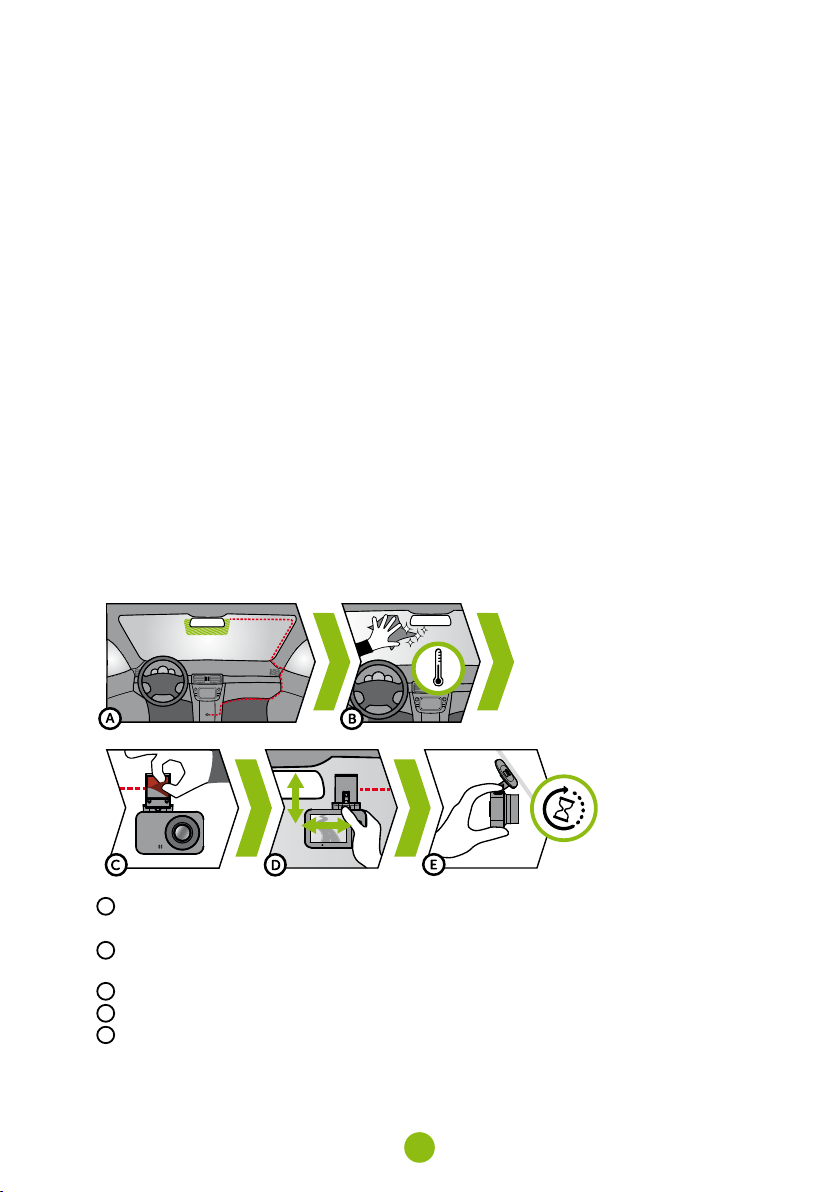
7. Placement on Glass
A
The ideal place to mount your camera is the space between the windscreen and the rear-view mirror
so as not to obstruct the driver‘s view
B
Make sure that the glass is clean and dry at the attachment point
The ideal bonding temperature is 20°C - 40°C
›
C
Remove the film from 3M adhesive pad on the camera holder
D
Before attaching it to the glass, point the camera to capture best view
E
Press the 3M adhesive pad onto the glass and hold it for a while
5

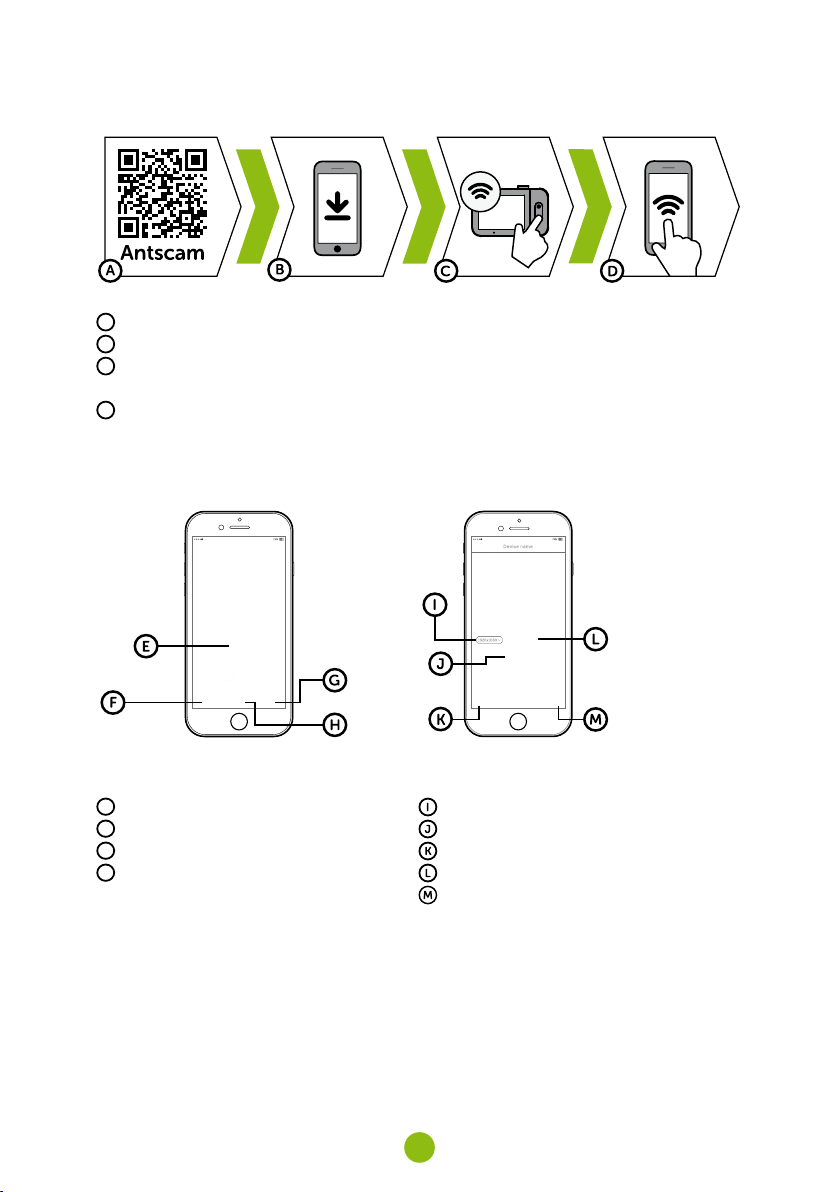
8. wiFi aPPlication
A
Scan the QR code or search for Antscam on the App Store/Google Play
B
Install the app on your smartphone or tablet
C
Turn on Wi-Fi on the camera - Camera menu -> Wi-Fi -> On -> Network Name (SSID) and Password
(PWD) will appear on the camera display
D
On the phone/tablet, connect to the Wi-Fi network with the camera name, enter the password (factory setting- 12345678), start the Antscam app and click the „+“ button to connect the camera
antscam aPP controls:
without connection
E
Connect the camera
F
Files dragged to your phone
G
Information
H
Camera
with connection
Change resolution
Start/stop recording
Files in the camera
Take photo
Camera settings
6

camera settinGs in antscam aPP
A
WiFi password
B
Record audio
A
B
C
D
E
F
G
H
C
WDR (wide dynamic range)
D
Date stamp
E
Loop recording
F
G-sensor sensitivity
G
Video resolution
H
Photo resolution
Format memory card
Firmware version
Default settings
9. recordinG onto a Pc
A
Remove the Micro SD card when the camera is off and insert it into the computer
Depending on the computer equipment, either directly, using a Micro SD/SD adapter or a Micro
›
SD/USB adapter (included)
B
Open the removable disk folder and play a file
Any regular video player can be used
›
C
Use a special player to play videos, including data, from the optional GPS module
At the same time as the video, you can view the speed travelled, the GPS coordinates and direc-
›
tions on the map
The app is available at http://truecam.com/download/M5W_player.zip
›
7

10. comPlete settinGs
settinGs descriPtion
Resolution Sets the video / photo resolution
Loop recording Sets the length of each loop
WDR When turned on, the camera compensates for luminance when there
Brightness Sets the overall brightness of the recording
Motion detection Turns motion detection on / off
Parking mode Turns parking mode on / off
Record audio Turns the microphone on / off
G-Sensor sensitivity Sets the sensitivity of the G-Sensor
Date stamp Displays time and date in video
WiFi Turns WiFi on / off
Date / time Sets date and time
Driver name Sets the text in the video
Screensaver The camera continues to record during screen saver
Volume Adjusts the volume of all camera sounds
System sounds Turns sound on / off for buttons and on / off status
Language Sets the camera menu language
Format Formats data on memory card
Default settings Sets camera to factory settings
Firmware version Displays the installed FW version
Higher resolution = more detail and larger file
60 fps = 60 frames per second = smoother video
Longer loop = larger file
Loop recording can also be turned off and recording will end if the SD
card is full
are very bright and very dark areas in the picture
At the same time, the camera automatically adjusts the brightness of
the recording depending on the light
More about this feature in Section 6
More about this feature in Section 6
Also possible to switch by holding down the MENU / MODE button
while recording
More about this feature in Section 6
Hold OK / POWER button = confirm
Hold MENU / MODE = cancel
The time and date are set automatically when pairing a camera with a
smart device via WiFi
Hold OK / POWER button = confirm
Hold MENU / MODE = cancel
Press any key to exit the screen saver
8

11. sPeciFications
Video Resolution Full HD (1920×1080) @ 30 fps
Angle of view 15 0°
Video format MP4, H.264
Image resolution Up to 12 Mpx
Photo format JPEG
Audio Built-in microphone that can be muted
LCD display 2“ 320×240
Memory MicroSD up to 64 GB
Connectivity WiFi
Features Magnetic holder, WDR, parking mode, motion detection, G-Sensor,
Menu languages English, Czech, German, Slovak, Polish, Hungarian
Power supply Supercapacitor
Dimensions 69 × 45 × 34 mm
HD (1280×720) @ 60 fps
HD (1280×720) @ 30 fps
loop recording, file protection, auto-start, magnetic GPS module with
speed camera detection (optional), magnetic CPL filter (optional)
12. saFety Precautions
Do not operate the camera whilst driving.
›
A film-coated or heated windscreen can reduce recording quality and interfere with the GPS module
›
(optional) signal.
Do not expose the camera to extreme temperatures – especially avoid direct sunlight.
›
Make sure that the legislation of the country where you operate the vehicle allows the use of
›
dashcams.
To prevent injury, the camera must always be fitted in the holder whilst driving and must not hinder
›
the use of safety features - especially airbags.
saFety Precautions
Use only the charger supplied with your device. Use of another type of charger may result in
›
malfunction and/or danger.
Do not use the charger in high moister environment. Never touch the charger when your hands or
›
feet are wet.
Allow adequate ventilation around the charger when using it to operate the device or to charge the
›
batter y. Do not cover the charger with paper or other objects that will reduce cooling. Do not use the
charger while it is inside a carrying case.
Connect the charger to a proper power source. The voltage requirements are found on the product
›
case and/or on the packaging.
Do not use the charger if it is visibly damaged. In case of damage, do not repair the equipment
›
yourself!
In case of device overheating, immediately disconnect the power source.
›
Charge the device under supervision only.
›
Packaging contains small pieces, that can be dangerous for children. Store the product always out
›
of reach of children. Bags or many of the pieces containing may cause suffocation after swallowing.
saFety notices For Power suPPly
For charging only use chargers, that is specified for this camera.
›
Use standard cables for charging, otherwise it could damage the device.
›
9

Do not use any damaged adapter or charger.
›
Power at room temperature, never charge at a temperature below 0°C or at a temperature higher
›
than 40°C.
Do not expose the charger to moisture, water, rain, snow or any kind of various liquids.
›
Never leave the camera unattended during power-up, short-circuiting or accidental overcharging
›
can cause aggressive chemicals to leak, explode, or cause a fire!
In the case of excessive heating of the camera, immediately disconnect it from the power supply.
›
Do not place charger on or near flammable objects. Beware of curtains, carpets, tablecloths etc.
›
carinG For your device
Taking good care of your device will ensure trouble-free operation and reduce the risk of damage.
›
Keep your device away from excessive moisture and extreme temperatures and avoid exposing your
›
device to direct sunlight or strong ultraviolet light for extended periods of time.
Do not drop your device or subject it to severe shock.
›
Do not subject your device to sudden and severe temperature changes. This could cause
›
moisture condensation inside the unit, which could damage your device. In the event of moisture
condensation, allow the device to dry out completely before use.
The screen surface can easily be scratched. Avoid touching it with sharp objects.
›
Never clean your device when it is powered on. Use a soft, lint-free cloth to wipe the screen and the
›
exterior of your device. Do not use paper towels to clean the screen.
Never attempt to disassemble, repair or make any modifications to your device. Disassembly,
›
modification or any attempt at repair could cause damage to your device and even bodily injury or
property damage and will void any warranty.
Do not store or carry flammable liquids, gases or explosive materials in the same compartment as
›
your device, its parts or accessories.
To discourage theft, do not leave the device and accessories in plain view in an unattended vehicle.
›
Overheating may damage the device.
›
other inFormation
1) For households: This marking indicates that this product should not be disposed with other household
wastes throughout the EU. To prevent possible harm to the environment or human health from uncontrolled waste disposal, recycle it responsibly to promote the sustainable reuse of material resources. To
return your used device, please use the return and collection systems or contact the retailer where the
product was purchased. They can take this product for environmental safe recycling. In case of incorrect
disposal of this kind of wastes user can be fined according to national laws. User information for disposal
of electric and electronic devices in countries outside the EU: The symbol stated above (crossed recycle
bin) is valid only in countries in European Union. For correct disposal of electric and electronic devices
ask your city hall or distributor of these devices. Everything is expressed by the symbol of crossed recycle bin on product, cover or printed materials.
2) You can determine a warranty service at the place of purchase. In case of technical problems or
queries contact your dealer who will inform you about the following procedure. Follow the rules for
work with electric devices. User is not allowed to disassembly the device neither replace any of its
components. To reduce the risk of electric shock, do not remove or open the cover. In case of incorrect setup and plug in of device you will expose yourself risk of electric shock.
Products are covered by a two year warranty, unless otherwise stated. The warranty period of the
batter y is 24 months and 6 months for its capacity.
10

declaration oF conFormity
Hereby, elem6 s.r.o., declares that all TrueCam M5 products are in compliance with the essential
re-quirements and other relevant provisions of Directive 2014/53/EU and 2014/30/EU. Products
are intended for sale without any restriction in Germany, Czech Republic, Slovak Republic, Poland,
Hungary and other EU countries. You can download the Declaration of Conformity from the website:
www.truecam.com/support/doc.
Frequency band(s) in which the radio equipment operates: 2.400–2.4835 GHz
›
Maximum radio-frequency power transmitted in the frequency band(s) in which the radio equipment
›
operates: 10,2 dBm
manuFacturer
elem6 s.r.o., Braškovská 308/15, 16100 Praha 6
www.truecam.com
®
TrueCam
All rights reserved.
brand is a registered trademark and our products are protected by patent.
11
Autokamera s WiFi
a magnetickým designem
CS – Uživatelská příručka
obsah
1. Obsah balení .........................................................................................................................................2
2. Seznámení s kamerou ...........................................................................................................................3
3. Ovládání ................................................................................................................................................3
4. Ikony na displeji .....................................................................................................................................4
5. První zapnutí ..........................................................................................................................................4
6. Základní funkce .....................................................................................................................................5
7. Umístění na sklo ....................................................................................................................................5
8. WiFi aplikace .........................................................................................................................................6
9. Přehrávání na PC ...................................................................................................................................7
10. Úplné nastavení ...................................................................................................................................8
11. Specifikace ..........................................................................................................................................9
12. Bezpečnostní zásady a upozornění ....................................................................................................9
1. obsah balení
x2
A
Autokamera TrueCam M5 WiFi
B
Magnetický držák s 3M nálepkou
C
Adaptér do autozapalovače se dvěma USB výstupy
D
Napájecí microUSB kabel o délce 3 m
E
Micro SD/USB adaptér k přenosu souborů do PC
F
Náhradní 3M nálepka pro opětovné přilepení držáku na sklo (2×)
G
3M držák pro uchycení napájecího kabelu (5×)
H
Ochranný obal pro uschování a přenášení
2
2. seznámení s kamerou
A
Širokoúhlý objektiv
B
Slot pro paměťovou kartu
C
Magnetický vstup držáku
D
Tlačítko OK / POWER
E
Tlačítko MENU / MODE
3. ovládání
OK / POWER
režim
video
režim
Foto
režim
Přehrávání
menu
kdykoliv
MENU / MODE
OK / POWER
MENU / MODE
OK / POWER
MENU / MODE
OK / POWER
MENU / MODE
RESET
F
2.0“ displej
G
Stavová dioda
(svítí = kamera je zapnutá, bliká = nahrávání)
H
Tlačítko RESET
Stisknutí Spustit/Ukončit nahrávání
Přidržení Zapnout/Vypnout kameru
Stisknutí
Přidržení
Stisknutí Vyfotit
Přidržení Zapnout/Vypnout kameru
Stisknutí Otevřít menu
Přidržení Přepnout režim
Stisknutí
Přidržení
Stisknutí Otevřít menu
Přidržení
Stisknutí
Přidržení
Stisknutí Dolů
Přidržení Zpět
Stisknutí
sponkou
Otevřít menu
Při nahrávání ochránit záznam
Přepnout režim
Při nahrávání zapnout/vypnout záznam zvuku
Spustit/Přerušit přehrávání
Ukončit zrychlené přehrávání
Zapnout/Vypnout kameru
Při přehrávání přepnout rychlost přehrávání
Přepnout režim
Při přehrávání návrat na výběr videa
Potvrdit
Při zadávání znaků nahoru
Přepínání menu režimu/menu kamery
Při zadávání znaků potvrdit
Restartovat kameru
3
4. ikony na disPleji
B C D
A
O
3
N
M
01/01/2019
L
5. První zaPnutí
02:33:50
1080FHD
00:21:29
E
F
G
H
A
Režim
B
Spuštění záznamu
C
WDR (wide dynamic range)
D
Zbývající čas nahrávání /
délka současného záznamu
E
Rozlišení
F
Parkovací režim
G
Paměťová karta vložena
H
Napájení
Čas
Datum
Jméno řidiče
L
WiFi vypnuta / zapnuta / připojena
M
Záznam zvuku zapnutý / vypnutý
N
Detekce pohybu
O
Délka záznamu do smyčky
A
Vložte microSD kartu dle obrázku na kameře (konektory karty směrem k displeji)
Používejte značkové karty třídy 10 a vyšší o kapacitě až 64 GB
›
Kartu vyjímejte pouze při vypnuté kameře
›
Kartu při prvním použití zformátujte přímo v kameře a alespoň jednou za měsíc formátování opa-
›
kujte pro zajištění správného fungování kamery
B
Zapojte adaptér do autozapalovače a pomocí USB kabelu jej propojte s držákem kamery
Kamera je určena k provozu pouze při připojení k napájení
›
Namísto baterie obsahuje kamera superkondenzátor, který umožňuje napájení a má několikaná-
›
sobně delší živostnost, než klasická baterie
C
Kamera se automaticky zapne a začne nahrávat
U některých vozidel je nejprve nutné otočit klíčem v zapalování
›
D
Před nalepením držáku na sklo proveďte základní nastavení kamery
Pro maximální pohodlí doporučujeme k nastavení použít WiFi aplikaci – viz část 8.
›
4
6. základní Funkce
záznam do smyčky
Kamera automaticky dělí záznam na kratší video soubory a při zaplnění SD karty začne přepisovat
›
nejstarší nechráněné soubory novými
Díky tomu se nemusíte starat o volné místo na kartě
›
ochrana souborů
Chcete-li soubor ochránit proti přepsání, stiskněte tlačítko MENU/MODE v průběhu nahrávání ane-
›
bo zvolte Chránit v menu Režimu přehrávání
G-senzor
Pokud G-senzor zaznamená náraz, automaticky ochrání aktuálně pořizované video proti přepsání
›
Pozor, při nastavení vysoké citlivosti a jízdě po nerovném povrchu může dojít k samovolnému
›
chránění souborů a úplnému zaplnění SD karty
detekce Pohybu
Kamera začne automaticky nahrávat, když zaznamená pohyb v zorném poli objektivu a pokud
›
pohyb ustane, tak po cca 10 vteřinách záznam ukončí
Pokud záznam ukončíte ručně nebo kameru vypnete, detekce pohybu se deaktivuje
›
Funkce slouží k monitorování zaparkovaného vozidla, nepoužívejte za jízdy
›
Pro použití funkce Detekce pohybu musí být kamera zapnutá a v napájení
›
Parkovací režim
Kamera začne automaticky nahrávat, když zaznamená otřes vozidla a pokud se pohyb neopakuje,
›
tak po cca 30 vteřinách záznam ukončí a vypne se
Pro použití funkce Parkovací režim musí být kamera vypnutá a v napájení
›
7. umístění na sklo
A
Ideálním místem pro připevnění autokamery je prostor mezi čelním sklem a zpětným zrcátkem tak,
aby nepřekážela řidiči ve výhledu
B
Ujistěte se, že sklo je v místě uchycení čisté a suché
Ideální teplota pro lepení je 20°C – 40°C
›
C
Sundejte folii z 3M nálepky na držáku kamery
D
Před přilepením na sklo nasměrujte zapnutou kameru tak, aby měla správný výhled
E
Přitlačte 3M nálepku na sklo a chvíli držte
5
8. wiFi aPlikace
A
Načtěte QR kód nebo vyhledejte aplikaci Antscam na App Store/Google Play
B
Nainstalujte aplikaci do svého chytrého telefonu nebo tabletu
C
Zapněte WiFi v kameře – menu kamery -> WiFi -> Zapnout -> na displeji kamery se zobrazí název
sítě (SSID) a heslo (PWD)
D
Na telefonu/tabletu se připojte na WiFi síť s názvem kamery, zadejte heslo (z výroby 12345678),
spusťte aplikaci Antscam a klikněte na tlačítko „+“ pro připojení kamery
ovládání aPlikace antscam:
bez PřiPojení
E
Připojit kameru
F
Soubory přetažené do telefonu
G
Informace
H
Kamera
Po PřiPojení
Nastavení rozlišení
Spustit/Ukončit nahrávání
Soubory v kameře
Vyfotit
Nastavení kamery
6

nastavení kamery v aPlikaci antscam
A
WiFi heslo
B
Záznam zvuku
A
B
C
D
E
F
G
H
C
WDR (wide dynamic range)
D
Časová známka
E
Záznam do smyčky
F
Citlivost G-senzoru
G
Rozlišení videa
H
Rozlišení fotografie
Formátovat kartu
Verze firmware
Tovární nastavení
9. Přehrávání na Pc
A
Vyjměte Micro SD kartu z vypnuté kamery a vložte ji do počítače
V závislosti na vybavení počítače buďto přímo, pomocí Micro SD/SD adaptéru nebo Micro SD/USB
›
adaptéru (součást balení)
B
Otevřete složku vyměnitelného disku a přehrajte libovolný soubor
Můžete použít jakýkoliv běžný přehrávač videa
›
C
Pro přehrávání videí včetně dat z doplňkově prodejného GPS modulu použijte speciální přehrávač
Zároveň s videem je možné sledovat údaje o rychlosti, GPS souřadnicích a trasu na mapě
›
Aplikace je dostupná na adrese http://truecam.com/download/M5W_player.zip
›
7

10. ÚPlné nastavení
nastavení PoPis
Rozlišení Nastaví rozlišení videa / fotografie
Záznam do smyčky Nastaví délku jednotlivých smyček
WDR Při zapnutí kamera vyrovnává světelnost, pokud jsou v obraze zároveň
Jas Nastaví celkovou světlost záznamu
Detekce pohybu Zapne / vypne detekce pohybu
Parkovací režim Zapne / vypne parkovací režim
Záznam zvuku Zapne / vypne mikrofon
Citlivost G-Senzoru Nastaví citlivost G-Senzoru
Časová známka Zobrazí čas a datum ve videu
WiFi Zapne / Vypne WiFi
Datum / čas Nastaví datum a čas
Jméno řidiče Nastaví libovolný text ve videu
Spořič obrazovky Při spořiči obrazovky kamera nadále nahrává
Hlasitost Nastaví hlasitost všech zvuků kamery
Systémové zvuky Zapne / vypne zvuk tlačítek a zapnutí / vypnutí
Jazyk Nastaví jazyk menu kamery
Formátovat Formátuje data na paměťové kartě
Tovární nastavení Nastaví kameru do továrního nastavení
Verze firmwaru Zobrazí nainstalovanou verzi FW
Vyšší rozlišení = více detailů a větší soubor
60 fps = 60 snímků za vteřinu = plynulejší video
Delší smyčka = větší soubor
Záznam do smyčky je také možné vypnout a v případě zaplnění SD
karty se záznam ukončí
velmi světlé a velmi tmavé plochy
Kamera zároveň automaticky reguluje jas záznamu podle světelných
podmínek
Více informací o této funkci v kapitole 6
Více informací o této funkci v kapitole 6
Je také možné přepínat přidržením tlačítka MENU / MODE při nahrávání
Více informací o této funkci v kapitole 6
Přidržení tlačítka OK / POWER = potvrdit
Přidržení tlačítka MENU / MODE = zrušit
Při spárování kamery s chytrým zařízením přes WiFi se čas a datum
nastaví automaticky
Přidržení tlačítka OK / POWER = potvrdit
Přidržení tlačítka MENU / MODE = zrušit
Spořič ukončíte stisknutím libovolného tlačítka
8

11. sPeciFikace
Rozlišení videa Full HD (1920×1080) @ 30 fps
Úhel záběru 150°
Formát videa MP4, komprese H.264
Rozlišení fotografie Až 12 Mpx
Formát fotografie JPEG
Zvuk Vestavěný mikrofon s možností vypnutí
LCD displej 2“ 320×240
Paměť Micro SD až 64 GB
Konektivita WiFi
Funkce Magnetický držák, WDR, parkovací režim, detekce pohybu, G-senzor,
Jazyky menu Čeština, Angličtina, Němčina, Slovenština, Polština, Maďarština
Napájení Superkondenzátor
Rozměry 69 × 45 × 34 mm
HD (1280×720) @ 60 fps
HD (1280×720) @ 30 fps
záznam do smyčky, ochrana souborů, automatické spuštění, magnetický GPS modul s detekcí radarů (doplňkově), magnetický CPL filtr
(doplňkově)
12. bezPečnostní zásady a uPozornění
Neovládejte kameru při řízení.
›
Čelní sklo potažené jakoukoliv folií a vyhřívané sklo mohou omezovat kvalitu záznamu a signál GPS
›
modulu (volitelné).
Nevystavujte kameru extrémním teplotám – zejména dlouhou dobu na přímém slunci.
›
Ujistěte se, že legislativa státu, kde provozujete vozidlo, umožňuje používání záznamových kamer.
›
Pro předcházení zranění musí být kamera za jízdy vždy uchycena v držáku a nesmí blokovat cestu
›
bezpečnostních prvků – zejména airbagů.
bezPečnostní zásady
Používejte pouze nabíječku dodávanou s přístrojem. Při použití jiného typu nabíječky může dojít
›
k poruše přístroje anebo může vzniknout jiné nebezpečí.
Nepoužívejte nabíječku ve vysoce vlhkém prostředí. Nikdy se nabíječky nedotýkejte mokrýma
›
rukama nebo stojíte-li ve vodě.
Při napájení přístroje nebo nabíjení baterie ponechte kolem nabíječky dostatečný prostor pro
›
cirkulaci vzduchu. Nepřikrývejte nabíječku papíry ani jinými předměty, které by mohly zhoršit její
chlazení. Nepoužívejte nabíječku uloženou v transportním obalu.
Nabíječku připojujte ke správnému zdroji napětí. Údaje o napětí jsou uvedeny na plášti výrobku
›
anebo na jeho obalu.
Nepoužívejte nabíječku, je-li zjevně poškozena. V případě poškození zařízení sami neopravujte!
›
V případě nadměrného zahřívání přístroj okamžitě odpojte od přívodu energie.
›
Nabíjejte zařízení pod dohledem.
›
Balení obsahuje malé dílky, které mohou být nebezpečné pro děti. Produkt vždy ukládejte mimo
›
dosah dětí. Sáčky nebo mnoho dílků, které obsahují, mohou po spolknutí nebo po nasazení na hlavu
způsobit udušení.
bezPečnostní uPozornění Pro naPájení
Pro nabíjení používejte jen nabíječku, která je pro tuto kameru určena.
›
Používejte standardní kabely pro nabíjení, jinak by mohlo dojít k poškození zařízení.
›
9
 Loading...