

TrueCam H5 WiFi User Manual
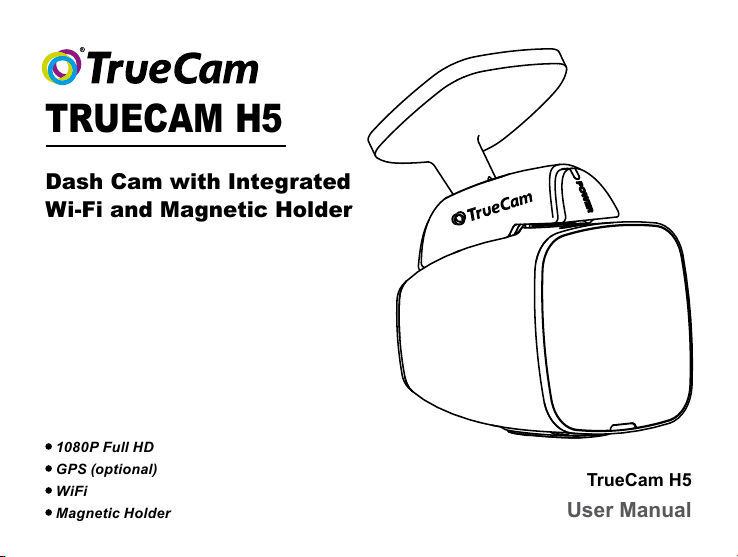
TRUECAM H5
Dash Cam with Integrated
Wi-Fi and Magnetic Holder
1080P Full HD
GPS (optional)
WiFi
Magnetic Holder
TrueCam H5
User Manual
1
Product Diagram & Functions ........................................................................................................1
a) Device Introduction ..........................................................................................................................1
b) Button Functions ..............................................................................................................................2
c) LED Status List ..................................................................................................................................... 3
d) Product Accessories ............................................................................................................................. 3
Basic Setup ......................................................................................................................................4
a) SD Card Installation ............................................................................................................................. 4
b) GPS (optional) ........................................................................................................................................... 4
c) Charging ............................................................................................................................................... 5
Basic Features .................................................................................................................................6
a) Motion detection ..............................................................................................................................6
b) Loop Settings ....................................................................................................................................... 6
c) LDWS System ...................................................................................................................................... 6
d) G-Sensor Function ............................................................................................................................... 6
e) Parking Mode ....................................................................................................................................... 7
Modes ....................................................................................................................................... 10
a) Video Mode ........................................................................................................................................ 10
b) Photo Mode ........................................................................................................................................ 10
c) Playback Mode ................................................................................................................................... 10
Important Features .................................................................................................................. 11
Connection .....................................................................................................................................11
a) Connecting to a Computer ................................................................................................................. 11
Menu Settings ................................................................................................................................12
a) In Video / Photo Mode ........................................................................................................................ 12
b) In Playback Mode ............................................................................................................................... 13
Software Player..............................................................................................................................18
Technical Specications ...............................................................................................................19
4
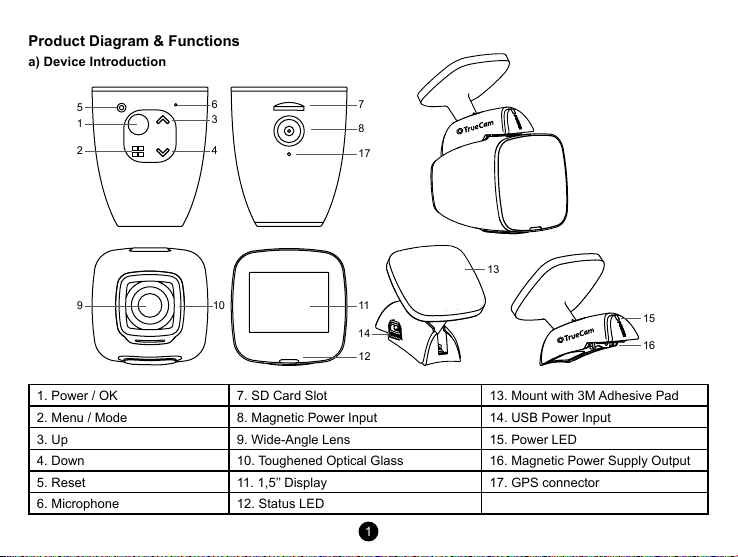
Product Diagram & Functions
a) Device Introduction
5
1
2 4
9
6 7
3
10
8
17
13
11
14
12
15
16
1. Power / OK 7. SD Card Slot 13. Mount with 3M Adhesive Pad
2. Menu / Mode 8. Magnetic Power Input 14. USB Power Input
3. Up 9. Wide-Angle Lens 15. Power LED
4. Down 10. Toughened Optical Glass 16. Magnetic Power Supply Output
5. Reset 11. 1,5’’ Display 17. GPS connector
6. Microphone 12. Status LED
1
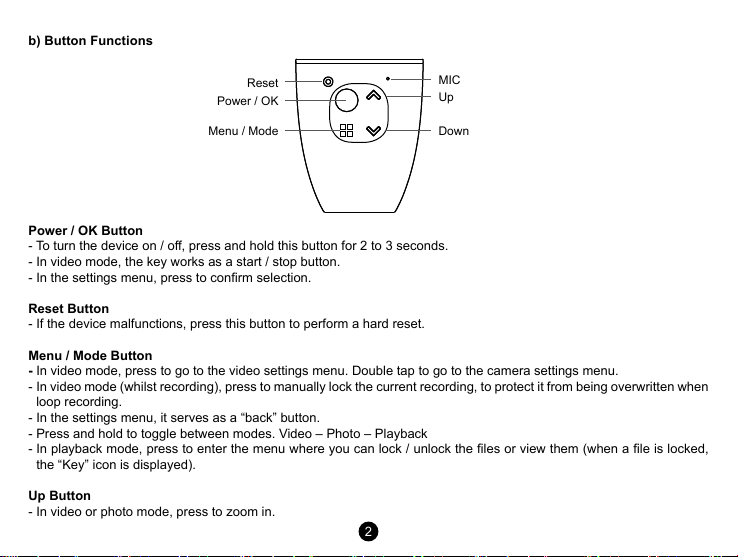
b) Button Functions
Reset
Power / OK
Menu / Mode Down
Power / OK Button
- To turn the device on / o, press and hold this button for 2 to 3 seconds.
- In video mode, the key works as a start / stop button.
- In the settings menu, press to conrm selection.
Reset Button
- If the device malfunctions, press this button to perform a hard reset.
Menu / Mode Button
- In video mode, press to go to the video settings menu. Double tap to go to the camera settings menu.
- In video mode (whilst recording), press to manually lock the current recording, to protect it from being overwritten when
loop recording.
- In the settings menu, it serves as a “back” button.
- Press and hold to toggle between modes. Video – Photo – Playback
- In playback mode, press to enter the menu where you can lock / unlock the les or view them (when a le is locked,
the “Key” icon is displayed).
Up Button
- In video or photo mode, press to zoom in.
MIC
Up
2
- In video mode, press and hold to rotate the screen 180 degrees.
- In the settings menu, press to go to the previous item.
- In playback mode, press to select the previous le.
- In playback mode, when the camera is recording video, press to rewind.
Down Button
- In video or photo mode, press to zoom out.
- In video mode, press and hold to turn on Wi-Fi.
- In the settings menu, press to go to the next item.
- In playback mode, press to select the next le.
- In playback mode, when the camera is playing video, press to forward.
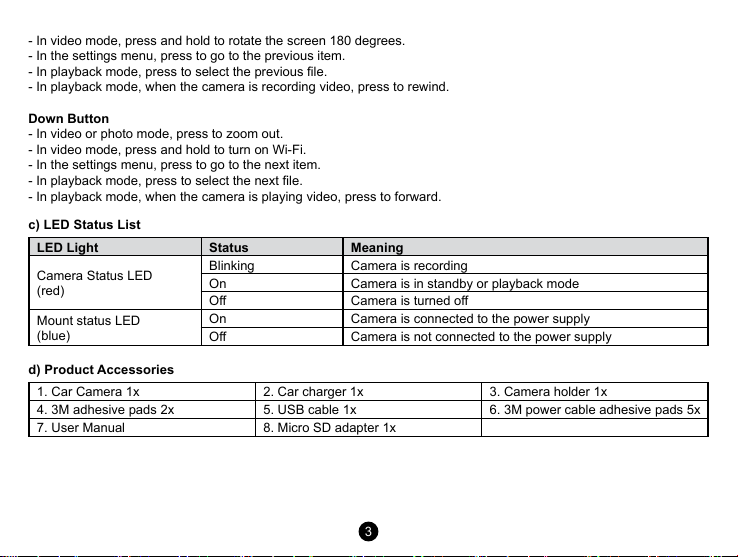
c) LED Status List
LED Light Status Meaning
Camera Status LED
(red)
Mount status LED
(blue)
d) Product Accessories
1. Car Camera 1x 2. Car charger 1x 3. Camera holder 1x
4. 3M adhesive pads 2x 5. USB cable 1x 6. 3M power cable adhesive pads 5x
7. User Manual 8. Micro SD adapter 1x
Blinking Camera is recording
On Camera is in standby or playback mode
O Camera is turned o
On Camera is connected to the power supply
O Camera is not connected to the power supply
3
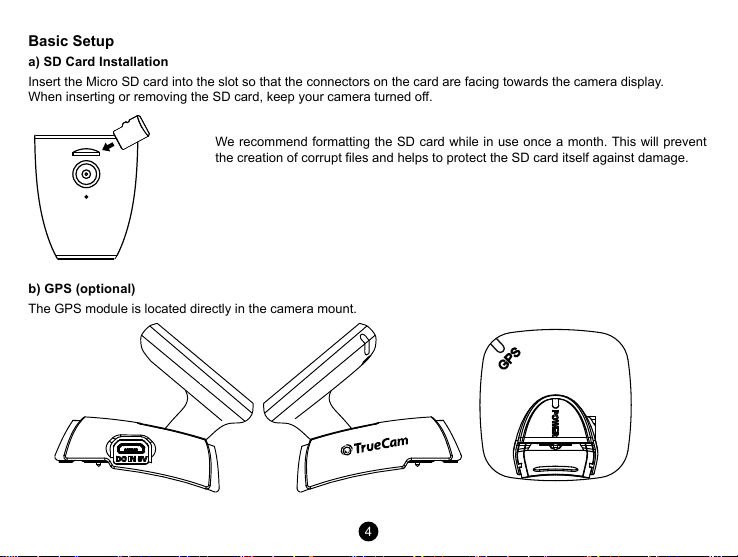
Basic Setup
a) SD Card Installation
Insert the Micro SD card into the slot so that the connectors on the card are facing towards the camera display.
When inserting or removing the SD card, keep your camera turned o.
We recommend formatting the SD card while in use once a month. This will prevent
the creation of corrupt les and helps to protect the SD card itself against damage.
b) GPS (optional)
The GPS module is located directly in the camera mount.
4

Install the device on the windscreen with the 3M adhesive pad. When not connected to a GPS satellite, the GPS icon
will be shown in red on the LCD display. When connected to a GPS satellite, the GPS icon will be shown
on the LCD display.
c) Charging
Connect the USB charging port of the mount to the input port of the car charger / cigarette lighter, then start the engine.
The camera automatically turns on and starts recording. Note: recording will only start automatically when the socket in
the vehicle is powered by the ignition key.
5
Basic Features
a) Motion detection
1. In video mode, press the Menu button to enter the settings, then select Motion Detection.
2. If the camera registers moving objects within its range, a ashing red dot “ “ will appear on the display and the
device will begin recording. When the device does not detect a moving object, it automatically stops recording after
10 seconds.
Note: We do not recommend using motion detection and loop recording at the same time. The motion detection
function is superior in this respect. We recommend that you have the camera connected to the power
supply for optimal use, otherwise the recording time is limited by the capacity of the battery, which
decreases with each recording made.
b) Loop Settings
Loop recording allows continuous recording regardless of the memory card capacity. You can choose from three time
intervals: 1 min / 3 min / 5 min / 10 min. The selected interval determines the length of recording time which the camera
will save. The advantage of using this setup is that you will never run out of space on your memory card. Moreover, it is
very easy to send very small les via e.g. e-mail for use as evidence.
c) LDWS System
The Lane Departure Warning System (LDWS) alerts the driver as soon as the vehicle starts veering out of its lane. This
system is designed to minimize trac accidents due to driver inattention caused by distractions or drowsiness. It’s an
additional feature with a live video preview.
d) G-Sensor Function
In case of an accident, the gravity sensor (G-sensor) can gather direction and other important collision data. According
to the value set for the G-sensor sensitivity, the camera will determine whether to lock the recording or not. If protection
mode is not turned on, the current video may be overwritten by loop recording. Be careful when setting the G-sensor to a
high sensitivity as it may cause le locking even when driving on a rough road. This might ll up the memory card quickly.
6
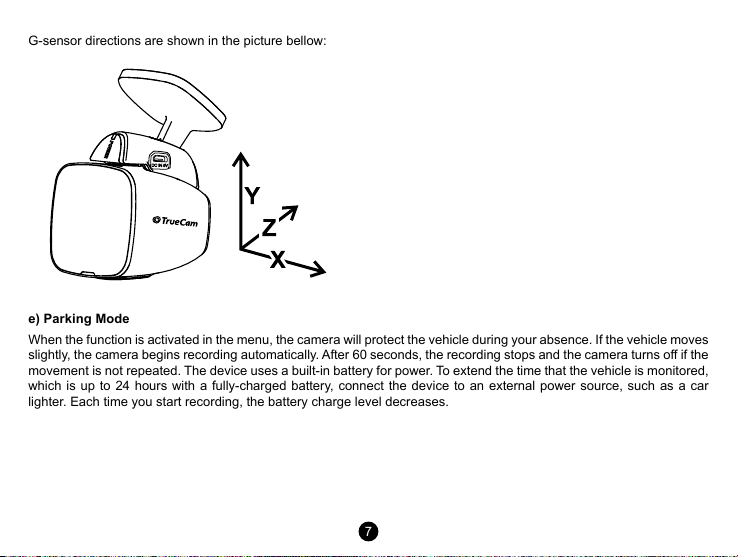
G-sensor directions are shown in the picture bellow:
e) Parking Mode
When the function is activated in the menu, the camera will protect the vehicle during your absence. If the vehicle moves
slightly, the camera begins recording automatically. After 60 seconds, the recording stops and the camera turns o if the
movement is not repeated. The device uses a built-in battery for power. To extend the time that the vehicle is monitored,
which is up to 24 hours with a fully-charged battery, connect the device to an external power source, such as a car
lighter. Each time you start recording, the battery charge level decreases.
7
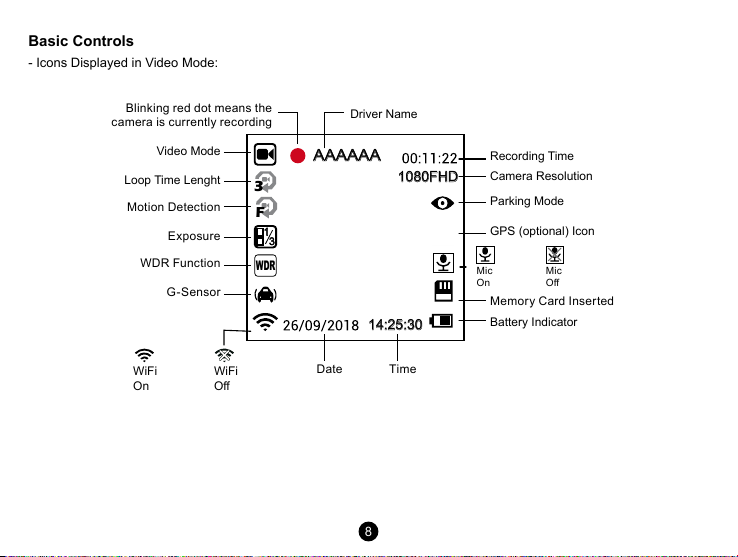
Basic Controls
WDR
1
3
AAAAAA
- Icons Displayed in Video Mode:
Blinking red dot means the
camera is currently recording
Video Mode
Loop Time Lenght
Motion Detection
Exposure
WDR Function
G-Sensor
3
F
WiFi
On
WiFi
O
Driver Name
1080FHD
14:25:30
TimeDate
8
Recording Time
Camera Resolution
Parking Mode
GPS (optional) Icon
Mic
On
Mic
O
Memory Card Inserted
Battery Indicator
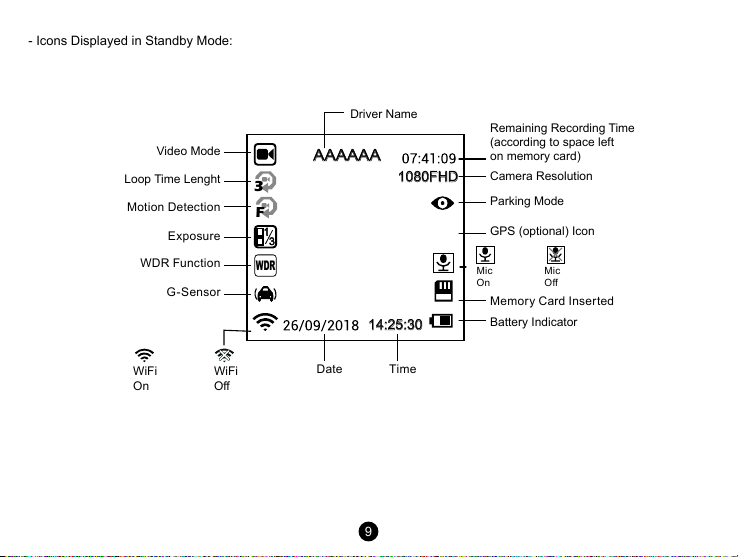
- Icons Displayed in Standby Mode:
WDR
1
3
AAAAAA
Video Mode
Loop Time Lenght
Motion Detection
Exposure
WDR Function
G-Sensor
WiFi
On
WiFi
O
Driver Name
3
1080FHD
F
14:25:30
TimeDate
Remaining Recording Time
(according to space left
on memory card)
Camera Resolution
Parking Mode
GPS (optional) Icon
Mic
On
Mic
O
Memory Card Inserted
Battery Indicator
9
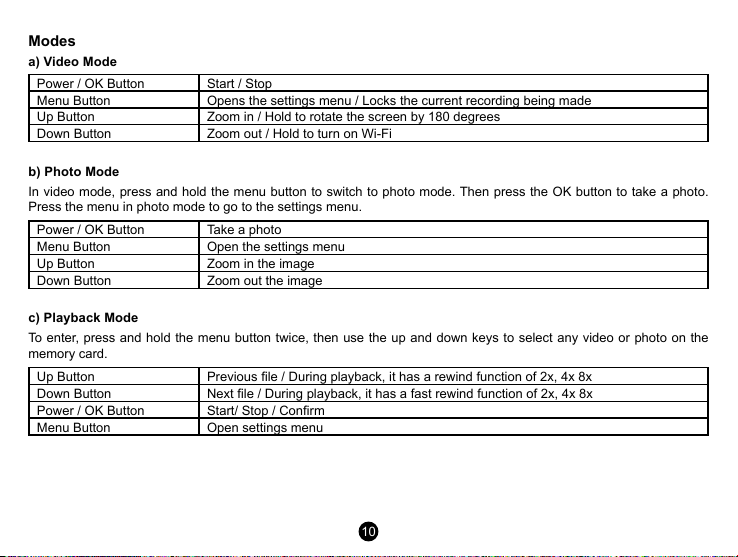
Modes
a) Video Mode
Power / OK Button Start / Stop
Menu Button Opens the settings menu / Locks the current recording being made
Up Button Zoom in / Hold to rotate the screen by 180 degrees
Down Button Zoom out / Hold to turn on Wi-Fi
b) Photo Mode
In video mode, press and hold the menu button to switch to photo mode. Then press the OK button to take a photo.
Press the menu in photo mode to go to the settings menu.
Power / OK Button Take a photo
Menu Button Open the settings menu
Up Button Zoom in the image
Down Button Zoom out the image
c) Playback Mode
To enter, press and hold the menu button twice, then use the up and down keys to select any video or photo on the
memory card.
Up Button Previous le / During playback, it has a rewind function of 2x, 4x 8x
Down Button Next le / During playback, it has a fast rewind function of 2x, 4x 8x
Power / OK Button Start/ Stop / Conrm
Menu Button Open settings menu
10
Important Features
Automatically Display GPS Coordinates (optional) – display the GPS position directly on the video. The position is
displayed in the form of coordinates.
Automatically Display Speed (optional) – display the speed of the vehicle directly on the video. This can be used for
review later. Speed displayed is based on GPS satellites and is only indicative.
Video Lock – protect the video against being overwritten by subsequent recordings. Videos can be locked in both video
and playback mode.
Motion Detection – automatically starts recording when the camera detects sucient motion, for example when revers-
ing.
Delay Power O – this feature is used to delay the shutdown of the camera after the car engine has been turned o.
Therefore, you can record what happens when you leave your vehicle.
Connection
a) Connecting to a Computer
1. Insert the microSD card into your computer (or into a USB or SD adapter).
2. Open the removeable disk folder and play any le.
11
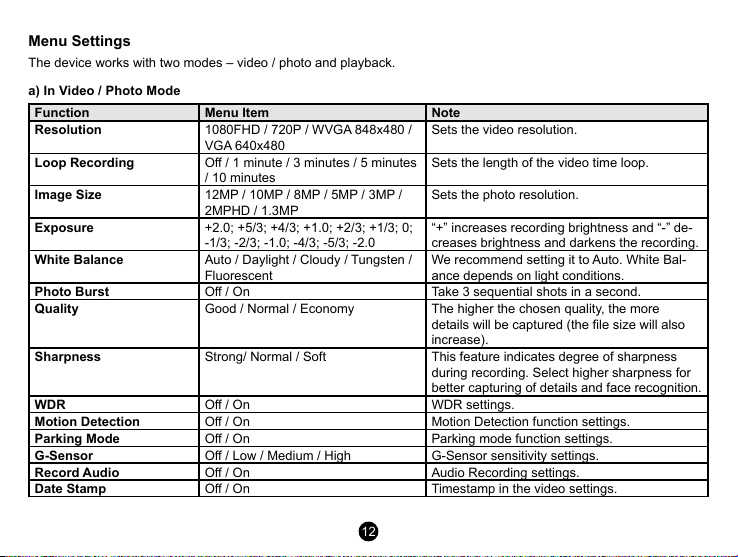
Menu Settings
The device works with two modes – video / photo and playback.
a) In Video / Photo Mode
Function Menu Item Note
Resolution
Loop Recording
Image Size
Exposure
White Balance
Photo Burst
Quality
Sharpness
WDR
Motion Detection
Parking Mode
G-Sensor
Record Audio
Date Stamp
1080FHD / 720P / WVGA 848x480 /
VGA 640x480
O / 1 minute / 3 minutes / 5 minutes
/ 10 minutes
12MP / 10MP / 8MP / 5MP / 3MP /
2MPHD / 1.3MP
+2.0; +5/3; +4/3; +1.0; +2/3; +1/3; 0;
-1/3; -2/3; -1.0; -4/3; -5/3; -2.0
Auto / Daylight / Cloudy / Tungsten /
Fluorescent
O / On Take 3 sequential shots in a second.
Good / Normal / Economy The higher the chosen quality, the more
Strong/ Normal / Soft This feature indicates degree of sharpness
O / On WDR settings.
O / On Motion Detection function settings.
O / On Parking mode function settings.
O / Low / Medium / High G-Sensor sensitivity settings.
O / On Audio Recording settings.
O / On Timestamp in the video settings.
12
Sets the video resolution.
Sets the length of the video time loop.
Sets the photo resolution.
“+” increases recording brightness and “-” de-
creases brightness and darkens the recording.
We recommend setting it to Auto. White Bal-
ance depends on light conditions.
details will be captured (the le size will also
increase).
during recording. Select higher sharpness for
better capturing of details and face recognition.
Driver Name
Date/Time
Power o Delay
Auto Power O
Beep Sound
Screensaver
Frequency
Language
Format
Factory Settings
Software Version
b) In Playback Mode
Delete
Protect
Presentation
- - - - - - To conrm the selected character, press Menu.
YY/MM/DD Date and Time settings.
O / 10 s / 20 s / 30 s Sets the delay when turning the camera o.
O / 1 min / 3 min / 5 min The camera switches o automatically in
O / On Switches the camera tones On / O.
Display o: 1 min / 3 min / 5 min / O Instead of playing recorded footage, the
50Hz / 60Hz Video frequency settings.
English / French / German / Russian
/ Polish / Czech / Slovak / Hungarian
/ Lithuanian
Cancel / OK Formats data on the memory card.
Cancel / OK Resets the camera to the original factory
xxxx Displays the installed FW version.
Delete current / Delete all
Lock current / Unlock current / Lock all / Unlock all
2 seconds / 5 seconds / 8 seconds
13
Press the OK button to conrm your full name.
standby mode after a given period of time if it
does not detect any motion.
camera screen can be turned o after a certain
time interval.
Language settings.
settings.
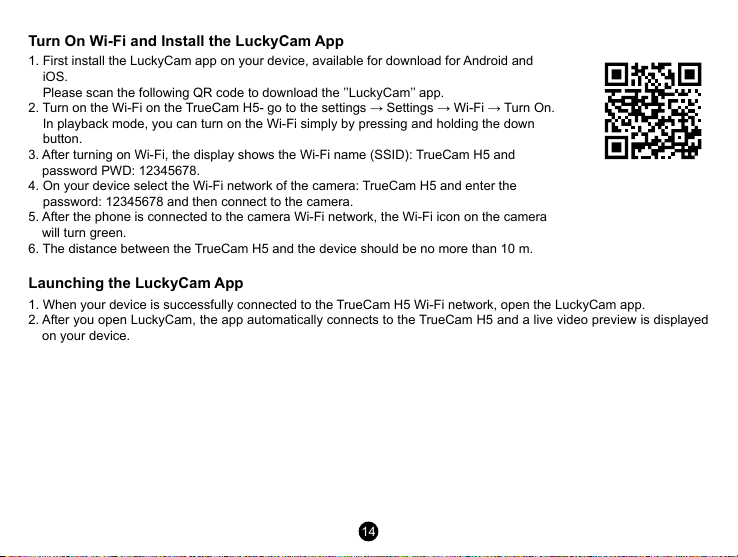
Turn On Wi-Fi and Install the LuckyCam App
1. First install the LuckyCam app on your device, available for download for Android and
iOS.
Please scan the following QR code to download the ’’LuckyCam’’ app.
2. Turn on the Wi-Fi on the TrueCam H5- go to the settings → Settings → Wi-Fi → Turn On.
In playback mode, you can turn on the Wi-Fi simply by pressing and holding the down
button.
3. After turning on Wi-Fi, the display shows the Wi-Fi name (SSID): TrueCam H5 and
password PWD: 12345678.
4. On your device select the Wi-Fi network of the camera: TrueCam H5 and enter the
password: 12345678 and then connect to the camera.
5. After the phone is connected to the camera Wi-Fi network, the Wi-Fi icon on the camera
will turn green.
6. The distance between the TrueCam H5 and the device should be no more than 10 m.
Launching the LuckyCam App
1. When your device is successfully connected to the TrueCam H5 Wi-Fi network, open the LuckyCam app.
2. After you open LuckyCam, the app automatically connects to the TrueCam H5 and a live video preview is displayed
on your device.
14
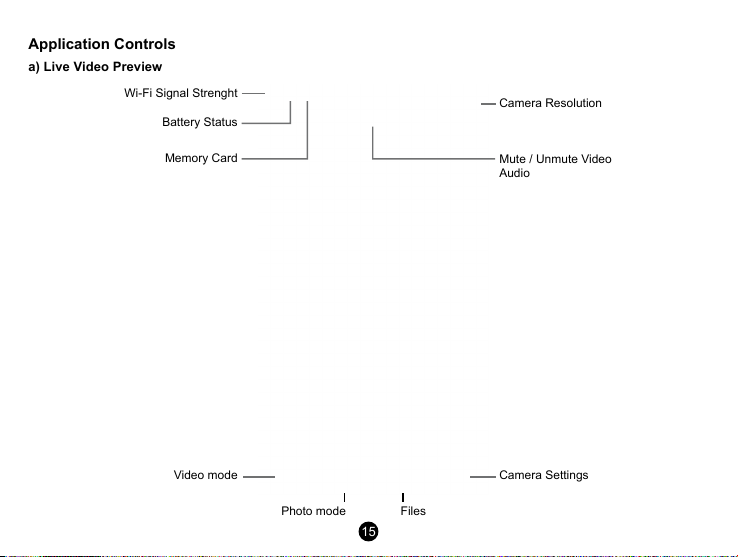
Application Controls
a) Live Video Preview
Wi-Fi Signal Strenght
Battery Status
Camera Resolution
Memory Card
Video mode
Photo mode Files
15
Mute / Unmute Video
Audio
Camera Settings

b) File List
16

c) Camera Settings Using Wi-Fi
Local folder
App Settings
G-senzor
Automatic recording
Video Loop Record
Video resolution
Motion detect
WDR
Microphone
Display date time
WiFi name (SSID)
WiFi password (PSW)
Exposure compensation
FW Version
Parking Monitor
Residual space
Press start format
Camera Language
Date and Time
Reset Camera Setting
17
Software Player
* The player uses data from the GPS module which isn’t included in the basic package
The TrueCam H5 dash cam oers you smart and useful software which allows you to view captured video, the map,
GPS coordinates and speed all on one screen.
Please download here: http://truecam.com/download/H5_player.zip
18
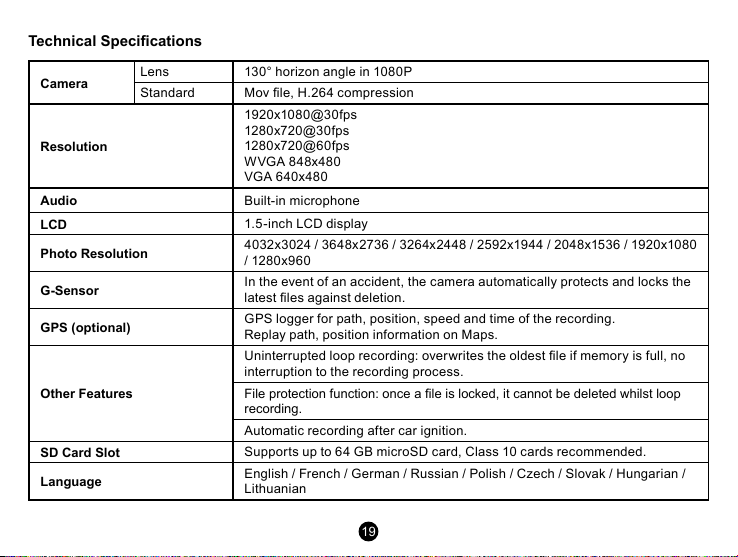
Technical Specications
Camera
Resolution
Audio
LCD
Photo Resolution
G-Sensor
GPS (optional)
Other Features
SD Card Slot
Language
Lens 130° horizon angle in 1080P
Standard Mov le, H.264 compression
1920x1080@30fps
1280x720@30fps
1280x720@60fps
WVGA 848x480
VGA 640x480
Built-in microphone
1.5-inch LCD display
4032x3024 / 3648x2736 / 3264x2448 / 2592x1944 / 2048x1536 / 1920x1080
/ 1280x96 0
In the event of an accident, the camera automatically protects and locks the
latest les against deletion.
GPS logger for path, position, speed and time of the recording.
Replay path, position information on Maps.
Uninterrupted loop recording: overwrites the oldest le if memory is full, no
interruption to the recording process.
File protection function: once a le is locked, it cannot be deleted whilst loop
recording.
Automatic recording af ter car ignition.
Suppor ts up to 64 GB microSD card, Class 10 cards recommended.
English / French / German / Russian / Polish / Czech / Slovak / Hungarian /
Lithuanian
19
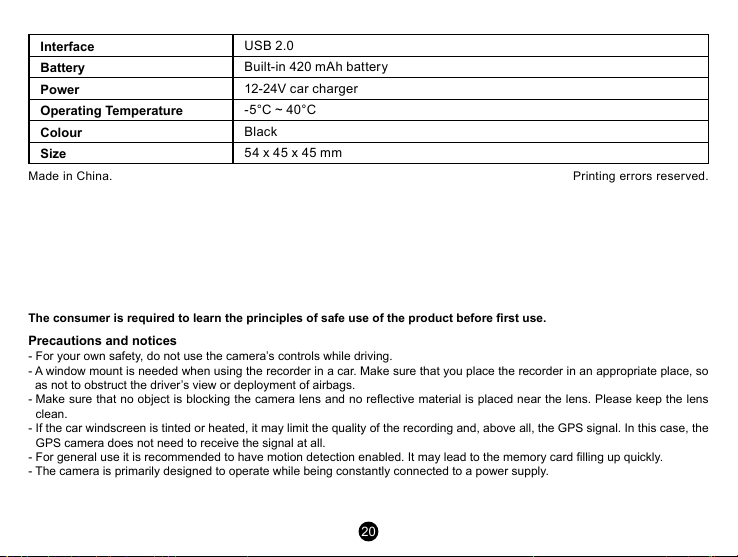
Interface
Battery
Power
Operating Temperature
Colour
Size
Made in China. Printing errors reser ved.
The consumer is required to learn the principles of safe use of the product before rst use.
Precautions and notices
- For your own safety, do not use the camera’s controls while driving.
- A window mount is needed when using the recorder in a car. Make sure that you place the recorder in an appropriate place, so
as not to obstruct the driver’s view or deployment of airbags.
- Make sure that no object is blocking the camera lens and no reective material is placed near the lens. Please keep the lens
clean.
- If the car windscreen is tinted or heated, it may limit the quality of the recording and, above all, the GPS signal. In this case, the
GPS camera does not need to receive the signal at all.
- For general use it is recommended to have motion detection enabled. It may lead to the memory card lling up quickly.
- The camera is primarily designed to operate while being constantly connected to a power supply.
USB 2.0
Built-in 420 mAh battery
12-24V car charger
-5°C ~ 40°C
Black
54 x 45 x 45 mm
20
Safety precautions
- Use only the charger supplied with your device. Use of another type of charger may result in malfunction and/or danger.
- Do not use the charger in high moister environment. Never touch the charger when your hands or feet are wet.
- Allow adequate ventilation around the charger when using it to operate the device or to charge the battery. Do not cover the
charger with paper or other objects that will reduce cooling. Do not use the charger while it is inside a carrying case.
- Connect the charger to a proper power source. The voltage requirements are found on the product case and/or on the packaging.
- Do not use the charger if it is visibly damaged. In case of damage, do not repair the equipment yourself!
- In case of device overheating, immediately disconnect the power source.
- Charge the device under supervision only.
- Packaging contains small pieces, that can be dangerous for children. Store the product always out of reach of children. Bags or
many of the pieces containing may cause suocation after swallowing.
Safety notices for Li-ion batteries
- Before rst use, fully charge the battery.
- For charging only use chargers, that is specied for this type of battery.
- Use standard cables for charging, otherwise it could damage the device.
- Never connect to a mechanically damaged charger or if the batteries are swollen. Do not use batteries in this condition due to
risk of explosion.
- Do not use any damaged adapter or charger.
- Charge at room temperature, never charge at a temperature below 0°C or at a temperature higher than 40°C.
- Avoid dropping the battery, don‘t puncture, or mutilate it. Denitely do not attempt to repair a damaged battery.
- Do not expose the charger or battery to moisture, water, rain, snow or any kind of various liquids.
- Do not leave the battery in the car, do not expose to direct sunlight and do not place it near heat sources. Strong light or high
temperatures can damage the battery.
- Never leave batteries without supervision during charging, short circuit or accidentally overcharge. Some batteries are unsuitable
for fast charging or being charged excessivly. This can cause a shock, or due to charger failure, may cause leakage of aggressive
chemicals, explosion or subsequent re!
- In the case of excessive heating of the battery during charging, immediately disconnect it from the power supply.
- Do not place charger and charging battery on or near ammable objects. Beware of curtains, carpets, tablecloths etc.
- Once the battery or device with integrated battery is fully charged, disconnect it from the power supply.
- Keep the battery out of the reach of children and animals.
- Never disassemble the charger or battery. If the battery is integrated, do not disassemble the device, unless stated otherwise.
Any such attempt is dangerous and can cause injury or damage to the product and subsequent loss of warranty.
21
- Do not dispose worn or damaged batteries into the trash, re or into heating devices, but hand them in at collection points for
hazardous waste.
Caring for your device
- Taking good care of your device will ensure trouble-free operation and reduce the risk of damage.
- Keep your device away from excessive moisture and extreme temperatures and avoid exposing your device to direct sunlight or
strong ultraviolet light for extended periods of time.
- Do not drop your device or subject it to severe shock.
- Do not subject your device to sudden and severe temperature changes. This could cause moisture condensation inside the
unit, which could damage your device. In the event of moisture condensation, allow the device to dry out completely before use.
- The screen surface can easily be scratched. Avoid touching it with sharp objects.
- Never clean your device when it is powered on. Use a soft, lint-free cloth to wipe the screen and the exterior of your device. Do
not use paper towels to clean the screen.
- Never attempt to disassemble, repair or make any modications to your device. Disassembly, modication or any attempt at
repair could cause damage to your device and even bodily injury or property damage and will void any warranty.
- Do not store or carry ammable liquids, gases or explosive materials in the same compartment as your device, its parts or
accessories.
- To discourage theft, do not leave the device and accessories in plain view in an unattended vehicle.
- Overheating may damage the device.
22
Other information
1) For households: This marking indicates that this product should not be disposed with other household wastes
throughout the EU. To prevent possible harm to the environment or human health from uncontrolled waste
disposal, recycle it responsibly to promote the sustainable reuse of material resources. To return your used
device, please use the return and collection systems or contact the retailer where the product was purchased.
They can take this product for environmental safe recycling. In case of incorrect disposal of this kind of wastes
user can be ned according to national laws. User information for disposal of electric and electronic devices in
countries outside the EU: The symbol stated above (crossed recycle bin) is valid only in countries in European
Union. For correct disposal of electric and electronic devices ask your city hall or distributor of these devices. Everything is
expressed by the symbol of crossed recycle bin on product, cover or printed materials.
2) You can determine a warranty service at the place of purchase. In case of technical problems or queries contact your dealer who
will inform you about the following procedure. Follow the rules for work with electric devices. User is not allowed to disassembly
the device neither replace any of its components. To reduce the risk of electric shock, do not remove or open the cover. In case of
incorrect setup and plug in of device you will expose yourself risk of electric shock.
Products are covered by a two year warranty, unless otherwise stated. The warranty period of the battery is 24 months and 6
months for its capacity.
23
Declaration of Conformity
Hereby, elem6 s.r.o., declares that all TrueCam H5 products are in compliance with the essential requirements
and other relevant provisions of Directive 2014/53/EU. Products are intended for sale without any restriction
in Germany, Czech Republic, Slovak Republic, Poland, Hungary and other EU countries. You can download
the Declaration of Conformity from the website: www.truecam.com/support/doc.
Frequency band(s) in which the radio equipment operates: 2.412–2.472 GHz
Maximum radio-frequency power transmitted in the frequency band(s) in which the radio equipment operates: 10,2 dBm
Manufacturer:
elem6 s.r.o., Braškovská 308/15, 16100 Praha 6
www.truecam.com
Misprints and changes in the manual are reserved.
24
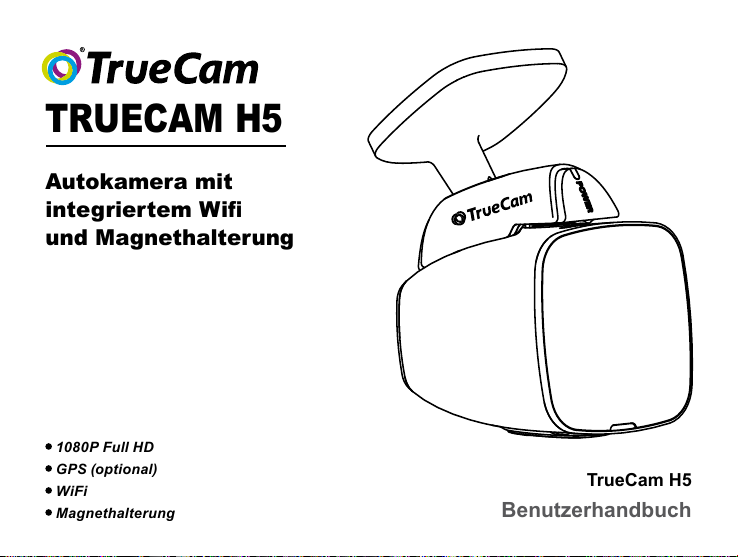
TRUECAM H5
Autokamera mit
integriertem Wi
und Magnethalterung
1080P Full HD
GPS (optional)
WiFi
Magnethalterung
TrueCam H5
Benutzerhandbuch
1
Produktschema & Funktionen ........................................................................................................1
a) Vorstellung des Produkts .................................................................................................................... 1
b) Tastenfunktion .....................................................................................................................................2
c) LED-Gerätestatus ................................................................................................................................. 3
d) Lieferumfang ........................................................................................................................................ 3
Grundeinstellungen .........................................................................................................................4
a) Installieren der Speicherkarte .............................................................................................................4
b) *GPS-Moduls........................................................................................................................................4
c) Stromversorgung .................................................................................................................................. 5
Basisfunktionen ...............................................................................................................................6
a) Bewegungserkennung ................................................................................................................ 6
b) Zeitschling ...........................................................................................................................................6
c) LDWS System ...................................................................................................................................... 6
d) Funktion des G-Sensors.......................................................................................................................6
e) Parkmodus ........................................................................................................................................... 7
Betriebsarten .................................................................................................................................10
a) Aufnahmemodus ................................................................................................................................10
b) Fotograeren ............................................................................................................................ 10
c) Wiedergabemodus .........................................................................................................................10
Wichtige Funktionen .....................................................................................................................11
Konnektivität ..................................................................................................................................11
a) Anschluss an Computer ..................................................................................................................... 11
Einstellungsmenü ..........................................................................................................................12
a) Im Modus Aufnahme / Fotograeren ................................................................................................. 12
b) Im Wiedergabemodus ....................................................................................................................... 13
Softwareplayer ...............................................................................................................................18
Technische Daten ..........................................................................................................................19
* GPS moduls (optional).
4
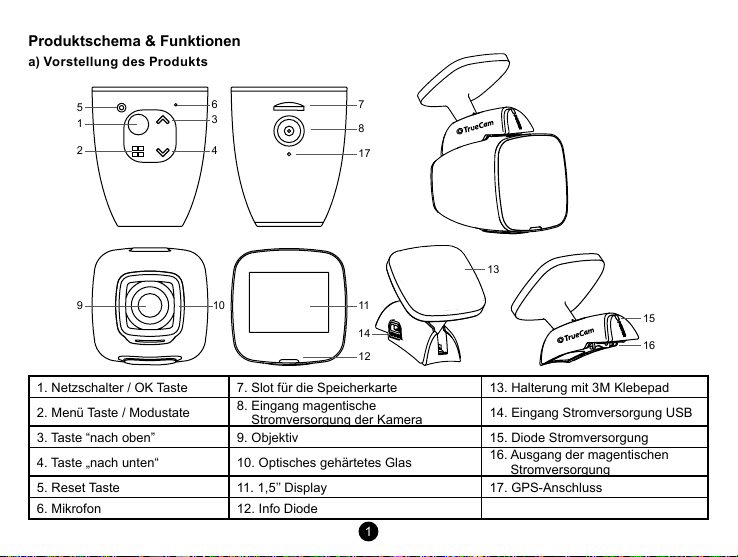
Produktschema & Funktionen
a) Vorstellung des Produkts
5
1
2 4
9
6 7
3
10
8
17
13
11
14
12
15
16
1. Netzschalter / OK Taste 7. Slot für die Speicherkarte 13. Halterung mit 3M Klebepad
2. Menü Taste / Modustate
8. Eingang magentische
Stromversorgung der Kamera
14. Eingang Stromversorgung USB
3. Taste “nach oben” 9. Objektiv 15. Diode Stromversorgung
4. Taste „nach unten“ 10. Optisches gehärtetes Glas
16. Ausgang der magentischen
Stromversorgung
5. Reset Taste 11. 1,5’’ Display 17. GPS-Anschluss
6. Mikrofon 12. Info Diode
1
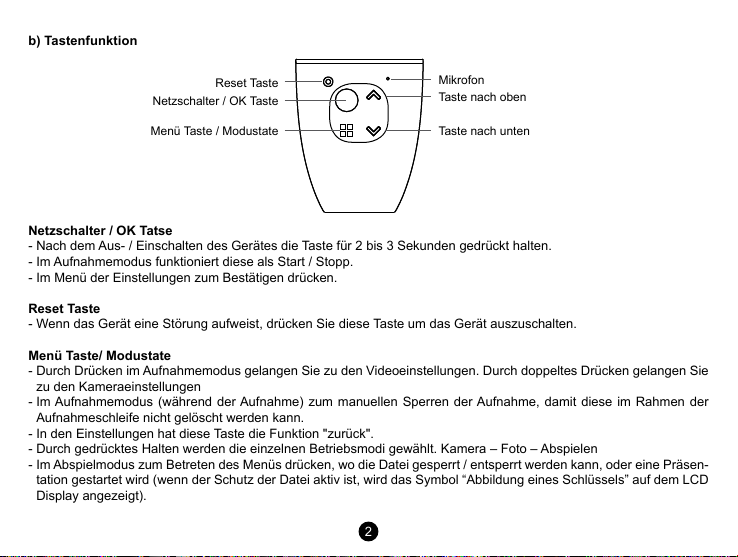
b) Tastenfunktion
Netzschalter / OK Taste
Menü Taste / Modustate Taste nach unten
Netzschalter / OK Tatse
- Nach dem Aus- / Einschalten des Gerätes die Taste für 2 bis 3 Sekunden gedrückt halten.
- Im Aufnahmemodus funktioniert diese als Start / Stopp.
- Im Menü der Einstellungen zum Bestätigen drücken.
Reset Taste
- Wenn das Gerät eine Störung aufweist, drücken Sie diese Taste um das Gerät auszuschalten.
Menü Taste/ Modustate
- Durch Drücken im Aufnahmemodus gelangen Sie zu den Videoeinstellungen. Durch doppeltes Drücken gelangen Sie
zu den Kameraeinstellungen
- Im Aufnahmemodus (während der Aufnahme) zum manuellen Sperren der Aufnahme, damit diese im Rahmen der
Aufnahmeschleife nicht gelöscht werden kann.
- In den Einstellungen hat diese Taste die Funktion "zurück".
- Durch gedrücktes Halten werden die einzelnen Betriebsmodi gewählt. Kamera – Foto – Abspielen
- Im Abspielmodus zum Betreten des Menüs drücken, wo die Datei gesperrt / entsperrt werden kann, oder eine Präsen-
tation gestartet wird (wenn der Schutz der Datei aktiv ist, wird das Symbol “Abbildung eines Schlüssels” auf dem LCD
Display angezeigt).
Reset Taste
Mikrofon
Taste nach oben
2
 Loading...