

Truecam A7 User Manual

Car DVR with GPS Logger
& Speed Camera Detector
● 2304x1296@30FPS
● GPS Logger & Speed Camera Detector
● Lighting Keyboard
● CPL & UV Lens available
User manual


Product Picture & Function..........................................................................................2
a) Device Introduction...................................................................................................................2
b) Button Function.........................................................................................................................3
c) LED Light Status List ...............................................................................................................5
d) Product Accessoris...................................................................................................................5
Basic Operation............................................................................................................5
a) TF Card Installation...................................................................................................................5
b) GPS/Speed Camera Detector Installation................................................................................6
c) Power Supplied..........................................................................................................................6
d) CPL Installation (Optional).........................................................................................................7
e) G-sensor Function...................................................................................................................8
f) Video Mode................................................................................................................................9
g) Take Picture............................................................................................................................10
h) Playback Mode......................................................................................................................11
Menu Setting........................................................................................................12
a) Video Mode............................................................................................................................12
b) Playback Mode..................................................................................................................13
Connection..........................................................................................................14
a) Connect to TV.........................................................................................................................14
b) Connect to Computer...............................................................................................................14
DVR Player..................................................................................................................15
Product Specication................................................................................................16
3

Product Picture & Function
15 16 17
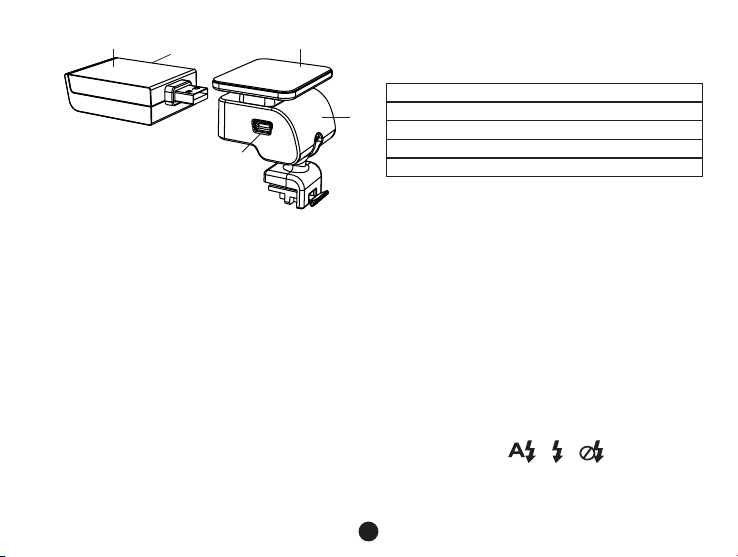
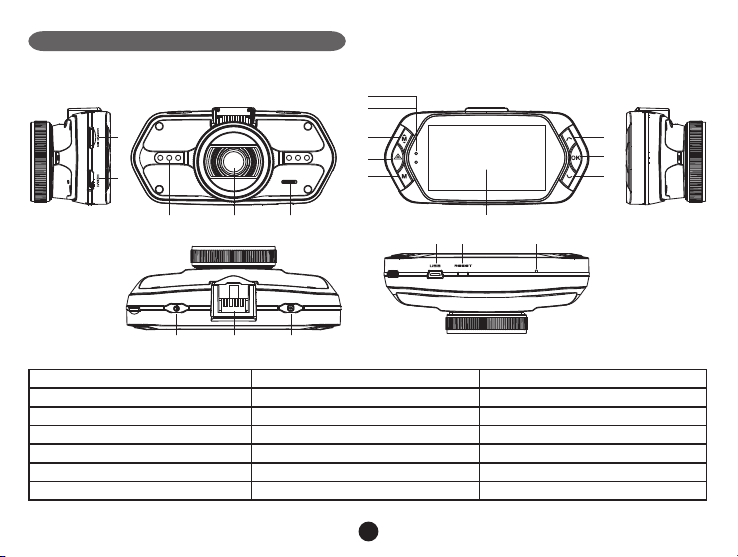
a) Device Introduction
1
2
6
7
8
9
10
12
13
14
5
3
1. TF Card Slot 2. HDMI Port 3. LED Light
4. Lens 5. Speaker 6. Status Light (Blue)
7. Charging Light (Red) 8. Menu Button 9. File Protection Button
10. Mode Button 11. LCD Display 12. Up Button
13. OK Button 14. Down Button 15. Power Button
16. Holder Connector 17. Photo Button 18. USB Port
19. Reset Button 20. Microphone
4
4
11
18 19 20
21
22
24
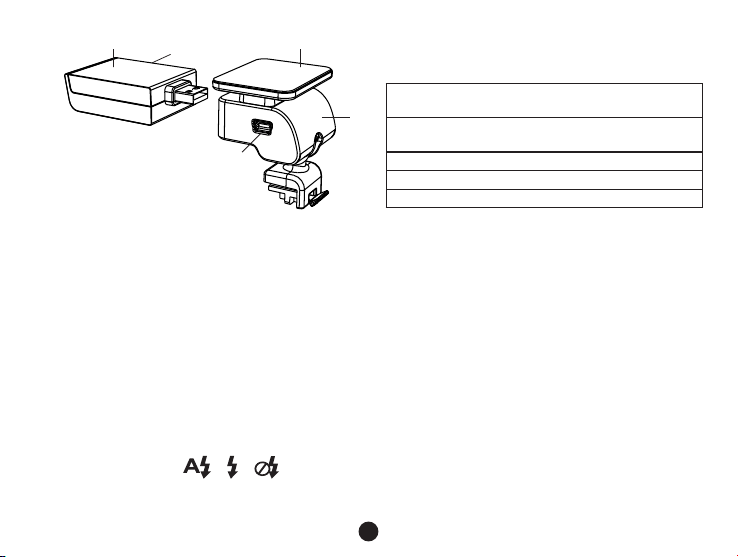
21. GPS/Speed Camera Detector Module
22. Voice Switch for Speed Camera Detector
25
23
b) Button Function
Power Button
Press this button for 2~3 sec. to turn on/off the device.
Photo Button
In video mode, in any time, press this button to take picture.
Reset Button
When the device crashed, press this button to shut down the device.
Menu Button
Press this button during standby status or playback mode, menu list of current mode will appear.
23. Power Input
24. Sticker for Holder
25. Camera Holder
When the device is in recoding, press this button to change the ash light status " ", " ", " ".
File Protection Button
In video mode, when device is in recording, press this button to set the recording video to be protected manually,
5

so as to prevent it from being overwritten by loop recording.
In playback mode, press this button to lock or unlock the video le.
When le protection is active, the icon “ ” will appear on LCD display.
Mode Button
The device only has two mode, video mode and playback mode.
Press this button during standby status, can switch device in video mode and playback mode.
When the device is in recording, there is no effect to press this button.
Up Button
In video mode, press this button to turn on/of f LCD display.
In menu setting, press this button to up item.
In playback mode, press this button to choose previous le.
OK Button
In video mode, press this button to start/stop recording.
In playback mode, press this button to play/pause video le.
In menu setting, press this button to conrm the menu setting.
Down Button
In video mode, press this button to start/stop sound recording.
In menu setting, press this button to next item.
In playback mode, press this button to choose next le.
Audio Switch
This button is only for Speed Camera Detector.
Push this switch to turn on/of f the voice of Speed Camera Detector.
6
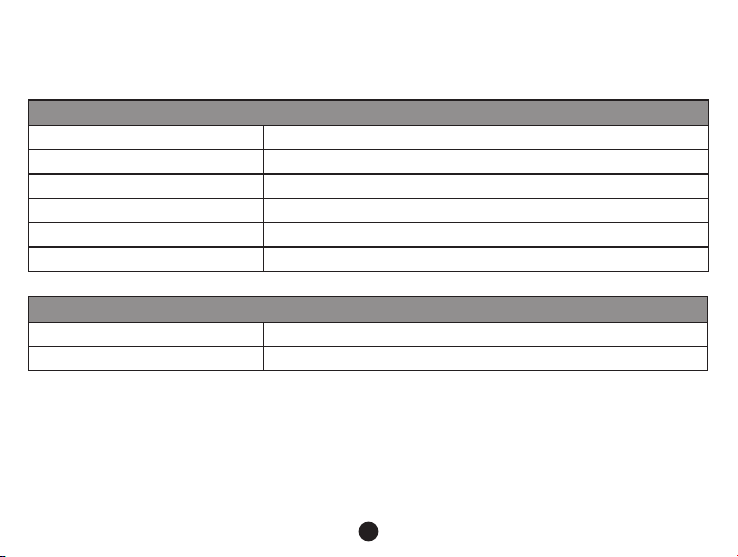
c) LED Light Status List
LED Light Status Meaning
Flash Device is in Recording
Status Light (Blue)
On Device is in standby or Playback Mode
Off Device is off
Charging Light(Red)
On Charging Battery
Off Charging nish
d) Product Accessories
1. Car DVR x1 2. Car Charger x1 3. Camera Holder x1 4. Sticker x1 5. Sucker x1
6. HDMI Cable x1 7. USB Cable x1 8. User's Manual x1 9. GPS/Speed Camera Detector Module x1
10. CD 11.UV Len (
Optional)
11.CPL Len (
Optional)
Basic Operation
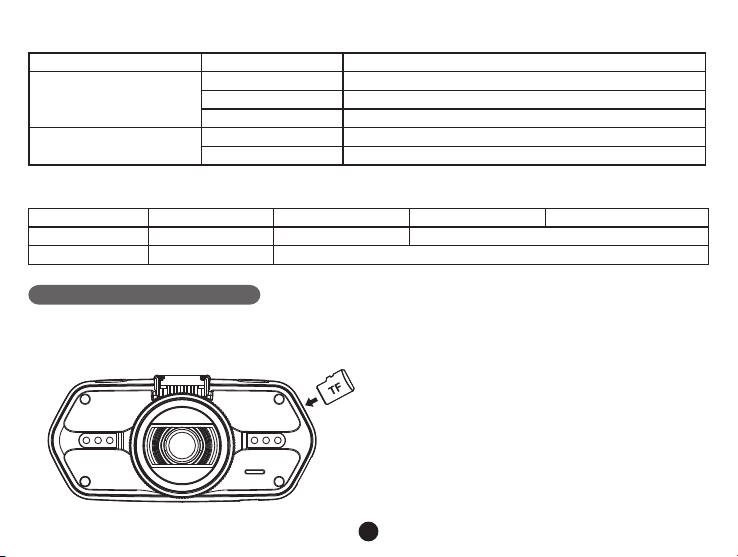
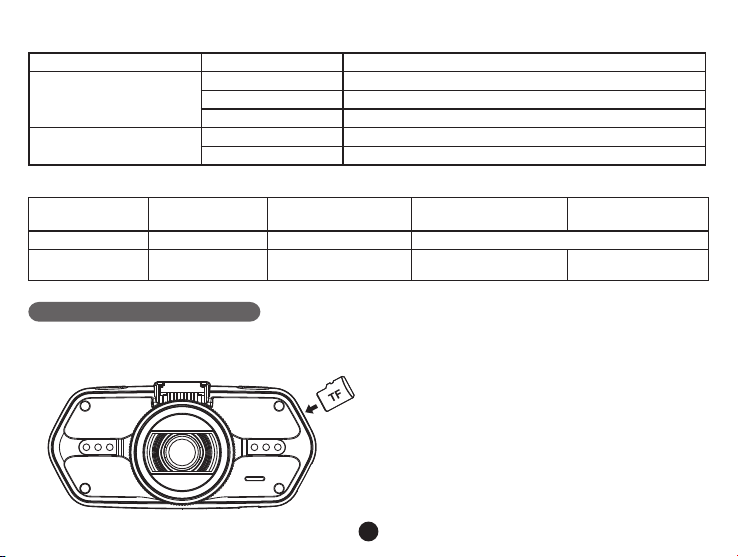
a) TF Card Installation
Install the TF card into TF Card Slot as picture shown.
7
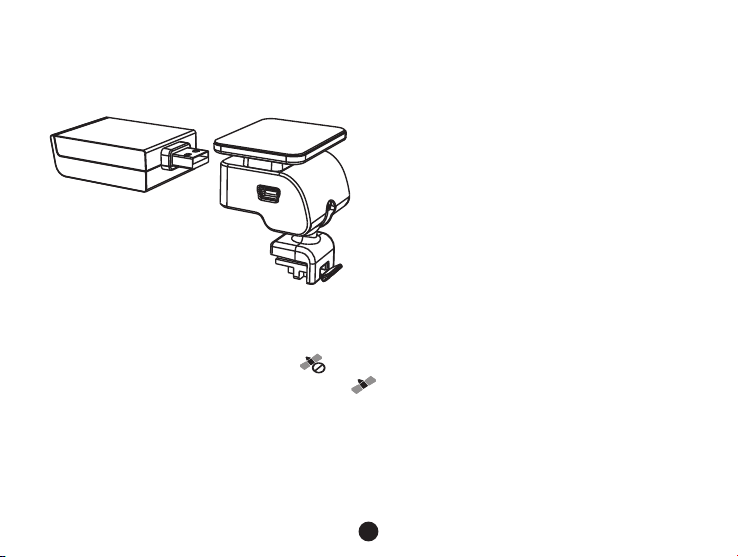
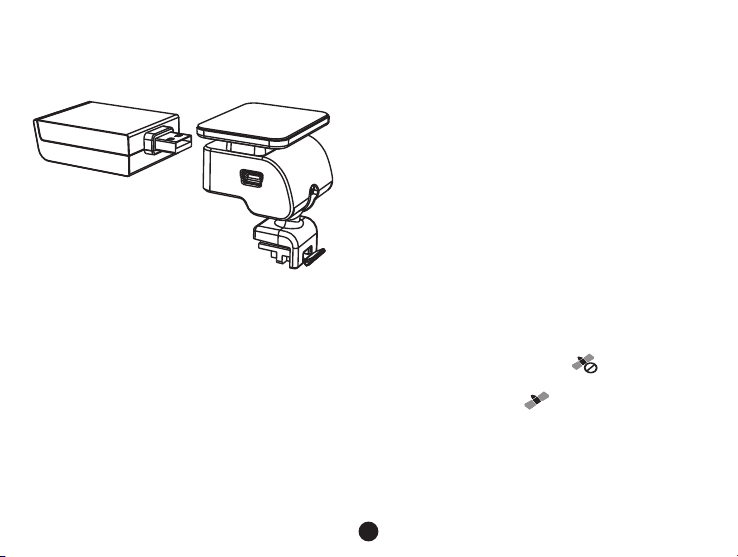
b) GPS/Speed Camera Detector Installation
Insert GPS/Speed Camera Detector module into camera holder, as below picture:
Install the device on the wind shield with sticker or sucker.
When power on, Speed Camera Detector will have voice from Speed Camera Detector Speaker, and the device
will automatically star t to catch GPS signal.
If doesn' t catch the GPS signal, GPS icon " " will be shown on LCD display.
If successfully catching the GPS signal, GPS icon " " will be shown on LCD Display.
8
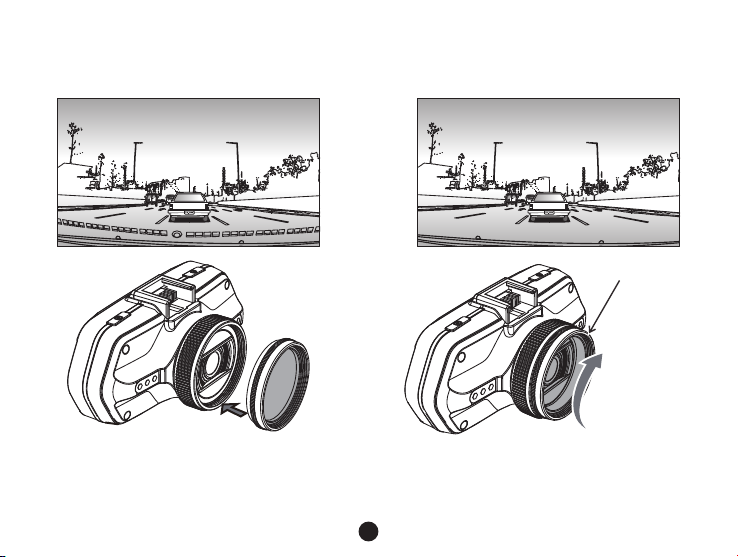
c) CPL Installation
get the good Polarized effect to car window reflection.
CPL:Circular-Polarizing Filters, could reduce the reection of inner car on the car window.
Without CPL With CPL
adjustment circle ring
Install CPL onto device thru screw on device camera. And after install CPL onto device and install device onto
car window, rotate the adjustment circle ring on CPL to
9

d) Power Supplied
Connect USB port and car cigarette with car charger, then start engine, the device will automatically power on
and recording.
Note: There is two Mini USB port, one is on device, another is on Camera Holder.
If connect car charger with Mini USB port on device, power supply to device only.
If connect car charger with Mini USB port on Camera Holder, power supply to device and GPS/Speed
Camera Detector Module both.
So if want to work with GPS/Speed Camera Detector Module, Car Charger need connect with Mini USB port
on Camera Holder.
e) G-sensor Function
When there is a collision, Gravity Sensor(G Sensor) can get the direction and exact data of collision.
Meanwhile, according to setting value in G sensor sensitivity, the device determine whether set current recorded
video to protection mode or not, which will not be overwritten by loop recording.
G-Sensor direction as below picture.
10

f) Video Mode
(Estimate from TF Card available space)
Power Indicator
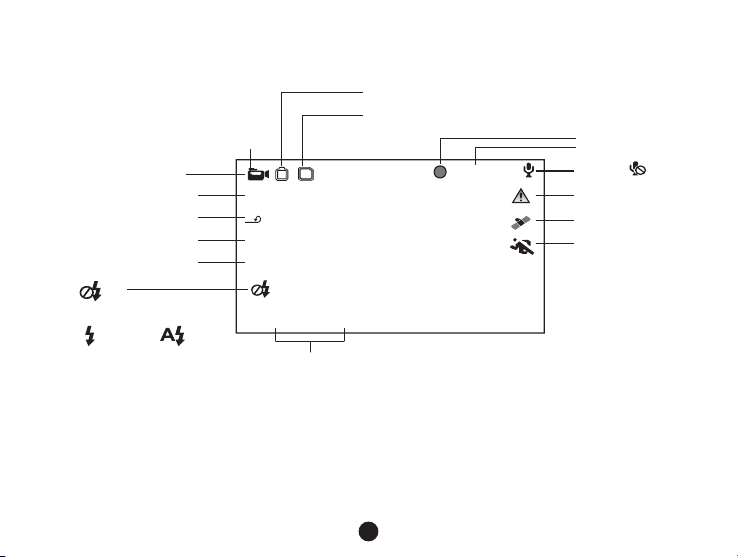
In video mode, in standby status, LCD display will be shown as below:
Video mode
Take picture
Video Resolution
Loop setting
Photo size
EV Value
LED Light Off
LED Light ON LED Light Auto
2304x1296 30P
5
4M
0.0 EV
2013/10/05 12:00
Date and time
TF Card Indicator
Mic Indicator
Mic off
GPS icon
Motion Detection
000:07:20
Available Recording time
11
In video mode, in recording status, LCD display will be shown as below:
Power Indicator
TF Card Indicator
Video mode
Take picture
Video Resolution
Loop setting
Photo size
EV Value
2304x1296 30P
5
4M
0.0 EV
A456T7S
000:00:42
Recording status
Recording Time
Mic on
Mic off
File Protection
GPS icon
Motion Detection
LED Light Off
LED Light ON LED Light Auto
g) Take Picture
In video mode, in any time, press photo button to take picture.
2013/10/05 12:00
Date and time
12
h) Playback Mode
Press Mode Button to enter playback mode, then press Menu Button to choose preview video/picture le. Use the
direction button to control playback operation.
Preview in six grids
Up Button Previous le
Down Button Next le
OK Button Conrm
Menu Button Enter menu list
File Protection Button Lock/unlock video/picture le
Mode Button Change mode
Play
OK Button Play/pause
Mode Button Back to six grids preview
13

Menu Setting
The device has two mode, Video Mode and Playback Mode.
a) In Video Mode:
Setup Menu Item
Video Resolution
Loop Setting Off/1min/3 min/5 min
Motion Detect Off / On
Sensor Flip Off / On
Flicker Auto/50HZ/60HZ
White Balance Auto/ sunny/ cloudy/ Tungsten/ uorescent
Contrast Standard / High / Low
Sharpness Standard / High / Low
EV -2/-1.7/-1.3/-1/-0.7/-0.3/0/0.3/0.7/1/1.3/1.7/2
Quality Super ne/ ne/ normal
Auto Power Off Off/ 1 min/ 3 min/ 5 min
Time Setup Time Zone/ Year/Month/ Day/ Hour: Minute
G-sensor Sensitivity Off/ 2G/ 2.5G/ 3G/ 3.5G/ 4G/ 4.5G
Key Light Auto/ Open/ Close
Fill Light Auto/ Open/ Close
2560x1080@30fps/ 2304x1296@30fps/ 1920x1080@45fps
1920x1080@30fps/ 1280x720@60fps
14

Language English / German / Czech / Polish / Hungarian / Russian / Chinese
Default Setting No/ yes
Format No/ yes
Software Version TRCMA7_ 50 _V1.9.9
b) In playback mode:
Back to Previous Level
File Protection Operation
Auto Play Video Play One/ Video Play All/ Video Repeat One/ Video Repeat All
Delete le No/ Delete this le/ Delete All les
Format No/ Yes
Protect Current File/Protect All File/
Unprotect Current File/Unprotect All File
15

Connection
a) Connect to TV
The device can output the video to Video equipment (T V or Monitor) to playback the data or adjust the setting.
1. Insert TF card to device.
2. Connect HDMI cable to the video equipment (TV or Monitor) and the device.
3. Power on the device.
4. Adjust the channel of the video equipment to HDMI input.
5. Installation completed.
b) Connect to Computer
1. Insert SD card to device.
2. Connect USB cable to device and computer, “USB connection” will be shown on screen, and removable disk
will be shown on computer.
3. Enter the removable disk, you could replay picture le or video le.
4. Copied le from another card will be stored in specic folder ” 999PROTE ”.
16
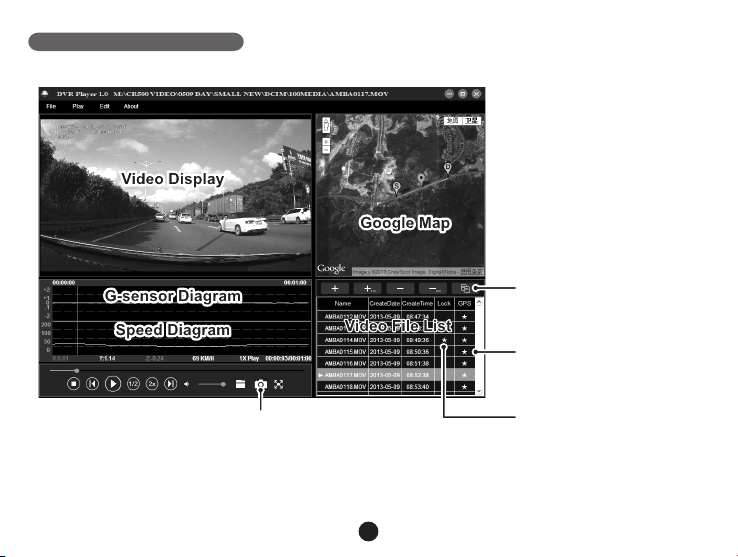
DVR Player
When visit TF card on computer, the DVR player will be in TF card. And the DVR player will be shown as below.
Pressing this button,
video file can copy to any folder
★ means video has GPS file
The captured picture will be stored in “DVRPlayer_Images” folder.
★ means video is locked
Note: Before use the player, please install Apple QuickTime, Microsoft Direct X 9.0C and IE7.0 or higher version.
17

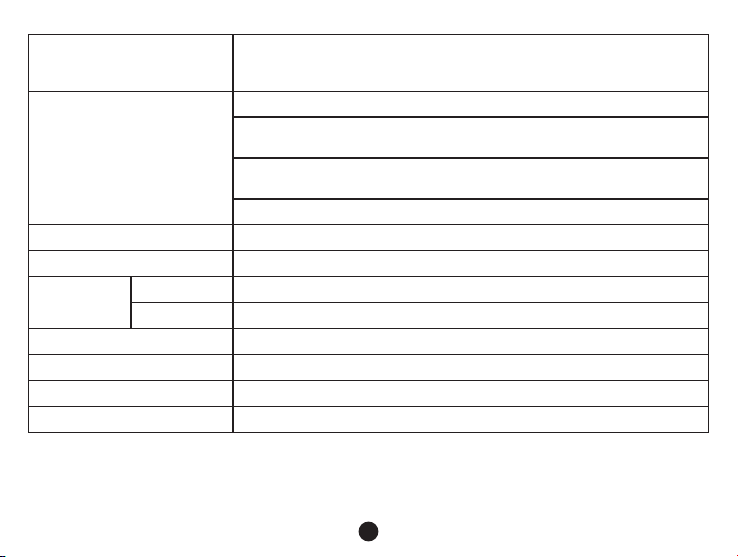
Product Specication
Camera
Video
WDR Function Wide Dynamic Range, Good Night Recording
Audio Built-in Microphone, could be turn off by menu or but ton
Still Image 26 88x1512 (4 M)
LCD 2.7inch 16:9 LCD Display
GPS Logger(Optional)
Speed Camera Detector
G-Sensor
Resolution 1/3" 4.0 Mega CMOS Sensor, OV4689, good night vision performance
Lens F/NO=2.0, 110° Horizon Angle in 1080P
Standard Mov le, H.264 Compression
Resolution
2560x1080@30fps/ 2304x1296@30fps/ 1920x1080@45fps
1920x1080@30fps/ 1280x720@60fps
Modulization GPS Logger as optional accessories
GPS Logger for path, position, speed and time record
Replay path, position information on Google Map
Work with speed camera database, when near any speed camera, it will
alarm with sound
When encounter heavy hit,
the device will automatically protect the latest les, so they can't be deleted.
18
Filter Lens (Optional)
CPL: Circular-Polarizing Filters, could reduce the reection of inner car on
the car window
UV Lens: Protect the DVR lens
Lighting Keyboard for Night Operation
Uninterrupted Cycle Recording:
Other Function
Over-write rst le if memory is full, no interruption between Video File
File Protection Function: Once File is protected, it wouldn’t be delete during
cycle recording
Automatically Recording after Car power on
SD card Slot Suppor t up to 32 GB Micro SD card
OSD Language English / German / Czech / Polish / Hungarian / Russian / Chinese
Interface
USB USB 2.0
AV Terminal HDMI
Battery Built-in 400 mAh Battery
Power 12-24V Car Charger
Color Black
Size 103x51x40 mm
Made in China.
19

Precautions and notices
- For your own safety, do not operate the controls of the product while driving.
- A window mount is needed when using the recorder in a car. Make sure that you place the recorder in an appropriate place, so
as not to obstruct the driver’s view or deployment of airbags.
- Make sure that no object is blocking the camera lens and no reective material is placed near the lens. Please keep the
lens clean.
- If the car’s windscreen is tinted with a coating, it may impact the recording quality.
Safety precautions
- Use only the charger supplied with your device. Use of another type of charger may result in malfunction and/or danger.
- Do not use the charger in a high moisture environment. Never touch the charger when your hands or feet are wet.
- Allow adequate ventilation around the charger when using it to operate the device or charge the battery. Do not cover the charger
with paper or other objects that will reduce cooling. Do not use the charger while it is inside a carrying case.
- Connect the charger to a proper power source. The voltage requirements are found on the product case and/or packaging.
- Do not use the charger if it is visibly damaged. In case of damage do not repair the equipment yourself!
- In case of device overheating, immediately disconnect the power connections.
About GPS
- GPS is operated by the United States government, which is solely responsible for the performance of GPS. Any change to the
GPS system can affect the accuracy of all GPS equipment.
- GPS satellite signals cannot pass through solid materials (except glass). When you are inside a tunnel or building, GPS
positioning is not available. Signal reception can be affected by situations such as bad weather or dense overhead obstacles
(e.g. trees, tunnels, viaducts and tall buildings).
- The GPS positioning data is for reference only.
Caring for your device
- Taking good care of your device will ensure trouble-free operation and reduce the risk of damage.
- Keep your device away from excessive moisture and extreme temperatures and avoid exposing your device to direct sunlight or
strong ultraviolet light for extended periods of time.
- Do not drop your device or subject it to severe shock.
- Do not subject your device to sudden and severe temperature changes. This could cause moisture condensation inside the
unit, which could damage your device. In the event of moisture condensation, allow the device to dry out completely before use.
- The screen surface can easily be scratched. Avoid touching it with sharp objects.
20

- Never clean your device with it powered on. Use a soft, lint-free cloth to wipe the screen and the exterior of your device. Do not
use paper towels to clean the screen.
- Never attempt to disassemble, repair or make any modications to your device. Disassembly, modication or any attempt at
repair could cause damage to your device and even bodily injury or property damage and will void any warranty.
- Do not store or carry ammable liquids, gases or explosive materials in the same compartment as your device, its parts
or accessories.
- To discourage theft, do not leave the device and accessories in plain view in an unattended vehicle.
- Overheating may damage the device.
Safety camera alerts
Caution:
- For legal reasons the safety camera function is not available in all countries. Seller, producer or distributor assumes no
responsibility for any damages incurred in connection with the use of cameras TrueCam and their functions. Always drive
according to the existing legislation and familiarize yourself with the legal standards in the relevant state in which the device you
want to use and whether it is in accordance with local legislation.
- You can receive alerts to warn you about the locations of safety cameras, which will enable you to monitor your speed through
these areas. When a safety camera appears and is positioned in the detectable direction, you will receive alerts. The screen will
display the visual alert, and you will also receive audio warnings. You can activate this function in your GPS module by setting
to ON position.
Updating safety camera data and voice guidance
- MagiCam HD SOLUTIONS s.r.o. does not warrant that all types and locations of safety camera data are available, as cameras
may be removed, relocated or new cameras installed. Seller, producer or distributor assumes no responsibility for the use of the
features and facilities.
- Occasionally MagiCam HD SOLUTIONS s.r.o. may offer you updates of safety camera data. Visit the website
www.truecam.eu for available downloads and different versions of the voice guidance, and follow the instructions to complete
the update.
21

Other information
1)
For households: This marking indicates that this product should not be disposed with other household wastes
throughout the EU. To prevent possible harm to the environment or human health from uncontrolled waste
disposal, recycle it responsibly to promote the sustainable reuse of material resources. To return your used
device, please use the return and collection systems or contact the retailer where the product was purchased.
They can take this product for environmental safe recycling. In case of incorrect disposal of this kind of wastes
user can be ned according to national laws.
User information for disposal of electric and electronic devices in countries outside the EU: The symbol stated above (crossed
recycle bin) is valid only in countries in European Union. For correct disposal of electric and electronic devices ask your
Environment Department or distributor of these devices. Everything is expressed by the symbol of crossed recycle bin on
product, cover or printed materials.
2)
You can determine a warranty service at the place of purchase. In case of technical problems or queries contact your dealer who
will inform you about the following procedure. Follow the rules for work with electric devices. User is not allowed to disassembly
the device neither replace any of its components. To reduce the risk of electric shock, do not remove or open the cover. In case
of incorrect setup and device connection you will expose yourself to risk of electric shock.
Declaration of Conformity:
Hereby, MagiCam HD SOLUTIONS s.r.o., declares that all TrueCam A7 products are in compliance with the
essential requirements and other relevant provisions of Directive 2004/108/EC. Products are intended for sale
without any restriction in Germany, Czech Republic, Slovak Republic, Poland, Hungary and other EU countries.
Products are covered for two years warranty, unless otherwise stated. You can download the Declaration of
Conformity from the website: www.truecam.eu
Exclusive importer of TrueCam products in EU:
MagiCam HD SOLUTIONS s.r.o.,
Braškovská 308/15, 16100 Praha 6
http://www.truecam.eu
Videokamera fürs Fahrzeug mit
GPS Sucher & Erkennungsgerät
für Geschwindigkeitsradare
● 2304x1296@30FPS
●
GPS Sucher & Erkennungsgerät für Geschwindigkeitsradare
● Unterleuchtete Tastatur
● CPL & UV Filter zum Nachkaufen
Benutzerhandbuch


Aufzeichnung des Produkts & Funktionen.............................................................2
a) Vorstellung des Geräts............................................................................................................2
b) Funktion der Tasten..................................................................................................................3
c) Verzeichnis der LED-Stände.................................................................................................5
d) Packungsinhalt........................................................................................................................5
Grundeinstellungen..................................................................................................5
a) Installierung der Speicherkarte................................................................................................5
b) Installierung des GPS/der Erkennung der Geschwindigkeitsradare.....................................6
c) Aufladen..........................................................................................................................6
d) Installierung des Polarisationsfilters (CPL)........................................................................7
e) Funktion des G-Sensors.................................................................................................8
f) Aufnahmemodus.................................................................................................9
g) Fotomodus..............................................................................................................10
h) Wiedergabemodus................................................................................................................11
Einstellungsmenu.................................................................................................12
a) Beim Videomodus..................................................................................................................12
b) Beim Wiedergabemodus...................................................................................................13
Verknüpfung.........................................................................................................14
a) Verknüpfung mit TV........................................................................................................14
b) Verknüpfung mit dem Computer.......................................................................................14
DVR Player...............................................................................................15
Technische Spezikation..........................................................................................16
3
Aufzeichnung des Produkts & Funktionen
15 16 17
a) Vorstellung des Produkts
1
2
6
7
8
9
10
12
13
14
5
3
1. Slot für die Speicherkar te 2. HDMI Port 3. LED
4. Objektiv 5. Lautsprecher 6. Statuslicht (blau)
7. Licht bei der Auadung (rot) 8. Menu Taste 9. Taste für Dateienschutz
10.
Modustaste
13. OK Taste 14. Taste "herunter" 15. Hauptschalter
16. Stecker des Halters 17. Auslöser für Fotos 18. USB Port
19. Reset Taste 20. Mikrofon
4
11. LCD Display 12. Taste "nach oben"
4
11
18 19 20
24
21. GPS Modul mit der Erkennung der Geschwin digkeitsradare
25
22. Schalter der Stimme der
Geschwindigkeitserkennungsgeräte
23. Einspeisungsstecker
21
22
23
24. Selbsklebende Fläche
25. Kamerahalter
b) Tastenfunktionen
Hauptschalter
Fürs Ausschalten/Einschalten auf diese Taste 2 bis 3 Sekunden drücken.
Auslöser
Zum Anfertigen eines Fotos kann im Videomodus jederzeit auf diese Taste gedrückt werden.
Reset Tase
Bei einer Störung des Geräts drücken Sie bitte auf diese Taste zur Notausschaltung.
Me nu Tast e
Drücken Sie diese Taste beim Bereitschaftsmodus oder beim Wiedergabemodus. Es wird ein Menu für den
jeweiligen Modus erscheinen. Falls das Gerät gerade aufnimmt, drücken Sie auf diese Taste für den Wechsel
des Beleuchtungsmodus " ", " ", " ".
5

Taste für Dateienschutz
Auf diese Taste können Sie während des Aufnehmens für den manuellen Schutz der angefertigten Aufnahme
drücken, damit diese vom Zeitraffer nicht gelöscht werden kann.
Drücken Sie auf diese Taste im Wiedergabemodus zum Verschließen / Aufschließen der Datei.
Wenn der Schutz der Datei aktiv ist, wird auf dem LCD Display das Symbol “ ” abgebildet.
Modustaste
Die Videokamera arbeitet nur mit zwei Modi: Aufnahme und Wiedergabe.
Mit dem Drücken auf diese Taste im Bereitschaftsregime wird von einem zum anderen Modus geschaltet.
Wenn die Kamera gerade aufnimmt, funktioniert diese Taste nicht.
Taste "nach oben"
Drücken Sie beim Aufnahmemodus für das Ausschalten / Einschalten des LCD Displays.
Im Einstellungsmenu drücken Sie auf diese Taste zum Zurückspulen zum vorigen Posten.
Drücken Sie auf diese Taste beim Wiedergaberegime zum Auswählen der vorigen Datei.
OK Tas te
Funktioniert als Star t / Stop beim Aufnahmemodus.
Funktoniert als Wiedergabe / Pause beim Wiedergabemodus.
Im Einstellungsmenu wird beim Drücken auf diese Taste die Wahl bestätigt.
Taste "herunter"
Drücken Sie auf diese Taste beim Aufnahmemodus fürs Einschalten / Ausschalten der Tonaufnahme.
Drücken Sie auf diese Taste beim Einstellungsmenu fürs Vorrücken zum nächsten Posten.
Drücken Sie auf diese Taste beim Wiedergabemodus für die Wahl der nächsten Datei.
Tonschalter
Diese Funktion ist nur für die Erkennungsgeräte der Geschwindigkeitsradare bestimmt.
Drücken Sie länger auf die Taste zum Einschalten / Ausschalten des Tons beim Erkennungsgerät der
Geschwindigkeitsradare.
6
c) Verzeichnis der Stände der LED
Licht der LED Stand Bedeutung
blinkt Gerät lädt auf
Standlicht (blau)
leuchtet Gerät ist im Bereitschaf ts- oder Aufnahmeodus
leuchtet nicht Gerät ist ausgeschaltet
Licht des Auadens (rot)
leuchtet Auaden der Batterien
leuchtet nicht Auaden beendet
d) Packungsinhalt
1. Videoamera x1 2. Auadegerät x1
6. HDMI Kabel x1 7. USB Kabel x1
10. CD
UV Filter (zusätzlich
zu kaufen)
3. Halter für die Kamera x1
8. Benutzerhandbuch x1
CPL Filter (zusätzlich
12.
zu kaufen)
4. 3M Halter mit
Selbstaufkleber x1
9. GPS Modul / Erkennung der Geschwindigkeitsradare x1
Grundeinstellungen
a) Installierung der Speicherkarte
Legen Sie die Speicherkarte in den Slot gemäß der Anleitung auf dem Bild ein.
7
5. Halter mit
Saugnapfen x1
b) Installierung des GPS / Erkennungsgeräts für die Geschwindigkeitsradare
Befestigen Sie das GPS Modul / das Modul des Erkennungsgeräts der Geschwindigkeitsradare am Halter
der Kamera (wie auf dem Bild):
Platzieren Sie das Gerät auf die Vorderscheibe mit Hilfe des selbsklebenden 3M Halters oder des
Saugnapfens ein.
Nach dem Einschalten der Videokamera wird das Erkennungsgerät der Geschwindigkeitsradare ertönen,
und das Gerät fängt an, das GPS Signal zu empfangen.
Wenn das Gerät keine Verbindung mit dem Satelliten erstellt, wird das Symbol des Fehlers " " auf dem Display
abgebildet.
Nach einer erfolgreichen Verbindungserstellung wird auf dem Display das Symbol " " abgebildet.
8
 Loading...