

TrueCam A4, A4 GPS Edition User Manual

● 1080P Full HD
● WDR function (Wide dynamic range)
● Illuminated keyboard
● GPS locator & speed camera detector
(optional)
WDR function (Wide dynamic range)
User manual
TRUECAM A4

Device introduction...................................................................................................3
Device installation......................................................................................4
Device operation..........................................................................................4
a) Automatic video-recording.......................................................................................................4
b) Taking picture...........................................................................................................................5
c) Motion detection function........................................................................................................5
d) G-sensor function...................................................................................................................5
e) File protection function............................................................................................................5
f) Playback function..................................................................................................5
g) U-disk mode.........................................................................................................................5
Other functions....................................................................................................6
Important functions....................................................................................................6
Icons on screen display.........................................................................................7
a) In standby status........................................................................................................7
b) In recording status.....................................................................................................8
GPS locator and speed camera detector (optional)......................................................9
a) GPS / Speed camera detector installation...............................................................................9
b) SPEEDOMETER...............................................................................................................10
c) DATAKAM Player..........................................................................................................11
LED light status list........................................................................................12
Button functions in video mode................................................................................12
Button functions in playback mode............................................................................13
Settings menu..................................................................................................14
a) In recording mode..............................................................................................................14
b) In playback mode.......................................................................................................15
Product parameters............................................................................................16
Accessories........................................................................................................16

3
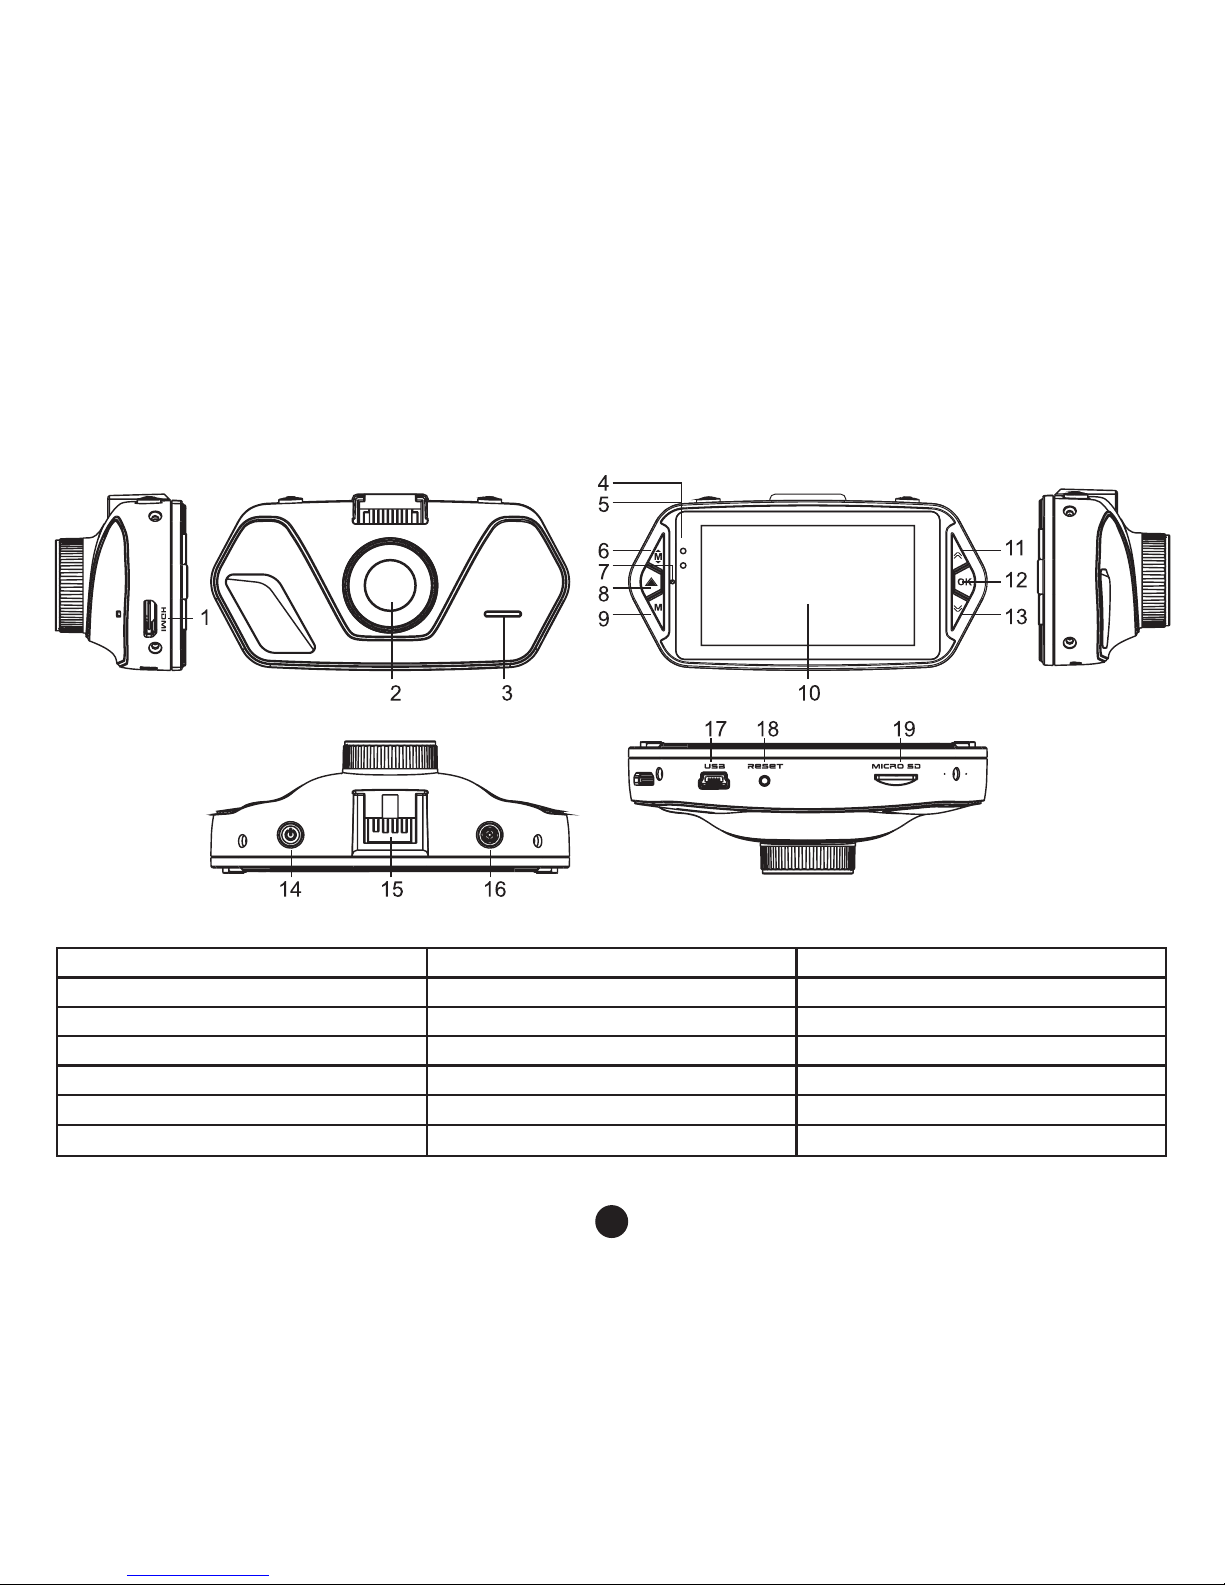
Device introduction:
1. HDMI port 2. Lens 3. Speaker
4. Rec light (blue) 5. Charging light (red) 6. Menu button
7. Microphone 8. File protection button 9. Mode button
10. LCD display 11. Up button 12. OK button
13. Down button 14. Power button 15. Bracket hole
16. Camera button 17. USB port 18. Reset button
19. Micro SD card slot

4
Device installation:
a) Insert the micro SD card into the slot. Always turn off the device whenever inserting or removing the SD card.
b) Install the device on the windshield.
c) Connect the USB port and the cigarette lighter socket with the car charger, then start the engine, the device will
automatically power on and start recording.
Device operation:
a) Automatic video-recording
1. Start the car engine.
2. The device will turn on and start recording automatically.
3. Press le protection button to lock or unlock the recording video le.
4. Press down button to start or stop audio recording.
5. Press Power button to turn off the LCD display.
6. Press OK button to stop or start recording.
7. When you turn the car engine off, the device will save the le and will be automatically powered off.
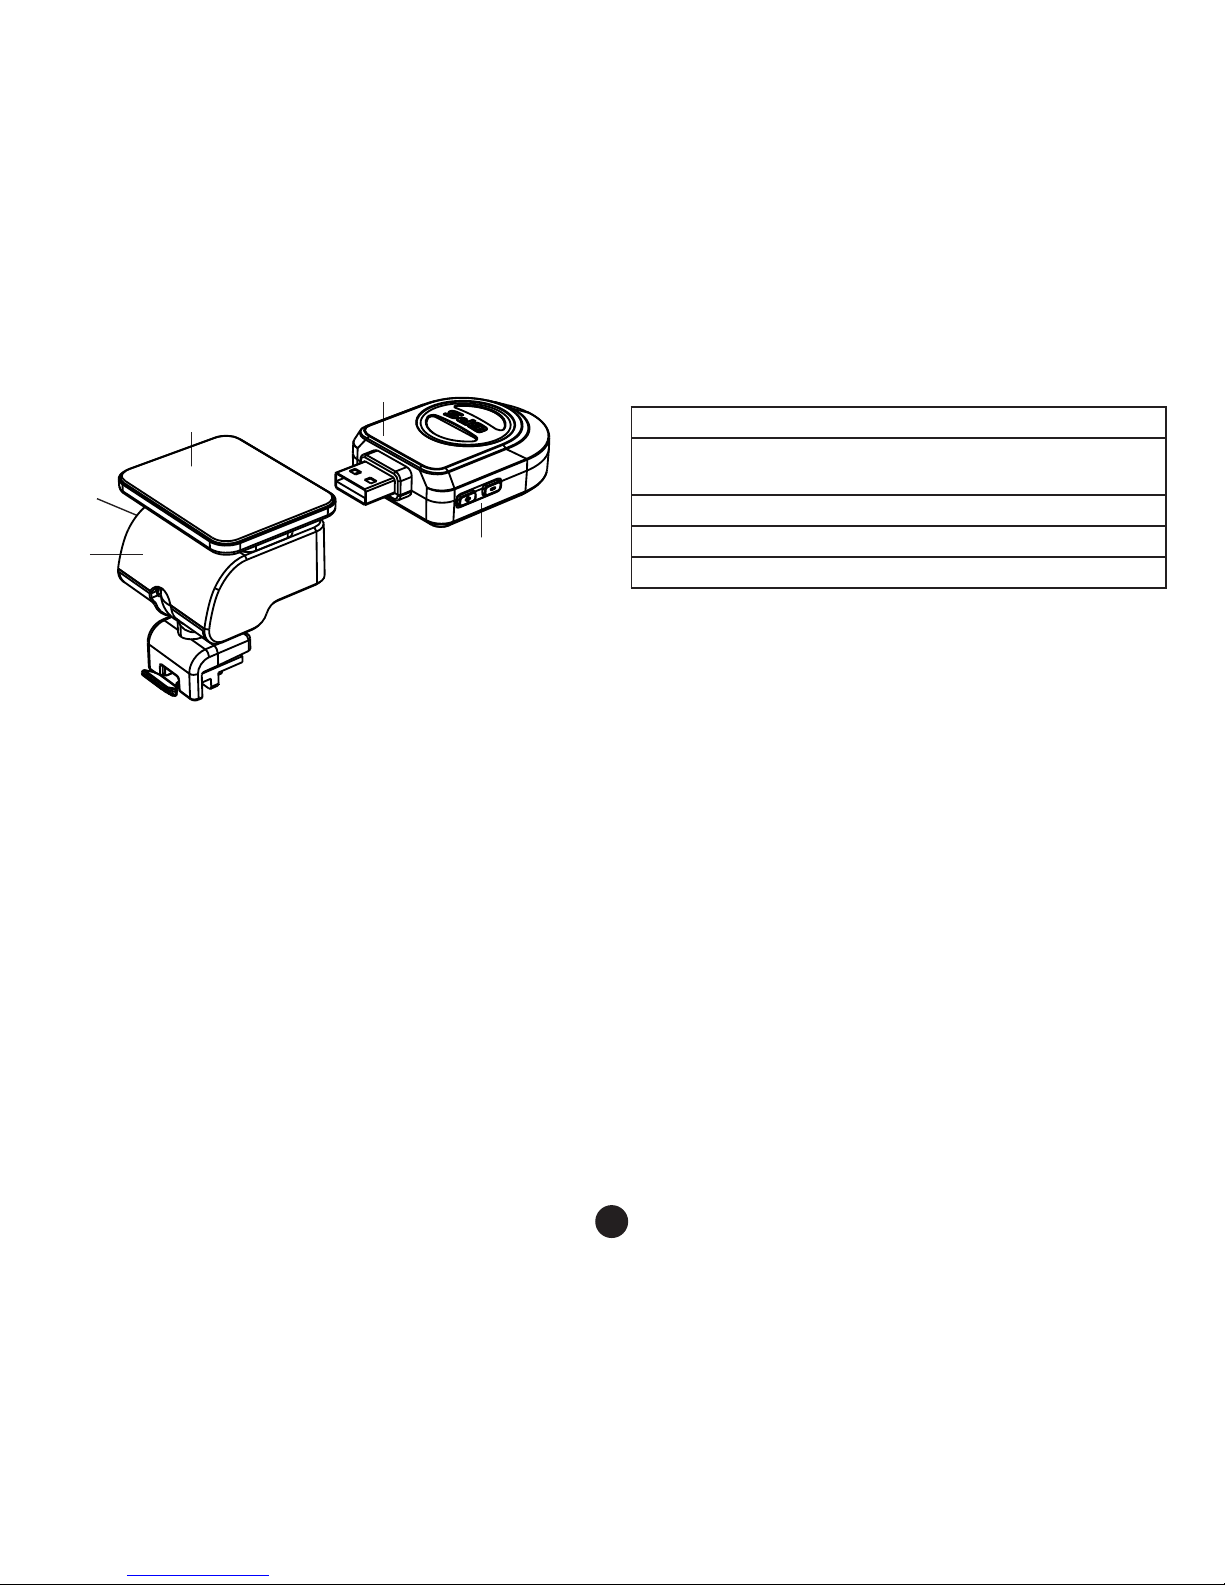
21. GPS module with speed camera detector
(optional)
22. Speed camera detector voice switch
23. Power connector
24. Adhesive surface
25. Camera holder
21
22
23
24
25

5
b) Taking picture
In recording mode, press camera button to take a photo in the current recording resolution.
In standby mode, press camera button to take a photo in the menu setting resolution.
c) Motion detection function
1. Press the menu button in the video mode to enter the settings options, then choose the motion detection.
2. If the device detects a moving object, red icon “
” will start ashing slowly and the camera will start recording
automatically.
When the device no longer detects any moving object, it will automatically stop recording.
d) G-sensor function
In case of an accident while the camera is recording, “
” icon will be shown on the screen and the current video
will be stored and protected against deletion, caused by cycle recording.
e) File protection function
1. Press the menu button while the device is recording “
” icon will be shown on the screen and the device will
lock and protect the current video from deletion.
2. Press the menu button again to disable le protection function.
f) Playback function
1. When device is in standby status, press the mode button to enter playback mode.
2. Press the up/down button to choose video le or image le.
3. Press the OK button to play or pause the video le.
4. Press the menu button to enter menu setting.
5. Press the mode button again to enter the menu settings.
g) U-disk mode
1. Turn off the device and connect it via USB cable to a computer.
2. Menu will be shown on the screen. Choose “Mass Storage” option and the “USB connected” message will be
shown on the screen. Removable disc will appear on your computer.
3. Open the removable disc, the video and image les will be stored in “DCIM” folder.

6
Other functions:
GPS coordinates view (optional)
- allows to display GPS position within the video. Location is display in the form of coordinates.
Current speed view (optional)
- allows to display current speed within the video, usable for future reference.
Video lock
- can be used to lock the video from subsequent overwriting by another video in the future. You can lock the videos
either in the recording mode or in the playback mode.
Important functions:
Motion detection
Automatically begins recording when the camera detects sufficient motion, for example, when reversiing. The
amount of motion needed to begin recording depends on the level of motion senstivity selected. Be careful when
selecting high sensitivity as this may quickly ll up the memory card.
Loop settings
Loop recording allows the car camera to continuously record regardless of the memory card capacity. You can
choose from four time intervals: Off / 2 min / 3 min / 5 min. The selected interval determines how long the camera
will record for and save. The advantage of this setup is that you will never run out of space on your memory card.
Moreover, it is much easier to send small les e.g. an E-mail for use as evidence.
Delay On / Off
This function is used to delay turning the camera on or off when the car engine is turned on or off. This can increase
the free space on the memnory card (when there is a switch on delay) or can provide a record of what happens
when you leave your car (when there is a switch off delay).
7
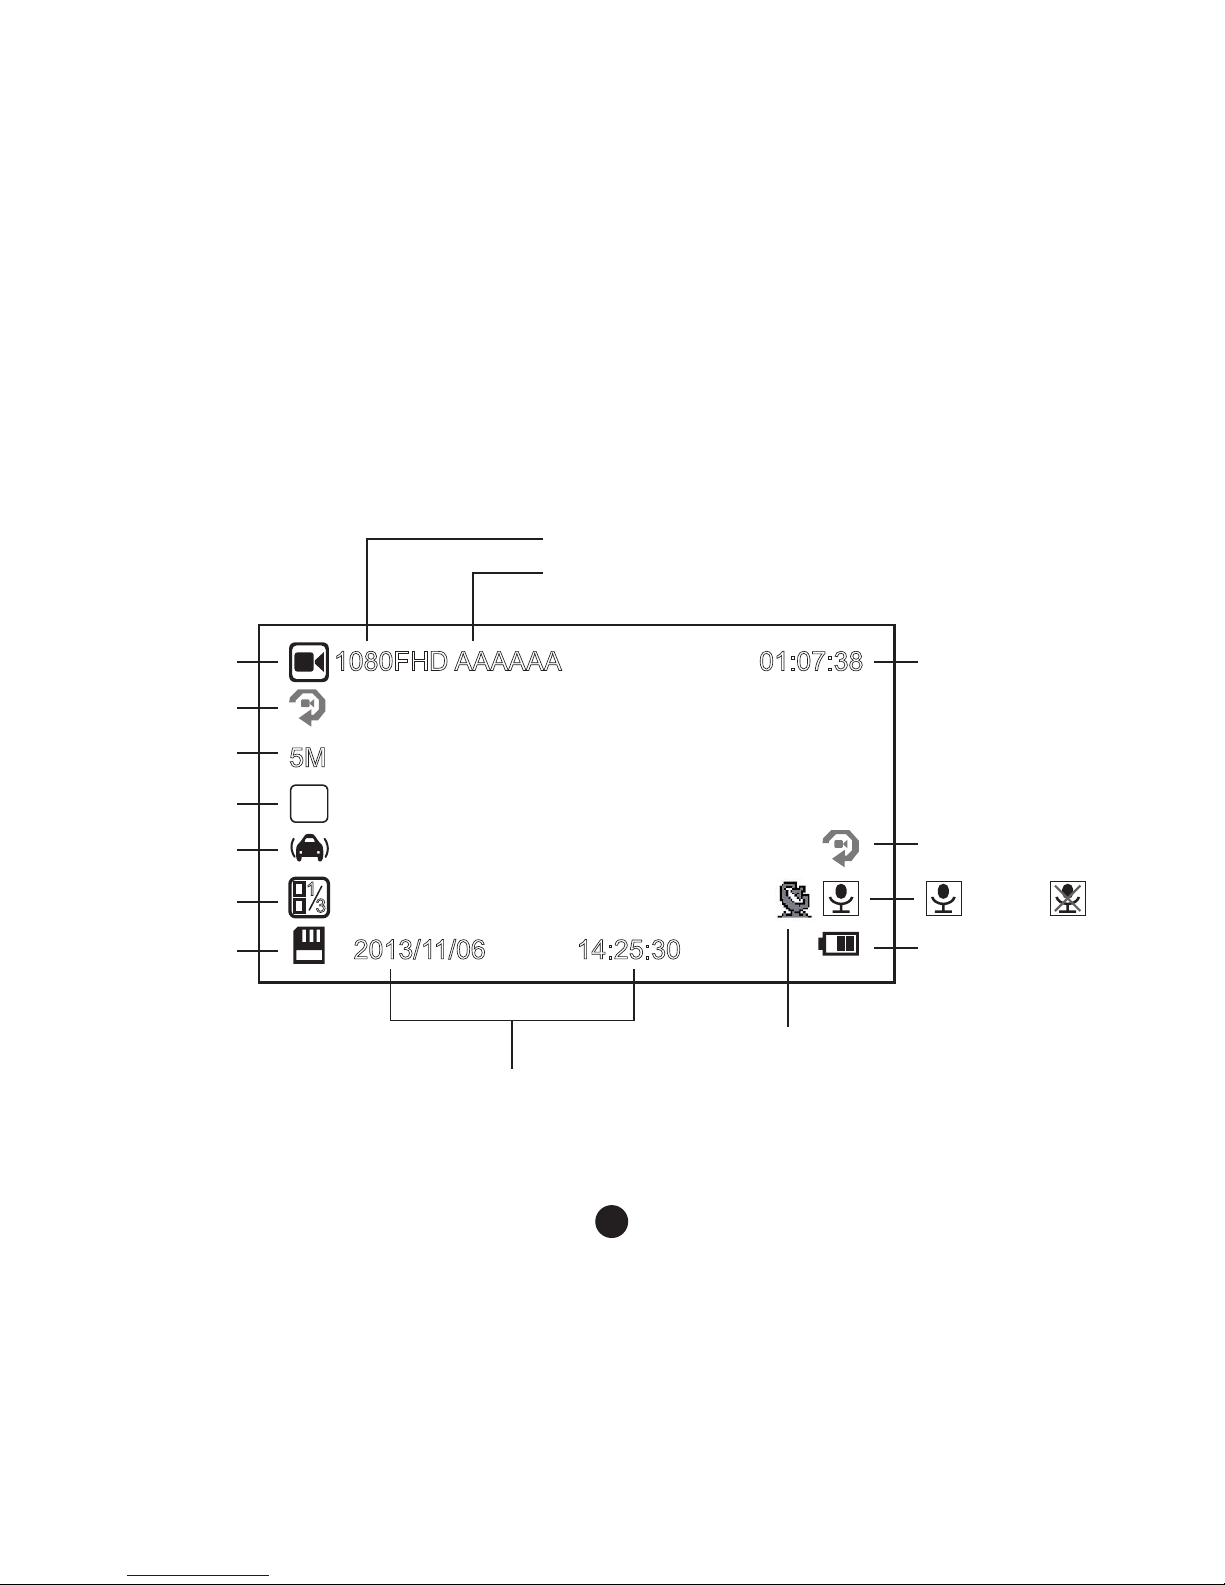
Icons on screen display:
a) In standby status
3
WDR
F
2013/11/06
5M
1080FHD AAAAAA 01:07:38
14:25:30
1
3
Motion detection
Remaining recording
time (estimated from
TF card available
data space).
Video mode
Power indicator
TF card indicator
G-sensor
Photo size
Loop setting
WDR
EV value
Mic on Mic off
Video resolution
Driver´s number
Date and time
GPS Icon (GPS module optional)
8
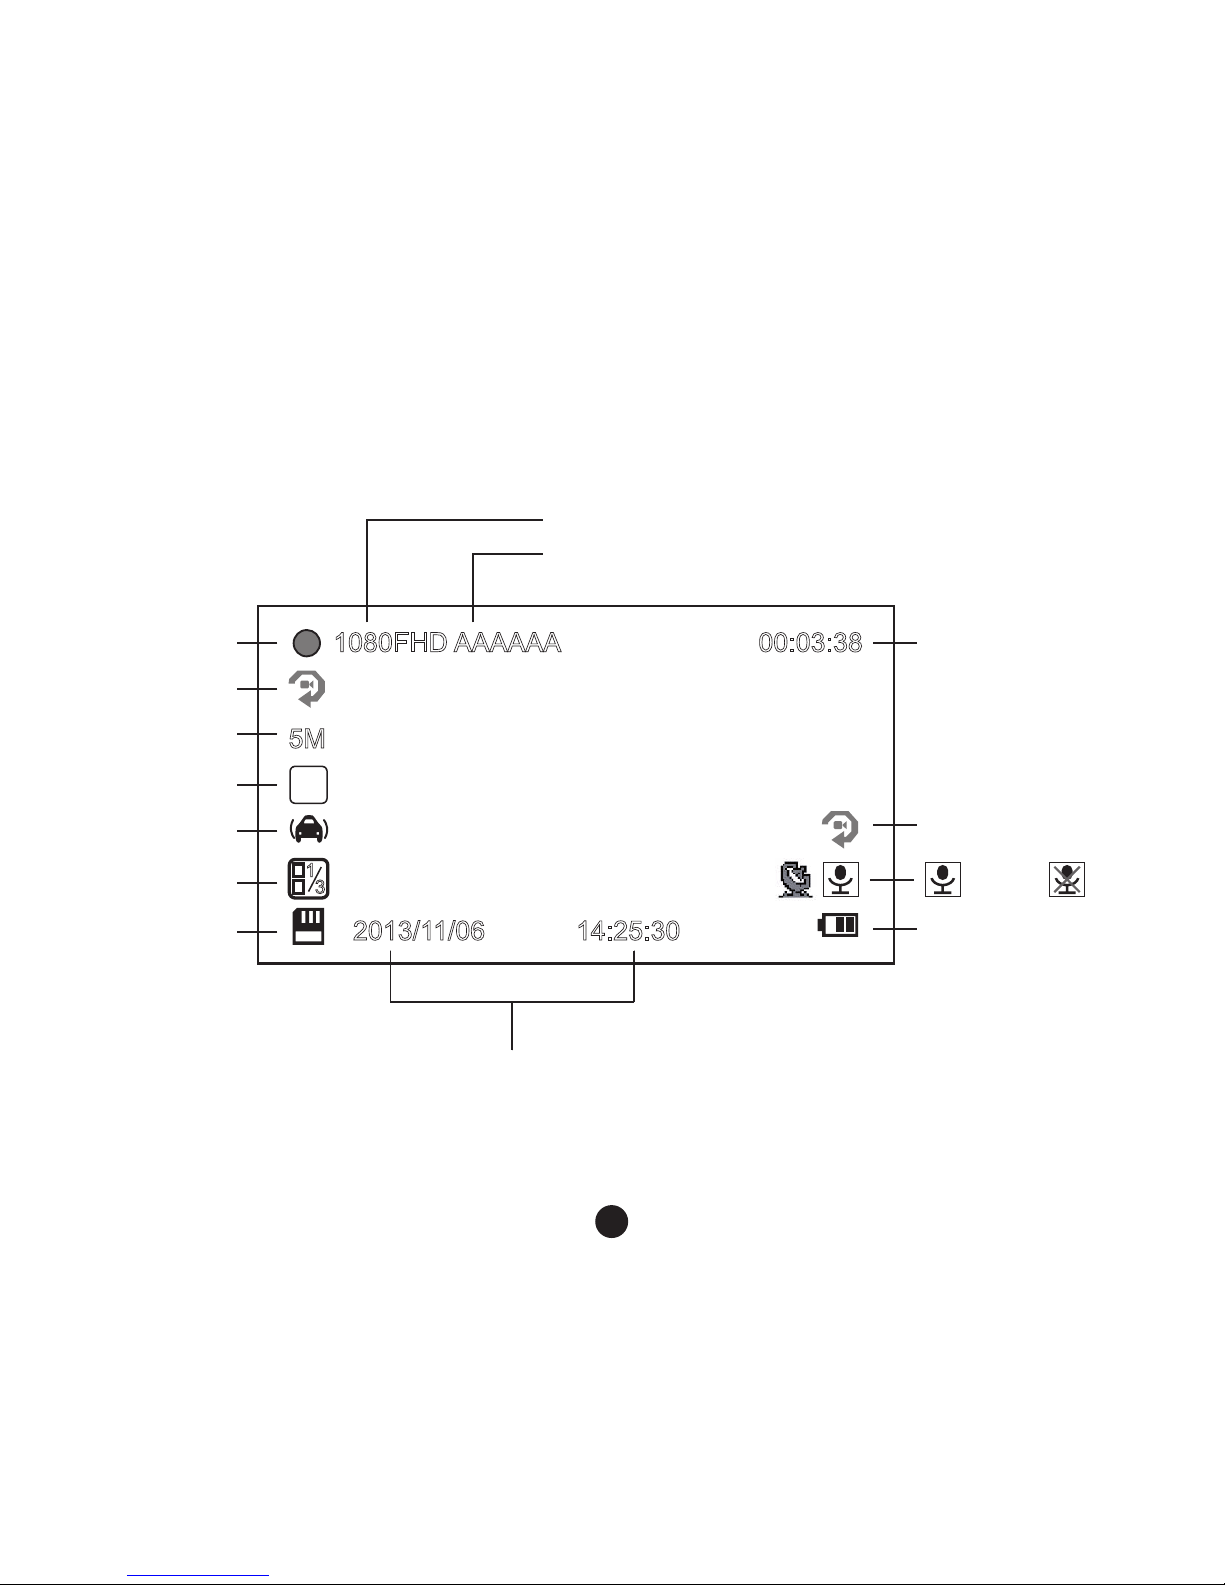
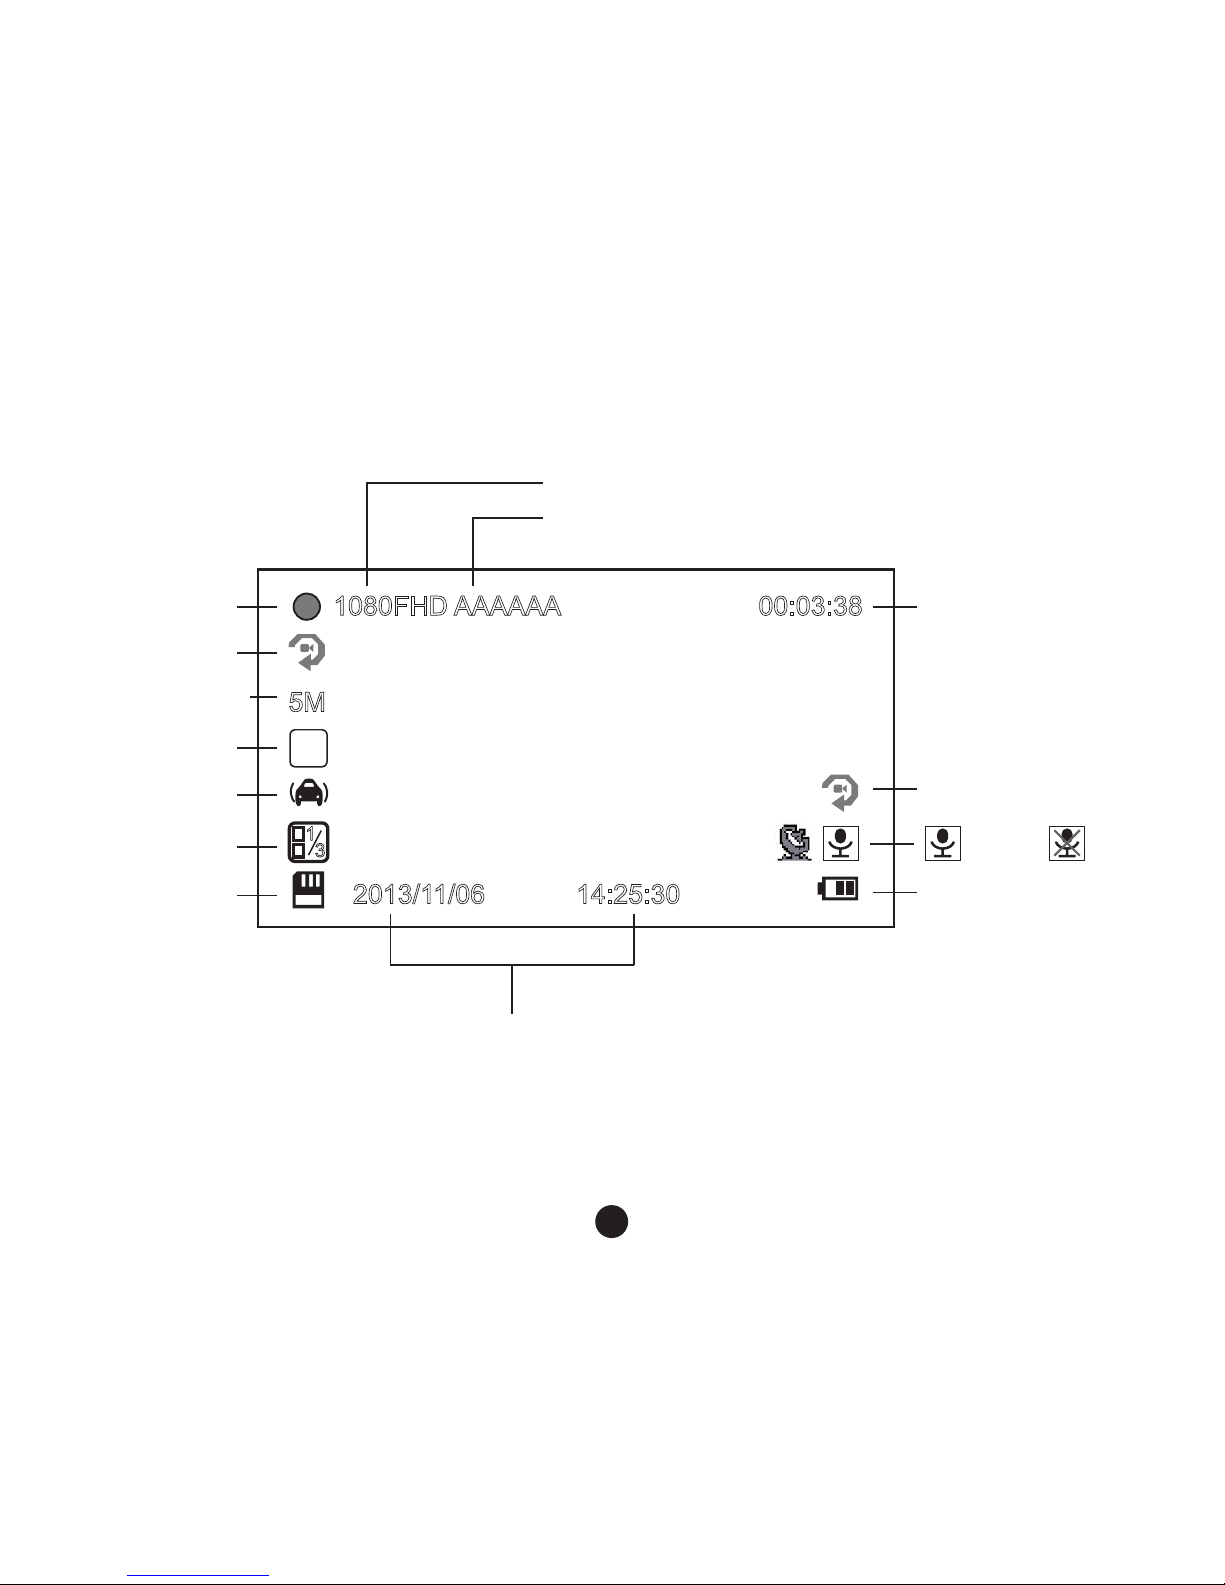
b) In recording status
3
WDR
F
2013/11/06
5M
1080FHD AAAAAA
14:25:30
1
3
Motion detection
Video resolution
Power indicator
TF card indicator
Driver´s number
Photo size
Loop setting
WDR
EV value
Mic on Mic off
Date and time
00:03:38
Recording time
Recording status
G-sensor

9
GPS locator and speed camera detector (optional)
a) GPS / Speed camera detector installation
Insert GPS / Speed camera detector module into the camera holder, as in the picture bellow:
Install the device on the windshield with the sticker or the sucker holder.
When the device is powered, speed camera detector speaker will provide voice instructions from the speed
camera detector speaker, and the device will automatically start to receive GPS signal.
When connected to a GPS satellite, GPS icon "
" will be shown on the LCD display.
10
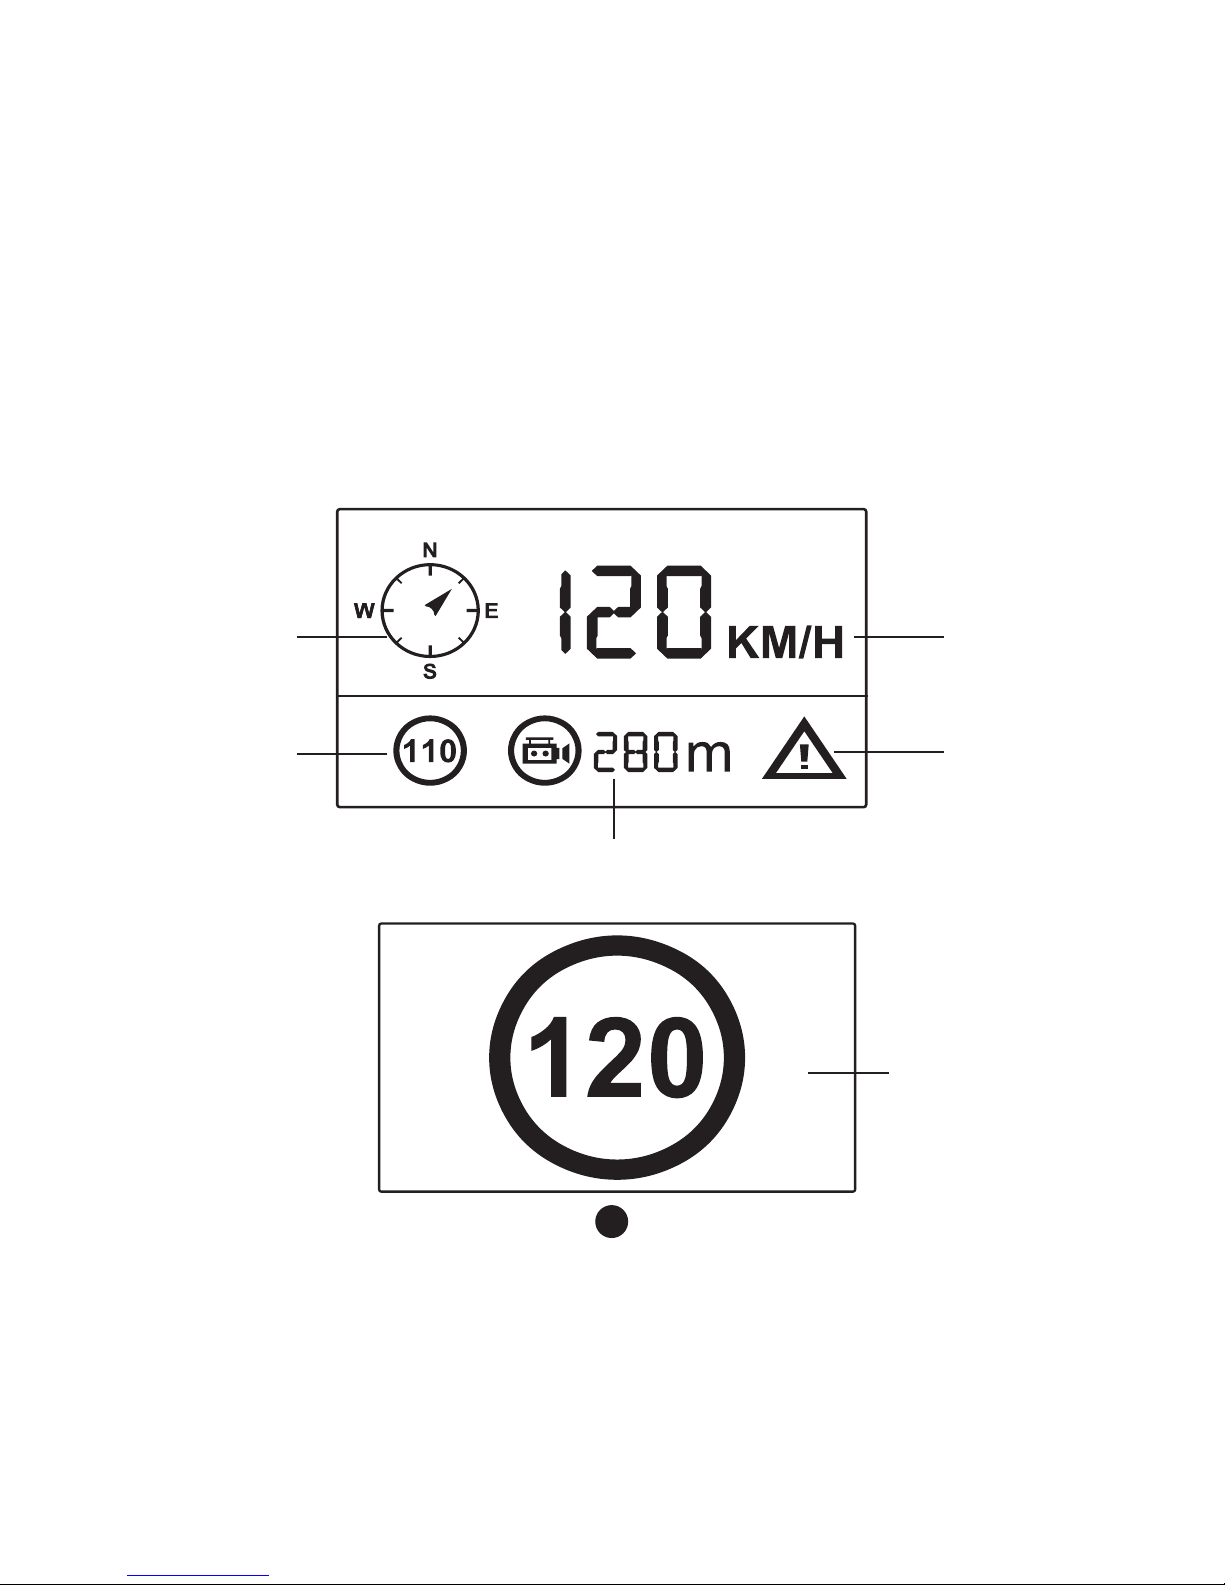
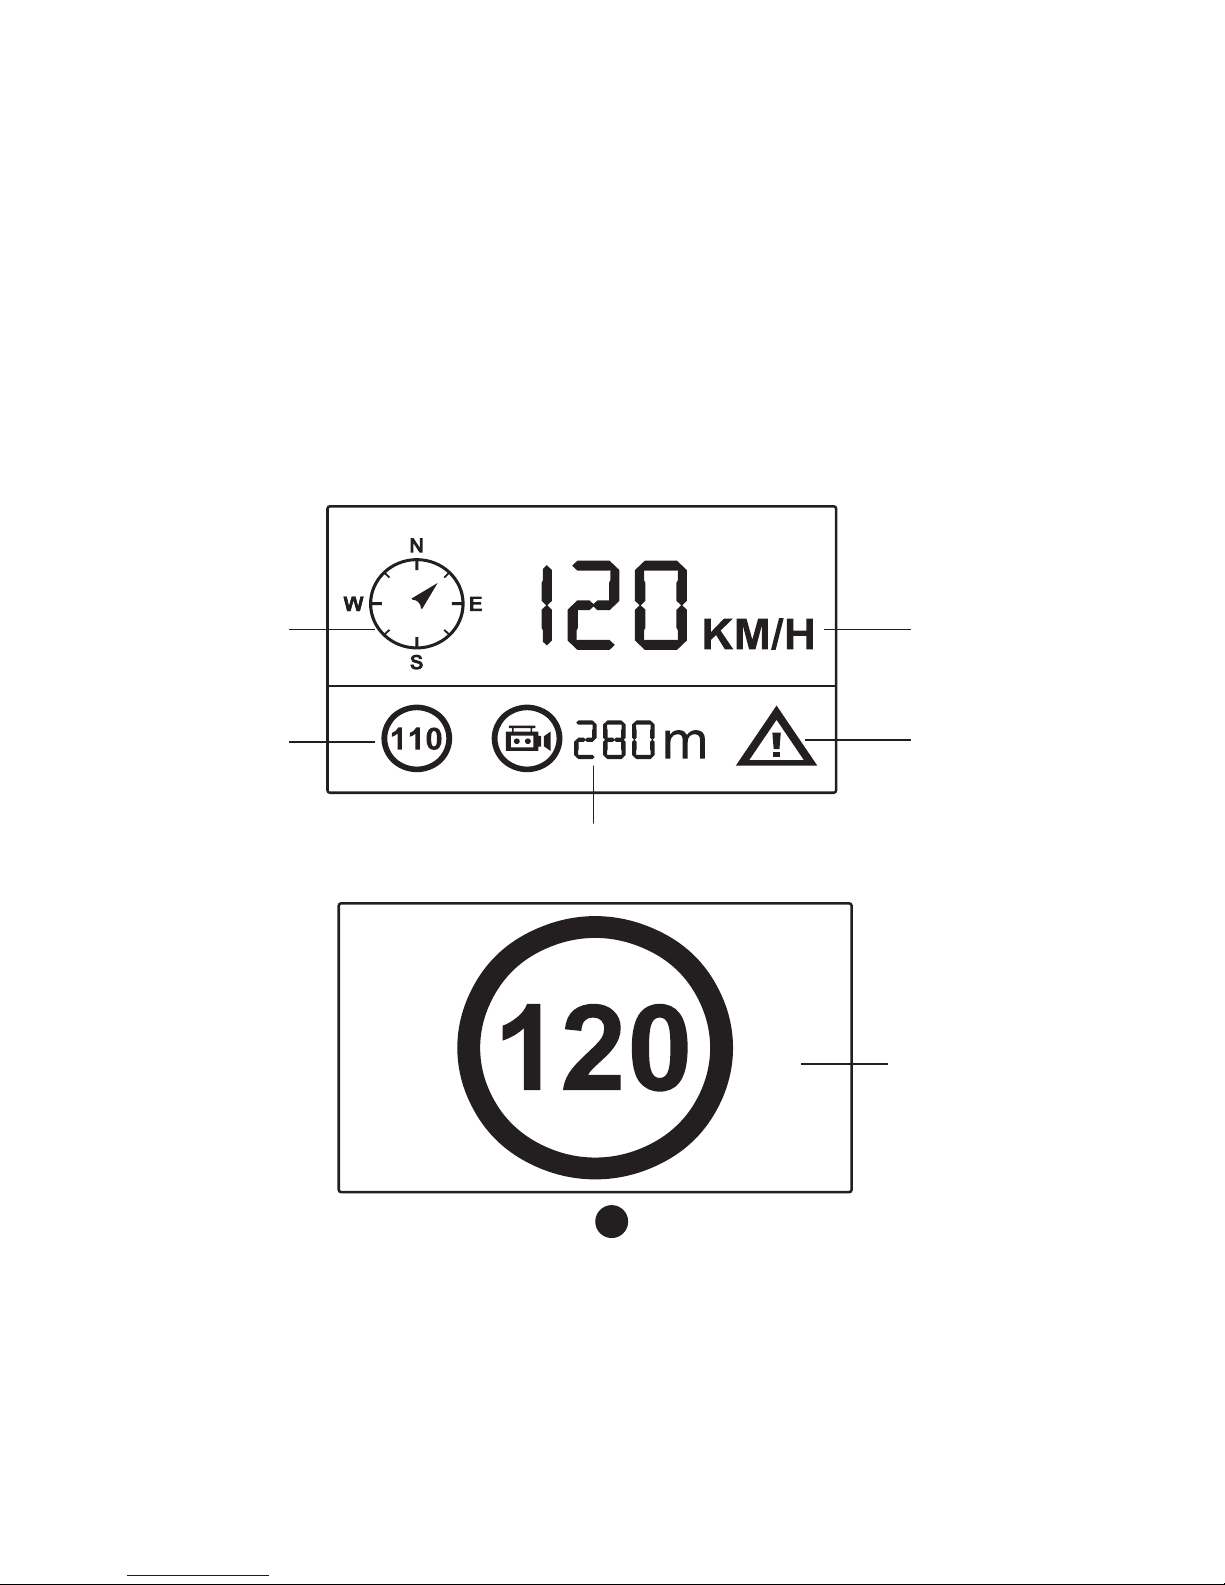
b) SPEEDOMETER
When in recording mode or standby mode, pressing up button will switch the screen to the picture bellow and
information about current speed, compass and distance to speed camera will be shown.
If the driving speed is above the current speed limit, the below picture will appear.
Compass
Distance to current speed camera
Current Car Speed
Speed Limitation of
current speed camera
Overspeed Icon
Speed Limitation of
current speed camera
11
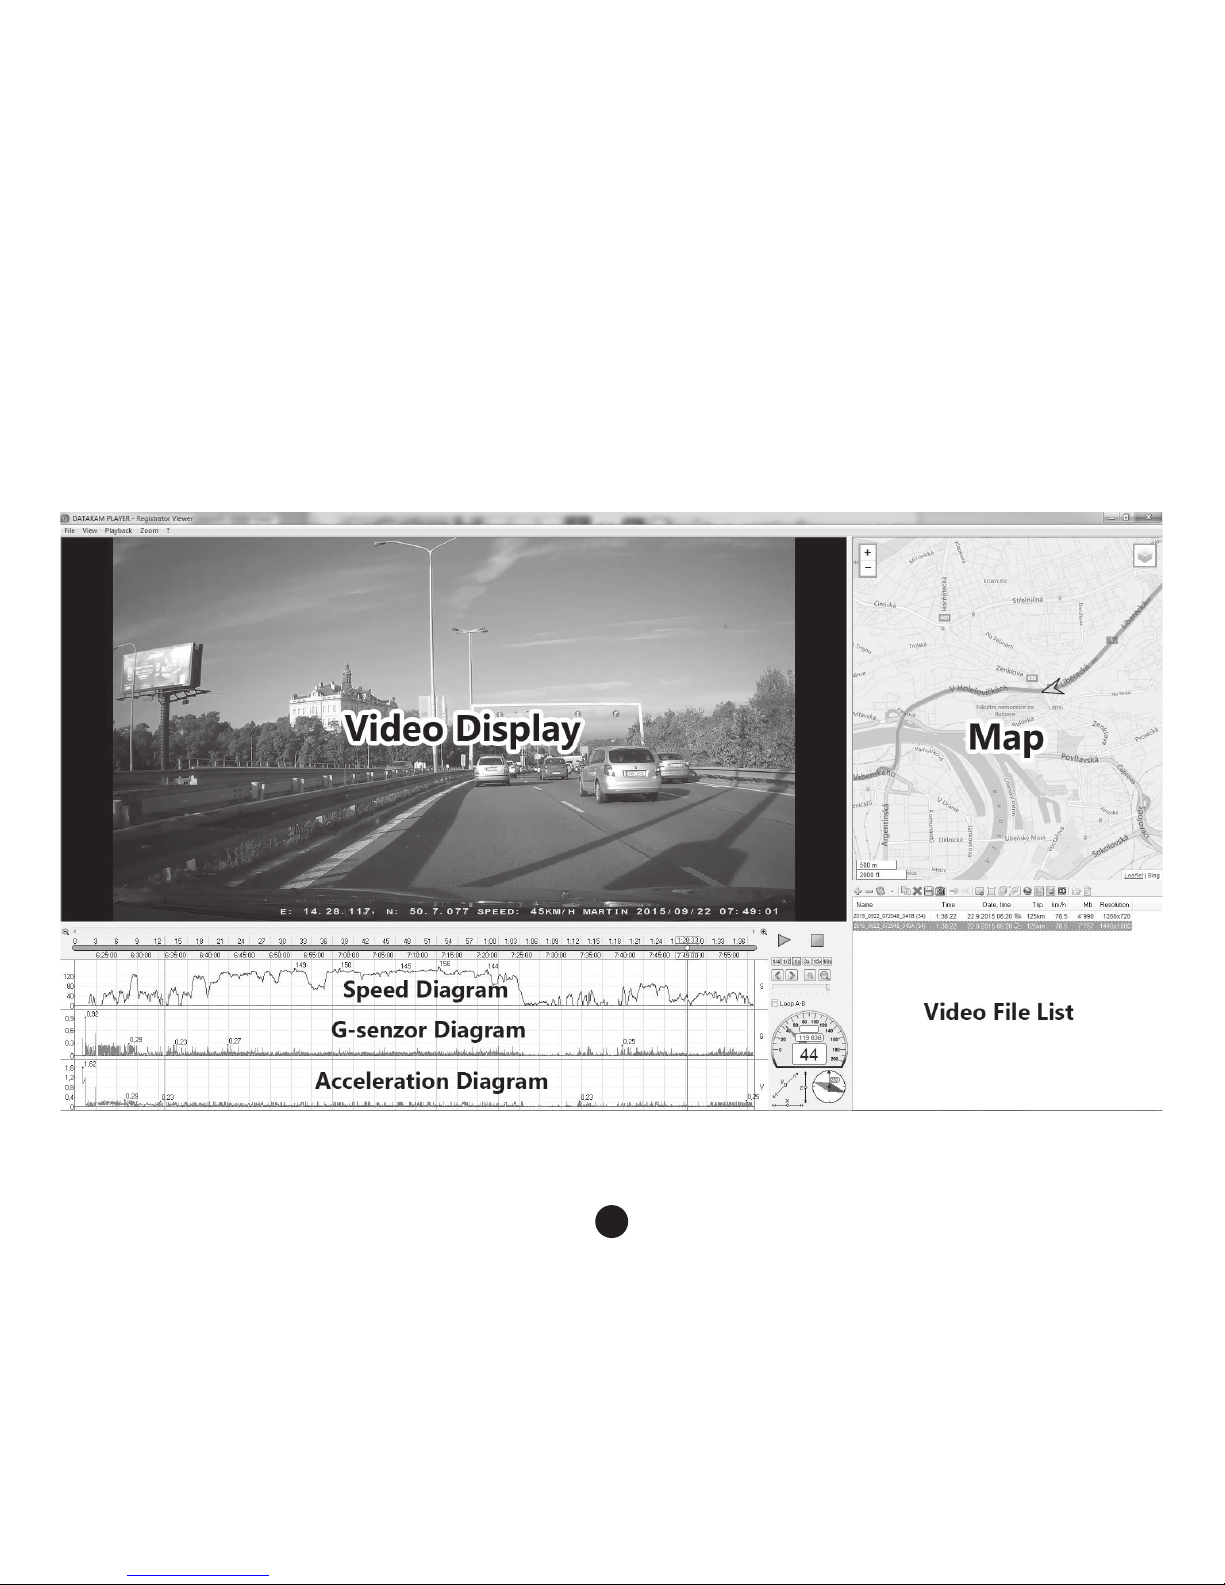
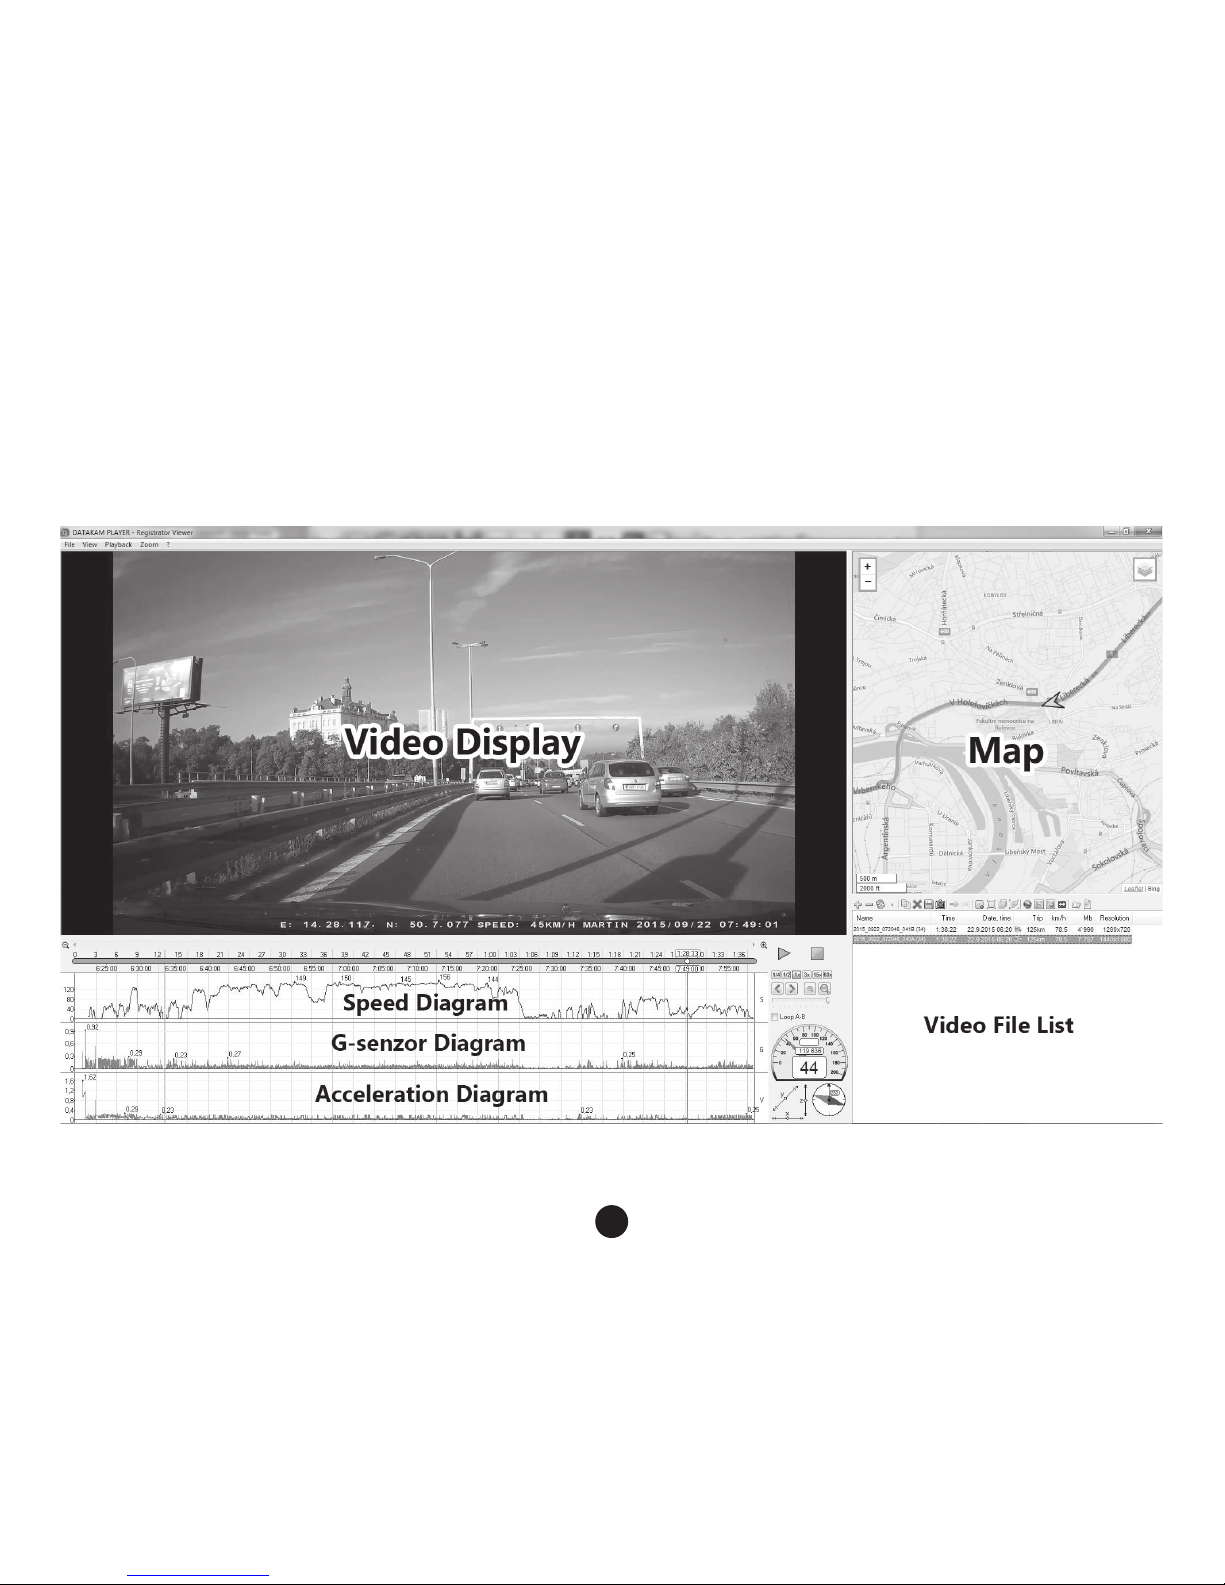
c) DATAKAM Player
TrueCam A4 camera offers you smart and useful software. On a single screen it allows you to view your footage,
the route on map, the speed chart and the g-forces obtained from the camera’s internal G-sensor.
The DATAKAM Player can be found on: www.truecam.com/download/A4GPS.zip

12
LED light status list
LED light Status Description
Rec light (blue)
Flash Device is recording
On Device is in standby or playback mode
Off Device is off
Charging light (red)
On Charging battery
Off Charging nished
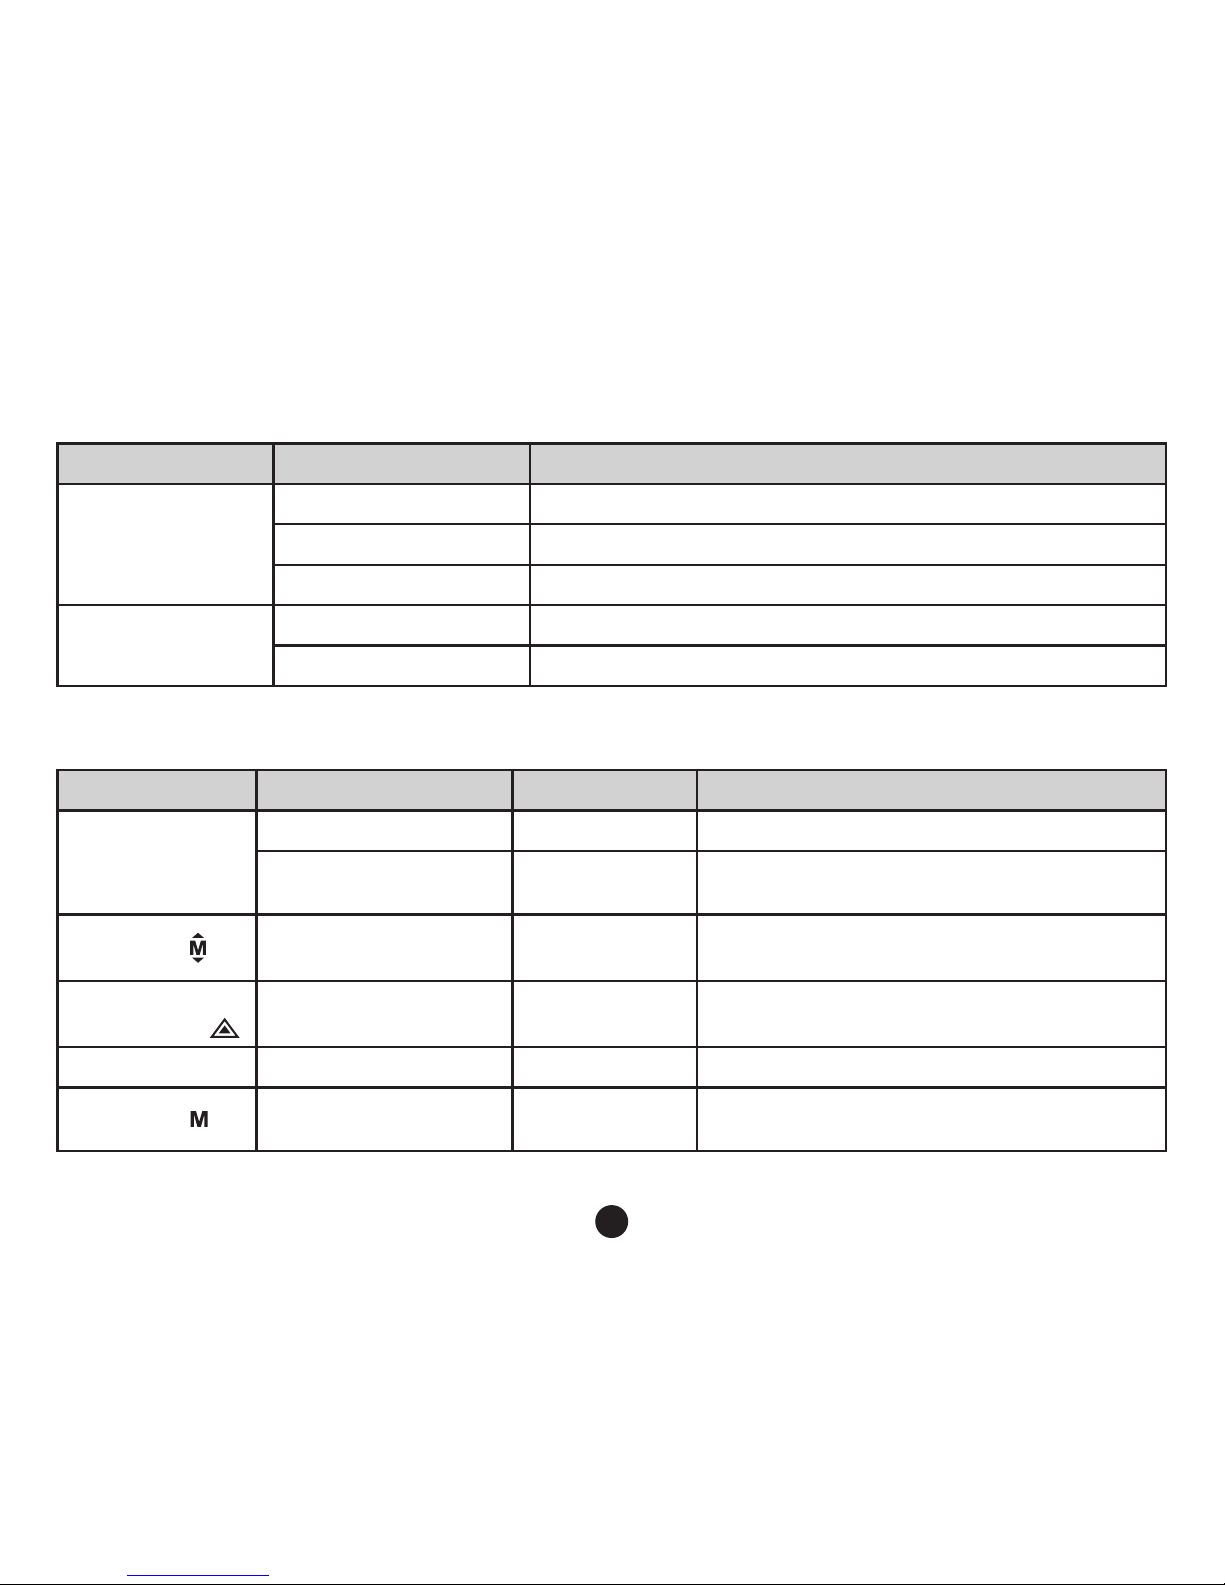
Button functions in video mode
Button Function Action Remark
Power button
Power on/off Long press Turn on/off device
LCD on/off Short press
Turn on/off LCD display in recording and
standby mode
Menu button
Menu setting Short press In standby mode, enter menu list
File protection
button
File protection Short press In recording mode, lock/unlock the video le
Camera button Take picture Short press Take a photo
Mode button
Switch mode Short press Switch video/playback mode
13
Up button
Up /
Speedometer on / off
Short press
Up button in menu settings
In recording mode or standby mode, press to
turn the speedometer on / off
OK button Video record Short press Start/stop video recording
Down button Down/mute Short press
Down button in menu settings
Start/stop voice recording in recording mode
Button functions in playback mode
Button Function Action Remark
Menu button
Menu setting Short press Enter menu list
Mode button
Switch mode Short press Switch video/playback mode
Up button
1) Previous le Short press Previous le
2) Rewind Short press
When playing video, press this button to
rewind
OK button Play/pause video le Short press Play/pause video le
Down button
1) Next le Short press Next le
2) Fast forward Short press
When playing video, press this button to
fast forward play

14
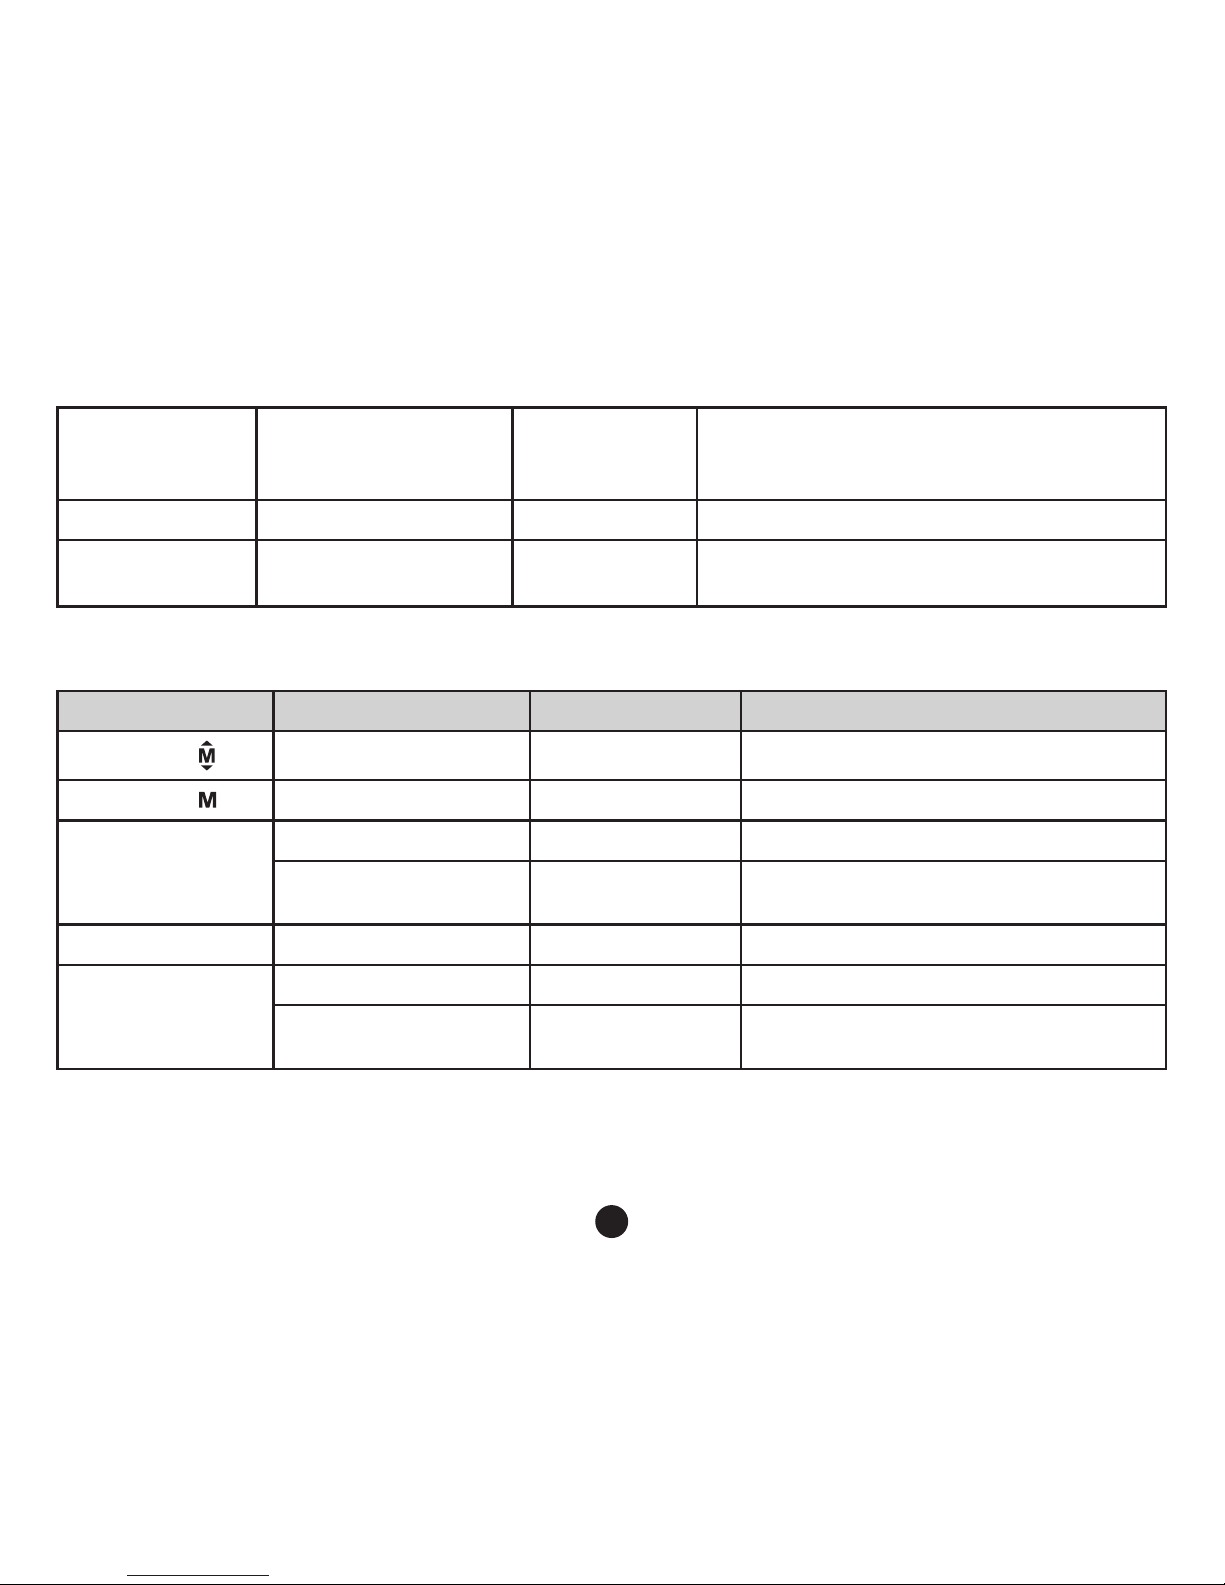
Settings menu:
The device uses two modes – recording and playback.
a) In recording mode
Function Menu item
Resolution 1080P 1920x1080 / 720P 1280x720 / WVGA 848x480 / VGA 640x280
Loop recording Off / 2 min / 3 min / 5 min
Picture resolution 12M / 8M / 5M / 3M / 2MHD
Exposure -2.0 / -1.7 / -1.3 / -1.0 / -0.7 / -0.3 / 0 / 0.3 / 0.7 / 1.0 / 1.3 / 1.7 / 2.0
White balance Auto / Daylight / Overcast / Tungsten / Fluorescent
WDR Off / On
Motion detection Off / Low / Medium / High
G-sensor Off / Low / Medium / High
Record audio Off / On
Date stamp Off / On
Driver name stamp - - - - - Driver label Off / On
Image rotation Off / On
Date / time YY/MM/DD
Power on delay Off / 10 seconds / 20 seconds / 30 seconds
Power off delay Off / 10 seconds / 20 seconds / 30 seconds
Auto Power Off Off / 1 minute / 3 minutes / 5 minutes
Beep Sound Off / On

15
Screensaver
Speedometer: 1 min / Speedometer: 3 min / Speedometer: 5 min / Display off: 1 min /
Display off: 3 min / Display off: 5 min / Off
Keyboard backlight Auto / Off / On
TV mode NTSC / PAL
Frequency 50 Hz / 60 Hz
Language
English / French / Spanish / Portuguese / German / Italian / Hungarian / Czech / Polish
/ Serbian / Chinese / Russian / Japanese
Time zone setting
GPS Watermark Off / On
Spped Watermark Off / On
Format Cancel / OK
Default setting Cancel / OK
Software version TRCM_A4 V1.7
b) In playback mode
Delete Delete Current / Delete All
Protect Lock Current / Unlock Current / Lock All / Unlock All
Format Yes / No
Slide Show 2 seconds / 5 seconds / 8 seconds

16
Product parameters:
Chipset Novatek NT96650
LCD display 2.7 Inch 16:9
Camera
Resolution 1/3" 3.0 mega CMOS sensor, AR0330
View angle 130° degree
Video
Resolution 1920x1080@30fps / 1280x720@30fps / 640x480@30fps
Standard Mov le, H.264 compression
Micro SD card Supported up to 32GB
G-sensor function Supported
File protection function Supported
Motion detection function Supported
Uninterrupted cycle recording Supported
Interface USB2.0 / HDMI
Audio Built-in microphone
Power 12-24V car charger
Battery Built-in 250mAh battery
Menu language
English / French / Spanish / Portuguese / German / Italian / Hungarian
/ Czech / Polish / Serbian / Chinese/ Russian / Japanese
Operating temperature -5°C ~ 40°C
Unit size 99x49x37 mm
Made in China. Printing errors are reserved.
Accessories:
Car DVR Car charger Camera holder USB cable Manual GPS module (optional)

17
Precautions and notices
- For your own safety, do no use the camera’s controls while driving.
- A window mount is needed when using the recorder in a car. Make sure that you place the recorder in an appropriate place,
so as not to obstruct the driver’s view or deployment of airbags.
- Make sure that no object is blocking the camera lens and no reective material is placed near the lens. Please keep the lens
clean.
- If the car’s windshield is tinted or coated, it may impact the recording quality.
Safety precautions
- Use only the charger supplied with your device. Use of another type of charger may result in malfunction and/or danger.
- Do not use the charger in high moister environment. Never touch the charger when your hands or feet are wet.
- Allow adequate ventilation around the charger when using it to operate the device or to charge the battery. Do not cover the
charger with paper or other objects that will reduce cooling. Do not use the charger while it is inside a carrying case.
- Connect the charger to a proper power source. The voltage requirements are found on the product case and/or on the
packaging.
- Do not use the charger if it is visibly damaged. In case of damage, do not repair the equipment yourself!
- In case of device overheating, immediately disconnect the power source.
Caring for your device
- Taking good care of your device will ensure trouble-free operation and reduce the risk of damage.
- Keep your device away from excessive moisture and extreme temperatures and avoid exposing your device to direct sunlight
or strong ultraviolet light for extended periods of time.
- Do not drop your device or subject it to severe shock.
-
Do not subject your device to sudden and severe temperature changes. This could cause moisture condensation inside the
unit, which could damage your device. In the event of moisture condensation, allow the device to dry out completely before use.
- The screen surface can easily be scratched. Avoid touching it with sharp objects.
- Never clean your device when it is powered on. Use a soft, lint-free cloth to wipe the screen and the exterior of your device.
Do not use paper towels to clean the screen.
- Never attempt to disassemble, repair or make any modications to your device. Disassembly, modication or any attempt at
repair could cause damage to your device and even bodily injury or property damage and will void any warranty.
- Do not store or carry ammable liquids, gases or explosive materials in the same compartment as your device, its parts or
accessories.
- To discourage theft, do not leave the device and accessories in plain view in an unattended vehicle.
- Overheating may damage the device.
Other information
1)
For households: This marking indicates that this product should not be disposed with other household wastes
throughout the EU. To prevent possible harm to the environment or human health from uncontrolled waste
disposal, recycle it responsibly to promote the sustainable reuse of material resources. To return your used
device, please use the return and collection systems or contact the retailer where the product was purchased.
They can take this product for environmental safe recycling.
In case of incorrect disposal of this kind of wastes user can be ned according to national laws.
User information for disposal of electric and electronic devices in countries outside the EU: The symbol stated above (crossed
recycle bin) is valid only in countries in European Union. For correct disposal of electric and electronic devices ask your city hall or
distributor of these devices. Everything is expressed by the symbol of crossed recycle bin on product, cover or printed materials.
2)
You can determine a warranty service at the place of purchase. In case of technical problems or queries contact your dealer who
will inform you about the following procedure. Follow the rules for work with electric devices. User is not allowed to disassembly
the device neither replace any of its components. To reduce the risk of electric shock, do not remove or open the cover. In case of
incorrect setup and plug in of device you will expose yourself risk of electric shock.
Declaration of Conformity:
Hereby, MagiCam HD SOLUTIONS s.r.o., declares that all TrueCam A4 products are in compliance with
the essential requirements and other relevant provisions of Directive 2004/108/EC. Products are intended
for sale without any restriction in Germany, Czech Republic, Slovak Republic, Poland, Hungary and other
EU countries. Products are covered for two years warranty, unless otherwise stated. You can download the
Declaration of Conformity from the website: www.truecam.eu
Exclusive importer of TrueCam product in EU:
MagiCam HD SOLUTIONS s.r.o.,
Braškovská 308/15, 16100 Praha 6
http://www.truecam.eu
● 1080p Full HD
● WDR Funktion (Wide Dynamic Range)
● Tasten hintergrundbeleuchtet
● GPS Modul und Blitzerwarner (als
Zusatzzubehör)
WDR Funktion (Wide Dynamic Range)
Benutzerhandbuch
TRUECAM A4

Vorstellung des Produkts.............................................................................................3
Installieren des Geräts.................................................................................................4
Einstellung des Geräts..................................................................................................4
a) Automatisches Aufnehmen.......................................................................................................4
b) Fotograeren.............................................................................................................................5
c) Bewegungserkennung...........................................................................................................5
d) G-Sensor Funktion...................................................................................................................5
e) Dateienschutz.....................................................................................................................5
f) Wiedergabemodus........................................................................................................5
g) Verbindung mit dem Computer................................................................................................5
Weitere Funktionen....................................................................................................6
Wichtige Funktionen....................................................................................................6
Abbildung der Symbole auf dem LCD Display..............................................................7
a) Im Bereitschaftsmodus.....................................................................................................7
b) Im Aufnahmemodus.............................................................................................................8
GPS Modul und Blitzerwarner (als Zusatzzubehör).....................................................9
a) Installieren des GPS-Moduls / Blitzerwarners..........................................................................9
b) TACHOMETER......................................................................................................................10
c) Applikation DATAKAM Player..................................................................................................11
Verzeichnis der LED Betriebszustände.....................................................................12
Funktion der Tasten im Aufnahmemodus...................................................................12
Tastenfunktionen im Wiedergabemodus...................................................................13
Einstellungsmenü...................................................................................................14
a) Im Aufnahmemodus............................................................................................................14
b) Im Wiedergabemodus....................................................................................................15
Technische Parameter...............................................................................................16
Verpackungsinhalt...................................................................................................16
3
Vorstellung des Produkts:
1. HDMI Port 2. Objektiv 3. Lautsprecher
4. Licht beim Aufnehmen (blau) 5. Licht bei der Auadung (rot) 6. Menü Taste
7. Mikrofon 8. Taste für Dateienschutz 9. Modustaste
10. LCD Display 11. Taste "nach oben" 12. OK Taste
13. Taste "nach unten" 14. Hauptschalter 15. Verbindung mit der Halterung
16. Auslöser für Fotos 17. USB Port 18. Reset Taste
19. Slot für die Speicherkarte
4
Installieren des Geräts:
a) Legen Sie die Micro SD Karte so ein, dass die Kontakte in Richtung des Displays zeigen.
Lassen Sie die Kamera ausgeschaltet beim Einlegen oder Herausnehmen der SD Karte.
b) Platzieren Sie das Gerät an der Windschutzscheibe mit Hilfe der selbstklebenden Halterung.
c) Verbinden Sie mittels des USB Ladekabels den 12V Zigarettenanzünder.
Starten Sie den Motor, die Kamera schaltet sich automatisch ein und beginnt mit dem Aufnahmevorgang.
Einstellung des Geräts:
a) Automatisches Aufnehmen
1. Starten Sie den Motor
2. Kamera schaltet sich automatisch ein und beginnt mit dem Aufnahmevorgang.
3. Mit dem Drücken auf Dateien Sperrtaste sichern Sie die in diesem Segment aufgenommenen Dateien.
4. Mit dem Drücken auf die Taste "nach unten" schalten Sie die Tonaufnahme ein oder aus.
5. Mit dem Drücken auf die Taste "Hauptschalter" schalten Sie den LCD Display aus.
6. Mit dem Drücken auf die OK Taste stoppen Sie / starten Sie den Aufnahmevorgang.
7. Schalten Sie den Motor aus, die Kamera speichert die Aufnahme und schaltet sich automatisch aus.
21. GPS Modul und Blitzerwarner (als Zusatzzubehör)
22. Schalter der Detektorstimmen von
Geschwindigkeitsradars
23. Speisestecker
24. Selbstklebeäche
25. Kameraträger
21
22
23
24
25

5
b) Fotograeren
Mit dem Drücken auf die Taste AUSLÖSER im Aufnahmemodus fertigen Sie ein Bild in der aktuellen Auösung an.
Mit dem Drücken auf die Taste AUSLÖSER im Bereitschaftsmodus fertigen Sie ein Bild in der Auösung nach der
aktuellen Einstellung im Menü an.
c) Bewegungserkennung
1. Drücken Sie auf die Taste Menü im Aufnahmemodus für den Einstieg in die Einstellung, dann wählen Sie die
Funktion Bewegungserkennung.
2. Wenn die Kamera in ihrer Reichweite bewegende Objekte erkennt, erscheint auf dem Bildschirm ein blinkender
roter Punkt “ ” und das Gerät beginnt mit dem Aufnehmen.
Sobald das Gerät keine bewegende Objekte in seiner Reichweite erkennt, beendet es automatisch das Aufnehmen.
d) G-Sensor Funktion
Falls die Kamera während des Aufnehmens eine ernsthafte Kollision der Geräts aufnimmt "(eine heftige
Richtungsänderung)", erscheint auf dem Bildschirm “
” und die Kamera speichert die aktuelle Aufnahme gegen
ihre folgende Überschreibung im Zeitraffermodus.
e) Dateienschutz
1. Drücken Sie während des Aufnehmens auf die Menü-Taste,“
” erscheint auf dem Bildschirm und die Kamera
speichert die aktuelle Aufnahme gegen ihre folgende Überschreibung im Zeitraffermodus.
2. Drücken Sie noch einmal auf die Menü-Taste um den Dateienschutz auszuschalten.
f) Wiedergabemodus
1. Wenn das Gerät im Bereitschaftsmodus ist, drücken Sie auf die Modustaste um den Wiedergabemodus
einzuschalten.
2. Drücken Sie die Taste "nach oben" / "herunter" für die Auswahl eines Videos oder eines Bildes.
3. Drücken Sie auf die OK Taste für die Wiedergabe / Pause beim Video.
4. Drücken Sie auf die Menü Taste um das Menü zu starten.
5. Drücken Sie wieder auf die Modustaste für das Starten des Aufnahmemodus.
g) Verbindung mit dem Computer
1. Schalten Sie die Kamera aus und verbinden Sie sie mittels des USB Kabels mit dem Computer.
2. Auf dem Bildschirm der Kamera erscheint das Menü, wählen Sie "Geräte mit hoher Kapazität" aus. In Ihrem
Computer erscheint die Erkennung eines neuen Wechseldatenträgers.
3. Machen Sie den Ordner des Wechseldatenträgers auf, Sie nden die Videos und die Bilder im Ordner "DCIM".

6
Weitere Funktionen:
GPS Koordinaten (als Zusatzzubehör)
- GPS Koordinaten werden direkt im Video angezeigt.
Geschwindigkeitsanzeige (als Zusatzzubehör)
- Die Geschwindigkeit wird direkt im Video angezeigt. Hilfreich bei nachträglicher Kontrolle der Geschwindigkeit.
Aufnahmesperre
- Schutz vor nicht gewolltem Überschreiben der Aufnahmen. Videos kann man im Aufnahme-modus sowie
Wiedergabemodus sperren.
Wichtige Funktionen:
Bewegungserkennung
Dient zur automatischen Auslösung der Aufzeichnungen wenn die Kamera ausreichende Bewegung erkennt, z. B.
Zurückfahren. Die Bewegungsintensität hängt von der eingestellten Empndlichkeit der Bewegungserkennung ab.
Beachten Sie, dass bei Einstellung einer hohen Empndlichkeit die Speicherkartekapazität bald voll sein kann.
Schleife-Einstellung
Die Zeitschleife ermöglicht ständige Aufzeichnungen der Autokamera ohne Rücksicht auf die Kapazität der
Speicherkarte. Man kann vier Zeitintervalle einstellen: Aus / 2 Min / 3 Min / 5 Min. Das eingestellte Zeitintervall gibt
an, wie lange die Kamera die Zeitaufnahmen speichern wird. Der Vorteil dieser Einstellung ist, dass die Kapazität
Ihrer Speicherkarte nie voll wird. Außerdem ist es viel einfacher diese kleinen Dateien als Beweismaterial zum
Beispiel in einer E-Mail abzusenden.
Aufgeschobene Einschaltung / Ausschaltung
Diese Funktion dient zur Aufschiebung der Einschaltung / Ausschaltung der Kamera nach Starten / Ausschaltung
des Motors Ihres Fahrzeugs. Auf diese Weise kann die freie Kapazität auf Ihrer Speicherkarte erhöht werden
(bei aufgeschobener Einschaltung), oder man hat die Aufzeichnungen des Geschehens nach dem Verlassen des
Fahrzeugs (bei aufgeschobener Ausschaltung).

7
Abbildung der Symbole auf dem LCD Display:
a) Im Bereitschaftsmodus
3
WDR
F
2013/11/06
5M
1080FHD AAAAAA 01:07:38
14:25:30
1
3
Bewegungserkennung
Restliche Aufnahmezeit
(nach dem freien Platz
auf der SD Karte)
Aufnahmemodus
Batteriestandsanzeige
Indikator der
SD-Karte
G-Sensor
Fotoauflösung
Loopzeit
WDR Funktion
Beleuchtungswert
Mikrofon
an
Mikrofon
aus
Videoerkennung
Bezeichnung des Fahrers
Datum und Uhrzeit
GPS-Ikone (GPS-Modul als Zusatzzubehör)
8
b) Im Aufnahmemodus
3
WDR
F
2013/11/06
5M
1080FHD AAAAAA
14:25:30
1
3
Bewegungserkennung
Auflösung des Videos
Batteriestandsanzeige
Indikator der
SD-Karte
Bezeichnung des Fahrers
Fotoauflösung
Zeitraffereinstellung
WDR Funktion
Beleuchtungswert
Datum und Uhrzeit
00:03:38
Zeit der Aufnahme
Blinkender roter
Punkt signalisiert,
dass das Gerät
gerade aufnimmt.
G-Sensor
Mikrofon
an
Mikrofon
aus
Loopzeit
9
GPS Modul und Blitzerwarner (als Zusatzzubehör)
a) Installieren des GPS-Moduls / Blitzerwarners
Befestigen Sie das GPS Modul/Blitzerwarner Modul löschen am Halter der Kamera (wie auf dem Bild):
Platzieren Sie das Gerät an der Windschutzscheibe mit Hilfe des selbsklebenden 3M Klebepads oder des
Saugnapfs. Nach dem Einschalten der Videokamera wird der Blitzerwarner ertönen, und das Gerät fängt an, das
GPS Signal zu empfangen.
Nach einer erfolgreichen Verbindungserstellung wird auf dem Display das Symbol "
" abgebildet.
10
b) TACHOMETER
Drücken der "nach oben" Taste im Aufnahmemodus oder Standbymodus wird das Display umgeschaltet
wie unten abgebildet. Aktuelle Geschwindigkeit, Kompass und die Entfernung zum nächsten Blitzer werden
angezeigt.
Wenn die erlaubte Höchstgeschwindigkeit überschritten ist wird das unten gezeigte Bild im Display angezeigt.
Kompass
Entfernung zum nächsten Blitzer
Aktuelle
Geschwindigkeit
Aktuelles
Geschwindigkeitslimit
Geschwindigkeitswarnung
Geschwindigkeitslimit
des aktuellen Fahrabschnitts
11
c) Applikation DATAKAM Player
Autokamera TrueCam A4 bietet die Möglichkeit, schlaue und nützliche Software applikationen zu nutzen. Dank
dieser Applikationen haben Sie die Möglichkeit, auf einem Monitor das erstellte Video, sowie die auf abgebildeten
Routen, Geschwindigkeit und die Angabe des G-Sensors zu verfolgen.
Die DATAKAM Player nden Sie auf der: www.truecamkameras.de/download/A4GPS.zip
12
Verzeichnis der LED Betriebszustände
LED Licht Stand Bedeutung
Licht bei der
Aufnahme
(blau)
blinkt Das Gerät nimmt auf
leuchtet Das Gerät ist im Bereitschafts- oder Wiedergabemodus
leuchtet nicht Das Gerät ist aus
Licht beim
Auaden (rot)
leuchtet Baterieauaden
leuchtet nicht Auaden beendet
Funktion der Tasten im Aufnahmemodus
Taste Funktion Aktion Anmerkung
Hauptschalter
An / Aus Lange drücken Schaltet die Kamera ein / aus
Display An / Aus Kurz drücken
Im Aufnahmemodus oder Standbymodus
drücken um das Display Ein / Ausschalten.
Menü Taste
Menüeinstellung Drücken
Die Menüfunktion im Bereitschaftsmodus
werden abgebildet
Taste für den
Dateienschutz
Dateienschutz Drücken
Die Aufnahme wird im Aufnahmemodus
gesperrt / entsperrt
Fotoauslöser Fotoanfertigung Drücken Fotograen
Modustaste
Moduswechsel Drücken
Schalten zwischen dem Aufnahmeund Wiedergabemodus
 Loading...