

Page 1
WIRELESS SUB EXTENDERS
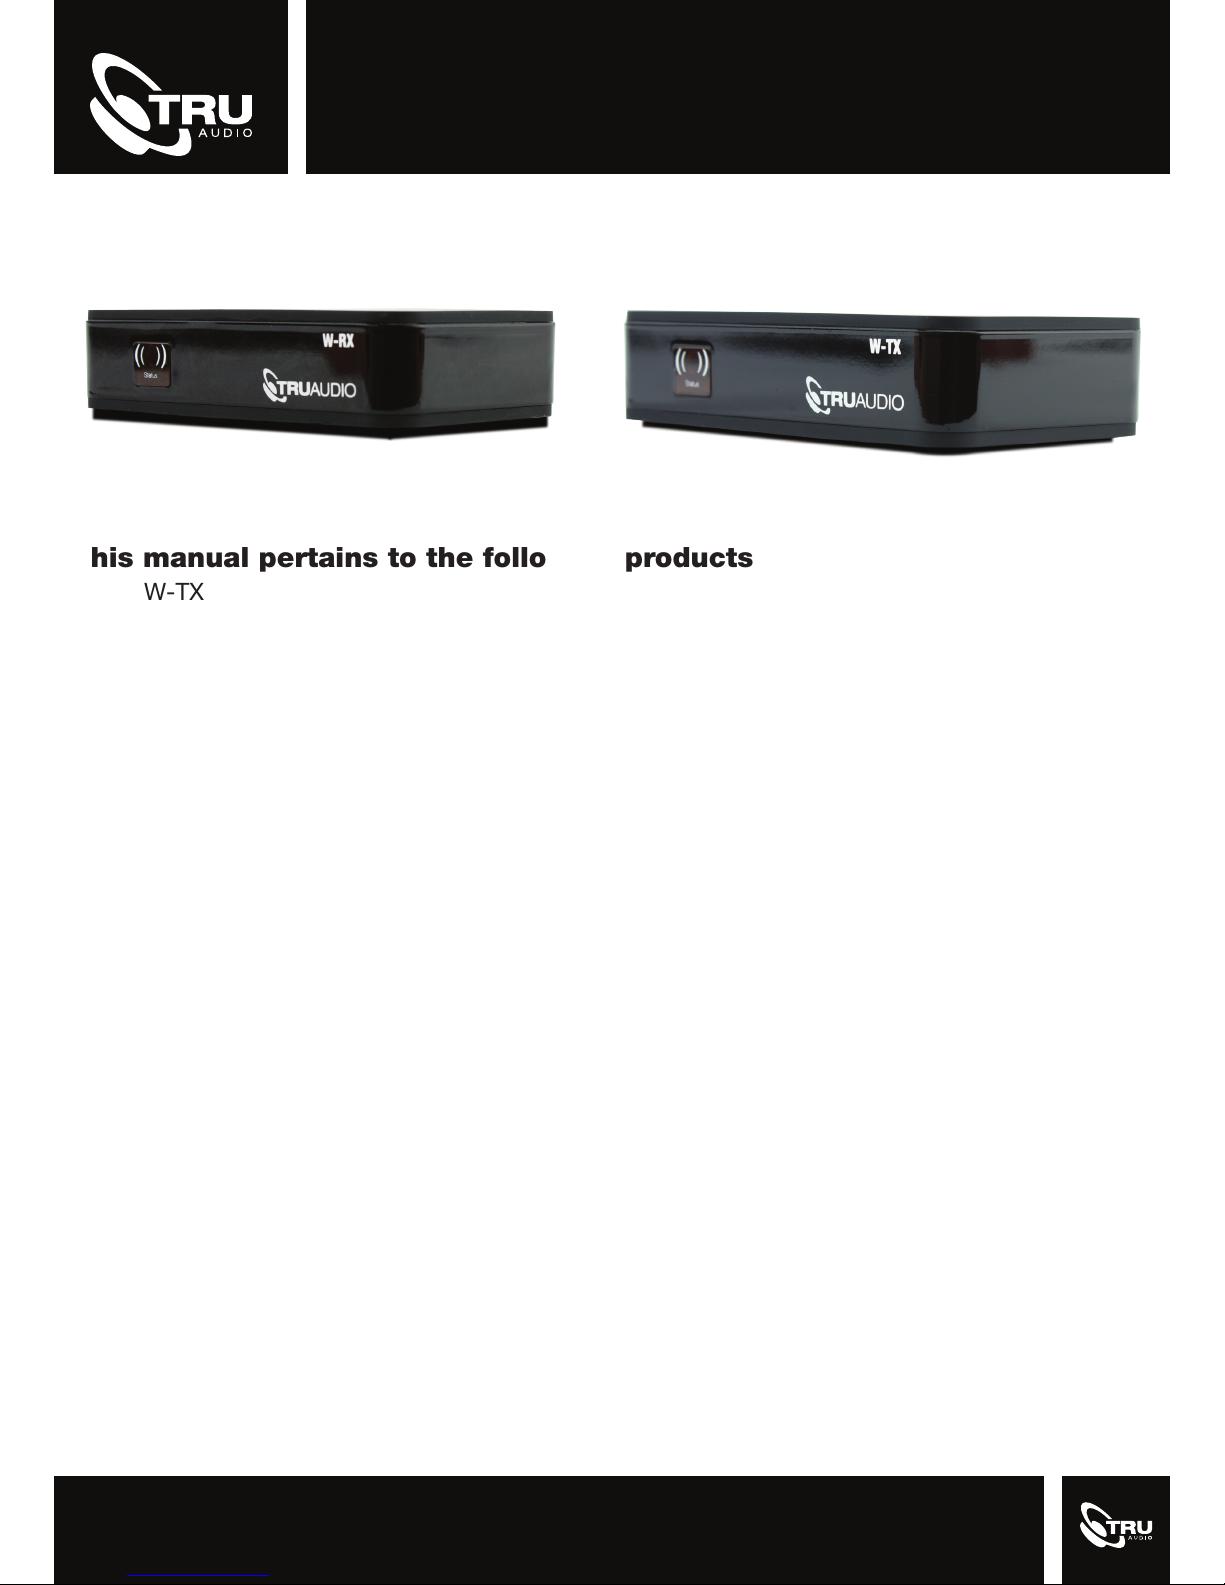
This manual pertains to the following products
• W-TX
• W-RX
W-TX / W-RX
User Manual
INCLUDED IN BOX:
• (1) W-RX or W-TX
• (1) 5.9V DC Adapter
• (1) Mounting Bracket
• (1) Quick User Guide
FEATURES:
• Connection Reliability: The W-TX and W-RX utilize a sophisticated frequency hopping algorithm
at 5.8 GHz and dual antenna diversity for best in class reliability. These devices will never interfere
with ZigBee, Z-Wave, Bluetooth, WiFi, or other wireless protocols in the crowded 2.4GHz channel.
• Easy One-Time Pairing: Pairing is as easy as plugging in and pressing a button. Once paired, the
devices will stay paired even if the power goes out.
Versatile Mounting: The included mounting bracket is designed to mount to the back of a sub, wall,
or other surface mount. The versatile hole pattern allows for a wide range of installation scenarios.
• Pairs with SLIM-PWR44: The W-RX receiver pairs seamlessly with the built in wireless sub transmitter in the SLIM-PWR44 for even more bass.
• Multiple Receivers: One transmitter can connect with up to 8 receivers for earth shattering bass
or for placing many subwoofers in a multi-channel system throughout a home.
Page 2
WIRELESS SUB EXTENDERS
W-TX / W-RX
User Manual
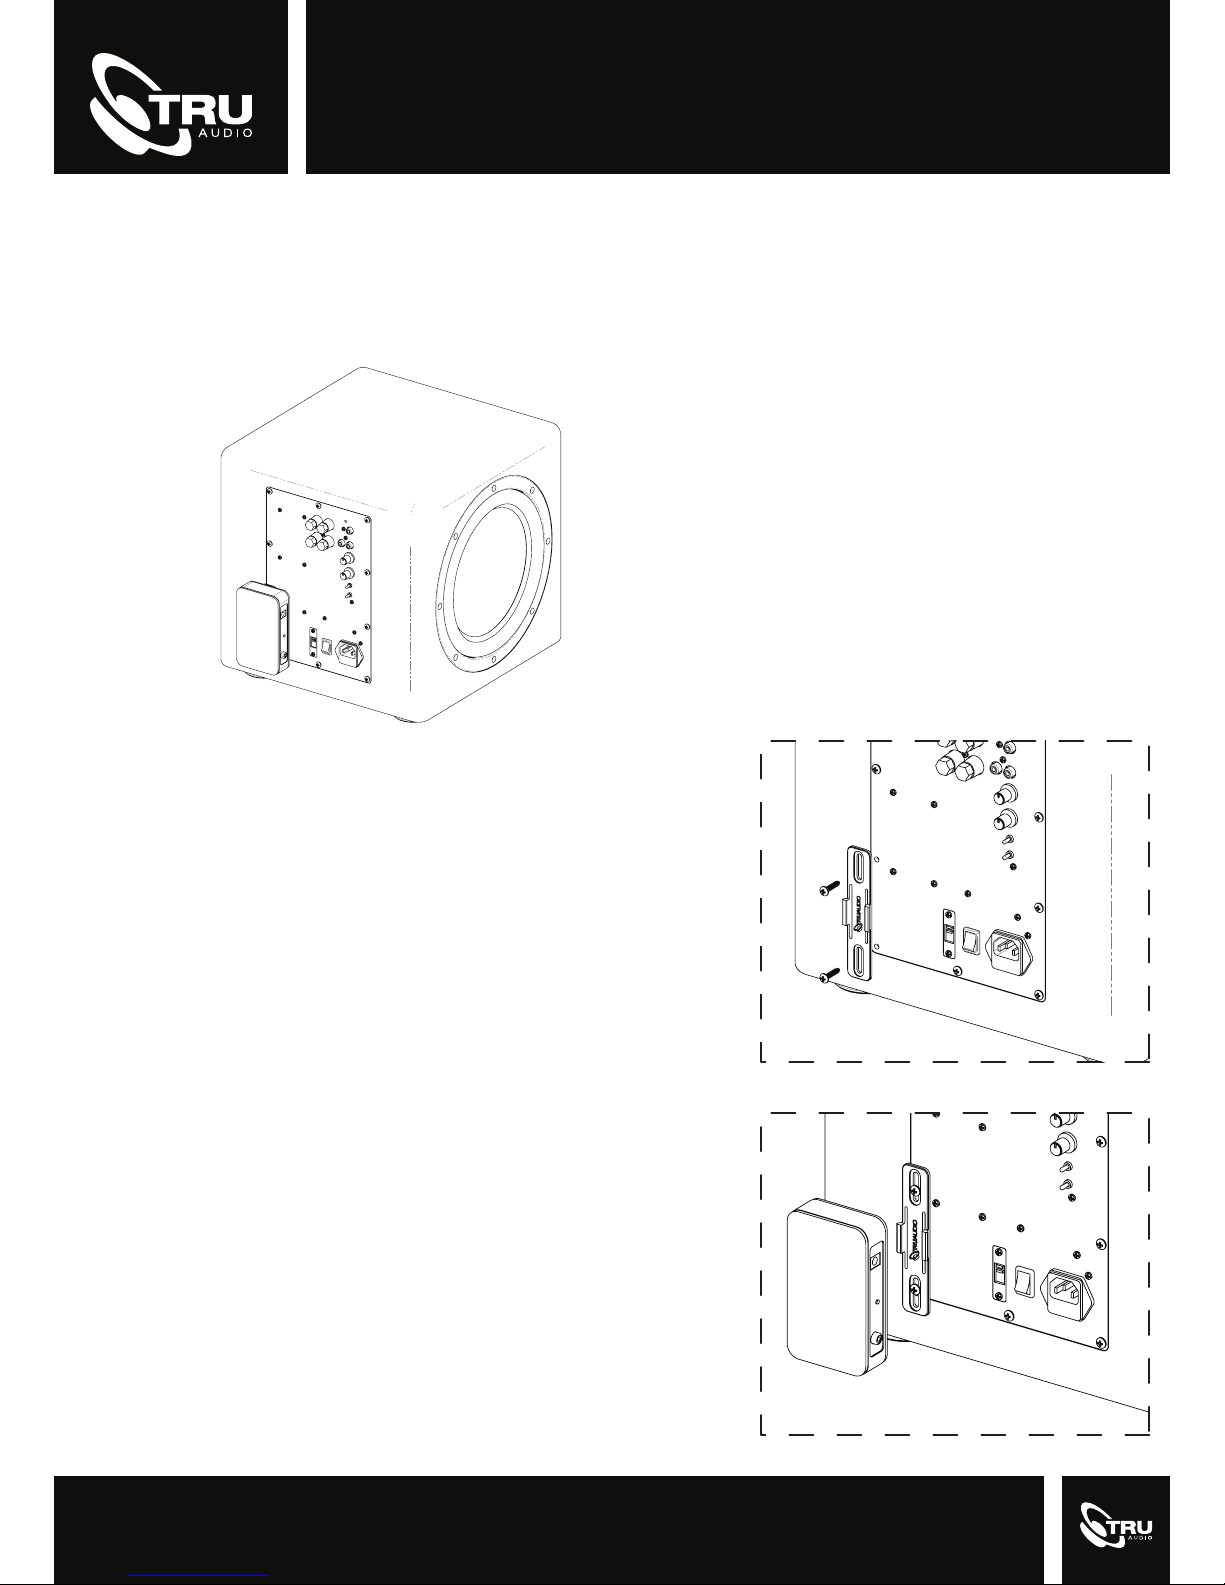
MOUNTING TO SUBWOOFER:
Each W-TX and W-RX comes with an included bracket for mounting to a sub, flat surface, or other
installation scenarios. Follow these steps to install a receiver to the back of a sub.
Step 1:
Remove two screws that mount the sub amp to the cabinet. Install the bracket by inserting the screws through
bracket and back into the original holes. The W-RX bracket has slots that will work with a wide range of hole patterns. We recommend you use two screws in near a corner
away from the electrical components. For most TruAudio
subs this will be in the lower left corner, your install may
vary..
Step 2:
Attach the W-RX to the bracket with a firm press. The unit
will snap into place. Use an RCA cable and the provided
power cable to complete the install.
Page 3
WIRELESS SUB EXTENDERS
W-TX / W-RX
User Manual
CONNECTING:
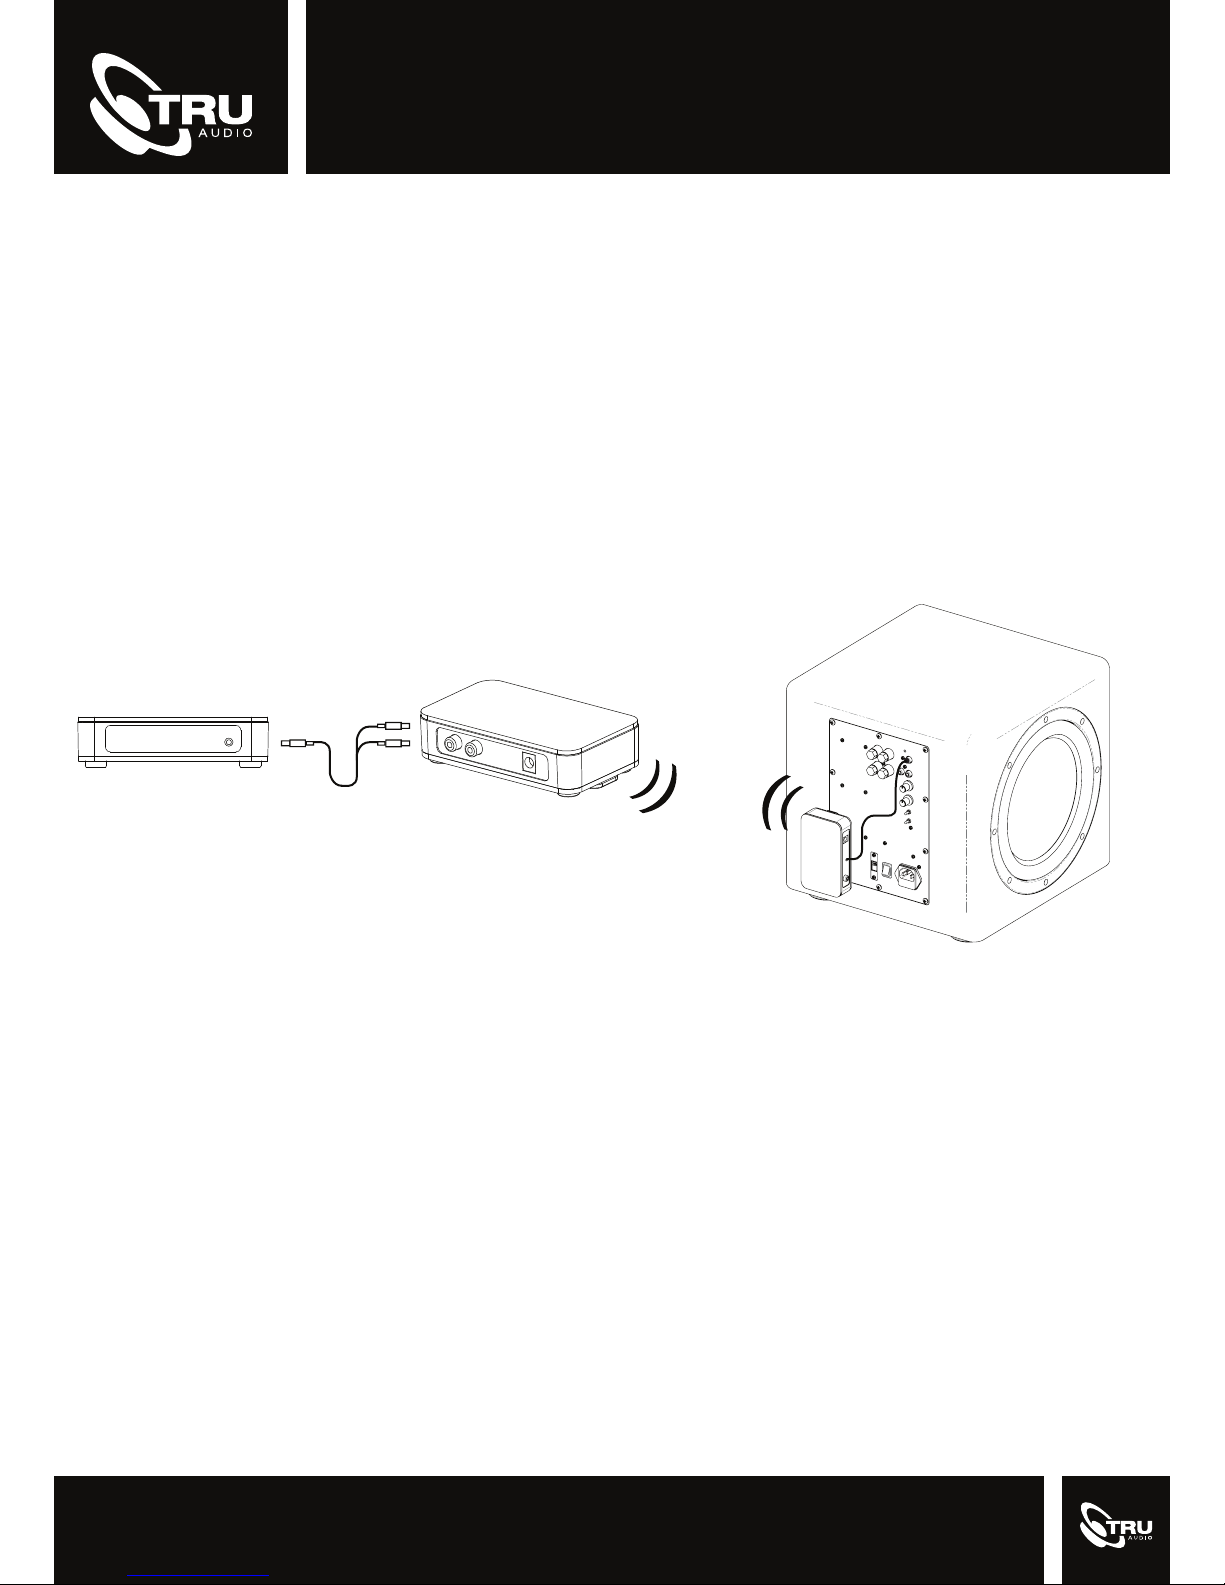
For best results use high quality, low impedance, shielded RCA connectors. For stereo inputs connect to the RCA Audio In jack. This can be connected to line level outputs on a source device such
as a TV or AV receiver. When connecting a LFE or mono source, use the R channel of the Audio In
RCA jack. For some subwoofers, you can use a Y connector to connect a LFE/mono sub out to
both the L and R channels of the RCA input to get more volume. Refer to the diagram below for the
system connections.
AV Receiver or AMP
LFE
Connection can be LFE or
Stereo into the transmitter
WIRELESS RANGE:
The line of sight rang for these devices are a 150 ft. Meaning in an open environment without obstacles in-between, the transmitter and receiver will work at distances of 150 ft. A worst case scenario
indoors you may only see around 50 ft of range. In our real world testing we have found these devices to work solidly at 75 ft. The range of your install will vary based on environment, but you should
be able to see a typical range between 50 ft and 75 ft for most indoor applications.
Page 4
WIRELESS SUB EXTENDERS
SOURCE
ON / STANDBY
BLUETOOTH
RELEASE
W-TX / W-RX
PAIRING INSTRUCTIONS:
For pairing with the W-TX:
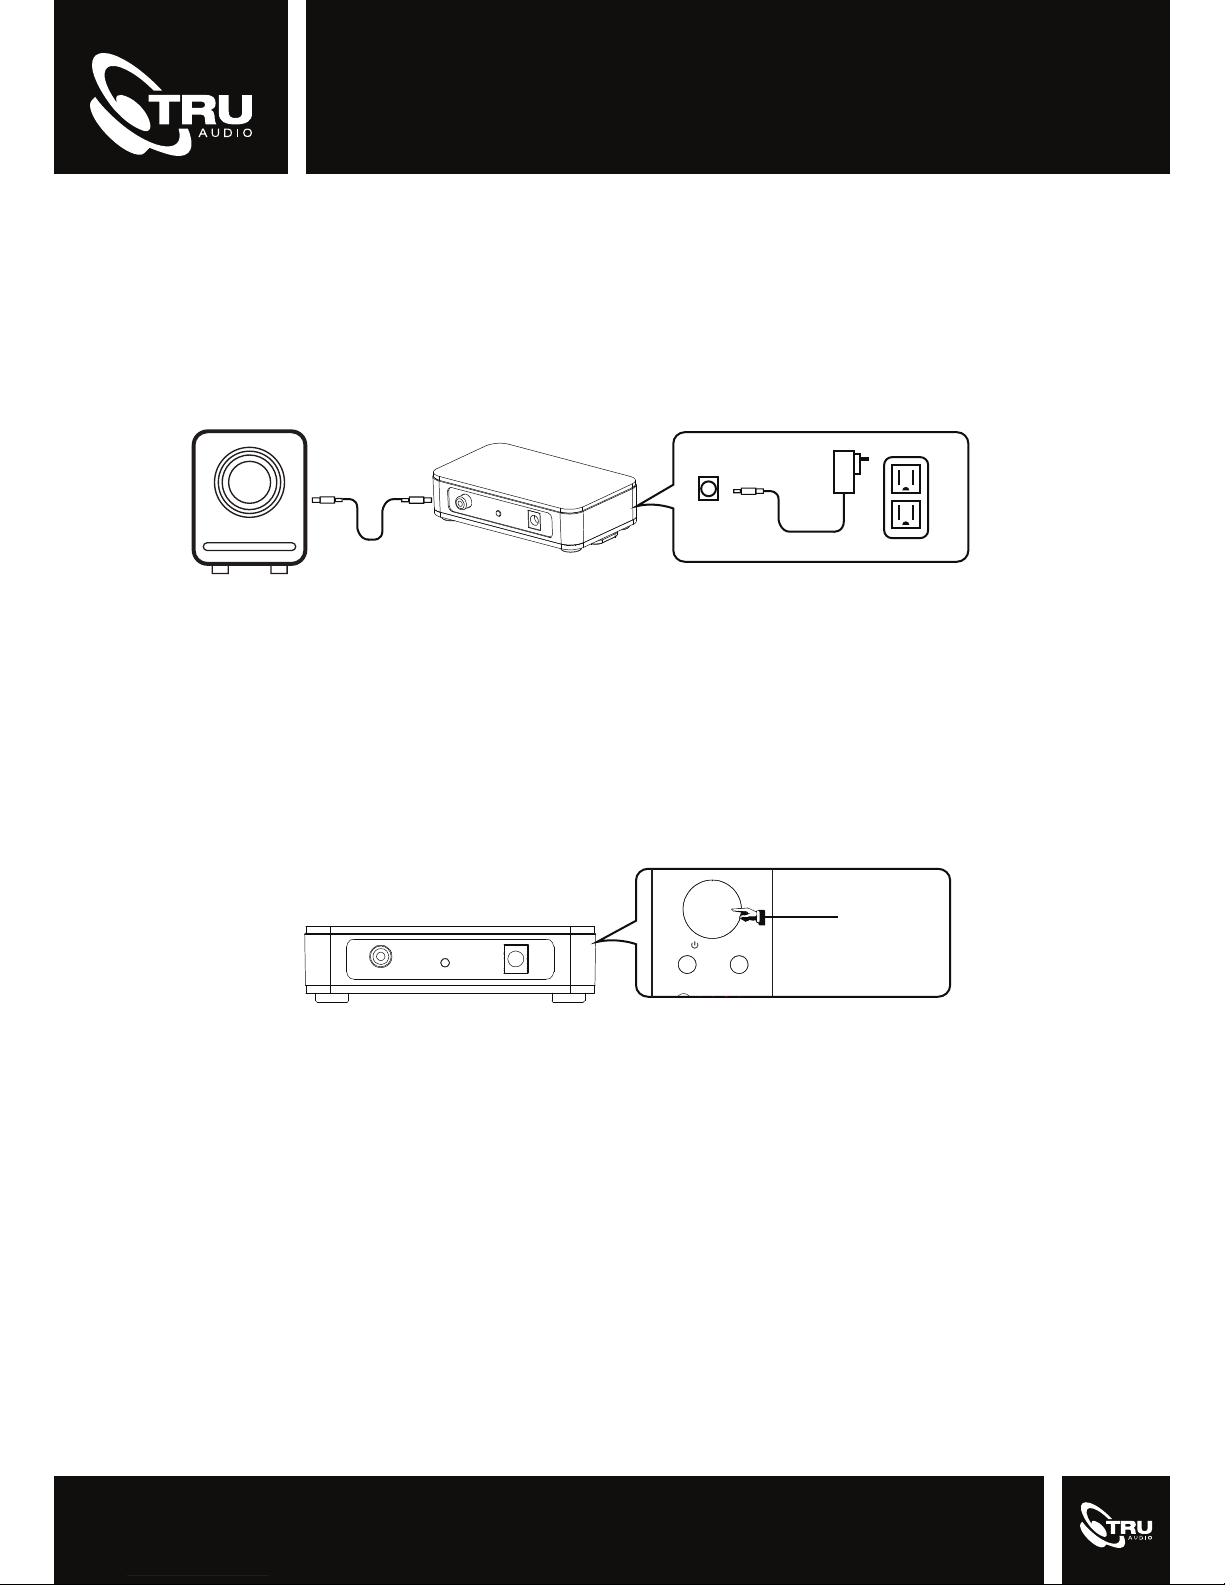
1. On the W-RX receiver, connect the Sub Out output to the LFE/mono input on a sub amplifier.
2. On the W-TX transmitter, connect an audio source to the Audio In RCA jack. For LFE/mono
signals use the L channel of the RCA jack.
3. Plug in the power supplies to the wall outlet, but wait to apply power.
5.9v
DC In
4. On the W-RX receiver, power the device by applying the 5.9v DC In.
5. Press the Pair button on the W-RX.
6. Within 10 seconds of pressing pair on the receiver, power on the W-TX transmitter by applying
the 5.9v DC In. Note: During the boot up process, the W-TX searches for the W-RX in pair mode
and connects automatically.
7. The LED indicator light will flash while not connected. Once the LED stops flashing and turns
solid then the connection is complete.
8. If the pairing fails, step through the trouble shooting steps of this guide.
User Manual
Pairing with SLIM-PWR44:
1. On the W-RX receiver, connect the Sub Out LFE output to the LFE input on a sub amplifier and
apply power.
2. Make sure the SLIM-PWR44 is turned off.
3. On the W-RX receiver press the Pair button.
Ensure the power to the
SLIM-PWR44 is off before
pushing pair on W-RX.
Sub Out
Pair
DC In
5.9v
4. Within 10 seconds, turn on the SLIM-PWR44. Note: During the boot up process, the
SLIM-PWR44 searches for the W-RX in pair mode and connects automatically.
5. The LED status indicator on the W-RX will blink for several seconds while connecting and then
show solid green when connected.
6. If connection fails, step through the trouble shooting steps of this guide.
MULTIPLE TRANSMITTERS:
For best results when connecting a system with multiple transmitters, only power on a single transmitter at a time while pairing. Power on a transmitter and pair all of the receivers, then power the
transmitter off and move to the next transmitter and receivers. When finished pairing, power on all of
the transmitters. Note that this process is necessary because when first powering on a receiver, the
device tries to auto connecting to a transmitter. This behavior makes connecting multiple receivers
to a transmitter a breeze.
Page 5
WIRELESS SUB EXTENDERS
W-TX / W-RX
User Manual
PAIRING MULTIPLE RECEIVERS:
Each W-TX is capable of connecting with up to 8 W-RX devices and transmitting to all of them
simultaneously. To pair a transmitter with multiple receivers, first ensure that only the intended transmitter is powered on and all others are off. Establish the first receiver pairing by using the normal
procedure. For each subsequent receiver simply plug in the receiver and the device will auto connect
to the transmitter. Be sure to only do one transmitter at a time.
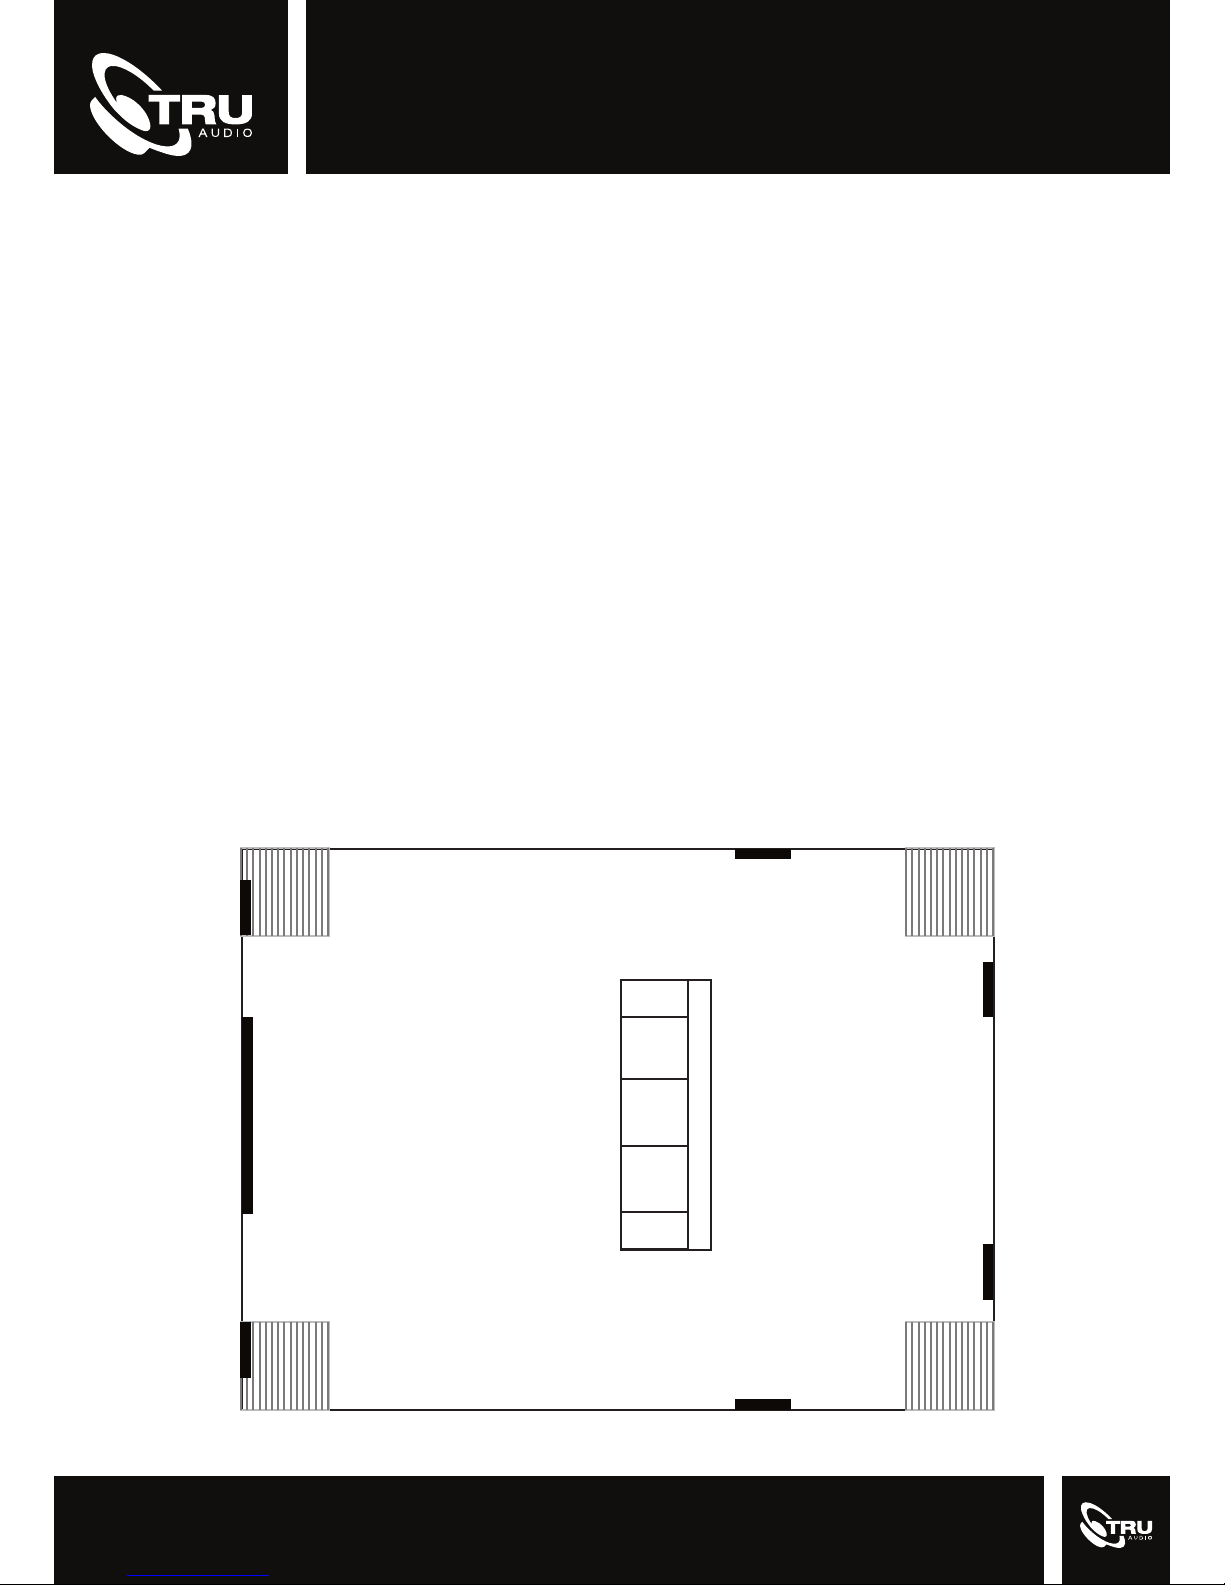
SUBWOOFER PLACEMENT:
Subwoofer placement can vary greatly depending on the acoustics of a room and the listening
positions. As a general guideline the corner of a room will produce the most bass. We recommend
choosing the corner closest to the speakers in which the sub will be paired with. For example, if the
sub will be paired with the front speakers, place the sub in a front corner. If the sub will be paired
with a rear set of speakers, place the sub in a rear corner. Once the wireless kit is installed, it is
recommended to listen to the sub in the main listening position to find the ideal placement. Move the
sub around about 12” at a time, all the while checking the response in the main listening position. Do
this until the desired response is achieved.
Ideal
Placement 1
Ideal
Placement 2
Optional
Placement
Optional
Placement
Page 6
WIRELESS SUB EXTENDERS
W-TX / W-RX
User Manual
TROUBLESHOOTING:
If device fails to connect, first check power connection to ensure each device is powered. The
status LED indicator should be blinking if powered on and not connected, solid color if connected.
Verify the distance from the transmitter to the receiver. In a typical room the transmitter should be
able to transmit to a receiver at a distance up to 50ft (15m).
Walls, furniture, metal racks, or other objects will interfere with the wireless signal transmission path.
Shorten the distance between the transmitter and receiver to verify full functionality. If the devices
can pair at the shortened distance, then the placement of the receiver is either too far from the
transmitter or there are too many objects obstructing the wireless signal path. You can solve this by
finding a closer placement for the receiver or one that is less obstructed.
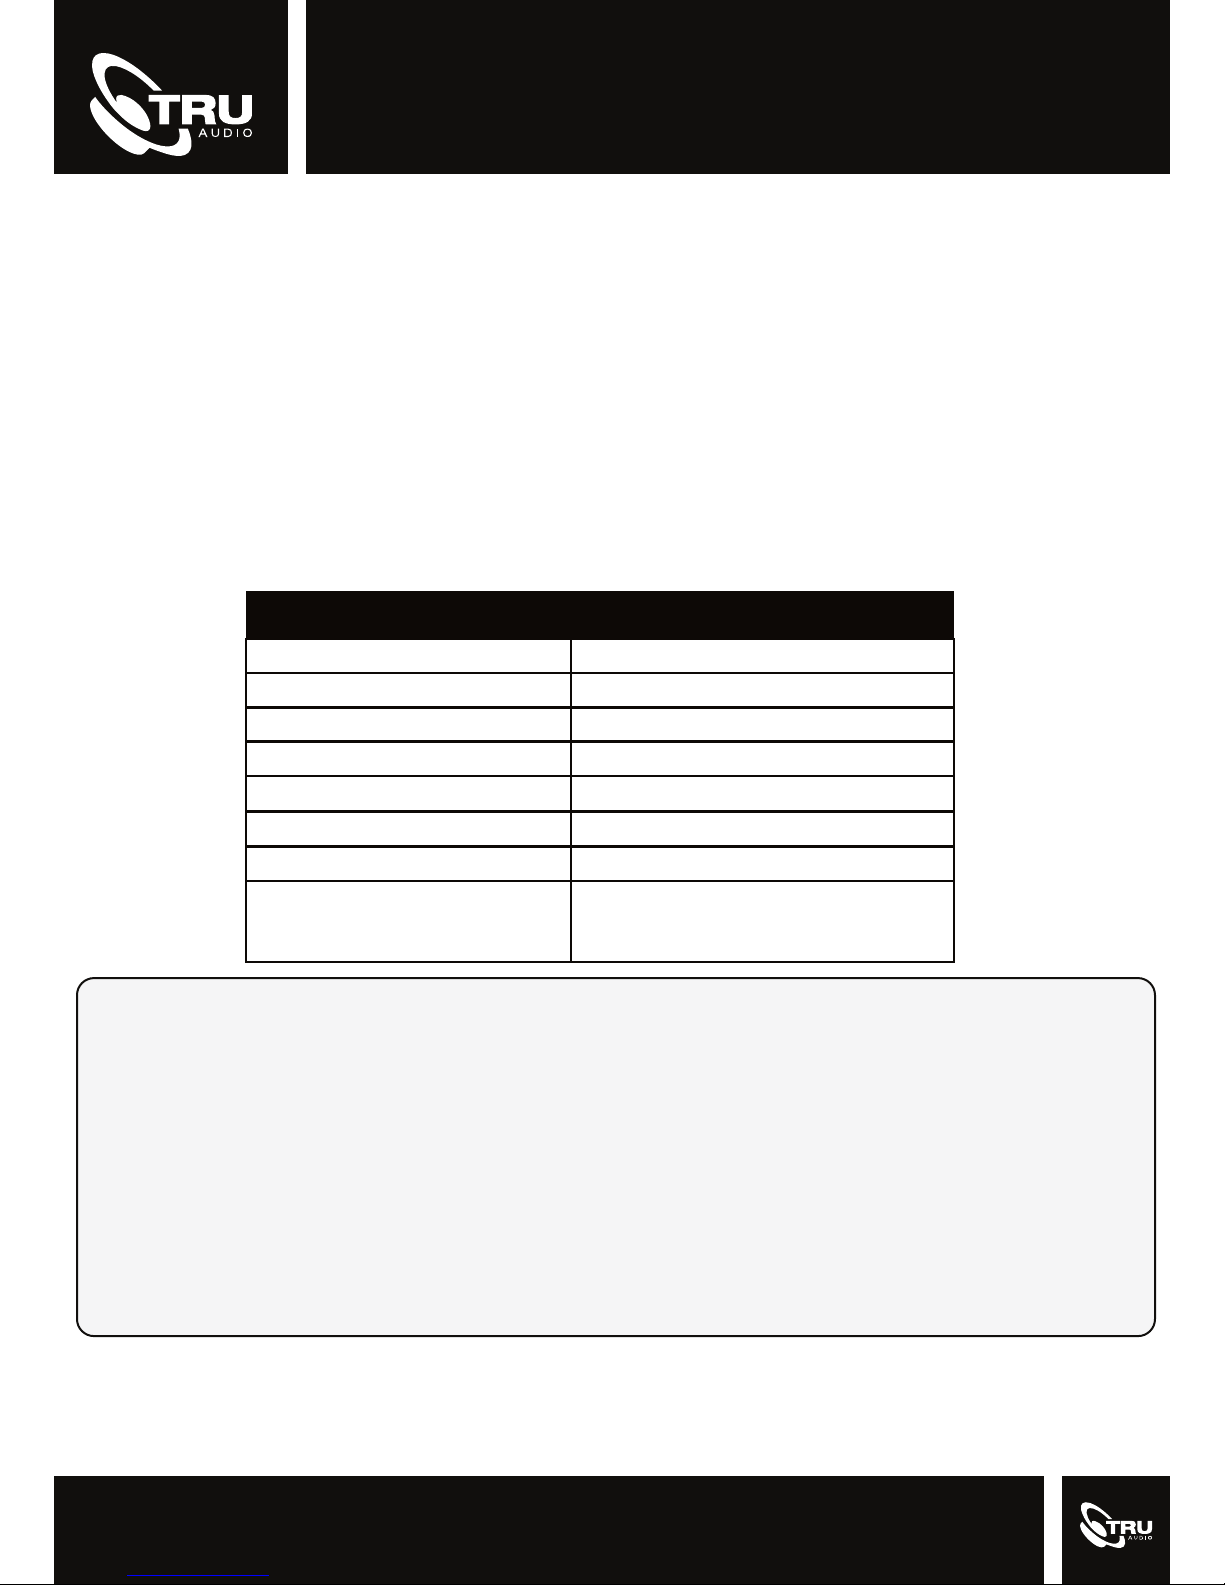
Specifications
Operating Frequency: 5.8 GHz
Latency: 16 ms
Supply Voltage: 110 - 240V
Typical Range - Line of Sight: 150 ft (50 m)
Typical Indoor Range:
Audio Sampling: 16 bit, 48khz
Audio Freq Range:
Dimensions (WxDxH)
SoundVision Technologies dba TRUAUDIO
50 ft (15m)
18Hz - 22kHz
4.5” (115mm) W
2.9” (73mm) D
1.1” (29mm) H
PRODUCT WARRANTY
All in-wall, in-ceiling, outdoor speakers, volume controls and freestanding loudspeakers have a limited lifetime warranty.
This warranty includes lifetime parts and repair labor on all components. Powered subwoofers and active electronics
have a two (2) year limited warranty. This warranty includes two (2) year parts and repair labor on all components.
TRUAUDIO’s obligation under these warrantees is limited to repairing or replacing any component found defective in
material or workmanship under normal conditions of use. These warrantees shall not apply to products which have
been abused, modified, disassembled, or repaired by anyone other than TRUAUDIO or one of its appointed service
centers. Products to be repaired under this warranty must be returned to the factory or designated service center with
all transportation and insurance charges pre-paid.
It is the policy of TRUAUDIO to continuously incorporate improvements into our products. All specifications are
subject to change without notice. If you have any questions regarding this or any other TRUAUDIO products,
please call 1-888-858-1555, Monday – Friday, 7:00 am – 6:00 pm MST.
TRUAUDIO Speaker Systems, Hurricane, Utah, 84737
Office: 435.986.1574 Fax: 435.251.9815
 Loading...