

Page 1
1
Page 2

2
IMPORTANT SAFEGUARDS
When using electrical appliances especially when children are present, basic safety precautions should always be followed to reduce
the risk of re, electric shock, and/or injury to persons, including the following:
1. READ ALL INSTRUCTIONS.
2. Do not touch hot surfaces. Use any handles or knobs.
3. To protect against re, electrical shock, or injury to persons DO NOT immerse cord, plug or appliance in water or other liquid.
4. Close supervision is necessary when any appliance is used by or near children.
5. Unplug from outlet when not in use and before cleaning. Allow to cool before putting on or taking off parts and before cleaning.
6. Do not operate any appliance with a damaged cord or plug, or after the appliance malfunctions or has been damaged in any manner.
Return appliance to the nearest authorized service facility for examination, repair or adjustment.
7. The use of accessory attachments not recommended by the appliance manufacturer may result in re, electric shock or injury to
persons.
8. Do not use outdoors.
9. Do not let cord hang over edge of table or counter or touch hot surfaces.
10. Do not place on or near a hot gas or electric burner, or in a heated oven.
11. Extreme caution must be used when moving an appliance containing hot food, hot oil, water or other hot liquids.
12. Do not use appliance for other than intended use.
13. To disconnect, turn Off, then remove plug from wall outlet.
14. Do not attempt to open the Capsule Puncturing Mechanism or the Slide-Out Brew Chamber during the brewing process or in the few
seconds following the completion of brewing.
15. Fill the water reservoir of this appliance with water only. Do not ll with other liquids or foods, except when following the specic
instructions in this guide for descaling or cleaning the machine.
SAVE THESE INSTRUCTIONS
Page 3
3
Page 4

4
This appliance is for HOUSEHOLD USE ONLY. It may be plugged into an AC electrical outlet (ordinary household current). Do not use
any other electrical outlet.
DO NOT OPERATE APPLIANCE IF THE LINE CORD SHOWS ANY DAMAGE, OR IF APPLIANCE WORKS INTERMITTENTLY OR
STOPS WORKING ENTIRELY.
A short power-supply cord is provided to reduce the risk resulting from becoming entangled in or tripping over a longer cord. Longer
detachable power-supply cords or extension cords are available and may be used if care is exercised in their use. If a longer detachable
power-supply cord or extension cord is used,
1. The marked electrical rating of the cord set or extension cord should be at least as great as the electrical rating of the appliance, and
2. The cord should be arranged so that it will not drape over the countertop or tabletop where it can be pulled on by children or tripped
over unintentionally.
POLARIZED PLUG
This appliance has a polarized plug (one blade is wider than the other). To reduce the risk of electric shock, this plug is intended to t into
a polarized outlet only one way. If the plug does not t fully into the outlet, reverse the plug and try again. If it still does not t, contact a
qualied electrician. Do not attempt to modify the plug in any way.
LINE CORD SAFETY TIPS
1. Never pull or yank on cord or the appliance.
2. To insert plug, grasp it rmly and guide it into outlet.
3. To disconnect appliance, grasp plug and remove it from outlet.
4. Before each use, inspect the line cord for cuts and/or abrasion marks. If any are found, this indicates that the appliance should be
serviced and the line cord replaced.
5. Never wrap the cord tightly around the appliance, as this could place undo stress on the cord where it enters the appliance and
cause it to fray and break.
Page 5
5
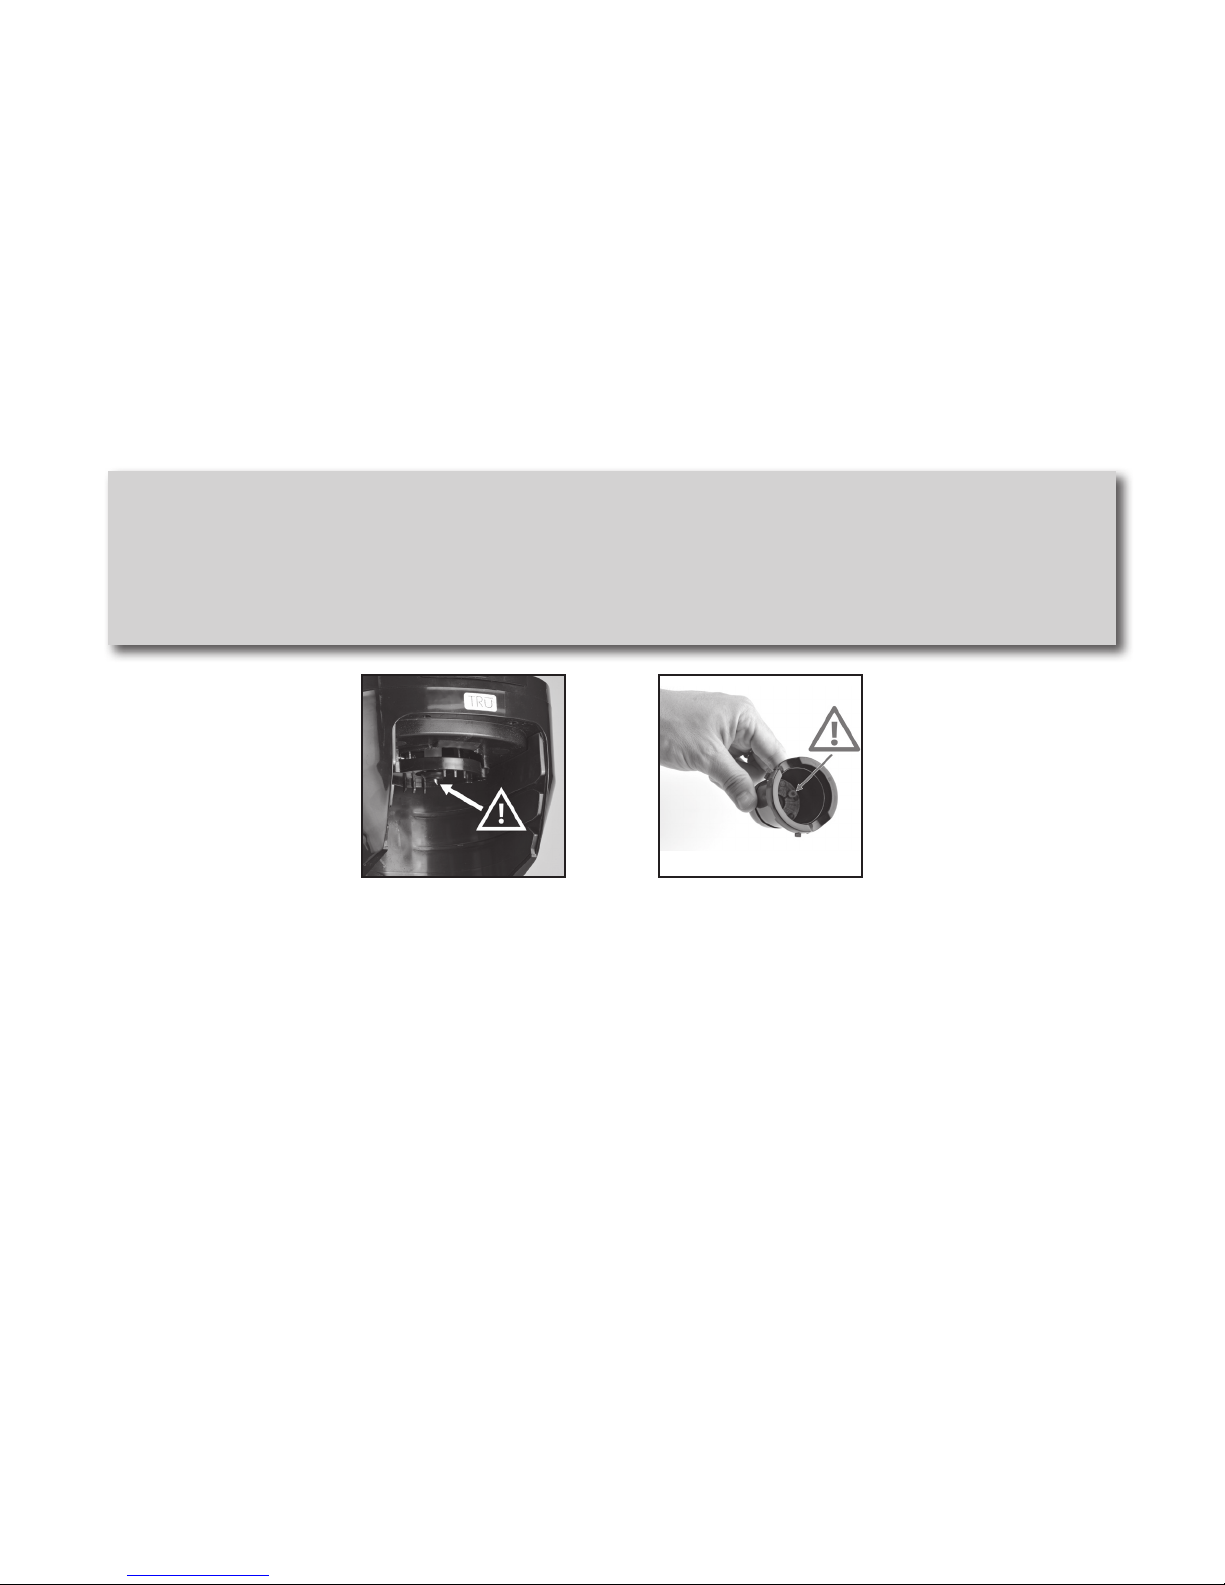
CAUTION: There are two sharp needles that puncture the K-Cup® capsule. One is located above the Slide-Out Brew
Chamber and the other is in the bottom of the K-Cup
®
Capsule Holder itself. To avoid risk of injury, do not put your ngers
in or near the K-Cup
®
Capsule Holder or the Brewer Housing above the Brew Chamber.
CAUTION: There is extremely hot water in the K-Cup® Capsule Holder during the brewing process. To avoid risk of injury,
do not lift the Capsule Puncturing / Locking Mechanism or open the Slide-Out Brew Chamber during the brewing process.
UNPACKING:
1. Carefully unpack the Brewer and all parts. Remove any tape, labels or packaging materials.
2. Wash Removable Water Tank, Water Tank Lid, Drip Tray, Drip Tray Cover, K-Cup
®
Capsule Holder, Brew Chamber, Brew Chamber
Adapter, Shower Head Attachment, Permanent Coffee Filter Basket, Glass Carafe and Carafe Lid with warm, soapy water. Rinse
well and dry thoroughly.
3. Wipe exterior surfaces of the Brewer with a soft, moist cloth to remove dust particles collected during packing and handling. NEVER
IMMERSE THE BREWER, CORD OR PLUG IN WATER OR ANY OTHER LIQUID.
4. Place Brewer on a solid, level, heat-resistant surface.
Sharp Needle in
Capsule Holder.
Sharp Needle Above
Brew Chamber.
Page 6

6
PREPARING FOR USE
PRIME AND CLEAN THE SYSTEM:
Before the rst use, the Internal Boiler System of the Coffee Brewer must be primed and cleaned with water.
1. Place the Water Tank on the Brewer and make sure it is properly seated on the Water Inlet.
2. Fill the Water Tank to the MAX level and replace Water Tank Lid.
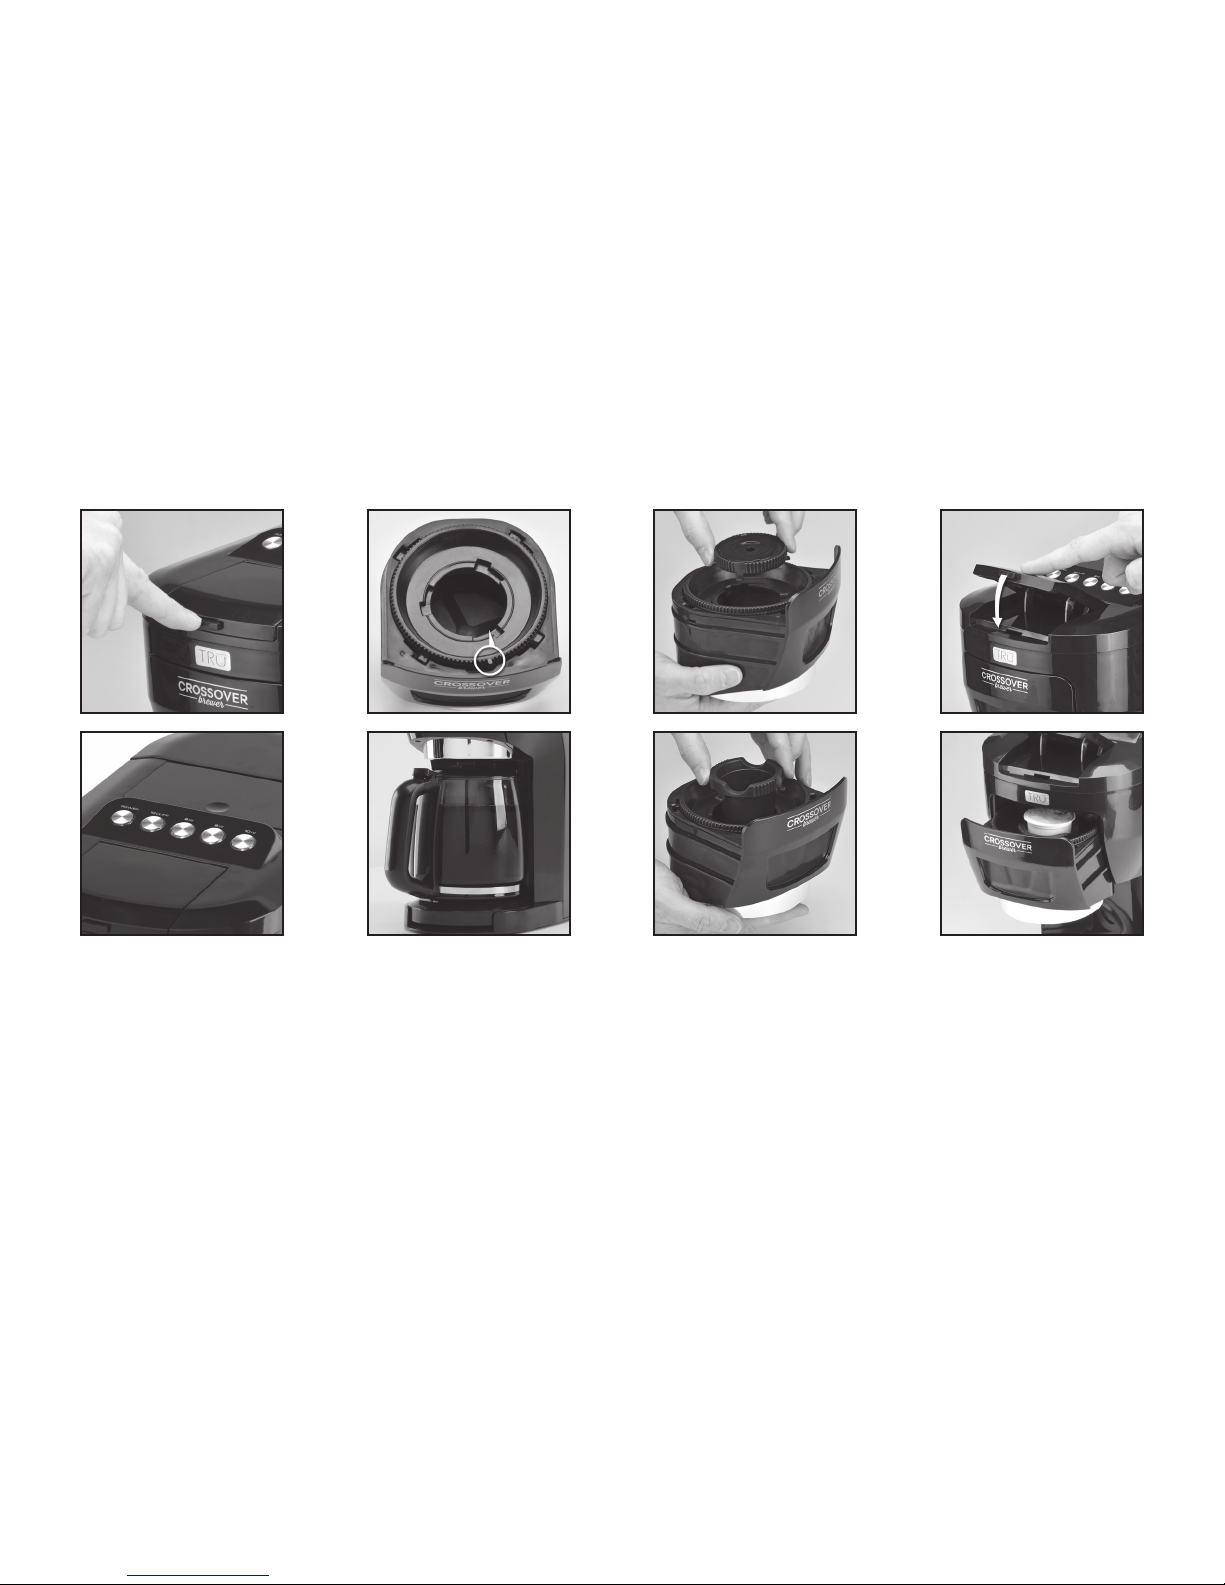
3. Press the Release Button on the front of the Brewer to release the Capsule Puncturing / Locking Mechanism and open the Slide-Out
Brew Chamber. See Fig. 1 on Page 7 under USING THE BREWER.
4. Insert the Brew Chamber Adapter (Ring) and the Shower Head Attachment into the Brew Chamber. See Fig. 2 and Fig. 3 on Page
7 under USING THE BREWER.
5. Align the Slide-Out Brew Chamber with the Brewer Housing and slide in place making sure it is completely closed. See Fig. 8 on
Page 7 under USING THE BREWER.
6. Lower the Capsule Puncturing / Locking Mechanism. See Fig. 4 on Page 7 under USING THE BREWER.
NOTE: If the Slide-Out Brew Chamber is not properly aligned, the Capsule Puncturing / Locking Mechanism will not lower
and latch.
7. Place the Glass Carafe on the Drip Tray and beneath the Brew Spout.
NOTE: When using the Glass Carafe, the Drip Tray must always be in place.
8. Plug the Coffee Brewer into an electrical outlet. Ideally, the Coffee Brewer should be operated on its own circuit, separate from other
appliances.
9. Turn the Coffee Brewer ON by pressing the Power Button. All lights will be illuminated. To prime, push the 10 Cups Button. The
machine will prime the Internal Boiler and then start the cleaning cycle.
10. During the priming cycle, all buttons will be illuminated and the 10 Cup Button will ash. After the priming cycle is complete, the
cleaning cycle will start automatically. The Coffee Brewer will heat up, run a complete cycle and dispense hot water to clean the
system. When the cleaning cycle is complete, the 10 Cup Button will stop ashing and all ve buttons will be illuminated.
CAUTION: DO NOT remove the Glass Carafe until the cleaning cycle is complete and the 10 Cups Button stops ashing and
all ve buttons become illuminated.
CAUTION: DO NOT attempt to open the Capsule Puncturing / Locking Mechanism during the priming and cleaning cycles.
11. When the cleaning cycle is complete, the Brewer is ready for use.
Page 7
7
USING THE BREWER
BREWING COFFEE USING THE GLASS CARAFE
1. Place the properly primed Brewer on a dry, level and heat-resistant surface.
2. Fill the Water Tank to the MAX level and make sure it is attached to the Brewer and properly seated on the Water Inlet. DO NOT
place any liquid other than water in the Water Tank.
Fig. 1 Fig. 2 Fig. 3 Fig. 4
Fig. 5 Fig. 6 Fig. 7
Fig. 8
Alignment
Indicator
Page 8

8
NOTE: Always check that the water level in the Water Tank is between the MIN and MAX markings before starting a brew
cycle. If the Brewer does not have enough water in the Water Tank to complete a brew cycle, then all ve buttons will
ash indicating more water must be added to the Water Tank. After water is added, press the corresponding function
button and the brew cycle will continue from where it stopped.
3. Press the Release Button on the front of the Brewer to release the Capsule Puncturing / Locking Mechanism (Fig. 1).
4. Remove the Slide-Out Brew Chamber from the Brewer.
5. Insert the Permanent Coffee Filter Basket into the Slide-Out Brew Chamber.
6. Insert the Brew Chamber Adapter into the Brew Chamber by aligning the 4 tabs on the Adapter with the 4 notches in the Brew
Chamber (Fig. 2).
NOTE: There is an alignment indicator on the Brew Chamber Adapter that should be positioned closest to the Brew
Chamber Handle when properly aligned.
7. Insert the Shower Head Attachment into the center of the Brew Chamber Adapter by aligning the 3 tabs on the Shower Head
Attachment with the 3 notches in the Brew Chamber Adapter (Fig. 3).
8. Replace the Slide-Out Brew Chamber into the Brewer making sure it is completely closed.
9. Lower the Capsule Puncturing / Locking Mechanism (Fig. 4).
NOTE: If the Slide-Out Brew Chamber is not properly closed, the Capsule Puncturing / Locking Mechanism will not
lower and latch.
10. Turn the Brewer ON by pressing the Power Button. All ve buttons will be illuminated (Fig. 5 shows Brewer Control Buttons).
11. Place the Glass Carafe on the Drip Tray (Fig. 6).
NOTE: When using the Glass Carafe, the Drip Tray must always be in place.
12. Press the 10 Cups Button. The brew cycle will now begin and the 10 Cups button will ash throughout the brewing cycle.
13. When the brew cycle is complete, the ashing will stop and all ve buttons will illuminate. Five minutes after the brew cycle is
complete, the Brewer will automatically shut off.
Page 9

9
BREWING COFFEE USING A SINGLE SERVE CAPSULE
1. Place the properly primed Brewer on a dry, level and heat-resistant surface.
2. Fill the Water Tank to the MAX level and make sure it is attached to the Brewer and properly seated on the Water Inlet. DO NOT
place any liquid other than water in the Water Tank.
NOTE: Always check that the water level in the Water Tank is between the MIN and MAX markings before starting a brew
cycle. If the Brewer does not have enough water in the Water Tank to complete a brew cycle, then all ve buttons will
ash indicating more water must be added to the Water Tank. After water is added, press the corresponding function
button and the brew cycle will continue from where it stopped.
3. Press the Release Button on the front of the Brewer to release the Capsule Puncturing / Locking Mechanism (Fig. 1).
4. Remove the Slide-Out Brew Chamber from the Brewer.
5. Remove the Permanent Coffee Filter Basket from the Slide-Out Brew Chamber.
6. Insert the Brew Chamber Adapter into the Brew Chamber by aligning the 4 tabs on the Adapter with the 4 notches in the Brew
Chamber (Fig. 2).
NOTE: There is an alignment indicator on the Brew Chamber Adapter that will closest to the Brew Chamber handle
when properly aligned.
7. Insert the Capsule Holder Attachment into the center of the Brew Chamber Adapter by aligning the 3 tabs on the Capsule Holder
Attachment with the 3 notches in the Brew Chamber Adapter (Fig. 7).
8. Insert a K-Cup® capsule into the Capsule Holder Attachment.
9. Replace the Capsule Drawer into the Brewer making sure it is completely closed (Fig. 8).
10. Lower the Capsule Puncturing / Locking Mechanism (Fig. 4). The K-Cup
®
capsule will be punctured on the top and bottom allowing
for the ideal ow of water during the brewing cycle.
NOTE: If the Brew Chamber is not properly closed, the Capsule Puncturing / Locking Mechanism will not lower and latch.
11. Turn the Brewer ON by pressing the Power Button. All ve buttons will be illuminated (Fig. 5 shows Brewer Control Buttons).
Page 10
10
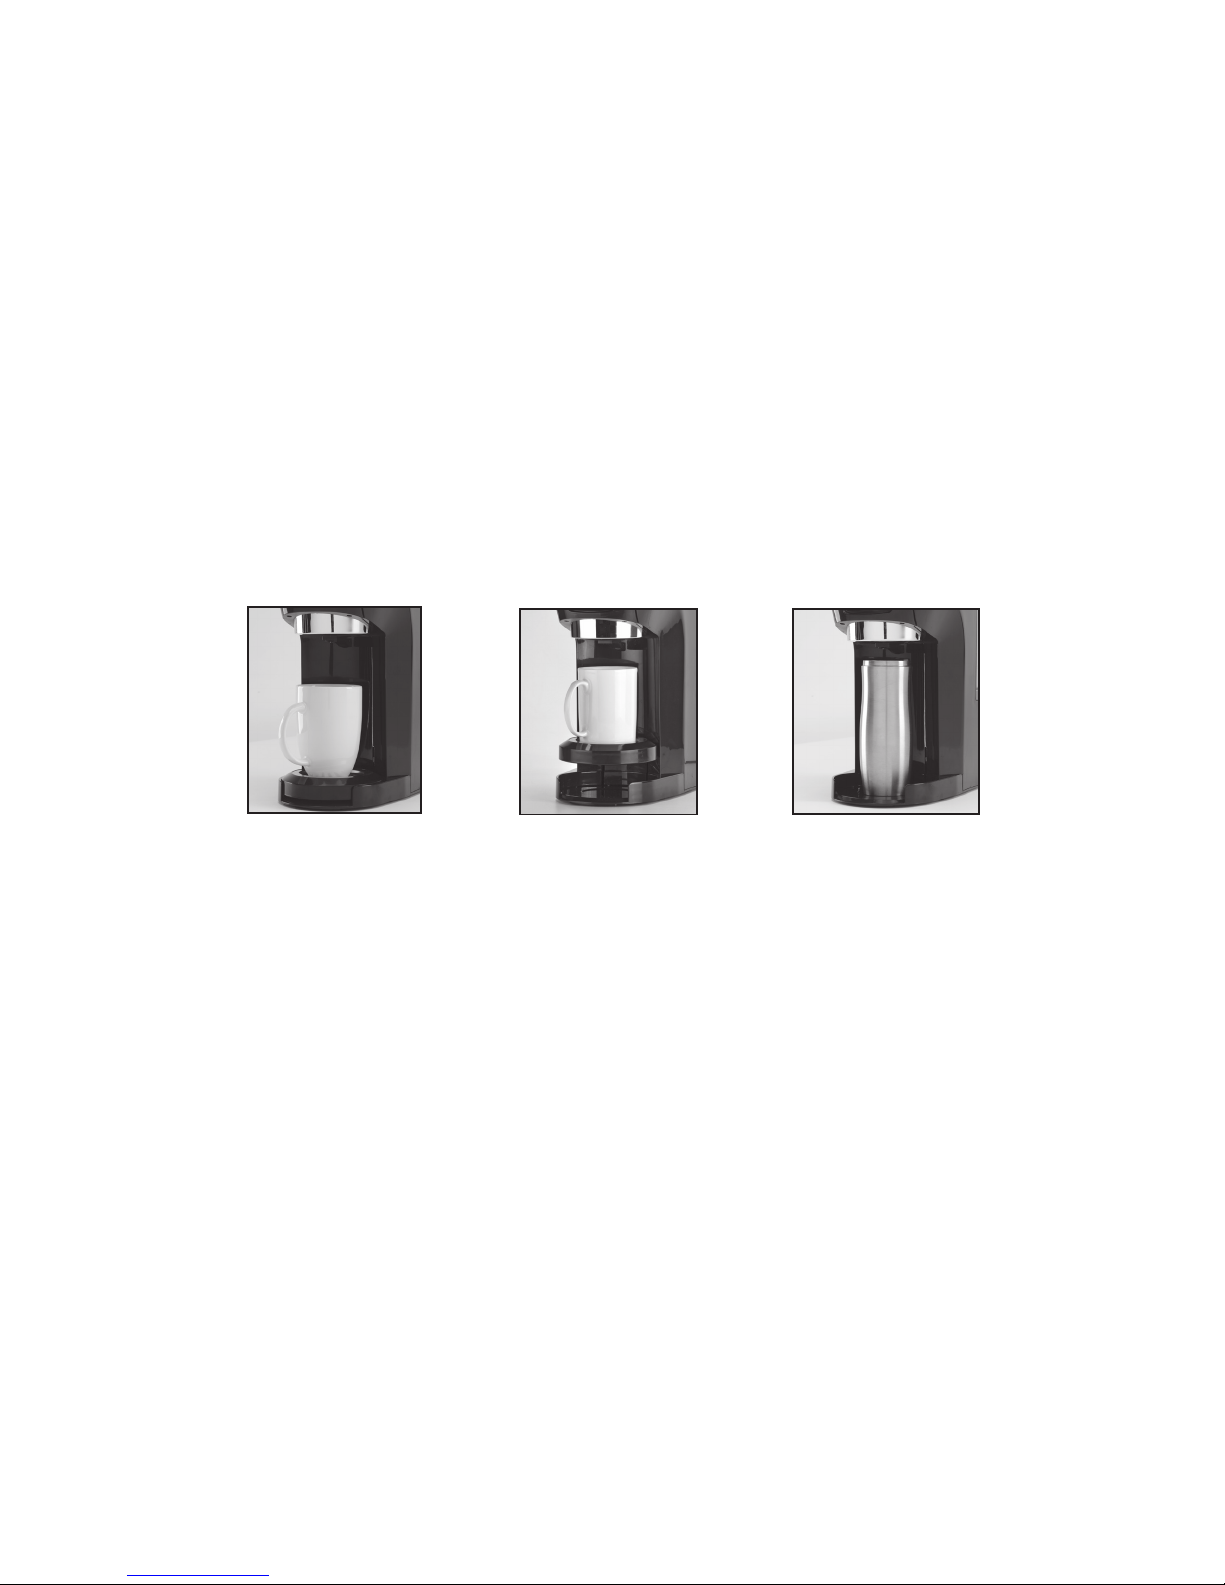
12. Place a mug on the Drip Tray and under the Brew Spout.
TIP: If using a taller mug which will not t underneath the Brew Spout, remove the Drip Tray and place the taller mug
on the Brewer Base. Be sure to keep the mug in place at the end of the brew cycle to catch any excess drips, since the
Drip Tray is not in place. The end of the brew cycle is indicated when the function button is no longer blinking.
TIP: To reduce splatter when using a small mug, adjust the Drip Tray position by tting the tabs on the back of the Drip
Tray into the notches on the Brewer Housing.
13. Select the brew size by pressing the 6oz, 8oz or 10oz button. The brew cycle will now begin and the brew size button selected will
ash throughout the brewing cycle.
TIP: To stop the brewing cycle at any time, press the ashing button.
14. When the brew cycle is complete, the ashing button will stop and all ve buttons will illuminate. Five minutes after the brew cycle is
complete, the Brewer will automatically shut off.
15. Do not leave used coffee capsules in the Brewer. Wait for the Brewer to cool before removing used capsules as they remain hot
following the brew cycle. Press the Release Button on the front of the Brewer, slide out the Brew Chamber and carefully remove the
used capsule and discard. Replace the Brew Chamber into the Brewer and lower the Capsule Puncturing / Locking Mechanism.
Place Drip Tray In Lower
Position For Use With
Taller Mugs.
Remove Drip Tray For
Use With Travel Mugs.
Raise Drip Tray to Upper
Position For Use With
Shorter Mugs.
Page 11

11
USER MAINTENANCE INSTRUCTIONS
This appliance contains no user serviceable parts. Do not try to repair it yourself. Refer it to qualied service personnel if servicing is
needed. The Brewer should be cleaned on a regular basis to prolong the life of the machine and to guarantee optimal brewing results.
TO CLEAN:
• Turn off the Brewer and unplug from the wall outlet.
• On a regular basis, check the Drip Tray for excess water or coffee. Empty the Drip Tray and wipe it clean with a damp cloth. Use
extra care when removing or emptying the Drip Tray, in order to prevent spilling any excess liquids from the Drip Tray.
• DO NOT leave used coffee capsules in the Brew Chamber.
• Wipe down the outside surfaces of the Brewer with a damp cloth and dry thoroughly. NEVER use harsh chemicals or abrasive
cleaning pads. NEVER immerse the Brewer in water or any other liquid and NEVER place the appliance under running water.
• The bottom rounded portion of the Capsule Holder can be removed for further cleaning, including the lower needle. Should the lower
needle become clogged because of coffee grinds a small household object or tool can be used to unclog the needle. Use caution as
the needle is sharp. To remove the bottom portion of the Capsule Holder gently squeeze the rounded portion and pull until the lower
section releases from the top section. To replace, use the two tabs on the bottom section as a guide and snap into place from the top.
• Clean the Removable Water Tank, Water Tank Lid, Drip Tray, Drip Tray Cover, K-Cup® Capsule Holder, Brew Chamber, Brew Chamber
Adapter, Shower Head Attachment, Permanent Coffee Filter Basket, Glass Carafe and Carafe Lid with warm, soapy water. Do not
use harsh chemicals or abrasive cleaners. Dry thoroughly prior to use. The Water Tank Lid, Drip Tray, Drip Tray Cover, Capsule
Holder, Brew Chamber Adapter, Shower Head Attachment, Permanent Coffee Filter Basket and Carafe Lid can be placed onto the
top shelf of a dishwasher. Use low temperature cycles if cleaning the parts in the dishwasher.
• DO NOT wash Slide-Out Brew Chamber, Water Tank or Glass Carafe in an automatic dishwasher. Wash those parts by hand only.
Page 12

12
DESCALING:
It is advised to descale the Brewer on a regular basis. Frequency of descaling the Brewer depends on amount of use and your local water
conditions. As a general time frame, the Brewer should be descaled every three months. Specic descaling products for coffee makers
are available in stores and online.
Follow the specic instructions for the descaling product on the package from the descaling product manufacturer.
• Make sure the Brewer is turned Off.
• Fill the Water Tank with undiluted white vinegar or if using a descaling product ll according to the instructions on the package of the
descaling product.
• Remove the Permanent Coffee Filter Basket from the Slide-Out Brew Chamber.
• Insert the Brew Chamber Adapter and Shower Head Attachment into the Slide-Out Brew Chamber.
• Push the Brew Chamber properly in place and place the Glass Carafe on the Drip Tray.
• Close the Capsule Puncturing / Locking Mechanism and start a brew cycle without ground coffee or a coffee capsule by pressing the
10 Cups Button.
• Power off the Brewer just after it begins to dispense and then allow it to sit for at least 30 minutes.
• After allowing to sit, run another brew cycle without adding ground coffee or a coffee capsule. Empty the dispensed liquid that has
accumulated in the Glass Carafe. Use extreme caution as contents may be hot.
• Fill the Water Tank with distilled or bottled water and run a full brew cycle. Run three additional brew cycles using distilled or bottled
water, each time without ground coffee or a coffee capsule. This will clean the Brewer and get rid of any residual taste from the
vinegar or descaler.
• The Brewer is now ready for regular use again.
Page 13
13
TO STORE:
• Be sure all parts are clean and dry before storing. Store appliance in its box or in a clean, dry place. Never store it while it is hot or
wet. Never wrap cord tightly around the appliance; keep it loosely coiled.
• ALWAYS store the Brewer in an upright position, as a small amount of water may remain in the boiler.
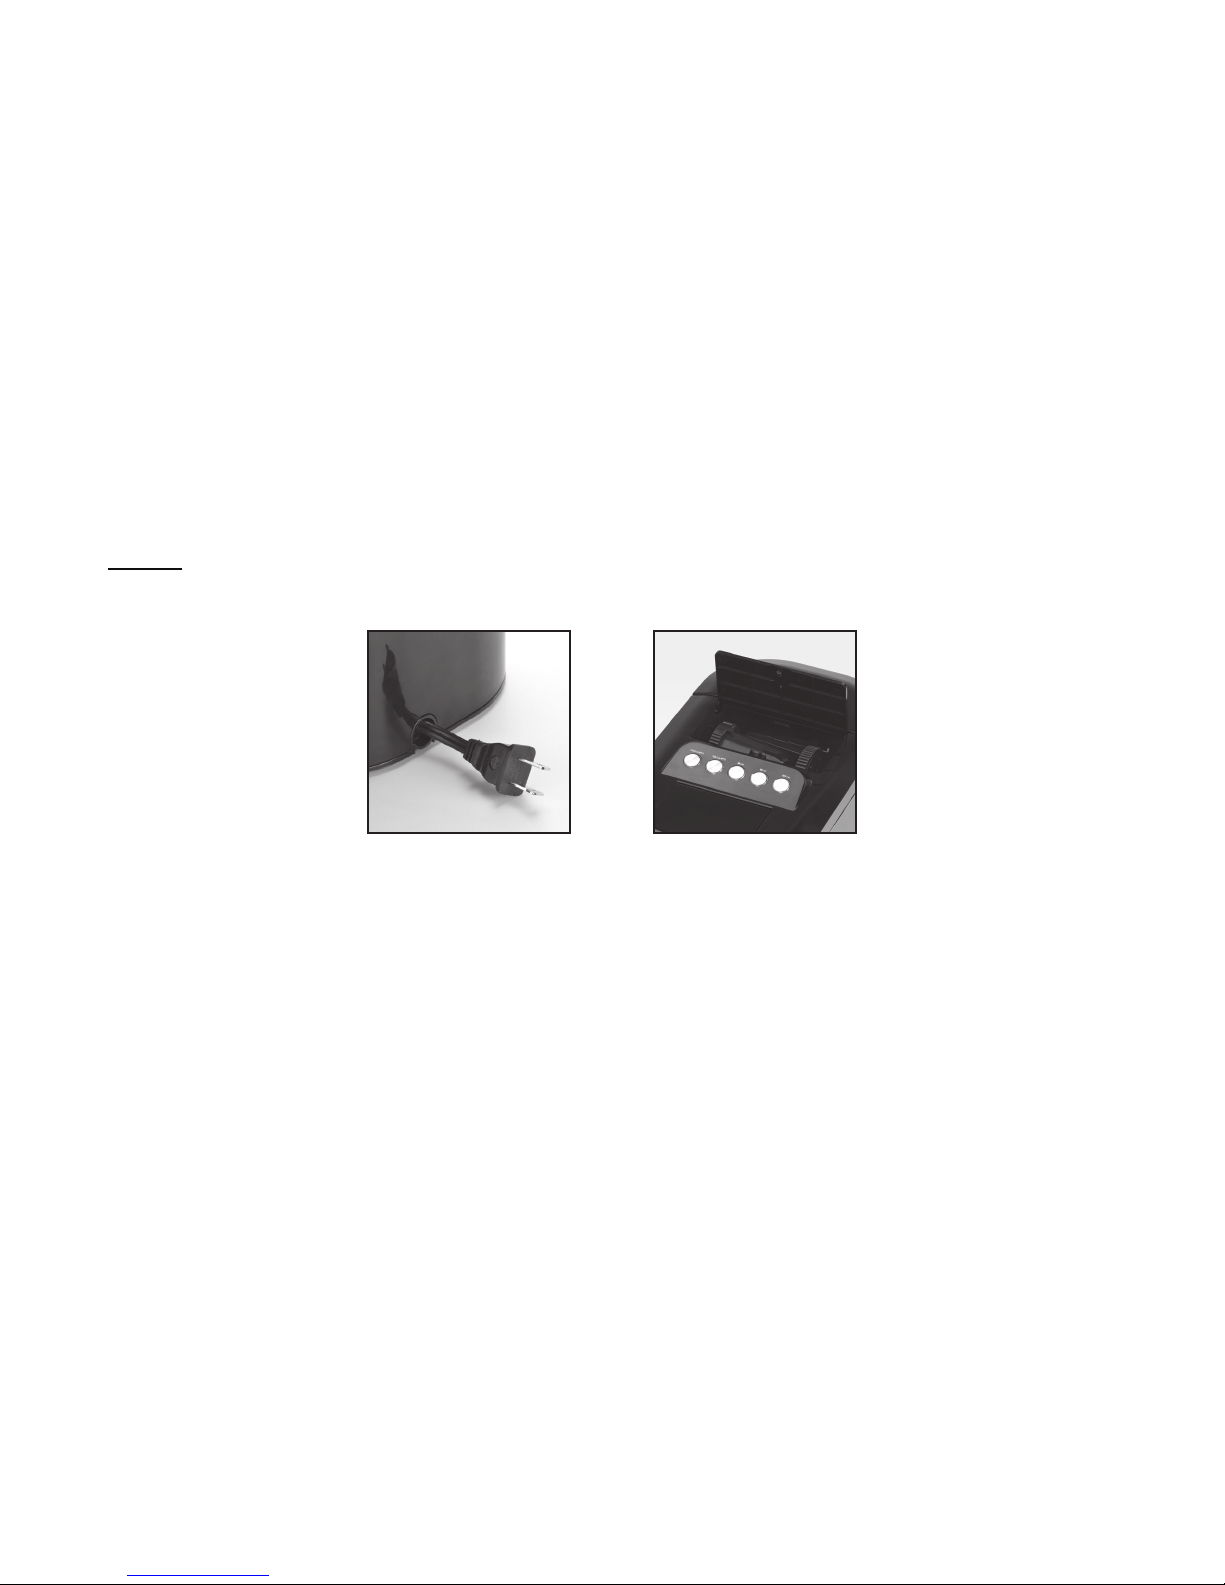
• Excess power cord length can be tucked into the Cord Storage Compartment on the back of the Brewer.
• On top of the Brewer is an Accessory Storage Compartment to store the Capsule Holder and the Shower Head Attachment.
Cord
Storage
Accessory
Storage
Page 14

14
ONE YEAR LIMITED WARRANTY
SELECT BRANDS, INC. warrants, subject to the conditions stated below, that from the date of purchase, this product will be free from
mechanical defects for a period of one (1) year. SELECT BRANDS, INC., at its option, will repair or replace this product found to be
defective during the warranty period. Should this product become defective by reason of improper workmanship or material defect during
the specied warranty period, Select Brands, Inc. will repair or replace the same effecting all necessary parts replacements for a period
of one year from the date of purchase.
Transportation charges on parts, or products in whole, submitted for repair or replacement, under this warranty, must be borne by the
purchaser.
CONDITIONS: This warranty is valid for the original retail purchaser from the date of initial retail purchase and is not transferable. Keep
the original sales receipt. Proof of purchase is required to obtain warranty service or replacement. Dealers, service centers, or retail
stores do not have the right to alter, modify or in any way, change the terms and conditions of this warranty.
Warranty registration is not necessary to obtain warranty on Select Brands, Inc. products. Save your proof of purchase receipt.
ABOUT YOUR PRODUCT WARRANTY: Most warranty repairs are handled routinely, but sometimes requests for warranty service
may not be appropriate. For example, warranty service would NOT apply if the product damage occurred because of misuse, lack of
routine maintenance, shipping, handling, warehousing or improper installation. Similarly, the warranty is void if the manufacturing date
or the serial number on the product has been removed or the equipment has been altered or modied. During the warranty period, the
authorized service dealer, at its option, will repair or replace any part that, upon examination, is found to be defective under normal use
and service.
NORMAL WEAR: This warranty does not cover normal wear of parts or damage resulting from any of the following: Negligent use or
misuse of the product; Improper voltage or current; Use contrary to the operation instructions; Deviation from instructions regarding
storage and transportation; Repair or alteration by anyone other than SELECT BRANDS, INC. or an authorized service center. Further,
the warranty does not cover Acts of God, such as re, ood, hurricanes and tornadoes.
SELECT BRANDS, INC. shall not be liable for any incidental or consequential damages caused by the breach of any express or implied
Page 15

15
warranty. Except to the extent prohibited by applicable law, any implied warranty of merchantability or tness for a particular purpose is
limited in duration to the duration of the above warranty. Some states, provinces or jurisdictions do not allow the exclusion or limitation of
incidental or consequential damages or limitations on how long an implied warranty lasts, so the above limitations or exclusion may not
apply to you. This warranty gives you specic legal rights, and you may also have other rights that vary from state to state or province
to province.
HOW TO OBTAIN WARRANTY SERVICE: You must contact SELECT BRANDS, INC. Customer Service at 1-913-663-4500. A Customer
Service representative will attempt to resolve warranty issues over the phone. If telephone resolution is not possible, the Customer
Service representative will require your assistance in performing routine diagnostic procedures. This warranty is effective for the time
periods listed above and subject to the conditions provided for in this policy.
To register this product and view other ne products, visit us online at www.selectbrands.com
K-Cup® is a registered trademark of Keurig, Incorporated.
Neither Select Brands, Inc or TRU™ has any afliation with Keurig, Incorporated.
This product is not manufactured, distributed, licensed, or endorsed by Keurig, Incorporated.
TRU™ and TRU™ Crossover Brewer are registered trademarks of Select Brands, Inc. 66219
Made in China
Page 16

 Loading...