

Page 1
Macro Invocation User’s Guide
Understanding and Using Macros
A macro is the name given to a collection of printer commands that can be stored inside the printer and used
repeatedly without having to send them to the printer each time they are needed. These collections of
commands are used most often to improve printing performance, reducing the size of print jobs sent to printers.
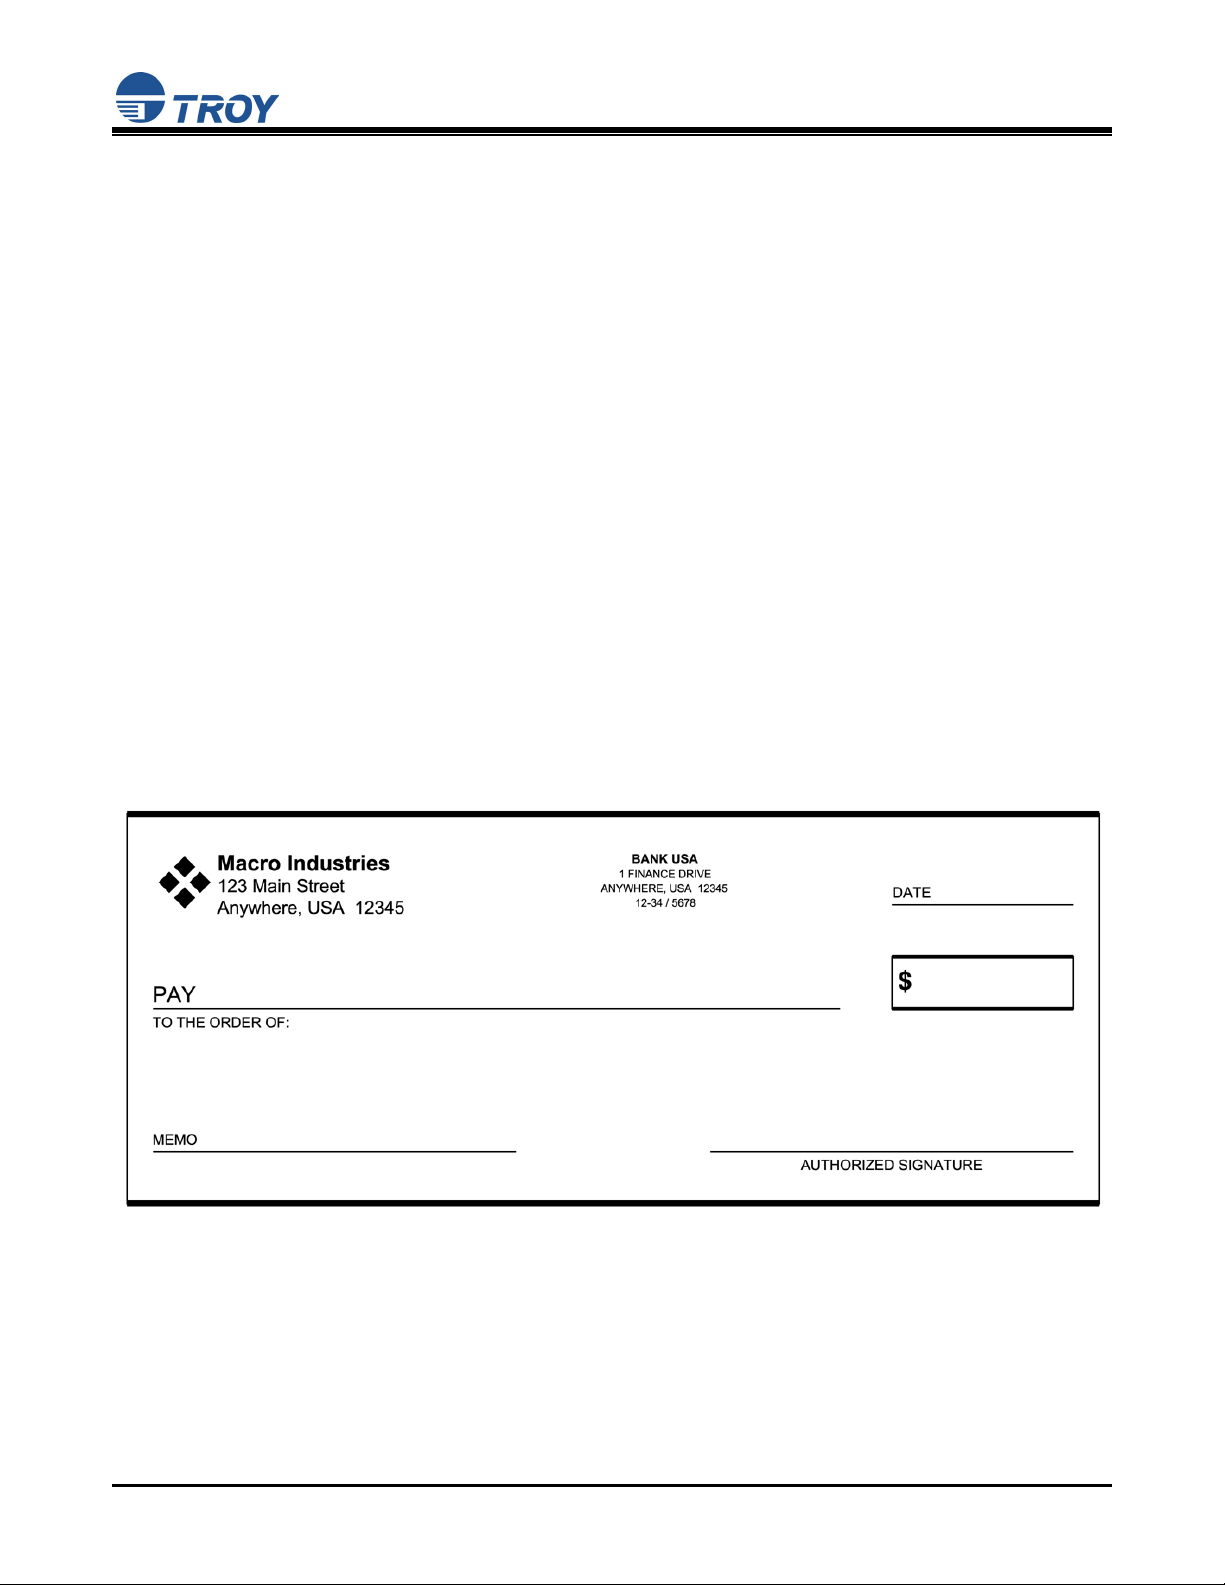
Macros can be used to create a blank form, such as the sample check shown below, or they can be used to
print signatures, logos, and other kinds of graphical information. In most cases, the printer commands
contained in macros will be PCL 5e and HP-GL/2 – the two most common printer languages supported by
Hewlett Packard printers.
Macros can be saved "temporarily" in a printer's RAM (Random Access Memory), or "permanently" on a flashfile system such as a TROY DIMM, TROY Memory Card, or an HP printer hard drive. Temporary macros must
be reloaded each time the printer is powered on, while permanent macros are retained even after the printer is
powered OFF.
The use of macros can do more than just reduce the amount of print data your application has to provide with
each page printed. Macros also provide a form of document security. Unless an individual knows how to print
the macro, they cannot obtain blank forms to be used for inappropriate purposes. This feature eliminates the
need to buy and inventory security papers (like preprinted check stock) and ensures only the latest versions of
forms are used.
The following form was created and printed as a macro, demonstrating the versatility of macro content. Since
this example is a check, also notice the form contains the company logo as a graphic but does not include the
signature. In this case, creating a check as a macro that was readily cashable with a digital signature would not
be a prudent security measure. The selection of macro content, therefore, also needs to reflect your company’s
security policies when appropriate. TROY's experienced team of digital imaging professionals can help you
design macros as well as ensure they comply with industry-standard security practices.
The example check shown above was created using an "overlay" macro. Overlay macros contain objects
typically found on a pre-printed form, allowing an application to "fill in" the form using simple printing methods.
There are other forms of macros – please consult the HP PCL Language Technical Reference Manual for more
information on types of macros.
Document #50-70348-001 Rev. C Page 1 of 6
Page 2

Macro Invocation User’s Guide
Understanding and Using Macros (continued)
Multiple macros can be stored in most PCL 5e printers. The number of macros that can be stored depends
directly on the macro size and the memory available to store macros. While it is possible to create macros by
printing documents "to file" using PCL 5e printer drivers and changing the file content into macro form, such files
are typically quite large. TROY's digital imaging experts can help you create the smallest possible macros,
enabling you to store a larger quantity and variety of macros on your printer.
In order for macros to be differentiated, each macro is assigned an identification number from 0 to 32767 that is
used to invoke, or use, a specific macro. This macro ID number must be contained in the macro file in order for
the printer to properly identify the macro and must never be the same as another macro number inside the
printer.
Macros can be downloaded into a printer using the TROY Printer Utility (preferred) or the HP Resource
Manager. Throughout the remainder of this document, it is assumed you have a macro properly created and
downloaded into your printer. Once again, TROY can assist you with the creation and implementation of
macros and forms. Please feel free to call the TROY Digital Imaging Department for assistance. For further
information on macros, please consult the HP PCL Language Technical Reference Manual.
Document #50-70348-001 Rev. C Page 2 of 6
Page 3

Macro Invocation User’s Guide
DataStream Elements vs. Macro Elements
Document #50-70348-001 Rev. C Page 3 of 6
Page 4

Macro Invocation User’s Guide
DataStream Elements vs. Macro Elements (continued)
The example on the previous page shows a form separated into multiple parts; part one demonstrates the
information that is part of your job data stream, part two demonstrates an example of typical macro/form, and
part three demonstrates the information from the first two parts merged into a single document. Please review
the following to help understand variable vs. static data information:
Variable information – is data that is typically unique to every page printed. This may also include
elements, which are repeated on every page, but for security purposes, are sent within the job data
stream. Examples of secure elements are signatures and bank account numbers.
Static information – is macro/form data that is "static" and consistent with each page within a print job.
Remember, you may store several macros and call them as needed. Macros typically contain graphics,
such as, lines, boxes, and other images. They may also contain headings, address information, or any
other text specific to that form.
You may combine/overlay several macros and variable information onto a single page to achieve the desired
results. The intent of this guide is to help you access macros that have already been created. Designing a
macro is not covered in this information, as a thorough understanding of the PCL / HPGL language is required.
Please contact the TROY Digital Imaging Department for further assistance on creating macros.
There are two methods to access the PCL 5e macros. For Microsoft Windows, refer to the section entitled
“Using Macros with Microsoft Windows”. For programming outside the Microsoft Windows environment, refer
to the section entitled “Programming for Macro Invocation (non-Microsoft Windows)”.
Using Macros with Microsoft® Windows™
The Hewlett-Packard PCL 5e printer driver must be installed on the host computer prior to loading the
TROY digital image support files.
Before access to the macro(s) is available, the following process must be completed. This process
installs the necessary support files/resources required into the Microsoft Windows operating system
environment. This process must be completed on each computer that requires access to the macro(s).
Installing the TROY Macro Metrics File for Microsoft Windows 98SE / ME
1. Close all applications before installing the macro metrics file.
2. Insert the TROY CD/floppy into your computer's CD-ROM drive. NOTE
downloaded from the <http://www.troygroup.com>
website, extract the file to a temporary folder and
make a note of the location. When reference is made to access this file, navigate to the folder that
contains the extracted metrics file.
3. From the Start menu, click on Settings, and then click on Printers.
4. Right-click on your TROY printer icon, and then click on Properties from the pop-up menu. If multiple
printers are installed, make sure the correct printer icon is selected that corresponds to your TROY
Printer. Remember the printer selected must be the PCL 5e language driver, not Postscript or other
printer language.
5. Click on the Configure tab located at the top of the Properties window.
6. Within the Other Options category, click on the More button. Some printer driver versions may not
display the Other Options category. If this is the case, simply skip to the next step.
: If the file were sent by email or
7. Within the Fonts category, place a check mark in the Font DIMMs (or Font Cards ) checkbox, and then
click on the Configure button (with some printer driver software versions, the Configure button may
already be “clicked”). A new window will open labeled Configure Font DIMMs (or Configure Font
Cards).
Document #50-70348-001 Rev. C Page 4 of 6
Page 5

Macro Invocation User’s Guide
8. Click on the Add button to open the Add Font DIMM (or Add Font Card) window.
9. Click on the Browse button to open a Windows Explorer-style window. Click on the down-arrow in the
Drives box to select the drive that contains the support files. From the root folder, double-click on the
Support Files folder from the list of folders, double-click on the Imaging folder, and then double-click
on the Macro folder.
10. Click on the metrics file name Macro#.pcm, located in the left-hand list on the screen. This will install
the universal metrics file for macros.
11. Click Open or OK (the displayed window may vary depending on the operating system being used).
With some printer drivers, the Add Font DIMM (or Add Font Card) window will appear. If this window
appears, simply click on OK to close the window.
12. Within the Configure Font DIMMs (or Configure Font Cards) window, verify the installation by clicking
on the font DIMM (or Card) name (TROY Universal Macro Call) listed under Installed DIMMs (or
Installed Cards). Within the Fonts on DIMM (or Fonts on Card) list, the Troy Macro # (Enabled), etc.
will be listed. If correct, click on OK. If incorrect, delete the font DIMM or Font Card name and repeat
from Step #8. Close all remaining open windows. The TROY Universal Macro Call metrics file is now
installed. Proceed to the section entitled “Using the TROY Universal Macro Call for Microsoft
Windows”.
Installing the TROY Macro Metrics File for Microsoft Windows 2000 / XP / Server 2003
1. Close all applications before installing the macro metrics file.
2. Insert the TROY CD/floppy into your computer's CD-ROM/floppy drive. NOTE
was sent by email or downloaded from the <http://www.troygroup.com>
temporary folder and make a note of the location. When reference is made to access the file, navigate
to the folder that contains the extracted macro metrics file.
3. From the Microsoft Windows Start menu, click on Settings, and then click on Printers.
4. Right-click on your printer icon, and then click on Properties from the pull-down menu. If multiple
printers are installed, make sure the correct printer icon is selected. Remember that the printer selected
must be the PCL 5e language driver, not Postscript or other printer language.
5. Click on the Device Settings tab located at the top of the Properties window.
6. Click on External Font (under the Font Substitution Table category), and then click on the Properties
button.
7. Click on the Browse button to open the drive selection window. Click on the appropriate drive letter to
select the CD-ROM/floppy drive on your computer. From the root folder, double-click on the Support
Files folder from the list of folders, double-click on the PCM Files folder, double-click on the Imaging
folder, and then double-click on the Macro folder.
8. Click on the file in the Macro folder (example: MACRO#.pcm), and then click on Add to add the macro.
Windows can support up to ten macros. If the Macro Metrics section of the TROY Digital Image Data
Sheet does not have a file name listed but states "Custom Metrics Required”, please contact the TROY
Digital Imaging Department for information on obtaining Windows support files for special orders.
9. Close all remaining open windows.
website, extract the file to a
: If the macro metric file
Document #50-70348-001 Rev. C Page 5 of 6
Page 6

Macro Invocation User’s Guide
Using the TROY Universal Macro Call for Microsoft Windows
The macro(s) is invoked by selecting a special font, which was automatically created in your Windows fonts
collection when you installed the metrics file (see above). For every page within Windows where you select this
font, the corresponding macro will become part of the page printed.
1. From your Windows application, select from the Windows Font Collection TROY Macro #.
2. Select the Point Size for the special TROY Macro # font. The point size actually represents the macro
ID that has been previously assigned to your macro. For example: You have a form stored as macro ID
12, you would simply select a Point Size of 12.
3. Type a space character or several space characters to ensure the font is included with your document.
This is very important, as some applications will not include a font if no characters are to be printed. Do
not use any other character beyond the space character, as these will print on the page.
4. Print the Windows document. Remember – The Windows application will not display any text on the
form, but the macro will be generated when printed to the TROY Security Printer.
Helpful Information on Macros and Microsoft Windows
Although a macro ID can within the range of 0 to 32767, keep in mind the following:
Your Windows application may have a limitation on which Point Size can be selected for a font. Some
limitations may be a much smaller range (i.e., 6 to 144), even numbers only, and select Point Sizes may
be available. It is highly recommended that you verify any limitations that your applications may have.
It is recommended to add the special macro font within its own text box or element. If your Windows
application does not have this ability and you must have the font selected in-line with the rest of the
data, choose a smaller point size for the macro ID. Choosing a higher number may result in loss of
page "real estate."
Programming for Macro Invocation (non-Microsoft Windows)
Some basic programming knowledge of HP PCL 5e (Hewlett Packard Printer Command Language) is
helpful to program the following. The programming information provided in this document will provide
the necessary information for invoking and printing a macro. For further information on programming
HP PCL 5e, please obtain the Hewlett Packard PCL / PJL Technical Reference Bundle. This set of
documentation can be purchased directly from Hewlett Packard.
Commands within PCL begin with the non-printable escape character. (ASCII 27 / HEX 1B). For this
document, the escape character will be represented as <esc>.
Programming example for TROY Digital Image Fonts (non-Microsoft Windows)
Your data here ' add your data here (if applicable)
<esc>&f72Y ' select the macro ID 72
<esc>&f3X ' invoke the macro (last ID specified)
your data here ' add your data here (if applicable)
<esc>&l0H ' print the current page.
Obtaining Technical Assistance
If you need help with the installation process, please call TROY Technical Support at (800) 332-6427, between
the hours of 8:00 AM and 8:00 PM, Monday through Friday, Eastern Standard Time. Customers outside the
United States, please call (304) 232-0899.
Document #50-70348-001 Rev. C Page 6 of 6
 Loading...