

Page 1
PocketPro Administrator’s Guide
Document #40165-110 Rev. A
NOTE: For best results, view this document using Adobe Acrobat Reader 5.0 or higher.
(For use with TROY PocketPro 100S Print Servers)
Click on the main headings in the table of contents to link directly to that section.
Page 2

Notice
TROY GROUP, INC. SPECIFICALLY DISCLAIMS THE IMPLIED WARRANTIES OF MERCHANTABILITY AND FITNESS OF THIS PRODUCT
FOR A PARTICULAR PURPOSE. TROY shall not be liable for any errors contained in this manual or for any damages resulting from loss of use,
data profits, or any incidental or consequential damages arising from the use of TROY products or services.
Warning
This equipment has been tested and found to comply with the limits for a Class A digital device pursuant to Part 15 of FCC Rules. These limits are
designed to provide reasonable protection against such interference when operating in a commercial environment. This equipment generates,
uses, and can radiate radio frequency energy, and if not installed and used in accordance with this guide, may cause harmful interference to radio
communications. Operation of this equipment in a residential area is likely to cause interference in which case the user, at his or her own
expense, will be required to take whatever measures will be required to correct the interference.
Trademarks
HP, HP/UX, LaserJet, DesignJet, DeskJet, PaintJet, JetDirect, and JetAdmin are trademarks of Hewlett-Packard Company. DEC, DECserver,
VMS, LAT, and ULTRIX are trademarks of Digital Equipment Corporation. UNIX is a trademark of UNIX Systems Laboratories. Ethernet is a
trademark of Xerox Corporation. PostScript is a trademark of Adobe Systems Incorporated. NetWare is a trademark of Novell, Inc. Apple,
Macintosh, LaserWriter, and AppleTalk are trademarks of Apple Computer, Inc. IBM, LAN Server, and AIX are trademarks of International
Business Machines Corporation. LAN Manager, Windows, and MS-DOS are trademarks of Microsoft Corporation. VINES is a trademark of
Banyan Systems Inc. PrintKit is a trademark of Northlake Software. QADD is a trademark of Network Compatibility Group. LAN Attached and
UNIX Printing for VINES is a trademark of Incognito Software Inc. XJet, XMark, XConnect, and XAdmin are trademarks of TROY Group, Inc.
TROY is a registered trademark of TROY Group, Inc.
Warranty
The TROY print servers are warranted to be free of defects in materials and workmanship for a period of five years. This period begins upon the
date of shipment if the hardware is installed by the Purchaser, or upon installation if the Hardware is installed by TROY. During the warranty
period, TROY will repair or replace the unit at no charge provided it is returned to TROY with the freight pre-paid. The warranty on repaired
products or replacement products is 30 days or the last day of the warranty of the original defective product, whichever is longer. This warranty
does not apply if the product has been damaged by accident, misuse, natural catastrophe, modification, improper service, or conditions resulting
from causes external to the product. The warranty shall be void if the TROY serial numbers have been removed.
Information and descriptions contained herein are the property of TROY Group, Inc. Such information and descriptions may not be copied,
disseminated, or distributed without the express written consent of TROY Group, Inc. This publication is subject to change without notice.
TROY Group, Inc.
2331 S. Pullman Street
Santa Ana, CA 92705
TEL: (949) 250-3280
(800) 332-6427
FAX: (949) 250-8972
http://www.troygroup.com
sales@troygroup.com
© Copyright 1992-2003 TROY Group, Inc.
Printed in the United States of America
June 2, 2003
0560
Page 3
Table of Contents
Preface
Conventions
This manual is designed and formatted for use as an online document (viewable on your computer screen). The
document contains electronic links that group applicable information and provide quick access to each section of
the manual. For best results, you must use Adobe Acrobat Reader 5.0 or higher to view or print this document.
Earlier versions of Adobe Acrobat Reader will not produce a properly formatted document on your computer
screen or printer. The latest version of Adobe Acrobat Reader is available as a free download from the Adobe
website at http://www.adobe.com.
This User’s Guide uses these conventions:
Bold indicates emphasis or a minor heading.
Italic refers to a document title or is used for emphasis.
COURIER type indicates text visible on a computer screen or keys on your computer keyboard.
DISPLAY FONT indicates text visible on the printer control panel display.
The letter l is used in examples to distinguish the small letter l from the numeral 1 (one).
The character Ø is used in examples to distinguish the letter O from the numeral 0 (zero).
<Esc>, <CR>, <LF>, <FF>, etc. are control characters. Use a text editor to enter the equivalent of the character.
For example, to get <Esc> using a DOS text editor, hold down the Ctrl key; and press the [ (left square bracket)
key. Other text editors may vary.
NOTE: Notes contain important information set off from the text.
CAUTION: Caution messages appear before procedures, which, if not observed,
WARNING: Warning messages alert you to a specific procedure or practice,
CLICK HERE
to access the
Table of Contents
could result in loss of data or in damage to equipment.
which, if not followed correctly, could cause serious personal injury.
PocketPro 100S Administrator’s Guide -- Document #40165-110 Rev. A TOC-1
Page 4

Table of Contents
TROY
PocketPro
100S Print
Server
Section 1 – Installing the Hardware
Introduction .........................................................................................................................................1-1
Product Features ..........................................................................................................................1-2
Installation Requirements...................................................................................................................1-3
Parallel Port Hardware Setup............................................................................................................1-3
LED Indicators .............................................................................................................................1-4
Test Switch Options......................................................................................................................1-4
EtherNet Connection...........................................................................................................................1-5
Unshielded Twisted Pair Network Connection.................................................................................1-5
Changing the Print Server Reset........................................................................................................1-5
Changing the Print Server Configuration (optional) .......................................................................1-6
Section 2 – Print Server Management Utilities
Introduction .........................................................................................................................................2-1
TROY ExtendView Utility..................................................................................................................2-1
Xadmin32 Utility .................................................................................................................................2-1
TROY WebXAdmin Utility ................................................................................................................2-2
Accessing the WebXAdmin Utility..............................................................................................2-2
TROY Print Server Command Console............................................................................................2-2
Using TELNET Commands.........................................................................................................2-3
Using XCONFIG Commands......................................................................................................2-3
HP JetAdmin Utility............................................................................................................................2-4
HP Web JetAdmin Utility...................................................................................................................2-4
PocketPro 100S Administrator’s Guide -- Document #40165-110 Rev. A TOC-2
Page 5

Table of Contents
TROY
PocketPro
100S Print
Server
Section 3 – TCP/IP Network Configuration
Introduction .........................................................................................................................................3-1
TROY TCP/IP Concepts.....................................................................................................................3-1
TCP/IP UNIX Host Configuration.....................................................................................................3-1
HP/UX Configuration ..................................................................................................................3-4
IBM RS/6000 AIX Configuration ...............................................................................................3-5
Sun Solaris 2.x Configuration .....................................................................................................3-6
SCO UNIX Configuration ...........................................................................................................3-7
Other Non-Standard Configuration Options.............................................................................3-8
Using ExtendView to Assign an IP Address.............................................................................3-11
Using DHCP to Configure the Print Server IP Address.........................................................3-11
Using arp and ping to Configure the Print Server IP Address ..............................................3-12
Using rarp to Configure the Print Server IP Address ............................................................3-13
Using BOOTP to Configure the Print Server IP Address ......................................................3-14
Configuring the Print Server IP Address with NCP or XCONFIG ......................................3-15
IP Security..........................................................................................................................................3-17
Raw TCP Ports ..................................................................................................................................3-17
Changing the Configuration (optional) ...........................................................................................3-18
Section 4 – Novell NetWare Network Configuration
Introduction .........................................................................................................................................4-1
NetWare Concepts...............................................................................................................................4-1
General Information ...........................................................................................................................4-2
Before You Begin..........................................................................................................................4-2
Default Names
Configuring the Print Server in Queue Server Mode ......................................................................4-3
Configuring the Print Server in Bindery Queue Server Mode Using ExtendView................4-4
PocketPro 100S Administrator’s Guide -- Document #40165-110 Rev. A TOC-3
(Service Names)..............................................................................................................4-3
Page 6

Table of Contents
TROY
PocketPro
100S Print
Server
Configuring the Print Server in NDS Queue Server Mode Using ExtendView .....................4-9
Configuring the Print Server Using HP JetAdmin 3.xx .........................................................4-20
Configuring the Print Server Using WebXAdmin ..................................................................4-21
Configuring the Print Server in NDS Queue Server Mode Using WebXAdmin..................4-21
Adding NetWare Print Queues Using NWAdmin (Queue Server Mode).............................4-24
Configuring the Print Server and Print Queue Using PCONSOLE and XCONFIG ..........4-25
Adding NetWare Print Queues in Queue Server Mode Using NWAdmin ...........................4-27
Configring the Print Server and Print Queue Using NDPS ..........................................................4-35
Configuring the Print Server and Print Queue with the TROY Wireless Gateway ............4-35
Configuring the Print Server and Print Queue with the Novell Gateway ............................4-43
Adding a Printer in Windows Workstation Using the NDPS Print Queue...........................4-44
Configuring the Print Server and Print Queue in Remote Printer Mode....................................4-49
Configuring the Print Server for Remote Printer Mode Using NWAdmin..........................4-49
Configuring the Print Server for Remote Printer Mode Using ExtendView........................4-62
Configuring the Print Server/Print Queue Using NWAdmin, WebXAdmin, JetAdmin.....4-66
Configuring the Print Server and Print Queue Using PCONSOLE and XCONFIG ..........4-67
Configuring the Workstation ...........................................................................................................4-70
Configuring the Workstation (Windows 95/98/ME) ...............................................................4-70
Configuring the Workstation (Windows 2000/XP) .................................................................4-70
Configuring the Workstation (Windows NT 4.xx) ..................................................................4-75
Configuring the Workstation (Windows 3.xx).........................................................................4-75
Configuring the Workstation (DOS-based NetWare Drivers)...............................................4-76
Testing the Print Queue .............................................................................................................4-76
Changing the Print Server Configuration (optional) .....................................................................4-76
PocketPro 100S Administrator’s Guide -- Document #40165-110 Rev. A TOC-4
Page 7

Table of Contents
TROY
PocketPro
100S Print
Server
Section 5 – AppleTalk Network Configuration
Introduction .........................................................................................................................................5-1
AppleTalk Concepts ............................................................................................................................5-1
Macintosh Configuration....................................................................................................................5-1
OS 8.x and 9.x ................................................................................................................................5-1
OS 10.x...........................................................................................................................................5-2
Section 6 – Windows NT/2000/XP LAN/Warp Server Configuration
Introduction .........................................................................................................................................6-1
Windows NT/2000 IP Configuration .................................................................................................6-1
Windows 2000/XP Standard TCP/IP Printer Configuration...................................................6-3
Windows NT 4.xx Configuration (LPR/LPD)............................................................................6-4
Windows NT 3.5x Configuration .......................................................................................................6-5
LAN Server/Warp Server Configuration..........................................................................................6-5
Section 7 – Windows Setup
Setup Procedure...................................................................................................................................7-1
Section 8 – IPP Configuration
Introduction .........................................................................................................................................8-1
Windows 2000 IPP Configuration .....................................................................................................8-1
Configuring IPP on Other Operating Systems .................................................................................8-1
Section 9 – Troubleshooting
Introduction .........................................................................................................................................9-1
Installation Problems ..........................................................................................................................9-1
Intermittent Problems.........................................................................................................................9-4
TCP/IP Troubleshooting.....................................................................................................................9-4
NetWare Troubleshooting ..................................................................................................................9-6
PocketPro 100S Administrator’s Guide -- Document #40165-110 Rev. A TOC-5
Page 8

Table of Contents
TROY
PocketPro
100S Print
Server
Appletalk Troubleshooting .................................................................................................................9-7
Windows Server Troubleshooting......................................................................................................9-8
Section 10 – Customer Support and Warranty
Introduction .......................................................................................................................................10-1
Worldwide Web Support ..................................................................................................................10-1
Obtaining Technical Support ...........................................................................................................10-1
Returning Products ...........................................................................................................................10-2
Extended Service Program ...............................................................................................................10-3
Warranty .....................................................................................................................................10-3
Disclaimer....................................................................................................................................10-3
Contacts ..............................................................................................................................................10-3
Appendix A – Command Summary
Introduction ........................................................................................................................................A-1
TELNET.......................................................................................................................................A-1
XCONFIG ....................................................................................................................................A-1
General Server Commands ...............................................................................................................A-2
Appletalk Commands.........................................................................................................................A-6
NetBIOS/NetBEUI Commands .........................................................................................................A-7
NetWare Commands ..........................................................................................................................A-8
SNMP Commands ............................................................................................................................A-10
TCP/IP Commands ..........................................................................................................................A-11
Appendix B – Using Services
Introduction ........................................................................................................................................B-1
Available Services...............................................................................................................................B-1
Predefined Command Strings ........................................................................................................... B-1
PocketPro 100S Administrator’s Guide -- Document #40165-110 Rev. A TOC-6
Page 9

Table of Contents
TROY
PocketPro
100S Print
Server
Enabling Protocols on a Service.................................................................................................B-3
Adding Filters to a Service..........................................................................................................B-4
Changing the Service Name........................................................................................................ B-4
Using Service Names with TCP/IP or NetWare .......................................................................B-5
Using the Character Substitution Filter .................................................................................... B-5
Appendix C – Reloading the Firmware
Introduction ........................................................................................................................................C-1
Downloading from a Windows Computer Using XAdmin32 .........................................................C-1
Downloading from a Windows NT or UNIX Host Computer Using Master Mode tftp..............C-2
Downloading from a UNIX Host Computer Using Slave Mode tftp .............................................C-3
Downloading from a UNIX Host Computer Using BOOTP ..........................................................C-4
Downloading from a NetWare Server ..............................................................................................C-5
Obtaining Firmware Updates............................................................................................................C-5
Appendix D – Glossary
PocketPro 100S Administrator’s Guide -- Document #40165-110 Rev. A TOC-7
Page 10
Section 1 Installing the Hardware
Introduction
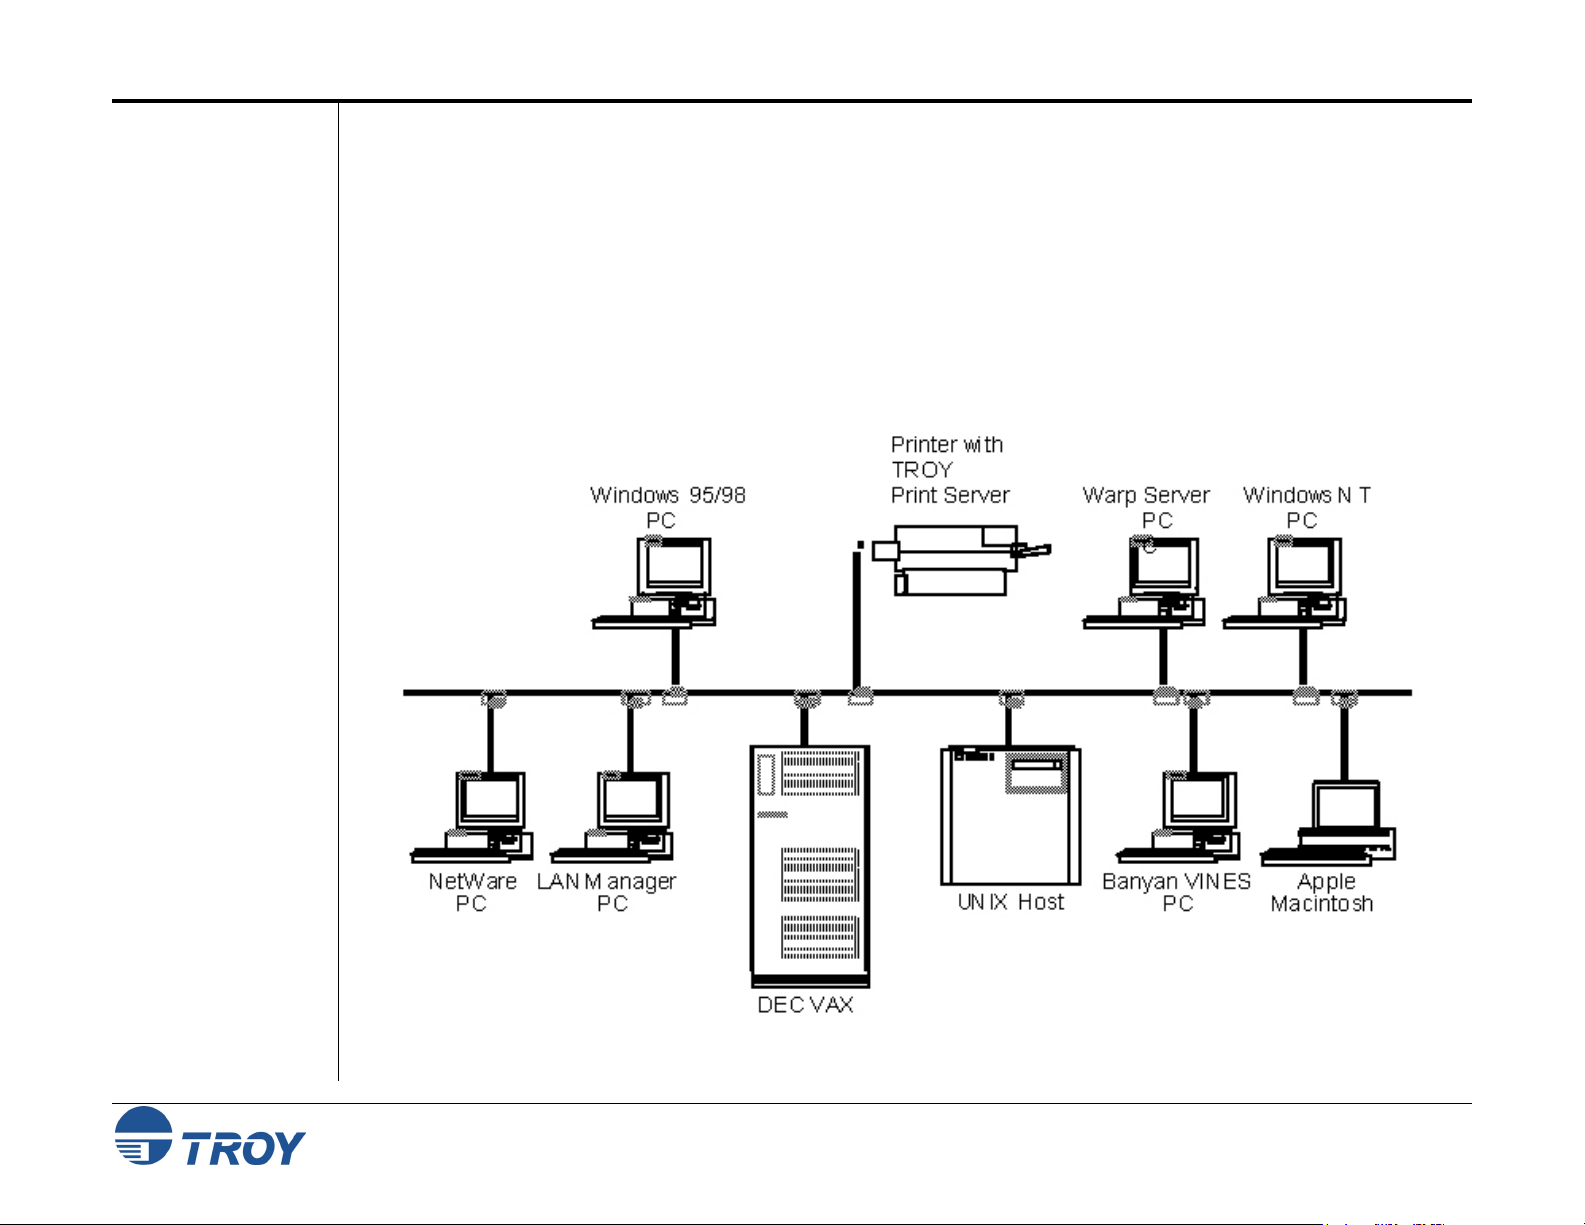
TROY external print servers allow multiple host computers to share virtually any type of printer or plotter on a
high-speed local area network (LAN). The PocketPro 100S is a compact low-cost Ethernet print server designed
to connect a printer with a parallel port to an Ethernet (10baseT) or Fast Ethernet (100baseT) network.
You can print jobs on a printer or plotter connected to a TROY external print server as if the printer or plotter
were attached directly to your computer. No special software is required on the host computers, and application
programs run without any modification. Because the TROY PocketPro 100S provides multiprotocol capabilities,
users on UNIX, Novell, AppleTalk, LAN Server, Windows NT/2000/XP, Windows 95/98/ME, and LAN
Manager computers can simultaneously access the same printer. The following diagram illustrates how TROY
external print servers are used in a typical network.
PocketPro 100S Administrator’s Guide -- Document #40165-110 Rev. A 1-1
Page 11

Section 1 Installing the Hardware
Product Features
The TROY PocketPro 100S print server offers the widest range of features in the industry:
TCP/IP, NetWare, AppleTalk, DLC/LLC, NetBEUI
Network Operating System compatibility:
- UNIX systems that support the Berkeley lpr/lpd printing protocol, or printing to a raw TCP port
- Novell NetWare V2.15 or above, V3.xx, or V4.xx, including support for bindery mode, Novell
Directory Services (NDS), and NDPS (Novell Distributed Print Servers)
- Windows NT and NTAS V3.5 or above, and Windows NT/2000/XP
- IBM OS/2, LAN Server, Warp Server
- Windows 95/98/ME (Peer-to-Peer or client mode)
- Windows for Workgroups (Peer-to-Peer or client mode)
High-speed Centronics parallel port compatible with IEEE P1284 bidirectional parallel interface standard
Superior network and printer management:
- Compatible with Hewlett-Packard JetAdmin and Web JetAdmin printer management software
(NOTE: The HP JetAdmin utility is no longer available for download from the HP web site)
- ExtendView, XAdmin32, WebXAdmin
- Remote console management via TELNET, or Xconfig (over Netware)
PrintraNet software for transparently sending documents to remote locations over the Internet
Internet Printing Protocol (IPP)
lpd-Plus feature for providing multiple services with a custom setup and reset strings, character substitution,
and text-to-PostScript conversion
Flash memory for easy updating of firmware via NetWare, BOOTP, tftp (master or slave mode)
AppleTalk spoofing capabilities for support of non-bidirectional parallel printers
AppleTalk binary support on printers that support the HP Tagged Binary Communications Protocol
IP address configuration via DHCP, BOOTP, rarp, arp, Xadmin32, ExtendView, or remote console
IP security to restrict printing based on IP address
A printer or plotter that uses a Centronics-compatible 36-pin female parallel port, IEEE P1284 bidirectional
parallel interface
PocketPro 100S Administrator’s Guide -- Document #40165-110 Rev. A 1-2
Page 12

Section 1 Installing the Hardware
Installation
Requirements
Parallel Port
Hardware
Setup
A Windows Operating System CD
An additional Ethernet (category 5) network cable
A Web browser such as Internet Explorer or Netscape (to use the WebXAdmin utility)
NOTE: If you are not sure that you have the required components, please ask your system administrator for
assistance, or call TROY Technical Support at (800) 332-6427. Customers outside the U.S., call (949) 250-3280,
Extension 200.
1. Before attempting to install the TROY PocketPro 100S print server, make sure you have installed your printer
or plotter as described in the documentation for the device.
2. Plug the TROY PocketPro 100S print server directly into the parallel port (36-pin female connector) on your
printer. No additional data cable is required.
NOTE: In the event that the print server cannot be connected directly to the printer's Centronics port, a 36-to-36pin Centronics (male-to-female) cable can be ordered from TROY (p/n CABLE-CEN2). For printers that use the
miniature Centronics IEEE 1284C connector, TROY offers the CABLE C/B adapter cable.
3. Plug the PocketPro power supply adapter into a 120-volt AC receptacle.
4. Plug the PocketPro power supply cable into the PocketPro 100S print server.
5. Switch your printer power ON.
PocketPro 100S Administrator’s Guide -- Document #40165-110 Rev. A 1-3
Page 13
Section 1 Installing the Hardware
LED Indicators
Test Switch
Options
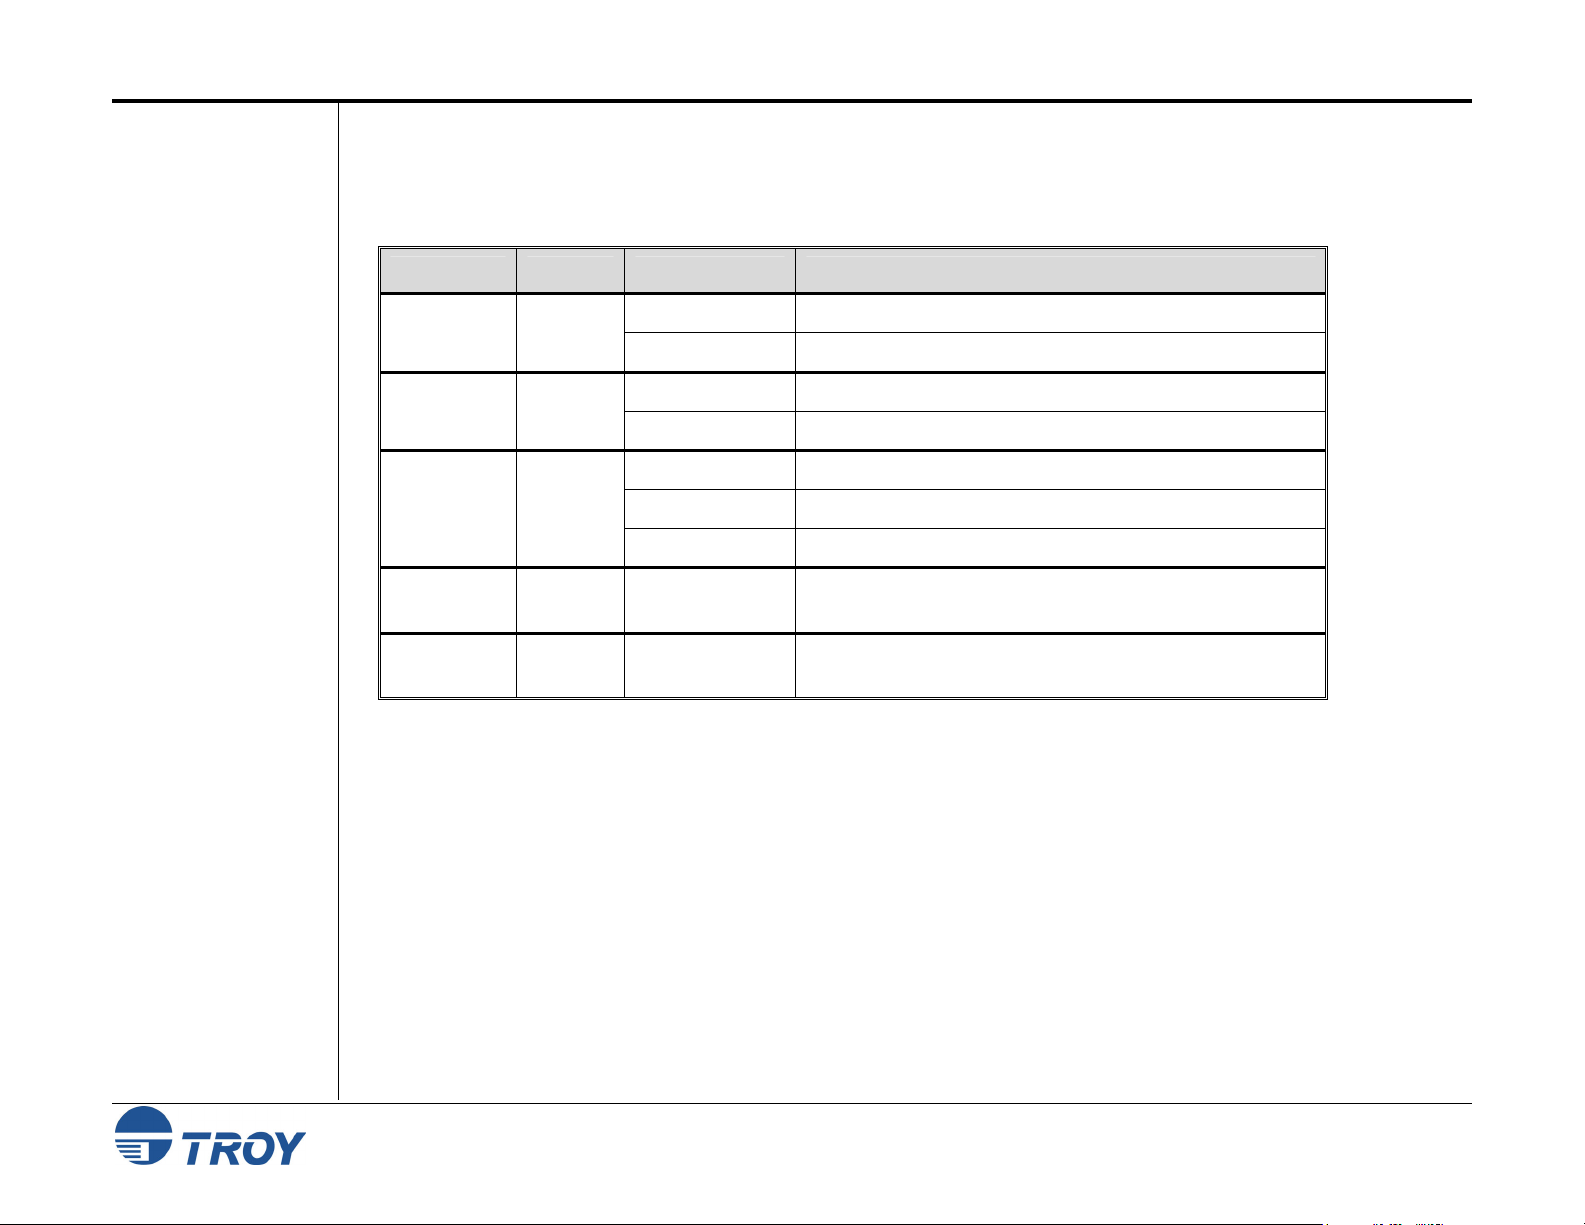
The back edge of the PocketPro 100S provides LED (Light Emitting Diodes) indicators for easy monitoring. The
following table defines the function of each LED.
The back edge of the TROY print server provides LED indicators (Light Emitting Diodes) for easy monitoring.
The following table defines the function of each LED.
Label Color State Status
POWER
DATA
RANGE
O
REEN
G
ON
OFF
ON
OFF
The unit is receiving power.
The unit is not receiving power.
The unit is transmitting at 100 megabits per second.
The unit is transmitting at 10 megabits per second.
LINK
Y
ELLOW
DATA+LINK YELLOW
GREEN
DATA+LINK YELLOW
GREEN
ON
OFF
Blinking
Blinking
Alternately
Blinking
Simultaneously
There is an Ethernet link.
There is no Ethernet link.
There is network activity.
A fatal error or exception has occurred.
The firmware is being updated.
To print a self-test page, press and hold the Test switch for one-eighth of a second but less than five seconds.
To reset the unit back to factory default settings, press and hold the Test switch for at least five seconds, and
then power-cycle the unit.
PocketPro 100S Administrator’s Guide -- Document #40165-110 Rev. A 1-4
Page 14

Section 1 Installing the Hardware
EtherNet
Connection
Unshielded
Twisted Pair
Network
Connection
Changing the
Print Server
Reset
The TROY PocketPro 100S print server can connect to either a 100baseTX Fast Ethernet network or a 10baseT
Ethernet network. It automatically senses the type of network, so no configuration is required.
To connect the TROY PocketPro 100S to a 10baseT unshielded twisted pair (UTP) Ethernet network, you will
need an unshielded twisted pair Ethernet hub with at least one unused port installed on your network, plus an
appropriate length of RJ45 modular cable.
To connect the TROY PocketPro 100S to a 100baseTX Fast Ethernet network, you will need a 100baseTX Fast
Ethernet hub with at least one unused port, plus an appropriate length of Category 5 RJ45 modular cable.
Connect one end of the RJ45 cable to the print server connector labeled "100baseTX/10baseT", and then connect
the other end to a port on the twisted pair Ethernet hub. The TROY PocketPro 100S will automatically determine
whether it is connected to a 10baseT or 100baseTX network.
The printer reset is a sequence of characters that is sent to the printer after the job is completed. It ensures that
the last page of the job is ejected from the printer and that the printer is reset to its default state so that the next
job will print properly.
The default printer reset for a TROY PocketPro 100S print server is a null, except on the TCP/IP text service,
which has <Formfeed> as the default. A null reset means that some print jobs may not be ejected upon
completion. Some operating systems, such as NetWare, provide the ability to insert a reset sequence at the end of
each job, in which case the TROY PocketPro 100S null reset is adequate. Also, Microsoft Windows printer
drivers typically provide a printer reset at the end of each job. But for those operating systems that do not
provide this reset capability, the TROY PocketPro 100S provides the ability to customize the printer reset to meet
the requirements of virtually any type of printer. The following predefined reset strings are available:
No. Definition Printer
1 Null (use if no reset is desired) -------- 2 <ESC>E PCL printer
3 CTRL-D PostScript printer
4 <ESC>%-12345X PJL (use with newer HP and Lexmark/IBM printers)
11 <Formfeed> General
PocketPro 100S Administrator’s Guide -- Document #40165-110 Rev. A 1-5
Page 15

Section 1 Installing the Hardware
Changing the
Print Server
Reset (cont.)
Refer to your printer documentation if you do not know the proper reset string. Use the null string if you are
planning to reset the printer from the host software (for example, from a Windows driver). If you want to define
a new reset string, refer to Appendix B.
You can insert a printer reset command either before or after each job, although generally the reset goes at the
end of the job. TROY print servers allow you to define multiple services for a given port. This is useful, for
example, if you want to use different reset strings with the same printer. For example, you might want to define a
service for UNIX jobs that contains an <ESC-E> reset, and a different service for NetWare that has no reset.
Print jobs are normally sent to service 1 (TWC_XXXXXX_P1, where “XXXXXX” is the last six digits of
Ethernet address, for all protocols except TCP/IP and AppleTalk) or service 2 (BINARY_P1, for TCP/IP). Refer
to Appendix B for additional information on using services.
To change the printer reset on a TROY PocketPro 100S print server using the XAdmin32 utility, double-click on
the print server name, enter the password (ACCESS by default), and then click on the Services tab, double-click
on the desired service, and then select the appropriate Printer Control String.
Alternatively, you may use the remote console by typing in the following command:
SET SERVICE servicename EOT stringno
The "servicename" is the name of the service (do a SHOW SERVICE command for a list of services) and
stringno is the number of the string. For example to use string 3 (the PostScript CTRL-D reset) on the default
parallel port service, you would enter the following:
SET SERVICE BINARY_P1 EOT 3
Changing the
Print Server
Configuration
(Optional)
In addition to changing the printer reset string, you can modify the TROY print server configuration in a number
of other ways. The procedure and commands for changing the configuration are described in Appendix A.
PocketPro 100S Administrator’s Guide -- Document #40165-110 Rev. A 1-6
Page 16

Section 2 Print Server Management Utilities
Introduction
TROY offers a wide variety of ways to configure and monitor the PocketPro 100S external print server. This
section discusses the installation and the basic usage of several management utilities. These methods include the
use of one or more of the following utilities:
TROY
ExtendView
Utility
XAdmin32
Utility
TROY ExtendView Utility (included on the TROY PocketPro 100S Installation CD)
TROY XAdmin32 Utility (available for download from the TROY web site)
TROY WebXAdmin Web-browser Utility
TROY Print Server Command Console
HP JetAdmin Windows-based Utility (no longer available for download from the HP web site)
HP Web JetAdmin Web-browser Utility
ExtendView is a 32-bit Windows utility using the TCP/IP or IPX/SPX protocols. To take full advantage of the
capabilities of ExtendView, you should use the Novell 32-bit client software on the PC workstation that is used
for configuring the print queues.
To install ExtendView (designed for Microsoft Windows 95/98/ME/2000/NT/XP operating systems), perform
the following steps:
1. Insert the TROY PocketPro 100S CD into the CD-ROM of your computer, and select Install Software.
2. Select TCP/IP Management Utilities, and then click on Next.
3. Select ExtendView, and then click on Install.
NOTE: For a detailed description of the ExtendView utility, please refer to the Help files provided with the utility.
XAdmin32 is a 32-bit Windows utility using the TCP/IP or IPX/SPX protocols. To take full advantage of the
capabilities of XAdmin32, you should use the Novell 32-bit client software on the PC workstation that is used for
configuring the print queues.
To install XAdmin32, download a copy of the software from the TROY web site (http://www.troygroup.com).
NOTE: For a detailed description of the XAdmin32 utility, please refer to the Help files provided with the utility.
PocketPro 100S Administrator’s Guide -- Document #40165-110 Rev. A 2-1
Page 17

Section 2 Print Server Management Utilities
TROY
WebXAdmin
Utility
Accessing the
WebXAdmin
Utility
WebXAdmin allows you to configure the print server with a standard web browser like Netscape Navigator or
Microsoft Internet Explorer. It can therefore be used on any operating system that supports web browser
capabilities. To use WebXAdmin, you must first make sure that you have a web browser installed on your
computer and that you have configured an IP address in both the computer and the print server. Also make sure
that you have configured your TCP/IP stack to communicate over the local area network (rather than via a PPP
dial-up connection).
To use the WebXAdmin utility, start your web browser and enter the IP address of the print server as the
destination web site. Once you are connected, enter the password (ACCESS is the default password) and select
the protocol or other item that you wish to configure. You will then be connected to the appropriate web page for
configuration of that item. You may use the normal browser buttons to move forward and back through the web
pages.
TROY Print
Server
Command
Console
All TROY print servers support a sophisticated command-line-oriented console for configuration and
management. This console contains features that are not available through WebXAdmin, including sophisticated
diagnostic capabilities. The TROY print server command console can be accessed via TELNET and the TROY
XCONFIG NetWare Utility. It is also available through one of the web pages using the WebXAdmin Utility.
The general configuration procedure is the same regardless of which method is used.
PocketPro 100S Administrator’s Guide -- Document #40165-110 Rev. A 2-2
Page 18

Section 2 Print Server Management Utilities
Using TELNET
Commands
Using XCONFIG
Commands
To connect to the print server using TELNET on UNIX, Windows NT, or most other TCP/IP systems, type the
following command at the UNIX system prompt:
TELNET ipaddress
The ipaddress is the IP address of the print server. When you are connected, push RETURN or ENTER to get
the "#" prompt, enter the password ACCESS (it will not echo), and type anything in response to the Enter
Username> prompt. When you get the Local> prompt, you are ready to enter commands.
To connect to the print server using the TROY XCONFIG NetWare Utility, insert the TROY Print Server
Software CD in your CD-ROM drive, browse the CD contents and look for XCONFIG.
If you have only one print server, you will be immediately connected. If you have more than one print server,
you will be given a list of available print servers. Type the number of the print server you want to connect to.
When you are connected, enter the password ACCESS (it will not echo) at the "#" prompt, and type anything in
response to the Enter Username> prompt. When you get the Local> prompt, you are ready to enter commands.
PocketPro 100S Administrator’s Guide -- Document #40165-110 Rev. A 2-3
Page 19

Section 2 Print Server Management Utilities
HP JetAdmin
Utility
HP Web
JetAdmin
Utility
NOTE: The TROY PocketPro 100S works transparently with the HP (Hewlett-Packard) JetAdmin utility; however,
this utility has been discontinued and is no longer available for download from the HP web site.
The TROY PocketPro 100S will appear in the list of configured print servers unless IPX is not running on the
computer and the print server is not configured with a valid IP address. If this is the case, select Device from the
menu bar and click on New. Select the desired print server from the list of unconfigured devices, and then press
Configure. Enter the requested information, including the IP address, subnet mask, and gateway, and then click
on Close to return to the list of configured print servers.
You may now select the print server from the list, and click on the Modify button (or select Device, and then
Modify from the menu bar) to change the print server configuration.
Once you are connected and are at the Web JetAdmin home page, click on the Find Device tab, and then click on
Find All Devices to get a list of all Web JetAdmin-compatible print servers (or you may limit your search by
using the Advanced Search method). Click on the desired TROY print server name, and the Properties page will
be displayed for that print server. Click on the Config tab to configure the print server.
PocketPro 100S Administrator’s Guide -- Document #40165-110 Rev. A 2-4
Page 20

Section 3 TCP/IP Network Configuration
Introduction
TROY TCP/IP
Concepts
TCP/IP UNIX
Host
Configuration
The TROY PocketPro 100S print servers include the TCP/IP (Transmission Control Protocol/Internet Protocol)
suite. Since virtually all UNIX host computers support TCP/IP, this capability allows a printer to be shared on a
UNIX Ethernet network. TCP/IP communications can proceed concurrently with other protocols, which means
that UNIX, NetWare, Apple, and other computers can share the same printer over an Ethernet network using a
TROY print server.
The TROY PocketPro 100s using TCP/IP appears to the network as a UNIX host computer with a unique IP
address running the lpd (line printer daemon) protocol. As a result, any host computer that supports the Berkeley
remote-LPR command can spool jobs to the TROY print server without the need for any special software on the
host computer. Application programs run transparently, and users do not need to learn new procedures to use the
printer. TROY print servers also support gateways for communications with hosts on remote networks. In
addition, raw TCP ports are available for special applications and compatibility with HP JetDirect print servers.
The TROY PocketPro 100S is preconfigured to run on a TCP/IP network with a minimum of setup. The only
mandatory configuration in the print server is the entering of an IP address (the TROY PocketPro 100S comes
with a default IP address of 192.0.0.192, but this should be changed to meet the addressing requirements of your
network.
The configuration process for most UNIX systems is described in the following steps. Unfortunately, this
process is not entirely standardized, so it is recommended that you refer to your system documentation (or man
pages) for additional information.
1. Configure the /etc/hosts file (or equivalent local host table) on each UNIX host that needs to communicate
with the TROY print server, or provide similar information to a name server on the network. Use your
favorite editor to add an entry to the /etc/hosts file containing the IP address and node name of the TROY
print server.
EXAMPLE: 192.189.207.3 TWC_00C351
The actual format of the entry may vary depending on your system, so check your system documentation, and
also note the format of other entries in the etc/hosts file.
NOTE: The node name in this file does not necessarily need to be the same as the one that is actually configured
in the TROY PocketPro 100S (the name that appears on the printer self-test), but it is good practice to make the
names the same; however, some operating systems, such as HP/UX, do not accept the "_" character in the default
name, so for these systems you must use a different name. In any case, the node name in the /etc/hosts file must
match the node name in the /etc/printcap file. Some systems, such as HP/UX and AIX, allow you to enter the IP
address as the host name when setting up the print queue. In this case, you do not need to configure the host file.
PocketPro 100S Administrator’s Guide -- Document #40165-110 Rev. A 3-1
Page 21

Section 3 TCP/IP Network Configuration
TCP/IP UNIX
Host
Configuration
(cont.)
2. Choose which TROY print server service you want to use. There are two types of services available on the
TROY PocketPro 100S. Binary services pass data through unmodified and are therefore required for PCL or
PostScript rasterized graphics printouts. Text services add a carriage return at the end of each line for proper
formatting of UNIX text files (which end in linefeed and do not have carriage returns). The text service can
also be used for non-rasterized graphics, such as ASCII PostScript graphics or many types of PCL graphics.
If you are using the parallel port on the print server, choose one of the available services (this service name will
be used in step 3):
BINARY_P1 Binary (parallel port)
TEXT_P1 Text (parallel port)
You may set up multiple print queues on your UNIX host computer for the same TROY print server, each with a
different service name (for example, one queue for binary graphics jobs and one for text jobs). Refer to
Appendix B for additional information on using services.
NOTE: The following step applies to the majority of UNIX systems, including Sun OS (but not Solaris 2.xx), Silicon
Graphics (lpr/lpd option required), DEC ULTRIX, DEC OSF/1, and Digital UNIX. Users of RS/6000 AIX, HP/UX, Sun
Solaris 2.xx, and other systems that do not use the printcap file should skip to Step #4. SCO users should also
skip to section 3-A (SCO uses the printcap file, but this file is automatically configured via the rlpconf command.
3. Configure the /etc/printcap file on each host computer to specify the local print queue, the TROY print
server name (also called remote machine or rm), and the TROY print server service name (also called remote
printer, remote queue, or rp), and the spool directory. An example of a typical printcap file is as follows:
laser1|Printer on Floor 1:\
:lp=:\
:rm=TWC_003C51:\
:rp=TEXT_P1:\
:sd=/usr/spool/lpd/laser1:
PocketPro 100S Administrator’s Guide -- Document #40165-110 Rev. A 3-2
Page 22

Section 3 TCP/IP Network Configuration
TCP/IP UNIX
Host
Configuration
(cont.)
This will create a queue named laser1 on the host computer that communicates to a TROY print server with a
node name (rm) of TWC_003C51 and a service name (rp) of TEXT_P1 for printing text files to the printer
through the spool directory /usr/spool/lpd/laser1. If you are printing binary graphics files, you would use the
service BINARY_P1 instead of TEXT_P1.
NOTE: The rm and rp options are not available on all UNIX systems; so, if necessary, check your documentation
(or man pages) to determine the equivalent options.
Users of Berkeley-compatible UNIX systems can use the lpc command to obtain the printer status:
%lpc status
laser1:
queuing is enabled
printing is enabled
no entries
no daemon present
Users of AT&T-compatible UNIX systems can generally use the lpstat or rlpstat commands to obtain similar
status information. Because this procedure varies from system to system, refer to your system documentation for
the exact usage.
NOTE: Skip Step #4 if you have completed Step #3.
4. If you have an HP/UX system, IBM RS/6000 AIX computer, or Sun Solaris 2.xx, there is no printcap file.
This is also true for some other AT&T-based UNIX systems, as well as many VMS-based TCP/IP software
packages (for example, UCX, TGV Multinet, etc.). On SCO systems, there is a printcap file, but it is
automatically configured by rlpconf command. Most of these systems use a printer setup program to define
the service name (remote printer), the TROY print server name (remote machine) or IP address, and the local
queue name (spool directory).
PocketPro 100S Administrator’s Guide -- Document #40165-110 Rev. A 3-3
Page 23

Section 3 TCP/IP Network Configuration
HP/UX
Configuration
In the case of HP/UX 10.xx, the sam program is used to set up the remote printer. The steps are as follows:
1. Execute the sam program. When you get a list of options, select Printers and Plotters.
2. Select LP Spooler.
3. Select Printers and Plotters.
4. Select Actions, and then select Add Remote Printer/Plotter.
Enter any name as the Printer Name (this will be the name of the print queue).
Enter the IP address of the print server as the Remote System Name.
Enter the desired print server service name as the Remote Printer Name.
Check the box next to Remote Printer is on BSD System. You may accept the default values for the
remaining items.
5. Click OK to configure the printer. You should now be able to print using the lp -d command with the printer
name.
If you are using the HP Distributed Print Service, the configuration procedure is slightly different because you are
sending the print jobs to a file server, which in turn spools the jobs to the print server. Therefore, you must know
the name of the file server (spooler host) in addition to the above information. You will add a physical printer
and a remote printer, and then assign a logical printer name to the remote printer (a unique name that does not
match any other name). To print, use the lp -d command with the logical printer name.
Earlier versions of HP/UX use similar procedures to 10.xx:
1. Enter sam and select "Peripheral Devices" and then "Add Remote Printer" (not "networked printer").
2. Enter the following remote printer settings (the other settings do not matter):
Line printer name (user-selectable)
Remote system name (the TROY print server name; must match what is in hosts file or use TROY print
server IP address)
Remote printer queue (TROY print server binary or text service name)
Remote Printer is on a BSD System (Yes)
PocketPro 100S Administrator’s Guide -- Document #40165-110 Rev. A 3-4
Page 24

Section 3 TCP/IP Network Configuration
IBM RS/6000
AIX
Configuration
The RS/6000 AIX operating system uses the smit program to set up the remote printer. The procedure is as follows
for AIX 4.0 and later:
1. Enter SMIT and select “devices”
2. Select “Printer/Plotter”
3. Select “Print Spooling”
4. Select “Add a Print Queue”
5. Select “Remote”
6. Enter the following Remote Printer Settings:
Name of queue (user selectable)
Host Name of Remote Printer (TROY Print server name; must match name /etc/hosts file or use TROY
print server IP address)
Name of queue on remote server (TROY print server binary or text service name)
Type of print spooler: BSD (press the list button and choose BSD).
The procedure for pre-V4.0 systems is as follows:
1. Enter smit and select "Devices"
2. Select "Printer/plotter"
3. Select "Manage remote printer subsystem"
4. Select "Client services"
5. Select "Remote printer queues"
6. Select "Add a remote queue"
7. Enter the following remote queue settings:
Name of queue to add (user selectable)
Activate the queue (Yes)
Destination host (TROY print server name; must match name in /etc/hosts file or use the print server IP
address)
Name of queue on remote printer (TROY print server binary or text service name)
Name of device to add (user selectable; for example, lp0)
PocketPro 100S Administrator’s Guide -- Document #40165-110 Rev. A 3-5
Page 25

Section 3 TCP/IP Network Configuration
Sun Solaris 2.x
Configuration
The Sun Solaris 2.x uses the lpsystem and lpadmin programs for remote printer configuration:
lpsystem -t bsd troyname
lpadmin -p queue -s troyname!\troyservice
accept queue [not required on newer Solaris systems]
enable queue [not required on newer Solaris systems]
The queue is the name of the local print queue, troyname is the TROY print server name (must match the entry in
the /etc/hosts file) or IP address and troyservice is the TROY print server binary or text service. If this is the first
printer configured, you must also use the lpsched command immediately prior to the accept command.
As an alternative, you may use Printer Manager in the admintool utility under OpenWindows. Select Edit, Add,
and Add Access to Remote Printer. Then enter the TROY print server name in the format
troyname!\troyservice as described above. Make sure that the Printer Server OS is set to BSD (the
default setting), and then click on Add.
It is recommend that you use the /etc/hosts file for the printer name rather than NIS or other name services. Also
note that due to a bug in the Sun lpd implementation on Solaris 2.4 and earlier releases, you may experience
problems printing very long print jobs. If this is the case, a workaround is to use the raw TCP port with the HP
JetDirect software as described later in this section.
PocketPro 100S Administrator’s Guide -- Document #40165-110 Rev. A 3-6
Page 26

Section 3 TCP/IP Network Configuration
SCO UNIX
Configuration
SCO UNIX requires TCP/IP V1.2 or later to work with the TROY PocketPro 100S. You must first configure the
/etc/hosts file as described in step 2. If necessary, start lpr services with the mkdev rlp command (this
command must be executed only one time or serious problems may result!). Then issue the rlpconf command
at the SCO system prompt. Respond to the questions as follows:
Printer name. Enter the name of the print server service (usually BINARY_P1 for binary graphics files or
TEXT_P1 for ASCII text files). If you are configuring more than one TROY print server, you will need
to change the print server service name on each print server to a unique name (using the WebXAdmin
Configure Service facility or the SET SERVICE oldname NAME newname command; refer to Appendix
A and Appendix B for details), because the service name is also used as the name of the print queue.
Remote printer or a local printer: Enter "r" for remote
Name of the remote host that <Printer name> is attached to: Enter the name of the TROY print server
that you configured in the /etc/hosts file)
System default printer: Enter either "y or "n" to make the printer the system default printer.
You should now be able to print to your queue. Note that this procedure assigns the queue name as the same as
the name of the print server's service. If you want to name the queue something different than the service name,
edit the /etc/printcap file.
PocketPro 100S Administrator’s Guide -- Document #40165-110 Rev. A 3-7
Page 27

Section 3 TCP/IP Network Configuration
Other NonStandard
Configuration
Options
With DEC TCP/IP Services for VMS (UCX), you first need to put a name for the TROY PocketPro 100S in the
HOSTS file using the command SET HOST name /ADDRESS=ipaddress at the UCX> prompt, where
name is the desired name for the print server and ipaddress is the IP address for the print server. Then use the
sys$system:ucx$lprsetup command to add a printer (print queue). Enter the desired printer name, and
then use the TROY print server name as the remote system name. Specify one of the TROY print server services
(see beginning of this section for options) as the remote system printer name (accept the defaults for other
questions).
Process Software's TCPware simply uses the VMS INIT/QUEU command with their special symbiont in the
following format:
INIT/QUEUE/PROC=TCPWARE_TSSSYM/ON="host,port" queue
The host is the IP address or name of the TROY print server, port is the TROY print server raw TCP port number
(9100 for the parallel port), and queue is the VMS queue name.
TGV's Multinet requires you to run the MULTINET CONFIGURE /PRINTERS command, then use the ADD
command to add a printer, specifying the TROY print server IP address, a protocol type of LPD, and one of the
service options described at the beginning of this section as the remote print queue.
With Wollongong's PATHWAY, first make sure that you have the Access option with lpd enabled. Then enter
the print server name and IP address in the TWG$TCP:[NETDIST.ETC]HOSTS. file, run the LPGEN program,
and execute the command add queue/rmachine=troyname/rprinter=service, where queue is the
name of the queue, troyname is the TROY print server name from the hosts file, and service is the TROY print
server service name.
To use a TROY PocketPro 100S with an IBM AS/400 running IBM’s TCP/IP Gateway Services for OS/400 (the
OS/400 system must be v3.1 or later):
1. Assign a TCP/IP address to the AS/400 and the TROY PocketPro 100S.
2. Use the CFGTCP command at your OS/400 prompt to add the print server’s TCP/IP address to the AS/400
host table.
PocketPro 100S Administrator’s Guide -- Document #40165-110 Rev. A 3-8
Page 28

Section 3 TCP/IP Network Configuration
Other NonStandard
Configuration
Options (cont.)
3. Use the following one-line OS/400 command to create the LPD queue:
CRTOUTQ OUTQ(<queuename> RMSTSYS (*INTNETADR) RMTPRTO(<service>)
AUTOSTRWTR(1) CNNTYPE(*IP) DESTTYPE (*OTHER) MFRTYPMDL (<driver>)
INTNETADR(‘<ipaddress>’) TEXT (‘<description>’)
The <queuename> is the new AS/400 print queue name, <service> is the TROY print server service name,
<driver> is the OS/400 printer driver name (*HP4 is recommended if in doubt), and <ipaddress> is the IP address
of the print server. Note that the IP address and description must be enclosed in single quotes.
Other systems use similar procedures to set up the TROY print server. These programs will generally ask for the
following information:
Requested information: You should use:
remote printer or remote TROY print server binary or text service name
remote host computer name Any name (must match name in printcap file, if any), or in some
cases, you may enter the TROY print server IP address here
remote host IP address TROY print server IP address
Tech support specialists for these companies can usually answer configuration questions if you provide them with
the equivalent UNIX configuration information (tell them that the TROY print server looks like a remote UNIX
host computer running the lpd line printer daemon).
4. If you have not created a spool directory for the TROY print server on your UNIX host computer, you will
need to do so now (the printer setup utilities in HP/UX, AIX, Solaris 2.xx, and other systems will
automatically create the spool directory). The lpd spool directory is usually located in the /usr/spool directory
(check with your system manager to see if the location is different for your system). To create a new spool
directory, use the mkdir command. For example, to create a spool directory for the queue laser1, you would
enter:
mkdir /usr/spool/lpd/laser1
PocketPro 100S Administrator’s Guide -- Document #40165-110 Rev. A 3-9
Page 29

Section 3 TCP/IP Network Configuration
Other NonStandard
Configuration
Options (cont.)
On some systems it is also necessary to start the daemon. This is done on Berkeley-compatible UNIX systems
with the lpc start command as shown in the following example:
lpc start laser1
5. The final step before printing is to add the IP address to the TROY print server. Consult with your system
administrator before assigning an IP address to avoid conflicts with other devices. If your network does not
have an officially assigned block of IP addresses, you may use any unique address between 192.168.254.1
and 192.168.254.254 (this is a reserved range of Class C addresses for private networks that are not connected
to the Internet per RFC 1918; note that you must also assign your host computer an IP address in this range).
The IP address can be set in any of the following ways:
ExtendView
XAdmin32
HP JetAdmin
DHCP
The UNIX arp and ping commands
Reverse Arp (rarp)
BOOTP
TROY XCONFIG NetWare utility
The easiest way to configure the IP address is using either ExtendView, XAdmin32, or JetAdmin as described in
Section 2. The remaining configuration methods are described in the following paragraphs.
NOTE: The IP address you assign to the print server must be on the same logical network as your host computers
(e.g., If your host has an IP address of 192.189.207.3, the TROY print server should have an IP of 192.189.207.x,
where x is an integer between 1 and 254), or you must properly configure your router to work with the TROY print
server.
PocketPro 100S Administrator’s Guide -- Document #40165-110 Rev. A 3-10
Page 30

Section 3 TCP/IP Network Configuration
Using
ExtendView to
Assign an IP
Address
Using DHCP to
Configure the
Print Server IP
Address
To assign an IP address using ExtendView, perform the following steps:
1. Launch the ExtendView utility by clicking on Start, Programs, TROY Group Printing, and ExtendView.
The utility will automatically search for TROY wireless devices on the network.
2. Locate your PocketPro 100S from the list of discovered devices; it will be listed as TWC_XXXXXX (where
XXXXXX are the last six digits of the MAC address with an IP address of 192.0.0.192).
3. Double-click on your PocketPro 100S from the list of displayed devices. ExtendView will prompt you for an
IP address. Enter an IP address, and then click on OK. You will then be directed to the Print Server
Configuration page.
4. Click on the TCP/IP tab, enter the subnet mask and default gateway, and then click on OK.
5. When prompted, click on Yes to save these changes and reset the print server.
The TROY PocketPro 100S supports the DHCP protocol for automatically loading the IP address from a host
computer that supports DHCP. By default, the print server will automatically try DHCP, BOOTP, and rarp
before using the IP address configured in the server.
NOTE: This procedure may take about a minute, so the print server cannot be accessed via TCP/IP during that
time. If a faster IP address load is required, select the desired IP configuration method (AUTO, DHCP, BOOTP,
RARP, STATIC) via WebXAdmin, or the print server console SET IP METHOD command (STATIC is used when the
IP address is manually entered).
PocketPro 100S Administrator’s Guide -- Document #40165-110 Rev. A 3-11
Page 31

Section 3 TCP/IP Network Configuration
Using arp and
ping to Configure
the Print Server
IP Address
The arp and ping method is one of the simplest ways of configuring the print server IP address. To use arp and
ping, enter the following commands at the operating system prompt:
arp -s ipaddress ethernetaddress [temp]
ping ipaddress
The ethernetaddress is the Ethernet address of the print server and ipaddress is the IP address of the print server.
The temp parameter should be used with UNIX systems, but is not supported by Microsoft operating systems.
For example, a typical UNIX entry would be:
arp -s 192.189.207.2 00:40:17:00:c3:e4 temp
ping 192.189.207.2
while a typical Microsoft entry would be:
arp -s 192.189.207.2 00-40-17-00-c3-e4
ping 192.189.207.2
If everything is OK, you will get a message back on the screen indicating that the print server is alive. If you do
not get such a message, first check the note bellow, and then try entering the commands again.
NOTE: This procedure will not work through a router (gateway) and only works if the print server IP address has
never been configured before. If you have previously configured an IP address, then use TELNET as described in
Appendix A to change the IP address, or set the unit to default before using ARP.
In order for the ARP command to work on Windows 95/98, the ARP table on the PC must have at least one IP
address defined other than its own. Type ARP -A at the DOS command prompt to verify that there is at least one
entry in the ARP table. If there is no other entry besides the local machine, ping another IP address on your
network, such as another workstation (you cannot ping yourself), in order to build the ARP table. This cannot be
the IP address of the computer you are working on.
PocketPro 100S Administrator’s Guide -- Document #40165-110 Rev. A 3-12
Page 32

Section 3 TCP/IP Network Configuration
Using rarp to
Configure the
Print Server IP
Address
The TROY PocketPro 100S IP address can be configured using the Reverse ARP (rarp) facility on your host
computer. This is done by editing the /etc/ethers file (if this file does not exist, you can create it) with an entry
similar to the following:
00:40:17:00:01:07 TROY_000107
The first entry is the Ethernet address of the TROY print server and the second entry is the name of the TROY
print server (the name must be the same as the one you put in the /etc/hosts file).
If the rarp daemon is not already running, start it (depending on the system the command can be rarpd,
rarpd -a, in.rarpd -a or something else; type man rarpd or refer to your system documentation for
additional information). To verify that the rarp daemon is running on a Berkeley UNIX-based system, type the
following command:
ps -ax | grep -v grep | grep rarpd
For AT&T UNIX-based systems, type:
ps -ef | grep -v grep | grep rarpd
The TROY PocketPro 100S will obtain the IP address from the rarp daemon when it is powered ON.
PocketPro 100S Administrator’s Guide -- Document #40165-110 Rev. A 3-13
Page 33

Section 3 TCP/IP Network Configuration
Using BOOTP to
Configure the
Print Server IP
Address
BOOTP is an alternative to rarp that has the advantage of allowing configuration of the subnet mask and
gateway. In order to use BOOTP to configure the IP address into the TROY print server, first make sure that
BOOTP is installed and running on your host computer (it should appear in the /etc/services file on your host as a
real service; type man bootpd or refer to your system documentation for information). BOOTP is usually started
up via the /etc/inetd.conf file, so you may need to enable it by removing the "#" in front of the bootp entry in that
file. For example, a typical bootp entry in the /etc/inetd.conf file would be:
#bootp dgram udp wait /usr/etc/bootpd bootpd -i
Depending on the system, this entry might be called "bootps" instead of "bootp". In order to enable BOOTP,
simply use an editor to delete the "#" (if there is no "#", then BOOTP is already enabled). Then edit the BOOTP
configuration file (usually /etc/bootptab) to enter the name, network type (1 for Ethernet), Ethernet address
(which can be found on the label on the TROY print server), and the IP address, subnet mask and gateway of the
TROY print server. Unfortunately, the exact format for doing this is not standardized, so you will need to refer to
your system documentation to determine how to enter this information (many UNIX systems also have template
examples in the bootptab file that you can use for reference). Some examples of typical /etc/bootptab entries
include:
TWC_000107 1 00:40:17:00:01:07 192.189.207.3
and:
TWC_000107:ht=ethernet:ha=004017000107:\
ip=192.189.207.3:
Certain BOOTP host software implementations will not respond to BOOTP requests if you have not included a
download filename in the configuration file; if this is the case, simply create a null file on the host and specify the
name of this file and its path in the configuration file.
As with rarp, the TROY print server will load its IP address from the BOOTP server when the printer is powered
ON.
PocketPro 100S Administrator’s Guide -- Document #40165-110 Rev. A 3-14
Page 34

Section 3 TCP/IP Network Configuration
Configuring the
Print Server IP
Address with
XCONFIG
Users of Novell computers have additional alternatives for configuring the TROY PocketPro 100S IP address by
using the remote console facility.
On a NetWare system, you would use the XCONFIG utility included with every TROY print server. Simply type
XCONFIG at the DOS prompt and select the desired TROY print server.
1. If you are using the remote console, you will get the message Connection established (XCONFIG) or Remote
console reserved (ULTRIX). Press RETURN and enter the password ACCESS in response to the "#" prompt
(it will not echo).
2. You will be prompted for a user name. Enter anything in response to this prompt.
3. You will then get the Local> prompt. Type SET IP ADDRESS ipaddress, where ipaddress is the desired IP
address you wish to assign to the TROY print server (check with your network manager for the IP address to
use). For example:
Local> SET IP ADDRESS 192.189.207.3
4. You will now need to set the subnet mask by typing SET IP SUBNET subnetmask, where subnetmask is the
desired subnet mask you wish to assign to the TROY print server (check with your network manager for the
subnet mask to use). For example:
Local> SET IP SUBNET 255.255.255.0
5. If you do not have any subnets, use one of the following default subnet masks:
255.255.255.0 for class C networks
255.255.0.0 for class B networks
255.0.0.0 for class A networks
6. Your network type can be identified by the left-most group of digits in your IP address. The value of this
group ranges from 192 through 255 for Class C networks (e.g., 192.189.207.3), 128 through 191 for Class B
networks (e.g., 128.10.1.30), and 1 through 127 for Class A networks (e.g., 13.27.7.1).
PocketPro 100S Administrator’s Guide -- Document #40165-110 Rev. A 3-15
Page 35

Section 3 TCP/IP Network Configuration
Configuring the
Print Server IP
Address with
XCONFIG (cont.)
7. If you have a gateway (router), enter its address with the command SET IP ROUTER routeraddress, where
routeraddress is the desired IP address of the gateway you wish to assign to the TROY print server. For
example:
Local> SET IP ROUTER 192.189.207.1
8. To verify that you have entered the IP information correctly, type SHOW IP.
9. Type EXIT to end the remote console session.
10. Before attempting to print, it is very important to verify the connection between the host and the TROY print
server by using the UNIX ping command with the IP address of the TROY print server. For example:
ping 192.189.207.3
You should get a message that the TROY PocketPro 100S is alive. If you get an error message or no response,
then there is no connection. You will not be able to print if you cannot ping the TROY print server. If this is the
case, verify that you have set up the host and TROY print server correctly and that the physical connections (e.g.,
the transceivers and cabling) are good. Refer to the Troubleshooting chapter for additional information.
11. To print to the TROY print server from UNIX, use the standard lpr command with the -P option to specify
the queue name. For example, to print the file TEST on the queue laser1, you would type:
lpr -Plaser1 TEST
Some AT&T-based UNIX systems, such as SCO and HP/UX, use the standard lp command instead of lpr. In
these cases, use the -d option instead of -P to specify the queue name as shown in the following example:
lp -dlaser1 TEST
TROY print servers implement only a subset of the lpr options. If you want to utilize printing options such as
landscape mode, language switching, etc., refer to Appendix B for information on using services.
PocketPro 100S Administrator’s Guide -- Document #40165-110 Rev. A 3-16
Page 36

Section 3 TCP/IP Network Configuration
IP Security
Raw TCP
Ports
The TROY PocketPro 100S provides a means of allowing only host computers with authorized IP addresses to
access the print server. This is very useful for applications like check printing, where general access to the
printer is not allowed. The console command SET IP ACCESS ENABLED ipaddress enters a host
computer IP address into the access table of the print server (where ipaddress is the IP address of the host
computer; refer to Appendix A for information on using the print server console). To remove an IP address, use
the command SET IP ACCESS DISABLED ipaddress. To reenable general access, use the command
SET IP ACCESS ALL.
The TROY PocketPro 100S provides a raw TCP port capability that can be used by any application that can open
and send data to a TCP port. The port number is 9100 (238C hex) for the parallel port. The ports pass data
through unmodified, so there is no TELNET interpretation provided. When using the raw TCP ports, make sure
that TELNET interpretation is disabled in your software or else you may get distorted printouts.
The raw TCP port is compatible with many popular software packages, including HP's JetDirect software for
UNIX, TGV Multinet (streams mode), IBM AIX for the RS/6000 (V3.25 or later), and any TCP/IP-based
software that supports HP's JetDirect Ethernet network interface card.
The HP JetDirect software for UNIX is available for Sun Solaris, SunOS, and HP/UX. HP printer users can
download these utilities from the HP web site (http://www.hp.com).
To use a TROY PocketPro 100S print server with the HP host printing utilities on an HP/UX or Sun system,
perform the following steps:
1. Download the software from the HP web site (http://hp.com).
2. If the download file is in tar format, use the tar xvf filename command to extract the software, where filename
is the name of the software that you downloaded (you must be logged in as root). If the file is in pkgadd
format, use the pkgadd -d filename all command to extract the software. Accept the default
directory to store the files. Follow the instructions in the README files to install the software.
3. Run JetAdmin by typing jetadmin at the UNIX prompt (on SunOS 4.xx systems, you use the hpnpcfg
program instead of JetAdmin, but the configuration steps are similar).
4. Select item 1 (Configuration) and then select item 3 (Add printer to local spooler).
PocketPro 100S Administrator’s Guide -- Document #40165-110 Rev. A 3-17
Page 37

Section 3 TCP/IP Network Configuration
Raw TCP
Ports (cont.)
5. Enter the desired name for the TROY print server or IP address at the Enter the network printer name/IP
Name prompt.
NOTE: You will get a message “Unknown printer”. Do you wish to continue?". Enter "Y" to continue.
6. Select the printer type (for example, “HP LaserJet IIISi Printers”).
Changing the
Configuration
(Optional)
7. If desired, change any of the configurable parameters (note that the default queue name is the name of the
printer plus an “_” and a number (e.g., laser_1)). Then enter 0 to configure the queue.
8. Answer “Y” at the “OK to Continue?” prompt. Exit the JetAdmin utility by pressing RETURN and then “q”
twice.
Print a job using the lp command. For example,
lp -dlaser_1 /etc/hosts
If you need a different TCP port number or if you want additional TCP ports, you may define a TCP port number
on any TROY print server service by using the following command:
SET SERVICE servicename TCP nn
The servicename is the name of the service, and nn is the desired port number (must be greater than 1023). Refer
to Appendix A for information on using services.
You may use TELNET, the XCONFIG NetWare utility to connect to the TROY PocketPro 100S remote console
and change the configuration or view the status. The procedure and configuration commands are described in
Appendix A.
PocketPro 100S Administrator’s Guide -- Document #40165-110 Rev. A 3-18
Page 38

Section 4 Novell NetWare Network Configuration
Introduction
NetWare
Concepts
The TROY PocketPro 100S allows NetWare client PCs to print jobs on the same printer as UNIX, AppleTalk,
and LAN Manager users. All NetWare jobs are spooled through the Novell server, so NetWare utilities and
application programs can use the printer transparently.
Novell NetWare is a sophisticated network operating system that allows PC clients (and other nodes) to access
network resources such as disk drives and printers as if they were directly connected. NetWare networks require
at least one file server, and users must log into this server to take advantage of the NetWare capabilities.
To handle printing over the network, the file server provides print spooling for the clients. It holds print jobs
locally until contacted by a print server on the network, which in turn sends the job to appropriate printer. In the
past, a NetWare print server was typically either a PC dedicated to handling printers or a Network Loadable
Module (NLM) or Value Added Process (VAP) running on the file server. Today, NetWare print servers are
often special-purpose networking hardware like a TROY print server.
There are two environments in which to configure the TROY PocketPro 100S print server:
Bindery (Netware 3.x)
Netware Directory Services (NDS) for Netware version 4.1 and higher.
TROY print servers can operate in three different modes to service NetWare print queues:
Remote Printer mode (also known as NPRINTER mode on NetWare 4.xx or RPRINTER mode on
NetWare 2.xx or 3.xx networks)
Queue Server mode (also called print server or PSERVER mode)
NDPS – Novell Distributed Print Servers (Netware 5.xx and later)
In remote printer mode, the client PC sends the print job to the file server, which in turn spools it to a print server
(the print server may be a physical device like a PC or a software NLM or VAP on the file server), which in turn
sends it to the printer. This approach provides good performance, and has the advantage of not consuming a user
slot on the file server.
The TROY PocketPro 100S can also act as a NetWare print server (queue server) with an attached printer, which
therefore eliminates the need for a dedicated PC print server or for an NLM or VAP on the file server. This
means that jobs from the client PC are spooled to the file server, which in turn spools the job directly to the
TROY print server. The advantage of this approach is higher performance, but it has the drawback of requiring a
user slot on the file server.
PocketPro 100S Administrator’s Guide -- Document #40165-110 Rev. A 4-1
Page 39

Section 4 Novell NetWare Network Configuration
NetWare
Concepts
General
Information
Before You Begin
Generally speaking, TROY recommends that you use queue server mode instead of remote printer mode because
the performance will be much higher. The exception to this recommendation is if you have a limited number of
available user slots (for example, if you have a 5-user NetWare license and you have five active users). TROY
print servers will work with NetWare Directory Services (NDS) or bindery emulation mode on NetWare 4.xx and
later networks.
In order to use the TROY PocketPro 100S on a NetWare network, one or more file servers must be configured
with a print queue that the TROY print server can service. Users send their print requests to the file server’s print
queue, and the jobs are then spooled (either directly, or in the case of remote printer mode, via an intermediate
print server) to the TROY print server.
The TROY PocketPro 100S external print server can be configured under Windows using TROY’s ExtendView
utility, XAdmin32, WebXAdmin, or Hewlett-Packard’s JetAdmin utilities. Alternatively, they can be configured
using the NetWare PCONSOLE utility in conjunction with TROY's DOS XCONFIG utility.
NOTE: You must enable bindery emulation in order to use queue server mode with these products.
Before you can configure a NetWare print queue, you must have sufficient privileges. With NetWare 3.xx and
earlier, you MUST be logged in as SUPERVISOR (not someone with Supervisor privileges). With NetWare
4.xx and later, make sure that you have sufficient administrator privileges to create a print queue in the desired
context.
PocketPro 100S Administrator’s Guide -- Document #40165-110 Rev. A 4-2
Page 40

Section 4 Novell NetWare Network Configuration
Default
Names
(Service Names)
The TROY PocketPro 100S automatically makes itself known on a NetWare network. The default NetWare
Print Server name is TWC_xxxxxx_P1, where "xxxxxx" are the last six digits of the Ethernet address (the Ethernet
address is on a label that is affixed to the TROY print server). Note that the NetWare Print Server name is used
for either NDS or bindery mode configuration.
If you are configuring the first port with WebXAdmin, the NDS Printer Name for this port is automatically
assigned as TWC_xxxxxx_P1 Printer. If you are using an alternate configuration method like NWAdmin, you
may assign any arbitrary unique name for the printer. If you are configuring any other port, the NDS Printer
Name is TWC_xxxxxx_pp, where "pp" is the port name (for example, S2).
The Print Server and Printer names are used extensively during the configuration process, so be sure to remember
them. Note that these names are actually the names of the print server's NetWare services (refer to Appendix B
for more information on using services). If desired, you may change the default names to something more
meaningful by using ExtendView, XAdmin32, WebXAdmin, or the print server console.
TWC_xxxxxx_P1 (parallel port; default NetWare Print Server name)
Configuring
the Print
Server in
Queue Server
Mode
The TROY PocketPro 100S can be configured in Queue Server mode for either bindery or NDS mode operation.
The simplest way to do this is with TROY's ExtendView, XAdmin32, WebXAdmin, or HP's JetAdmin utilities.
ExtendView and WebXAdmin are Windows-based utilities that allow you to configure the print server and create
NetWare print queues without using NetWare utilities like PCONSOLE or NWAdmin (if you have Windows
3.xx, you must use XAdmin as described in this chapter). JetAdmin is a Hewlett-Packard utility that provides
similar capabilities. Any of these utilities can be used in conjunction with Novell's NWAdmin or PCONSOLE.
NOTE: The Hp JetAdmin 1.xx and 2.xx utilities do not allow direct configuration of NetWare print queues. If you
are using these versions, you may configure the print server with JetAdmin and then use NWAdmin or PCONSOLE
to add the print queue. If possible, TROY recommends that you upgrade to JetAdmin 3.xx.
PocketPro 100S Administrator’s Guide -- Document #40165-110 Rev. A 4-3
Page 41

Section 4 Novell NetWare Network Configuration
Configuring the
Print Server in
Bindery Queue
Server Mode
Using
ExtendView
1. Make sure that ExtendView is installed and running on your system.
2. Launch ExtendView; it will automatically list all available print servers on the network. If your device is not
shown, press F5 or click on the icon to refresh the list.
PocketPro 100S Administrator’s Guide -- Document #40165-110 Rev. A 4-4
Page 42

Section 4 Novell NetWare Network Configuration
Configuring the
Print Server in
Bindery Queue
Server Mode
Using
ExtendView
(cont.)
3. Select your print server from the list (you should be able to identify using its MAC address and serial
number), and the press ALT-C to configure. Alternatively, you can highlight the device, right-click on it, and
then click on Configuration.
PocketPro 100S Administrator’s Guide -- Document #40165-110 Rev. A 4-5
Page 43

Section 4 Novell NetWare Network Configuration
Configuring the
Print Server in
Bindery Queue
Server Mode
Using
ExtendView
(cont.)
4. Click on the NetWare tab and select PServer (NDS and/or Bindery) mode.
PocketPro 100S Administrator’s Guide -- Document #40165-110 Rev. A 4-6
Page 44

Section 4 Novell NetWare Network Configuration
Configuring the
Print Server in
Bindery Queue
Server Mode
Using
ExtendView
(cont.)
5. Click on the Netware Bindery tab. Select your NetWare default file server. The print server name is
TWC_xxxxxx_P1, where xxxxxx are the last 6 digits of the MAC address. You may leave it as is or change
it to something else. It is recommended that you do not change the print server name.
6. For available queues, you will see your NetWare file server. If there is a queue already created, you will see
“+ “ next to your file server name indicating that you can expand it to list all available queues. You can select
an existing queue or create a new one.
PocketPro 100S Administrator’s Guide -- Document #40165-110 Rev. A 4-7
Page 45

Section 4 Novell NetWare Network Configuration
Configuring the
Print Server in
Bindery Queue
Server Mode
Using
ExtendView
(cont.)
7. To create a new queue, click on Create, select your file server where
you want your queue to reside, enter a queue name for it, and then
click on OK. The new queue will be listed under available queues.
8. Select the queue that you would like to use, and then click on the button to attach it to the print server.
Click on OK twice to save the changes and reset the print server.
9. Exit ExtendView. You are now ready to use the print queue from a NetWare workstation.
PocketPro 100S Administrator’s Guide -- Document #40165-110 Rev. A 4-8
Page 46

Section 4 Novell NetWare Network Configuration
Configuring the
Print Server in
NDS Queue
Server Mode
Using
ExtendView
1. Make sure that ExtendView is installed and running on your system.
2. Launch ExtendView; it will automatically list all available print servers on the network. If your device is not
shown, press F5 or click on the icon to refresh the list.
PocketPro 100S Administrator’s Guide -- Document #40165-110 Rev. A 4-9
Page 47

Section 4 Novell NetWare Network Configuration
Configuring the
Print Server in
NDS Queue
Server Mode
Using
ExtendView
(cont.)
3. Select your print server from the list (you should be able to identify using its MAC address and serial
number), and then press ALT-C to configure. Alternatively, you can highlight the device, right-click on it,
and then click on Configuration.
PocketPro 100S Administrator’s Guide -- Document #40165-110 Rev. A 4-10
Page 48

Section 4 Novell NetWare Network Configuration
Configuring the
Print Server in
NDS Queue
Server Mode
Using
ExtendView
(cont.)
4. Click on the Netware tab, and then select PServer (NDS and/or Bindery) mode.
PocketPro 100S Administrator’s Guide -- Document #40165-110 Rev. A 4-11
Page 49

Section 4 Novell NetWare Network Configuration
Configuring the
Print Server in
NDS Queue
Server Mode
Using
ExtendView
(cont.)
5. Click on the NDS tab, and then click on Modify Print Server Object.
6. Click on to select the Tree that you want to use. Click on to create a new Print Server Object.
PocketPro 100S Administrator’s Guide -- Document #40165-110 Rev. A 4-12
Page 50

Section 4 Novell NetWare Network Configuration
Configuring the
Print Server in
NDS Queue
Server Mode
Using
ExtendView
(cont.)
7. Click on to select Context.
8. Choose the desired context, and then click on OK.
PocketPro 100S Administrator’s Guide -- Document #40165-110 Rev. A 4-13
Page 51

Section 4 Novell NetWare Network Configuration
Configuring the
Print Server in
NDS Queue
Server Mode
Using
ExtendView
(cont.)
9. The desired context will be shown; enter the desired name for the print server object, and then click on
Create.
10. Click on OK to save the changes.
PocketPro 100S Administrator’s Guide -- Document #40165-110 Rev. A 4-14
Page 52

Section 4 Novell NetWare Network Configuration
Configuring the
Print Server in
NDS Queue
Server Mode
Using
ExtendView
(cont.)
11. Click on Modify Port 1 Printer Object.
PocketPro 100S Administrator’s Guide -- Document #40165-110 Rev. A 4-15
Page 53

Section 4 Novell NetWare Network Configuration
Configuring the
Print Server in
NDS Queue
Server Mode
Using
ExtendView
(cont.)
12. Click on the button alongside the Printer field to create a new printer object.
13. If desired, change the context by clicking on the button. Enter the desired name for the printer object, and
then click on Create.
PocketPro 100S Administrator’s Guide -- Document #40165-110 Rev. A 4-16
Page 54

Section 4 Novell NetWare Network Configuration
Configuring the
Print Server in
NDS Queue
Server Mode
Using
ExtendView
(cont.)
14. Click on alongside the Queues field to create a new NetWare queue.
15. If desired, change context by clicking on alongside Context. Enter the desired Print Queue name, and
then click on alongside Print Queue Volume field to select where the queue will reside.
PocketPro 100S Administrator’s Guide -- Document #40165-110 Rev. A 4-17
Page 55

Section 4 Novell NetWare Network Configuration
Configuring the
Print Server in
NDS Queue
Server Mode
Using
ExtendView
(cont.)
16. Select the appropriate Volume where you want to spool the files, and then click on OK.
17. Verify Print Queue settings, and then click on Create.
PocketPro 100S Administrator’s Guide -- Document #40165-110 Rev. A 4-18
Page 56

Section 4 Novell NetWare Network Configuration
Configuring the
Print Server in
NDS Queue
Server Mode
Using
ExtendView
(cont.)
18. Click on SAVE to save the created printer object.
19. Click on OK twice to save changes and reset the print
server.
20. Exit ExtendView. You are now ready to use the print queue from a NetWare workstation.
PocketPro 100S Administrator’s Guide -- Document #40165-110 Rev. A 4-19
Page 57

Section 4 Novell NetWare Network Configuration
Configuring the
Print Server
Using HP
JetAdmin 3.XX
1. Make sure that JetAdmin 3.xx is running on your system and that you have sufficient privileges to use it to
create print queues. If you are using the Microsoft NetWare client on your workstation, make sure that you
have installed Services for NetWare Directory Services in the Network control panel.
2. Click on Start, select Programs, select the HP JetAdmin Utilities 3.0 folder, and then select HP JetAdmin.
One or more TROY print server NetWare services will show up in the list of printers (the default service
names are listed in the Default Print Server Names section at the beginning of this chapter).
3. Click on the NetWare service you wish to configure, and then go the menu bar and select File, Modify.
4. If desired, change the print server name and description. Click on Next. Do this with caution because this
will change the print server service name, and will, therefore, affect any other protocols that use this service.
5. Make sure that NetWare Directory Services is selected in the window on the left side of the display.
Click on the inverted triangle button and select the NDS tree.
Click Change... button to select the NDS context.
6. Click on the Operating Mode button and select Queue Server Mode.
7. Click on the Queues button, and click on the Change... button. Select the Available Print Queues window:
If you are configuring an NDS queue, click on the context where the print queue will reside.
If you are configuring a bindery queue, click on the volume where the queue will reside.
8. Click on Create and enter any unique name for the Queue name.
If you are configuring an NDS queue, the default file server on which the print queue will reside will
be listed. You may optionally change this by clicking on the inverted triangle button and selecting a
different server. You may also optionally change the context that you selected in the previous step by
clicking on the Browse... button. Click on OK, and proceed to Step 9.
If you are configuring a bindery queue, you may optionally click on the inverted triangle button to
change the file server volume selected in the previous step. Click on OK to continue and go to Step 9.
9. Click on Yes when asked if you want to add the queue to the list of serviced queues. The queue name will
now appear in the Available Print Queues in the selected context (for NDS mode) or under the selected
volume (for bindery mode).
10. Click on OK, and then click on Next. If applicable, enter the IP address, and then click on Next.
11. If desired, you can enable users that will be notified in the event of printer problems. Click on Finish. You
can now use the print queue from your NetWare workstation.
PocketPro 100S Administrator’s Guide -- Document #40165-110 Rev. A 4-20
Page 58

Section 4 Novell NetWare Network Configuration
Configuring the
Print Server
Using
WebXAdmin
Configuring the
Print Server in
NDS Queue
Server Mode
Using
WebXAdmin
1. Enter the IP address of the print server as the destination address in your browser, and then press ENTER or
RETURN.
2. Enter the configuration password (ACCESS is the default), and then press Submit.
3. Click on Configure NetWare. You will see one enabled service (the default service names are listed in the
Default Print Server Names section at the beginning of this chapter). Click on the service.
If you are using NDS, type in the tree and context (the context may be entered in either the form
printers.mytree or OU=printers.O=mytree. Click Submit and exit the browser. Proceed to the next
section, Adding NetWare Print Queues using NWAdmin.
If you are using bindery mode with WebXAdmin, click on Configure Bindery File Servers from the
main menu, type in the name of the file server where the print queue will reside, and then click on
Add. Proceed to the next section, Configuring NetWare Print Queues using NWAdmin.
1. Enter the IP address of the print server as the destination address in your browser, and then press Enter or
Return.
2. Enter the configuration password (ACCESS is the default password), and then click on Submit.
PocketPro 100S Administrator’s Guide -- Document #40165-110 Rev. A 4-21
Page 59

Section 4 Novell NetWare Network Configuration
Configuring the
Print Server in
NDS Queue
Server Mode
Using
WebXAdmin
(cont.)
3. Click on Configure Netware
to see the enabled service (the
default service names are
listed in the Default Print
Server Names section at the
beginning of this chapter).
4. Click on the service. Select Queue Server,
type in the tree and context (the context may be
entered in either the form “printers.mytree” or
“OU=printers.O=mytree”. Click on Submit to
go back to the main page.
PocketPro 100S Administrator’s Guide -- Document #40165-110 Rev. A 4-22
Page 60

Section 4 Novell NetWare Network Configuration
Configuring the
Print Server in
NDS Queue
Server Mode
Using
WebXAdmin
(cont.)
5. Click on Reset PrintServer, and
then exit the browser. Proceed to the
next section, Adding NetWare Print
Queues using NWAdmin.
PocketPro 100S Administrator’s Guide -- Document #40165-110 Rev. A 4-23
Page 61

Section 4 Novell NetWare Network Configuration
Adding NetWare
Print Queues in
Queue Server
Mode Using
NWAdmin
If you are using WebXAdmin or JetAdmin 1.xx or 2.xx, you need to use NWAdmin to configure the actual
NetWare print queue. This is because these utilities only allow you to define the print server context and tree (or
file server, if you are using bindery mode). The following steps are required:
1. Make sure that you have defined the context and tree for each NetWare Print Server and Printer that you
wish to configure by using WebXAdmin, or the print server console as described in previous sections. Then
start the Novell NWAdmin program by double clicking on the icon.
2. Create a printer object:
Click on the container where the object will reside.
Select Object from the menu bar, and then select Create.
When you get the New Object menu, select Printer (non-NDPS), and then click on OK.
Enter a printer name, and then click on Create. The new printer will then be listed.
If you are configuring the port, you may enter any arbitrary name for the Printer.
NOTE
: If you are configuring the default service, the name of the printer object can be any unique name (it cannot
be the same as the default service name). If you are configuring any other service, the name of the printer object
is the same as the name of the service.
3. Create a print queue object:
Click on the container where the object will reside. Select Object from the menu bar and then Create.
When you get the New Object menu, select Print Queue, and then click on OK.
Select Directory Service Queue. Enter any desired name for the print queue.
Click on the Print Queue Volume button, and select the volume on which the print queue will reside.
Click on OK, and then click on Create.
PocketPro 100S Administrator’s Guide -- Document #40165-110 Rev. A 4-24
Page 62

Section 4 Novell NetWare Network Configuration
Adding NetWare
Print Queues in
Queue Server
Mode Using
NWAdmin (cont.)
4. Create a print server object:
Click on the container where the object will reside.
Select Object from the menu bar, and then click on Create.
When you get the New Object menu, select Print Server, and then click on OK.
Enter the name of the TROY print server (default is TWC_xxxxxx_P1), and select Create. Use the
default print server name (the default names are listed under Default Print Server Names at the
beginning of this chapter) unless you specifically changed it with ExtendView, XAdmin 32, or print
server console.
5. Associate the printer with the print queue:
Change context if required, and then double-click on the name of the printer you created in Step 3.
Click on Assignments, and then click on Add...
Change context if necessary, and then select the print queue you created in Step 4. Click OK, and
then click on OK again.
6. Associate the print server with the printer:
Change the context if required, and then double-click on the name of the print server you created in
Step 5.
Click on Assignments, and then click on Add...
Change the context if necessary, and then select the printer created in Step 3. Click OK, and then
click on OK again.
Configuring the
Print Server and
Print Queue in
Queue Server
Mode Using
PCONSOLE and
XCONFIG
7. Exit NWAdmin. You are now ready to use the print queue from a NetWare workstation.
As an alternative to HP JetAdmin, you can use the standard Novell PCONSOLE utility in conjunction with
TROY's XCONFIG program to set up your print queues (if desired, you may use TELNET instead of the
XCONFIG utility). The procedure is basically as follows:
1. Use XCONFIG to connect to the print server. Enter the password (ACCESS is the default) and type anything
in response to the Enter Username> prompt.
PocketPro 100S Administrator’s Guide -- Document #40165-110 Rev. A 4-25
Page 63

Section 4 Novell NetWare Network Configuration
Configuring the
Print Server and
Print Queue in
Queue Server
Mode Using
PCONSOLE and
XCONFIG (cont.)
2. If you are configuring an NDS queue, enter the commands:
SET SERVICE servicename TREE treename
SET SERVICE servicename CONTEXT contextname
The servicename is the service that you want to configure (the default service names are listed in the Default
Print Server Names section at the beginning of this chapter), treename is the name of your NDS tree, and
contextname is the NDS context where the print server will reside. Skip to Step 3.
If you are configuring a bindery queue, enter the command:
SET NETW QSERVER fileserver ON servicename
The fileserver is the name of the file server where the queue will reside (note that this is not necessarily the same
as the volume name), and servicename is the name of the print server service (the default service names are listed
in the Default Print Server Names section at the beginning of this chapter).
NOTE: The SET NETWARE SERVER command, which enables file servers on a global basis, is available for
compatibility with older firmware releases, but is not recommended for new applications.
3. Start PCONSOLE
If necessary, change to the desired context if you are using NDS.
Go to Print Queues, press Insert to create a new print queue, and enter the name of the print queue.
If you are configuring an NDS queue, you will also need to enter a volume name (press Insert to
browse for available volumes).
Select Print Servers (NetWare 4.xx and later) or Queue Servers (NetWare 2.xx and 3.xx), press
Insert and enter the name of the TROY print server (the default print server names are discussed in
the Default Print Server Names section at the beginning of this manual).
Go to Print Queues, select the desired print queue, and then select Print Servers and press Insert to
select the name of the TROY print server.
Exit PCONSOLE.
4. Go back to XCONFIG and enter the command:
SET NETWARE RESCAN
After a few seconds, do a SHOW NETWARE command; you should see the queue you created being serviced by
the file server. You are now ready to use the queue.
PocketPro 100S Administrator’s Guide -- Document #40165-110 Rev. A 4-26
Page 64

Section 4 Novell NetWare Network Configuration
Adding Netware
Print Queues in
Queue Server
Mode Using
NWAdmin
1. Make sure that you have defined the context
and tree for each NetWare Print Server and
Printer that you wish to configure by using
WebXAdmin or the print server console.
Then start the Novell NWAdmin program
by double-clicking on the icon.
2. Create a printer object by clicking on the
container where the object will reside.
Select Object from the menu bar, and then
click on Create.
3. When you get the New Object menu, select Printer (Non NDPS), and then click on OK.
PocketPro 100S Administrator’s Guide -- Document #40165-110 Rev. A 4-27
Page 65

Section 4 Novell NetWare Network Configuration
Adding Netware
Print Queues in
Queue Server
Mode Using
NWAdmin (cont.)
4. Enter a printer name, and then click on Create. The new printer will then be listed.
PocketPro 100S Administrator’s Guide -- Document #40165-110 Rev. A 4-28
Page 66

Section 4 Novell NetWare Network Configuration
Adding Netware
Print Queues in
Queue Server
Mode Using
NWAdmin (cont.)
5. Create a print queue object by clicking on the container where the object will reside. Select Object from the
menu bar, and then click on Create. When you get the New Object menu, select Print Queue, and then OK.
6. Select Directory Service Queue. Enter any desired name for the print queue. Click on the Print Queue
Volume button, and then select the volume on which the print queue will reside.
PocketPro 100S Administrator’s Guide -- Document #40165-110 Rev. A 4-29
Page 67

Section 4 Novell NetWare Network Configuration
Adding Netware
Print Queues in
Queue Server
Mode Using
NWAdmin (cont.)
7. Click on OK, and then click on Create. The new print queue will then be listed.
PocketPro 100S Administrator’s Guide -- Document #40165-110 Rev. A 4-30
Page 68

Section 4 Novell NetWare Network Configuration
Adding Netware
Print Queues in
Queue Server
Mode Using
NWAdmin (cont.)
8. Create a print server object by clicking on the container
where the object will reside. Select Object from the
menu bar, and then click on Create. When you get the
New Object menu, select Print Server (Non NDPS),
and then click on OK.
9. Enter the name of the TROY print server (the default is
TWC_xxxxxx_P1) and select Create. Use the default
print server name (the default names are listed under
Default Print Server Names at the beginning of this
chapter) unless you specifically changed it with
ExtendView, XAdmin32 or print server console. The
new print server should now be listed as shown.
PocketPro 100S Administrator’s Guide -- Document #40165-110 Rev. A 4-31
Page 69

Section 4 Novell NetWare Network Configuration
Adding Netware
Print Queues in
Queue Server
Mode Using
NWAdmin (cont.)
10. Associate the printer with the print queue by changing the context if required, and then double-clicking on the
name of the printer you created in Step 3. Click on Assignments, and then click on Add…
PocketPro 100S Administrator’s Guide -- Document #40165-110 Rev. A 4-32
Page 70

Section 4 Novell NetWare Network Configuration
Adding Netware
Print Queues in
Queue Server
Mode Using
NWAdmin (cont.)
11. Change the context if necessary, and then
select the print queue you created in Step 4.
Click on OK, and then click on OK again.
12. Associate the print server with the
printer by changing the context if
required, and then double-clicking on
the name of the print server you
created in Step 5. Click on
Assignments, and then click on Add…
PocketPro 100S Administrator’s Guide -- Document #40165-110 Rev. A 4-33
Page 71

Section 4 Novell NetWare Network Configuration
Adding Netware
Print Queues in
Queue Server
Mode Using
NWAdmin (cont.)
13. Change the context if necessary, and
then select the printer created in Step 3.
Click on OK, and then click on OK
again.
14. Exit NWAdmin. You are now ready to
use the print queue from a NetWare
workstation.
PocketPro 100S Administrator’s Guide -- Document #40165-110 Rev. A 4-34
Page 72

Section 4 Novell NetWare Network Configuration
Configuring
the Print
Server and
Print Queue
Using NDPS
Configuring the
Print Server and
Print Queue with
the TROY
Wireless Gateway
Novell Distributed Print Services (NDPS) is Novell’s new method of handling printers. The biggest advantage of
NDPS compared to the old queue server and remote printer methods is simpler configuration for the user. NDPS
is currently implemented on NetWare 5 through the use of NetWare Loadable Modules (NLMs) known as
gateways. The TROY PocketPro 100S is compatible with the Novell Gateway, which is included with the Novell
NetWare 5 software and is also available as an option for NetWare 4.
To configure a TROY print server with the TROY wireless gateway, you must first install the NDPS on the client
workstation (use any NetWare client 2.2 or later CD-ROM and specify "Custom installation"). Then install the
NDPS Broker and create an NDPS Manager (use the NetWare Administrator "Create" command and select the
appropriate NDPS object).
1. Launch the NWAdmin utility (NetWare Administrator) and select the container where you want the printer
object to reside. Click on Object Create…
PocketPro 100S Administrator’s Guide -- Document #40165-110 Rev. A 4-35
Page 73

Section 4 Novell NetWare Network Configuration
Configuring the
Print Server and
Print Queue with
the TROY
Wireless Gateway
(cont.)
2. Select NDPS Printer, and then click on OK.
3. Enter the desired NDPS Printer Name, and select Create a New Printer Agent to create a new printer that
will be using the TROY Wireless gateway. Click on CREATE.
PocketPro 100S Administrator’s Guide -- Document #40165-110 Rev. A 4-36
Page 74

Section 4 Novell NetWare Network Configuration
Configuring the
Print Server and
Print Queue with
the TROY
Wireless Gateway
(cont.)
4. Verify the Printer Agent name, and then click on to browse for the NDPS manager. Select the NDPS
Manager to use, and then click on OK.
PocketPro 100S Administrator’s Guide -- Document #40165-110 Rev. A 4-37
Page 75

Section 4 Novell NetWare Network Configuration
Configuring the
Print Server and
Print Queue with
the TROY
Wireless Gateway
(cont.)
5. Select TROY Wireless Gateway Configuration
as the gateway type, and then click on OK.
6. From the Search Setup, select IP and specify Local
Search, and then click on Find Now.
NOTE: TROY recommends that you use IP if
your NetWare server is configured to use
IP. Alternatively, you can also use IPX.
PocketPro 100S Administrator’s Guide -- Document #40165-110 Rev. A 4-38
Page 76

Section 4 Novell NetWare Network Configuration
Configuring the
Print Server and
Print Queue with
the TROY
Wireless Gateway
(cont.)
7. Locate your device (Pocket Pro 100S) from the print server list, select it, and then click on Next.
PocketPro 100S Administrator’s Guide -- Document #40165-110 Rev. A 4-39
Page 77

Section 4 Novell NetWare Network Configuration
Configuring the
Print Server and
Print Queue with
the TROY
Wireless Gateway
(cont.)
8. For the Printing Protocol, select LPR, then “Print to IP Address”. Select the suitable Printer Type, and then
click on Finish. Wait for the Printer Agent to finish loading.
PocketPro 100S Administrator’s Guide -- Document #40165-110 Rev. A 4-40
Page 78

Section 4 Novell NetWare Network Configuration
Configuring the
Print Server and
Print Queue with
the TROY
Wireless Gateway
(cont.)
9. Click on the tab of the operating system that you are running and select the appropriate Printer Driver. Click
on Continue.
NOTE: If you are running Windows XP, select the Windows 2000 Driver.
10. Verify the drivers were installed, and then click on OK. Wait for the Printer Object to be completely created.
PocketPro 100S Administrator’s Guide -- Document #40165-110 Rev. A 4-41
Page 79

Section 4 Novell NetWare Network Configuration
Configuring the
Print Server and
Print Queue with
the TROY
Wireless Gateway
(cont.)
11. The newly created NDPS printer will be listed. You are now ready to use the print queue from a NetWare
workstation.
PocketPro 100S Administrator’s Guide -- Document #40165-110 Rev. A 4-42
Page 80

Section 4 Novell NetWare Network Configuration
Configuring the
Print Server and
Print Queue with
the Novell
Gateway
To configure the TROY PocketPro 100S with the Novell gateway, you must first install the NDPS on the client
workstation (use any NetWare client 2.2 or later CD-ROM and specify "Custom installation"). Then install the
NDPS Broker and create an NDPS Manager (use the NetWare Administrator "Create" command and select the
appropriate NDPS object).
Next you must create an NDPS Printer object (which emulates a Print Server NLM), and you must also configure
the print server as a remote printer (NPRINTER) that is connected to this Printer Object. The print server can be
configured using WebXAdmin or print server console (specify the Printer Object as the name of the Print Server
NLM, and select any desired printer number for the TROY print server). Create the NDPS Printer as follows:
1. In the NetWare Administrator (NWAdmin), select the container where you want to put the printer object.
2. You will get the Object menu. Select Create to get the New Object dialog.
3. Select NDPS Printer.
4. Type in any name for the NDPS Printer.
5. Select Create a New Printer Agent to create a new printer that uses the Novell gateway and click Create.
6. Make sure that he Printer Agent name is correct, and then click on Browse to select the NDPS manager.
7. Select the Novell Printer Gateway as the Gateway Type.
8. Configure the Connection type as "Remote" and specify the Port type as Other.
9. In the PServer Emulation box, use the default SAP name (which should be the same as the name of the
Printer Agent) and specify the printer number (this number must match the one that you configured in the
TROY print server). Click "Next".
10. Click Finish to get the Select Printer Drivers dialog.
11. Select the printer driver for each operating system (Win3.1, Win9X, Windows 2000/XP, or Windows NT4.0).
12. Click Continue to finish this process.
You can then use the standard Windows 9X Add Printer utility to add the printer on any client workstation.
Specify a Network Printer and then use then browse to find the Printer Agent that you just created. The driver
will be automatically downloaded and you will be ready to print.
PocketPro 100S Administrator’s Guide -- Document #40165-110 Rev. A 4-43
Page 81

Section 4 Novell NetWare Network Configuration
Adding a Printer
in a Windows
Workstation
Using the NDPS
Print Queue
Use the following steps to add a printer in a Windows 2000/XP workstation using the NDPS print queue.
1. Go to START PRINTERS and FAXES (START SETTINGS PRINTERS on Windows 2000),
and then click on Add Printer.
2. Click Next on the Welcome Window.
PocketPro 100S Administrator’s Guide -- Document #40165-110 Rev. A 4-44
Page 82

Section 4 Novell NetWare Network Configuration
Adding a Printer
in a Windows
Workstation
Using the NDPS
Print Queue
(cont.)
3. Select A network printer, or a printer
attached to another computer, and then
click on Next.
4. Select Connect to this printer (or to
browse for a printer, select this option
and click Next):, and then click on Next.
PocketPro 100S Administrator’s Guide -- Document #40165-110 Rev. A 4-45
Page 83

Section 4 Novell NetWare Network Configuration
Adding a Printer
in a Windows
Workstation
Using the NDPS
Print Queue
(cont.)
5. The search for printers will be initiated. When the process has finished, a list of network printers will be
displayed. Go to NDPS Printers NDPS Controlled Access Printers, and then locate the NDPS printer
that you created earlier. Click on Next. Windows will automatically copy the driver files.
PocketPro 100S Administrator’s Guide -- Document #40165-110 Rev. A 4-46
Page 84

Section 4 Novell NetWare Network Configuration
Adding a Printer
in a Windows
Workstation
Using the NDPS
Print Queue
6. Select YES if you would like this printer to be the default printer. Otherwise, just click on Next.
PocketPro 100S Administrator’s Guide -- Document #40165-110 Rev. A 4-47
Page 85

Section 4 Novell NetWare Network Configuration
Adding a Printer
in a Windows
Workstation
Using the NDPS
Print Queue
7. Complete the wizard by clicking on Finish. You will then see the printer you just created in your Printers
folder.
PocketPro 100S Administrator’s Guide -- Document #40165-110 Rev. A 4-48
Page 86

Section 4 Novell NetWare Network Configuration
Configuring
the Print
Server and
Print Queue
in Remote
Printer Mode
To configure the TROY PocketPro 100S for remote printer mode, two basic steps are required. First, you must
use Novell's NWAdmin or PCONSOLE to add the print queue to the NetWare server. Then you must configure
the print server for remote printer operation using ExtendView, XAdmin32, WebXAdmin, JetAdmin, or the print
server console.
NOTE: You cannot configure both Queue Server and Remote Printer mode on the same print server port.
To configure the TROY Pocket Pro100S print server for remote printer mode using NWAdmin in Windows
2000/XP, perform the following steps:
Configuring the
Print Server for
Remote Printer
Mode Using
NWAdmin
1. Start NWAdmin and select the desired Container Object that will contain the new print server. Select Object
Create to create a print server.
PocketPro 100S Administrator’s Guide -- Document #40165-110 Rev. A 4-49
Page 87

Section 4 Novell NetWare Network Configuration
Configuring the
Print Server for
Remote Printer
Mode Using
NWAdmin (cont.)
2. When you get the New Object menu, select Print Server (Non-NDPS) and then OK.
3. Enter the name of the Print Server, and then click on Create. The
new Print Server will be listed.
PocketPro 100S Administrator’s Guide -- Document #40165-110 Rev. A 4-50
Page 88

Section 4 Novell NetWare Network Configuration
Configuring the
Print Server for
Remote Printer
Mode Using
NWAdmin (cont.)
4. Load the PSERVER NLM (NetWare Loadable
Module) on your NetWare file server, and make sure
that you select the Print Server that you created
earlier. Verify that your PServer NLM is “running”.
5. In NWAdmin, select the desired Container Object
(Organizational Unit) that will contain the new
printer, and then click on Object Create.
6. When you get the New Object menu, select Printer
(Non-NDPS), and then click on OK.
PocketPro 100S Administrator’s Guide -- Document #40165-110 Rev. A 4-51
Page 89

Section 4 Novell NetWare Network Configuration
Configuring the
Print Server for
Remote Printer
Mode Using
NWAdmin (cont.)
7. Enter the name of the printer, and the click on Create.
8. Double-click on the name of your PSERVER NLM (Print Server). Click on Assignments, and then click on
ADD…
PocketPro 100S Administrator’s Guide -- Document #40165-110 Rev. A 4-52
Page 90

Section 4 Novell NetWare Network Configuration
Configuring the
Print Server for
Remote Printer
Mode Using
NWAdmin (cont.)
PocketPro 100S Administrator’s Guide -- Document #40165-110 Rev. A 4-53
Page 91

Section 4 Novell NetWare Network Configuration
Configuring the
Print Server for
Remote Printer
Mode Using
NWAdmin (cont.)
9. If necessary, change the directory context. Select the printer you created, and then click on OK.
PocketPro 100S Administrator’s Guide -- Document #40165-110 Rev. A 4-54
Page 92

Section 4 Novell NetWare Network Configuration
Configuring the
Print Server for
Remote Printer
Mode Using
NWAdmin (cont.)
10. Note the number of the printer, as you will use this later, and then click on OK.
NOTE: You may also assign another printer number. Select the printer, and then click on Printer Number.
Enter the desired printer number and click on OK.
PocketPro 100S Administrator’s Guide -- Document #40165-110 Rev. A 4-55
Page 93

Section 4 Novell NetWare Network Configuration
Configuring the
Print Server for
Remote Printer
Mode Using
NWAdmin (cont.)
11. Verify the new printer number, and then click on OK.
PocketPro 100S Administrator’s Guide -- Document #40165-110 Rev. A 4-56
Page 94

Section 4 Novell NetWare Network Configuration
Configuring the
Print Server for
Remote Printer
Mode Using
NWAdmin (cont.)
12. Select the desired Container Object
(Organizational Unit) that will contain the
default print queue, and then click on Object
Create to get the New Object menu.
13. Select Print Queue, and then click on OK.
PocketPro 100S Administrator’s Guide -- Document #40165-110 Rev. A 4-57
Page 95

Section 4 Novell NetWare Network Configuration
Configuring the
Print Server for
Remote Printer
Mode Using
NWAdmin (cont.)
14. Make sure that Directory Service Queue is selected, and then type in a name for the default print queue.
15. Click on the button to select the print queue volume. Change the directory context if necessary, select the
desired volume (Objects), and then click on OK.
PocketPro 100S Administrator’s Guide -- Document #40165-110 Rev. A 4-58
Page 96

Section 4 Novell NetWare Network Configuration
Configuring the
Print Server for
Remote Printer
Mode Using
NWAdmin (cont.)
16. Verify the print queue settings, and then click on Create to create the print queue.
17. Double-click on the name of the printer you created previously, click on Assignments, and click on ADD.
PocketPro 100S Administrator’s Guide -- Document #40165-110 Rev. A 4-59
Page 97

Section 4 Novell NetWare Network Configuration
Configuring the
Print Server for
Remote Printer
Mode Using
NWAdmin (cont.)
18. Change context if necessary, select the
print queue you created earlier, and then
click on OK.
PocketPro 100S Administrator’s Guide -- Document #40165-110 Rev. A 4-60
Page 98

Section 4 Novell NetWare Network Configuration
Configuring the
Print Server for
Remote Printer
Mode Using
NWAdmin (cont.)
19. Verify the print queue name, and then click on OK.
20. Exit NwAdmin by clicking on Object Exit.
PocketPro 100S Administrator’s Guide -- Document #40165-110 Rev. A 4-61
Page 99

Section 4 Novell NetWare Network Configuration
Configuring the
Print Server for
Remote Printer
Mode Using
ExtendView
To configure the TROY Pocket Pro100S print server for remote printer mode using ExtendView in Windows
2000/XP, perform the following steps:
1. Launch the ExtendView utility and locate your Pocket Pro 100S using either its serial number or Ethernet
address. If it is not listed, click on the button to refresh the list.
PocketPro 100S Administrator’s Guide -- Document #40165-110 Rev. A 4-62
Page 100

Section 4 Novell NetWare Network Configuration
Configuring the
Print Server for
Remote Printer
Mode Using
ExtendView
(cont.)
2. Right-click on your TROY print server, and then click on Configuration.
PocketPro 100S Administrator’s Guide -- Document #40165-110 Rev. A 4-63
 Loading...