

Page 1
Page 2
Page 3
Page 4
Page 5
Page 6
Page 7
7
ASSEMBLY
IMPORTANT: Read entire Operator’s Manual before you
attempt to assemble or operate your new pressure washer.
Unpacking the Pressure Washer
1. Remove the parts bag, accessories, and inserts included
with pressure washer.
2. Slice two corners at the end of carton from top to
bottom so the panel can be folded down flat.
3. Remove pressure washer from carton.
Carton Contents
Items in the carton include:
• Main Unit
• Handle
• High Pressure Hose
• Spray Gun
• Nozzle Extension with Quick Connect Fitting
• Plastic Accessory Tray
• Oil Bottle
• Parts Bag (which includes the following):
• Operator’s Manual
• Engine Operator’s Manual
• Owner’s Registration Card
• Safety Goggles
• Bag containing 4 multi–colored Quick Connect
Spray Tips
• Handle/Tray Fastening Hardware Kit (which
includes):
• Carriage Bolts (2)
• “L” Bolt
• Plastic Knobs (3)
• Tree Clips (4)
PREPARING PRESSURE
WASHER FOR USE
If you have any problems with the assembly of your
pressure washer or if parts are missing or damaged, call the
pressure washer helpline at 1-888-611-6708. If calling for
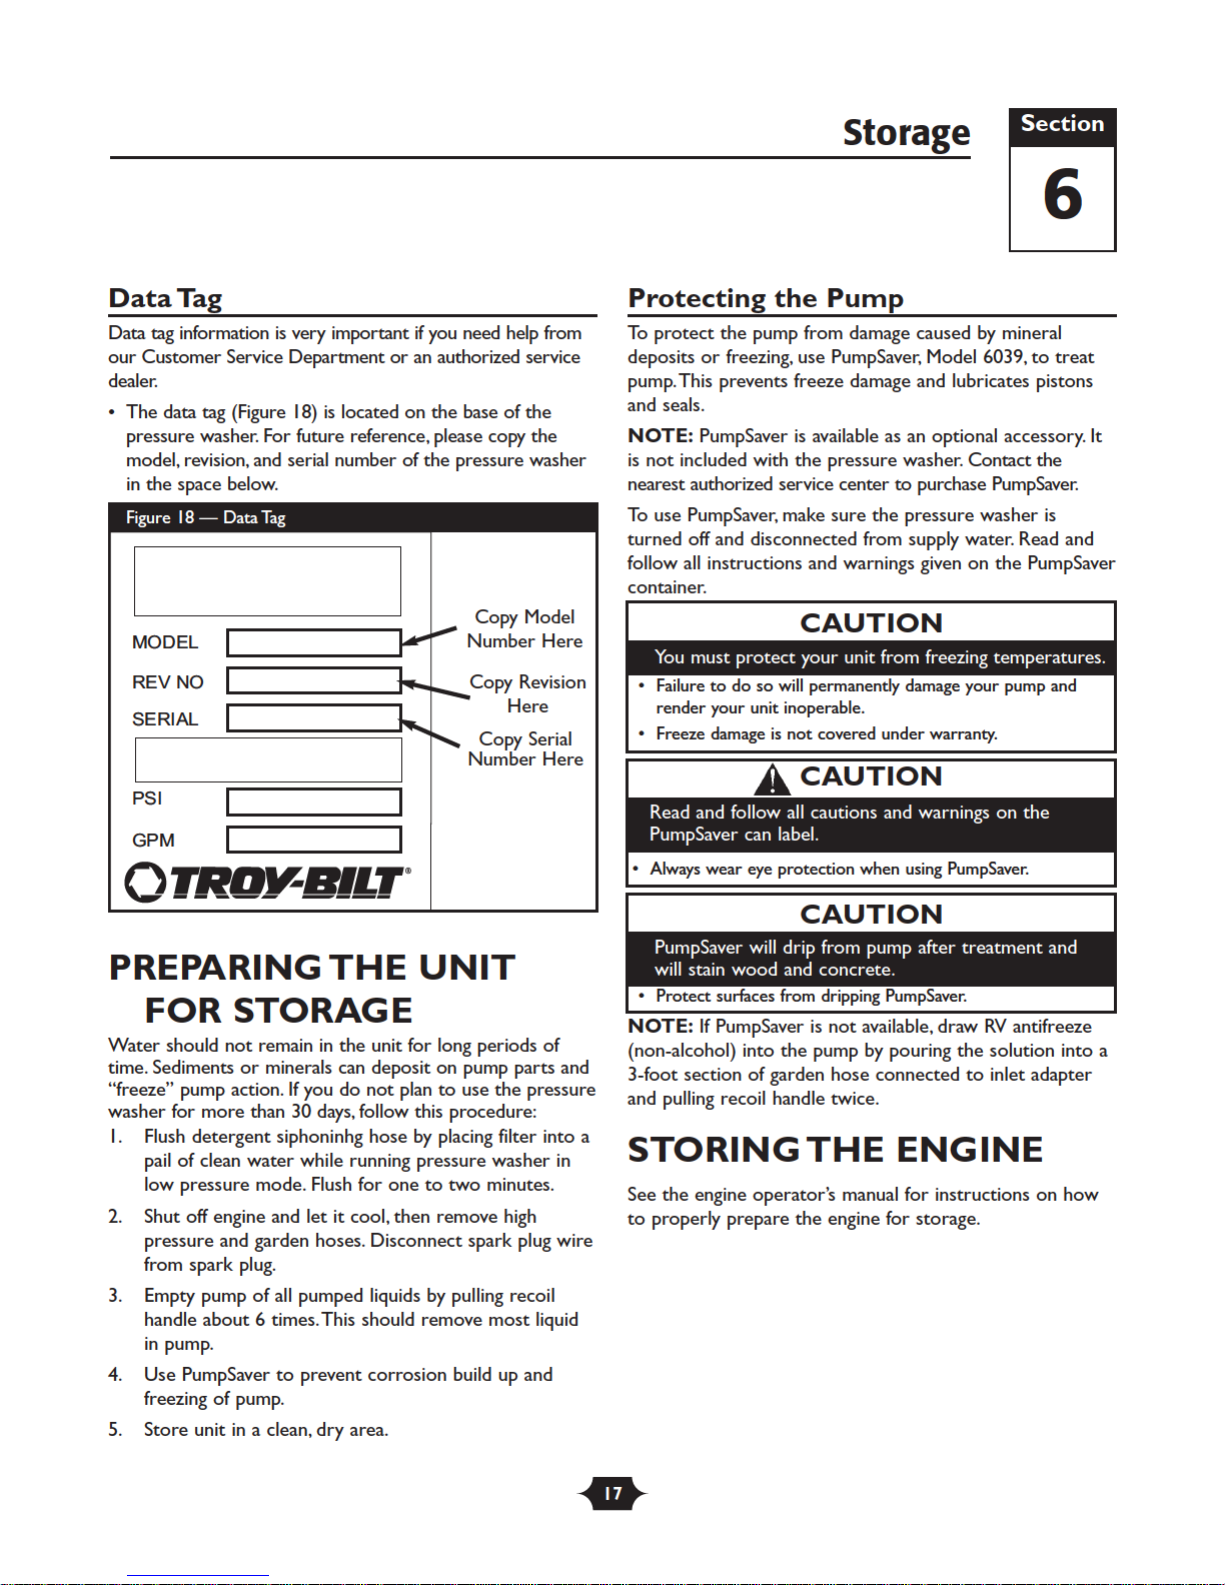
assistance, please have the model, revision, and serial
number from the data tag available.
To prepare your pressure washer for operation, you
will need to perform these tasks:
1. Fill out and send in registration card.
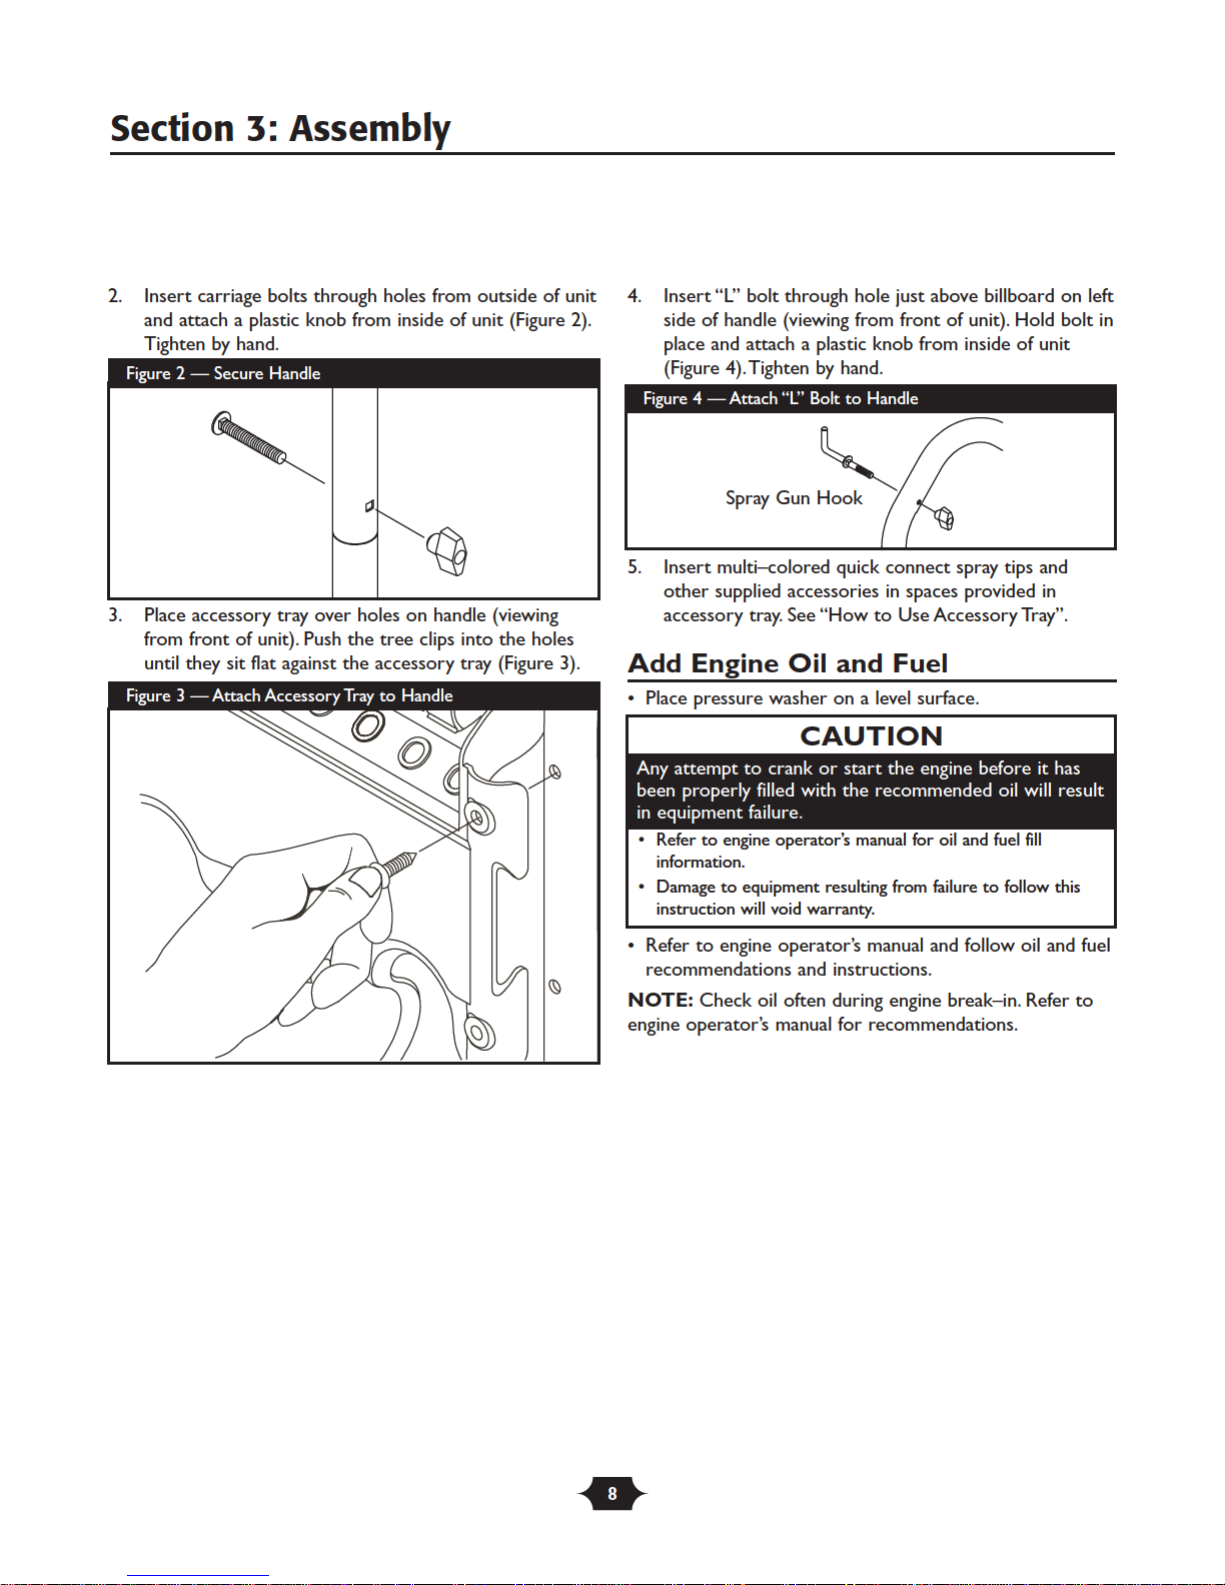
2. Attach handle to main unit, then attach accessory tray
to handle.
3. Add oil to engine crankcase.
4. Add fuel to fuel tank.
5. Connect high pressure hose to spray gun and pump.
6. Connect water supply to pump.
7. Attach nozzle extension to spray gun.
8. Select/attach quick connect spray tip to nozzle
extension.
Attach Handle and Accessory Tray
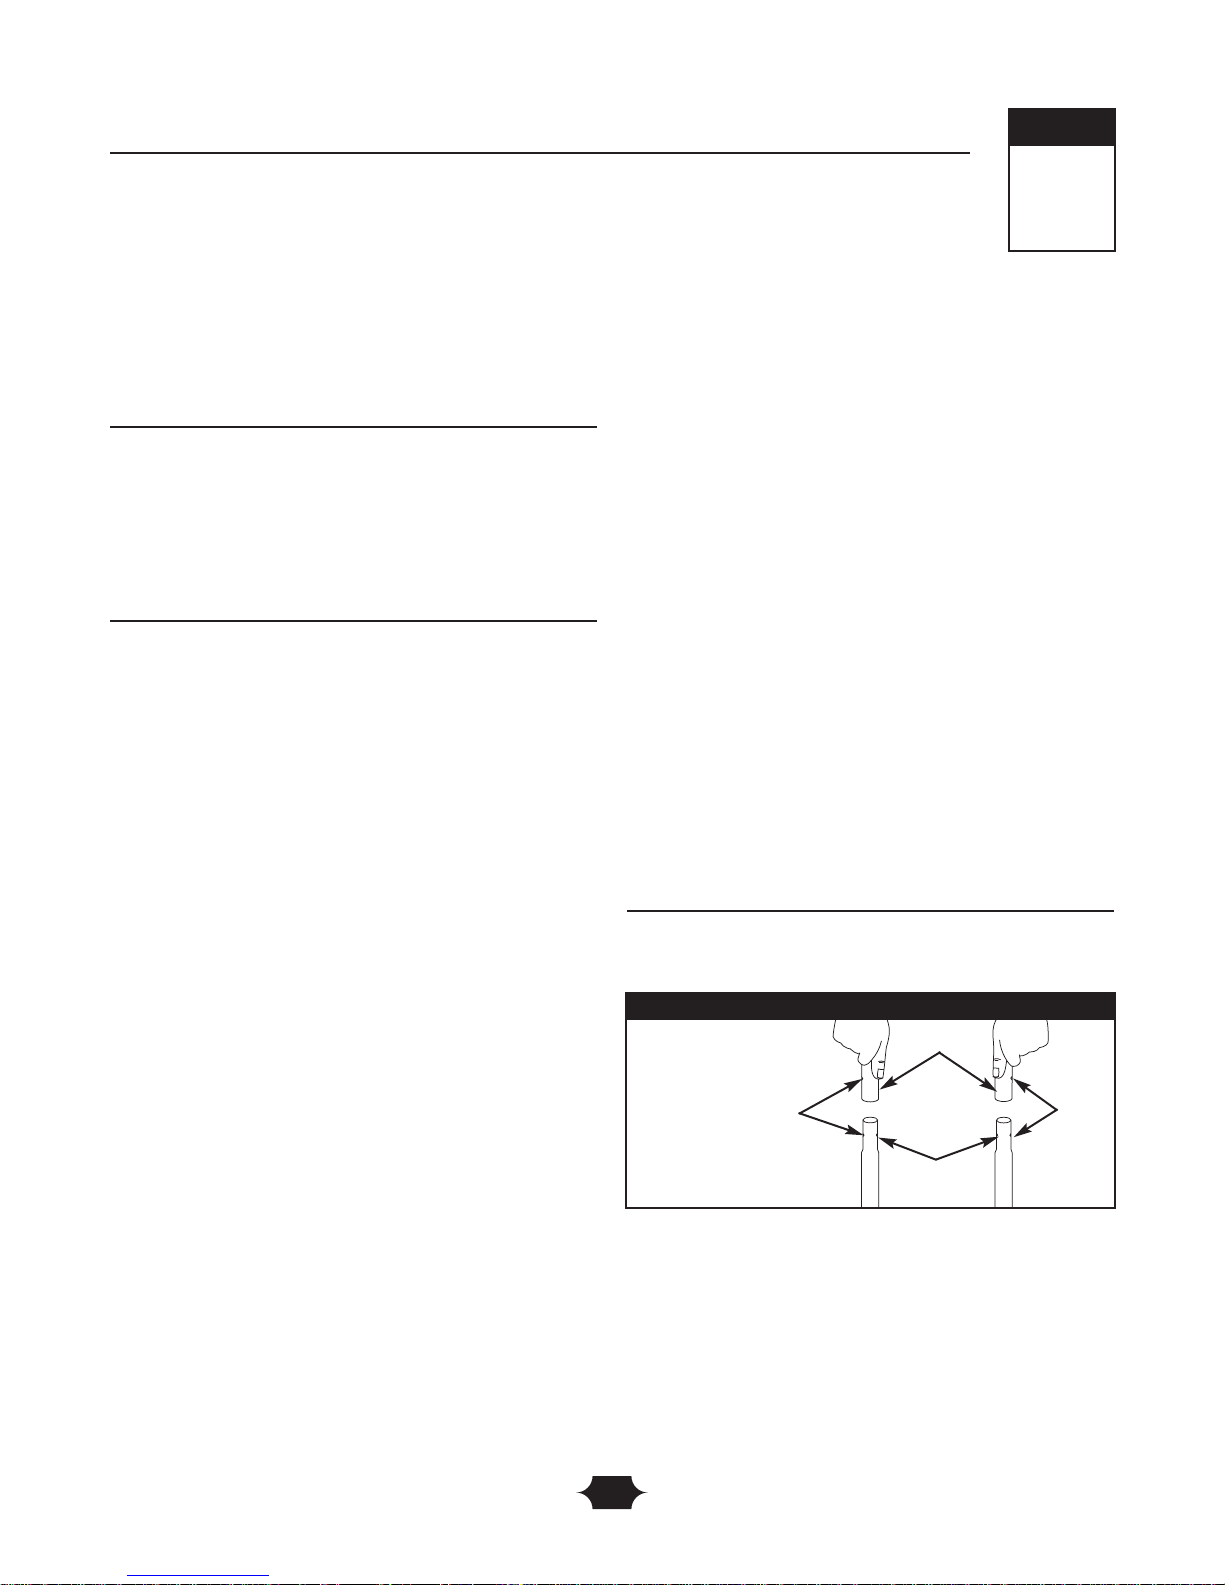
1. Place handle onto handle supports connected to main
unit. Make sure holes in handle align with holes on
handle supports (Figure 1).
NOTE: It may be necessary to move the handle supports
from side to side in order to align the handle so it will slide
over the handle supports.
Align Holes
Handle
Handle
Supports
Figure 1 — Attach Handle to Base
3
Section
Assembly
Page 8
Page 9
Page 10
Page 11
Page 12
Page 13
13
Section 4: Operation
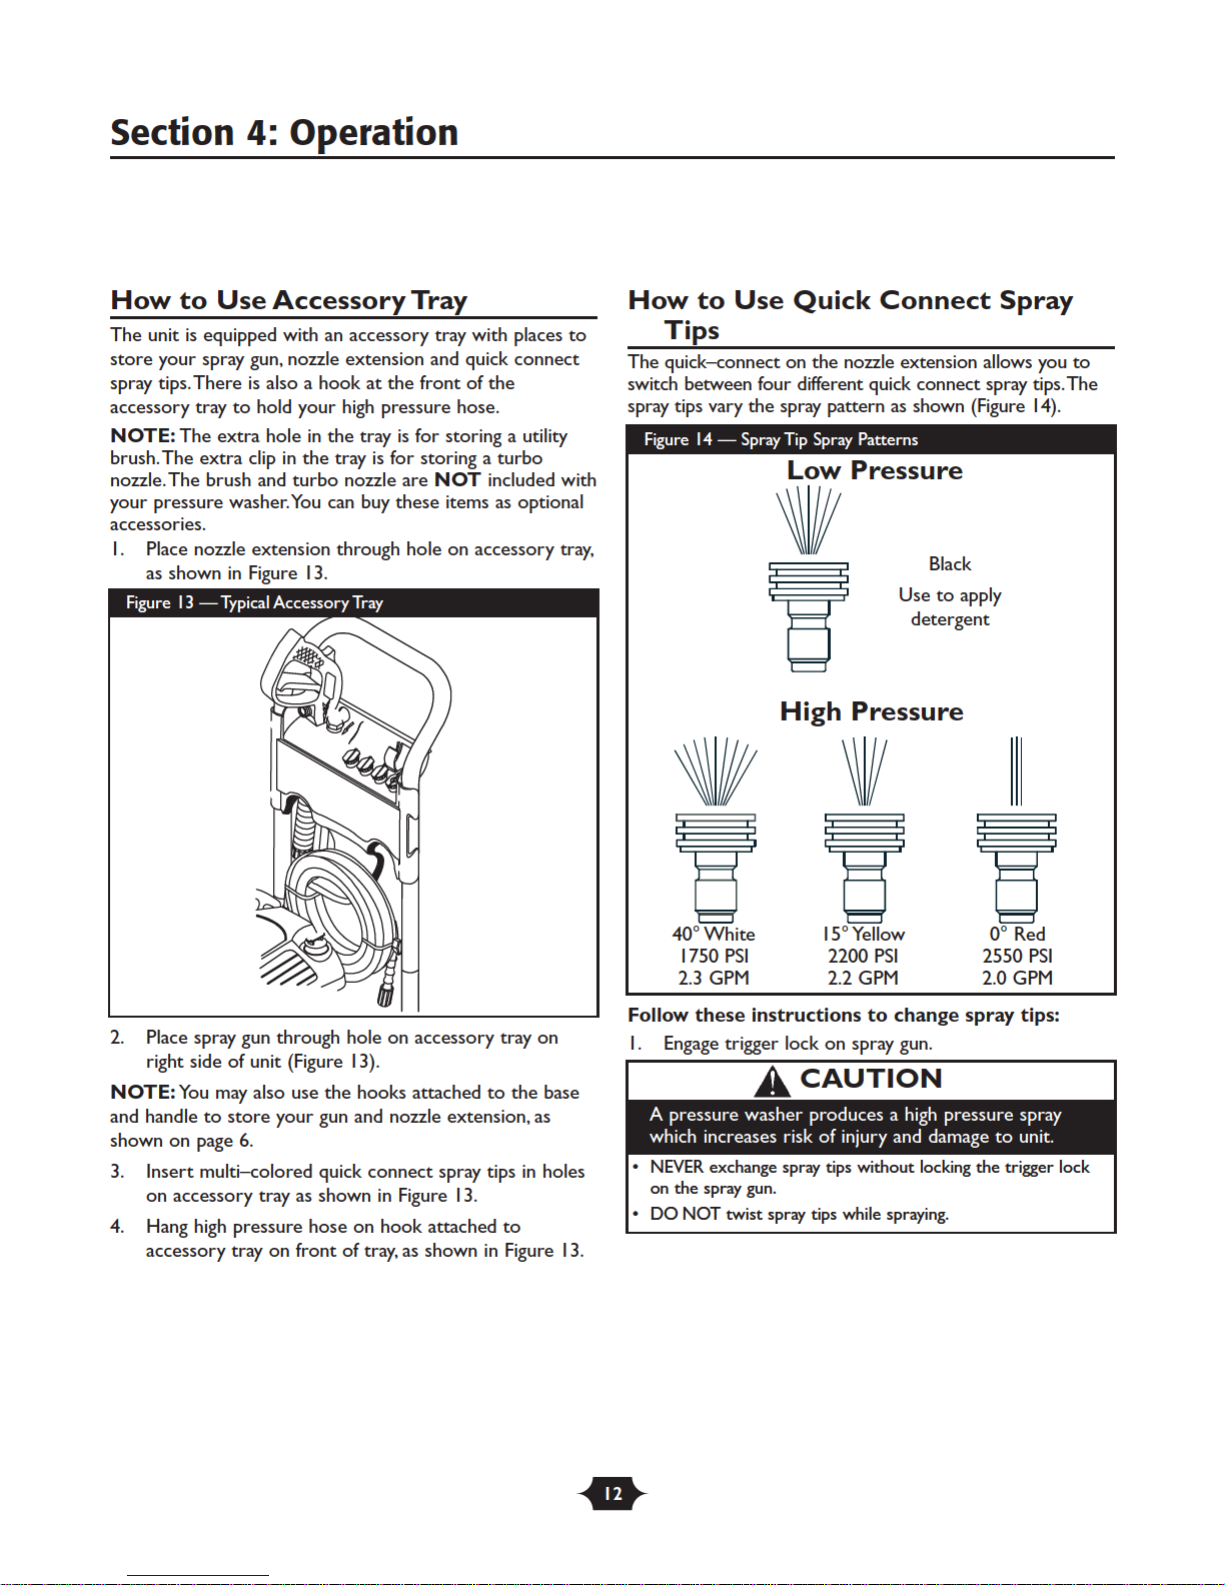
2. Pull back collar on quick–connect and pull current
spray tip off. Store spray tips in holder provided on the
accessory tray.
3. Select desired spray tip:
• For delicate rinse (lower pressure and higher
flow), for gentle cleaning of cars/trucks, boats, RV’s,
patio furniture, lawn equipment, etc., select white
40° spray tip.
• For general rinsing (medium pressure and medium
flow), ideal for most all purpose cleaning such as
home siding, brick patios, wood decks, driveways
and sidewalks, garage floors, etc., select yellow
15° spray tip.
• For maximum rinsing (higher pressure and lower
flow), for stubborn or hard to reach surface such
as second story surfaces, paint removal, oil stains,
rust removal or other stubborn substances (tar,
gum, grease, wax, etc.), select red 0° spray tip.
• To apply chemical, applies project specific cleaners
to help break down stubborn dirt and grime on a
variety of surfaces, select black detergent spray tip.
4. Pull back on collar, insert new spray tip and release collar.
Tug on spray tip to make sure it is securely in place.
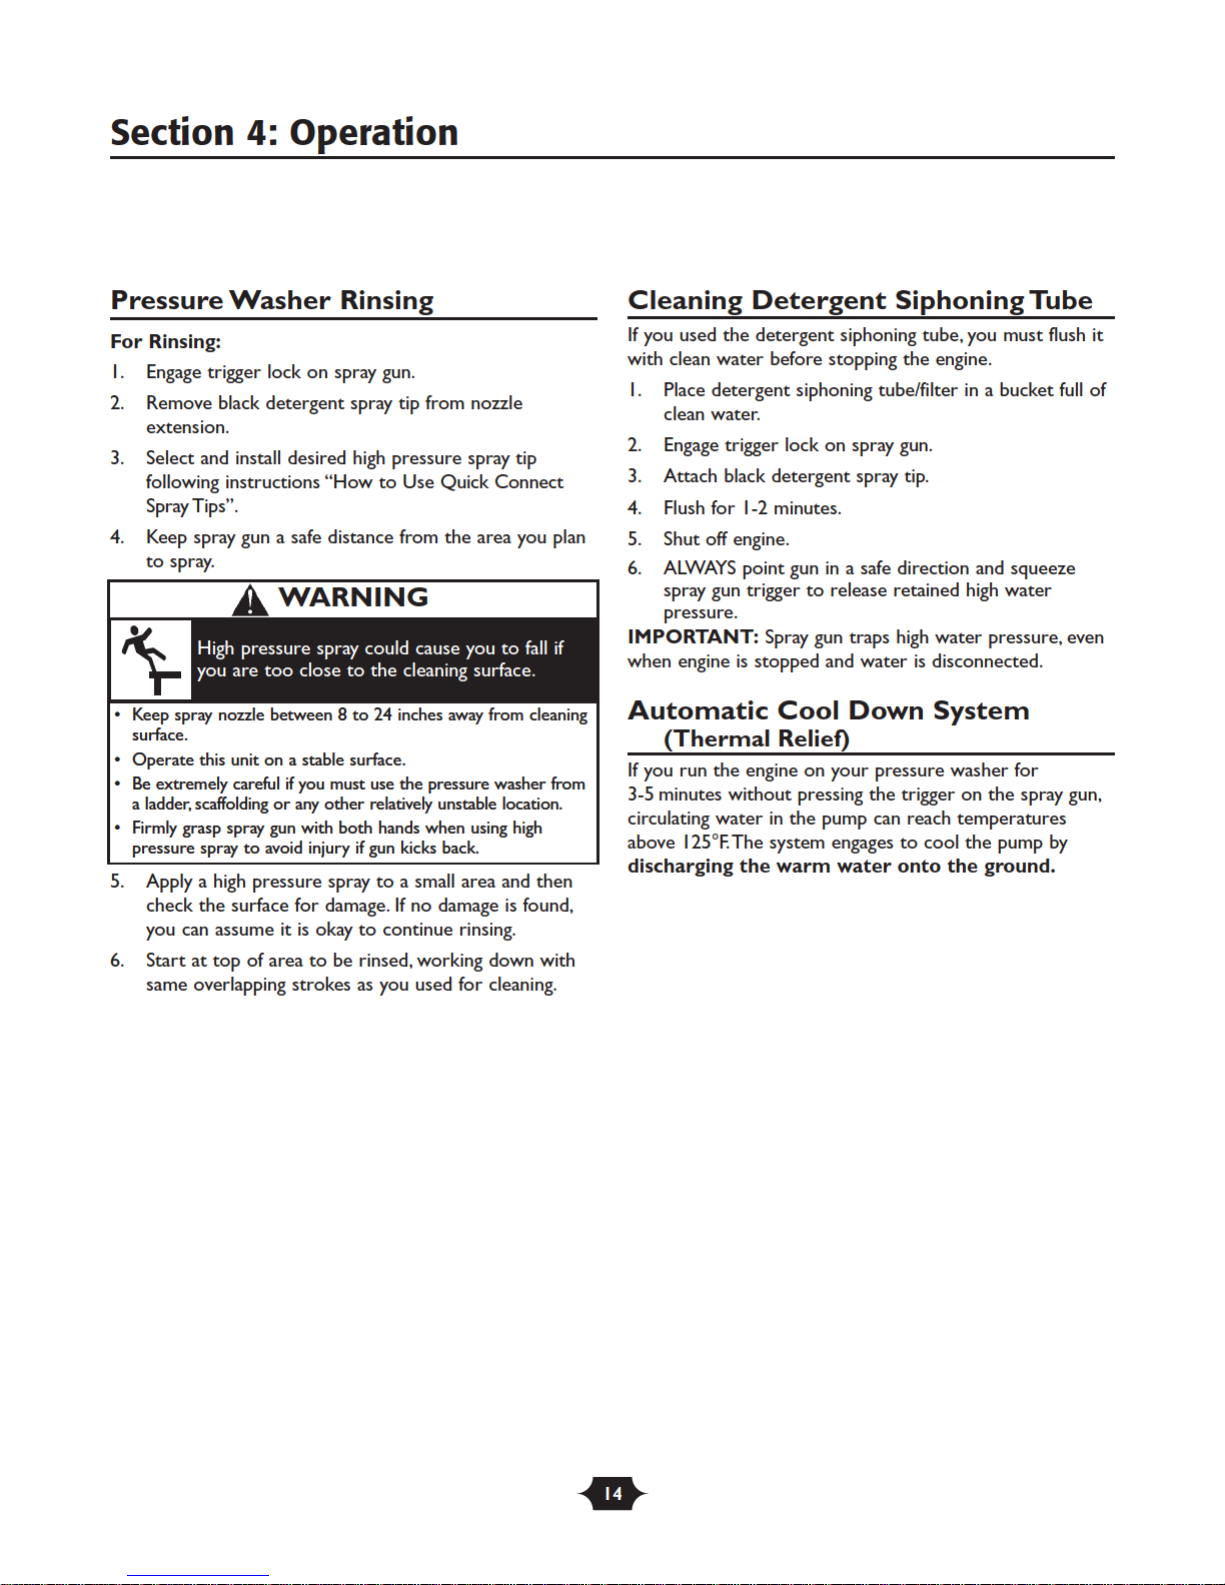
5. For most effective cleaning, keep spray tip from 8 to
24 inches away from cleaning surface. If you get spray
tip too close, you may damage cleaning surface.
6. DO NOT get closer than 6 inches when cleaning tires.
Cleaning and Applying Detergent
IMPORTANT: Use detergents designed specifically
for pressure washers. Household detergents could
damage the pump.
To apply detergent follow these steps:
1. Review spray tip use.
2. Prepare detergent solution as required by
manufacturer.
3. Place small filter end of detergent siphoning tube into
detergent container.
4. Make sure black detergent spray tip is installed.
NOTE: Detergent cannot be applied with the high
pressure spray tips (White,Yellow or Red).
5. Make sure garden hose is connected to water inlet.
Check that high pressure hose is connected to spray
gun and pump and start engine.
6. Apply detergent to a dry surface, starting at lower
portion of area to be washed and work upward, using
long, even, overlapping strokes.
7. Allow detergent to soak in between 3–5 minutes
before washing and rinsing. Reapply as needed to
prevent surface from drying. DO NOT allow detergent
to dry on (prevents streaking).
IMPORTANT:You must flush the detergent siphoning
system after each use by placing the filter into a bucket of
clean water, then run the pressure washer in low pressure
for 1-2 minutes.
CAUTION
• Starting the engine without all the hoses connected and
without the water turned ON will damage the pump.
• Damage to equipment resulting from failure to follow this
instruction will void warranty.
You must attach all hoses before you start the engine.
CAUTION
• When inserting the filter into a detergent solution bottle,
route the tube so as to keep it from inadvertently contacting
the hot muffler.
Keep the detergent siphoning tube from coming in
contact with the hot muffler.
Page 14
Page 15
Page 16
Page 17
Page 18
18
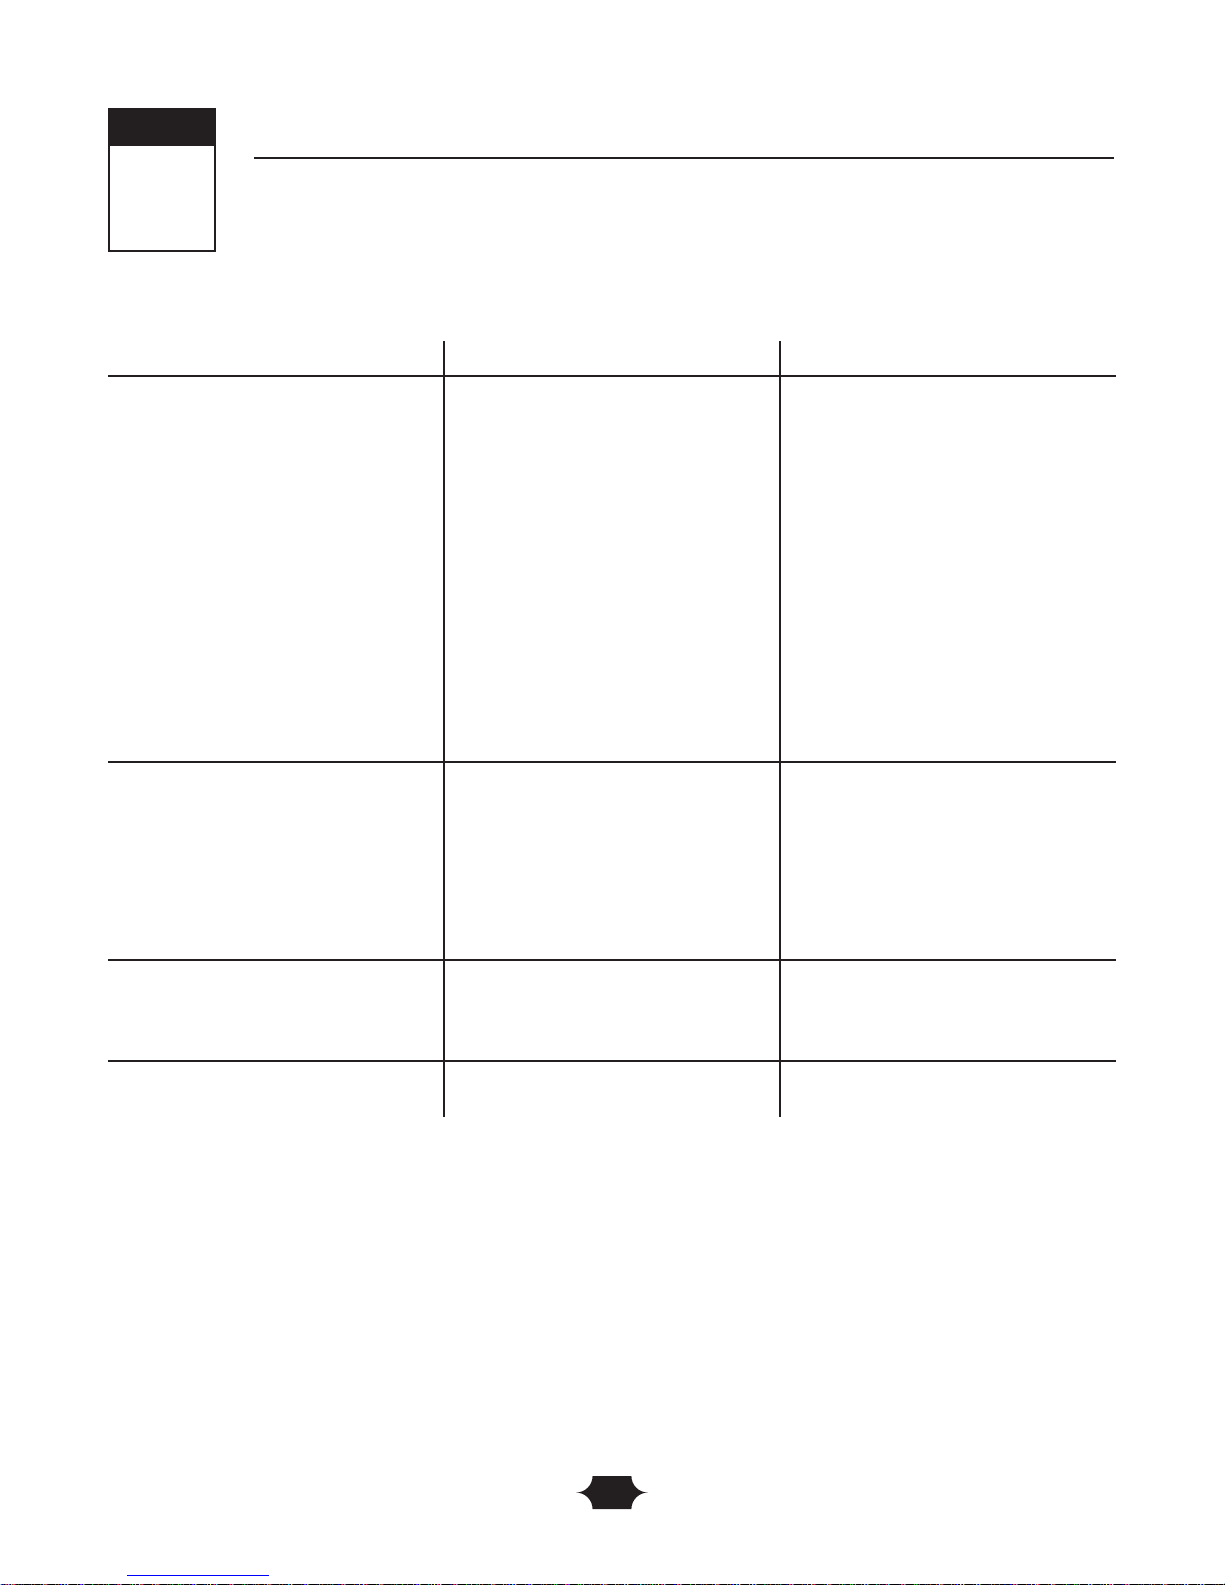
TROUBLESHOOTING
Problem Cause Correction
Pump has following problems:
failure to produce pressure, erratic
pressure, chattering, loss of
pressure, low water volume.
1. Low pressure nozzle installed.
2. Water inlet is blocked.
3. Inadequate water supply.
4. Inlet hose is kinked or leaking.
5. Clogged inlet hose strainer.
6. Water supply is over 100°F.
7. High pressure hose is blocked or
leaks.
8. Gun leaks.
9. Nozzle is obstructed.
10. Pump is faulty.
1. Replace nozzle with high pressure
nozzle.
2. Clear inlet.
3. Provide adequate water flow.
4. Straighten inlet hose, patch leak.
5. Check and clean inlet hose
strainer.
6. Provide cooler water supply.
7. Clear blocks in outlet hose.
8. Replace gun.
9. Clean nozzle.
10. Contact authorized service facility.
Detergent fails to mix with spray.
1. Detergent siphoning tube is not
submerged.
2. Chemical filter is clogged or
cracked.
3. Dirty in-line filter.
4. High pressure nozzle installed.
1. Insert detergent siphoning tube
into detergent.
2. Clean or replace filter/detergent
siphoning tube.
3. See "Check In-Line Filter".
4. Replace nozzle with low pressure
nozzle.
Engine runs good at no-load but
"bogs" when load is added.
Engine speed is too slow. Move throttle control to FAST
position. If engine still "bogs down",
contact Briggs and Stratton service
facility.
Pressure washer stops during
operation.
Out of fuel. Fill fuel tank.
Troubleshooting
7
Section
Page 19

TROY-BILT® PRESSURE WASHER OWNER WARRANTY POLICY
LIMITED WARRANTY
“Troy-Bilt® is a registered trademark of Troy-Bilt, LLC and is used under license to Briggs & Stratton Power Products. Briggs &
Stratton Power Products Group, LLC will repair or replace, free of charge, any part(s) of the pressure washer that is defective in
material or workmanship or both. Transportation charges on product submitted for repair or replacement under this warranty
must be borne by purchaser. This warranty is effective for the time periods and subject to the conditions stated below. For
warranty service, find the nearest Authorized Service Dealer in our dealer locator map at www.briggspowerproducts.com.
THERE IS NO OTHER EXPRESS WARRANTY. IMPLIED WARRANTIES, INCLUDING THOSE OF MERCHANTABILITY AND
FITNESS FOR A PARTICULAR PURPOSE, ARE LIMITED TO ONE YEAR FROM PURCHASE, OR TO THE EXTENT
PERMITTED BY LAW ANY AND ALL IMPLIED WARRANTIES ARE EXCLUDED. LIABILITY FOR INCIDENTAL OR
CONSEQUENTIAL DAMAGES ARE EXCLUDED TO THE EXTENT EXCLUSION IS PERMITTED BY LAW. Some states or
countries do not allow limitations on how long an implied warranty lasts, and some states or countries do not allow the
exclusion or limitation of incidental or consequential damages, so the above limitation and exclusion may not apply to you. This
warranty gives you specific legal rights and you may also have other rights which vary from state to state or country to country.
1 year
90 days
Consumer Use
Commercial Use
The warranty period begins on the date of purchase by the first retail consumer or commercial end user, and continues for the
period of time stated above. “Consumer use" means personal residential household use by a retail consumer. “Commercial use"
means all other uses, including use for commercial, income producing or rental purposes. Once equipment has experienced
commercial use, it shall thereafter be considered as commercial use for purposes of this warranty.
NO WARRANTY REGISTRATION IS NECESSARY TO OBTAIN WARRANTY ON BRIGGS & STRATTON PRODUCTS. SAVE
YOUR PROOF OF PURCHASE RECEIPT. IF YOU DO NOT PROVIDE PROOF OF THE INITIAL PURCHASE DATE AT THE TIME
WARRANTY SERVICE IS REQUESTED, THE MANUFACTURING DATE OF THE PRODUCT WILL BE USED TO DETERMINE
THE WARRANTY PERIOD.
ABOUT YOUR WARRANTY
We welcome warranty repair and apologize to you for being inconvenienced. Any Authorized Service Dealer may perform warranty
repairs. Most warranty repairs are handled routinely, but sometimes requests for warranty service may not be appropriate. For
example, warranty service would not apply if equipment damage occurred because of misuse, lack of routine maintenance,
shipping, handling, warehousing or improper installation. Similarly, the warranty is void if the manufacturing date or the serial number
on the pressure washer or engine has been removed or the equipment has been altered or modified. During the warranty period,
the Authorized Service Dealer, at its option, will repair or replace any part that, upon examination, is found to be defective under
normal use and service. This warranty will not cover the following repairs and equipment:
• Normal Wear: Outdoor Power Equipment, like all mechanical devices, needs periodic parts and service to perform well. This
warranty also does not cover normal maintenance such as air filters, adjustments, fuel system cleaning and obstruction (due to
chemical, lime, dirt, and so forth).
• Installation and Maintenance: This warranty does not apply to equipment or parts that have been subjected to improper or
unauthorized installation or alteration and modification, misuse, negligence, accident, overloading, overspeeding, improper
maintenance, repair or storage so as, in our judgment, to adversely affect its performance and reliability. This warranty also
does not cover normal maintenance such as air filters, adjustments, fuel system cleaning and obstruction (due to chemical,
lime, dirt, and so forth).
• Other Exclusions: This warranty excludes wear items such as quick couplers, seals, o-rings, pumps that have been run
without water supplied or damage or malfunctions resulting from accidents, abuse, modifications, alterations, or improper
servicing or freezing or chemical deterioration. Accessory parts, such as guns, hoses, nozzle extensions (wands), and nozzles,
are excluded from the product warranty. This warranty excludes used, reconditioned, and demonstration equipment and
failures due to acts of God and other force majeure events beyond the manufacturers control.
BRIGGS & STRATTON POWER PRODUCTS GROUP, LLC
JEFFERSON, WI, USA
Effective February 1, 2006 replaces all undated Warranties and all Warranties dated before February 1, 2006
198186E, Rev 0, 02/01/2006
WARRANTY PERIOD
 Loading...