

Troy-Bilt 1904 Owner's Manual
r®
Owner's ManuaU / Manual del Prepietarie
Pressure VVasher / Lavadora de Presi6n
Model / Modelo 0n904
IMPORTANT: READ SAFETY RULES AND INSTRUCTIONS CAREFULLY
IMPORTANTE: LEYO LA SEGURIDAD LAS ORDENESY LAS INSTRUCClONES DETENIDAMENTE
Questions? Preguntas?
Helpline - 1-888-61 !-6708 M-F 8+5 CT
Troy-BiltO is a registered trademark of MTD and is used under license to Briggs & Stratton Power Products
Troy-Bit_) es una marca registrada registrada de MTD y se usa abajo licencia a Briggs& Stracton Power Products+
BRIGGS & STRATTON POWER PRODUCTS GROUP, LLC
JEFFERSON,WISCONSIN, U.S.A.
Printed in USA Manual No 192097G5 Revision I (02t05/2002)
SafetyRules
TABLE OF CONTENTS
Safety Rules.................................................. 2-3
Know "four Pressure "Washer ....................... 4
Assembly ........................................................ 5-7
Operation ..................................................... 8-II
Maintenance ......................................... 12-14
Storage ................................................................ 15
Troubleshooting ........................................... 16
Notes ................................................... 17
Replacement Parrs .......................................... 18-19
Warranty ...........................................Last Page
EQUIPPiENT
DESCRIPTION
limitations and any hazards involved.
Every effort hasbeen made to ensure that information in
this manual is accurate and current, However, we reserve the
right to change, alter" or otherwise improve the product and
this document at any time without prior notice
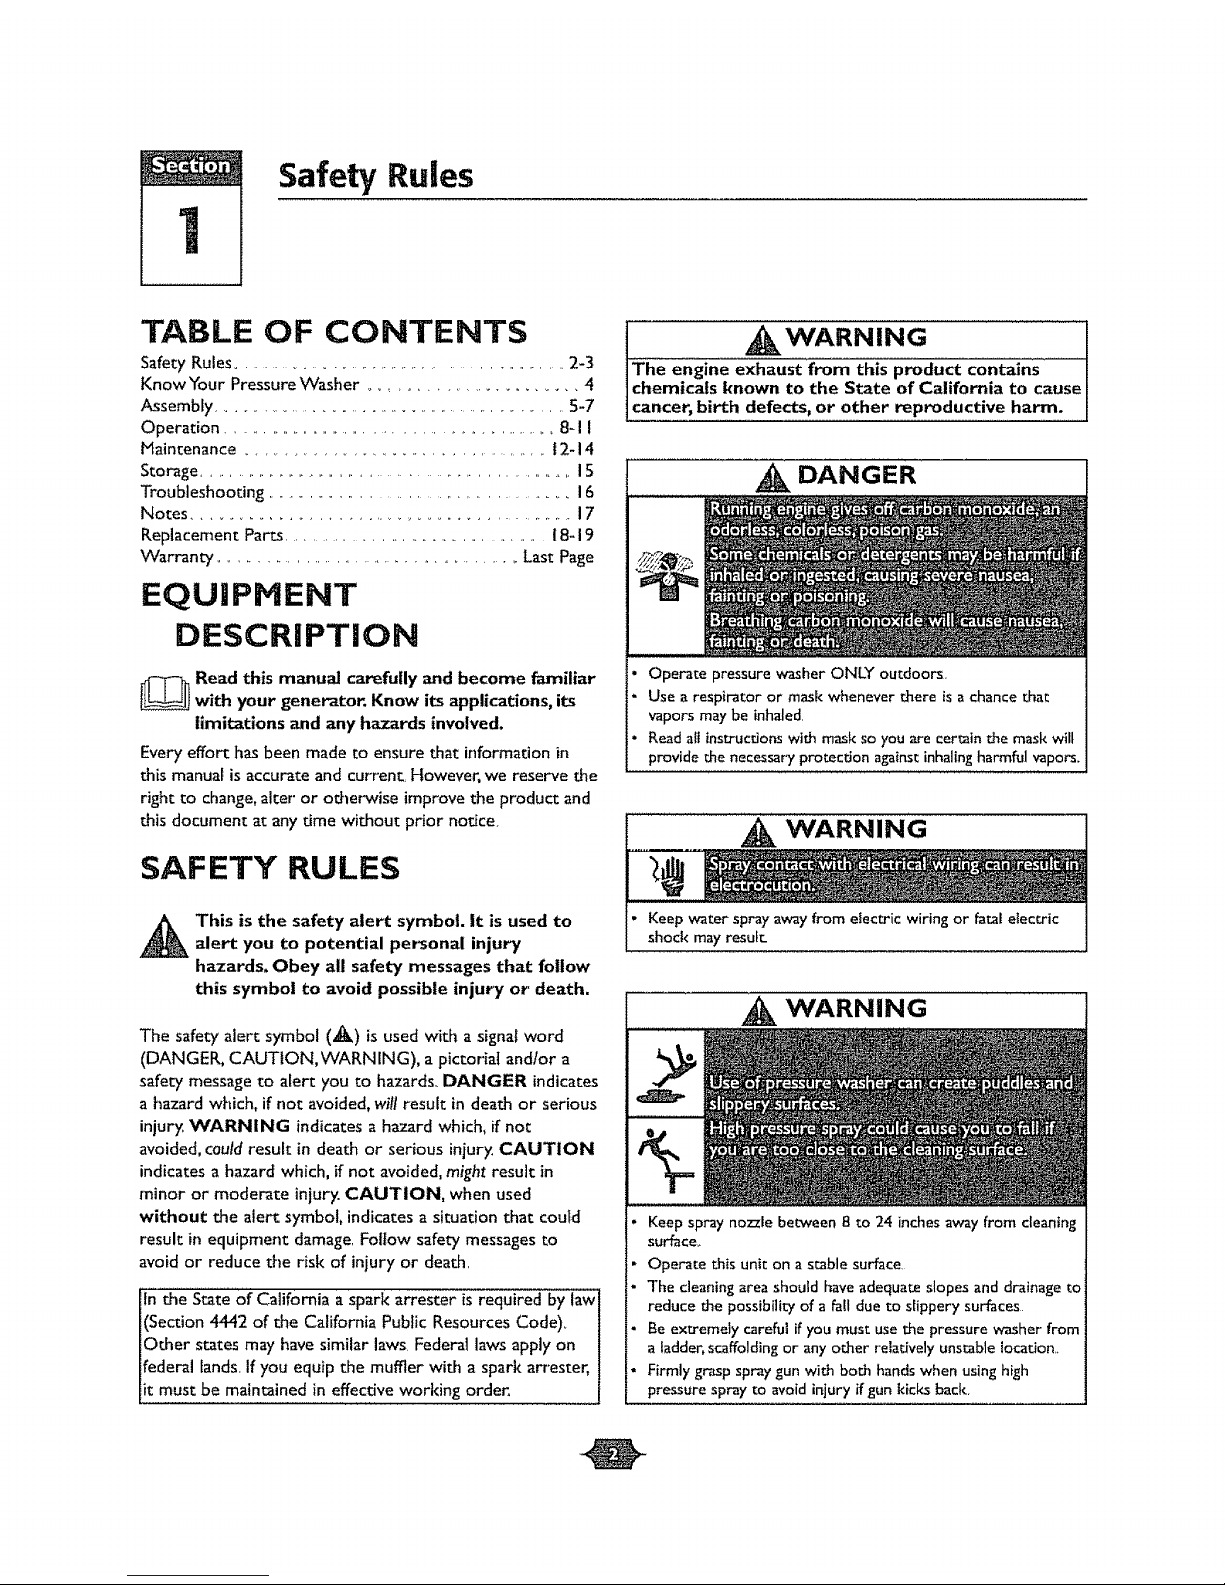
SAFETY RULES
_k his is the safety alert symbol. It is used to
alert you to potential personal injury
hazards. Obey all safety messages that follow
this symbol to avoid possible injury or death.
The safety alert symbol (_1_) is used with a signal word
(DANGER, CAUTtON,VVARNING), apictorial andtor a
safety messageto alert you to hazards.,DANGER indicates
a hazard which, if not avoided, will result in death or serious
injury, WARNING indicates a hazard which, if not
avoided, could result in death or serious injury. CAUTION
indicates a hazard which, if not avoided, might result in
minor or moderate injury.CAUTION, when used
without the alert symbol, indicates asituation that coutd
result in equipment damage. Foflow safety messages to
avoid or reduce the risk of injury or death.
lefnthe State of California a spark arrester is required by law]
(Section 4442 of the California Public Resources Code)_ 1
Other states may have similar laws. Federal laws apply on I
deral lands. If you equip the muffler with a spark arrester, !
t must be maintained in effective worldng order, i
A( kWARNING
The engine exhaust from this product contains
chemicals known to the State of California to cause
cancer, birth defects, or other reproductive harm.
DANGER 1
Operate pressure washer ONLY outdoors.
Use a respirator or mask whenever there is a chance that
vapors may be inhaled.
Read all instrucrJons with mask so you are certain the mask wilt
provide the necessary protection against inhaling harmful vapors.
_k WARNING
• Keep water spray away from electric wiring or fatal electric
shock may resufc
WARNING
• Keep spray nozzle between 8 to 24 inches away from cleaning
surface,.
• Operate this unit on a stable surface,
• The cleaning area should have adequate slopes and drainage to
reduce the possibility of a fall due to slippery surfaces
• Be extremely careful if you must use the pressure washer from
a ladder, scaffolding or any other relatively unstable location..
• Firmly grasp spray gun with both hands when using high
pressure spray r_oavoid injury if gun kicks back.
SectionI:SafetyRules
WARNING
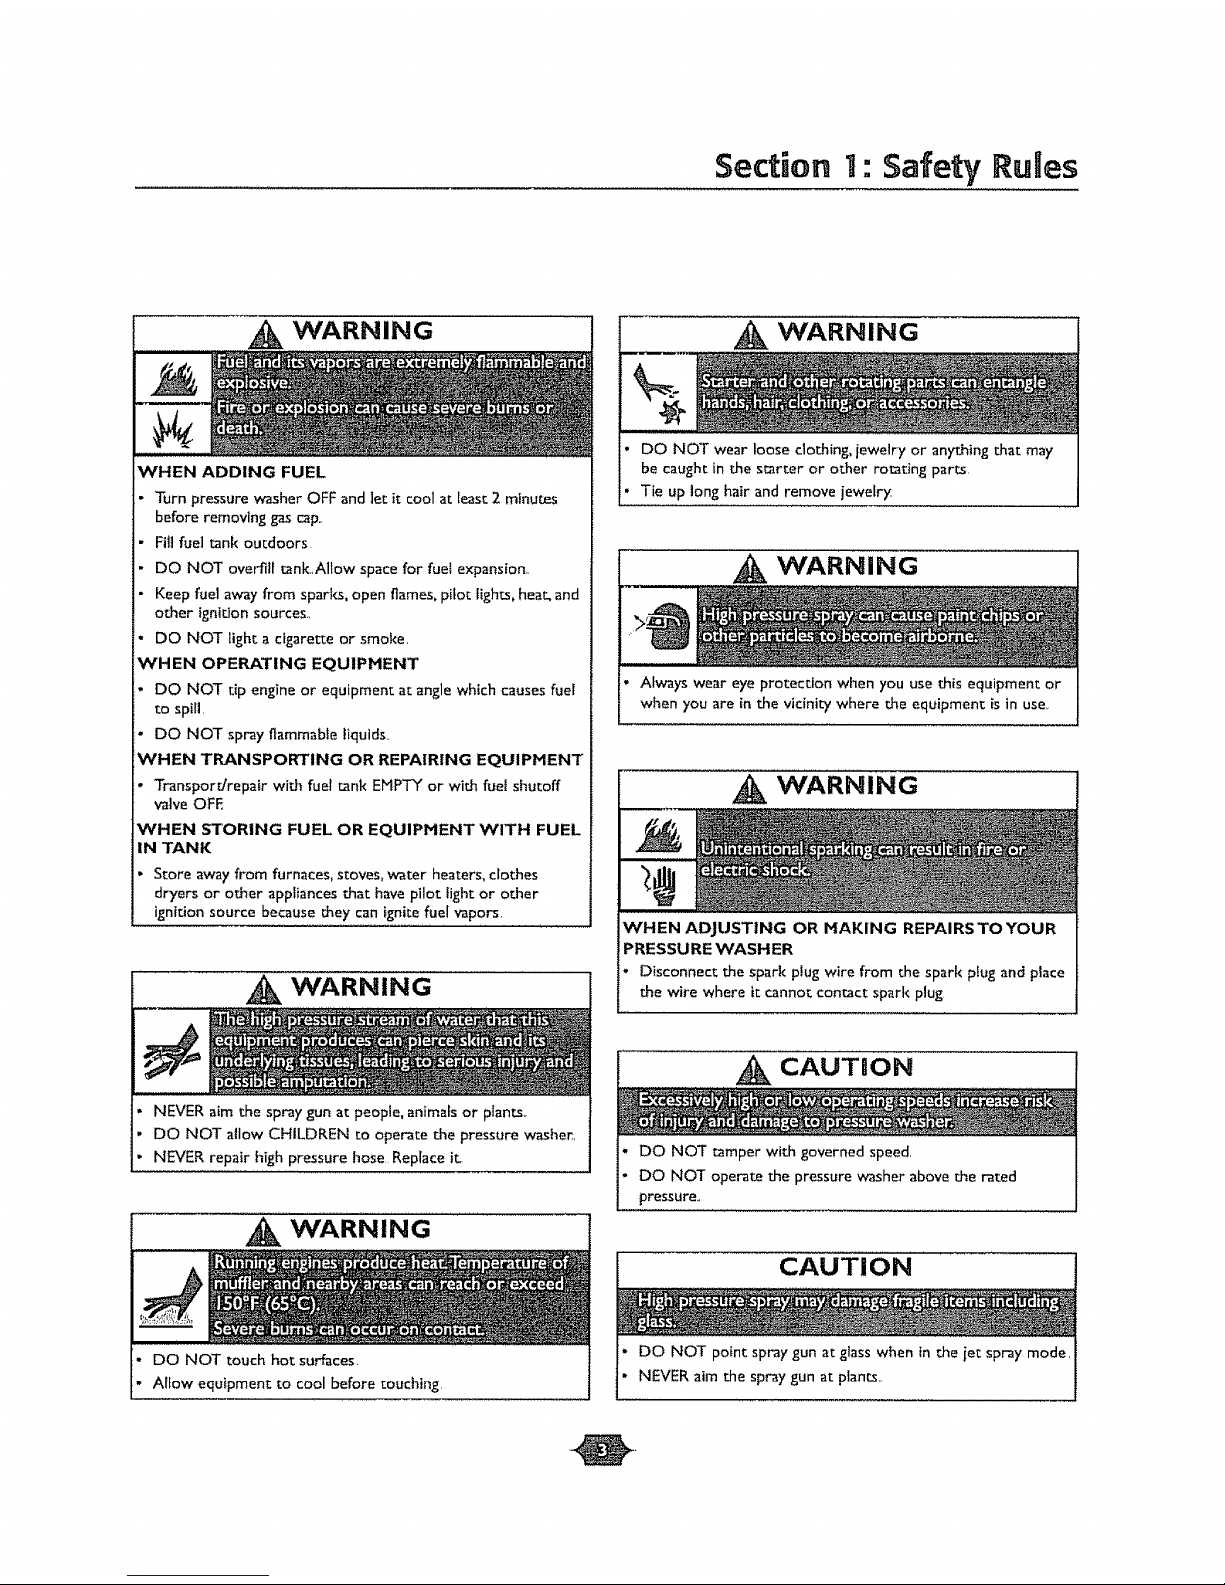
WHEN ADDING FUEL
• Turn pressure washer OFF and let it cool at least 2 mtnums
before removing gas cap.
• Fill fuel tank outdoors
• DO NOT overfill tank.Allow space for fuel expansion..
• Keep fuel away from sparks, open flames, pilot lights, heat. and
other igniLion sources.,
- DO NOT light a cigarette or smoke.
WHEN OPERATING EQUIPHENT
- DO NOT tip engine or equipment at angle which causes fuel
to spill.
• DO NOT spray flammable liquids..
WHEN TRANSPORTING OR REPAIRING EQUIPHENT
• Transpordrepair with fuel tank EMPTY or with fuel shutoff
valve OFE
WHEN STORING FUEL OR EQUIPHENT WITH FUEL
IN TANK
- Store away from furnaces, stoves, water heaters, clothes
dryers or other appliances that have pilot light or other
ignition source because they can ignite fuel vapors_
WARNING I
WARNING
DO NOT wear loose clothing, jewelry or anything that may
be caught in the starter or other rotating pars.
Tie up long hair and remove jewefr)_
WARNING
WARNING
WHEN ADJUSTING OR HAKIN G REPAIRS TO YOU R
PRESSURE WASHER
, Disconnect the spark plug wire from the spark plug and place
the wire where it cannot contact spark plug
I
NEVER aim the spray gun at people, animals or plants.
DO NOT allow CHILDREN to operate the pressure washer,
NEVER repair high pressure hose Replace it:
WARNING
• DO NOT touch hot surfaces.
Allow equipment to cool before touching.
I CAUTION
DO NOT tamper with governed speed.
DO NOT operate the pressure washer above the rated
pressure.,
I
CAUTION
I
DO NOT point spray gun at glass when in the iet spray mode.
NEVER aim the spray gun at plants..
2
Features and Controls
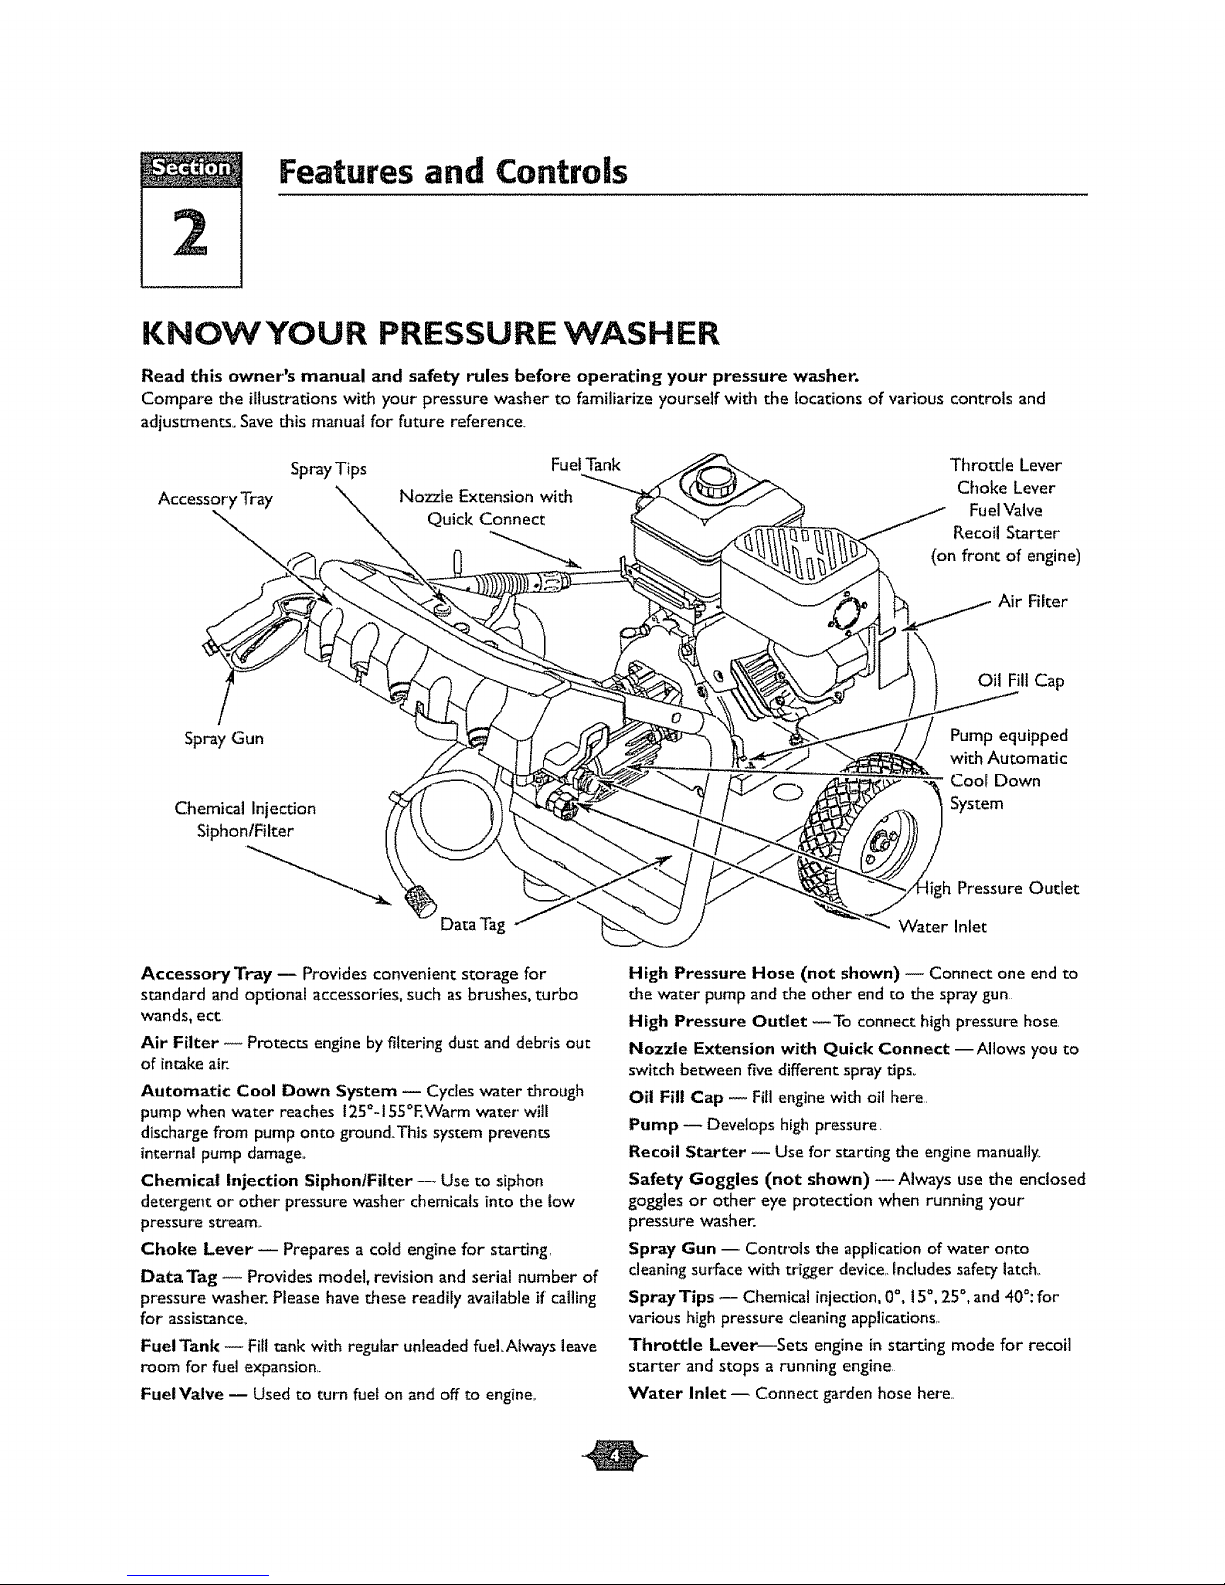
KNOWYOUR PRESSURE WASHER
Read this owner's manual and safety rules before operating your pressure washer.
Compare the illustrations with your pressure washer to familiarize yourself with the locations of various controls and
adiustments. Save this manual for future reference.
Accessory Tray
Spray Tips
Fuel Tank
Nozzle Extension with
Quick Connect
Throtde Lever
Choke Lever
FuelValve
Recoil Starter
(on front of engine)
Air Filter
/
Spray Gun
Chemical Injection
SiphonlFilter
Oil Fill Cap
Pump equipped
with Automatic
Cool Down
System
Data Tag
Accessory Tray -- Provides convenient storage for
standard and optional accessories, such as brushes, turbo
wands, ecc
Air Filter -- Protects engine by filtering dust and debris out
of intake air_
Automatic Cool Down System -- Cyctes water through
pump when water reaches 125°-I 55°EWarm water" will
discharge from pump onto ground.This system prevents
internal pump damage,.
Chemical Injection Siphon/Filter -- Use to siphon
detergent or other pressure washer chemicals into the low
pressur'e stream,,
Choke Lever -- Prepares a cold engine for starting,
DataTag- Provides model, revision and serial number of
pressure washer. Please have these readily available if' calling
for assistance_
Fuel Tank -- Fill tank with regular unleaded fuel,Always leave
room for fuel expansion,.
Fuel Valve -- Used to turn fuel on and off to engine,,
Pressure Outlet
VVater Inlet
High Pressure Hose (not shown) -- Connect one end to
the water pump and the other end to the spray gun
High Pressure Outlet --To connect high pressure hose,
Nozzle Extension with Quick Connect --Allows you to
switch between five different spray tips_
Oil Fill Cap -- Fill engine with oil here.
Pump -- Develops high pressure,
Recoil Starter -- Use for starting the engine manually.
Safety Goggles (not shown) --Always use the enclosed
goggles or other eye protection when running your
pressure washer.
Spray Gun -- Controls the application of water onto
cleaningsurface with trigger device,.Includes safety latch,,
Spray Tips _ Chemical injection, 0°, t5°,25°,and 40°: for
various high pressure cleaningapplicadons,.
Throttle Lever--Sets engine in starting mode for recoil
starter and stops a running engine.
Water Inlet -- Connect garden hose here,.
AssembEy
3
IMPORTANT: Read entire owner's manual before you
attempt to assemble or operate your new pressure washer.
REMOVE PRESSURE
WASHER FROM
CARTON
- Remove the parts bag packed with pressure washer.
- Slice two corners at the end of carton from top to
bottom so the panel can be folded down flat, then
remove all packing material
. Roll pressure washer out of carton.
Carton Contents
Items in the carton include:
• Main Unit
• Safety Goggles
• Handle
• Plastic Accessory Tray
• High Pressure Hose
• Spray Gun
- Nozzle Extension with Quick Connect Fitting
• Oil Botde
- PartsBag(whichincludesthefollowing):
• Owner's Manual
• Engine Manual
• Owner's Registration Card
• Bagcontaining 5 multi-colored Quick Connect Spray
Tips
• Maintenance Kit
• Handle Fastening Hardware Kit (which includes):
• Carriage Bolt
• "U' Bolt
• Plastic Knobs (2)
• "J" Hook
- Chemical Hose Clip
• SelfTapping Screws (5)
PREPARING PRESSURE
WASHER FOR USE
If you have any problems with the assembly of your
pressure washer or if parts are missing or damaged, cal! the
pressure washer helpline at !-888-611-6708.
To prepare your pressure washer for operation, you
will need to perform these tasks:
I, Fill out and send in registration card,
2, Attach accessory tray to handle, then attach handle to
main unic
3. Add oil to engine crankcase
4 Add fuel to fuel tank.,
5 Connect high pressure hose to spray gun and pump,
6. Connect water supply to pump,
7 Attach nozzle extension to spraygun,
8, Selecdattach quick connect spray tip to nozzle
extension.
Attach Handle and Accessory Tray
NOTE: All assembly operations given in this section will be
described from the perspective of assembling the pressure
washer from the rear,
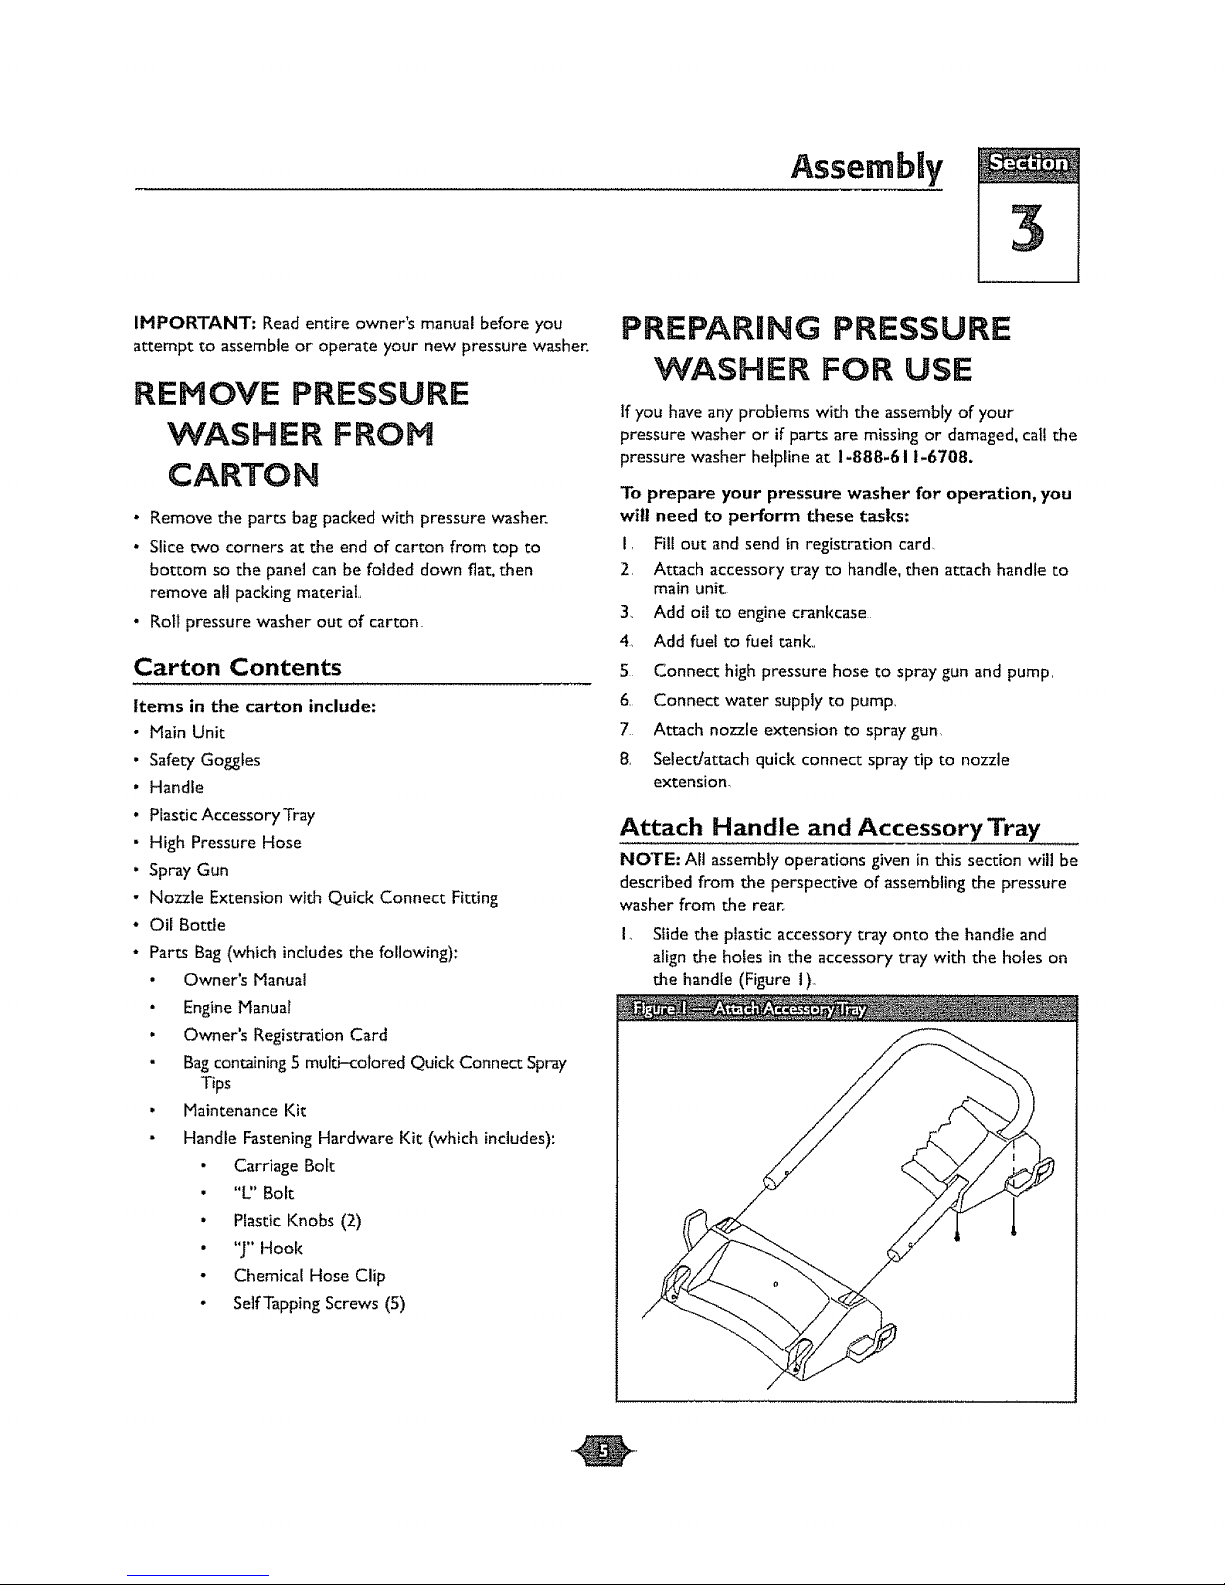
I, Slide the plastic accessory tray onto the handle and
align the holes in the accessory tray with the holes on
the handle (Figure 1).
Section 3: Assembly
2 Secure tray to handle with self tapping screws using a
#2 phillips screwdriver. Ensure screws are tight but not
crushing the plastic accessory tray°
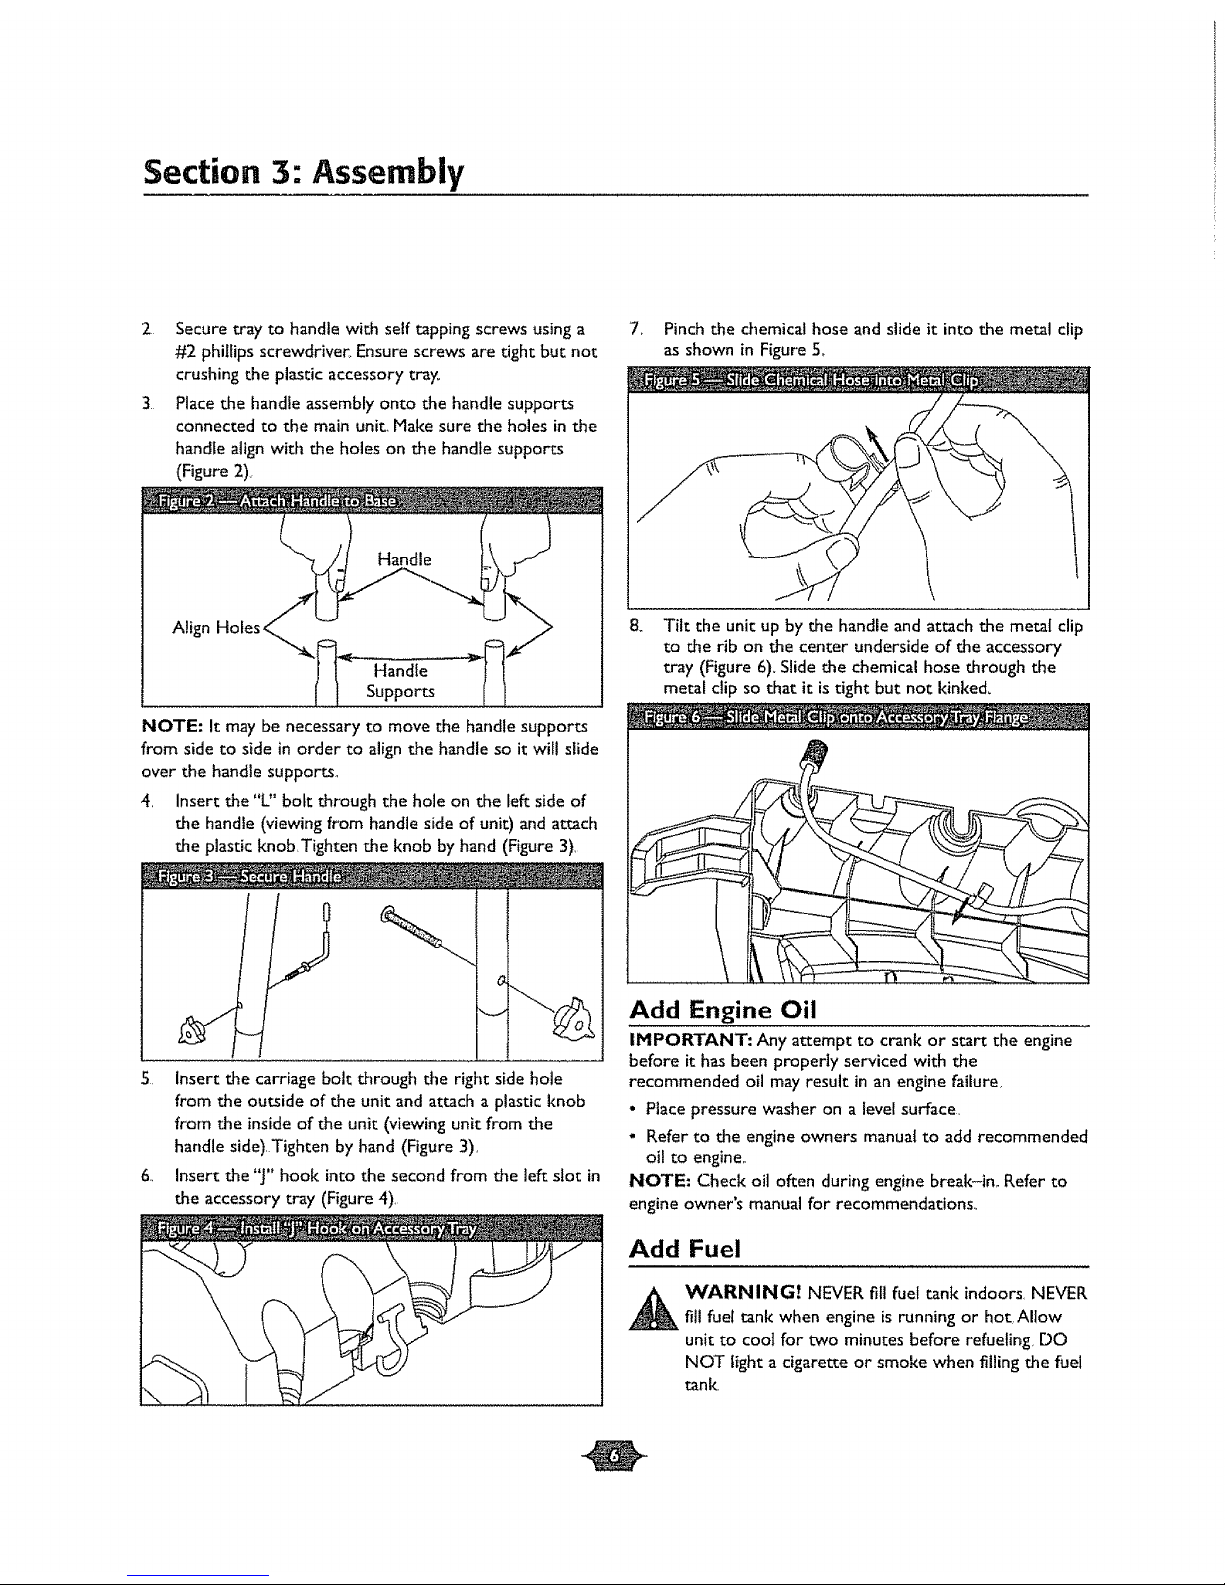
3 Place the handle assembly onto the handle supports
connected to the main unit_ Make sure the holes in the
handle align with the holes on the handle supports
(Figure 2)
NOTE: It may be necessary to move the handle supports
from side to side in order to align the h_ndle so it will slide
over the handle supports.
4. Insert the"L" bait through the hole on the left side of
the handle (viewing from handle side of unit) and attach
the plastic knobTighten the knob by hand (Figure 3),
5. insert the carriage bolt through the right side hole
from the outside of the unit and attach a plastic knob
from the inside of the unit (viewing unit from the
handle side) Tighten by hand (Figure 3),
6.. Insert the "J" hook into the second from the left slot in
the accessory tray (Figure 4),
7. Pinch the chemical hose and slide it into the metal clip
as shown in Figure 5_
8. Tilt the unit up by the handle and attach the metal clip
to the rib on the center underside of the accessory
tray (Figure 6). Slide the chemical hose through the
metal clip so that it is tight but not kinked,
Add Engine Oil
IMPORTANT: Any attempt to crank or start the engine
before it hasbeen properly serviced with the
recommended oil may result in an engine failure,
• Place pressure washer on a level surface
- Refer to the engine owners manual to add recommended
oil to engine,.
NOTE= Check oil often during engine break-in,. Refer to
engine owner's manual for recommendations..
Add Fuel
WARNING! NEVER fill fuel tank indoors, NEVER
fill fuel tank when engine is running or hot, Allow
unit to cool for two minutes before refueling, DO
NOT Iight a cigarette or smoke when filling the fuel
tank,
Section 3: Assembly
,_ WARNING! NEVER fill fuel tank completely full.
Provide space for fuel expansion Wipe away any fuel
spillage from engine and equipment before starting°
. Place pressure washer on a level surface,
. Refer to the engine owners manual to add recommended
fuel to engine,
Connect Hose and Water Supply to
Pump
IMPORTANT: To avoid pump damage, you must assemble
the nozzle extension to the spray gun and attach all hoses
before you start the engine,
NOTE'-Your pressure washer comes with a quick connect
that you can use to attach the high pressure hose to either
the spray gun or pump,
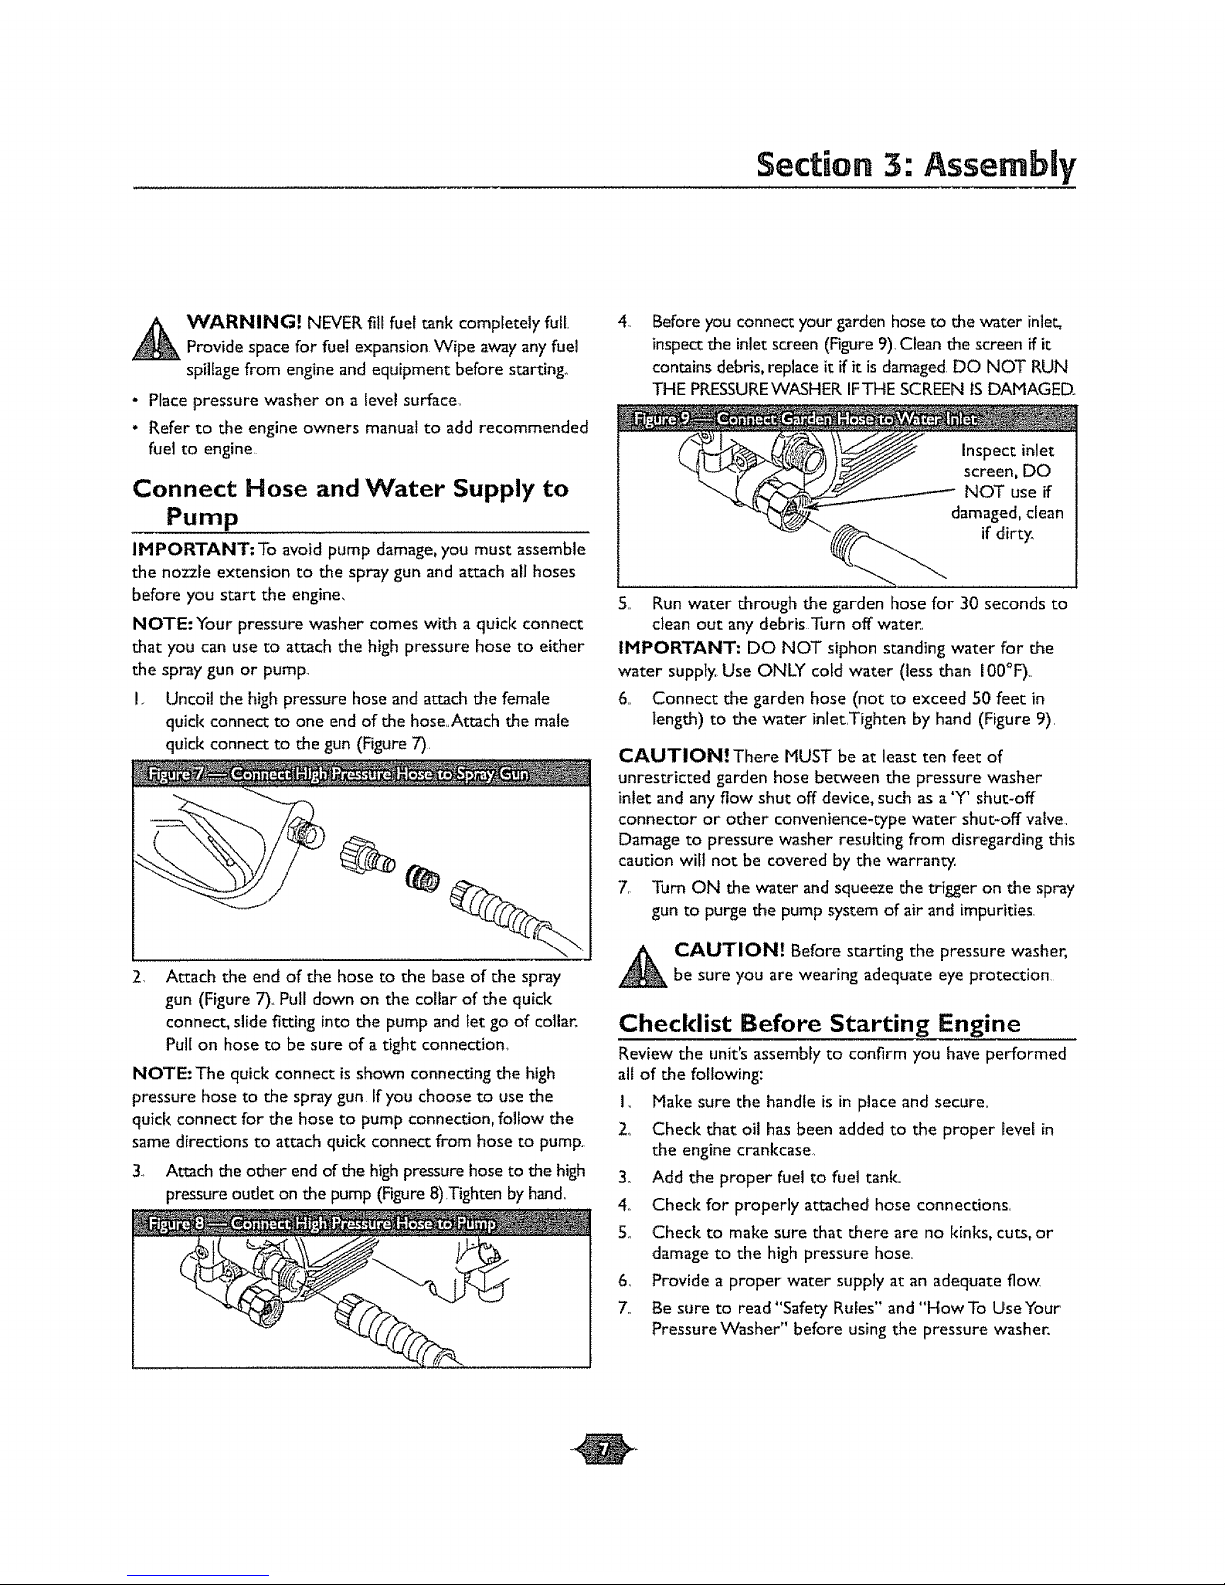
I., Uncoil the high pressure hose and attach the female
quick connect to one end of the hose,Attach the male
quick connect to the gun (Figure 7)
2, Attach the end of the hose to the base of the spray
gun (Figure 7)._Pull down on the collar of the quick
connect, slide fitting into the pump and let go of collar.
Pull on hose to be sure of a tight connection.
NOTE: The quick connect is shown connecting the high
pressure hose to the spray gun If you choose to use the
quick connect for the hose to pump connection, follow the
same directions to attach quick connect from hose to pump.
3_ Attach the other end of the high pressure hose to the high
pressure outlet on the pump (Figure 8).Tighten by hand,
,.
Before you connect your garden hose to the water inlet,
inspect the inlet screen (Figure9), Clean the screen if it
contains debris, replace it if it is damaged DO NOT RUN
THE PRESSUREWASHERIFTHE SCREEN ISDAMAGED.,
Inspect inlet
screen, DO
NOT use if
if dirty_
5. Run water through the garden hose for 30 seconds to
clean out any debris Turn off water,,
IMPORTANT: DO NOT siphon standing water for the
water supply, Use ONLY cold water (less than i 00°F),_
6. Connect the garden hose (not to exceed 50 feet in
length) to the water inlet,Tighten by hand (Figure 9)
CAUTION! There MUST be at least ten feet of
unrestricted garden hose between the pressure washer
inlet and any flow shut off device, such as a 'Y' shut-off
connector or other convenience-type water shut-off valve,
Damage to pressure washer resulting from disregarding this
caution will not be covered by the warran_
7, Turn ON the water and squeeze the trigger on the spray
gun to purge the pump system of air and impurities.
._ CAUTION! Before starting the pressure washer,
be sure you are wearing adequate eye protection
Checklist Before Starting Engine
Review the unit's assembly to confirm you have performed
all of the following:
I, Make sure the handle is in place and secure,,
2_ Check that oil hasbeen added to the proper level in
the engine crankcase,
3_ Add the proper fuel to fuel tank.,
4,. Check for properly attached hose connections,
5,, Check to make sure that there are no kinks, cuts, or
damage to the high pressure hose.
6, Provide a proper water supply at an adequate flow
7,, Be sure to read"Safety Rules" and "HowTo UseYour
PressureVVasher" before using the pressure washer.
Operation
HOW TO USE YOUR
PRESSURE WASHER
Ifyou have any problems operating your pressure washer,
please call the pressure washer heipline at !-888-611-6708,
To Start Your Pressure Washer
To star_ your pressure washer for the first time, follow
these instructions step-by-step.This starting information
also applies if you have let the pressure washer sit idle for
at least a day_
I_ Place the pressure washer near an outside water
source capable of supplying water at a flow rate
greater than 3°6gallons per minute and no lessthan
20 PSIat the pressure washer end of the garden hose,
2,_ Check that the high pressure hose isconnected to the
spray gun and to the pump See "Preparing Pressure
Washer" for Use" for illustrations
3,_ Make sure unit is in a level position
4_ Connect the garden hose to the water inlet on the
pressure washer pump, Turn ON the water.
CAUTION! DO NOT run the pump without the water
supply connected and turned on/You must follow this
caution or the pump will be damaged,
5, Squeeze the trigger on the gun until you have a steady
stream of water, This purges the pump of air and
impurities.,
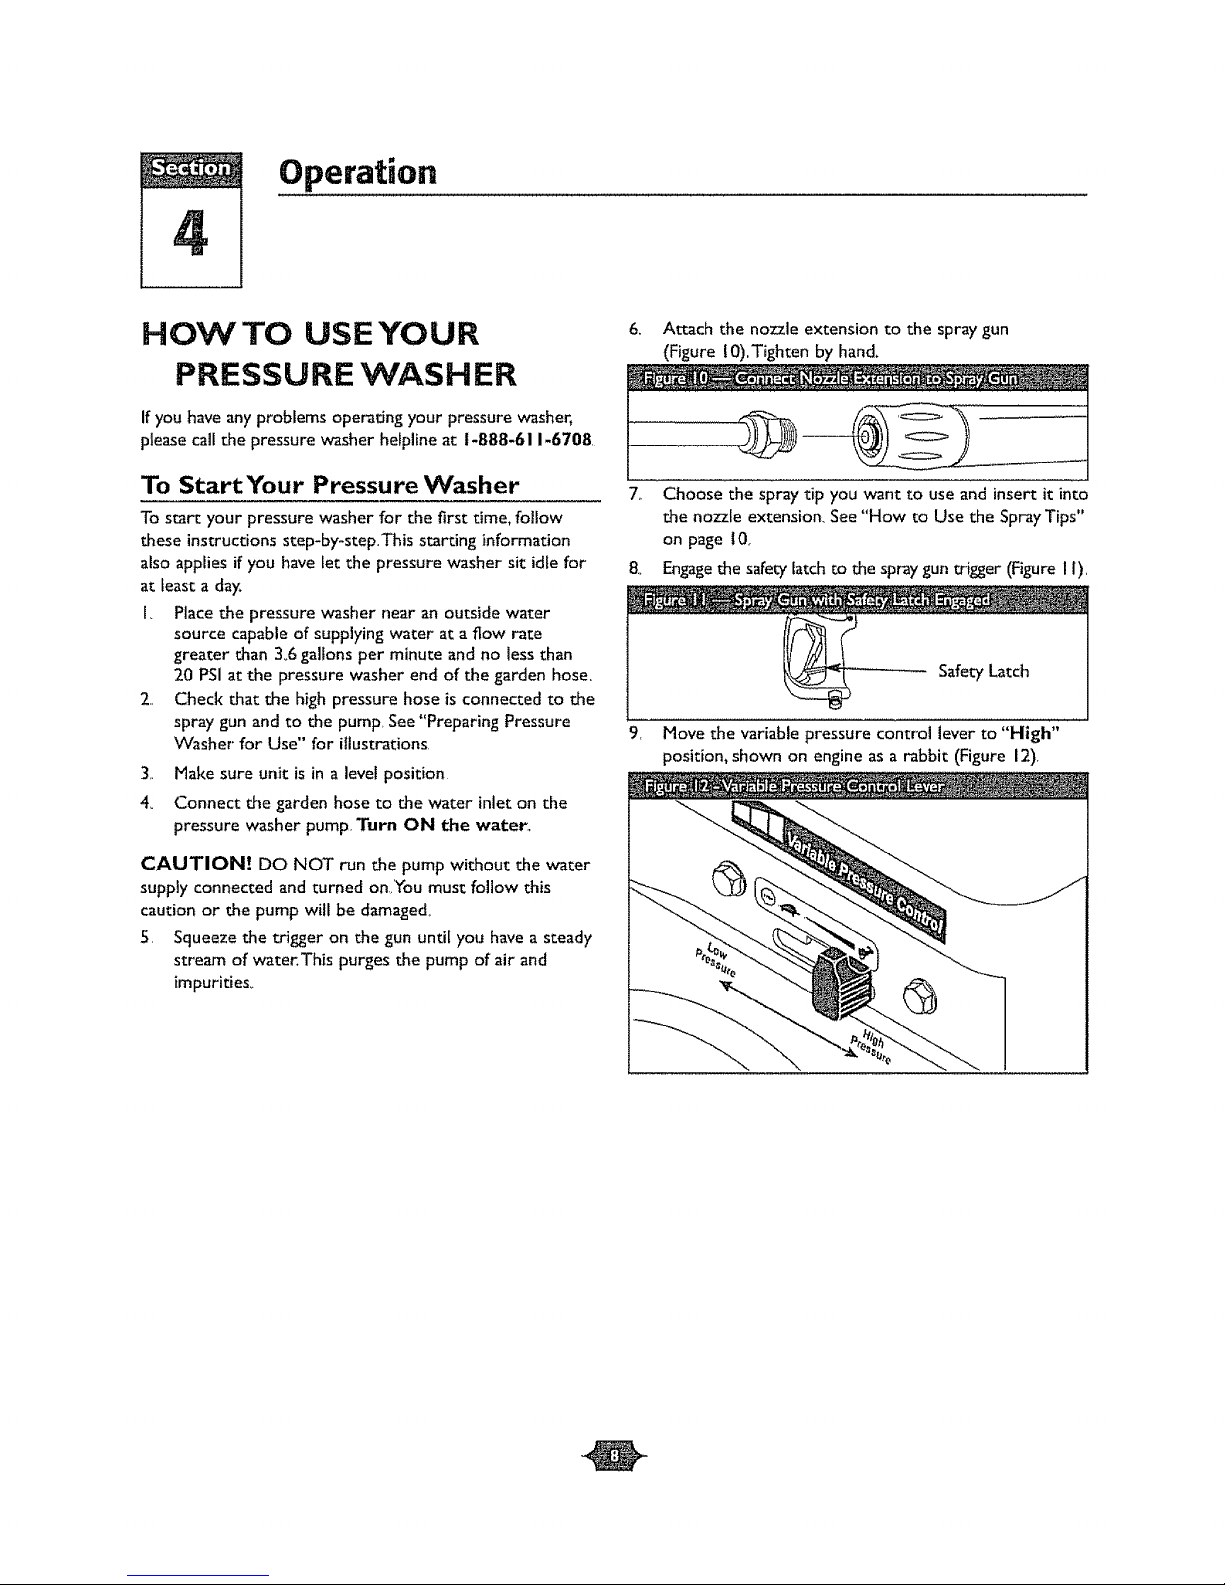
6, Attach the nozzle extension to the spray gun
(Figure 10).Tighten by hand,
7,, Choose the spray tip you want to use and insert it into
the nozzle extension. See "How to Use the SprayTips"
on page I0r
8,, Engagethe safety latch to the spraygun trigger (Figure I I),
9, Move the variable pressure control lever to "High"
position, shown on engine as a rabbit (Figure 12)_
Section 4: Opera ion
I0r Start the engine according to instructions given in the
engine owner's manual.
NOTE: If the recoil starter is hard to pull, it may be
necessary to squeeze the gun trigger to relieve internal
pump pressure
How to StopYour Pressure Washer
• Move variable pressure control lever to "Stop" position
o Turn engine off according to instructions given in the
engine owner's manual
, Squeeze trigger on the spray gun to relieve
pressure in the hose_
NOTE: A small amount of water wild squirt out when you
release the pressure_
How to Use Accessory Tray
The unit is equipped with an accessory tray with places to
store your nozzle extension and quick connect spray tips,
and slots to hold the cleaning solution bottle and the
detergent siphoning filter.There are also two hooks at the
ends of the handle to hold your spray gun and high
pressure hose.
NOTE:The extra holes in the tray are for storing abrush
and a turbo wand The brush and turbo wand are NOT
included with your pressure washer.You can buy these
items as optional accessories.
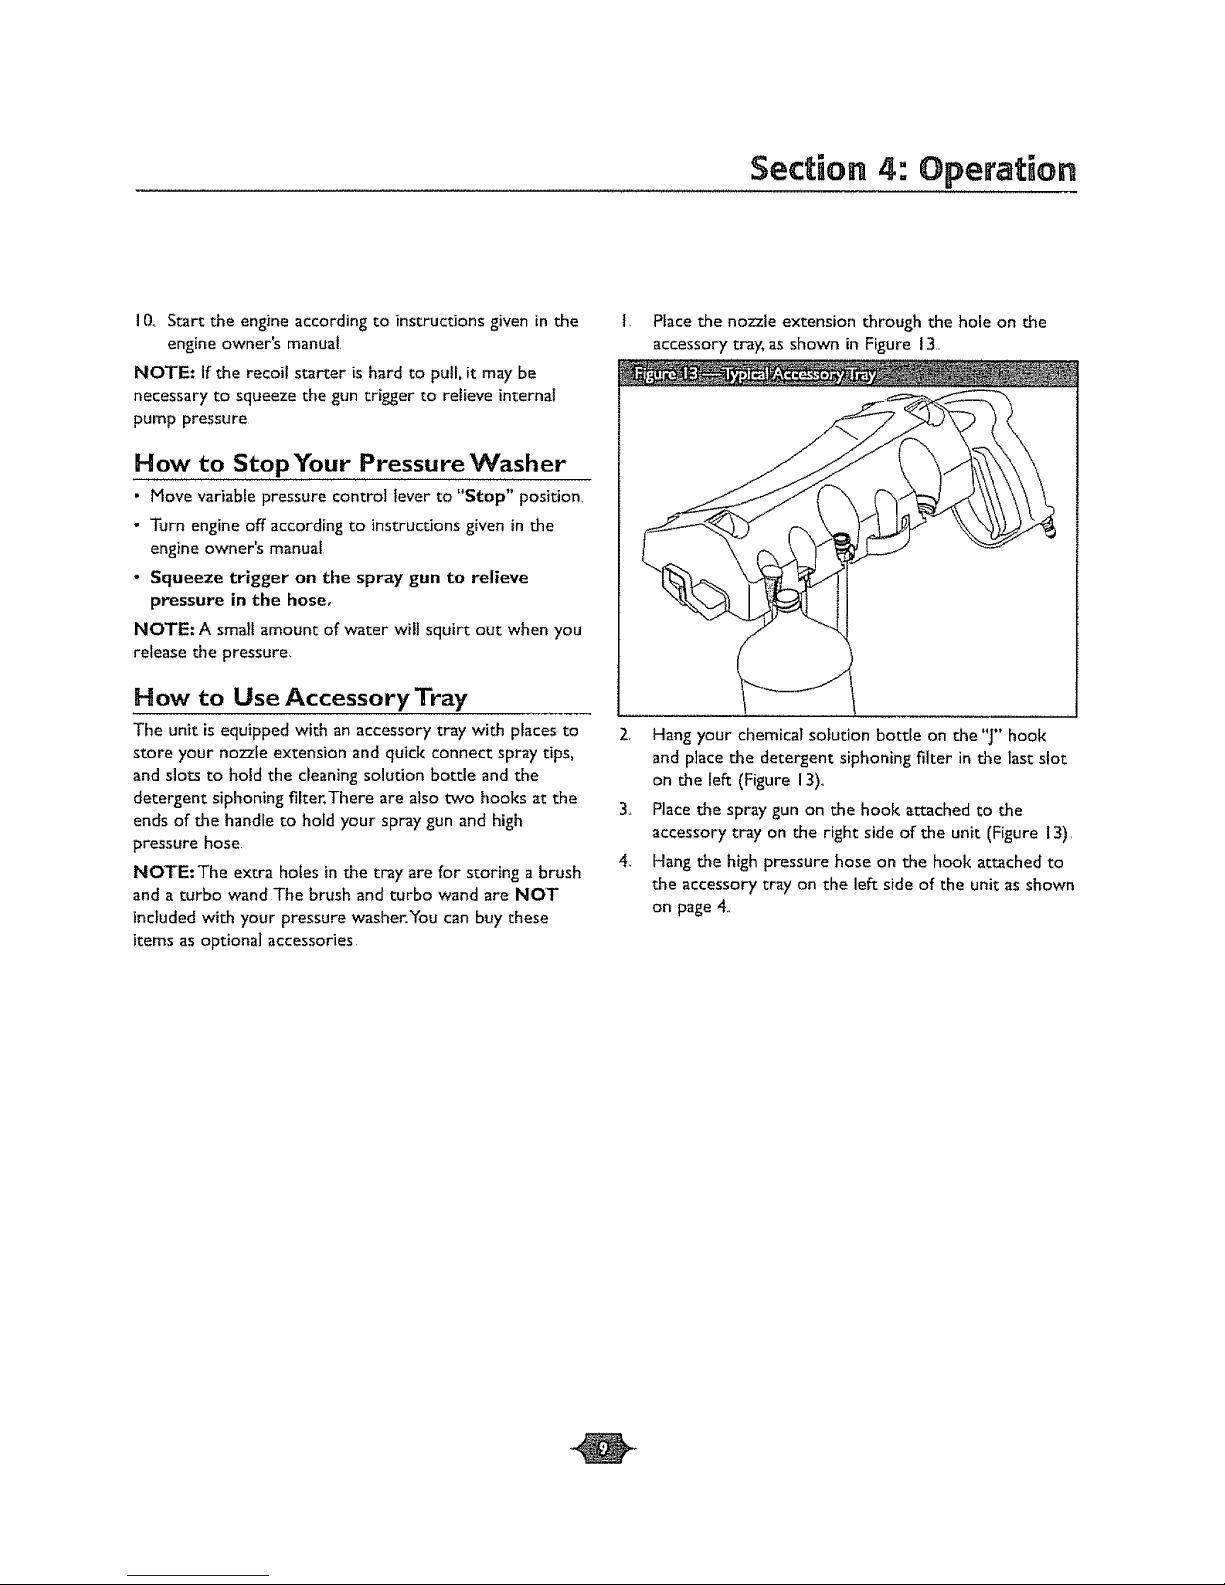
t. Place the nozzle extension through the hole on the
accessory tray, as shown in Figure 13.
2r Hang your chemical solution bottle on the"J" hook
and place the detergent siphoning filter in the last slot
on the left (Figure 13)_
3.. Place the spray gun on the hook attached to the
accessory tray on the right side of the unit (Figure 13).
4, Hang the high pressure hose on the hook attached to
the accessory tray on the left side of the unit as shown
on page 4..
Section 4: Operation
How to Use the SprayTips
,_ CAUTION! NEVER exchange spray tips without
locking the safety latch on the trigger.
The quick-connect on the nozzle extension allows you to
switch between five different spray tips The spray tips vary
the spray pattern as shown below (Figure t4)
Follow these instructions to change spray tips:
I._ Engagethe safety latch on the spray gun
2.. Pull back the collar on the quick-connect and pull the
current spray tip off. Store the spray tips in the space
provided on the handles storage panel,
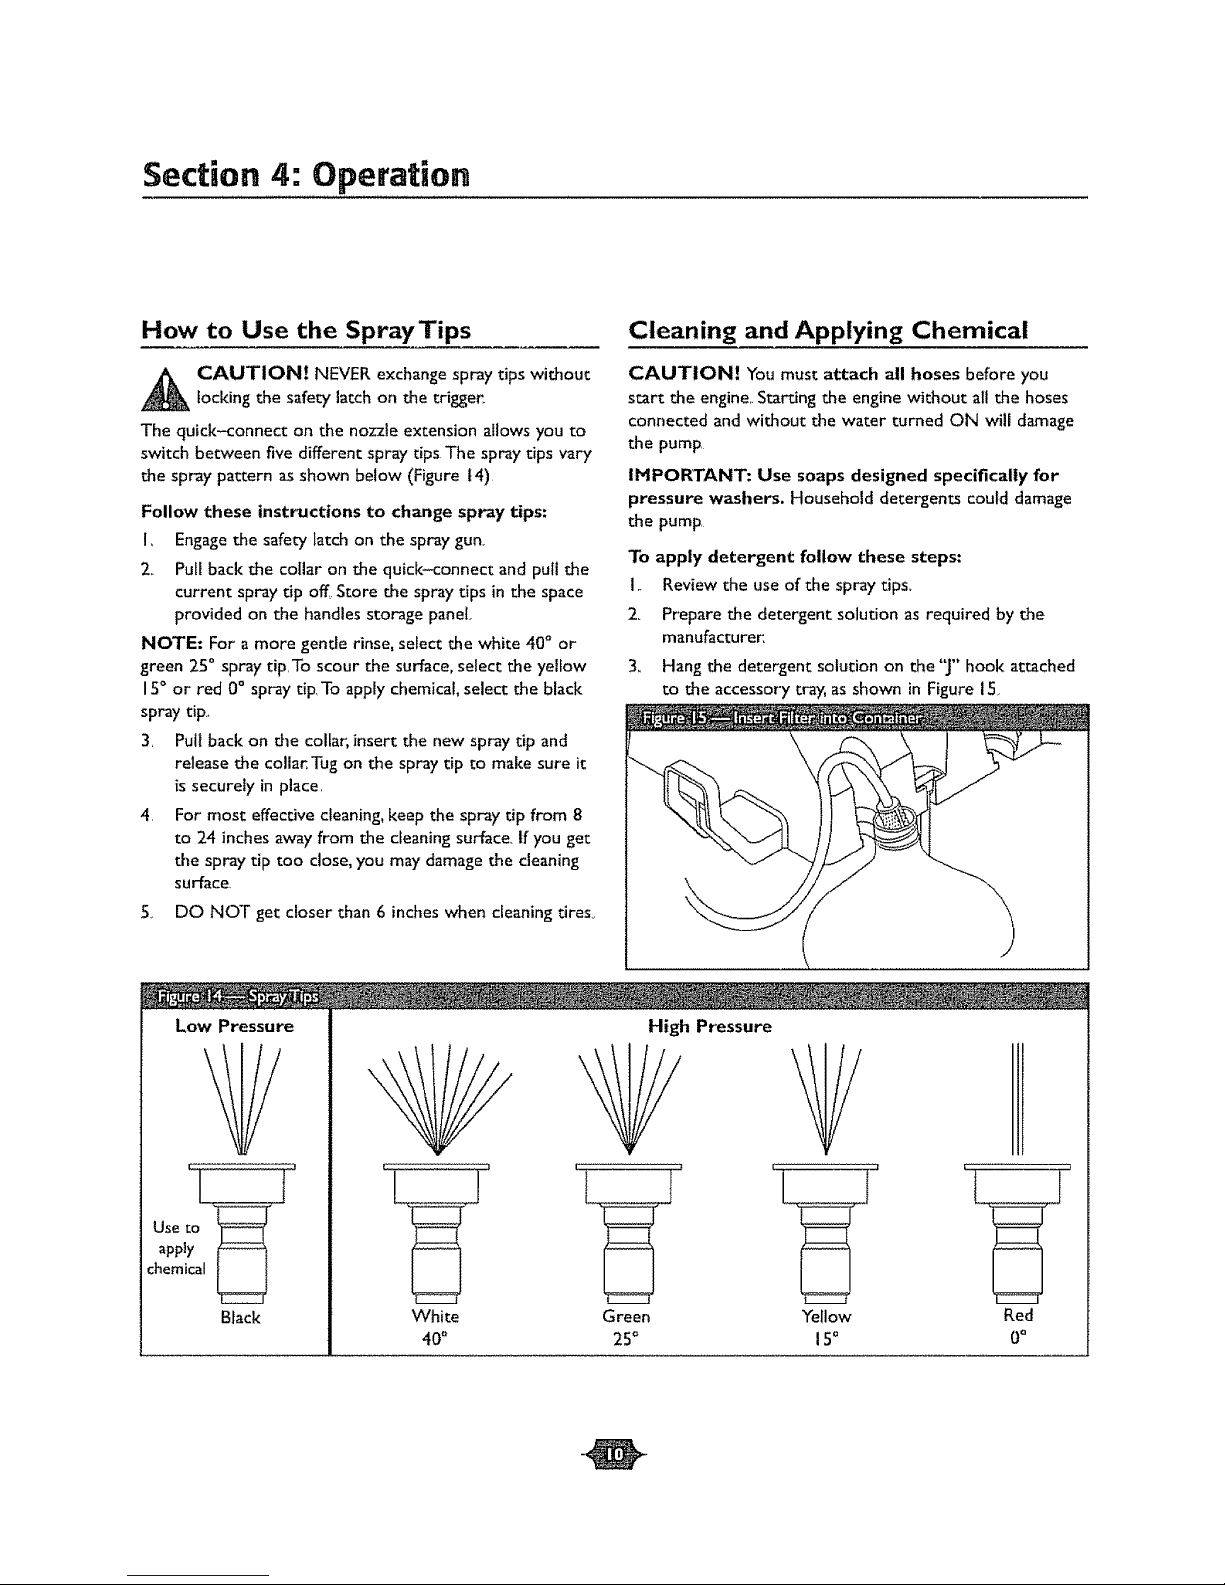
NOTE: For a more gentle rinse, select the white 40° or
green 25° spray tipTo scour the surface, select the yellow
15° or red 0 ° spray tipTo apply chemical, select the black
spray tip..
3, Pull back on the collar, insert the new spray tip and
release the collar_Tug on the spray tip to make sure it
is securely in place.
4_ For most effective cleaning, keep the spray tip from 8
to 24 inchesaway from the cleaning surface. If you get
the spray tip too close, you may damage the cleaning
surface.
5.. DO NOT get closer than 6 inches when cleaning tires_
Cleaning and Applying Chemical
CAUTION! You must attach all hoses before you
start the engine. Starting the engine without all the hoses
connected and without the water turned ON will damage
the pump
IMPORTANT: Use soaps designed specifically for
pressure washers. Household detergents could damage
the pump
To apply detergent follow these steps:
I.. Review the use of the spray tips.,
2_ Prepare the detergent solution as required by the
manufacturer.
3_
Hang the detergent solution on the "j" hook attached
to the accessory tray, as shown in Figure IS
Low Pressure
Use to
apply
:heroical
Black
l
White Red
40° 0°
High Pressure
I I'
Green Yellow
25° 150
Section4: Operation
4, Place the small filter end of the detergent siphoning
tube into the detergent container.
CAUTION! Keep the chemical injection tube from
coming in contact with the hot muffler,
5. Make sure the black spray tip is installed..
NOTE: Detergent cannot be applied with the high
pressure spray tips (White, Green,Yellow, or Red),
6o Hake sure the garden hose is connected to the water
inlet. Check that the high pressure hose is connected
to the spray gun and the pump and start the engine,
7,, Apply the detergent to a dry surface, starting at lower
portion of area to be washed and work upward, using
long, even,overlapping strol<es..
8. Allow the detergent to soak in between 3-5 minutes
before washing and rinsing_Reapply as needed to
prevent surface from drying. DO NOT allow the
detergent to dry on (prevents streaking)..
IMPORTANT:You must flush the chemical injection
system after each use by placing the filter into a bucket of
clean water, then run the pressure washer in tow pressure
for I-2 minutes.
Pressure Vv'asher Rinsing
_ ARNING! Be extremely careful if you must use
the pressure washer from a ladder, scaffolding or any
other relatively unstable location, When you press
the trigger, the recoil from the initial spray can be
very strong,The high pressure spray could cause you
to fall if you are too close to the cleaning surface,,
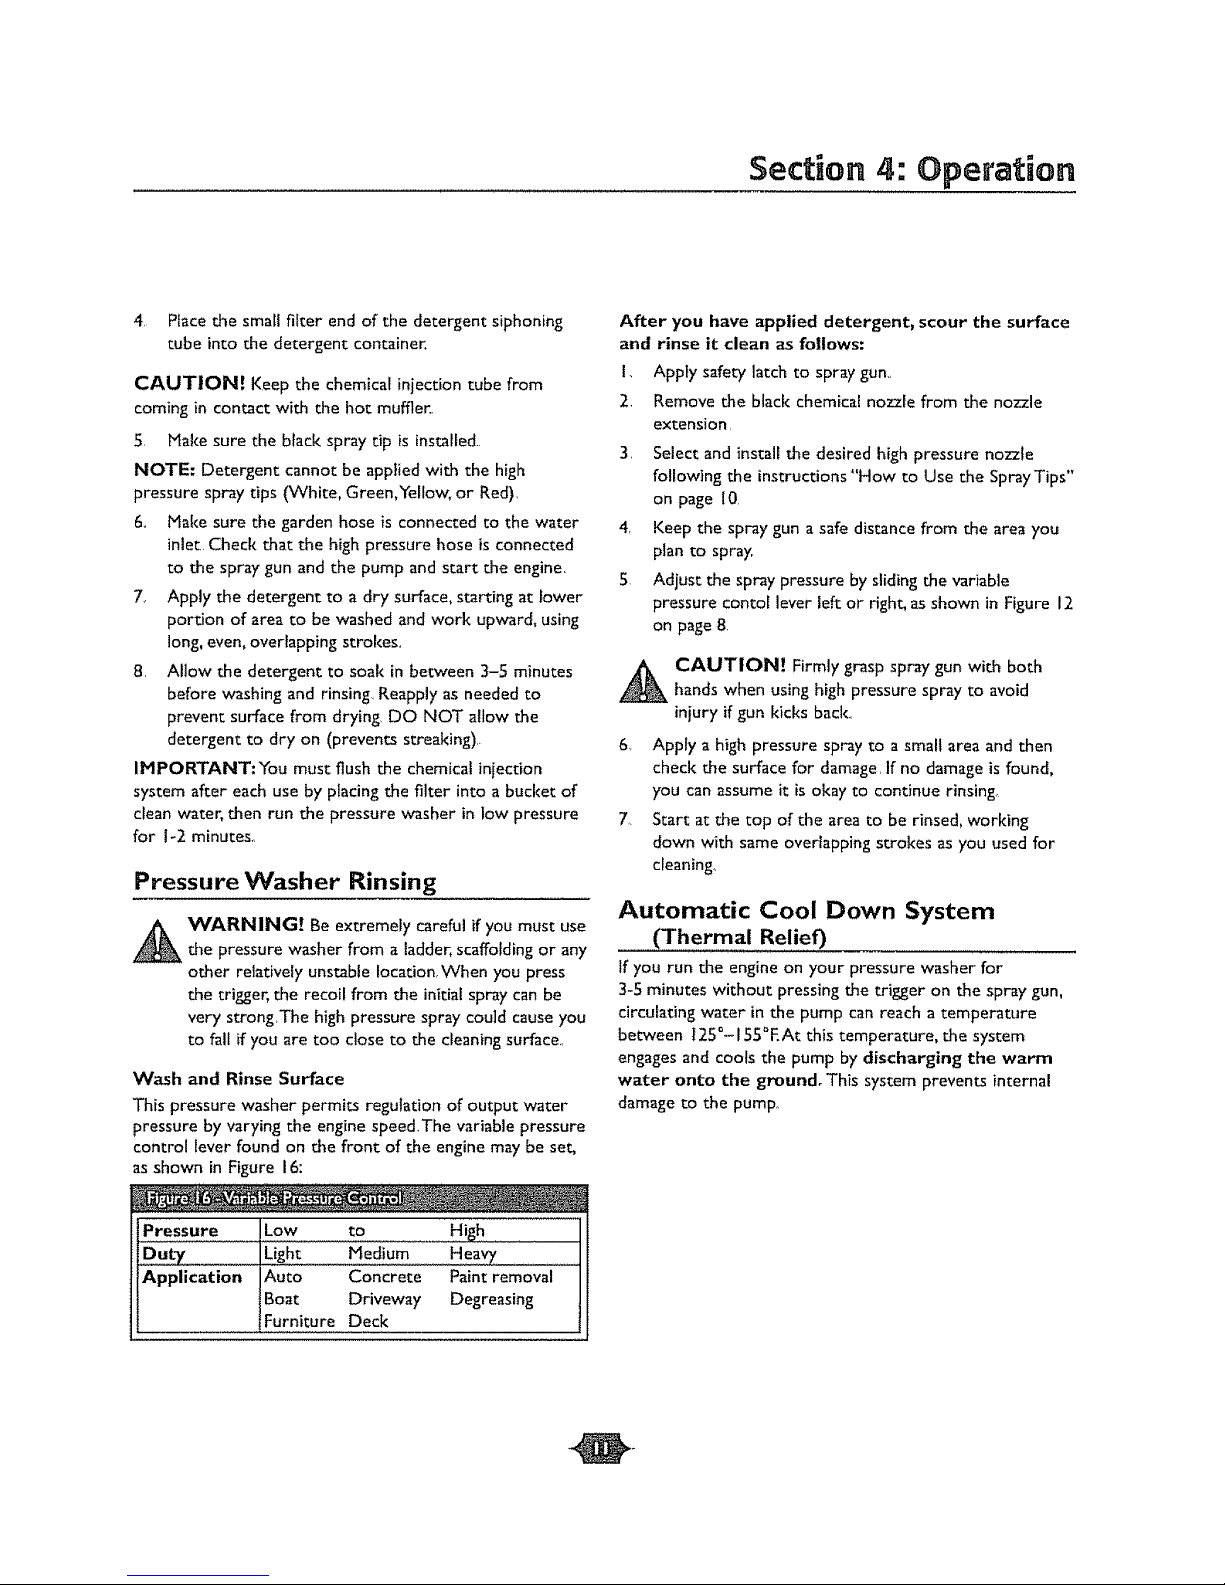
Wash and Rinse Surface
This pressure washer permits regulation of output water
pressure by varying the engine speedThe variable pressure
control lever found on the front of the engine may be set,
as shown in Figure 16:
Pressure Low to High
DU_ Light Medium Heavy
Application Auto Concrete Paint removal
Boat Driveway Degreasing
Furniture Deck
,
3.
After you have applied detergent, scour the surface
and rinse it clean as follows:
1, Apply safety latch to spray gun,,
Remove the black chemical nozzle from the nozzle
extension,
4r
5,
Select and install the desired high pressure nozzle
following the instructions "How to Use the SprayTips"
on page l0
Keep the spray gun a safe distance from the area you
plan to spray,
Adjust the spray pressure by sliding the variable
pressure contol lever left or right, as shown in Figure 12
on page 8.
_ AUTION! Firmly grasp spray gun with both
hands when using high pressure spray to avoid
injury if gun kicks back..
6_ Apply a high pressure spray to a small area and then
check the surface for damage, if no damage is found,
you can assume it is okay to continue rinsing_
7,. Start at the top of the area to be rinsed, working
down with same overlapping strokes as you used for
cleaning.,
Automatic Cool Down System
(Thermal Relief)
If you run the engine on your pressure washer for
3-5 minutes without pressing the trigger on the spray gun,
circulating water in the pump can reach a temperature
between t25 °-155°EAt this temperature, the system
engages and cools the pump by discharging the warm
water onto the ground. This system prevents internal
damage to the pump_
 Loading...