

Page 1

Safety o Assembly o Operation oTips &Techniques oMaintenance *Troubleshooting o Parts Lists oWarranty
®
21" Rotary Mower -- Model Series 440
READ SAFETY RULES AND mNSTRUCTmONS CAREFULLY BEFORE OPERATION
Warning: Thisunitis equippedwithan internalcombustionengineandshouldnotbeusedonornearanyunimprovedforest-covered,brush=
coveredor grass=coveredlandunlesstheengine'sexhaustsystemisequippedwitha sparkarrestermeetingapplicablelocalorstatelaws(if any),
If a sparkarresterisused,it shouldbemaintainedineffectiveworkingorderbytheoperator,Inthe StateofCaliforniatheaboveis requiredbylaw
(Section4442ofthe CaliforniaPublicResourcesCode),Otherstatesmayhavesimilarlaws,Federallawsapplyonfederallands,A sparkarrester
forthe mufflerisavailablethroughyournearestengineauthorizedservicedealeror contacttheservicedepartment,RO,Box361131Cleveland,
Ohio44136=0019,
PRINTEDiN U,S,A Troy-Bilt LLC, P.O. BOX 381131 CLEVELAND, OHIO 44138-0019 FORMNO,769=02166
Phone: 1(888} 840-8483, 1-330-558-7220 10/2005
Page 2
This Operator's Manua_ is an important part of your new lawn mower, mtwH_ he_p you assemble,
prepare and maintain the unit for best performance. Please read and understand what it says.
Table of Contents
Slope Gauge ....................................................... 3
Safe Operation Practices ................................... 4
Setup and Adjustment ....................................... 6
Operating Your Lawn Mower .............................. 8
Finding and Recording Model Number
BEFOREYOU STARTASSEMBLING
YOURNEW EQUIPMENT,
please locatethe modelplate onthe equipmentand copythe
informationto the sample model plate providedto the righL
Youcan locatethe modelplate by standing at the operating
positionand lookingdown at the rearof the deck. This
informationwill be necessaryto usethe manufacturer'sweb
site and/or obtainassistancefrom theCustomerSupport
Departmentoran authorizedservice dealer.
Maintaining Your Lawn Mower ......................... 10
Trouble Shooting .............................................. 12
Off-Season Storage and Safety Labe{s .......... 13
Parts List ........................................................... 14
Warranty ............................................ Back Cover
Modem Number Serial Number
0 TRDV BILT TROY-B LTLLc
www.troybiit.com CLEVELAND,ON44136
P. O. BOX 361131
338=558=7228
Customer Support
PIease do NOTreturn the unit to the retai{er from which it was
purchased, without first contacting Customer Support.
ifyou havedifficulty assemblingthis productor have any
questions regardingthe controls, operationor maintenanceof
this unit, you can seek help from the expert& Choose fromthe
options below:
1_VisittroybHt.com for manyuseful suggestions.Clickon
CustomerSupport button and you will get the four options
reproducedin this sampleto the righLClick on the appro-
priatebutton and help is immediatelyavailable.
2_Phonea Customer Support Representative
at 1(866)840-6483.
3. The engine manufacturer is responsiblefor all engine-
relatedissueswith regardsto performance,power-rating,
specifications,warrantyand service. Pleasereferto the
eng Need a manual and/or parts list? Download
separatelywithyour unit, for more information, literature from recent model years.
Click here to search our knowledge base°
Searchby product, keyword, or phrase.
Login to check the status of your questions, modify
your inquiries, or update your personal profile.
Need local assistance? Click here to find authorized
service centers in your area.
2
Page 3
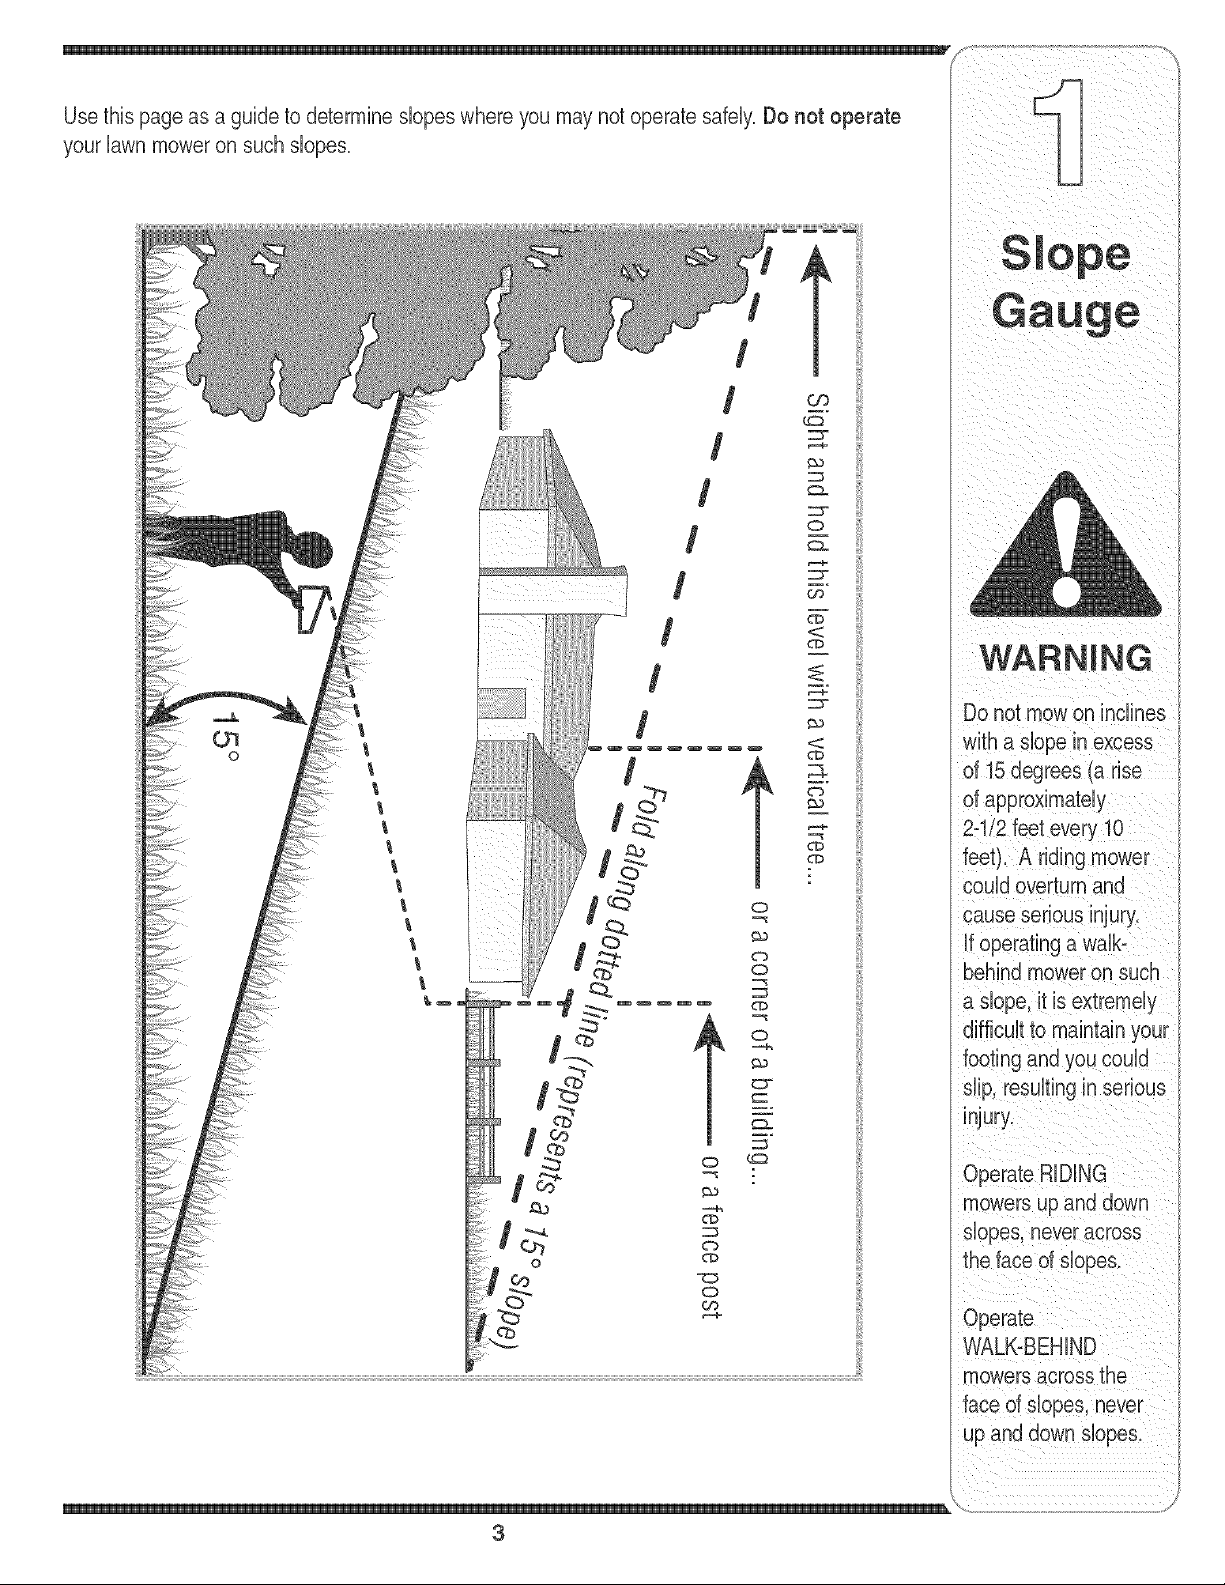
yourlawnmoweronsuchslopes.
/
t
/
/
/
/
/
o
WARNING
w_
Do not mowon inclines
with a dope in excess
of 15 degrees (a rise
of approximately
2-"
feet). A riding r
couldoverturnand
cause serious injury.
if operatinga walb
behindmoweron such
a dope, it isextremely
footing and you could
dip, resultingin serious
injury.
OperateRiDiNG
mowersupand down
dopes, neveracross
o
3
theface of dopes.
Operate
WALK-BEHIND
mowersacrossthe
face of dopes, never
up and down slopes.
\
Page 4
manual.Aswithanytypeofpowerequipment,carelessnessorerroronthepartoftheoperatorcan
resultinseriousinjury.Thismachineiscapableofamputatinghandsandfeetandthrowingobjects.
! Failuretoobservethefollowingsafetyinstructionscouldresultinseriousinjuryordeath.
Children
Tragicaccidentscan occurifoperatorisnotalertto presence
ofchildren.Childrenare oftenattractedto mowerandmowing
activity.Theydonot understandthe dangers.Neverassume
thatchildrenwill remainwhereyoulastsawthem.
1. Keepchildrenoutofthe mowingareaandunderwatchful
careof aresponsibleadultotherthanthe operator.
2. Bealertandturnmoweroffifa childentersthearea.
3. Beforeand whilemovingbackwards,look behindanddown
forsmallchildren.
4. Useextremecarewhenapproachingblindcorners,
doorways,shrubs,trees,orotherobjectsthatmayobscure
yourvisionofa childwho mayrun intothemower.
5. Keepchildrenawayfromhot orrunningengines.Theycan
sufferburnsfroma hotmuffler.
6. Neverallowchildrenunder14yearsoldto operateapower
mower.Children14yearsold andovershouldreadand
understandoperationinstructionsandsafetyrulesinthis
manualandshouldbetrainedandsupervisedbyaparent.
endangerthepersonal
safetyand/orproperty
and followthewarnings 5. Tohelpavoidbladecontactora thrownobjectinjury, ._ generallya '_arningof!rouble.........
and i..struction2 stay inoperatorzonebehindhandlesandkeepchildren, "
u _ competestop beforeremovngthe grasscatcheror uncog
, ,; bystanders,helpers,andpetsat least75feet frommower .
un_nusmanuau glngthechute
1. Readthis operator'smanualcarefullyin its entiretybefore
2. Thismachineis aprecisionpieceof powerequipment,
3. Neverallowchildrenunder 14yearsoldto operatethis
4. Thoroughlyinspecttheareawherethe equipmentisto
General Operation
attemptingtoassemblethismachine.Read,understand,
andfollow allinstructionsonthe machineandin the
manual(s)beforeoperation.Becompletelyfamiliarwith
thecontrolsandthe properuseof thismachinebefore
operatingit.Keepthismanualin asafeplaceforfuture
andregularreferenceandfor orderingreplacementparts.
nota plaything.Therefore,exerciseextremecautionat all
times.Yourunithasbeendesignedto performonejob: to
mowgrass.Do notuseitfor anyotherpurpose.
machine.Children14yearsoldand overshouldreadand
understandthe instructionsinthis manualandshould
betrainedand supervisedbya parent.Onlyresponsible
individualswhoarefamiliarwiththese rulesof safe
operationshouldbeallowedtousethis machine.
beused.Removeall stones,sticks,wire,bones,toysand
otherforeignobjectswhichcould betripped overor picked
upand thrownbythe blade.Thrownobjectscancause
seriouspersonalinjury.Planyourmowingpatternto avoid
dischargeofmaterialtowardroads,sidewalks,bystanders
andthe like.Also,avoiddischargingmaterialagainsta
wallorobstructionwhichmaycausedischargedmaterial
toricochetbacktowardtheoperator.
whileit isin operation.Stopmachineifanyoneenters
6. Alwayswearsafetyglassesorsafetygogglesduringopera-
tionandwhileperforminganadjustmentor repairtoprotect
youreyes.Thrownobjectswhich ricochetcancauseserious
injurytothe eyes.
7. Wearsturdy,rough-soledworkshoesand close-fitting
slacksandshirts. Shirtsand pantsthatcoverthe armsand
legsandsteel-toedshoesare recommended.Neveroperate
thismachinein barefeet,sandals, slipperyor lightweight
(e.g.canvas)shoes.
8. Donotputhandsorfeet nearrotatingpartsor undercutting
deck.Contactwithbladecanamputatehandsandfeet.
9. Amissingor damageddischargecovercancauseblade
contactor thrownobject injuries.
10.Manyinjuriesoccurasa resultofthe mowerbeingpulled
overthefoot duringafall causedby slippingortripping.
Do notholdonto the mowerifyouarefalling;releasethe
handleimmediately.
11.Neverpullthe mowerbacktowardyouwhileyouare
walking.Ifyou mustbackthe mowerawayfromawallor
obstructionfirstlookdownandbehindtoavoidtrippingand
thenfollow thesesteps:
a. Stepbackfrommowertofully extendyourarms.
b. Besureyou arewell balancedwithsurefooting.
c. Pullthe mowerbackslowly,no morethanhalfway
towardyou.
d. Repeatthese stepsasneeded.
12.Donotoperatethe mowerwhileunderthe influenceof
alcoholor drugs.
13.Donotengage theself-propelledmechanismon unitsso
equippedwhilestartingengine.
14.Thebladecontrolhandleis asafetydevice.Neverattempt
tobypassits operation.Doingso makesthesafetydevice
inoperativeandmay resultinpersonal injurythrough
contactwiththe rotatingblade.The bladecontrolhandle
mustoperateeasilyin bothdirectionsandautomatically
returntothe disengagedpositionwhenreleased.
15.Neveroperatethe mowerinwetgrass. Alwaysbesure of
yourfooting. A slipandfallcan causeseriouspersonal
injury.If youfeelyouare losingyourfooting,releasethe
bladecontrolhandleimmediatelyandthe bladewillstop
rotatingwithinthreeseconds.
16.Mowonlyindaylightor goodartificiallight.Walk,neverrun.
17.Stopthe bladewhencrossinggraveldrives,walksor roads.
18.Ifthe equipmentshouldstart tovibrateabnormally,stopthe
engineandcheck immediatelyforthecause.Vibrationis
]_ _nutthe engne errandwar unl: me Daaecomes-coa
and on the machine, area.
..... ,J
4
Page 5
Thecuttingbladecontinuesto rotatefora fewsecondsafter
the engineisshutoff. Neverplaceanypartofthe bodyin
the bladeareauntilyou aresurethe blade hasstopped
rotating.
20.Neveroperatemowerwithoutpropertrailshield,discharge
cover,grasscatcher,bladecontrolhandle,or othersafety
protectivedevicesin placeandworking.Neveroperate
mowerwithdamagedsafetydevices.Failuretodo socan
resultin personalinjury.
21.Mufflerandenginebecomehotand cancauseaburn.Do
nottouch.
22.Onlyuseparts andaccessoriesmadefor thismachineby
manufacturer.Failureto doso canresultinpersonalinjury.
23.Ifsituationsoccurwhichare not coveredinthis manual,
usecareand goodjudgment.Contactyourdealerfor
assistance.Telephone1-866-840-6483forthe nameofyour
nearestdealer.
SJope Operation
Slopesareamajorfactorrelatedto slipandfallaccidentswhich
canresultinsevereinjury.Operationonslopesrequiresextra
caution.Ifyoufeel uneasyonaslope,donotmowit.Foryour
safety,usethe slopegaugeincludedas partofthis manualto
measureslopesbeforeoperatingthisunitona slopedor hilly
area.Iftheslopeis greaterthan15degrees,donotmowit.
Do:
1. Mowacrossthefaceof slopes;neverup anddown.
Exerciseextremecautionwhenchangingdirectionon
slopes.
2. Watchfor holes,ruts,rocks,hiddenobjects,or bumpswhich
can causeyou toslipor trip.Tallgrasscan hideobstacles.
3. Alwaysbesureofyourfooting.A slip andfall cancause
seriouspersonalinjury.If youfeelyouarelosingyour
balance,releasetheblade controlhandleimmediately,and
the bladewillstop rotatingwithin3seconds.
Do Not:
1. Donotmowneardrop-offs, ditchesorembankments,where
you couldloseyour footingorbalance.
2. Donotmowslopesgreaterthan15degrees asshownon
the slopegauge.
3. Donotmowon wetgrass.Unstablefootingcouldcause
slipping.
Service
Safe HandlingOf Gasoline:
1. To avoidpersonalinjuryor propertydamageuseextreme
carein handlinggasoline.Gasolineisextremelyflammable
andthevaporsare explosive.Seriouspersonalinjurycan
occurwhengasolineis spilledonyourselforyourclothes
whichcanignite.
2. Washyourskinand changeclothesimmediately.
3. Useonly anapprovedgasolinecontainer.
4. Neverfill containersinsideavehicleoronatruckor trailer
bedwith a plasticliner.Alwaysplacecontainerson the
groundawayfromyourvehiclebeforefilling.
5. Removegas-poweredequipmentfromthe truck ortrailer
andrefuelit on theground.Ifthisis notpossible,then refuel
suchequipmentonatrailerwitha portablecontainer,rather
thanfroma gasolinedispensernozzle.
6. Keepthe nozzleincontactwiththerim of thefuel tankor
containeropeningat alltimesuntilfuelingis complete.Do
notusea nozzlelock-opendevice.
7. Extinguishallcigarettes,cigars,pipesandothersources
ofignition.
8. Neverfuelmachineindoorsbecauseflammablevaporswill
accumulatein the area.
9. Neverremovegascap oraddfuelwhileengineishot or
running. Allowengineto coolat leasttwominutesbefore
refueling.
10.Neveroverfillfueltank. Filltankto nomorethan_ inch
belowbottomof fillerneckto provideforfuelexpansion.
11.Replacegasolinecapandtightensecurely.
12.Ifgasolineis spilled,wipeit off theengineand equipment.
Moveunitto anotherarea.Wait5 minutesbeforestarting
engine.
13.Neverstorethemachineorfuel containernearanopen
flame,sparkorpilot lightas onawater heater,space
heater,furnace,clothesdryer,orothergas appliances.
14.Toreducefire hazard,keepmowerfreeofgrass,leaves,
or otherdebrisbuild-up.Cleanupoil orfuel spillageand
removeanyfuel soakeddebris.
15.Allowamowertocool at least5 minutesbeforestoring.
General Service:
1. Neverrunanengineindoorsorina poorlyventilatedarea.
Engineexhaustcontainscarbonmonoxide,an odorlessand
deadlygas.
2. Beforecleaning,repairing,or inspecting,makecertainthe
bladeandall movingpartshavestopped.Disconnectthe
sparkplugwireandgroundagainsttheengineto prevent
unintendedstarting.
3. Checkthe bladeandenginemountingboltsatfrequent
intervalsfor propertightness.Also,visuallyinspectbladefor
damage(e.g.,bent,cracked,worn)Replacebladewiththe
originalequipmentmanufacture's(O.EM.) bladeonly,listed
inthismanual."Useofpartswhichdo notmeettheoriginal
equipmentspecificationsmayleadto improperperformance
andcompromisesafety!"
4. Mowerbladesare sharpandcancut.Wrapthebladeorwear
gloves,anduseextracautionwhenservicingthem.
5. Keepallnuts,bolts,andscrewstighttobe surethe equip-
mentisin safeworkingcondition.
6. Nevertamperwithsafetydevices.Checktheirproperopera-
tionregularly.
7. Afterstrikinga foreignobject,stopthe engine,discon-
nectthe sparkplugwireandgroundagainsttheengine.
Thoroughlyinspectthemowerforanydamage.Repairthe
damagebeforestartingandoperatingthemower.
8. Neverattempttomakea wheelorcuttingheight adjustment
whiletheengineis running.
9. Grasscatchercomponents,dischargecover,andtrail
shieldaresubjecttowear anddamagewhichcould expose
movingpartsorallow objectsto bethrown.Forsafety
protection,frequentlycheckcomponentsand replaceim-
mediatelywithoriginal equipmentmanufacturer's(O.EM.)
partsonly,listedin this manual.'Use of partswhich do
not meettheoriginalequipmentspecificationsmayleadto
improperperformanceandcompromisesafety!"
10.Donot changetheenginegovernorsettingor overspeedthe
engine.Thegovernorcontrolsthe maximumsafeoperating
speedofthe engine.
11.Maintainorreplacesafetylabels,asnecessary'.
12.Observeproperdisposallawsand regulations.Improper
disposaloffluidsand materialscanharmtheenvironment.
ThisSymbolpoints
ua! before attemptingto
resuUt in personalinjury_
::When you see th s
_symbol
,EEDMTSWARNmNG
Responsibility
Restrictthe use
of this powermachine
to personswhoread
understand
5
Page 6

NOTE:Stand behind
Ihemoweras if you
were going to operate
it,Your righthandcor-
respondsto the right
sideof the mower;your
left hand corresponds
to the left side d the
mower.
IMPORTANT
DO NOTcrimp the
cableswhen liftingthe
handleup.
Step 1
HardwarePack
Wing Nuts (2) CarriageBolts (2)
1, Removeanypackingmaterialwhichmaybebetween
upperand lowerhandles,
a, Pullupand backon upperhandleasshownin
Step1,Makecertainthelowerhandleisseated
securelyintothe handlemountingbrackets,
b, Tightenhandknobssecuringupperhandleto
lowerhandle,Makesurethateach carriageboltis
seatedproperlyinthe handle,
2, Locatehairpinclip in oneholeontheweldpinon each
sideof lowerhandle,
a, Removehairpinclipfromthis hole,Usinga pairof
pliers,inserthairpinclipintotheotherholeonthe
weldpin, Repeaton otherside,
b, inserta carriageboltfromthehardwarepackinto
theupperholeon thehandlemountingbracket,
Securewithoneplasticwingnut,also included
inthe hardwarepack,Repeatonothersidewith
remainingitemsfromhardwarepack,
3, The ropeguideisattachedtothe rightsideofthe
upperhandle,Loosenthewingnutwhichsecuresthe
ropeguide,
a, Holdthe bladecontrolagainstupperhandle,
b, Pullstarterropeoutofthe engine,Releasethe
bladecontrol,
c, Slipstarterropeintoropeguide,Tightenwingnut,
4, Insertpostoncane ties into holesprovidedon the
lowerhandle,Pullcane tie tightandtrimexcess,
IMPORTANT
This unit isshipped
without gasoline or
oilin the engine. Fill
upgasolineand oil
as instructedin the
accompanyingengine
manual BEFORE
operatingyour mower,
Step 2
Step 3 Step 4
6
Page 7

positionprovidescuttingheightadiustment,
a, Depresslevertowardswheel,
b, Moveitto anyof theninepositionsfordesired
cuttingheight,SeeStep5,
c, Releaselevertowardsmowerdeck,
6, Followstepsbelowtoassemblethegrasscatcher:
a, Placebagoverframesothatitsblackplasticside
isat thebottom,
b, Slipplasticchannelofgrassbagover hooksonthe
frame,SeeStep6,All the plasticchannelsexcept
centertopof bagattachfromoutsideof bag,
c, Attachcentertopof bagfrominsideof bag,
7, Followstepsbelowtoattachgrasscatcher:
a, Liftreardischargedoor,
b, Placegrasscatcheron thepivotrod, Letgo
ofdischargedoorso that itrestson thegrass
catcher,SeeStep7,
Toremovegrasscatcherorconvertto a mulcher(if
equipped),liftreardischargedooronthe moweras
showninStep8, Liftgrasscatcherupand outofthe pivot
rod,Releasereardischargedoorto allowit tocloserear
openingofmower,
Step 5
_Make certain bagis
WARNING: Never operate mower
unless the hooks on the grass
catcher are firmlyseated on the
pivot rod, and the rear discharge
door rests firmJyagainst top of
the grass catcher.
\
Step 6
unless the hooks on
}
Step 7
7
Page 8

Recoil
Grass Bag
,<-_ Blade Control
-- Drive Control
WARNING
The blade control
mechanism is a
safety device. Never
attempt to bypassits
operations.
Use extreme care
when handling
gasoline. Gasoline is
extremely flammable
and the vapors are
explosive. Neverfuel
the machine indoors
or while the engine
is hot or running.
Extinguish cigarettes,
cigars, pipes and
other sources of
ignition.
Keep hands and feet
_way from the chute
tea on cutting deck.
Refer to warning
label on the unit.
Levers
Gasoline
Now that you have set up your lawn mower for op-
eration, get aquainted with its controls and features.
These are described below and illustrated on this
page. This knowledge will allow you to use your
new equipment to its fullest potential.
B_ade Control
The blade control is attached to the upper handle
of the mower. Depress and squeeze it against the
upper handle to operate the unit. Release it to stop
engine and blade.
WARNING:This bladecontrol mecha-
nism isa safety device. Neverattempt
to bypass its operations.
Drive Contro_
The drive control is located on the underside of
the upper handle and is used to engage the drive.
Squeeze it against the upper handle to engage the
drive; reIease it to slow down or stop mower from
propelling. See Figure 1=
Height
Levers
J
Figure 1
Cutting Height Adjustment Levers
One adjustment lever is located on each wheel and
is used to adjust the cutting height. All four levers
have to be at the same relative position to ensure a
uniform cut.
Recoi_ Starter
The recoiI starter is attached to the right upper
handle. Stand behind the unit and puII the recoil
starter rope to start the unit.
Gas and Oil Fil_-Up
1. Check oil level and add oil if necessary. Follow engine
manual for this. See Figure 1 above for location of the
oil fill.
2. Service the engine with gasoline as instructed in the
engine manual See Figure 1above for location of
gas fill
WARNING: Use extreme care when han-
dling gasoline. Gasoline is extremely
flammable and the vapors are explosive.
Never fuel the machine indoors or while
the engine is hot or running. Extinguish
cigarettes, cigars, pipes and other
sources of ignition.
8
Page 9

WARNING:The operation of anylawn
mowercan result inforeign objects
being thrown into the eyes,wNch can
damageyour eyes severely.Always
wearsafety glasses while operating
the mower,or while performing any
adjustments or repairs on it.
Starting Engine
WARNING:Besure no one other than
the operator isstanding nearthe lawn
mowerwhile starting engine or operat-
ing mower.Neverrun engineindoors
or inenclosed, poorly ventilated areas.
Engine exhaustcontains carbon monox-
ide,an odorless and deadly gas. Keep
hands,feet, hair and loose clothing
awayfrom anymoving partsonengine
and lawn mower.
1, Pushprimerthreetimes,Waitabouttwoseconds
betweeneachpush,SeeFigure2,In temperature
around55° F or below,primefivetimes,Donotprime
to restarta warmengine,
2, Standingbehindthe mower,squeezethebladecontrol
againstupperhandle,SeeFigure2,
3, Holdingthesetwohandlestogetherfirmly,grasprecoil
starterhandleand pullropeout witha rapid,continu=
ous,fullarm stroke,SeeFigure2,Keepinga firm
gripon thestarterhandle,lettheroperewindslowly,
Repeatuntilenginecranks,Lettheroperewindeach
timeslowly,
Stopping Engine
1, Releasebladecontrolto stoptheengineandblade,
2, Disconnectsparkplugwire fromsparkplugand
groundagainsttheengine,
_k ARNING:Wait for the blade to stop
Using Your Lawn Mower
Be surelawnisclear ofstones,sticks,wire,or other
obiectswhichcoulddamagelawnmowerorengine,
Suchobiectscouldbe acddentlythrownbythemower
in anydirectionandcauseseriouspersonaliniuryto the
operatorandothers,
completely beforedoing anywork
on the moweror to removethe grass
catcher.
WARNING:Neveroperateyour mower
without either the rear door orthe entire
grass catcher assembly firmly secured.
J
Figure 2
_IL ARNING:If you strike aforeign
1, Oncetheengineis running,squeezethedrive
controlagainsttheupperhandleto propelmower,
2, For bestresults,do notcut wetgrass,
3, Fora healthierlawn,nevercutoff morethanone=
thirdof thetotallengthofthe grass,
object, stop the engine. Remove
wire from the spark plug, thoroughly
respect mowerfor anydamage,and
repair damagebefore restarting and
operating. Extensivevibration of
mower during operation isan indica-
tion of damage.Theunit should be
promptly inspected and repaired.
Using as Muncher
Formulchinggrass,removethegrasscatcherfromthe
mower,The reardischargedoorshouldbeclosed,
1, Foreffectivemulching,do notcut wetgrass,
2, Neworthickgrassmayrequirea narrowercut,
Adiustgroundspeedaccordingtoconditionoflawn,
3, If thegrasshasbeenallowedto growinexcessof
4 inches,mulchingisnotrecommended,Usethe
grasscatcherto bagclippingsinstead,
Using Grass Catcher
Youcanusethegrasscatchertocollectclippingswhile
youareoperatingthemower,
1, Attachgrasscatcherfollowinginstructionsonpage
7,Grassclippingswill automaticallycollectinbagas
yourun mower,Operatemowertillgrassbagisfull,
2, Stopenginecompletelybyreleasingtheblade
controlhandle,Makesurethattheunit hascometo
a completestop,
3, Liftdischargedoorand pullgrassbagup andaway
fromthemowertodisposeofthe grassclippings,
being thrown into
the eyes, which can
damage your eyes
severely. Always wear
safety glasses while
iioperating the mower,
_ngine or operating
_ower. Never tun
engine !ndoors or
in enclosed poorly
ventilated areas' En_
gine exhaust Contains
carbon monoxide, an
odorless and deadly
_gas, Keep hands, feet,
hair and loose Clothing
away from any mov ng
/
9
Page 10

disconnectspark
plug,andground
oga n,teng n b fOrO
\
Figure 3
reassembiy,
mustoperatefreelyin bothdirections,SeeFigure3,
2, Lubricatethewheelsatleastoncea seasonwith
lightoil (or motoroil), If wheelsareremovedforany
reason,lubricatesurfaceof thepivotarm andinner
surfaceofthewheelwithlightoil SeeFigure3,
3, Lubricatethetorsionspringandpivotpointontherear
dischargedoorperiodicallywithlightoil to prevent
rust,SeeFigure3,
4, Thetransmissionis prequbricatedandsealedatthe
factoryanddoesnotrequirelubrication,
5, Followthe accompanyingenginemanualforlubrica-
tionscheduleandinstructionforenginelubrication,
Deck Care
1, Disconnectsparkplugwire,Draingasolinefromlawn
mower,or placea pieceof plasticunderthegascap,
2, Tip mowersothatitrestsonthe housing,Keepthe
sidewiththe aircleanerfacingup,Holdmowerfirmly,
WARNING:Nevertip the mowermore
than 90 degrees in anydirections and
do not leavethe mowertipped for any
length of time. Oil can drain into the
upper part of the enginecausing a
starting problem.
Figure 4
Genera[ Recommendations
1, Alwaysobservesafetyruleswhen performing
anymaintenance,
2, Thewarrantyonthislawnmowerdoesnotcover
itemsthathavebeensubiectedtooperatorabuse
or negligence,Toreceivefullvaluefromwarranty,
operatormustmaintainthe lawnmoweras
instructedhere,
3, Changingofengine-governedspeedwill void
enginewarranty,
4, Alladjustmentsshouldbecheckedat leastonce
eachseason,
5, Periodicallycheckall fastenersand makesurethese
aretight,
WARNING:Alwaysstop engine,
disconnect spark plug, andground
against engine beforecleaning,
lubricating or doing any kind of
maintenanceon your machine.
3, Scrapeanddean theundersideofthe deckwitha
suitabletool Do notspraywithwater,
4, Putthemowerbackonits wheelsonthe ground,If
youhadput plasticunderthe gascapearlier,make
sureto removeitnow,
Engine Care
1, Maintainoillevelasinstructedinenginemanual,
2, Serviceaircleanerevery25 hoursundernormal
conditions,Cleaneveryfewhoursunderextremely
dustyconditions,Refertoenginemanual
3, Cleansparkplugandresetthegap oncea season,
Checkenginemanualforcorrectplugtype andgap
specifications,
4, Cleanengineregularlywitha clothorbrush,Keepthe
coolingsystem(blowerhousingarea)dean topermit
properaircirculation,Removeallgrass,dirtand
combustibledebrisfrom mufflerarea,
Replacing Rear Flap
1, Toremoverearflap,cut offtheflatendof thewire rod
whichsecuresit tothe deck,SeeFigure4,
2, Attachthenewflapand newrodtodeck, bendingthe
endsof thenew rodoverto securetodeck,
10
Page 11

B_ade Care f -_,
_ ARNING:When removing cutting
1, Disconnectsparkplugwirefromsparkplug,Turn
moweron itssidemakingsurethattheairfilterand
thecarburetorareup,
2, Removebolt,bladebell support,blade,andblade
adapterfromthe enginecrankshaft,SeeFigure5,
3, The bladecanbe sharpenedwitha fileoron agrind=
ingwheel Do notattemptto sharpenthebladewhile
itis stillon themower,Whensharpeningblade,follow
originalangleofgrind,Grindcuttingedgesequallyto
keepbladebalanced,
4, Removebladefromthe adapterfortestingbalance,
Balancethebladeona roundshaftscrewdriverto
check,Removemetalfromthe heavysideuntilit
balancesevenly,
bladefor sharpening or replacement,
protect your handswith apairof heavy
gloves or usea heavy rag to hold blade.
WARNING:An unbalanced bladewill
cause excessivevibration when rotating
at high speeds, it may causedamage
to mower,and could breakcausing
personalinjury.
i i i
Figure 5
WhenremOVing
the cutting blade
_for sharpening or
rep!aeement or
5, Lubricatetheenginecrankshaftandtheinnersurface
ofthe bladeadapterwithlightoil Slidethe blade
adapterontotheenginecrankshaft,Placetheblade
on theadaptersuchthat theside ofthe blademarked
"Bottom"(orwithpartnumber)facesthe groundwhen
themoweris intheoperatingposition,Makesurethat
bladeisalignedandseatedon bladeadapterflanges,
6, Placebladebellsupporton the blade,Alignnotches
on thebladebellsupportwithsmallholesinblade,
Replacehexbolt andtightenhexbolttotorque:450
in,Ibs,rain,,600 in,Ibs,max,
Toensuresafeoperationof yourmower,periodically
checkthe bladeboltfor correcttorque,
Belt Care
1, Removetwoshoulderscrewssecuringfrontdrive
coverto mowerdeck,SeeFigure6, Pressinwardon
sidesoffrontdrivecoverand releasetabsthatsecure
itto theheightadiusterbrackets,Removedrive cover
frommower,
2, Loosenscrewholdingbelttensionspringtotrans=
mission,SeeFigure6 inset,Donot removescrew
completely,As youloosenit, tensiononthebeltwillbe
released,
3, Pushtransmissionupa littleandslidebeltoffthe
transmissionpulley,Lift mowertoaccessbeltfrom
undersideof mower,Slidebeltoff ofenginepulleyand
aroundtheblade,SeeFigure7,
Figure 6
::, ,, /
Figure 7
4, Replacewithnewbelt,workingaroundblade,Make
surebelt isfirmlyseatedonenginepulleywhile
pullingfromtheothersideandslidingit aroundthe
transmissionpulley,Tightenscrewloosenedearlier
tosecurebelt tensionspringto thetransmission,
Reassemblefrontdrivecover,
pair of heavy g oves
or use a heavy rag to
hold the blade.
An unbalanced blade
will cause excessive
vibration when rotat-
ingat high speeds, it
may cause damage
to mower, and could
break causing per-
sonal injury.
11
Page 12

Shoot og
For repairs beyond
theminoradjustments
listed here, contact
an authorized service
dealer.,
Enginefailsto Start 1, B!aclecontroidisengaged, i: Engagebladecent[eL
2. SparkPlugwh'edisc0nnected_ 2. C0nneciWgetoSparkplug,
Fue!tankempty0rStalefueL Filltankwith Clean,freshgaso)ine
Enginenotprirned, 4. Pdrneengineasinstructedin ©perat-
5. Eautysparkpug, 5, Cean, adustgap, orrepace.!ngYourLawnMowe[.
6. Blocked fuel line, 6. Clean fuel line,
7. Enginefl00ded. 7 Waitalewminutest0restart butdo
l
Engineruns erratic 1. Sparkplugwireloose. 1 Connectandtightensparkplugwire.
2. Blockedfuellineor stalefuel. 2. Cleanfuelline:fill tank withclean,
freshgasoline.
3. Vent ingas capplugged.
4. Wateror dirt infuel system.
5. Dirtyaircleaner.
6. Carburetorout of adjustment.
3. Clearvent.
4. Drainfueltank.Refill withfresh fuel.
5. Refertoenginemanual.
6. Refertoenginemanual.
Engineoverheats 1. Engineoi! levellow. 1. Fillcrankcasewithproperoi!.
2. Air flowrestricted. 2. Removeblowerhousing
andclean.
!
: 3. Carburetornot adjustedproperly, : 3. Refertoenginemanual.
il_ _ i i i
!i_ii_i_i_ii_i _ii iiilt t t t t t t t t t __i
Occasionalskips
(hesitates)at
highspeed
1. Sparkpluggaptooclose.
2. Carburetoridle mixtureadjustment
improperlyset.
3. Dirtyair cleaner. ! 3. Refertoenginemanual.
1. Adjustgap to .030".
2. Refertoenginemanual.
2. Refertoenginemanual.
Excessive 1. Cuttingbladelooseorunbalanced. 1. Tighten bladeand adapter.Balance
Vibration
2. Bentcutting blade.
I B
Uneven cut 1. Wheels notpositionedcorrectly. 1. Placeall fourwheelsin same
2. Dullblade. 2. Sharpenorreplaceblade.
blade.
2. Seean authorizedservicedealer.
heightposition.
Mowerw not 1 Betnot nsta edpropery 1 Checkbet for properpu ey nsta aton
se f re I 1 and movement.
p pe 2. Debriscloggingdriveoperation. 2. Stopengine,disconnectsparkplug
3. Damagedorworn belt. m & inspectandreplacebelt.
wireand cleanoutdebris.
14
Page 13

Off-Season Storage 4, Coatmower'scutt,ngbladewithchass,sgreaseto
Thefollowingstepsshouldbetakento prepareyourlawn preventrusting,
mowerforstorage, S,Storemowerinadry,e_eanarea,Donotstorenext ,//
1, Cleanand lubricatemowerthoroughlyasdescribedin to corrosivematerials,suchas fertilizer, / /
the ubrcaton nstructons ..........
2, We donotrecommendtheuseofa pressurewasher ventilatedor metalstorageshed,careshouldbetaken
or gardenhoseto cleanyour unit, torust=prooftheequipment,Usinga lightoilorsilicone,
3, Referto enginemanualforcorrectengine coattheequipment,especiallycablesandall moving SOn
storageinstructions, partsofyourlawnmowerbeforestorage,
when storinganytypeOTpowerequipmentinapoorly
Safety Labels Found On Your Lawn Mower
PLACEANDWORKING.IF DAMAGEDREPLACEiMMEDiATELY.
WARNING
DONOTremove safety
(or any) labels from
mower for any reason,
13
\
Page 14

Q
Q
@
Q
..//"
-@
@.
Q
o "_
14
Page 15

1 747-1161A BladeControlHandle
2 749-1092A UpperHandle
3 747-04080 GrassCatcherFrame
4 749-0928A LowerHandle
5 720-0279 WingNut
6 710-1205 RopeGuide
7 710-1174 CarriageBolt,5/16-18x 2
8 664-04011 GrassBagAssembly
9 720-04072 StarKnob5/16-18
10 731-04204 DeluxeBaleCover
11 726-0240 CableTie
12 710-0703 CarriageBolt,I/4-20
13 731-04134A RearDischargeDoor
14 750-04162 Spacer
15 732-04089A TorsionSpring- LH
16 732-04090A TorsionSpring- RR
17 734-04014B RearWheel,8"x2,125"
18 731-04150C RearBaffle
20 787-01277 Deck- 21"
22 782-5002B FrontBaffle
23 748-04015A BladeAdapterw/Pulley
24 742-0741 21"StandardCut Blade
25 710-1257 HexBolt, 3/8-24x2,5
26 687-02044 PivotPlateAssembly
27 736-0524B BladeBelISupport
28 787-01298 HeightAdiustmentPlate- RH
787-01299 HeightAdiustmentPlate- LH
29 720-0426 AdiustmentLeverKnob
30 732-0706 FrontLever-RH
732-0707 FrontLever- LH
31 738-04136 ShoulderScrew
32 634-04018 FrontWheel,8" x2,125"
33 710-04371 Screw,1/4-15x 1,250
34 746-1132 ControICable-40,75"
36 731-04998 Trailshield
37 732-0700 TrailshieldWire
38 712-0397 WingNut,1/4-20
39 747-04035 RearDoorPivotRod
40 732-04175 SpringLever
41 687-02071A PivotArm Assembly- RH
687-02070A PivotArmAssembly-LH
42 710-1652 ABScrew
43 712-04065 FlangeLockNut,3/8-16
44 714-0104 HairpinClip
45 710-0654A TT SeresScrew,3/8-16x 1,00
46 687-02193 Ht, Adj,Assy,Front- LH
687-02194 Ht, Adi,Assy,Front- RH
47 687-02069 RearHandleBracketAssy,-LR
687-02068 RearHandleBracketAssy,- RH
48 747-1214 LowerBailHandle
49 710-1650 ShoulderScrew
50 746-04203 DriveCable51"
51 754-04101 V-Belt
52 618-04376 TransmissionAssembly
53 731-05020A FrontDriveCover
54 732-1043 BeltTensionSpring
55 682-0015 BearingAssembly
56 736-0447 WaveWasher
57 710-0216 HexScrew
58 715-0221 DowelPin
59 717-1762 Gear,14T-RH
717-1761 Gear,14T- LH
60 710-04531 Screw1/4-20
61 782-7551A WheeIDustCap
62 716-0102 SnapRing
63 736-0474 Washer,1,5"0D
64 750-04594 SleeveSpacer-LH
65 750-04595 SleeveSpacer-RR
66 715-04030 Roll Pin
67 756-04151A InputPulley
68 787-01292 HandleBracket-RH
787-01291 HandleBracket-LH
and disengage safely.
A substitute inon OEMt
oV-Beltcan bedanger-
us by notdisengaging
completely,
To order
replacement parts,
call 1=866=840-648S,
1-336=558-7220_
or log on to our
Web site at
www.troybiltocom
NOTE:Forpaintedparts,pleaserefertothe listof
colorcodesbelow, Pleaseaddtheapplicablecolor
code,whereverneeded,to thepart numbertoorder
a replacementpart, For instance,ifa part numbered
700-xxxxispaintedTroybiltRed,the partnumberto
orderwouldbe 700-xxxx-0638,
TroybiltRed:0638
PowderBlack:0637
\
15
Page 16

MANUFACTURER'S LIMITED WARRANTY FOR
®
The limitedwarrantyset forthbelowis givenbyTroy_BiltLLCwithrespect
tonewmerchandisepurchasedandusedintheUnitedStates,itsposses_
sionsandterritories.
"Troy_Bilt"warrantsthis productagainstdefectsinmatedalandworkmam
shipfor a periodof two(2)yearscommencingon thedateoforiginal
purchaseandwill,atits option,repairorreplace,freeofcharge,anypart
foundto bedefectivein materialsor workmanship.This limitedwarranty
shallonly applyif this producthasbeenoperatedand maintainedin
accordancewiththe Operator'sManualfurnishedwiththeproduct,and
hasnotbeensubiectto misuse,abuse,commercialuse,neglect,accident,
impropermaintenance,alteration,vandalism,theft,fire,water,or damage
becauseofother perilor naturaldisaster.Damageresultingfromthe
installationor use ofany part,accessoryorattachmentnotapprovedby
Troy_Biltforuse withtheproduct(s)coveredbythis manualwillvoidyour
warrantyastoany resultingdamage.
Normalwearpartsarewarrantedtobefreefromdefectsinmaterialand
workmanshipfora periodofthirty (30)daysfromthedate ofpurchase.
Normalwearpartsinclude,butare notlimitedto itemssuchas: batteries,
belts,blades,bladeadapters,grassbags,riderdeckwheels,seats,snow
throwerskidshoes,shaveplates,augerspiralrubberandtires.
NOWTO OBTAIN SERVICE: Warranty service is available,WITH
PROOFOF PURCHASE,through your local authorizedservice
dealer.To locate the dealer inyourarea, check your YellowPages,
or contact Troy-Bilt LLC at RO. Box 361131,Cleveland,Ohio 44136-
0019,or can 1-866-840-6483 or 1-330-558-7220,or logon to our
Web site at www.troybilt.com.
This limitedwarrantydoesnot providecoverageinthefollowingcases:
a. Theengineorcomponentpartsthereof.Theseitemsmay
carrya separatemanufacturer'swarranty.Refertoapplicable
manufacturer'swarrantyfortermsandconditions.
b. Logsplitterpumps,valves,andcylindershaveaseparateone
yearwarranty.
c. Routinemaintenanceitemssuchas lubricants,filters,blade
sharpening,tune_ups,brakeadiustments,clutch adiustments,
deckadiustments,andnormaldeteriorationofthe exteriorfinish
duetouse orexposure.
d. Servicecompletedbysomeoneotherthananauthorizedservice
dealer.
e. Troy_Biltdoesnotextendanywarrantyforproductssoldor
exportedoutsideofthe UnitedStates,its possessionsand
territories,exceptthosesold throughTroy_Bilt'sauthorized
channelsofexportdistribution.
f. Replacementpartsthatare notgenuineTroy_Biltparts.
g. Transportationchargesandservicecalls.
Noimpliedwarranty, includinganyimpliedwarrantyof merchant°
ability offitness for a particular purpose, applies after the applicable
period of express written warranty aboveasto the parts as identi-
fied. Noother express warranty,whetherwritten or oral, exceptas
mentioned above,given by anyperson or entity, including a dealer or
retailer,with respectto any product, shall bind Troy-Bilt. Duringthe
period of the warranty,the exclusive remedyis repair or replacement
of the product as setforth above.
The provisions as set forth inthis warranty provide the sole and
exclusive remedyarising from the sale. Troy-Bilt shall not be liable
for incidental orconsequential loss or damage including, without
limitation, expensesincurred for substitute or replacement lawncare
services or for rental expensesto temporarily replacea warranted
product.
Somestatesdonot allowtheexclusionorlimitationofincidentalor
consequentialdamages,or limitationson howlonganimpliedwarranty
lasts,sothe aboveexclusionsor limitationsmaynotapplytoyou.
Innoeventshall recoveryof anykindbegreaterthantheamountofthe
purchasepriceof theproductsold.Alteration of safety features of the
product shall void this warranty. Youassumetheriskandliabilityfor
loss,damage,oriniurytoyouand yourpropertyand/ortoothersandtheir
propertyarisingout ofthe misuseorinabilityto usethe product.
This limitedwarrantyshallnotextendto anyoneotherthanthe original
purchaseror to thepersonforwhomit waspurchasedasa gift.
HOWSTATELAWRELATESTOTHISWARRANTY:Thislimitedwar-
rantygh,'esyouspecificlegalrights,andyoumayalso haveotherrights
whichvaryfromstateto state.
IMPORTANT:OwnermustpresentOriginalProofofPurchasetoobtain
warrantycoverage.
TROYBILT LLC, P.O. BOX 361131 CLEVELAN D, OHIO 44136-0019; Phone: 1(866} 840-6483, 1-330-558-7220
 Loading...