

Page 1
Form 1905103 (3/98)
Owner’s Manual
5 H.P.
• Safety
• Assembly
• Controls
• Operation
• Maintenance
Model
12168
®
© 1998 GARDEN WAY INCORPORATED
TM
Page 2
2
Dear Owner:
Thank you for purchasing the TROY-BILT
®
VersaTiller™. This unique piece of outdoor
power equipment gives you the deep tilling
power that rear-mounted counter-rotating tines
provide, and provides the outstanding convenience of a front tine cultivator and tiller as well.
The optional edger attachment and optional aerator
attachment install easily and work very effectively
to add even more versatility to your machine.
Please read this manual. It tells you how to
safely and easily assemble, operate and
maintain your machine. Be sure that you and
any other operator carefully follow the
recommended safety practices at all times.
Failure to do so could result in personal injury
or property damage. This manual is considered
a permanent part of the unit and it must stay
with the unit if it is resold. A replacement
manual can be obtained from the factory or
your local authorized dealer.
All information in this manual is based on the
latest product information available at the time
of printing. Review this manual frequently to
familiarize yourself with its features and operation.
If you have any problems or questions concerning the unit, contact your local authorized dealer
or the factory. Our telephone numbers and
mailing addresses are listed on Page 3.
We want to ensure your complete satisfaction at
all times.
Safety Alert Symbol
This is a safety alert symbol.
It is used in this manual and
on the unit to alert you to
potential hazards. When you see this
symbol, read and obey the message
that follows it. Failure to obey safety
messages could result in personal
injury or property damage.
Owner Registration Card
Please fill out and mail the enclosed
owner registration
card. The purpose of
this card is to register
each unit at the
factory in order to
keep the owner
informed with informational bulletins
and safety literature.
Warranty Service
The warranty statement is included in
the unit’s literature package.
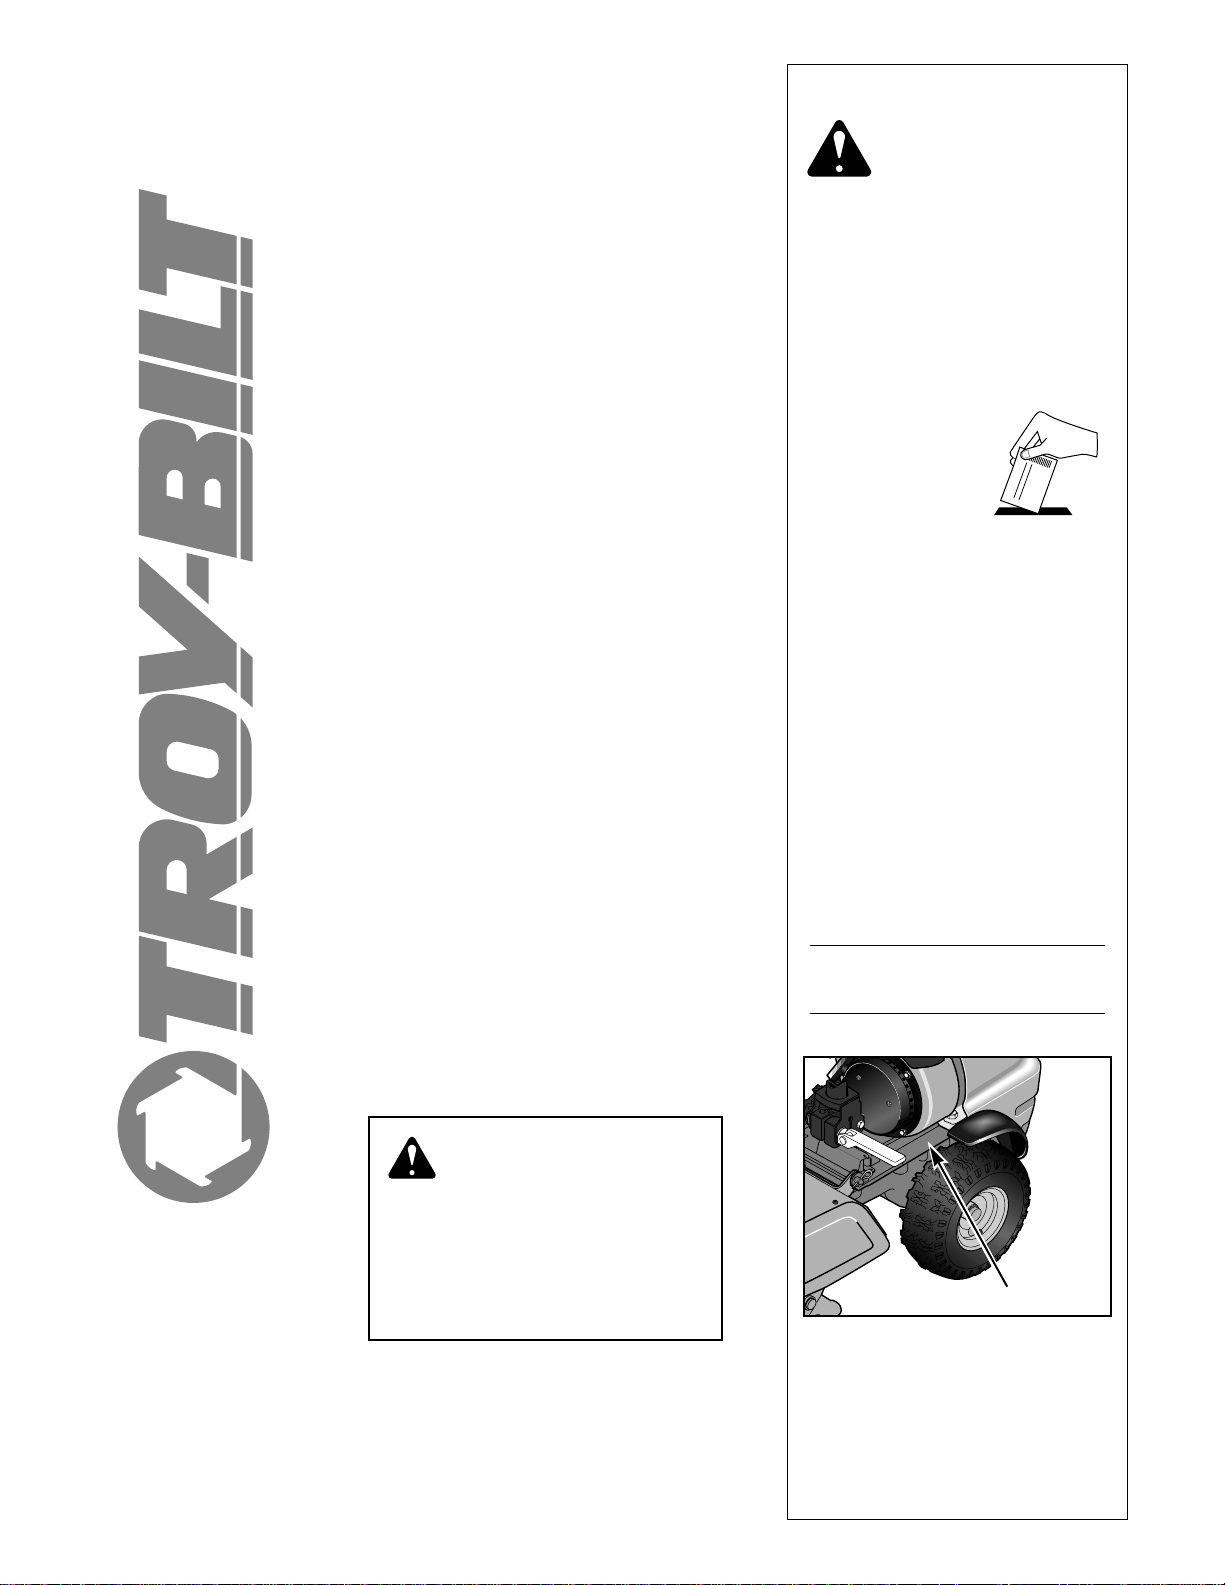
Model/Serial Numbers
The Model/Serial Numbers are located
on the engine mounting bracket (see
figure below). For ready reference,
record these numbers in the spaces
below.
Date of purchase:
Model/Serial Numbers:
Left and Right Sides
Left and right sides of the unit are
determined from the operator’s
position behind the handlebar.
®
M
I
A
L
M
I
A
L
Model/Serial Numbers
The engine exhaust from this
product contains chemicals
known to the State of
California to cause cancer,
birth defects or other
reproductive harm.
WARNING:
Page 3
3
Table of Contents
Owner Registration card ............................................................ 2
Warranty Service .................................................................... 2
Model/Serial Numbers .............................................................. 2
Customer Service and Technical Service ........................................ 3
Replacement Parts .................................................................. 3
Engine Service and Repair ......................................................... 3
SECTION 1: SAFETY ................................................................. 4
Safety Decals .................................................................................................. 6
SECTION 2: ASSEMBLY ............................................................. 7
Handlebar Assembly ....................................................................................... 7
Add Motor Oil to Engine .................................................................................. 8
Check/Adjust Tire Pressure.............................................................................. 8
Check Hardware Tightness.............................................................................. 8
How to Transport Machine in “Freewheel”....................................................... 8
SECTION 3: FEATURES & CONTROLS............................................... 9
Drive Bail......................................................................................................... 9
Swivel Handlebars........................................................................................... 9
Handlebar Locking Lever................................................................................. 9
Hood Release Pin............................................................................................. 9
Tines................................................................................................................ 9
Operational Interlock System........................................................................... 9
Engine Throttle Lever....................................................................................... 10
Fuel Primer Bulb.............................................................................................. 10
Recoil Starter................................................................................................... 10
Oil Fill Tube and Dipstick ................................................................................. 10
Fuel Tank......................................................................................................... 10
Spark Plug....................................................................................................... 10
Air Cleaner....................................................................................................... 10
Muffler............................................................................................................. 10
SECTION 4: OPERATION ............................................................. 11
Preparation Before Starting ............................................................................. 12
Break-In Operation........................................................................................... 12
The Operational Interlock System.................................................................... 13
Convert From Rear Tine Tiller to Front Tine Tiller/Cultivator............................ 14
Start and Stop the Engine................................................................................ 15
How to Operate Your Machine As A Rear Tine Tiller........................................ 15
Clearing Debris from Tines.............................................................................. 16
How to Operate Your Machine As A Front Tine Tiller/Cultivator....................... 16
Cultivating in Flower Beds/Shrubbery Areas.................................................... 16
Optional Attachments ...................................................................................... 17
Loading and Unloading the Tiller..................................................................... 18
SECTION 5: MAINTENANCE ......................................................... 19
Required Maintenance Schedule...................................................................... 19
Tiller/Cultivator Maintenance........................................................................... 20
Engine Maintenance......................................................................................... 23
Off Season storage.......................................................................................... 23
Troubleshooting.................................................................................. Back Cover
Customer Service and
Technical Service
If you have questions or
problems with the unit,
contact your local dealer
or call or write to the
factory. (When calling or
writing the factory,
provide the model/serial
number of the unit.)
Replacement Parts
Factory specified
replacement parts are
available from your
authorized dealer or
directly from the
factory. For parts ordering information,
refer to the parts catalog.
Engine Service and
Repair
For engine service or
repair, contact your
nearest authorized
engine dealer (look in
the Yellow Pages
under “Engines–Gasoline”). The engine
is warranted by the engine manufacturer.
Any unauthorized work performed on the
engine during the warranty period may
void this warranty. For complete details
on the engine warranty, refer to the
engine owner manual.
To Contact the Factory:
GARDEN WAY INCORPORATED
1 Garden Way
Troy, New York 12180
FAX: (518) 391-7332
Telephone Numbers:
Customer Service: 1-800-437-8686
Technical Service: 1-800-520-5520
Parts Service: 1-800-648-6776
Outside the United States and Canada:
Customer Service: (518) 391-7007
Technical Service: (518) 391-7008
Parts Service: (518) 391-7006
TO AVOID SERIOUS INJURY:
• READ THE OWNER’S MANUAL.
• KNOW LOCATIONS AND FUNCTIONS OF ALL CONTROLS.
• KEEP ALL SAFETY DEVICES AND SHIELDS IN PLACE AND WORKING.
• NEVER ALLOW CHILDREN OR UNINSTRUCTED ADULTS TO OPERATE TILLER.
• SHUT OFF ENGINE AND DISCONNECT SPARK PLUG WIRE BEFORE MANUALLY
UNCLOGGING TINES OR MAKING REPAIRS.
• KEEP BYSTANDERS AWAY FROM MACHINE.
• KEEP AWAY FROM ROTATING PARTS.
• USE EXTREME CAUTION WHEN REVERSING OR PULLING THE MACHINE TOWARDS
YOU.
CAUTION
Page 4
Training
Read this Owner’s Manual and the
separate engine owner manual
carefully before operating this
equipment. Be completely familiar
with the controls and the proper use
of the unit. Know how to stop the
unit and disengage the controls
quickly. A replacement manual is
available by contacting us.
2. Never allow children to operate the
equipment. Never allow adults to
operate the equipment without
proper instruction.
3. Keep the area of operation clear of all
persons, particularly small children
and pets. Keep bystanders at least
25 feet away from the area of
operation.
4. Keep in mind that the operator or
user is responsible for accidents or
hazards occurring to other people,
their property, and themselves.
5. Familiarize yourself with all safety
and operating decals on the unit and
on any attachments or accessories.
6. Do not run the engine in an enclosed
area. Engine exhaust contains
carbon monoxide gas, a deadly
poison that is odorless, colorless,
and tasteless. Do not operate the
unit near buildings, windows, or air
conditioners.
7. Do not allow hands or any other part
of the body or clothing near the
rotating tines or near any other
moving part. Once the engine is
started and the unit is in rear tine
tiller mode, the tines and wheels
begin to rotate when the Drive Bail is
closed against the handlebar. If in
front tine cultivator mode, only the
tines rotate when the Drive Bail is
closed.
8. Before inspecting, servicing or
adjusting any part of the unit, shut
the engine off, wait for all moving
parts to stop, disconnect the spark
plug wire from the spark plug. Move
the wire away from the spark plug.
9. Do not operate the unit if you are
under the influence of alcohol,
medication, or when tired or ill.
Preparation
1. Thoroughly inspect the area where
the equipment will be used. Remove
foreign objects before tilling or
cultivating.
2. Let go of the Drive Bail before starting
the engine.
3. Do not operate this equipment without wearing suitable clothing. Avoid
loose garments or jewelry that could
get caught in moving parts of the
tiller or its engine.
4. Do not operate the tiller when you
are barefoot, in sandals, sneakers or
other light footwear. Wear protective
footwear that grips well on slippery
surfaces.
5. Do not till or cultivate near underground electric cables, telephone
lines, pipes or hoses. Contact your
telephone company or utility to verify
locations of cables or lines.
6. Handle gasoline with care; it is
flammable, the vapors explosive.
Take the following precautions:
a.) Use an approved gas container.
b.) Gas cap shall never be removed
or fuel added with engine running.
Engine shall be allowed to cool
before refueling. Operators shall not
smoke.
c.) Keep matches, cigarettes, cigars,
pipes, open flames, or sparks away
from the fuel tank and fuel container.
Section
1
Safety
SPARK ARRESTER WARNING TO RESIDENTS OF CALIFORNIA AND SEVERAL OTHER STATES
Under California law, and under the laws of several other states, you are not permitted to operate an
internal combustion engine using hydrocarbon fuels on any forest, brush, hay, grain, or grass
covered land; or land covered by any flammable agricultural crop without an engine spark arrester in
continuous effective working order.
The engine on the unit is an internal combustion engine which burns gasoline, a hydrocarbon fuel, and must be equipped with a
spark arrester muffler in continuous effective working order. The spark arrester must be attached to the engine exhaust system in
such a manner that flames or heat from the system will not ignite flammable material. Failure of the owner/operator of the unit to
comply with this regulation is a misdemeanor under California law (and other states) and may also be a violation of other state
and/or federal regulations, laws, ordinances or codes. Contact your local fire marshal or forest service for specific information
about which regulations apply in your area.
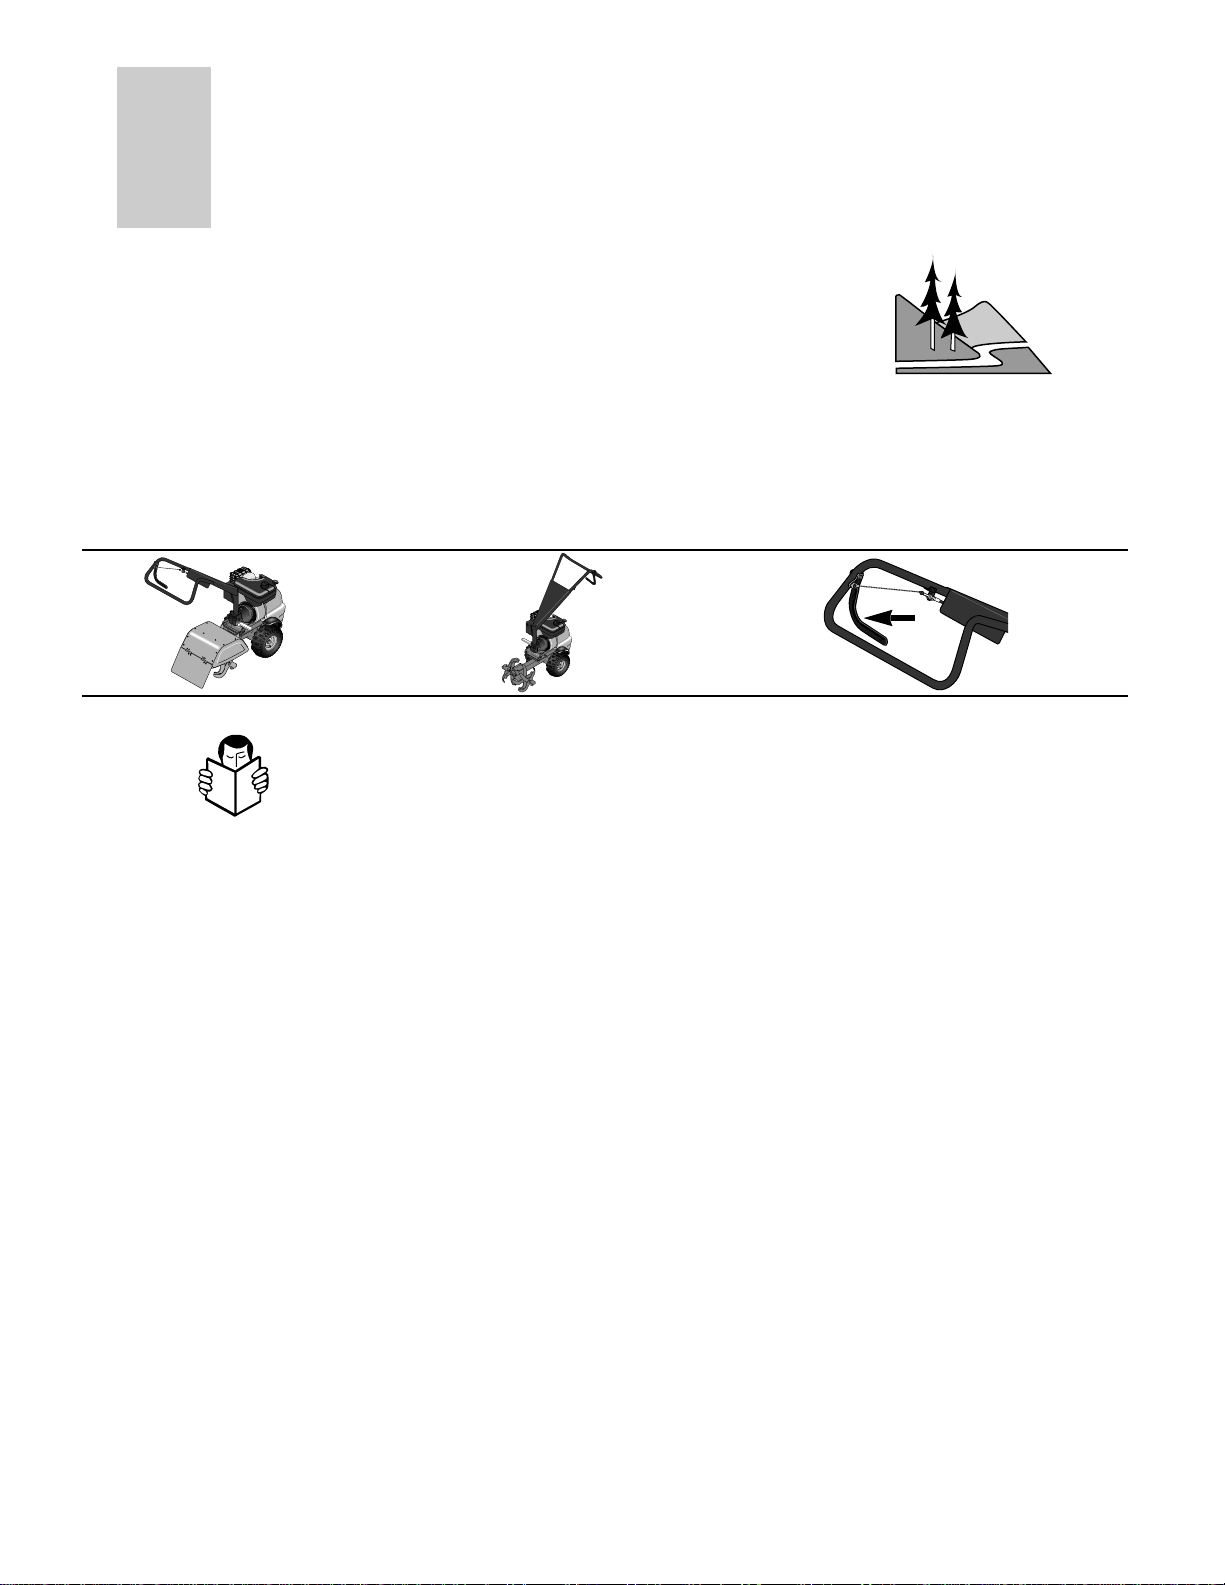
4
Rear
Tine
Tiller
Mode
Front Tine
Cultivator
Mode
Drive
Bail
Page 5

Section 1: Safety
Operation
1. Do not put hands or feet near or
under rotating parts.
2. Use extreme caution when on or
crossing gravel driveways, walks or
roadways. Be alert for hidden
hazards or traffic. Do not carry
passengers.
3. If you hit a foreign object, stop the
engine, let all moving parts come to
a complete stop, disconnect spark
plug wire and move wire away from
the spark plug, and inspect for damage. Repair damage before restarting.
4. Exercise caution to avoid slipping or
falling.
5. If abnormal tiller vibration occurs,
stop engine immediately, disconnect
the spark plug wire, and move wire
away from spark plug. Check for the
cause. Carefully inspect for any damage. Fix the problem before using
the tiller again. Vibration is generally
a warning sign of trouble.
6. Stop the engine, let all moving parts
stop completely, disconnect the
spark plug wire and move the wire
away from the plug before leaving
the operating position, unclogging
tines, or making repairs, adjustments
or inspections.
7. Take all possible precautions when
leaving the machine unattended. Let
go of all controls. Stop engine, allow
all moving parts to stop completely,
disconnect spark plug wire and move
wire away from plug to prevent the
possibility of accidental starting.
8. Before cleaning, repairing or
inspecting, stop the engine, let all
moving parts stop completely,
disconnect the spark plug wire and
move wire away from spark plug to
prevent the possibility of accidental
starting.
9. The Operational Interlock System
should be tested for correct function
every time prior to using this equipment. See Section 4 in this Manual.
10. Never use equipment unless safety
guards and safety devices are in
place and working properly.
11. Do not remove the hood flap or in
any way alter its performance. Doing
so may allow stones to be thrown in
the operator’s direction, increase the
risk of accidentally coming into contact with the tines, or increasing the
possibility that the unit may unexpectedly be propelled backward.
12. Do not run the engine in an enclosed
area. Engine exhaust contains carbon
monoxide gas, a deadly poison that
is odorless, colorless and tasteless.
13. Keep children and pets away.
14. Never operate the equipment in the
rear tine tiller mode (operator
standing behind the tines) unless the
tine hood is properly installed over
the tines. Refer to illustrations on
Page 4. The tine hood may only be
removed after the handlebar is
swung around 180oto the front tine
tiller/cultivator mode (handlebar is
positioned over the engine). Never
till or cultivate in front tine tiller/
cultivator mode with the tine hood
installed— in this mode the tine
hood should always be off. Failure to
comply with these requirements
could result in serious personal
injury or damage to the tine hood. A
special safety interlock switch prevents the engine from running if the
tine hood is removed when the handlebaris in the rear tine tiller mode
(handlebars over hood and tines).
See illustration on Page 4.
15. When in rear tine tiller mode, the
tiller could unexpectedly jump
backward if the tines dig in too
deeply and the wheels lose traction.
To minimize the possibility of the
machine jumping backwards, do not
push down on the handlebar when in
rear tine tilling mode.
16. If in doubt about tilling conditions,
use the following precautions to help
you in maintaining tiller control:
a.) Walk on the left side of the
handlebar when in the rear tine tilling
mode. When front tine tilling or
cultivating, walk behind the handlebar.
b.) Use slower engine throttle speeds.
c.) When tilling, work gradually
deeper with each tilling pass.
d.) Clear the tilling area of big
stones, roots and other debris.
e.) When in rear tine tilling mode,
avoid putting downward pressure on
the handlebar which would cause the
wheels to lose traction. If necessary,
apply upward pressure to increase
wheel traction and to prevent the
tines from digging too deeply. When
in the cultivating mode, do the
opposite—apply downward
handlebar pressure to prevent the
tines from digging too deeply.
f.) In an emergency, release the control lever to stop tines and wheels.
17. Do not overload the capacity of the
machine by trying to till or cultivate
too deeply at too fast a rate.
18. Never use the tiller at high speed on
hard or slippery surfaces. Look
behind and use care when backing
up (there is no powered “reverse”).
19. Do not use this unit on steep slopes.
On modest slopes, slow down.
Obtain good footing. Don’t let unit
“freewheel” down slopes. When
possible, operate unit under power
with wheels engaged.
20. Clear the area of bystanders before
tilling or cultivating.
21. Use only attachments and accessories approved by Garden Way Inc.
22. Use tiller attachments and accessories when recommended.
23. Never operate this equipment without good visibility or light.
5
d.) Fill fuel tank outdoors using
extreme caution. Never add fuel
indoors. Use a funnel or spout to
prevent spillage.
e.) Replace all fuel tank and
container caps securely.
f.) If fuel is spilled, do not attempt to
start the engine, but move the
machine away from the area of
spillage and avoid creating any
source of ignition until fuel vapors
dissipate.
7. Never attempt to make any
adjustments while the engine is
running or the spark plug wire is
connected, except when so
instructed.
Page 6
6
24. Never operate this equipment if
you are fatigued, or under the influence of alcohol, drugs or medicine.
25. Operators shall not tamper with
the engine-governor settings; the
governor controls the maximum
safe operating speed and protects
the engine and all moving parts
from damage caused by
overspeed. Authorized service
shall be sought if a problem exists.
26. Do not touch engine parts that
may be hot from operation
(muffler, fins, etc.). Be certain all
parts have cooled down before
inspecting, cleaning or repairing.
27. Remember—to stop tines and
wheels, let go of the Drive Bail.
Do not try to restrain the tiller. Let
go of the handlebar if necessary.
28. Use extreme caution when moving
backward or pulling unit toward you.
29. Start the engine carefully
according to instructions and with
feet well away from the tines.
30 Never pick up or carry equipment
while the engine is operating.
Section 1: Safety
1. Never perform maintenance when
engine is running or spark plug wire is
connected except when specifically
directed to do so.
2. Keep tiller, attachments and
accessories in safe working condition.
3. Check all nuts, bolts and screws frequently for proper tightness. Always
verify the equipment is in safe working
condition.
4. Never store the machine with fuel in
the fuel tank inside a building where
fumes may reach an open flame or
spark, or where ignition sources are
present (such as hot water and space
heaters, furnaces, clothes dryers, etc.).
5. Let the engine cool down before
storing it in an enclosure.
6. To reduce fire hazard possibilities, keep
the engine free of grass, leaves or
grease.
7. Store gasoline in a cool, well-ventilated
area, safely away from any spark- or
flame-producing equipment. Store
gasoline in an approved container,
safely out of the reach of children.
8. Refer to the Maintenance Section in
this Manual for storage information if
your equipment is to be stored for an
extended period.
9. If the fuel tank has to be drained, do
this outdoors.
10.Follow manufacturer’s recommendations for safe loading, unloading,
transport and machine storage.
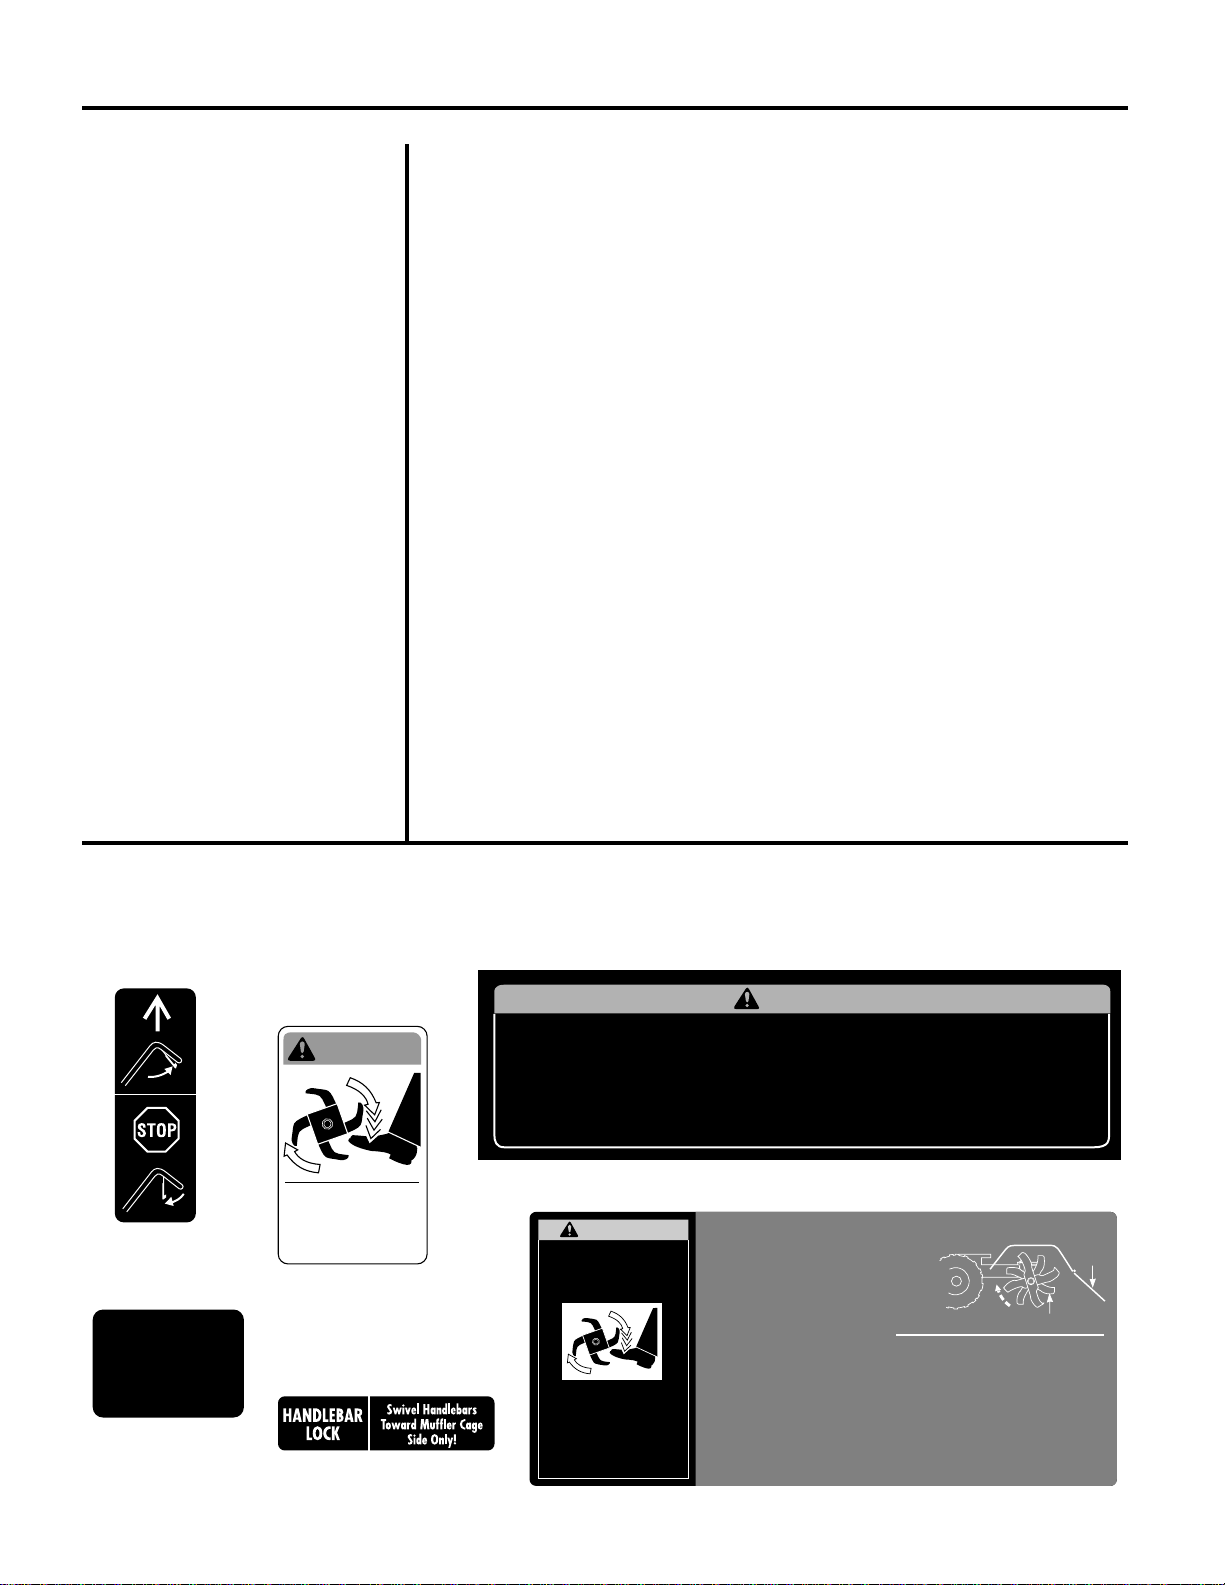
Decals For your personal safety and the safety of
others, safety message decals have been affixed to your unit.
Keep them clean and legible . Contact your local service
dealer or the factory for replacements if any decals are
damaged or missing. Refer to the separate parts catalog for
decal locations, part numbers, and ordering instructions.
The safety and operational decals on your equipment are
shown below (not actual size).
Maintenance and Storage
1911359.A (1/98)
WARNING
1911362.B (3/98)
To Avoid Serious Injury:
• Read the Operator’s Manual.
• Know the location and functions
of all controls.
• Keep all safety devices and
shields in place and working.
• Keep away from rotating parts.
•
Never allow children or uninstructed
adults to operate machine.
• Shut off engine and disconnect spark
plug wire before manually unclogging
tines or making repairs.
• Use extreme caution when reversing
or pulling the machine towards you.
• Keep bystanders away from
machine.
• Do not operate tiller in rear
tine tilling mode without tine
hood in place, or in front tine
tilling mode with tine hood
installed.
PLACE FREE HAND
HERE
WHEN MANUALLY
STARTING ENGINE.
1915810 (12/97)
W ARNING
Keep away from
rotating tines.
Rotating tines will
cause injury.
1911361.A (1/98)
Decal located on front plate of handlebar.
Decal located on top
of handlebar– left side.
Decal located on bottom
of handlebar and on
hood flap.
Decal located on
fuel tank.
Decal located on
handlebar locking lever.
WARNING
Tines could propel tiller backwards
when rear-tine tilling!
Contact with tines will cause injury.
To avoid injury:
Let go of control lever.
Stand to left rear side of handlebar
when first setting down tines onto
sod or hard ground.
Follow these safe operating procedures before starting the engine:
1. When in rear-tine mode, check that the wheels are properly
engaged (NOT in Freewheel). When properly engaged, wheels
will not roll more than 10 inches before locking up.
2. Check that flap on tine hood is in place, freely hanging down and
trailing behind tiller (see illustration at right).
3. Check that tines are properly installed so that curved cutting
edges will enter the soil first.
4. Check the engine for fuel and oil. Check the tiller's safety items.
Curved Cutting Edge
Freely
Trailing
Flap
TILLING/CULTIVATING INSTRUCTIONS
See your Owner's Manual for complete operating and safety instructions before operating this machine; the following are just some key
reminders. (A replacement manual is available from your dealer or at the factory.)
1. For front-tine cultivating, remove the tine hood. Loosen
the Handlebar Locking Lever and swing the handlebar
around over the engine. Swing only toward the muffler
cage side of engine. Rotating the handlebar in the wrong
direction will damage the safety electrical interlock switch.
Tighten the locking lever.
2. For rear-tine tilling, attach the tine hood. Loosen the
Handlebar Locking Lever and swing the handlebars to the
rear position over the hood. Swing only toward the muffler
cage side of engine. Tighten the locking lever.
3. Squeeze the Drive Bail lever to operate. Release this
lever at any time to immediately stop the tiller.
4. For rear-tine mode, walk to one side (the left is easiest);
lift slightly on the handlebar for better wheel traction.
Wheels are automatically engaged.
5. For front-tine mode, walk right behind the handlebar;
wheels are automatically in Freewheel.
6. Use front-tine mode to roll machine across lawns or
driveways.
IMPORTANT: Check that safety interlock switch is clean and free of debris at all times. See "Maintenance" Section in
Owner's Manual.
1911507.A (5/98)
Decal located on top of tine hood.
Page 7
7
WARNING
TO PREVENT PERSONAL INJURY
OR PROPERTY DAMAGE, DO
NOT START THE ENGINE UNTIL
ALL ASSEMBLY STEPS ARE
COMPLETE AND YOU HAVE READ
AND UNDERSTAND THE SAFETY
AND OPERATING INSTRUCTIONS
IN THIS MANUAL.
Inspect unit
Inspect the unit and carton for damage
immediately after delivery. Contact the
carrier (trucking company) if you find or
suspect damage. Inform them of the
damage and request instructions for filing
a claim. To protect your rights, put your
claim in writing and mail a copy to the
carrier within 15 days after the unit has
been delivered. Contact the factory if you
need assistance in this matter.
Tools/Materials Needed for
Assembly
(One) 1/2" wrench*
(Two) 9/16" wrenches*
(One) Automotive-type air pressure gauge
(One) Clean oil funnel
(One) Quart clean, high-quality engine oil.
Refer to the Engine Owner Manual
for engine oil specifications and
quantity required. Do not overfill.
* Adjustable wrenches may be
substituted.
IMPORTANT: Motor oil must be added to
the engine before starting. Follow the
instructions in this “Assembly” section
and in the Engine Owner’s Manual.
Unpacking Instructions
1. After opening the carton, remove cardboard support materials and packaging
material around handlebar and engine.
2. Lift up the carton to remove it.
3. Carefully put aside the upper section
of the handlebar (it is connected to the
machine by a control cable) and the hardware bag. See Fig. 2-1. Do not kink the
control cable connected to the uper handlebar section. Also cut the plastic tie on the
handlebar to free the drive bail (Fig. 2-1).
4. The assembly is easiest by leaving the
tiller on the wood shipping pallet until the
handlebar has been completely assembled.
If the unit must be moved off the pallet
and rolled to another location for assembly, see “Freewheel” message on Pg. 8.
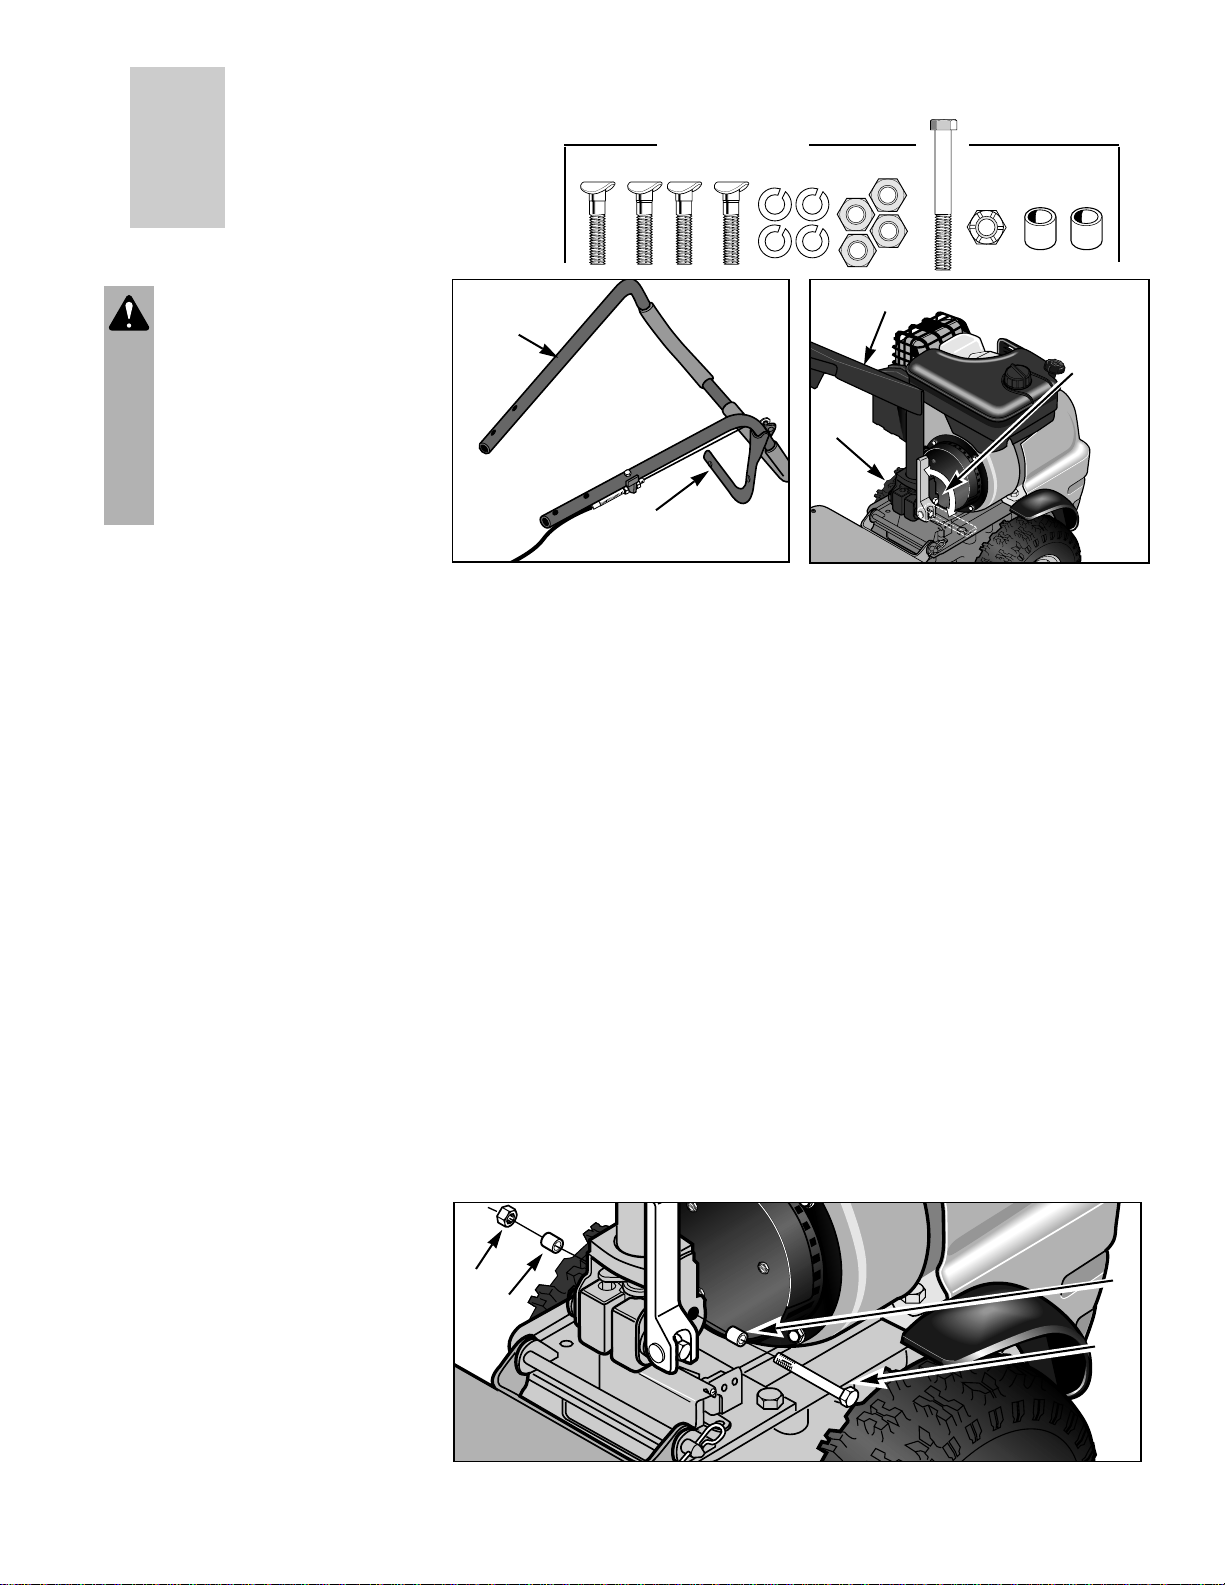
5. Open the hardware bag and group the
hardware. Check the contents against the
following list and Fig. 2-1A above (hardware shown at a reduced size):
• four 5/16"-18 x 1-1/2" curved head screws
• four 5/16" lockwashers
• four 5/16"-18 hex nuts
• one 3/8"-16 x 3-1/4" screw
• one 3/8"-16 locknut
• two steel bushings (for handlebar)
STEP 1: Adjust Handlebar Height
1. Move the handlebar locking lever up
(A, Fig. 2-2), then tilt the lower handlebar
section upward to align the holes in the
base and the lower handlebar section (B).
2. Hold the lower handlebar section in
this position with the holes in the base
aligned. Move the handlebar locking
lever down to “freeze” the hole alignment.
STEP 2: Install Hardware in Base
and Lower Handlebar Section
1. Insert one bushing (C, Fig. 2-3) on the
end of the 3-1/4" long screw (D), and
slide the screw through the base of the
lower handlebar section. Put the other
bushing (C) on the screw on the other
side, sliding it on all the way.
2. Use 9/16" wrenches to install the 3/8"
locknut (E) on the screw (D). Tighten hardware securely. NOTE: Do not tighten the
other long screw next to this hardware – it
is factory tightened. See Fig. 2-3.
Section
2
Assembly
Fig. 2-1
Fig. 2-2
Upper
Handlebar
Section
Cut plastic tie to
free the drive bail
Fig. 2-3: Install hardware to secure lower handlebar section to the base.
C
C
D
B
Hardware Shipped
Fig. 2-1A
A
Lower Handlebar
Section
E
Page 8
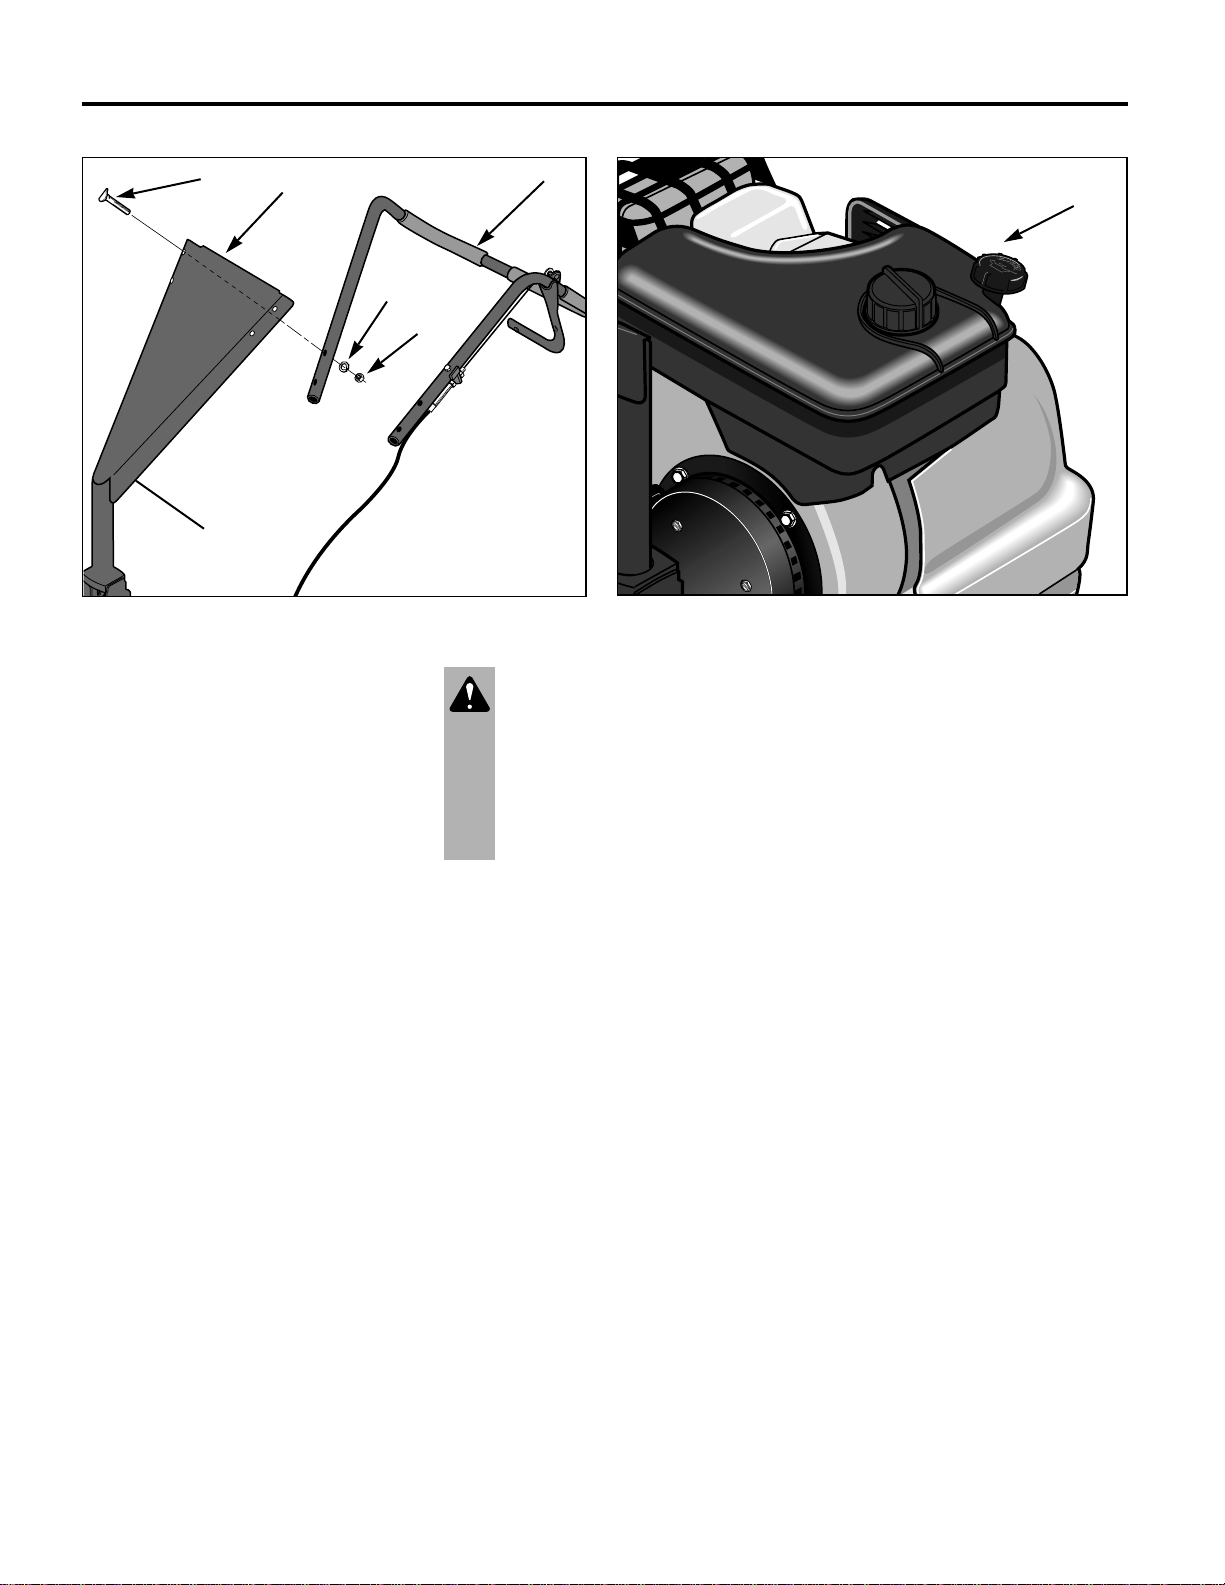
STEP 3: Attach Upper Handlebar
Section to Lower Handlebar Section
1. Align the mounting holes in the upper
handlebar section (F, Fig. 2-4) with the
corresponding mounting holes in the
lower handlebar section (G).
2. Insert four 5/16"-18 x 1-1/2" curved
head screws (H, Fig. 2-4) DOWN through
the holes in the two handlebar sections.
Install the top screws first for easiest
installation. Secure the screws with four
5/16" lockwashers (I), and four 5/16"-18
hex nuts (J). Tighten with a 1/2" wrench.
3. Press the handlebar control cable into
the plastic clip (K, Fig. 2-4) underneath
the left side of the control panel.
4. Lift up the handlebar locking lever and
swivel the handlebar toward the engine
starter rope to test hardware tightness at
the base of the handlebar. If the handlebar
seems secure and swivels smoothly, the
hardware is tightened properly. Tighten
the front bolt (D, Fig. 2-3) more if the
handlebar doesn’t seem secure enough.
Loosen the front bolt (D) a little if the
handlebar is hard to swivel. IMPORTANT:
This bolt must be tightened properly for
the handlebar to swivel properly. The
other long bolt next to it should not be
tightened now, but may at some time in
the future require tightening which is
explained in the Maintenance Section.
WARNING
DO NOT START THE ENGINE
UNTIL ENGINE CRANKCASE HAS
BEEN FILLED WITH OIL.
FAILURE TO FOLLOW THIS
INSTRUCTION WILL RESULT
IN SERIOUS ENGINE DAMAGE.
STEP 4: Add Motor Oil to Engine
1. Refer to the separate Engine Owner’s
Manual for the recommended type and
viscosity motor oil to use.
2. With the tiller on level ground,
unscrew and remove the oil fill dipstick
(L, Fig. 2-5). Using a funnel, pour fresh
motor oil into the dipstick opening. Add
oil gradually and check the level with the
dipstick several times to be sure not to
overfill the engine. Add oil until the level
is up to the “FULL” mark on the dipstick.
3. The oil level on the dipstick should
always be between the “ADD” and “FULL”
marks. Wait a few minutes after filling the
crankcase for the oil to settle. Re-check
the oil level and adjust as needed.
4. Wipe up any oil spillage and replace
the oil fill dipstick securely.
STEP 5: Check and Adjust
Tire Air Pressure
Use an automotive-type tire pressure
gauge to check the air pressure in both
pneumatic tires. Inflate both tires evenly
between 15-to-20 PSI.
STEP 6: Check External
Hardware for Tightness
Inspect the screws, bolts and nuts on the
tiller and make sure they are securely
tightened.
How To Move the
Machine in “Freewheel”
IMPORTANT: To “freewheel” (wheels
turn freely due to disengagement from
transmission gears) the machine off the
pallet to another location, unlock the
handlebar locking lever (see Pg. 9),
then swivel the lower section of the
handlebar (stand on the engine muffler
cage side only) 1800to position it over
the engine. Relock the lever. Using the
lower handlebar section for leverage,
roll the equipment to the desired
location. Swivel the handlebar back to
its original position over the tine hood to
return to the rear tine tiller mode. Do
not pick up the machine by the fenders
to avoid damage to the fenders.
8
Section 2: Assembly
Fig. 2-4
Fig. 2-5
F
G
H
I
J
K
L
Lower
Handlebar
Section
Upper
Handlebar
Section
Page 9

Section
3
Features and Controls
This section describes the various
features and controls on the unit. Refer
to the next section, “Operation,” for an
explanation of the use of these controls.
TILLER FEATURES/CONTROLS
Drive Bail
Holding the Drive Bail (A, Fig. 3-1)
closed against the handlebar engages the
tines and wheels (when handlebar is in
the rear tine tiller mode) or engages
power to just the tines (when handlebar is
turned to front tine tiller/cultivator mode).
Swivel Handlebar
The handlebar (B, Fig. 3-1) swivels 180
o
to convert the equipment into either a rear
tine tiller or a front tine tiller/cultivator.
The handlebar also offers infinite height
adjustments for operator comfort.
IMPORTANT: Only swivel the handlebar
180o on the muffler cage side of the equipment, or damage to the unit can occur!
Handlebar Locking Lever
Lift up the lever (C, Fig. 3-1) to unlock
the handlebar. This allows the handlebar
height to be raised or lowered, and the
handlebar to be swiveled 180o. See Inset
Figures above for rear tine tiller and front
tine tiller/cultivator modes.
Hood Release Pin
This pin (D, Fig. 3-1) locks the hood to
the tiller chassis. When the pin is taken out
the hood can be removed and then the
handlebar swiveled around and positioned
over the engine for cultivating. NOTE: The
hood must always be in place and locked
with the hood release pin when the
machine is used for rear tine tilling or else
the engine will not run.
Tines
Four tine sets (E, Fig. 3-1) (each set has
four tines) rotate at high speed and
do the tilling and cultivating in the soil.
When you are rear tine tilling and standing in the operator’s position behind the
hood, the tines rotate counterclockwise
(CRT) in a direction opposite from forward
travel. When you are front tine tilling or
cultivating (hood is removed; handlebar is
swung 180oover the engine), the tines
rotate clockwise in the direction of
forward travel.
IMPORTANT: In rear tine tiller mode,
both the tines and wheels are powered.
In front tine tiller/cultivator mode, only
the tines are powered.
Operational Interlock System
Located at the base of the handlebar (F,
Fig. 3-1). This safety switch shuts the
engine off or prevents it from starting if
the operator attempts rear tine tilling with
the tine hood off, or attempts front tine
tilling/cultivating with the handlebar in
any position other than pointing back
over the engine.
IMPORTANT: Do not attempt to operate
machine in front tine tiller/cultivator
mode with the tine hood installed as
damage to the tine hood could occur.
Fig. 3-1
A
B
C
D
E
F
Rear Tine
Tiller Mode
(tine hood
must be on)
Swivel
Handlebar
on this side
ONLY
Front Tine
Tiller/
Cultivator Mode
(tine hood must
be removed)
1
2
3
9
MUFFLER
CAGE
Page 10

10
Section 3: Features and Controls
ENGINE FEATURES/CONTROLS
The following are descriptions of the
features and controls on your engine.
Additional engine information is
provided in Section 4 “Operation” in this
manual and in the engine manufacturer’s
Operator’s Manual which is included in
your literature package. Be sure to read
the Engine Operator’s Manual carefully
and save it for future reference.
Engine Throttle Lever
The throttle lever (G, Fig. 3-2) is used to
adjust engine speed as well as start and
stop the engine.
Move the throttle lever all the way up
from the STOP position to the START/RUN
position before pulling out the recoil
starter. There is an IDLE position between
the STOP and START/RUN positions.
Move the throttle lever down to the STOP
position to turn the engine off.
Fuel Primer Bulb
This bulb (H, Fig. 3-2) pumps a small
amount of gasoline into the carburetor to
aid in starting the engine. Refer to the
following section, “Operation,” for
specific primer bulb operating
information under various starting
conditions.
Recoil Starter
The recoil starter (I, Fig. 3-2) is used to
manually start the engine.
Oil Fill Tube and Dipstick
Turn and lift up to remove the oil
dipstick (J, Fig. 3-2) from the top of the
engine. Always keep the oil level between
the “ADD” and “FULL” marks at the end of
the dipstick. Refer to your Engine
Operator’s Manual for specific motor oil
recommendations.
Fuel Tank
The fuel tank and cap are on top of the
engine (K, Fig. 3-2).
Spark Plug
The spark plug wire (L, Fig. 3-2) must
be securely attached to the spark plug in
order for the engine to start and run
properly. Always disconnect the spark
plug wire and move it away from the plug
before performing any repairs or
maintenance.
Air Cleaner
Your engine has a dual element air
cleaner system for maximum filtration
efficiency (see M, Fig. 3-2). Never run
the engine without the complete air
cleaner installed. Service the air filter
system regularly as specified in your
Engine Operator’s Manual.
Muffler
The engine muffler (N, Fig. 3-2) has a
steel cage surrounding it to keep objects
away from its hot surface. Do not touch
the engine muffler while the engine is
running or cooling down.
Fig. 3-2: Engine features and controls.
J
K
M
N
WARNING
Before operating your machine,
be sure you read and understand
all safety, controls, and operating instructions in this Owner’s
Manual and on the decals on
your machine.
Failure to follow these instructions can result in serious injury
or property damage.
L
I
H
G
Page 11

This section explains how to:
• Transport the Machine
• Prepare for Starting and
Break-In Operation
• Check Operational Interlock System
• Convert the Equipment From a
Rear Tine Tiller to a Front Tine
Tiller/Cultivator...Then Back to a
Rear Tine Tiller
• Start and Stop the Engine
• Operate the Rear Tine Tiller
• Clear Debris from the Tines
• Operate the Front Tine
Tiller/Cultivator
• Cultivate in Flower Beds and
in Confined Shrub Areas
• Optional Attachments
• Load and Unload the Tiller
Before operating your unit, be sure you
have read and understand all Safety
Instructions in Section 1 and Controls
information in Section 3. First practice
using the unit (as a tiller and a cultivator)
in an open, level area. After a thorough
practice session, you can then “freewheel”
the unit to the work area.
How To Transport the
Machine in “Freewheel”
To “freewheel” the machine to another
location, unlock the handlebar locking
lever (see Pg. 9), then swivel the
handlebar (do this on the engine muffler
side only) 1800to position it over the
engine. Relock the lever. Roll the
equipment to the desired location.
Swivel the handlebar back to its original
position over the tine hood to return to
the rear tine tiller mode.
IMPORTANT: Always swivel
handlebar around on muffler
cage side of engine. To avoid
damage to engine recoil cover
and control cable, never swivel
handlebar on fuel tank side of
engine!
Fig. 4-1A
Fig. 4-1B
Fig. 4-2A
Fig. 4-2B
WARNING
Before operating your machine,
be sure you read and understand
all safety, controls, and operating instructions in this Owner’s
Manual and on the decals on
your machine.
Failure to comply can result in
injury or property damage.
Section
4
Operation
WARNING
• To avoid injury, keep hands,
feet, legs and clothing away
from revolving tines.
• Do not operate tiller in
rear tine tilling mode without tine hood in place, or in
front tine tilling/cultivating
mode with tine hood on.
11
MAXIMUM RECOMMENDED HANDLEBAR OFFSET IS 200LEFT OR 200RIGHT IN
EITHER REAR TINE TILLER MODE OR FRONT TINE TILLER/CULTIVATOR MODE.
Rear
Tine
Tiller
Mode
Front Tine
Tiller/
Cultivator
Mode
(Swinging handlebar 200in either
direction equals about 1/2 the
handlebar width)
(Swinging handlebar 200in
either direction equals about
1/2 the handlebar width)
Page 12

12
Section 4: Operation
Preparation For Starting
Make the following checks and
adjustments before starting the engine.
1. Check Engine Oil Level.
2. Check the Air Cleaner. It must be
securely assembled and clean.
3. Check Safety Guards. All guards and
covers must be securely in place.
4. Attach Spark Plug Wire.
5. Check Engine Cooling System. Cool-
ing fins and air intake must be clean.
6. Adjust Handlebar Height.
7. Test Operational Interlock System.
Perform this test in both front tine cultivator mode and in rear tine tiller mode.
Refer to Pg. 13 for full instructions.
8. Select Rear Tine Tiller Mode or
Front Tine Tiller/Cultivator Mode. If you
select rear tine tiller mode, check to see
that the wheels do not
“Freewheel.” Roll
the tiller forward several inches to verify
that the wheels are fully engaged.
If you
select front tine tiller/cultivator mode,
check to see that the wheels do
“Freewheel.” See Pg. 14 for instructions.
8. Add Gasoline to Fuel Tank. Use
fresh, clean unleaded automotive gasoline.
Either regular or premium grades are
acceptable. DO NOT MIX OIL WITH GASOLINE. See the separate Engine Operator’s
Manual for all fuel recommendations.
NOTE: Do not use fuel containing
methanol (wood alcohol). Fuel containing
up to 10% ethanol or “Gasohol” may be
used but requires special care when the
engine is not used for extended periods.
Use clean fuel and store in an approved,
covered container. Use a clean fill funnel.
Never use “stale” gasoline left over from
last season or if stored for long periods.
To Add Gasoline:
1. Clean the fuel cap area before removing
the fuel cap.
2. Using a clean funnel, fill tank to within
1/2" of the top to prevent spills and to
allow for fuel expansion. Replace the fuel
cap securely before starting the engine.
WARNING
Gasoline is highly flammable and its vapors are explosive. Follow these
safety practices to help prevent injury from fire or explosion:
• Never fill tank if engine is running or hot from use. Let engine and
muffler cool down before refueling.
• Do not permit open flames, sparks, matches or any smoking materials in
the refueling area.
• Fill fuel tank outdoors in a well-ventilated area. Wipe away any fuel
spills and move tiller away from fumes before starting the engine.
• Use only an approved fuel container and lock it safely away from children.
• Store fuel and the equipment in a well-ventilated area. Do not store fuel
or the tiller where fuel vapors may reach an open flame or spark, or an
ignition source (a hot water heater, furnace, clothes dryer, electric motor,
or the like).
• Let engine cool down before storing equipment.
Fig. 4-3
Break-In Operation
During the first few hours of new
operation, the following maintenance
steps are required. For detailed informa-
tion on these procedures, refer to Section
5— “Maintenance.”
1. Change Engine Oil. Change oil after
the first two (2) hours of new operation.
Thereafter, every fifty (50) operating hours.
2. Check Drive Belt Tension. Due to the
new belt “seating in,” a tension adjustment
may be needed after the first 2-to-3 hours
of new operation.
IMPORT ANT: TO AVOID DAMAGE
TO THE ENGINE RECOIL COVER,
CONTROL CABLE AND THE
INTERLOCK SYSTEM, NEVER
SWIVEL HANDLEBAR ON FUEL
TANK SIDE OF ENGINE.
Page 13

Section 4: Operation
13
DANGER
The Operational Interlock
System is designed for the
operator’s safety. Do not
disconnect or attempt to defeat
the purpose of the system. If
the system malfunctions,
immediately contact your local
authorized dealer or the TROYBILT Technical Service
Department for assistance. Do
not use the equipment unless the
Operational Interlock System is
functioning properly.
Fig. 4-4A: Handlebar positioned over the engine. Hood is off. Start
the engine. Swing the handlebar from over the engine halfway around
toward the tines. The engine should stop.
Fig. 4-4B: The handlebar is positioned over the tines; the tine hood is
installed. Start the engine. Remove the tine hood– the engine should
stop and fail to restart. Replace tine hood– the engine should start.
Check the Operational Interlock System by
performing the test below in
Front Tine Tiller/Cultivator Mode :
Check the Operational Interlock System by
performing the test below In
Rear Tine Tiller Mode :
The Operational Interlock System
The Operational Interlock System is a
micro-switch designed to shut the engine
off immediately (or prevent it from
starting) if an attempt is made to use the
equipment in either of two unsafe conditions.
The system is active all the time and will
shut the engine off or prevent it from
starting if: A) you attempt to operate the
equipment in the rear tine tiller mode with
the hood removed, or B) if the equipment
is in the front tine tiller/cultivator mode
(hood is removed) and an attempt is made
to swivel the handlebar more than halfway
around from the cultivating position at the
front of the engine. If either of these
situations occurs, the engine will shut off
if running, or the engine will not start.
Rear Tine Tiller Mode – In this mode, the
handlebar is positioned directly over the
tine hood (or within 200of this position)
and the operator stands alongside or behind the hood. The hood must be properly installed and securely locked. If the
tine hood were to be removed, the
engine would stop immediately or, if it
had not been running, it would not start.
Front Tine Tiller/Cultivator Mode – In this
mode, the handlebar is swiveled around
so it is over the engine (or is within 20
0
of this position) and the tine hood is
removed. If the handlebar were
swiveled more than halfway around in the
direction of the tines, the engine would
stop or, if it had not been running, it
would not start.
TOP VIEW
TOP VIEW
1) When the equipment is in “Front Tine Tiller /
Cultivator Mode,” the handlebar is positioned over the
engine and the tine hood is removed. See Pg. 14 for
detailed instructions.
2) Start the engine.
3) Swivel handlebar halfway around toward the tines
(one muffler cage side of engine). See Fig. 4-4A.
4) The engine should shut off and should not be able
to be restarted with the handlebar in this position.
This means the Interlock System is operating properly.
5) Swivel handlebar around over the engine again.
Now the engine should be able to be started.
1) When in “Rear Tine Tiller Mode,” the handlebar is
positioned over the tine hood. The hood must be
properly and securely installed. Engine must be off.
2) Start the engine.
3) Be very careful not to engage the Drive Bail when
performing this step. Remove the tine hood (see Fig 44B). The engine should stop. If it does, the Interlock
System is operating properly. Do not use the tiller if
the engine continues to run– a repair is needed.
4) Replace the tine hood securely. The engine will
now be able to be started again.
Engine
Muffler
Cage
Page 14

Section 4: Operation
To Change from rear tine tiller mode
to front tine tiller/cultivator mode:
1. Move the equipment to a level, firm
surface.
2. Stop the engine and disconnect the
spark plug wire.
3. Lift up the handlebar locking lever (A,
Fig. 4-5) to unlock the handlebar.
4. Grasp the handlebar and walk it
around the muffler cage side of the
engine a full 180ountil the handlebar is
positioned over the top of the engine.
Refer to Fig. 4-6.
5. Push the handlebar locking lever
down.
6. Remove the hair pin clip (B, Fig. 4-7)
from the hood release pin (C, Fig. 4-7).
Slide the hood release pin out of the hood
bracket (D, Fig. 4-7).
7. Lift up the hood flap and tilt the tine
hood backward so the bracket at the rear
of the hood disengages from the
transmission. Lift the hood assembly off
and put it aside. Refer to Fig. 4-7. Keep
the hair pin clip and hood release pin
installed on the hood at all times to
prevent their loss. Reconnect the spark
plug wire securely.
8. The equipment is now ready for front
tine tilling and cultivating! See Fig. 4-8.
T o Change from front tine tiller/
cultivator mode to rear tine tiller mode:
1. Stop the engine and disconnect the
spark plug wire. The equipment must be
on a level, firm surface.
2. Replace the hood by first engaging the
rear hood bracket on the pin at the endof
the transmission (see Fig. 4-7). Connect
the front of the hood to the handlebar base
by aligning the two brackets (offset the
hood brackets to the left of the base
brackets), then insert the hood release pin
and hair pin clip (see Fig. 4-7).
3. Lift up the handlebar locking lever (A,
Fig. 4-5) to unlock the handlebar.
4. Swivel the handlebar around on the
engine muffler cage side of the equipment 180o to position it over the tine
hood. Push the locking lever down. This
is the rear tine tiller mode. See Fig. 4-9.
5. Reconnect the spark plug wire.
Use this procedure to convert your equipment from rear tine tiller mode...
to front tine tiller/cultivator mode..then back to a rear tine tiller again.
WARNING
To avoid serious personal
injury or property damage,
stop the engine, let all
moving parts stop
completely, disconnect the
spark plug wire, move the
wire away from the spark
plug, and let the engine and
muffler cool down before
changing from one tiller
mode to another or performing any adjustments or service on your equipment.
Fig. 4-5
Fig. 4-6
A
14
Fig. 4-7
B
C
D
Fig. 4-8
Fig. 4-9
Page 15

To Start and Stop the Engine
IMPORTANT: Use the following steps to
practice starting and stopping the
engine ONLY. Do not attempt to use the
equipment as a tiller or cultivator until
you have read all operating instructions
in this Owner’s Manual.
To Start the Engine:
1. The spark plug wire must be connected
to the spark plug and the fuel tank must
have fresh, unleaded gasoline.
2. Let go of all controls.
3. Move engine throttle lever (E, Fig. 4-10)
all the way up to RUN/START position.
4. Push fuel primer bulb (F, Fig. 4-10) two
or three times. Allow two seconds or so
between pushes. In cold weather (below
50oF) push primer five times. NOTE:
Primer use may be needed to restart a
warm engine after a short shutdown.
5. Grasp starter handle (G, Fig. 4-10) and
pull rope out slowly until it pulls slightly
harder. Let rope rewind slowly. Then pull
rope with a rapid full arm stroke. Let rope
return slowly. NOTE: If engine fails to
start after three (3) pulls, push fuel primer
two times and pull starter rope again.
To Stop the Engine:
1. Move the engine throttle lever (E, Fig. 4-
10) down to the STOP position.
2. Let all moving parts come to a
complete stop, then disconnect the spark
plug wire and move the wire away from the
spark plug to prevent the possibility of
accidental starting.
Fig. 4-10
E
F
G
Section 4: Operation
How to Operate Your Machine
as a Rear Tine Tiller
You will find that general tilling, and
sodbusting in particular, are real delights
with the VersaTiller. This is largely due to
the machine’s counter-rotating tines
which handle tough ground-breaking jobs
easily. Be sure the equipment is in rear
tine tiller mode (see Fig. 4-11).
When breaking new sod (especially
when it is wet or very hard), the wheels
could lose traction and cause the tines to
unexpectedly propel the tiller backward.
This condition is most likely to occur during initial tine engagement with the sod,
such as when starting a new tilling pass.
If this condition occurs, simply release
the drive bail to quickly stop the tines and
wheels. Do not exert any downward
pressure on the handlebar or attempt to
restrain the tiller.
To minimize the possibility of the tiller
moving unexpectedly backwards, always
avoid pushing down on the handlebar
when in the rear tine tilling mode. If
necessary, apply upward pressure to
increase wheel traction and to prevent
the tines from digging too deeply. This
is a very important technique! See Fig.
4-11. Also, check that the tine hood flap
is back in the trailing position and not
pointing straight down or toward the tines.
1. Start the engine and let it warm up.
2. Stand behind and on the left-side of
the handlebar and close the Drive Bail by
moving the bail up against the handlebar.
The tines and wheels will rotate. You may
walk on the left side of the machine and
slightly behind the handlebar, guiding the
tiller as it moves along, keeping its path
straight. Using one
hand on the handlebar
prevents footprints in
the freshly tilled soil
3. As you approach
the end of the first
row, raise the
handlebar to lift the
tines out of the soil.
As you swing the
handlebar to make
your turn for the next
row, let the powered
wheels assist you in
making the turn.
4. Lower the handlebar to let the tines
contact the soil again and complete the
next row. Continue tilling back and forth.
5. Till the complete garden area once
again, but at a right-angle to the original
direction.
6. To stop the tiller, let go of the Drive
Bail. To stop the engine, move the engine
throttle lever all the way down to STOP.
IMPORTANT: The wheels will not “freewheel” when the equipment is in rear
tine tiller mode (they only “freewheel”
when in front tine cultivator mode).
Fig. 4-11
WARNING
Engine throttle lever speed
should not be adjusted while
the tines are engaged either
for tilling or cultivating.
Failure to comply could
result in severe personal
injury or property damage.
15
Page 16

16
Section 4: Operation
Clearing Debris from the Tines
Long grass, string, or tough vines may
become tangled in the tines. It’s not
necessary to remove all of the tangled
material for best tilling results, but the
bulk of the material should be removed
for effective tilling. The tine hood may be
removed for the most complete tine
cleaning.
To avoid tangled materials:
• Till under crop residues or cover crops
while they are still green.
• Using the handlebar, swing the tiller
from side-to-side (6" to 12" each way)
occasionally– this can clear up tangles.
• If tangled material begins to build up,
stop the engine, let all moving parts
stop completely, disconnect the spark
plug wire, move the wire away from the
plug, then use a pocket knife or
linoleum knife to cut the material away.
WARNING
To help avoid personal injury,
shut off the engine, let all
moving parts stop completely,
disconnect the spark plug wire
and move the wire away from
the plug before attempting to
clean the tiller tines.
How to Operate Your Machine as
a Front Tine Tiller/Cultivator
The VersaTiller is not only a very
capable, high-performance rear tine tiller,
but a wonderful front tine tiller/cultivator
as well. Its cultivating capabilities will help
your garden, flower beds, and shrubbery
areas flourish the entire growing season.
If you plan carefully before planting,
you can leave enough room between plant
rows for later cultivating. That will
eliminate most hand-weeding or hoeing
chores during the growing season. Allow
for the overall wheel width (16") between
rows plus some additional room for plant
growth (particularly for bushy crops like
beans, tomatoes, peas, etc.) See Fig. 4-12.
Tine Width (all four tine gangs): 12"
Tine Width (inner tine gangs only): 71⁄4"
Wheel-to-Wheel Width: 16"
1. Be sure the equipment is in front tine
tiller/cultivator mode (see Fig.4-8 and 4-
12). The handlebar must be positioned
over the engine and the tine hood
removed. (See Page 14 for instructions.)
2. Start the engine and let it warm up.
Adjust the throttle lever to a medium
engine speed.
3. Stand behind the handlebar and at the
front of the engine (Fig. 4-12). Close the
DRIVE BAIL against the handlebar and the
tines will revolve.
IMPORTANT: When in front tine tiller/
cultivator mode, only the tines are
powered when the Drive Bail is closed–
NOT THE WHEELS. In this mode, the
wheels are always in “freewheel” and the
equipment can be easily moved.
4. The rotating tines will pull the machine
along as it tills or cultivates. You can
push down on the handlebar to raise the
tines if they stay in one location too long.
5. To stop the tines, let go of the drive bail.
To stop the engine, move the engine
throttle lever all the way down to STOP.
Cultivating Tips:
• Shallow cultivating is most effective.
Don’t let the tines dig in too deeply as
you proceed through a row. To prevent
this from happening, push down on the
handlebar to raise the tines up. Also use
the handlebar as a depth control so the
tines do not till up vegetable plant roots
which are deeper than weed roots.
• Sweep the tines from side to side by
moving the handlebar. This action imitates hand-weeding and prevents the tines
from staying in one location too long.
• You may remove both outer tine gangs
if a narrower overall tine width will help
cultivate between individual plants.
Simply take off the hardware that secures
both outer tine gangs and slide the outer
gangs off the tine shaft.
Cultivating in Flower Beds and
in Confined Shrubbery Areas
The VersaTiller is designed to help you
cultivate easily in and around congested
flower beds and shrub areas. If
necessary, simply remove the two outer
tine gangs. The remaining inner tine
gangs measure just 71⁄
4" overall. You can
“poke” these tines into very compact
areas without damaging flowers, leaves
and stems.
Fig. 4-12: Cultivating in the garden.
Page 17

17
OPTIONAL A TTACHMENTS
The Edger Attachment
The Edger Attachment allows you to
make clean, sharp edges wherever grass
meets a walkway, driveway, terrace, patio,
or other such surface. It’s an extremely
handy landscaping and yard care tool that
attaches quickly to your equipment.
Simply set up in front tine tiller/cultivator
mode (the tine hood must be off, and
handlebar positioned over the engine),
remove the tines, and install the edger
blade and wheel on the tine shaft. Refer
to Fig. 4-13.
The Aerator Attachment
The aerator is an extremely effective way
to open up the “pores” in your lawn’s
sod, thereby allowing sprinkler water,
commercial nutrients, rain, and air to
enter the earth and nourish the lawn
roots. It is especially beneficial when
reseeding areas of grass, as lawn growth
occurs much more quickly after you use
the aerator tines.
This attachment is used when your
equipment is in the rear tine tiller mode—
the tine hood is securely mounted and the
handlebar extends back over the tine
hood. Simply remove the four tine gangs
from the tine shaft, and in their place
install the four aerator blades supplied
with their own mounting hardware. See
Fig. 4-14.
Section 4: Operation
Fig. 4-13: The edger
attachment leaves sharp,
clean edges between grassy
areas and walkways,
driveways, patio areas, etc.
Fig. 4-14: The aerator
attachment uses four aerator
tines (installed in place of the
regular tiller tines) to open
up airways in the soil for
better absorption of
moisture, air, and lawn
fertilizer applications.
Page 18

18
Section 4: Operation
Loading and Unloading the Tiller
• Shut off the tiller engine before loading
or unloading. Let the engine cool. Disconnect the spark plug wire and prevent the
wire from touching the spark plug.
• The tiller is too heavy (over 120 lbs.)
and bulky to be safely lifted by one
person. If you do lift the tiller, two or
more people should share the load. With
one person on one side of the equipment
and another person on the other side,
each should grip the machine at the front
shield (use the slot in the shield) and at
the tine hood.
• However, the preferred method that we
recommend is that you use sturdy ramps
and manually roll the tiller (in front-tine
cultivator mode so the wheels freewheel)
in or out of the vehicle with another
person’s assistance.
• Ramps should be strong enough to
easily support the tiller and those moving
it. The ramps should also have good
traction, side rails to direct the tiller, and a
locking device to secure them to the
vehicle bed.
• The operator and assistants should
wear sturdy footwear with good traction.
• Position the vehicle so the ramp angle
is as flat as possible. Turn off the vehicle
engine and apply its parking brake.
• When going up the ramps, stand behind
the handlebar and push the equipment
ahead of you.
• When going down ramps, walk backward down the ramps with the equipment
following you.
• Have wood blocks handy to chock the
wheels if necessary. Use the chocks, for
example, if repositioning the equipment
on the ramps is required. Also chock the
wheels when transporting the equipment
in the vehicle.
• Once in the vehicle, securely tie the
equipment for stability during travel.
WARNING
Loading and unloading a
tiller in or from a vehicle is
potentially hazardous and
we don’t recommend that
you do so unless absolutely
necessary, as this could
result in personal injury or
property damage. However,
if you must load or unload
the tiller, follow the directions below.
Page 19

Section
5
Maintenance
NOTE: All references to left, right,
front and rear of the machine are
determined by standing behind the
handlebar and facing the direction of
forward travel.
Subjects covered in this section
include:
• Tiller/Cultivator Maintenance
• Engine Maintenance
• Storing your Equipment
REQUIRED MAINTENANCE SCHEDULE
Before Every Every As
PROCEDURE Each 10 25 Noted
Use Hours Hours
Check engine oil level • And every 5
operating hours
Test Operational Interlock • See Section 4
Safety System
Check drive belt tension • After initial
2 hours
Check nuts and bolts • After initial
2 hours
Clean tiller tine shaft •
Lubricate tiller •
Change engine oil* Every 50 oper-
ating hours
***
Clean foam element air filter • More often in
Check paper element air filter • dusty, dirty areas
Check for oil leaks • After initial
2 hours
Check gear oil level in • **
the transmission
Check tines for wear •
Check air pressure in tires • Annually, at
start of season
Lubricate eccentric pivot bushings • And at end of
tilling season
* During engine break-in period, change engine oil after first 2 hours of operation.
** Check transmission gear oil level every 25 hours and at beginning of tilling season
if any leakage is observed.
*** More often under dirty or dusty conditions.
WARNING
Before inspecting, cleaning
or servicing the machine,
shut off engine, wait for all
moving parts to come to a
complete stop, disconnect
spark plug wire and move
wire away from spark plug.
Failure to follow these
instructions can result in
serious personal injury or
property damage.
19
Page 20

20
TILLER/CULTIVA TOR
MAINTENANCE
Tighten Bolts and Nuts
Check for loose or missing hardware
every ten (10) operating hours. Failure to
tighten or replace missing fasteners can
cause poor performance, equipment
damage or oil leakage. See your Parts
Catalog for fastener descriptions.
Most hardware on your equipment is
visible. Pay particular attention to the
hardware shown in Fig. 5-1 at right.
1. Check the mounting screws (A) securing the protective high-impact cover on
the engine.
2. Check hardware (B) securing Drive
Bail to the handlebar.
3. Check the two screws (C) securing the
bearing cap to the end of the transmission housing. Do not overtighten them or
the aluminum threads could be stripped.
4. Check the four screws (D) securing
the handlebar mounting plate to the two
chassis side rails.
5. Check the mounting hardware
securing the tine sets (E) to the tine shaft.
The locknuts do not need to be overtightened. Just tighten them securely.
6. Check that the interlock switch (F) is
securely connected to the interlock housing.
7. The cable jam nuts (G) on the left side
of the handlebar securing the Drive Bail
cable to the cable bracket must be tight.
8. Also, if the handlebar feels loose (the
handlebar locking lever must be DOWN)
when force is exerted on the handlebar
either up and down or from side to side,
check the tightness of the two screws (H
and I in the Inset Figure above) that
secure the handlebar and the handlebar
locking lever to the base. Over time, the
“seating” of parts can cause some looseness to occur. Tighten both nuts that
secure the screws approximately onesixth (1/6th) of a turn. Check to see if the
loose handlebar feeling has been
eliminated. Alternate between modest
tightening and checking for handlebar
looseness until the handlebars feel as
secure as when new.
Section 5: Maintenance
WARNING
Before inspecting, cleaning
or servicing the machine,
shut off engine, wait for all
moving parts to come to a
complete stop, disconnect
spark plug wire and move
wire away from spark plug.
Failure to follow these
instructions can result in
serious personal injury or
property damage.
Fig. 5-1: Hardware locations to check for tightness.
Tiller/Cultivator Lubrication
Proper lubrication of the tiller’s mechanical parts is an essential part of good
maintenance. Lubrication should be done
after every ten (10) hours of operation.
Use #30 weight motor oil wherever oil is
specified. Use a quality grease with a
metal lubricant where grease is
recommended (grease without a metal
lubricant is acceptable). The
transmission requires special gear oil
which is described on the next page.
IMPORTANT– Do not allow oil or
grease, or other lubricant to come into
contact with pulleys or drive belt. This
can cause the belt to slip on the pulleys.
1. After removing the wheels (one at a
time), lightly lubricate the wheel shaft on
the areas which the wheels ride. Use a
quality metal lubricant.
2. After removing the tine gangs from the
tine shaft, very lightly grease all exposed
areas of the tine shaft (both ends).
3. The base of the handlebar locking
lever has several rotating parts. Use a
spray lubricant such as WD-40 to keep
these parts lubricated.
A
B
C
D
E
F
G
H
I
Page 21

Section 5: Maintenance
21
T ransmission Gear Oil Maintenance
A. Check for Transmission Oil Leaks
After the first two (2) hours of brandnew operation, check the transmission for
oil leaks. Thereafter, check for leaks
every 25 operating hours. Specifically,
inspect the following areas for signs of
leaks or seepage:
1. There are oil seals on each side of the
transmission housing where the tine shaft
passes through the housing. Examine
those areas for seepage or for leaks on
the ground. An oil seal leak can lead to
internal damage, so the seal should be
replaced immediately.
2. There are oil seals on each side of the
transmission housing where the wheel
shaft passes through the housing. Leaks
from either of these seals also means seal
replacement should be done right away.
3. The end of the transmission housing
has a bolted on end cap. It should be
examined for leaks. Tighten the bolts if
they seem loose. If a gear oil leak continues, remove the end cap, clean its
surfaces, and apply a new coating of
rubberized silicone sealant behind the end
cap. Reinstall the end cap by tightening
the bolts securely, but do not overtighten
them.
B. Check Transmission Gear Oil Level
Every 25 hours of operation (and at the
beginning of the tilling season), check the
gear oil level in the transmission housing
(see Fig. 5-2).
1. Shut off the engine, let all moving
parts stop completely, disconnect the
spark plug wire and move the wire away
from the plug to prevent the possibility of
accidental starting.
2. Disconnect the tine hood from the
hood bracket and put the hood aside
(refer to Figs. 4-6 and 4-7). Tilt tine end
of tiller up to allow gear oil to move to
front cavity in the transmission. Then
lower tine end of tiller down.
3. Clean around the top cover (H, Fig. 5-
2) before removing the four cover screws
(I, Fig. 5-2). Loosen the cover by gently
tapping it sideways with a hammer (do
not pry it up with a screwdriver which
could damage the gasket underneath the
cover). The gear oil level should be 1-3/4"
below the topmost surface of the chassis
(this surface is machined) when level.
Add or remove gear oil as needed (use a
dipper or suction).
Small Top-0ffs: use SAE 140 or SAE
85W-140. Use API rating of GL-4 .
Full Replacement: SAE 140 or SAE 85W-
140 with an API rating of GL-4 only.
4. Replace the top cover securely with
the four screws (I) removed previously.
Tighten them firmly, but do not overtighten to avoid thread damage.
5. Replace the tine hood.
6. Reconnect the spark plug wire.
Drive Belt Maintenance
A. Checking Cable Tension
Applied to the Drive Belt
After the first two hours of operation,
the amount of tension that the bail lever
cable applies to the drive belt should be
checked and, if necessary, adjusted.
Thereafter, perform this check every
twenty-five (25) operating hours.
1. Move the machine to firm, level
ground. The equipment must be in the
front tine cultivator mode (the handlebar
is swung around over the engine and the
tine hood is removed).
2. Start the engine. Move the throttle
lever to between idle and full-speed.
Position yourself behind the handlebar.
3. Slowly pull the Drive Bail back toward
the handlebar and note when the tines
begin to rotate. The bail lever should
have traveled anywhere between one-third
(1/3) to one-half (1/2) the distance toward
the handlebar. Cable tension on the belt
must be increased if the bail traveled
more than one-half the distance. Reduce
cable tension if the tines “creep” with the
bail fully open or if they rotate when the
bail is less than one-third closed.
B. Adjusting Cable Tension
Applied to the Drive Belt
4. To increase cable tension, loosen the
upper nut (J, Fig. 5-3) securing the
threaded cable adjuster (K) to the handlebar mounting bracket. Turn the lower nut
to move the cable end down, then
retighten the upper nut.
5. To decrease cable tension, loosen the
lower nut (L, Fig. 5-3), turn the upper nut
to move the adjuster upward, then
retighten the lower nut.
6. Recheck the cable tension (see Steps
1 through 3 at left).
Fig. 5-2: Remove transmission top cover to check the level of gear oil.
Fig. 5-3
H
I
J
K
L
Page 22

22
Maintenance of the
Operational Interlock System
The Operational Interlock System is an
electrical safety system that prevents the
engine from starting (or shuts the engine
off) if either of two unsafe operating
conditions were to occur: 1) while in use
as a rear tine tiller with the handlebar
extending over the tine hood, the interlock
will shut the engine off if the tine hood
were not securely locked in place; 2)
while in use as a front tine tiller/cultivator
with the hood removed and the
handlebars positioned over the engine,
the interlock will shut the engine off if the
handlebar is swiveled more than 90
0
toward the exposed tines.
Keep the interlock switch area (M,
Fig.5-5) clean and free of all debris.
Inspect this location every time the
equipment is used and clean if dirty.
Also check the two electrical
connections (N and O, Fig. 5-6) on the
engine. The connectors must be securely
attached.
Section 5: Maintenance
Tine Maintenance
Tine Sets Should Be Inspected
Regularly and Replaced When Worn
Inspect the tines every 25 hours of
operation (or at least a couple of times a
year) for wear and general condition. If
any tines are broken, or if you notice that
tilling and cultivating do not mix the soil
as thoroughly as when the tines were
new, it’s time to inspect and perhaps
replace the tine sets. Refer to your parts
catalog for correct part number
information. NOTE: The tine sets with the
thicker tines must be positioned closest
to the transmission. The hardware
securing the tine sets must be tightened
securely (8 ft-lbs.).
The tine sets must be reinstalled as
shipped originally from the factory. The
tines are designed to rotate backward,
with their curved cutting edges entering
the soil first. If mounted incorrectly, the
tines may tend to run along on top of the
ground rather than digging in the soil.
This could unexpectedly cause the machine to
jump backward. Also–
the tines must all point
inward and the two tine
sets with the thicker
tines must be mounted
inboard, as seen in Fig.
5-4.
Fig. 5-4: All of the tines point inward. The tines are thicker on the two
inner sets. Tines must be mounted so each tine’s cutting edge enters
the soil first.
Fig. 5-5: Location of interlock switch.
Fig. 5-6: Engine shutoff locations.
M
N
O
THE TWO INNER TINE
SETS HAVE THICKER TINES
ALL TINES MUST
FACE INWARD AND
TINE CUTTING EDGES
MUST ENTER
SOIL FIRST
Page 23

23
ENGINE MAINTENANCE
Engine Oil Maintenance
Change engine oil after the first two (2)
hours of new operation. Thereafter,
change the oil every fifty (50) operating
hours (or sooner if the work environment
is very dirty or dusty).
The front cover shield (secured with
four screws) must be removed to gain
access to the oil drain plug which is
located at the base of the engine on the
muffler side. Locations to check/add oil
and drain oil are shown in Figs. 5-7 and
5-8. Follow the engine manufacturer’s
literature for specific oil changing procedures, quantities, and the specific grade
and viscosity of oil to use in the engine.
Air Cleaner Maintenance
The engine is equipped with a dual
element air cleaner (refer to Fig. 5-9) that
filters the air twice before it enters the
carburetor to mix with the fuel. The filters
must be kept clean and properly installed
at all times.
Refer to the engine manufacturer’s
literature supplied with your equipment
for complete air cleaner service and
maintenance information.
Spark Plug Maintenance
The spark plug (see Fig. 5-10) must be
in good condition for proper engine
operation. Remove and inspect the plug
every one-hundred (100) operating hours
or annually, whichever comes first.
The correct electrode gap for your
engine spark plug is .030". Check the gap
with a feeler gauge. Do not use a spark
plug if the porcelain is cracked, the
electrodes are pitted or burned, or if other
visible damage is present.
To install a plug, first tighten it securely by hand, then use a spark plug wrench
to tighten the plug another 1/4 turn.
Ignition System Maintenance
Your engine is equipped with electronic ignition. It does not have a
condenser or points, so there is no need
to perform any regular “tune-up”
maintenance on this system other than
adjusting or replacing the spark plug.
OFF-SEASON STORAGE
When your tiller won’t be used during
the off-season, prepare it for storage with
the following steps:
1. Clean the tiller and engine.
2. Do routine tiller lubrication and check
for loose hardware.
3. Protect the engine from deterioration
or damage by referring to the Engine
Storage instructions in your engine
manual literature. Drain the gasoline or
use a gasoline stabilizer as recommended
in the Engine Manual.
4. When the engine is still warm, drain
the oil from the engine crankcase. Refill
with fresh, clean motor oil.
5. Protect the internal cylinder against
rust by removing the spark plug and
pouring one ounce of clean engine oil into
the spark plug hole. Then slowly pull out
the recoil starter rope 2 or 3 times to
distribute the oil internally. Replace the
spark plug, but do not reconnect the plug
wire. Pull the rope out until resistance is
felt— let the rope rewind. The valves are
seated.
6. Lubricate the eccentric pivot bushings
(at the base of the handlebar) with WD-40.
7. Store the equipment in a clean, dry
area.
8. Never store the equipment with fuel in
the fuel tank in an enclosed area where
gas fumes could reach an open flame or
spark, or where ignition sources are
present (like space heaters, hot water
heaters, furnaces, etc.).
Section 5: Maintenance
Figs. 5-7 and 5-8
Fig. 5-9
Fig. 5-10
Check and
Add Oil
Oil
Drain
Plug
Air Cleaner
Page 24

For customer assistance, contact your nearest authorized dealer or:
GARDEN WAY INCORPORATED • 1 Garden Way • Troy, New York 12180
Customer Service: 1-800-437-8686 • Technical Service: 1-800-520-5520 • Parts Service: 1-800-648-6776 • FAX: (518) 391-7332
Outside the United States and Canada:
Customer Service: (518) 391-7007 • Technical Service: (518) 391-7008 • Parts Service: (518) 391-7006 • FAX (518) 391-7332
1905103 Rev. A (5/98) Printed in U.S.A.
©
1998 Garden Way Incorporated
TROUBLESHOOTING
Before performing any of the procedures in this Troubleshooting Chart, refer to the appropriate information contained
in this Manual for the correct safety precautions and operating or maintenance procedures. Contact your local
authorized Engine Service Dealer for engine service. Contact your local authorized TROY-BILT tiller dealer or the
Factory for service problems with the machine.
PROBLEM POSSIBLE CAUSE CORRECTION
Engine Does Not Start. 1. Spark plug wire disconnected. 1. Reconnect wire.
2. Fuel tank empty. 2. Add gasoline.
3. Stale gasoline. 3. Drain gasoline and add fresh gasoline.
4. Incorrect throttle setting. 4. Put throttle in correct setting.
5. Dirty air filter. 5. Replace air filter.
6. Defective or incorrectly gapped spark plug. 6. Inspect spark plug.
7. Carburetor out of adjustment. 7. See Engine Service Dealer.
8. Tine hood not properly attached. 8. Check for proper hood installation.
9. Handlebar swung more than half-way. 9. Swing handlebar back into proper range.
Engine Runs Poorly. 1. Bad spark plug. 1. Inspect spark plug.
2. Incorrect throttle setting. 2. Move throttle to correct setting.
3. Dirty air filter(s). 3. Replace filter.
4. Carburetor out of adjustment. 4. See Engine Service Dealer.
5. Stale gasoline. 5. Drain gasoline and add fresh gasoline.
6. Dirt or water in fuel tank. 6. See Engine Service Dealer.
7. Engine cooling system clogged. 7. Clean engine cooling fins.
Engine Overheats. 1. Engine cooling system clogged. 1. Clean fins.
2. Carburetor out of adjustment. 2. See Engine Service Dealer.
3. Oil level is low. 3. Check and add oil.
Engine does not shut off. 1. Defective engine throttle lever. 1. See Engine Service Dealer.
If tines turn, but wheels do not 1. Wheel Clutch not engaging properly. 1. See local servicing Dealer.
turn in rear tine tiller mode.
Wheels do not disengage in 1. Wheel Clutch not disengaging properly. 1. See local servicing Dealer.
front tine tiller/cultivator mode.
Tines do not turn. 1. Drive belt is off pulleys or belt is broken, 1. Replace drive belt on pulleys or adjust drive bail
or drive bail cable tension is incorrect. cable tension (see Page 21).
 Loading...