

Troybilt 020344-2 Owner’s Manual
,®
O
I'_vm
Pressure Washer
Operator'sManual
This pressure washer is rated in accordance to the Pressure Washer Manufacturers Association
(PWMA) standard PWI01 (Testing and Rating Performance of Pressure Washers).
BRIGGS & STRATTONPOWER PRODUCTSGROUP, LLC
JEFFERSON, WISCONSIN, U.S.A.
Manual No. 208040GS
Revision A (03/23/2009)
Thankyou for purchasingthis quality-built Troy-Bilt pressure washer. We are pleased that you've placedyour confidence in
the Troy-Bilt brand. When operatedand maintainedaccording to the instructions in this manual,your Troy-Bilt pressure
washer will provide manyyearsof dependableservice.
Thismanualcontainssafety information to makeyou awareof the hazardsand risks associatedwith pressurewashersand
how to avoid them. BecauseTroy-Bilt does not necessarilyknow all the applications this pressurewasher could be used for, it
is important that you readand understandthese instructions thoroughly beforeattempting to start or operatethis equipment.
Save theseinstructionsfor futurereference.
Thispressure washer requiresfinal assemblybefore use. Referto the Assembly sectionof this manualfor instructionson
final assembly procedures.Follow the instructions completely.
Where to Find Us
You never haveto lookfar to find Briggs & Stratton support and servicefor your pressure washer. Consultyour Yellow Pages.
Thereareover 30,000 Briggs & Stratton authorized service dealersworldwide who provide qualityservice. You can also
contact Troy-Bilt Customer Service by phone at (888) 611-6708, or on the Internetat www.troybilt.com. Forengine related
questions, call American HondaMotor Company,Inc. at (800) 426-7701 or visit www.honda-engines.com for a dealerIocator.
PressureWasher
Model Number
Revision LL_
Serial Number
DatePurchased
IIIIIIIII
Troy-Bilt® is a registeredtrademark of MTD Products Inc and is used under
license to Briggs & Stratton Power Products.
Briggs & Stratton Power Products Group, LLC
900 North Parkway
Jefferson, WI 53549
Copyright © 2009. All rights reserved. No part of this
material may be reproduced or transmitted in any form
without the express written permission of Briggs & Stratton
Power Products Group, LLC.
2 www.troybilt.com
Tableof Contents
Operator Safety ................................. 4
Equipment Description......................................... 4
Important SafetyInformation.................................... 4
Assembly ..................................... 7
Unpack PressureWasher....................................... 7
Attach Handle,CleaningTank andAccessory Tray ................... 7
Attach DetergentSiphon Hoseto Pump ........................... 8
Add Engine Oil and Fuel........................................ 8
Connect Hoseand Water Supply to Pump.......................... 9
FeaturesandControls............................ 10
Operation .................................... 11
PressureWasher Location..................................... 11
How to Start Your PressureWasher ............................. 12
How to Stop Your PressureWasher ............................. 13
How to UseAccessory Tray.................................... 13
How to Use SprayTips ....................................... 14
CleaningandApplying Detergent................................ 14
PressureWasher Rinsing ..................................... 15
Automatic Cool Down System (Thermal Relief)..................... 15
Maintenance .................................. 16
GeneralRecommendations .................................... 16
PressureWasher Maintenance ................................. 16
Engine Maintenance.......................................... 18
After EachUse.............................................. 18
Storage ................................................... 19
Troubleshooting ................................ 20
Warranties .................................... 21
PressureWasher OwnerWarranty............................... 21
Specifications ................................. 22
Product Specifications........................................ 22
Common ServiceParts ....................................... 22
Espafiol
OperatorSafety
Important Safety Information
Equipment Description
Readthis manual carefullyand becomefamiliar
withyourpressurewasher. Knowits applications,
its limitations,and any hazardsinvolved.
This pressurewasher operatesat 2,600 PSI(179.3 BARS)
and a flow rateof 2.3 gallons per minute (8.7 liters per
minute). Thishigh quality residential system features
10" (25.4 cm) wheels, axialcam pump with stainless steel
pistons, automatic cool down system,detergent siphoning
system, quick connect spray tips, heavyduty 25' (7.6 m)
hose, and more.
Everyeffort has beenmadeto ensurethat information in this
manual is accurate and current. However,we reservethe
right to change,alter, or otherwise improvethe product and
this document at any time without prior notice.
The EmissionControl System for this pressurewasheris
warranted for standards set by the Environmental Protection
Agency andthe CaliforniaAir ResourcesBoard.
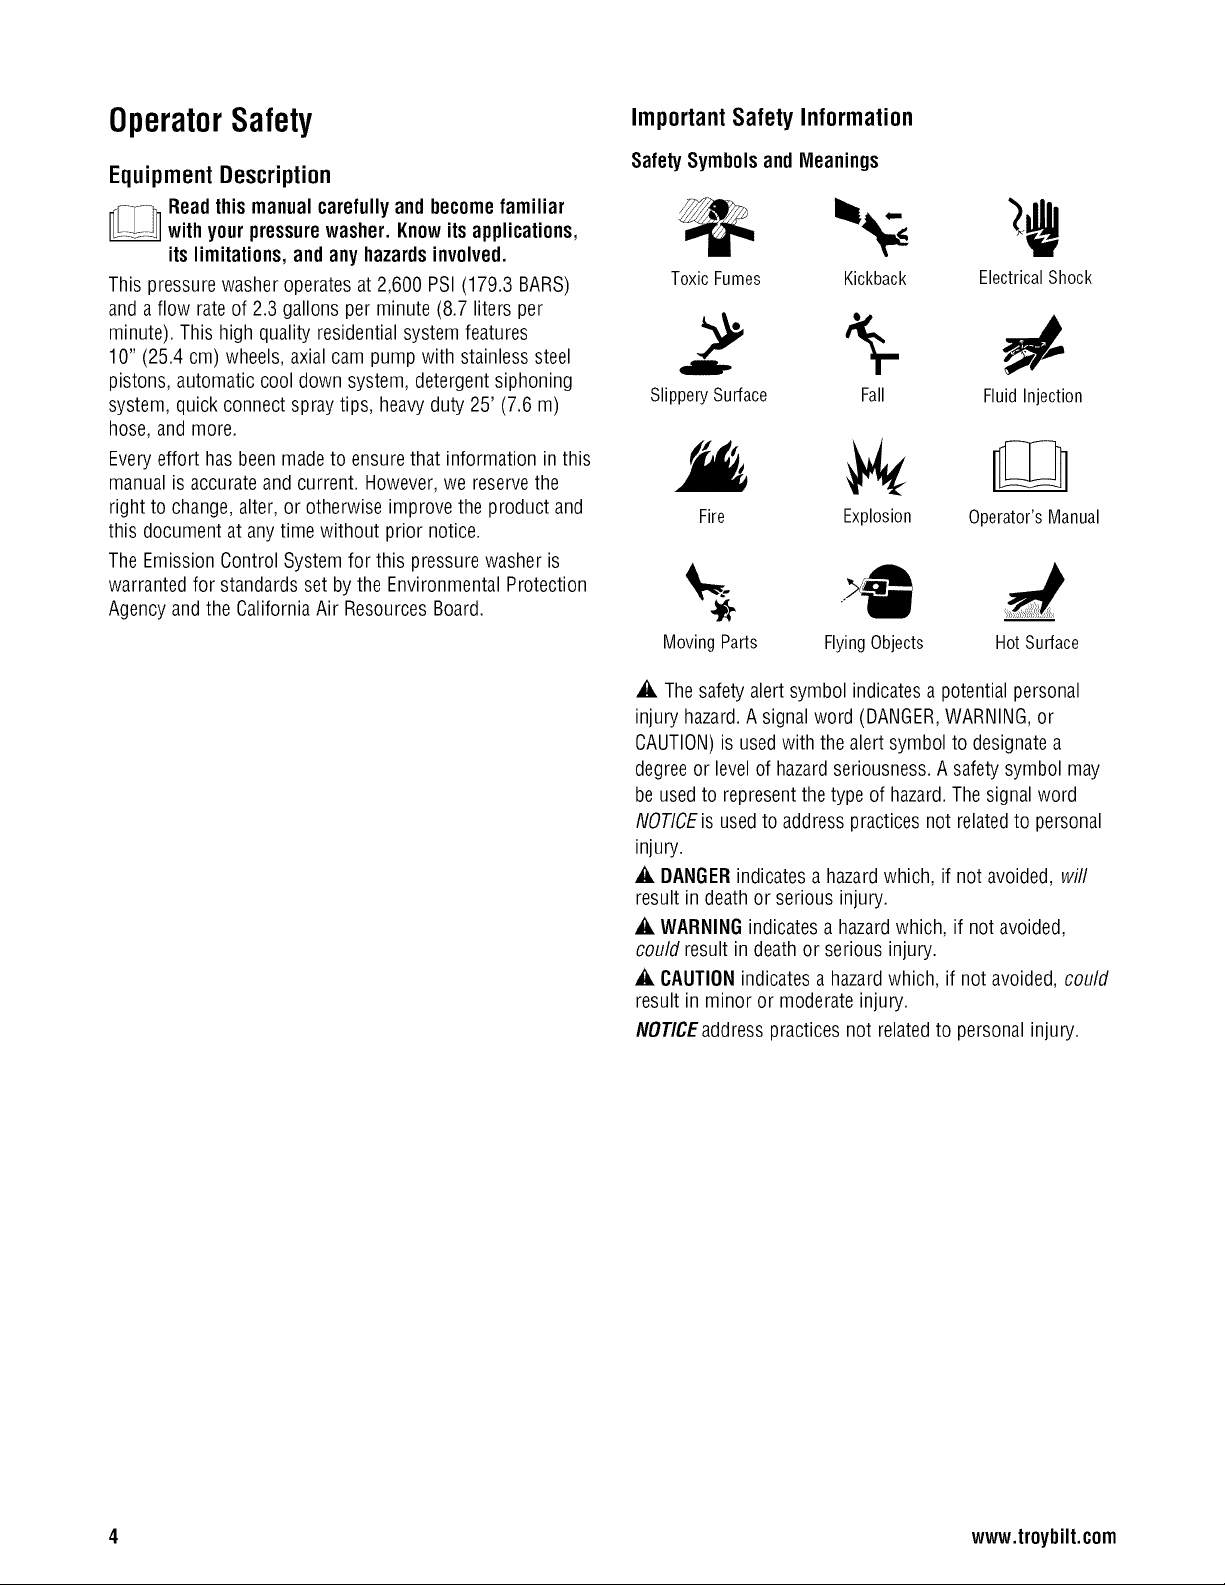
SafetySymbolsandMeanings
ElectricalShockToxic Fumes Kickback
Slippery Surface Fall Fluid Injection
Fire Explosion Operator'sManual
Moving Parts FlyingObjects Hot Surface
,A The safety alert symbol indicatesa potentialpersonal
injury hazard.A signalword (DANGER,WARNING,or
CAUTION)is usedwith the alert symbol to designatea
degreeor level of hazardseriousness.A safety symbol may
be usedto representthe type of hazard.The signal word
NOTICEis usedto addresspracticesnot relatedto personal
injury.
_i, DANGERindicatesa hazardwhich, if not avoided, will
result in death or serious injury.
_i, WARNINGindicatesa hazardwhich, if not avoided,
could result in death or serious injury.
_i, CAUTIONindicates a hazardwhich, if not avoided, could
result in minor or moderate injury.
NOTICEaddress practices not relatedto personal injury.
4 www.troybilt.com
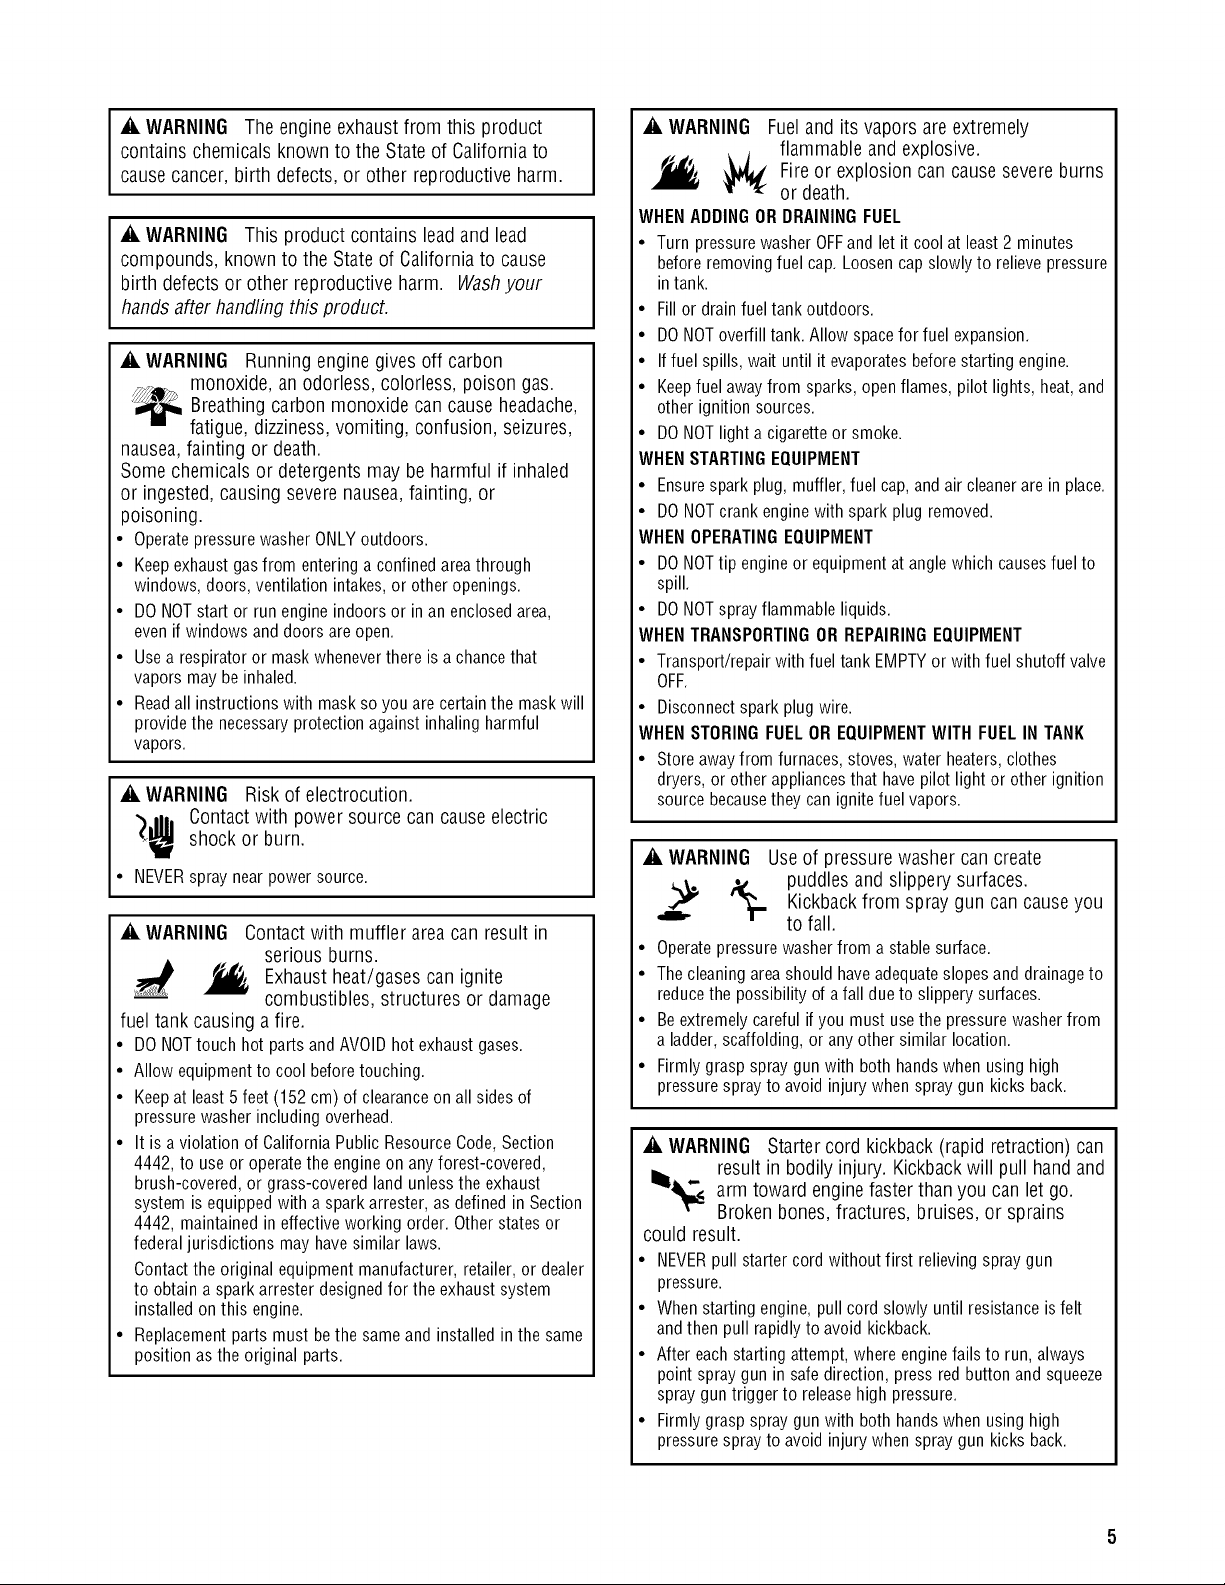
_i, WARNING Theengine exhaustfrom this product
contains chemicalsknown to the State of California to
causecancer, birth defects, or other reproductive harm.
_i, WARNING This product contains lead and lead
compounds, known to the Stateof Californiato cause
birth defectsor other reproductive harm. Washyour
hands after handlingthis product.
_i, WARNING Running engine gives off carbon
monoxide, an odorless, colorless, poison gas.
Breathing carbon monoxide can cause headache,
fatigue, dizziness, vomiting, confusion, seizures,
nausea, fainting or death.
Some chemicals or detergents may be harmful if inhaled
or ingested, causing severe nausea, fainting, or
poisoning.
• Operatepressurewasher ONLYoutdoors.
• Keepexhaustgas from entering a confinedareathrough
windows, doors, ventilation intakes, or other openings.
• DO NOTstart or run engine indoors or in an enclosedarea,
evenif windows anddoors areopen.
• Use a respirator or maskwheneverthere is a chancethat
vapors may beinhaled.
• Readall instructions with mask so you are certain the mask will
provide the necessaryprotection against inhaling harmful
vapors.
A, WARNING Riskof electrocution.
"_,dh Contactwith power sourcecan causeelectric
shock or burn.
¢W
• NEVERspraynearpowersource.
_i, WARNING Contact with muffler area can result in
serious burns.
Exhaust heat/gases can ignite
combustibles, structures or damage
fuel tank causing a fire.
• DO NOTtouch hot parts andAVOID hot exhaust gases.
• Allow equipment to cool beforetouching.
• Keepat least5 feet (152 cm) of clearanceon all sidesof
pressure washer including overhead.
• It is a violation of California Public ResourceCode,Section
4442, to use or operate the engineon anyforest-covered,
brush-covered, or grass-covered land unlessthe exhaust
system is equipped with aspark arrester, as defined in Section
4442, maintained in effective working order. Other statesor
federal jurisdictions may have similar laws.
Contactthe original equipment manufacturer, retailer, or dealer
to obtain a sparkarrester designedfor the exhaust system
installed on this engine.
• Replacement parts must bethe sameand installed in the same
position as the original parts.
_i, WARNING Fuel and its vapors are extremely
flammable and explosive.
_, _ Fire or explosion can cause severe burns
WHENADDING ORDRAININGFUEL
• Turn pressurewasher OFFand let it cool at least 2 minutes
before removing fuel cap. Loosen capslowly to relieve pressure
in tank.
• Fill or drain fuel tank outdoors.
• DONOToverfill tank. Allow spacefor fuel expansion.
• If fuel spills, wait until it evaporates beforestarting engine.
• Keepfuel awayfrom sparks, open flames, pilot lights, heat,and
other ignition sources.
• DONOTlight a cigaretteor smoke.
WHENSTARTINGEQUIPMENT
• Ensurespark plug, muffler,fuel cap,and air cleanerarein place.
• DO NOTcrank enginewith spark plug removed.
WHENOPERATINGEQUIPMENT
• DONOTtip engine or equipmentat anglewhich causes fuel to
spill.
• DONOTsprayflammable liquids.
WHENTRANSPORTINGOR REPAIRINGEQUIPMENT
• Transport/repair with fuel tank EMPTYor with fuel shutoff valve
OFF.
• Disconnect spark plug wire.
WHENSTORINGFUELOR EQUIPMENTWITH FUELIN TANK
• Store away from furnaces, stoves, water heaters,clothes
dryers, or otherappliancesthat have pilot light or other ignition
source becausethey can ignitefuel vapors.
_i, WARNING Use of pressure washer can create
• Operatepressurewasher from a stable surface.
• Thecleaning areashould have adequateslopes anddrainageto
reducethe possibility of afall dueto slippery surfaces.
• Beextremely careful if you must use the pressurewasher from
a ladder,scaffolding, or anyother similar location.
• Firmly grasp spray gun with both handswhen using high
pressure sprayto avoid injury when spray gun kicks back.
or death.
Kickback from spray gun can cause you
_ puddles and slippery surfaces.
to fall.
_i, WARNING Startercord kickback(rapid retraction) can
result in bodily injury. Kickbackwill pull hand and
,1_ arm toward enginefasterthan you can let go.
Broken bones,fractures, bruises, or sprains
could result.
• NEVERpull starter cord without first relieving spraygun
pressure.
• When starting engine, pull cord slowly until resistanceisfelt
andthen pull rapidly to avoid kickback.
• After each starting attempt, where enginefails to run, always
point spray gun in safedirection, press red button and squeeze
spray guntrigger to releasehigh pressure.
• Firmly grasp spray gun with both handswhen using high
pressure sprayto avoid injury when spray gun kicks back.

A, WARNING The high pressurestream of water that
this equipment produces can cut through skin
and its underlying tissues, leadingto serious
injury and possible amputation.
Spraygun traps high water pressure, evenwhen engineis
stopped and water is disconnected, which can cause
injury.
• DONOTallowCHILDRENtooperatepressurewasher.
• NEVERrepairhighpressurehose.Replaceit.
• NEVERrepairleakingconnectionswithsealantofanykind.
Replaceo-ringor seal.
• NEVERconnecthighpressurehoseto nozzleextension.
• Keephighpressurehoseconnectedto pumpandspraygun
whilesystemispressurized.
• ALWAYSpointspraygunin safedirection,pressredbutton
andsqueezesprayguntriggerto releasehighpressure,every
timeyoustopengine.
• NEVERaimspraygunatpeople,animals,or plants.
• DONOTsecuresprayguninopenposition.
• DONOTleavespraygununattendedwhilemachineis running.
• NEVERuseaspraygunwhichdoesnothaveatriggerlockor
triggerguardin placeandinworkingorder.
• Alwaysbecertainspraygun,nozzlesandaccessoriesare
correctlyattached.
_i, WARNING Unintentional sparking can result in fire or
NOTICE High pressurespray may damagefragile items
including glass.
• DONOTpointspraygunatglasswhenusingred(0°)spraytip.
• NEVERaimspraygunatplants.
NOTICE Improper treatment of pressure washer can
damage it and shorten its life.
• If you havequestions about intended use,ask dealeror contact
qualified service center.
• NEVERoperateunits with broken or missing parts, or without
protective housing or covers.
• DO NOTby-pass any safety device on this machine.
• DONOTtamper with governedspeed.
• DONOToperate pressurewasher above rated pressure.
• DONOTmodify pressurewasher in any way.
• Before starting pressure washer in cold weather,check all parts of
the equipment to be sure ice has not formed there.
• NEVERmove machine by pulling on hoses. Use handleprovided
on unit.
• Checkfuel systemfor leaksor signs of deterioration, such as
chafed or spongy hose,loose or missing clamps, or damaged
tank or cap. Correct all defects before operating pressure washer.
• This equipment is designedto be usedwith Briggs & Stratton
Power Products authorized parts ONLY.If equipment is used with
parts that DONOTcomply with minimum specifications, user
assumesall risks and liabilities.
_ electric shock.
WHENADJUSTINGOR MAKINGREPAIRSTOYOURPRESSURE
WASHER
• Disconnect the spark plugwire from the spark plug and place
the wire where it cannot contact spark plug.
WHENTESTINGFORENGINESPARK
• Use approved spark plug tester.
• DONOTcheckfor sparkwith spark plug removed.
_i, WARNING Starter and other rotating parts can
entangle hands, hair, clothing, or accessories.
• NEVERoperatepressure washerwithout protective housing or
covers.
• DO NOTwear looseclothing, jewelry or anything that may be
caught in the starter or other rotating parts.
• Tie up long hairand remove jewelry.
A, WARNING Risk of eyeinjury.
Spraycan splash backor propel objects.
• Always wear indirect vented (chemical splash) safety goggles
markedto comply with ANSIZ87.1 when using or in vicinity of
this equipment.
• NEVERsubstitute safetyglasses or dry-condition goggles for
indirect vented safety goggles.
6 www.troybilt.com
Assembly
Read entireoperator'smanual beforeyou attempt
toassembleor operateyour new pressurewasher.
Your pressure washer requires some assembly and is ready
for useafter it has beenproperly serviced with the
recommendedoil and fuel.
If you haveanyproblems with the assemblyof your pressure
washer, pleasecall the pressurewasher helpline at
(888} 611-6708. If calling for assistance, pleasehavethe
model, revision, and serial number from the identification
label available.
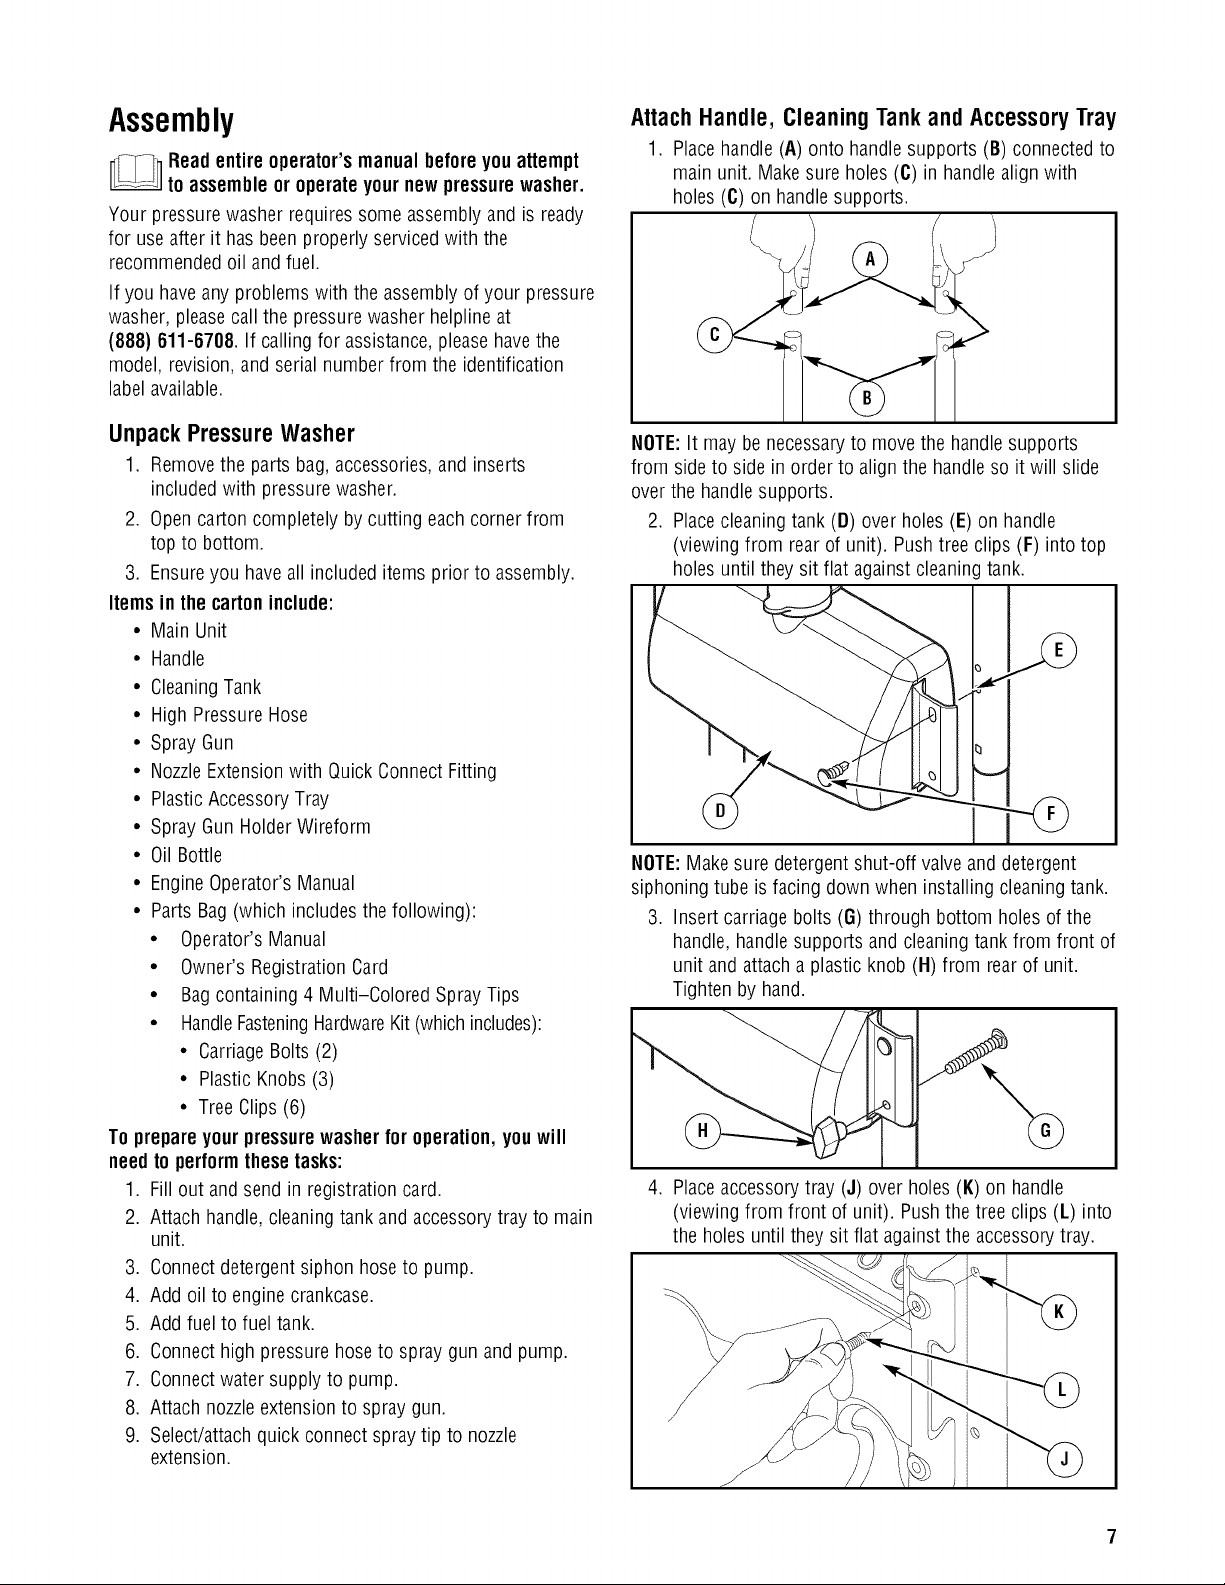
Attach Handle, Cleaning Tank and Accessory Tray
1. Placehandle (A) onto handle supports (B) connected to
main unit. Makesure holes (C) in handle alignwith
holes (C) on handlesupports.
UnpackPressureWasher
1. Removethe parts bag,accessories,and inserts
included with pressure washer.
2. Opencarton completely by cutting each corner from
top to bottom.
3. Ensureyou haveall included items prior to assembly.
Items inthe cartoninclude:
• Main Unit
• Handle
• CleaningTank
• HighPressureHose
• Spray Gun
• NozzleExtension with Quick Connect Fitting
• PlasticAccessoryTray
• Spray GunHolderWireform
• Oil Bottle
• Engine Operator's Manual
• Parts Bag(which includesthe following):
• Operator's Manual
• Owner's Registration Card
• Bag containing 4 Multi-Colored Spray Tips
• HandleFasteningHardwareKit(which includes):
• CarriageBolts(2)
• PlasticKnobs (3)
• TreeClips(6)
To prepare your pressurewasherfor operation, youwill
need toperformthesetasks:
1. Fill out and send in registration card.
2. Attach handle,cleaningtank andaccessorytray to main
unit.
3. Connect detergent siphon hoseto pump.
4. Add oil to enginecrankcase.
5. Add fuel to fuel tank.
6. Connect high pressure hose to spray gun and pump.
7. Connect water supply to pump.
8. Attach nozzleextension to spraygun.
9. Select/attachquick connect spray tip to nozzle
extension.
NOTE:It may be necessaryto move the handle supports
from sideto side in order to align the handle so it will slide
over the handle supports.
2. Placecleaningtank (D) over holes (E) on handle
(viewing from rear of unit). Pushtree clips (F) into top
holes until they sit flat against cleaning tank.
I
NOTE:Makesure detergentshut-off valve and detergent
siphoning tube is facing down when installing cleaningtank.
3. Insert carriage bolts (G) through bottom holes of the
handle, handlesupports and cleaningtank from front of
unit andattacha plastic knob (H)from rear of unit.
Tighten by hand.
%
4. Place accessorytray (J) over holes (K) on handle
(viewing from front of unit). Pushthe tree clips (L) into
the holes until they sit flat againstthe accessorytray.
.
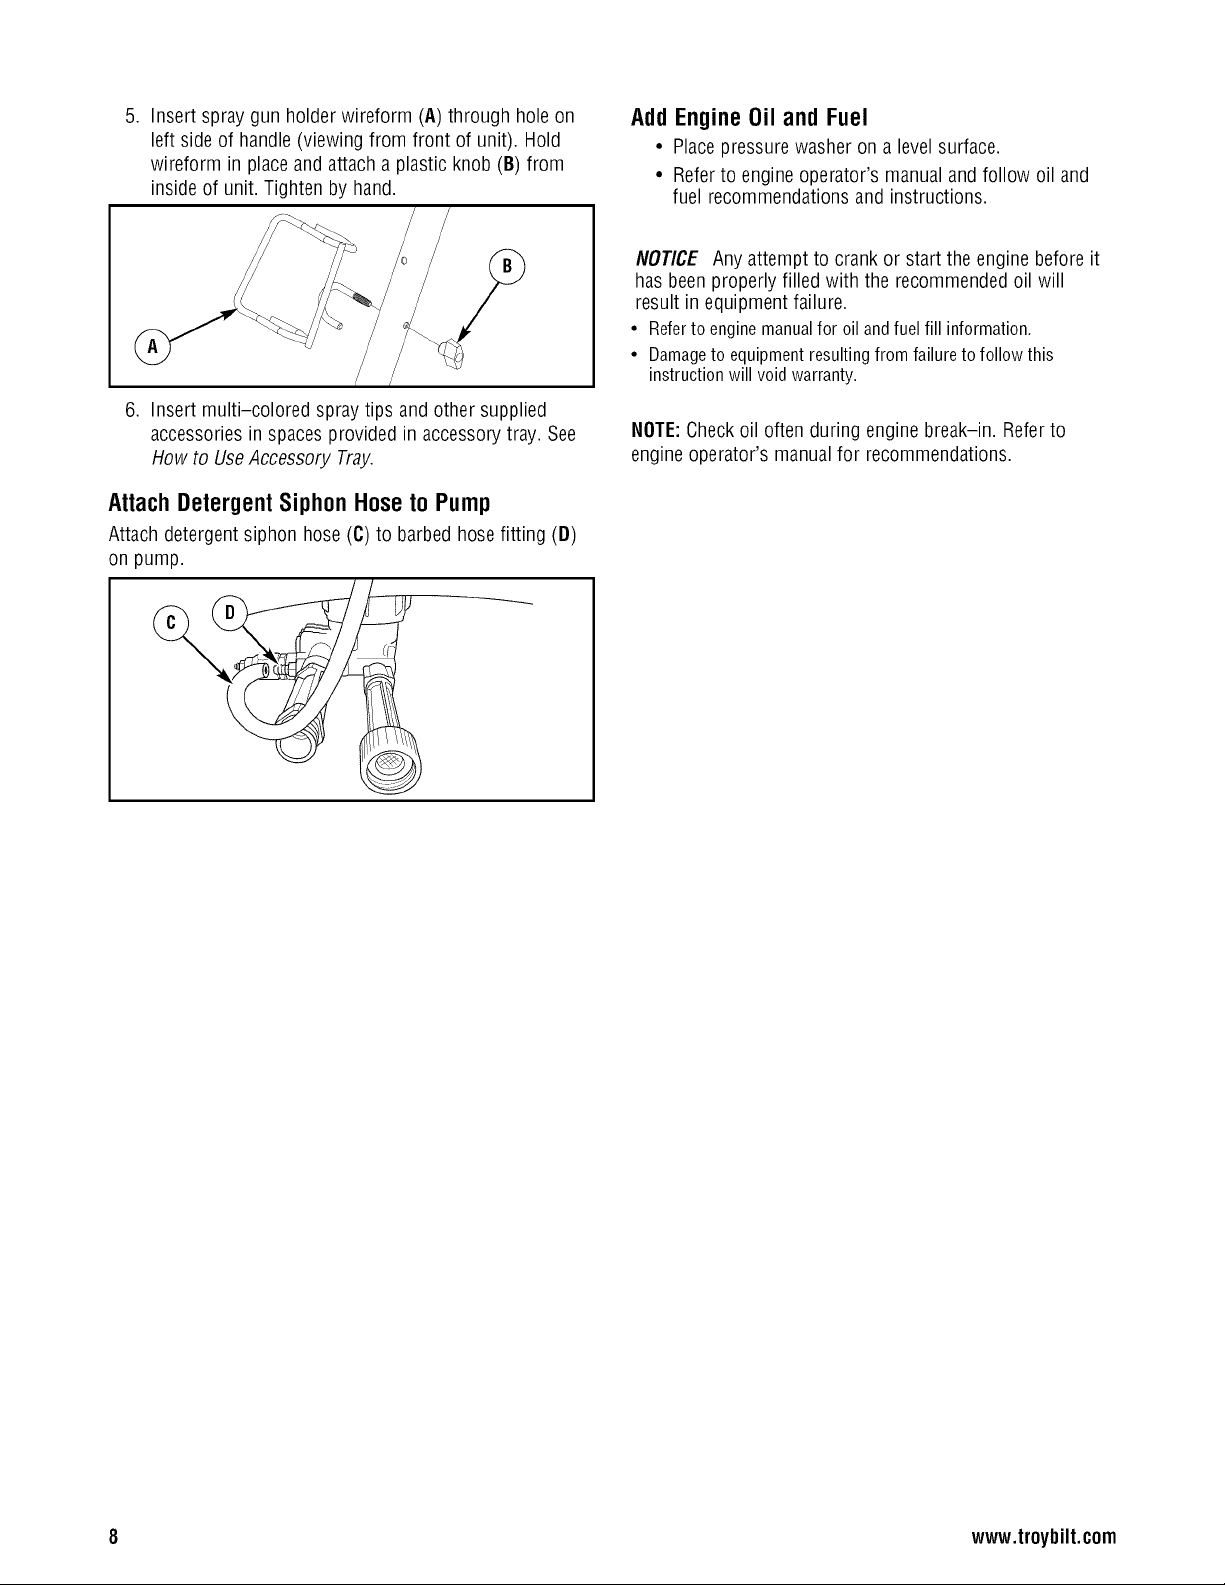
Insert spraygun holder wireform (A) through holeon
left side of handle(viewing from front of unit). Hold
wireform in placeand attacha plastic knob (B) from
inside of unit. Tighten by hand.
6. Insert multi-colored spraytips and other supplied
accessoriesin spacesprovided in accessory tray. See
How to UseAccessory Tray.
Attach Detergent Siphon Hose to Pump
Attach detergentsiphon hose (C)to barbedhose fitting (D)
on pump.
Add Engine Oil and Fuel
• Placepressurewasheron a level surface.
• Refer to engineoperator's manual and follow oil and
fuel recommendationsand instructions.
NOTICE Anyattempt to crankor start the engine before it
has beenproperly filled with the recommendedoil will
result in equipment failure.
• Referto enginemanualfor oilandfuelfill information.
• Damageto equipmentresultingfromfailuretofollowthis
instructionwill voidwarranty.
NOTE:Checkoil often during engine break-in. Referto
engine operator's manualfor recommendations.
8 www.troybilt.com
ConnectHoseandWaterSupplyto Pump
NOTICE DONOTrun the pump without the water supply
connectedandturned on.
• Damagetoequipmentresultingfrom failuretofollowthis
instructionwill voidwarranty.
NOTE:Removeand discard the shipping capsfrom the
pump's high pressureoutlet and water inlet before attaching
hoses.
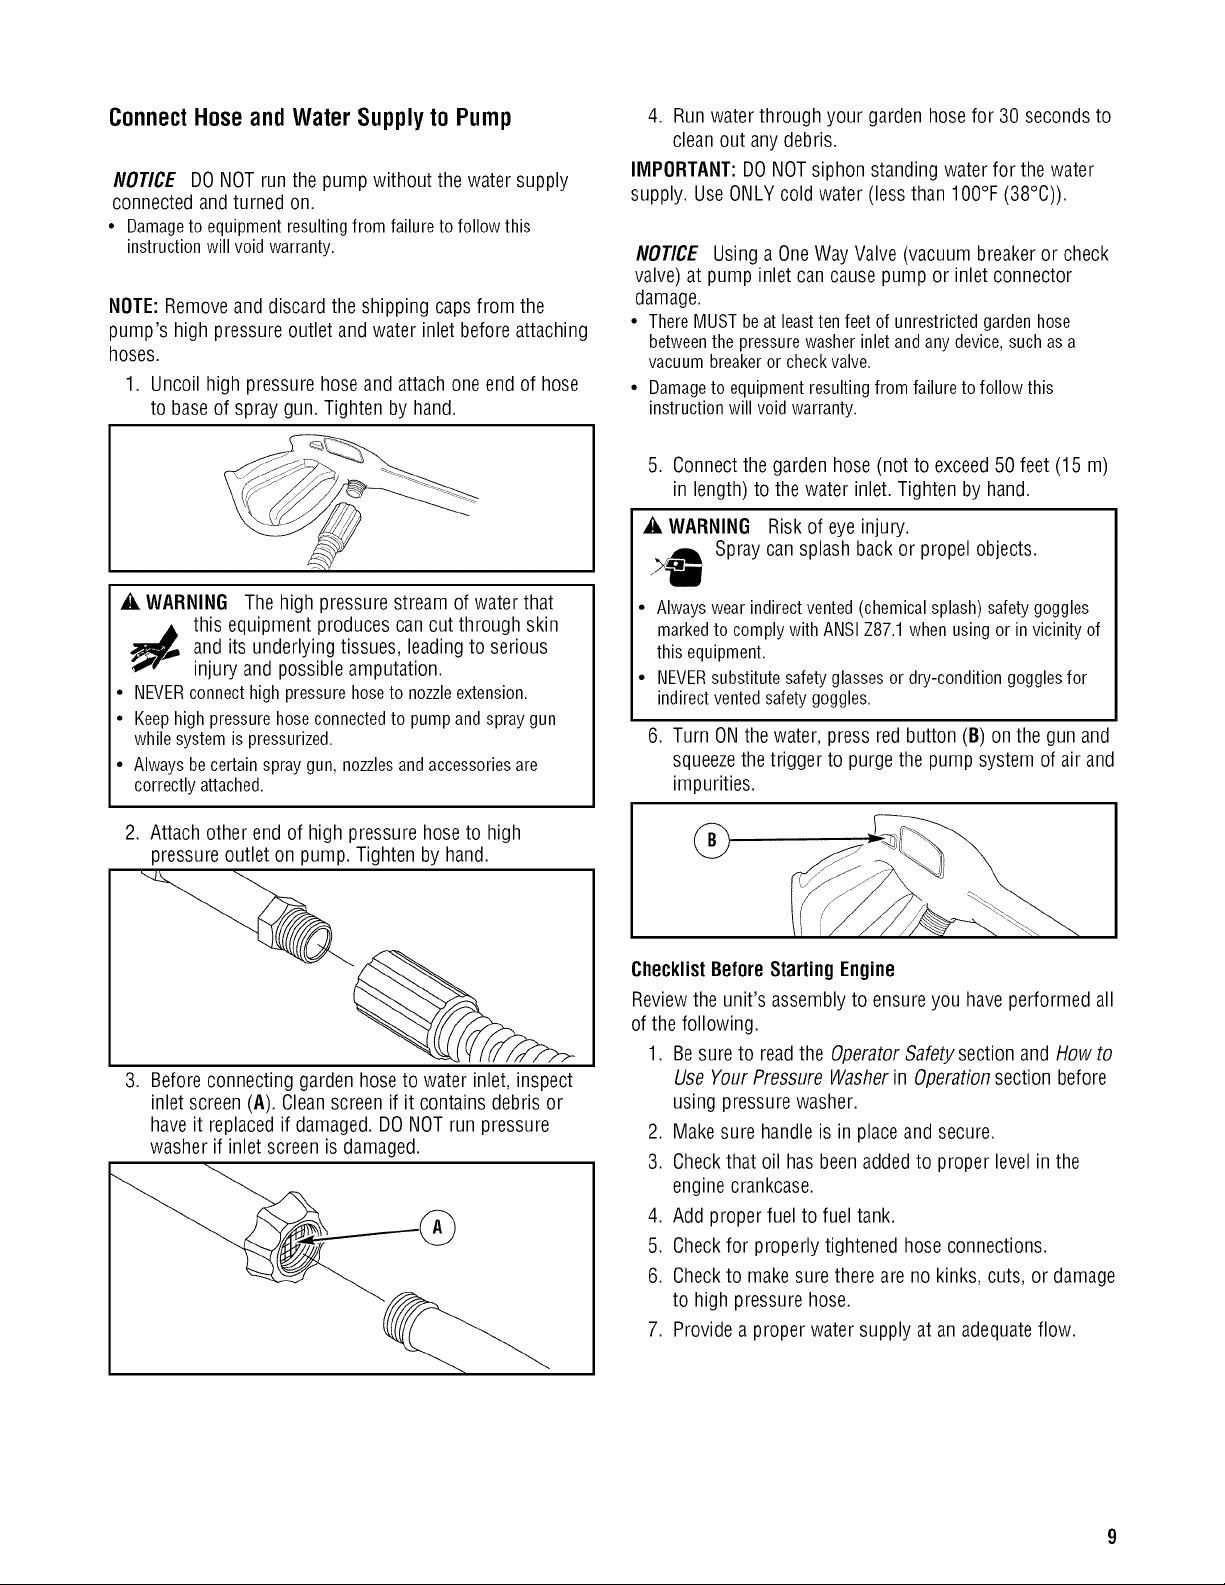
1. Uncoil high pressure hoseand attachoneend of hose
to baseof spray gun. Tighten by hand.
4. Run water through your gardenhosefor 30 secondsto
cleanout any debris.
IMPORTANT:DONOTsiphon standing water for thewater
supply. UseONLYcold water (less than 100°F (38°C)).
NOTICE Using a OneWayValve (vacuum breakeror check
valve) at pump inlet cancause pump or inlet connector
damage.
• ThereMUSTbeatleasttenfeetof unrestrictedgardenhose
betweenthepressurewasherinletandanydevice,suchasa
vacuumbreakeror checkvalve.
• Damageto equipmentresulting from failure to follow this
instruction will void warranty.
5. Connectthe garden hose (not to exceed50 feet (15 m)
in length) to the water inlet. Tighten by hand.
A, WARNING Risk of eyeinjury.
Spray cansplash back or propel objects.
_i, WARNING The high pressure stream of water that
this equipment produces can cut through skin
and its underlying tissues, leading to serious
injury and possible amputation.
• NEVERconnect high pressure hose to nozzleextension.
• Keephigh pressure hose connectedto pump and spraygun
while system is pressurized.
• Always be certain spray gun, nozzlesand accessoriesare
correctly attached.
2. Attach other end of high pressure hoseto high
pressure outlet on pump. Tightenby hand.
3. Before connecting garden hoseto water inlet, inspect
inlet screen(A). Cleanscreen if it contains debris or
haveit replaced if damaged.DONOTrun pressure
washer if inlet screenis damaged.
• Always wear indirect vented (chemicalsplash) safety goggles
markedto comply with ANSIZ87.1 when using or in vicinity of
this equipment.
• NEVERsubstitute safetyglasses or dry-condition goggles for
indirect vented safety goggles.
6. Turn ONthewater, press red button(B) on the gun and
squeezethetrigger to purge the pump system of air and
impurities.
ChecklistBeforeStarting Engine
Reviewthe unit's assemblyto ensure you haveperformedall
of the following.
1. Besureto readthe OperatorSafety section and Howto
Use Your Pressure Washerin Operationsection before
using pressurewasher.
2. Makesure handle is in place and secure.
3. Checkthat oil has been addedto proper level in the
engine crankcase.
4. Add proper fuel to fuel tank.
5. Checkfor properly tightened hose connections.
6. Checkto makesure there are no kinks,cuts, or damage
to high pressure hose.
7. Provide a proper watersupply at anadequateflow.
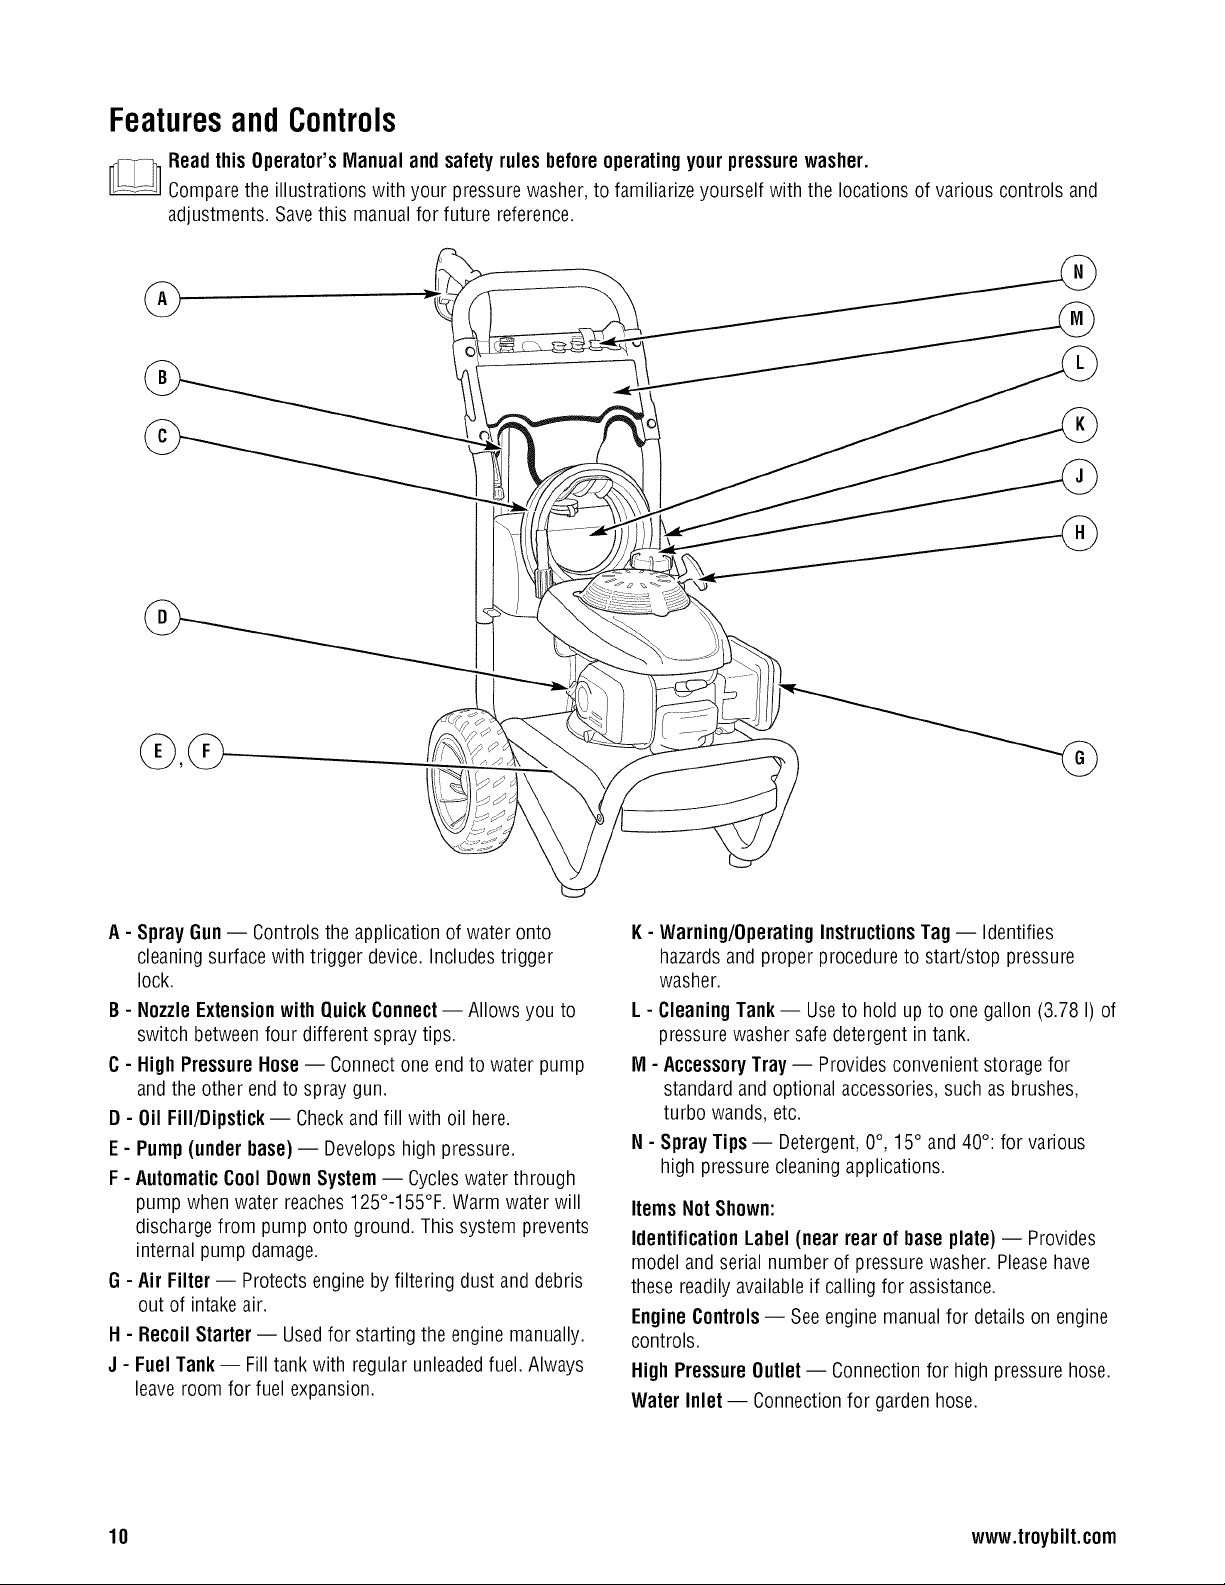
FeaturesandControls
Readthis Operator'sManual and safetyrules beforeoperatingyour pressurewasher.
Comparethe illustrations with your pressure washer,to familiarizeyourself with the locations of various controls and
adjustments. Savethis manual for future reference.
A- Spray Gun-- Controls the applicationof water onto
cleaning surfacewith trigger device. Includestrigger
lock.
B- NozzleExtensionwith QuickConnect-- Allows you to
switch betweenfour different spray tips.
C- HighPressureHose-- Connectone end to water pump
and the other end to spray gun.
D - Oil Fill/Dipstick-- Checkand fill with oil here.
E - Pump(under base)-- Developshigh pressure.
F -AutomaticCoolDownSystem-- Cycleswaterthrough
pump when water reaches125°-155°F. Warmwater will
dischargefrom pump onto ground. This system prevents
internal pump damage.
G - Air Filter-- Protects engine by filtering dust anddebris
out of intake air.
H - Recoil Starter-- Usedfor starting the engine manually.
J - Fuel Tank -- Fill tank with regular unleadedfuel. Always
leaveroom for fuel expansion.
K- Warning/OperatingInstructionsTag-- Identifies
hazardsand proper procedure to start/stop pressure
washer.
L- CleaningTank-- Useto hold up to one gallon (3.78 I) of
pressure washer safe detergent in tank.
M - AccessoryTray -- Provides convenient storage for
standard and optional accessories, such as brushes,
turbo wands, etc.
N - SprayTips -- Detergent,0°, 15° and40°: for various
high pressure cleaning applications.
Items NotShown:
IdentificationLabel(near rear of base plate) -- Provides
model andserial number of pressure washer. Pleasehave
these readily availableif calling for assistance.
Engine Controls-- Seeengine manual for details on engine
controls.
High PressureOutlet-- Connectionfor high pressure hose.
Water Inlet -- Connectionfor gardenhose.
10 www.troybilt.com
Operation
If you haveanyproblems operating your pressure washer,
pleasecallthe pressure washer helpline at (888) 611-6788.
PressureWasherLocation
Clearancesand Air Movement
• , WARNING Exhaustheat/gases can ignite
combustibles, structures or damagefuel tank
causing a fire.
• Keepat least5 ft. (152 cm) clearanceon all sides of pressure
washer including overhead.
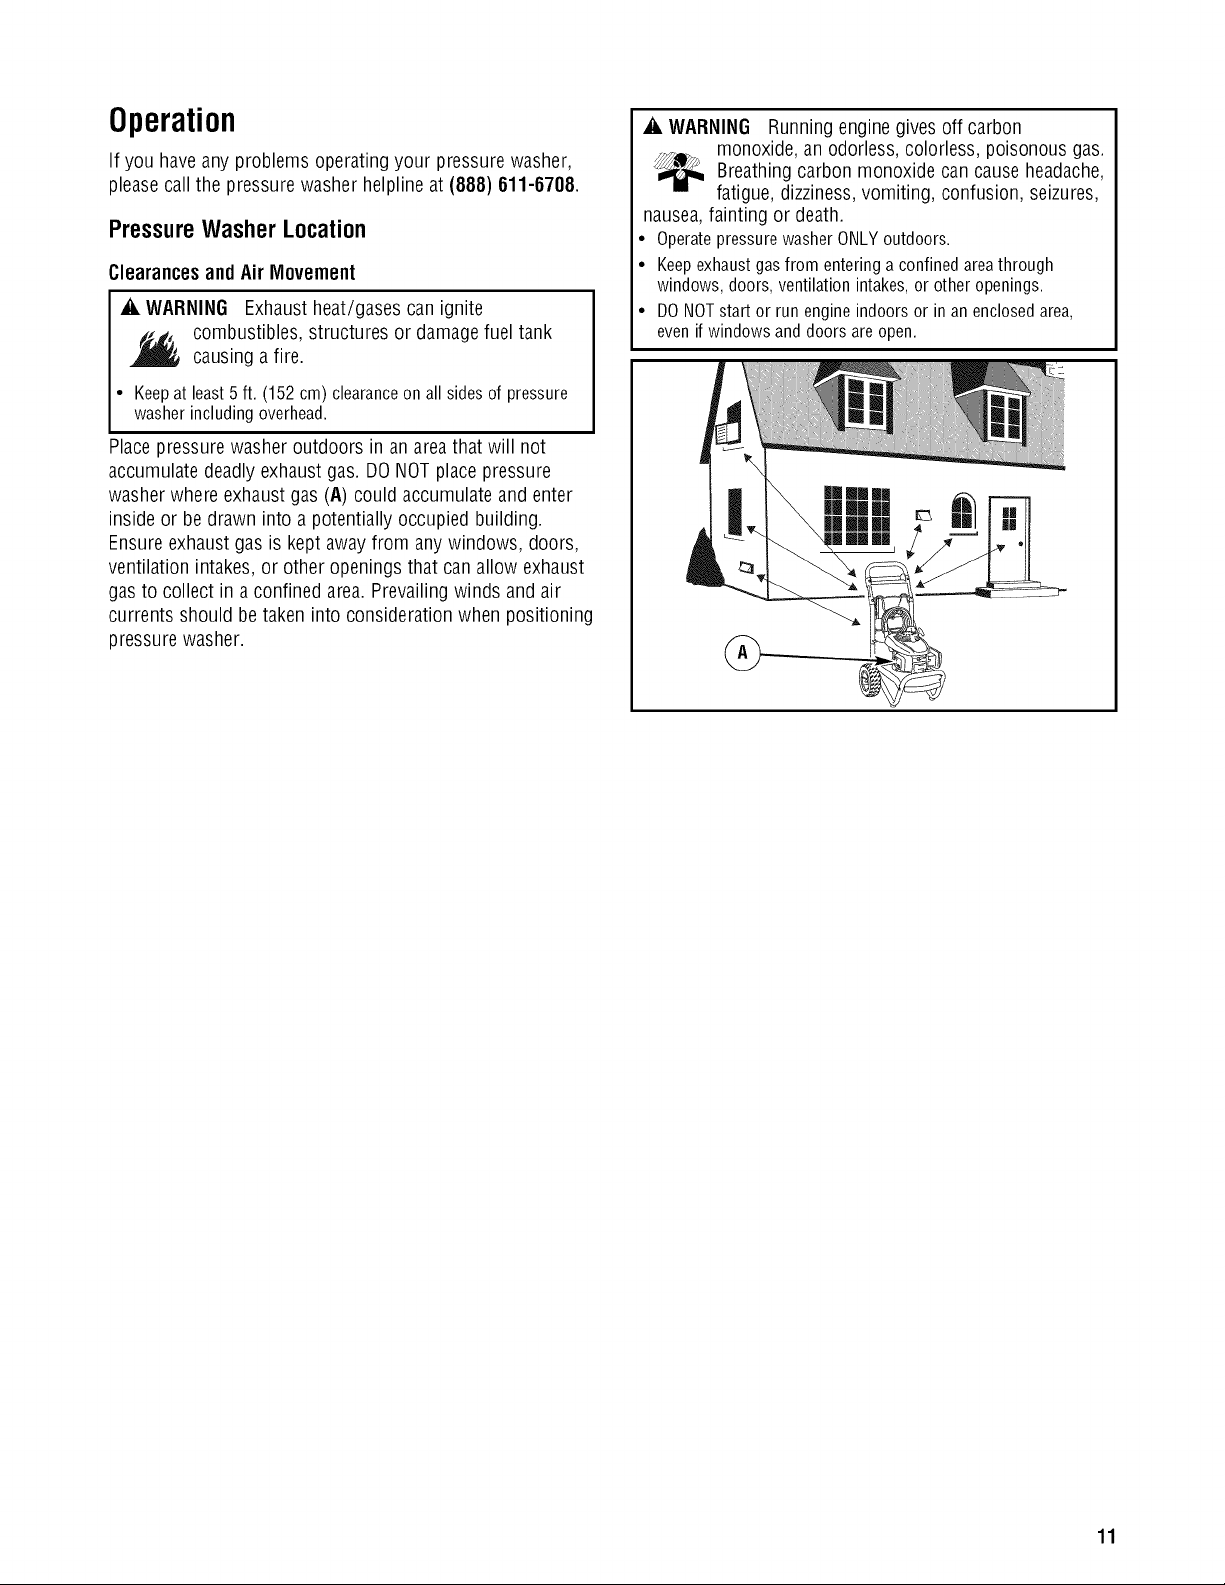
Placepressurewasher outdoors in an areathat will not
accumulate deadlyexhaustgas. DONOTplacepressure
washer where exhaustgas (A) could accumulate and enter
inside or be drawn into a potentially occupied building.
Ensureexhaustgas is keptawayfrom any windows, doors,
ventilation intakes,or other openingsthat can allow exhaust
gasto collect in aconfined area. Prevailing winds and air
currents should be takeninto consideration when positioning
pressure washer.
A, WARNING Running enginegives off carbon
monoxide,an odorless,colorless, poisonous gas.
Breathingcarbon monoxide can cause headache,
fatigue, dizziness,vomiting, confusion, seizures,
nausea,fainting or death.
• OperatepressurewasherONLYoutdoors.
• Keepexhaustgasfromenteringa confinedareathrough
windows,doors,ventilationintakes,or otheropenings.
• DONOTstartor runengineindoorsor in anenclosedarea,
evenifwindowsanddoorsareopen.
A
11
How to Start Your Pressure Washer
To start your pressure washer for thefirst time, follow these
instructions step-by-step. This starting information also
applies if you havelet the pressure washer sit idle for at least
a day.
1. Placepressure washer nearanoutside water source
capableof supplying water at a flow rategreaterthan
3.3 gallons per minute (12.5 liters perminute) and no
less than 20 PSI (1.38 BARS)at pressure washer end
of garden hose. DONOTsiphon supply water.
2. Checkthat high pressurehoseis tightly connectedto
spray gun and pump. SeeAssembly section.
3. Make sure unit is in a level position.
4. Connect garden hose to water inlet on pressurewasher
pump.
NOTICE DONOTrun the pump without the water supply
connectedandturned on.
• Damagetoequipmentresultingfrom failuretofollowthis
instructionwill voidwarranty.
5. Turn ONwater, point spray gun in a safe direction,
press red button and squeezetrigger to purge pump
system of air and impurities.
6. Attach nozzleextension to spraygun. Tighten by hand.
X
\
,
Choosespray tip you want to useand insert it into
nozzleextension. See How to UseSpray Tips.
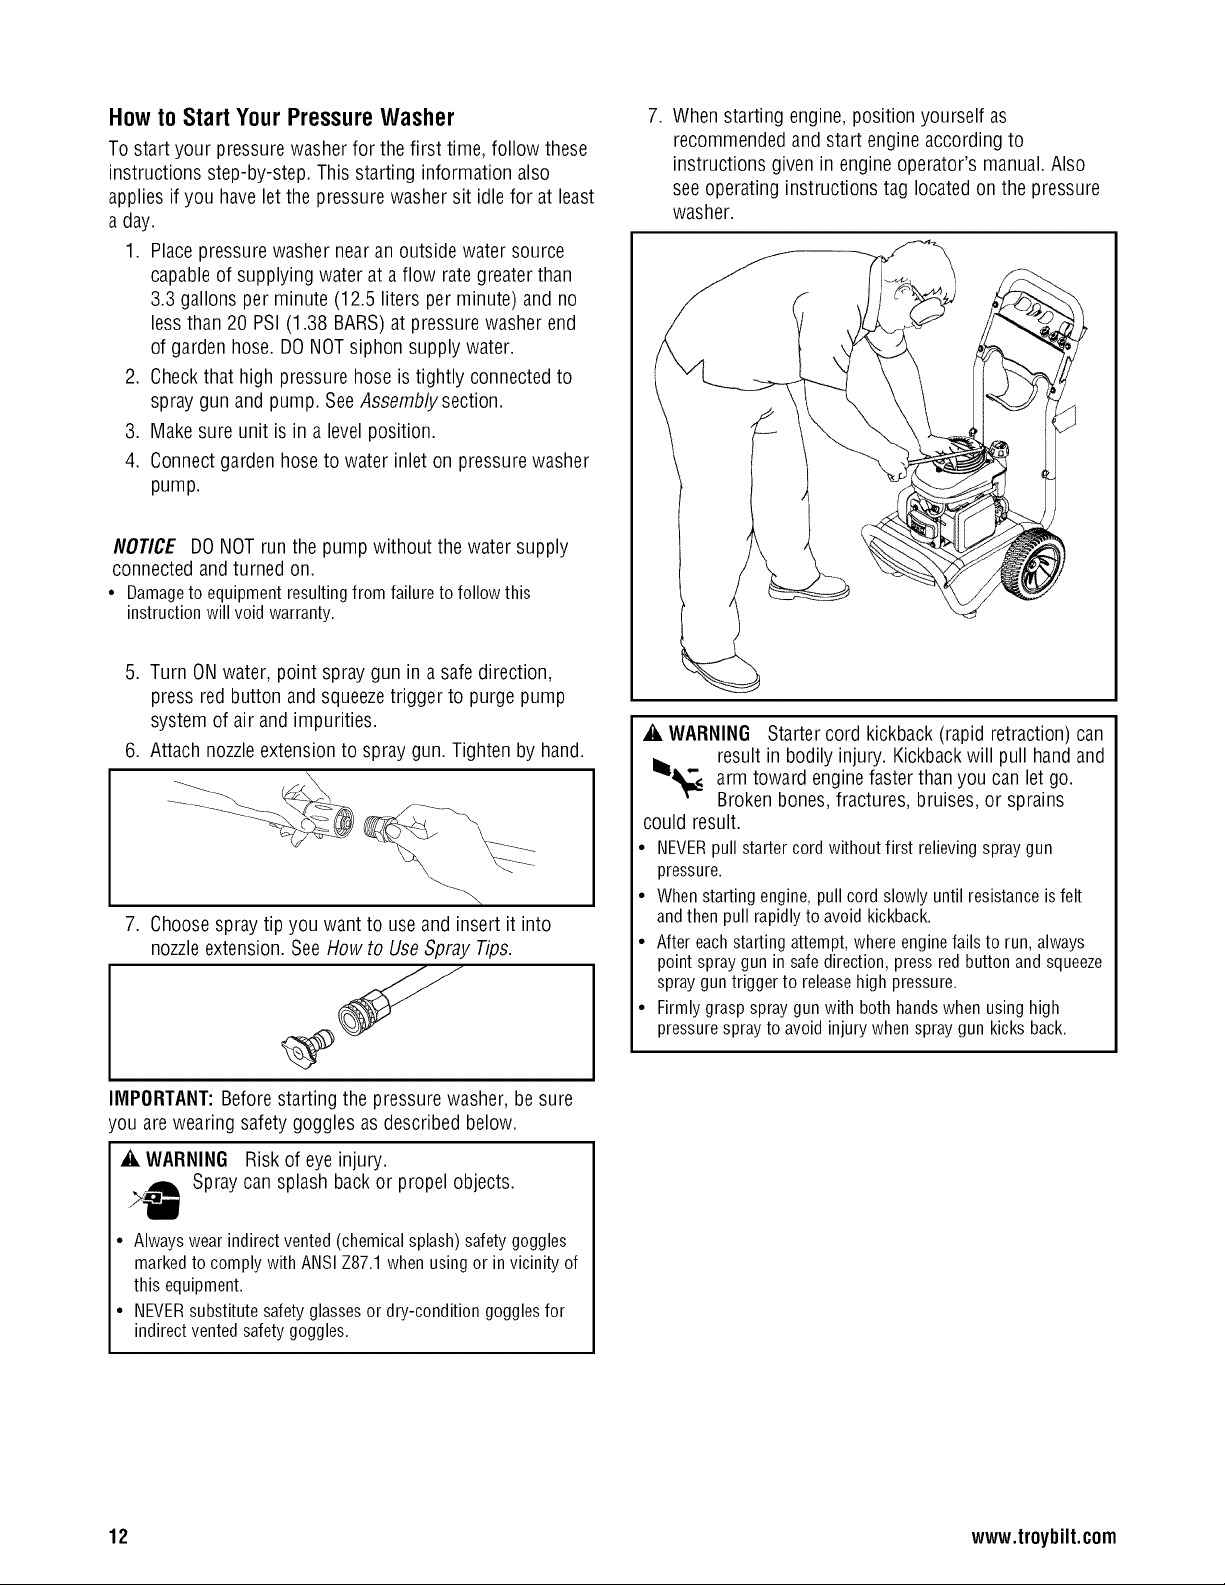
,
Whenstarting engine, position yourself as
recommendedand start engine accordingto
instructions given in engine operator's manual. Also
seeoperating instructions tag locatedon the pressure
washer.
A. WARNING Startercord kickback (rapid retraction) can
result in bodily injury. Kickbackwill pull hand and
_,_ arm toward enginefasterthan you can let go.
v-
Broken bones,fractures, bruises, or sprains
could result.
• NEVERpull starter cord without first relieving spraygun
pressure.
• When starting engine, pull cord slowly until resistanceisfelt
andthen pull rapidly to avoid kickback.
• After each starting attempt, where enginefails to run, always
point spray gun in safedirection, press red button and squeeze
spray guntrigger to releasehigh pressure.
• Firmly grasp spray gun with both handswhen using high
pressure sprayto avoid injury when spray gun kicks back.
IMPORTANT:Beforestarting the pressurewasher, be sure
'ou are wearing safety goggles as described below.
A. WARNING Riskof eye injury.
Spraycan splash backor propel objects.
• Always wear indirect vented (chemical splash) safety goggles
markedto comply with ANSIZ87.1 when using or in vicinity of
this equipment.
• NEVERsubstitute safetyglasses or dry-condition goggles for
indirect vented safety goggles.
12 www.troybilt.com
_i, WARNING The high pressurestream of water that
this equipment produces can cut through skin
and its underlying tissues, leadingto serious
injury and possible amputation.
Spraygun traps high water pressure, evenwhen engineis
stopped and water is disconnected, which can cause
injury.
• DONOTallowCHILDRENtooperatepressurewasher.
• Keephighpressurehoseconnectedto pumpandspraygun
whilesystemispressurized.
• NEVERaimspraygunatpeople,animals,or plants.
• DONOTsecuresprayguninopenposition.
• DONOTleavespraygununattendedwhilemachineis running.
• NEVERuseaspraygunwhichdoesnothaveatriggerlockor
triggerguardin placeandinworkingorder.
• Alwaysbecertainspraygun,nozzlesandaccessoriesare
correctlyattached.
3. ALWAYSpoint gun in a safe direction and press red
button and squeezespray gun trigger to release
retained highwater pressure.
IMPORTANT:Spray gun traps high water pressure, even
when engineis stopped andwater is disconnected.
_i, WARNING The high pressure stream of waterthat
and its underlying tissues, leadingto serious
this equipment produces can cut through skin
injury and possible amputation.
Spray guntraps high water pressure, evenwhen engineis
stopped and water is disconnected, which can cause
injury.
• Keephighpressurehoseconnectedto pumpandspraygun
whilesystemispressurized.
• ALWAYSpointspraygunin safedirection,pressredbutton
andsqueezesprayguntriggerto releasehighpressure,every
timeyoustopengine.
_i, WARNING Contactwith muffler area can result in
serious burns.
Exhaustheat/gases can ignite
combustibles, structures or damage
fuel tankcausing a fire.
• DONOTtouchhotpartsandAVOIDhotexhaustgases.
• Allowequipmentto coolbeforetouching.
• Keepat least5feet(152cm)of clearanceonall sidesof
pressurewasherincludingoverhead.
• It isaviolationofCaliforniaPublicResourceCode,Section
4442,to useor operatetheengineon anyforest-covered,
brush-covered,or grass-coveredlandunlesstheexhaust
systemisequippedwithasparkarrester,asdefinedinSection
4442,maintainedineffectiveworkingorder.Otherstatesor
federaljurisdictionsmayhavesimilarlaws.
Contactthe originalequipmentmanufacturer,retailer,ordealer
to obtainasparkarresterdesignedfor theexhaustsystem
installedonthisengine.
• Replacementpartsmustbethesameandinstalledinthe same
positionasthe originalparts.
How to Stop Your Pressure Washer
1. Releasespray guntrigger and let engine idlefor two
minutes.
2. Turn engine off according to instructions given in
engine operator's manual.
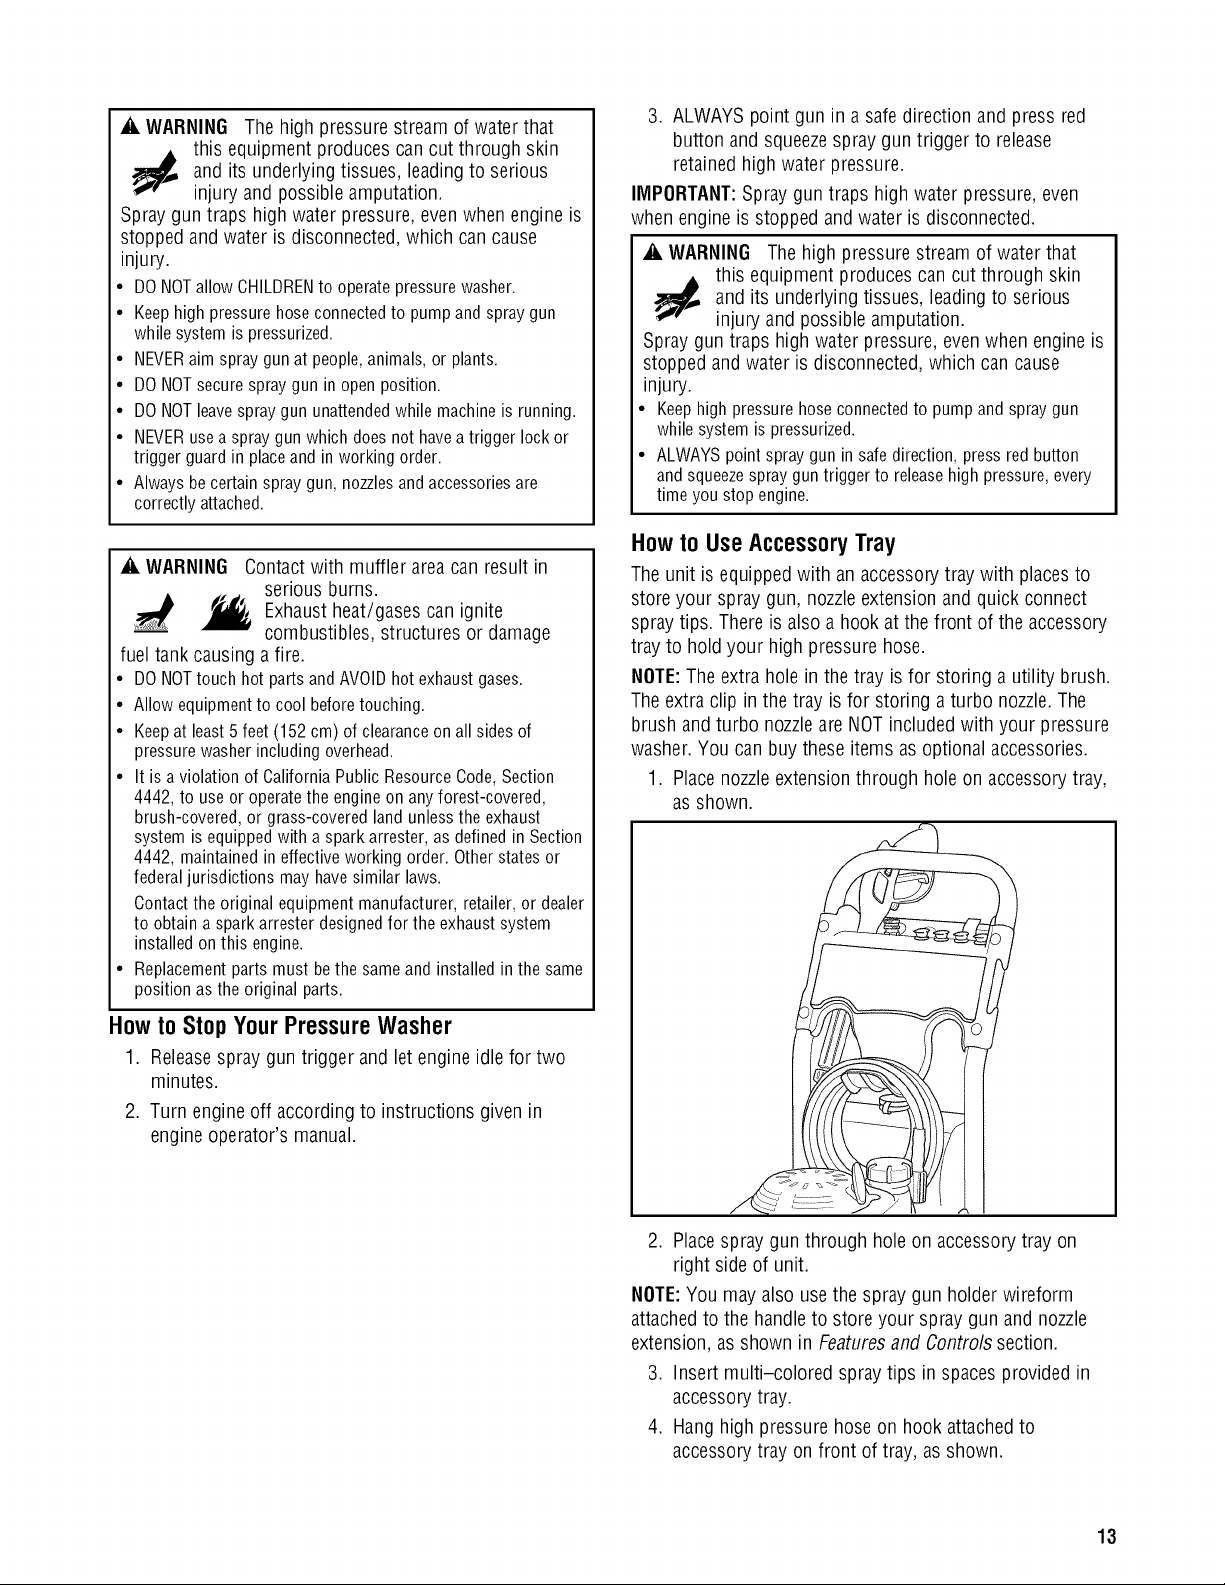
How to Use Accessory Tray
Theunit is equipped with an accessorytray with places to
store your spray gun, nozzleextension andquick connect
spray tips. Thereis also a hook atthe front of the accessory
tray to hold your high pressure hose.
NOTE:The extra hole in the tray is for storing a utility brush.
Theextraclip in the tray is for storing aturbo nozzle.The
brush andturbo nozzleare NOTincluded with your pressure
washer.You can buy these items as optional accessories.
1. Placenozzleextension through holeonaccessorytray,
as shown.
!
2. Placespray gun through hole on accessorytray on
right side of unit.
NOTE:You mayalso use the spray gun holder wireform
attachedto the handleto store your spray gun and nozzle
extension, as shown in Featuresand Controls section.
3. Insert multi-colored spraytips in spaces provided in
accessorytray.
4. Hang high pressure hose on hook attachedto
accessorytray on front of tray, as shown.
13
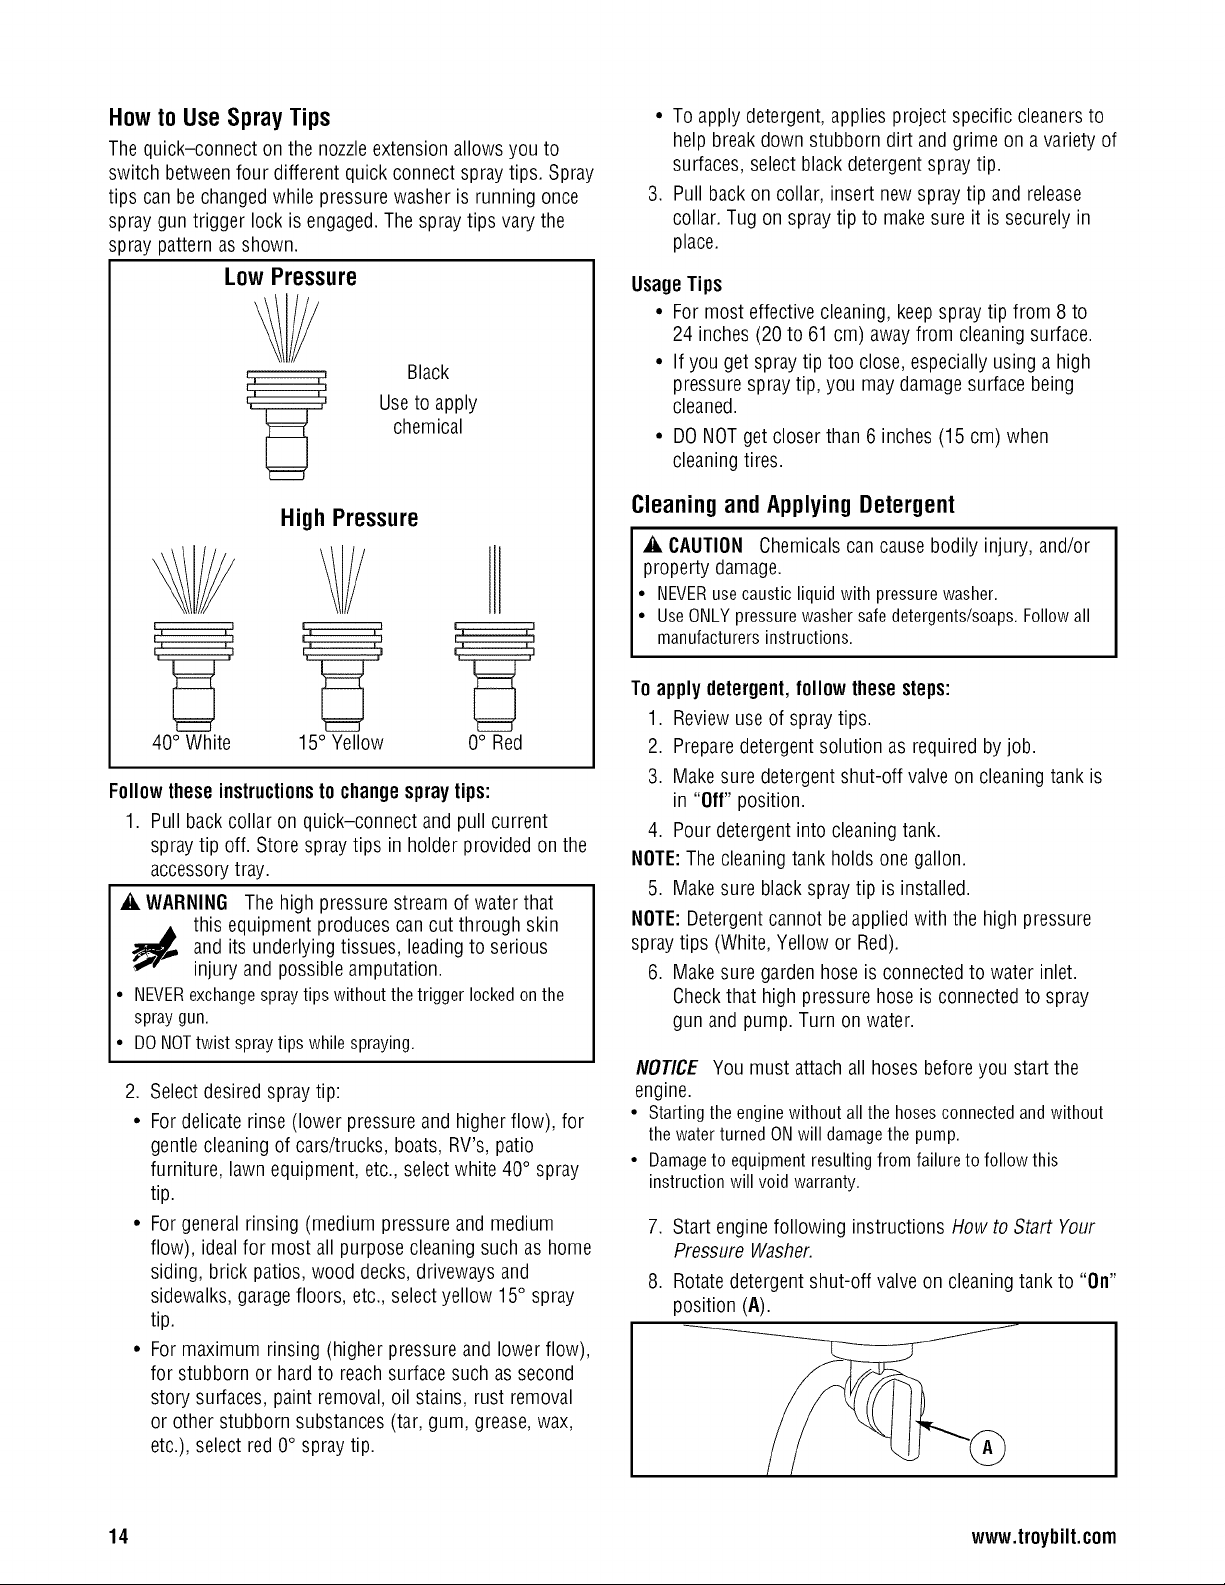
How to Use Spray Tips
The quick-connect on the nozzleextension allows you to
switch betweenfour different quick connect spraytips. Spray
tips can be changedwhile pressurewasher is running once
spray gun trigger lock is engaged.Thespray tips vary the
spray pattern as shown.
Low Pressure
Black
Useto apply
chemical
• To applydetergent, applies projectspecific cleanersto
help breakdown stubborn dirt and grime on a variety of
surfaces, selectblack detergent spraytip.
3. Pull backon collar, insert new spray tip and release
collar. Tug on spray tip to makesure it is securely in
place.
UsageTips
• For most effective cleaning, keepspray tip from 8 to
24 inches (20 to 61 cm) awayfrom cleaning surface.
• If you get spray tip too close, especiallyusing a high
pressure spray tip, you may damage surface being
cleaned.
• DONOTget closer than 6 inches (15 cm) when
cleaningtires.
High Pressure
40° White 15° Yellow 0° Red
Followtheseinstructionsto changespraytips:
1. Pull backcollar on quick-connect and pull current
spray tip off. Store spray tips in holderprovided on the
accessorytray.
_i, WARNING The high pressurestream of water that
and its underlying tissues, leadingto serious
this equipment produces can cut through skin
injury and possible amputation.
• NEVERexchangespraytipswithoutthetriggerlockedonthe
spraygun.
• DONOTtwist spraytipswhilespraying.
2. Select desiredspray tip:
• Fordelicate rinse (lower pressure and higherflow), for
gentle cleaningof cars/trucks, boats, RV's,patio
furniture, lawn equipment, etc., selectwhite 40° spray
tip.
• Forgeneral rinsing (medium pressureandmedium
flow), idealfor most all purposecleaning such as home
siding, brick patios, wood decks,driveways and
sidewalks, garagefloors, etc., selectyellow 15° spray
tip.
• For maximum rinsing (higher pressureand lower flow),
for stubborn or hard to reachsurface such as second
story surfaces, paint removal,oil stains, rust removal
or other stubborn substances(tar, gum, grease,wax,
etc.), select red 0° spray tip.
Cleaning and Applying Detergent
_i, CAUTION Chemicals can cause bodily injury, and/or
property damage.
• NEVERusecaustic liquid with pressure washer.
• Use ONLYpressurewasher safe detergents/soaps. Follow all
manufacturers instructions.
To applydetergent,follow these steps:
1. Reviewuse of spraytips.
2. Preparedetergent solution as required by job.
3. Makesure detergent shut-off valveon cleaningtank is
in "Off" position.
4. Pour detergentinto cleaningtank.
NOTE:The cleaningtank holds onegallon.
5. Makesure black spraytip is installed.
NOTE:Detergent cannot beapplied with the high pressure
spray tips (White, Yellow or Red).
6. Makesure garden hose is connectedto water inlet.
Checkthat high pressurehoseis connected to spray
gun and pump. Turn on water.
NOTICE You must attach allhoses beforeyou start the
engine.
• Startingthe enginewithoutallthe hosesconnectedandwithout
thewaterturnedONwill damagethe pump.
• Damageto equipmentresultingfromfailuretofollowthis
instructionwill voidwarranty.
7. Start enginefollowing instructions How to Start Your
Pressure Washer.
8. Rotatedetergent shut-off valve on cleaningtankto "On"
position (A).
14 www.troyhilt.com
 Loading...