

Page 1
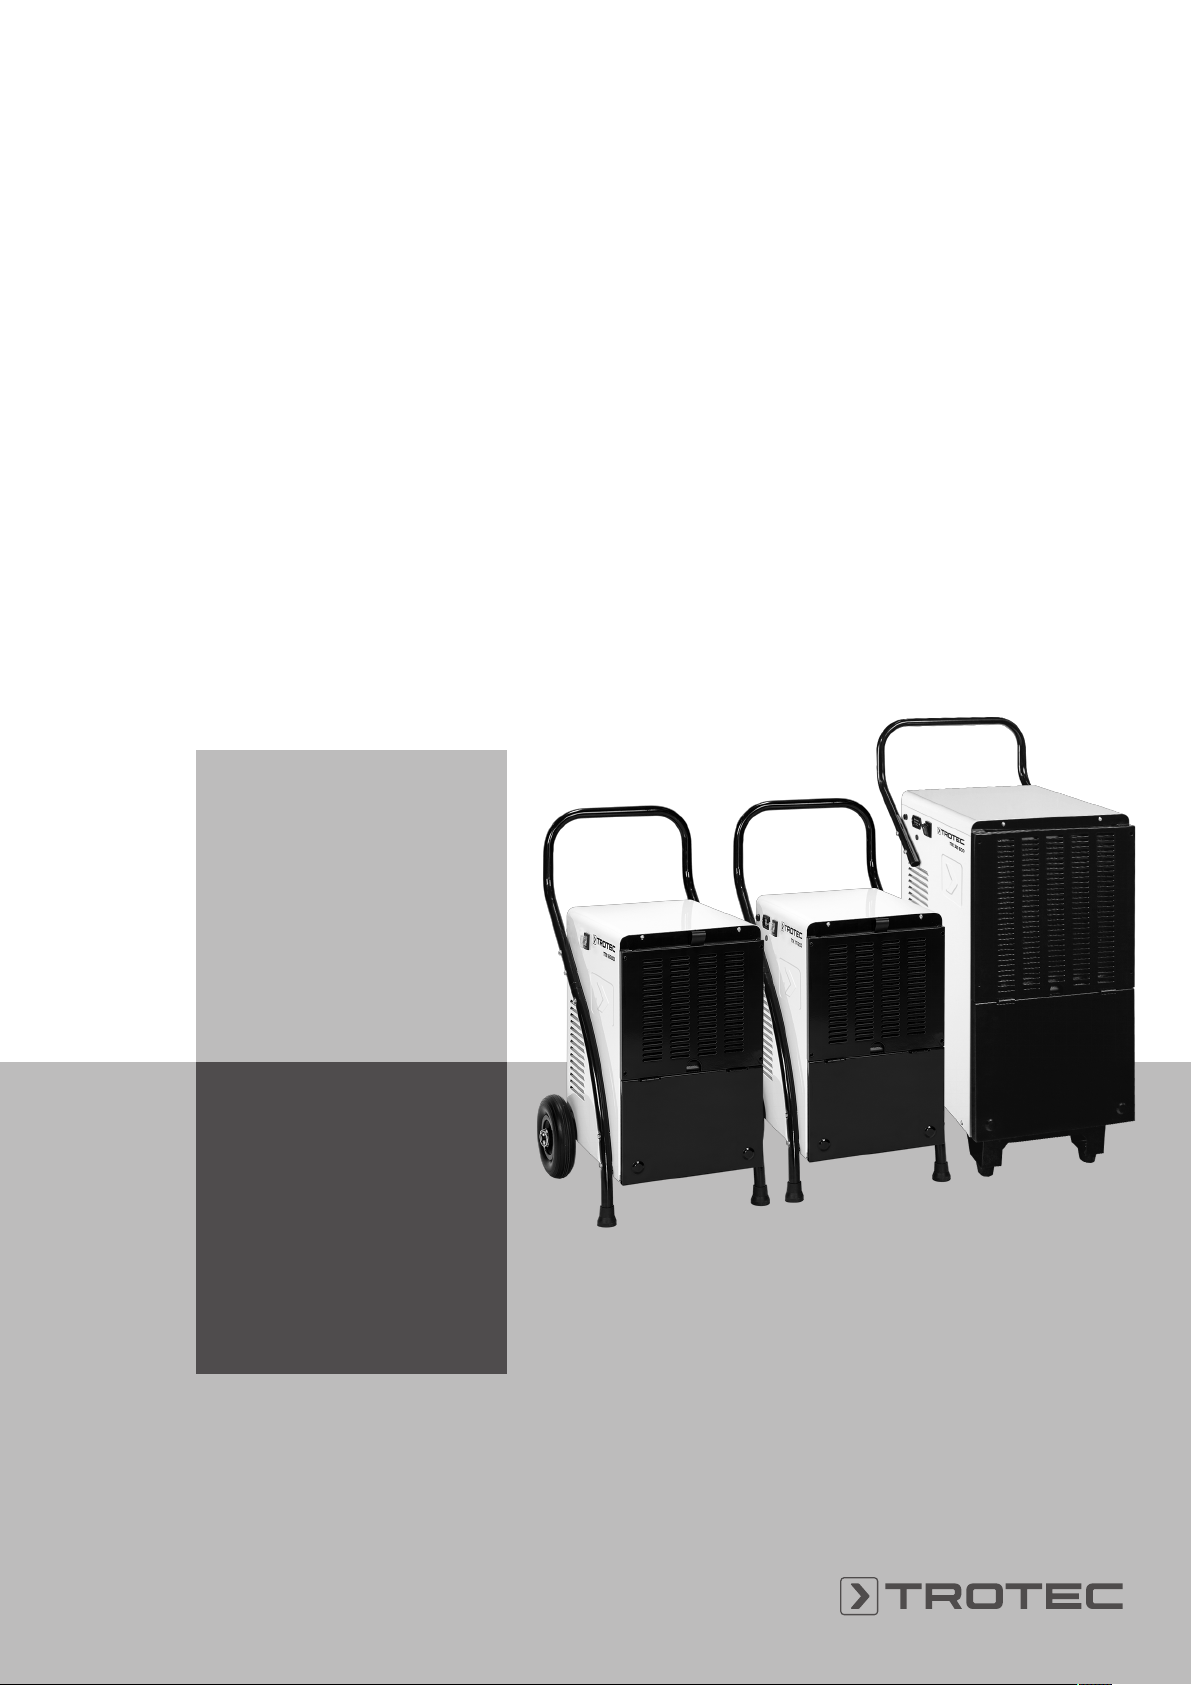
TTK 165 ECO / TTK 170 ECO / TTK 380 ECO
EN
ORIGINAL INSTRUCTIONS
DEHUMIDIFIER
TRT-BA-TTK165ECO-TTK170ECO-TTK380ECO-TC2017-16-004-EN
Page 2
Table of contents
Notes regarding the instructions ..........................................2
Safety .....................................................................................2
You can download the current version of the instructions and
the EUdeclaration of conformity via the following link:
Information about the device................................................4
Transport and storage...........................................................6
Assembly and installation.....................................................6
Operation .............................................................................10
Available accessories..........................................................14
Errors and faults..................................................................15
Maintenance ........................................................................16
Technical annex...................................................................19
Disposal ...............................................................................22
Declaration of conformity ...................................................22
Notes regarding the instructions
Symbols
TTK 165 ECO
https://hub.trotec.com/?id=40461
TTK 170 ECO
https://hub.trotec.com/?id=40716
TTK 380 ECO
https://hub.trotec.com/?id=42742
Warning of electrical voltage
This symbol indicates dangers to the life and health of
persons due to electrical voltage.
Warning
This signal word indicates a hazard with an average
risk level which, if not avoided, can result in serious
injury or death.
Caution
This signal word indicates a hazard with a low risk
level which, if not avoided, can result in minor or
moderate injury.
Note
This signal word indicates important information (e.g.
material damage), but does not indicate hazards.
Info
Information marked with this symbol helps you to carry
out your tasks quickly and safely.
Follow the manual
Information marked with this symbol indicates that the
instructions must be observed.
Safety
Read this manual carefully before starting or using the
device. Always store the manual in the immediate vicinity
of the device or its site of use!
Warning
Read all safety warnings and all instructions.
Failure to follow the warnings and instructions may
result in electric shock, fire and/ or serious injury.
Save all warnings and instructions for future
reference.
This appliance can be used by children aged from
8years and above and persons with reduced physical,
sensory or mental capabilities or lack of experience
and knowledge if they have been given supervision or
instruction concerning use of the appliance in a safe
way and understand the hazards involved.
Children shall not play with the appliance. Cleaning and
user maintenance shall not be made by children
without supervision.
• Do not use the device in potentially explosive rooms.
• Do not use the device in aggressive atmosphere.
• Set the device up in an upright and stable position.
• Let the device dry out after a wet clean. Do not operate it
when wet.
2 EN
dehumidifier TTK 165 ECO / TTK 170 ECO / TTK 380 ECO
Page 3
• Do not use the device with wet or damp hands.
• Do not expose the device to directly squirting water.
• Never insert any objects or limbs into the device.
• Do not cover or transport the device during operation.
• Do not sit on the device.
• This appliance is not a toy! Keep away from children and
animals. Do not leave the device unattended during
operation.
• Check accessories and connection parts for possible
damage prior to every use of the device. Do not use any
defective devices or device parts.
• Ensure that all electric cables outside of the device are
protected from damage (e.g. caused by animals). Never
use the device if electric cables or the power connection
are damaged!
• The electrical connection must correspond to the
specifications in chapter Technical data.
• Insert the mains plug into a properly secured mains
socket.
• Observe the device's power input, cable length and
intended use when selecting extensions to the power
cable. Completely unroll extension cables. Avoid electrical
overload.
• Before carrying out maintenance, care or repair work on
the device, remove the mains plug from the mains socket.
Hold onto the mains plug while doing so.
• Switch the device off and disconnect the power cable from
the mains socket when the device is not in use.
• Do not under any circumstances use the device if you
detect damages on the mains plug or power cable.
If the supply cord is damaged, it must be replaced by the
manufacturer, its service agent or similarly qualified
persons in order to avoid a hazard.
Defective power cables pose a serious health risk!
• When positioning the device, observe the minimum
distances from walls and other objects as well as the
storage and operating conditions specified in the Technical
data chapter.
• Make sure that the air inlet and outlet are not obstructed.
• Make sure that the suction side is kept free of dirt and
loose objects.
• Do not remove any safety signs, stickers or labels from the
device. Keep all safety signs, stickers and labels in legible
condition.
• Only transport the device in an upright position with an
emptied condensation tank or drain hose.
• Discharge the collected condensate before transport and
storage. Do not drink it. Health hazard!
Intended use
Only use the device for drying and dehumidifying room air, while
adhering to and following the technical data.
Intended use comprises:
• dehumidifying and drying:
– living rooms, bedrooms, bathrooms and basements
– laundries, holiday homes, camper vans, boats
• maintaining the dryness of:
– storage spaces, archives, laboratories, garages
– bathrooms, wash rooms, changing rooms etc.
Improper use
The device is not intended for industrial use.
• Do not place the device on wet or flooded ground.
• Do not place any objects, e.g. clothing, on the device.
• Do not use the device outdoors.
• Any unauthorised modifications, alterations or structural
changes to the device are forbidden.
• Any operation other than as described in this manual is
prohibited. Non-observance renders all claims for liability
and guarantee null and void.
Personnel qualifications
People who use this device must:
• be aware of the dangers that occur when working with
electric devices in damp areas.
• have read and understood the instructions, especially the
Safety chapter.
Maintenance tasks which require the housing to be opened
must only be carried out by specialist companies for cooling and
air-conditioning or by Trotec.
EN 3
dehumidifier TTK 165 ECO / TTK 170 ECO / TTK 380 ECO
Page 4
Residual risks
Warning of electrical voltage
Work on the electrical components must only be
carried out by an authorised specialist company!
Warning of electrical voltage
Before any work on the device, remove the mains plug
from the mains socket!
Hold onto the mains plug while pulling the power cable
out of the mains socket.
Warning
Dangers can occur at the device when it is used by
untrained people in an unprofessional or improper way!
Observe the personnel qualifications!
Warning
The device is not a toy and does not belong in the
hands of children.
Warning
Risk of suffocation!
Do not leave the packaging lying around. Children may
use it as a dangerous toy.
Note
Do not operate the device without an inserted air filter!
Without the air filter, the inside of the device will be
heavily contaminated. This could reduce the
performance and result in damage to the device.
Behaviour in the event of an emergency
1. Switch off the device.
2. In an emergency, disconnect the device from the mains
feed-in: Hold onto the mains plug while pulling the power
cable out of the mains socket.
3. Do not reconnect a defective device to the mains.
Information about the device
Description of the device
The device uses the principle of condensation to automatically
dehumidify rooms.
The fan sucks damp room air through the air inlet, the air filter,
the evaporator and to the condenser located behind it. The air is
cooled at the cold evaporator until it is below the dew point.
Water vapour contained in the room air precipitates on the
evaporator fins as condensation or rime. The dehumidified,
cooled air is slightly warmed at the condenser and blown out
again. The drier air thus conditioned mixes with the air in the
room. The humidity in the room where the device is positioned
is reduced as air constantly circulates through the device.
Depending on the air temperature and the relative humidity, the
condensed water either drops continuously or only during the
defrost phase through the integrated drain nozzle into the
condensation tank below. It is fitted with a float to measure the
filling level.
In case of the device TTK 165 ECO defrosting takes place
electronically in air circulation mode.
The devices TTK170ECO and TTK380ECO come with a hot
gas automatic defrost system. Here, the hot gas of the
refrigerant circuit is used actively for fast and effective
defrosting. This makes the devices TTK170ECO and
TTK380ECO considerably more effective at temperatures
below 15°C.
Once the maximum filling level of the condensation tank is
reached or in case the condensation tank is not installed
correctly, the condensation tank indicator light (see chapter
Device depiction) is illuminated. The compressor and fan will
switch off. The condensation tank indicator light only goes out
again once the emptied condensation tank is reinserted.
If required, an external hygrostat can be connected to the
devices TTK170ECO and TTK380ECO for controlling the
humidity level. Moreover, an operating hours counter helps you
to meet the maintenance deadlines.
Optionally, the condensed water can be drained by attaching a
hose at the condensation connection.
The device can reduce the relative humidity of a room to approx.
30%.
Because of the heat radiation generated during operation, the
room temperature may rise slightly.
Info
The illustrations in this operating manual feature the
device TTK 170 ECO by way of example. However, the
depicted operating steps and explanations also apply to
the devices TTK165ECO and TTK380ECO unless
otherwise mentioned.
4 EN
dehumidifier TTK 165 ECO / TTK 170 ECO / TTK 380 ECO
Page 5
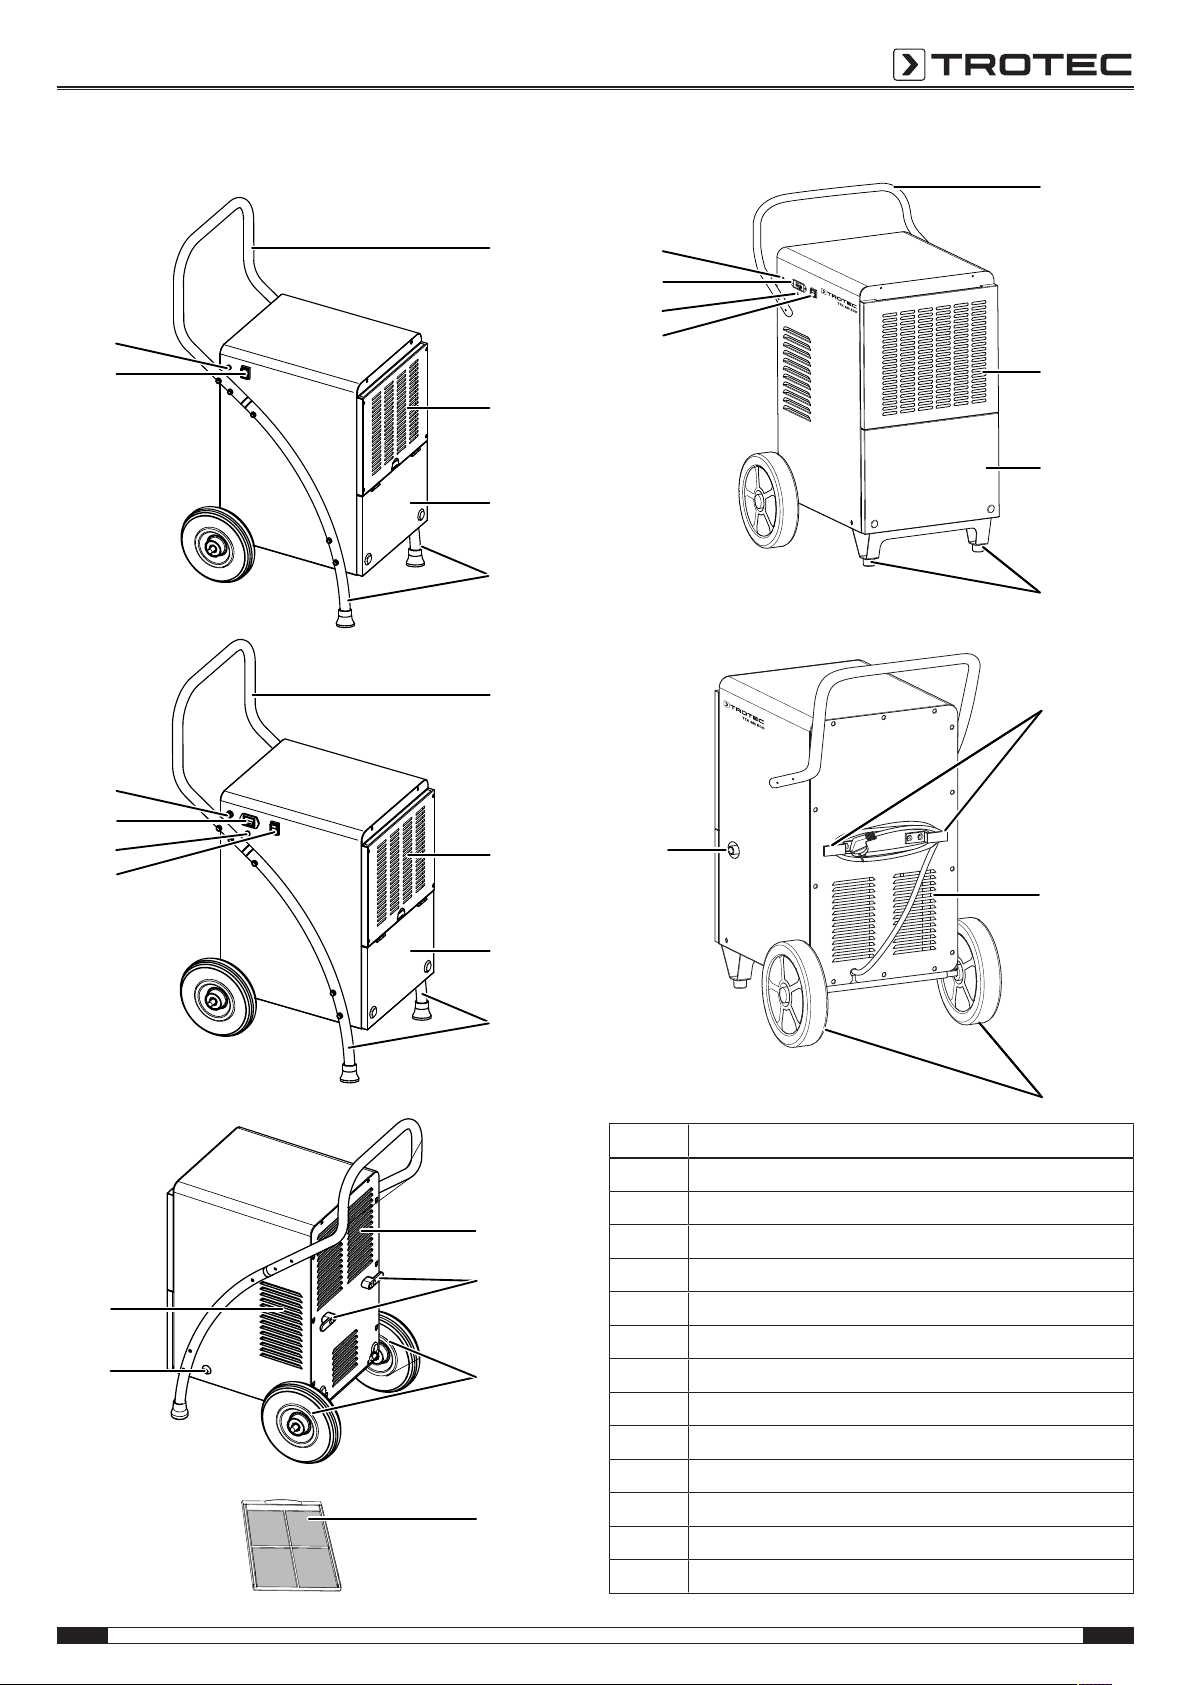
Device depiction
1
2
3
4
10
11
12
13
TTK 170 ECO
TTK 165 ECO
1
2
3
4
10
11
5
6
9
8
7
5
TTK 165 ECO / TTK 170 ECO
1
2
3
4
10
11
12
13
TTK 380 ECO
5
6
9
7
TTK 380 ECO
EN 5
dehumidifier TTK 165 ECO / TTK 170 ECO / TTK 380 ECO
No. Designation
1 Transport handle
2 Air inlet with air filter
3 Condensation tank (behind cover)
4 Feet
5 Air outlet
6 Power cable holder
7 Wheels
8 Air filter
9 Condensation drain hose connection
10 On/off switch
11 Condensation tank indicator light
12 Operating hours counter
13 Connection for optional external hygrostat
Page 6
Transport and storage
Note
If you store or transport the device improperly, the
device may be damaged.
Note the information regarding transport and storage of
the device.
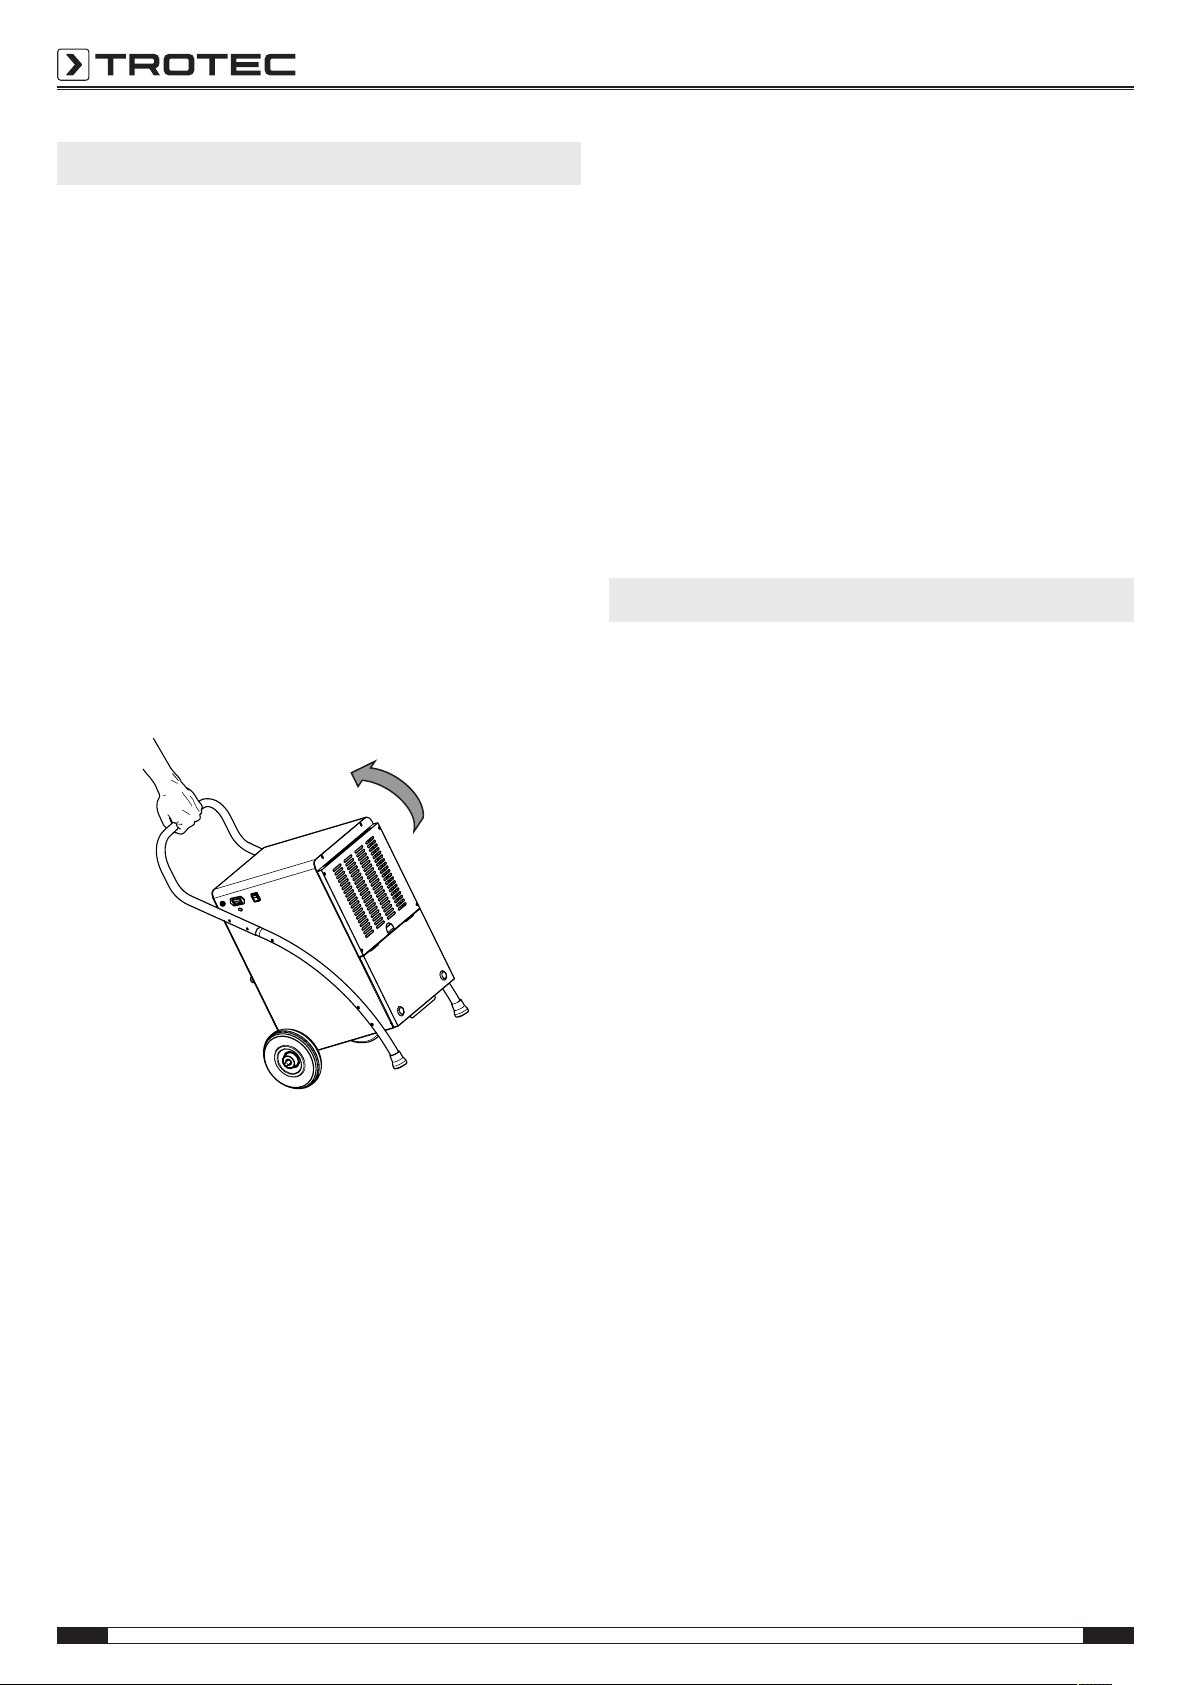
Transport
To make the device easier to transport, it is fitted with a
transport handle and two wheels.
Before transporting the device, observe the following:
• Switch off the device.
• Hold onto the mains plug while pulling the power cable out
of the mains socket.
• Do not use the power cable to drag the device.
• Drain the remaining condensate from the device and the
condensation drain hose (see chapter Maintenance).
• Do not incline the device by more than 45°, for otherwise
the device could be damaged.
Storage
Before storing the device, proceed as follows:
• Drain the remaining condensate from the device and the
condensation drain hose (see chapter Maintenance).
• Hold onto the mains plug while pulling the power cable out
of the mains socket.
When the device is not being used, observe the following
storage conditions:
• dry and protected from frost and heat
• in an upright position where it is protected from dust and
direct sunlight
• with a cover to protect it from invasive dust, if necessary
• Place no further devices or objects on top of the device to
prevent it from being damaged.
Assembly and installation
Scope of delivery
TTK 165 ECO / TTK 170 ECO
• 1x Device
• 1x Air filter
• 2x Transport wheel
• 1x Axle
• 2x Standard split pin
• 2 x Linchpin
• 4x Washer
• 1 x Transport handle
• 2 x Foot
• 2 x Large screw
• 10 x Small screw
• 1x Manual
TTK380ECO
• Only wheel the device on a level and smooth surface.
After transporting the device, observe the following:
• Set up the device in an upright position after transport.
• After having transported the device in horizontal position,
leave the device to rest for 12to24hours, so the
refrigerant can accumulate within the compressor. Wait
12to24hours before switching the device back on! Acting
contrary might lead to compressor damage and a
malfunctioning device. Any warranty claims will be voided
in this case.
• 1x Device
• 1 x Transport handle
• 1x Air filter
• 4x Screw
• 1x Manual
Unpacking the device
1. Open the cardboard box and take the device out.
2. Completely remove the packaging.
3. Fully unwind the power cable. Make sure that the power
cable is not damaged and that you do not damage it during
unwinding.
6 EN
dehumidifier TTK 165 ECO / TTK 170 ECO / TTK 380 ECO
Page 7
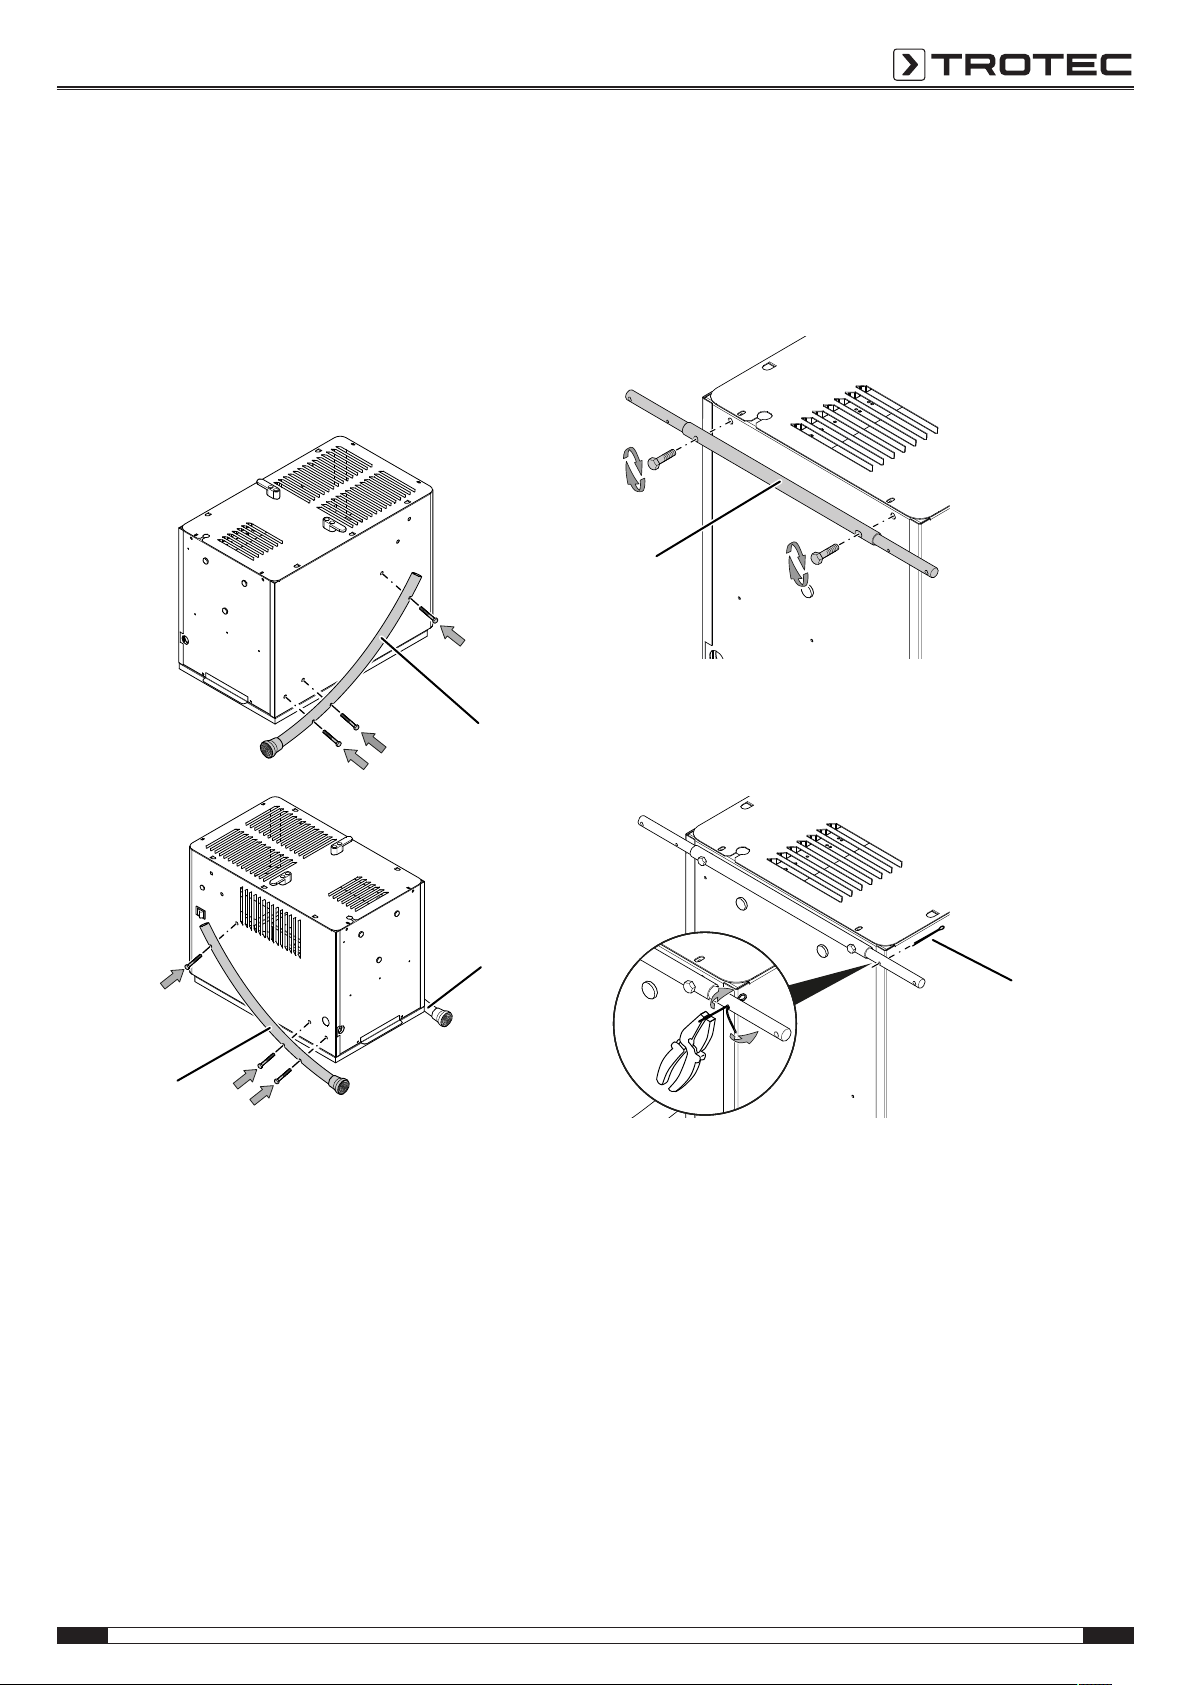
Assembly
4
4
4
14
15
Use tools suitable for the intended task.
Mounting the feet TTK165ECO/ TTK170ECO
Prior to initial start-up, the feet must be attached to the device.
To do so, please proceed as follows:
1. Place the device on its front side.
2. Mount the two feet(4) to the device sides using six
screws. The feet must protrude from the bottom side of the
device.
Mounting the wheels TTK165ECO/ TTK170ECO
Prior to initial start-up, the wheels and the axle must be
attached to the device. To do so, please proceed as follows:
ü The device is placed on its front side.
1. Use two large screws to fasten the axle(14) to the rear
bottom side of the device. Ensure tight fit.
2. Insert a standard split pin(15) into the inner hole of the
axle up to the stop. Bend the end of the split pin outwards
to fix the split pin.
3. Then mount the wheels.
3. Place a washer(16) on the axle(14).
4. Place a wheel(7) in front of the washer(16).
EN 7
dehumidifier TTK 165 ECO / TTK 170 ECO / TTK 380 ECO
Page 8

5. Place a second washer(16) in front of the wheel(7).
7
14
16
16
17
17
16
1
4
6. Insert a linchpin(17) into the hole in front of the
washer(16) up to the stop. Turn over the ring of the
linchpin(17).
Mounting the transport handle
Prior to initial start-up, the transport handle must be attached to
the device. To do so, please proceed as follows:
TTK 165 ECO / TTK 170 ECO
1. Mount the transport handle(1) to both feet(4) using four
screws.
TTK380ECO
1. Mount the handle(1) on both sides of the device using two
hexagon screws each.
7. Repeat this process on the other side of the axle.
8. After mounting the wheels and the feet, place the device in
an upright position.
Note
Leave the device to rest for 12to24hours, so the
refrigerant can accumulate within the compressor.
Wait 12to24hours before switching the device back
on! Acting contrary might lead to compressor damage
and a malfunctioning device. Any warranty claims will
be voided in this case.
8 EN
dehumidifier TTK 165 ECO / TTK 170 ECO / TTK 380 ECO
Page 9

Start-up
A
B
C
C
D
When positioning the device, observe the minimum distance
from walls or other objects as described in the Technical data
chapter.
Inserting the air filter
Note
Do not operate the device without an inserted air filter!
Without the air filter, the inside of the device will be
heavily contaminated. This could reduce the
performance and result in damage to the device.
• Make sure that the air filter is installed before switching
the device on.
• Before restarting the device, check the condition of the
power cable. If there are doubts as to the sound condition,
contact the customer service.
• Set the device up in an upright and stable position.
• Do not create tripping hazards when laying the power
cable or other electric cables, especially when positioning
the device in the middle of the room. Use cable bridges.
• Make sure that extension cables are completely unrolled.
• When positioning the device, keep a sufficient distance to
heat sources.
• Make sure that no curtains or other objects interfere with
the air flow.
• When positioning the device, particularly in wet areas,
secure it locally with an RCD (residual current device)
which complies with the respective regulations.
• Do not incline the device by more than 45°, for otherwise
the device could be damaged.
EN 9
dehumidifier TTK 165 ECO / TTK 170 ECO / TTK 380 ECO
Page 10

Inserting the condensation tank
TTK 165 ECO
10
11
12 10
13
TTK 380 ECO
11
• Ensure that the float inside the condensation tank is
inserted correctly.
• Ensure that the condensation tank is empty and inserted
correctly.
TTK 165 ECO / TTK 170 ECO
Operation
Notes:
• Avoid open doors and windows.
• After being switched on, the device operates fully
automatically.
• The compressor switches on approx.3minutes after the
device has been switched on.
• The fan continuously runs in dehumidification mode until
the device is switched off.
Operating elements
TTK165ECO
TTK380ECO
• Guide the condensation drain hose into the opening on top
of the condensation tank.
Connecting the power cable
• Insert the mains plug into a properly secured mains
socket.
TTK 170 ECO / TTK 380 ECO
No. Designation Meaning
10 On/off switch For switching the device on or off
11 Indicator light Indication of full condensation
tank
12 Operating hours
Indication of operating hours
counter
13 Hygrostat connection Connection for hygrostat
operation (optional)
10 EN
dehumidifier TTK 165 ECO / TTK 170 ECO / TTK 380 ECO
Page 11

Switching the device on
Once you have completely installed the device as described in
the Start-up chapter, you can switch it on.
Press the on/off switch(10). The device starts to dehumidify in
continuous operation.
Note
Only use the device in an upright position, otherwise
the compressor could be damaged.
Memory function
After a power failure during operation the device will switch
back on.
Auto stop function
If the condensation tank is full or not inserted correctly, the
device will stop automatically.
Operating hours counter
The devices TTK170ECO and TTK380ECO are equipped with
an operating hours counter(12). The hour display has five digits.
Operation with hose attached to the condensation
connection
TTK 165 ECO / TTK 170 ECO
For continuous operation or unattended dehumidification, please
connect a suitable condensation drain hose to the device.
ü A suitable hose (diameter: 12mm) is ready for use.
ü The device is switched off.
1. Open the front cover.
2. Remove the condensation tank.
3. Guide the condensation drain hose through the hole in the
device's bottom panel.
EN 11
dehumidifier TTK 165 ECO / TTK 170 ECO / TTK 380 ECO
Page 12

4. Push one end of the hose onto the hose connection at the
condensation tank.
5. Refit the condensation tank into the device. Guide the other
hose end to a suitable drain or sufficiently dimensioned
collection container.
TTK380ECO
ü A suitable hose (diameter: 16mm) is ready for use.
ü The device is switched off.
1. Open the front cover.
2. Remove the condensation tank.
6. Please note that the hose must not be kinked.
3. Connect the condensation drain hose to the connection
inside the housing.
12 EN
dehumidifier TTK 165 ECO / TTK 170 ECO / TTK 380 ECO
Page 13

4. Refit the condensation tank into the device.
5. Close the front cover.
7. Guide the other hose end to a suitable drain or sufficiently
dimensioned collection container. Please note that the
hose must not be kinked.
8. Make sure that the condensation drain hose is installed
with a continuous decline.
Remove the hose if you want to collect the condensate in the
condensation tank again. Allow the hose to dry prior to storage.
6. Push one end of the hose onto the hose connection on the
outside of the housing.
EN 13
dehumidifier TTK 165 ECO / TTK 170 ECO / TTK 380 ECO
Page 14

Automatic defrost
At low ambient temperatures, ice may form at the evaporator
during dehumidification. The device will then carry out an
automatic defrost. Dehumidification is briefly interrupted during
defrosting. The fan keeps running.
In case of the device TTK 165 ECO defrosting takes place
electronically in air circulation mode. In defrost mode, the
compressor switches off while the fan keeps running and
circulates the compressor's waste heat around the evaporator
for defrosting.
The devices TTK170ECO and TTK380ECO come with a hot
gas automatic defrost system based on the bypass procedure.
Here, the hot gas of the refrigerant circuit is used actively for
fast and effective defrosting. As soon as ice starts to form, a
special valves opens automatically, redirects the hot gas to the
evaporator, and closes again after defrosting is completed so
that drying operation can be continued via the regular
refrigerant circuit. Unlike air circulation defrosting, hot gas
automatic defrosting allows for considerably shorter defrost
phases, which is an essential requirement for effective
dehumidification in low-temperature surroundings (below 15°C)
such as unheated rooms. After all, the actual dehumidification
process only takes place when defrosting is not in progress.
The duration of the defrost process can vary. Do not switch off
the device during automatic defrost. Do not remove the mains
plug from the mains socket.
Available accessories
Warning
Only use accessories and additional equipment
specified in the instructions.
Using insertion tools or accessories other than those
specified in the instructions may cause a risk of injury.
TTK 170 ECO / TTK 380 ECO
Designation Article number
Air filter TTK 165 ECO 7.710.000.115
Air filter TTK 170 ECO 7.710.000.006
Air filter TTK 380 ECO 7.710.000.851
External condensate pump 6.100.003.020
Hygrostat HG110 with jack plug
(TTK170ECO and TTK380ECO)
6.100.002.044
External hygrostat (optional)
The devices TTK170ECO and TTK380ECO allow for
connection of the external hygrostat HG110. The desired
humidity can be regulated by use of a hygrostat. The external
hygrostat is connected to the connection for the external
hygrostat(13).
Shutdown
Warning of electrical voltage
Do not touch the mains plug with wet or damp hands.
• Switch off the device.
• Hold onto the mains plug while pulling the power cable out
of the mains socket.
• If necessary, remove the condensation drain hose and any
residual fluid from it.
• Empty the condensation tank, if need be.
• Clean the device according to the Maintenance chapter.
• Store the device according to the Storage chapter.
14 EN
dehumidifier TTK 165 ECO / TTK 170 ECO / TTK 380 ECO
Page 15

Errors and faults
The device has been checked for proper functioning several
times during production. If malfunctions occur nonetheless,
check the device according to the following list.
The device does not start:
• Check the power connection.
• Check the power cable and mains plug for damage.
• Check the on-site fusing.
• Check the filling level of the condensation tank and empty
it if necessary. The condensation tank indicator light(11)
must not light up.
• Check the condensation tank for correct seating.
• Check the room temperature. Observe the device's
permissible operating range according to the technical
data.
• Check the float in the condensation tank for dirt. If
necessary, clean the condensation tank. The float must be
able to move freely.
The device is running, but there is no formation of
condensate:
• Check whether the condensation drain hose is positioned
correctly.
• When using the condensate pump: Check the
condensation tank and hoses for dirt.
• Check the room temperature. Observe the device's
permissible operating range according to the technical
data.
• Ensure that the relative room humidity complies with the
technical data.
• Check the air filter for dirt. If necessary, clean or replace
the air filter.
• From the outside, check the condenser for dirt (see
chapter Maintenance). If the condenser is dirty, have it
cleaned by a specialist company or by Trotec.
• The device might carry out an automatic defrost. During
automatic defrost, the device does not dehumidify.
The compressor does not start:
• Check the room temperature. Observe the device's
permissible operating range according to the technical
data.
• Ensure that the relative room humidity complies with the
technical data.
• Check whether the overheating protection of the
compressor has tripped. Disconnect the device from the
mains and let it cool down for approx. 10minutes before
reconnecting it.
• The device might carry out an automatic defrost. During
automatic defrost, the device does not dehumidify.
The device gets very warm, is loud or loses power:
• Check the air inlets and air filters for dirt. Remove external
dirt.
• From the outside, check the device for dirt (see chapter
Maintenance). If the inside of the device is dirty, have it
cleaned by a specialist company for cooling and airconditioning or by Trotec.
Note
Wait for at least 3 minutes after maintenance and
repair work. Only then switch the device back on.
Your device still does not operate correctly after these
checks?
Please contact the customer service. If necessary, bring the
device to a specialist company for cooling and air-conditioning
or to Trotec for repair.
The device is loud or vibrates:
• Check whether the device is set up in a stable and upright
position.
Condensate is leaking:
• Check the device for leaks.
EN 15
dehumidifier TTK 165 ECO / TTK 170 ECO / TTK 380 ECO
Page 16

Maintenance
Maintenance intervals
Maintenance and care interval before every
start-up
Check the air inlets and outlets for
X X
dirt and foreign objects and clean if
necessary
Clean the exterior
Visually check the inside of the
device for dirt
Check the air filter for dirt and
X X
foreign objects and clean or replace
if necessary
Replace the air filter
Check for damage
X
Check the attachment screws
Test run
Empty the condensation tank and/or
drain hose
Maintenance and care log
Device type: .............................................
as needed at least every
2weeks
X X
X X
X X
X
at least every
4weeks
at least every
6months
X
Device number: ....................................
at least
annually
X
Maintenance and care interval
Check air inlets and outlets for dirt
and foreign objects and clean if
necessary
Clean the exterior
Visually check the inside of the
device for dirt
Check the air filter for dirt and
foreign objects and clean or replace
if necessary
Replace the air filter
Check for damage
Check the attachment screws
Test run
Empty the condensation tank and/or
drain hose
Comments
1. Date: ...................................
Signature: ................................
5. Date: ...................................
Signature: ................................
9. Date: ...................................
Signature: ................................
13. Date: .................................
Signature: ................................
1 2 3 4 5 6 7 8 9 10 11 12 13 14 15 16
2. Date: ....................................
Signature: .................................
6. Date: ....................................
Signature: .................................
10. Date: ..................................
Signature: .................................
14. Date: ..................................
Signature: .................................
3. Date: ....................................
Signature: .................................
7. Date: ....................................
Signature: .................................
11. Date: ..................................
Signature: .................................
15. Date: ..................................
Signature: .................................
4. Date: ....................................
Signature: .................................
8. Date: ....................................
Signature: .................................
12. Date: ..................................
Signature: .................................
16. Date: ..................................
Signature: .................................
16 EN
dehumidifier TTK 165 ECO / TTK 170 ECO / TTK 380 ECO
Page 17

Activities required before starting maintenance
Cleaning the air filter
Warning of electrical voltage
Do not touch the mains plug with wet or damp hands.
• Switch the device off.
• Hold onto the mains plug while pulling the power cable out
of the mains socket.
Warning of electrical voltage
Tasks which require the housing to be opened
must only be carried out by authorised specialist
companies or by Trotec.
Refrigerant circuit
• The entire refrigerant circuit is a maintenance-free,
hermetically sealed system and may only be maintained or
repaired by specialist companies for cooling and airconditioning or by Trotec.
Cleaning the housing
Clean the housing with a soft, damp and lint-free cloth. Ensure
that no moisture enters the housing. Protect electrical
components from moisture. Do not use any aggressive cleaning
agents such as cleaning sprays, solvents, alcohol-based or
abrasive cleaners to dampen the cloth.
Note
Ensure that the air filter is not worn or damaged. The
corners and edges of the air filter must not be
deformed or rounded. Before reinserting the air filter,
make sure that it is undamaged and dry!
The air filter has to be cleaned as soon as it is dirty. This is
brought to light e.g. by a reduced capacity (see chapter Errors
and faults).
1. Remove the air filter from the device.
Visual inspection of the inside of the device for dirt
1. Remove the air filter.
2. Use a torch to illuminate the openings of the device.
3. Check the inside of the device for dirt.
4. If you see a thick layer of dust, have the inside of the
device cleaned by a specialist company for cooling and airconditioning or by Trotec.
5. Put the air filter back in.
2. Clean the filter using a slightly damp, soft, lint-free cloth. If
the filter is heavily contaminated, clean it with warm water
mixed with a neutral cleaning agent.
3. Allow the filter to dry completely. Do not insert a wet filter
into the device!
EN 17
dehumidifier TTK 165 ECO / TTK 170 ECO / TTK 380 ECO
Page 18

4. Reinsert the air filter into the device.
Emptying the condensation tank
If the condensation tank is full or not installed correctly, the
condensation tank indicator light(11) will be illuminated. The
compressor and fan will switch off.
1. Take the condensation tank out of the device.
4. Refit the condensation tank into the device.
Make sure not to damage the float when inserting or
removing the condensation tank.
In doing so, make sure that the float is positioned
correctly.
Also make sure that the condensation tank is inserted
correctly, otherwise the device cannot be switched back
on.
2. Empty the condensation tank over a drain or sink.
Activities required after maintenance
If you want to continue using the device:
• Reconnect the device to the mains.
If you do not intend to use the device for a considerable time:
• Store the device according to the Storage chapter.
3. Rinse the tank with clear water. Clean the tank regularly
using a mild cleaning agent (no detergent!).
18 EN
dehumidifier TTK 165 ECO / TTK 170 ECO / TTK 380 ECO
Page 19

Technical annex
Technical data
Model TTK165ECO TTK170ECO TTK380ECO
Max. dehumidification
52 l / 24h 52 l / 24h 80 l/ 24h
performance
Dehumidification performance
50l / 24h 50l / 24h 79l / 24h
@ 30°C and 80%RH
Amount of air 350 m3/h 350 m3/h 950 m3/h
Operating range (temperature) 5°C to 32°C 5°C to 32°C 5°C to 32°C
Operating range (relative humidity) 30% to 90 %RH 30% to 90 %RH 30% to 90 %RH
Input voltage 220–240V/ 50Hz 220–240V/ 50Hz 220–240V/ 50Hz
Max. power input 0.9 kW 0.9 kW 1.15 kW
Nominal current 3.6 A 4.2 A 5.2 A
Recommended fusing 10A 10A 10A
Refrigerant R-410A R-410A R-410A
Amount of refrigerant 400 g 405 g 890 g
GWP factor 2088 2088 2088
CO2 equivalent 0.84t 0.85t 1.445t
Water tank 5 l 6.6 l 11.1 l
Sound pressure level
56 dB(A) 56 dB(A) 65 dB(A)
(1m distance)
Dimensions
495x 455x 900 mm 495x 455x 900 mm 530x 575x 1060 mm
(lengthx widthx height)
Minimum distance to walls and
other objects
top (A):
rear (B):
sides (C):
front (D):
50 cm
50 cm
50 cm
50 cm
50 cm
50 cm
50 cm
50 cm
50 cm
50 cm
50 cm
50 cm
Weight 30 kg 31 kg 53 kg
EN 19
dehumidifier TTK 165 ECO / TTK 170 ECO / TTK 380 ECO
Page 20

Wiring diagram
TTK165ECO
TTK170ECO
20 EN
dehumidifier TTK 165 ECO / TTK 170 ECO / TTK 380 ECO
Page 21

TTK380ECO
EN 21
dehumidifier TTK 165 ECO / TTK 170 ECO / TTK 380 ECO
Page 22

Disposal
The icon with the crossed-out waste bin on waste
electrical or electronic equipment stipulates that this equipment
must not be disposed of with the household waste at the end of
its life. You will find collection points for free return of waste
electrical and electronic equipment in your vicinity. The
addresses can be obtained from your municipality or local
administration. For further return options provided by us please
refer to our website www.trotec24.com.
The separate collection of waste electrical and electronic
equipment aims to enable the re-use, recycling and other forms
of recovery of waste equipment as well as to prevent negative
effects for the environment and human health caused by the
disposal of hazardous substances potentially contained in the
equipment.
The device is operated with fluorinated greenhouse gas which
can be dangerous for the environment and contribute to global
warming when emitted to the atmosphere.
Further information is provided on the nameplate.
Dispose of the refrigerant appropriately and according to the
national regulations.
Declaration of conformity
The text below sets out the contents of the declaration of
conformity. The signed declaration of conformity can be found
at https://hub.trotec.com/?id=40461.
Declaration of conformity
in accordance with the ECMachinery Directive 2006/42/EC, AnnexII, Part1,
SectionA
Herewith, we– TrotecGmbH– declare that the machinery
designated below was developed, constructed and produced in
compliance with the requirements of the ECMachinery
Directive in the version 2006/42/EC.
Product model/ product:
Product type:
Year of manufacture as of:
Relevant EU directives:
• 2014/30/EU: 29March 2014
Applied harmonised standards:
• EN ISO 12100:2010
• EN 55014-1:2006/A1:2009
• EN 55014-1:2006/A2:2011
• EN 60335-1:2012/A11:2014
• EN60335-2-40:2003
• EN 60335-2-40:2003/A11:2004
• EN 60335-2-40:2003/A12:2005
• EN 60335-2-40:2003/A1:2006
• EN 60335-2-40:2003/A2:2009
• EN 60335-2-40:2003/A13:2012
• EN61000-3-2:2014
• EN 61000-3-3:2013
• EN 62233:2008
Applied national standards and technical specifications:
• EN 55014-2:2015
Manufacturer and name of the authorised representative of
the technical documentation:
Trotec GmbH
Grebbener Straße 7, D-52525 Heinsberg
Phone: +49 2452 962-400
E-mail: info@trotec.de
TTK 165 ECO, TTK 170 ECO,
TTK 380 ECO
dehumidifier
2019
Place and date of issue:
Heinsberg, 18.06.2010
Detlef von der Lieck, Managing Director
22 EN
dehumidifier TTK 165 ECO / TTK 170 ECO / TTK 380 ECO
Page 23

Trotec GmbH
Grebbener Str. 7
D-52525 Heinsberg
+49 2452 962-400
+49 2452 962-200
info@trotec.com
www.trotec.com
 Loading...