

Page 1

QUBE+
EN
ORIGINAL INSTRUCTIONS
INSULATION DRYING UNIT
TRT-BA-QUBE-TC2015-27-010-EN
Page 2
Table of contents
Notes regarding the instructions ..........................................2
Safety .....................................................................................2
Information about the device................................................4
Transport and storage...........................................................7
Follow the manual
Information marked with this symbol indicates that the
instructions must be observed.
You can download the current version of the instructions and
the EUdeclaration of conformity via the following link:
Assembly and installation.....................................................8
Start-up................................................................................10
Operation .............................................................................11
Errors and faults..................................................................13
Maintenance ........................................................................15
Technical annex...................................................................22
Disposal ...............................................................................26
Declaration of conformity ...................................................26
Notes regarding the instructions
Symbols
Warning of electrical voltage
This symbol indicates dangers to the life and health of
persons due to electrical voltage.
Warning of hot surface
This symbol indicates dangers to the life and health of
persons due to hot surface.
Warning
This signal word indicates a hazard with an average
risk level which, if not avoided, can result in serious
injury or death.
Caution
This signal word indicates a hazard with a low risk
level which, if not avoided, can result in minor or
moderate injury.
Note
This signal word indicates important information
(e.g. material damage), but does not indicate hazards.
Info
Information marked with this symbol helps you to carry
out your tasks quickly and safely.
Qube+
https://hub.trotec.com/?id=40717
Safety
Read this manual carefully before starting or using the
device. Always store the manual in the immediate vicinity
of the device or its site of use!
• Do not use the device in potentially explosive rooms.
• Do not use the device in aggressive atmosphere.
• Set the device up in an upright and stable position.
• Make sure that the air inlet and outlet are not obstructed.
• Make sure that the suction side is kept free of dirt and
loose objects.
• Never insert any objects or limbs into the device.
• Do not cover or transport the device during operation.
• Ensure that all electric cables outside of the device are
protected from damage (e.g. caused by animals). Never
use the device if electric cables or the power connection
are damaged!
• Observe the device's power input, cable length and
intended use when selecting extensions to the power
cable. Completely unroll extension cables. Avoid electrical
overload.
• Switch the device off and disconnect the power cable from
the mains socket when the device is not in use.
• Do not under any circumstances use the device if you
detect damages on the mains plug or power cable.
If the supply cord is damaged, it must be replaced by the
manufacturer, its service agent or similarly qualified
persons in order to avoid a hazard.
Defective power cables pose a serious health risk!
• Insert the mains plug into a properly secured mains
socket.
2 EN
insulation drying unit Qube+
Page 3
Intended use
The Qube+ is to be used in low pressure mode for insulation
drying of floating screeds, flat roofs (warm roof constructions)
and hollow floorings. It is intended to transport non-aggressive
and non-explosive gaseous media.
Improper use
The device is not suitable for the inflation of bouncy castles or
similar objects.
The device is not designed to suck in large quantities of water.
If, during insulation drying, you notice that there are large
amounts of water left in the insulation layer, the water must be
sucked off with a water extractor before using the device.
The device is not suitable for the intake of frothing or foaming
media, aggressive cleaning agents and acetone-based fluids.
Media other than those listed as intended use must not be
conveyed.
Personnel qualifications
People who use this device must:
• be aware of the dangers that occur when working with
electric devices in damp areas.
• have read and understood the instructions, especially the
Safety chapter.
Warning
Risk of suffocation!
Do not leave the packaging lying around. Children may
use it as a dangerous toy.
Note
Do not operate the device without an inserted air filter!
Without the air filter, the inside of the device will be
heavily contaminated. This could reduce the
performance and result in damage to the device.
Note
Overheating of motor electronics
Permanent or repeated overheating may destroy the
motor electronics. Avoid overheating the device and
provide sufficient air circulation. If necessary, direct the
warm air out of the room. Room temperatures above
35°C are to be avoided during operation.
Also observe the information in the Set-up chapter.
Note
Observe the overvoltage protection.
The device comes equipped with an overvoltage
protection. When checking for electrical safety, please
bear in mind that the test voltage has to be reduced to
250V.
Residual risks
Warning of electrical voltage
Work on the electrical components must only be
carried out by an authorised specialist company!
Warning of electrical voltage
Before any work on the device, remove the mains plug
from the mains socket!
Hold onto the mains plug while pulling the power cable
out of the mains socket.
Warning of hot surface
Risk of injury due to hot surfaces at the outlet opening.
Warning
Small objects and particles can be sucked in and lead
to injuries.
Make sure that no person is standing near the inlet or
outlet opening while the device is running.
Warning
Dangers can occur at the device when it is used by
untrained people in an unprofessional or improper way!
Observe the personnel qualifications!
Note
Damage to the turbine due to sucked-in particles.
If impurities enter into the turbine, this might damage
the turbine. The turbines are suited for transporting
clean air only.
Behaviour in the event of an emergency
1. Switch off the device.
2. In an emergency, disconnect the device from the mains
feed-in: Hold onto the mains plug while pulling the power
cable out of the mains socket.
3. Do not reconnect a defective device to the mains.
EN 3
insulation drying unit Qube+
Page 4
Information about the device
Device description
The Qube+ consists of only one device and is 50% lighter and
50% smaller than a comparable MultiQube tower.
A multi-device installation with complex hose connections can
be omitted without replacement. Just set it up, plug it in, switch
it on – all done! No further equipment technology is required.
The device comes ready for connection with all integrated parts:
a powerful fan motor, a water separator, a 4-stage filter system
and an efficient silencer – ultra-compact, united in a robust,
stackable aluminium construction, offering clearly more
advantages and at the same time causing considerably less
costs than multi-device solutions.
Globally unique integral solution:
• VX 5 turbine
• Water separator WA 4i
• HEPA filter module
• Silencer NR 19
Equipment features:
• Adaptronic power control for flexible low-pressure surface
drying operations ranging from 8m2 to 85m
• Globally unique HiDry automatism for all power stages
• Optiflow NT multi-function display
• Non-wearing touchscreen control panel
• Counter for operating hours and energy consumption
(MID-compliant)
• Night operation – whisper mode
• 2 TTKwic quick couplings for drainage connection of
dehumidifiers
• Flexible 4-stage filter system
• DA4 interface
• Efidry humidity sensor connection
• Residual water draining
• Connection for discharge of hot process air
• Service socket (tamper-proof)
• Cable holder
• Key lock to prevent maloperation
• ECO level (stage1) for small surfaces
• Height-adjustable telescopic push handle
2
The device is equipped with a touch screen with LC display.
It provides information on the operating stage, air flow rate etc.
The background colour of the LC display changes according to
the traffic light principle to indicate how suitable your drying
installation is. An optimal air flow rate is indicated by a green
background colour during operation. If the display is illuminated
in yellow, this means that the installation is OK but the flow
conditions for the dry air are not optimal. Drying can be carried
out without any difficulties while the display is yellow. A red
background indicates an uneconomic operation. The
compressor should not be permanently operated in this
condition.
Practical benefits:
• The most light, compact and powerful system unit on the
market
• 50% smaller than a comparable MultiQube installation, up
to 75% smaller than constructions from competitors
• Flexible filter system with optional HEPA filter usage
• Total weight only 27kg
• Stackable
With the device all negative time factors can be eliminated in
one sweep – this way less devices are needed and moved,
stock requirements are reduced, more equipment can be
transported to the damage site per tour, less time is needed for
set-up and disassembly as well as for cleaning. All in all, your
working, space and warehouse productivity can be increased
many times over by using the Qube+!
4 EN
insulation drying unit Qube+
Page 5
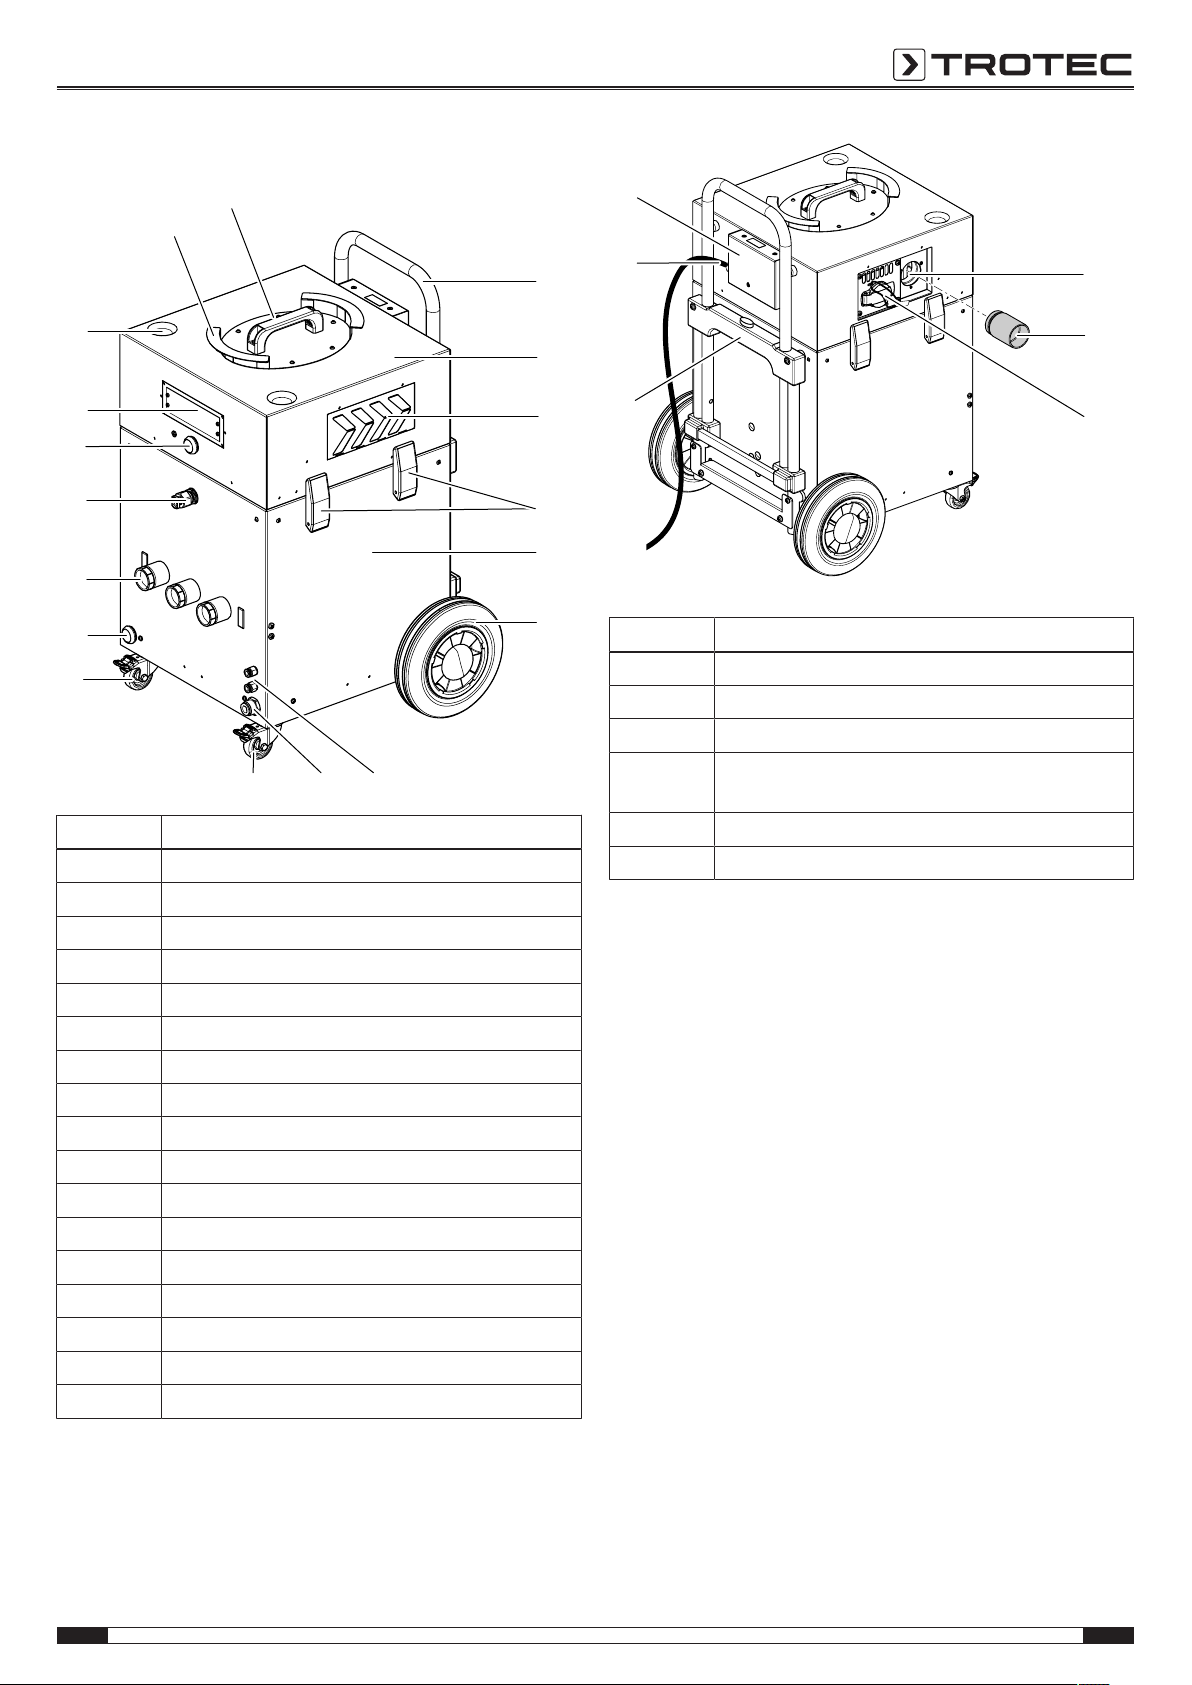
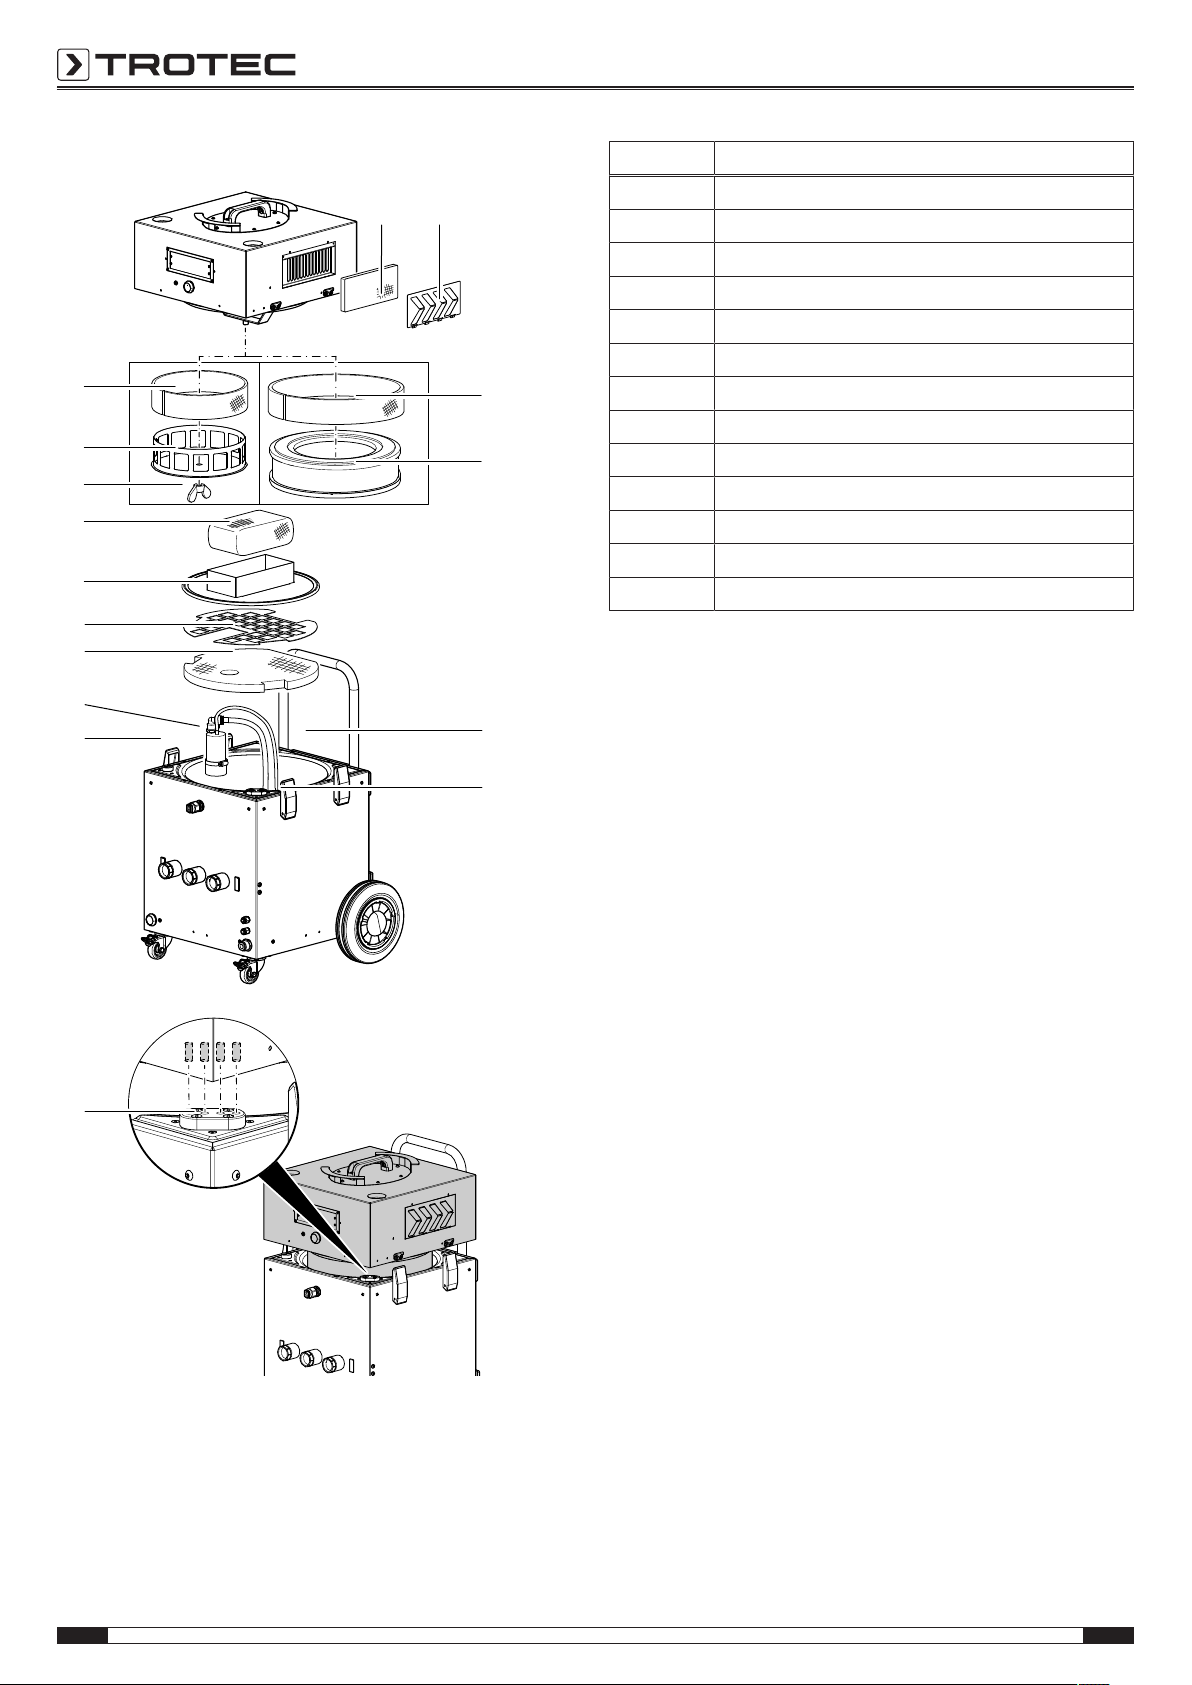
Device depiction
1
3
17
4
16
15
14
13
12
11
10
6
8 79
9
2
5
18
19
21
22
20
23
No. Designation
1 Telescopic push handle
2 Upper part with turbine
3 Air inlet for cooling
4 Tension lock
5 Lower part with pump
6 Wheel
7 TTKwic connection
8 Drain hose connection
9 Castor with parking brake
10 Residual water draining button
11 Hose connectors
12 DA4 sensor connection
13 Power button and communication port
14 Touchscreen control panel
15 Castor retainer (for storage)
16 Power cable retainer
17 Carrying handle upper part
No. Designation
18 Connection for discharge of process air
19 Connector 50 mm
20 Service socket (tamper-proof)
21 Holder for storage with release button for the
height-adjustable telescopic push handle
22 Power cable
23 MIDmeter
EN 5
insulation drying unit Qube+
Page 6
Schematic detail view with filters
A
B
24
34
31
30
27
4
28
23
4
4
25
26
32
33
29
35
No. Designation
23 F7 air filter
24 Air filter cover
25 F8 filter sleeve for HEPA filter (optional)
26 HEPA filter (optional)
27 Pump
28 Coarse filter
29 Coarse filter fixation grid
30 Demister holder
31 Demister
32 Wing nut
33 Cage
34 G4 filter sleeve
35 Spring contacts for electrical connection
6 EN
insulation drying unit Qube+
Page 7
Transport and storage
Note
If you store or transport the device improperly, the
device may be damaged.
Note the information regarding transport and storage of
the device.
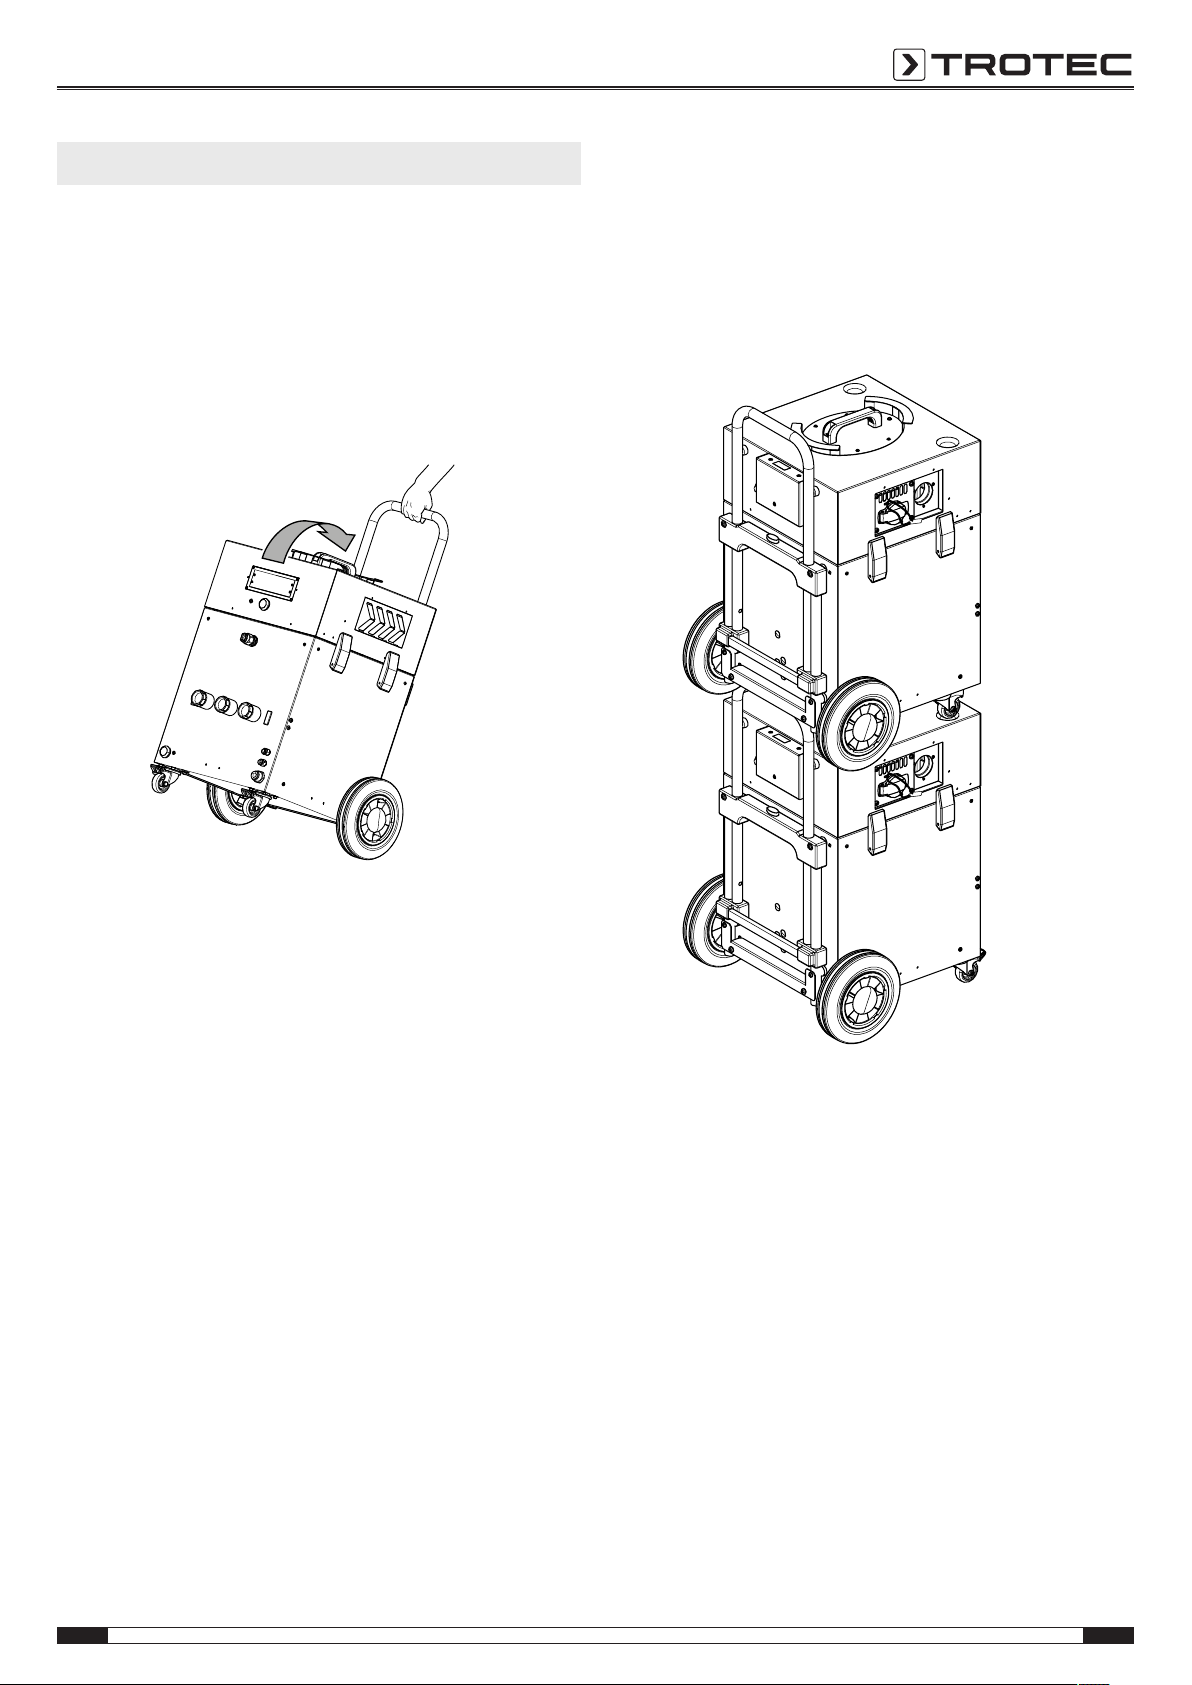
Transport
To make the device easier to transport, it is fitted with a
transport handle and two wheels.
Storage
Before storing the device, proceed as follows:
• Empty and clean the condensation tank prior to storage.
• Hold onto the mains plug while pulling the power cable out
of the mains socket.
The devices can also be stacked on top of one another for
storage.
Before transporting the device, proceed as follows:
• Switch off the device at the mains switch.
• Remove the mains plug from the mains socket.
• Drain any residual water from the device.
• Remove the connected hoses and components.
• Prior to every transport check whether the upper and lower
part of the device are firmly connected via the tension
locks.
• Do not incline the device by more than 45°, for otherwise
the device could be damaged.
When the device is not being used, observe the following
storage conditions:
• dry and protected from frost and heat
• in an upright position where it is protected from dust and
direct sunlight
• with a cover to protect it from invasive dust, if necessary
EN 7
insulation drying unit Qube+
Page 8
Assembly and installation
21
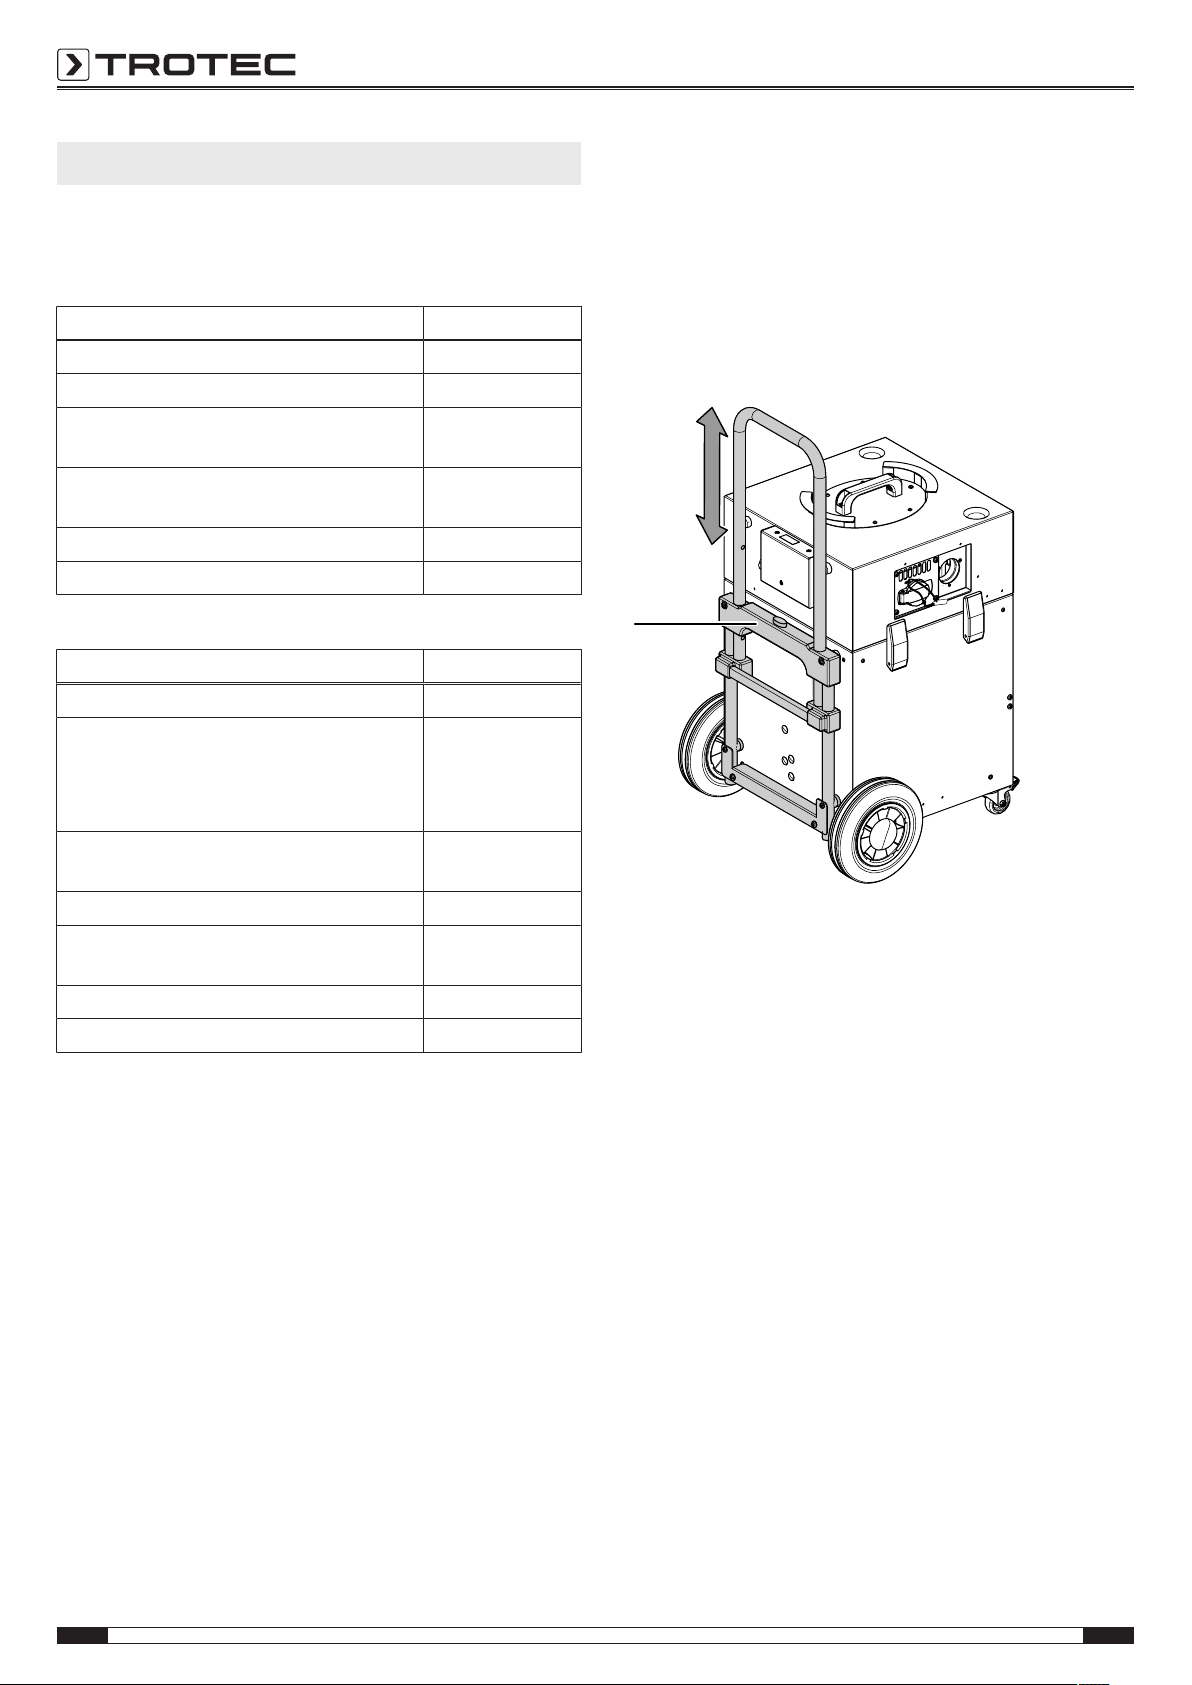
Scope of delivery and accessories
Accessories and supplies contained in the scope of delivery of
the Qube+:
Quantity and designation Art. no.
1 x water separator bottom filter mat 7.160.000.206
1 x G4 filter sleeve 7.160.000.214
1 x F7 Z-line filter for filtering the sucked-in
motor cooling air
1 x 50 mm hose connection for process air
discharge
1 x drain hose, length 5m, Ø12mm 7.331.000.476
1 x coarse filter fixation grid 7.241.001.245
Further accessories and supplies:
Accessories Art. no.
38 mm connector 7.200.000.002
HEPA filter module, H13 high-efficiency
particulate air filter as per DIN EN 1822-1,
filtration efficiency > 99.97% / 0.3µm,
incl. F8 prefilter sleeve (DIN EN 779)
F8 filter sleeve for HEPA filter module, filter
class 8 (DINEN779)
F8 filter sleeve 7.160.000.216
connection cable VX-DA for data
transmission to the DA4
sound protection hood 6.100.000.070
protective cover 6.100.003.15
7.160.000.213
7.200.000.001
7.160.000.221
7.160.000.215
7.333.000.015
Assembly
Remove the packaging. Remove any transport locks from the
supply connections.
The wheels are already preassembled.
The telescopic push handle is preassembled and can be
adjusted in height:
Press and hold the height adjustment button(21) to adjust the
extendable length of the telescopic push handle.
8 EN
insulation drying unit Qube+
Page 9
Connecting the drain hose
The device must be connected to an appropriate drain or
collection container via a drain hose so that the device can drain
the accumulated water from the water tank if required.
Observe the following when connecting the drain hose:
• Please note that the collection container must be
sufficiently dimensioned. The end of the drain hose should
not extend into the water.
• Please note that only unpolluted water may be discharged
into the drain.
• The drain must be able to take the respective water
quantity.
• Height differences of up to 10m are permissible.
• Dispose of contaminated water in accordance with the
national regulations.
1. Connect the drain hose (Ø12mm) to the water discharge
connection.
TTKwic quick couplings
As standard, the device comes with two integrated TTKwic
quick couplings(7), where condensate discharge hoses of up to
two used dehumidifiers plus condensate pump can be
connected. The entire water discharge is then taking place
centrally via the drain hose of the device.
Note
When using the TTKwic connections of the device,
please make sure that the device is switched on.
If the device is switched off, the accumulated
condensation will not be pumped out and may
overflow.
Should the device – while using the TTKwic
connections – create much less noise during operation
or stop working altogether, set the device to a lower
performance level or switch on TTKwic mode, see
chapter Operation.
2. Guide the other hose end to a drain or collection container.
• Regularly inspect the drain hose and hose connection for
kinks and dirt. Remove kinks and clean the drain hose,
if required.
EN 9
insulation drying unit Qube+
Page 10

Positioning the device
When setting up the device, make sure that the warm air
generated by the device is discharged. The room temperature
should not exceed 35°C.
If condenser dryers are operated at temperatures above 35°C
and at high humidity levels permanently, the pressure in the
refrigerant circuit will rise. Consequently the compressor will
permanently run at its limit, which leads to increased wear and
tear.
• If required, ensure that the process air is discharged by
connecting a suitable discharge hose to the process air
discharge connection(18).
• Provide sufficient fresh air supply by ventilating the room
at regular intervals.
• Should the discharge of warm air not be an option, the
device can also be installed outside of the room to be dried
and the hose connection can be established by means of a
PlanoPro door gap nozzle (art.no. 6.100.000.160).
Such an installation may look like this, for example:
Start-up
• Use suitable hoses (observe number and diameter) to set
up the drying installation.
• Remove the sealing caps from the connectors to which you
want to connect a hose. If a connector is not needed, the
sealing cap must remain on the connector.
Note
Connectors without a sealing cap or a connected hose
may cause water to escape and thus result in water
damages.
Carefully check the connectors before switching the
device on.
• For drying operations, only use cables and sockets
complying with the regulations. In addition to the 16A
fuse, the socket should also be secured by a 30mA
residual current device (RCD).
Note
We recommend using a suitable mat if the Qube is
placed on sensitive ground.
The device comes equipped with an overheating protection.
This serves to prevent excessive ambient temperatures.
It protects the materials and devices located in the room.
Inserting the filters
Check whether the filters have been properly inserted into the
device:
• G4 filter sleeve or optional F8 filter sleeve or HEPA filter
with F8 filter sleeve
• demister
• coarse filter (filter mat) with coarse filter fixation
• pump filter
Info
The coarse filter fixation should rest on the coarse filter
to prevent the coarse filter from floating
unintentionally.
Mains connection
• Plug the mains plug into a sufficiently fused socket.
Switching the device on
Press the power button(42) to switch the device on.
The following working stages are available:
• 4 power stages 1-4
• stage 5: boost stage
• whisper mode
• TTKwicmode
Check the installation via the LC display:
• green: optimal air volume flow
• yellow: limit range
• red: air flow rate too low – installation must be optimized
10 EN
insulation drying unit Qube+
Page 11

Operation
36 37 38
40 39
14
42
41
12
Operating elements
Setting the power stages and operating modes
The device comes with 4 power stages, a boost mode, a
whisper mode and the TTKwic mode.
Whisper mode can be activated by pressing the whisper mode
button(40).
Setting the power stages and the boost mode
In boost mode, the motor runs at its maximum performance.
Choose from the power stages1 to 4 or boost mode by pressing
the buttons plus(38) or minus(37).
Setting whisper mode
In whisper mode, the compressor runs with a max. motor power
of 60%, thus reducing the noise emission (e.g. at night).
Whisper mode is automatically left after 10h and the
compressor starts to run at its previously chosen power stage
again. Selecting another stage via the control panel will also
stop the whisper mode.
Press the whisper mode button(40) to activate or deactivate
whisper mode.
• A countdown(10h) on the control panel indicates the
remaining whisper mode duration.
• Pressing a button on the control panel deactivates whisper
mode. This only applies if the key lock is disabled.
No. Designation
12 DA4 sensor connection
14 Touchscreen control panel
36 LC display
37 Minus button (decrease power stage)
38 Plus button (increase power stage)
39 Operating hours button
40 Whisper mode button
41 Communication port
42 Power button
Setting TTKwic mode
In this operating mode the device's motor is turned off and only
the pump operates. So if a dehumidifier transports water into
the device by means of a condensate pump, the accumulated
water will be pumped off when the tank's maximum filling level
is reached.
Press the whisper mode button(40) followed by minus(37) to
activate or deactivate TTKwic mode.
Info
In whisper mode you can enable or disable TTKwic
mode at any time.
The whisper mode duration(10h) also applies to the
TTKwic mode.
EN 11
insulation drying unit Qube+
Page 12

Key lock
To prevent an accidental maladjustment of the device settings,
the device is fitted with a key lock function.
Simultaneously press and hold the plus(38) and minus(37)
buttons for approx. 5s to enable or disable the key lock. Pay
attention to the indication on the display.
The key lock indication in the top right corner of the LC display
changes according to the selected setting:
• Padlock closed: The key lock is activated.
• Padlock open: The key lock is deactivated.
Example for an enabled key lock function:
Example for a disabled key lock function:
Info
The key lock will be activated automatically after
approx. 10min of non-use.
Displaying the operating hours
Pressing the operating hours button(39) while the device is
switched on allows you to see the number of operating hours.
The energy consumption can be read at the rear of the Qube+.
The counter has an MIDcertificate qualifying it for billing
purposes.
In accordance with calibration regulations, restoration
companies are so-called "meter users" or "users of
measurement readings", which binds them to observe the
German Weights and Measures Act (MessEG). The MessEG
regulates the recording and transfer of measurement readings
based on which the power consumption costs of the devices
shall be determined.
Emptying the tank
Info
The drain hose must be connected and guided to an
appropriate drain or collection container.
Filling level sensors inside the tank control the automatic
operation of the pump. Once a certain filling level is reached in
the tank, the pump will start to operate automatically:
• The message abpumpen... appears on the LC display.
• The pump drains the accumulated water via the connected
drain hose.
• If the pump cannot drain the water fast enough, the
motor’s fan will be switched off. The message Behaelter
voll! appears on the LC display. The maximum tank filling
level has been reached. The pump drains the accumulated
water.
• Once the tank has been emptied, the fan motor will switch
back on and the drying operation will continue.
Shutdown
Warning of electrical voltage
Do not touch the mains plug with wet or damp hands.
• Remove the residual water by pressing the button for
residual water draining(10).
• Press the power button(42) to switch the device off.
• Wait until the motor has come to a standstill.
• Remove any hose connections.
• Reinsert the sealing plugs removed during start-up.
Info
If a load is connected to the service socket, its energy
consumption will also be measured by the energy
meter.
Connecting the DA4 (external control unit)
The communication port(41) is used for data transfer to the
DA4 control unit. The data may then be forwarded (USB and
modem or USB only).
Additionally, the internal sensor of the DA4 must be connected
via the sensor connection(12).
12 EN
insulation drying unit Qube+
Page 13

Errors and faults
The device has been checked for proper functioning several
times during production. If malfunctions occur nonetheless,
check the device according to the following list.
The device does not start:
• Check the power connection.
• Check the power cable and mains plug for damages.
• Check the on-site fusing.
• Check whether the overheating protection has tripped.
The device comes equipped with an overheating
protection. If the temperature within the device exceeds
the permissible value, the air flow rate will be reduced
automatically. Temperatur 1! will be displayed. If the
temperature increase continues nonetheless, the device
will be switched off and Temperatur 2! appears on the
display.
If necessary, direct the warm air out of the room. A room
temperature of more than 35°C is to be avoided during
operation. Also observe the information in the Set-up
chapter.
Little or no air is sucked in or blown out:
• Check the installation and add relief openings to improve
the air circulation and to operate the compressor within its
operating range if necessary.
Motor switches off during operation or its performance is
reduced:
• The device has been overheated due to improper operation
and switched off by the thermal protection of the motor.
This may be due to the following causes:
– High counter pressure on the outlet side has led to
overheating.
– Too strong flow resistance on the suction side has led
to overheating in suction mode.
• Wait until the motor has cooled down. Then switch the
device back on.
• Check the installation and add relief openings to improve
the air circulation and to operate the compressor within its
operating range if necessary.
• Check whether the air filter of the turbine is soiled or
clogged.
• If the room temperature exceeds 35°C, provide better
ventilation. If necessary, guide the warm air out of the
room.
Your device still does not operate correctly after these
checks?
Please contact the customer service. If necessary, bring the
device to a specialist company for cooling and air-conditioning
or to Trotec for repair.
Motor is not running:
• Check the display. If Behaelter getrennt! is indicated, the
upper part may not be correctly positioned on the lower
part. Check whether the upper and lower part are properly
connected to one another.
• Check whether voltage is applied.
• Check the electrical connections and safety installations.
EN 13
insulation drying unit Qube+
Page 14

Fault messages
The following fault messages may appear on the LC display:
Fault message Cause Remedy
Behaelter getrennt!
(tank disconnected)
The electrical
contact between
the upper and
lower part is
disrupted. The
motor switches
off.
Check whether the
upper and lower part of
the device are firmly
connected via the
tension locks. Check
the contacts of the
upper and lower part.
Clean if necessary.
Pumpe
Abkuehlphase..
(cooling phase
pump)
The pump is in
continuous
operation mode
and has no time
to cool down.
No action required.
The cooling phase lasts
15min. Then the
device starts up again
and resumes operation
with the previously
selected settings.
Behaelter voll!
(tank full)
The water tank is
full.
No action required.
The pump drains the
accumulated water via
the drain hose. The
motor switches off. The
motor will only switch
back on and the Qube
will only continue to
operate once the water
has been drained.
Pumpe pruefen!
(check pump)
The pump is
blocked and can
no longer operate.
Press the button for
draining residual
water(10). If the pump
is still blocked, switch
the device off. Clean
tank and pump
thoroughly.
The pump is in
operation but
there is no water
in the tank.
Switch the Qube off
and back on. If the
message appears
again, check the water
level sensor and clean
this area thoroughly.
Too much water
in the insulation
layer or an
unconnected
drain hose causes
the pump to
operate
continuously.
Check the drain hose
for proper fit. There
must be no kinks or
loops in the hose that
could prevent the water
from being drained off.
Check for potential
leakage.
Fault message Cause Remedy
abpumpen...
(pumping off)
The pump drains
the accumulated
water.
No action required.
If the pump is to run
permanently, the water
should be removed
with an industrial
suction unit in a first
step.
Filter wechseln!
(change filter)
The G4 or F8 filter
sleeve or the
HEPA filter is
clogged.
Exchange the filter
sleeve. In case a HEPA
filter is used and the
message continues to
be shown on the
display, the HEPA filter
itself must be
exchanged as well.
12V Netzteil
pruefen
(check 12V power
adapter)
Temperatur 1!
(temperature1)
Temperatur 2!
(temperature2)
The sensor for
monitoring the
water level is not
working properly.
The temperature
within the device
exceeds the
permissible value,
this tripped the
overheating
protection.
The temperature
within the device
exceeds the
permissible value,
this tripped the
overheating
protection. The
device has
switched off.
Please contact the
customer service.
No action required.
The air flow rate will be
adjusted automatically.
Investigate the cause
of overheating if
required to prevent
further overheating.
Investigate the cause
of overheating.
If necessary, direct the
warm air out of the
room. A room
temperature of more
than 35°C is to be
avoided during
operation. Also observe
the information in the
Set-up chapter.
14 EN
insulation drying unit Qube+
Page 15

Maintenance
Activities required before starting maintenance
Warning of electrical voltage
Do not touch the mains plug with wet or damp hands.
• Switch the device off.
• Hold onto the mains plug while pulling the power cable out
of the mains socket.
Warning of electrical voltage
Tasks which require the housing to be opened
must only be carried out by authorised specialist
companies or by Trotec.
Note
Observe the overvoltage protection.
The device comes equipped with an overvoltage
protection. When checking for electrical safety, please
bear in mind that the test voltage has to be reduced to
250V.
Info
Via the following link you will find an explanation of
how to clean the Qube+ and what to observe for this
process:
https://www.youtube.com/watch?v=8_G8kCDMHIM
Cleaning the housing
Clean the device with a soft, damp and lint-free cloth. Ensure
that no moisture enters the housing. Protect electrical
components from moisture. Do not use any aggressive cleaning
agents such as cleaning sprays, solvents, alcohol-based or
abrasive cleaners to dampen the cloth.
Draining residual water
The residual water should always be drained before the device
is transported.
Press the button for residual water draining to drain the water
left in the tank.
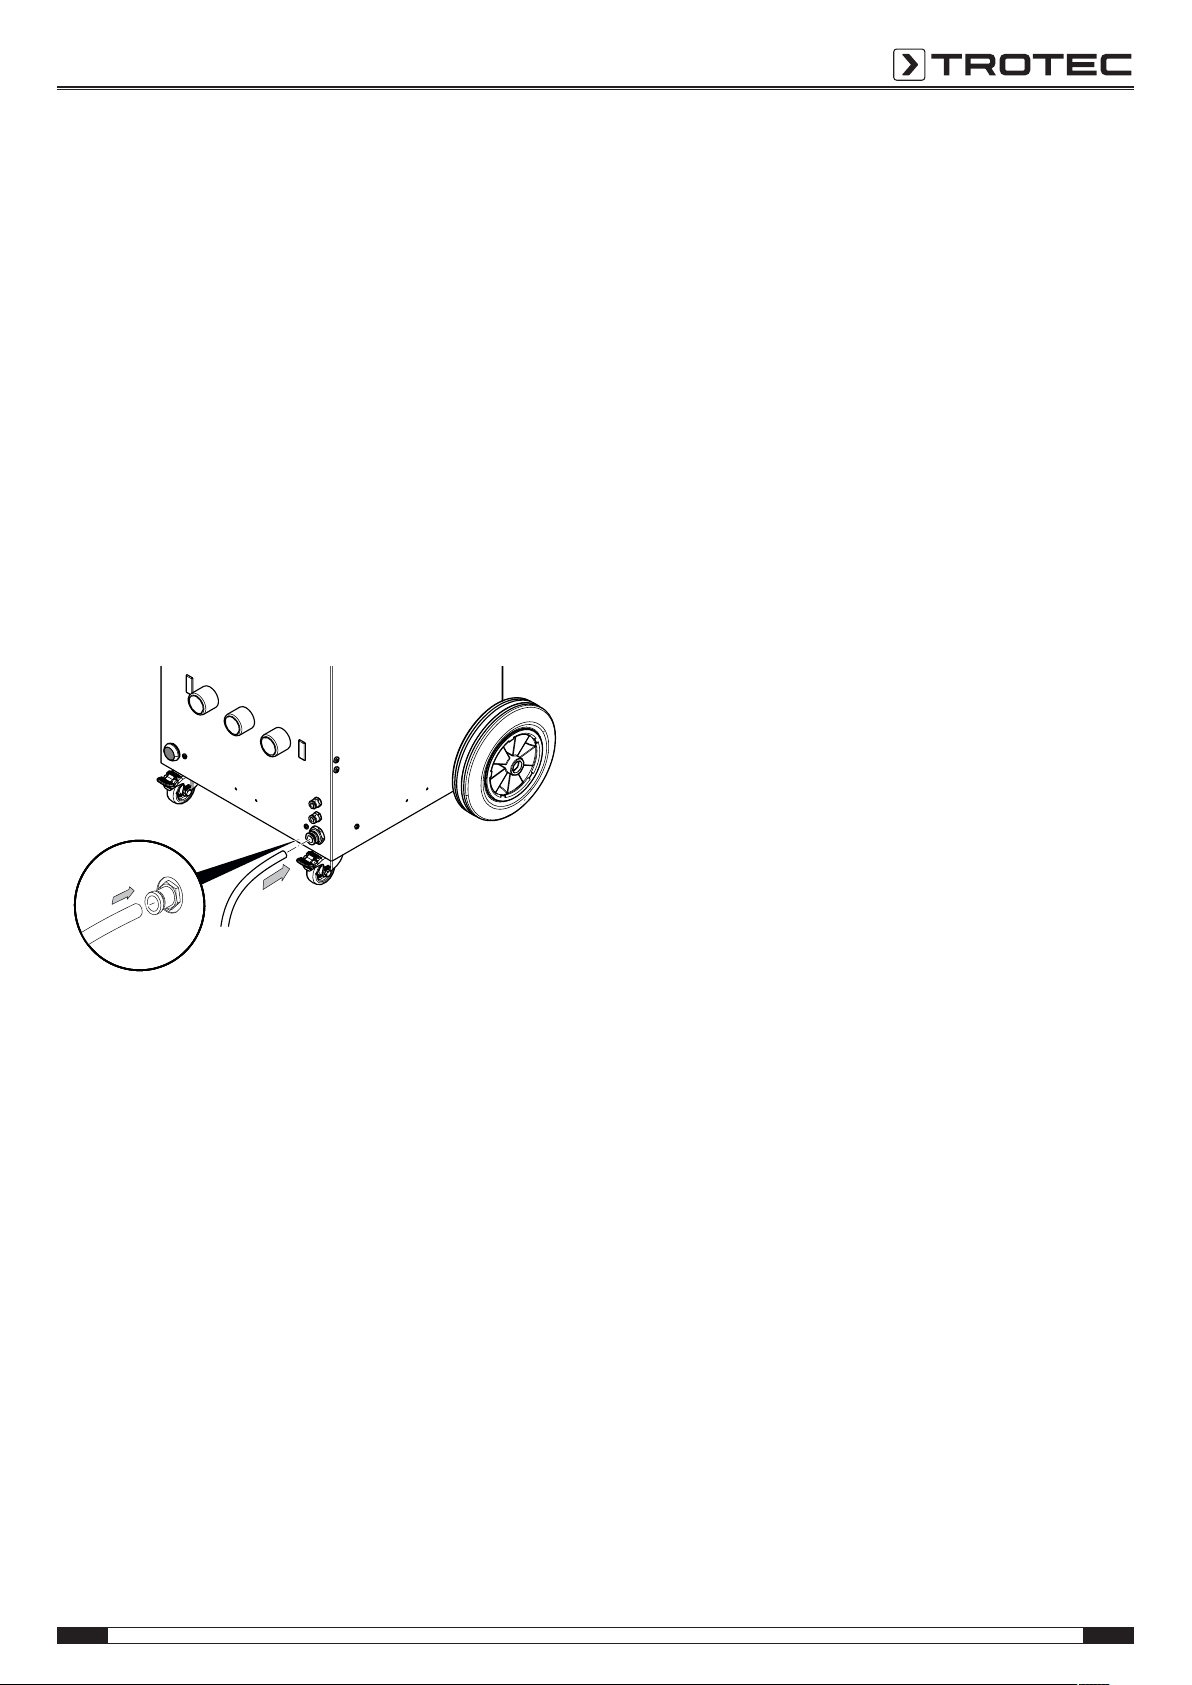
Exchanging or removing the drain hose
The drain hose should be cleaned if dirt is visible.
If there are signs of wear or damage, the drain hose should be
exchanged.
Remove the drain hose before transporting the device.
ü The device is switched off and disconnected from the
mains.
ü The residual water has been drained.
1. Press the blue ring on the outside of the quick coupling
together and at the same time pull the hose.
EN 15
insulation drying unit Qube+
Page 16

2. If required, connect a new drain hose.
A
B
34
31
27
28
23
25
26
Cleaning or replacing the filters
The filters must be cleaned or replaced as soon as they are
dirty.
If the Filter wechseln! message appears on the display, the filter
inside the device (G4 or F8 filter sleeve or HEPA filter) must be
replaced as it does not allow a sufficient quantity of air to pass.
Observe the following before cleaning or replacing the filter:
• Press the power button(42) to switch the device off.
• Disconnect the device from the mains.
• Drain the residual water from the tank.
The device is equipped with different filter types:
• G4 filter sleeve(34) (F8 filter sleeve also an option here)
• F8 filter sleeve for HEPA filter, optional (25)
• HEPA filter, optional (26)
• demister (31)
• coarse filter (28)
• air filter (23)
• pump filter (part of 27)
16 EN
insulation drying unit Qube+
Page 17

Replacing the air filter
17
4
4
ü The device is switched off and disconnected from the
mains.
ü The residual water has been drained.
1. Remove the cover from the air filter.
2. Remove the air filter.
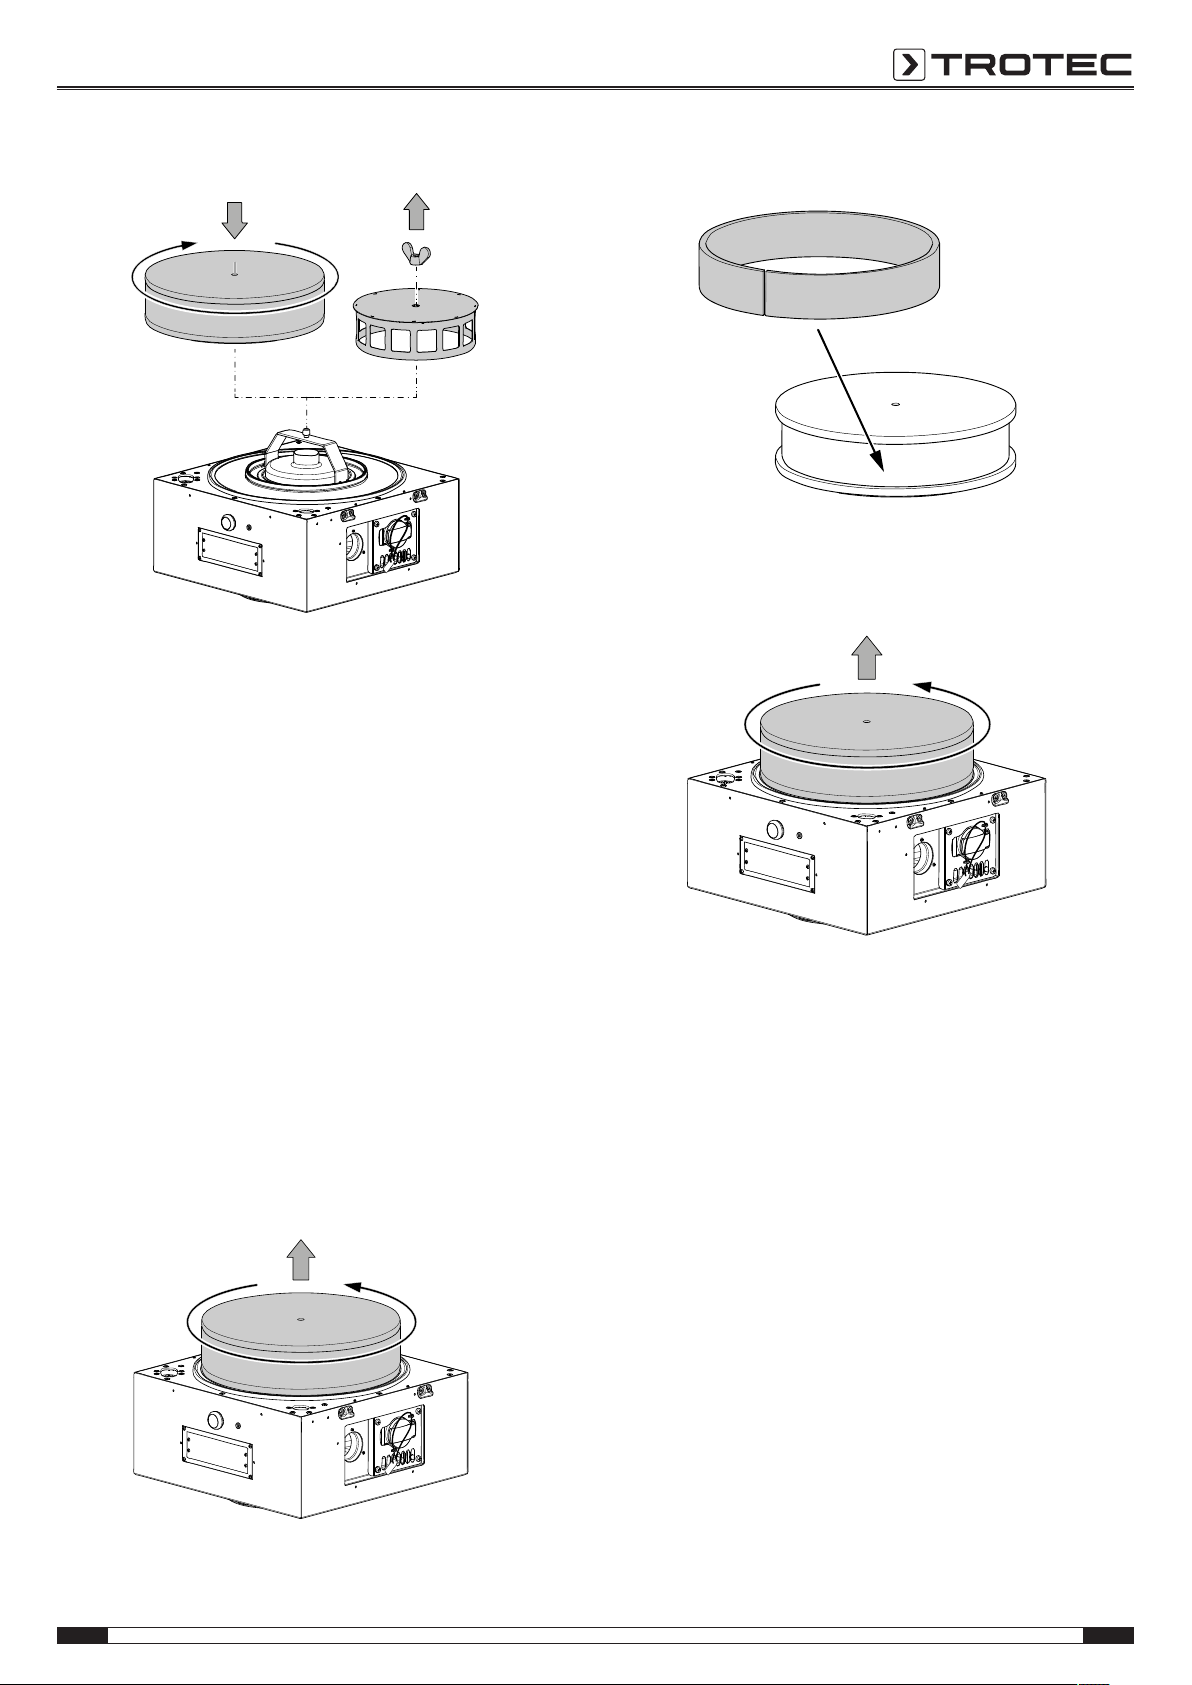
Replacing the G4 filter sleeve
If the Filter wechseln! message appears on the display, the
G4 filter sleeve inside the device must be replaced as it does not
allow a sufficient quantity of air to pass.
ü The device is switched off and disconnected from the
mains.
ü The residual water has been drained.
1. Open the 4 tension locks(4).
2. Lift the upper part at the carrying handle(17) and place it
onto a stable base.
3. Install a new air filter.
4. Reattach the coverto the air filter.
3. Turn the upper part so that the bottom side with the filter
points upwards.
EN 17
insulation drying unit Qube+
Page 18

4. Remove the G4 filter sleeve from the cage.
5. Place a new G4 filter sleeve around the cage and close the
Velcro® fastener. Make sure that the sleeve surrounds the
cage completely.
6. Put the upper part back on the device and close the
tension locks.
Cleaning the demister
ü The device is switched off and disconnected from the
mains.
ü The residual water has been drained.
ü The upper part has been removed (see Replacing the
G4 filter sleeve).
1. Take the demister out of the holder in the lower part of the
device.
2. Rinse the demister under running water.
ð Exchange the demister if required (e.g. in case of
damages).
3. Put the demister back into the holder.
4. Put the upper part back on the device and close the
tension locks.
18 EN
insulation drying unit Qube+
Page 19

Cleaning the pump filter
43
44
45
ü The device is switched off and disconnected from the
mains.
ü The residual water has been drained.
ü The upper part has been removed (see Replacing the
G4 filter sleeve).
1. Take the demister along with the holder out of the lower
part of the device.
2. Remove the coarse filter fixation.
4. Loosen the quick coupling of the hose(43) on the tank
wall.
5. Slightly lift the sheet that is fixating the pump.
6. Take out the pump.
7. Detach the pump filter from the pump.
8. Rinse the pump filter under running water.
ð Exchange the pump filter if required (e.g. in case of
damages).
3. Loosen the connecting plug(44) of the electrical
connection on the tank wall. Close the cap(45) of the plug
connection to avoid contamination.
9. Slightly lift the sheet that is fixating the pump and refit the
pump.
10. Check the pump for tight fit.
11. Plug the hose(43) back into the quick coupling.
12. Open the cap(45) of the pump's electrical connection and
put the plug(44) back in.
13. Refit the coarse filter fixation. The coarse filter fixation
should rest on the coarse filter.
14. Refit the demister along with the holder.
15. Put the upper part back on the device and close the
tension locks.
EN 19
insulation drying unit Qube+
Page 20

Cleaning the coarse filter (filter mat)
ü The device is switched off and disconnected from the
mains.
ü The residual water has been drained.
ü The upper part has been removed (see Replacing the
G4 filter sleeve).
1. Take the demister along with the holder out of the lower
part of the device.
2. Remove the coarse filter fixation.
5. Rinse the coarse filter and the coarse filter fixation under
running water.
ð Exchange the coarse filter and the coarse filter fixation
if required (e.g. in case of damages).
6. Put the coarse filter back in.
7. Slightly lift the sheet that is fixating the pump and refit the
pump.
8. Check the pump for tight fit.
9. Plug the hose(43) back into the quick coupling.
10. Open the cap(45) of the pump's electrical connection and
put the plug(44) back in.
11. Refit the coarse filter fixation. The coarse filter fixation
should rest on the coarse filter.
12. Refit the demister along with the holder.
13. Put the upper part back on the device and close the
tension locks.
3. Remove the pump as described in chapter Cleaning the
pump filter, step3 to 6.
4. Remove the coarse filter.
Replacing the G4 filter sleeve by an F8 filter sleeve
(optional)
If a finer ambient air filtration is required, the G4 filter sleeve
can be replaced by an F8 filter sleeve.
1. Please proceed as described in chapter Replacing the
G4 filter sleeve.
2. Replace the G4 filter sleeve by the F8 filter sleeve
(7.160.000.216). In doing so, make sure that the coarse
fleece is positioned on the outside and the finer fleece on
the inside of the cage.
Replacing the G4 filter sleeve by a HEPA filter (optional)
If required, the G4 filter sleeve can be replaced by a HEPA filter.
ü The device is switched off and disconnected from the
mains.
ü The residual water has been drained.
1. Proceed as described in steps1 to 3 in the chapter
Replacing the G4 filter sleeve.
2. Loosen the wing nut and remove the cage with the
G4 filter sleeve.
20 EN
insulation drying unit Qube+
Page 21
3. Screw the HEPA filter onto the upper part.
4. Put the upper part back on the device and close the
tension locks. Make sure that the contacts of the upper
and lower part are properly aligned with one another.
4. Remove the F8 filter sleeve from the HEPA filter.
5. Place the new F8 filter sleeve around the HEPA filter. Make
sure that the sleeve surrounds the filter completely.
6. Screw the HEPA filter back onto the upper part.
Exchanging the HEPA filter and the F8 filter sleeve
(optional)
If the Filter wechseln! message appears on the display, the filter
inside the device must be replaced as it does not allow a
sufficient quantity of air to pass. Always exchange the HEPA
filter on every construction site to prevent contamination. If the
Filter wechseln! message appears on the display during
operation, you can exchange the F8 filter sleeve in a first step.
If this is not sufficient (Filter wechseln! message still displayed),
the HEPA filter must be exchanged as well.
ü The device is switched off and disconnected from the
mains.
ü The residual water has been drained.
1. Please proceed as described in steps1 and 2 in the
chapter Replacing the G4 filter sleeve.
2. Turn the upper part so that the bottom side with the
HEPA filter points upwards.
3. Unscrew the HEPA filter from the upper part.
7. Put the upper part back on the device and close the
tension locks.
EN 21
insulation drying unit Qube+
Page 22

Technical annex
Technical data
Technical data and equipment Qube+
Suitable for surfaces sized up to (low pressure) power stage 1 10m
power stage 2 25m
power stage 3 50m
power stage 4 85m
2
2
2
2
Maximum pressure (low pressure) 220 mbar
Air flow rate (freely blowing)
1
Defined volumetric flow optimum (sucking in) of the HiDry
automatism incl. HEPA filter
whisper mode 90 m
power stage 1 50 m
power stage 2 90 m
power stage 3 140 m
power stage 4 160 m
boost stage 180 m
250 m
3
3
3
3
3
3
3
Motor power (depending on the performance level) whisper mode 0.2 to 1.2 kW
Sound level (distance 3m, depending on the performance level) whisper mode 48dB(A) to 59dB(A)
Volume collection container 10 l
Input voltage 230V/ 50Hz
Weight 27 kg
Dimensions Lx Wx H (telescopic push handle down/ up) 490x 500x 735/ 925mm
Mobility carrying handle ■
stackable ■
rollable ■
carriage design ■
Hose connections insulation drying 3 x ø 38 mm
TTKwic dehumidifier quick couplings 2 x
Waste water connection ■
DA4 interface ■
Efidry humidity sensor connection ■
Service socket (tamper-proof) ■
50 mm connector for compressed air discharge ■
Residual water draining ■
Overflow sensor with automatic switch-off ■
Baffle plate for coarse filtration ■
Stainless steel demister for water separation and fine filtration ■
Robust and non-wearing touchscreen control panel design ■
Optiflow NT multi-function display ■
digital
2
2
2
2
Operating hours counter digital
Power meter, MID-compliant
3
Plain text status indication ■
Illumination for power control ■
HEPACONTROL filter change indicator ■
22 EN
insulation drying unit Qube+
Page 23

Technical data and equipment Qube+
TTKwic operating mode ■
Height-adjustable telescopic push handle ■
Cable holder with fixable plug ■
Thermal protection ■
Maintenance quick release fasteners ■
1
maximum air flow rate of the fan motor (not integrated) 2 vvia OptiflowNT multi-function display 3 What does MID-compliant mean? In some areas, the Measuring Instruments Directive (MID)
replaces the previous regulation of national authorization and subsequent calibration. As a result, all energy meters in Europe used for energy consumption-based billing have to be MID-compliant
from now on. Therefore, the Qube+ holds a separate certified, MID-compliant counter, which transmits its data to the OptiflowNT multi-function display for inspection.
EN 23
insulation drying unit Qube+
Page 24

Exploded assembly drawing
A
B
2
3
4
1
11
12
7
13
6
8
9
10
5
14
15
16
Info
The position numbers of the spare parts differ from
those describing the positions of the components
mentioned in these instructions.
24 EN
insulation drying unit Qube+
Page 25

List of spare parts
Pos. no. Article number Designation
1 7.600.000.006 swivel castor 50/19
2 P10006255 telescopic push handle
3 7.310.000.897 handle
4 7.600.000.001 plain bearing wheel 200/50 with black end cap
5 7.200.000.001 connector 50 mm aluminium
6 P10003459 housing Qube+ filter insert
7 7.160.000.221 HEPA filter module H13 incl. F8 prefilter sleeve
8 P10000203 demister insert
9 P10002223 housing Qube+ demister holder
10 P10006736 Qube+ water separator bottom filter mat
11 7.160.000.213 F7 Z-line filter
12 P10003460 housing Qube+ cover air aperture
13 7.160.000.214 G4 filter sleeve
14 7.331.000.476 drain hose (5m)
15 7.170.001.201 pump with plug
16 7.241.001.245 coarse filter fixation
Additional spare parts available on request.
EN 25
insulation drying unit Qube+
Page 26

Disposal
The icon with the crossed-out waste bin on waste
electrical or electronic equipment stipulates that this equipment
must not be disposed of with the household waste at the end of
its life. You will find collection points for free return of waste
electrical and electronic equipment in your vicinity. The
addresses can be obtained from your municipality or local
administration. For further return options provided by us please
refer to our website www.trotec24.com.
The separate collection of waste electrical and electronic
equipment aims to enable the re-use, recycling and other forms
of recovery of waste equipment as well as to prevent negative
effects for the environment and human health caused by the
disposal of hazardous substances potentially contained in the
equipment.
Declaration of conformity
The text below sets out the contents of the declaration of
conformity. The signed declaration of conformity can be found
at https://hub.trotec.com/?id=40717.
Declaration of conformity
In accordance with the ECMachinery Directive 2006/42/EC,
AnnexII, part1, SectionA
Herewith, we– Trotec GmbH&Co.KG– declare that the
machinery designated below was developed, constructed and
produced in compliance with the requirements of the
ECMachinery Directive in the version 2006/42/EC.
Product model/ Product:
Product type:
Year of manufacture as of:
Relevant EU directives:
• 2011/65/EU: 1July 2011
• 2014/30/EU: 29March 2014
Applied harmonised standards:
• EN 55014-1:2006
• EN 55014-2:2016
• EN 60335-1:2012/AC:2014
• EN60335-2-40:2003
• EN61000-3-2:2014
• EN 61000-3-3:2013
Applied national standards and technical specifications:
• None
Qube+
insulation drying unit
2018
Manufacturer and name of the authorised representative of
the technical documentation:
Trotec GmbH & Co. KG
Grebbener Straße 7, D-52525 Heinsberg
Phone: +49 2452 962-400
E-mail: info@trotec.de
Place and date of issue:
Heinsberg, 20.09.2018
Detlef von der Lieck, Managing Director
26 EN
insulation drying unit Qube+
Page 27

Trotec GmbH & Co. KG
Grebbener Str. 7
D-52525 Heinsberg
+49 2452 962-400
+49 2452 962-200
info@trotec.com
www.trotec.com
 Loading...