

Page 1
ProMarker OEM
ProMarker OEM
Operating manual
Operating manual
8021
8021
OM 8021_5.0_EN (08/2019)
OM 8021_5.0_EN (08/2019)
ENGLISH (Translation)
ENGLISH (Translation)
Page 2

Trotec Laser GmbH
+43 7242 239-7070
service-at@troteclaser.com
Trotec Laser Canada
+1 800 663 1149-902
techsupport@troteclaser.ca
Trotec Laser Deutschland
GmbH
+49 89 322 99 65-13
service-de@troteclaser.com
Trotec Laser UK
+44 0191 4188 110
service-uk@troteclaser.com
Trotec Laser Pty Ltd
+61 26413-5904
service@troteclaser.com.au
Trotec Laser AG
+41 32387-1611
service-ch@troteclaser.com
suisse@troteclaser.com
Trotec Laser España
+34 93 102 50 50
soporte@troteclaser.com
Trotec Laser Srl
+39 02 9475 5447
supporto.tecnico@troteclaser.com
Trotec Laser België
Trotec Laser Belgique
+31 850 70 51 55
support@troteclaser.nl
Trotec Laser GmbH
+86 189 500 735 62
china@troteclaser.com
Trotec Laser France SAS
+33 1 72 62 20 94
support.technique@trotec.fr
Trotec Laser Japan
Corporation
Tokyo: +81 42 313 0740
Osaka: +81 6 6180 2200
service-jp@troteclaser.com
High Speed Laser Systems S.
de R.L. de C.V.
+52 55 5351-7252
mexico@troteclaser.com
Trotec Laser Inc.
+1 866 226 8505, Option 2
support@troteclaser.com
2 ENGLISH (Translation)
Trotec Laser B.V.
+31 850 70 51 55
support@troteclaser.nl
Rubber Stamp & Engraving
+27 875 509-335
support@trodat.co.za
Trodat Polska Sp. z o.o.
+48 22 339 35 39
serwis_pl@trodat.net
Page 3

Trotec Laser GmbH
Freilingerstraße 99
4614 Marchtrenk, Austria
Invoice Address:
Linzerstraße 156
4600 Wels, Austria
Tel.: +43 7242 239-0
General contact to Technical Support:
Tel.: +43 7242 239-7000
E-mail: techsupport@troteclaser.com
www.troteclaser.com
ENGLISH (Translation) 3
Page 4

Technical Changes Technical specifications are subject to change without notice.
Trotec Laser GmbH reserves the right to improve or modify any of the products without
prior notice.
© Copyright This documentation with all illustrations is intellectual property of Trotec Laser GmbH.
The entire documentation is given to the user for personal use only. Reproduction,
translation or any distribution to third parties is not permitted without the prior consent of
Trotec Laser GmbH. Any breach of law will be prosecuted.
4 ENGLISH (Translation)
Page 5

Content
Content
1 Introduction.................................................................................................................8
2 General Information................................................................................................... 9
2.1 Information about this manual.............................................................................................. 9
2.1.1 Storage of the manual............................................................................................................9
2.1.2 General instructions for using the manual............................................................................. 9
2.2 Explanation of symbols........................................................................................................11
2.3 Liability and warranty........................................................................................................... 12
2.4 Scope of delivery (standard configuration)........................................................................12
2.5 Type plate............................................................................................................................... 14
3 Safety......................................................................................................................... 15
3.1 General safety notes.............................................................................................................15
3.1.1 Intended use......................................................................................................................... 17
3.1.2 Improper use.........................................................................................................................17
3.1.3 Residual risk......................................................................................................................... 17
3.1.4 Machine modification............................................................................................................ 18
3.1.5 Operating modes.................................................................................................................. 18
3.1.6 Applicable safety regulations................................................................................................ 18
3.2 Laser safety........................................................................................................................... 20
3.2.1 Laser classification............................................................................................................... 20
3.3 Areas of responsibility......................................................................................................... 22
3.3.1 Responsibilities of the operating company...........................................................................22
3.3.2 Responsibilities of the operating personnel......................................................................... 23
3.4 Requirements for operating an service personnel............................................................23
3.5 Machine identification (warning and safety stickers)....................................................... 24
3.6 Secondary (indirect) hazards...............................................................................................25
3.6.1 Fire hazard............................................................................................................................25
3.6.2 Gases, fumes and dust........................................................................................................ 25
3.7 In case of emergency........................................................................................................... 26
4 Technical Data.......................................................................................................... 27
4.1 General description...............................................................................................................27
4.2 Laser rack dimensions......................................................................................................... 28
4.3 Marking head dimensions.................................................................................................... 29
5 Before commissioning.............................................................................................30
5.1 Unloading, inspection and reporting faults........................................................................30
ENGLISH (Translation) 5
Page 6

Content
6 Transport and Storage.............................................................................................32
6.1 Transport conditions.............................................................................................................32
6.2 Storage conditions................................................................................................................ 32
6.3 Place of storage.................................................................................................................... 33
6.4 Transport inspection and reporting of defects.................................................................. 33
7 Setup and installation.............................................................................................. 34
7.1 For your safety...................................................................................................................... 34
7.2 Temperature and humidity................................................................................................... 34
7.3 Installation location...............................................................................................................34
7.4 Mechanical installation......................................................................................................... 35
7.4.1 Installation of the marking head........................................................................................... 35
7.5 Electrical installation............................................................................................................ 37
7.5.1 Overview marking head interface (back side)......................................................................38
7.5.2 Overview PC interface (back side).......................................................................................39
7.5.3 Mains connection..................................................................................................................39
7.5.4 Overview laser rack interface (back side)............................................................................ 40
7.5.5 Interface pin configuration.................................................................................................... 42
8 Operation...................................................................................................................44
8.1 Installation inspection...........................................................................................................44
8.2 Marking software................................................................................................................... 44
8.3 Control panel......................................................................................................................... 45
8.4 Power On/Off......................................................................................................................... 46
8.5 Emission indicator................................................................................................................ 47
8.6 Focusing.................................................................................................................................48
9 Ingetration / Connection.......................................................................................... 49
9.1 Switching sequences............................................................................................................ 49
10 Maintenance.............................................................................................................. 51
10.1 Safety notes........................................................................................................................... 51
10.2 Changing of the laser source filter mat..............................................................................51
10.3 Cleaning the optics............................................................................................................... 52
11 Troubleshooting........................................................................................................53
11.1 Error, cause and remedy...................................................................................................... 53
11.2 Possible error messages......................................................................................................54
6 ENGLISH (Translation)
Page 7

Content
12 Contact details..........................................................................................................56
13 Disassembly..............................................................................................................57
14 Disposal.....................................................................................................................58
15 Appendix....................................................................................................................59
15.1 Datasheet 8021 ProMarker OEM..........................................................................................60
15.2 CE 8021 ProMarker FL..........................................................................................................65
ENGLISH (Translation) 7
Page 8

Introduction
1 Introduction
The ProMarker is a second generation of a high quality marking laser. The Yb fiber laser source means the
system has an extremely long life cycle and minimal maintenance costs. This system is maintenance free
apart from the filter pad and processing lens.
The combination of a high quality galvanometer scanner and a fiber laser produce highly precise marking
results in short marking times.
This, together with the marking software and the available interfaces, provides a flexible and productive
marking solution of the highest quality standards.
8 ENGLISH (Translation)
Page 9

General Information
2 General Information
For reasons of better legibility, gender-neutral form of address (e. g. "he/she") are not used in the operating
manual. It is expressly stated that in all text passages where natural persons or groups of persons are
mentioned, people of both sexes are always meant.
2.1 Information about this manual
Before beginning any work on the machine, read this manual completely and carefully.
Keep the manual for further consultation close to the machine.
This manual describes how to operate the machine properly and safely. Be sure to follow the safety
instructions given here, as well as any local accident prevention regulations and general safety regulations
applicable to the field of usage. Before beginning any work on the machine, ensure that the manual, in
particular the chapter entitled "Safety Information" and the respective safety guidelines, has been read in its
entirety and fully understood.
2.1.1 Storage of the manual
This manual is an integral part of the machine and must therefore be kept in the direct vicinity of the machine
and be accessible at all times.
2.1.2 General instructions for using the manual
The operating manual describes how to handle the device correctly and safely and guides you through the
necessary steps for initial use. The operating manual also contains important information regarding system
maintenance.
Warning
This operating manual must be read and followed carefully before commissioning and operating
the device. Failing the observe individual points listed in this operating manual may result in
personal injury and/or material damage to property!
This system may only be operated using devices and spare parts included in the scope of supply or the
replacement or list of spare parts.
Ancillary devices must be calibrated to meet the safety and operational requirements of the base machine
(please contact your dealer or the manufacturer with any queries).
ENGLISH (Translation) 9
Page 10

General Information
The ProMarker OEM is a class 4 laser marking system according to IEC 60825-1 "safety of laser products".
If the ProMarker OEM is integrated into a system as an OEM component, the operator bears sole
responsibility for compliance with the legal standards and safety guidelines.
The operator of the laser marking system is obliged to comply with the "applicable safety regulations" as
described in the chapter "safety".
10 ENGLISH (Translation)
Page 11
General Information
2.2 Explanation of symbols
Important technical safety notes and instructions in this manual are indicated by symbols. It is important to
observe and follow these notes and instructions on workplace safety. Avoid accidents, personal injury and
material damage to property by acting with extreme caution.
Danger
This symbol indicates an imminently hazardous situation which, if not avoided, will result in
death or serious injury.
Warning
This symbol indicates a potentially hazardous situation which, if not avoided, could result in
death or serious injury.
Warning Current
This symbol warns of potentially dangerous situations related to the electric voltage. Failure to
observe the safety instructions leads to risk of serious injury or death. Particular care should be
taken during maintenance and repair work.
Warning Laser
This symbol warns of potentially dangerous situations related to the laser beam. Failure to
observe the safety instructions leads to risk of serious injury.
Caution
This symbol indicates a potentially hazardous situation which, if not avoided, could result in
minor or moderate injury.
Notice
This symbol indicates potential risks of damage to the supported product (or to property).
In addition, non-observance may result in damage, malfunction or failure of the machine.
Information
This symbol indicates tips and information which must be observed for efficient and trouble-free
handling of the product.
Disposal
This symbol indicates notes regarding the professional disposal of the product or accessories.
ENGLISH (Translation) 11
Page 12

General Information
2.3 Liability and warranty
Warranty periods specified in the manufacturers "warranty terms and conditions" shall be binding for the
buyer. If no warranty periods are specified, the general terms and conditions of sale, delivery and payment
apply.
All information, illustrations, tables, specifications and diagrams contained in this operating manual have
been carefully compiled according to the current state of technology. No liability is accepted with regard to
errors, missing information and any resulting damage or consequential loss.
Strict compliance with the safety procedures described in this operating manual and extreme caution
when using the equipment are essential for avoiding and reducing the possibility of personal injury or
damage to the equipment. The manufacturer shall not be liable for any damage and or faults resulting from
nonobservance of instructions in this manual.
Nonobservance of the operation, maintenance and service instructions described within this manual
absolves Trotec Laser GmbH from any liability in case of a defect.
Furthermore, Trotec Laser GmbH shall accept no liability whatsoever for damage caused by the use of nonoriginal parts and accessories.
Additionally, Trotec Laser GmbH shall not be held responsible for any personal injury or property damage, of
an indirect or specific nature, consequential loss, loss of commercial profits, interruption to business, or loss
of commercial information resulting from use of the equipment described in this manual.
It is strictly prohibited to make any alterations, to prepare translations, decompile, disassemble, reverse
engineer or copy the software.
Trotec Laser GmbH reserves the right to update any of the information, illustrations, tables, specifications
and diagrams contained in this operating manual with regard to technical developments at any time without
notice.
2.4 Scope of delivery (standard configuration)
12 ENGLISH (Translation)
Page 13

General Information
1 Cable set (1 long cable (W203) + 1 short cable (W503))
2 Cable COM connection (W505)
3 Green bridging plugs (X11, X61, X71)
4 Black bridging plug (X31)
5 Galvanometer scanner controller card (for PC)
6 Slot Combiner print (X103, X53)
7 Slot cover plate 9pin (COM FL)
8 2 keys for the laser rack
9 CD with marking software
10 Lens cleaning kit
11 Allen key set
12 IEC connector for the laser rack
The monitor, keyboard and mouse are not included in the standard scope of supply.
Notice
The system should be returned and transported in the original packaging.
ENGLISH (Translation) 13
Page 14

General Information
2.5 Type plate
The type plate contains information regarding the serial number, manufacturer, date of manufacture,
connection values and consumption data.
The type plate is located on the reverse side of the laser rack.
Enter the serial number, model and year of construction of the machine here.
This data is important should the unit experience a fault and for ordering replacement parts.
14 ENGLISH (Translation)
Page 15

Safety
3 Safety
TO AVOID POSSIBLE HARM READ AND FOLLOW THESE INSTRUCTIONS.
The machine is built at the time of it's development and production according to applicable, established
technical rules and is considered to be safe to operate.
Dangers can be caused by the machine if the machine:
■
is operated by unqualified personnel,
■
the personnel have not been trained,
■
the machine is used improperly or not as intended,
■
or if the machine is used for other intended purposes.
This chapter provides an overview of all important safety aspects that are necessary for optimum protection
of persons and safe and trouble-free operation of the machine. Other chapters of this manual contain specific
safety notes for the avoidance and prevention of hazards.
3.1 General safety notes
Warning
Risk posed by the incorrect actions of untrained individuals.
The improper use of the machine can lead to injury and/or damage to the machine.
– Inform personnel about the machine’s function and any other risks and record this in the
training records.
– Observe official regulations regarding the operation of machines and accident prevention
regulations.
Danger
Risk posed by missing, faulty or bridged safety installations and machine components.
Faulty or missing safety installations and machine components can lead to death, injury and/or
damage to the machine.
– Check carefully that safety installations and machine components are functioning properly
and are fault free.
– The specified actions should be undertaken immediately if parts are faulty or de-fective.
Warning
Risk posed by incorrect operation (in particular in setup-mode).
Setting and operating the machine with limited knowledge of its function can lead to injury and/
or damage to the machine.
– Read and observe the operating and safety notes before commissioning the machine!
ENGLISH (Translation) 15
Page 16
Safety
Warning
Risk posed by incorrect operation by unauthorized individuals.
Setting and operating the machine with limited knowledge of its function can lead to injury and/
or damage to the machine.
– Never leave the machine unattended while in operation.
– Turn off the machine at the main switch when not in use.
Caution
Risk posed by missing machine signage.
Making the wrong assumptions can lead to the risk that the machine is operated incorrectly.
– Replace missing machine signage.
Caution
Risk posed by non-repairable faults.
Any non-repairable fault may damage the machine.
– Turn off the machine and call customer service!
Caution
Risk posed by using inferior spare parts or parts of other manufacturers.
The use of inferior spare parts or parts produced by other manufacturers impairs the safety of
the machine and invalidates the Declaration of Conformity (CE) supplied with it.
– Wear parts or damaged mechanical, safety or electrical components should be replaced by
original spare parts.
Warning
Risk posed by missing protective equipment.
– Wear the appropriate workwear.
– Wear safety glasses suitable for the laser (Laser Class 4).
– Use a suitable extraction system.
Warning
Risk posed by laser marking reaction products.
A suitable extraction system must be used when laser marking due to the possible generation of
gases, fumes and any other partially toxic by-product.
In individual cases, the reaction products may consist of static dust. If this enters any electrical
systems it can cause short circuits leading to personal injury and material damage.
16 ENGLISH (Translation)
Page 17

Safety
Warning
Risk posed by flammable or explosive materials.
Class 4 laser radiation such as that emitted by the Promarker may ignite materials or cause
explosions. Among others it should be ensured that:
– Parameters are selected so that the material does not overheat.
– The system is monitored if necessary.
– Dust is extracted safely.
– There is no accumulation of any flammable residues or remnants in the workspace.
3.1.1 Intended use
The ProMarker is a Class 4 laser marker as per DIN EN 60825-1 "Safety of laser products". It is intended for
integration in systems and lines.
The ProMarker is intended exclusively for laser marking using the supplied marking software.
The following points should also be observed as part of the intended use:
Notice
– Only mark approved materials using suitable parameters.
– Perform maintenance and service according to the specifications in this operating manual.
– Use a suitable extraction system to remove fumes, dust or other reaction products.
– The machine may only be operated by suitably trained individuals.
– Observe effective safety regulations and the procedures described in this operating manual.
If the intention is to use the system for other applications, Trotec Laser GmbH should be informed in
advance.
3.1.2 Improper use
Use of the machine for any purposes other than those intended or described in the present manual is
regarded as improper and therefore prohibited. Trotec Laser GmbH will not accept any liability for damage
caused by improper use. The risks in case of improper use are exclusively borne by the user.
Non-observance of the operation, maintenance and service instructions described within this manual
absolves Trotec from any liability in case of a defect.
3.1.3 Residual risk
Even if all safety regulations are observed, a residual risk remains during operation.
ENGLISH (Translation) 17
Page 18

Safety
3.1.4 Machine modification
It is strictly prohibited to alter, refit or modify the machine in any way without the express consent of the
manufacturer.
Likewise, it is strictly prohibited to remove, bridge or bypass any safety devices. Operating conditions and
connection and setup values stated in the data sheet must be complied with at all times.
Operation of the system is permitted only with original parts and accessories by the manufacturer. Use of
third-party parts affects machine safety.
3.1.5 Operating modes
Normal operation
For normal operation the following conditions must be met:
•
Intended use of the machine (see chapter "Intended use").
•
Operation of the machine only by trained personnel.
•
Full functional and mounted safety devices.
•
Machine must be in technically flawless condition.
•
Processing of permissible materials according to the material list.
•
Maintenance and service are not included.
Notice
During normal operation it is not necessary to wear safety glasses.
Service operation
Service activities may be carried out only by authorized, trained service technicians. If side panels as well as
covers get removed and safety devices get bypassed, it can lead to direct and indirect scattered radiation.
The service operation is therefore declared as laser class 4 (US: class IV) and proper precautions need to be
taken (see "Laser classification").
3.1.6 Applicable safety regulations
The following directives and guidelines must be observed to avoid hazards when operating Trotec laser
systems:
Guidelines/Regulations
2006/42/EC EC Machinery Directive
2014/30/EU EMC Guideline
18 ENGLISH (Translation)
Page 19

Safety
Applied harmonized standards
EN ISO 12100:2011-03 Safety of machinery - General principles for design - Risk assessment and
risk reduction.
IEC 60825-1:2014,
EN 60825-4:2011
IEC 60204-1:2005 Safety of machinery - Electrical equipment of machines - Part 1: General
ISO/DIS 11553-1:2009-03 Safety of machinery - Laser processing machines - Part 1: General safety
IEC 61000-6-4:2007-02 Electromagnetic compatibility (EMC) - Part 6-4: Generic standards -
ISO 13857:2008 Safety of machinery - Safety distances to prevent hazard zones being
EN 55011+A1:2016-05 Industrial, scientific and medical equipment - Radio-frequency disturbance
Safety of laser products - Part 1: Equipment classification and requirements.
requirements.
requirements.
Emission standard for industrial environments.
reached by upper and lower limps.
characteristics - Limits and methods of measurement.
Notice
Safety norms and regulations.
The general guidelines and directives listed within this manual may differ according to locality,
region or country.
Therefore, always observe the directives as well as the regulations of the institutions for
statutory accident insurance association applicable to you. The operator is responsible for
fulfilling all safety requirements, as Trotec Laser GmbH has no influence on the proper use of
the machine.
Observe the official regulations for your business location in accordance with the applicable
local legal regulations (on accident prevention regulations or employee protection), e.g. DGUV
regulation 11 for Germany.
ENGLISH (Translation) 19
Page 20

Safety
3.2 Laser safety
3.2.1 Laser classification
The laser safety class indicates the risk potential based on the level of accessible laser radiation.
The ProMarker is a laser class 4 product and complies to the latest safety norms and regulations (IEC
60825-1).
Class 4 (US: class IV)
Class 4 (US: class IV) high powered lasers (visible or invisible) considered to present potential acute hazard
to the eye and skin for both direct and scatter (diffused) conditions.
Also have potential hazard considerations for fire (ignition) and byproduct emissions from target or process
materials. It is the responsibility of the operator of the machine to take appropriate measurements to
eliminate any dangers such as fire or explosions through the laser beam.
Warning Laser
Obligations of the operator for the operation of class 4 lasers (US: class IV):
– Observe official regulations for the business location in accordance with the applicable local
legal regulations (on accident prevention regulations or employee protection), e. g. DGUV
regulation 11 for Germany.
– According to DGUV regulation 11 "Laser radiation", as well as national regulations:
Written appointment of a competent laser safety officer for compliance with the relevant
regulations.
– Mark the danger zone as such by attaching warning lights and warning signs on the outside.
– Protect the danger zone against unauthorized access.
– Wear appropriate laser safety glasses within the danger zone that are matched to the
wavelength and power of the laser.
– Install an additional and well visible warning light to warn the operator of the presence of
laser radiation.
Compliance with the points above does not absolve the operator from meeting the relevant standards and
guidelines for the operation of a Class 4 laser system.
20 ENGLISH (Translation)
Page 21

Safety
Class 1
The accessible laser radiation of Class 1 laser systems does not pose any hazard for the skin or eyes.
In order to operate the Promarker as a Class 1 laser system, the following points must be observed:
Notice
– The entire course of the laser beam should be shielded to prevent radiation.
– Any covers providing access to laser areas which may be removed without using a tool
should be fitted with suitable safety latches.
– Inspection windows in the housing should be fitted with safety glass suitable for the laser
output and the shaft length of the laser (DIN EN 207).
Class 2 (US: class II)
The accessible laser radiation of Class 2 (US: Class II) laser systems does not pose any hazard for the skin.
Diffuse reflections as well as any short-term irradiation of the eyes (exposure time max. 0.25 seconds) also
pose no risk due to the low output power.
However, it is possible to suppress the natural eyelid closure reflex and stare into the class-2 laser beam for
a time long enough for the eyes to get injured.
The ProMarker uses a Class 2 pilot laser. In order to prevent irritation of the eyes during operation, the
operator should not look directly at the laser source. Diffuse reflections of the pilot laser are entirely
harmless.
ENGLISH (Translation) 21
Page 22

Safety
3.3 Areas of responsibility
3.3.1 Responsibilities of the operating company
The operator has the following responsibilities:
•
It is the responsibility of the operator to comply with the national official and statutory regulations for the
operation of a class 4 (US: class IV) laser system or laser system with a build in laser source of class 4
(US: class IV).
•
In addition to the safety notes and instructions stated in this manual, consider and observe the local
accident prevention regulations and general safety regulations that apply at the operation site of the
machine.
•
A CO2 fire extinguisher must always be at hand, as the laser beam can ignite flammable materials.
•
If the machine is used industrially, the operator is subject to the legal obligations concerning industrial
safety.
•
All personnel involved in installation, set-up, operation, maintenance and repair of the machine must
have read and understood this manual and in particular the “Safety” section. The personnel must be
trained and informed about all the functions, potential dangers and safety issues of the machine on a
yearly basis.
•
The user is recommended to prepare company internal instructions considering the occupational
qualifications of the personnel employed in each case, and the receipt of the instruction/this manual or
the participation in the introduction/training should in each case be acknowledged in writing.
•
Keep the manual in the immediate vicinity of the machine so that it is accessible at all times to all
persons working on or with the machine.
•
Authority for the individual activities relating to the application of the machine (e.g. installation, operation,
maintenance and cleaning) must be clearly defined and observed, so that no unclear competencies
result under the aspect of safety. This applies in particular to work to be performed on the electrical
equipment that may only be performed by qualified specialists.
•
Maintenance and repair work as specified in the manual must be carried out regularly.
•
For all activities concerning installation, set-up, start-up, operation, modifications of conditions and
methods of operation, maintenance, inspection and repair, the switch-off procedures that may be
provided in the manual must be observed.
•
Provide appropriate personal protection equipment (e.g. protective goggles according to wavelength and
laser power).
•
The operator is responsible for the safety-related state of the machine.
•
Do not store any flammable materials in the working area or in the immediate vicinity of the device.
Particularly, residues of processed materials have to be removed to prevent any fire hazard.
•
The operator must ensure cleanliness and accessibility at and around the machine by corresponding
instructions and controls.
22 ENGLISH (Translation)
Page 23

3.3.2 Responsibilities of the operating personnel
The operating personnel has the following responsibilities:
•
Always wear personal protective equipment.
•
It is the duty of the operating personnel to check the machine before start of work for externally visible
damage and defects, and to immediately report any changes that appear (including behavior during
operation) that may affect the safety of the machine. It must be made sure that the machine is operated
only in perfect condition.
•
The machine must not be left unattended while it is operating (supervised operation).
•
Switch off the machine described herein at the main switch for periods of non-use.
•
Operate the machine described here only with a lens in place. A missing lens may cause the unfocused
laser beam to be reflected out of the housing.
•
Stop this machine immediately in case of failure.
•
No working methods are permitted that affect the safety of persons or of the machine.
•
Always keep clean the machine and its components such as lens and mirrors.
Safety
Caution
The adjustment of the beam path may only be carried out by service personnel of Trotec Laser
GmbH.
3.4 Requirements for operating an service personnel
The requirements for the operating and service personnel are:
•
The personnel must have read and understood this manual and in particular the "Safety" section.
•
The personnel must not be under the influence of drugs, alcohol or reactivity affecting medication when
working on or with the machine.
•
The personnel must be familiar with using the CO2 fire extinguisher.
•
The personnel must be trained in order to be qualified to operate the machine. If the personnel lack the
necessary knowledge for working on or with the machine, they must first be trained and note down the
training in the training verification form.
Activity Intended user group Definition
Control/operation/other
activities (e.g. troubleshooting,
maintenance)
Qualified personnel
or Trotec service
technicians
Qualified personnel are those who can
judge the work entrusted to them and detect
potential risks based on their occupational
training, knowledge and experience as
well as their understanding of the relevant
regulations.
ENGLISH (Translation) 23
Page 24

Safety
3.5 Machine identification (warning and safety stickers)
Notice
The warning signs on the device indicate potential hazards and provide information regarding
the laser device performance data.
24 ENGLISH (Translation)
Page 25

Safety
3.6 Secondary (indirect) hazards
3.6.1 Fire hazard
Warning
Fire hazard
Fire hazard from gas and processing of inflammable materials.
– Do not operate the device without supervision.
– Keep CO2 fire extinguisher ready at hand in the immediate vicinity of the device.
If a main laser beam comes into contact with inflammable material, e.g. paper, the latter may ignite, quickly
leading to fire. Therefore, before switching on the laser and after deactivating the Standby-mode you must
make sure that there is no inflammable material in the path of the laser beam.
Furthermore, gases formed beneath the material being processed may ignite, especially if the extraction
requirements are not met.
The risk of flaming is increased in case of insufficient care and cleaning as well.
Additionally, regularly control the air cooling system on your laser. In particular, the filters and ventilators
should be checked regularly for proper function to avoid defects caused by overheating.
3.6.2 Gases, fumes and dust
Depending on the materials being marked and the parameters selected, laser marking may generate gases,
fumes, aerosols or dust. The toxicity of such by-products depends on the material.
The operator is responsible for ensuring a suitable extraction system is in place and for compliance with the
relevant guidelines in order to protect individuals and the environment. Instructions may be found in, among
others, the guidelines of the Association of German Engineers VDI 2262 1...3 "Workplace air; reduction of
exposure to air pollutants".
The operator must also ensure that gases, fumes or dust do not settle on the processing lens. Any dirt
accumulating on the processing lens can lead to a loss of performance, poor marking results and damage to
the device.
ENGLISH (Translation) 25
Page 26

Safety
3.7 In case of emergency
In case of malfunction
•
In case of unusual operating states, open the acrylic top lid to stop working process or respectively press
the Emergency stop button, if available and switch off the laser device.
•
When appropriate disconnect the machine from the mains.
•
Inform laser safety officer and supervisor.
•
Follow the Operating manual.
•
Have repair work performed by Trotec Laser GmbH service technicians only.
•
In case of fire: Use only CO2 fire extinguisher to quench the fire, insofar as this is possible without
endangering yourself.
Notice
After a deletion, Trotec Technical Support must be involved before the system is put back into
operation.
In case of accident, First Aid
•
If due to laser irradiation eye injury has occurred (upon exceedance of the maximum allowable irradiation
rate), the accident victim must immediately be presented to an ophthalmologist.
•
Assumption of eye injury is justified whenever laser irradiation has occurred and the maximum allowable
irradiation rate may have been exceeded.
•
First aider must pay attention to self-protection.
•
Power off the device.
•
Remove injured person from the danger zone and provide First Aid.
•
Call emergency doctor!
26 ENGLISH (Translation)
Page 27

Technical Data
4 Technical Data
The technical data sheet can be found in the appendix of this manual.
4.1 General description
All electronic components are integrated in the machine. All necessary connectors are located on the reverse
side of the laser rack.
ENGLISH (Translation) 27
Page 28

Technical Data
4.2 Laser rack dimensions
28 ENGLISH (Translation)
Page 29

4.3 Marking head dimensions
Technical Data
ENGLISH (Translation) 29
Page 30

Before commissioning
5 Before commissioning
•
Read the operating manual and ensure it is accessible at all times.
•
The ambient temperature must be between +15 °C and +25 °C (59 °F and 77 °F) and not exceed the
relative humidity of 45-65% (non-condensing). Non-observation leads to damage.
•
A laser system consists of high quality electrical and optical components. Mechanical stresses, vibrations
and impacts must always be avoided.
•
If the system has been subject to significant temperature variations, it must be brought back to room
temperature before being commissioned.
•
Sufficient air must be supplied to the 19 inch module of ventilated systems. The accumulation of heat due
to covered ventilation slots or filter pads can damage the system.
•
Assemble the device at the point of installation according to the instructions.
•
The operating personnel must read and understand the operating manual, in particular the chapter
on “Safety notes”. It is recommended that the operator compiles with inhouse instructions regarding
safety and operation and that the receipt of these instructions/operating manual and the participation in
briefings/training courses is confirmed in writing.
•
Laser marking may generate gases, fumes and other reaction products on the surface of the material.
The operator must therefore use an effective extraction system.
5.1 Unloading, inspection and reporting faults
In the event of transportation damage or incomplete delivery:
•
Record all details in writing immediately.
•
Note all claims on the transportation documents.
•
Photograph any damage.
•
Send report to Trotec Laser GmbH.
After unloading:
•
Inspect the machine and machine components for transportation damage.
•
Check the delivery for completeness.
•
Remove all transport packaging.
30 ENGLISH (Translation)
Page 31

Before commissioning
Warning
On delivery the marking head is firmly attached to the laser rack using the fiber optic cable. The
fiber optic cable is enclosed with the jumper cables in a black protective tube for protection.
Avoid any unnecessary stretching or bending of the fiber optic cable. This could damage the
fiber optic cable.
– The lens unit should only be uncovered following installation.
– The lenses are high quality optical components which must be kept clean in order to ensure
optimum marking results.
– Never touch the lenses with bare fingers!
ENGLISH (Translation) 31
Page 32

Transport and Storage
6 Transport and Storage
6.1 Transport conditions
•
When transporting outside, always transport in a covered vehicle or one with sufficient weather-proofing.
•
Protect the machine against transportation damage using straps and inserts, and leave sufficient
distance between other transported items.
•
Ambient temperature for transportation:
minimum temperature 10°C
maximum temperature 40°C
•
Handle the machine and machine components with care.
•
Do not place any heavy loads on the machine or machine components.
•
Avoid heavy impacts.
•
Take particular care when transporting electronic components.
Transport conditions
Transport temperature (ambiente temperature): -10 °C to +40 °C (14 °F to 104 °F)
Relative humidity: Maximum 70%, non-condensing
•
Avoid high temperature fluctuations.
6.2 Storage conditions
•
Store the machine and machine components in a dry location.
•
Protect the machine and machine components against scratches.
•
Take particular care when packing away electronic components.
•
When storing for a long period, preserve bare metal parts (e.g. apply oil).
Storage conditions
Storage temperature (ambiente temperature): 0 °C to +30 °C (32 °F to 86 °F)
Relative humidity: Maximum 60%, non-condensing
•
Avoid high temperature fluctuations.
32 ENGLISH (Translation)
Page 33

Transport and Storage
6.3 Place of storage
Storage room or boxed with sufficient weatherproofing. The storage location must be free from corrosive
elements, fumes and flammable materials.
6.4 Transport inspection and reporting of defects
•
Immediately after receipt inspect the delivery to ensure that it is complete and has not suffered any
damage.
•
If any transport damage is visible, do not accept the delivery, or accept it only with reservation.
•
Record the scope of the damage on the transport documents or delivery note.
•
For all defects that are not discovered upon delivery, be sure to report them as soon as they are
detected, since damage claims must be filed within a certain period, as mandated by law.
ENGLISH (Translation) 33
Page 34

Setup and installation
7 Setup and installation
7.1 For your safety
Notice
The setup has to be carried out by Technical Support.
7.2 Temperature and humidity
Ambiente conditions
Operating temperature (ambiente temperature): +15 °C to +25 °C (59 °F to 77 °F)
Relative humidity: 45% to 65%, non-condensing
•
If the system has been exposed to large temperature fluctuations, it must first be brought back to room
temperature before commissioning.
Environmental conditions
•
Provide sufficient illumination at the workplace.
•
Ensure a dust-free environment (II° according to IEC60947-1).
•
Shielding from EMC.
•
Freedom of interfering electrical installations, hoses and pipe lines.
•
Power supply free of fluctuations.
7.3 Installation location
Installation location
The installation location must:
•
Have a stable power supply.
•
Be vibration free.
•
Have sufficient air supply for the laser rack and PC.
34 ENGLISH (Translation)
Page 35

Setup and installation
7.4 Mechanical installation
7.4.1 Installation of the marking head
The correct, stable and reproducible alignment of the working head in relation to the workpiece to be
marked is a prerequisite for faultless marking results. The marking head should therefore be installed with
appropriate care.
Mounting
The working head may be mounted either from the top using the supplied feet or from below using the hole
pattern on the base plate. The feet may be assembled in various positions on the working head base plate.
The feet may be disassembled if they are not required and the working head should be secured tightly. Also
the support bracket should not be subject to any vibrations during operation. In order to avoid damaging the
lens, keep the protective cap on the lens during installation.
The following diagram illustrates the hole pattern for the feet. The working head is secured using the two
mounting feet through holes 6.6 mm in diameter (designed for M6 screws).
The following diagram illustrates the working head hole pattern when used for direct installation without the
feet.
ENGLISH (Translation) 35
Page 36

Setup and installation
Alignment
The focal plane lies parallel to the working head base plate. When installing the marking head it is therefore
important to ensure that the marking head base plate is aligned as parallel as possible to the intended
processing plane. Otherwise uneven results will be produced on the marking field as a result of the changing
focal position. In order to adjust the focal position, the distance between the object to be marked and the
working head may be altered. Clearance holes 6 mm in diameter are located adjacent to the M6 threaded
holes in the working head base place in order to aid the precise alignment of the working head.
Motorized Z-axis
For mounting the marking head on the motorized Z-axis you have to remove the two mounting feet and fix it
on the axis plate.
Fiber Optic Cable
The working head is connected to the actual laser source in the laser rack via an approx. 2.1 m long fiber
optic cable. The fiber optic cable is enclosed with the jumper cables in a black protective tube for protection.
In order not to damage the filaments, do not bend the cable by a radius of more than 66 mm. The tube
should also not be subject to any mechanical stresses.
Caution
If necessary, the cable and the fiber optic cable may be disconnected from the marking head.
As this will expose sensitive optical surfaces, this may only be performed by trained service
personnel.
36 ENGLISH (Translation)
Page 37

Setup and installation
Laser rack and PC
The laser rack and the PC should be located next to or directly above one another if possible in order for the
modules to be connected to one another with the cables provided.
When installing in a control cabinet or rack, ensure there is sufficient ventilation. Both the laser rack and the
PC require a sufficient supply of air. The air should be sucked in from the front and blown out at the rear.
When installing the laser rack, also ensure the minimum radius of curvature of the fiber optic cable (black
tube) is not exceeded on the rear side.
Galvanometer scanner controller card
The enclosed galvanometer scanner controller card needs to be installed in a computer. The installation
guide is enclosed in the accessory.
Software installation
The software will be installed by starting the SETUP.exe from the software-CD. Please follow the steps on
the screen. The correct configurations files must be installed after the software setup is finished.
The installation guide is enclosed in the accessory.
7.5 Electrical installation
Following the mechanical installation of the marking head, laser rack and PC, the components must be
connected to one another electrically. (The laser rack and marking head are already connected to one
another on delivery.) The peripherals (power supply, external control and safety signals, etc.) are then
connected via the laser rack and PC interfaces.
All connectors are clearly identified in order to facilitate the electrical installation. The connector marked X43
belongs to the socket with the same denotation.
The connector denotations are also coded. The last digit of the connector denotation identifies the respective
hardware components.
Therefore:
X ... 1 Laser rack
X ... 2 Marking head
X ... 3 PC interfaces
ENGLISH (Translation) 37
Page 38

Setup and installation
7.5.1 Overview marking head interface (back side)
Notice
The cables are already connected to the marking head on delivery.
Caution
The fiber cable should only be disconnected from the marking head by trained service
personnel.
Before working on the system, remove the power plug!
38 ENGLISH (Translation)
Page 39

7.5.2 Overview PC interface (back side)
Setup and installation
Connectors X93 and X103 are joined directly via a short cable.
Connector X53 is joined to X51 on the laser rack by using another cable.
Connector X83 is joined through the black tube to X82 on the marking head.
7.5.3 Mains connection
Laser rack and PC have a cold device socket on the rear for the cold device cables supplied.
Before commissioning, it is essential to check whether the laser rack is configured to the mains voltage and
frequency.
The configuration of the laser rack is given on the type plate or on the warning label above the IEC
connector.
Warning Current
The laser rack is fitted with different main fuses depending on the configured supply voltage:
115V AC - 1 x 6.3 A "T" speed/time-delay
230V AC - 2 x 4 A "T" speed/time-delay
The main fuses are located behind the cover, immediately adjacent to the IEC connector.
The same main fuse is used on the PC for all mains voltages.
ENGLISH (Translation) 39
Page 40

Setup and installation
7.5.4 Overview laser rack interface (back side)
Notice
Before the laser marker can be put into operation, the external safety circuits and the external
start and stop signals must be connected.
Caution
When making these connections, the operator must ensure that all safety circuits comply with
the respective valid national standards and guidelines for the use of laser devices. Otherwise
the device may cause personal injury or material damage.
The following connectors are available on the laser rack:
X11 – Safety circuit (Emergency stop button / interlock safety switch / external messages)
The X11 connector enables the connection of external safety circuits, additional emergency stop circuits and
external warning lamps.
Warning
The digital 24V inputs should only be controlled by isolated contacts with the 24V pin 13 on X11.
The input of signals with any other reference potential could result in damage to the respective
inputs.
X31 – External panel
The connector X31 may be used to connect an external control panel such as that located on the front of the
laser rack.
If no external panel is connected, the supplied connector must be used with the bridging devices.
X51 – On/Off-switch
Laser control. This is connected to X53 on the Galvo controller card. Only use the original cable supplied.
40 ENGLISH (Translation)
Page 41

Setup and installation
X61 – Exhaust system
This connector is used to control, start and stop a Trotec extraction unit. Only use the original cable supplied.
X71 – Start / Stop
The X71 connector may be used to send start and stop signals via an external controller or receive a signal
from the laser. The pin configuration is provided in "Interface Pin Configurations"
"Busy" is a laser output which can be set as required using a script.
"Stop" is an external input used to interrupt all running laser programs immediately. It is not necessary to
monitor these inputs in a script.
"Start" is an external input which may be monitored in the software in order to trigger a marking process.
If the monitoring of the signal is not active within a script, the input will have no effect on the program
sequence.
For the "Start" and “Stop” Signal external 24VDC are needed.
Notice
If no external emergency stop circuit is connected, the supplied connector must be used with
the bridging devices. In this case, only the emergency stop button on the front of the laser rack
is active. The precise pin configuration of the plug is provided in "Interface Pin Configurations".
Warning
The maximum load of each of the digital 24V outputs on the interface is 100mA. A short circuit
of the outputs must be avoided as it will damage the respective inputs.
ENGLISH (Translation) 41
Page 42

Setup and installation
7.5.5 Interface pin configuration
X11 – Safety circuit (Emergency stop button / interlock safety switch / external messages)
X31 - External panel
42 ENGLISH (Translation)
Page 43

X71 – Start / Stopp
Setup and installation
ENGLISH (Translation) 43
Page 44

Operation
8 Operation
8.1 Installation inspection
In order to ensure the unit is installed correctly, the following points should be checked:
•
Ensure the power supply corresponds to the correct connection values and suitable fuses have been
used.
•
Has the mechanical and electrical installation been performed correctly and completely?
•
Check the mechanical and electrical installation for completeness and the correct input voltages.
•
Ensure that the optical components are free from dust and dirt.
•
Have the protective covers been removed from the focusing objective lens?
•
Check the environmental conditions against the technical specification.
•
Are you familiar with the laser safety regulations?
•
Have all laser safety measured been fulfilled?
The system may then only be switched on once all provisions for complying with laser safety have been
checked by an authorized individual and confirmed to have met the standards.
8.2 Marking software
The marking software is included on the accompanying software CD.
For information on using the software, please read the accompanying software manual.
44 ENGLISH (Translation)
Page 45

8.3 Control panel
Operation
Number Description Types
❶ Main switch switch
❷ System ready control lamp
❸ Shutter control lamp
❹ Laser busy control lamp
❺ Emergency stop button switch
❻ Error reset button
❼ Key switch switch
ENGLISH (Translation) 45
Page 46

Operation
8.4 Power On/Off
1. Press the master switch ❶ on the laser rack.
2. The switch is illuminated in green and the two status lamps on the marking head also illuminate in green
(shutter closed).
3. Put the key in the key switch ❼ (vertically) and turn 90° to the right.
4. Press the ❻ "Error reset" button to reset the system to its normal state.
5. System ready ❷, Shutter ❸ and the two status lamps (red) on the marking head should now be
illuminated. The laser is now ready to start marking.
6. Start the PC. (The mains switch is located on the front behind the right hand cover. When operating the
system for the first time it may be necessary to check the master switch on the reverse side of the PC. In
its normal state this can remain in the “On” position.)
7. Now start the marking software on the PC.
If an error occurs, the ❻ "Error Reset" button illuminates. Pressing this button acknowledges the error and
the system is then ready to continue operating.
We recommending using only the key switch ❼ to pause the laser. To completely turn off the laser, the main
switch ❶ must be set to O.
46 ENGLISH (Translation)
Page 47

Operation
8.5 Emission indicator
The laser system is fitted with an emission indicator. If the system is switched on or the safety lock is open,
there is usually a possibility that laser radiation will be emitted. This is signalled by a separate indicator and/
or an illuminated "Shutter" switch.
The emission lamps or illuminated shutter switch ❸ signal that:
Emission indicator off – device without power.
Emission indicator yellow – shutter closed, no laser output.
Emission indicator red – shutter open, discharge of laser output possible.
ENGLISH (Translation) 47
Page 48

Operation
8.6 Focusing
Notice
It is absolutely essential to maintain the correct focal distance for every laser marking process.
Only when in focus will the laser beam achieve the power density necessary for permanent and
clearly legible marking.
Prior to any marking it is therefore necessary to set the correct focal distance between the marking head
and the workpiece. An incorrect focal distance is the most common cause of poor or even indistinguishable
markings.
The focal distance (A) is measured between the lower edge of the working galvo head (B) and the upper
surface of the workpiece (C). The correct focal distance depends on the lens used (focal length).
Focal length Working distance (A)
F=100 134,6 mm
F=160 211,6 mm
F=254 361,6 mm
48 ENGLISH (Translation)
Page 49

Ingetration / Connection
9 Ingetration / Connection
9.1 Switching sequences
Switching sequence diagrams are provided for various standard processes which indicate the interplay of the
individual signals.
ENGLISH (Translation) 49
Page 50

Ingetration / Connection
50 ENGLISH (Translation)
Page 51

Maintenance
10 Maintenance
10.1 Safety notes
Caution
Before any maintenance work takes place, ensure that the power supply has been switched off
and the system is de-energised.
Notice
All maintenance work must be carried out according to the safety regulations.
In order to ensure the maximum availability and lifetime of the system, we recommend you regularly check
the filter system and ventilation and keep the surrounding area clean. Before switching on the system, make
a visual inspection of the lenses.
10.2 Changing of the laser source filter mat
This laser system is fitted with a ventilation system. A filter pad is used to protect the electronic components
from dust and dirt in the ambient air. This filter pad should be checked and replaced at regular intervals in
order to ensure optimum cooling.
The filter pad is located behind the ventilation slots on the front of the laser rack.
Laser rack filter pad:
ENGLISH (Translation) 51
Page 52

Maintenance
10.3 Cleaning the optics
This system is fitted with high quality optical components, which under normal operating conditions are
maintenance free for their lifetime. However, it may be necessary to clean output lenses, e.g. the scanner flat
field lens (f-theta objective) if it becomes covered in dust or fumes.
Notice
Never touch the optical components with your fingers! Oily or dirty hands may damage the lens
surfaces.
Do not use any tools or hard objects to clean the surfaces. Scratches cannot be repaired.
Laser optics are highly sensitive and their surfaces are not as hard as traditional glass. They
can also be easily damaged by cleaning. It is therefore necessary to ensure that any dirt is
removed using a suitable suction device and that the surrounding area is cleaned regularly.
Small bellows should be used to remove dust.
Notice
Do not use compressed air as it contains small quantities of oil and water.
To remove larger pieces of dirt, only use a lens cleaning cloth with high proof (at least 98%) alcohol.
Notice
Do not dip the cleaning tissue in the cleaning solution. This contaminates the solution and
makes it unusable. Place drops of the solution on the cloth!
Apply the cleaning solution carefully in order to avoid scratching the surface of the lens.
Do not wipe the lens with a dry cloth. Do not touch the reverse side of the cloth. Dirt and sebum
on the fingers can be transferred to the lens by the cloth and cause damage.
Distribute the cleaning fluid carefully using small circular motions. Start at the center of the lens and move
outwards to the edge. Keep moving the cloth until the entire surface is clean.
Do not exert any pressure on the lens.
52 ENGLISH (Translation)
Page 53

Troubleshooting
11 Troubleshooting
This chapter should assist maintenance personnel with the identification and resolution of operational faults
based on error messages and symptoms.
Danger
Maintenance and repair work should only be carried out by Trotec Laser GmbH or one of its
authorized personnel under observation of the safety regulations.
11.1 Error, cause and remedy
Problem Possible cause Remedy
Error message on loading the
program.
Laser will not switch on. Plug or cable installed incorrectly. Check the plug and cable are
Status lamps on marking head
remain green.
No laser beam. Laser not in focus. Check working distance.
Insufficient laser output. Laser not in focus. Check working distance.
Plug or cable installed incorrectly. Check the plug and cable are
installed correctly.
Laser power supply switched off. Turn on main switch.
Software not installed correctly. Re-install software.
Software terminated irregularly. Restart computer.
installed correctly.
Laser power supply switched off. Turn on main switch.
Faulty fuse in laser power supply. Replace fuse.
safety circuit not closed. Check safety circuit If no safety
circuit is connected, use bridging
connector X11.
Shutter closed. Open shutter - if not possible check
safety circuit.
Incorrect laser parameters. Check the parameters in the
program. Use suitable parameters
for the material and application.
Incorrect laser parameters. Check the parameters in the
program. Use suitable parameters
for the material and application.
Missing symbols. Focusing lens dirty. Clean focusing lens.
Surface of the material dirty. Clean material surface.
Other faults. Contact Technical Support.
ENGLISH (Translation) 53
Page 54

Troubleshooting
11.2 Possible error messages
Below is a list of possible errors which may be detected by the system. These will appear in the software as
messages on the display.
The Reset signal (X11) or the reset button on the laser rack are used to acknowledge an error. In order for
the system to be reset, the error or the corresponding input signal must be acknowledged.
Warning
System errors which cannot be reset or which indicate a hardware error should only be resolved
by Trotec Laser GmbH trained service personnel.
Error message Cause
Card off line. Software has lost connection to the TLC2 controller
Scanner not connected. No connection to the galvanometer scanner.
Scanner X error. The X-axis of the galvanometer scanner has
identified an error.
Scanner Y error. The Y-axis of the galvanometer scanner has
identified an error.
Signal cable not connected. No connection to the marking head.
External abort. External abort signal identified on X11.
External stop. External stop signal identified on X11.
Voltage error (15V). +/- 15V power supply not functioning correctly.
Voltage error (24V). 24V power supply not functioning correctly.
Laser power supply error. Faulty laser source power supply.
Shutter error. Shutter has not reached intended position.
Cover connector opened during marking. ICL1 and ICL2 were opened during the marking
process .
External sum alarm. External error signal identified on X11.
System locked by key switch. Key switch on laser rack locked.
Laser temperature. Laser source overheated.
Laser power. 24 V power supply outside the permissible tolerance
zone.
Laser not ready for emission. e.g. key switch not activated.
Laser back reflection. Back reflection of the laser beam.
Laser system error. Laser power supply voltage is too high or too low.
Emergency stop button. Emergency stop button activated.
Error. +/-15V monitoring.
24V laser monitoring.
54 ENGLISH (Translation)
Page 55

Error message Cause
24V monitoring.
Shutter temperature.
Required shutter position.
Troubleshooting
ENGLISH (Translation) 55
Page 56

Contact details
12 Contact details
Technical Support
In case of questions, contact our experienced Technical Support in your local area.
For global service contact numbers and further information please see our website, section "Support":
www.troteclaser.com
When calling, please make sure that the machine is in your immediate vicinity, and that you have the
following information ready (see response form):
At which working process did the problem occur?
What you have done so far to correct the problem.
Serial no (see type plate).
Error code.
Local Offices / Sales
Our store locator and detailed information on our offices in your area can be found on our website in section
"Contact", "Local Office": www.troteclaser.com
Technical Documentation
For feedback or to suggest changes to this manual, contact:
Technical documentation: +43 (0) 7242 239 - 7000
E-Mail: technical.documentation@troteclaser.com
56 ENGLISH (Translation)
Page 57

13 Disassembly
Warning
Danger of injury when disassembling the machine.
There is danger of injury when disassembling the machine.
Always wear suitable protective clothing (e.g. safety goggles, safety shoes, safety gloves).
Warning Current
Electric current.
The machine must be disconnected from the main power supply.
Notice
– Always use suitable tools to disassemble the machine.
– Mind the springs.
– Follow chapter "Disposal".
Disassembly
Process:
1. Remove all workpieces from the system.
2. Turn the key switch to switch off the machine.
3. Switch off the main switch at the back of the machine.
4. Remove the exhaust system.
5. Disconnect all cables at the back of the machine.
ENGLISH (Translation) 57
Page 58

Disposal
14 Disposal
Disposal
Do not dispose of the machine with domestic waste!
Electronic devices have to be disposed of according to the regional directives on electronic and
electric waste disposal.
In case of further questions, please ask your supplier.
Use suitable tools if you have to dissemble the machine. All parts need to be sorted into the
individual material types and be disposed of according to the regional directives on electronic
and electric waste disposal.
58 ENGLISH (Translation)
Page 59

15 Appendix
✓ Technical Data
✓ Conformity Declaration
Acceptance report
Response form
Training verification form
Appendix
ENGLISH (Translation) 59
Page 60

www.troteclaser.com
ProMarker OEM
Technical Datasheet
1
High-Speed Laser Marking
as Easy as Printing
OEM fiber laser head for easy integration
Laser
Laser
Ytterbium pulsed fiber lasers, maintenance free
Wavelength
1064 nm ± 8
Pulse duration
100 ns ± 20
Beam quality
M² < 2
Power stability
better ± 5%
Cooling
air cooled
Laser type
FL 10
FL 20
Max. average output power
10 W
20 W
Max. pulse energy
1 mJ
1 mJ
Pulse repetition rate
2-200 kHz
2-200 kHz
Integrated pilot laser
Galvo-System
Standard:
F-160
Lens / Focal length
F-100
F-254
Marking area (mm x mm)
70 x 70
110 x 110
180 x 180
Focal diameter
~ 27 µm
~ 45 µm
~ 68 µm
Max. marking speed
800 cps – 1 mm single line with F = 160 mm
Max. positioning speed
12.000 mm/s with F = 160 mm
Page 61

www.troteclaser.com
ProMarker OEM
Technical Datasheet
2
Control
Computer requirements
Windows XP (SP2) or Windows 7 (32 bit)
CD Drive, 256 MB RAM, > 200 MB space on HD, 1 GHz Processor, 1
free PCI Slot + 2 empty slot covers in casing
1 serial interface (RS232)
Control electronics
TLC2-PCI board
Interfaces laser
Laser-interlock, marking-start (24 VDC), marking-stop (24 VDC),
Software
DirectMark
Options / Accessories
PC
Interfaces PC
DELL OptiPlex 7020 MT (Standard Base MT)
Intel Core i3-4150 (Dual Core, 3.5 GHz, 3 MB)
4GB (1X4GB) 1600 MHz DDR3 Non-ECC 2 SR
250GB SATA, DVD ROM, Windows® 7 (32bit)
USB, Ethernet, Trigger-Input
Optional lenses
F-100, F-160, F-254
Focus finder
Second pilot laser for precise and user friendly adjustment of
working distance
Z-post or motorized Z-axis
Accessories (included in delivery):
Laser safety glasses
Retrofit ProMarker 300
ProMarker 300 housing with manual or software controlled zaxis --> laser class 2 system
Additional optional accessories
Rotary unit with different chucks
Foot switch for efficient and user friendly control of the system
Exhaust systems
Laser safety glasses
Page 62

www.troteclaser.com
ProMarker OEM
Technical Datasheet
3
Dimensions / Installation / Laser Safety
Dimensions (W x H x D)
Marking head: 120 x 138 x 528 mm³
Laser rack unit: 483 x 140 x 686 mm³
(equals 3RU, 19" compatible)
Fiber cable
Overall length: 3 m
Available length: ~ 2,5 m
Minimum bending radius: 80 mm
Weight
Marking head: app. 8 kg
Laser rack: app. 17 kg
Ambient conditions
Operating temperature range +5 to +35° C.
Relative humidity max. 90 %.
Non-condensing
Electrical Requirements
115 - 230 VAC, 50/60 Hz, 1/N/PE
Power Consumption
< 600 W (incl. PC)
System Protection
Marking head: sealed against spray water (IP 54)
Laser rack unit: dust protected (IP20)
Laser class
CDRH laser safety
Laser class 4
CE tested
Photo 1: ProMarker marking head and laser rack unit
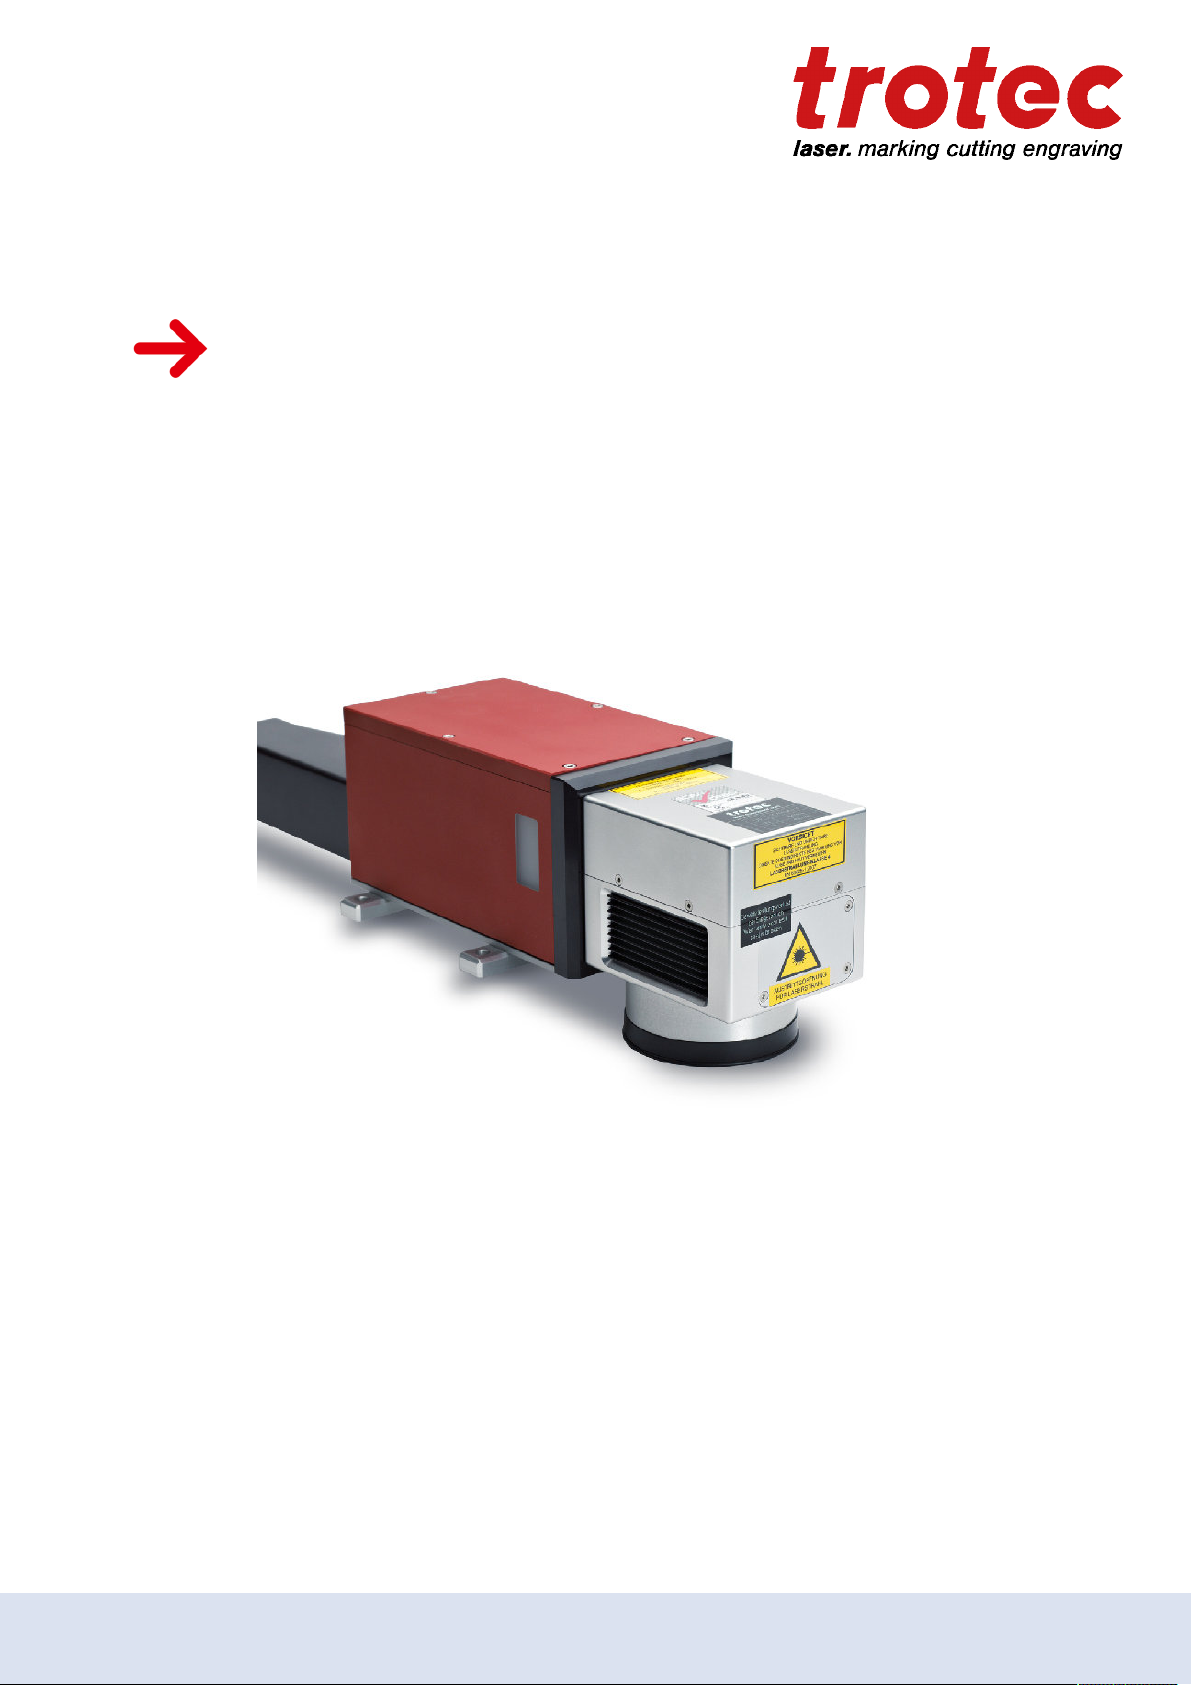
Page 63

www.troteclaser.com
ProMarker OEM
Technical Datasheet
4
Figure 1: Laser rack
Laser rack: 482,6 x 140 x 686 mm³ (W x H x D)
(equals 3RU, 19" compatible)
Figure 2: Marking head
483 mm
120 mm
528 mm plus. 130mm bending radius for fiber
138 mm*
* with F = 160 mm
Page 64

www.troteclaser.com
ProMarker OEM
Technical Datasheet
5
Working distances for ProMarker
The working distance is measured between the lower edge of the marking head and the work piece as shown in
Figure 3.
Because the actual values for two lenses of the same focal length may vary slightly, it is recommended to check
the working distance after the lens has been changed. To do so, continuously mark a circle and adjust the working distance for optimum results.
Figure 3: Working distances
Lens
Working distance D
( +/- 0,2 mm)
Marking field
F-100
134,6 mm
70 x 70 mm²
F-160
211,6 mm
110 x 110 mm²
F-254
361,6 mm
180 x 180 mm²
Content subject to change without prior notice
Updated: December 2016
D
17,6 mm
Page 65

EC–Declaration of Conformity
(Machine directive 2006/42/EG, appendix II A)
Manufacturer:
TROTEC Laser GmbH
Linzer Straße 156,
A-4600 Wels
Authorized person for the compilation of technical documentation:
Gerhard KREMPL, TROTEC Laser GmbH, Linzer Straße 156, A-4600 Wels
We hereby certify that
ProMarker FL
Modell N° 8021 ProMarker FL 10/20
in its conception, construction and form put by us into circulation is in accordance with all the relevant
essential health and safety requirements of the EC machinery directive 2006/42/EEC.
Further valid guidelines/regulations for the product:
2014/35/EG Low Voltage Directive
2014/30/EG EMC Guideline
Applied harmonized standards:
- EN ISO12100:2011-03 Machine Safety
- EN ISO11553-1:2016 Safety of machinery – Laser processing machines
- EN 60204-1:2011-01 Machine Safety – electr. Equipment
- EN 60825-1:2015-07, EN 60825-4:2011-12 Safety of Laser Equipment
- EN 61000-6-4:2011-09 Electromagnetic Compatibility
Place, Date:
Wels, 7/15/2016
Personal data of the signer:
Georg ERNST, Head of Research and Development
Signature:
 Loading...