

Page 1
Trotec PAC FT 2600 Portable air conditioner
The PAC FT 2600 portable room air conditioner comes with an infrared remote control and an air outlet
hose with a flat nozzle.The unit’s primary function is to air condition rooms. It also filters and
dehumidifies the air, thus creating a comfortable climate in the room.
Safety Instructions
Please make sure that you follow the below safety instructions:
• The unit is not suitable for outdoor operation
• Do not set up or operate the unit in rooms susceptible to explosions
• Ensure that the unit is set up at a safe distance from flammable materials
• Do not set up or operate the unit if the atmosphere is contaminated by oil, sulphur or salt
• Do not set the unit near curtains, drapes or blinds. Minimum distance of 50cm
• Ensure that the air conditioners intake and outlet openings are always clear of foreign objects
• Ensure that the air conditioner is securely placed on a level surface
• The unit may only be operated in an upright position
• Do not insert foreign objects into the air intake or outlet openings
• Do not place any heavy or warm objects on top of the unit
• Do not expose the unit to direct streams of water
• Operate the unit only within its permissible operating ranges. Pay attention to the surrounding temperatures
• This unit may only be connected to a correctly installed, grounded and fused plug socket. 230V / 50Hz, fuse 10A
• When unplugging the unit, do not pull the power cord too forcefully or bend it too much. This may result in damage to
the cable
• Do not move the unit while in operation. Wait at least 5 minutes before starting the unit after it has been moved. This
protects the unit from damage
• Switch the unit off by pressing the power button. Do not switch the unit off by unplugging the power cord
• Do not transport the unit during operation
• Do not place the unit on its side
• Protect all electrical cables from being damaged
• Make sure that all extension cables are suitable in terms of capacity, length and intended use
• Do not lay any lines underneath the carpet
• Never operate the unit without its air filters
• Never aim the air current directly at people
• Never open the unit housing. This may cause an electric shock
• Work on the cooling system and on the electrical equipment may only be performed by an authorised service centre
Operation/handling which does not comply with these instructions are prohibited
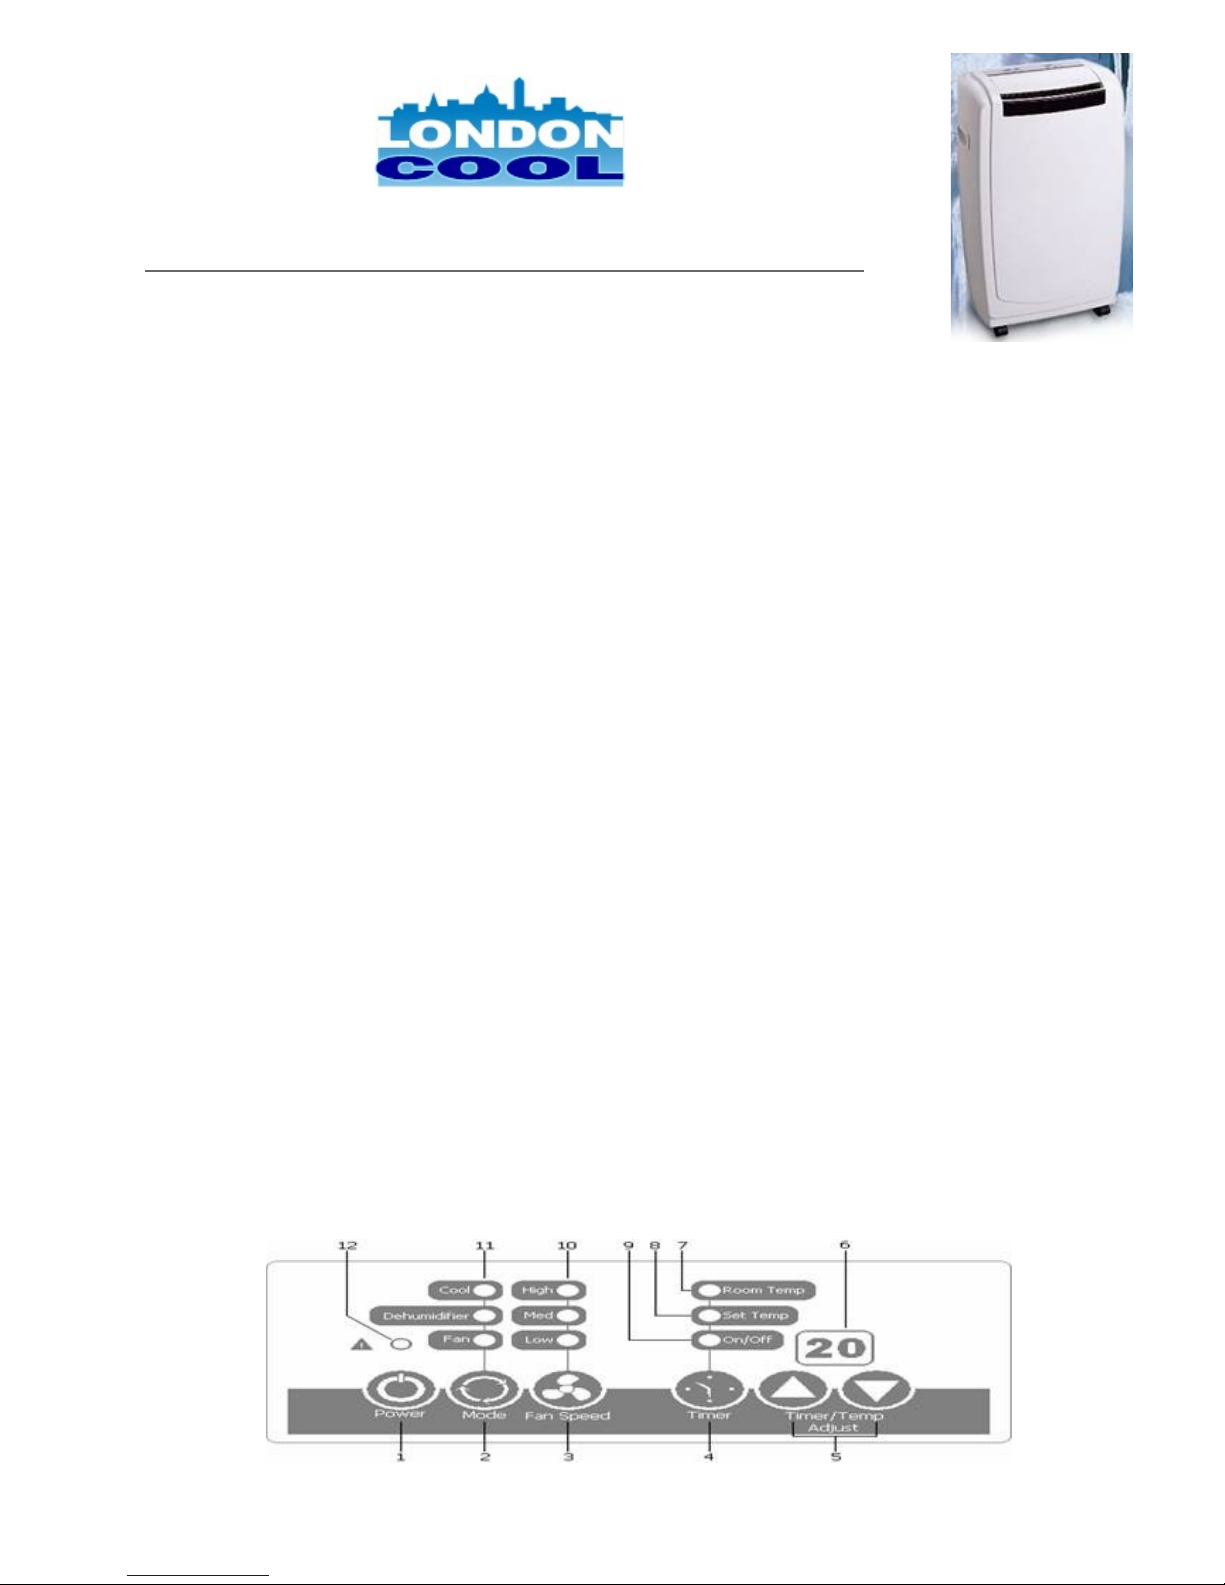
Control Panel
1. Power – Use this button to switch the unit on and off
2. Mode – This button is used to select the desired operating mode. There are three operating modes available which are:
Page 2

• Cooling mode – The unit cools the room to the set temperature, which can be set between 16°C and 32°C.
The fan speed can be freely selected
3. Dehumidification mode – The unit dehumidifies the room. The temperature can be set between 16°C and 32°C. The
fan speed is preset to med and can not be changed
4. Ventilation mode – The unit is being used to circulate the air with no cooling effect. The temperature can not be set,
but the fan speed can be freely selected
5. Fan Speed – This can be used to select the fan speed in the cooling and ventilating operating modes. The fan speeds
are high, med, and low
6. Timer – This is used to allow you to set the timer so the unit can be automatically switched on or off
7. Timer / Temp Adjust – These are used to select the desired temperature in the cooling and dehumidifying operating
modes. The display will now show the target temperature and can be changed accordingly. The target temperature can
be set between 16°C and 32°C on 1°C increments by pressing either the up or down button
Left button – Higher target temperature
Right button – Lower target temperature
In addition to this the up and down button is also used to set the timer period for switching the unit on and off
automatically.
Left button – Longer timer period
Right button – Shorter timer period
8. Display – The room temperature that is measured by the internal sensor of the unit is shown in the display. If one of
the up or down buttons is pressed the display switches to show the target temperature. If the timer button is pressed
the display will then switch and show the remaining number of hours that are left until the unit will be switched on or
off. With no buttons pressed the display will switch back to show the room temperature after 15 seconds
9. Room Temp Signal Light – This light will illuminate to show that the measured room temperature is being shown in
the display
10. Set Temp Signal Light – This light will illuminate to show the target temperature is being shown in the display
11. On/Off Signal Light – This light will illuminate to show whether or not a timer has been activated. It will blink if it is
possible for you to change the timer accordingly
12. Fan Speed Display – The light will illuminate to show which fan speed setting the unit is running at
13. Operating Mode Display – The light will illuminate next to the operating mode that you have the unit set on
14. Tank Fill Display – This light indicates that the floating switch of the internal tank has switched off the units operation.
The internal tank does not become full during normal operation because the exhaust fan transports the accumulated and
evaporated condensation to the outside via the exhaust hose. Follow the below instructions to re-start the unit
• Switch the unit off by pressing the on / off button and unplug the unit from the power supply
• Place a suitable container under the condensation drain of the internal unit. The condensation drain is located at the
bottom left at the back of the unit
• Pull the plug from the condensation drain and collect the water that drains out
• Replace the plug
Keep in mind that is there is no plug or it is inserted incorrectly, water may leak out after the unit has resumed
operation
Operation
Please note that the unit operates most efficiently and most comfortably when put into operation before the hottest part of the
day, e.g. the morning.
The selected target temperature should be 4°C - 7°C below the outside temperature. It should never be lower because the room
temperature would feel too cold when coming from non-air-conditioned room and people may catch cold.
The selected target temperature does not affect the performance of the unit. This means that when temperatures in the room are
high, it is not practical to adjust the unit to the lowest possible target temperature.
Prior to Initial Operation
The unit should be set up in the desired location, with the air outlet side facing the room. Follow the below safety instructions
when setting up the unit.
There must be a minimum of 20cm between the back of the unit and the wall
• After transporting the unit, place it on its wheels and let the unit stand for at least 5 minutes before switching it on
• Place the device securely on a level and firm service. An uneven surface can cause vibrations and disruptive noise’s
• Before plugging in the power cord, make sure that the required current is available. 230v / 1~, N, PE / 50Hz / 10A
• If extension cords are necessary, make absolutely sure that they are sufficient thickness
• All extension of the power cords must be sufficiently think and may only be used if they are completely extended or
rolled up
• Make sure that there is a plug for the condensation drain and that it has been properly placed. It is possible that water
will leak out after the unit becomes operational
• Never operate the unit without the air intake filter. Without and air intake filter, that plate fins of the evaporators
become dirty and performance of the unit suffers
• The maximum unit performance of the unit is achieved by opening the air flap completely
• Make sure that sensitive objects, such as plants in the room, are not directly in the path of the expelled air
Page 3

Recommendations for optimum unit operation
1. In case of direct sunlight, make sure to close all curtains and blinds
2. Keep doors and windows closed during operation
Expelling warm air
During cooling mode, the unit generates warm air. This air must be expelled from the room being cooled to retain the cooling
effect. It is therefore necessary to insert the supplied exhaust hose into the air outlet opening at the back of the unit.
• Make sure that the deflector piece from the top slides down into the notches on the side until it clicks into place
• To ensure that the unit operates effectively, do not place the flexible exhaust hose supplied at sharp angles and make
sure there are no kinks
• You may not extend the exhaust hose
• The air expelled from the hose contains a certain amount of moisture. We therefore recommend expelling the air to the
surroundings or the outside
Initial Operation
Prior to initial operation, the air intake and outlet openings must be inspected for foreign bodies and the air intake filter for dirt.
Blocked or dirty grilles and filters must be cleaned immediately.
Cooling operating mode
1. Switch the unit on with the power button
2. Select the cool operating mode and the cool signal light will illuminate
3. Set the desired target temperature with the timer/temp adjust button. (The room temp signal light will disappear, the
set temp light illuminates and the selected target temperature appears on the display)
4. Select the desired fan speed
Dehumidifying operating mode
The dehumidifying operating mode is very different from the cooling operating mode with respect to the drainage of condensation
Important information on condensation drainage
• Set up the unit in the room to be dehumidified and do not guide the exhaust hose to the outside. The warm air remains
in the room, thus improving the dehumidifying performance of the unit
• The exhaust fan may not expel the accumulated condensation again via the exhaust hose to the air in the room in
dehumidification mode. To prevent this from occurring, the internal tank must be emptied on a regular basis
1. Switch the unit on using the power button
2. Select the dehumidifier operating mode and the dehumidification light will illuminate
3. Set the lowest target temperature of 16°C with the timer/temp adjust button. (The med fan speed is preset and cannot
be changed)
4. Pull the plug from the condensation drain, collect the water and guide it via a hose to a drain at a lower level
5. Make sure that if there is an external container, it does not overflow. (This can result in water damage)
6. After the dehumidifier operation is complete, reinsert the plug of the condensation drain. (Keep in mind that if there is
no plug or it is inserted incorrectly, water may leak out)
Fan operating mode (Circulation)
1. Switch the unit on using the power button
2. Select the fan operating mode and the fan light will illuminate
3. Select the desired fan speed using the fan speed button
Timer operation
The timer can be preset to switch on or switch off the unit for a maximum of 12 hours. Each time one of the timer/temp adjust
buttons is pressed, the number of remaining hours is increased or decreased by an hour. The number of hours is shown on the
display.
How to set the unit to switch off automatically
1. While the unit is on press the timer button. The room temp button disappears and the on/off buttons will start blinking
2. Set the desired amount of time until the unit is switched off with the timer/temp adjust buttons
3. Keep in mind that after setting has been made, the room temp lights up again and the display will switch to show the
room temperature
After the set amount of time has elapsed, the unit switches off automatically. Whether or not the timer is activated is indicated
by the on/off display.
Page 4

How to set the unit to switch on automatically
KEEP IN MIND: The unit will switch on with the most recently made settings. If you want different setting, you must switch the
unit on, make the changes and then switch the unit off again.
1. While the unit is switched off, press the timer button. The on/off button will start blinking
2. Set the desired amount of time until the unit is switched on with the timer/temp adjust buttons
After the set amount of time has elapsed, the unit switches on automatically. Whether or not the timer is activated is indicated
by the on/off display.
Information about the timer
• Press the power button to reset the timer function
• If the timer button is pressed while the timer is activated, the remaining time is shown on the display and can be
modified by means of the timer/temp adjust buttons
• If the unit is unplugged from the power supply, any programmed timer function is deleted
Shutting Down the Unit
To shut down the unit, always switch it off with the power button on the control panel or via the remote control. Only now can
you unplug it from the power supply. Never shut the running unit off by pulling the power plug.
Cleaning and Maintenance
Regular maintenance and observance of some basic principles are required to ensure a long service life and to keep the unit
functioning properly. However, the unit should be inspected at least once a year and thoroughly cleaned after long periods of
use. The entire cooling system is low maintenance, closed-loop system and must only be serviced by London Cool.
Cleaning the plastic housing
For cleaning, use only a clean, soft and slightly moist towel to carefully wipe the housing. Please observe the following:
• Never use chemical cleaners or polish to clean the unit. These can damage the surface
• Only use lukewarm water. Maximum of 40°C warm
• Make sure that no moisture gets into the unit. Never spray water or other fluids into the unit. This can damage the
electrical components
• Never clean the unit under a stream of water
• Thoroughly clean the air intake and outlet openings on a regular basis. This is where the most dirt accumulates in the
shortest period of time
Cleaning the filter
The unit is equipped with an air intake filter. It can be removed from the back of the unit. The filter must be cleaned on regular
intervals. Clean the air filters after no longer than 100 hours of operation. If the air is heavily contaminated, reduce this time
period accordingly.
Never operate the unit without the air filter. The air filter prevents the condenser from becoming dirty and the
performance of the unit from being adversely affected.
• Switch the unit off with the on/off button on the control panel or the infrared remote control
• Unplug the unit
• Remove the filter from the unit
• Clean the dust that has accumulated from the filter. You can use a vacuum cleaner
• If the dust filter is very dirty, wash it with a lukewarm soap solution
• Let the filter air dry
• Replace the filter in the unit
• Make sure that the filter is dry and undamaged
Troubleshooting
The unit has been designed using state of the art manufacturing processes and it has been tested repeatedly to ensure that it is
working properly. However, should a problem occur, refer to the following list.
UNPLUG THE UNIT FROM THE POWER SUPPLY BEFORE PERFORMING ANY WORK ON IT
Problem Possible Cause Check Remedy
Page 5

The unit does not start or
switches itself off
automatically
Power failure
Are all other electrical
components working?
Check current and wait for the
unit to start again
Defective power fuse / main
switch is off
Are all currents for lighting
functional?
Replace power fuse / switch
on main switch
Power supply line is damaged
Are all other electrical
components working?
Maintenance is required by an
authorised personnel, or call
London Cool on 0800 440 444
Temperature range is either
too high or too low
Is the fan still working?
Keep the unit within operating
temperature range 20°C 35°C
Water tank is full
Is the tank full signal light
illuminated?
Empty tank
The surrounding temperature
is outside of the operating
range (16°C to 35°C)
Does E1 appear on the
display?
Do not operate the unit
outside the operating range
The unit is either not
cooling at all or only
cooling a little bit
The exhaust hose is bent,
placed downwards or blocked
Does the cooling performance
improve when the unit is
operated without an exhaust
hose and without a filter
Make sure that the exhaust
channel is not blocked
Dirty filter input and/or
output opening blocked by
foreign matter
Is the filter dirty? Clean the filter
The unit is too close to the
wall or other objects
Has the minimum distance of
50cm been maintained?
Maintain minimum distance
The unit is either not
cooling at all or only
cooling a little bit
Windows and doors are open
/ thermal load increased
Has something been changed
in the design or application?
Close windows and doors /
reduce thermal load
Low pressure in the setup
room when operating the unit
Does the cooling performance
improve when a door or
window is opened?
Correct pressure in the setup
room
Cooling operation mode not
set
Is the fan operating mode
set?
Switch the units operating
mode
The unit is switch on with the
timer function
Is the timing on led light up? Press the on/off button again
Temperature setting is too
high
Is the temperature setting
higher than the temperature
of the room?
Lower the temperature
Excess voltage due to
lightning
Was there lightning recently
in the region?
Unplug the unit from the
power supply with switch 5
and restart the unit
Page 6

The air flap is not opened
wide enough
Check the position of the air
flap
Open the air flap as wide as
possible
The unit does not respond
to the infrared remote
control
Remote-controlled batteries
are dead or the transmission
distance is too far
Does the button function work
at a distance of approx. 3m?
Replace batteries / reduced
distance or change location
Polarity of batteries is
incorrect after replacement
Is the polarity correct?
Insert the batteries correctly.
Pay attention to the labels.
Condensation water leaks
out of the unit
The unit is not standing
upright
Is the unit upright?
Place the unit upright and
make sure it is firmly in place
The plug for the condensation
drain is not inserted correctly
or is damaged
Is water dripping out of the
condensation drain?
Insert the plug correctly or
replace is necessary
Should the unit still not be working despite these checks, please contact
London Cool on 0800 440 444
London Cool air conditioner rental and sales
This document has been compiled in good faith, but no representation is made or warranty given (either express or implied) as
to the completeness or accuracy of this information
 Loading...