

Page 1

PMSS 10-200
EN
OPERATING MANUAL
3-IN-1 MULTI-FUNCTION
SANDER
TRT-BA-PMSS10-200-TC-001-EN
Page 2

Table of contents
Notes regarding the operating manual................................. 1
Not permissible for wet grinding
Information marked with this symbol indicates that wet
grinding is prohibited.
Safety .....................................................................................2
Information about the device................................................6
Transport and storage...........................................................9
Start-up..................................................................................9
Operation .............................................................................14
Errors and faults..................................................................16
Maintenance ........................................................................17
Disposal ...............................................................................18
Notes regarding the operating manual
Symbols
Warning of electrical voltage
This symbol indicates dangers to the life and health of
persons due to electrical voltage.
Warning of explosive substances
This symbol indicates dangers to the life and health of
persons due to potentially explosive substances.
Warning of hot surface
This symbol indicates dangers to the life and health of
persons due to hot surface.
Warning of sharp object
This symbol indicates dangers to the life and health of
persons due to pointed objects.
Notice
This signal word indicates important information
(e.g. material damage), but does not indicate hazards.
Info
Information marked with this symbol helps you to carry
out your tasks quickly and safely.
Follow the manual
Information marked with this symbol indicates that the
operating manual must be observed.
Wear ear protection
Information marked with this symbol indicates that you
should wear hearing protection.
Wear safety glasses
Information marked with this symbol indicates that you
should wear eye protection.
Wear a protective mask
Information marked with this symbol indicates that you
should wear a protective mask.
Wear tight-fitting protective clothing
Information marked with this symbol indicates that you
should wear protective clothing.
Wear protective gloves
Information marked with this symbol indicates that you
should wear protective gloves.
You can download the current version of the operating manual
and the EU declaration of conformity via the following link:
Warning of hand injuries
This symbol indicates dangers to the health of persons
PMSS 10-200
due to hand injuries.
Warning
This signal word indicates a hazard with an average
https://hub.trotec.com/?id=41419
risk level which, if not avoided, can result in serious
injury or death.
Caution
This signal word indicates a hazard with a low risk
level which, if not avoided, can result in minor or
moderate injury.
1 EN
Operating manual – 3-in-1 multi-function sander PMSS 10-200
Page 3

Safety
Read this manual carefully before starting or using the
device. Always store the manual in the immediate vicinity
of the device or its site of use!
Warning
Read all safety warnings and all instructions.
Failure to follow the warnings and instructions may
result in electric shock, fire and/ or serious injury.
Save all warnings and instructions for future
reference.
This appliance can be used by children aged from
8years and above and persons with reduced physical,
sensory or mental capabilities or lack of experience
and knowledge if they have been given supervision or
instruction concerning use of the appliance in a safe
way and understand the hazards involved.
Children shall not play with the appliance. Cleaning and
user maintenance shall not be made by children
without supervision.
The term power tool used in the safety warnings refers to both
mains-operated and battery-powered electric tools (with/
without power cable).
General Power Tool Safety Warnings – Work area
safety
• Keep work area clean and well lit. Cluttered or dark
areas invite accidents.
• Do not operate power tools in explosive atmospheres,
such as in the presence of flammable liquids, gases or
dust. Power tools create sparks which may ignite the dust
or fumes.
• Keep children and bystanders away while operating a
power tool. Distractions can cause you to lose control.
General Power Tool Safety Warnings – Electrical
safety
• Power tool or power adapter plugs must match the
outlet. Never modify the plug in any way. Do not use
any adapter plugs with earthed (grounded) power
tools. Unmodified plugs and matching outlets will reduce
risk of electric shock.
• Avoid body contact with earthed or grounded surfaces,
such as pipes, radiators, ranges and refrigerators.
There is an increased risk of electric shock if your body is
earthed or grounded.
• Do not expose power tools to rain or wet conditions.
Water entering a power tool will increase the risk of
electric shock.
• Do not abuse the cord. Never use the cord for carrying,
pulling or unplugging the power tool. Keep cord away
from heat, oil, sharp edges or moving parts. Damaged
or entangled cords increase the risk of electric shock.
• When operating a power tool outdoors, use an
extension cord suitable for outdoor use. Use of a cord
suitable for outdoor use reduces the risk of electric shock.
• If operating a power tool in a damp location is
unavoidable, use a residual current device(RCD)
protected supply. Use of an RCD reduces the risk of
electric shock.
General Power Tool Safety Warnings – Personal
safety
• Stay alert, watch what you are doing and use common
sense when operating a power tool. Do not use a
power tool while you are tired or under the influence of
drugs, alcohol or medication. A moment of inattention
while operating power tools may result in serious personal
injury.
Use personal protective equipment. Always
wear eye protection. Protective equipment such
as protective mask, non-skid safety shoes, hard
hat, hearing protection or tight-fitting protective
clothing used for appropriate conditions will
reduce personal injuries.
• Prevent unintentional starting. Ensure the switch is in
the off-position before connecting to power source
and/or battery pack, picking up or carrying the tool.
Carrying power tools with your finger on the switch or
energising power tools that have the switch on invites
accidents.
EN 2
Operating manual – 3-in-1 multi-function sander PMSS 10-200
Page 4

• Remove any adjusting key or wrench before turning
the power tool on. A wrench or a key left attached to a
rotating part of the power tool may result in personal
injury.
• Do not overreach. Keep proper footing and balance at
all times. This enables better control of the power tool in
unexpected situations.
• Dress properly. Do not wear loose clothing or
jewellery. Keep your hair, clothing and gloves away
from moving parts. Loose clothes, jewellery or long hair
can be caught in moving parts.
• If devices are provided for the connection of dust
extraction and collection facilities, ensure these are
connected and properly used. The use of a dust
extraction system may reduce dust-related hazards.
General Power Tool Safety Warnings – Power tool
use and care
• Do not force the power tool. Use the correct power tool
for your application. The correct power tool will do the
job better and safer at the rate for which it was designed.
• Do not use the power tool if the switch does not turn it
on and off. Any power tool that cannot be controlled with
the switch is dangerous and must be repaired.
• Disconnect the plug from the power source and / or
the battery pack from the power tool before making
any adjustments, changing accessories, or storing
power tools. Such preventive safety measures reduce the
risk of starting the power tool accidentally.
• Store idle power tools out of the reach of children and
do not allow persons unfamiliar with the power tool or
these instructions to operate the power tool. Power
tools are dangerous in the hands of untrained users.
• Maintain power tools. Check for misalignment or
binding of moving parts, breakage of parts and any
other condition that may affect the power tool’s
operation. If damaged, have the power tool repaired
before use. Many accidents are caused by poorly
maintained power tools.
• Use the power tool, accessories and tool bits etc. in
accordance with these instructions, taking into
account the working conditions and the work to be
performed. Use of the power tool for operations different
from those intended could result in a hazardous situation.
General Power Tool Safety Warnings – Service
• Have your power tool serviced by a qualified repair
person using only identical replacement parts. This will
ensure that the safety of the power tool is maintained.
Safety Warnings Common for Grinding, Sanding,
Wire Brushing, Polishing or Abrasive Cutting-Off
Operations
• This power tool is intended to function as a grinder or
sander. Read all safety warnings, instructions, illustrations
and specifications provided with this power tool. Failure to
follow all instructions listed below may result in electric
shock, fire and/ or serious injury.
• Do not use accessories which are not specifically
designed and recommended by the tool manufacturer.
Just because the accessory can be attached to your power
tool, it does not assure safe operation.
• The rated speed of the accessory must be at least
equal to the maximum speed marked on the power
tool. Accessories running faster than their rated speed can
break and fly apart.
• The outside diameter and the thickness of your
accessory must be within the capacity rating of your
power tool. Incorrectly sized accessories cannot be
adequately guarded or controlled.
• Threaded mounting of accessories must match the
grinder spindle thread. For accessories mounted by
flanges, the arbour hole of the accessory must fit the
locating diameter of the flange. Accessories that do not
match the mounting hardware of the power tool will run
out of balance, vibrate excessively and may cause loss of
control.
• Do not use a damaged accessory. Before each use
inspect the accessory such as abrasive wheels for
chips and cracks, backing pads and abrasive belts for
cracks, tear or excess wear, wire brushes for loose or
cracked wires. If power tool or accessory is dropped,
inspect for damage or install an undamaged
accessory. After inspecting and installing an
accessory, position yourself and bystanders away
from the plane of the rotating accessory and run the
power tool at maximum no-load speed for one minute.
Damaged accessories will normally break apart during this
test time.
3 EN
Operating manual – 3-in-1 multi-function sander PMSS 10-200
Page 5

• Wear personal protective equipment. Depending on
application, use face shield, safety goggles or safety
glasses. As appropriate, wear dust mask, hearing
protectors, gloves and workshop apron capable of
stopping small abrasive or workpiece fragments. The
eye protection must be capable of stopping flying debris
generated by various operations. The dust mask or
respirator must be capable of filtrating particles generated
by your operation. Prolonged exposure to high intensity
noise may cause hearing loss.
• Keep bystanders a safe distance away from work area.
Anyone entering the work area must wear personal
protective equipment. Fragments of workpiece or of a
broken accessory may fly away and cause injury beyond
immediate area of operation.
• Hold the power tool by insulated gripping surfaces
only, when performing an operation where the cutting
accessory may contact hidden wiring or its own cord.
Contacting a live wire might energize exposed metal parts
of the device and lead to an electric shock.
• Position the cord clear of the spinning accessory. If you
lose control, the cord may be cut or snagged and your
hand or arm may be pulled into the spinning accessory.
• Never lay the power tool down until the accessory has
come to a complete stop. The spinning accessory may
grab the surface and pull the power tool out of your
control.
• Do not run the power tool while carrying it at your
side. Accidental contact with the spinning accessory could
snag your clothing, pulling the accessory into your body.
• Regularly clean the power tool’s air vents. The motor’s
fan will draw the dust inside the housing and excessive
accumulation of powdered metal may cause electrical
hazards.
• Do not operate the power tool near flammable
materials. Sparks could ignite these materials.
• Only use the power tool for dry sanding. Water entering
an electrical appliance increases the risk of electric shock.
• Secure the workpiece. The grip of tensioning devices or a
vice is more secure than holding the workpiece only by
hand.
• During operation hold onto the power tool with both
hands. Make sure that you stand firmly on the ground. It is
safer to handle the power tool with two hands.
• Never touch the abrasive belt while it is in motion. Risk
of injury.
• Do not use worn, torn or heavily contaminated
abrasive belts. Damaged abrasive belts can be torn apart,
catapulted away and so lead to personal injury.
• For processing wood, or in particular materials that
produce harmful dusts when sanded, connect the
power tool to an appropriate external exhaust system.
• Only hold the power tool against the workpiece when
the tool is switched on and running. If you are finished
with processing the workpiece, lift the power tool off
the workpiece before you switch it off.
• Make sure that nobody's safety is jeopardized by
flying sparks. Remove combustible materials from the
working environment. Grinding metal causes sparks to
fly.
• Always keep the power cable behind the device.
• Using a power tool that comes equipped with a dust
collector or can be connected to the vacuum cleaner
by means of a dust extraction device involves a fire
hazard. In unfavourable conditions – e.g. in case of flying
sparks caused by grinding metal or metal remainders in
wood – the wood dust inside the dust collector (or in the
vacuum cleaner's dust collection bag) might self-ignite.
The risk is particularly high when the wood dust is mixed
with paint residues or other chemical substances and the
sanding material is hot after a longer period of work.
Therefore, avoid overheating of the workpiece and of the
power tool at all times and empty the dust collector or the
vacuum cleaner's dust bag before taking work breaks.
• Do not use the dust extraction system when grinding
metals.
• Ensure sufficient ventilation.
Safety Warnings Specific for Sanding Operations
• Do not use excessively oversized sanding disc paper.
Follow manufacturers recommendations, when
selecting sanding paper. Larger sanding paper extending
beyond the sanding pad presents a laceration hazard and
may cause snagging, tearing of the disc or kickback.
Intended use
Only use the device PMSS 10-200 for the dry grinding of wood,
plastic, metal, spackle and painted surfaces whilst adhering to
the technical data.
The device must only be used for dry sanding.
We recommend using the power tool with original Trotec
accessories.
Improper use
The device PMSS 10-200 is not intended for processing moist
materials.
EN 4
Operating manual – 3-in-1 multi-function sander PMSS 10-200
Page 6

Personnel qualifications
People who use this device must:
• have read and understood the operating manual, especially
the Safety chapter.
Personal protective equipment
Warning of explosive substances
Fine dust produced during grinding is highly
flammable. Risk of fire and explosion!
Use a dust or chip bag or a dust extraction system for
collecting the produced dusts.
Empty the dust collector before taking work breaks.
Wear hearing protection.
Excessive noise can lead to hearing loss.
Wear eye protection.
With it you protect your eyes from splintering, falling
and flying pieces which could cause injuries.
Wear a protective mask.
It saves you from inhaling harmful dusts generated
when processing workpieces.
Wearing protective gloves.
They protect your hands from burns, crushing injuries
and skin abrasions.
Wear tight-fitting protective clothing.
This protects you from the draw-in and entanglement
hazard posed by rotating parts.
Residual risks
Warning of electrical voltage
Electric shock from insufficient insulation.
Check the device for damages and proper functioning
before each use.
If you notice damages, no longer use the device.
Do not use the device when the device or your hands
are damp or wet!
Warning of electrical voltage
Work on the electrical components must only be
carried out by an authorised specialist company!
Warning of electrical voltage
Before any work on the device, remove the mains plug
from the mains socket!
Hold onto the mains plug while pulling the power cable
out of the mains socket.
Warning of electrical voltage
There is a risk of a short-circuit due to liquids
penetrating the housing!
Do not immerse the device and the accessories in
water. Make sure that no water or other liquids can
enter the housing.
Warning of explosive substances
Wood dust inside the dust collector can self-ignite in
case of flying sparks. Do not use the dust extraction
system when grinding metals!
Wood dust can intermix with varnish residues or other
chemical substances.
Risk of fire and explosion!
Avoid overheating of the workpiece and the device.
Empty the dust collector or the vacuum cleaner's dust
collection bag at regular intervals.
Warning of hot surface
The insertion tool might still be hot after the
application. Burn hazard when touching the insertion
tool.
Do not touch the insertion tool bare-handed!
Wear protective gloves!
Warning of hot surface
The workpiece becomes hot during grinding. Risk of
burns.
Do not touch the processed part of the workpiece!
Allow it to cool down.
Wear protective gloves!
Warning
Toxic dusts!
The harmful / toxic dusts produced during operation
pose of risk to the health of the operator and persons
in the vicinity.
Wear eye protection and a dust mask!
Warning
Do not process materials containing asbestos.
Asbestos is considered carcinogenic.
Warning
Risk of injuries caused by flying parts.
Use a dust or chip bag or a dust extraction system.
Warning
Dangers can occur at the device when it is used by
untrained people in an unprofessional or improper way!
Observe the personnel qualifications!
Warning
The device is not a toy and does not belong in the
hands of children.
5 EN
Operating manual – 3-in-1 multi-function sander PMSS 10-200
Page 7

Warning
Risk of suffocation!
Do not leave the packaging lying around. Children may
use it as a dangerous toy.
Caution
Vibration emissions can cause a health hazard if the
device is used for an extended period of time or if it is
not properly handled and maintained.
Caution
Keep a sufficient distance from heat sources.
Notice
If you store or transport the device improperly, the
device may be damaged.
Note the information regarding transport and storage of
the device.
Behaviour in the event of an emergency
1. Switch the device off.
2. In an emergency, disconnect the device from the mains
feed-in: Hold onto the mains plug while pulling the power
cable out of the mains socket.
3. Do not reconnect a defective device to the mains.
Information about the device
Device description
The device PMSS 10-200 is a 3-in-1 multi-function sander for
dry sanding.
The device is equipped with a 200W motor.
The three sanding plates delta sander, random orbital sander
and orbital sander are suitable for sanding wooden surfaces,
plastic, metal, spackle and paints in corners, along edges and
on larger surfaces.
For material-compatible working, the nominal oscillation rate
can be set steplessly within a range of 14,000 to 24,000 opm at
the setting wheel.
The device is fitted with a switch for continuous operation
enabling convenient and fatigue-free working.
The tool-free clamping system/Velcro system permits a simple
exchange of sanding sheets.
A clean working environment can be accomplished by use of
the dust collector with integrated filter and the adapter for
external dust extraction.
EN 6
Operating manual – 3-in-1 multi-function sander PMSS 10-200
Page 8
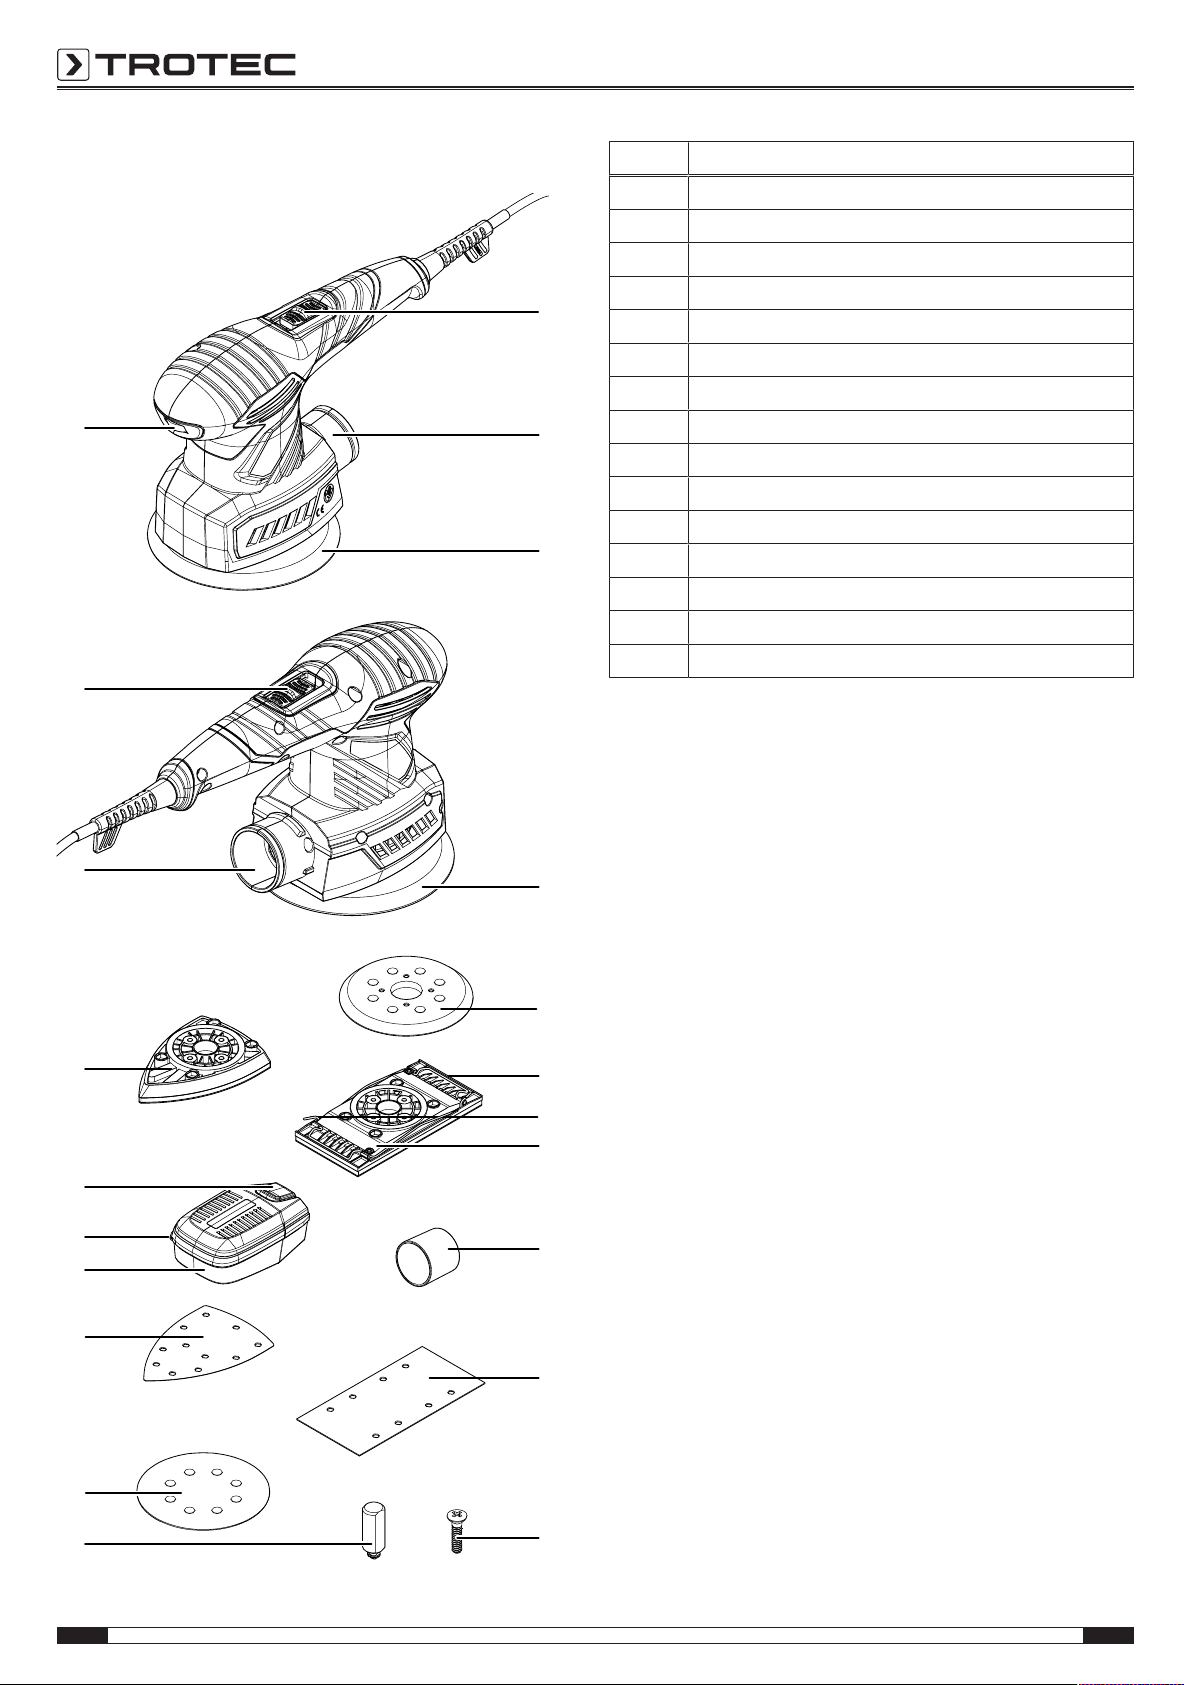
Device depiction
1
2
3
15
1
2
3
3
4
5
6
7
8
9
10
11
12
13
8
8
14
No. Designation
1 On/off switch
2 Dust extraction connection
3 Random orbital sanding plate
4 Clamping bracket
5 Locking lever
6 Orbital sanding plate
7 Reducer
8 Sanding sheet
9 Screw
10 Rubber pin
11 Dust collector with filter
12 Tab
13 Dust box release button
14 Delta sanding plate
15 Setting wheel for oscillation rate selection
Scope of delivery
• 1x Device PMSS 10-200
• 1x Dust collector
• 1x Reducer
• 1 x Orbital sanding plate
• 1 x Random orbital sanding plate
• 1 x Delta sanding plate
• 3 x Sanding sheet for wood, grain size:80
for random orbital sanding plate, orbital sanding plate,
delta sanding plate
• 3 x Sanding sheet for wood, grain size:240
for random orbital sanding plate, orbital sanding plate,
delta sanding plate
• 4x Rubber pin
• 4 x Screw
• 1 x Transport case
• 1x Manual
7 EN
Operating manual – 3-in-1 multi-function sander PMSS 10-200
Page 9

Technical data
Parameter Value
Model PMSS10-200
Mains connection 1/N/PE ~ 230V/ 50Hz
Power consumption 200W
Nominal oscillation rate 14,000–24,000opm
Idle speed 7,000– 12,000rpm
Orbit diameter 2mm
Grinding surface
Delta sanding plate
Random orbital sanding plate
Orbital sanding plate
108 cm
116 cm
165 cm
Cable length 3 m
Protection class
II /
Weight 1.5kg
Vibration information according to EN60745
Vibration emission value main
handle a
h
11.5m/s²
Uncertainty K 1.5m/s²
2
2
2
Information on noise and vibration:
• The vibration level specified in these instructions was
determined by means of a measuring method standardized
in EN60745 and can be used for a device comparison. The
specified vibration emission value may also be used for a
preliminary assessment of the exposure.
Caution
Vibration emissions can cause a health hazard if the
device is used for an extended period of time or if it is
not properly handled and maintained.
• The vibration level will change depending on the
application of the power tool and may in some cases differ
from the value specified in these instructions. The vibration
load may be underestimated if the power tool is used
regularly in such a way. For a precise estimation of the
vibration load during a certain work period, it is also
important to consider the periods during which the device
is switched off, or is running but not actually employed.
This can reduce the vibration load over the entire work
period significantly.
Sound values according to EN60745
Sound pressure level L
Sound power L
WA
pA
76dB(A)
87dB(A)
Uncertainty K 3 dB
Wear hearing protection.
Excessive noise can lead to hearing loss.
EN 8
Operating manual – 3-in-1 multi-function sander PMSS 10-200
Page 10

Transport and storage
Start-up
Notice
If you store or transport the device improperly, the
device may be damaged.
Note the information regarding transport and storage of
the device.
Transport
For transporting the device, use the transport case included in
the scope of delivery in order to protect the device from external
influences.
Before transporting the device, observe the following:
• Switch off the device.
• Hold onto the mains plug while pulling the power cable out
of the mains socket.
• Allow the device to cool down.
• Remove the tool from the tool holder.
• If attached, disconnect the dust extraction system from the
device.
Storage
Before storing the device, observe the following:
• Switch off the device.
• Hold onto the mains plug while pulling the power cable out
of the mains socket.
• Allow the device to cool down.
• Remove the tool from the tool holder.
• If attached, disconnect the dust extraction system from the
device.
• Clean the device as described in the Maintenance chapter.
• For storing the device, use the transport case included in
the scope of delivery in order to protect the device from
external influences.
When the device is not being used, observe the following
storage conditions:
• dry and protected from frost and heat
• ambient temperature below 40 °C
• protected from dust and direct sunlight inside the transport
case
Unpacking the device
• Take the transport case out of the packaging.
Warning of electrical voltage
Electric shock from insufficient insulation.
Check the device for damages and proper functioning
before each use.
If you notice damages, no longer use the device.
Do not use the device when the device or your hands
are damp or wet!
• Check the contents of the transport case for completeness
and look for damages.
Warning
Risk of suffocation!
Do not leave the packaging lying around. Children may
use it as a dangerous toy.
• Dispose of the packaging material according to the
national regulations.
Changing the sanding plate
Warning of electrical voltage
Before any work on the device, remove the mains plug
from the mains socket!
Hold onto the mains plug while pulling the power cable
out of the mains socket.
Notice
The orbital sanding plate and the delta sanding plate
can only be mounted in one direction.
When mounting the orbital sanding plate, the arrow
must point to the front.
When mounting the delta sanding plate, the tip must
point to the front.
Notice
The rubber pins may only be used for the orbital
sanding plate and the delta sanding plate.
The random orbital sanding plate is preassembled.
You can change the sanding plate to carry out various activities.
9 EN
Operating manual – 3-in-1 multi-function sander PMSS 10-200
Page 11

ü Use tools suitable for the intended task.
9
3
16
17
18
21
10
19
6
14
19
10
1. Loosen the four screws(9) at the sanding plate(3).
ð The sanding plate is now loosened.
2. Remove the sanding plate(3) from the device.
4. Check the felt ring(21) for correct fit.
5. When mounting the orbital sanding plate(6) or the delta
sanding plate(14), insert the four rubber pins(10) into the
sanding plate so that the latching noses sit in the
recesses(19).
3. Adjust the flange(16) for the selected sanding plate. The
threaded holes(17) for the screws must be aligned with
the marks(18) on the device.
6. Place the orbital sanding plate(6) or delta sanding
plate(14) onto the flange(16). When mounting the orbital
sanding plate, the arrow(20) must point to the front. When
mounting the delta sanding plate, the tip must point to the
front.
7. Pay attention that the rubber pins(10) are positioned in the
recesses(19) in the device. The rubber pins ensure that
the sanding plate is fixed in position.
EN 10
Operating manual – 3-in-1 multi-function sander PMSS 10-200
Page 12

8. Press the sanding plate onto the flange(16) until it clicks
6
10
19
9
16
20
14
16
10
9
19
8
into place.
9. Tighten the four screws(9).
Changing the sanding sheet
Warning of electrical voltage
Before any work on the device, remove the mains plug
from the mains socket!
Hold onto the mains plug while pulling the power cable
out of the mains socket.
Notice
Make sure to exchange the sanding sheet in due time.
Otherwise the sanding sheet might tear and cause
damage to the workpiece.
Notice
The sanding sheet must not be kinked.
The sanding sheet can be exchanged for processing different
materials. Moreover available are different grain sizes for coarse
to fine sanding. It might be necessary to adjust the speed
according to the new sanding sheet.
You can attach the sanding sheet to the sanding plate using the
Velcro backing.
Notice
Sanding accessories such as fleece and polishing felt
are attached to the sanding plate in the same way.
1. Before attaching a new sanding sheet, remove dust and
dirt from the sanding plate e.g. using a brush. Tap off the
dust from the sanding plate's Velcro backing to ensure
optimum adhesion.
2. Place the sanding sheet(8) with its smooth bottom side on
the sanding plate so that it fits exactly. The dust extraction
holes of the sanding sheet and sanding plate should be
aligned precisely.
10. Check the sanding plate for tight fit.
11 EN
Operating manual – 3-in-1 multi-function sander PMSS 10-200
3. Firmly press the sanding sheet down.
Page 13
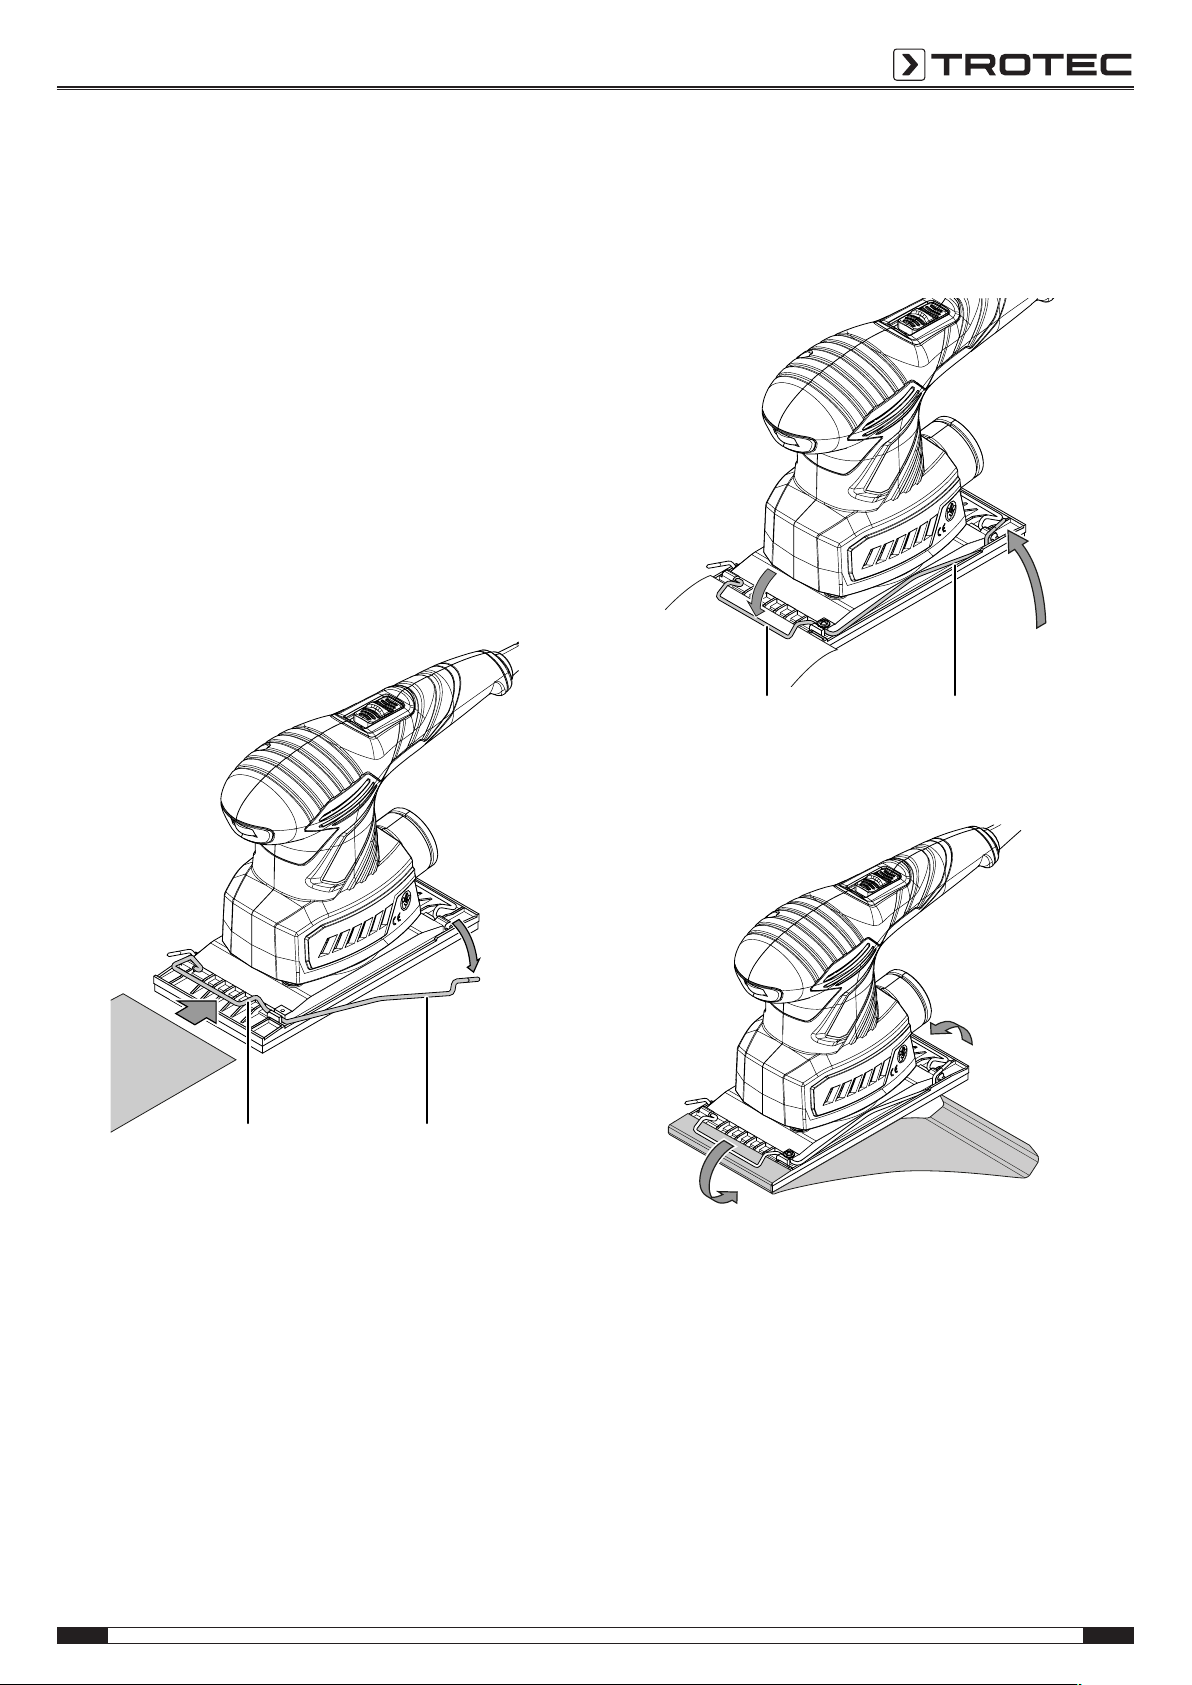
4. To exchange or remove the sanding sheet, simply pull it off
4
5
4
5
the sanding plate.
When using the orbital sanding plate, you can also use sanding
sheets without Velcro backing.
Notice
When using unperforated sanding sheets, the dust
extraction system cannot be used.
Notice
When cutting the sanding sheet to size, make sure that
the sanding sheet is larger than the orbital sanding
plate.
Otherwise, you cannot fix the sanding sheet in the
clamping bracket.
Proceed as follows:
1. Fold down the locking lever(5) on one side of the device to
open the corresponding clamping bracket(4).
3. Fold the locking lever(5) back up to close the clamping
bracket(4). Fix the locking lever at the orbital sanding
plate again.
ð The sanding sheet is now fixed on one side by the
clamping bracket.
2. Slide the sanding sheetwith its smooth bottom side under
the open clamping bracket.
4. Guide the sanding sheet tightly along the orbital sanding
plate to the other clamping bracket.
5. Repeat steps1 to 3.
EN 12
Operating manual – 3-in-1 multi-function sander PMSS 10-200
Page 14

Assembling the dust collector
2
11
22
7
2
Warning of explosive substances
Wood dust inside the dust collector can self-ignite in
case of flying sparks. Do not use the dust extraction
system when grinding metals!
Wood dust can intermix with varnish residues or other
chemical substances.
Risk of fire and explosion!
Avoid overheating of the workpiece and the device.
Empty the dust collector or the vacuum cleaner's dust
collection bag at regular intervals.
Wear a protective mask
Wear an appropriate protective mask when working
with the device.
Notice
The cover with the filter must point upwards.
Otherwise the dust collector cannot be installed.
1. Push the dust collector(11) onto the dust extraction
connection(2). The two lugs(22) at the dust extraction
connection fit into the two grooves of the dust
collector(11). The dust collector(11) must lock into place
in the device.
Mounting the external dust extraction system
Alternatively, you can also connect the dust extraction system to
the device.
Warning of explosive substances
Wood dust inside the dust collector can self-ignite in
case of flying sparks. Do not use the dust extraction
system when grinding metals!
Wood dust can intermix with varnish residues or other
chemical substances.
Risk of fire and explosion!
Avoid overheating of the workpiece and the device.
Empty the dust collector or the vacuum cleaner's dust
collection bag at regular intervals.
Caution
Use a special vacuum cleaner to suck off harmful or
toxic materials.
1. Insert the reducer(7) for the external dust extraction
system into the dust extraction connection(2).
2. Connect a suitable vacuum cleaner (e.g. industrial vacuum
cleaner) to the reducer(7). If anything is unclear or if you
have questions, please contact the manufacturer of your
vacuum cleaner.
13 EN
Operating manual – 3-in-1 multi-function sander PMSS 10-200
Page 15

Oscillation rate selection
15
By use of the setting wheel for oscillation rate selection you can
change the oscillation rate at any time, even during operation of
the device. The required oscillation rate depends on the material
and the operating conditions and can be determined by way of
field-testing. For sanding harder materials such as wood or
metal we recommend a higher oscillation rate, for softer
materials e.g. non-ferrous metals and varnishes a low
oscillation rate is sufficient. The setting range covers 6levels:
1– MAX (14,000 – 24,000 opm).
1. Turn the setting wheel(15) to the desired oscillation rate.
Connecting the power cable
1. Insert the mains plug into a properly secured mains
socket.
Operation
Tips and notes on handling the multi-function sander
General information:
• Only use sanding sheets which are approved for the device
used.
• Check the sanding plate for correct fit before every
application. The sanding plate must be firmly locked in
place in the flange.
• Before every application, make sure that you have selected
the correct sanding sheet for the intended use. A coarse
grit is suited for rough grinding, a fine grain size, on the
other hand, is more appropriate for fine and finish grinding.
• Do not process wood and metal using the same sanding
sheet.
• Only use intact, flawless sanding sheets. Damaged
sanding sheets could tear and cause damage to the
workpiece. Exchange sanding sheets in due time.
• Clamp the workpiece unless it is firmly and safely
positioned by its own weight.
• Do not overload the device so that it comes to a standstill.
• Keep the venting slots clear to prevent the motor from
overheating.
Sanding:
• The oscillation rate and grain size of the sanding sheet
define the removal rate and the surface finish.
• Always sand in parallel to the grinding path ensuring an
appropriate overlap.
• Do not apply excessive contact pressure. Increased
contact pressure leads to a greater wear of the device and
the sanding sheet.
• If the material's surface is untreated, start grinding with
coarse or medium grain size and finish off with a fine grit.
• Best use a coarse grain size (40 or 60 grit) for removing
paint and for rough grinding particularly raw wood. For
surface-grinding undressed or sawn timber use abrasive
belts of medium grit (grain size80, 100 or 120). Use a fine
grit (grain size180, 240 or 320) to smoothen and finegrind timber and surfaces coated with old paint as well as
for dry sanding untreated wooden surfaces.
• Avoid the accumulation of dust at the workplace, always
use a dust extraction system when grinding.
• Use the front or lateral edge of the sanding sheet on the
sanding plate to process poorly accessible spots.
• Use a dust extraction system when grinding off residual
paint. Paint residues might smelt and then smudge both
workpiece and sanding sheet.
• Switch the device on before applying it to the workpiece.
Once the grinding process is concluded, lift the device off
the workpiece before you switch it off.
EN 14
Operating manual – 3-in-1 multi-function sander PMSS 10-200
Page 16

The non-binding values listed in the table below shall serve as a
1
1
point of reference for selecting the right sanding sheet for the
task at hand:
4. To switch the device off, slide the on/off switch(1) to 0.
For processing paint and lacquer
grain size: 40 – 240
layers or primers such as filler and
spackle
For grinding off paint coarse 40, 60
For sanding primer paint medium 80, 120
For final sanding of primers before
fine 180, 240
lacquering
For processing any wood-based
grain size: 40 – 240
material
For pre-grinding e.g. of rough,
coarse 40, 60
unplaned beams and boards
For surface grinding and levelling of
small irregularities
For fine and finish grinding of hard
medium 80, 100,
120
fine 180, 240
wood
Switching the device on and off
Wear your personal protective equipment when working with
the device.
1. Slide the on/off switch(1) to I.
Shutdown
Warning of electrical voltage
Do not touch the mains plug with wet or damp hands.
• Switch off the device.
• Hold onto the mains plug while pulling the power cable out
of the mains socket.
• If required, allow the device to cool down.
• Remove the tool from the device (see Start-up chapter).
• If attached, disconnect the dust extraction system from the
device.
• Clean the device according to the Maintenance chapter.
• Store the device according to the Storage chapter.
2. Position the device on the workpiece.
3. Lift the device off the workpiece before you switch it off.
15 EN
Operating manual – 3-in-1 multi-function sander PMSS 10-200
Page 17

Errors and faults
The device has been checked for proper functioning several
times during production. If malfunctions occur nonetheless,
check the device according to the following list.
Troubleshooting tasks which require the housing to be opened
must only be carried out by an authorized specialist electrical
company or by Trotec.
Slight smoke or odour are emitted during first use:
• This is not a fault. These phenomena disappear after a
brief runtime.
The device does not start:
• Check the power connection.
• Check the power cable and mains plug for damages.
• Check the on-site fusing.
Info
Wait for at least 10 minutes before switching the
device back on.
The sanding plate does not move although the motor is
running:
• Make sure that there is no workpiece debris blocking the
drive. Remove the blockages, if any.
• Check whether you have mounted a sanding plate that is
suitable for this device.
The sanding plate is loose:
• Check whether you have mounted a sanding plate that is
suitable for this device.
• Check the sanding plate for tight fit. If necessary, tighten
the screws.
• If necessary, check the rubber pins in the sanding plate for
correct fit.
The sanding sheet wears off quickly:
• Check whether the selected sanding sheet is suitable for
the material to be processed.
• Reduce the pressure applied on the workpiece.
• Select a lower oscillation rate by turning the setting wheel
for the oscillation rate selection to the desired level.
The device becomes hot:
• Make sure not to exert too much pressure on the device
during operation.
• Select a lower oscillation rate by turning the setting wheel
for the oscillation rate selection to the desired level.
• Check whether the selected sanding sheet is suitable for
the tasks to be carried out.
• Keep the venting slots clear to prevent the motor from
overheating.
• Wait for 10minutes before switching the device back on.
Notice
Wait for at least 3 minutes after maintenance and
repair work. Only then switch the device back on.
Your device still does not operate correctly after these
checks?
Please contact the customer service. If necessary, bring the
device to an authorized specialist electrical company or to
Trotec for repair.
The motor slows down:
• Check whether the device is overloaded by the workpiece.
• Reduce the pressure applied on the workpiece.
• Check whether the workpiece is suitable for the tasks to
be carried out.
The surface of the workpiece is not smooth or the grinding
performance is insufficient:
• Check whether the selected sanding sheet is suitable for
the material to be processed.
• If the sanding sheet is worn, replace it with a new one, see
chapter Changing the sanding sheet.
• Check the oscillation rate setting. It must be suitable for
both the sanding sheet and the material.
• Select a higher oscillation rate by turning the setting wheel
for the oscillation rate selection to the desired level.
EN 16
Operating manual – 3-in-1 multi-function sander PMSS 10-200
Page 18

Maintenance
12
13
11
2
2
11
22
Activities required before starting maintenance
Warning of electrical voltage
Do not touch the mains plug with wet or damp hands.
• Switch off the device.
• Hold onto the mains plug while pulling the power cable out
of the mains socket.
• Allow the device to cool down completely.
Warning of electrical voltage
Maintenance tasks which require the housing to be
opened must only be carried out by authorised
specialist companies or by Trotec.
Notes on maintenance
Inside the device, there are no parts that need to be maintained
or lubricated by the user.
Cleaning
The device should be cleaned before and after each use.
Notice
The device does not have to be lubricated after
cleaning.
Warning of electrical voltage
There is a risk of a short-circuit due to liquids
penetrating the housing!
Do not immerse the device and the accessories in
water. Make sure that no water or other liquids can
enter the housing.
• Clean the device with a soft, damp and lint-free cloth.
Ensure that no moisture enters the housing. Protect
electrical components from moisture. Do not use any
aggressive cleaning agents such as cleaning sprays,
solvents, alcohol-based or abrasive cleaners to dampen
the cloth.
• Dry the device with a soft, lint-free cloth.
• Keep the ventilation openings free from dust deposits to
prevent overheating of the motor.
Emptying/ cleaning the dust collector
The device accomplishes a high removal rate. For optimum
working conditions regularly empty and clean the dust collector.
1. Detach the dust collector(11) from the dust extraction
connection(2) by pressing the release button(13).
2. Open the dust box by pulling the tab(12).
3. Remove the cover from the dust collector.
4. Tap both parts of the dust collector against a solid surface
to loosen the dust. Clean the filter.
5. Empty both parts completely. Use a brush to remove
adherent abrasive dust.
6. Fit the cover back on the dust collector.
7. Push the dust collector(11) back onto the dust extraction
connection(2). The two lugs(22) at the dust extraction
connection fit into the two grooves of the dust
collector(11). The dust collector(11) must lock into place
in the device.
17 EN
Operating manual – 3-in-1 multi-function sander PMSS 10-200
Page 19

Cleaning/ changing the filter insert of the dust collector
The filter insert has to be cleaned as soon as it is dirty. Check
the filter insert for dirt once or twice a year.
The filter insert should be exchanged in case of heavy soiling or
damage.
1. Remove the filter retainer with the filter insert from the
dust collector cover.
2. Clean the filter insert with warm water mixed with a
neutral cleaning agent.
3. Allow the filter insert to dry completely. Do not put a wet
filter insert into the dust collector!
4. Fit the filter retainer with the filter insert back into the dust
collector cover.
Disposal
The icon with the crossed-out waste bin on waste
electrical or electronic equipment stipulates that this equipment
must not be disposed of with the household waste at the end of
its life. You will find collection points for free return of waste
electrical and electronic equipment in your vicinity. The
addresses can be obtained from your municipality or local
administration. For further return options provided by us please
refer to our website www.trotec24.com.
The separate collection of waste electrical and electronic
equipment aims to enable the re-use, recycling and other forms
of recovery of waste equipment as well as to prevent negative
effects for the environment and human health caused by the
disposal of hazardous substances potentially contained in the
equipment.
EN 18
Operating manual – 3-in-1 multi-function sander PMSS 10-200
Page 20

Trotec GmbH & Co. KG
Grebbener Str. 7
D-52525 Heinsberg
+49 2452 962-400
+49 2452 962-200
info@trotec.com
www.trotec.com
 Loading...