

Page 1
DH 30 VPR+ / DH 60 VPR+
EN
OPERATING MANUAL
DEHUMIDIFIER / CLIMATE
MANAGER
TRT-BA-DH30VPR+-DH60VPR+-TC-002-EN
Page 2
Table of contents
Notes regarding the operating manual.................................1
Safety .....................................................................................2
You can download the current version of the operating manual
and the EU declaration of conformity via the following link:
Information about the device................................................4
Transport, assembly and preparation for start-up .............6
Important information regarding the dehumidification
performance and drying rate ................................................8
Operation .............................................................................10
Errors and faults..................................................................15
Maintenance ........................................................................17
Technical annex...................................................................20
Disposal ...............................................................................22
Notes regarding the operating manual
Symbols
Warning of electrical voltage
This symbol indicates dangers to the life and health of
persons due to electrical voltage.
DH 30 VPR+
http://hub.trotec.com/?id=39535
DH 60 VPR+
http://hub.trotec.com/?id=39536
Warning
This signal word indicates a hazard with an average
risk level which, if not avoided, can result in serious
injury or death.
Caution
This signal word indicates a hazard with a low risk
level which, if not avoided, can result in minor or
moderate injury.
Notice
This signal word indicates important information (e.g.
material damage), but does not indicate hazards.
Info
Information marked with this symbol helps you to carry
out your tasks quickly and safely.
Follow the manual
Information marked with this symbol indicates that the
operating manual must be observed.
1 EN
Operating manual – dehumidifier / climate manager DH 30 VPR+ / DH 60 VPR+
Page 3

Safety
Read this manual carefully before starting or using the
device. Always store the manual in the immediate vicinity
of the device or its site of use!
Warning
Read all safety warnings and all instructions.
Failure to follow the warnings and instructions may
result in electric shock, fire and/ or serious injury.
Save all warnings and instructions for future
reference.
This appliance can be used by children aged from 8
years and above and persons with reduced physical,
sensory or mental capabilities or lack of experience
and knowledge if they have been given supervision or
instruction concerning use of the appliance in a safe
way and understand the hazards involved.
Children shall not play with the appliance. Cleaning and
user maintenance shall not be made by children
without supervision.
• Do not use the device in potentially explosive rooms.
• Do not use the device in aggressive atmosphere.
• Let the device dry out after a wet clean. Do not operate it
when wet.
• Do not use the device with wet or damp hands.
• Do not expose the device to directly squirting water.
• Never insert any objects or limbs into the device.
• Do not sit on the device.
• This appliance is not a toy! Keep away from children and
animals. Do not leave the device unattended during
operation.
• Do not cover or transport the device during operation.
• Check accessories and connection parts for possible
damage prior to every use of the device. Do not use any
defective devices or device parts.
• Ensure that all electric cables outside of the device are
protected from damage (e.g. caused by animals). Never
use the device if electric cables or the power connection
are damaged!
• The electrical connection must correspond to the
specifications in chapter Technical data.
• Insert the mains plug into a properly secured mains
socket.
• Observe the technical data when selecting extensions to
the power cable. Completely unroll the extension cable.
Avoid electrical overload.
• Before carrying out maintenance, care or repair work on
the device, remove the mains plug from the mains socket.
Hold onto the mains plug while doing so.
• Switch the device off and disconnect the power cable from
the mains socket when the device is not in use.
• Do not under any circumstances use the device if you
detect damages on the mains plug or power cable.
If the supply cord is damaged, it must be replaced by the
manufacturer, his service agent or similarly qualified
persons in order to avoid a hazard.
Defective power cables pose a serious health risk.
• Observe the storage and operating conditions (see chapter
Technical data).
• Ensure that the air inlet and outlet are not obstructed.
• Ensure that the side of the device where the air inlet is
found is kept free of dirt and loose objects.
• Only transport the device in an upright position with an
emptied condensation tank or drain hose.
• Discharge the collected condensate before transport and
storage. Do not drink it. Health hazard!
Intended use
Only use the device as a stationary dehumidifier for drying and
dehumidifying room air as well as for odour elimination
(ionization) whilst adhering to the technical data and safety
instructions.
Intended use comprises:
• protecting valuables and movables in museums, galleries,
libraries or garages against moisture,
• odour neutralization in garages, archives, wine cellars,
cellar vaults, storage facilities or rooms that are neither
inhabited nor used by persons,
• drying and dehumidifying:
– production plants, underground rooms
– store rooms, archives, laboratories
• keeping dry of:
– instruments, devices, files
– electrical control centres
– moisture-sensitive goods, loads, etc.
Improper use
Do not place the device on wet or flooded ground.
Do not use the device outdoors.
Do not place any objects, e.g. wet clothing, on the device for
drying.
Any unauthorised modifications, such as alterations or structural
changes to the device, are forbidden.
EN 2
Operating manual – dehumidifier / climate manager DH 30 VPR+ / DH 60 VPR+
Page 4

Personnel qualifications
People who use this device must:
• be aware of the dangers that occur when working with
electric devices in damp areas.
• have read and understood the operating manual, especially
the Safety chapter.
Maintenance tasks which require the housing to be opened
must only be carried out by specialist companies for cooling and
air-conditioning or by Trotec.
Residual risks
Warning of electrical voltage
Work on the electrical components must only be
carried out by an authorised specialist company!
Warning of electrical voltage
Before any work on the device, remove the mains plug
from the mains socket!
Hold onto the mains plug while pulling the power cable
out of the mains socket.
Warning
Dangers can occur at the device when it is used by
untrained people in an unprofessional or improper way!
Observe the personnel qualifications!
Behaviour in the event of an emergency
1. In an emergency, disconnect the device from the mains
feed-in:
Pull the mains plug.
2. Do not reconnect a defective device to the mains.
Warning
A falling device can cause injuries! Always transport
and assemble the device with the help of other
persons. Never stand below the device when it is
suspended. Ensure adequate stability of the device's
wall fixing.
Warning
Risk of suffocation!
Do not leave the packaging lying around. Children may
use it as a dangerous toy.
Warning
Ozone formation!
In case of improper use the device generates a minor
concentration of ozone when operating at stage 5.
In general, ozone may cause or intensify fire, it may be
fatal if inhaled and irritating to eyes, respiratory system
and skin!
Endeavour to prevent the formation of ozone. Hence,
never leave the device running at stage5 in continuous
operation!
Notice
Do not operate the device without an inserted air filter!
Without air filter the inside of the device will be heavily
contaminated, this could reduce both the
dehumidification performance and odour elimination
and result in damage to the device.
3 EN
Operating manual – dehumidifier / climate manager DH 30 VPR+ / DH 60 VPR+
Page 5

Information about the device
Value Protection Range technology (VPR+)
If properly dimensioned and operated, the dehumidifiers of the
VPR+series keep the humidity level steady around the clock
and, if needed, neutralize a great number of offensive smells.
The humidity is automatically regulated to the set level that
reliably prevents corrosion, condensation and mould formation.
A relative humidity between 45 and 50% provides better
protection than any other measure against corrosion and rust.
Rust mainly occurs at inaccessible, hardly visible spots.
In addition to the dehumidification and odour elimination, the
process air is further freed from dust and/or soot depending on
the used filter model.
The integrated pump ensures the discharge of the accumulating
condensate even over differences in height.
The fan comes with two stages to adjust the device
performance to the contaminations and conditions in the room.
Description of the device
The dehumidifiers of the VPR+ series use the principle of
condensation to automatically dehumidify rooms.
The fan sucks damp room air through the air inlet(3), the
evaporator and the condenser located behind it. The air is
cooled at the cold evaporator until it is below the dew point.
Water vapour contained in the room air precipitates on the
evaporator fins as either condensation or rime. The
dehumidified, cooled air is rewarmed at the condenser and
blown out at a temperature of approx. 5 °C above room
temperature.
The drier air thus conditioned mixes with the air in the room via
the air outlet(1). The humidity in the room where the device is
positioned is reduced as air constantly circulates through the
device. Depending on the air temperature and the relative
humidity, the condensed water either drops into the
condensation tray continuously or only during the defrost
phases.
To set the desired humidity level, a hygrostat with control
dial(8) is provided in the device's interior. This control dial can
be easily accessed once the filter flap(3) has been removed.
The device can reduce the relative humidity of a room to approx.
30%.
At a room temperature of 15°C, the devices emit 1.6 to 3 times
of their power consumption to the room air in form of heat (see
chapter Technical data, COP). Because of the heat dissipation,
which develops during operation, the room temperature can
therefore rise by approx. 1 to 3°C.
A high humidity level in the air (starting at 70%RH) provides
the perfect breeding ground for mould. However, the room air
must not be too dry either (<40%RH). Materials such as
leather or rubber become porous, and wood becomes brittle and
fissured.
For the storage of vehicles we recommend a relative humidity
between 45 and 50%. For other material-specific humidity
values please refer to the respective manufacturer's instructions
for the stored goods.
Additionally, the device comes equipped with an ionizer which
eliminates odours and bacteria from the room air, if required.
Depending on the model an integrated filter absorbs dust and /
or soot in the room air.
The incorporated pump helps to discharge condensate; in doing
so, it is possible to overcome a difference in altitude of up to
10m. That way, it is possible to discharge condensate across
several storeys.
EN 4
Operating manual – dehumidifier / climate manager DH 30 VPR+ / DH 60 VPR+
Page 6
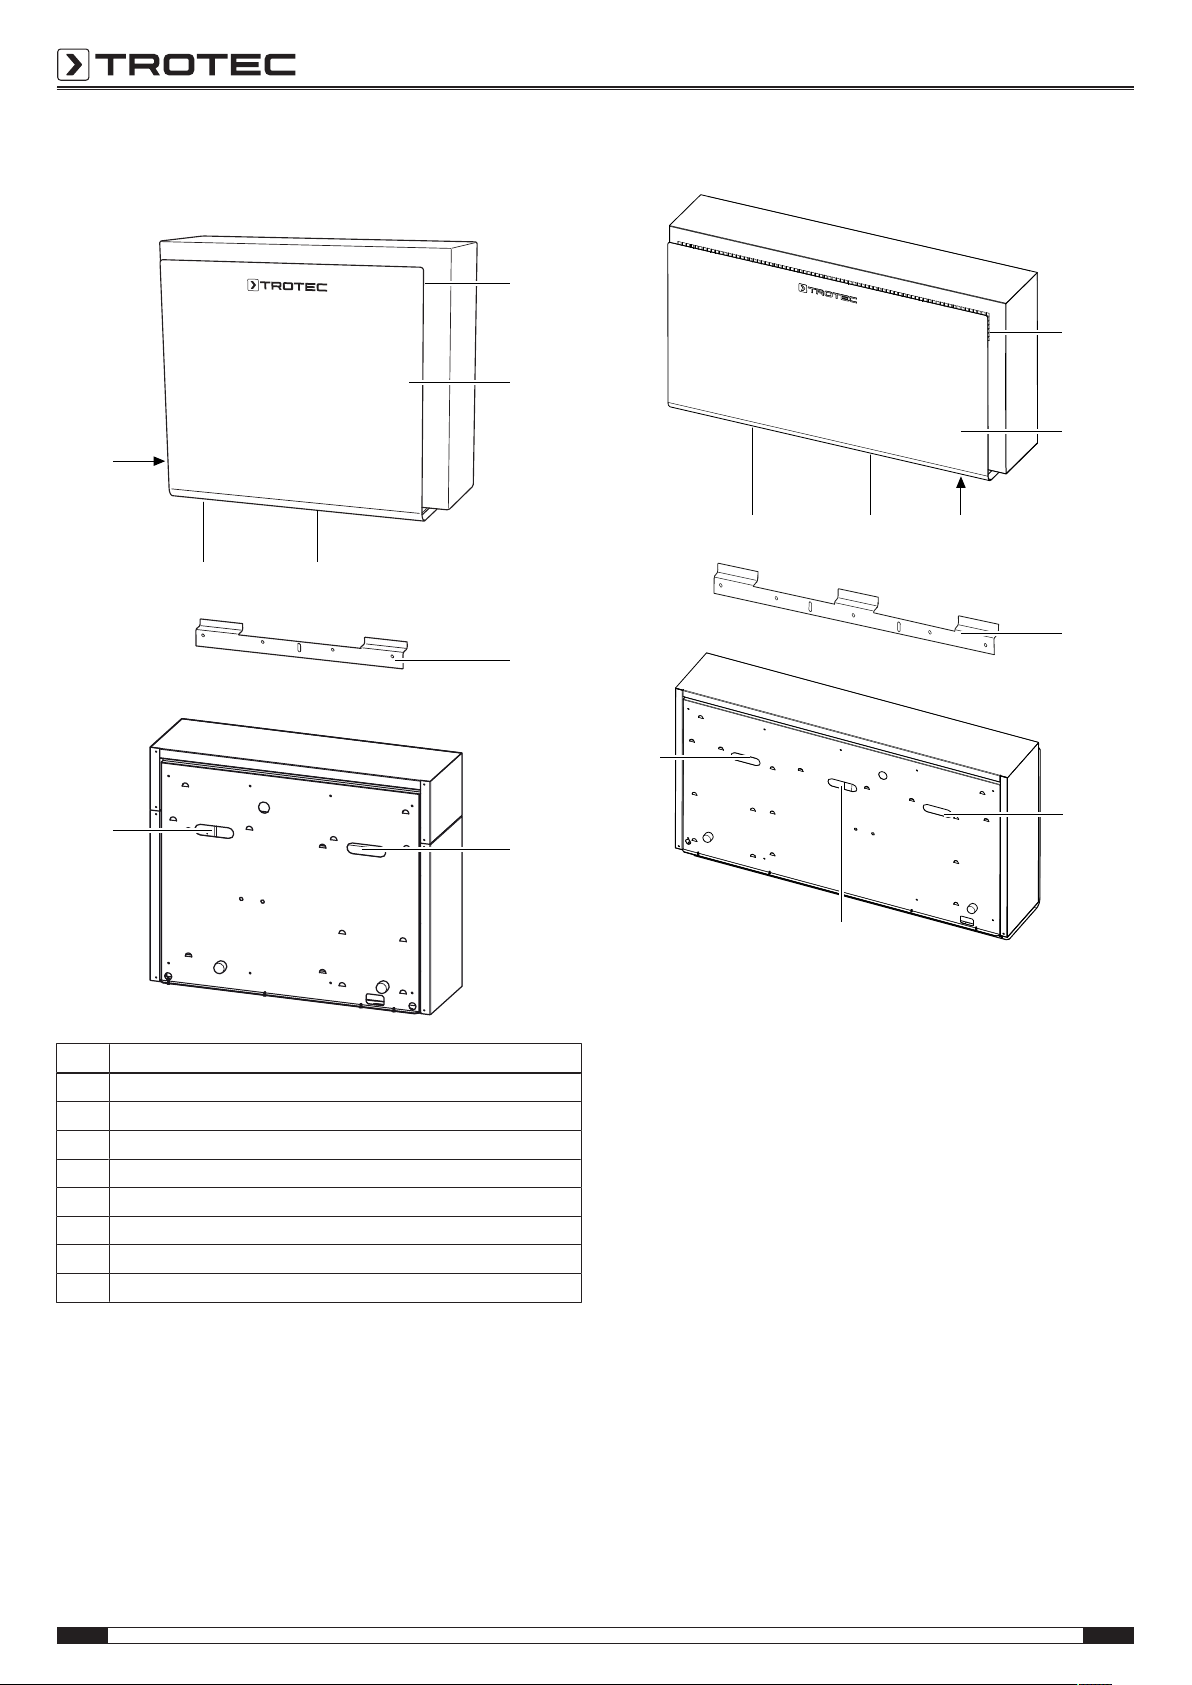
Device depiction
1
2
4
6
3
7, 8
5
6
1
2
6
3
7, 85
6
6
4
DH30VPR+
DH60VPR+
No. Designation
1 Air outlet (behind faceplate)
2 Housing
3 Air inlet with filter flap
4 Wall holder
5 Hose connector for condensation drain hose
6 Suspension
7 Ionizer control panel (tamper-proof installation inside the device)
8 Control dial hygrostat (tamper-proof installation inside the device)
Scope of delivery
• Dehumidifier
• Wall holder
• Air filter (combination filter)
• Air filter (standard)
• Condensation drain hose, ø 5mm (inside), l = 10m
• Power cable with CEE 7/7 Schuko plug
• Operating manual
Available accessories
• Combination filter DH30VPR+ (5pieces): art. no.
7.710.000.926
• Standard air filter DH30VPR+: art. no. 7.710.000.925
• Combination filter DH60VPR+ (5pieces): art. no.
7.710.000.929
• Standard air filter DH60VPR+: art. no. 7.710.000.930
5 EN
Operating manual – dehumidifier / climate manager DH 30 VPR+ / DH 60 VPR+
Page 7
Transport, assembly and preparation for start-up
C
C
A
B
D
DH 30 VPR+
DH 60 VPR+
Always utilize the help of another person to transport and
assemble the DH30VPR+. Always utilize the help of two other
persons to transport and assemble the DH60VPR+. Do not try
to assemble the device without the help of another person. To
lift the device, use a forklift or an elevating truck as appropriate.
Observe the following instructions:
• When assembling the device, keep a sufficient distance to
heat sources.
• When assembling the device, especially in wet areas,
secure the device locally with an RCD (Residual Current
protective Device) which complies with the relevant
regulations.
• Make sure that extension cables are completely unrolled.
• Insert the mains plug into a properly secured mains
socket.
• When assembling the device, observe the minimum
distance from adjacent walls or other objects as described
in the Technical Data chapter.
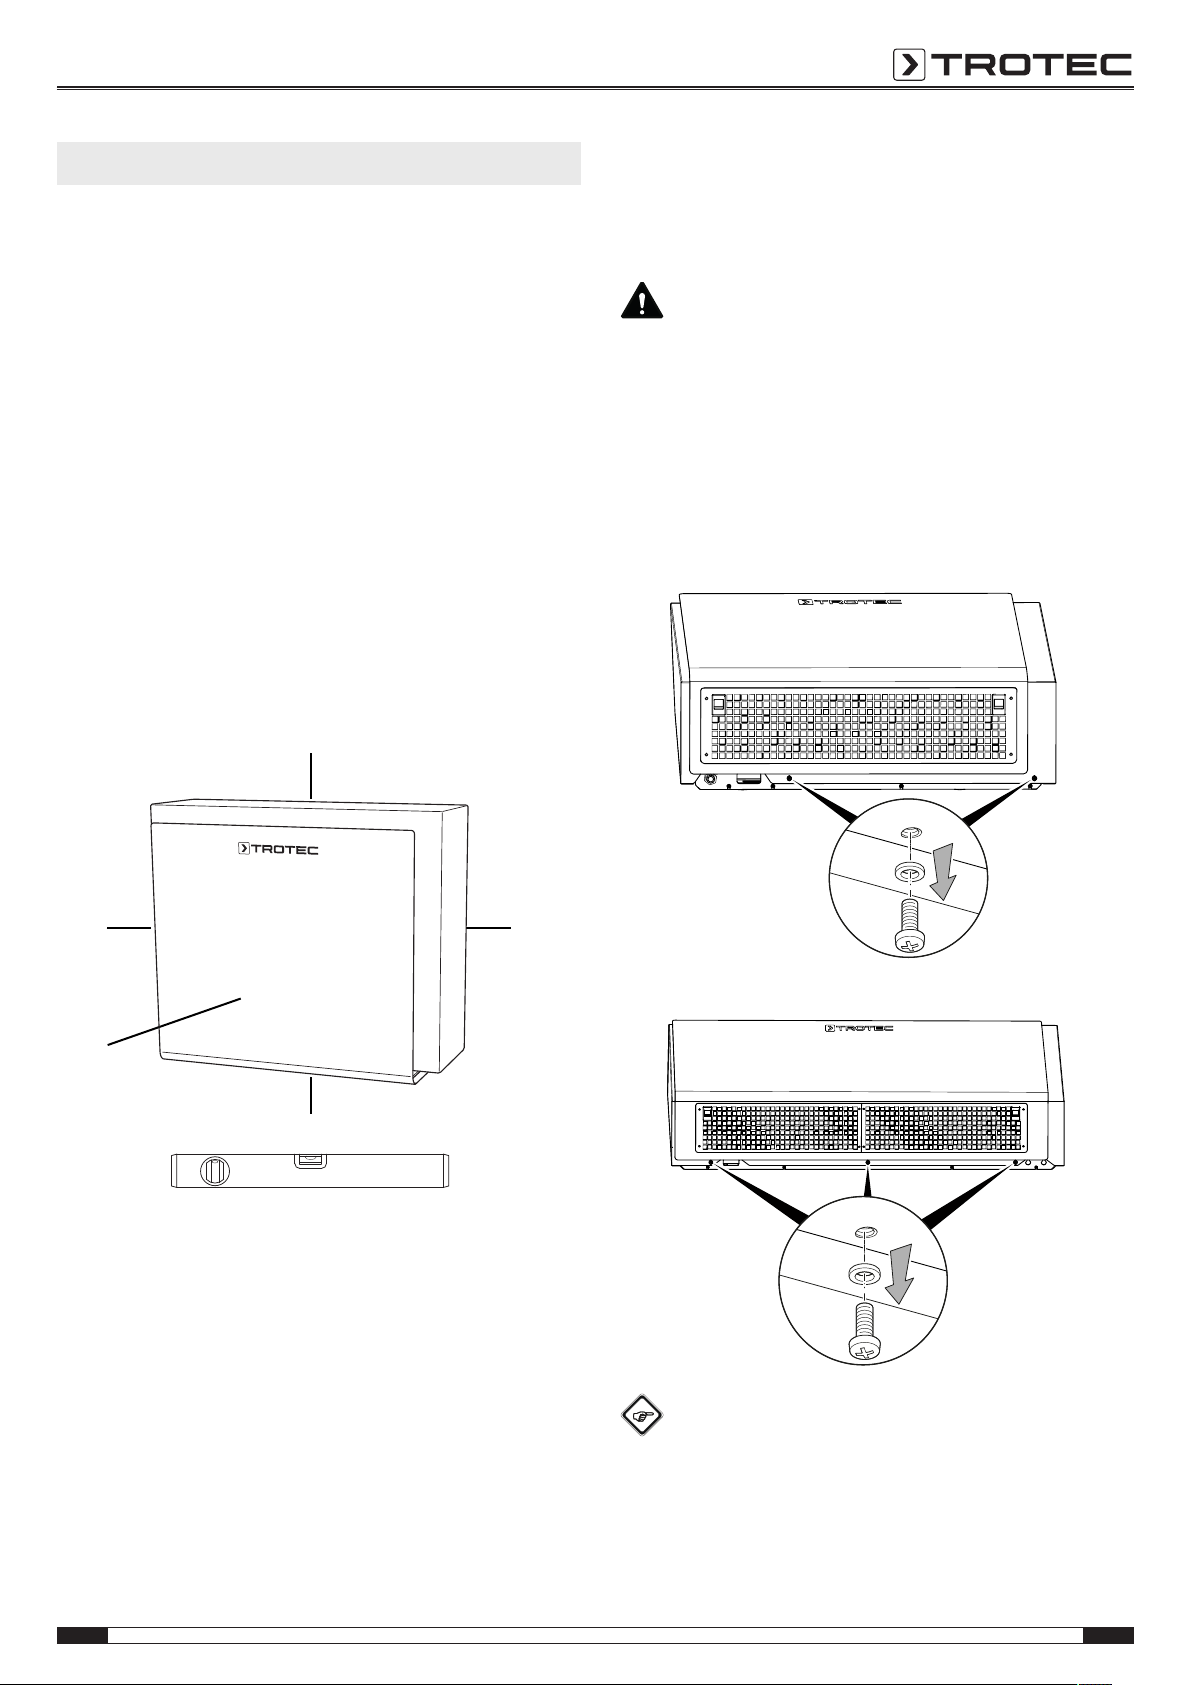
Assembly
Assemble the device as follows:
Select screw and dowel sizes suitable for the weight of the
device (see technical data) and the structure of the wall.
Warning
A falling device can cause injuries! Always transport
and assemble the device with the help of other
persons. Never stand below the device when it is
suspended. Ensure adequate stability of the device's
wall fixing.
1. The table or floor on which you should now unpack the
device must be clean.
2. Open the screw connection at the housing.
EN 6
Info
The principle of hanging up the DH60VPR+ is the
same as for the DH30VPR+. But the DH60VPR+
comes with a longer suspension rail.
The following steps will be illustrated by using the
DH30VPR+ as example.
Operating manual – dehumidifier / climate manager DH 30 VPR+ / DH 60 VPR+
Page 8
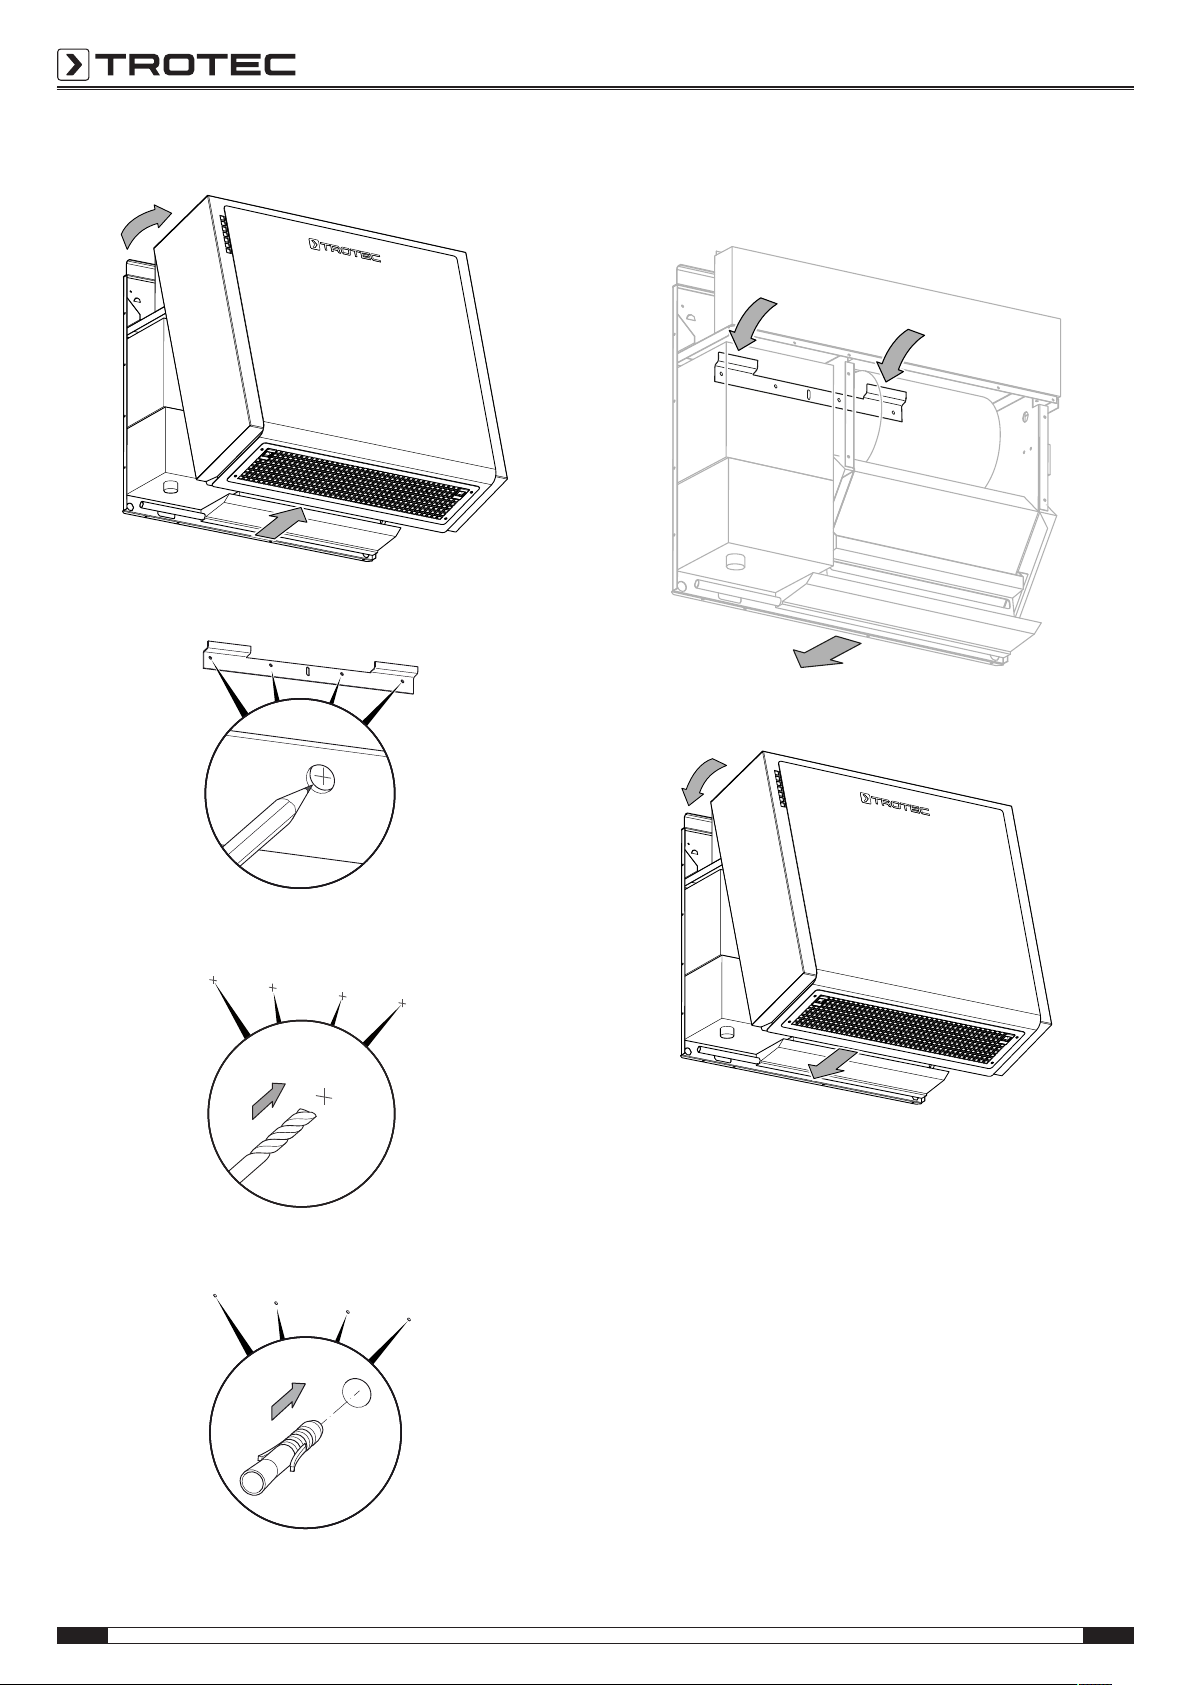
3. Remove the housing.
4. Mark the position for the bore holes.
8. Suspend the device from the wall holder by means of the
mounting brackets. Utilize the help of one or two other
persons as well as suitable lifting gear to do so.
9. Put the housing back on the device.
5. Drill the holes into the wall.
6. Insert suitable dowels into the bore holes.
10. Fasten the housing to the device.
Storage
Drain any possibly remaining condensate.
When the device is not being used, observe the following
storage conditions:
• in an upright and stable position.
• dry and protected from frost and heat.
• protected from dust and direct sunlight.
• with a cover to protect it from invasive dust, if necessary.
7. Fasten the wall holder in place.
7 EN
Operating manual – dehumidifier / climate manager DH 30 VPR+ / DH 60 VPR+
Page 9

Important information regarding the dehumidification performance and drying rate
The dehumidification performance depends on:
• the layout of the room
• the individual usage behaviour
• the room temperature
• the relative humidity
The higher the room temperature and relative humidity, the
greater the dehumidification performance or drying speed at
which a wet vehicle dries.
For use in living rooms, a relative humidity of approx. 50% is
sufficient. In store rooms and archives, the humidity should
generally not exceed a level of approx. 50%.
Dehumidification of garages
For the storage of vehicles we recommend a relative humidity
between 45 and 50%. For other material-specific humidity
values please refer to the respective manufacturer's instructions
for the stored goods.
How the room temperature influences the dehumidification
performance?
In the winter at decreasing mean temperatures of below 15°C
the dehumidifier's capacity and thus the room volumes to be
covered are disproportionately reduced.
This circumstance results from the physical correlations
between the room air's moisture absorption capacity at low
temperatures and the performance curve of condenser dryers
that may appear complex to the layman. In order to render these
complex correlations comprehensible for the typical user we
endeavour to briefly describe the recommended course of action
on the subject of capacity and performance limits of the DH-VPR
+ devices at low temperatures:
Correlation between the temperature in the garage
and duration of the drying process
Mean temperature in a gar-
age during the
winter
starting at
19°C
Approximate drying
duration of wet
vehicles*
using a DH-VPR+
climate manager
less than 1day
The drying period
can be reduced
through additional
ventilation**
drying
16 – 19 °C approx. 1day
accelerated by
approx. 50 – 70%
12 – 15 °C 1 – 2 days
8 – 11 °C 3 – 5 days
4 – 7 °C more than 5days
drying
accelerated by
approx. 30 – 50 %
* The time for drying moisture
accumulated in the car body,
at the underbody and inside
the engine compartment as
well as in ribbings and
hollows could even be
significantly extended if there
is no air circulation!
Rule of thumb:
The higher the room temperature, the sooner will the
dehumidifier DH-VPR+ have "dried" the room air and therefore
all the vehicles in the garage. In contrast, the lower the room
temperatures, the longer will it take to completely dry wet
vehicles. To be sure, even at low temperatures the DH-VPR+
can quickly dry the air in the garage to the desired level, the car
and floor however remain moist.
On principle, it takes a disagreeably long time to dry wet
vehicles at temperatures below 15°C (up to several days), this
is particularly problematic considering the instant corrosion. It is
not due to the dehumidifier DH-VPR+ that the vehicle will not
dry, but rather the physical circumstances of humidity combined
with the evaporation behaviour (drying rate) of water.
A consequence of low temperatures is that on surfaces water
evaporates very slowly even at an ideal room climate of
50%RH. In simplified terms, this is due to the fact that at low
temperatures – insofar as relative humidity (%RH) is concerned
– the gradient of vapour pressure between the dry room air and
the water surface is very large, in terms of the absolute
humidity (g/m³), however, it is very small.
As a result, the water at wet vehicles situated in cold garages
evaporates very slowly even though the DH-VPR+ devices are
running at full capacity.
** Additional ventilation has a
favourable impact on the drying
duration for residual moisture
accumulated in the car body, at
the underbody and inside the
engine compartment as well as
in ribbings and hollows.
EN 8
Operating manual – dehumidifier / climate manager DH 30 VPR+ / DH 60 VPR+
Page 10

Here a worst-case scenario:
A modern car wet with rain is parked in a garage along with a
classic vehicle. The room temperature is 4°C. Attributable to
evaporation of water at the still warm, wet vehicle, the relative
humidity in the garage quickly rises to 95%.
95% of relative humidity at 4°C mean that in absolute terms
only about 6g of water are bound in a cubic metre of air, for
that is the physical limit that can be absorbed.
For comparison:
At a room temperature of 21°C and 95%RH, 17g of water
are retained by a cubic metre of air. In other words, for every
100m³ of room air in the garage the air contains over 1litre
more of pure water (than at 4°C) in the form of water vapour.
This quickly adds up to several litres of water in the garage! And
it results in the DH-VPR+ withdrawing next to none of the water
from the room air at these low temperatures, because it is
unable to extract any. Hardly any water is bound in the room air,
rendering dehumidification a physical impossibility.
The higher the room temperature, the more moisture
can be absorbed by the room air
Temperature in the
garage:
Relative humidity:
4 °C 21 °C
50 % 95 % 50 % 95 %
3 g/m³ 6 g/m³ 9 g/m³ 17 g/m³
Moisture retained
by the room air:
(absolute humidity)
Consequence for
drying wet
vehicles:
With 95% the relative humidity given in our example is rather
high. The vehicle's corrosion and the mould formation at the
walls started immediately. It does not take a great amount of
absolute humidity in the air to get the processes of corrosion
and mould growth going. It is enough if water is bound as
vapour, even though expressed in absolute terms (g/m³) the
values are not very impressive.
Vapour pressure
difference:
3 g/m³
Low drying speed
(minor vapour pressure
difference)
Vapour pressure
difference:
8 g/m³
High drying speed
(great vapour pressure
difference)
And there is another aspect:
Due to the minor absolute vapour pressure differences, the
drops of water on the wet car do not evaporate. It stays wet
despite the DH-VPR+ operation. And the situation is the same:
Low temperatures --> minor differences in the air's moisture
content with regard to the absolute humidity level (g/m³) in spite
of large differences regarding the relative humidity.
Even at low temperatures, the DH-VPR+ keeps the room climate
at the desired level. If new water enters the scene at these low
room temperatures by way of a wet vehicle and the temperature
remains low, the wet vehicle will dry very slowly, hence causing
the humidity inside and at the car to rise to a corrosion-prone
level. Dry keeping is not a problem. Quick drying, however, is a
physical impossibility.
Conclusion:
Using DH-VPR+ devices classic cars can be stored and
showcased during the winter to a temperature of 0°C. Yet the
capacity is disproportionately reduced (see table Correlation
between the temperature in the garage and duration of the
drying process).
However, if both the storage and a quick drying of wet vehicles
are required – also during the winter – you will additionally have
to ensure heating in order to increase the drying rate for wet
vehicles so as to effectively prevent corrosion and mould
growth.
So, if the classic car garage is used all through the year and/ or
there are often wet cars inside, we recommend room
temperatures of at least 15°C. If water only sporadically enters
the garage, there is no need for permanent heating. It will be
sufficient to heat the garage to a level between 15°C and 20°C
during the drying phase lasting several days. On these grounds,
we recommend a general on-demand heating option to achieve
a reasonable temperature for drying the garage quickly.
Depending on the temperature, a heating phase of 3 to 7days
should normally suffice to ensure a fail-safe drying process.
This period can be considerably reduced by the use of fans.
Especially for a quick drying in the car body, at the underbody
as well as in ribbings and hollows we always recommend the
use of fans for wet classic cars (see table Correlation between
the temperature in the garage and duration of the drying
process).
The more frequently and extensively the cars are used, the
higher should be the average temperature in the garage so as to
attain a quick and fail-safe drying process and thus to prevent
corrosion and mould.
9 EN
Operating manual – dehumidifier / climate manager DH 30 VPR+ / DH 60 VPR+
Page 11

Operation
NORMAL
DRIER
8
9
10
11
12
13
DH 30 VPR+
DH 60 VPR+
• Once the device has been switched on, the drying function
works fully automatically.
• The ionization function may be started manually as
needed, see chapter Ionization.
• To make sure that the built-in sensor can determine the
humidity correctly and that the room air is permanently
filtered, the fan continues to operate until the device is
switched off.
• Avoid open doors and windows.
Info
The possible dehumidification performance of the DHVPR+ climate managers is directly tied to the room
temperature.
The higher the room temperature, the more moisture
can be withdrawn from the room air.
The lower the room temperature, the less moisture can
be withdrawn from the room air.
For more information please read the chapter
Important information regarding the
dehumidification performance and drying rate. The
physical correlations are illustrated elaborately by way
of example scenarios and the recommended course of
action.
No. Designation
8 Control dial hygrostat
9 Fusing 6.3 A / T (time delay)
10 Power Ionization button
11 Ionizer control dial
12 Warning light
13 Fan stage switch
Installing the condensation drain hose
1. Connect one end of the condensation drain hose to the
bulkhead coupling.
Operating elements
Info
You can access the operating elements by opening the
filter flap at the device, see chapter Maintenance.
The control panel of the DH30VPR+ is located on the
left-hand side, in case of the DH60VPR+ it can be
found on the right.
The depiction of the operating elements features the
device DH60VPR+ by way of example. In case of the
DH30VPR+, the individual operating elements can be
located elsewhere but with identical labelling.
2. Place the other end of the condensation drain hose in a
sufficiently dimensioned container (at least 50litres for the
DH30VPR+, 90 for the DH60VPR+) or lead the hose end
to a drain.
3. Avoid kinking.
EN 10
Operating manual – dehumidifier / climate manager DH 30 VPR+ / DH 60 VPR+
Page 12

Notes regarding the condensation drain hose:
NORMAL
DRIER
8
NORMAL
DRIER
8
9
10
11
12
13
• The maximum pump height amounts to 10m for the
DH30VPR+ and to 15m for the DH60VPR+.
• The condensation drain hose should be no longer than
25m.
• The end of the condensation drain hose must always be
free and may not protrude into the water.
• While laying the condensation drain hose, make sure that
– even at low temperatures – the water inside the hose
cannot freeze.
Switching the device on
1. Ensure that the condensation drain hose has been laid and
connected properly. Do not create tripping hazards.
2. Ensure that the condensation drain hose is not bent or
jammed and that there are no objects on the condensation
drain hose.
3. Ensure that the condensation can run off properly.
4. Insert the mains plug into a properly secured mains socket.
Regulating the room humidity level
1. Set the desired humidity level via the control dial(8) of the
hygrostat.
2. Turn the control dial to the middle of the word NORMAL.
After 2days a humidity level between 50 and 55% should
be reached.
3. Then check the humidity level by means of a
thermohygrometer. If the air is too dry (insufficient humidity
level), turn the hygrostat control approx. 1cm to the left, if
the air is too humid (excessive humidity), turn it approx.
1cm to the right (towards the word DRIER).
4. Every time you have changed the hygrostat setting wait for
2days, then repeat the procedure until the desired humidity
level is reached.
Automatic defrost
If the room temperature is lower than 15°C, the heat exchanger
will freeze during dehumidification. The device will then carry
out an automatic defrost. The duration of the defrost process
can vary depending on the room temperature. The lower the
temperatures, the longer the defrost period.
Ionization
Ex factory, the dehumidifier DH-VPR+ comes equipped with a
special, high-quality NTP air purification unit. In its plasma zone,
airborne odours, pollutants and microorganisms, as are found
primarily in the recommended fields of application for the VPR
+series, can be neutralized efficiently through oxidative
conversion.
When contaminated air flows through the ionizer unit, it is
neutralized by means of electrical excitation to form singlet
oxygen with broken down hydrogen and oxygen molecules,
which are harmless for humans and nature.
The ionizers employed in the VPR+series are able to
continuously neutralize most types of these application-specific
odorous substances in the room air. As a consequence the
odour nuisance is reduced slowly, but steadily.
Ionization control
The ionization function can be switched on via button10. When
the ionization function is activated, the button(10) is
illuminated.
The device comes with a controller for 5intensity levels(11).
With the settings 1 to 4 the production of singlet oxygen can be
ð Upon reaching the desired humidity value, the compressor
switches off automatically.
ð The fan keeps running to ensure a permanent air circulation
for filtering the air, neutralizing possible odours and
monitoring the humidity level.
ð If the set humidity level is exceeded, the compressor will
automatically be activated to dehumidify the room air once
again.
11 EN
Operating manual – dehumidifier / climate manager DH 30 VPR+ / DH 60 VPR+
adjusted from the minimum to the maximum value for the
standard permanent treatment.
Beyond that, an additional 5th level is available for short-time
intensive treatments.
When using this fifth setting, a small amount of ozone is
generated inside the device, however, if used as intended,
this concentration is neither a health hazard nor is it
damaging to the material.
Page 13

Recommended procedure for standard treatment
(settings 1-4)
The perception of odours is subjective. Besides, fluctuating
climate parameters such as the humidity level and room
temperature influence not only the diffusion of odour particles in
the room, but also the reaction potential for the oxidative
conversion of airborne odours and pollutants.
For this reason it is not possible to specify a linear reference
value e.g. depending on the room size. Instead we recommend
an individual, active levelling geared to the local circumstances
and your personal requirements:
1. Before the first application, air the room out thoroughly.
2. To begin with, set the ionizer to level3 and the fan to
stage1 and let the device run with these settings for up to
7days.
3. During or at least at the end of the treatment there should
be either a perceivable reduction of the odour intensity
and/or a slight ozone odour.
If so, you can now turn the ionizer down by 1level and, if
required, repeat this step according to your odour
perception until you have reached level1.
4. If after a period of 7days you cannot observe a reduction of
the odour intensity or an ozone smell, increase the
operating level one by one up to max. level4 and treat the
room again for up to 7days. Before using level5 (intensive
treatment), first read the Procedure for intensive treatment.
Note:
• Any time you reduce or increase the setting by one level,
wait for at least 7days before making another change.
After every interval and before any level adjustment air the room
out exhaustively!
For the standard treatment the fan should be set to stage1.
Procedure for intensive treatment
In case of considerable odour nuisance – e.g. from long-lasting
sources such as drains, fuel odours or the smell of mould or
intensive one-time sources like tobacco, animal smells or musty
odours in the car etc. – and if the previously performed standard
treatment was not successful, it is appropriate to carry out a
short-time intensive treatment at level5 to effectively eliminate
the cause.
1. Make sure that all surfaces in the room to be treated are
freely accessible for the circulatory air of the DH-VPR+
(open windows, boot and bonnet of vehicles, open wardrobe
doors, shut the curtains to provide the best possible
effective surface). If possible, remove car mats and carpets
in the passenger compartment and boot and spread them
out on the floor of the garage. The better the air circulation
at the surfaces to be treated, the better the chances for a
successful odour elimination. To achieve optimum results,
the room temperature during the intensive treatment should
be in a range of 20 to 25°C. This generally serves to ensure
a diffusion of the odorous substances. During the intensive
treatment the room temperature must not exceed 28°C!
2. Set the ionizer to level5 and the fan to stage2 and let the
device run with these settings for 24hours.
3. After this treatment period set the intensity switch from 5
back to a lower level and see to a thorough 15-minute
ventilation (rush airing) of the room. The ozone smell is
usually evaporated after 2 to 3 intermittent ventilation
processes.
4. If after the 24-hour treatment the reduction in odour
intensity is not satisfactory, repeat step2 up to five times as
the circumstances require.
5. After a successful odour reduction repeat step3 and
continue with the standard treatment (levels1-4).
6. Also set the fan to at least stage1.
Small amounts of ozone are generated within the device during
the intensive treatment. In the room air the ionizer does not
produce ozone concentrations exceeding the generally
applicable limit values. For reasons of safety and due to
individual sensitivities however, there must be no person or
animal present in the room to be treated. Entering the room as
well as brief visits to switch the device on and off are as
harmless as the short-term exposure to the ozone smell that is
sometimes subjectively perceived as intense.
Note:
• If an ozone odour becomes noticeable in the room (not just
at the outlet opening) during the standard treatment,
gradually turn the intensity down until the smell is no
longer perceivable (Remember to air the room every time
you lower the intensity level).
EN 12
Operating manual – dehumidifier / climate manager DH 30 VPR+ / DH 60 VPR+
Page 14

Ozone smell
If used as intended and for appropriate room sizes in inhabited
rooms such as basements, garages, halls or libraries our ionizer
does not produce harmful concentrations exceeding the max.
allowable concentration at the workplace (MAC limit value) even
if set to the highest level(5).
And yet, even this low concentrated ozone odour is often
perceived as very disagreeable. The factor between the odour
threshold perception of 40µg/m³ and the valid exposure limit
values at the workplace based on the MAC value (maximum
allowable concentration) of 0.2mg (200µg)/m³ of room air
amounts to 5.
With ozone concentrations of as little as 40µg/m³ or slightly
above many a person perceives this ozone smell as offensive
and very disagreeable. Up to the MAC limit value variations in
the ozone concentration can hardly be discerned by way of
smell, which means that even with completely uncritical
concentrations the reek of ozone is distinctive.
However it also indicates that at the same time strong
odoriphores are being effectively neutralized, e.g. tobacco,
animal or mould odours diffusing from leather, textiles, carpets,
wood or other porous materials.
Room temperatures and odours
Also important for a successful application beside the correct
dosing is the temperature at which the treatment takes place.
Heat increases the rate at which odorous substances diffuse
from materials. Once the odour is in the air, it is bound by
oxygen.
If during the wintertime the room temperature is too low (below
12°C), the odour might come back all of a sudden in the
summer. Additional heating in the cold season helps to improve
the release of not yet diffused odour particles. Hence, the
correct temperature for an effective treatment is to be attained
by trial and error.
It is easily conceivable, that you only need to use the ionizer
after the winter season, when the fuel evaporation of vehicles
with carburettor increases, odours from textile coverings begin
to diffuse or else only after extreme precipitation periods, when
the basement begins to smell musty owing to the increasing
moisture penetration in the brickwork.
Individual odour perception
The odour perception and rating differs from one individual to
another.
Because of this individual perception, a general across-theboard recommendation for dosage and usage is not feasible,
therefore every user can only achieve his odour balance by
actively and patiently levelling out the intensity levels.
Whether it concerns the smell of mould in a vault cellar, fuel
odours in the garage or the musty smell in a historical library –
every person feels differently about it. Mostly, it is not the smell
per se that is regarded as bothersome, but the intensity.
Subtle smells, generally associated with the respective
collector's item, are often desirable and even perceived as
quaint – an automobile enthusiast for instance might just love a
whiff of gas in the garage whereas his wife will probably take to
her heels once a certain intensity is reached. For an oenophile
an old wine cellar may well smell a little musty and old, but
never foul. There are many other examples we could add to the
list.
To ensure an adequate efficiency of the device as well as your
individual satisfaction, active tuning of the intensity level over
several weeks bringing it closer to your personal odour balance
cannot be avoided.
An odour neutraliser is no odour improver
Nevertheless, you should always bear in mind that this device is
an odour neutraliser, not an odour improver as may be
commonly used for the active scent marketing in department
stores. Pure neutralization through the electrical oxidation or
chemical bonding of odours does not imply a subsequent
fragrance or pleasant smell in the air.
From experience: in some cases it is also possible that after the
successful neutralization of primary odours other smells, which
have previously gone unnoticed, become apparent and are then
in turn individually perceived as objectionable.
Odour is and will remain an extremely distinct issue greatly
influenced by the personal sense of smell and the perceptual
sensitivity.
With a device of the VPR+series you have chosen a
professional tool to improve the storage conditions for your
valuables.
We are not in a position to improve the existing state of
materials and objects, but, if applied correctly, our products can
contribute to their permanent preservation by protecting your
valuables from corrosion, dust, mould and bacterial
decomposition.
13 EN
Operating manual – dehumidifier / climate manager DH 30 VPR+ / DH 60 VPR+
Page 15

Ozone treatment for similar applications
A (highly concentrated) ozone treatment is carried out for
example in the professional car valeting. Especially in case of
pre-owned cars, unpleasant odours inside the passenger
compartment (e.g. former smoker's vehicle) can be eliminated
in this manner.
The oxidising effect of ozone turns odorous substances into
odourless substances. Germs and odour-causing bacteria are
killed in this process – even at otherwise inaccessible locations
such as under seats or in ventilation openings. As a result of this
treatment the vehicle is disinfected and usually odour-free.
The ozone treatment is also a worldwide standard method for
odour neutralization and disinfection in the hotel industry, used
in smoking rooms or for other substantial odour nuisances.
In the sector of fire, water and sewage damage restoration
ozonization has been the most commonly used standard method
for many years.
Employed for these applications are however pure ozone
generators with concentrations of 5g/m³ and more, which
cannot be compared with the NTPgenerator built into the
VPR+series.
Should you have similar requirements or be unable to get the
odour sources under control despite the application of the
VPR+ionizer, please contact our specialist consultants. We'd be
happy to advise you and we offer ozone generators of every
performance class for the professional odour neutralization. If
necessary, we will refer you to proven experts in your region.
Neutralization of fuels
Generally, the fuel odour in garages can be neutralized
sufficiently. Within 2weeks the objective of a sufficient
neutralization rate is usually achieved.
With extreme evaporation rates however (many sources of
evaporation, sports carburettor, leaky tank lines or gaskets and
high room temperatures) in some cases the neutralization
performance of the (or an) ionizer is not sufficient to produce the
desired success. An ozone concentration well beyond the max.
allowable concentration at the workplace (MAC limit value)
would have to be emitted in the room.
Leaving aside the fact that fuel vapours of this concentration are
hazardous to health, low-dose ionizers can solve this special
problem only in part.
In order to successfully eliminate such extreme fuel odours,
mechanical and chemical bonding of the vapours has to be
effected in addition to the electrical neutralization.
For this purpose we offer mechanical air cleaners that have
activated carbon filters specifically designed for extreme fuel
odours. Combined with the ionizer we achieve a satisfactory
solution in 99% of cases with extreme fuel odours. Often
another separate ionizer can also be helpful in such cases.
Please contact our consultants as needed.
Air filter
As standard, devices of the VPR+series are delivered with 2air
filters:
• 1 x air filter dust (standard)
• 1 x air filter dust/soot (combination filter)
The technical data given for the air volume freely blowing refers
to the air volume at the device outlet without filter. Every air
filter applied reduces the amount of circulated air depending on
the type of filter and its filtration efficiency.
All filters are adapted for the devices of the VPR+series and
work together perfectly.
Owing to the more efficient 2-stage filter ladder, the dust/soot
combination filter reduces the amount of exhaust air to a greater
extent than the standard air filter. The circulating air
performance depends on the contamination level of the
combination filter: with a new air filter it is reduced by 15%, if
the filter is heavily contaminated with soot the circulating air
performance will be reduced by up to 99%. Soot contains oily
products from incomplete combustion and clogs the filter
surface excessively – especially when combined with the dust
from the room air. On these grounds and in case of a high dust
and soot pollution it is especially important to regularly check
the air filter for dirt and to replace it if necessary.
The two stages of the fan permit an individual adjustment of the
circulating air performance to the respective room size and
odour nuisance. The selected filtration method must be
observed, since the attainable air flow rate varies depending on
the used filter type (standard or combination filter). The table
below contains the model-specific air flow rates for the fan
stages1 and 2 including all filter combinations:
DH30VPR+:
Fan stage Freely blowing Standard filter Combination filter
Stage 1 502 m³/h 455 m³/h 420 m³/h
Stage 2 745 m³/h 685 m³/h 635 m³/h
DH60VPR+:
Fan stage Freely blowing Standard filter Combination filter
Stage 1 745 m³/h 675 m³/h 590 m³/h
Stage 2 1,065 m³/h 985 m³/h 900 m³/h
In garages with modern vehicles, where corrosion is of minor
importance, in museums, libraries or wine cellars, thus all
rooms in which the emission of soot can normally be ruled out
and where the prevention of mould and bacteria is paramount, it
is advisable to use the standard air filter. The standard air filter
has less impact on the reduction of circulated air volume than
the combination filter. Consequently a higher air circulation is
achieved when using the standard air filter. Albeit, for the filter
change the same rules apply as for the combination filter.
A dirty air filter significantly reduces the dehumidification
performance, the equipment's lifetime and the efficiency of
odour neutralization.
EN 14
Operating manual – dehumidifier / climate manager DH 30 VPR+ / DH 60 VPR+
Page 16

Shutdown
DH 30 VPR+
DH 60 VPR+
Warning of electrical voltage
Do not touch the mains plug with wet or damp hands.
1. Hold onto the mains plug while pulling the power cable out
of the mains socket.
2. If necessary, remove the condensation drain hose and any
residual fluid from it.
3. Clean the device according to the Maintenance chapter.
4. Store the device according to the Storage chapter.
Errors and faults
The device has been checked for proper functioning several
times during production. If malfunctions occur nonetheless,
check the device according to the following list.
The device does not start:
• Check the power connection (230 V/1~/50 Hz).
• Check the power cable for damages.
• Check the on-site fusing.
• Have the electrics checked by a specialist company for
cooling and air-conditioning or by Trotec.
An alarm signal is emitted:
• The pump attempts to pump off a larger quantity of water.
The device will be switched off completely. As soon as the
water is gone, the device will restart and the alarm dies.
• If the emitted alarm signal is a continuous tone, the
condensate pump inside the device needs to be checked.
To do so, please proceed as follows:
1. Hold onto the mains plug while pulling the power cable out
of the mains socket.
2. Open the screw connection at the housing.
The device is running, but there is no formation of
condensate:
• Check whether the condensation drain hose is positioned
correctly.
• Check the room temperature. Observe the device's
permissible operating range according to the technical
data (see chapter Important information regarding the
dehumidification performance and drying rate).
• Ensure that the relative humidity complies with the
technical data (see chapter Important information
regarding the dehumidification performance and drying
rate).
• Check the preselected humidity level at the hygrostat's
control dial(8). The humidity in the room must be above
the selected range. Reduce the desired humidity level by
turning the control dial(8) to the right (towards the word
DRIER).
• Check the condensate pump for proper functioning or
unusual vibrations and sounds. Remove external dirt (see
chapter Maintenance).
• Check the air filter for dirt. If necessary, clean or replace
the air filter (see chapter Maintenance).
The device is loud or vibrates:
• Check whether the device is mounted horizontally.
• Check whether the air filter has been inserted correctly.
15 EN
Operating manual – dehumidifier / climate manager DH 30 VPR+ / DH 60 VPR+
Page 17

3. Remove the housing.
4. Check whether the float in the container floats. If required,
fill a little water into the condensation tray. If the float is
stuck and does not float, it could help to lightly tap the side
of the container.
5. Check whether water has accumulated in the condensate
collection container or the condensation tray.
8. Fasten the housing to the device.
9. Plug the power cable back into the mains socket.
If the alarm signal continues despite these measures, please
contact Trotec.
The device gets very warm, is loud or loses power:
• Check the air filter for dirt. Remove external dirt.
• Check the inside of the device for dirt. If necessary, clean
the interior of the device using compressed air.
Your device still does not operate correctly after these
checks?
Have the device repaired by authorised expert staff or by Trotec.
6. If so, clean the drain hoses.
7. Put the housing back on the device.
EN 16
Operating manual – dehumidifier / climate manager DH 30 VPR+ / DH 60 VPR+
Page 18

Maintenance
Maintenance intervals
Maintenance and care interval before every
start-up
Check air inlets and outlets for dirt and
foreign objects and clean if necessary
Clean the exterior X X
Visually check the inside of the device for
dirt
Check for damage X X
Check the attachment screws X X
Test run X
Replace air filter X
Replace air filter (in case of a high dust
and/or soot pollution)
Empty the condensate pump, condensation
tray and/or condenser dryer
X X
as needed at least every 2
weeks
X X
every 2 months at
the latest
X
at least every 4
weeks
at least every 6
months
at least annually
Maintenance and care log
Device type: .............................................
Maintenance and care interval 1 2 3 4 5 6 7 8 9 10 11 12 13 14 15 16
Check air inlets and outlets for dirt and
foreign objects and clean if necessary
Clean the exterior
Visually check the inside of the device for
dirt
Check for damage
Check the attachment screws
Check the condensate pump and tank, and
clean if necessary
Test run
Comments
Device number: ....................................
1. Date: ................................
Signature: ............................
5. Date: ................................
Signature: ............................
9. Date: ................................
Signature: ............................
13. Date: ..............................
Signature: ............................
17 EN
2. Date: ................................
Signature: ............................
6. Date: ................................
Signature: ............................
10. Date: ..............................
Signature: ............................
14. Date: ..............................
Signature: ............................
Operating manual – dehumidifier / climate manager DH 30 VPR+ / DH 60 VPR+
3. Date: ................................
Signature: ............................
7. Date: ................................
Signature: ............................
11. Date: ..............................
Signature: ............................
15. Date: ..............................
Signature: ............................
4. Date: ................................
Signature: ............................
8. Date: ................................
Signature: ............................
12. Date: ..............................
Signature: ............................
16. Date: ..............................
Signature: ............................
Page 19

Activities required before starting maintenance
DH 30 VPR+
DH 60 VPR+
• Do not touch the mains plug with wet or damp hands.
• Before any work, remove the mains plug!
Warning of electrical voltage
Maintenance tasks at the electrical equipment or the
air-conditioning technology must only be carried out by
specialist companies for cooling and air-conditioning or
by Trotec.
Cleaning the housing
Clean the device with a soft, damp and lint-free cloth. Ensure
that no moisture enters the housing. Protect electrical
components from moisture. Do not use any aggressive cleaning
agents such as cleaning sprays, solvents, alcohol-based or
abrasive cleaners to dampen the cloth.
2. Remove the housing.
Cleaning the inside of the device
Perform this activity once a year.
1. Open the screw connection at the housing.
3. Clean the hose lines at the pump and remove any dirt.
4. Put the housing back on the device.
EN 18
5. Fasten the housing to the device.
6. Plug the power cable back into the mains socket.
Operating manual – dehumidifier / climate manager DH 30 VPR+ / DH 60 VPR+
Page 20

Refrigerant circuit
3
• The entire refrigerant circuit is a maintenance-free,
hermetically sealed system and may only be maintained or
repaired by specialist companies for cooling and airconditioning or by Trotec.
Replacing the air filter
Perform this activity every 6 months. In case of a high dust and/
or soot pollution the air filter has to be replaced after 2months
at the latest.
Notice
Ensure that the air filter is not worn or damaged. The
corners and edges of the air filter must not be
deformed or rounded. Before reinserting the air filter,
make sure that it is undamaged and dry!
Notice
A dirty air filter obstructs the air current. This can lead
to damages at the refrigerant circuit and ionizer.
During operation with a dirty air filter there will be
neither dehumidification nor ionization.
2. Remove the air filter.
3. Install the new air filter. In doing so, make sure that the
white side of the combination filter faces outwards.
The air filter's frame must line up precisely with the corners
and edges of the cut-out to prevent unfiltered air flows!
1. Open the filter flap(3).
4. Dispose of the used filter according to the national
regulations.
5. Refit the filter flap(3).
19 EN
Operating manual – dehumidifier / climate manager DH 30 VPR+ / DH 60 VPR+
Page 21

Technical annex
l / 24 h
35
30
25
20
15
10
°C
1) 2)
40 % 50 %
30 %
60 % 70 %
80 %
0 10 20 30 40 50 60
2,15
1,90
1,70
1,50
1,35
1,20
0,80
0,75
0,70
0,65
0,60
0,55
DH 30 VPR
DH 30 VPR+
l / 24 h
35
30
25
20
15
10
°C
1) 2)
40 % 50%
30 %
60 % 70%
80 %
0 20 40 60 80 100 120
4,1
3,5
3,1
2,6
2,3
1,9
1,3
1,2
1,1
1,0
0,9
0,8
DH 60 VPR
DH 60 VPR+
Technical data
Parameter Value
Model
DH30VPR+ DH60VPR+
Dehumidification performance see dehumidification diagrams
Mains connection 1/N/PE~ 230 V / 50 Hz
Power cable CEE 7/7 / l = 3.5 m
Power input dehumidification 0.75 kW 1.2 kW
Power input ventilation 88 W 85 W
Nominal/peak current 4.4 A / 15.8 A 7.5 A / 30 A
Heat emission at 15°C 1.35 kW 2.3 kW
Coefficient of performance (COP *) 2.5 2.9
Refrigerant R-407C R-407C
Amount of refrigerant 0.5 kg 0.8 kg
GWP (Global Warming Potential) 1774 1774
Air flow rate (freely blowing, stage2) 745 m³/h 1,065 m³/h
Sound pressure level (3 m distance) 52 dB(A) 54 dB(A)
Operating range temperature 0to 40°C 0to 40°C
Setting range relative humidity 30 % to 60 % RH
Max. permissible relative humidity 90 % RH
Max. pump height of the condensate pump 10 m 15 m
Condensation drain hose ø 5 mm (inside), l = 10 m
Weight 57 kg 90 kg
Dimensions (width x depth x height)
787 x 280 x 690 (mm) 1,255 x 280 x 690 (mm)
incl. wall holder
Standard faceplate steel, white powder-coated
Minimum distance to walls or other objects:
A: top:
B: bottom:
C: side:
D: front:
12.5 cm
12.5 cm
12.5 cm
12.5 cm
12.5 cm
12.5 cm
12.5 cm
12.5 cm
* The COP is the ratio of the generated cooling capacity or heat output to the electrical power input.
Dehumidification chart
EN 20
No. Designation
Operating manual – dehumidifier / climate manager DH 30 VPR+ / DH 60 VPR+
1) Heat emission in kW at 60 %RH
2) Power input in kW at 60 %RH
Page 22

Refrigerant circuit diagram
COMPRESSOR
SOLENOID VALVE
AIR CONDENSER
EVAPORATOR
DRIER
CAPILLARY
INSULATION
PROCESS PORT
21 EN
Operating manual – dehumidifier / climate manager DH 30 VPR+ / DH 60 VPR+
Page 23

Disposal
The icon with the crossed-out waste bin on waste
electrical or electronic equipment stipulates that this equipment
must not be disposed of with the household waste at the end of
its life. You will find collection points for free return of waste
electrical and electronic equipment in your vicinity. The
addresses can be obtained from your municipality or local
administration. For further return options provided by us please
refer to our website www.trotec24.com.
The separate collection of waste electrical and electronic
equipment aims to enable the re-use, recycling and other forms
of recovery of waste equipment as well as to prevent negative
effects for the environment and human health caused by the
disposal of hazardous substances potentially contained in the
equipment.
You are responsible for deleting any personal data stored on the
waste equipment to be disposed of.
The device is operated with fluorinated greenhouse gas which
can be dangerous for the environment and contribute to global
warming when emitted to the atmosphere.
Further information is provided on the nameplate.
Dispose of the refrigerant appropriately and according to the
national regulations.
EN 22
Operating manual – dehumidifier / climate manager DH 30 VPR+ / DH 60 VPR+
Page 24

Trotec GmbH & Co. KG
Grebbener Str. 7
D-52525 Heinsberg
+49 2452 962-400
+49 2452 962-200
info@trotec.com
www.trotec.com
 Loading...