

Page 1

TRO-TR-BA-
Trotec GmbH & Co. KG • Grebbener Str. 7 • D-52525 Heinsberg
Tel.: +49 (0) 24 52 / 962 - 400 • Fax: +49 (0) 24 52 / 962 - 200
www.trotec.de • E-Mail: info@trotec.de
BD15-HS-001-INT
Bedienungsanleitung – Laser-Distanzmessgerät
. . . . . . . . . . . . . A - 1
Operating Manual – Laser Distance Meter
. . . . . . . . . . . . . . . . . . B - 1
Notice d’emploi – Télémètre laser
. . . . . . . . . . . . . . . . . . . . . . . C - 1
I
Manuale d’uso – Misuratore di distanza laser . . . . . . . . . . . . . . . D - 1
O
Gebruikshandleiding – Laser-afstandsmeetinstrument . . . . . . . . E - 1
E
Manual de instrucciones –
Distanciómetro láser
. . . . . . . . . . . . . F - 1
P
Manual de instruções – Distanciómetro a Laser . . . . . . . . . . . . . . . G - 1
Q
Instrukcja obsługi – Dalmierz laserowy. . . . . . . . . . . . . . . . . . H - 1
T
Kullanım kılavuzu – Lazer mesafe ölçüm cihazı . . . . . . . . . . . . I - 1
o
Руководство по эксплуатации – лазерный дистанционный
измерительный прибор
. . . . . . . . . . . . . . . . . . . . . . . . . . . . J - 1
c
Brugervejledning –
laserinstrument til afstandsmåling
. . . . . . . . . .K - 1
o
Käyttöohje –
Laser-etäisyysmittari
. . . . . . . . . . . . . . . . . . . . . . . L - 1
N
Bruksanvisning – Laseravstandsmåler . . . . . . . . . . . . . . . . . . . . M - 1
S
Bruksanvisning – Laserdistansmätare . . . . . . . . . . . . . . . . . . . . . N - 1
RUS
FIN
Page 2

A - 1 Bedienungsanleitung – Laser-Distanzmessgerät BD 15
Inhalt
1. Sicherheitshinweise . . . . . . . . . . . . . . . . . . A - 01
2. Inbetriebnahme . . . . . . . . . . . . . . . . . . . . . A - 03
3. Erste Einstellungen . . . . . . . . . . . . . . . . . . . A - 04
4. Messungen . . . . . . . . . . . . . . . . . . . . . . . A - 05
5. Funktionen . . . . . . . . . . . . . . . . . . . . . . . A - 06
6. Technische Daten . . . . . . . . . . . . . . . . . . . . A - 08
7. Fehlersuche und Behebung . . . . . . . . . . . . . . . . A - 09
8. Messbedingungen . . . . . . . . . . . . . . . . . . . A - 10
Das kompakte, handliche und vor allen Dingen sehr nützliche Basismodel wurde
speziell für unterschiedliche Aufgaben im Innenbereich entwickelt und konzipiert. Die
angenehmen, superweichen Schnelltasten für Funktionen wie Addition, Subtraktion,
Flächen- und Volumenberechnungen sorgen dafür, dass die Messungen leichter von
der Hand gehen und äußerst zuverlässig sind.
Diese Veröffentlichung ersetzt alle vorhergehenden. Kein Teil dieser Veröffentlichung
darf in irgendeiner Form ohne unsere schriftliche Genehmigung reproduziert oder unter
Verwendung elektronischer Systeme verarbeitet, vervielfältigt oder verbreitet werden.
Technische Änderungen vorbehalten. Alle Rechte vorbehalten. Warennamen werden
ohne Gewährleistung der freien Verwendbarkeit und im Wesentlichen der Schreibweise
der Hersteller folgend benutzt. Die verwendeten Warennamen sind eingetragene und
sollten als solche betrachtet werden. Konstruktionsveränderungen im Interesse einer
laufenden Produktverbesserung sowie Form-/Farbveränderungen bleiben vorbehalten.
Lieferumfang kann von den Produktabbildungen abweichen. Das vorliegende Dokument wurde mit der gebotenen Sorgfalt erarbeitet. Wir übernehmen keinerlei Haftung
für Fehler oder Auslassungen. © TROTEC
®
1. Sicherheitshinweise
Zulässige Anwendung
• Durchführung von Entfernungsmessungen und
• Berechnungen, z.B. Flächen und Raummaße.
Unzulässige Anwendung
• Das Gerät darf nicht ohne eine entsprechende Einweisung in Betrieb
genommen werden.
Page 3

Bedienungsanleitung – Laser-Distanzmessgerät BD 15 A - 2
• Das Gerät nicht außerhalb der vorgegebenen Grenzen betreiben.
• Die Sicherheitssysteme dürfen nicht deaktiviert werden. Es dürfen
keine Gefahrenetiketten oder Aufkleber, die auf die richtige Bedienung
hinweisen, von dem Gerät entfernt werden.
• Das Gerät darf nicht mit Werkzeug (Schraubenzieher, etc.) geöffnet
werden, es sei denn, es wird ausdrücklich in der Bedienungsanleitung
darauf hingewiesen.
• Das Gerät darf weder verändert noch modifiziert werden.
• Zubehör von anderen Herstellern/Drittanbietern darf nur mit ausdrück licher Genehmigung der Trotec GmbH & Co. KG verwendet werden.
• Das Gerät darf nicht vorsätzlich zu anderen Zwecken missbraucht
oder auf unverantwortliche Weise auf Gerüsten, Leitern, in unmittelbarer
Nähe von laufenden Maschinen oder ungeschützten Teilen von Ma schinen oder Einrichtungen eingesetzt werden.
• Das Gerät darf nicht direkt in die Sonne gerichtet werden.
• Das Gerät darf nicht verwendet werden, wenn keine ausreichenden Sicher heitsvorkehrungen an der Vermessungsstelle getroffen wurden (z.B. bei
Messungen an öffentlichen Straßen, auf Baustellen, etc.).
Laser- Klassifizierung
Zur Entfernungsmessung erzeugt das BD15 einen Laserstrahl, welcher
von der Gerätevorderseite ausgesendet wird.
Dies ist ein Produkt der Laser-Kategorie 2 :
Schauen Sie nicht in den Laserstrahl und richten Sie den Laser nicht auf
andere Personen. Die Augen werden im Normalfall durch einen Reflex
(blinken) oder durch das instinktive, schnelle Wegdrehen des Kopfes
geschützt.
Schauen Sie niemals mit irgendwelchen optischen Hilfsmitteln direkt in den Laserstrahl! Sie gefährden die Gesundheit Ihrer Augen,
wenn Sie in den Laserstrahl schauen.
Elektronische Geräte gehören nicht in den Hausmüll, sondern müssen in der Europäischen Union – gemäß Richtlinie
2002/96/EG DES EUROPÄISCHEN PARLAMENTS UND DES
RATES vom 27. Januar 2003 über Elektro- und Elektronik-
Altgeräte – einer fachgerechten Entsorgung zugeführt
werden. Bitte entsorgen Sie dieses Gerät am Ende seiner Verwendung
entsprechend der geltenden gesetzlichen Bestimmungen.
m
Page 4

A - 3 Bedienungsanleitung – Laser-Distanzmessgerät BD 15
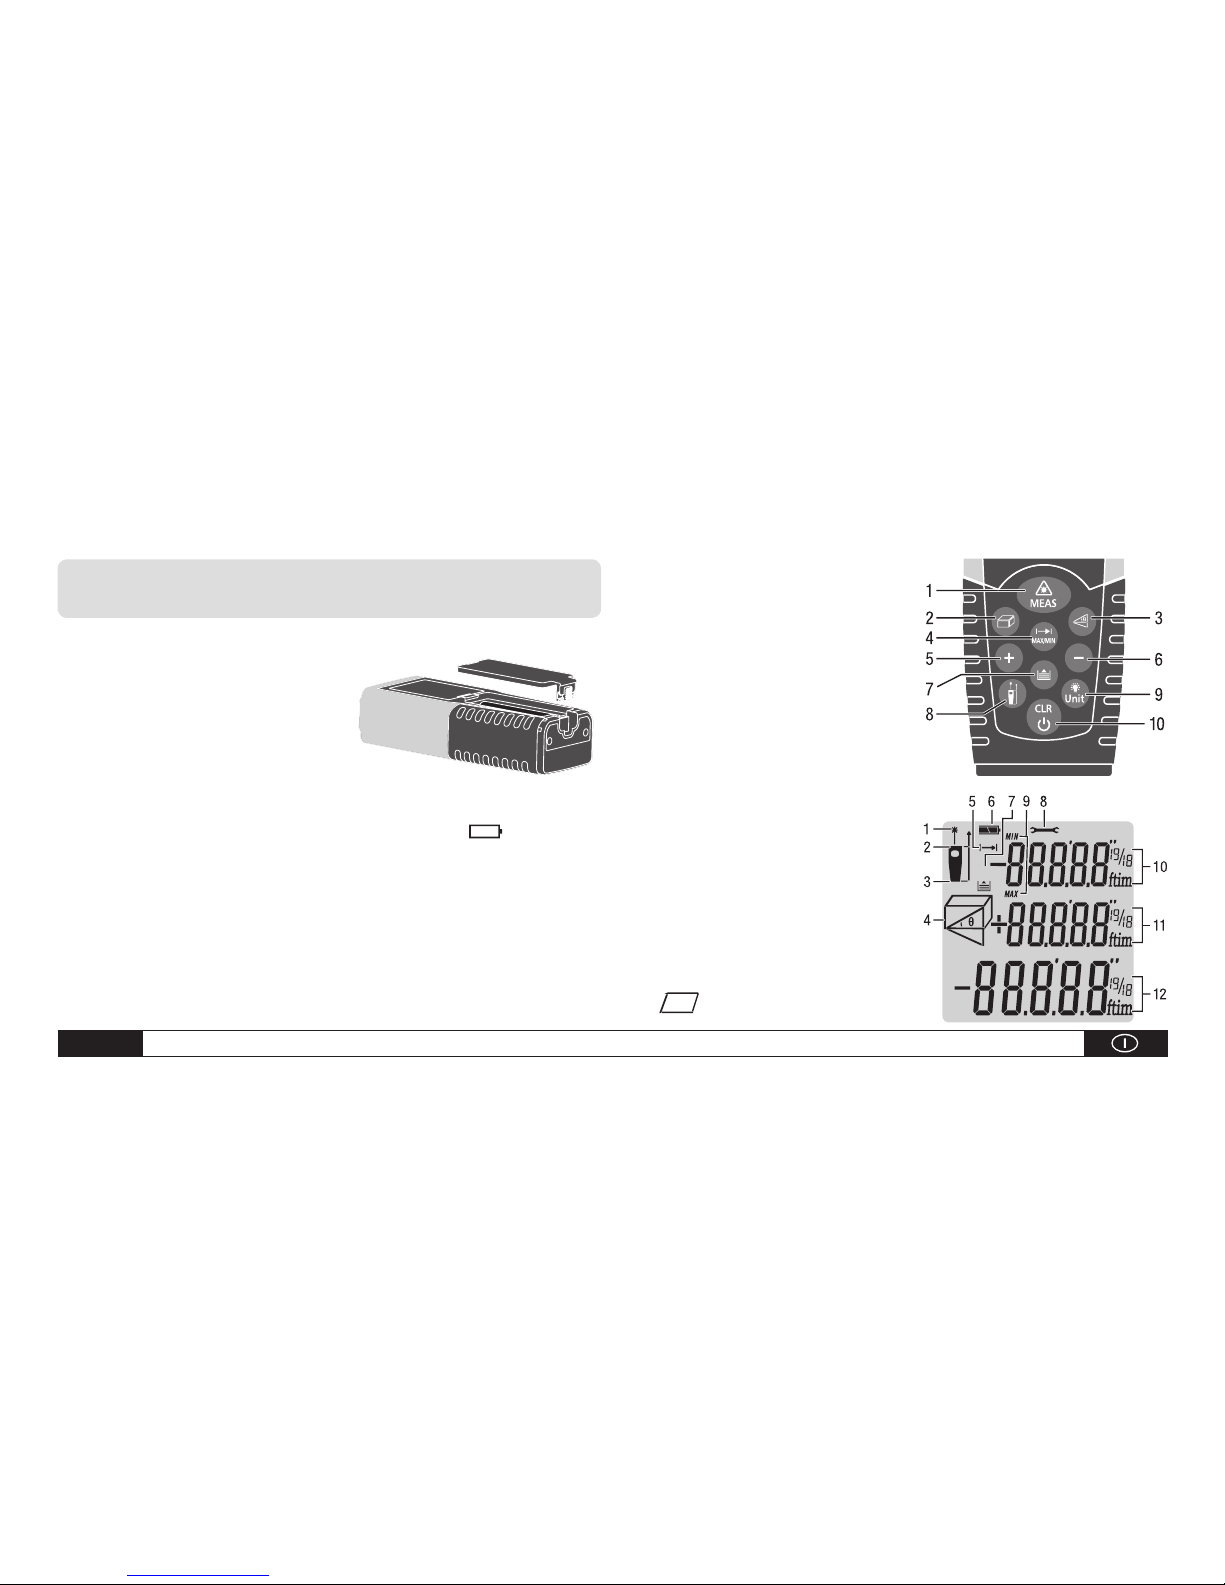
2. Inbetriebnahme
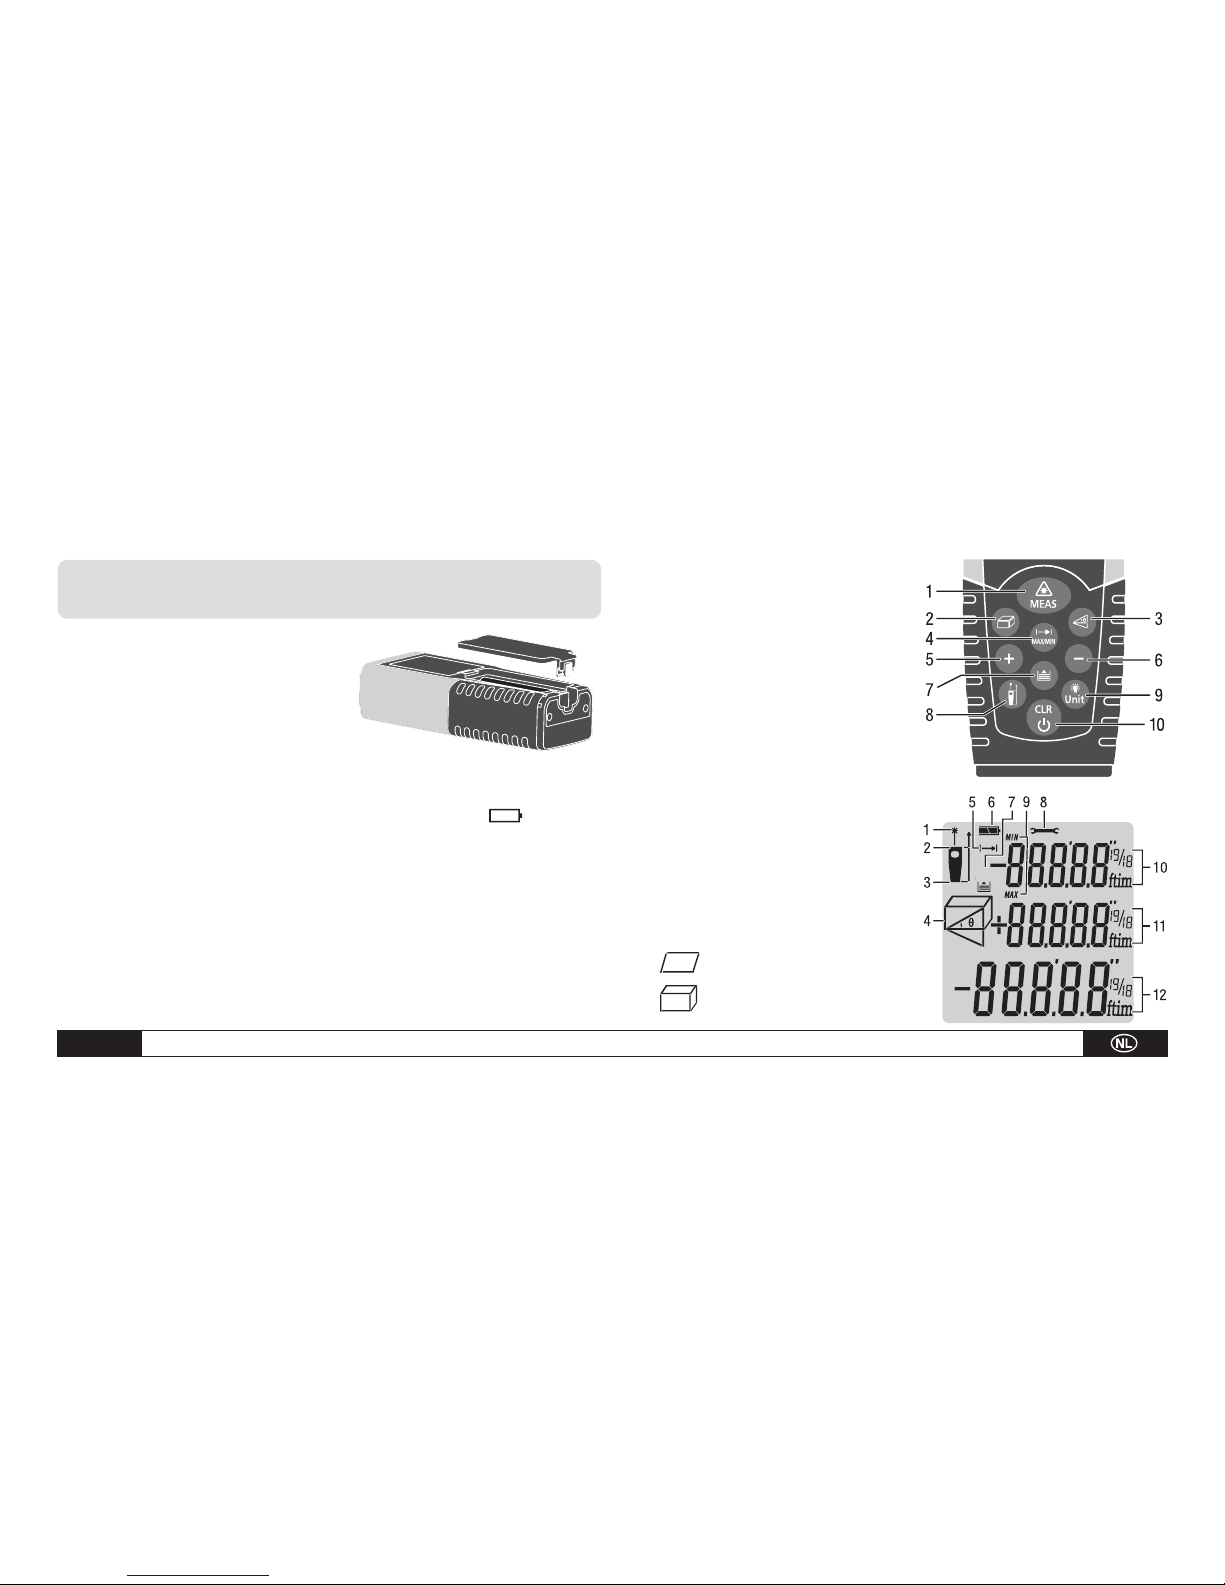
Batterien einsetzen/wechseln
1) Entfernen Sie zunächst den Deckel
vom Batteriefach.
2) Setzen Sie die Batterien ein.
Achten Sie dabei auf die richtige Polarität.
3) Schließen Sie das Batteriefach wieder.
Die Batterien müssen gewechselt werden, wenn das „ “ Symbol ununterbrochen im Display blinkt. Entfernen Sie bei Nichtbenutzung des
Gerätes über einen längeren Zeitraum die Batterien aus dem Batteriefach, um Korrosion zu vermeiden.
Tastenfeld
1) Ein-/Messtaste
2) Fläche-/Raumvolumentaste
3) Taste für indirekte Messung
4) Taste für Einzel-/
Dauerentfernungsmessung
5) Plus-Taste ( + )
6) Minus-Taste ( - )
7) Speichertaste (Chronik)
8) Referenztaste
9) Beleuchtungs-/Einheitentaste
10) Lösch-/Aus-Taste
LCD-Display
1) Laser aktiv
2) Referenzwert (vorne)
3) Referenzwert (hinten)
4) Variable Messfunktionen
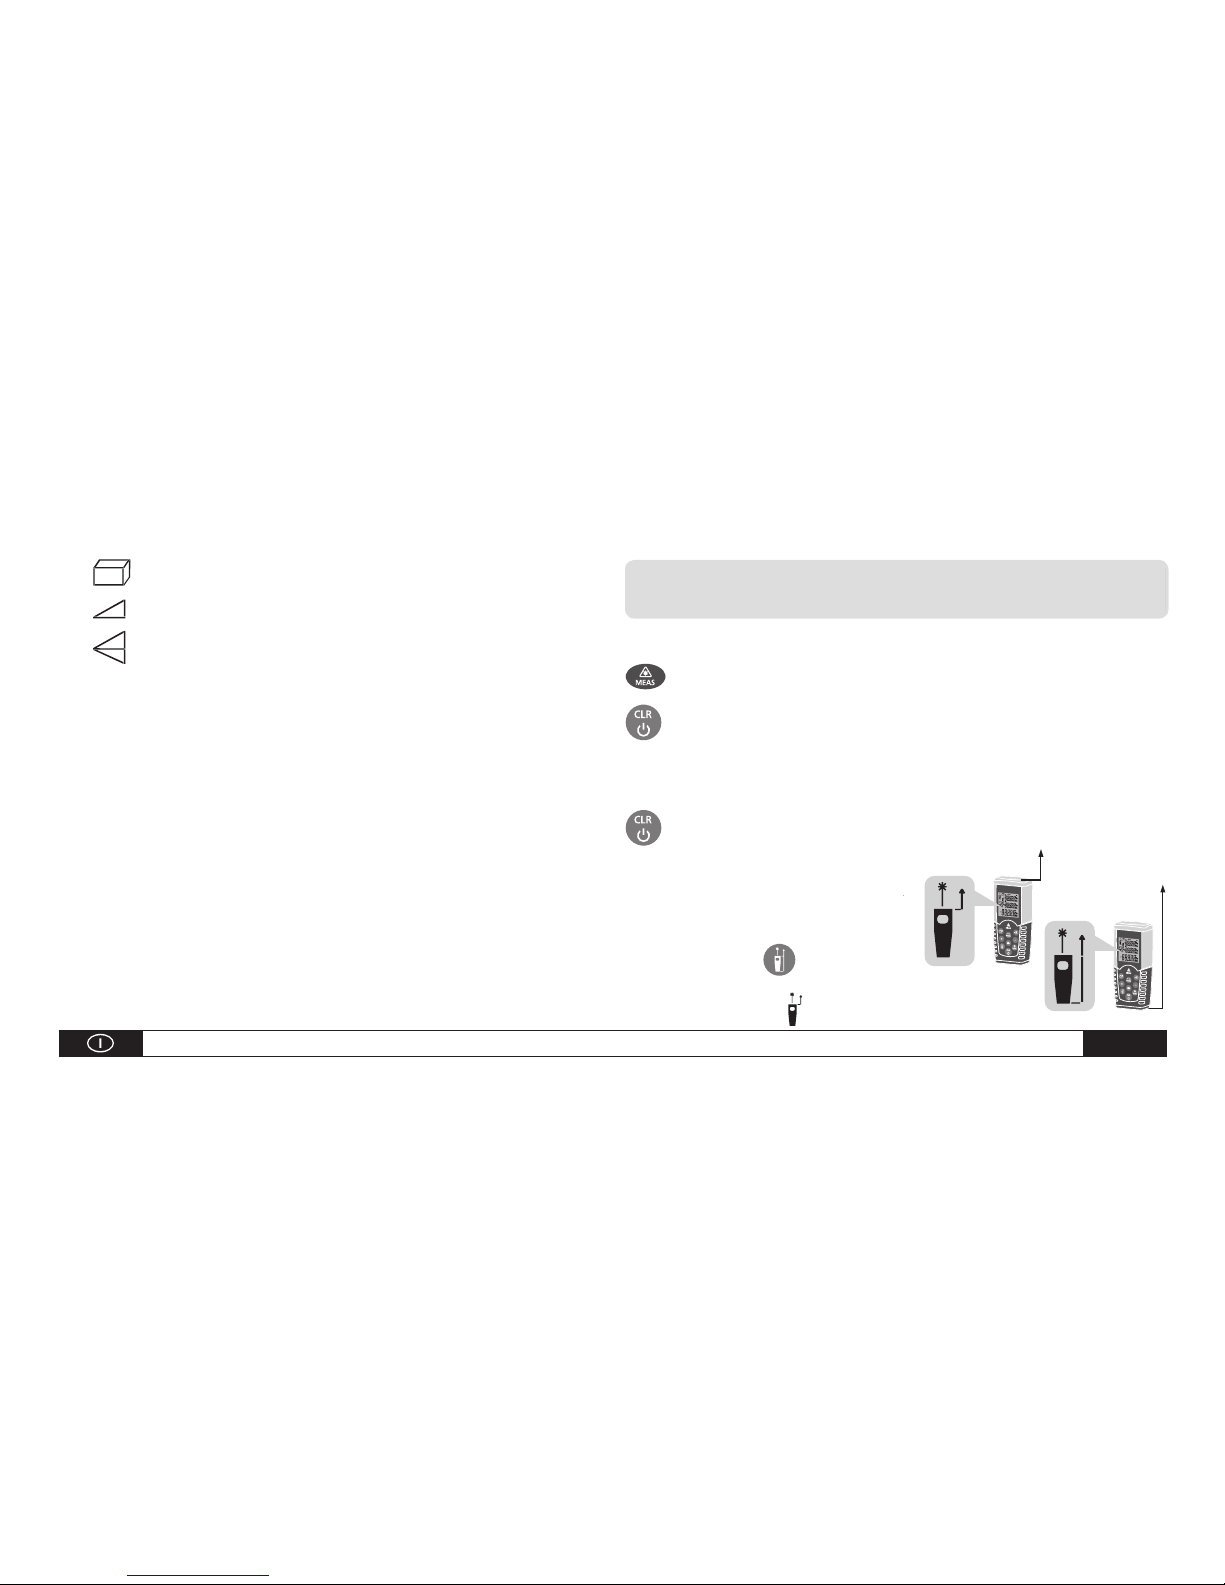
Flächenmessungen
Volumenmessungen
18
Page 5

Bedienungsanleitung – Laser-Distanzmessgerät BD 15 A - 4
Indirekte Messung
Indirekte (zweite) Messung
5) Einzelentfernungsmessung
6) Batteriestatus
7) Chronik, Anzahl der abrufbaren Werte
8) Gerätefehlerwarnung
9) Dauermessung/Max- und Min-Messung
10) Anzeigenzeile für den ersten Wert
11) Anzeigenzeile für den zweiten Wert
12) Unterste Zeile für den letzten Messwert oder Ergebnis der Berechnung
3. Erste Einstellungen
Ein- und ausschalten
Schaltet das Gerät und den Laser ein und aus.
Halten Sie diese Taste gedrückt, um das Gerät auszuschalten.
Das Gerät schaltet sich automatisch aus, wenn es länger als drei Minuten nicht gebraucht wird.
Löschtaste
Löscht die letzte Aktion oder die Daten auf dem Display.
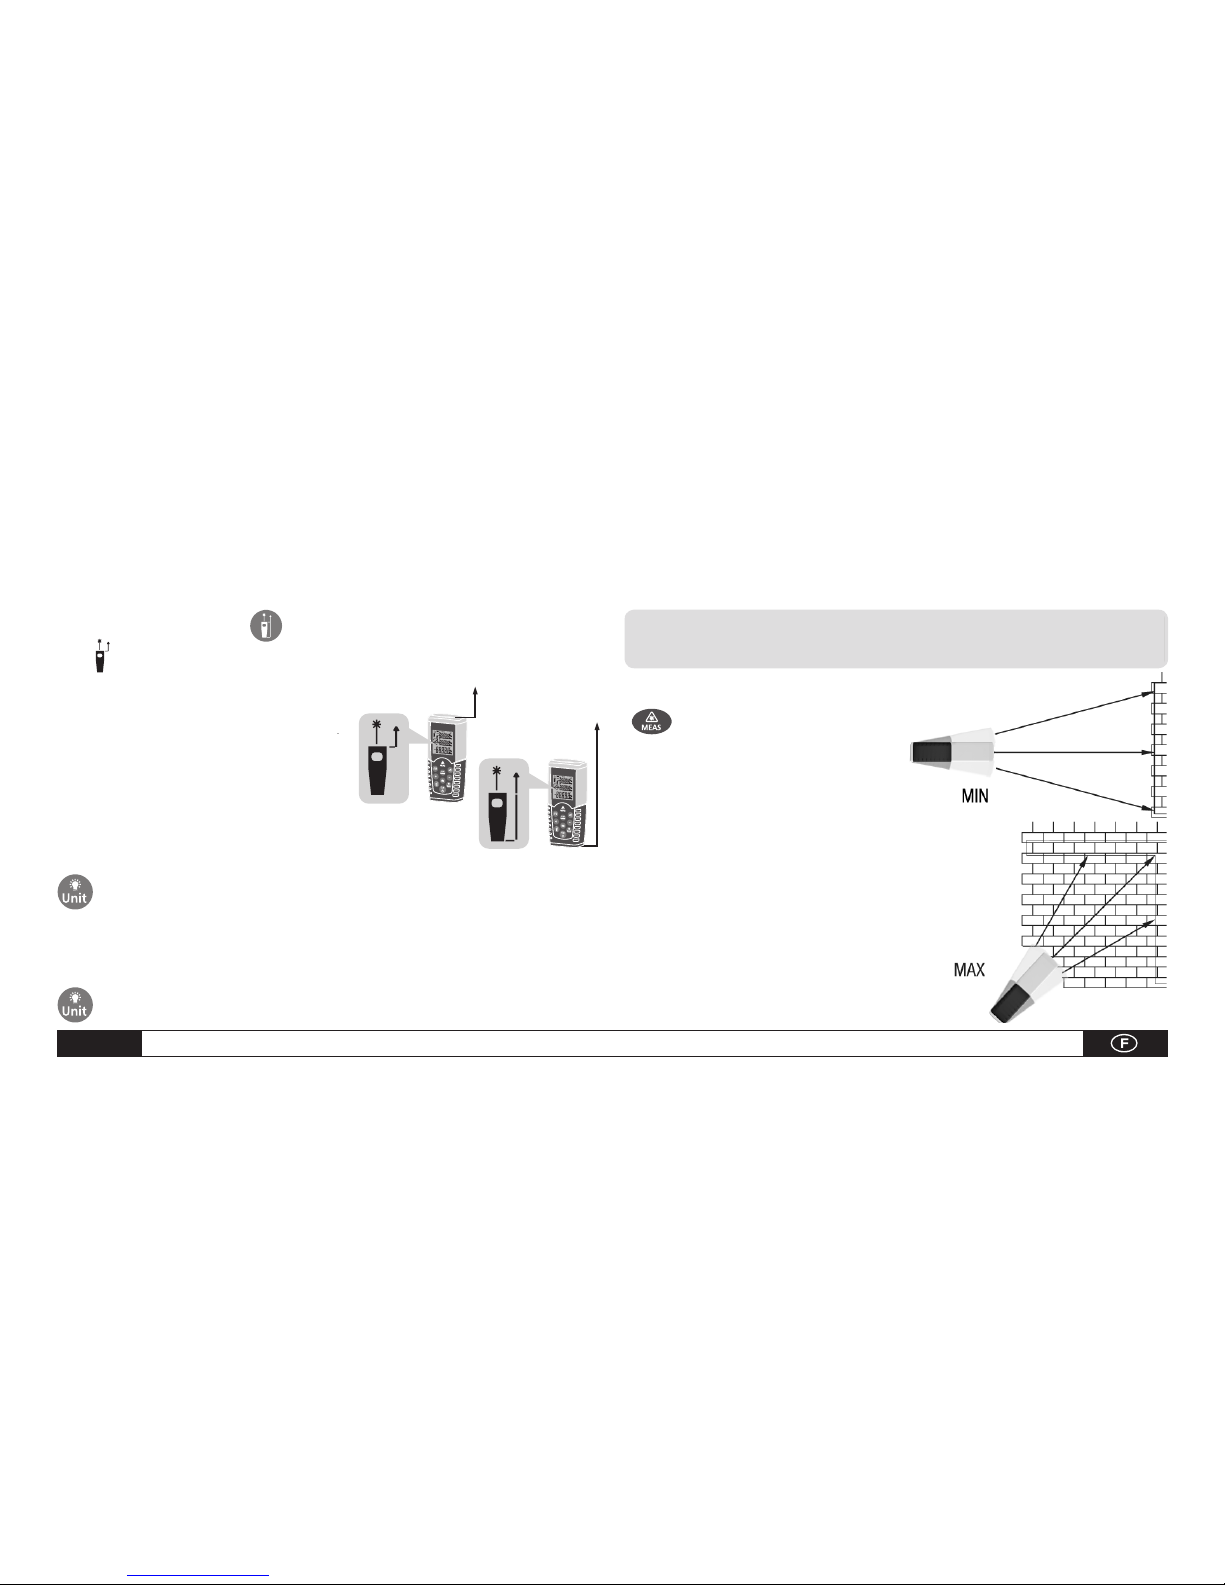
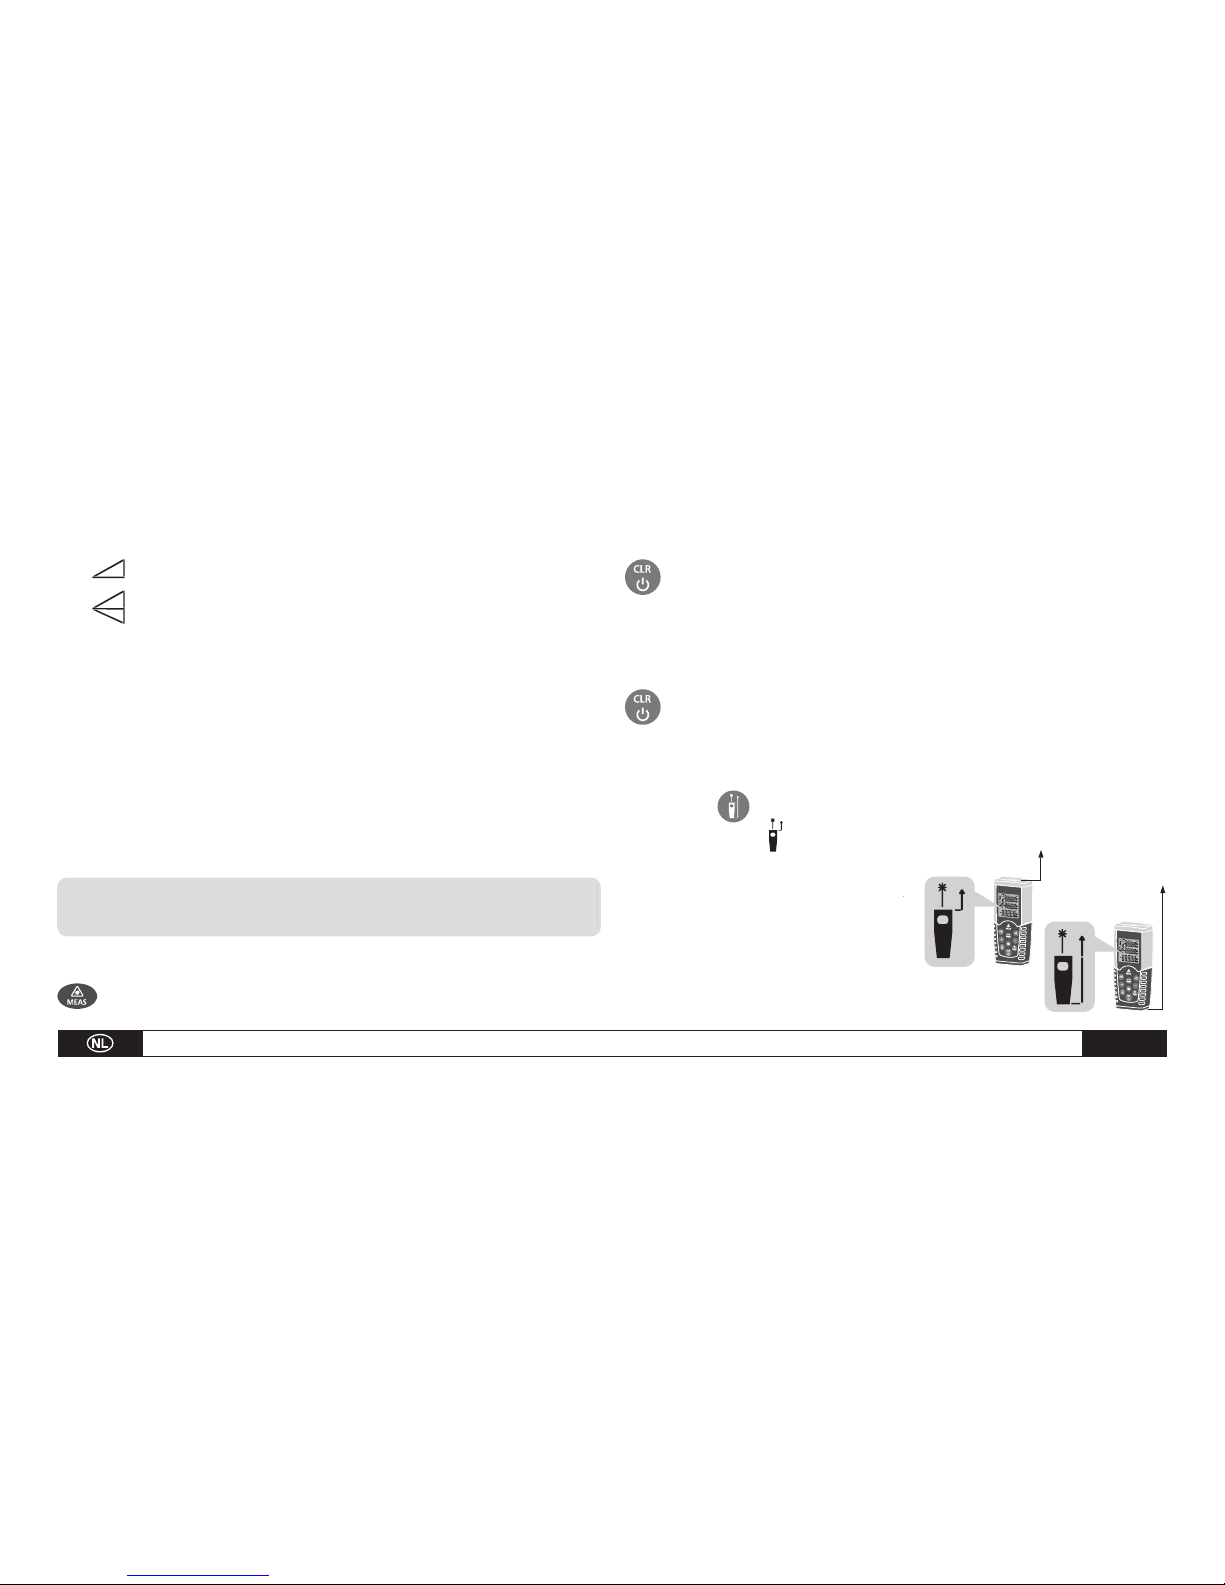
Referenzwert einstellen
Der Referenzwert geht vom hinteren Teil des Geräts aus. Drücken Sie
diese Taste , um den Referenzpunkt zum vorderen Teil des Geräts zu
verlagern . Ein Signalton ertönt jedes Mal, wenn der Referenzpunkt verlagert
wird. Der Referenzwert kehrt nach dem
Einschalten automatisch zu der
ursprünglichen Stellung (hinten am
Gerät) zurück.
Page 6

A - 5 Bedienungsanleitung – Laser-Distanzmessgerät BD 15
Hintergrundbeleuchtung
Drücken Sie die Beleuchtung/UNITS-Taste, um die Hintergrundbeleuchtung ein- bzw. auszuschalten. Die Werte lassen sich bei Dunkelheit
oder schlechten Lichtverhältnissen deutlich besser vom Display ablesen.
Entfernungseinheit auswählen
Halten Sie die Taste gedrückt, um die Entfernungseinheit zu selektieren. Drücken Sie die Taste erneut, um von Metern zu Fuß oder Fuß und Zoll
(m, ft, in, ft+in) und zurück zu gelangen.
4. Messungen
Einzelentfernungsmessung
Drücken Sie die EIN-Taste, um den Laser zu aktivieren. Drücken Sie die
Taste erneut, um eine Entfernungsmessung durchzuführen. Der gemessene
Wert wird sofort auf dem LCD-Display angezeigt.
Dauermessung (Trackingfunktion) / Max- und Min-Messungen
Die Funktion Dauermessung (Tracking) wird verwendet, um Messungen zu übertragen z.B. von
Bauzeichnungen.
Bei dieser Messmethode kann das
Gerät zum Ziel hin bewegt werden,
wobei der Messwert ungefähr alle
0,5 Sekunden neu errechnet wird.
Die dazugehörigen Maximum- und
Minimummesswerte werden jeweils in der ersten und zweiten
Zeile dargestellt.
Der Benutzer kann zum Beispiel
den Laserstrahl gegen eine Wand
richten und sich dann nach und
nach von der Wand entfernen und dabei solange den Messwert ablesen,
bis die gewünschte Entfernung erreicht worden ist. Drücken Sie, um in
Page 7

Bedienungsanleitung – Laser-Distanzmessgerät BD 15 A - 6
diesen Modus zu gelangen, die entsprechende Taste
,
bis die Anzei-
ge für die Dauermessung im Display erscheint. Drücken Sie die Taste erneut
, um den Vorgang abzubrechen. Der Vorgang wird automatisch nach
100 Messungen im Dauermodus beendet.
5. Funktionen
Addition / Subtraktion
Entfernungsmessungen
Der zweite Messwert wird mit dem ersten Messwert addiert. Drücken
Sie die Taste
, um den zweiten Messwert zu sehen. Das Ergebnis der
beiden Messwerte erfolgt automatisch. Der zweite Messwert wird von
dem ersten Messwert abgezogen. Drücken Sie die Taste , um das Er-
gebnis zu sehen. Der zweite Messwert erscheint immer in der zweiten Zeile,
das Ergebnis in der untersten Zeile.
Der letzte Schritt wird abgebrochen.
Kehren Sie zur Einzelentfernungsmessung zurück.
Flächenmessungen
Drücken Sie die entsprechende Taste einmal. Das Symbol für
diesen Messvorgang erscheint auf dem Display.
Drücken Sie die Taste , um die erste Messung (z.B. die Länge) vor-
zunehmen.
Drücken Sie die Taste
erneut, um die zweite Messung (z.B. die Breite)
vorzunehmen.
Das Gerät errechnet nach dem zweiten Drücken der Taste selbständig die
Fläche und zeigt diese in der untersten Zeile an. Der zuletzt gemessene Wert
wird in der zweiten Zeile auf dem Display angezeigt.
Volumenmessungen
Drücken Sie die für diesen Messvorgang vorgesehene Taste 2x , bis die
entsprechende Anzeige im Display erscheint. Die zu messende Seite
wird jeweils blinkend im Display angezeigt und die jeweilige Messung durch
Drücken der Taste aktiviert.
Page 8

A - 7 Bedienungsanleitung – Laser-Distanzmessgerät BD 15
Drücken Sie dieselbe Taste , um einmal die Länge zu messen und dann ein
zweites und drittes Mal, um sowohl die Breite als auch die Höhe zu messen.
Das Gerät errechnet anschließend das Volumen und zeigt diesen Wert auf
dem Display an. Der zuletzt gemessene Wert wird dabei nicht angezeigt.
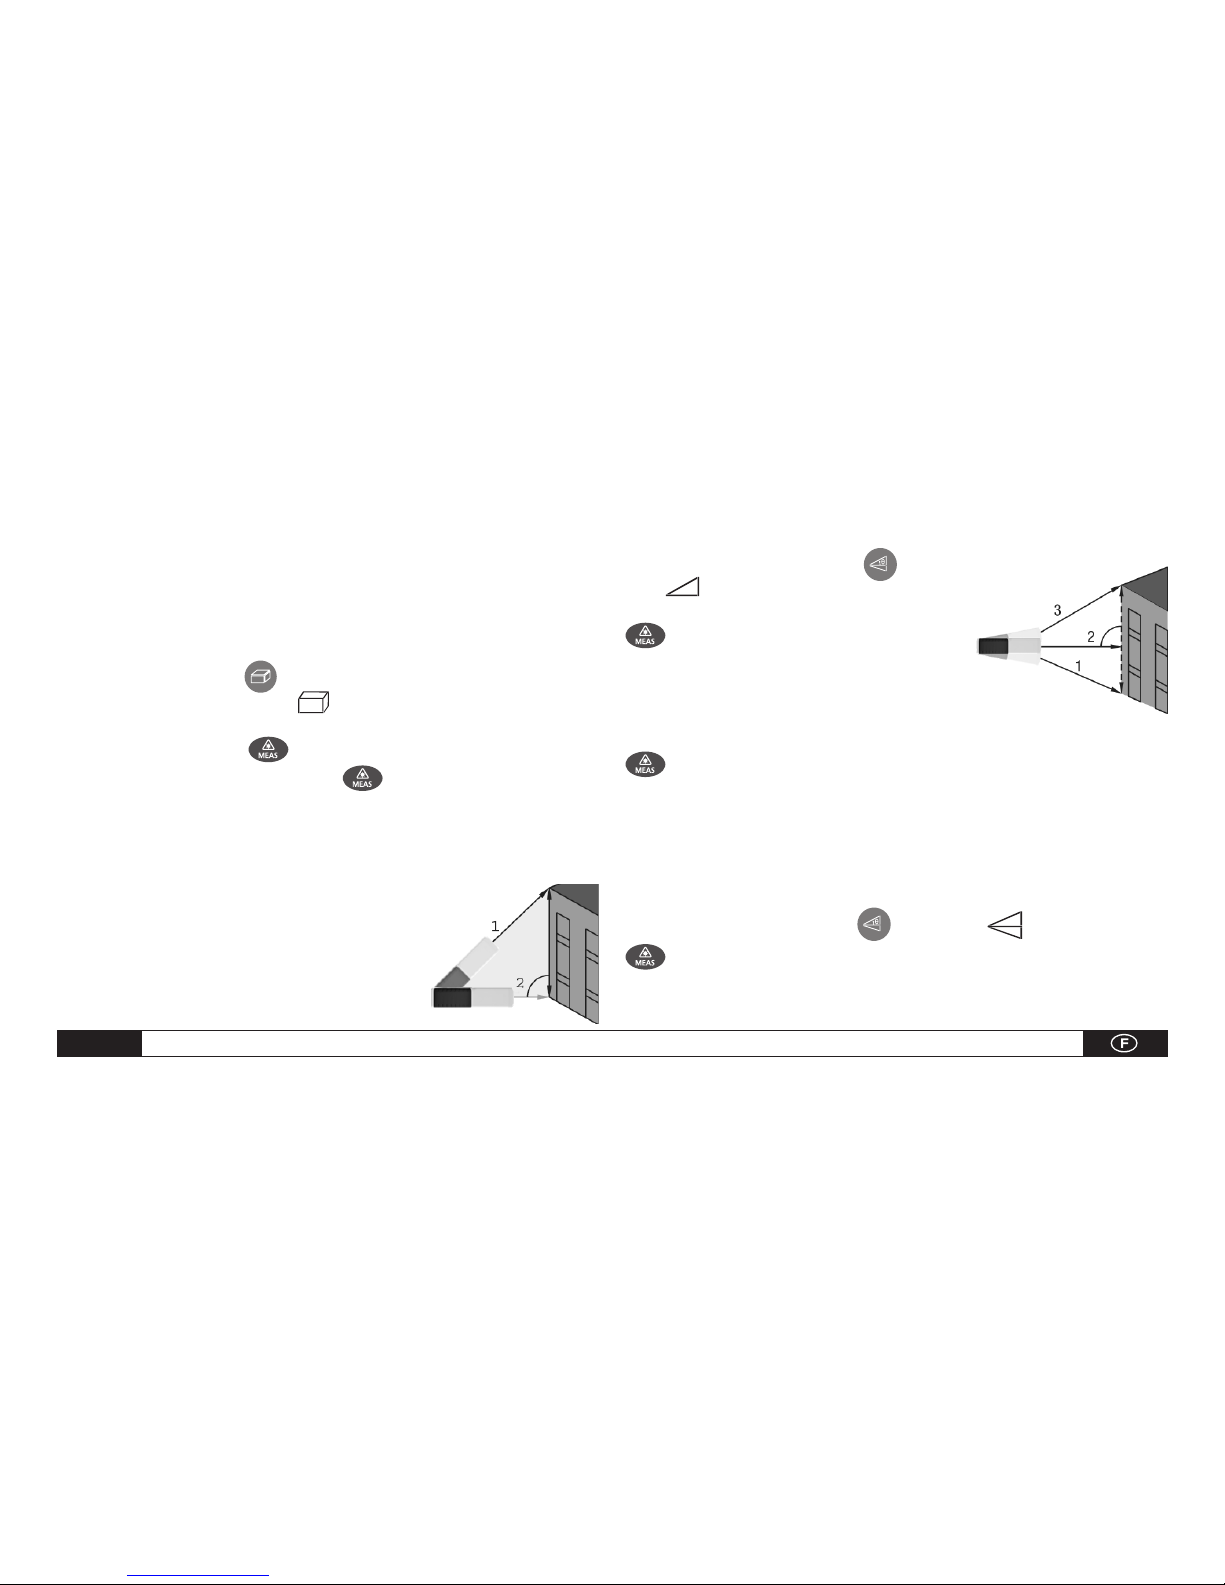
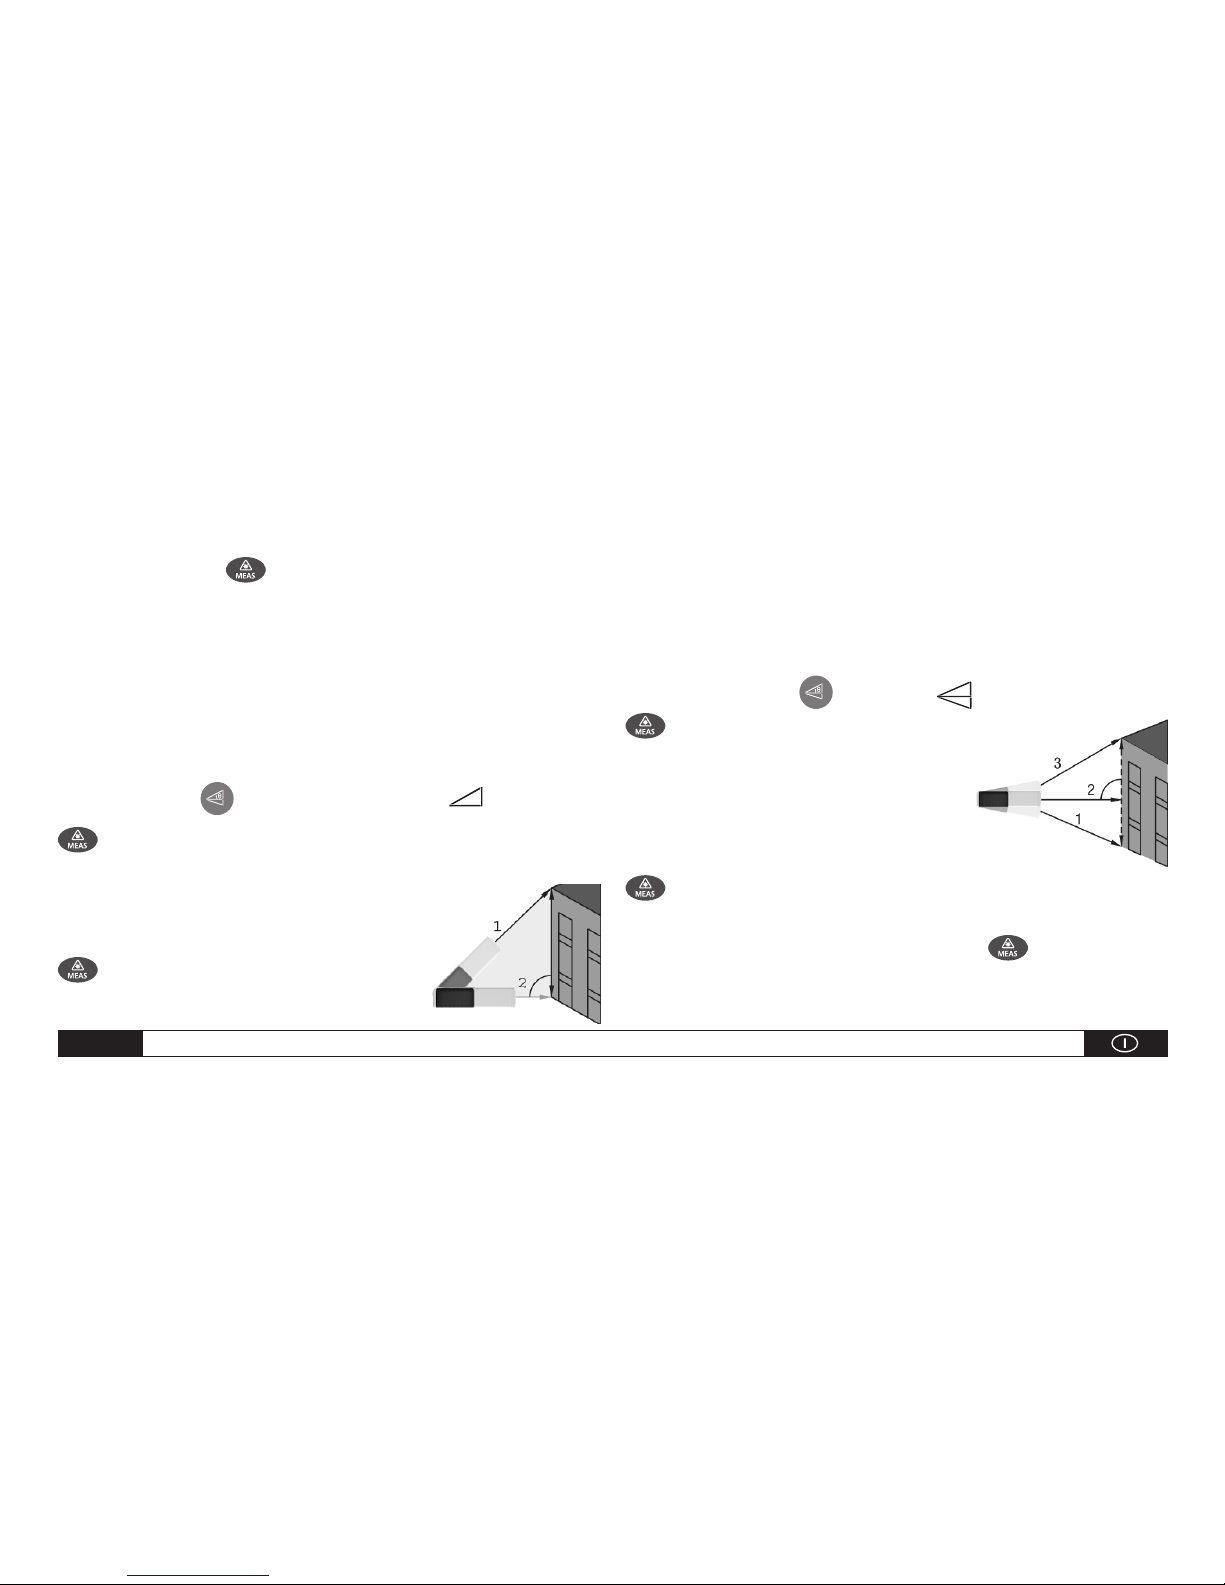
Indirekte Messungen
Indirekte Messungen: Errechnung einer Entfernung mittels zwei Hilfsmessungen. Gehen Sie bei Höhenmessungen, die zwei oder drei Messungen
benötigen, zum Beispiel wie folgt vor:
Drücken Sie die Taste einmal, das Symbol wird nun angezeigt.
Zielen Sie zunächst auf den höheren Punkt (1) und führen Sie eine
Messung durch. Der erste Messwert wird übernommen. Halten Sie das Gerät
dabei möglichst ruhig und setzen Sie es mit den beiden hinteren Kanten plan
auf den Untergrund auf.
Drücken Sie die Messtaste erneut, um
die horizontale Linie zu messen. Das Resultat
dieser Messung wird in der zweiten Zeile angezeigt, während das Gesamtergebnis gleichzeitig in der untersten Zeile angezeigt wird.
Indirekte Messung – Errechnung einer Entfernung an Hand von drei
Messgrößen
Drücken Sie die Taste 2x; die Anzeige
erscheint auf dem Display.
Zielen Sie zunächst auf den unteren
Punkt (1) und führen Sie eine Messung durch.
Der erste Messwert wird übernommen. Halten
Sie das Gerät dabei möglichst ruhig. Der Anschlag an den beiden hinteren
Kanten darf sich während der Messungen nicht verändern!
Visieren Sie nun den horizontalen Zielpunkt an (2) und führen Sie die
Messung durch. Das Resultat wird in der zweiten Zeile angezeigt.
Zielen Sie abschließend auf den oberen Punkt (3) und drücken Sie die Taste
, um die Messung (3) durchzuführen. Das Ergebnis wird in der untersten
Zeile angezeigt, während die Teilergebnisse in der zweiten Zeile gezeigt werden.
Chronik
Die letzten 20 Werte (Messungen oder Berechnungen) werden in um-
gekehrter Reihenfolge gezeigt. Benutzen Sie die dafür vorgesehenen Tasten
oder , um durch die Aufzeichnungen zu navigieren.
Page 9

Bedienungsanleitung – Laser-Distanzmessgerät BD 15 A - 8
6. Technische Daten
Technische Daten
Reichweite . . . . . . . . . . . . . . . . . . . . . . . . . . . 0,05 bis 50 m*
(0,16 - 164 ft)
Messgenauigkeit bis 10 m . . . . . . . . . . . . . . . . Typisch: ±1,5 mm**
(± 0,06 in)
Messeinheiten . . . . . . . . . . . . . . . . . . . . . . . . . . . . . . m,in,ft
Laser-Kategorie . . . . . . . . . . . . . . . . . . . . . . . . . . . . . Klasse II
Laser-Typ . . . . . . . . . . . . . . . . . . . . . . . . . . . . . 635 nm, <1mW
Flächen-, Volumenberechnungen . . . . . . . . . . . . . . . . . . . . . . •
Indirekte Messungen (Pythagoras Funktion) . . . . . . . . . . . . . . . . . •
Addition/Subtraktion . . . . . . . . . . . . . . . . . . . . . . . . . . . . . . •
Dauermessung . . . . . . . . . . . . . . . . . . . . . . . . . . . . . . . . . •
Min-/Max- Entfernungsanzeige/Trackingfunktion . . . . . . . . . . . . . . .•
Hintergrundbeleuchtung und mehrfache Zeilenanzeige . . . . . . . . . . •
Signalton . . . . . . . . . . . . . . . . . . . . . . . . . . . . . . . . . . . . •
Staub- und stoßfest . . . . . . . . . . . . . . . . . . . . . . . . . . . . IP 54
Anzahl der Aufzeichnungen in der Chronik . . . . . . . . . . . . . . . . 20
Betriebstemperatur . . . . . . . . . . . . . . 0°C bis 40°C (32°F bis 104°F)
Lagerungstemperatur . . . . . . . . . . . -10 °C bis 60°C (14°F bis 140°F)
Batterie Lebensdauer . . . . . . . . . . . . . . . . bis zu 4.000 Messungen
Batterien . . . . . . . . . . . . . . . . . . . . . . . . . . . . Typ AAA 2 x 1,5V
Laser-Abschaltautomatik . . . . . . . . . . . . . . . . . . nach 30 Sekunden
Abschaltautomatik . . . . . . . . . . . . . . . . . . . . . . . . . nach 3 min
Abmessungen . . . . . . . . . . . . . . . . . . . . . . . . 115 x 48 x 28 mm
Gewicht . . . . . . . . . . . . . . . . . . . . . . . . . . . . . . . . . . . 135 g
* Verwenden Sie eine Zieltafel, um die Entfernung tagsüber oder bei schlecht
reflektierenden Zielen zu vergrößern!
** Bei günstigen Bedingungen (gute Eigenschaften der Zieloberfläche; Zimmertempera tur) bis zu 10 m. Bei ungünstigen Bedingungen wie zum Beispiel bei starkem Son nenlicht, schlecht reflektierenden Flächen, hohen Temperaturveränderungen kann es
ab einer Entfernung von 10 m zu einer Abweichung von ± 0,15 mm/m kommen.
Page 10

A - 9 Bedienungsanleitung – Laser-Distanzmessgerät BD 15
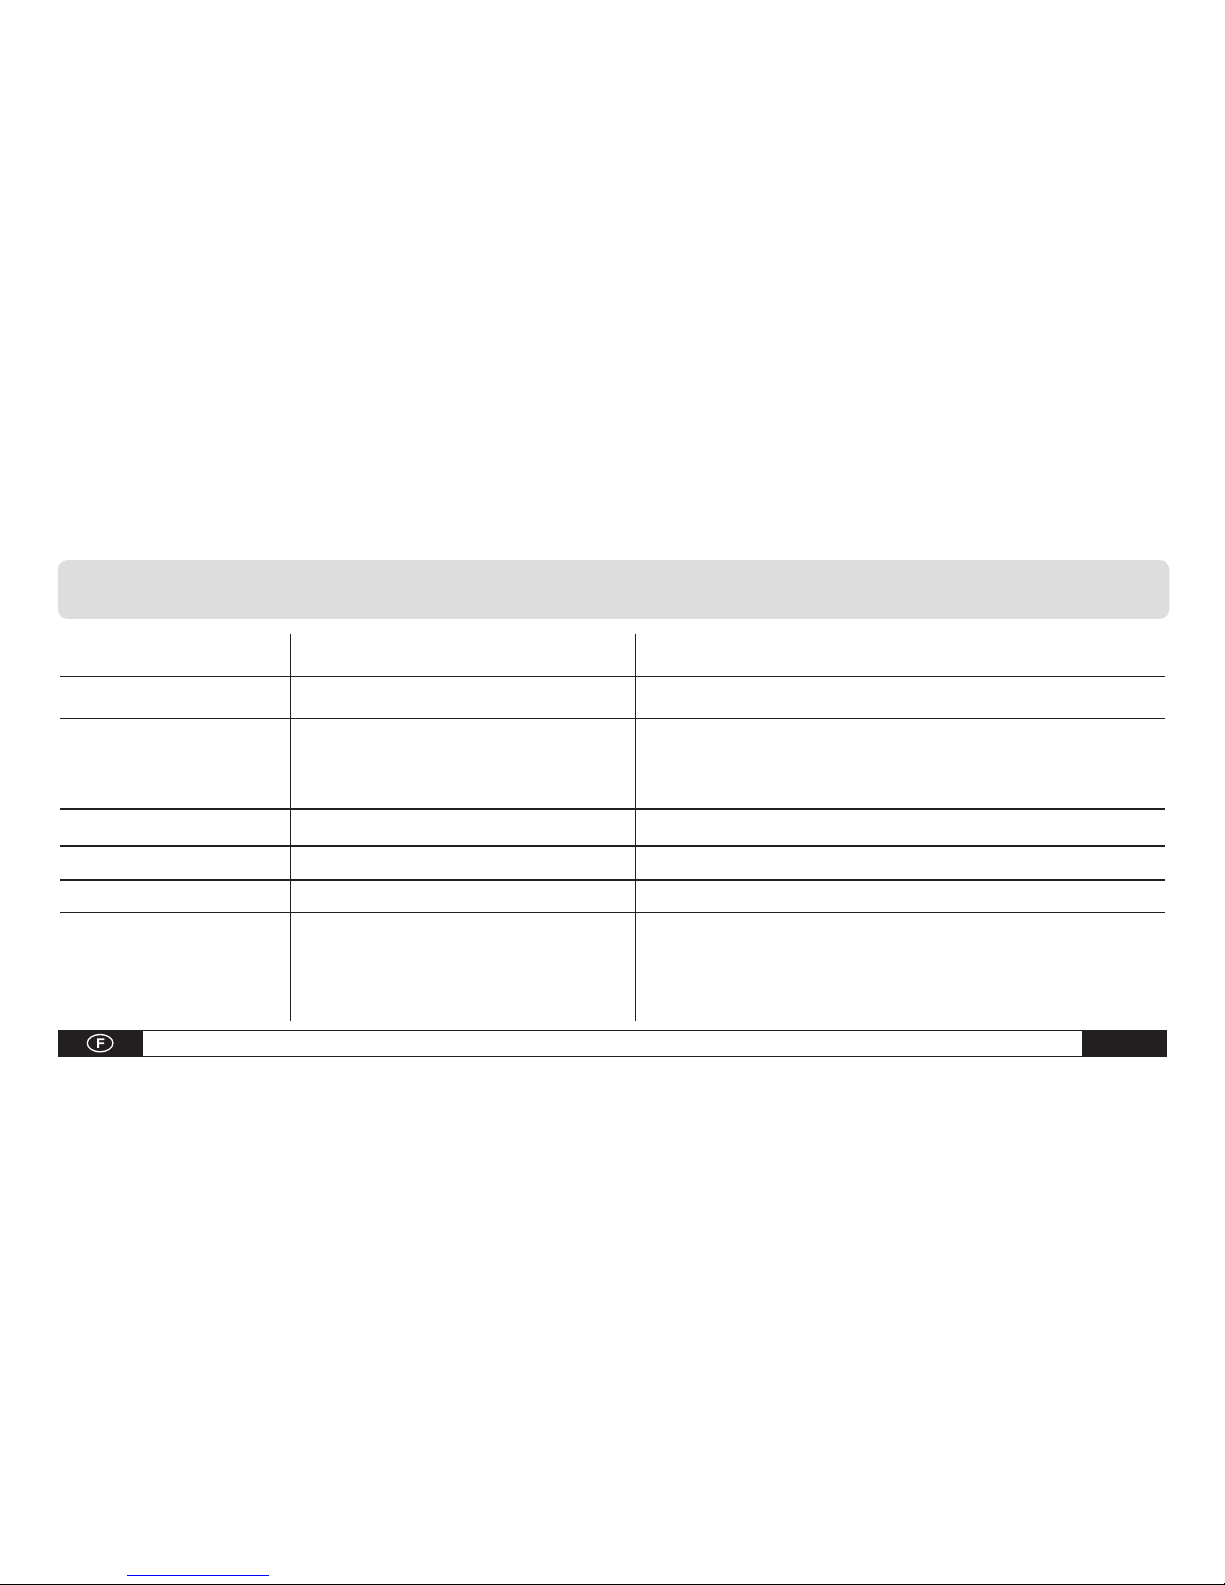
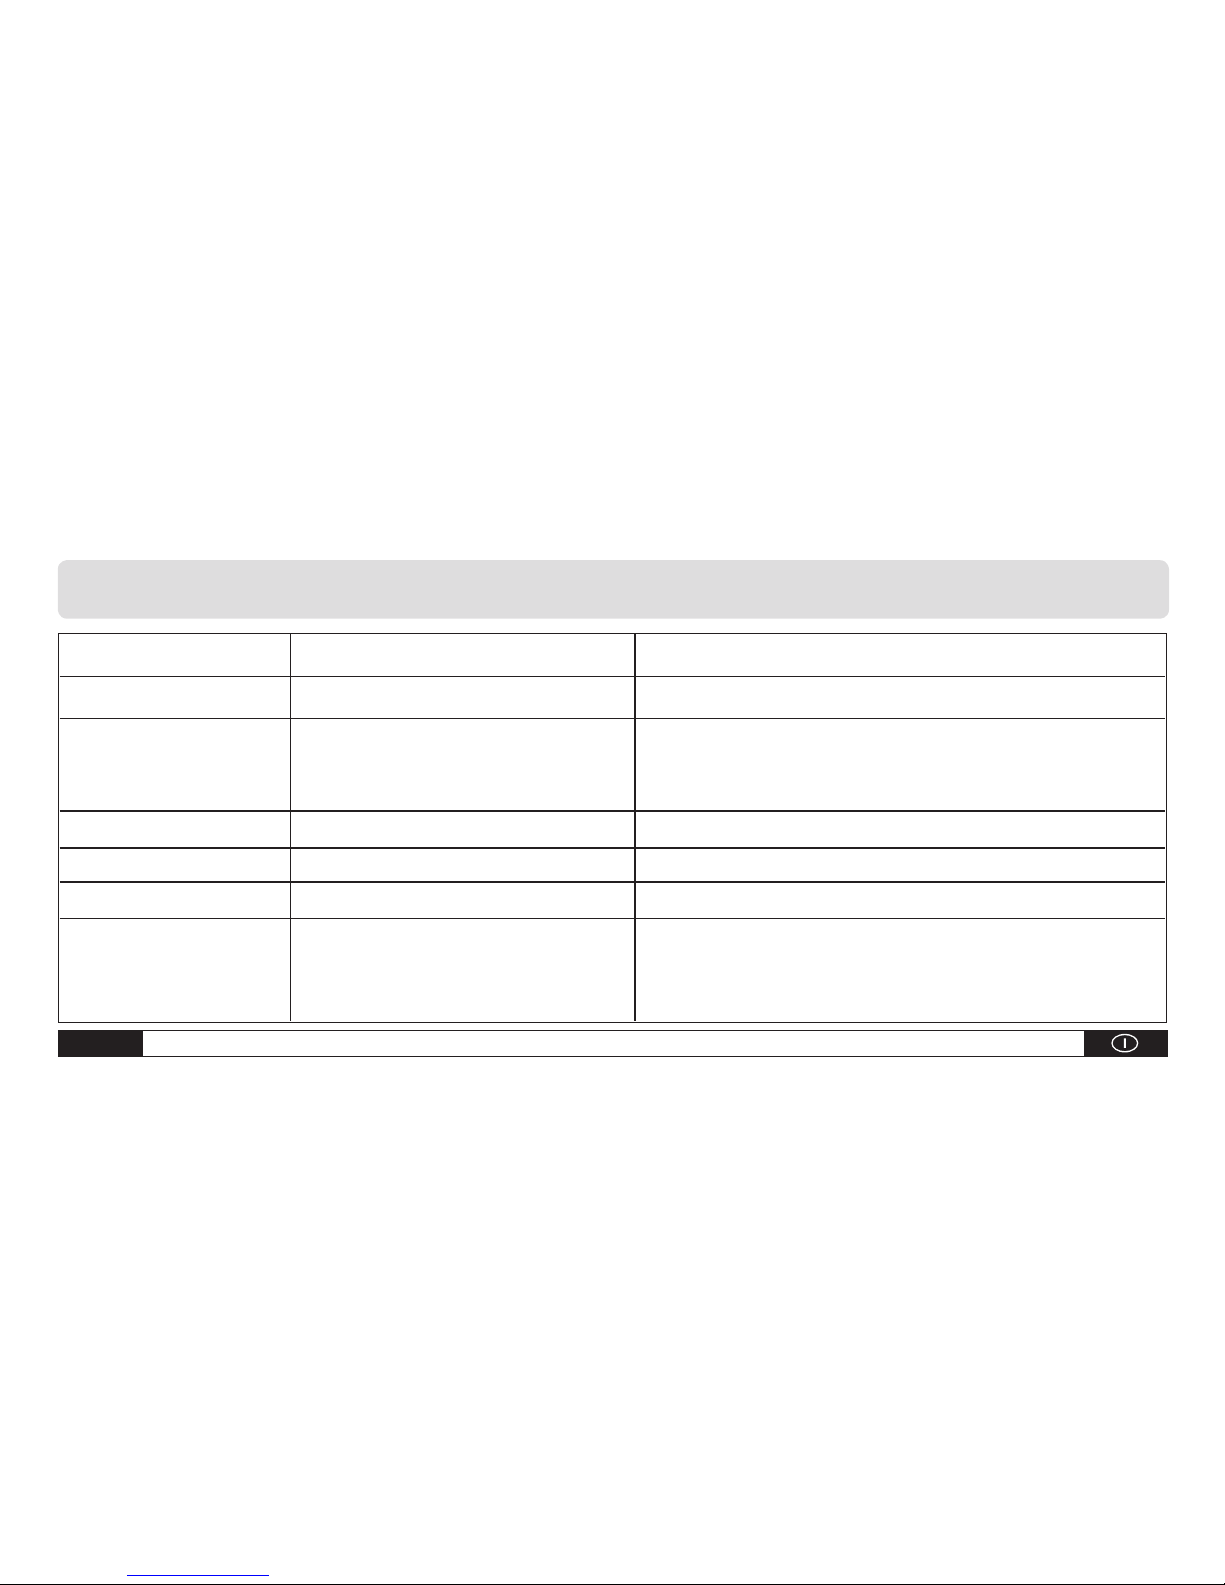
7. Fehlersuche und Behebung
Code Ursache korrigierende Maßnahme
204 Fehler bei der Kalkulation Wiederholen Sie den Vorgang
208 Das Empfangssignal ist zu Verwenden Sie eine größere Zieltafel (optional)
schwach/die Messzeit ist zu
lang/die Entfernung beträgt > 50m
209 Das Empfangssignal ist zu stark Das Ziel reflektiert zu stark (verwenden Sie eine Zieltafel)
252 Die Temperatur ist zu hoch Lassen Sie das Gerät abkühlen
253 Die Temperatur ist zu niedrig Das Gerät muss zuerst aufwärmen
255 Hardwarefehler Schalten Sie das Gerät mehrmals ein und aus. Setzen Sie
sich bitte mit Ihrem Händler in Verbindung, wenn das Symbol
weiterhin erscheint. Er wird Ihnen weiterhelfen.
Page 11

Bedienungsanleitung – Laser-Distanzmessgerät BD 15 A - 10
8. Messbedingungen
Messentfernung
Das Gerät hat eine Reichweite von 50 m.
Größere Entfernungen sind unter bestimmten Bedingungen – z.B. nachts,
in der Dämmerung, wenn das Ziel von Schatten verdeckt wird – auch
ohne Zieltafel möglich. Tagsüber kann eine Zieltafel verwendet werden,
um die Entfernung bei schlecht reflektierenden Zielen zu vergrößern.
Zieloberflächen
Es können Messfehler auftreten, wenn der Laser auf farblose Flüssigkeiten (z.B. Wasser), staubfreies Glas, Styropor oder andere halbdurchlässige Materialen trifft. Es kann ebenfalls zu einer Verfälschung des Messergebnisses kommen, wenn der Laser auf eine hochglänzende Fläche trifft
und von dieser abgelenkt wird. Matte, nicht-reflektierende oder dunkle
Flächen können die Messzeit verlängern.
Pflege
Tauchen Sie das Gerät niemals in Wasser ein. Wischen Sie es nur mit einem feuchten, weichen Tuch ab. Benutzen Sie keine aggressiven Reinigungsmittel. Behandeln Sie das Gerät stets so, wie Sie eine hochwertige
Kamera oder ein sensibles Messgerät behandeln würden.
Page 12

B - 1 Operating Manual – Laser Distance Meter BD 15
Contents
1. Safety instructions . . . . . . . . . . . . . . . . . . . . B - 01
2. Starting up . . . . . . . . . . . . . . . . . . . . . . . B - 03
3. First settings . . . . . . . . . . . . . . . . . . . . . . . B - 04
4. Carrying out measurements . . . . . . . . . . . . . . B - 05
5. Functions . . . . . . . . . . . . . . . . . . . . . . . . . B - 06
6. Technical specifications . . . . . . . . . . . . . . . . . B - 08
7. Troubleshooting and corrective measures . . . . . . . . B - 09
8. Measuring conditions . . . . . . . . . . . . . . . . . B - 10
This compact, easy-to-use and extremely useful base model was specifically designed
and developed for a variety of different indoor applications. The soft touch shortcut
keys for addition, subtraction, and area and volume calculations guarantee quick and
reliable measuring and make the laser distance meter far easier to use.
This publication replaces all previous publications. No part of this publication may be
reproduced, processed using electronic systems, replicated or distributed in any way
without prior written aurhorisation by us. Subject to technical modifications. All rights reserved. Names of goods are used without guarantee of free usage and used for the most
part according to the manufacturers‘ syntax. The names of goods used are registered and
should be considered as such. We reserve the right to modify the design in the interest
of ongoing product improvement, such as shape and colour modifications. The scope of
delivery may vary from that in the product description. All due care has been taken in
compiling this document. We accept no liability for errors or omissions. © TROTEC
®
1. Safety instructions
Permissible use
• For carrying out distance measuring
• For carrying out calculations, e.g. areas and volumes
Undue application
• Do not take the meter into operation unless the person doing so has
been properly instructed with regard to its use.
• Do not use the meter when not within the prescribed limits for this
particular device.
Page 13

Operating Manual – Laser Distance Meter BD 15 B - 2
• Do not deactivate the safety systems. Explanatory or hazard labels
which instruct the user as to the manner in which the device operates
may not be removed.
• Do not open with any tools (screwdriver etc.) whatsoever unless
explicitly permitted in the operating instructions.
• Do not change or modify the meter in any way.
• Accessories from other manufacturers or third parties may only be used
when express permission has been granted by Trotec GmbH & Co. KG.
• Do not use the meter for any purpose other than the purpose for
which it was originally intended and may not be used on scaffolding,
ladders or in the immediate vicinity of running machines or their un protected parts or other facilities when not handled and used with the
necessary care and attention.
• Do not point at the sun.
• Do not use the meter as long as adequate safety measures have not
been taken at the site or location where measuring is to be carried
out (e.g. on building sites, public roads etc.).
Laser Classification
The BD15 determines distances and carries out measuring by generating a laser beam which emerges from the front of the instrument.
This is a Laser Class 2 product:
Do not look directly into the laser beam and do not point the laser at other
persons. You will normally be able to protect your eyes by carrying out a
reflexive action (blinking) or by instinctively turning away your head.
Do not at any time and under no circumstances look into the
laser beam when using optical aids of any kind! This could seriously affect your eyes.
In accordance with the EU (European Union) Directives on
Waste Electrical and Electronic Equipment (WEEE), electronic equipment must not be treated as domestic waste,
but must be disposed of professionally in accordance with
Directive 2002/96EU of the EUROPEAN COUNCIL AND PARLIAMENT of 27 January 2003 regarding old electrical and electronic
equipment. Please dispose of this appliance in a manner appropriate to
the relevant legal requirements at the end of its product life.
m
Page 14

B - 3 Operating Manual – Laser Distance Meter BD 15
2. Starting up
Inserting/changing the battery
1) First remove the lid from
the battery compartment.
2) Insert the battery.
Make sure that the poles are correctly aligned.
3) Close the lid of the battery compartment..
The batteries have to be changed when the „ “ symbol blinks continuously in the display. Avoid corrosion by removing the batteries when
not used over longer periods.
Keypad
1) On/Measuring key
2) Area/Volume key
3) Key for indirect measurements
4) Key for individual/Continuous measuring
5) Plus key ( + )
6) Minus key ( - )
7) Memory key
8) Reference key
9) Backlight/Units key
10) Delete/Off key
LCD Display
1) Laser active
2) Reference value (at the front)
3) Reference value (at the back)
4) Variable measuring functions
Area measurements
Volume measurements
Indirect measurements
18
Page 15

Operating Manual – Laser Distance Meter BD 15 B - 4
Indirect (second) measurement
5) Individual distance measurement
6) Battery status
7) History, number of values that can be recalled
8) Device error warning
9) Continuous measuring/Max and Min measurements
10) Display line for the first value
11) Display line for the second value
12) Bottom line for the last value or the result of the calculation
3. First settings
Powering on and off
Switches the device and the laser on and off.
Press and hold the key to power off again.
The device powers off automatically when not used for longer than 3
minutes.
Delete key
Deletes the last action or the data on the display.
Setting the reference value
The reference value is emitted from the back of the device. Press this key
, to shift the reference value to
the front of the . An acoustic signal sounds each time the reference
point is displaced. The reference
value returns to the original position
(at the back) after the device has been
switched on.
Page 16

B - 5 Operating Manual – Laser Distance Meter BD 15
Backlit display
Press the illumination /UNITS key to switch the backlight on or off.
The backlight makes it much easier to read the display in the dark or when
lighting is poor.
Selecting units of distance
Press and hold the key to select a unit of distance. Press the key again
to change from metres to feet or from feet to inches (m, ft, in, ft+in).
4. Measurements
Individual measurements
Press the ON key to activate the laser. Press the key again to carry
out a measurement. The measured value is presented immediately on
the LCD display.
Continuous measuring / Max and Min measurements
The continuous measuring (tracking) function is used to transfer
measurements to building plans,
for example.
The meter can be moved toward
and away from the target when this
measuring method is used. A new
measuring value is calculated every
0.5 seconds. The related maximum
and minimum values are presented
in the first and the second lines of
the display respectively.
The user can, for example, point the
laser at a wall and then walk away
from the wall while at the same
time reading the values off the display until the desired distance has
been reached. To access this mode, press the relevant key
until
Page 17

Operating Manual – Laser Distance Meter BD 15 B - 6
the indication for continuous measuring appears on the display. Press
the key
again to cancel this procedure. The procedure is terminated
automatically after 100 measurements in continuous measuring mode.
5. Functions
Addition / Subtraction
Distance measurement
Adding the second value to the first value. Press the key , to see
the second value. The result from the addition of these two values appears
automatically. Subtracting the second value from the first value. Press
the key
to see the result. The second value always appears in the
second line, the result in the bottom line.
The last step is cancelled.
Return to the individual measuring mode.
Area measurements
Press the relevant key once. The symbol for the measuring mode
appears on the display.
Press the key to start the first measurement (e.g. the length).
Press the key
again to carry out the second measurement (e.g.
the width).
The meter calculates the area independently after the second press of the
key and presents it as a value in the bottom line of the display. The last
measuring value is displayed in the second line.
Volume measurements
Press the key for this measuring mode 2x until the relevant information
appears on the display. The side that is to measured starts to blink on
the display: Press the key
to activate the measurement.
Press the same key
again to measure the length and a second and a
third time to measure the width as well as the height. The meter calculates
the volume and presents the result as a value on the display. The last
measuring value is not displayed.
Page 18

B - 7 Operating Manual – Laser Distance Meter BD 15
Indirect measurements
Indirect measurements: determining a distance using two measurments. In
order to obtain a height measurement, for which you will need two or three
measurements, proceed as follows:
Pres the key once for the symbol to appear.
Aim at the highest point (1) and carry out your measurement. The first
value is saved. Hold the meter as steadily as possible and set it down evenly
on the ground so that it rests on the bottom two edges.
Press the measuring key again to measure the horizontal distance. The
result of this measurement is displayed in the second line, while the total sum
is displayed in the bottom line.
Indirect measuring – calculating a distance using three measuring
values
Press the key 2x; the symbol appears on the display.
Aim at the lowest point (1) and carry out
your measurement. The first value is saved.
Hold the meter as steadily as possible.
The exact position of the two bottom edges
must remain unchanged throughout!
Now point the laser at the horizontal target point (2) and carry out your measurement.
The result is displayed in the second line.
Finish by aiming at the top point (3) and pres the
key to carry out measuring (3). The result is presented in the bottom line
while the partial result is displayed in the second line.
History
The last 20 values (measurements or calculations) are displayed in the
reverse order. Use the keys or
which are reserved for this purpose
to navigate through the saved values.
Page 19

Operating Manual – Laser Distance Meter BD 15 B - 8
6. Technical specifications
Technical Specifications
Range . . . . . . . . . . . . . . . . . . . . . . . . . . . 0.05 to 50 m*
(0,16 - 164 ft)
Measuring accuracy up to 10 m . . . . . . . . . . . . . . . . Typical: ±1.5 mm**
(± 0.06 in)
Units of measurement . . . . . . . . . . . . . . . . . . . . . . . . . . m,in,ft
Laser category . . . . . . . . . . . . . . . . . . . . . . . . . . . . . Class II
Laser type . . . . . . . . . . . . . . . . . . . . . . . . . . . 635 nm, <1mW
Area, volume calculations . . . . . . . . . . . . . . . . . . . . . . . . . . . •
Indirect measurements (Pythagoras function) . . . . . . . . . . . . . . . . •
Addition/Subtraction . . . . . . . . . . . . . . . . . . . . . . . . . . . . . . •
Continuous measuring . . . . . . . . . . . . . . . . . . . . . . . . . . . . •
Min/Max distance display/Tracking function . . . . . . . . . . . . . . . . •
Backlit, multi-line display . . . . . . . . . . . . . . . . . . . . . . . . . . . •
Acoustic signal . . . . . . . . . . . . . . . . . . . . . . . . . . . . . . . . •
Dust and shockproof . . . . . . . . . . . . . . . . . . . . . . . . . . . IP 54
Number of readings saved to memory . . . . . . . . . . . . . . . . . . 20
Operating temperature . . . . . . . . . . . . 0°C to 40°C(32°F to 104°F)
Storage temperature . . . . . . . . . . . . -10 °C to 60°C(14°F to 140°F)
Battery life . . . . . . . . . . . . . . . . . . . . up to 4.000 measurements
Batteries . . . . . . . . . . . . . . . . . . . . . . . . . . . Type AAA 2 x 1.5V
Laser auto off . . . . . . . . . . . . . . . . . . . . . . . . . . . after 30 Secs
Auto power off . . . . . . . . . . . . . . . . . . . . . . . . . after 3 mins
Dimensions . . . . . . . . . . . . . . . . . . . . . . . . 115 x 48 x 28 mm
Weight . . . . . . . . . . . . . . . . . . . . . . . . . . . . . . . . . . . 135 g
* Using a target plate will increase the measuring distance during daytime in case of
targets with poor reflective characteristics
** Under good conditions (target surface exhibits favourable properties, room tempera ture) up to 10 m (33 ft). Deviations of up to ± 0.15 mm/ m (0.0059 in/3.3 ft) may occur
for distances over 10 m (33 ft) under less favourable conditions, for example strong
sunlight, poorly reflecting targets, high variations in temperature.
Page 20

B - 9 Operating Manual – Laser Distance Meter BD 15
7. Troubleshooting and Corrective Measures
Code Cause Corrective measures
204 Corrective measures Repeat process
208 Reception signal is too weak/ Use a larger target plate (optional)
measuring time is too long/
distance is > 50m (164 ft)
209 The reception signal is too strong The target is reflecting too strongly (use a target plate)
252 The temperature is too high Allow the meter to cool down
253 The temperature is too low The device has to warm up first
255 Hardware error Switch the meter on and off a few times.
Contact your dealer if the symbol continues to appear.
He will be able to help you.
Page 21

Operating Manual – Laser Distance Meter BD 15 B - 10
8. Measuring conditions
Measuring distance
The laser meter has a range of up to 50 m.
Measurements over greater distances can also be carried out under cer-
tain conditions, for example at night, dusk, when the target is shaded
without having to use a target plate. A target plate can be used during the
day to increase the measuring distance if the target itself exhibits poor
reflective characteristics.
Target surfaces
Errors may occur during measuring if the laser beam is directed at uncoloured liquids (e.g. water), glass that is free of dust, polystyrene or other
semi-permeable materials. Further errors may also occur when the laser
beam is deflected from surfaces which have strong reflective properties.
Matt, non-reflecting surfaces can result in longer measuring times.
Cleaning
Do not immerse the laser into water. Clean with a damp cloth only. Do not
use caustic cleaning agents. Treat your laser distance meter in exactly
the same way you would normally treat an expensive camera or any
other piece of sensitive equipment.
Page 22

C - 1 Notice d’emploi – Appareil de mesure de distance à laser
Sommaire
1. Consignes de sécurité . . . . . . . . . . . . . . . . . . C - 01
2. Mise en service . . . . . . . . . . . . . . . . . . . . . C - 03
3. Premiers réglages . . . . . . . . . . . . . . . . . . . . C - 04
4. Mesures. . . . . . . . . . . . . . . . . . . . . . . . . . C - 05
5. Fonctions . . . . . . . . . . . . . . . . . . . . . . . . . C - 06
6. Caractéristiques techniques . . . . . . . . . . . . . . . C - 08
7. Recherche et élimination des défaillances . . . . . . . . C - 10
8. Conditions de mesure . . . . . . . . . . . . . . . . . . .C - 11
Le modèle de base compact, maniable et surtout très utile a été développé et conçu
spécialement pour les différentes tâches à effectuer à l’intérieur. Les touches rapides
agréables et ultra souples pour des fonctions telles que l’addition, la soustraction, les
calculs de surfaces et de volumes facilitent les mesures et assurent une fiabilité ma-
ximale. La présente publication annule et remplace toutes les versions précédentes.
Aucune partie de la présente publication ne peut être reproduite ou traitée, polycopiée ou diffusée à l’aide de systèmes électroniques sous quelque forme que ce soit
sans notre autorisation écrite. Sous réserve de modifications techniques. Tous droits
réservés. Les noms de produits sont utilisés sans la garantie de la libre utilisation
et essentiellement selon l’orthographe utilisée par le fabricant. Les noms de produits
utilisés sont enregistrés et doivent être considérés comme noms de marques. Sous
réserve de modifications de construction réalisées dans l’intérêt de l’amélioration constante des produits, ainsi que de modifications de forme et de couleur. Le contenu de
la livraison peut différer des illustrations du produit. Le présent document a été réalisé
avec le soin nécessaire. Nous n’assumons aucune responsabilité quant aux erreurs ou
omissions. © TROTEC®
1. Consignes de sécurité
Utilisation conforme
• Réalisation de mesures de distances et de calculs, par ex. les sur
faces et volumes des pièces
Page 23

Notice d’emploi – Appareil de mesure de distance à laser C - 2
Utilisation non conforme
• L’appareil ne doit pas être mis en service sans une initiation approp riée à son utilisation.
• L’appareil ne doit pas être utilisé en dehors des limites définies.
• Les systèmes de sécurité ne doivent pas être désactivés. Les éti quettes de dangers ou les autocollants indiquant l’utilisation confor me ne doivent pas être retirés de l’appareil.
• L’appareil ne doit pas être ouvert avec des outils (tournevis, etc.), sauf
si cela est indiqué explicitement dans la notice d’emploi.
• L’appareil ne doit être ni transformé, ni modifié.
• Les accessoires d’autres fabricants / fournisseurs tiers ne pourront
être utilisés qu’avec l’autorisation explicite de la société Trotec GmbH
& Co. KG.
• L’appareil ne doit pas faire l’objet d’un usage abusif intentionnel dévi
ant de l’utilisation conforme ou être utilisé d’une manière irres ponsable sur des échafaudages, des échelles, à proximité immédiate
de machines en service ou d’éléments non protégés de machines ou
d’équipements.
• L’appareil ne doit pas être orienté directement vers le soleil.
• L’appareil ne doit pas être utilisé si les mesures de sécurité prises sur le
lieu de mesure sont insuffisantes (par ex. lors de mesures sur la voie pub lique, sur des chantiers, etc.).
Classement laser
Pour les mesures de distances, l’appareil BD15 génère un rayon laser
émis par la face avant de l’appareil.
Ceci est un appareil de la catégorie de laser 2 :
Ne regardez pas dans le rayon laser et ne dirigez pas le rayon laser
sur d’autres personnes. Les yeux sont normalement protégés par
un réflexe (clignement) ou par le détournement instinctif et rapide
de la tête.
Ne regardez jamais directement dans le rayon laser à l’aide de moyens auxiliaires optiques ! Vous mettez en danger la santé de vos
yeux si vous regardez directement dans le rayon laser.
m
Page 24

C - 3 Notice d’emploi – Appareil de mesure de distance à laser
Les appareils électroniques ne doivent pas être éliminés
dans les ordures ménagères ; au sein de l’Union Européenne, ils doivent être éliminés conformément à la Directive
2002/96/CE du parlement Européen et du Conseil du 27
janvier 2003 relative aux déchets d’équipements électriques et électroniques. Au terme de son utilisation, veuillez éliminer
cet appareil selon les réglementations légales en vigueur.
2. Mise en service
Mise en place / remplacement des piles
1) Retirez d’abord le cache du com partiment à piles.
2) Insérez les piles. Veillez à respecter la
bonne polarité.
3) Refermez le compartiment à piles.
Les piles doivent être remplacées lorsque le symbole « » clignote
sans interruption à l’écran. Si vous n’utilisez pas l’appareil pendant une
période prolongée, retirez les piles du compartiment à piles afin de prévenir toute corrosion.
Champ de touches
1) Touche Marche / Mesure
2) Touche Surface / Volume de pièce
3) Touche de mesure indirecte
4) Touche de mesures de distances
individuelles/continues
5) Touche Plus ( + )
6) Touche Moins ( - )
7) Touche de rangement
8) Touche de référence
9) Touche d’éclairage / d’unités
10) Touche de suppression / d’arrêt
Page 25

Notice d’emploi – Appareil de mesure de distance à laser C - 4
Ecran LCD
1) Laser actif
2) Valeur de référence (avant)
3) Valeur de référence (arrière)
4) Fonctions de mesures variables
Mesures de surfaces
Mesures de volumes
Mesure indirecte
(Seconde) mesure indirecte
5) Mesure de distance individuelle
6) Etat de la pile
7) Historique, nombre de valeurs affichables
8) Avertissement de défaillance d’appareil
9) Mesure continue / Mesure Max et Min
10) Ligne d’affichage de la première valeur
11) Ligne d’affichage pour la seconde valeur
12) Ligne inférieure pour la dernière valeur de mesure ou le résultat du
calcul
3. Premiers réglages
Mise en marche et arrêt
Allume et éteint l’appareil et le laser.
Appuyez de manière continue sur cette touche pour éteindre
l’appareil. L’appareil s’éteint automatiquement s’il n’est pas utilisé pendant plus de trois minutes.
Touche de suppression
Supprime la dernière action ou les données à l’écran.
18
Page 26
C - 5 Notice d’emploi – Appareil de mesure de distance à laser
Régler la valeur de référence
La valeur de référence est comptée à partir du bord arrière de l’appareil.
Appuyez sur cette touche , pour commuter le point de référence sur le
bord avant de l’appareil. Un signal sonore est émis à chaque commutation du point de référence. Après la
mise en marche de l’appareil, la valeur
de référence revient automatiquement
à sa position initiale à l’arrière de
l’appareil.
Rétroéclairage
Appuyez sur la touche Rétroéclairage / UNITS pour allumer ou
éteindre le rétroéclairage. En cas d’obscurité ou de mauvais éclairage, les
valeurs seront ainsi plus faciles à relever à l’écran.
Sélectionner l’unité de distance
Maintenez la touche appuyée pour sélectionner l’unité de distance.
Appuyez une nouvelle fois sur la touche pour commuter de Mètres en
Pieds ou de Pieds en Pouces (m, ft, in, ft+in) et inversement.
4. Mesures
Mesure de distance individuelle
Appuyez sur la touche MARCHE pour activer le laser. Appuyez une
nouvelle fois sur la touche pour réaliser une mesure de distance. La valeur
mesurée s’affiche immédiatement sur
l’écran LCD.
Mesure continue (fonction de
Tracking) / Mesures Max et Min
La fonction de mesure continue
(Tracking) est utilisée pour transférer des mesures, par ex. de plans
de construction.
Page 27

Notice d’emploi – Appareil de mesure de distance à laser C - 6
Cette méthode de mesure permet de déplacer l’appareil vers l’objectif,
en recalculant la valeur de mesure toutes les 0,5 secondes environ. Les
valeurs de mesure maximales et minimales correspondantes s’affichent
respectivement dans la première et la seconde ligne.
L’utilisateur peut par ex. diriger le rayon laser sur un mur, puis s’éloigner
progressivement du mur en relevant la valeur de mesure jusqu’à
appuyez sur la touche correspondante jusqu’à ce que l’affichage
de la mesure atteindre la distance souhaitée. Pour accéder à ce mode,
continue apparaisse à l’écran. Appuyez une nouvelle fois sur la touche
, pour interrompre le processus. Le processus est interrompu automa-
tiquement après 100 mesures réalisées en mode continu.
5. Fonctions
Addition / Soustraction
Mesures de distances
La seconde valeur de mesure est additionnée à la première valeur de
mesure. Appuyez sur la touche
pour afficher la seconde valeur de
mesure. Le résultat des deux valeurs de mesure s’affiche automatiquement. La seconde valeur de mesure est soustraite de la première valeur de
mesure. Appuyez sur la touche pour afficher le résultat. La seconde
valeur de mesure s’affiche toujours dans la seconde ligne, le résultat dans
la ligne inférieure.
La dernière étape est interrompue.
Revenez aux mesures de distances individuelles.
Mesures de surfaces
Appuyez une fois sur la touche correspondante. Le symbole pour
ce processus de mesure s’affiche à l’écran.
Appuyez sur la touche pour procéder à la première mesure (par ex.
la longueur).
Appuyez une nouvelle fois sur la touche
pour procéder à la seconde
mesure (par ex. la largeur).
Page 28
C - 7 Notice d’emploi – Appareil de mesure de distance à laser
Après le second actionnement de la touche, l’appareil calcule automatiquement la surface et l’affiche dans la ligne inférieure. La dernière valeur
mesurée s’affiche dans la seconde ligne de l’écran.
Mesures de volume
Appuyez 2x sur la touche prévue pour ce processus de mesure jusqu’à
ce que l’affichage correspondant apparaisse à l’écran. Le côté à mesurer s’affiche à l’écran en clignotant et la mesure correspondante est activée
en appuyant sur la touche .
Appuyez une fois sur la même touche
mesurer la longueur, puis une
seconde et une troisième fois pour mesurer la largeur et la hauteur.
L’appareil calcule ensuite le volume et affiche cette valeur à l’écran. La der-
nière valeur mesurée n’est pas affichée.
Mesures indirectes
Mesures indirectes : calcul d’une distance au
moyen de deux mesures auxiliaires. Procédez par
exemple comme suit pour les mesures de hauteur
requérant deux ou trois opérations de mesure :
appuyez une fois sur la touche s’affiche
alors .
Visez maintenant le point supérieur (1)
et effectuez une mesure. La première valeur de
mesure est enregistrée. Tenez l’appareil aussi
fermement que possible et placez-le avec les
deux bords arrières à plat sur le support.
Appuyez une nouvelle fois sur la touche de mesure pour mesurer la
ligne horizontale. Le résultat de cette mesure s’affiche dans la seconde ligne,
tandis que le résultat total apparaît simultanément dans la ligne inférieure.
Mesure indirecte – Calcul d’une distance au moyen de trois grandeurs
de mesure
Appuyez deux fois sur la touche ; l’affichage apparaît à l’écran.
Visez d’abord le point inférieur (1) et effectuez une mesure. La première valeur de mesure est enregistrée. Maintenez l’appareil aussi fermement
que possible pendant cette opération.
Page 29

Notice d’emploi – Appareil de mesure de distance à laser C - 8
La butée des deux bords arrières ne doit pas varier pendant la mesure !
Visez à présent le point cible horizontal (2) et effectuez la mesure. Le
résultat s‘affiche dans la seconde ligne.
Visez pour terminer le point supérieur (3) et appuyez sur la touche
pour effectuer la mesure (3). Le résultat s’affiche dans le ligne inférieure, tandis que les résultats intermédiaires apparaissent dans la seconde
ligne.
Chronik
Les 20 dernières valeurs (mesures ou calculs) s’affichent dans
l’ordre inverse. Utilisez les touches ou pour naviguer à travers
les enregistrements.
6. Caractéristiques techniques
Portée . . . . . . . . . . . . . . . . . . . . . . . . . . . 0,05 à 50 m*
(0,16 - 164 ft)
Précision de mesure jusqu’à 10 m . . . . . . . . . . . . . . . . Typique: ±1.5 mm**
(± 0,06 in)
Unités de mesure. . . . . . . . . . . . . . . . . . . . . . . . . . . . . . m,in,ft
Catégorie laser . . . . . . . . . . . . . . . . . . . . . . . . . . . . . Classe II
Type de laser. . . . . . . . . . . . . . . . . . . . . . . . . . . .635 nm, <1mW
Calculs de surfaces et de volumes . . . . . . . . . . . . . . . . . . . . . . •
Mesures indirectes (fonction de Pythagore) . . . . . . . . . . . . . . . . . •
Addition / Soustraction . . . . . . . . . . . . . . . . . . . . . . . . . . . . . •
Mesure continue. . . . . . . . . . . . . . . . . . . . . . . . . . . . . . . . .•
Affichage des distances Min/Max / Fonction de Tracking . . . . . . . . . •
Rétroéclairage et affichage sur plusieurs lignes . . . . . . . . . . . . . . •
Signal sonore . . . . . . . . . . . . . . . . . . . . . . . . . . . . . . . . . . . •
Page 30

C - 9 Notice d’emploi – Appareil de mesure de distance à laser
Etanche aux poussières et résistant aux chocs . . . . . . . . . . . . . . . .IP 54
Nombre d’entrées dans l’historique. . . . . . . . . . . . . . . . . . . . . 20
Température de service. . . . . . . . . . . . . . 0°C à 40°C (32°F à 104°F)
Température de stockage . . . . . . . . . . . -10 °C à 60°C (14°F à 140°F)
Durée de vie de pile. . . . . . . . . . . . . . . . . . . jusqu’à 4 000 mesures
Piles . . . . . . . . . . . . . . . . . . . . . . . . . . . . . . . Typ AAA 2 x 1,5V
Désactivation automatique du laser . . . . . . . . . . . . . . après 30 secondes
Désactivation automatique. . . . . . . . . . . . . . . . . . . . . . après 3 minutes
Dimensions . . . . . . . . . . . . . . . . . . . . . . . . 115 x 48 x 28 mm
Poids . . . . . . . . . . . . . . . . . . . . . . . . . . . . . . . . . . . . . . 135 g
* Utilisez un tableau cible pour augmenter la distance de jour ou en cas de cibles à
réflexion insuffisante !
** Sous de bonnes conditions (caractéristiques favorables de la surface cible ; tempéra ture ambiante) jusqu’à 10 m. Sous des conditions défavorables telles que par ex. une
lumière solaire très forte, des surfaces à réflexion insuffisante, des variations de tem pératures importantes, des divergences de ± 0,15 mm/m peuvent apparaître audelà
de 10 m.
Page 31
Notice d’emploi – Appareil de mesure de distance à laser C - 10
7. Recherche et élimination des défaillances
Code Cause Mesure corrective
204 Erreur de calcul Répétez le processus
208 Le signal de réception est trop Utilisez un tableau cible plus grand (optionnel)
faible/le temps de mesure est trop
long/la distance est > 50 m
209 Le signal de réception est trop fort La réflexion de la cible est trop importante (utilisez un tableau cible)
252 La température est trop élevée Laissez refroidir l’appareil
253 La température est trop basse Laissez l’appareil chauffer d’abord
255 Défaillance matérielle Eteignez et rallumez l’appareil à plusieurs reprises. Veuillez contacter
votre revendeur si le symbole persiste. Il se fera un plaisir de vous
aider.
Page 32

C - 11 Notice d’emploi – Appareil de mesure de distance à laser
8. Conditions de mesure
Distance de mesure
La portée de l’appareil est de 50 m.
Des distances supérieures sont possibles sous certaines conditions –
par ex. la nuit, à la tombée de la nuit, lorsque la cible est à l’ombre –
même sans tableau cible. De jour, un tableau cible permet d’augmenter
la distance en cas de cibles à réflexion insuffisante.
Surfaces cibles
Des erreurs de mesure peuvent survenir lorsque le laser touche des liquides incolores (par ex. de l’eau), du verre sans poussières, du polystyrène ou d’autres matières semi-transparentes. De même, le résultat de
mesure peut être faussé lorsque le laser touche une surface très brillante
et est défléchi par celle-ci. Les surfaces mates, non réfléchissantes ou
sombres peuvent prolonger la durée de mesure.
Entretien
N’immergez jamais l’appareil dans de l’eau. Essuyez-le uniquement
avec un chiffon doux humide. N’utilisez pas de détergents agressifs.
Traitez toujours l’appareil comme vous le feriez avec une caméra de
qualité ou un instrument de mesure sensible.
Page 33

Notice d’emploi – Appareil de mesure de distance à laser C - 12
Page 34

D - 1
Istruzioni per l’uso – Misuratore di distanza laser
Indice
1. Indicazioni di sicurezza . . . . . . . . . . . . . . . . . D - 01
2. Messa in funzione . . . . . . . . . . . . . . . . . . D - 03
3. Impostazioni di base . . . . . . . . . . . . . . . . . . . D - 04
4. Misurazioni . . . . . . . . . . . . . . . . . . . . . . . D - 05
5. Funzioni . . . . . . . . . . . . . . . . . . . . . . . D - 06
6. Caratteristiche tecniche . . . . . . . . . . . . . . . . . D - 08
7. Diagnosi e risoluzione dei problemi . . . . . . . . . . . . D - 09
8. Condizioni di misurazione. . . . . . . . . . . . . . . . .D - 10
La versione base pratica e compatta e soprattutto di grande utilità è stata progettata e
concepita per lo svolgimento di varie operazioni in ambienti chiusi. I pratici tasti morbidissimi consentono di svolgere rapidamente funzioni come l’addizione, la sottrazione
ed il calcolo di superfici e volumi ed eseguire le misurazioni in modo semplice ed estre-
mamente affidabile. La presente pubblicazione sostituisce tutte le precedenti. Senza il
nostro consenso scritto, non sono consentite la copia in alcuna forma né l’elaborazione,
la duplicazione o la diffusione con sistemi elettronici della presente pubblicazione, o
parte di essa. Il produttore si riserva il diritto di apportare modifiche tecniche. Tutti
i diritti riservati. I nomi commerciali vengono impiegati senza alcuna garanzia della
libera utilizzabilità e sostanzialmente in conformità a quanto stabilito dai produttori. I
nomi commerciali utilizzati sono registrati e devono essere considerati tali. Il produttore si riserva il diritto di apportare modifiche costruttive nell’interesse del continuo
miglioramento del prodotto, nonché modifiche della forma e del colore. La dotazione
può variare rispetto alle immagini del prodotto. Il presente documento è stato elaborato
con la massima accuratezza. Il produttore non si assume alcuna responsabilità per
eventuali errori od omissioni. © TROTEC®
1. Indicazioni di sicurezza
Utilizzo consentito
• Misurazioni di distanza e calcoli, per es. superfici e volumi.
Utilizzo non consentito
• E’ vietato avviare lo strumento senza istruzioni in merito.
• Non utilizzare lo strumento al di fuori dei limiti indicati.
Page 35

Istruzioni per l’uso – Misuratore di distanza laser
D - 2
• I sistemi di sicurezza non possono essere disattivati. Non rimuovere
dallo strumento le etichette di segnalazione di pericolo e gli adesivi
che indicano il corretto funzionamento.
• Non aprire lo strumento con attrezzi (cacciavite ecc.), a meno che ciò
non venga espressamente indicato nelle istruzioni per l’uso.
• Non modificare né alterare lo strumento in alcun modo.
• L’utilizzo di accessori di altri produttori / distributori è ammesso solo
con l’espres so consenso della Trotec GmbH & Co. KG.
• E’ vietato fare cattivo uso dello strumento prevalentemente per alt ri scopi o utilizzarlo in modo irresponsabile su ponteggi, scale, nel le immediate vicinanze di macchine in funzione oppure componenti
di macchine o dispositivi non protette.
• Non indirizzare lo strumento direttamente verso il sole.
• Non utilizzare lo strumento se non sono stati adottati provvedimenti di
sicurezza sufficienti nel punto in cui viene eseguita la misurazione
(per es. su strade pubbliche, cantieri ecc.).
Classificazione laser
Per la misurazione di distanze il BD15 produce un raggio laser che viene
trasmesso dal lato anteriore dello strumento.
E’ un prodotto della categoria laser 2 :
Non fissare il raggio laser e non indirizzare il laser verso altre persone.
Normalmente, gli occhi vengono protetti da un riflesso (battito delle ciglia) o con uno spostamento istintivo repentino del capo.
Non guardare mai il raggio laser direttamente con mezzi ottici di
alcun tipo! Fissando il raggio laser potrebbe essere compromessa
la salute degli occhi.
E’ vietato gettare gli apparecchi elettronici nei rifiuti domestici; è invece necessario provvedere ad un corretto smaltimento nell’ambito dell’Unione Europea – in conformità alla
Direttiva 2002/96/CE DEL PARLAMENTO EUROPEO E DEL
CONSIGLIO del 27 gennaio 2003 sugli apparecchi elettrici ed elettronici usati. Una volta terminato l’utilizzo, provvedere allo
smaltimento dello strumento in conformità alle disposizioni di legge
in materia.
m
Page 36
D - 3
Istruzioni per l’uso – Misuratore di distanza laser
2. Messa in funzione
Inserimento e sostituzione delle batterie
1) Rimuovere anzitutto il coperchio
dallo scomparto batterie.
2) Inserire le batterie.
Verificare la corretta polarità.
3) Richiudere lo scomparto batterie.
Le batterie devono essere sostituite se il simbolo „ “ sul display
lampeggia ininterrottamente. In caso di inutilizzo prolungato dello strumento, rimuovere le batterie dallo scomparto per evitare la corrosione.
Campo tasti
1) Tasto On / misurazione
2) Tasto superficie /volume
3) Tasto per misurazioni indirette
4) Tasto per misurazione di distanze
singole / prolungata
5) Tasto più ( + )
6) Tasto meno ( - )
7) Tasto immagazzinamento
8) Tasto di riferimento
9) Tasto unità di illuminazione
10) Tasto cancella /Off
Display LCD
1) Laser attivo
2) Valore di riferimento (anteriore)
3) Valore di riferimento (posteriore)
4) Funzioni di misurazione variabili
Misurazione superfici
18
Page 37
Istruzioni per l’uso – Misuratore di distanza laser
D - 4
Misurazione volumi
Misurazione indiretta
Misurazione indiretta (seconda)
5) Misurazione di distanze singole
6) Stato batteria
7) Cronologia, numero dei valori richiamabili
8) Segnalazione errori
9) Misurazione prolungata /Misurazione max. e min.
10) Riga display per il primo valore
11) Riga display per il secondo valore
12) Riga in basso per l’ultimo valore rilevato o risultato del calcolo
3. Impostazioni di base
Accensione e spegnimento
Spegne ed accende lo strumento ed il laser.
Tenere premuto il tasto per spegnere lo strumento. Lo strumento si
spegne automaticamente se non viene utilizzato per almeno tre minuti.
Tasto cancella
Cancella l’ultima azione o i dati
sul display.
Impostare il valore di riferimento
Il valore di riferimento deriva dalla
parte posteriore dello strumento. Premere questo tasto
perspostare il
punto di riferimento nella parte anteriore dello strumento . Un segnale
Page 38

D - 5
Istruzioni per l’uso – Misuratore di distanza laser
acustico indica quando viene spostato il punto di riferimento. Dopo
l’accensione il valore di riferimento torna automaticamente alla posizione
originale (sul retro dello strumento).
Retroilluminazione
Premere il tasto dell’illuminazione/UNITS per attivare e disattivare
la retroilluminazione. I valori visualizzati sul display possono essere letti
meglio al buio o in condizioni di scarsa luminosità.
Selezionar e l’unità della distanza
Tenere premuto il tasto per selezionare l’unità della distanza. Ripremere
il tasto per passare dall’unità metri a piedi o da piedi a pollici (m, ft. in, ft+in)
e viceversa.
4. Misurazioni
Misurazione di distanze singole
Premere il tasto ON, per attivare il laser. Premere nuovamente il tasto
per misurare una distanza. Il valore rilevato viene immediatamente visualizzato
sul display LCD.
Misurazione prolungata (funzione tracking) / Misurazioni
max e min
La funzione della misurazione prolungata (tracking) viene utilizzata
per trasmettere misurazioni, per es.
di progetti di costruzione.
Per tale metodo di misurazione, lo
strumento può essere spostato fino
al target ricalcolando il valore approssimativamente ogni 0,5 secondi. I valori rilevati massimi e minimi
vengono rappresentati nella prima
e nella seconda riga.
L’operatore potrà, ad esempio, indirizzare il raggio laser verso una parete e allontanandosi sempre di più
Page 39

Istruzioni per l’uso – Misuratore di distanza laser
D - 6
da tale parete leggere il valore rilevato a questa modalità premere il
tasto corrispondente finché sul display non viene finché non viene
raggiunta la distanza desiderata. Per passare a
visualizzata la misurazione prolungata. Premere nuovamente il tasto per interrompere il processo. Il processo viene automaticamente terminato dopo 100 misurazioni
nella modalità prolungata.
5. Funzioni
Addizione / Sottrazione
Misurazione delle distanze
Il secondo valore rilevato viene sommato al primo. Premere il tasto
per vedere il secondo valore rilevato. Viene automaticamente deter-
minato il risultato dei due valori rilevati. Il secondo valore rilevato viene
sottratto dal primo. Premere il tasto per vedere il risultato. Il secondo
valore rilevato appare sempre nella seconda riga, il risultato nell’ultima.
La prima fase viene interrotta.
Ritornare alla misurazione delle distanze singole.
Misurazione superfici
Premere il tasto corrispondente una volta. Il simbolo per questo
processo di misurazione appare sul display.
Premere il tasto
per effettuare la prima misurazione (ad es. la lung-
hezza).
Premere nuovamente il tasto
per eseguire la seconda misurazione
(ad es. la larghezza).
Dopo aver premuto il tasto per la seconda volta lo strumento calcola automaticamente la superficie e mostra il risultato nell’ultima riga. L’ultimo valore
rilevato viene visualizzato sulla seconda riga del display.
Misurazione volumi
Premere due volte il tasto previsto per questo processo di misurazione finché non appare sul display il valore corrispondente. Il lato da
misurare lampeggia sul display e viene attivata la misurazione premendo il
tasto .
Page 40
D - 7
Istruzioni per l’uso – Misuratore di distanza laser
Premere lo stesso tasto per misurare una volta la lunghezza e quindi una
seconda e una terza volta per misurare la larghezza e l’altezza.
Lo strumento calcola infine il volume e visualizza il risultato sul display. Non
viene visualizzato l’ultimo valore rilevato.
Misurazioni indirette
Misurazioni indirette: Calcolo di una distanza con due misurazioni ausiliarie.
Per le misurazioni dell’altezza che richiedono due o tre misurazioni, procedere ad esempio come segue:
Premendo il tasto una volta, appare il simbolo .
Indirizzare il raggio anzitutto verso il punto più alto (1) ed eseguire la
misurazione. Viene registrato il primo valore rilevato. Tenere lo strumento il
più possibile fermo ed appoggiare gli spigoli
posteriori in piano sul fondo.
Premere di nuovo il tasto di misurazione
per misurare la linea orizzontale. Il risultato di
questa misurazione viene visualizzato nella seconda riga, mentre il totale contemporaneamente nell’ultima.
Misurazione indiretta – Calcolo di una distanza sulla base di tre dimensioni
Premere 2 volte il tasto 2x; il risultato appare sul display.
Mirare anzitutto al punto in basso (1) ed
eseguire una misurazione. Viene registrato il
primo valore rilevato. Tenere lo strumento il più
possibile fermo. Non modificare l’appoggio
sugli spigoli posteriori durante le misurazioni!
Mirare al punto orizzontale (2) ed eseguire la misurazione. Il risultato
viene visualizzato nella seconda riga.
Mirare quindi al punto in alto (3) e premere il tasto per eseguire la mi-
surazione (3). Il risultato viene visualizzato nell’ultima riga, mentre i risultati
parziali nella seconda riga.
Page 41

Istruzioni per l’uso – Misuratore di distanza laser
D - 8
Cronologia
Gli ultimi 20 valori (misurazioni o calcoli) vengono visualizzati nella
sequenza inversa. Utilizzare i tasti appositamente previsti
o per
spostarsi da un dato all’altro.
6. Caratteristiche tecniche
Caratteristiche tecniche
Raggio d’azione . . . . . . . . . . . . . . . . . . . . . . . . . . . 0,05 bis 50 m*
(0,16 - 164 ft)
Precisione delle misurazioni fino a 10 m . . . . . . . . . . Tipica: ±1,5 mm**
(± 0,06 in)
Unità di misura . . . . . . . . . . . . . . . . . . . . . . . . . . . . . . m,in,ft
Categoria laser . . . . . . . . . . . . . . . . . . . . . . . . . . . . . Classe II
Tipo di laser . . . . . . . . . . . . . . . . . . . . . . . . . . . . . 635 nm, <1mW
Calcolo superfici, volumi . . . . . . . . . . . . . . . . . . . . . . . . . . . •
Misurazioni indirette (funzione di pitagora) . . . . . . . . . . . . . . . . . •
Addizione/Sottrazione . . . . . . . . . . . . . . . . . . . . . . . . . . . . . .•
Misurazione prolungata . . . . . . . . . . . . . . . . . . . . . . . . . . . . •
Funzione dati distanza min/max / funzione tracking . . . . . . . . . . . . . •
Retroilluminazione e display a più righe . . . . . . . . . . . . . . . . . . .•
Segnale acustico. . . . . . . . . . . . . . . . . . . . . . . . . . . . . . . . . . . . •
Resistente alla polvere e agli urti . . . . . . . . . . . . . . . . . . . . . . IP 54
Numero dei rilevamenti nella cronologia . . . . . . . . . . . . . . . . 20
Temperatura di esercizio . . . . . . . . . . . da 0°C a 40°C (da 32°F a104°F)
Temperatura di immagazzinamento . . . da -10 °C a 60°C (da 14°F a 140°F)
Durata della batteria . . . . . . . . . . . . . . . . fino a 4.000 misurazioni
Batterie . . . . . . . . . . . . . . . . . . . . . . . . . . . . . Tipo AAA 2 x 1,5V
Spegnimento automatico laser. . . . . . . . . . . . . . . . . . dopo 30 secondi
Spegnimento automatico . . . . . . . . . . . . . . . . . . . . . . . dopo 3 min
Dimensioni . . . . . . . . . . . . . . . . . . . . . . . . . . . 115 x 48 x 28 mm
Peso . . . . . . . . . . . . . . . . . . . . . . . . . . . . . . . . . . . 135 g
* Utilizzare una piastra segnale per aumentare la distanza durante il giorno o per target
poco riflettenti!
** In condizioni favorevoli (buone proprietà della superficie del target; temperatura am biente) fino a 10 m. In condizioni sfavorevoli come, ad esempio, in presenza di forte
luce, superfici poco riflettenti, elevate variazioni delle temperature, a partire da una
distanza di 10 m si può avere una differenza di ± 0,15 mm/m.
Page 42
D - 9
Istruzioni per l’uso – Misuratore di distanza laser
7. Diagnosi e risoluzione dei problemi
Codice Causa Provvedimento correttivo
204 Errore di calcolo Ripetere la procedura
208 Il segnale di ricezione è troppo debole Utilizzare una piastra segnale di maggiori dimensioni (optional)
tempi necessari per la misurazione
troppo lunghi / la distanza è > 50m
209 Il segnale di ricezione è troppo forte Target troppo riflettente (utilizzare una piastra segnale)
252 La temperatura è troppo elevata Far raffreddare lo strumento
253 La temperatura è troppo bassa Lo strumento deve dapprima riscaldarsi
255 Errore hardware Spegnere e riaccendere più volte lo strumento. Mettetevi in contatto
con il distributore, se il simbolo è ancora presente. Vi potrà fornire
assistenza.
Page 43

Istruzioni per l’uso – Misuratore di distanza laser
D - 10
8. Condizioni di misurazione
Distanza di misurazione
Lo strumento ha un raggio d’azione di 50 m.
Distanze maggiori sono possibili in determinate condizioni – ad es. di
notte, nella penombra se il target viene coperto dall’ombra – anche senza piastra segnale. Di giorno è possibile usare una piastra segnale per
aumentare la distanza dei target poco riflettenti.
Superfici dell’obiettivo
Possono verificarsi errori nella misurazione se il laser colpisce liquidi
incolori (ad es. acqua), vetri puliti, polistirolo o altri materiali parzialmente porosi. Può anche verificarsi un’alterazione del risultato della misurazione se il laser copisce una superficie brillante e viene deviato. Le
superfici scure o non riflettenti possono prolungare i tempi necessari
per la misurazione.
Cura
Non immergere mai lo strumento nell’acqua. Per pulire lo strumento è
sufficiente passare un panno morbido e umido. Non utilizzare detergenti
aggressivi. Utilizzare lo strumento sempre come se si trattasse di una
macchina fotografica di alta qualità o uno strumento di misurazione
sensibile.
Page 44

E - 1
Gebruikshandleiding – Laser-afstandsmeetinstrument
Inhoud
1. Veiligheidsinstructies . . . . . . . . . . . . . . . . . E - 01
2. Inbedrijfname . . . . . . . . . . . . . . . . . . . . . E - 03
3. Eerste instellingen . . . . . . . . . . . . . . . . . . . . E - 04
4. Metingen . . . . . . . . . . . . . . . . . . . . . . . . . E - 05
5. Functies . . . . . . . . . . . . . . . . . . . . . . . . . E - 06
6. Technische gegevens . . . . . . . . . . . . . . . . . . E - 08
7. Foutopsporing en verhelpen van fouten . . . . . . . . . E - 09
8. Meetomstandigheden . . . . . . . . . . . . . . . . . . E - 10
Het compacte, handige en vooral zeer nuttige basismodel werd speciaal voor verschillende taken in het binnenbereik ontwikkeld en ontworpen. De aangename,
superzachte sneltoetsen voor functies zoals Optellen, Aftrekken, Oppervlakte- en
volumeberekeningen zorgen ervoor, dat de metingen gemakkelijker gaan en uiterst
betrouwbaar zijn.
Deze publicatie vervangt alle voorafgaande publicaties. Geen deel van deze publicatie
mag in welke vorm dan ook zonder onze schriftelijke goedkeuring gereproduceerd of
met gebruik van elektronische systemen verwerkt, vermenigvuldigd of verspreid worden. Technische wijzigingen voorbehouden. Alle rechten voorbehouden. Productnamen
worden zonder garantie van het vrije gebruik en in principe de schrijfwijze van de
fabrikanten overeenkomstig gebruikt. De gebruikte productnamen zijn geregistreerde
productnamen en moeten als zulke beschouwd worden. Constructieveranderingen in
het interesse van een lopende productverbetering alsmede vorm-/kleurveranderingen
blijven voorbehouden. Leveringsomvang kan afwijken van de productafbeeldingen. Dit
document werd met de grootste zorgvuldigheid opgesteld. Wij zijn niet aansprakelijk
voor fouten of weglatingen. © TROTEC®
1. Veiligheidsinstructies
Toegestaan gebruik
• Uitvoeren van afstandsmetingen en berekeningen, bijv. oppervlakken
en ruimtematen.
Niet-toegestaan gebruik
• Het instrument mag niet zonder een overeenkomstige instructie in
bedrijf worden genomen.
Page 45
Gebruikshandleiding – Laser-afstandsmeetinstrument
E - 2
• Het instrument niet buiten de vooraf vastgestelde grenzen gebruiken.
• De veiligheidssystemen mogen niet gedeactiveerd worden. Er morgen
geen gevarenetiketten of stickers, die op de correcte bediening wijzen,
van het instrument verwijderd worden.
• Het instrument mag niet met gereedschap (schroevendraaier etc.) geopend
worden, tenzij dit uitdrukkelijk in de handleiding staat aangegeven.
• Het instrument mag noch veranderd noch aangepast worden.
• Accessoires van andere fabrikanten/derde aanbieders mogen alleen met
uitdrukkelijke toestemming van Trotec GmbH & Co. KG gebruikt worden.
• Het instrument mag niet opzettelijk voor andere doeleinden misbruikt o f
op onverantwoordelijke wijze op stellingen, ladders, in directe nabijheid
van draaiende machines of onbeschermde onderdelen van machines of
inrichtingen gebruikt worden.
• Het instrument mag niet direct naar de zon gericht worden.
• Het instrument mag niet gebruikt worden, als er geen voldoende
veiligheidsmaatregelen op het meetpunt getroffen werden (bijv. bij
metingen op de openbare weg, op bouwplaatsen etc.).
Laser-classificatie
Voor de afstandsmeting genereert de BD15 een laserstraal, die vanaf de
voorkant van het instrument uitgestraald wordt.
Dit is een product van de laser-categorie 2 :
Kijk niet in de laserstraal en richt de laser niet op andere personen. De
ogen worden normaal gesproken door een reflex [knipperen] of door het
instinctieve, snelle wegdraaien van het hoofd beschermd.
Kijk nooit met wat voor optische hulpmiddelen dan ook direct in
de laserstraal! U brengt de gezondheid van uw ogen in gevaar,
als u in de laserstraal kijkt.
Elektronische instrumenten horen niet bij het huisafval, maar moeten in de Europese unie- conform richtlijn
2002/96/EG VAN HET EUROPESE PARLEMENT EN DE RAAD
van 27 januari 2003 met betrekking tot elektro- en elekt-
ronische-oude apparatuur – bij een deskundige plaats voor
afvalverwijdering worden gedeponeerd. Dit instrument moet aan het
einde van zijn gebruik door u conform de geldende wettelijke bepalingen verwijderd worden.
m
Page 46
E - 3
Gebruikshandleiding – Laser-afstandsmeetinstrument
2. Inbedrijfname
Batterijen plaatsen/vervangen
1) Verwijder eerst het deksel
van het batterijvak.
2) Plaats de batterijen.
Let daarbij op de juiste polariteit.
3) Sluit het batterijvak weer.
De batterijen moeten vervangen worden, als het symbool „ “ ononderbroken in het display knippert. Als het instrument gedurende een langere
periode niet gebruikt wordt, verwijder dan de batterijen uit het batterijvak, om corrossie te voorkomen.
Toetsenpaneel
1) Aan-/meettoets
2) Oppervlakte-/ruimtevolumetoets
3) Toets voor indirecte meting
4) Toets voor afzonderlijke-/
continue-afstandsmeting
5) Plus-toets ( + )
6) Min-toets( - )
7) Opslagtoets
8) Referentietoets
9) Verlichtings-/eenheidstoets
10) Wis-/Uit-toets
LCD-display
1) Laser actief
2) Referentiewaarde (voor)
3) Referentiewaarde (achter)
4) Variabele meetfuncties
Oppervlaktemetingen
Volumemetingen
18
Page 47
Gebruikshandleiding – Laser-afstandsmeetinstrument
E - 4
Indirecte meting
Indirecte (tweede) meting
5) Afzonderlijke afstandsmeting
6) Batterijstatus
7) Kroniek, aantal oproepbare waarden
8) Foutwaarschuwing instrument
9) Continue meting/Max- en Min-meting
10) Weergaveregel voor de eerste waarde
11) Weergaveregel voor de tweede waarde
12) Onderste regel voor de laatste meetwaarde of resultaat van de berekening
3. Eerste instellingen
In- en uitschakelen
Schakelt het instrument en de laser aan en uit.
Houd deze toets ingedrukt, om het instrument uit te schakelen.
Het instrument wordt automatisch uitgeschakeld, als het langer dan drie
minuten niet gebruikt wordt.
Wis-toets
Wist de laatste actie of de gegevens op het display.
Referentiewaarde instellen
De referentiewaarde gaat uit van het achterste deel van het instrument. Druk
deze toets in , om het referentiepunt naar het voorste deel van het instrument te verplaatsen . Een signaaltoon klinkt elke keer, als het referentiepunt
verplaatst wordt. De referentiewaarde
keert na het inschakelen automatisch
naar de oorspronkelijke stand (achter
op het instrument] terug.
Page 48

E - 5
Gebruikshandleiding – Laser-afstandsmeetinstrument
Achtergrondverlichting
Druk de Verlichting/UNITS-toets in, om de achtergrondverlichting inresp. uit te schakelen. De waarden kunnen bij duisternis of slechte lichtverhoudingen aanzienlijk beter van het display afgelezen worden.
Afstandseenheid selecteren
Houd de toets ingedrukt, om de afstandseenheid te selecteren.
Druk de toets opnieuw in, om van meters naar voet of voet en inch (m, ft,
in, ft+in) te gaan en terug te keren.
4. Metingen
Afzonderlijke afstandsmeting
Druk de AAN-toets in, om de laser te activeren. Druk de toets opnieuw
in, om een afstandsmeting uit te voeren. De gemeten waarde wordt direct op
het LCD-display weergegeven.
Continue-meting (Tracking-functie) / Max- en Min-metingen
De functie Continue-meting (Tracking) wordt gebruikt, om metingen
over te brengen, bijv. van bouwtekeningen.
Bij deze meetmethode kan het instrument naar het doel toe bewogen
worden, waarbij de meetwaarde
ongeveer iedere 0,5 seconden opnieuw berekend wordt. De bijbehorende maximium- en minimummeetwaarden worden telkens in
de eerste en tweede regel weergegeven.
De gebruiker kan bijvoorbeeld de
laserstraal op een muur richten
en dan steeds verder afstand nemen van de muur en daarbij zolang de
meetwaarde aflezen, tot de gewenste afstand is bereikt. Druk om in
Page 49

Gebruikshandleiding – Laser-afstandsmeetinstrument
E - 6
de continue-meting in het display verschijnt. Druk de toets opnieuw in
, om de procedure af te breken. De procedure wordt automatisch na
100 metingen in de continue-modus beëindigd.
5. Functies
Optellen / Aftrekken
Afstandsmetingen
De tweede meetwaarde wordt bij de eerste meetwaarde opgeteld. Druk
de toets in
, om de tweede meetwaarde te zien. Het resultaat van de
beide meetwaarden gebeurt automatisch. De tweede meetwaarde
wordt van de eerste meetwaarde afgetrokken. Druk de toets in , om
het resultaat te zien. De tweede meetwaarde verschijnt altijd in de tweede
regel, het resultaat in de onderste regel.
De laatste stap wordt afgebroken.
Keer naar de afzonderlijke afstandsmeting terug.
Oppervlaktemetingen
Druk de overeenkomstige toets eenmaal in. Het symbool voor
deze meetprocedure verschijnt op het display.
Druk de toets in , om de eerste meting (bijv. de lengte) uit te voeren.
Druk de toets in
om de tweede meting (bijv. de breedte) uit te voeren.
Het instrument berekent na het tweede indrukken van de toets zelfstandig
het oppervlak en geeft dit in de onderste regel aan. De als laatst gemeten
waarde wordt in de tweede regel op het display weergegeven.
Volumemetingen
Druk de voor deze meetprocedure bedoelde toets 2x in tot de overeenkomstige weergave in het display verschijnt. De te meten kant wordt
telkens knipperend in het display weergegeven en de betreffende meting
wordt door het indrukken van de toets
geactiveerd.
Druk dezelfde toets in , om eenmaal de lengte te meten en dan een
tweede en derde keer, om zowel de breedte alsook de hoogte te meten. Het
instrument berekent vervolgens het volume en geeft deze waarde op het display
weer. De als laatst gemeten waarde wordt daarbij niet weergegeven.
Page 50

E - 7
Gebruikshandleiding – Laser-afstandsmeetinstrument
Indirecte metingen
Indirecte metingen: berekening van een afstand m.b.v. twee hulpmetingen. Ga bij hoogtemetingen, die twee of drie metingen nodig hebben,
bijvoorbeeld als volgt te werk:
Druk de toets eenmaal in, het symbool wordt nu weergegeven.
Richt eerst op het hogere punt (1) en voer een meting uit. De eerste
meetwaarde wordt overgenomen. Houd het instrument daarbij zo rustig mogelijk en plaats het met de beide achterste randen vlak op de ondergrond.
Druk de meettoets opnieuw in, om de horizontale lijn te meten. Het resultaat van deze meting wordt in de tweede regel weergegeven, terwijl het totale
resultaat tegelijkertijd in de onderste regel wordt weergegeven.
Indirecte meting - berekening van een afstand aan de hand van drie
meetgrootheden
Drük de toets 2x in; de weergave
verschijnt op het display.
Richt eerst op het onderste punt (1) en
voer een meting uit. De eerste meetwaarde
wordt overgenomen. Houd het instrument daarbij zo rustig mogelijk.
De aanslag op de beide achterste randen
mag tijdens de metingen niet veranderen!
Mik nu op het horizontale bestemmingspunt (2) en voer de meting uit. Het resultaat
wordt in de tweede regel weergegeven.
Richt tenslotte op het bovenste punt(3) en
druk de toets in
, om de meting (3) uit te voeren. Het resultaat wordt
in de onderste regel weergegeven, terwijl de deelresultaten in de tweede
regel weergegeven worden.
Kroniek
De laatste 20 waarden (metingen of berekeningen) worden in omgekeerde volgorde weergegeven. Gebruik de daarvoor bedoelde toetsen
of , om door de registraties te navigeren.
Page 51

Gebruikshandleiding – Laser-afstandsmeetinstrument
E - 8
6. Technische gegevens
Technical Specifications
Reikwijdte . . . . . . . . . . . . . . . . . . . . . . . . . . . 0,05 tot 50 m*
(0,16 - 164 ft)
Meetnauwkeurigheid tot 10 m . . . . . . . . . . . . . . . Typisch: ±1,5 mm**
(± 0,06 in)
Meeteenheden . . . . . . . . . . . . . . . . . . . . . . . . . . . . . . m,in,ft
Laser categorie . . . . . . . . . . . . . . . . . . . . . . . . . . . . . Klasse II
Laser type . . . . . . . . . . . . . . . . . . . . . . . . . . . 635 nm, <1mW
Oppervlakte-, volumeberekeningen . . . . . . . . . . . . . . . . . . . . . •
Indirecte metingen (Pythagoras-functie) . . . . . . . . . . . . . . . . . . . •
Optellen/aftrekken . . . . . . . . . . . . . . . . . . . . . . . . . . . . . . . •
Continue meting . . . . . . . . . . . . . . . . . . . . . . . . . . . . . . . •
Min-/Max- verwijderingsweergave/Tracking-functie . . . . . . . . . . . . •
Achtergrondverlichting en meervoudige regelweergave . . . . . . . . . . •
Signaltoon . . . . . . . . . . . . . . . . . . . . . . . . . . . . . . . . . . . •
Stof- en stootbestendig . . . . . . . . . . . . . . . . . . . . . . . . . . IP 54
Aantal registraties in de kroniek . . . . . . . . . . . . . . . . . . . . . . 20
Bedrijfstemperatuur . . . . . . . . . . . . . . 0°C tot 40°C(32°F tot 104°F)
Opslagtemperatuur . . . . . . . . . . . . . -10 °C tot 60°C(14°F tot 140°F)
Levensduur batterij . . . . . . . . . . . . . . . . . . . . tot 4.000 metingen
Batterijen . . . . . . . . . . . . . . . . . . . . . . . . . . . Typ AAA 2 x 1,5V
Uitschakelautomatiek laser . . . . . . . . . . . . . . . na 30 seconden
Uitschakelautomatiek . . . . . . . . . . . . . . . . . . . . . . . . . na 3 min
Afmetingen . . . . . . . . . . . . . . . . . . . . . . . . 115 x 48 x 28 mm
Gewicht . . . . . . . . . . . . . . . . . . . . . . . . . . . . . . . . . . 135 g
* Gebruik een plaat met doelwit, om de afstand overdag of bij slecht-reflecterende doelen
te vergroten!
** Bij gunstige omstandigheden (goede eigenschappen van het doeloppervlak; kamer
temperatuur) tot 10 m. Bij ongunstige omstandigheden zoals bijvoorbeeld sterk zon licht, slecht reflecterende oppervlakken, hoge temperatuurveranderingen kan vanaf
een afstand van 10 m een afwijking van ± 0,15 mm/m ontstaan.
Page 52
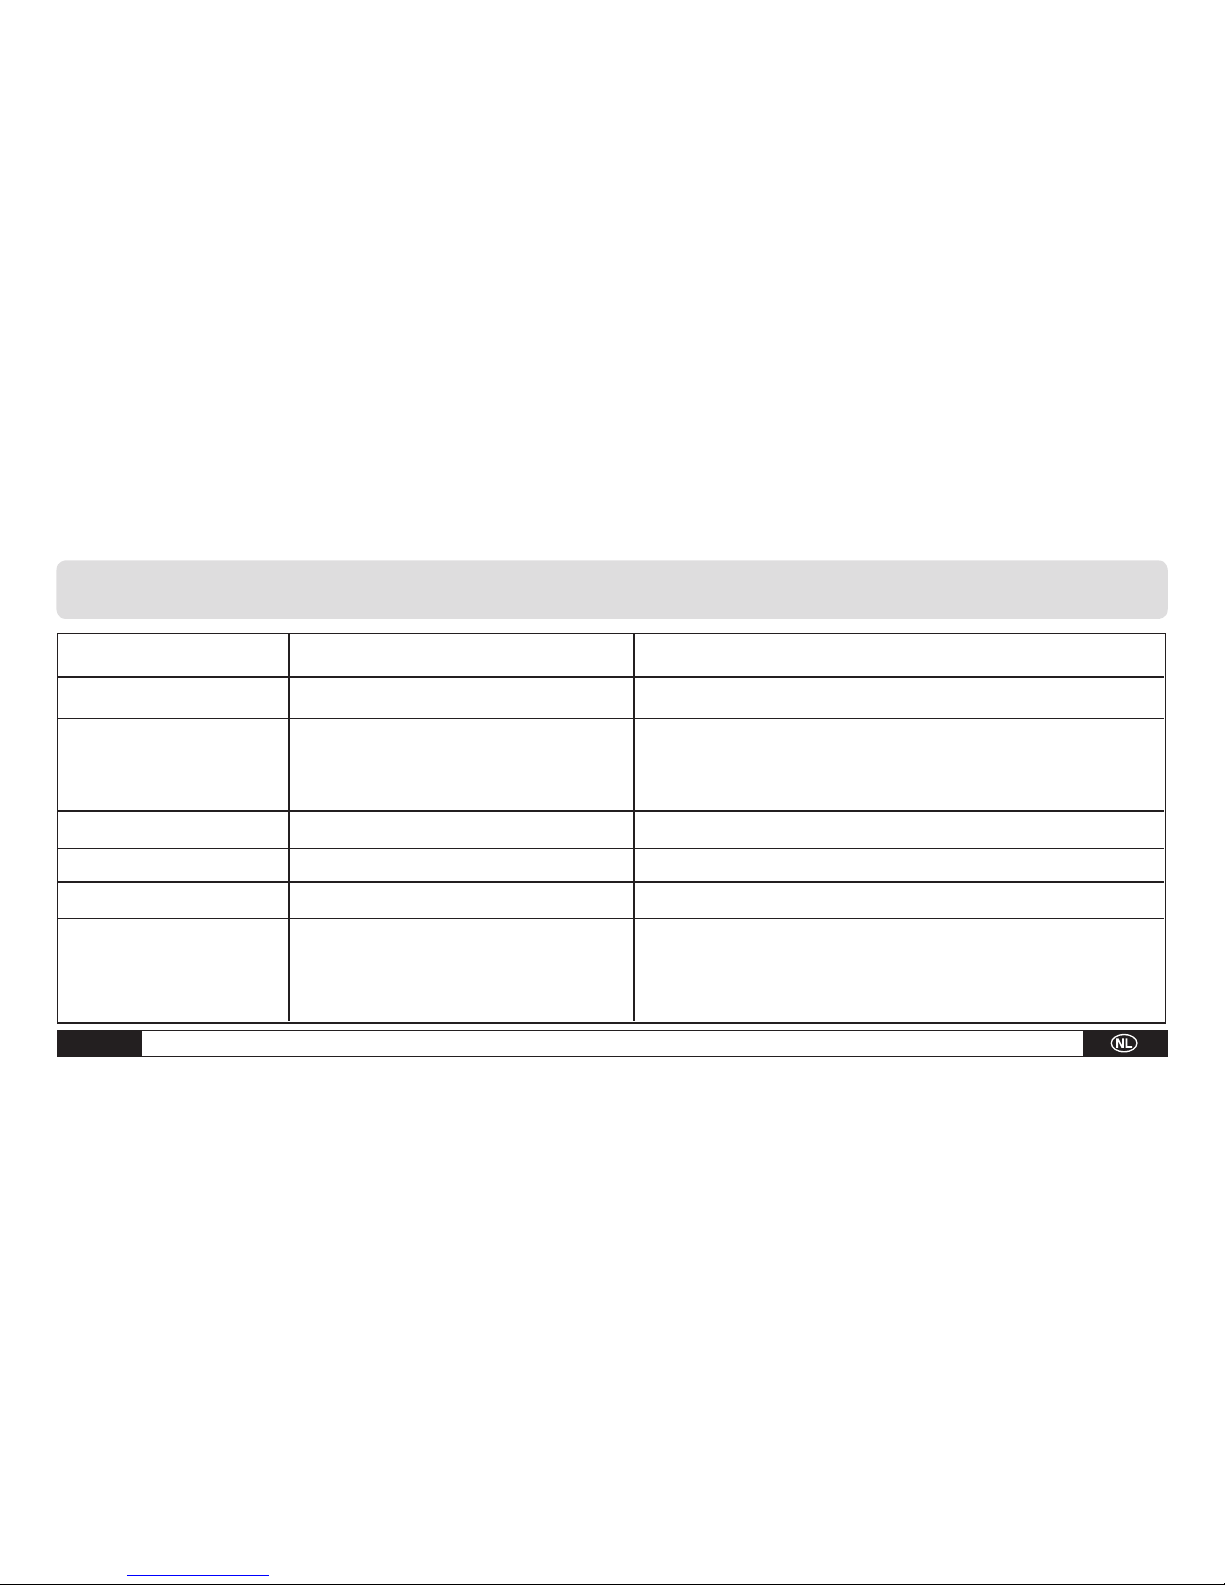
E - 9
Gebruikshandleiding – Laser-afstandsmeetinstrument
7. Foutopsporing en verhelpen van fouten
Code oorzaak corrigerende maatregel
204 Fout bij de calculatie Herhaal de procedure
208 Het ontvangstsignaal is te Gebruik een grotere plaat met doelwit [optioneel]
zwak/de meettijd is te
lang/de afstand bedraagt > 50m
209 Het ontvangstsignaal is te sterk Het doel reflecteert te sterk (gebruik een plaat met doelwit)
252 De temperatuur is te hoog Laat het instrument afkoelen
253 De temperatuur is te laag Het instrument moet eerst opwarmen
255 Hardwarefout Schakel het instrument meerdere malen aan en uit.
Neem contact op met uw dealer, als het symbool verder
blijft verschijnen. Deze zal u verder helpen.
Page 53

Gebruikshandleiding – Laser-afstandsmeetinstrument
E - 10
8. Meetomstandigheden
Meetafstand
Het instrument heeft een reikwijdte van 50 m.
Grotere afstanden zijn onder bepaalde omstandigheden - bijv.‚ s nachts, in
de schemering, als het doel door de schaduw bedekt wordt - ook zonder
plaat met doelwit mogelijk. Overdag kan een plaat met doelwit gebruikt
worden, om de afstand bij slecht reflecterende doelen te vergroten.
Doeloppervlakken
Er kunnen meetfouten optreden, als de laser op kleurloze vloeistoffen
[bijv. water], stofvrij glas, styropor of andere half-doorlaatbare materialen treft. Er kan eveneens een vervalsing van het meetresultaat ontstaan, als de laser op een hoogglanzend vlak treft en door deze afgewend
wordt. Matte, niet-reflecterende of donkere oppervlakken kunnen de
meettijd verlengen.
Onderhoud
Dompel het instrument nooit in water. Veeg het alleen met een vochtige,
zachte doek af. Gebruik geen agressief reinigingsmiddel. Behandel het
instrument altijd zoals u een hoogwaardige camera of een gevoelig meetinstrument zou behandelen.
Page 54

F - 1 Manual de instrucciones – Distanciómetro láser
E
Índice
1. Indicaciones de seguridad . . . . . . . . . . . . . . . . F - 01
2. Puesta en servicio . . . . . . . . . . . . . . . . . . . . F - 03
3. Configuración básica . . . . . . . . . . . . . . . . . . . F - 04
4. Mediciones . . . . . . . . . . . . . . . . . . . . . . . . F - 05
5. Funciones . . . . . . . . . . . . . . . . . . . . . . . . . F - 06
6. Datos técnicos . . . . . . . . . . . . . . . . . . . . . . F - 08
7. Búsqueda de errores y soluciones . . . . . . . . . . . . F - 09
8. Condiciones de medición . . . . . . . . . . . . . . . . F - 10
El modelo básico que se caracteriza por ser compacto, manejable y sobre todo muy
práctico ha sido diseñado y desarrollado especialmente para realizar diversas tareas
en interiores. Las teclas rápidas para funciones como adición, sustracción, cálculo de
superficies o de volúmenes, etc., son agradables al tacto y extremadamente suaves y
con ellas las mediciones se realizan más fácilmente y resultan mucho más fiables.
Esta versión sustituye a todas las anteriores. Ninguna parte de esta publicación puede
ser en forma alguna reproducida o procesada, copiada o difundida mediante el empleo
de sistemas electrónicos sin nuestro consentimiento por escrito. Reservado el derecho
a introducir modificaciones técnicas. Todos los derechos reservados. Los nombres de
los artículos son utilizados sin garantía de libre uso y siguiendo en lo esencial la grafía
del fabricante. Los nombres de los artículos utilizados están registrados y deben considerarse como tales. Queda reservado el derecho a introducir modificaciones técnicas
en interés de una mejora constante del producto, así como a modificar forma y color.
El material suministrado puede divergir respecto de las ilustraciones del producto. El
presente documento ha sido elaborado con el mayor cuidado. No asumimos ningún
tipo de responsabilidad por errores u omisiones. © TROTEC
®
1. Indicaciones de seguridad
Aplicación admisible
• Realización de mediciones de distancia y cálculos, p. ej., de superficies
y capacidad.
Aplicación inadmisible
• No se puede poner en servicio el aparato sin conocer las correspon dientes instrucciones al respecto.
Page 55

Manual de instrucciones – Distanciómetro láser F - 2
E
• No ponga en servicio el aparato fuera de los límites descritos.
• No se deben desactivar los sistemas de seguridad. No está permitido
retirar del aparato ninguna etiqueta de peligro o ningún adhesivo que
haga referencia al manejo correcto.
• No está permitido abrir el aparato con herramientas (destornillador, etc.),
a no ser que así se indique expresamente en el manual de instrucciones
• No está permitido cambiar ni modificar el aparato.
• Los accesorios de otros fabricantes/proveedores sólo se pueden utilizar
con la autorización expresa de Trotec GmbH & Co. KG.
• No se debe utilizar el aparato de manera intencionada para otros fines
o de forma irresponsable en armazones, escaleras, en las inmediaci ones de máquinas en marcha o de piezas sin protección de disposi tivos o máquinas.
• El aparato no se debe dirigir directamente al sol.
• No se puede utilizar el aparato si no se han tomado las medidas de
seguridad oportunas en el lugar de medición (p. ej., en caso de me diciones en vías públicas, en obras, etc.).
Clasificación del láser
Para medir distancias, el BD15 genera un rayo láser que se emite desde
la parte delantera del aparato.
El BD15 es un producto que corresponde a la categoría de láser 2:
No mire directamente al rayo láser ni lo dirija a otras personas. Normalmente, los reflejos (parpadeo) o el girar rápida e instintivamente la
cabeza constituyen una protección para los ojos.
No mire nunca directamente al rayo láser en ningún tipo de instrumento óptico. Si mira directamente al rayo láser, pondrá en
peligro la salud de sus ojos.
En la Unión Europea los equipos electrónicos no pueden
acabar en la basura doméstica, sino que deben ser eliminados debidamente conforme a la Directiva 2002/96/CE
DEL PARLAMENTO EUROPEO Y EL CONSEJO del 27 de enero
2003 sobre residuos de aparatos eléctricos y electrónicos.
Al final de su vida útil, elimine este detector en conformidad con la
normativa legal en vigor.
m
Page 56

F - 3 Manual de instrucciones – Distanciómetro láser
E
2. Puesta en servicio
Colocación/cambio de las pilas
1) Primero quite la tapa
del compartimento de las pilas.
2) Coloque las pilas.
Al colocarlas observe la polaridad correcta.
3) Vuelva a cerrar el compartimento de las pilas.
Las pilas se deben cambiar cuando el icono „ “ parpadee sin interrupción en el display. Si no va a utilizar el aparato durante un largo
período de tiempo, retire las pilas del compartimento para evitar la
corrosión.
Teclado
1) Tecla de conexión/medición
2) Tecla de superficies/capacidades
3) Tecla para medición indirecta
4) Tecla para medición de distancia puntual/
continua
5) Tecla más ( + )
6) Tecla menos ( - )
7) Tecla de fijación
8) Tecla de referencia
9) Tecla de iluminación/unidades
10) Tecla de borrado/desconexión
Display LCD
1) Láser encendido
2) Valor de referencia (delante)
3) Valor de referencia (detrás)
4) Funciones de medición variables
Mediciones de superficies
Mediciones de volúmenes
18
Page 57

Manual de instrucciones – Distanciómetro láser F - 4
E
Medición indirecta
(Segunda) medición indirecta
5) Medición de distancia puntual
6) Estado de las pilas
7) Historial, número de valores extraíbles
8) Aviso de error del aparato
9) Medición continua/medición máx. y mín.
10) Línea de indicación del primer valor
11) Línea de indicación del segundo valor
12) Línea inferior del último valor de medición o del resultado del cálculo
3. Configuración básica
Conexión y desconexión
Enciende y apaga el aparato y el láser.
Mantenga pulsada esta tecla para apagar el aparato.
El aparato se apaga automáticamente si no se utiliza durante un intervalo superior a tres minutos.
Tecla de borrado
Borra la última acción o los datos en el display.
Configuración del valor de referencia
El valor de referencia parte de la parte posterior del aparato. Pulse esta
, utecla para trasladar el punto de referencia a la parte delantera del aparato
. Suena un tono cada vez que se traslada el punto de referencia. El punto
de referencia vuelve automáticamente
a la posición original (parte posterior
del aparato) cada vez que se enciende
el aparato.
Page 58

F - 5 Manual de instrucciones – Distanciómetro láser
E
Iluminación de fondo
Pulse la tecla de iluminación/UNITS para encender o apagar la ilu-
minación de fondo. Cuando esté oscuro o las condiciones de luz no sean
óptimas, los valores se podrán leer claramente mejor en el display.
Selección de la unidad de distancia
Mantenga pulsada esta tecla para seleccionar la unidad de distancia.
Vuelva a pulsar esta tecla para cambiar de metros a pies o a pies y pulgadas
(m, ft, in, ft+in).
4. Mediciones
Medición de distancia puntual
Pulse la tecla CON. para encender el láser. Vuelva a pulsar la tecla para
realizar una medición de distancia. El valor medido aparecerá de inmediato
en el display LCD.
Medición continua (función de tracking) / mediciones máx. y mín.
La función de medición continua
(tracking) se utiliza para transmitir
mediciones, p. ej., de los planos de
la obra.
Con este método de medición el
aparato se puede mover hacia el
objetivo y el valor de medición se
vuelve a calcular aprox. cada 0,5
segundos. Los valores máximo y
mínimo correspondientes se representan en la primera y segunda
línea respectivamente.
El usuario puede, por ejemplo, dirigir el rayo láser hacia una pared y
luego irse distanciando poco a poco
de la pared e ir leyendo a la vez el valor de medición hasta alcanzar la
distancia que se desee. Para acceder a este modo pulse la tecla
Page 59

Manual de instrucciones – Distanciómetro láser F - 6
E
correspondiente hasta que aparezca la indicación de medición continua
en el display. Vuelva a pulsar esta tecla , para cancelar el proceso.
El proceso finaliza automáticamente después de realizar 100 mediciones
en el modo continuo.
5. Funciones
Adición / sustracción
Mediciones de distancia
El segundo valor de medición se añade al primer valor de medición.
Pulse la tecla
, para ver el segundo valor de medición. El resultado de
ambos valores de medición se calcula automáticamente. El segundo
valor de medición se sustrae del primero. Pulse la tecla , para ver el
resultado. El segundo valor de medición siempre aparece en la segunda
línea y el resultado en la línea inferior.
Se cancela el último paso.
Vuelva a la medición de distancia puntual.
Mediciones de superficies
Pulse la tecla correspondiente una vez. El icono de este proceso
de medición aparecerá en el display.
Pulse la tecla , para efectuar la primera medición (p. ej., la longitud).
Vuelva a pulsar la tecla
para efectuar la segunda medición (p. ej., la
anchura).
Después de pulsar la segunda tecla, el aparato calcula automáticamente
la superficie y la indica en la línea inferior. El último valor medido aparece
indicado en la segunda línea del display.
Mediciones de volúmenes
Pulse la tecla prevista para este proceso de medición dos veces
hasta que aparezca la indicación correspondiente ien el display. El lado
que se va a medir aparece parpadeando en el display y se activa la medición
correspondiente pulsando la tecla
.
Page 60
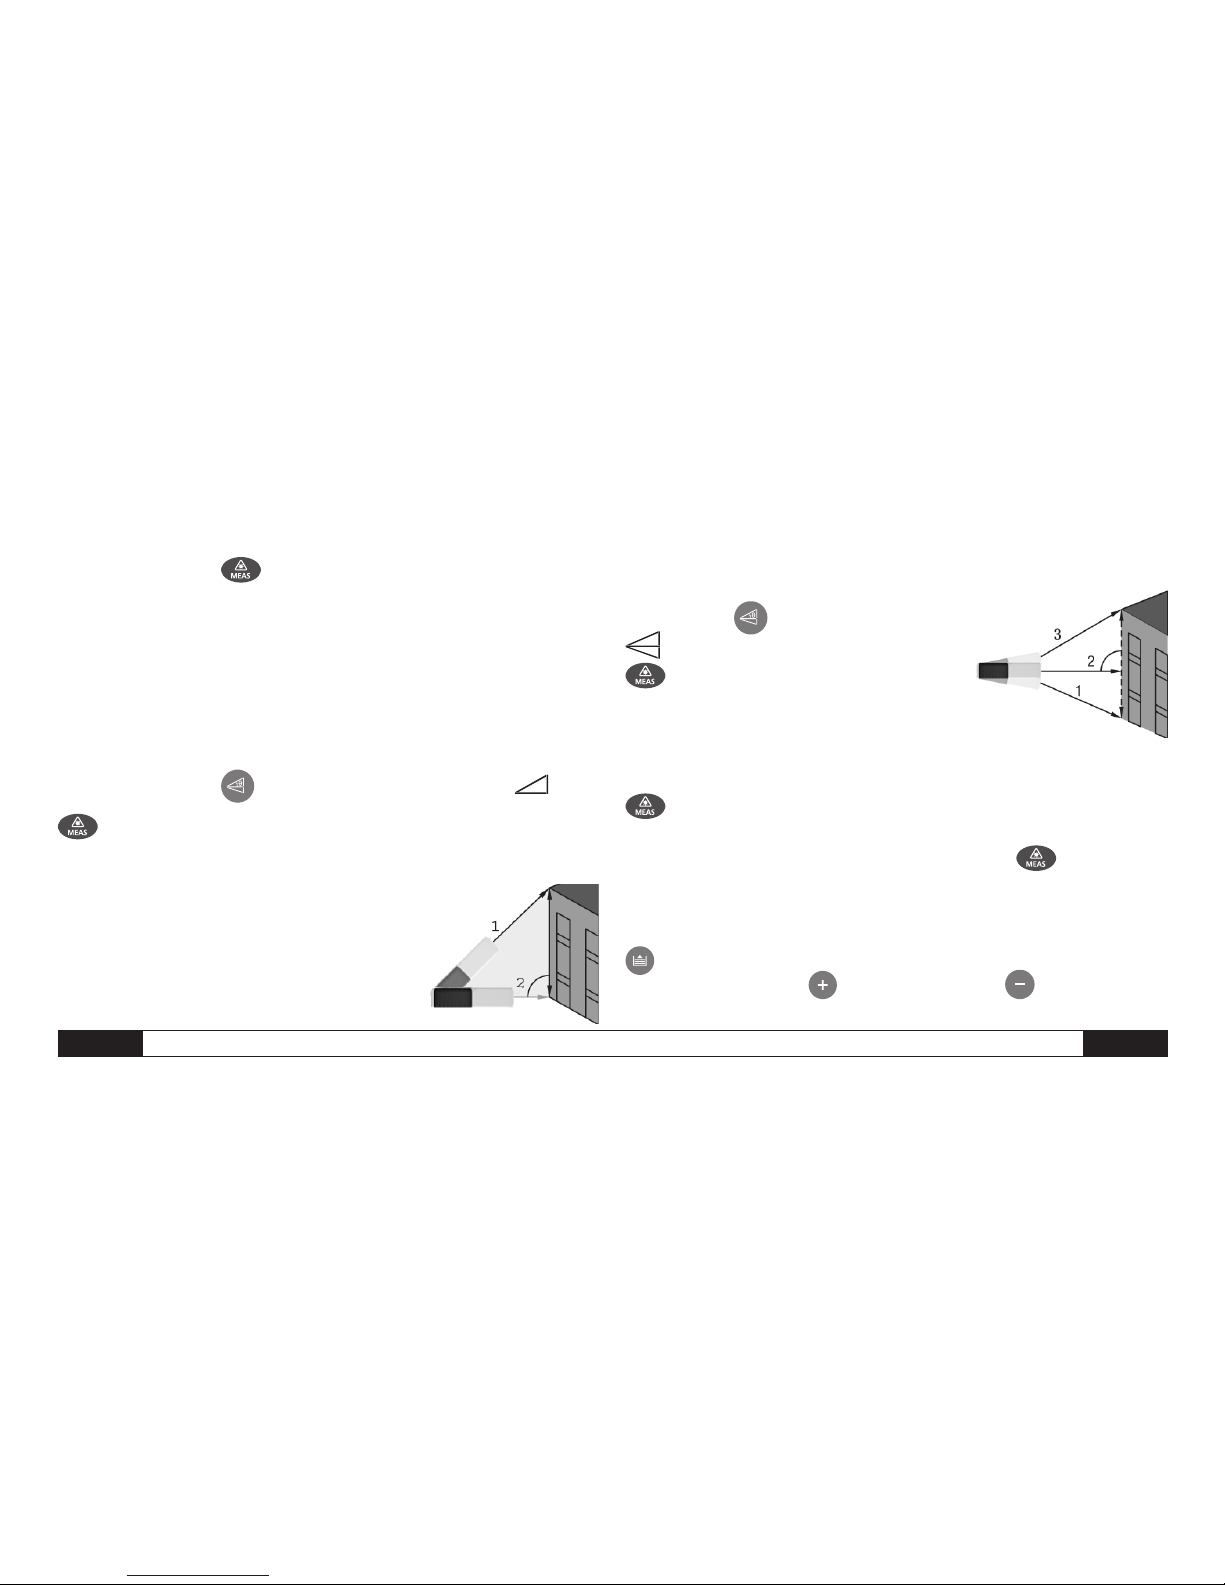
F - 7 Manual de instrucciones – Distanciómetro láser
E
Pulse la misma tecla para medir una vez la longitud y, luego, una
segunda y tercera vez, para medir tanto la anchura como la altura.
A continuación, el aparato calcula el volumen e indica este valor en el
display. El último valor medido no se indica.
Mediciones indirectas
Mediciones indirectas: cálculo de una distancia mediante dos mediciones
auxiliares. En caso de mediciones de altura que requieran dos o tres mediciones, proceda, por ejemplo, de la siguiente manera:
Pulse una vez la tecla a continuación, aparecerá el icono .
Apunte primero al punto más alto (1) y realice una medición. Se aplica
el primer valor de medición. Mantenga el aparato lo más estable posible y
colóquelo plano con los dos cantos posteriores sobre el suelo.
Vuelva a pulsar la tecla de medición para medir
la línea horizontal. El resultado de esta medición se indica en la segunda línea y el resultado
total se visualiza al mismo tiempo en la línea
inferior
.
Medición indirecta – Cálculo de una distancia en virtud de tres magnitudes de medición
Pulse la tecla dos veces ; la indicación
aparecerá en el display.
Apunte primero al punto inferior (1) y
realice una medición. Se aplica el primer valor
de medición. Al apuntar, mantenga el aparato
lo más estable posible. El tope situado en los dos cantos posteriores no
se debe cambiar durante las mediciones!
A continuación, apunte al objetivo horizontal (2) y realice la medición.
El resultado se indicará en la segunda línea.
Finalmente, apunte al punto superior (3) y pulse la tecla
para realizar la
medición (3). El resultado se indica en la línea inferior y los resultados parciales
se visualizan en la segunda línea.
Historial
Se visualizan los últimos 20 valores (mediciones o cálculos) en orden
inverso. Utilice las teclas
previstas al efecto o , para navegar por
los datos guardados.
Page 61

Manual de instrucciones – Distanciómetro láser F - 8
E
6. Datos técnicos
Especificaciones técnicas
Alcance . . . . . . . . . . . . . . . . . . . De 0,05 a 50 m* (0,16 - 164 ft)
Precisión de medición hasta 10 m . . . Típicamente: ±1,5 mm** (± 0,06 in)
Unidades de medición . . . . . . . . . . . . . . . . . . . . . . . . . . m,in,ft
Categoría del láser . . . . . . . . . . . . . . . . . . . . . . . . . . . Klasse II
Tipo de láser . . . . . . . . . . . . . . . . . . . . . . . . . . 635 nm, <1mW
Cálculos de superficies y volúmenes . . . . . . . . . . . . . . . . . . . . . •
Mediciones indirectas (función de Pitágoras) . . . . . . . . . . . . . . . . •
Adición/sustracción . . . . . . . . . . . . . . . . . . . . . . . . . . . . . . •
Medición continua . . . . . . . . . . . . . . . . . . . . . . . . . . . . . . . •
Indicación de distancia mín./máx./función de tracking . . . . . . . . . . . •
Iluminación de fondo e indicación múltiple de línea . . . . . . . . . . . . •
Tono de señal . . . . . . . . . . . . . . . . . . . . . . . . . . . . . . . . . . •
Resistente al polvo y a los golpes . . . . . . . . . . . . . . . . . . . . . IP 54
Número de registros guardados en el historial . . . . . . . . . . . . . . 20
Temperatura de servicio . . . . . . . . . De 0 °C a 40 °C (de 32 °F a 104 °F)
Temperatura de almacenamiento . . De -10 °C a 60 °C (de 14 °F a 140 °F)
Duración de las pilas . . . . . . . . . . . . . . . . Hasta 4.000 mediciones
Pilas . . . . . . . . . . . . . . . . . . . . . . . . . . . . Typ AAA 2 x 1,5V
Desconexión automática del láser . . . . . . . . . . Al cabo de 30 segundos
Desconexión automática . . . . . . . . . . . . . . . . . . . Al cabo de 3 min
Dimensiones . . . . . . . . . . . . . . . . . . . . . . . . 115 x 48 x 28 mm
Peso . . . . . . . . . . . . . . . . . . . . . . . . . . . . . . . . . . . 135 g
* Utilice una tablilla de mira para aumentar la distancia durante el día o si los objetivos
no son buenos reflectores.
** En condiciones favorables (buenas propiedades de la superficie de objetivo; tempe
ratura ambiente) hasta 10 m. En condiciones desfavorables, por ejemplo, con luz
solar intensa, con superficies poco reflectantes o con cambios bruscos de la tempe
ratura, puede producirse una desviación de ± 0,15 mm/m a partir de una distancia de 10 m.
Page 62

F - 9 Manual de instrucciones – Distanciómetro láser
E
7. Búsqueda de errores y soluciones
Código Causa Medida correctora
204 Error en el cálculo Repita la operación
208 La señal de recepción es demasiado Utilice una tablilla de mira más grande (opcional)
débil/el tiempo de medición es
demasiado largo/la distancia es > 50 m
209 La señal de recepción es demasiado intensa El objetivo refleja con demasiada intensidad (utilice una tablilla de mira)
252 La temperatura es demasiado alta Deje que se enfríe el aparato
253 La temperatura es demasiado baja El aparato se tiene que calentar primero
255 Error de hardware Encienda y apague varias veces el aparato. Póngase
en contacto con su distribuidor si sigue apareciendo el icono.
Él le asesorará para solucionar el problema.
Page 63

Manual de instrucciones – Distanciómetro láser F - 10
E
8. Condiciones de medición
Distancia de medición
El aparato tiene un alcance de 50 m.
Es posible medir distancias mayores en determinadas condiciones (p.
ej., por la noche, en el crepúsculo, cuando el objetivo está cubierto por
sombras), también sin tablilla de mira. Se puede utilizar una tablilla de
mira durante el día para aumentar la distancia con objetivos poco reflectantes.
Superficies de objetivo
Pueden aparecer errores de medición cuando el láser se encuentra con
líquidos incoloros (p. ej., agua), vidrio exento de polvo, icopor u otros materiales semitransparentes. También puede producirse un falseamiento
del resultado de medición cuando el láser se encuentra con una superficie de alto brillo y ésta lo desvía. Las superficies mates, no reflectantes
u oscuras pueden aumentar el tiempo de medición.
Cuidado
No sumerja nunca el aparato en agua. Límpielo únicamente con un paño
húmedo y suave. No utilice medios de limpieza agresivos. Manipule
siempre el aparato como si manipulara una cámara de alta calidad o un
instrumento de medición sensible.
Page 64

G - 1 Manual de instruções – Distanciómetro a Laser
P
Sumário
1. Aviso de segurança . . . . . . . . . . . . . . . . . . G - 01
2. Colocação em funcionamento . . . . . . . . . . . . . .G - 03
3. Primeiros ajustes . . . . . . . . . . . . . . . . . . . G - 04
4. Medições . . . . . . . . . . . . . . . . . . . . . . . G - 05
5. Funções . . . . . . . . . . . . . . . . . . . . . . . G - 06
6. Características técnicas . . . . . . . . . . . . . . . . . G - 08
7. Localização e eliminação de falhas. . . . . . . . . . . . . G - 09
8. Condições de medição. . . . . . . . . . . . . . . . . . G - 10
O modelo básico compacto, portátil e sobretudo muito útil foi especialmente desenvolvido e projectado para diferentes tarefas em ambientes interiores. Teclas agradáveis,
extremamente macias para funções como adição, subtracção, cálculos de superfícies
e volumes, facilitam o manuseio nas medições que são muito confiáveis.
Esta publicação substitui todas as anteriores. Nenhuma parte desta publicação pode
ser reproduzida, redigida, copiada ou divulgada de qualquer forma ou através de sistemas electrónicos sem nossa autorização por escrito. Alterações técnicas reservadas.
Todos os direitos reservados. As marcas registradas são citadas sem garantia nenhuma, como se faz por hábito, e são geralmente escritos conforme os fabricantes. As
marcas citadas são registradas e devem também ser consideradas como registradas.
Alterações de construção no interesse da melhoria contínua da produção e alterações
de forma e cores são reservadas. O conteúdo da entrega pode divergir das fotos do
produto. Este documento foi elaborado com toda a diligência necessária. Não nos responsabilizamos por quaisquer enganos ou falhas. © TROTEC®
1. Aviso de segurança
Uso permitido
• Realização de medições de distância e cálculos, por ex. de superfí cies e dimensões.
Uso não permitido
• O equipamento não pode ser colocado em funcionamento sem a de vida instrução.
Page 65

Manual de instruções – Distanciómetro a Laser G - 2
P
• O equipamento não pode ser usado fora dos limites determinados.
• Os sistemas de segurança não podem ser desactivados. Nenhuma
etiqueta de advertência ou adesivo, com as informações sobre o ma nuseio correcto, pode ser retirada do equipamento.
• O equipamento não pode ser aberto com ferramenta (chave de fen das etc.) excepto, se estiver explicitamente mencionado no manual
de instruções.
• O equipamento não pode ser alterado nem modificado.
• Acessórios de outros fabricantes/terceiros só podem ser usados com
autorização expressa da Trotec GmbH & Co. KG.
• O equipamento não pode ser propositalmente usado em outros fins
que os previstos ou de maneira irresponsável em andaimes, escadas,
na proximidade de máquinas em funcionamento ou partes de máqui nas ou instalações desprotegidas.
• O equipamento não pode ser apontado directamente para o sol.
• O equipamento não pode ser usado se não foram tomadas as medi das de segurança necessárias nos locais de medição (por ex. vias
públicas, obras de construção civil etc.).
Classificação do laser
Para a medição de distância, o BD15 gera um raio laser emitido do lado
frontal do aparelho.
Este é um produto da categoria de laser 2 :
Não olhe no raio laser e não aponte o laser para outras pessoas. Os
olhos se protegem normalmente através de um reflexo (piscar) ou um
movimento rápido e intuitivo, virando a cabeça.
Nunca olhe com qualquer tipo de auxílio óptico directamente no
raio laser! Ao olhar directamente no raio laser, põe-se em perigo a
saúde de seus olhos.
Na União Europeia, os aparelhos electrónicos não deverão
ser eliminados juntamente com o lixo doméstico, mas sim
através de um processo de eliminação especializado, segundo a directiva 2002/96/CE DO PARLAMENTO E CONSEL-
HO EUROPEUS de 27 de Janeiro de 2003 sobre aparelhos
eléctricos e electrónicos antigos. No final da utilização do equipamento, elimine o mesmo segundo as disposições legais em vigor.
m
Page 66

G - 3 Manual de instruções – Distanciómetro a Laser
P
2. Colocação em funcionamento
Colocar/trocar as pilhas
1) Tire primeiro a tampa
do compartimento de pilhas.
2) Coloque as pilhas.
Observando a polaridade correcta.
3) Feche de novo o compartimento de pilhas.
Deve-se trocar as pilhas, se o símbolo „ “ não parar de piscar no
ecrã. Caso não utilizem o equipamento durante muito tempo, retire as
pilhas do compartimento de pilhas para evitar corrosão.
Teclado
1) Tecla ligar/medir
2) Tecla superfície/volume
3) Tecla para a medição indirecta
4) Tecla para medição individual-/
contínua de distância
5) Tecla Mais ( + )
6) Tecla Menos ( - )
7) Tecla Armazenagem
8) Tecla Referência
9) Tecla Iluminação/Unidades
10) Tecla Apagar/Desligar
Ecrã LCD
1) Laser activo
2) Valor de referência (na frente)
3) Valor de referência (atrás)
4) Funções de medição variáveis
Medições de superfícies
Medições de volumes
18
Page 67

Manual de instruções – Distanciómetro a Laser G - 4
P
Medição indirecta
(Segunda) medição indirecta
5) Medição individual de distância
6) Estado da pilha
7) Histórico, quantidade dos valores memorizados
8) Alerta de falha do equipamento
9) Medição contínua/medição máxima e mínima
10) Linha para o primeiro valor no ecrã
11) Linha para o segundo valor no ecrã
12) Última linha para o último valor de medição ou resultado de cálculo
3. Primeiros ajustes
Ligar e desligar
Liga e desliga o equipamento e o laser.
Premir esta tecla para desligar o equipamento.
O aparelho será automaticamente desligado se não for usado durante
três minutos.
Tecla Apagar
Apaga a última acção ou os dados no ecrã.
Ajustar o valor de referência
O valor de referência se orienta a parte posterior do equipamento. Premir
esta tecla para pôr o ponto de referência na parte anterior do equipamento . Cada vez, que o ponto
de referência é mudado soa um sinal
acústico. O valor de referência retorna
automaticamente à posição original
(na parte posterior) após ter ligado o
aparelho.
Page 68

G - 5 Manual de instruções – Distanciómetro a Laser
P
Iluminação de fundo
Premir a tecla Iluminação/UNITS para ligar ou desligar a iluminação
de fundo. Os valores podem ser lidos com mais facilidade no ecrã sob más
condições de iluminação ou no escuro.
Seleccionar unidade de distância
Premir a tecla para seleccionar a unidade de distância. Premir de novo
a tecla para mudar as unidades de metros para pés ou pés e polegadas
(m, ft, in, ft+in) e para voltar.
4. Medições
Medição individual de distância
Premir a tecla LIGAR para activar o laser. Premir de novo a tecla para
realizar uma medição de distância. O valor medido é imediatamente apresentado no ecrã LCD.
Medição contínua (função de rastreamento) / Medições máximo
e mínimo
A função Medição contínua (rastrear) é usada para transferir
medições por ex. de desenhos de
construções.
Usando este método de medição
pode-se movimentar o equipamento na direcção do objecto, o valor
de medição será recalculado aproximadamente a cada 0,5 segundo.
Os respectivos valores de medição
máximos e mínimos serão apresentados na primeira e segunda
linhas.
O usuário pode apontar o raio laser
por ex. para um muro e mover-se cautelosamente observando o valor de
medição até chegar à distância desejada. Para seleccionar este modo
Page 69
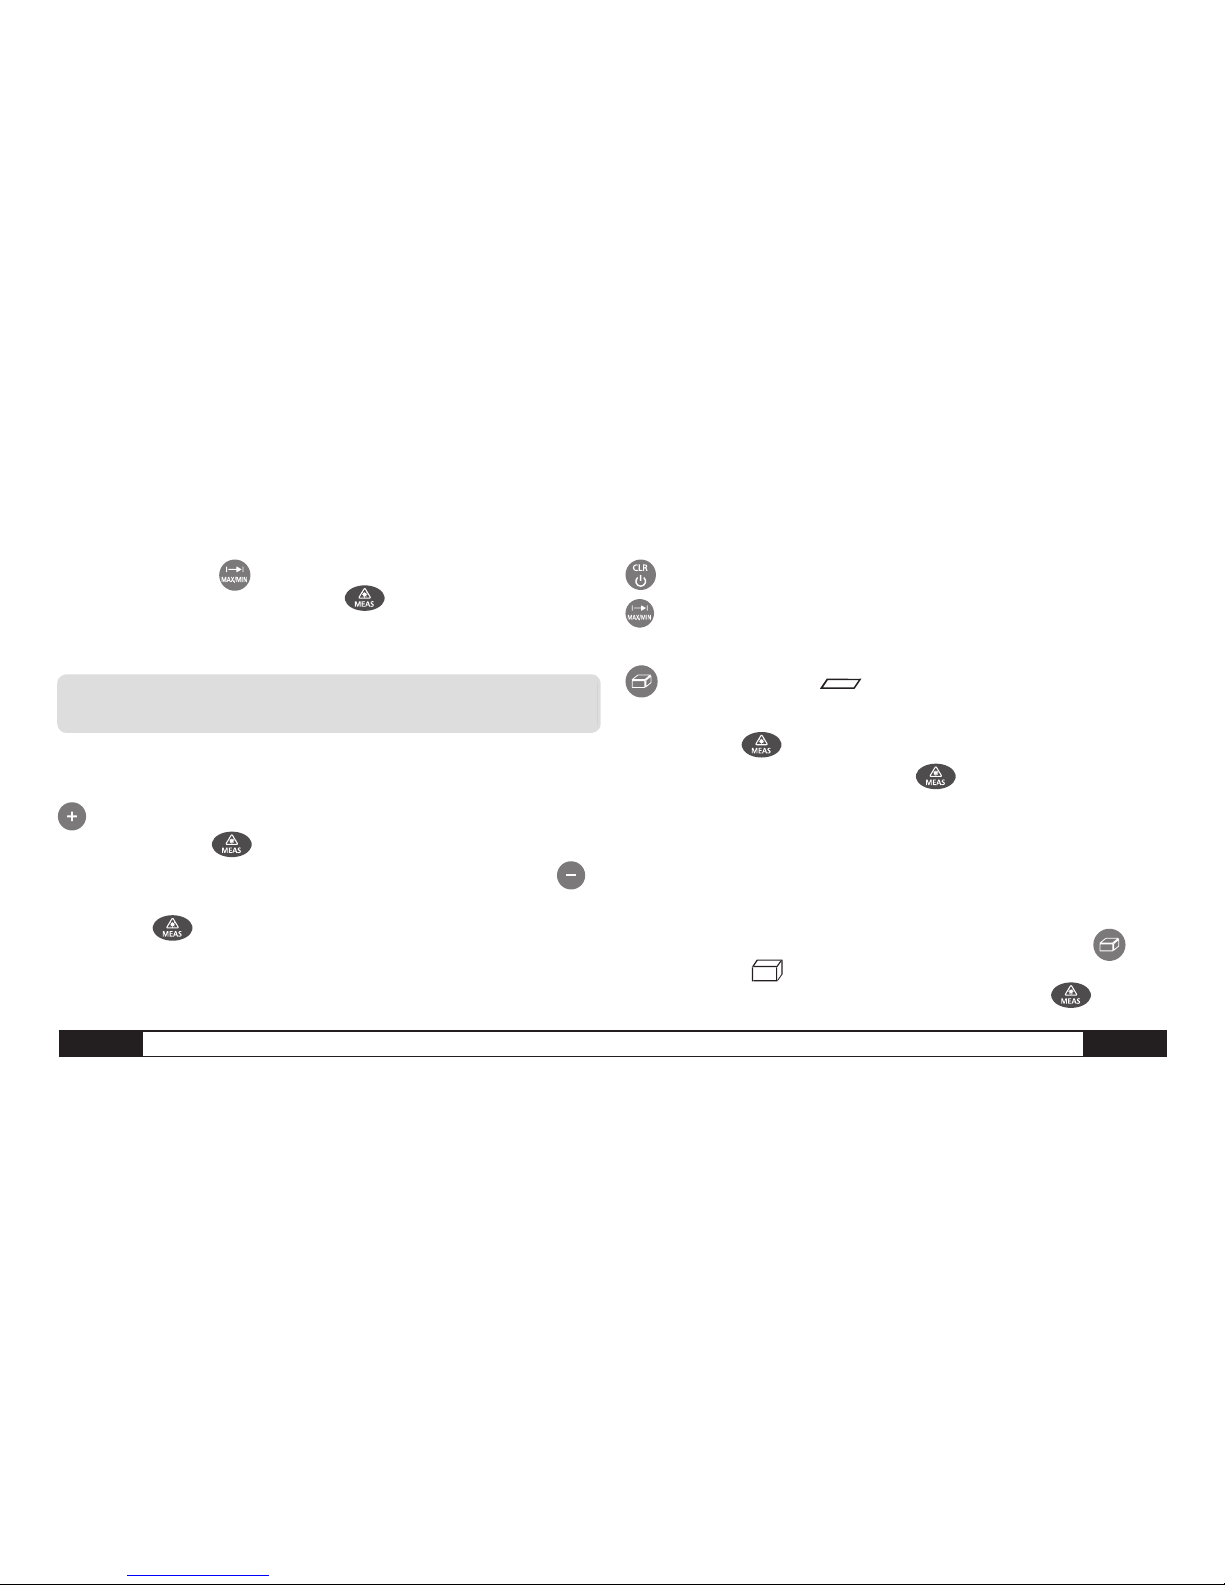
Manual de instruções – Distanciómetro a Laser G - 6
P
premir a devida tecla até ser apresentada a indicação Medição contínua no ecrã. Premir de novo a tecla desejada. Para para interromper o procedimento. O procedimento é automaticamente finalizado após 100
medições no modo contínuo.
5. Funções
Adição / Subtracção
Medições de distância
O segundo valor de medição é adicionado ao primeiro valor de medição.
Premir a tecla para
para visualizar o segundo valor de medição. O
resultado dos dois valores de medição é calculado automaticamente. O
segundo valor de medição é subtraído do primeiro valor de medição. Premir
a tecla para visualizar o resultado. O segundo valor de medição é
sempre apresentado na segunda linha e o resultado na última linha. O último
passo será interrompido.
O último passo será interrompido.
Voltar para a Medição individual de distância.
Medições de superfícies
Premir a devida tecla uma vez. O símbolo para este procedimen-
to de medição é apresentado no ecrã.
Premir a tecla para realizar a primeira medição (por ex. o compri-
mento). Premir de novo a tecla para
realizar a segunda medição
(por ex. a largura).
Após premir a tecla uma segunda vez, o equipamento calcula automatica-
mente a superfície e apresenta o resultado na última linha. O último valor
medido é apresentado na segunda linha no ecrã.
Medições de volumes
Premir 2x a tecla prevista para este procedimento de medição até a
devida indicação ser apresentada no ecrã. O lado a ser medido pisca no
ecrã e a respectiva medição é activada após premir a tecla .
Page 70

G - 7 Manual de instruções – Distanciómetro a Laser
P
Premir uma vez a mesma tecla medir o comprimento e em seguida uma
segunda e terceira vez para medir a largura e a altura.
Em seguida, o equipamento calcula o volume e apresenta o resultado no
ecrã. Nesta ocasião, o último valor medido não é apresentado no ecrã.
Medições indirectas
Medições indirectas: Cálculo de uma distância através de duas medições
auxiliares. Para as medições de altura, que precisam por ex. de duas ou três
medições, proceder da seguinte maneira:
Premir uma vez a tecla o símbolo é apresentado.
Aponte primeiro para o ponto mais alto (1) e realize uma medição. O
primeiro valor de medição será memorizado. Segure o equipamento o mais
firme possível posicionando as laterais traseiras em base plana.
Premir de novo a tecla para medir a lin-
ha horizontal. O resultado desta medição será
indicado na segunda linha, e ao mesmo tempo
a soma é apresentada na última linha.
Medição indirecta – cálculo de uma distância através de três variáveis
medidas
Premir 2x a tecla ; A indicação é
apresentada no ecrã.
Aponte primeiro para o ponto (1) mais
baixo e realize uma medição. O primeiro valor
de medição será memorizado. Segurar o das
equipamento o mais firme possível. O encosto
dos dois cantos posteriores não pode ser alterado durante as medições!
Aponte agora para o ponto de mira horizontal (2) e realize a medição.
O resultado é apresentado na segunda linha.
No final, apontar para o ponto superior (3) e premir a tecla , para realizar
(3) a medição. O resultado é apresentado na última linha, os resultados parciais
são ao mesmo apresentados na segunda linha.
Histórico
Os 20 últimos valores (de medição ou cálculo) são apresentados na
sequência inversa. Usar as teclas previstas ou
para navegar nas
anotações.
Page 71

Manual de instruções – Distanciómetro a Laser G - 8
P
6. Características técnicas
Especificações técnicas
Alcance . . . . . . . . . . . . . . . . . . . . . . . . . . . 0,05 até 50 m*
(0,16 - 164 ft)
Precisão de medição até 10 m . . . . . . . . . . . . . . Típico: ±1,5 mm**
(± 0,06 in)
Unidades de medição . . . . . . . . . . . . . . . . . . . . . . . . . . . m,in,ft
Categoria de laser. . . . . . . . . . . . . . . . . . . . . . . . . . . . . Classe II
Tipo de laser . . . . . . . . . . . . . . . . . . . . . . . . . . . . . 635 nm, <1mW
Cálculos de superfícies e volumes . . . . . . . . . . . . . . . . . . . . . . •
Medições indirectas (Funções de Pitágoras) . . . . . . . . . . . . . . . . . •
Adição/Subtracção . . . . . . . . . . . . . . . . . . . . . . . . . . . . . . •
Medição contínua . . . . . . . . . . . . . . . . . . . . . . . . . . . . . . . . •
Indicação de distância mínima/máxima / função de rastreamento. . . . . . •
Iluminação de fundo e indicação de múltiplas linhas . . . . . . . . . . . . •
Sinal acústico . . . . . . . . . . . . . . . . . . . . . . . . . . . . . . . . . . •
À prova de poeira e de choques. . . . . . . . . . . . . . . . . . . . . . . . . .IP 54
Número de anotações no histórico . . . . . . . . . . . . . . . . . . . . . 20
Temperatura de operação . . . . . . . . . . . .0°C até 40°C (32°F até 104°F)
Temperatura de armazenamento . . . . . . -10 °C até 60°C (14°F até 140°F)
Duração da pilha. . . . . . . . . . . . . . . . . . . . . . até 4.000 medições
Pilhas . . . . . . . . . . . . . . . . . . . . . . . . . . . . Tipo AAA 2 x 1,5V
Desligamento automático do laser. . . . . . . . . . . . . . . .após 30 segundos
Desligamento automático . . . . . . . . . . . . . . . . . . . . após 3 minutos
Dimensões. . . . . . . . . . . . . . . . . . . . . . . . . . 115 x 48 x 28 mm
Peso . . . . . . . . . . . . . . . . . . . . . . . . . . . . . . . . . . . .135 g
* Usar uma placa de mira para aumentar a distância durante o dia ou quando os alvos
não reflectem bem!
** Em condições favoráveis (boas características da superfície do alvo; temperatura
ambiente) até 10 m. Em condições desfavoráveis como por exemplo em plena luz de
sol, superfícies que não reflectem bem, grandes variações de temperaturas, pode
haver desvios de ± 0,15 mm/m à partir de uma distância de 10 m.
Page 72
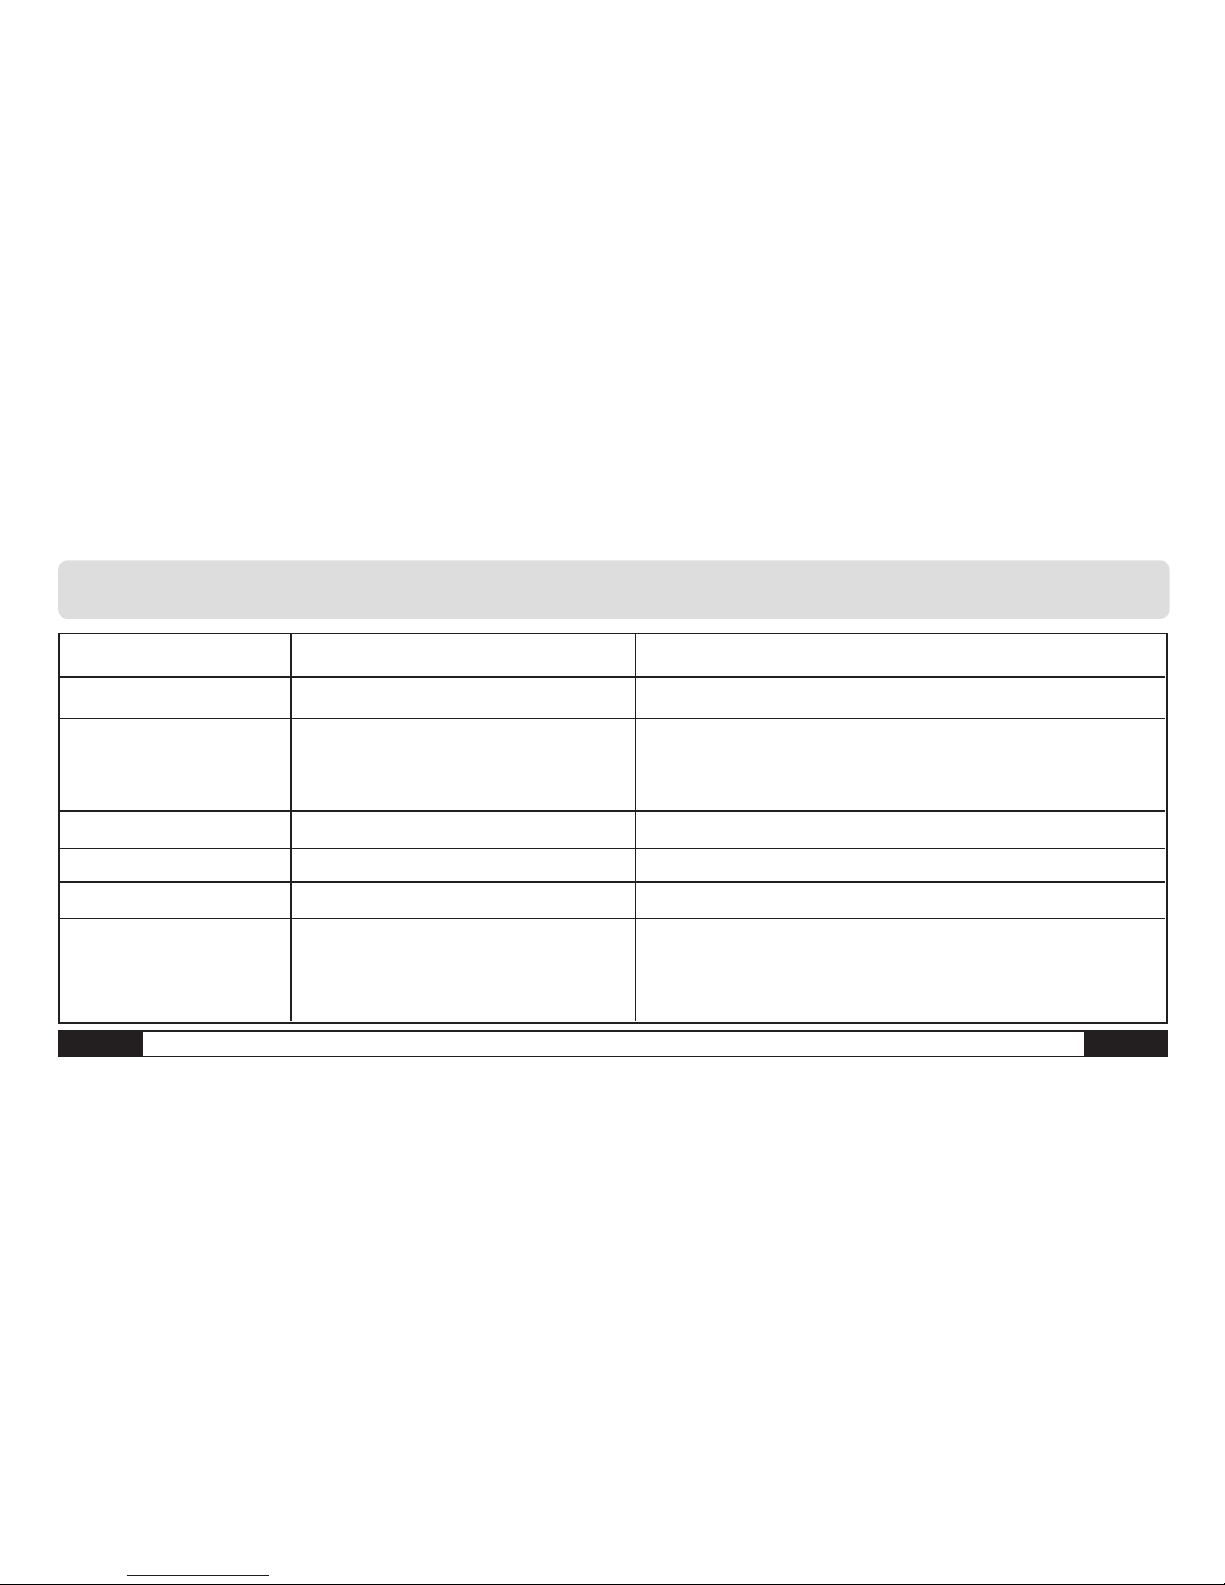
G - 9 Manual de instruções – Distanciómetro a Laser
P
7. Localização e eliminação de falhas
Código Causa Medidas correctivas
204 Falha de cálculo Repetir o procedimento
208 O sinal de recepção está fechado Usar uma placa de mira (opcional)
maior fraco/o tempo de medição
demorada demais/a distância está > 50 m
209 O sinal de recepção está forte demais O objecto reflecte demais (usar uma placa de mira)
252 A temperatura está alta demais Deixar o equipamento esfriar
253 A temperatura está baixa demais Deixar primeiro aquecer o equipamento
255 Falha do hardware Ligar e desligar várias vezes o equipamento. Favor entrar em contacto
com o revendedor se o símbolo continua a ser apresentado. Ele
encontrará uma solução.
Page 73

Manual de instruções – Distanciómetro a Laser G - 10
P
8. Condições de medição
Distância da medição
O alcance do equipamento é 50 m.
Distâncias maiores podem ser alcançadas em determinadas condições
– por ex. de noite, ao anoitecer, com alvo na sombra – mesmo sem placa
de mira. De dia pode ser usada uma placa de mira para aumentar a
distância em alvos que não reflectem bem.
Superfícies do alvo
Se o laser atingir líquidos incolores (por ex. água), vidro sem poeira,
esferovite ou outros materiais semipermeáveis podem resultar falhas de
medição. Os resultados de medição podem também sofrer alterações se
o laser atingir uma superfície com brilho intenso e for reflectido. Superfícies foscas sem reflexo ou escuras também podem aumentar o tempo
de medição.
Manutenção
Nunca imergir o equipamento em água. Limpe-o com um pano macio,
um pouco húmido. Não usar detergente agressivos. Trabalhe com o equipamento da mesma maneira como se utilizasse uma máquina fotográfica de alta qualidade ou um aparelho de medição sensível.
Page 74

H - 1 Instrukcja obsługi – Dalmierz laserowy
Q
Spis treści
1. Zasady bezpieczeństwa. . . . . . . . . . . . . . . . . .H - 01
2. Uruchomienie . . . . . . . . . . . . . . . . . . . . . H - 03
3. Pierwsze ustawienia . . . . . . . . . . . . . . . . . . . H - 04
4. Pomiary . . . . . . . . . . . . . . . . . . . . . . . . . .H - 05
5. Funkcje. . . . . . . . . . . . . . . . . . . . . . . . . . .H - 06
6. Dane techniczne . . . . . . . . . . . . . . . . . . . . H - 08
7. Wykrywanie i usuwanie błędów . . . . . . . . . . . . . . H - 09
8. Warunki pomiarowe . . . . . . . . . . . . . . . . . . . H - 10
Kompaktowy, poręczny i przede wszystkim bardzo użyteczny model bazowy został
specjalnie zaprojektowany i wykonany do różnorodnych zastosowań wewnątrz
pomieszczeń. Przyjemne, niezwykle miękkie przyciski szybkiego dostępu do takich
funkcji jak: dodawanie, odejmowanie, obliczanie pola powierzchni i objętości czynią
pomiar łatwiejszym, szybszym i wyjątkowo niezawodnym.
Niniejsza wersja publikacji zastępuje wszystkie wcześniejsze. Bez naszej pisemnej
zgody żadna część niniejszej publikacji nie może być w jakiejkolwiek formie reprodukowana lub przy użyciu systemów elektronicznych przetwarzana, powielana lub
rozpowszechniana. Zmiany techniczne zastrzeżone. Wszelkie prawa zastrzeżone.
Nazwy produktów używane są bez gwarancji swobodnego rozporządzania nimi i
stosowane są zasadniczo zgodnie z pisownią producenta. Użyte nazwy produktów
są zastrzeżonymi znakami handlowymi i powinny być traktowane jako takie znaki.
Zastrzegamy sobie prawo do zmian konstrukcyjnych, służących bieżącemu udoskonalaniu produktu, a także prawo do zmian kształtu i kolorów. Dostarczony produkt
może odbiegać od przedstawionego na ilustracjach. Niniejsza dokumentacja została
opracowana z wymaganą starannością. Nie ponosimy odpowiedzialności za błędy i
przeoczenia. © TROTEC®
1. Zasady bezpieczeństwa
Dozwolone zastosowanie
• Przeprowadzenie pomiarów odległości i obliczeń, np. pól powierzchni
i objętości.
Niedozwolone zastosowanie
• Używanie przyrządu bez znajomości zasad jego obsługi
Page 75

Instrukcja obsługi – Dalmierz laserowy H - 2
Q
• Praca przyrządu poza przewidzianymi dla niego granicami.
• Nie wolno dezaktywować systemów bezpieczeństwa. Zabrania się
usuwania z przyrządu oznaczeń objaśniających jego funkcjonalność
oraz ostrzegających przed zagrożeniem.
• Otwieranie przyrządu przy użyciu narzędzi (np. wkrętaki) jest zabro nione, chyba, że w instrukcji obsługi jest to w niektórych przypad kach wyraźnie dozwolone.
• Zabrania się dokonywania modyfikacji i przeróbek przyrządu.
• Używanie akcesoriów innych producentów/firm trzecich wymaga
wyraźnej zgody firmy Trotec GmbH & Co. KG.
• Nie wolno świadomie wykorzystywać przyrządu do celów niezgod nych z jego przeznaczeniem, jak również używać go w sposób nieo dpowiedzialny na rusztowaniach, drabinach, w bezpośredniej
bliskości pracujących maszyn lub w zasięgu niezabezpieczonych
urządzeń, bądź części instalacji.
• Nie wolno kierować przyrządu bezpośrednio na słońce.
• Nie wolno używać przyrządu, jeśli nie ma zapewnionych dostatecz nych środków bezpieczeństwa w miejscu pomiaru (np. przy pomi-
arach na drogach publicznych, budowach itd.).
Klasyfikacja lasera
W celu dokonania pomiaru odległości przyrząd BD15 emituje wiązkę
lasera, wychodzącą z przedniej strony przyrządu.
Dalmierz wyposażony jest w laser klasy 2 :
Nie wolno spoglądać bezpośrednio w wiązkę lasera lub kierować ją na
inne osoby. Ochrona oczu jest zwykle zapewniona poprzez odruch mrugania lub odruchowe, szybkie odwrócenie głowy.
Nie spoglądać bezpośrednio w wiązkę lasera przy użyciu jakich-
kolwiek przyrządów optycznych! Spoglądanie w wiązkę lasera jest
niebezpieczne dla oczu.
W Unii Europejskiej nie wolno traktować urządzeń elektrycznych jak zwykłych odpadów, lecz muszą być one
właściwie utylizowane zgodnie z Dyrektywą 2002/96/WE
PARLAMENTU EUROPEJSKIEGO I RADY z dnia 27. stycznia
2003 r. dotyczącą zużytego sprzętu elektrycznego i elektronicznego. Po zakończeniu użytkowania przyrządu należy dokonać jego
właściwej utylizacji zgodnie z obowiązującymi przepisami prawnymi.
m
Page 76

H - 3 Instrukcja obsługi – Dalmierz laserowy
Q
2. Uruchomienie
Wkładanie/wymiana baterii
1) Najpierw należy zdjąć przykrywkę
wnęki na baterie.
2) Włożyć baterie.
Uważać na prawidłową biegunowość.
3) Z powrotem zamknąć wnękę na baterie.
Baterie muszą zostać wymienione, gdy na wyświetlaczu będzie stale
pulsował „ “ W przypadku nieużywania przyrządu przez dłuży okres
czasu, należy wyjąć z niego baterie, aby zapobiec powstaniu korozji.
Klawiatura
1) Przycisk włączenia/wykonania pomiaru
2) Przycisk pomiaru powierzchni/objętości
3) Przycisk pomiaru pośredniego
4) Przycisk pojedynczego/
ciągłego pomiaru odległości
5) Przycisk dodawania ( + )
6) Przycisk odejmowania ( - )
7) Przycisk historii pomiarów
8) Przycisk zmiany punktu odniesienia
9) Przycisk podświetlenia ekranu/
wyboru jednostki
10) Przycisk kasowania/wyłączenia
Wyświetlacz LCD
1) Laser włączony
2) Punkt odniesienia (przód)
3) Punkt odniesienia (stopka)
4) Różne funkcje pomiarowe
18
Page 77
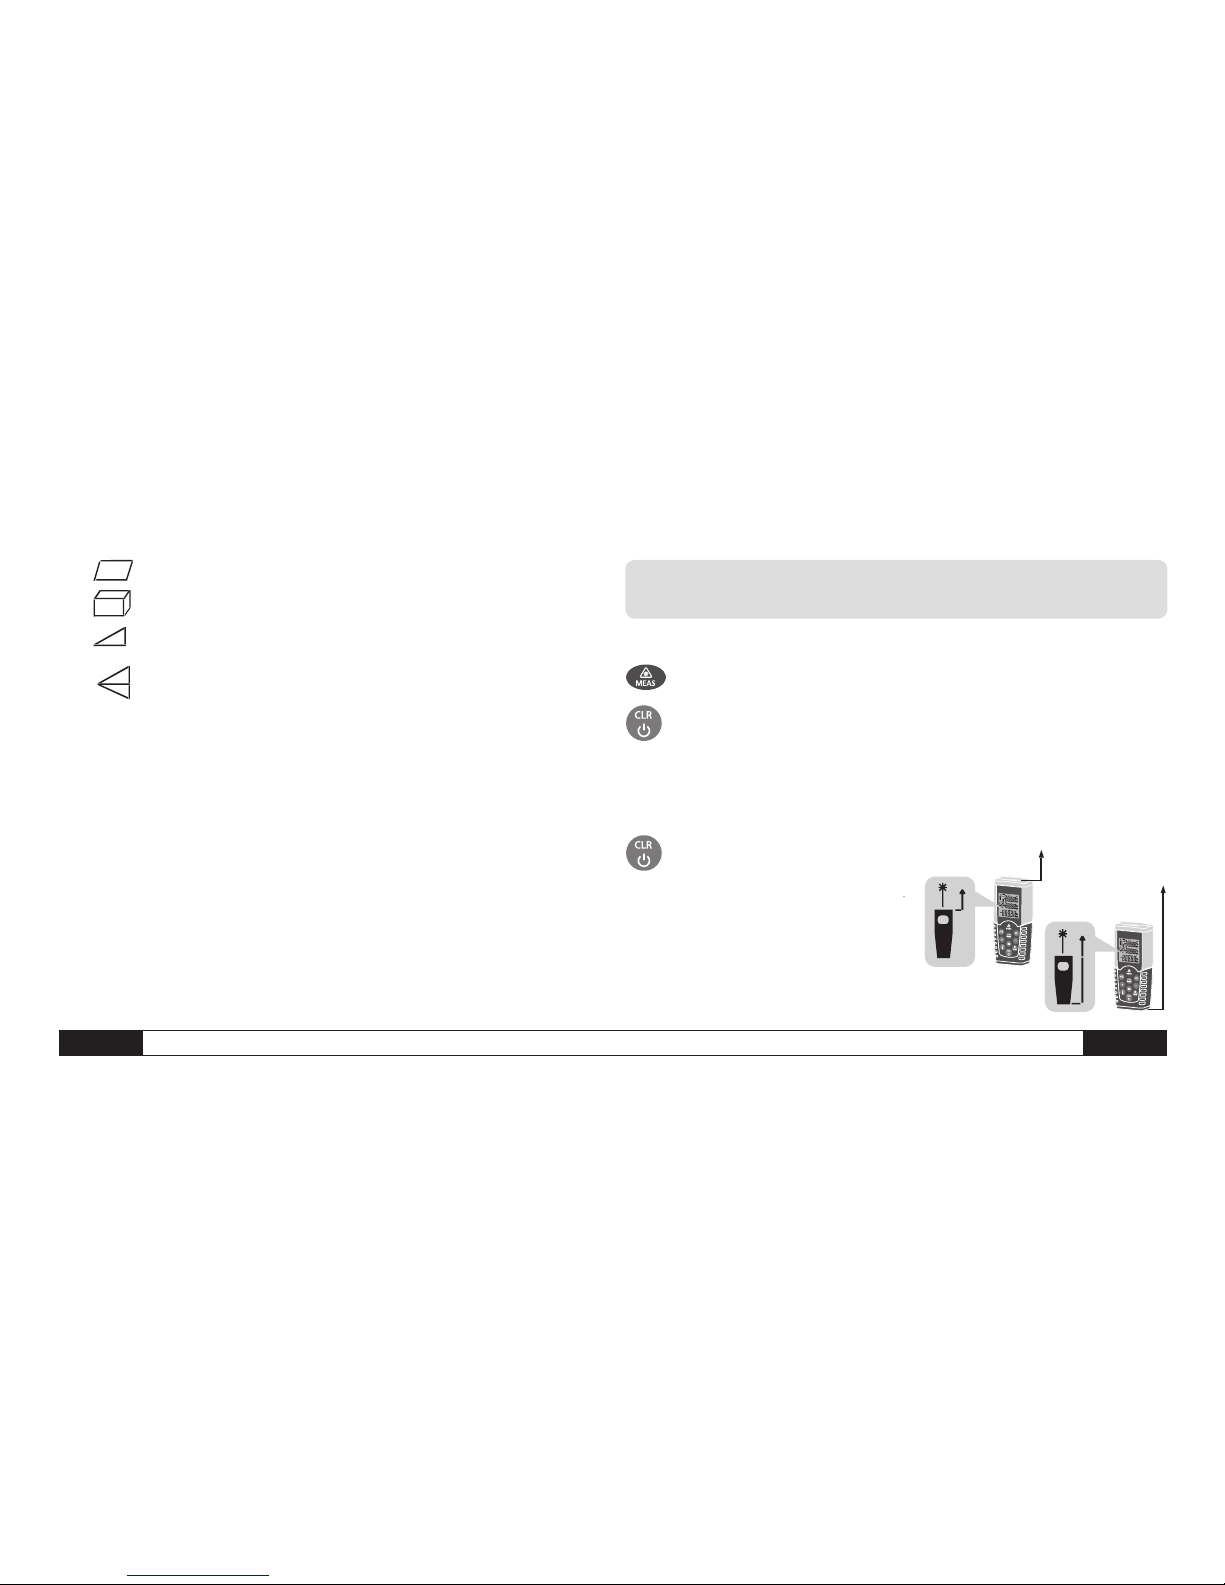
Instrukcja obsługi – Dalmierz laserowy H - 4
Q
Pomiar pola powierzchni
Pomiar objętości
Pomiar pośredni
Pomiar pośredni (drugi)
5) Pojedynczy pomiar odległości
6) Poziom naładowania baterii
7) Historia pomiarów, liczba zapisanych wartości
8) Symbol błędu przyrządu
9) Pomiar ciągły/pomiar maksimum i minimum
10) Wiersz wskazujący pierwszą wartość
11) Wiersz wskazujący drugą wartość
12) Wiersz na samym dole wskazujący ostatnią zmierzoną wartość lub
wynik obliczeń
3. Pierwsze ustawienia
Włączanie i wyłączanie
włącza przyrząd i laser.
Przytrzymanie wciśniętego przycisku powoduje wyłączenie przyrządu.
Dalmierz wyłączy się samoczynnie, jeśli nie będzie używany przez ponad
trzy minuty.
Przycisk kasowania
powoduje anulowanie ostatniej czynności lub skasowanie danych na wyświetlaczu.
Ustawienie punktu odniesienia
Ustawieniem domyślnym punktu
odniesienia jest stopka dalmierza.
Page 78
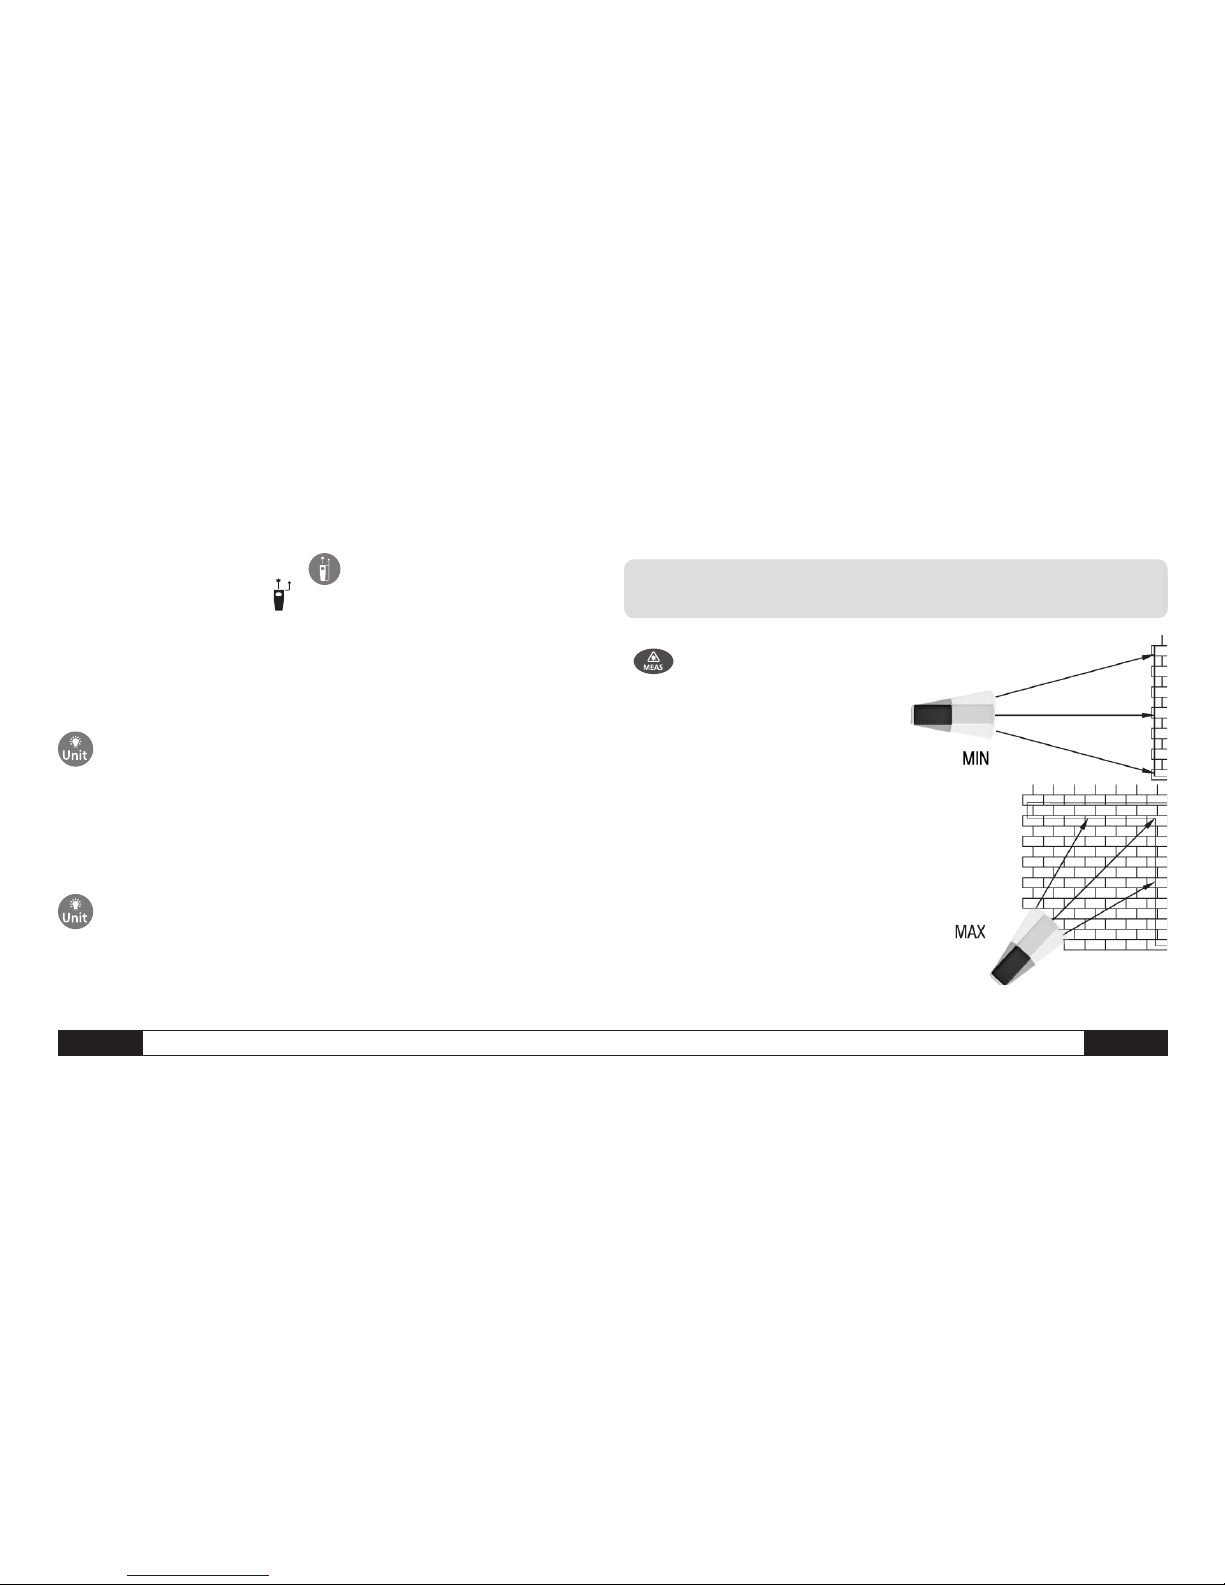
H - 5 Instrukcja obsługi – Dalmierz laserowy
Q
Naciśnięcie przycisku powoduje
,przeniesienie punktu odniesienia
pomiarów na czoło dalmierza . Każdemu przeniesieniu punktu odniesienia
towarzyszy sygnał dźwiękowy. Po włączeniu dalmierza punkt odniesienia
powraca automatycznie do położenia domyślnego (stopka dalmierza).
Podświetlenie ekranu
Aby włączyć lub wyłączyć podświetlenie ekranu należy nacisnąć
przycisk Podświetlenie/UNITS. Podświetlenie ekranu umożliwia znacznie
lepszy odczyt danych na wyświetlaczu o zmroku lub w słabych warunkach
świetlnych.
Wybór jednostki odległości
Nacisnąć przycisk, aby wybrać jednostkę odległości. Ponownie
nacisnąć przycisk, aby przejść z metrów na stopy lub stopy i cale
(m, ft, in, ft+in), bądź powrócić do jednostki wyjściowej.
4. Pomiary
Pojedynczy pomiar odległości
Nacisnąć przycisk włączenia,
aby aktywować laser. Ponownie
nacisnąć przycisk, aby wykonać pomiar odległości. Wynik pomiaru pojawi
się natychmiast na wyświetlaczu.
Pomiar ciągły (funkcja tracking)/
pomiar maksimum i minimum
Funkcja pomiaru ciągłego (tracking) używana jest do przeniesienia pomiarów np. z rysunków
budowlanych.
Za pomocą tej metody pomiaru
można przemieścić dalmierz w
miejsce docelowe, przy czym
Page 79

Instrukcja obsługi – Dalmierz laserowy H - 6
Q
wartość pomiaru wyliczana jest co 0,5 sekundy. Osiągnięta wartość
maksymalna oraz minimalna wskazywana jest odpowiednio w
pierwszym i drugim wierszu wyświetlacza.
Przykładowo użytkownik może skierować wiązkę lasera na ścianę, a
następnie stopniowo oddalać się od ściany, odczytując kolejne wartości
należy nacisnąć przycisk aż na wyświetlaczu pojawi się wskaźnik
pomiaru, aż osiągnie żądaną odległość. Aby przejść do tego trybu pomiaru , pomiaru ciągłego. Ponowne naciśnięcie przycisku powoduje
zakończenie pomiaru ciągłego. Funkcja zakończy się automatycznie po 100
pomiarach wykonanych w trybie ciągłym.
5. Funkcje
Dodawanie / odejmowanie
Pomiar odległości
Wynik drugiego pomiaru zostanie dodany do wyniku pierwszego po-
miaru. Nacisnąć przycisk
,aby zobaczyć wynik drugiego pomiaru.
Wynik obu pomiarów wyświetla się automatycznie. Wynik drugiego pomiaru
zostanie odjęty od wyniku pierwszego pomiaru. Nacisnąć przycisk, aby
zobaczyć wynik. Wynik drugiego pomiaru wyświetla się zawsze w drugim
wierszu, natomiast wynik obliczeń w trzecim wierszu.
Ostatnia czynność zostanie anulowana.
Powrót do pojedynczego pomiaru odległości.
Pomiar pola powierzchni
Nacisnąć jeden raz przycisk. Na wyświetlaczu pojawi się symbol
dla tego procesu pomiaru.
Nacisnąć przycisk aby wykonać pomiar pierwszej wielkości (np.
długość).
Ponowne naciśnięcie przycisku
spowoduje wykonanie pomiaru drugiej wielkości (np. szerokość). Po drugim naciśnięciu przycisku dalmierz
samoczynnie wyliczy pole powierzchni i jego wartość wyświetli się w trzecim wierszu. Wynik ostatniego pomiaru widoczny jest w drugim wierszu
wyświetlacza.
Page 80

H - 7 Instrukcja obsługi – Dalmierz laserowy
Q
Pomiar objętości
Nacisnąć dwukrotnie przycisk przewidziany do tego rodzaju pomiaru
aż na wyświetlaczu pojawi się symbol. Strona, która ma być zmierzona,
sygnalizowana jest na wyświetlaczu poprzez pulsowanie, a odpowiedni pomiar wykonywany jest po naciśnięciu przycisku.
Nacisnąć ten sam przycisk , aby najpierw zmierzyć długość, a następnie
nacisnąć drugi i trzeci raz, aby zmierzyć zarówno szerokość, jak i wysokość.
Po trzecim pomiarze dalmierz samoczynnie wylicza objętość, której wartość
widoczna jest na wyświetlaczu. Wynik ostatniego pomiaru nie jest wyświetlany.
Pomiary pośrednie
Pomiar pośredni: Obliczenie odległości na podstawie dwóch miar pomocniczych. W przypadku wyznaczenia wysokości, wymagającego dwóch
lub trzech pomiarów należy postępować
przykładowo w taki sposób:
Nacisnąć jeden raz przycisk na
wyświetlaczu pojawi się symbol.
Najpierw wycelować dalmierz na
wyżej położony punkt (1), a następnie wykonać pomiar. Pierwsza zmierzona
wartość zostaje przejęta do obliczeń. Przyrząd należy trzymać spokojnie i
umieścić go dwoma tylnymi krawędziami poziomo na podłożu.
Ponownie nacisnąć przycisk wykonania pomiaru, aby zmierzyć odcinek
poziomy. Wynik tego pomiaru wyświetli się w drugim wierszu, natomiast wynik
obliczeń pojawi się automatycznie w wierszu trzecim.
Pomiar pośredni – obliczenie odległości na podstawie trzech miar pomocniczych
Nacisnąć dwa razy przycisk
; na
wyświetlaczu pojawi się symbol.
Wycelować dalmierz najpierw na dolny
punkt (1) i wykonać pomiar. Pierwsza zmierzona wartość zostanie przejęta do obliczeń.
Przyrząd należy trzymać spokojnie.
Ograniczenie ruchu przy obu tylnych krawędziach nie może się zmienić
podczas pomiarów!
Page 81

Instrukcja obsługi – Dalmierz laserowy H - 8
Q
Następnie wycelować dalmierz na punkt poziomy (2) i wykonać pomiar. Wynik wyświetla się w drugim wierszu.
Na zakończenie wycelować dalmierz na górny punkt (3) i nacisnąć przycisk aby wykonać pomiar (3). Wynik obliczeń pojawi się w trzecim
wierszu, natomiast wyniki częściowe widoczne są w wierszu drugim.
Historia pomiarów
Ostatnie 20 wartości (pomiarów lub obliczeń) wskazywane są w odw-
rotnej kolejności. Do przeglądania zapisanych wyników służą przewidziane
do , tego celu przyciski lub.
6. Dane techniczne
Specyfikacje techniczne
Zasięg. . . . . . . . . . . . . . . . . . . . . . . . . . . . . 0,05 bis 50 m*
(0,16 - 164 ft)
Dokładność pomiarów do 10 m . . . . . . . . . . . . . . . . zwykle: ±1,5 mm**
(± 0,06 in)
Jednostki pomiaru. . . . . . . . . . . . . . . . . . . . . . . . . . . . . . m,in,ft
Kategoria lasera . . . . . . . . . . . . . . . . . . . . . . . . . . . . . klasa II
Typ lasera . . . . . . . . . . . . . . . . . . . . . . . . . . . . 635 nm, <1mW
Obliczanie pola powierzchni, objętości . . . . . . . . . . . . . . . . . . . . .•
Pomiary pośrednie (funkcja Pitagorasa) . . . . . . . . . . . . . . . . . •
Dodawanie/odejmowanie . . . . . . . . . . . . . . . . . . . . . . . . . . . .•
Pomiar ciągły . . . . . . . . . . . . . . . . . . . . . . . . . . . . . . . . . •
Wskazanie odległości min./maks. /funkcja tracking . . . . . . . . . . . . . .•
Podświetlenie ekranu i kilkuwierszowe wskazanie danych . . . . . . . . . •
Page 82

H - 9 Instrukcja obsługi – Dalmierz laserowy
Q
Sygnał dźwiękowy . . . . . . . . . . . . . . . . . . . . . . . . . . . . . . . •
Odporność na pył i uderzenia . . . . . . . . . . . . . . . . . . . . . . . . IP 54
Ilość wartości zapisanych w historii pomiarów . . . . . . . . . . . . . . 20
Temperatura pracy . . . . . . . . . . . . od 0°C do 40°C(od 32°F do 104°F)
Temperatura przechowywania . . . . .od -10 °C do 60°C(od 14°F do 140°F)
Żywotność baterii . . . . . . . . . . . . . . . . . . . . . do 4000 pomiarów
Baterie . . . . . . . . . . . . . . . . . . . . . . . . . . . . typ AAA 2 x 1,5V
Automatyczne wyłączenie lasera . . . . . . . . . . . . . . po 30 sekundach
Automatyczne wyłączenie urządzenia . . . . . . . . . . . . . . . . po 3 min.
Wymiary . . . . . . . . . . . . . . . . . . . . . . . . . . . .115 x 48 x 28 mm
Masa . . . . . . . . . . . . . . . . . . . . . . . . . . . . . . . . . . . . 135 g
* Aby zwiększyć zasięg pomiaru wykonywanego w świetle dziennym lub dotyczącego
powierzchni o słabych właściwościach odbijających należy użyć tarczki celowniczej!
** W korzystnych warunkach (dobre właściwości powierzchni celu; temperatura po
kojowa) do 10 m. W niekorzystnych warunkach np. przy silnym nasłonecznieniu,
słabo odbijających się powierzchniach, wysokich zmianach temperatur, dokładność
pomiarów z odległości od 10 m może ulec pogorszeniu o ± 0,15 mm/m.
Page 83
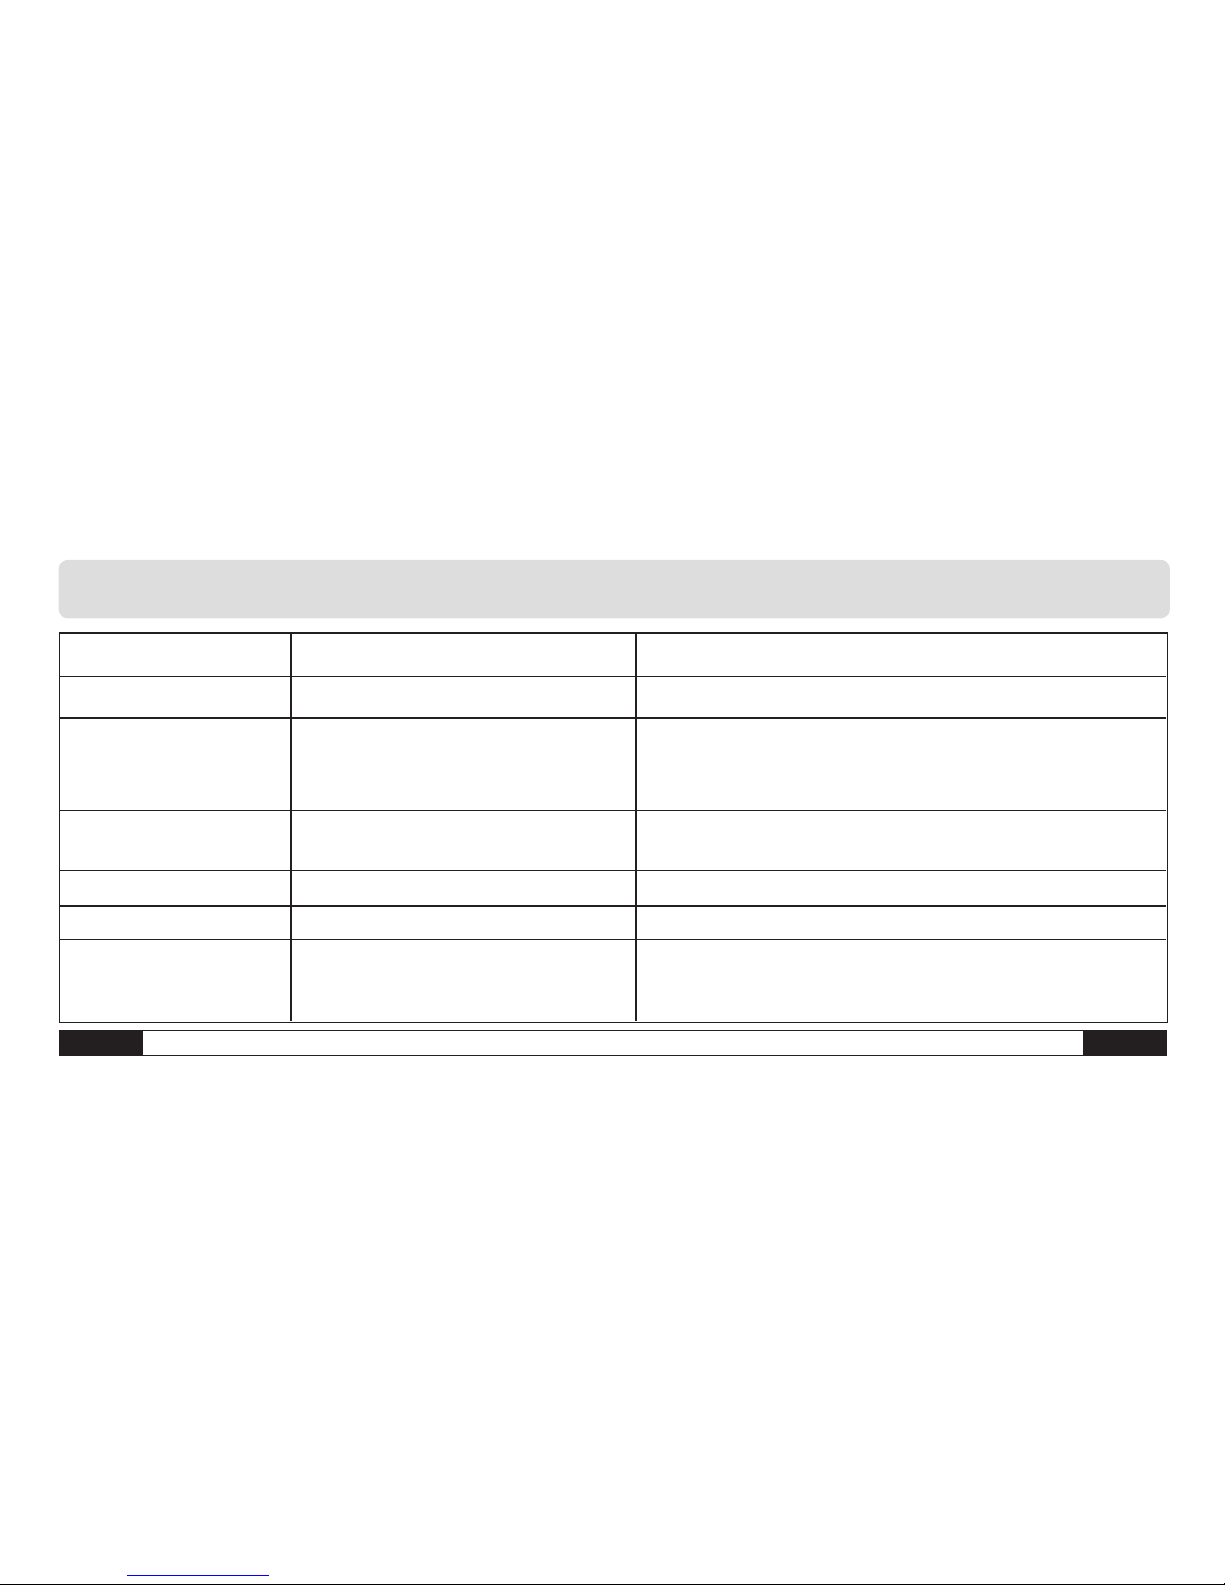
Instrukcja obsługi – Dalmierz laserowy H - 10
Q
7. Wykrywanie i usuwanie błędów
Kod Przyczyna Postępowanie korygujące
204 Błąd obliczeń Powtórzyć procedurę pomiarową
208 Zbyt słaby sygnał powrotny/ Użyć większej tarczki celowniczej (opcja)
zbyt długi czas pomiaru/
odległość przekracza 50 m
209 Zbyt silny sygnał powrotny Cel posiada zbyt silne właściwości odbijające wiązkę lasera (użyć
tarczki celowniczej)
252 Zbyt wysoka temperatura Ochłodzić urządzenie
253 Zbyt niska temperatura Ogrzać urządzenie
255 Błąd sprzętowy Kilkakrotnie włączyć i wyłączyć urządzenie. Jeśli symbol ten będzie
się nadal pojawiał, należy skontaktować się ze sprzedawcą w celu
uzyskania pomocy.
Page 84

H - 11 Instrukcja obsługi – Dalmierz laserowy
Q
8. Warunki pomiarowe
Zasięg pomiaru
Zasięg pomiaru ograniczony jest do 50 m.
W określonych warunkach np. nocą, o zmierzchu, a także jeśli cel jest
zacieniony, wzrasta zasięg pomiaru bez konieczności używania tarczki celowniczej. Zasięg pomiaru wykonywanego w świetle dziennym
lub przy słabych właściwościach odbijających powierzchni celu można
zwiększyć poprzez zastosowanie tarczki.
Powierzchnie celu
Błędy pomiaru mogą wystąpić, jeśli wiązka lasera zostanie skierowana na bezbarwne ciecze (np. wodę), czyste szkło, styropian lub inne
półprzepuszczalne materiały. Do błędnych wyników pomiaru może dojść
również w przypadku skierowania wiązki lasera na powierzchnie o wysokim połysku, które powodują odchylenie toru wiązki. Powierzchnie
matowe, ciemne, słabo odbijające mogą wydłużyć czas pomiaru.
Czyszczenie
Urządzenia nie wolno zanurzać w wodzie. Brud należy wycierać tylko
wilgotną, delikatną szmatką. Nie używać żrących środków czyszczących.
Z dalmierzem należy się obchodzić podobnie jak z aparatem fotograficznym lub wrażliwym przyrządem pomiarowym.
Page 85

Instrukcja obsługi – Dalmierz laserowy H - 12
Q
Page 86

I - 1 Kullanım kılavuzu – Lazer aralık ölçüm cihazı
T
İçindekiler
1. Güvenlik uyarıları . . . . . . . . . . . . . . . . . . . . I - 01
2. Çalıştırma. . . . . . . . . . . . . . . . . . . . . . . . I - 03
3. İlk ayarlar. . . . . . . . . . . . . . . . . . . . . . . . I - 04
4. Ölçümler . . . . . . . . . . . . . . . . . . . . . . . . I - 05
5. Fonksiyonlar . . . . . . . . . . . . . . . . . . . . . . I - 06
6. Teknik veriler . . . . . . . . . . . . . . . . . . . . . . I - 08
7. Arıza giderme. . . . . . . . . . . . . . . . . . . . . . I - 09
8. Ölçüm şartları. . . . . . . . . . . . . . . . . . . . . . I - 10
Uyumlu, kullanışlı ve her şeyden önce oldukça faydalı olan temel model iç alanlardaki çeşitli görevler için geliştirilip tasarlanmıştır. Toplama, çıkarma, yüzey ve hacim
hesaplamaları gibi fonksiyonları sağlayan rahat, süper yumuşak hızlı tuşlar ölçümlerin
elinizle daha hızlı yapmanızı sağlar.
Bu doküman bundan önceki tüm dokümanların yerini alır. Bu dokümanın hiçbir kısmı
herhangi bir şekilde yazılı iznimiz olmadan kopyalanmaz veya elektronik sistemler
kullanılarak işlenemez, çoğaltılmaz veya yayımlanamaz. Teknik değişiklik hakkı saklıdır.
Tüm hakları saklıdır. Ürün isimleri serbest kullanım hakkı olmadan ve üreticinin ifade
ettiği şekliyle aşağıdaki gibi kullanılır. Kullanılan ürün isimleri kayıtlı isimlerdir ve bu
şekilde ele alınmalıdır. Sürekli yapılan ürün iyileştirmeleri ve şekil/renk değişiklikleri
kapsamında yapısal değişiklik hakkı saklıdır. Teslimat kapsamı ürün şekillerinden farklı
olabilir. Mevcut doküman gerekli itina ve dikkatle hazırlanmıştır. Hatalardan veya eksik
bilgiden dolayı sorumlu değiliz. © TROTEC®
1. Güvenlik uyarıları
Müsaade edilen kullanımı
• Uzaklık ölçümleri yapmak ve
• Hesaplamalar, örneğin yüzeyler ve oda ölçüleri.
Müsaade edilmeyen kullanımı
• Cihaz, uygun bir talimatı olmadan çalıştırılmamalıdır.
• Cihaz öngörülen sınırların dışında çalıştırmayın.
Page 87

T
Kullanım kılavuzu – Lazer aralık ölçüm cihazı I - 2
• Güvenlik sistemleri devre dışı bırakılmamalıdır. Doğru kullanımı gös teren tehlike etiketleri cihazdan sökülmemelidir.
• Cihaz aletlerle (tornavida) açılmamalıdır, çünkü kullanım kılavuzunda
bu durum açık açık anlatılmıştır.
• Cihaz ne değiştirilmeli nede modifiye edilmelidir.
• Diğer üreticilerin/üçüncü kişilerin aksesuarları sadece Trotec GmbH &
Co. KG onayıyla kullanılmalıdır.
• Cihaz farklı amaçlar için kullanılmamalı veya sorumsuzca merdivene,
çalışan makinelerin veya makinelerin yada düzeneklerin korunaksız
parçalarının yakınına bırakılmamalıdır.
• Cihaz doğrudan güneşe bırakılmamalıdır.
• Ölçüm yerinde yeterli düzeyde güvenlik tedbirleri alınmamışsa cihaz
kullanılmamalıdır (örneğin sokaklarda, inşaat sahalarında yapılan ölçümler de).
Lazer sınıflandırma
BD15, uzaklık ölçümü için cihazın ön yüzünden gönderilen bir lazer ışını
oluşturur.
Bu 2. lazer kategorisi ürünüdür:
Lazer ışınına bakmayın ve lazeri diğer kişilere doğrultmayın. Gözler normal durumda bir refleksle (göz kapaklarını açıp kapamak) veya başın
hızlıca çevrilmesiyle korunur.
Asla herhangi bir optik yardımcı malzemeyle doğrudan lazer ışınına
bakmayın! Lazer ışınına baktığınızda gözlerinizin sağlığını tehlikeye atmış olursunuz.
Elektronik cihazları ev çöpüne atmayın, tam aksine Avrupa
Birliğinde - 2002/96/EG AVRUPA PARLAMENTOSUNUN 27
Ocak 2003 tarihli eski elektronik cihazlara ilişkin yönergesi
gereği – atılmalıdır. Bu cihazı son kullanma tarihinden sonra
geçerli yasal talimatlara göre elinizden çıkarın.
m
Page 88

I - 3 Kullanım kılavuzu – Lazer aralık ölçüm cihazı
T
2. Çalıştırma
Bataryaları değiştirmek
1) Önce kapağı bataryadan sökün.
2) Bataryaları takın.
Bu sırada doğru polariteye dikkat edin.
3) Batarya kutusunu tekrar takın.
„ “ sembolü kesintisiz bir şekilde ekranda yanıp sönerse bataryalar
değiştirilmelidir. Cihazı uzun süre kullanmadığınız zaman paslanmasını
önlemek için bataryaları kapaktan sökün.
Tuş alanı
1) Açma/ölçme tuşu
2) Yüzey/oda hacim tuşu
3) İn direk ölçüm tuşu
4) Tekli/sürekli mesafe ölçüm tuşu
5) Artı tuşu ( + )
6) Eksi tuşu ( - )
7) Saklama tuşu
8) Referans tuşu
9) Aydınlatma/ünite tuşu
10) Silme/kapatma tuşu
LCD ekran
1) Lazer aktif
2) Referans değeri (ön)
3) Referans değeri (arka)
4) Değişken ölçüm fonksiyonları
Yüzey ölçümler
Hacim ölçümler
18
Page 89

T
Kullanım kılavuzu – Lazer aralık ölçüm cihazı I - 4
İn direk ölçüm
İn direk (ikinci) ölçüm
5) Tekli mesafe ölçümü
6) Batarya durumu
7) Kronik, çalıştırılan değerler sayısı
8) Cihaz hata uyarısı
9) Sürekli ölçüm/maks. ve min. ölçümü
10) Birinci değerin gösterge satırı
11) İkinci değerin gösterge satırı Son ölçüm değerin en alt satırı veya
hesaplama sonucu
12) Son ölçüm değeri veya hesaplama sonucu için en alt satır
3. İlk ayarlar
Açmak ve kapatmak
Cihazı ve lazeri açıp kapatır.
Cihazı kapatmak için bu tuşu basılı tutun.
Üç dakikadan uzun süre kullanılmazsa cihaz otomatik olarak kapanır.
Silme tuşu
Son aksiyonu veya ekrandaki verileri siler.
Referans değerini ayarlamak
Referans değeri cihazın arka
parçasından başlar. Referans noktasını
cihazın ön
parçasına uzatmak
için bu tuşa basın . Referans noktası
Page 90

I - 5 Kullanım kılavuzu – Lazer aralık ölçüm cihazı
T
uzatıldığında bir sinyal sesi her defasında duyulur. Referans değeri açıldıktan
sonra otomatik olarak eski konuma (cihazın arkasına) geri döner.
Arka plan aydınlatması
Arka plan aydınlatmasını açmak veya kapatmak için aydınlatma/
UNITS tuşuna basın. Değerler karanlıkta veya kötü ışık koşullarında net
olarak ekrandan okunabilir.
Mesafe ünitesini seçmek
Mesafe ünitesini seçmek için tuşu basılı tutun. Metreden ayağa veya
ayak ve inç (m, ft, in, ft+in) ve geri dönmek için tuşa yeniden basın.
4. Ölçümler
Tekli mesafe ölçümü
Lazeri etkinleştirmek için AÇMA tuşuna basın. Bir uzaklık ölçümü yapmak için tuşa yeniden basın. Ölçülen değer hemen LCD ekranında gösterilir.
Sürekli ölçüm (zamanlama fonksiyonu) / maks. ve min. ölçümler
Ölçümleri aktarmak için sürekli ölçüm fonksiyonu (Tracking)
kullanılır.
Bu ölçüm metodunda cihaz hedefe
doğru hareket edebilir, bu sırada
ölçüm değeri yaklaşık her 0,5 saniyede bir yeniden hesaplanır. Buna
ait maksimum ve minimum ölçüm
değerler birinci ve ikinci satırda
gösterilir.
Kullanıcı örneğin lazer ışınını bir
duvara doğrultabilir ve gitgide duvardan uzaklaşabilir ve bu sırada
istenen uzaklığa ulaşana kadar
ölçüm değerini okuyabilir.
İşlemi kesmek için tuşa yeniden basın İşlem otomatik olarak 100
Moda erişmek için ekranda sürekli ölçüm göstergesi görünene kadar
ilgili tuşa basın. Ölçümden sonra sürekli moda halinde tamamlanır.
Page 91

T
Kullanım kılavuzu – Lazer aralık ölçüm cihazı I - 6
5. Fonksiyonlar
Toplama / çıkarma
Uzaklık ölçümleri
İkinci ölçüm değer birinci ölçüm değerle toplanır
, İkinci ölçüm
değeri görmek için tuşa basın. Her iki ölçüm değerin sonucu otomatik olarak
gerçekleşir. İkinci ölçüm değer birinci ölçüm değerden çıkarılır. Sonucu
görmek için tuşa basın. İkinci ölçüm değer her zaman ikinci satırda,
sonuç en alt satırda görünür.
Son adım iptal edilir.
Tekli uzaklık ölçümüne geri dönün.
Yüzey ölçümler
İlgili tuşa bir kez basın. Bu ölçme işleminin sembolü ekranda
görünür.
Birinci ölçümü (örneğin uzunluklar) yapmak için tuşa basın.
İkinci ölçümü (örneğin genişlikler) yapmak için tuşa basın.
Cihaz tuşa ikinci kez basıldıktan sonra otomatik olarak yüzeyi hesaplar ve
bunu en alt satırda gösterir. En son gösterilen değer ekranda ikinci satırda
gösterilir.
Hacim ölçümler
Bu ölçüm işlemi için öngörülen tuşa ilgili , gösterge ekranda görünene
kadar 2 kez basın . Ölçülecek taraf yanıp sönerek ekranda gösterilir ve
ilgili ölçüm tuşa basarak etkinleştirilir .
Bir kez uzunluğu ölçmek için ve ardından bir ikinci ve üçüncü kez, gerek
genişliği gerekse yüksekliği ölçmek için aynı tuşa basın. Ardından cihaz hacmi
hesaplar ve bu değeri ekranda gösterir. En son ölçülen değer bu sırada gösterilmez.
İn direk ölçümler
İn direk ölçümler: İki yardımcı ölçümle bir uzaklığı hesaplamak. İki veya üç
ölçüm gerektiren yükseklik ölçümlerinde örneğin aşağıdaki gibi hareket edin:
Page 92
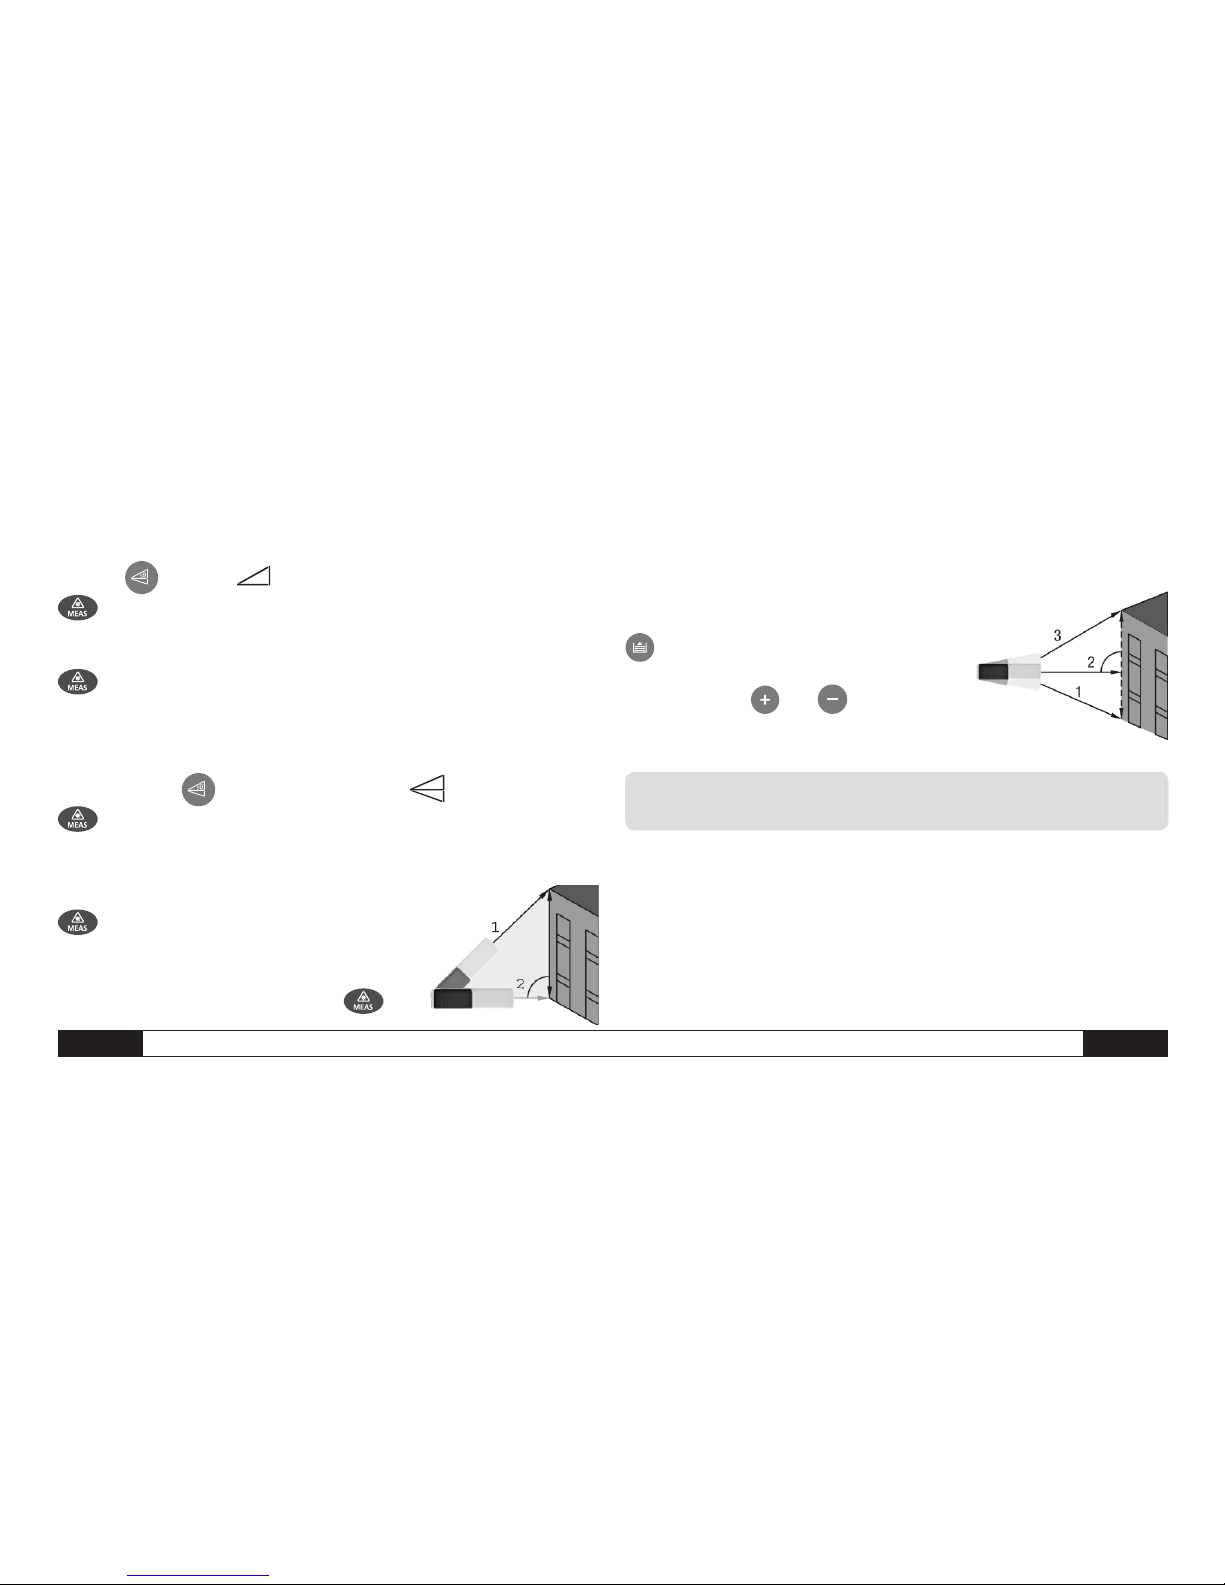
I - 7 Kullanım kılavuzu – Lazer aralık ölçüm cihazı
T
Tuşa bir kez basın sembol şimdi gösterilir.
Önce en yüksek noktayı (1) hedefleyin ve bir ölçüm yapın. Birinci
ölçüm değeri kaydedilir. Bu sırada cihazı mümkün olduğu kadar sakin tutun
ve her iki arka kenarlarıyla arka plana düz tutun.
Yatay hattı ölçmek için ölçüm tuşuna yeniden basın. Bu ölçümün so-
nucu, toplam sonuç aynı anda en alt satırda gösterildiği sırada ikinci satırda
gösterilir.
İn direk ölçüm – Üç ölçüm genişliğinde bir uzaklığı hesaplamak
Tuşa 2 kez basın gösterge ekranda görünür .
Önce en alt noktayı (1) hedefleyin ve bir ölçüm yapın. Birinci ölçüm
değeri kaydedilir. Cihazı bu sırada mümkün olduğu kadar sakin tutun.
Her iki arka kenardaki tahdit noktaları ölçümler sırasında
değişmemelidir!
Şimdi yatay hedef noktasını gezleyin
(2) ve ölçümü yapın. Sonuç ikinci satırda
gösterilir.
Son olarak üst noktayı (3) hedefleyin ve
ölçümü (3) yapmak için tuşa basın. Sonuç, ikinci satırda gösterildiği sırada en
alt sırada genel sonuç gösterilir.
Kronik
Son 20 değer (ölçümler veya hesaplama-
lar) tam tersi sırada gösterilir. Çizimler arasında
gezinti yapmak için bunun için öngörülen tuşlardan faydalanın.
6. Teknik veriler
Teknik özellikler
Menzil . . . . . . . . . . . . . . . . . . . . . . . . . . . . . . .0.05 ila 50 m*
(0,16 - 164 ft)
10m’ye kadar ölçüm doğruluğu. . . . . . . . . . .Tipik: ±1.5 mm** (± 0.06 in)
Ölçüm üniteleri . . . . . . . . . . . . . . . . . . . . . . . . . . . . . . m,in,ft
Lazer kategori. . . . . . . . . . . . . . . . . . . . . . . . . . . . . . . . Sınıf II
Page 93

T
Kullanım kılavuzu – Lazer aralık ölçüm cihazı I - 8
Lazer tip . . . . . . . . . . . . . . . . . . . . . . . . . . . 635 nm, <1mW
Yüzey, hacim hesaplamaları. . . . . . . . . . . . . . . . . . . . . . . . . . . •
İn direk ölçümler (Pythagoras fonksiyonu). . . . . . . . . . . . . . . . . . . •
Toplama / çıkarma . . . . . . . . . . . . . . . . . . . . . . . . . . . . . . •
Sürekli ölçüm . . . . . . . . . . . . . . . . . . . . . . . . . . . . . . . . . •
Min/Maks. Uzaklık göstergesi/Tracking fonksiyonu . . . . . . . . . . . . . . •
Arka plan aydınlatması ve çok amaçlı satır göstergesi . . . . . . . . . . .
Sinyal sesi . . . . . . . . . . . . . . . . . . . . . . . . . . . . . . . . . . . . •
Toza ve çarpmaya dayanıklı . . . . . . . . . . . . . . . . . . . . . . . . . IP 54
Kronikteki çizimlerin sayısı . . . . . . . . . . . . . . . . . . . . . . . . . . 20
Çalışma sıcaklığı. . . . . . . . . . . . . . . . . . 0°C ila 40°C(32°F ila 104°F)
Depolama sıcaklığı . . . . . . . . . . . -10 °C ila 60°C(-10,00°C ila 60,00°C)
Batarya ömrü. . . . . . . . . . . . . . . . . . . . . . . . . 4.000 ölçüme kadar
Bataryalar . . . . . . . . . . . . . . . . . . . . . . . . . . . . Tip AAA 2 x 1.5V
Lazer kapatma otomatiği . . . . . . . . . . . . . . . . . . . . 30 saniye sonra
Kapatma otomatiği . . . . . . . . . . . . . . . . . . . . . . . . 3 dakika sonra
Ebatlar . . . . . . . . . . . . . . . . . . . . . . . . . . . . 115 x 48 x 28 mm
Ağırlık . . . . . . . . . . . . . . . . . . . . . . . . . . . . . . . . . . . . . 135g
Marka . . . . . . . . . . . . . . . . . . . . . . . . . . . . Trotec
*Uzaklığı günaşırı veya kötü yansımalı hedeflerde büyütmek için bir hedef tablosu
. . . . . . . . . . . . . . . . . . . . . . . . . . . . . . . . . . . . . . . . . kullanın!
** Uygun şartlarda (hedef yüzeyinin uygun özellikleri; oda sıcaklığı) 10 metreye kadar.
Aşırı güneş ışınında, kötü yansıyan yüzeylerde, yüksek sıcaklık değişiklikleri gibi
uygunsuz şartlarda 10 metrelik bir uzaklıktan sonra ± 0.15 mm/m‘lik bir sapma
meydana gelebilir.
Page 94

I - 9 Kullanım kılavuzu – Lazer aralık ölçüm cihazı
T
7. Arıza giderme
Kod Nedeni Düzeltilen önlemler
204 Hesaplamada hata İşlemi tekrarlayın
208 Alış sinyali çok Büyük bir hedef tablosu kullanın (isteğe bağlı)
xayıf/ölçüm süresi çok
uzun/uzaklık > 50m’dir
209 Alış sinyali çok güçlü Hedef yansımalı olarak çok güçlü (bir hedef tablosu kullanın)
252 Sıcaklık çok yüksek Cihazı soğutmaya bırakın
253 Sıcaklık çok düşük Cihaz önce ısıtılmalıdır
255 Donanım eksikliği Cihazı birçok kez açıp kapatın. Sembol görünmeye devam ederse
bayiinizle bağlantıya geçin. Size yardım etmeye devam edecek.
Page 95

T
Kullanım kılavuzu – Lazer aralık ölçüm cihazı I - 10
8. Ölçüm şartları
Ölçme uzaklığı
Cihazda 50m’lik bir menzil vardır.
Geniş uzaklıklar belirli şartlar altında - örneğin akşam, karanlıkta hedef
gölge tarafından kapatılmışsa - hedef tablosu olmadan da mümkündür.
Uzaklığı kötü yansımalı hedeflerde genişletmek için gün aşırı bir hedef
tablosu kullanılabilir.
Hedef yüzeyleri
Lazer renksiz sıvılara (örneğin su), tozsuz cama veya yarım geçirgen
malzemelere düşerse ölçüm hataları meydana gelebilir. Lazer çok parlak bir yüzeye düşerse ve burada başka bir yöne yönlenirse aynı şekilde
ölçüm sonucunda bir hata meydana gelebilir. Yansımayan veya koyu yüzeye sahip kumaşlar ölçüm süresini uzatabilir.
Bakım
Cihazı asla suya batırmayın. Sadece nemli, yumuşak bir bezle silin. Etkili
bir temizlik maddesi kullanmayın. Cihazı tıpkı kaliteli bir kamera veya
hassas bir ölçüm cihazı gibi ele alın.
İthalatçı:
TROTEC Endüstri Ürünleri Ticaret Limited Şirketi
Turgut Reis Mah.
Barbaros Cad. E4 Blok. No. 61 / Giyimkent
34235 Esenler/İstanbul
Tel: 0212 438 56 55
E-posta: info@trotec.com.tr
Page 96

J - 1
Руководство по эксплуатации – лазерный дистанционный измерительный прибор
Содержание
1. Указания по технике безопасности . . . . . . J - 01
2. Ввод в эксплуатацию . . . . . . . . . . . . . . J - 03
3. Первые настройки . . . . . . . . . . . . . . . . .J - 04
4. Измерения . . . . . . . . . . . . . . . . . . . . . J - 05
5. Функции . . . . . . . . . . . . . . . . . . . . . . J - 06
6. Технические данные . . . . . . . . . . . . . . . J - 08
7. Поиск и устранение неисправностей . . . . . .J - 09
8. Условия измерения . . . . . . . . . . . . . . . J - 10
Компактная, удобная в пользовании и, прежде всего, очень полезная
базовая модель была специально разработана и предусмотрена для
выполнения различных задач внутри помещений. Приятные, супермягкие
клавиши для таких функций, как сложение, вычитание, измерение
площади и объема обеспечивают легкость и предельную надежность
управления измерением вручную.
Данное издание заменяет все предыдущие. Запрещается воспроизводить
или обрабатывать, размножать или распространять с использованием
электронных систем любую часть данного издания в какой-либо форме без
нашего письменного согласия. Оставляем за собой право на технические
изменения. Все права защищены. Наименования товаров используются
без гарантии свободной возможности использования и в основном
соответствуют стилю производителя. Использованные наименования
товаров являются зарегистрированными и должны рассматриваться
как таковые. Оставляем за собой право на конструктивные изменения в
интересах постоянного улучшения продукта, а также изменения формы
/ цвета. Объем поставки может отличаться от изображения продукта.
Настоящий документ разработан с особой тщательностью. Мы ни в коем
случае не берем на себя ответственность за ошибки и пропуски. © TRO-
TEC®
1. Указания по технике безопасности
Допустимое использование
• Проведение измерений расстояний и расчетов,
например, площадей и объемов.
Недопустимое использование
Page 97

Руководство по эксплуатации – лазерный дистанционный измерительный прибор
J - 2
• Ввод прибора в эксплуатацию без соответствующего
обучения запрещен.
• Не использовать прибор вне пределов заданного
диапазона.
• Запрещается отключать системы безопасности.
Запрещается удалять с прибора этикетки об
опасности или наклейки с указаниями на правила
эксплуатации.
• Недопустимо вскрывать прибор инструментами
(отвертками и т. д.), если только в инструкции по
эксплуатации нет прямого указания об этом.
• Запрещено изменять или модифицировать прибор.
• Принадлежности других производителей/сторонних
поставщиков можно использовать только с
разрешения Trotec GmbH & Co. KG.
• Запрещается намеренно использовать прибор не по
назначению или использовать его безответственным
образом на лесах, лестницах, в непосредственной
близости от работающих станков или от
незащищенных частей станков и других механизмов.
• Недопустимо направлять прибор непосредственно на
солнце.
• Запрещается использовать прибор, если на месте
измерения не были приняты достаточные меры по
обеспечению безопасности (например, при
измерениях на дорогах общего пользования, стройках
и т. д.).
Классификация лазера
Для измерения расстояния с помощью BD15
используется лазерный луч, испускаемый с передней
стенки прибора.
Это продукт категории лазера 2 :
Не смотрите на лазерный луч и не направляйте лазер
на других людей. Защита глаз обычно происходит
рефлекторно (морганием) или инстинктивным быстрым
поворотом головы.
Page 98
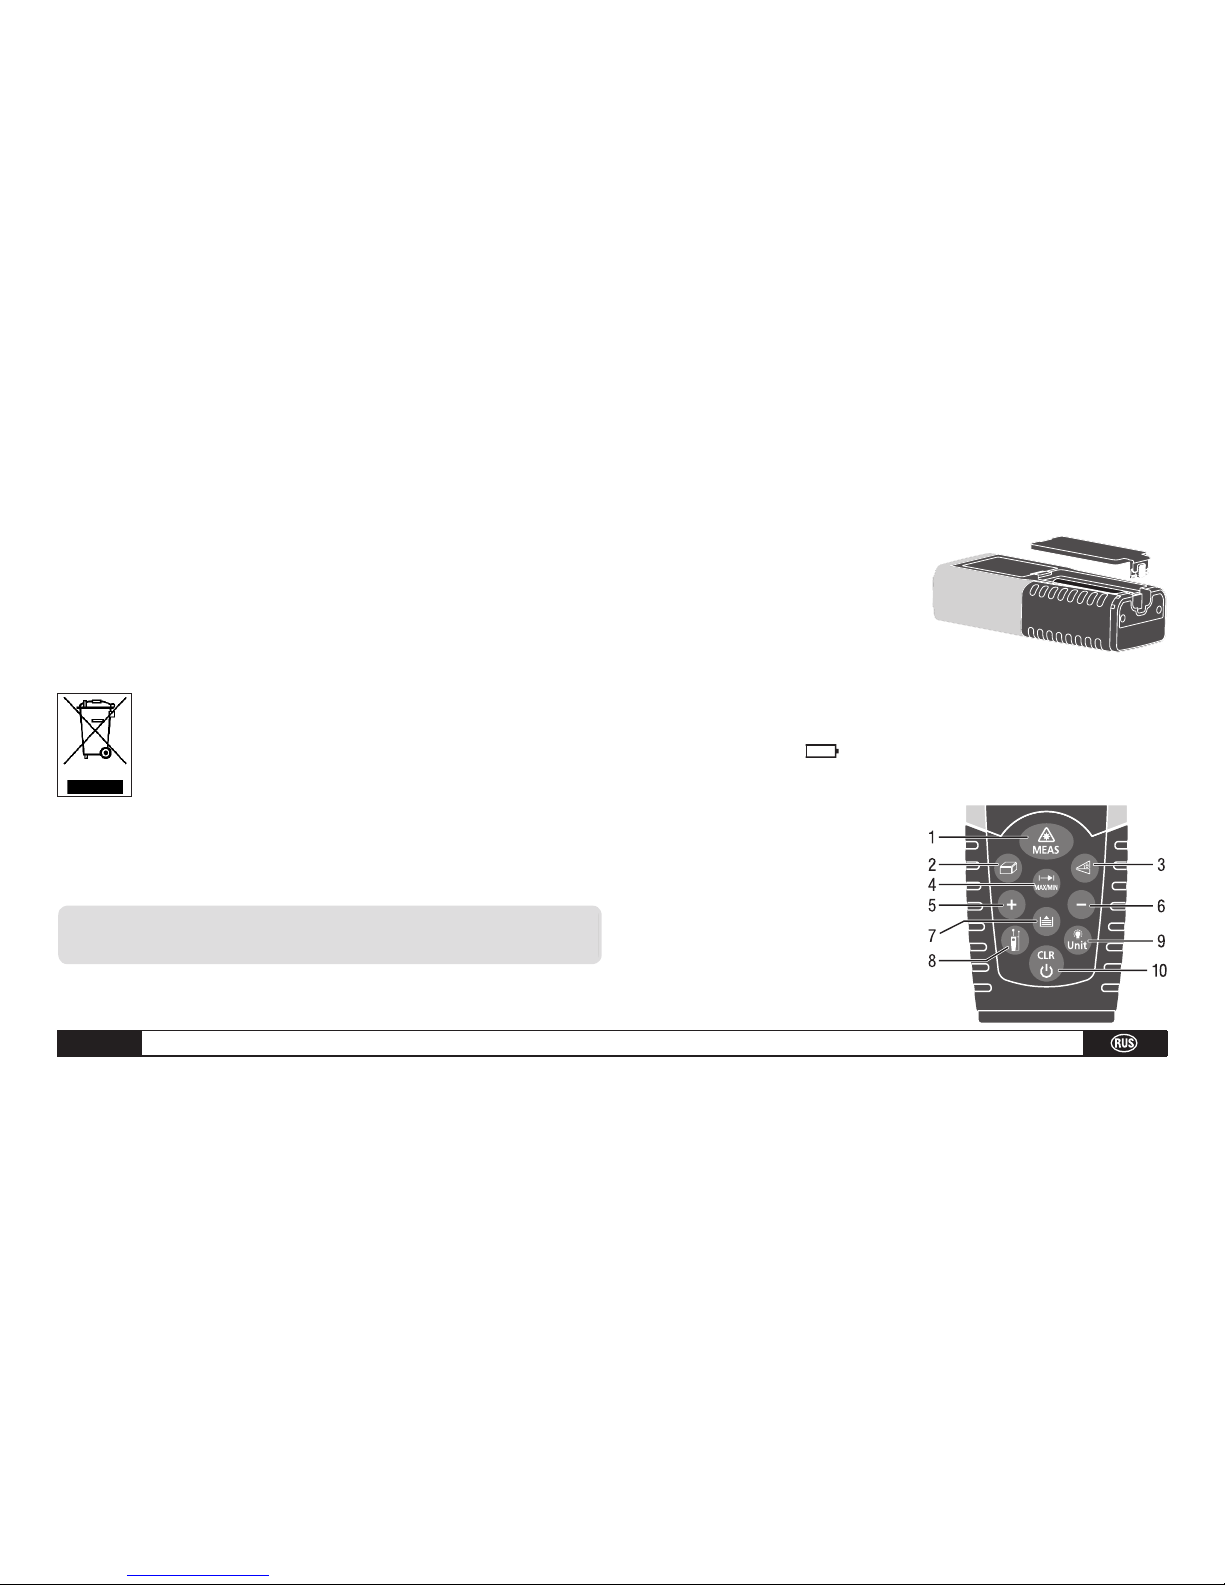
J - 3
Руководство по эксплуатации – лазерный дистанционный измерительный прибор
Никогда не смотрите с помощью какого-нибудь
оптического вспомогательного средства прямо
на луч лазера! Вы причините своим глазам вред,
если будете смотреть на лазерный луч.
Электронные приборы не выбрасывать вместе
с бытовыми отходами, а утилизировать в
Европейском Союзе согласно директиве
2002/96/EG ЕВРОПЕЙСКОГО ПАРЛАМЕНТА
И СОВЕТА от 27. 01.2003 г. об электрических
и электронных приборах, отслуживших свой срок. По
окончании эксплуатации сдайте прибор в утилизацию в
соответствии с действующим законодательством
2. Ввод в эксплуатацию
Установка/замена батарей
1) Сначала снимите крышку
с отделения для батарей.
2) Вставьте батареи.
Соблюдайте при этом правильную полярность
3) Снова закройте отделение для батарей.
Батареи следует заменить, если на дисплее непрерывно
мигает символ „ “ При неиспользовании прибора
в течение долгого времени удалите батареи для
предотвращения коррозии.
Клавишная панель
1) Клавиша включения/
измерения
2) Клавиша площадь/объем
3) Клавиша для непрямого
измерения
m
Page 99
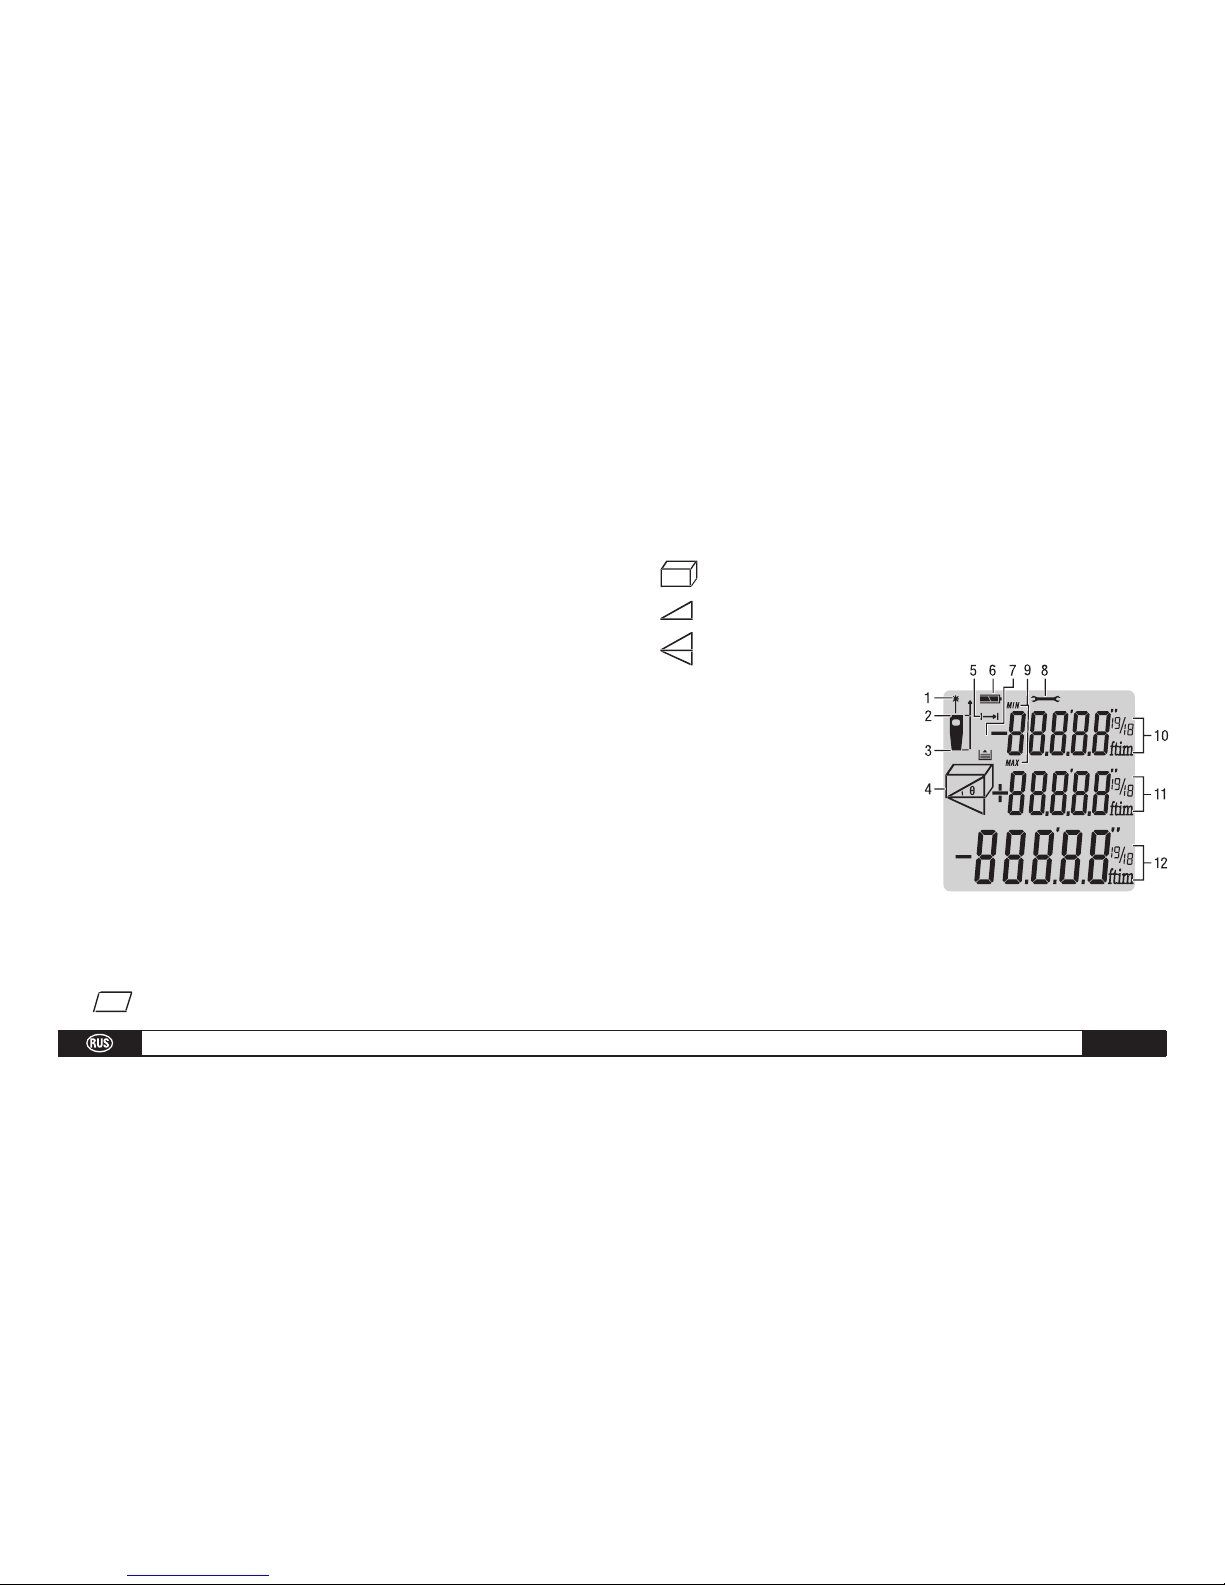
Руководство по эксплуатации – лазерный дистанционный измерительный прибор
J - 4
4) Клавиша для одиночного/ непрерывного измерения
расстояния
5) Клавиша «плюс» ( + )
6) Клавиша «минус»( - )
7) Клавиша хранения
8) Клавиша изменения опорной точки
9) Клавиша подсветки/единиц измерения
10) Клавиша удаления/выключения
Жидкокристаллический дисплей
1) Лазер активный
2) Опорная точка (спереди)
3) Опорная точка (сзади)
4) Различные функции измерения
Измерение площади
Измерение объема
Непрямое измерение
Непрямое (второе) измерение
5) Одиночное измерение
расстояния
6) Состояние батареи
7) Архив, количество
вызываемых значений
8) Предупреждение об ошибке
прибора
9) Непрерывное измерение/
измерение максимума/минимума
10) Строка индикации для первого значения
18
Page 100

J - 5
Руководство по эксплуатации – лазерный дистанционный измерительный прибор
11) Строка индикации для второго значения
12) Самая нижняя строка для последнего значения
измерения или результата расчета
3. Начальные настройки
Включение и выключение
Включает и выключает прибор и лазер.
Нажмите на эту клавишу, чтобы выключить прибор.
Прибор выключается автоматически, если он не
используется дольше трех минут.
Клавиша удаления
Отменяет последнее действие или удаляет данные
на дисплее.
Установка опорной точки
Опорная точка привязана к задней кромке прибора.
Нажмите эту клавишу , чтобы перенести опорную
точку на переднюю кромку прибора . При каждом
перемещении опорной
точки подается звуковой
сигнал. При включении
прибора опорная точка
автоматически возвращается
к первоначальной установке
(по задней кромке).
Фоновая подсветка
Нажмите клавишу подсветки /единиц измерения,
чтобы включить или выключить фоновую подсветку.
В этом режиме значительно облегчается считывание
показаний с дисплея в темноте или при плохом
освещении.
 Loading...