

Page 1
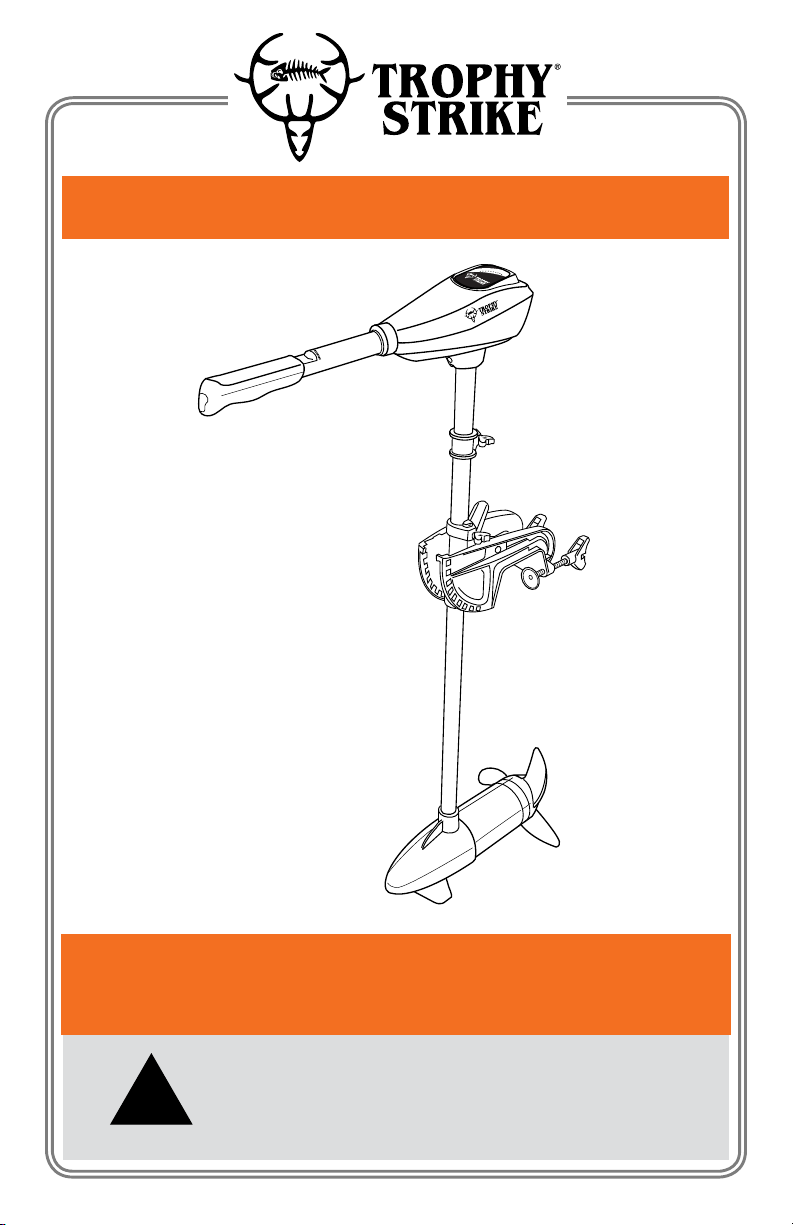
Transom Mount Trolling Motors
3
4
LOW
2
5
6
1
7
8
9
10
HIGH
12VDC
POWER
55
Lbs Thrust
0
1
2
3
108487 (36Lbs) / 108488 (46Lbs) / 108489 (55Lbs) / 108490 (60Lbs)
Operation Manual
This safety alert symbol identies important safety messages in
!
this manual. Failure to follow this important safety information may
result in serious injury or death.
Part # 108706 Rev B
Page 2

Trophy Strike® is a brand of
1100 W 120th Ave, Suite 600
Westminster, CO 80234 • 720-287-5182
Register warranty online within 30 days of purchase!
For Service or Questions
trophystrike.com/warranty
Call 1-877-487-8275
720-287-5182
www.trophystrike.com
Page 3

Table of Contents
Safety Information ............................................................................4
Safety Decals.....................................................................................4
Installation..........................................................................................5
First Time Running ............................................................................5
Operation ............................................................................................6
Connecting to Battery ......................................................................6
Controlling the Motor .......................................................................7
Raising the Motor..............................................................................8
Lowering the Motor ..........................................................................8
Maintenance......................................................................................9
Troubleshooting ..............................................................................10
Specications ................................................................. Back Cover
3
Page 4
Safety Information
!
WARNING
Read the Operation Manual Before Use
• This is not a life saving device (no otation)
• Do not allow children to operate or leave unattended with the trolling motor
• Users must wear a Coast Guard approved life jacket
• Read the operation Manual before attempting to operate the trolling motor
• Never submerge the controller
• If the controller falls into water, clean, and allow to dry before operating
• Use the trolling motor at a temperature between -4° and 113°F (-20° - +45°C)
• Never replace parts with unauthorized components
• Never try to disassemble the trolling motor
• To prevent damage to the shaft avoid over tensioning the mounting bracket
• Never allow hands, feet, hair, clothing or foreign objects to come into contact
with the propeller
• Always inspect the area to be navigated for people, rocks, plants or hazards
• Only operate in water that is deeper than 2.7 feet (0.8 meters)
• Recharge battery when only 4 lights are illuminated
• Keep the battery in a well ventilated area
• Always disconnect the battery from the trolling motor when not in use
Safety Decals
Safety labels on the ice auger are to remind you of important information while
you are operating the unit. Make sure all safety warning decals are attached and
in readable condition. Replace missing or defaced decals. Contact Trophy Strike
at 1-877-487-8275 for replacement decals.
WARNING
● This is not a life saving device (no flotation)
● Read manual before operating
● Do not leave children unattended with trolling motor
● Keep hair, clothing and body away from propeller
● Wear Coast Guard approved flotation device
● Only use in water deeper than 2.7 feet (0.8 meters)
● Do not use if waves are higher than 3.28 feet (1 meter)
● Watch for hazards: plants, rocks, swimmers and boats
● To prevent damage to shaft do not overtighten bracket
● Keep upper portion of trolling motor dry, do not submerge
● Connect red cable to positive, black cable to negative
● After 30 minutes of use at high speed reduce to lower speed
● Recharge battery when only 4 lights are illuminated
● Disconnect from battery when only 3 lights are illuminated
4
108705
Page 5
Installation
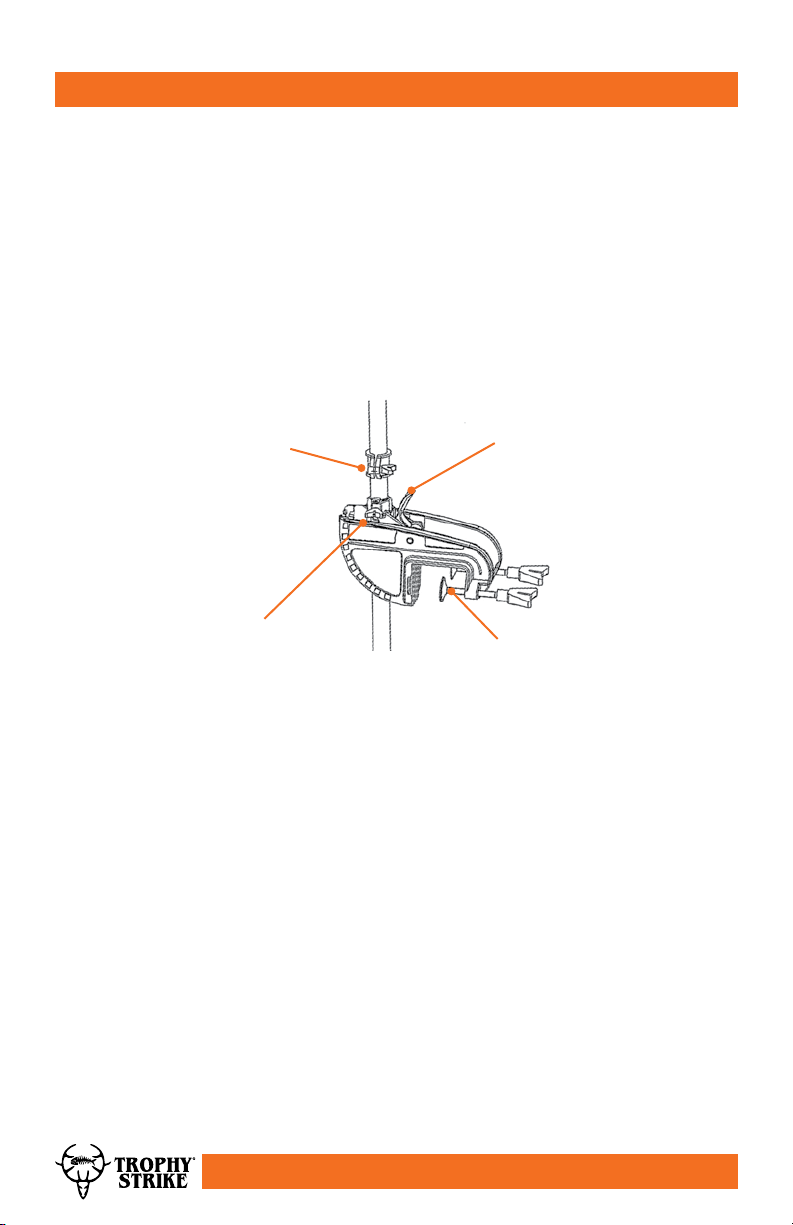
Transom Mounting Installation
Tilt Position Lever - allows the user to adjust the angle of the motor
Steering Tension Adjustment - To adjust the steering resistance tighten or loosen
Depth Adjustment Collar - Adjust the trolling motor up or down by loosening
the collar located on the column directly above the mount. The column can be
adjusted and the motor positioned at the desired depth in the water. Then secure
by tightening the collar.
Transom Mounting Screws - Allow for easy and fast connection to the vessels
mounting bracket.
Depth
Adjustment
Collar
Steering
Tension
Adjustment
First Time Running
1. Place trolling motor onto the back of the vessel.
2. Lightly tighten the transom mounting screws to the mounting bracket of
the vessel.
3. Press the tilt lever and gently lower the trolling motor’s propeller into the water.
4. Use the depth adjuster collar to adjust the height of the trolling motor.
5. The trolling motor should be between 6” - 12” below the waterline.
Never operate the trolling motor with the propeller out of the water.
Tilt Position
Lever
Transom
Mounting
Screws
5
Page 6
Operation
Connection to Battery
!
WARNING
Be sure that the switch is in the off position before connecting to a battery.
1. Once the trolling motor is adjusted at a safe operating depth, fully tighten the
transom mounting screws.
2. Ensure the twist grip is on the neutral position “O”.
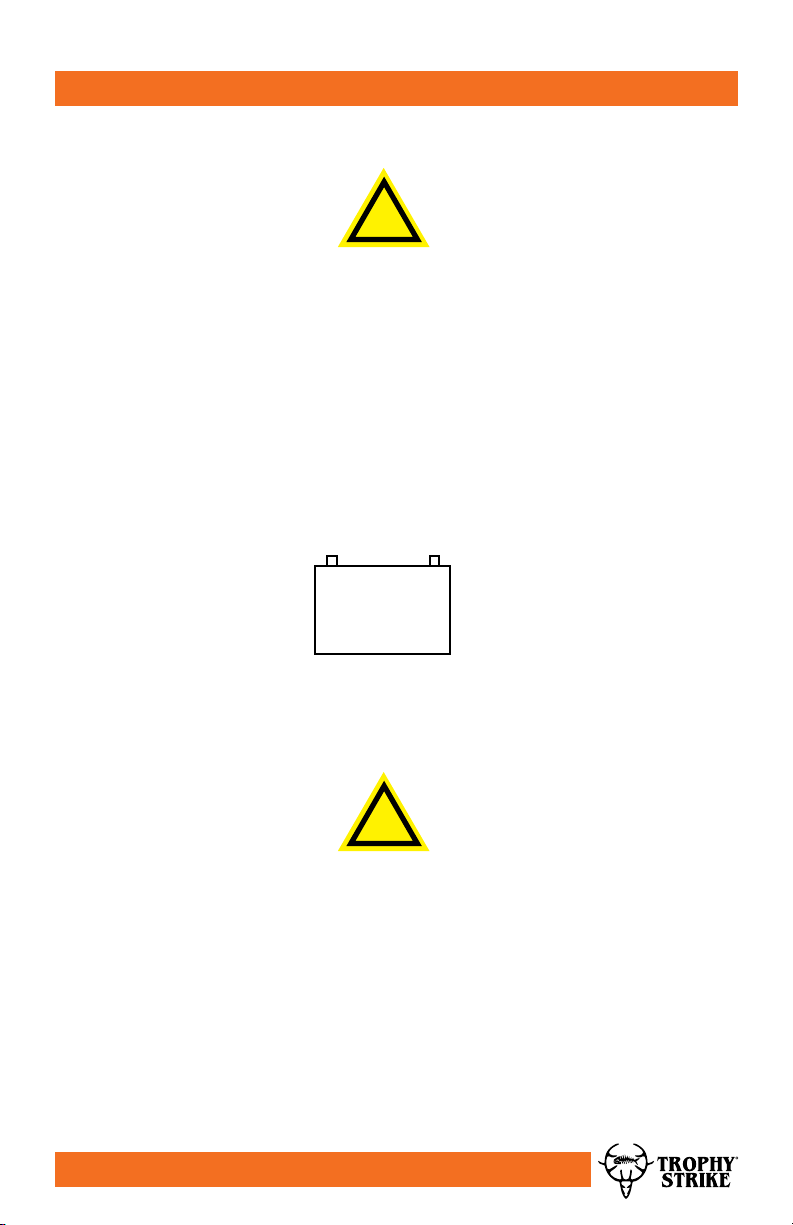
3. Attach the battery cables to a 12 volt battery. The red wire should attach to the
positive battery terminal (+) and the black cable should attach to the negative
terminal (-).
Black Cable
to
Negative
Terminal
− +
Red Cable
to
Positive
Terminal
12V DC
Battery
Battery Type
12V deep cycle or marine battery with at least 50 ampere hour rating. To extend
running time two batteries can be attached wired in tandem. If it is necessary to
extend the battery cable length use 6 gauge AWG wire.
!
WARNING
Batteries contain sulphuric acid which can cause severe burns
to eyes, skin and clothing.
Avoid direct contact with the battery or use gloves to handle. The battery
produces hydrogen and oxygen when being charged. Use caution when charging
the battery. Avoid battery contact with open ame or other possible sources of
ignition including electrical devices.
6
Page 7
Operation
Controlling the Motor
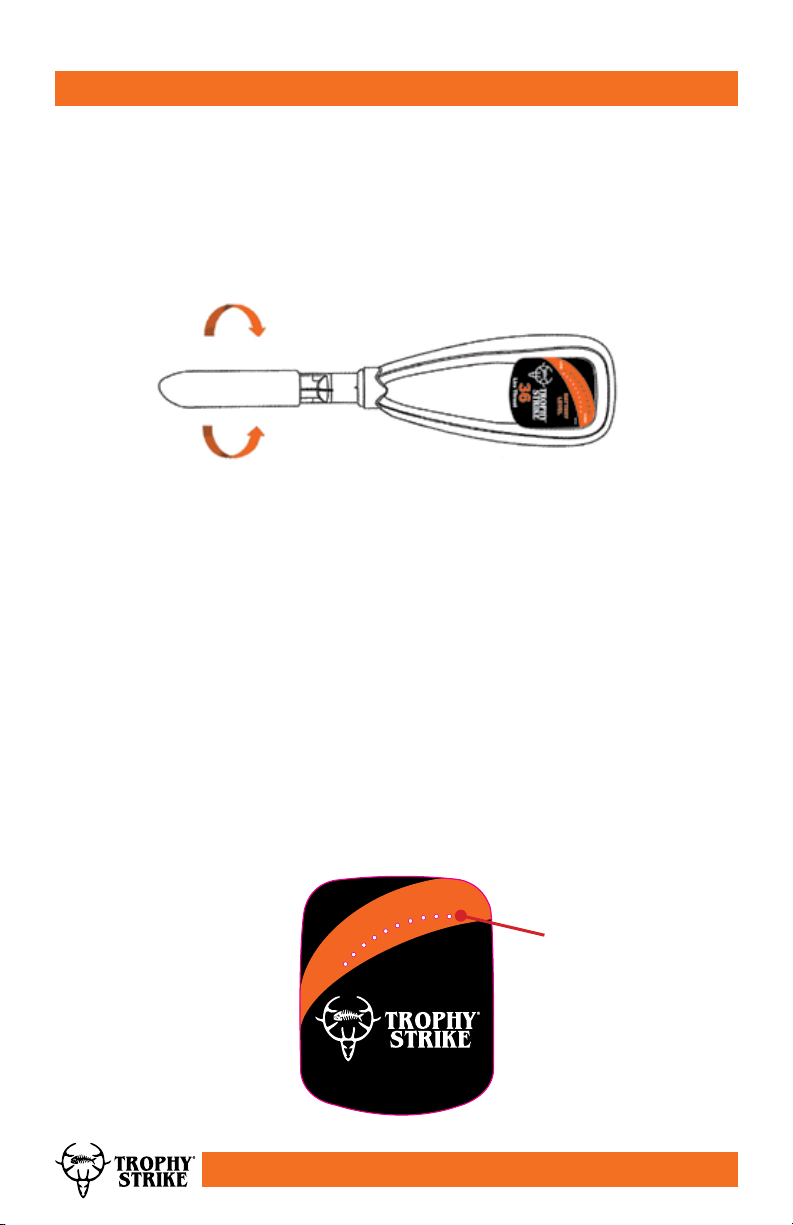
1. Select the desired speed using the twist grip. There are 5 forward speeds and
three reverse speeds. NEVER go from a forward speed to a reverse speed
without allowing the propeller to come to a complete stop.
3 Reverse
Speeds
5 Forward
Speeds
On/Off Speed Control
Rotate the handle clockwise to move forward. There are 5 forward speeds. Rotate
the handle counter-clockwise to move in reverse. There are 3 reverse speeds.
To stop the trolling motor from running move the handle to the off “O” position.
Adjusting the Propeller Depth
Move the control handle to the off “O” position. Unloosen the depth adjustment
collar and position the trolling motor either up or down. the operating depth
should be between 6” and 12” deep.
Battery Level Indicator
There are 10 LED lights on the top of the trolling motor. 10 lights illuminated
indicate a full battery charge. When seven of the batteries are not illuminated the
battery should be disconnected from the trolling motor and charged.
10
9
8
7
HIGH
BATTERY
LEVEL
108700
Battery
Level
Indicator
LED’s
LOW
6
5
4
3
2
1
36
Lbs Thrust
7
Page 8

Operation
Raising the Trolling Motor
To raise the trolling motor out of the water, turn the handle to the off “O” position.
Disconnect from the battery to prevent accidental start. Push and hold the tilt
lever with one hand and with the other hand push down on the end of the handle
to bring the propeller up and out of the water. Then release the tilt lever to lock
into place.
Lowering the Trolling Motor
Disconnect the battery to prevent accidental start. Press the tilt lever with one
hand and with the other hand hold onto the end of the handle and slowly lower the
propeller into the water. When fully lowered into position, release the tilt lever to
lock into place.
8
Page 9
Maintenance
After Every Use
1. Check the propeller and remove any plants, shing line or other debris after
each use.
2. Lubricate the pivot points with a non-aerosol lubricant. Spray lubricants may
contain components that are harmful to various parts of the trolling motor.
3. Check all battery connections for tightness.
4. Check condition of all battery cables and replace if necessary.
5. Thoroughly wash the trolling motor propeller and shaft and components that
have come into contact with salt water. Avoid getting the top and handle of the
trolling motor wet.
6. Recharge batteries for next use.
7. Store the trolling motor in an area constantly above freezing temperature.
Replacing the Propeller
1. Disconnect the trolling motor from the battery.
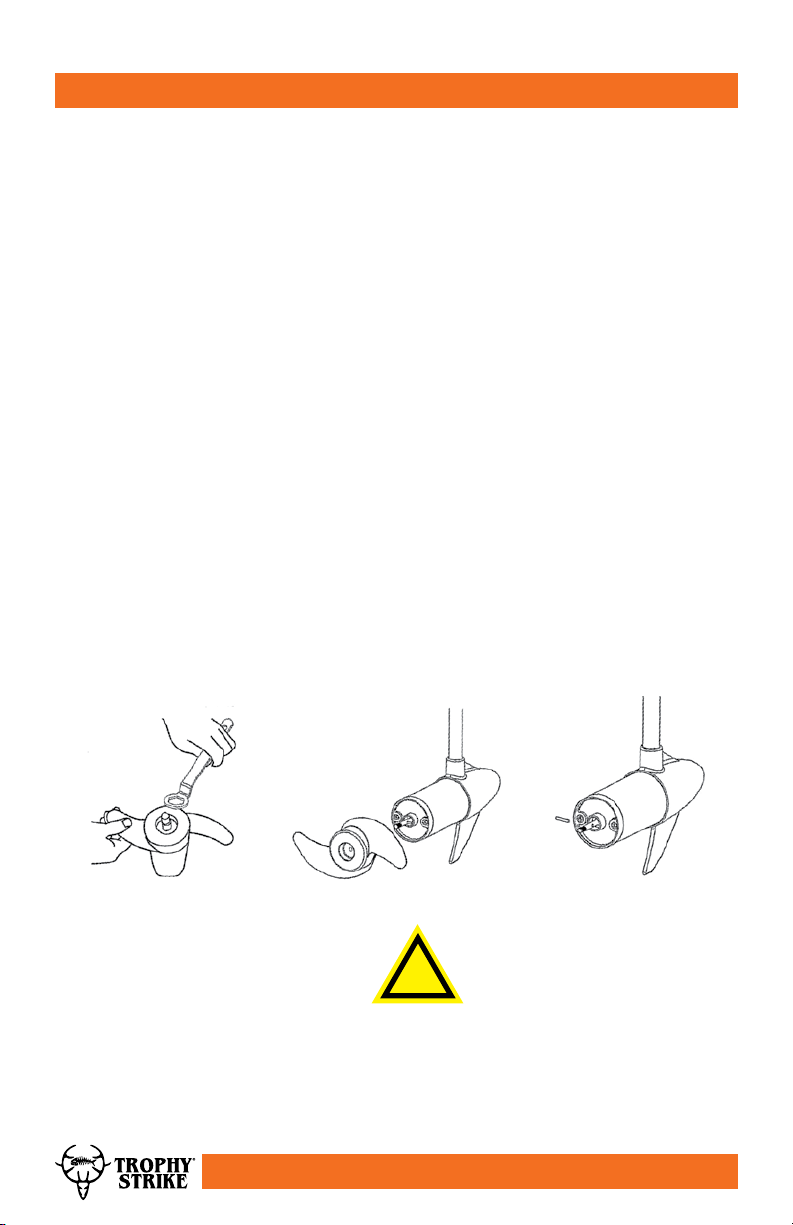
2. Hold the propeller blade with one hand and using the spanner included or
needle nose pliers remove the propeller nut (see Figure 1).
3. Pull the propeller straight forward and off of the shaft (see Figure 2). Tap the
backside of the propeller with a rubber mallet to loosen if necessary. Replace
the propeller pin if bent (see Figure 3). Align the new propeller with the shaft and
reinstall propeller nut by hand, then 1/4 turn with pliers or spanner. Do not overtighten the propeller nut.
Figure 1
Figure 2
!
WARNING
Do not strike the propeller pin with a hammer to remove it.
Damage to the trolling motor shaft may occur.
Figure 3
9
Page 10

Troubleshooting
Loss of power Propeller may be entangled with debris.
Remove propeller clean and replace.
Battery connections may be loose.
Battery may have low charge.
Battery may be faulty.
Wrong cable size connection from battery to
motor.
Permanent magnet cracked or chipped.
Motor will make a whining or grinding sound.
Excessive noise or vibration Propeller may be entangled with debris.
Remove propeller clean and replace.
Propeller may be damaged or unbalanced.
Propeller may be loose.
Trolling motor shaft is bent. Remove propeller,
set at medium speed and check if armature
wobbles.
Turn propeller by hand. It should move freely
with a slight resistance of the motor.
Motor does not power on Check for loose connections.
Turn propeller by hand. It should move freely
with a slight resistance of the motor.
Recharge battery and check voltage.
Propeller may be entangled with debris.
Remove propeller clean and replace.
Motor loses one Check for loose connections.
or more speeds Check for battery charge status,
and charge battery to fullest or replace
battery.
10
Page 11

Notes
11
Page 12

Warranty & Specications
IMPORTANT NOTICE
We, the manufacturer, reserve the right to change the product and/or specications
in this manual without notication. The manual is for information usage only and the
pictures and drawings depicted herein are for reference only.
Warranty Repair and Service
Do not return this product to the store for warranty issues or repair. Call our customer
service department at 720-287-5182, 1-877-487-8275, or visit www.trophystrike.com
for the location of the nearest service center.
Record the information below for future reference.
Model No.
Serial No.
Date of Purchase
Place of Purchase
Register warranty online within 30 days of purchase!
trophystrike.com/warranty
SKU/Part No. 108487 108488
GTIN/UPC 00819157020737 00819157020744
Description 36 lbs. Thrust 46 Lbs. Thrust
Power 354 Watts 492 Watts
Battery Required 12V DC 12V DC
Speeds 5 Forward/3 reverse 5 Forward/3 reverse
Control Tiller Twist Handle Tiller Twist Handle
Mount Level Lock Level Lock
Motor Bracket 10 Positions Adjustable Tilt 10 Positions Adjustable Tilt
Propeller All aluminum head with marine paint All aluminum head with marine paint
Shaft Anti-corrosive composite Anti-corrosive composite
Weight 16.1 Lbs 17.6 Lbs
Shipping Weight 21.2 Lbs 22.5
Warranty 2 Year Limited Warranty 2 Year Limited Warranty
SKU/Part No. 108489 108490
GTIN/UPC 00819157020751 00819157020768
Description 55 lbs. Thrust 60 Lbs. Thrust
Power 636 Watts 684 Watts
Battery Required 12V DC 12V DC
Speeds 5 Forward/3 reverse 5 Forward/3 reverse
Control Tiller Twist Handle Tiller Twist Handle
Mount Level Lock Level Lock
Motor Bracket 10 Positions Adjustable Tilt 10 Positions Adjustable Tilt
Propeller All aluminum head with marine paint All aluminum head with marine paint
Shaft Anti-corrosive composite Anti-corrosive composite
Weight 20.4 Lbs 21.4 Lbs
Shipping Weight 25.6 Lbs 26.5 Lbs
Warranty 2 Year Limited Warranty 2 Year Limited Warranty
Trophy Strike® is a brand of
1100 W 120th Ave., Suite 600
Westminster, CO 80234 • 720-287-5182
For Service or Questions
Call 1-877-487-8275
720-287-5182
www.trophystrike.com
 Loading...