

Page 1
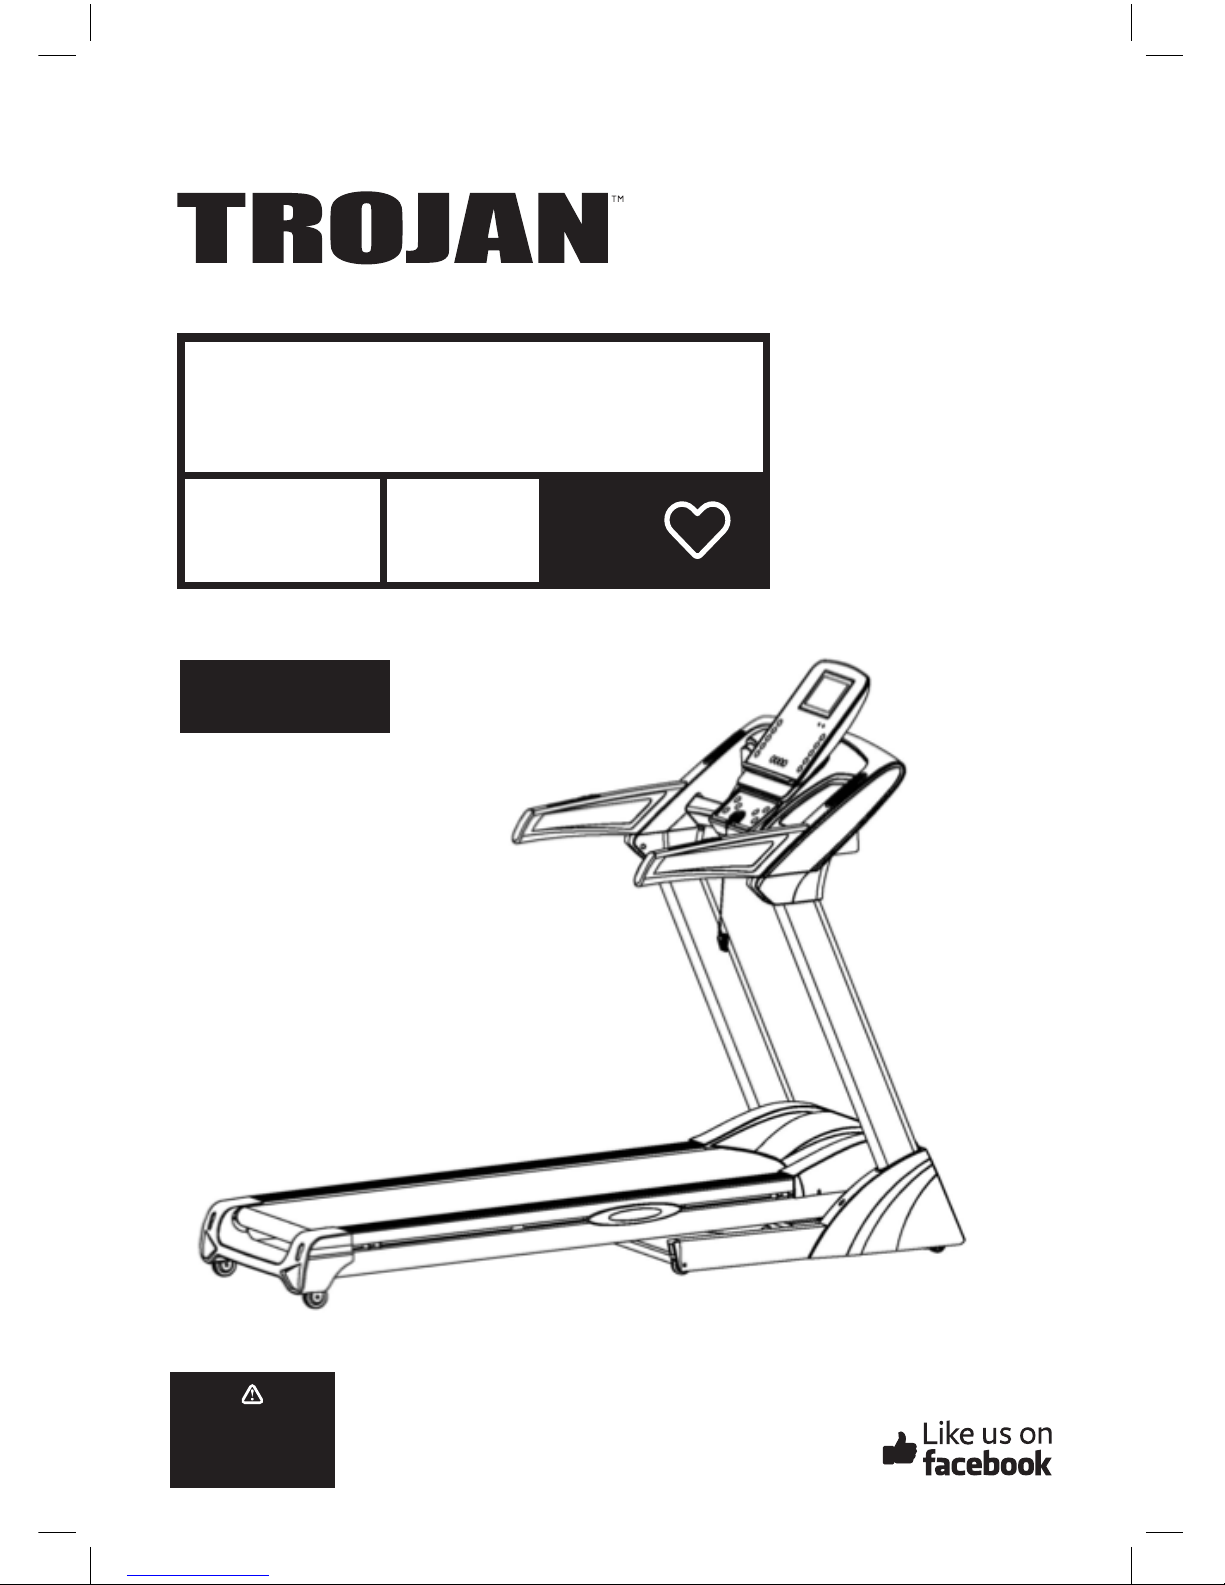
TR 1500
TREADMILL
AUTO
INCLINE
CARDIO
USER MANUAL
Visit facebook.com/trojanhealth
www.trojanhealth.co.za
CAUTION
READ ALL PRECAUTIONS AND
INSTRUCTIONS IN THIS MANUAL
BEFORE USING THIS EQUIPMENT.
KEEP THIS MANUAL FOR
FUTURE REFERENCE.
Page 2

2
TR 1500 - T
INDEX
• Important Safety Instructions ________________________________ 3
• Grounding Instructions _______________________________________ 5
• Pre Assembly Check List ______________________________________ 6
• Hardware & Tools List ________________________________________ 7
• Parts List ____________________________________________________ 8
• Exploded Drawing ___________________________________________ 10
• Assembly Steps ______________________________________________ 11
• Computer Functions __________________________________________ 13
• Operation Instructions _______________________________________ 14
• Trouble Shooting ____________________________________________ 18
• Technical Parameter _________________________________________ 19
• Folding Instructions __________________________________________ 20
• Exercise Instructions ________________________________________ 21
• Maintenance ________________________________________________ 24
• Running Belt Adjustment ____________________________________ 25
• Centre The Running Belt _____________________________________ 26
• Fitness Tips & Techniques _____________________________________ 27
• Conditioning Guidelines _______________________________________ 28
• Warm Up & Cool Down _______________________________________ 29
• 2 Year Limited Warranty ______________________________________ 30
• Repairs Procedure ____________________________________________ 31
• Notes _______________________________________________________ 32
Page 3
3
TR 1500 - T
IMPORTANT SAFETY INSTRUCTIONS
It is the sole responsibility of the purchaser of Trojan products to read the owner’s manual, warning labels and
instruct all individuals, on proper usage of the equipment. Understanding each and every warning to the fullest
is important. If any of these instructions or warnings are unclear please contact Trojan Customer Services on
0861 TROJAN (0861 876526), within the Republic of South Africa. Customers residing outside South Africa
can contact us on +27 10 206 4405.
The equipment is only intended for home use and is not intended for commercial, institutional and/or studio
facilities use.
Contact Trojan with any questions regarding this classication. It is recommended that all users of Trojan be
informed of the following information prior to use.
HEALTH WARNING
• Before starting any exercise or conditioning program you should consult with your personal physician to
see if you require a complete physical exam. This is especially important if you are inactive, pregnant or
suffer from any illness.
• If at any time during exercise you feel faint, dizzy or experience pain, stop exercising immediately and
consult your physician.
• To avoid muscular pain and strain, begin each workout by stretching and warming up and end each session
by cooling down and stretching.
INSTALLATION
Trojan recommends that all equipment:
• Be secured to or set up on a solid, level surface to stabilise and eliminate rocking or tipping over
during training.
• Be set up inside your home away from moisture and dust (the equipment is not designed for outdoor use).
• Be set up with sufcient ventilation to ensure proper operation.
• Be set up with sufcient space around the equipment so that all exercises can be completed safely. It is
recommended that there should be at least 1 m of space around the equipment where access is required
to exercise.
PROPER USAGE
• Do not use the equipment in any way other than as designed or intended by the manufacturer. It is
imperative that Trojan equipment is used properly to avoid injury.
• Injuries may result from exercising improperly or excessively.
• Your Trojan equipment should only be used by one person at a time.
• Be careful to maintain your balance while using, mounting, dismounting or assembling your Trojan
equipment to avoid injury.
• Do not attempt to adjust the seat or handlebars while you are on your Trojan equipment.
• Servicing other than the procedures in this manual should be performed by an authorised service
representative only.
Page 4
4
TR 1500 - T
ACCESS CONTROL
• Trojan recommends that all tness equipment be used in a supervised area. It is recommended that
the equipment be located in an access controlled area. Control is the responsibility of the owner. Keep
children away from all equipment.
• Parents or others supervising adults must provide close supervision of children if the equipment is used in
the presence of children.
INSPECTION
• Do not use or permit use of any equipment that is damaged, or has worn or broken parts. For all Trojan
equipment use only replacement parts supplied by Trojan.
• Always make sure that all nuts and bolts are tightened prior to each use.
• Maintain labels and nameplates – do not remove labels for any reason. They contain
important information.
• Equipment maintenance – preventative maintenance is the key to smooth operating equipment. Please
ensure that you follow our maintenance tips to ensure the continued correct function of your
Trojan equipment.
• Before any use, examine all accessories approved for use with the Trojan equipment for damage or wear.
• Should your Trojan equipment appear damaged or worn, do not attempt to use or repair the
equipment yourself.
• Please contact our service department on 0861 TROJAN (0861 876526) to arrange a repair.
Customers residing outside South Africa can contact us on +27 10 206 4405.
OPERATING WARNINGS
• It is the purchaser’s responsibility to instruct all users as to the proper operating procedures of all
Trojan equipment.
• Keep children away from all moving parts. Parents must provide close supervision of children if the
equipment is used in the presence of children.
• Do not wear loose tting clothing or jewellery when using the equipment. It is also recommended that
users tie up long hair to avoid contact with moving parts.
• Ensure that anyone not using the equipment stays clear of the user, accessories and moving parts while
the machine is in operation.
USER WEIGHT LIMITATIONS
• This Trojan TR 1500 Treadmill may not be used by persons weighing more than 130 kg.
SAVE THIS INSTRUCTION MANUAL FOR FUTURE USE AND REFERENCE.
If any of these instructions or warnings are unclear please contact Trojan Customer Services on
0861 TROJAN (0861 876526) within the Republic of South Africa or visit www.trojanhealth.co.za.
Customers residing outside South Africa can contact us on +27 10 206 4405.
IMPORTANT SAFETY INSTRUCTIONS
Page 5
5
TR 1500 - T
GROUNDING INSTRUCTIONS
This product must be grounded. If a malfunction or breakdown occurs, grounding provides a path of
least resistance for electric current to reduce the risk of electric shock. This product is equipped with
a cord having an equipment-grounding conductor and a grounding plug. The plug must be plugged
into an appropriate outlet that is properly installed and grounded in accordance with all local codes
and ordinances.
DANGER – improper connection of the equipment-grounding conductor can result in a risk of
electric shock. Check with a qualied electrician or serviceman if you are in doubt as to whether the
product is properly grounded. Do not modify the plug provided with the product. If it will not t the
outlet have a proper outlet installed by a qualied electrician.
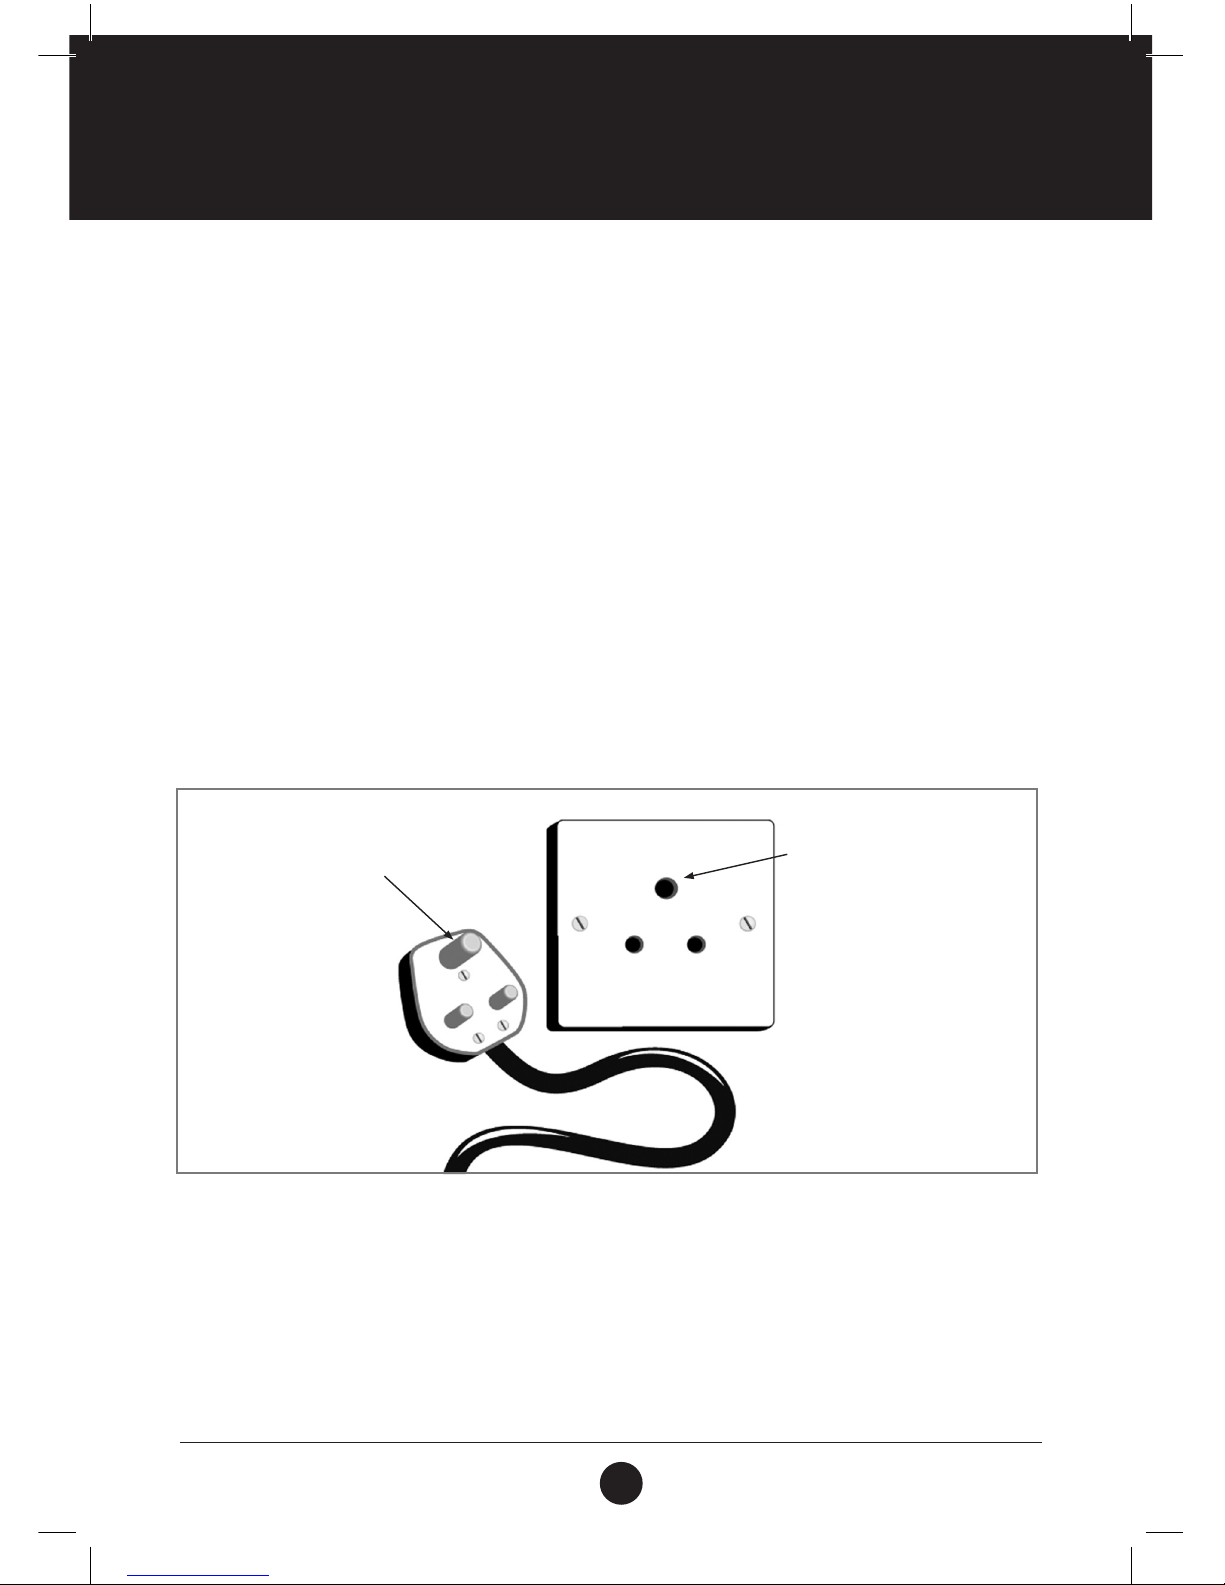
This product is for use on a nominal 220 - 240 Volt circuit and has a grounding plug that looks like
the plug illustrated in the gure. Make sure that the product is connected to an outlet with the
same conguration as the plug. No adaptor should be used with this product.
Please unplug the treadmill when not in use to avoid any damage in the event of power surges.
GROUNDED OUTLET
GROUNDING PIN
Page 6
6
TR 1500 - T
PRE ASSEMBLY CHECK LIST
Thank you for choosing the Trojan TR 1500 Treadmill. We take great pride in producing this product and hope it
will provide many hours of quality exercise to make you feel better, look better and enjoy life to its fullest. Yes,
it’s a proven fact that a regular exercise program can improve your physical and mental health. Too often, our
busy lifestyles limit our time and opportunity to exercise. The Trojan TR 1500 Treadmill provides a convenient
and simple method to begin your assault on getting your body in shape and achieving a healthier lifestyle.
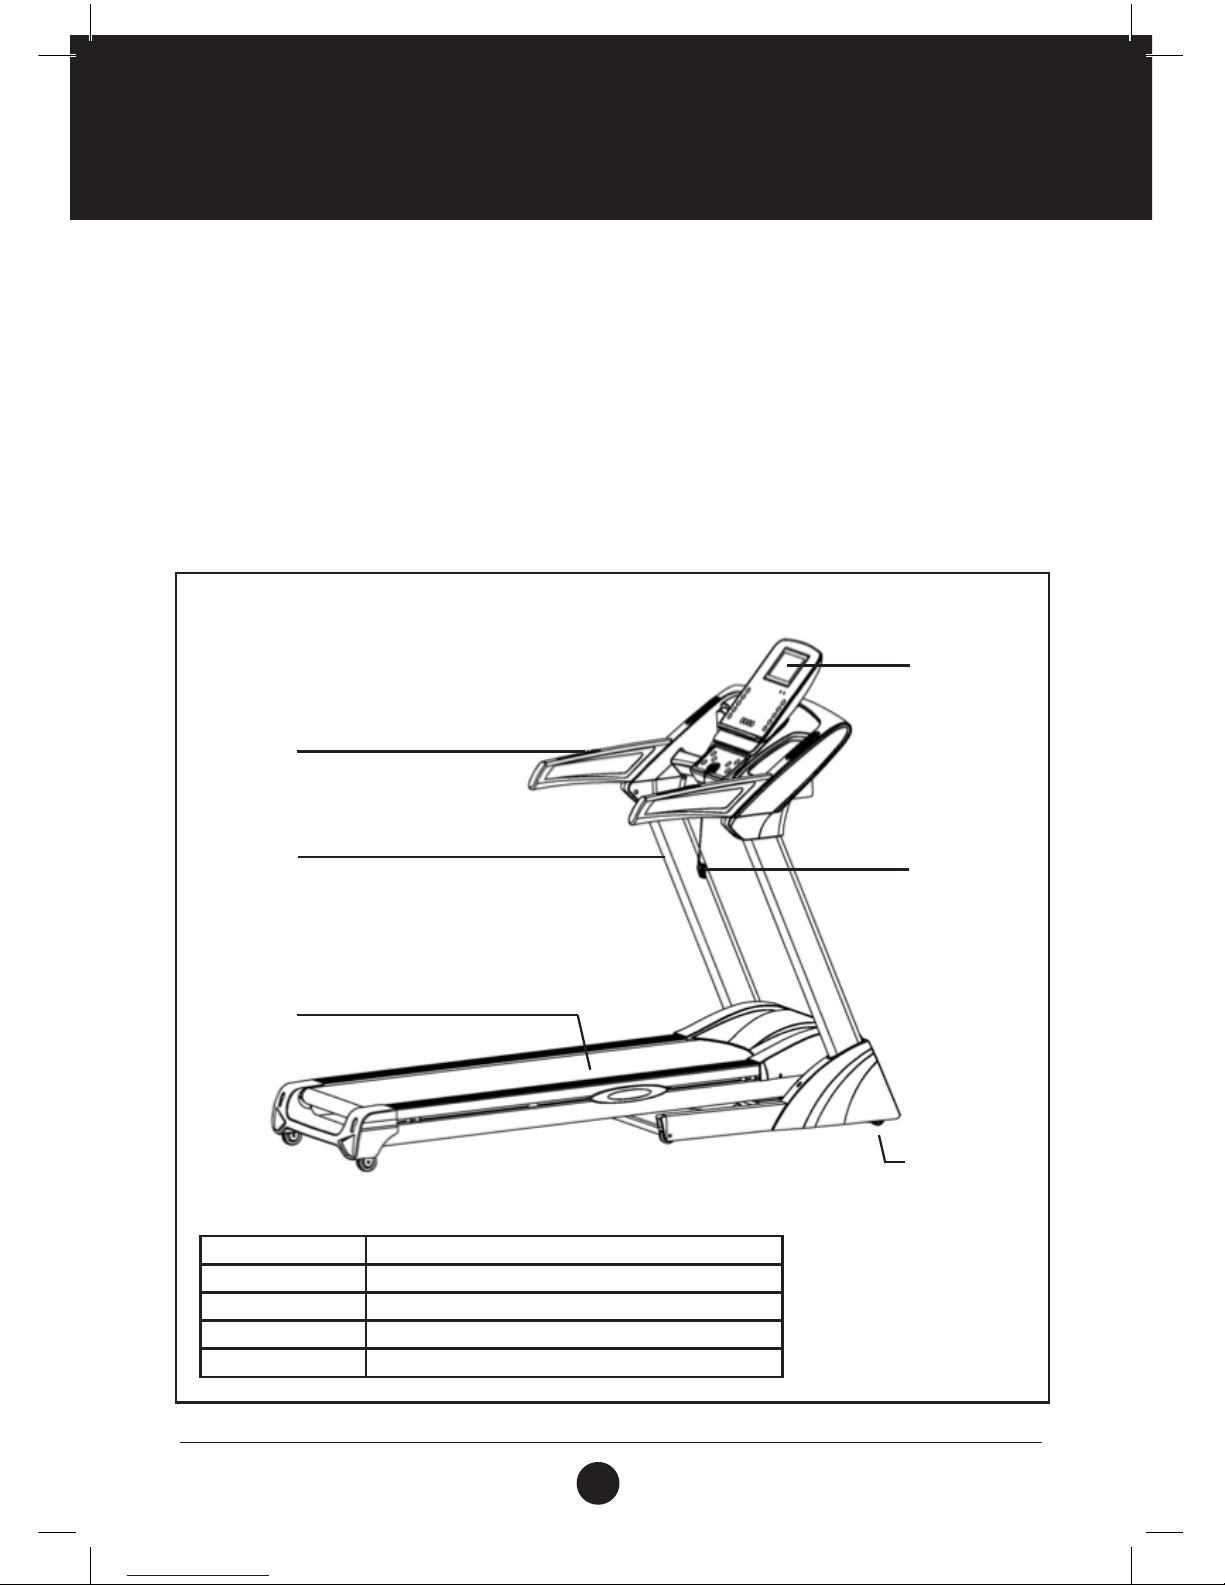
Before reading further, please review the drawing below and familiarise yourself with the parts that are labelled.
Read this manual carefully before using the Trojan TR 1500 Treadmill.
Wheel
Computer
Running
Belt
Hand Pulse
Upright
Safety Key
Running Deck 1350 mm (l) x 480 mm (w)
Set-up Size 1790 mm (l) x 875 mm (w) x 1480 mm (h)
User Weight 130 Kg (maximum)
Speed 1 - 18 Km/h
Programs Time, Speed, Distance, Calories, Pulse, Program, Incline
Page 7
7
TR 1500 - T
HARDWARE & TOOLS LIST
INSTRUCTIONS FOR ASSEMBLY
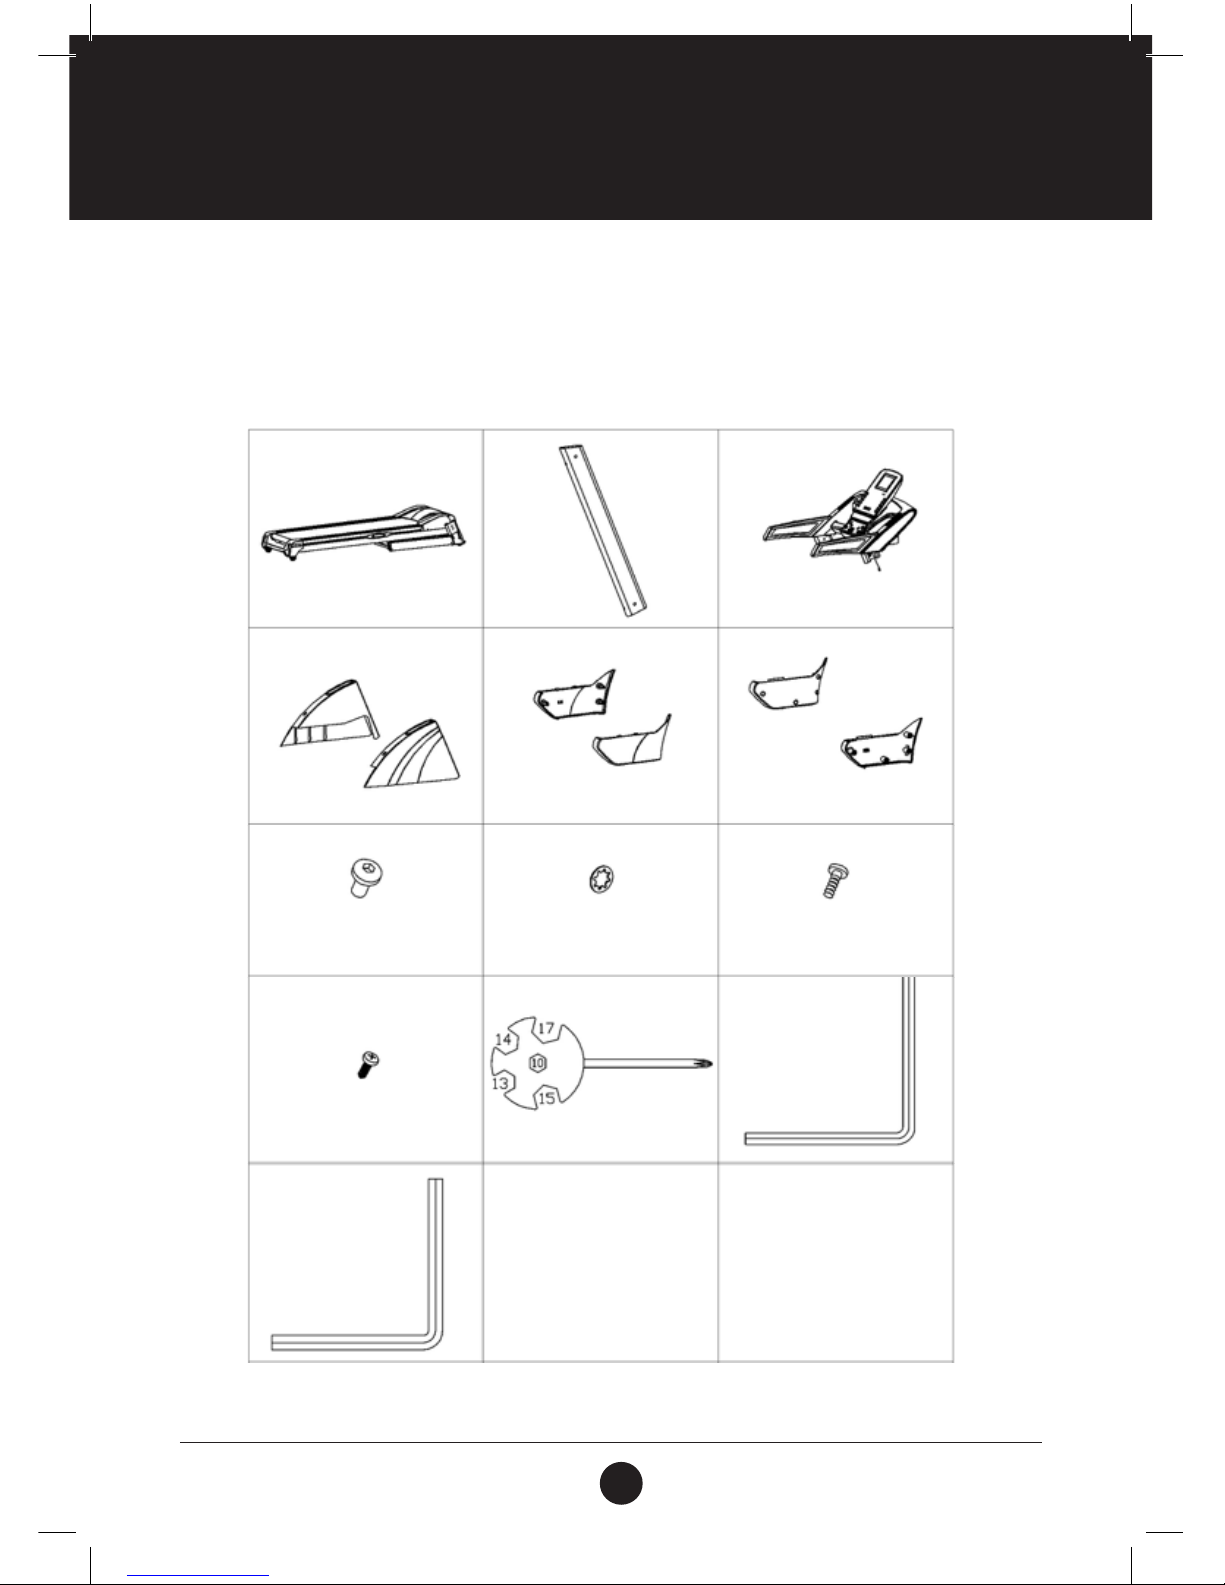
• Before you start to assemble, please check the hardware packaging to make sure all parts are included.
• Basic tools, such as spanners will be provided for assembly.
2 3
4
19
Main Frame L/R Upright Tube Computer Frame
L/R Protective Covers
Hex Socket Screw
Cross Tapping Screw
Lock Washer Philips Washer Head Screw
L/R Upright Tube Covers 1 L/R Upright Tube Covers 2
26
27
50
73 65
69
Multi Tool
Allen key
Allen key
Page 8
8
TR 1500 - T
PARTS LIST
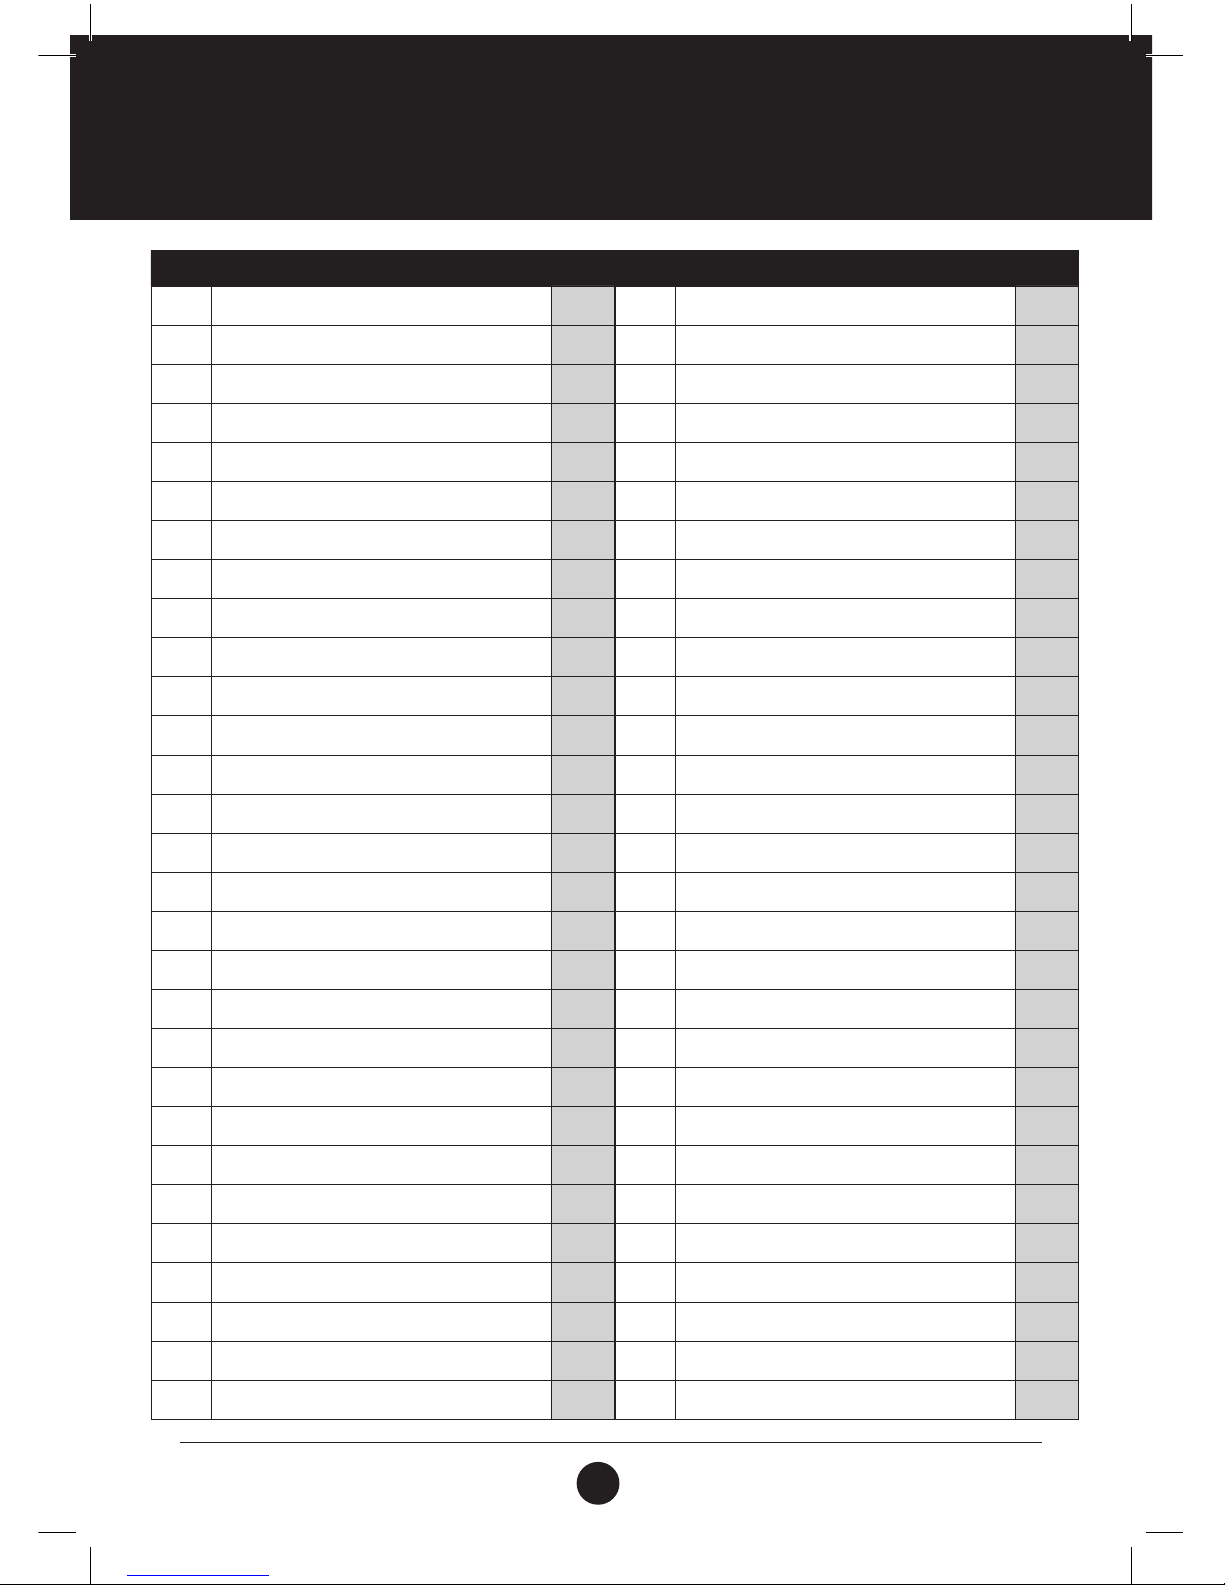
No. Description Qty
1 Bottom Frame 1
2 Main Frame 1
3 L/R Upright Tube 2
4 Computer Frame 1
5 Incline Frame 1
6 Strengthening Tube 1
7 Wheel Bracket 2
8 Front Roller 1
9 Rear Roller 1
10 Metal Speaker Grille 2
11 Cylinder 1
12 Transport Wheel Stopper 2
13 D-Shaped Axle 2
14 Transport Wheel Axle 2
15 Spacer 2
16 Edging Fixing 8
17 Motor Cover 1
18 Rear Protective Cover 1
19 l/R Protective Covers 2
20 Computer Upper Cover 1
21 Computer Bottom Cover 1
22 l/R Computer Side Covers 2
23 Computer Panel 1
24 Computer Bottom Panel 1
25 l/R Loudspeaker Covers 2.
26 l/R Upright Tube Covers 1 2
27 l/R Upright Tube Covers 2 2
28 Pu Handlebar Grip 2
29 Front Roller Cover 1
No. Description Qty
30 Running Board 1
31 Running Belt 1
32 Edgings 2
33 Transport Wheel 2
34 End Cap 2
35 Flat Foot Pad 2
36 Square End Cap (Outer) 2
37 Protective Plug 2
38 Cushion 2
39 Power Cord Buckle 1
40 Adjusting Wheel 2
41 Square End Cap (Inner) 2
42 Belt 1
43 Wheel 2
44 Blow Molding Cushion 2
45 Plastic Pad 4
46 Square End Cap (Inner) 2 2
47 Hex Socket Screw M10 x 55 1
48 Hex Socket Screw M10 x 50 2
49 Hex Socket Screw M10 x 40 1
50 Hex Socket Screw M10 x 15 14
51 Hex Socket Screw M8 x 50 4
52 Hex Socket Screw M8 x 45 1
53 Hex Socket Screw M8 x 40 3
54 Hex Screw M8 x 75 1
55 Hex Screw M8 x 50 1
56 Hex Screw M8 x 35 2
57 Hex Socket Head Screw M8 x 18 4
58 Hex Socket Head Screw M6 x 45 1
Page 9

9
TR 1500 - T
No. Description Qty
59 Hex Socket Head Screw M6 x 55 2
60 Hex Socket Head Screw M6 x 10 2
61 Hex Socket Screw M6 x 30 4
62 Hex Socket Screw M6 x 25 2
63 Cross Pan Screw M5 x25 8
64 Philips Washer Head Screw M5 x 16 2
65 Philips Washer Head Screw M5 x 8 11
66 Cross Pan Screw M4 x 15 4
67 Philips Washer Head Screw M4 x 8 7
68 Cross Tapping Screw St4 × 55 4
69 Cross Tapping Screw St4 × 16 50
70 Cross Tapping Screw St2.9 × 9.5 6
71 Cross Pan Screw St2.9 × 6 2
72 Cross Pan Screw M4 x 8 4
73 Lock Washer 10 x 1.2 18
74 Lock Washer 8 x 1.2 8
75 Lock Washer 6 x 1.2 3
76 Flat Washer 13 x 8 x 1.2 10
77 Flat Washer D4 2
78 Spring Washer D4 2
79 Spring Washer 8 6
80 Nylon Nut M10 4
81 Nylon Nut M8 10
82 Nylon Nut M6 8
83 Cross Pan Screw M6 x 15 2
PARTS LIST
No. Description Qty
84 C-Shaped Clasp 8 4
85 PVB 1
86 Shortcut Key 2
87 Computer Connecting Wire 1
88 Upper Extension Wire 1
89 Lower Extension Wire 1
90 Controller Wire 1
91 Safety Lock 1
92 Light Sensor 1
93 Light Sensor Support 1
94 DC Motor 1
95 Incline Motor 1
96 Switch 1
97 Overload Protector 1
98 Power Cord 1
99 Amplier Board 1
100 Loudspeaker 2
101 Loudspeaker Plate 2
102 Audio Jack 1
103 MP3 Wire 1
104 SD Card / USB Socket 1
105 Inductor 1
106 Filter 1
107 Headphone Jack 1
Page 10
10
TR 1500 - T
EXPLODED DRAWING
Page 11
11
TR 1500 - T
ASSEMBLY STEPS
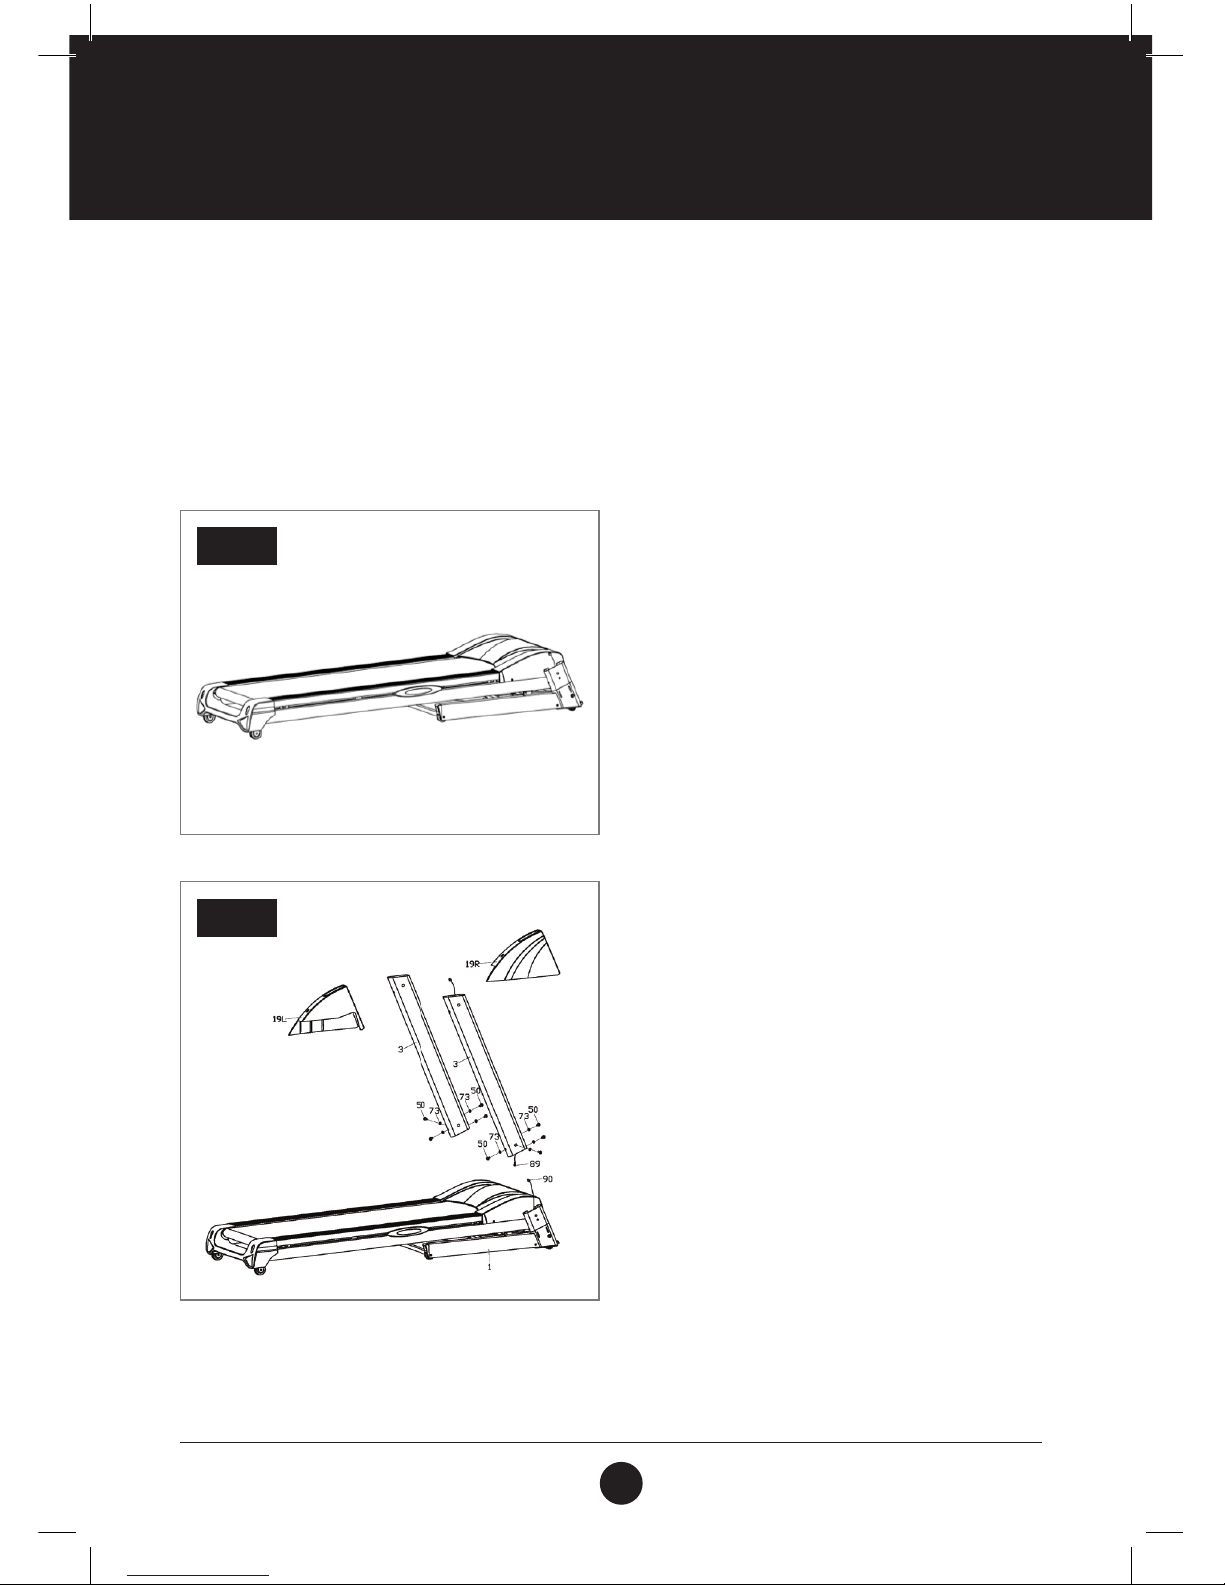
1. PREPARATION
• Before assembling make sure that you will have enough space around the item.
• Use the supplied parts and hardware for the assembly.
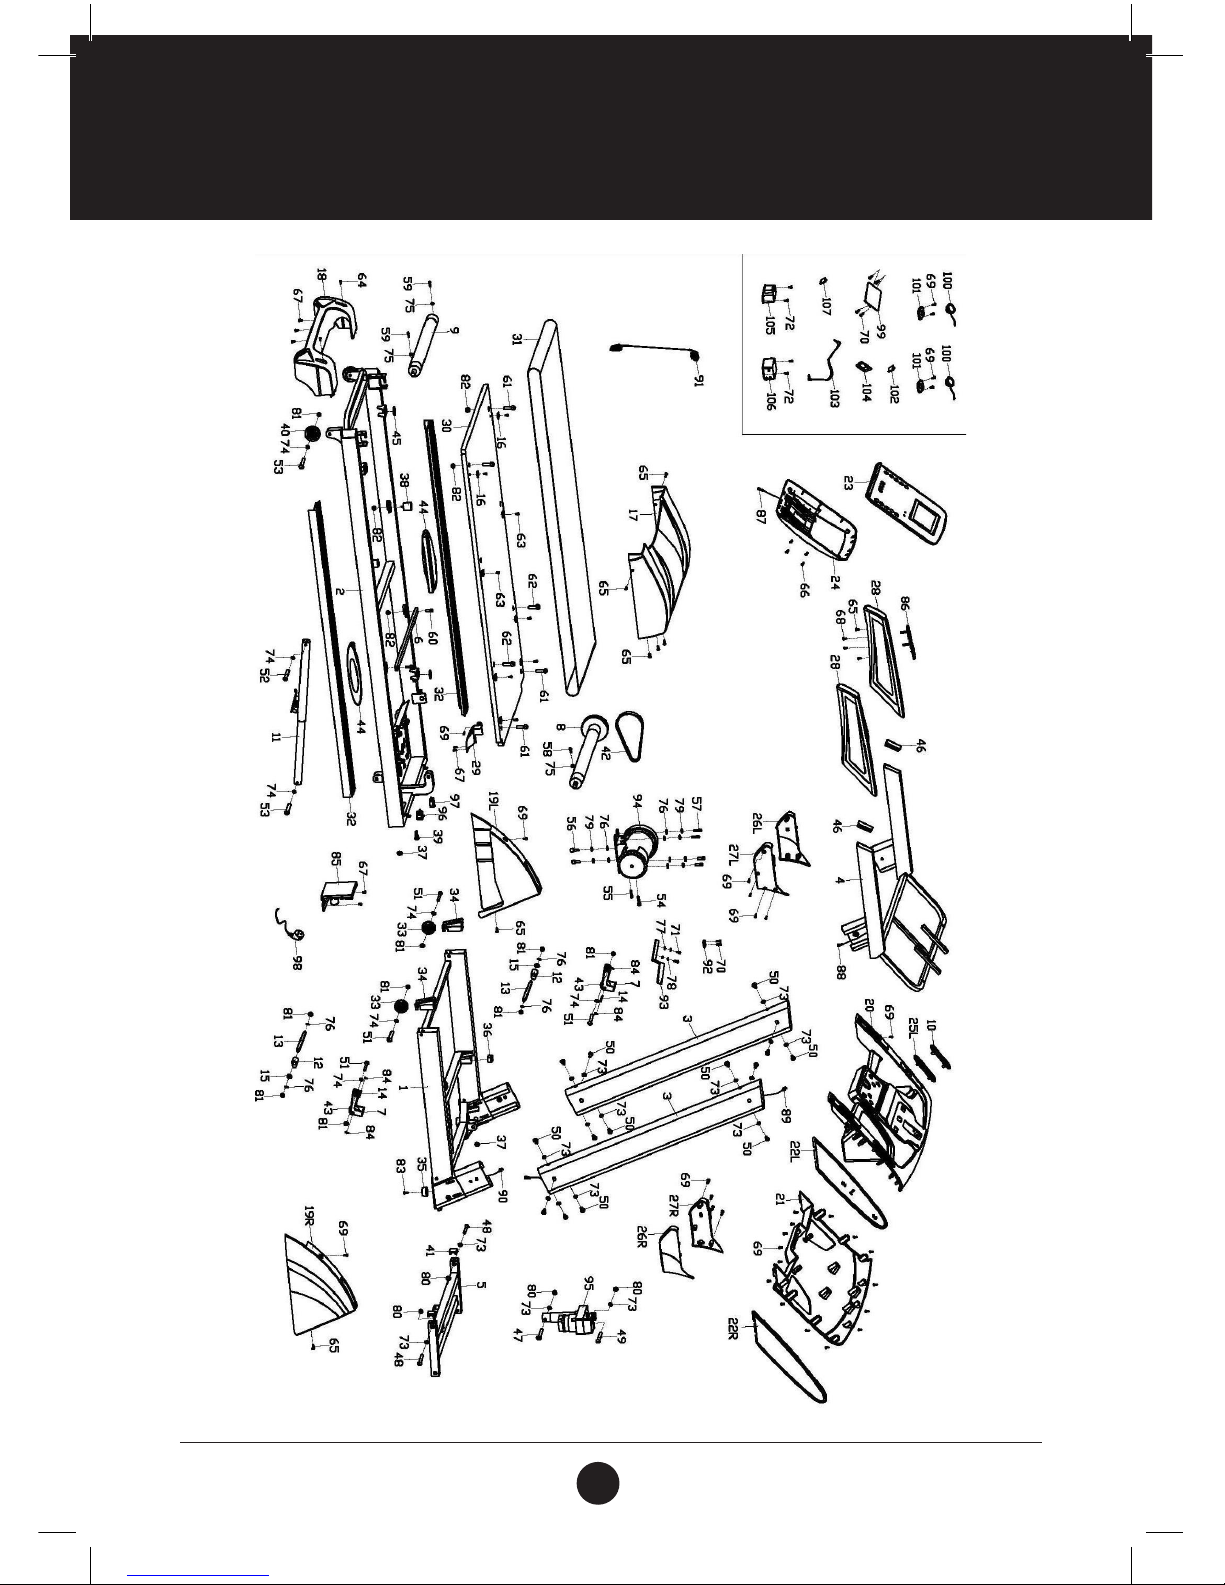
• Before assembling please check whether all the required parts have been supplied as per the exploded
drawing on the opposite page.
STEP 1
STEP 1:
Open the carton, remove all the parts and place the Main
Frame (1) on a at and dry surface.
Note: Please do not cut the packing straps immediately.
STEP 2:
Cut the straps when the main frame has been securely
placed on a at and dry surface.
Note: Do not move it any more.
Connect the Controller Wire (90) and the Lower
Extension Wire (89).
Secure the Left and Right Upright Tube (3) on the Bottom
Frame (1) with the Hex Socket Screws (50) and the Lock
Washer (73).
Note: Please do not tighten the Hex Socket Screw (50)
for the time being.
Insert the Protective Guard (19L/R) into the Left and
Right Upright Tube (3).
STEP 2
Page 12
12
TR 1500 - T
ASSEMBLY STEPS
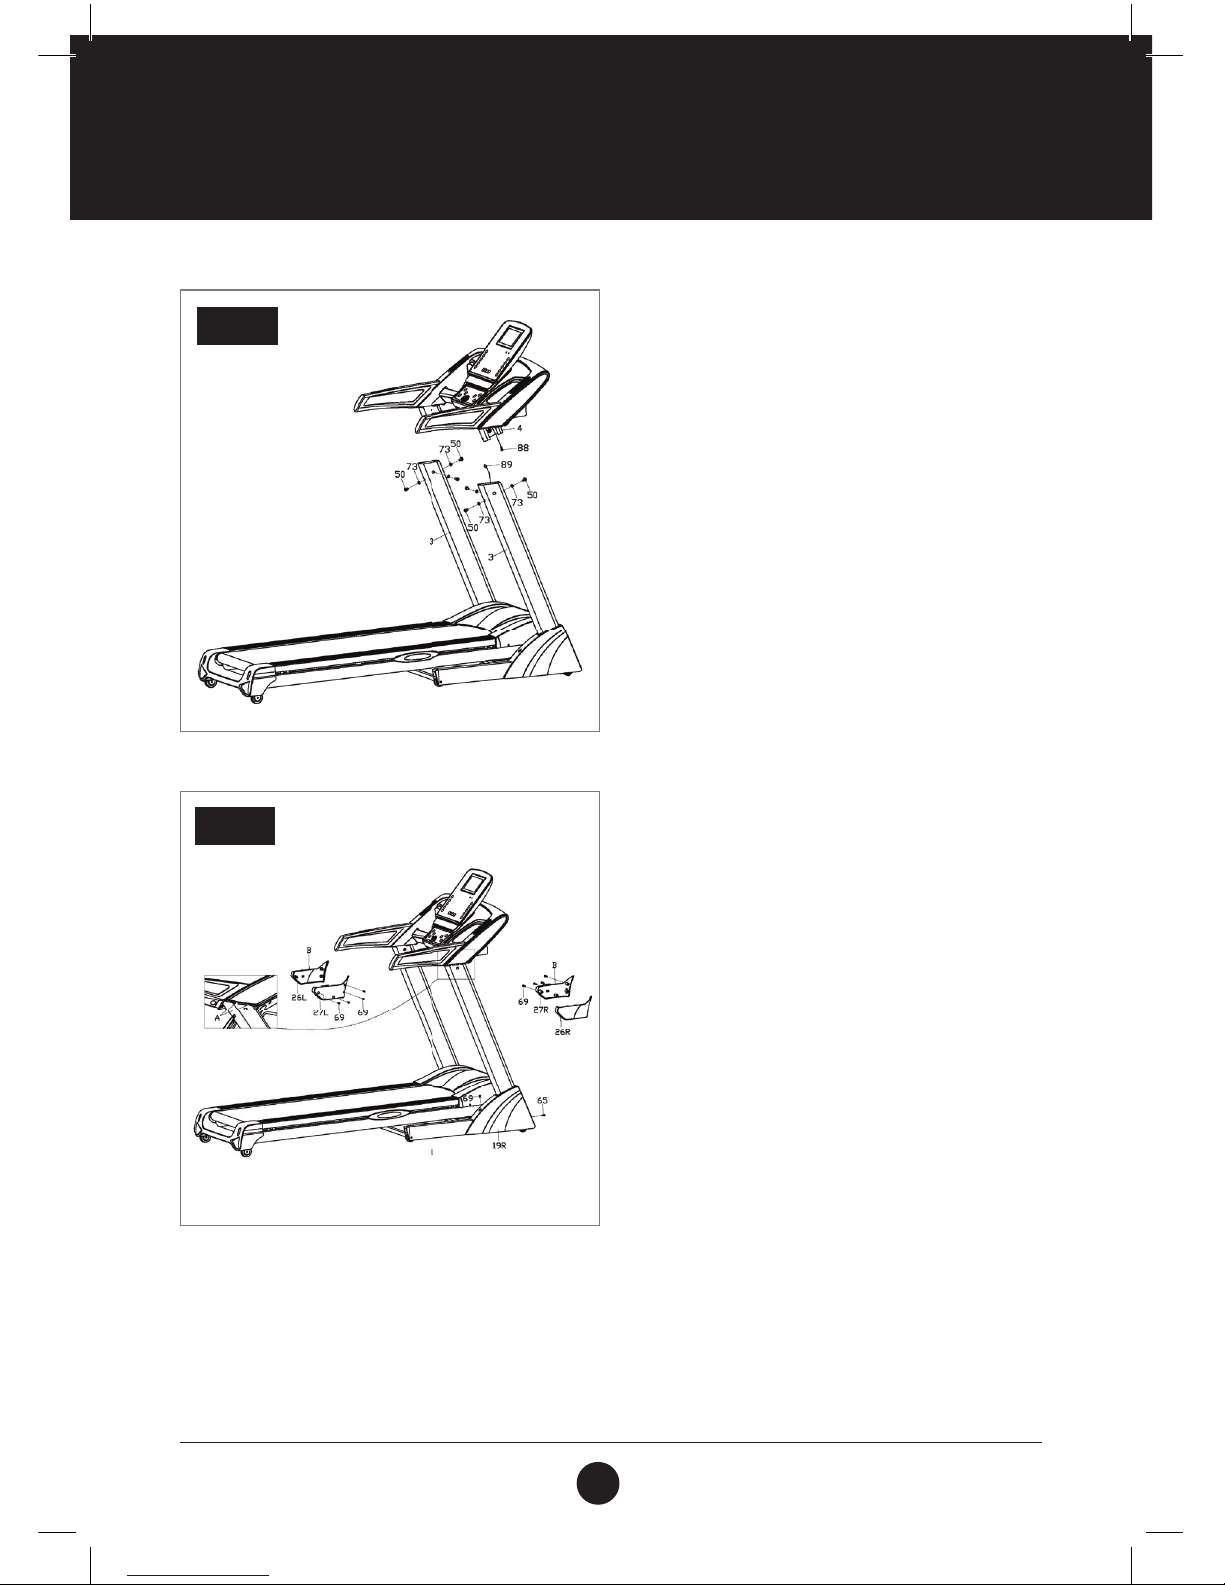
STEP 3:
Connect the Upper Extension Wire (88) with
Lower Extension Wire (89)
Lock the Computer Frame (4) on the Left and Right
Upright Tube (3) with the Hex Socket Screw (50) and
Lock Washer (73), and tighten all the bolts securely.
STEP 4:
Secure the Protective Cover (19L /R ) to the Bottom
of the Frame (1) with Cross Tapping Screw (69) and
Philips Washer Head Screw (65).
Insert (B) of the Upright Tube Cover 1 (26L/R) and
Upright Tube Cover 2 (27L/R) to (A) of the Computer
Frame (4) as illustrated below. Then afx the Upright
Tube Cover 1 (26L/R) and Upright Tube Cover 2
(27L/R) tightly to the Left and Right Upright Tube (3)
with Cross Tapping Screw (69).
STEP 3
STEP 4
PLEASE ENSURE THE ASSEMBLY HAS BEEN COMPLETED PER THE ABOVE
INSTRUCTIONS AND THAT ALL BOLTS ARE SECURELY TIGHTENED. ONCE
THIS HAS BEEN CHECKED, YOU MAY PROCEED WITH THE INSTRUCTIONS
THAT FOLLOW. PLEASE ENSURE THAT YOU READ THE INSTRUCTIONS
CAREFULLY BEFORE OPERATING THE TREADMILL.
ATTENTION:
Page 13
13
TR 1500 - T
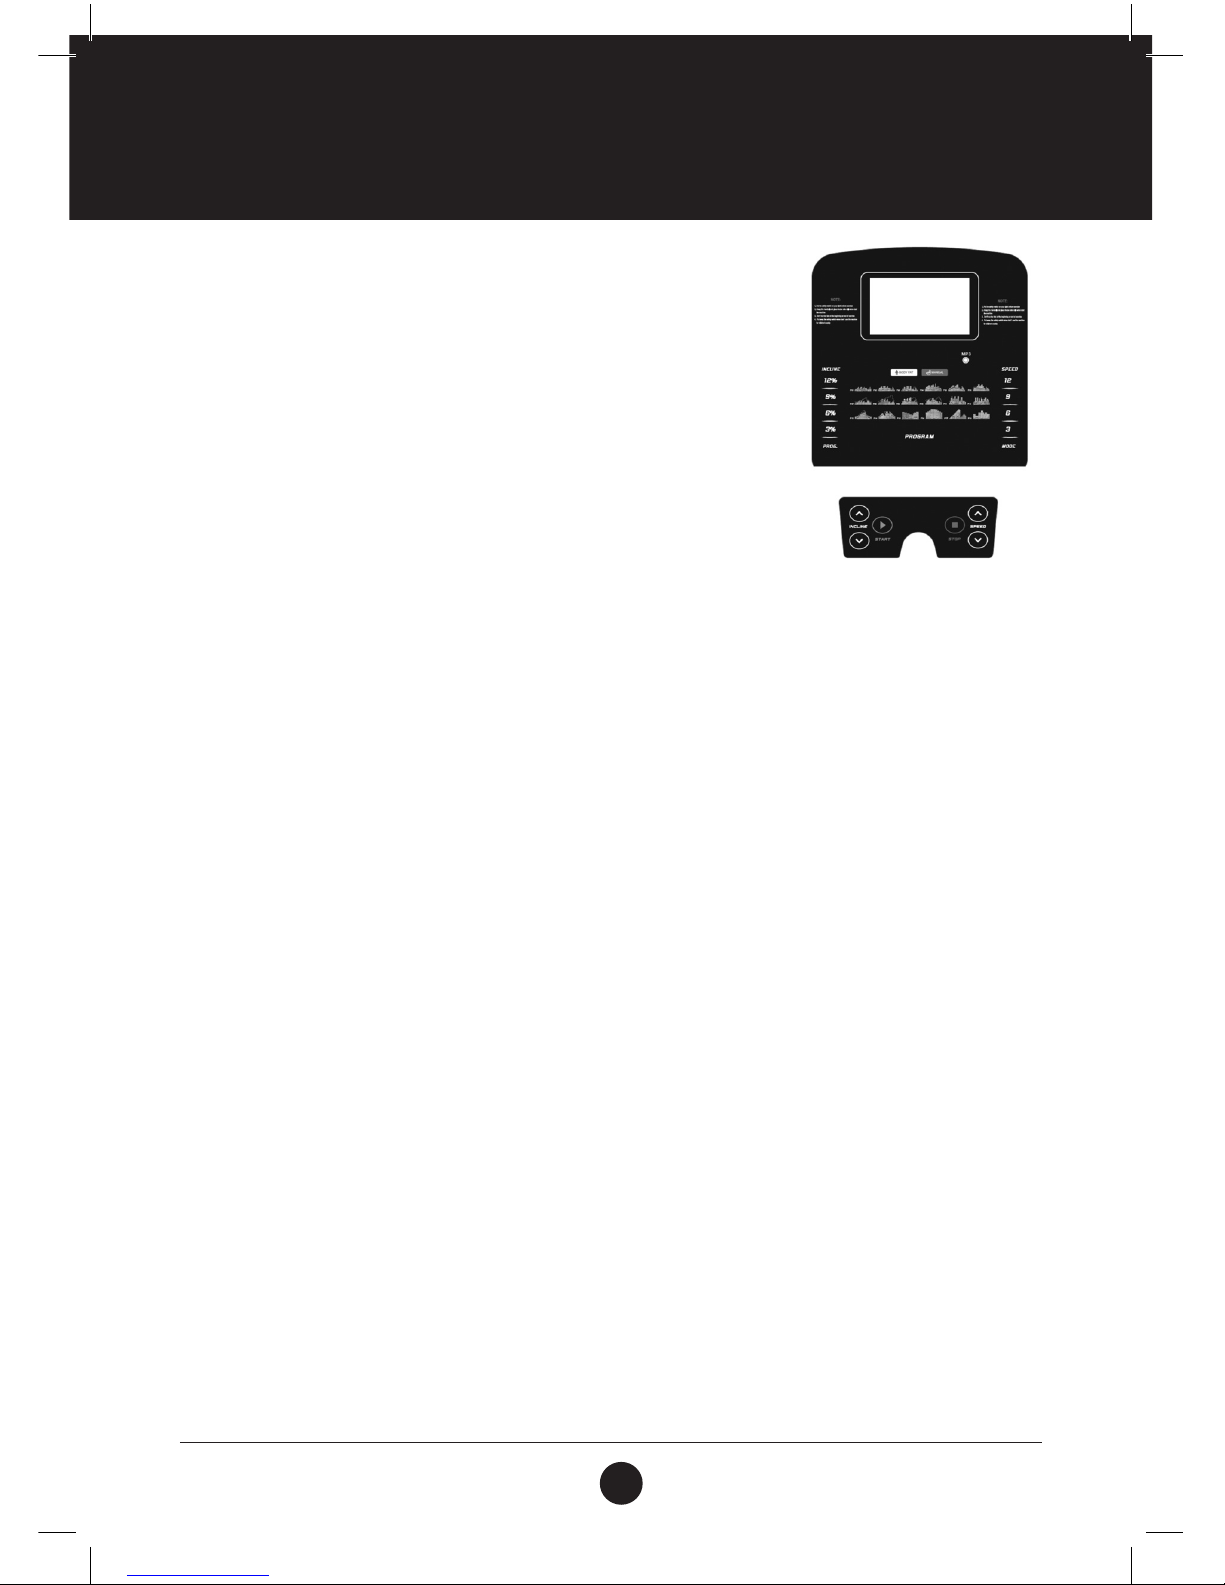
FUNCTION BUTTON:
SPEED: Displays speed data.
TIME/ HEART RATE: Displays time and heart rate data.
Displays heartbeat rst while in operation.
DISTANCE / CALORIE / INCLINE: Displays distance / calorie / incline data and displays these in order
of operation. Press “MODE” to switch between the selections.
Incline will be displayed rst; if the incline is 0, the distance data
will be shown.
STEP: Displays the step count.
FUNCTION KEYS:
START, STOP, PROGRAM, MODE, SPEED +, SPEED -, INCLINE +, INCLINE -, SPEED SHORTCUT (3/6/9/12/15)
KMH/MPH, INCLINE SHORTCUT (3/6/9/12/15)%.
FUNCTIONS AND OPERATIONS:
PROGRAM: When the treadmill is in standby mode, press PROGRAM to make a selection between:
P01 - P18 as well as U01 - U03 and FAT.
MODE: When the treadmill is in standby mode, press MODE to make a selection between:
default mode, time countdown, distance countdown and calorie countdown mode.
START: When the treadmill is in standby mode, press START to start the treadmill.
STOP: When the motor is running, press STOP to stop the treadmill.
SPEED +: When the treadmill is in standby mode press SPEED + to increase the set value. When
the treadmill is running, press SPEED + to increase the speed.
SPEED -: When the treadmill is in standby mode press SPEED - to decrease the set value. When
the treadmill is running, press SPEED - to decrease the speed.
INCLINE +: When the treadmill is in standby mode press INCLINE + to increase the set value.
When the motor is running, press INCLINE + to increase the incline.
INCLINE -: When the treadmill is in standby mode press INCLINE - to decrease the set value.
When the motor is running, press INCLINE - to decrease the incline.
VOLUME: Adjusts the music volume.
UP/NEXT: Changes the track currently playing.
PROGRAM + MODE: When the safety key is removed, press PROGRAM+MODE for 3 seconds for metric /
inch conversion.
COMPUTER FUNCTIONS
Page 14

14
TR 1500 - T
OPERATION INSTRUCTIONS
PROGRAMS INCLUDE:
• One manual mode (including default mode), time countdown, calorie countdown and distance countdown
modes;
• 18 xed programs: P01 - P18;
• 3 customized programs: U01, U02 and U03.
STARTUP
• Place the safety key in the slot on the Computer.
• Press “START” and the screen will display 3—2—1 with a corresponding “Beep” and the treadmill will start.
MANUAL MODE:
How to enter manual mode:
• Switch on the power supply. The treadmill will switch on and automatically enter the default mode under
manual mode;
• When the treadmill is in standby mode, press MODE to select the default mode under the manual mode.
THREE SETTING FUNCTIONS UNDER MANUAL MODE ARE AVAILABLE.
TIME, DISTANCE, CALORIE:
• When selecting the manual mode, the time is displayed as 0:00;
• In manual mode, press MODE to select the time countdown mode. The time screen will display the time and
ash. The preset time is 30:00. Adjust the countdown time by SPEED +/ SPEED - and INCLINE +/ INCLINE -.
The time setting range: 5:00-99:00.
• In manual mode, press MODE to select the distance countdown mode. The preset distance will be displayed as
1.00 km/mi. Adjust the distance by SPEED +/ SPEED - and INCLINE +/ INCLINE - in the range of 0.50-99.90 km/
mi. Each increase/ decrease point will be 0.1 km/mi.
• In manual mode, press MODE to select the calorie countdown mode. The preset calorie will be displayed as
50.0 kcal. Set the calorie by SPEED +/ SPEED - and INCLINE +/ INCLINE - in the range of 10.0-999.0 kcal. Each
increase/ decrease point will be 1.0 kcal.
OPERATION IN MANUAL MODE:
• Press START and the treadmill will start operating after 3 seconds. The initial speed will be 1.0 km/h in the
metric system or 0.6 miles/h in the imperial system;
• Press SPEED +/ SPEED – to adjust the speed;
• Press INCLINE +/ INCLINE - to adjust the incline;
• Press the speed shortcuts to quickly get to the speed marked on the key;
• Press the incline shortcuts to quickly get up to the incline marked on the key;
• When the motor is running, press STOP to stop the treadmill;
• Remove the safety key to immediately stop the treadmill. The LCD computer will display “---” and the buzzer
will “Beep” 3 times;
• When the set time, calories or distance reduces to zero the buzzer will “Beep” 3 times and the speed screen
will display END. 5 seconds later, the machine will return to the standby mode and the buzzer will “Beep”
twice.
• The machine is set to display a maximum of 99:59 minutes. Thereafter the machine will stop.
• In Forward-Timing Mode, hold the “MODE” button for 3 seconds. This will temporarily deactivate the Automatic
Shutdown function after every 100 minutes.
• “Lubrication” reminder: After every 300 KM, the screen will light up the “Lubrication” reminder icon and “Beep”
twice. To clear this, stop the treadmill and hold the “STOP” button.
Page 15

15
TR 1500 - T
OPERATION INSTRUCTIONS
FIXED PROGRAM MODE:
• The default time is set to 30min. The setting range is between 5:00 - 99:00. Press SPEED +/ SPEED - or
INCLINE +/ INCLINE - to adjust the speed and incline;
• Press START and the treadmill will start running. The speed will gradually increase to the speed of the rst
stage of the auto program (see details in the table of program parameters);
• Press SPEED +/ SPEED - to adjust the speed;
• Press INCLINE +/ INCLINE - to adjust the incline;
• Press the speed shortcuts to get to the speed marked on the display quicker;
• Press incline shortcut to get to the incline marked on the display quicker;
• Each program is divided into 20 stages. The time for each stage will be divided by the 20 stages;
• The buzzer will sound three times when switching from one stage to another;
• When the set time reduces to zero, the speed will gradually reduce until the machine comes to a complete
stop, followed by 3 “Beeps”. The computer will display END. 5 seconds later, the machine will return to the
standby mode;
• Remove the safety key to stop the treadmill immediately. The LCD screen will display “---” and the buzzer will
“Beep” 3 times.
CUSTOMIZED PROGRAM:
In addition to the 18 preset programs, the treadmill also has 3 customizable programs to support the user’s specic
requirements. These are U01, U02 and U03.
SETTING OF CUSTOMIZED PROGRAMS:
In standby mode, press PROGRAM to get to the required customized program (U01 - U03). Press MODE to select
the program. Set the parameters in the rst time section and set the speed by using the SPEED +/ SPEED - keys or
speed shortcuts. Set the incline by using the INCLINE +/ INCLINE – keys or incline shortcuts. Press MODE to complete
the rst stage time and set up parameters for the second stage settings until the setup is complete for all 20 stages.
Settings will be kept until such time as the user changes them. Settings will also not be lost when switching off the
power.
TO BEGIN THE CUSTOMIZED EXERCISE PROGRAM:
In standby mode, press PROGRAM until the required customized program (U01 - U03) is displayed. Select the exercise
time and press START and the machine will begin the program.
INSTRUCTIONS TO THE SETTING OF CUSTOMIZED PROGRAM:
Each program divides the exercise time into 20 stages. Ensure that speed, incline and time is selected for all 20
stages before pressing start.
Page 16
16
TR 1500 - T
OPERATION INSTRUCTIONS
MINIMUM
VALUE
DEFAULT
SETTING
SETTING
RANGE
DISPLAY
RANGE
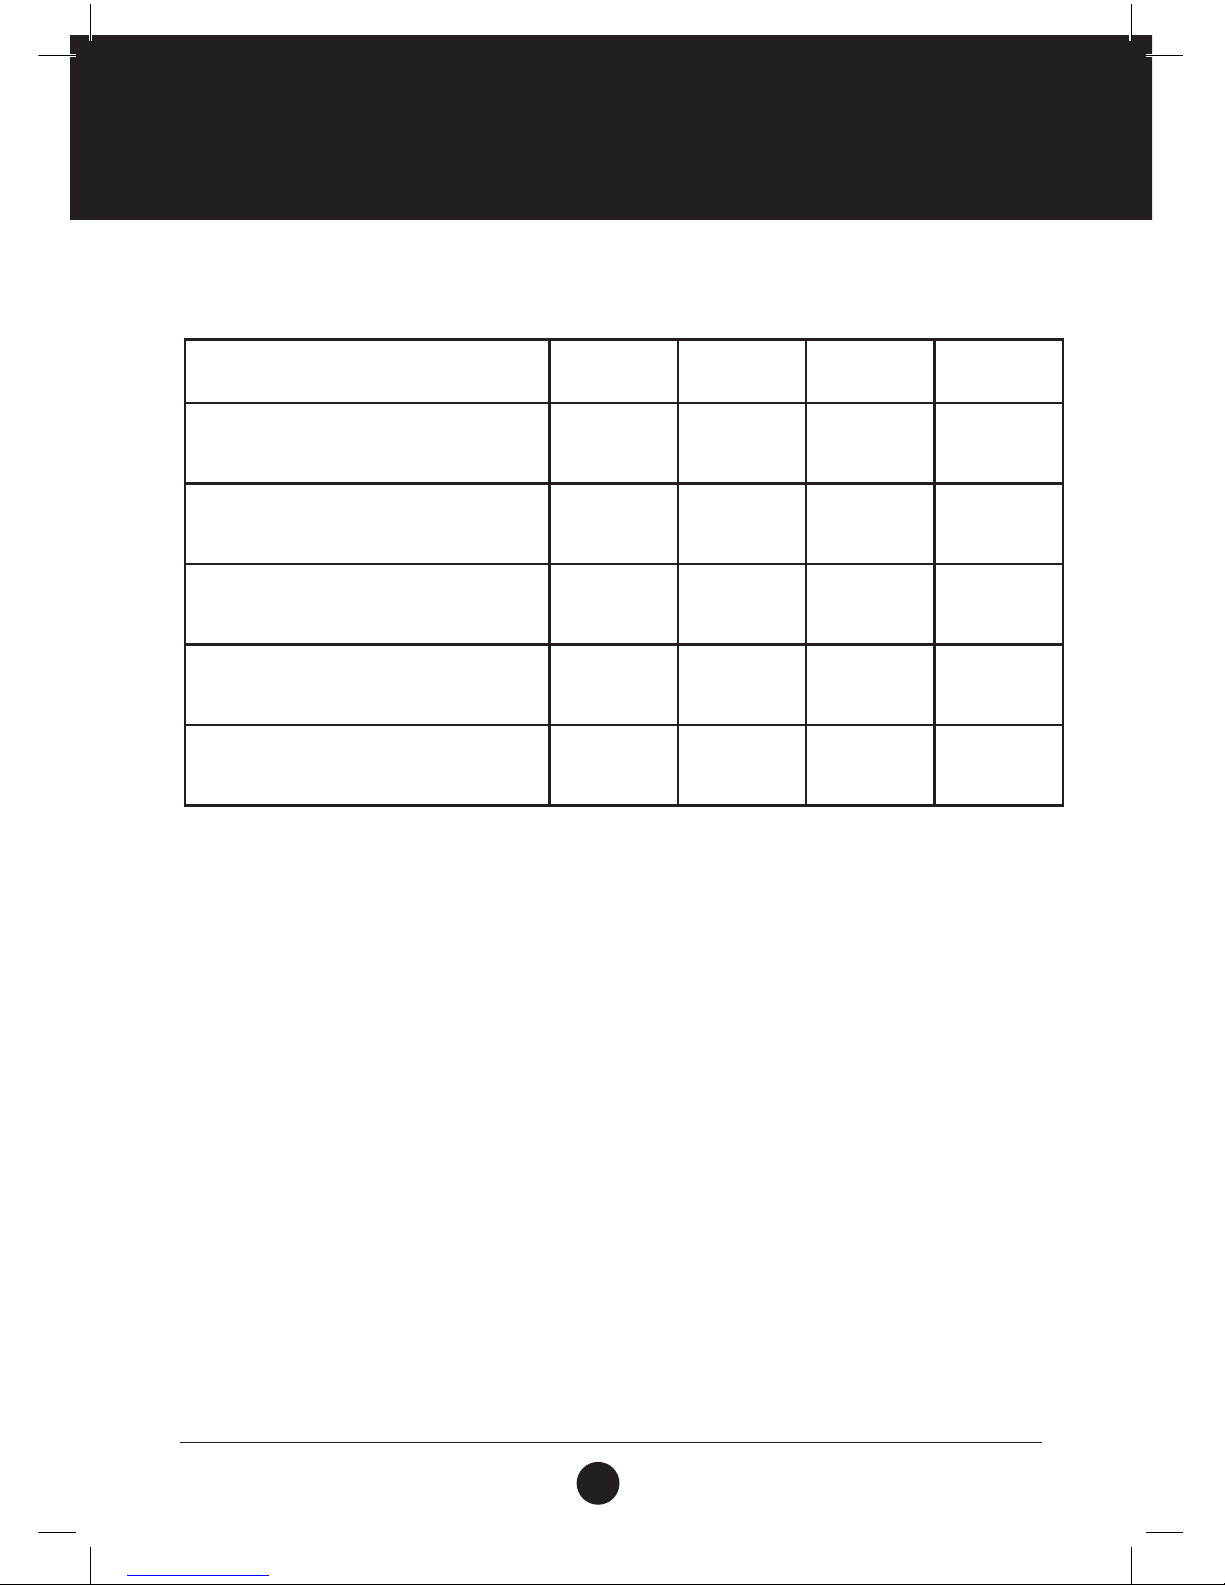
TIME (M:S)
0:00 30:00 5:00 - 99:00 0:00 - 99:59
SPEED IN METRIC SYSTEM (KM/H)
SPEED IN IMPERIAL SYSTEM (MI/H)
0.0 N/A N/A
1.0—18.0
0.6-11
INCLINE (%)
00 N/A N/A 0-15
DISTANCE (KM/MI)
0.0 1.00 0.50—99.90 0.00—99.99
CALORIE (KCAL)
0 50.0 10.0—999.0 0.0—999.9
PARAMETER DISPLAY RANGE:
SAFETY KEY FUNCTION:
The safety key can be removed at any time. The LCD screen will display “---” and the buzzer will “Beep” 3 times.
The treadmill will come to an immediate stop. When the safety key is removed, all settings will reset to default.
ENERGY-SAVING MODE:
The system has an energy-saving function. In standby mode, if the treadmill has not received any instruction
from the user after 10 minutes, the system will enter the energy-saving mode automatically. Press any key to
restart the system.
MP3 FUNCTION (OPTIMAL):
When connecting to MP3 or other audio devices when the treadmill is switched on, the treadmill can play music.
Volume is controlled with the connected audio device. Adjust the volume to avoid damaging the speakers.
SHUTDOWN:
Be sure to shut down the treadmill by switching off the power supply to avoid damaging the treadmill.
CAUTIONS:
• Ensure that the power is on and the safety key is inserted before using the treadmill.
• If the treadmill is not running properly, remove the safety key and the treadmill will slow down and come
to a complete stop. Insert the safety key to return to the standby mode.
• Should you have any queries, please contact the Trojan Call Centre for assistance.
Page 17
17
TR 1500 - T
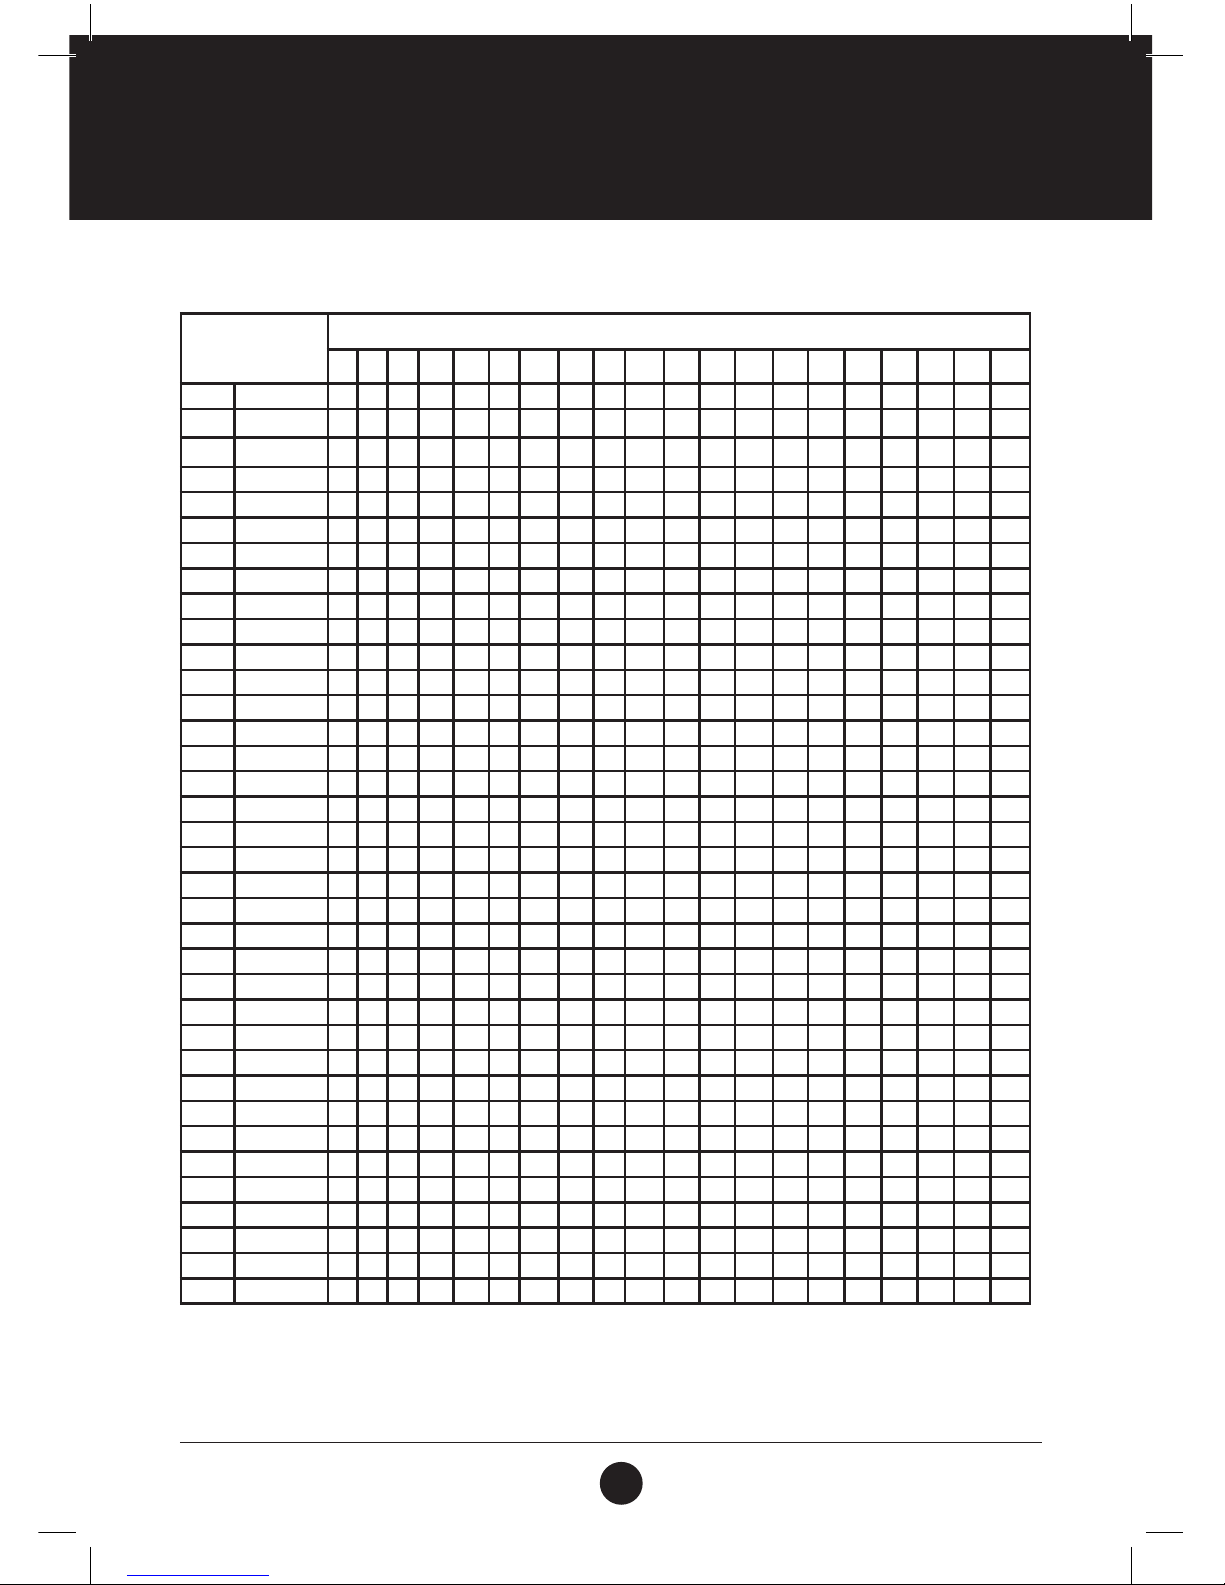
PROGRAM TABLE
OPERATION INSTRUCTIONS
TIME
PROGRAM
Setup time ÷ 20 = each stage of the running time
1 2 3 4 5 6 7 8 9 10 11 12 13 14 15 16 17 18 19 20
P1 SPEED
2 3 3 4 5 3 4 5 5 3 4 5 4 4 4 2 3 3 5 3
INCLINE
1 1 2 2 2 3 3 3 2 2 1 2 2 1 1 3 3 2 2 2
P2 SPEED
2 4 4 5 6 4 6 6 6 4 5 6 4 4 4 2 2 5 4 2
INCLINE
1 2 2 2 2 3 3 2 2 2 2 2 3 3 3 4 4 3 2 2
P3 SPEED
1 3 3 5 5 3 6 6 6 3 6 6 3 3 3 1 3 4 2 1
INCLINE
1 2 2 1 1 2 2 2 1 1 1 1 3 3 3 5 5 2 1 1
P4 SPEED
3 5 5 6 7 7 5 7 7 8 8 5 9 5 5 6 6 4 4 3
INCLINE
2 3 3 2 2 3 3 3 2 2 2 2 4 4 4 6 6 3 2 2
P5 SPEED
2 4 4 5 6 7 7 5 6 7 8 8 5 4 3 3 6 5 4 2
INCLINE
3 3 3 4 4 5 5 5 4 4 4 4 5 5 3 3 3 2 2 2
P6 SPEED
2 4 4 4 5 6 8 8 6 7 8 8 6 4 4 2 5 4 3 2
INCLINE
3 5 5 5 4 4 4 3 3 3 3 4 4 4 3 3 3 4 3 2
P7 SPEED
2 3 3 3 4 5 3 4 5 3 4 5 3 3 3 6 6 5 3 3
INCLINE
4 4 4 4 3 3 6 6 6 7 7 8 8 9 9 6 6 5 4 4
P8 SPEED
2 3 3 6 7 7 4 6 7 4 6 7 4 4 4 2 3 4 4 2
INCLINE
4 5 5 5 6 6 6 7 8 9 9 9 10 10 10 12 12 8 6 3
P9 SPEED
2 4 4 7 7 4 7 8 4 8 9 9 4 4 4 5 6 3 3 2
INCLINE
5 5 5 6 6 6 4 4 6 6 5 5 8 8 9 9 9 7 4 2
P10 SPEED
2 4 5 6 7 5 4 6 8 8 6 6 5 4 4 2 4 4 3 3
INCLINE
5 6 6 6 7 5 8 8 4 4 4 5 5 8 8 10 10 8 6 3
P11 SPEED
2 5 8 10 7 7 10 10 7 7 10 10 5 5 9 9 5 5 4 3
INCLINE
4 5 3 2 6 6 2 2 2 2 2 4 5 6 3 2 5 5 2 0
P12 SPEED
3 4 9 9 5 9 5 8 5 9 7 5 5 7 9 9 5 7 6 3
INCLINE
1 2 3 2 3 5 5 0 0 2 3 5 7 3 3 5 6 5 3 3
P13 SPEED
3 3 4 4 5 5 6 6 7 7 8 8 9 6 5 5 4 4 3 3
INCLINE
1 1 3 3 5 5 7 7 9 9 11 11 9 3 5 5 3 3 1 1
P14 SPEED
3 4 5 6 7 6 5 4 7 9 9 7 6 9 8 7 6 5 4 3
INCLINE
0 3 3 5 5 7 7 9 9 7 7 5 5 7 7 5 5 3 3 0
P15 SPEED
9 9 9 8 8 8 7 7 7 6 6 6 5 7 8 8 8 9 9 9
INCLINE
0 1 2 1 2 3 3 2 1 2 2 2 0 2 3 2 3 3 2 0
P16 SPEED
8 8 9 9 10 10 12 12 12 12 12 12 11 12 10 10 9 9 8 8
INCLINE
0 0 0 0 1 1 0 0 0 1 1 0 0 0 1 1 0 0 0 0
P17 SPEED
1 2 3 4 5 6 7 8 9 10 11 12 11 2 3 4 5 6 5 4
INCLINE
0 0 0 0 3 3 0 0 0 3 3 0 0 0 3 3 0 0 0 0
P18 SPEED
6 6 6 4 4 4 8 8 8 10 10 10 8 6 8 8 8 6 6 6
INCLINE
0 1 1 2 2 2 0 0 0 1 1 1 0 0 1 1 1 0 0 0
Page 18
18
TR 1500 - T
TROUBLE SHOOTING
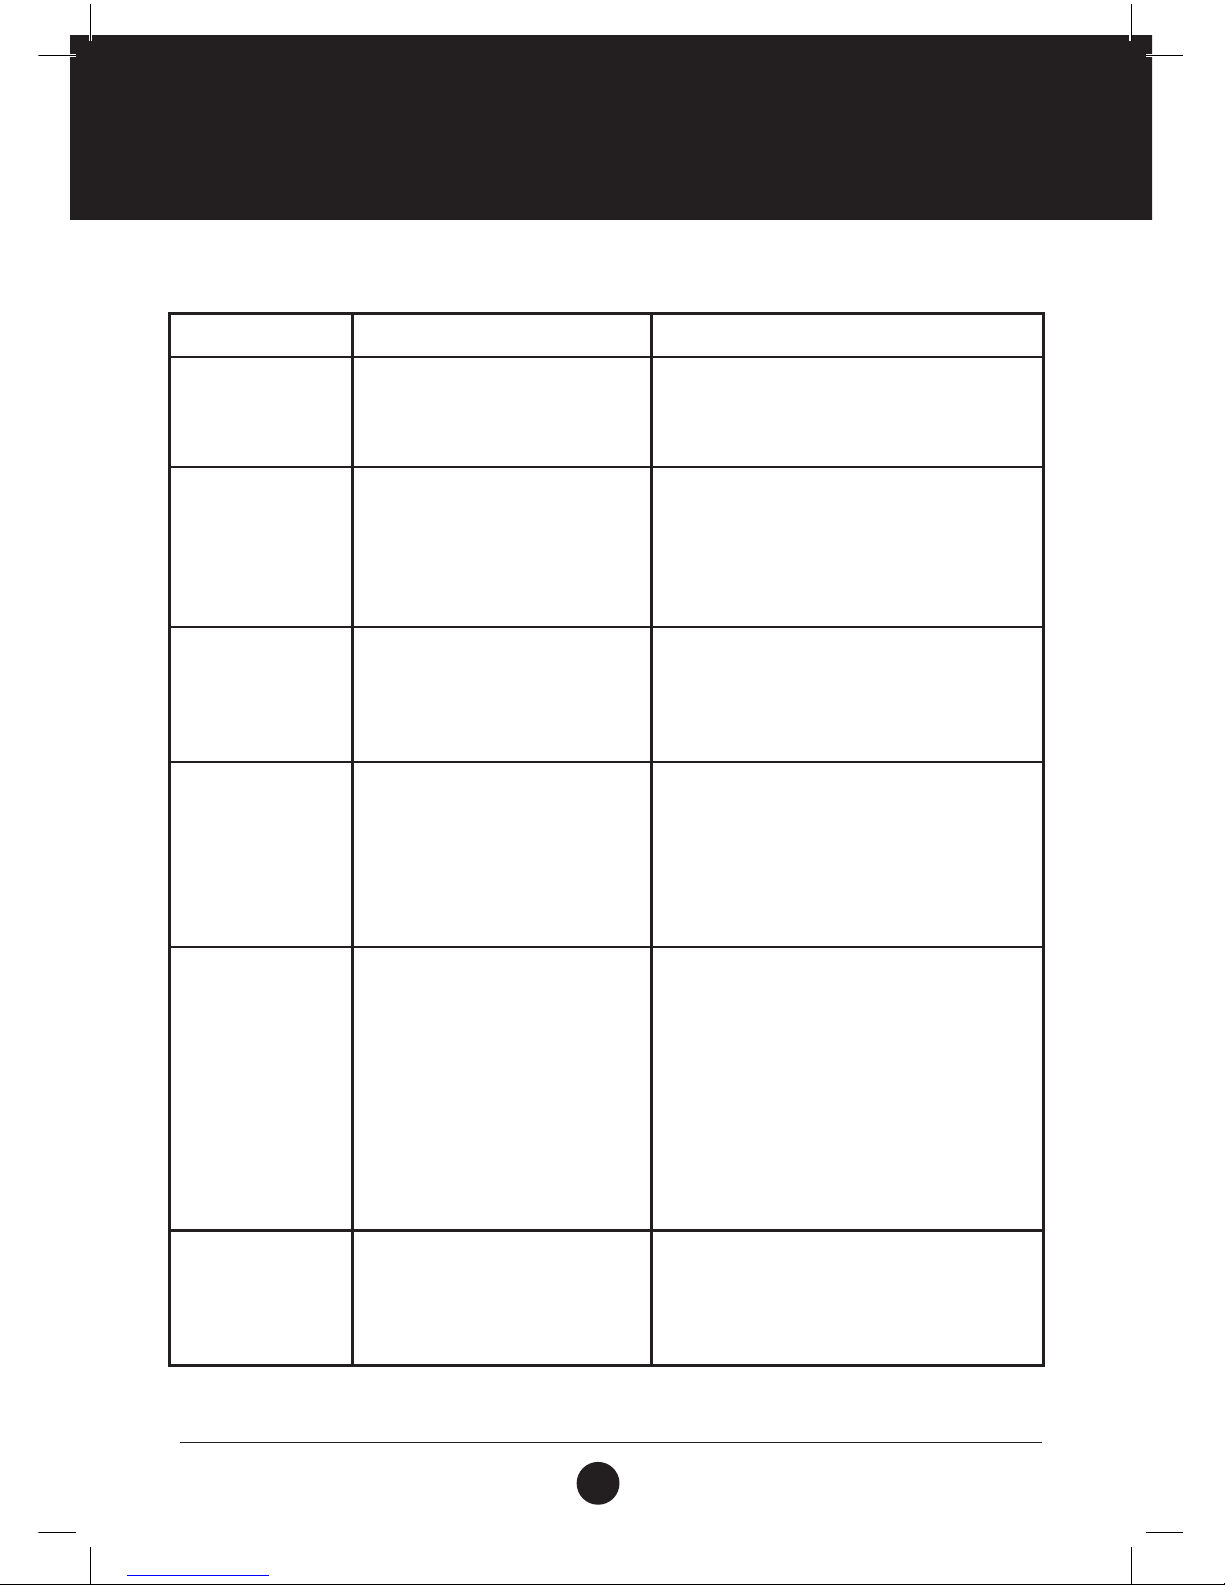
ERROR CODE MAIN REASON SOLUTION TO ERROR
E01 This error indicates a possible
message failure between computer
and bottom control board.
1. Check that the computer and bottom
control board wires are connected
correctly.
2. Change the entire control board.
E02 This error indicates a protection
against exploding.
1. If there is bad connection with an open
circuit in the motor, please change to a
new motor or check the connection.
2. If the power cable has a puncture. Please
change to a new Power cable or control
board.
E03 This error indicates a possible no
sensor signal.
1. Check that the speed sensor wire
connection is correct. If not, then
reconnect the wire
2. Check if the speed sensor is damaged. If it
is, then change to a new speed sensor.
E04 This error indicates a possible incline
motor study failure.
1. Check if the incline motor wires have been
connected correctly. If not, re-connect
them.
2. Check if wire on the incline motor is
damaged. Change wire if required.
3. After checking all the above, press the
study key on the incline motor to reset.
E05 This error indicates a possible
current overload.
1. If current overload has been detected
or the motor is stuck this will cause an
excessive current and the machine will
start self-protecting its system. Adjust
the machine and restart.
2. Check if the motor has a noise coming
from the it or if the motor / bottom
control board has burnt out. If it has burnt
out, then change to a new motor and/or
bottom control board. Use correct voltage
moving forward.
E08 This error indicates a possible driver
problem.
1. Check if the 8pin 24C02 integrated circuit
on the bottom control board is connected
correctly. If not, then reconnect it.
2. You may need to change the bottom
control board.
Page 19
19
TR 1500 - T
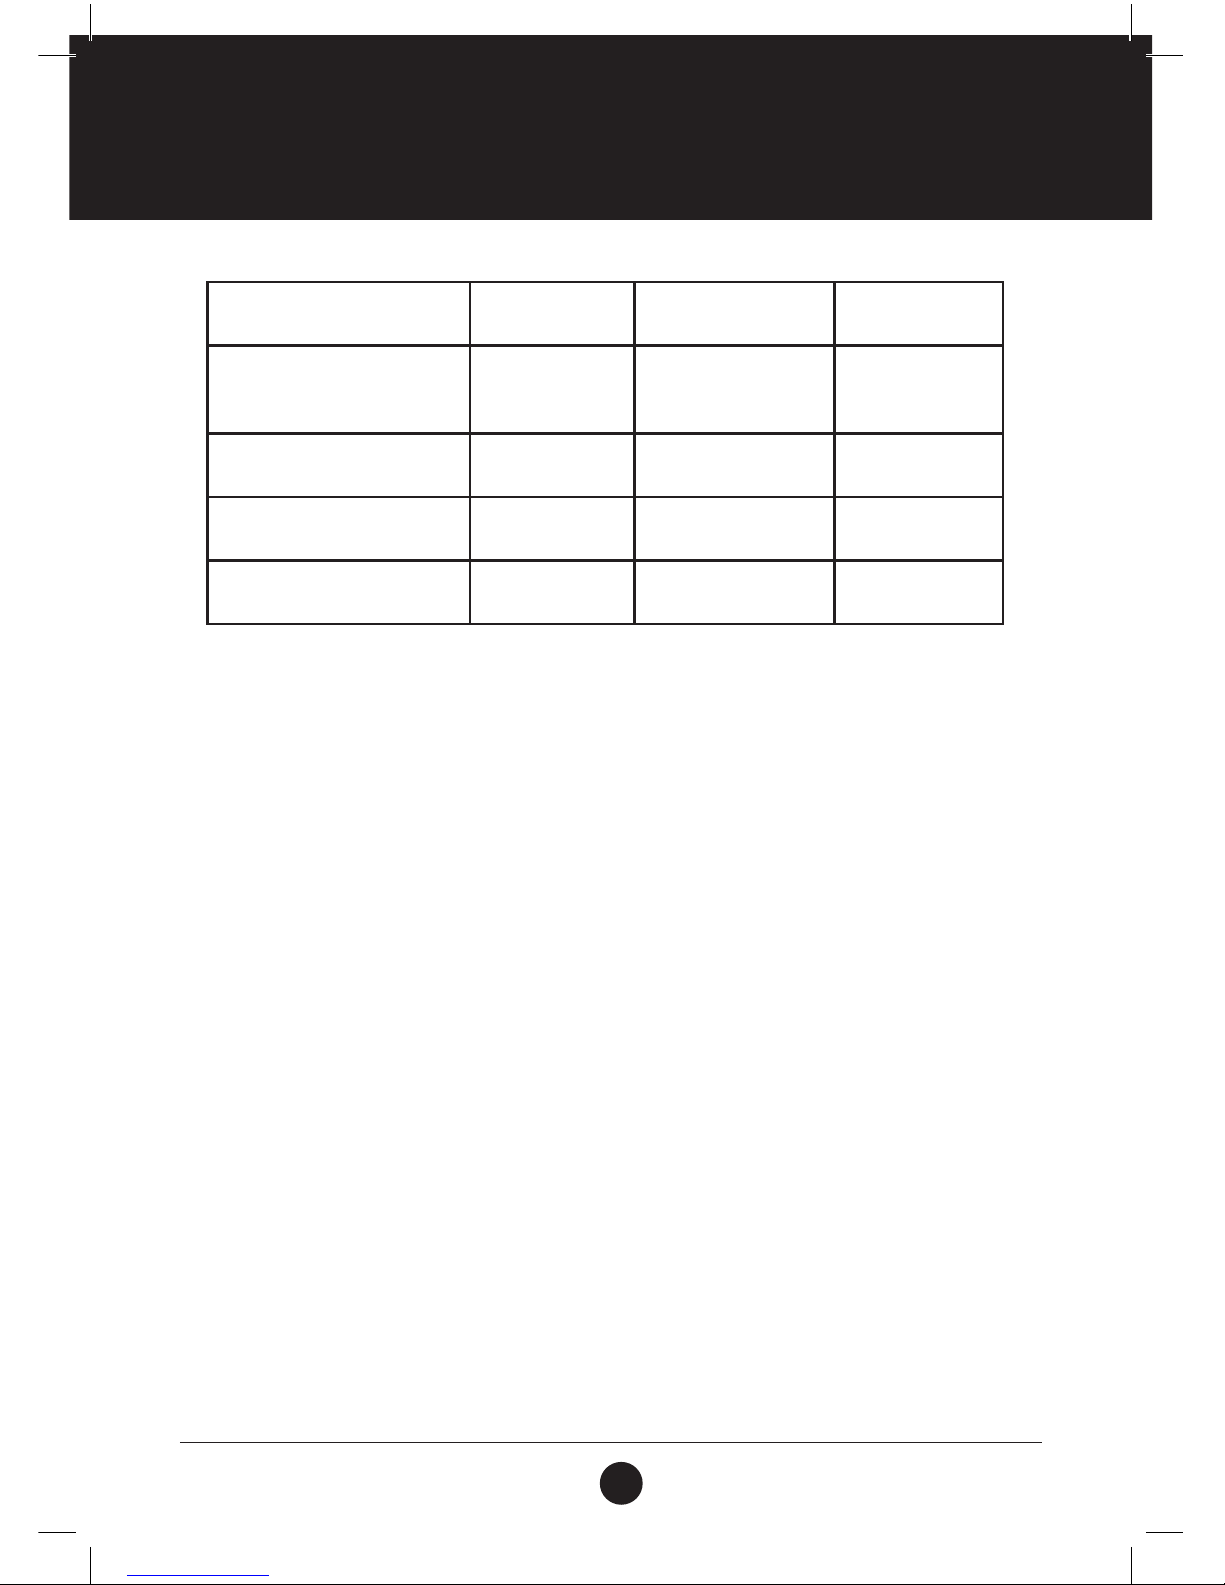
TECHNICAL PARAMETER
ASSEMBLY SIZE (MM)
1790 x 870 x 1480
POWER
1.75 HP
FOLDING SIZE (MM)
1120 x 875 x 1560
MAX OUTPUT
POWER
3.0 HP
RUNNING SURFACE (MM)
480 x 1350
INPUT CURRENT
Per Order
NET WEIGHT
85 KG
SPEED RANGE
1.0-18 KM/H
MAX WEIGHT
130 KG
INCLINE
0-15 %
Page 20
20
TR 1500 - T
FOLDING INSTRUCTIONS
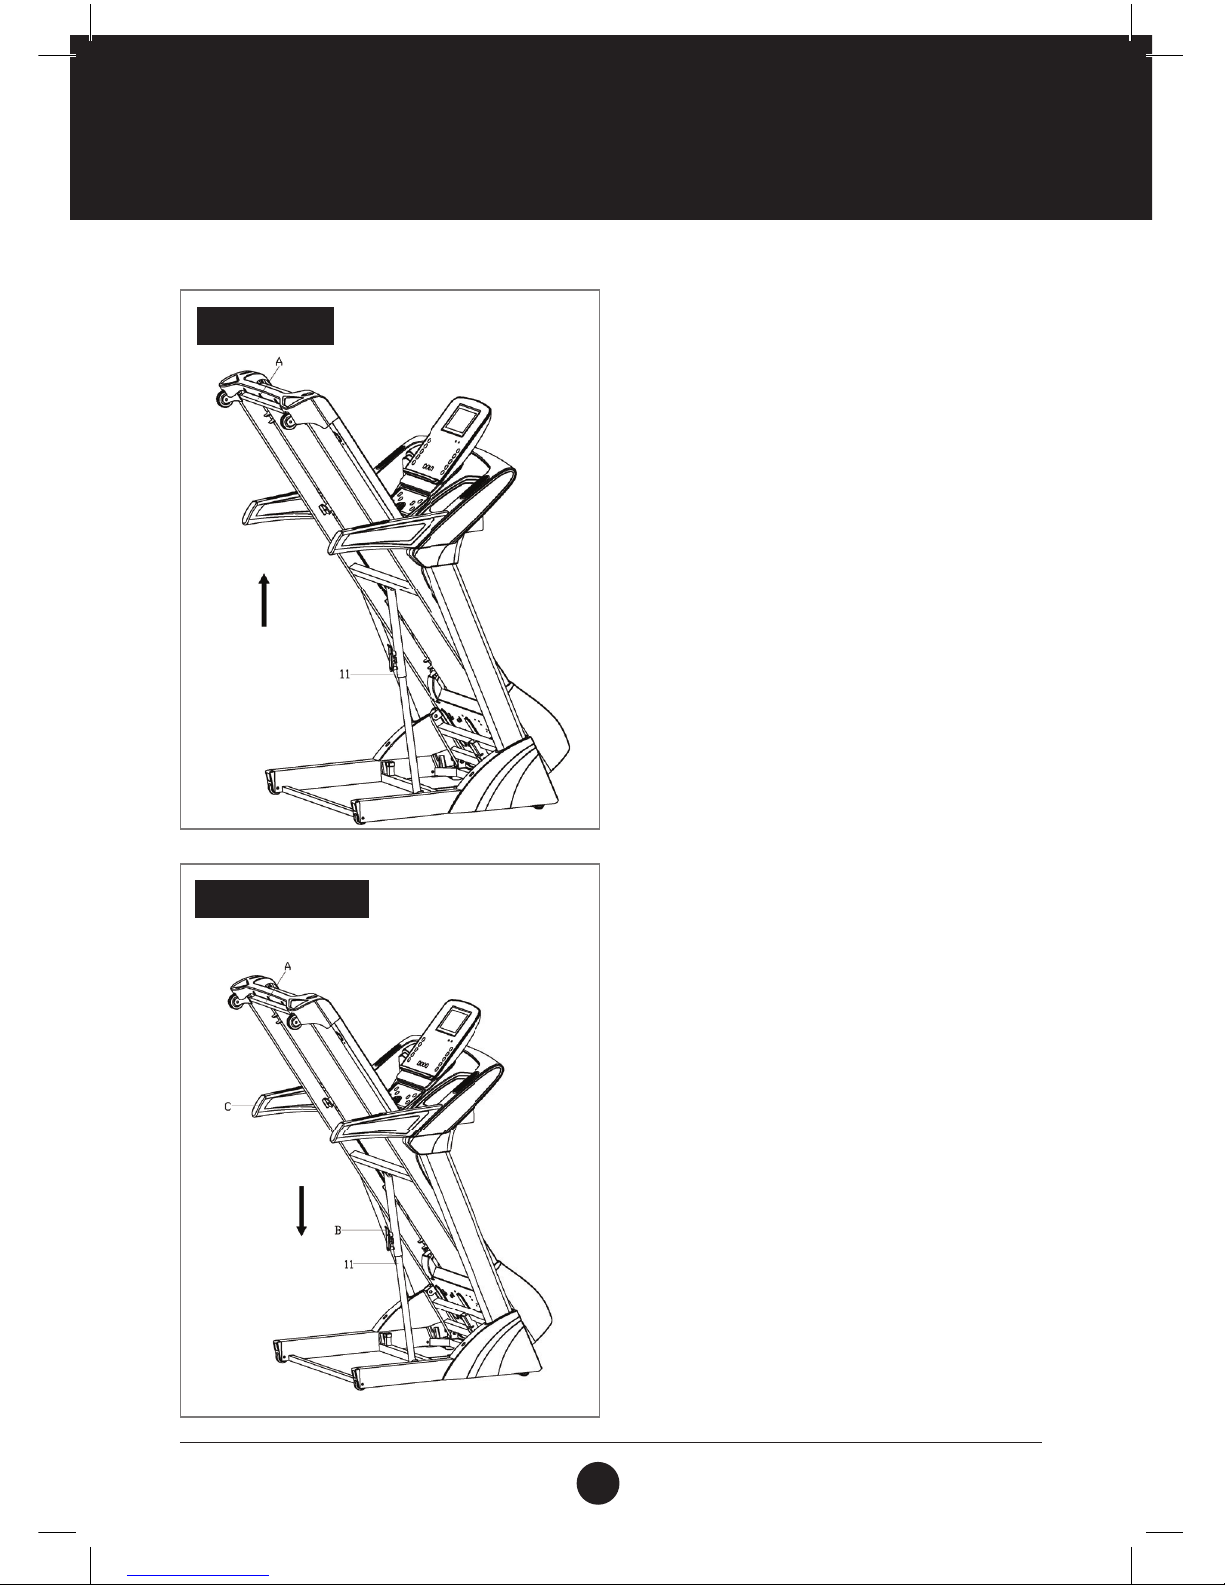
PULLING UP:
Place one hand on (A), as illustrated below, and lift up
the machine in the direction of the arrow until you hear
a click sound from the cylinder (11).
Note: Please unplug the power cord to shut down the
machine completely before folding or unfolding the
machine.
PULLING DOWN:
Place one hand on (A), tap (B) on the cylinder (11)
with your foot and pull the running deck down to
the point in line with the main frame handles (C).
The running deck will lower automatically.
Note: ensure that all parts are secured and
correctly assembled before beginning to exercise
with the treadmill.
To prevent injury, please ensure that you,
children or pets are not in the way of the
descending running deck.
PULLING UP
PULLING DOWN
Page 21
21
TR 1500 - T
EXERCISE INSTRUCTIONS
Using your Treadmill provides you with several benets, it will improve your physical tness, tone
muscle and in conjunction with calorie controlled diet help you lose weight.
THE WARM UP PHASE
This stage helps get the blood owing around the body and the muscles working properly. It will also reduce
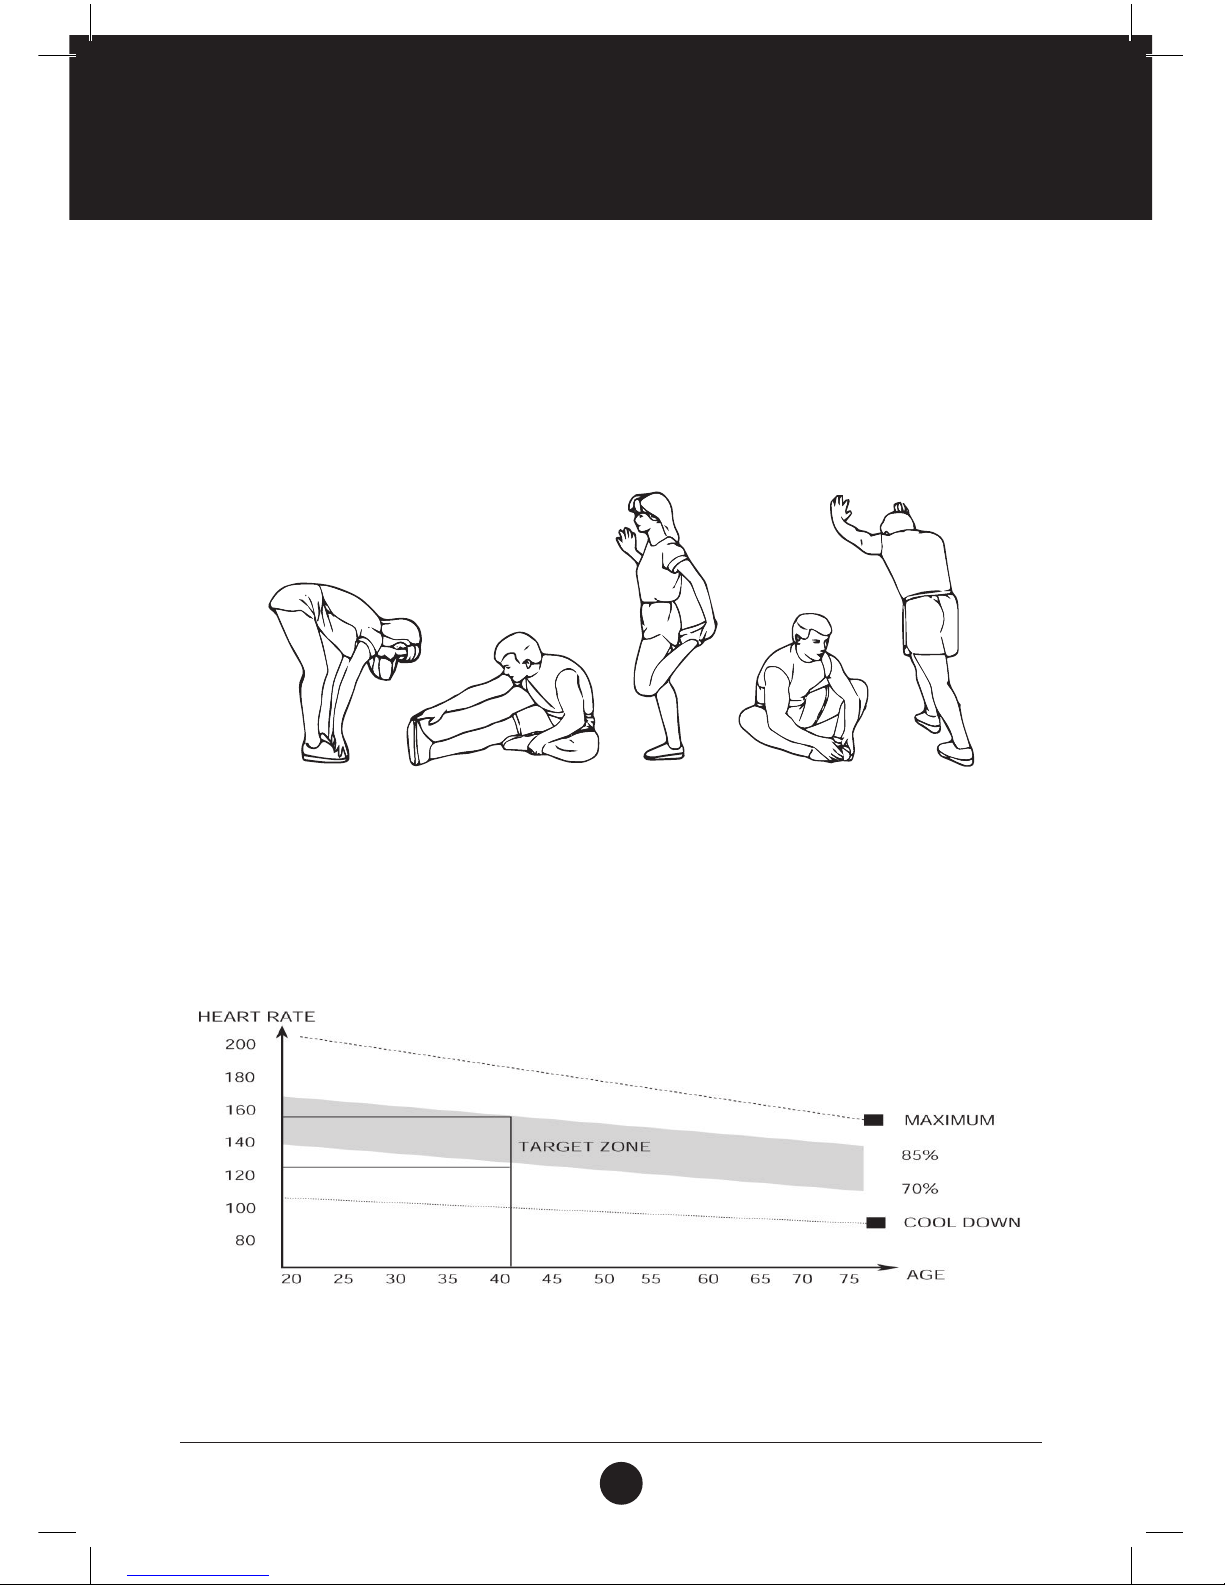
the risk of cramp and muscle injury. It is advisable to do a few stretching exercises as shown below. Each
stretch should be held for approximately 30 seconds, do not force or jerk your muscles into a stretch.
If it hurts, STOP.
THE EXERCISE PHASE
This is the stage where you put the effort in. After regular use, the muscles in your legs will become
stronger. Work at your own pace, but it is very important to maintain a steady tempo throughout.
The rate of work should be sufcient to raise your heart beat into the target zone shown on the
graph below.
Down
Stretch
Quad
Stretch
Tendon
Stretch
Groin
Stretch
Hamstring
Stretch
Page 22

22
TR 1500 - T
EXERCISE INSTRUCTIONS
This stage is to let your Cardiovascular System and muscles wind down. This is a repeat of the warm up
exercise e.g. reduce your tempo, continue for approximately 5 minutes. The stretching exercises should now
be repeated, again remembering not to force or jerk your muscles into the stretch.
As you get tter you may need to train longer and harder. It is advisable to train at least three times a week,
and if possible space your workouts evenly throughout the week.
MUSCLE TONING
To tone muscle while on your Treadmill you will need to have the resistance set quite high. This will
put more strain on your leg muscles and may mean you cannot train for as long as you would like. If you are
also trying to improve your tness, you need to alter your training program. You should train as normal
during the warm up and cool down phases, but towards the end of the exercise phase you should increase
resistance, making your legs work harder than normal. You may have to reduce your speed to keep your
heart rate in the target zone.
WEIGHT LOSS
The important factor here is the amount of effort you put in. The harder and longer you work the more
calories you will burn.
WARM UP STAGE
Please consult with your doctor or professional person before use.
Before you use the motorized treadmill, please learn how to control the machine. It is important to
understand how to start the machine, stop the machine and how to adjust the speed of the machine. After
that, you can begin using the treadmill. Stand on anti-slip pads located on both sides of the running deck
and hold the handle bar with both hands. Keep the machine at the low speed of about 1.6~3.2 Km/h, then
test the running machine speed by using one foot. Once you are used to the speed, then you can run on the
machine and you can add the speed between 3 and 5 Km/h. Keep the speed about 10 minutes,
then stop the machine.
Page 23

23
TR 1500 - T
EXERCISE INSTRUCTIONS
EXERCISE STAGE
Learn how to adjust the speed and incline before using. Walk at about 1 km at a stable velocity and write
down the time, it will take you about 15-25 minutes. If walking at 4.8 km/h, it will take you about 12 minutes
in 1 km. If you feel comfortable at the stable velocity, you can add the speed and incline.
EXERCISE INTENSITY
Warm up at a slow speed. Once started, gradually add more speed every 2 minutes to ensure body is warm
and ready for exercise. Once comfortable and warm, increase speed to desired speed level.
EXERCISE FREQUENCY
The cycle time: 3 - 5 times per week and 15 - 60 minutes per workout.
You can control the running intensity through adjusting the velocity and incline of treadmill. We suggest
that you don’t set the incline at rst; improve the incline is the effective way to strengthen the exercise’s
intensity.
Consult with your physician or health professional before starting your workout. Professionals can help you
make up the suitable exercise time-chart according to your age and health condition, determine the velocity
of movement, and the intensity of exercise. Please stop at once, If you feel chest tightness, chest pain,
irregular heart beat, difculty breathing , dizziness or other discomfort during exercise. You should consult
with your physician or health professional.
If you have limited experience in using a treadmill you can follow the below guideline:
Speed 0.8-3.0 Km/h Beginner
Speed 3.0-4.5 Km/h Slow walking
Speed 4.5-6.0 Km/h Normal walking
Speed 6.0-7.5 Km/h Fast Walking
Speed 7.5-9.0 Km/h Jogging
Speed 9.0-12.0 Km/h Fast Jog/Run
ATTENTION: VELOCITY OF MOVEMENT AT ≤6 KM/H, IS A NORMAL WALKING SPEED.
THE VELOCITY OF MOVEMENT AT ≥9 KM/H IS CONSIDERED A RUNNING SPEED.
Page 24

24
TR 1500 - T
MAINTENANCE
Reasonable cleaning/lubricating should be made to extend the life time of this unit.
Performance is maximised when the belt and mat are kept as clean as possible.
WARNING
The mat/deck friction may play a major role in the function and life of your treadmill and that is
why we recommend you constantly lubricate this friction point to prolong the serviceable life of
your treadmill.
Failing to do this may void your warranty.
• Unplug power cord before maintenance.
• Stop treadmill before folding.
GENERAL CLEANING
• Use a soft, damp cloth to wipe the edge of the belt and the area between the belt edge
and frame.
• A mild soap and water solution along with a nylon scrub brush will clean the top of the
textured belt.
• This task should be done once a month. Allow to dry before using.
• On a monthly basis, vacuum underneath your treadmill to prevent dust building up. Once a year,
you should remove the black motor shield and vacuum out dirt that may have accumulated.
GENERAL CARE
• Check parts for wear before use.
• Always replace the mat if worn and any other defective parts.
• If in doubt do not use the treadmill and contact our help line.
Take care to protect carpets and oor in case of leakages. This product is a machine that
contains moving parts which have been greased/lubricated and could leak out.
Page 25
25
TR 1500 - T
MAINTENANCE
General cleaning of the unit will greatly prolong the treadmill. Keep treadmill clean by dusting regularly.
Be sure to clean the exposed part of the deck on either side of the running deck and also the side rails.
This reduces the buildup of foreign material underneath the walking belt.
The top of the belt may be cleaned with a wet, soapy cloth. Be careful to keep liquid away from inside
the motorized treadmill frame or from underneath the belt.
WARNING: Always unplug the treadmill from the electrical outlet before removing the motor cover.
At least once a year remove the motor cover and vacuum under the motor cover.
RUNNING BELT AND DECK LUBRICATION
This treadmill is equipped with a pre-lubricated, low maintenance deck system. The belt/ deck friction may
play a major role in the function and life of your treadmill, thus requiring periodic lubrication. We recommend
a periodic inspection of the deck.
We recommend lubrication of the deck according to the following:
• Light user (less than 3 hours/ week) annually
• Medium user (3-5 hours/ week) every six months
• Frequent user (more than 5 hours/ week) every three months
ATTENTION: Any repair must be done by a professional technician.
After 2 hours of use it is recommended that the treadmill be turned off for at least 10 minutes
before being used again.
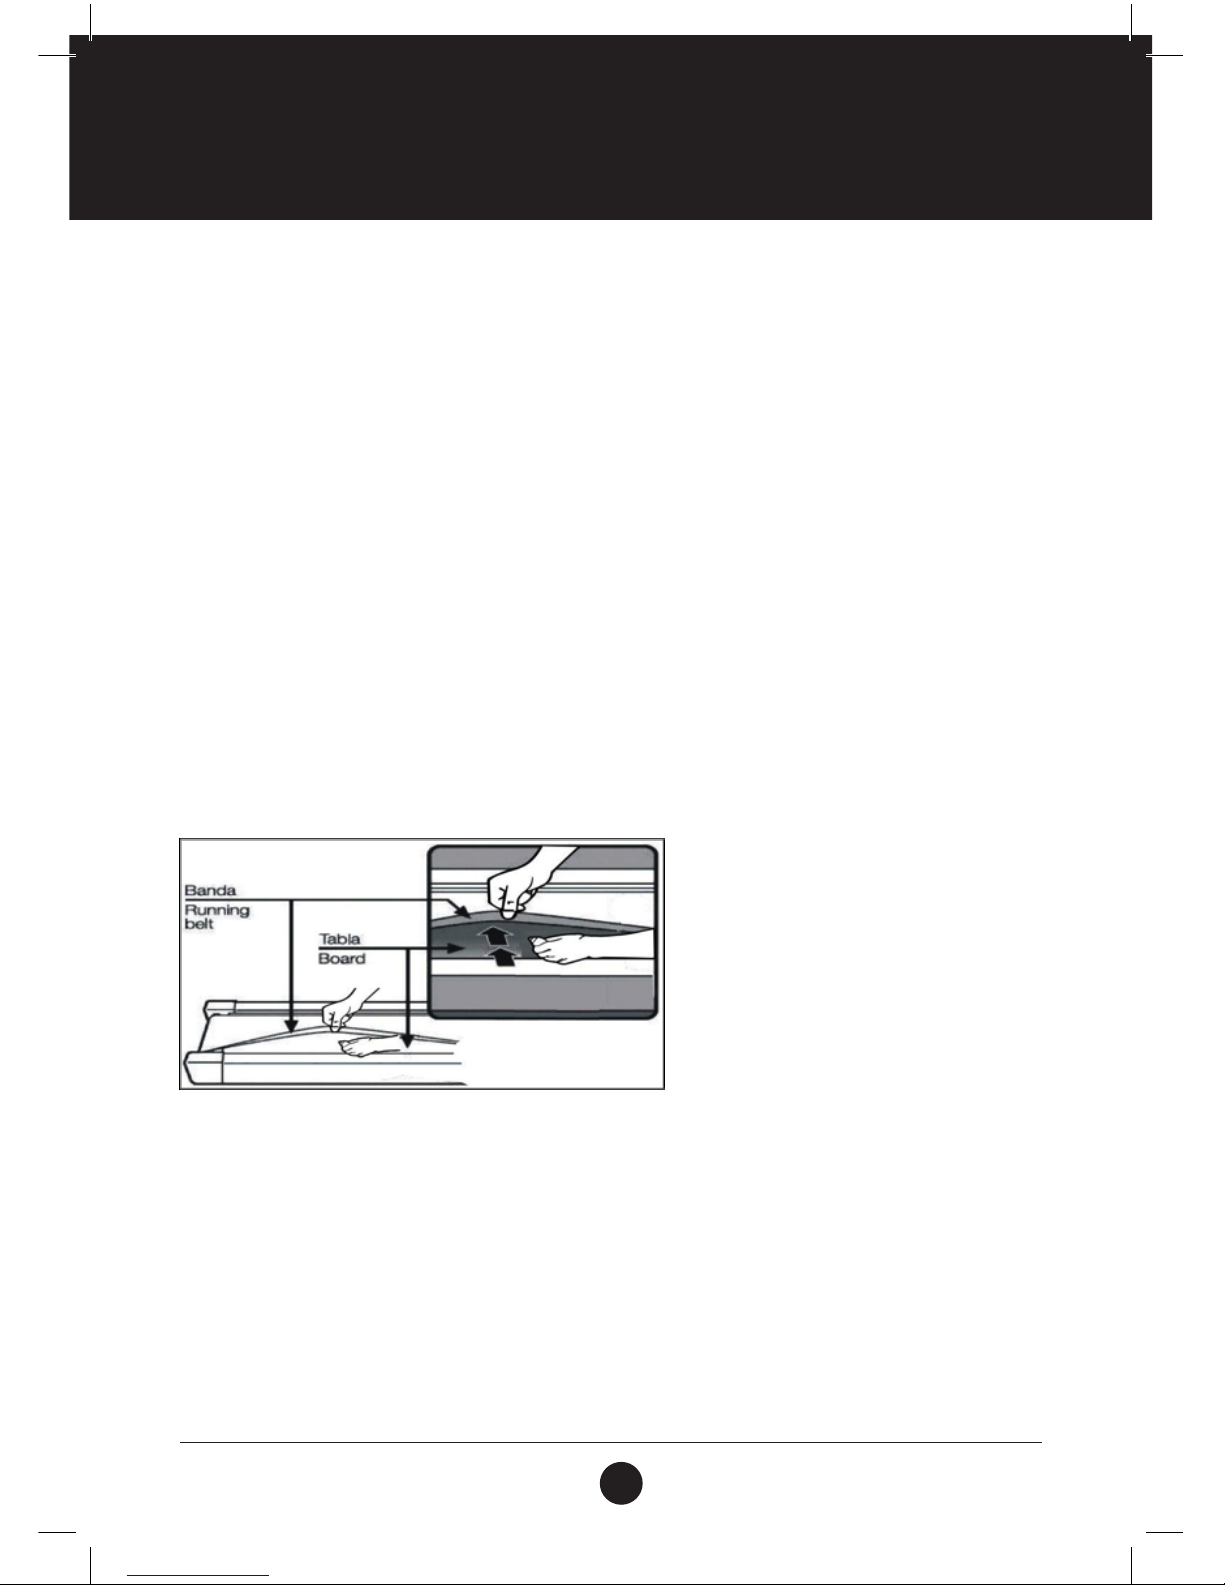
To avoid slipping during running as well as possibly damaging the belt it is important that the belt is kept
tight over the rollers. You can adjust the distance between the plates and the belt. Be careful not to
make belt too tight or too loose.
Page 26
26
TR 1500 - T
CENTRE THE RUNNING BELT
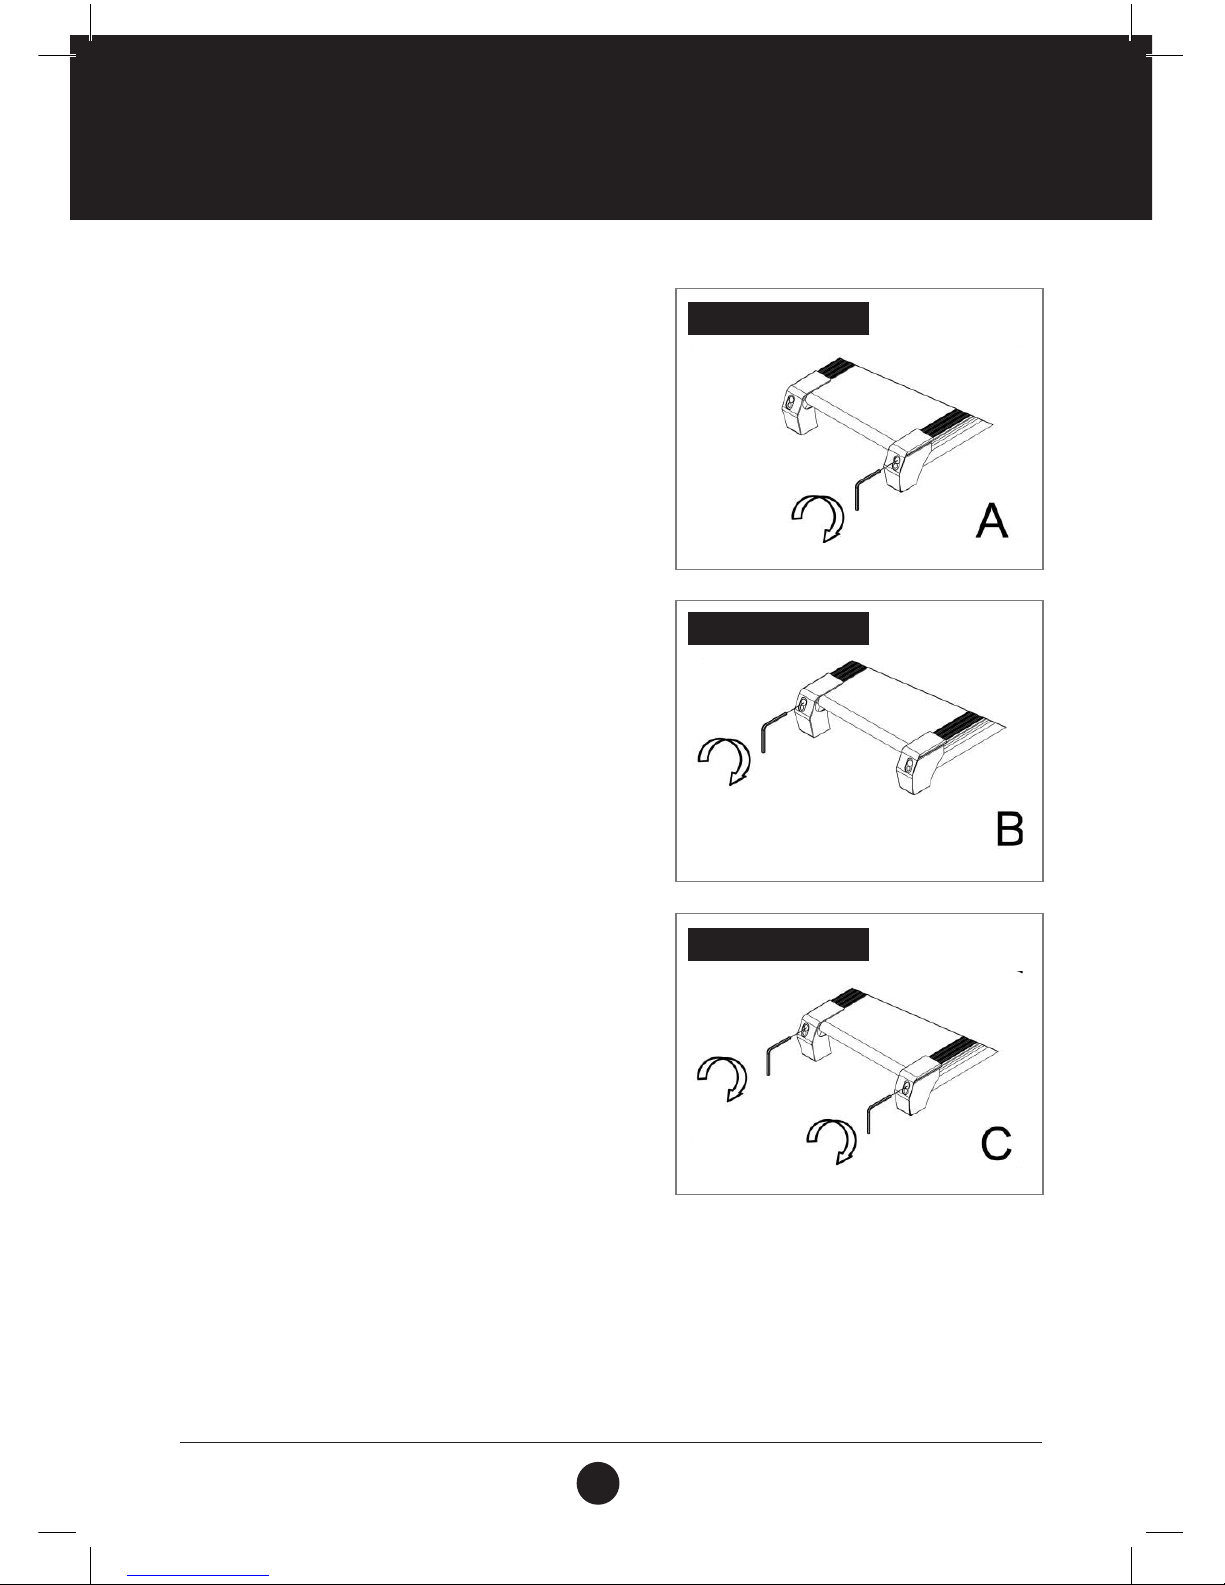
ILLUSTRATION A
Place treadmill on a level surface. Run Treadmill at
approximately 6-8 Km/h to check the running condition.
If the belt has drifted to the right, turn the right adjusting
bolt 1/4 turn clockwise, then start running until centering
the belt.
ILLUSTRATION B
If the belt has drifted to the left, turn the left adjusting
bolt 1/4 turn clockwise, then start running until centering
the belt.
ATTENTION: The space between the belt and the right/
left edgings are equal in distance. And the gap between
the right and left distance should be no more than 5 mm.
ILLUSTRATION C
Periodically adjust the tightness of the belt as the belt
tends to loosen after use. Turn the left and
right adjusting bolt, 1/4 turn clockwise, then re-start
running, conrm the belt-tightness until the belt is the
correct tightness.
ATTENTION: The space between the belt and the right/
left edgings are equal in distance. And the gap between
the right and left distance should be no more than 5 mm.
ILLUSTRATION A
ILLUSTRATION B
ILLUSTRATION C
Page 27
27
TR 1500 - T
FITNESS TIPS & TECHNIQUES
VISIT:
www.trojanhealth.co.za for equipment choices and exercise programs
AEROBIC EXERCISE
Aerobic exercise is any sustained activity that sends oxygen to your muscles via your heart and lungs.
Aerobic exercise improves the tness of your lungs and heart − your body’s most important muscle. Aerobic
exercise tness is promoted by any activity that uses your large muscles (arms, legs, or buttock, for
example). Your heart beats quickly and you breathe deeply. An aerobic exercise should form part of your
entire exercise routine.
WEIGHT TRAINING
Along with aerobic exercising which helps get rid of and keep off the excess fat that our bodies can store,
weight training is an essential part of the exercise routine process. Weight training helps tone, build and
strengthen muscle. If you are working above your target zone, you may want to do a lesser amount of reps.
Always consult your physician before beginning any exercise program.
MUSCLE CHART
TROJAN TR 1500 TREADMILL
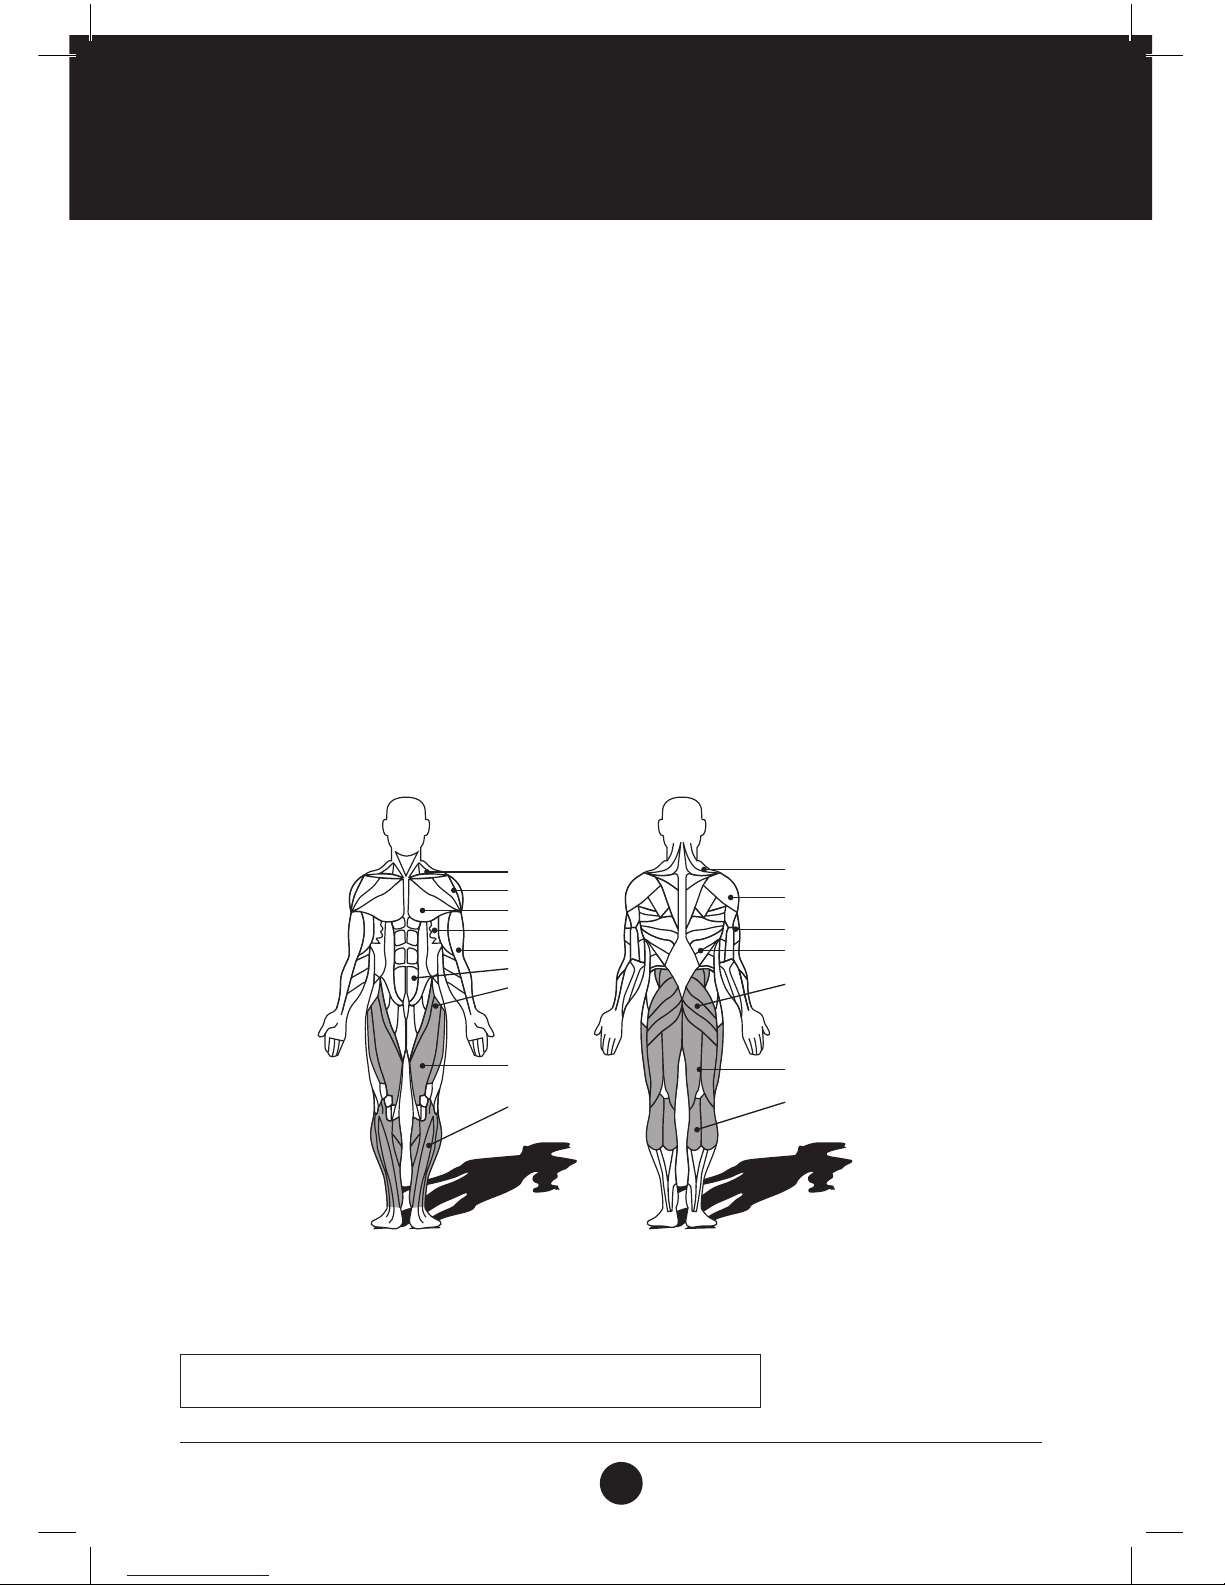
The exercise routine that is performed on the Trojan TR 1500 Treadmill will develop the lower body
muscle group as well as condition the circulatory system and provide a good aerobic workout. These muscle
groups are highlighted on the muscle chart below.
Tr apezius
Posterior
Tricep
Latissimus Dorsi
Gluteals
Hamstrings
Gastrocnemius
Tr apezius
Anterior
Pectoralis Major
Serratus Anterior
Biceps
Abdominal
Sartorius
Quadriceps
Tibialis
Page 28
28
TR 1500 - T
EXERCISE INTENSITY
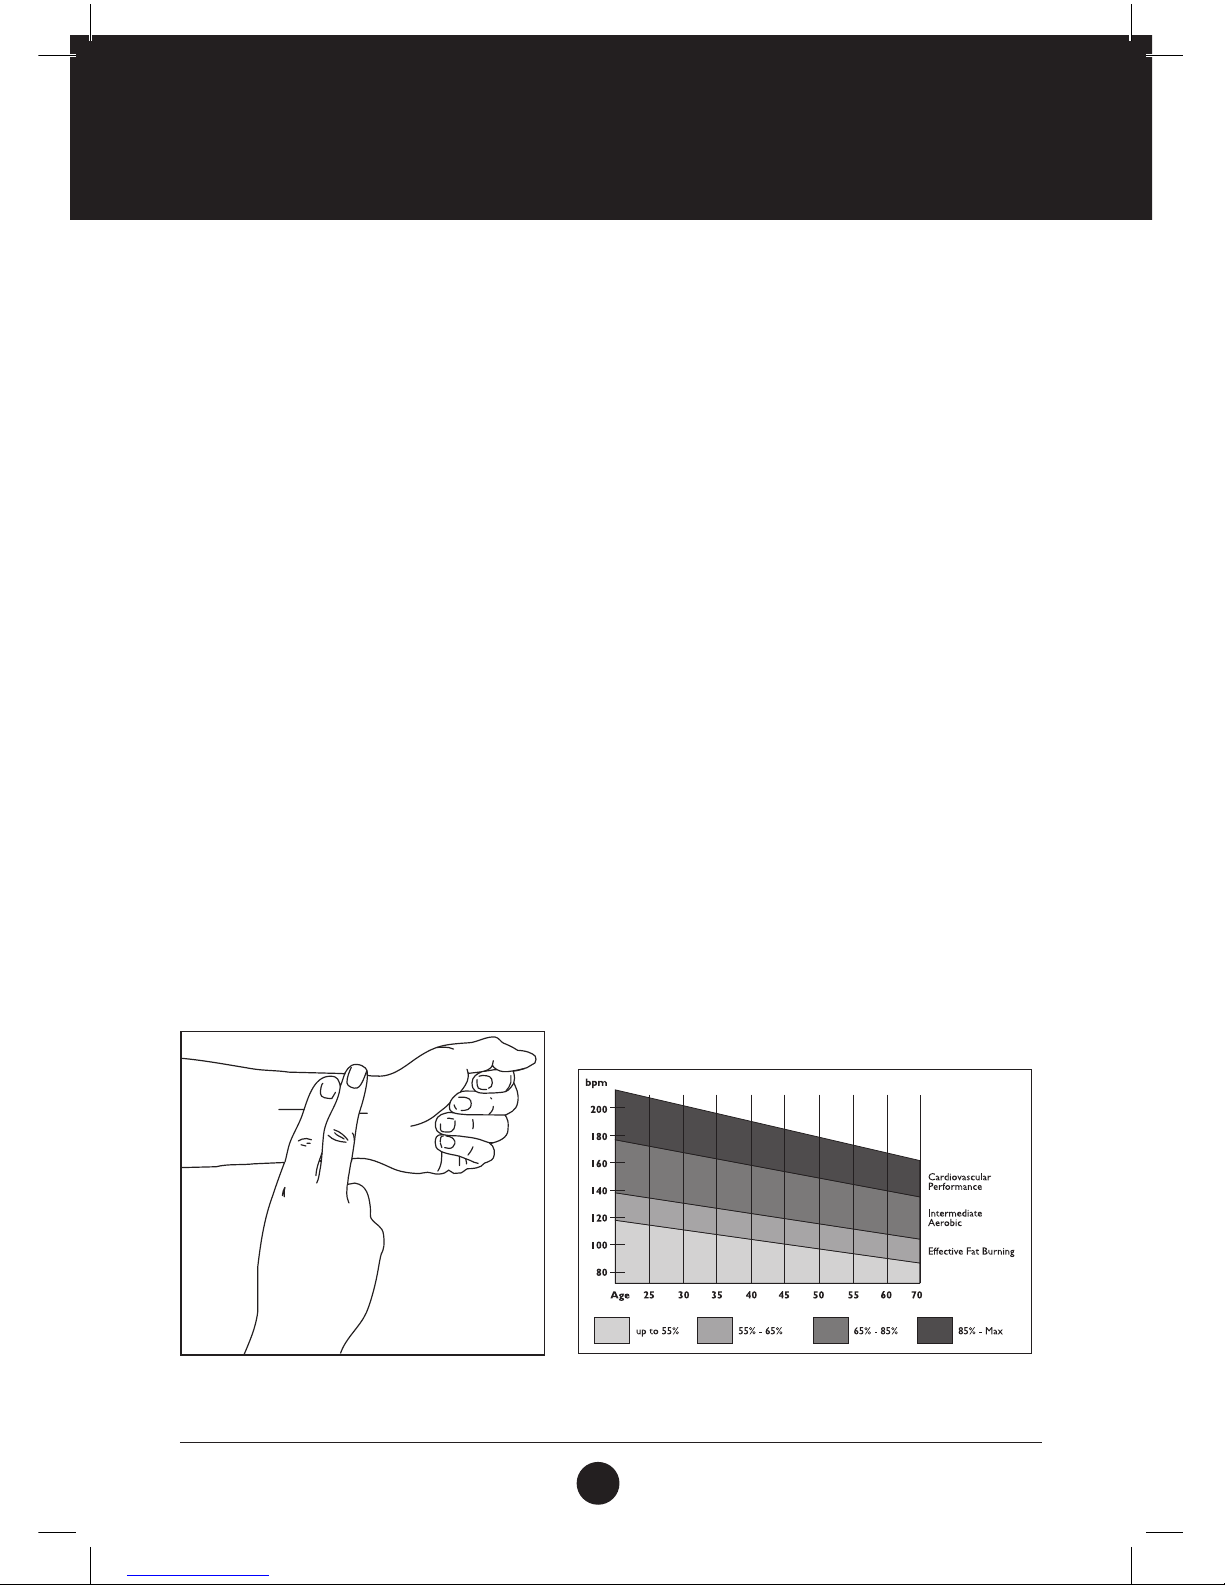
To maximise the benets of exercising, it is important to exercise with the proper intensity. The proper intensity
level can be found by using your heart rate as a guide. For effective aerobic exercise, your heart rate should be
maintained at a level between 65% and 85% of your maximum heart rate as you exercise. This is known as your
target zone. You can nd your target zone in the table below.
During the rst few months of your exercise program, keep your heart rate near the low end of your target zone as
you exercise. After a few months, your heart rate can be increased gradually until it is near the middle of your
target zone as you exercise.
To measure your heart rate, stop exercising but continue moving your legs or walking around and place two ngers
on your wrist. Take a six second heartbeat count and multiply the results by 10 to nd your heart rate. For
example, if your six second heartbeat count is 14, your heart rate is 140 beats per minute. (A six second count is
used because your heart rate will drop rapidly when you stop exercising).
Adjust the intensity of your exercise until your heart rate is at the proper level.
For more information visit:
www.trojanhealth.co.za
CONDITIONING GUIDELINES
How you begin your exercise program depends on your physical condition. If you have been inactive for
several years, or are severely overweight, you must start slowly and increase your time on the equipment, a
few minutes per workout.
Initially, you may be able to exercise only for a few minutes in your target zone, however, your aerobic
tness will improve over the next six to eight weeks. Don’t be discouraged if it takes longer. It’s important
to work at your own pace. Ultimately, you’ll be able to exercise continuously for 30 minutes. The better your
aerobic tness, the harder you will have to work to stay in your target zone. Please remember these
essentials:
• Have your doctor review your training and diet programs to advise you of a workout routine you should adopt.
• Begin your training program slowly with realistic goals that have been set by you and your doctor.
• Monitor your pulse frequently.
• Establish your target heart rate based on your age and condition.
Page 29
29
TR 1500 - T
WARM UP & COOL DOWN
WORKOUT GUIDELINES CLEANING
Each workout should include the following three parts:
1. A WARM-UP: 5 to 10 minutes of stretching and light exercise. A proper warm-up increases your body
temperature, heart rate, and circulation in preparation for exercise.
2. TRAINING ZONE EXERCISE: 20 to 30 minutes of exercising with your heart rate in your
training zone. (Note: During the rst few weeks of your exercise program, do not keep your heart
rate in your training zone for longer than 20 minutes).
3. COOL-DOWN: 5 to 10 minutes of stretching. This will increase the exibility of your muscles
and will help to prevent post-exercise problems.
EXERCISE FREQUENCY
To maintain or improve your condition, plan three workouts each week, with at least one day
of rest between workouts. After a few months of regular exercise, you may complete up to ve
workouts each week, if desired. Remember, the key to success is to make exercise a regular and
enjoyable part of your everyday life.
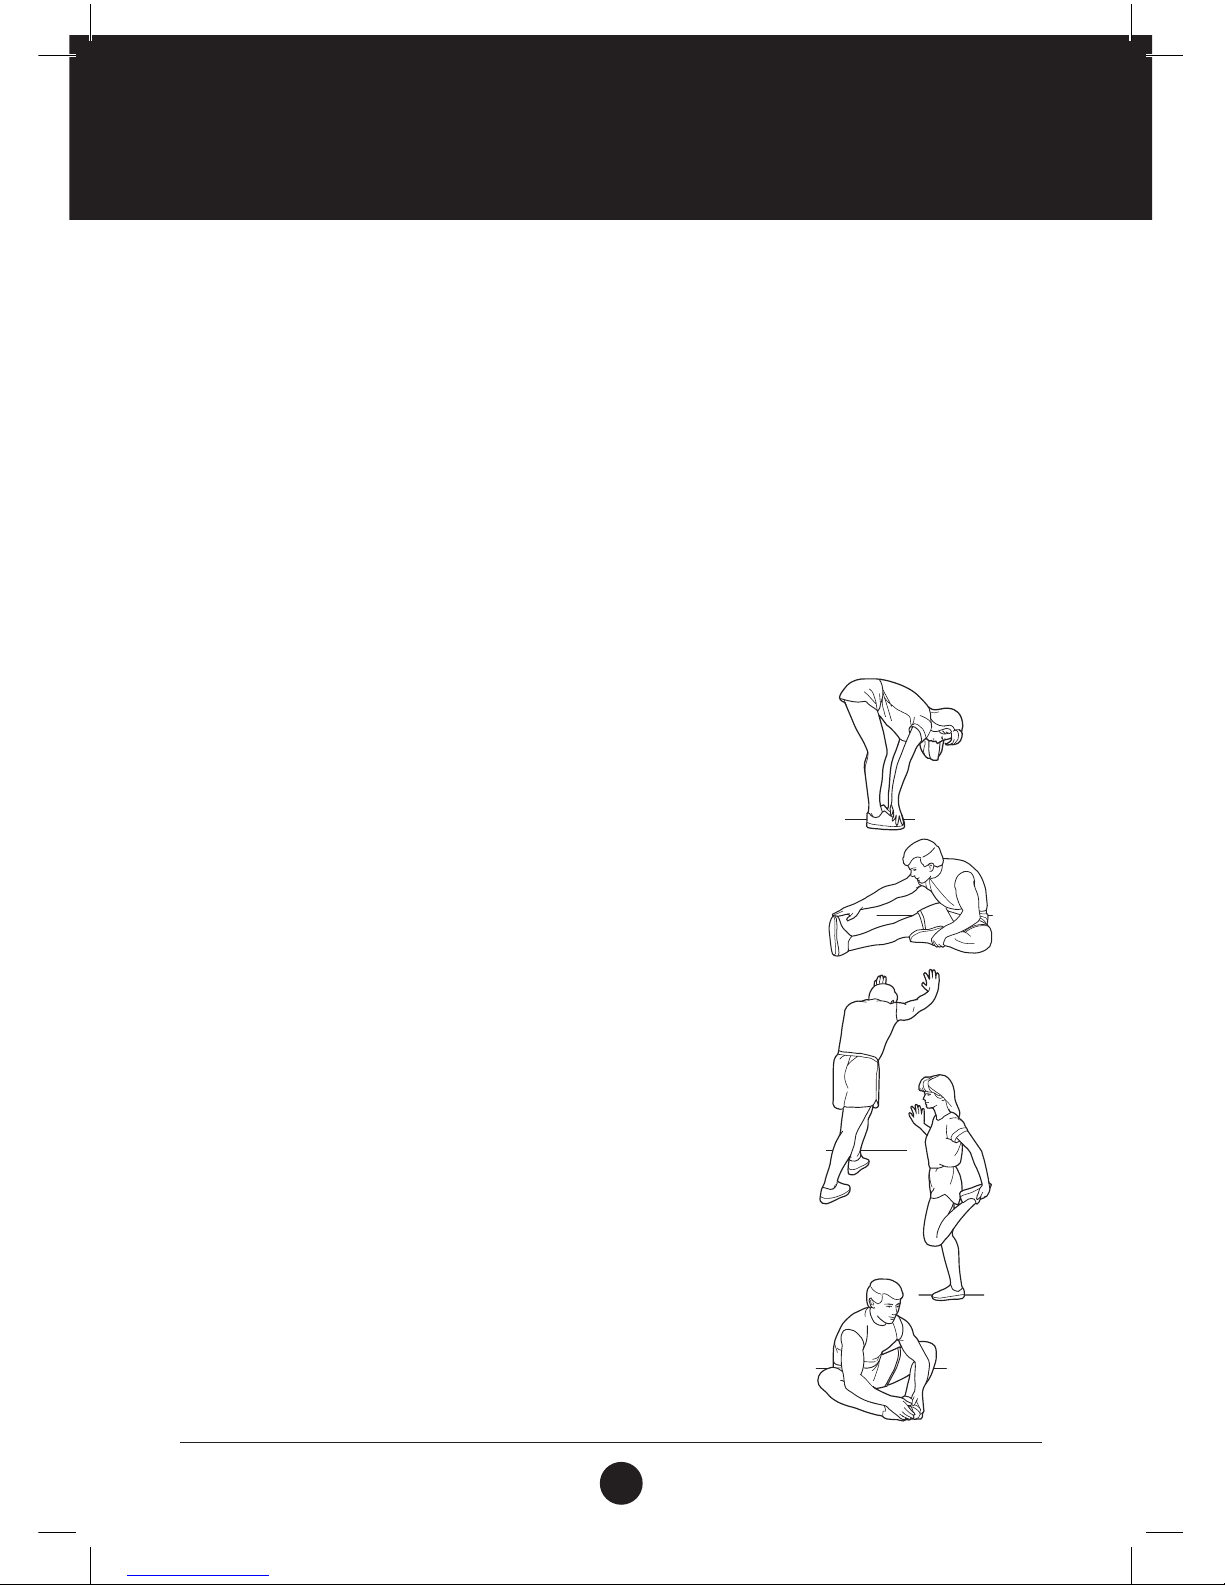
SUGGESTED STRETCHES
The correct form for several basic stretches is shown at the right
Move slowly as you stretch, hold the position and never bounce.
1. TOE TOUCH STRETCH
Stand with your knees bent slightly and slowly bend forward
from your hips. Allow your back and shoulders to relax as you reach
down toward your toes as far as possible. Hold for 15
counts, and then relax. Repeat 3 times.
Stretches: Hamstrings, back of knees and back.
2. HAMSTRING STRETCH
Sit with one leg extended. Bring the sole of the opposite foot toward
you and rest it against the inner thigh of your extended leg. Reach
toward your toes as far as possible. Hold for 15 counts, and then relax.
Repeat 3 times for each leg.
Stretches: Hamstrings, lower back and groin.
3. CALF/ACHILLES STRETCH
With one leg in front of the other, reach forward and place your hands
against a wall. Keep your back leg straight and your back foot at on
the oor. Bend your front leg, lean forward and move your hips toward
the wall. Hold for 15 counts, and then relax. Repeat 3 times for each
leg. To cause further stretching of the Achilles tendons, bend you back
leg as well.
Stretches: Calves, Achilles tendons and ankles.
4. QUADRICEPS STRETCH
With one hand against a wall for balance, reach back and grasp one
foot with your other hand. Bring your heel as close to your buttocks
as possible. Hold for 15 counts, then relax. Repeat 3 times for each leg.
Stretches: Quadriceps and hip muscles.
5. INNER THIGH STRETCH
Sit with the soles of your feet together and your knees outward. Pull
your feet toward your groin area as far as possible. Hold for 15 counts,
and then relax. Repeat 3 times.
Stretches: Quadriceps and hip muscles.
1
2
3
4
5
Page 30
30
TR 1500 - T
2 YEAR LIMITED WARRANTY
The Manufacturer hereby provides a warranty to the original purchaser of this product (‘the Consumer’)
that this product will be free of manufacturing defects in materials and workmanship which under
normal, personal, family or household use (commercial use expressly excluded) manifest themselves
within 2 years from the date of purchase.
EXCLUSIONS
• The warranty does not include and will not be construed to cover products damaged as a result of
disaster, misuse, commercial use, not in accordance within the written instructions included with
the product, abuse and/or any non-authorised modication of the product, incorrect installation of
the product or normal wear and tear.
• All demo models carry a 3 month warranty.
WAIVER
The warranty and the obligations of the Manufacturer provided herein are in lieu of, and the consumer,
waives all other warranties, guarantees, conditions or liabilities, express or implied, arising by law or
otherwise, including without limitation, any obligation of the manufacturer in respect of any injury,
loss or damage (direct, indirect or consequential) arising out of the use of, or inability to use this
product and whether or not occasioned by the manufacturer’s negligence or any act or omission on its part.
PROOF OF PURCHASE
Any claim in terms of the warranty must be supported by a proof of purchase or a warranty number.
Warranty numbers can be issued through contacting our Trojan Call Centre on 0861 Trojan
(0861 876526) or online at www.trojanhealth.co.za. Customers residing outside South Africa can contact us on
+27 10 206 4405. If such proof is not available, then notwithstanding anything to the contrary herein, the
service agent’s prevailing charges for services/repairs including call out and/or spares will be payable by the
Consumer upon collection or delivery of the repaired product.
The Consumer does not need to return the product to the store. The Consumer should call the Trojan
Call Centre on 0861 Trojan (0861 876526). Customers residing outside South Africa can contact us on
+27 10 206 4405 and the call centre will advise of the procedure. During the warranty period the product
may only be serviced and/or repaired by the Manufacturer’s duly authorised agent(s).
/ +27 10 206 4405
Page 31
31
TR 1500 - T
REPAIRS PROCEDURE
Visit facebook.com/trojanhealth
www.trojanhealth.co.za
#18M06T018
Should you experience any faults or breakdowns on your Trojan equipment, please adhere to the following
procedure to have the fault rectied speedily and professionally.
Do not return the product to the store.
Call the Trojan Call Centre on 0861 Trojan (0861 876526) to log the faulty product (under warranty or out of
warranty). Customers residing outside South Africa can contact us on +27 10 206 4405.
The operator or technical advisor will try identify the fault, and will book a service team call out.
The service team will endeavour to x the problem in your home on an agreed date and time.
Only if the fault cannot be repaired in the convenience of your home, will the service team take the faulty
product back to the service centre.
Items repaired in our service centre will be returned to your home on an agreed date and time.
Note: Should you live in an outlying area or outside South Africa, it may be necessary to return the product
to the store nearest to you. Our service operator will advise you of your repair procedure.
COST OF REPAIRS
UNDER WARRANTY
Any items still under warranty will be repaired free of charge, as long as it complies with the terms and
conditions of the warranty (refer to “warranties” section in this manual). Any items that need to be repaired
that are NOT covered in the warranty will be for the consumer’s expense. A quote for the repair/replacement
of these items will be provided to the consumer for approval prior to repairs being conducted.
OUT OF WARRANTY
Any items that need to be repaired once the warranty has expired will be for the consumer’s expense
including call out fees.
A quote for the repair/replacement of these items will be provided to the consumer for approval prior to
repairs being conducted.
Manufactured For Masstores (Pty) Ltd.
16 Peltier Drive, Sunninghill, Ext 6, Sandton, 2146, South Africa.
MADE IN CHINA
If this product p roves to
be faulty d uring normal
use due to d efective
materials
or
workmanship.
Refer t o our website for
terms and conditions.
Please call us for any product
queries, after s ales support,
repairs or installations.
Always consult a
physician before starting
a new exercise routine
Use in conjunction
with a healthy
eating plan
Only use product for
its intended purpose
to prevent injury
YEAR
WARRANTY
0861 876 526
0861 TROJAN
+27 10 206 4405
Page 32

32
TR 1500 - T
NOTES
 Loading...