

Page 1
HOME GYM CARE INSTRUCTIONS
AND ASSEMBLY MANUAL
TROJAN
MY SPACE MY TIME
®
#
1
HOME
FITNESS
SO
UTH AFRI
CA’
S
SI
N
CE
1981
CAUTION
READ ALL PRECAUTIONS AND
INSTRUCTIONS IN THIS MANUAL
BEFORE USING THIS EQUIPMENT
KEEP THIS MANUAL FOR
FUTURE REFERENCE
1 YEAR
warranty
CALL
0861 876526
0861 TROJAN
POWER STACK 500
HOME GYM
1574
Page 2

1. SAFETY INSTRUCTIONS 3
2. PRE ASSEMBLY CHECK LIST 4
3. PARTS LIST 5
4. HARDWARE LIST 7
5. ASSEMBLY STEPS 9
6. FITNESS TIPS AND TECHNIQUES 18
7. CONDITIONING GUIDELINES 19
8. WARM-UP AND COOL-DOWN 20
9. EXERCISE PROGRAM 21
10. FREQUENTLY ASKED QUESTIONS 25
11. EXPLODED DRAWING 26
12. TROJAN 1 YEAR LIMITED WARRANTY 27
13. TROJAN REPAIRS PROCEDURE 29
INDEX PAGE
Page 3

1574-3
1. SAFETY INSTRUCTIONS
WARNING :
To reduce the risk of serious injury, read the following safety instruction before using the TROJAN POWER
STACK 500.
1. Use the TROJAN POWER STACK 500 only on a level surface.
2. Keep children and pets away from this equipment at all times.
3. The TROJAN POWER STACK 500 is able to handle a max user weight (120kg) and stack weight (68kg)
4. The TROJAN POWER STACK 500 should be used by only one person at a time.
5. Be careful to maintain your balance while using, mounting, dismounting, folding, unfolding or assembling the TROJAN
POWER STACK 500, loss of balance may result in a fall and serious bodily injury.
6. Use the TROJAN POWER STACK 500 only as described in the manual.
7. Do not attempt to adjust the back rest while you are on the TROJAN POWER STACK 500.
8. Before using this equipment to exercise, always do stretching exercises to warm up properly.
9. Always make sure all bolts and nuts are tightened prior to each use.
WARNING
Before starting any exercise or conditioning program you should consult with your personal physician to see if you
require a complete physical exam. This is especially important if you are over the age of 35, have never exercised before,
are pregnant, or suffer from any illness.
Page 4
1574-4
Thank you for choosing the TROJAN POWER STACK 500 We take great pride in producing this quality product and
hope it will provide many hours of quality exercise to make you feel better, look better and enjoy life to its fullest.
Yes, it’s a proven fact that a regular exercise program can improve your physical and mental health. Too often, our busy
lifestyles limit our time and opportunity to exercise. The TROJAN POWER STACK 500 provides a convenient and simple
method to begin your assault on getting your body in shape and achieving a healthier lifestyle.
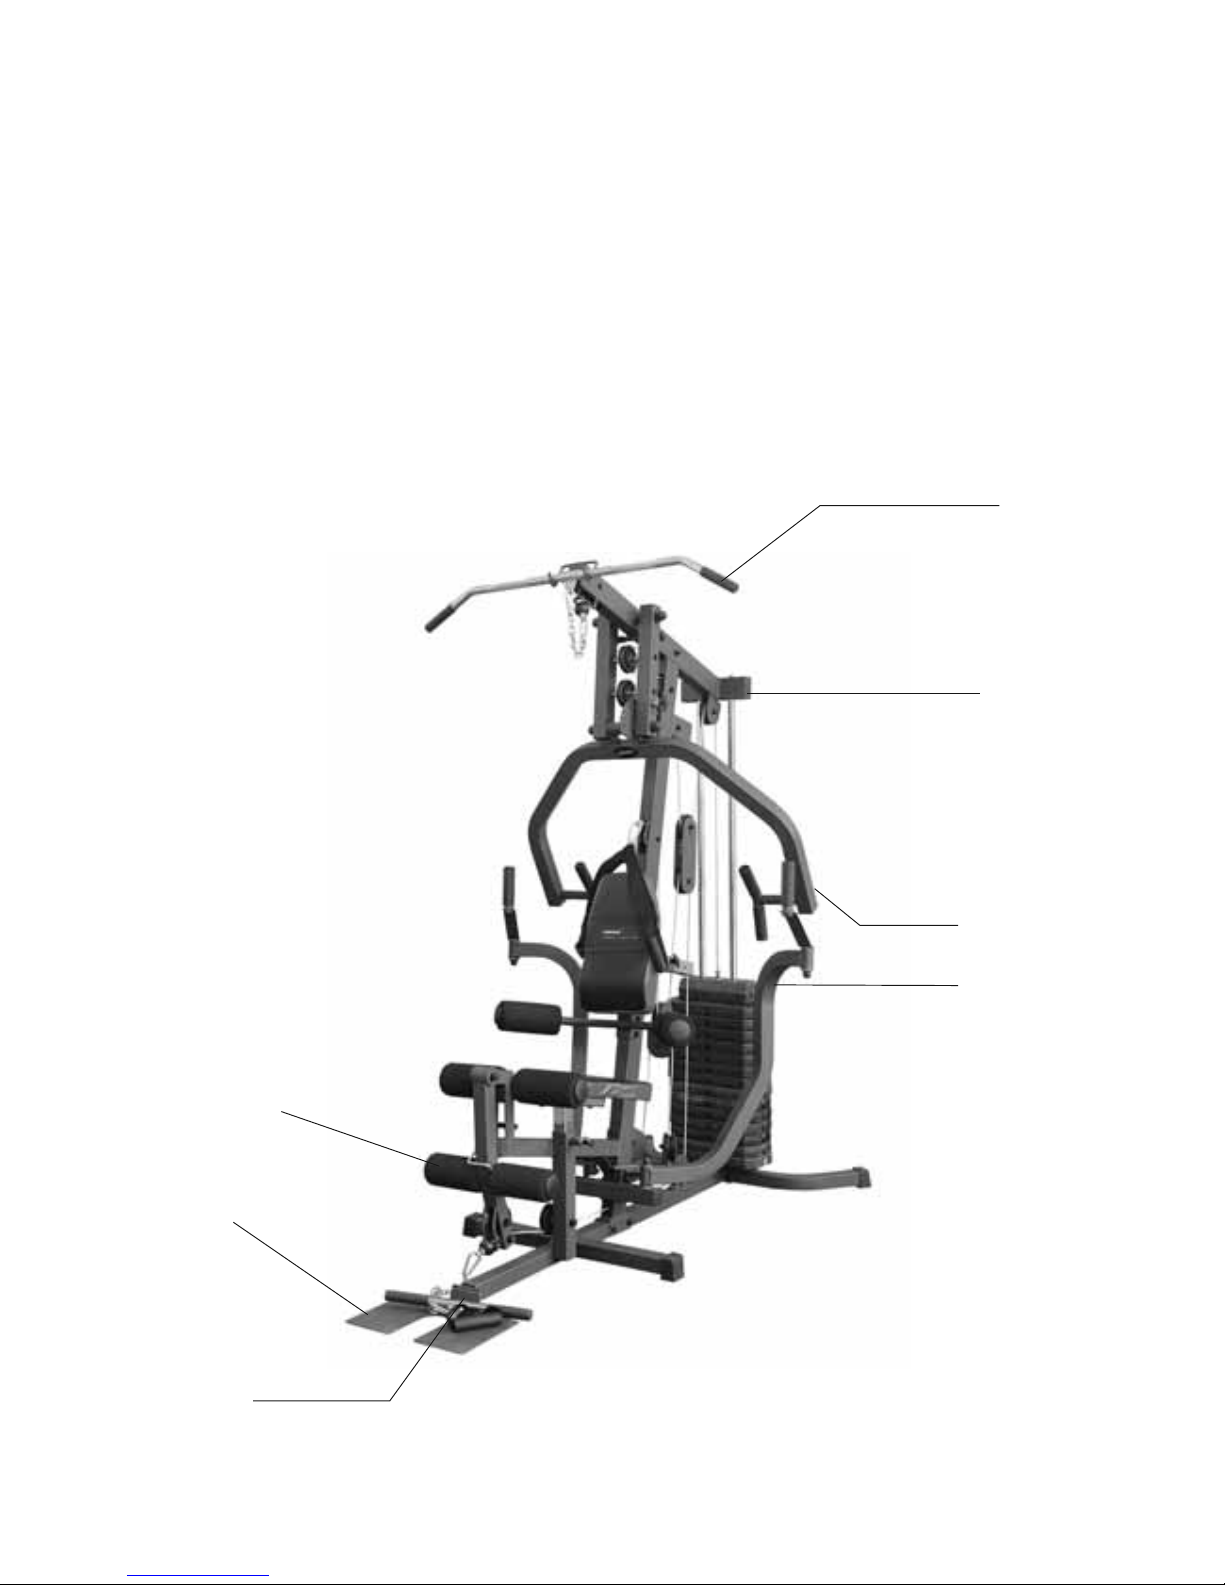
Before reading further, please review the drawing below and familiarize yourself with the parts that are labeled.
• Read this manual carefully before using the TROJAN POWER STACK 500
Leg Extension
Frame
Press Arm
Butterfly Arm
Lat Bar
Foot Plate
Spport Frame
Motif Plate
2. PRE ASSEMBLY CHECK LIST
Page 5
1574-5
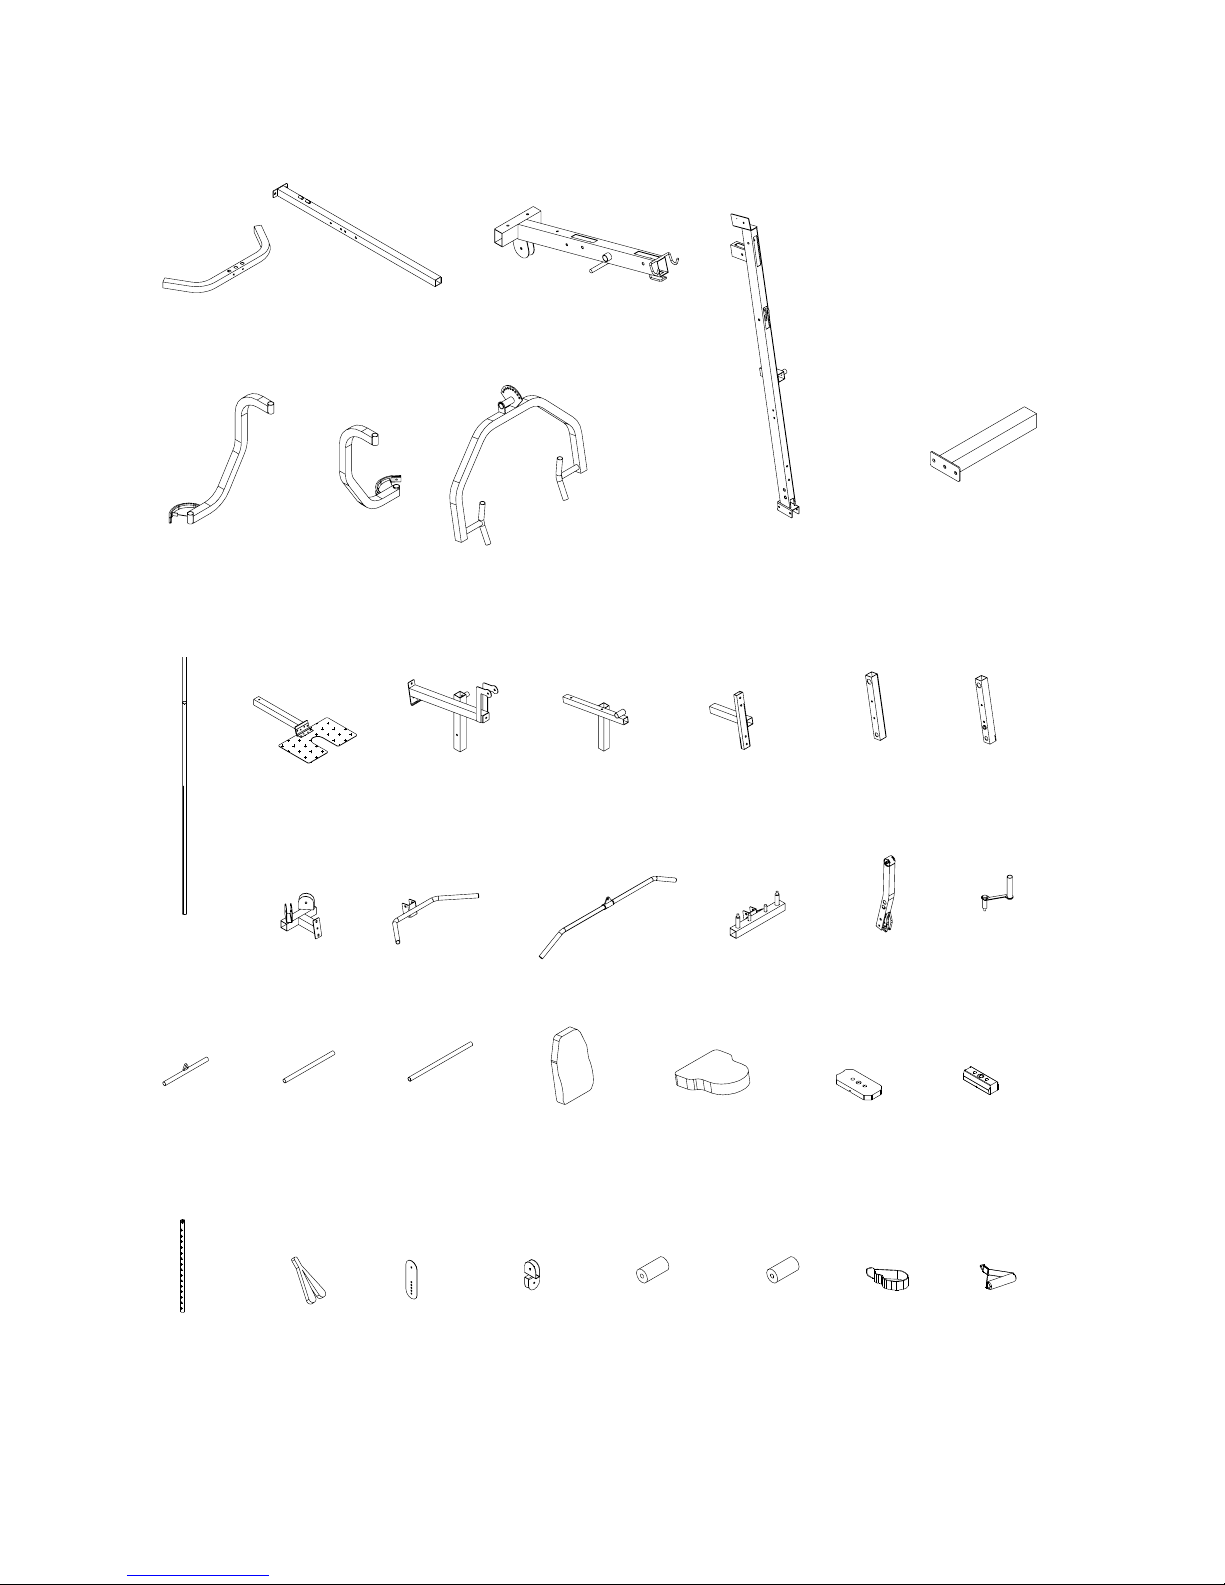
3. PARTS LIST
(23L)LONG
FOAM ROD
1PC
(32B)FOAM
ROLL 2PCS
(1)REAR BASE
FRAME 1PC
(2)MAIN BASE
FRAME 1PC
(3)TOP FRAME
1PC
(4)LEFT PRESS
FRAME 1PC
(5)RIGHT
PRESS FRAME
1PC
(6)PRESS ARM
1PC
(7)FRONT
UPRIGHT 1PC
(8)BASE FRAME
2PCS
(9)CHROME
TUBE 2PCS
(12)SEAT
FRAME 1PC
(11)SEAT
SUPPORT
FRAME 1PC
(10)FOOT PLATE
1PC
(13)BACK REST
SUPPORT 1PC
(14)RIGHT
CONNECT
FRAME 1PC
(15)LEFT
CONNECT
FRAME 1PC
(16)BRACKET
SUPPORT
1PC
(17)HAND BAR
1PC
(18)LAT BAR
1PC
(19)BUTTERFLY
MOUNT 1PC
(20)LEG
EXTENSION
1PC
(21)HAND TUBE
2PCS
(27)TOP
WEIGHT 1PC
(26)WEIGHT
PLATE 14PCS
(25)SEAT
CUSHION 1PC
(24)BACKREST
CUSHION 1PC
(23S)SHORT
FOAM ROD
1PC
(22)CURL BAR
1PC
(34)HANDLE
1PC
(32A)BIG FOAM
ROLL 4PCS
(31)PULLEY
HOUSING
1PC
(30)STEEL
PLATE 2PCS
(29)AB
STRAP
1PC
(28)WEIGHT
SELECTION
ROD 1PC
(33)ANKLE
STRAP 1PC
Page 6
1574-6
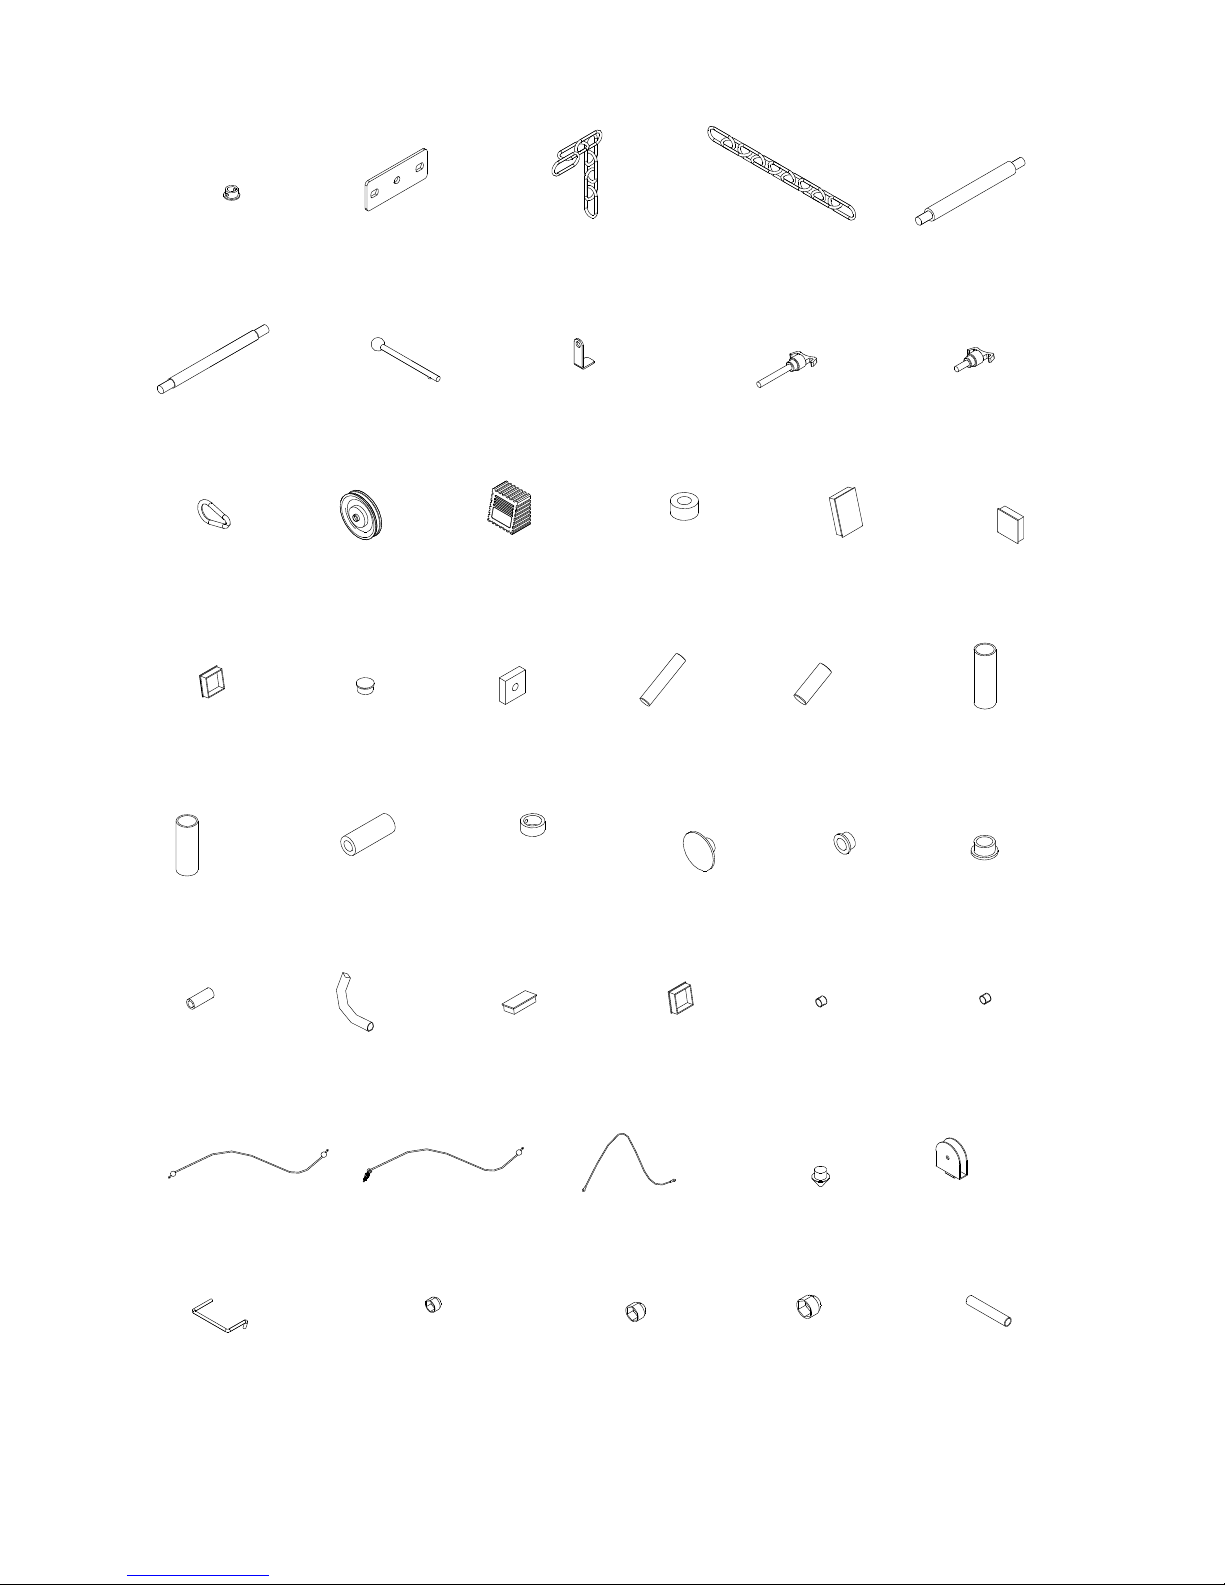
PARTS LIST
(100)SINGLE
PULLEY
BRACKET 1PC
(101)LOCK
HOOK 1PC
(102)3/8" PLASTIC
DOME CAP 8PCS
(103)1/2" PLASTIC
DOME CAP 2PCS
(104)5/8" PLASTIC
DOME CAP 4PCS
(105)PIN 1PC
(94)TAPER
END PLUG 1PC
(36)CONNECT
PLATE 1PC
(37)CHAIN 1PC
(38)LONG CHAIN
1PC
(39)BIG PIVOT
SHAFT 1PC
(40)PIVOT SHAFT
1PC
(41)BLACK BALL
PIN 1PC
(42)PULLEY HOOK
1PC
(43)LONG POP PIN
1PC
(44)POP PIN
2PCS
(49)50X75mm
SQUARE PLUG
4PCS
(48)ROUND
DONUT 2PCS
(47)SQUARE END
CAP 4PCS
(46)PULLEY
17PCS
(45)CHAIN HOOK
5PCS
(54)HAND GRIP
4PCS
(53)SQUARE
BUMPER 1PC
(52)32mm ROUND
END PLUG 8 PCS
(51)45X45mm
SQUARE END
PLUG 1PC
(50)50X50m
m
SQUARE EN
D
PLUG 11PC
S
(59)STEEL
BUSHING 2PCS
(58)LONG HAND
GRIP 2PCS
(57)SHORT FOAM
GRIP 4PCS
(56)LONG FOA
M
GRIP 2PCS
(55)SMALL HAND
GRIP 2PCS
(65)25X50mm
SQUARE PLUG
2PCS
(64)LITTLE
COVER 2PCS
(62)COPPER
BUSHING 10
P
(61)LITTLE OIL
BUSHING 6PCS
(60)ROUND CAP
6PCS
(71)BUTTERFLY
CABLE 1PC
(69)LOWER
CABLE 1PC
(68)LITTLE
BUSHING 2P
C
(67)MIDDLE
BUSHING 11PCS
(66)38X38mm
SQUARE END
PLUG 2PCS
(63)BIG BUSHING
4PCS
(70)UPPER CABLE
1PC
PLASTIC BUSHING
PC
5)
NOTE :
The described parts are all you need to assemble this machine.
Before starting assembly, please check the hardware packing to make sure they are included.
Page 7
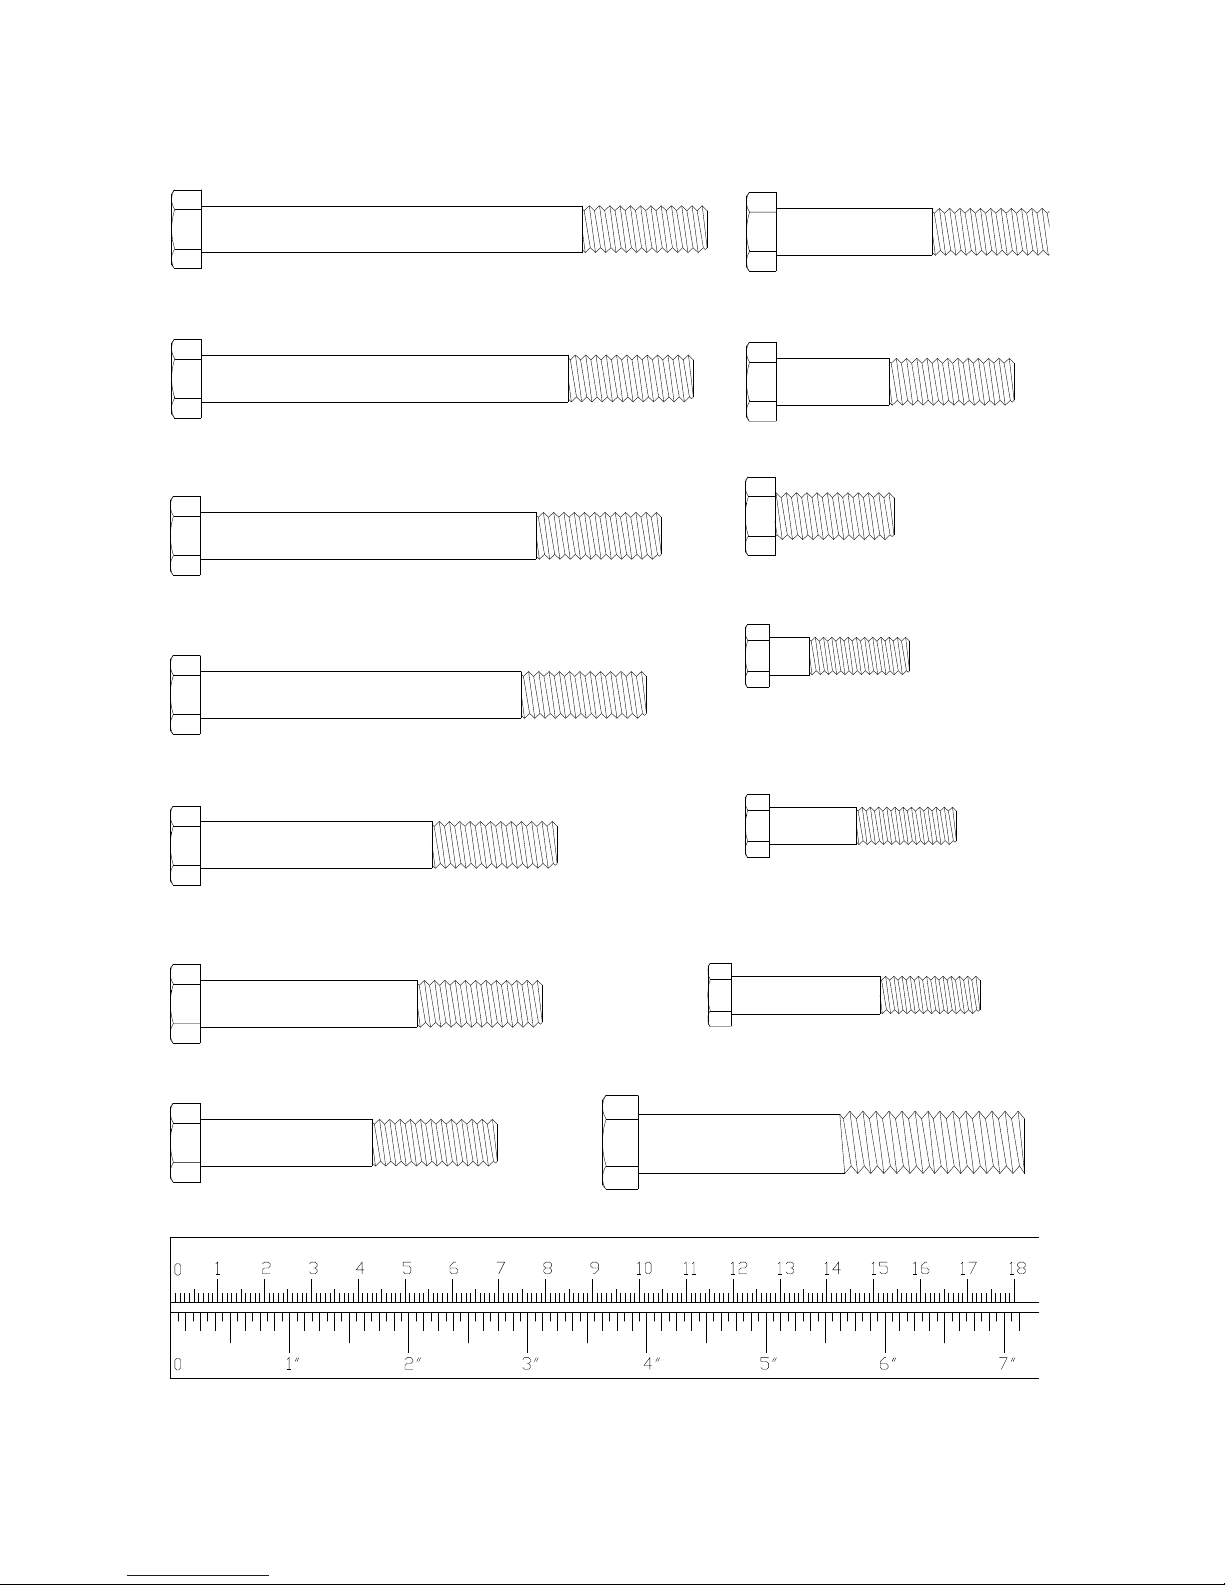
1574-7
(97)M8X30mm HEX BOLT 2PCS
(78)3/8"x2-3/8" HEX BOLT 2PCS
(95)3/8"x4" HEX BOLT 1PC
(81)M8X40mm HEX BOLT 2PCS
(79)M8X53mm HEX BOLT 2PCS
mm
(80)3/8"x2" HEX BOLT 8PCS
(82)3/8"x1" HEX BOLT 5PCS
(74)3/8"x3-3/4" HEX BOLT 2PCS
(72)3/8"x4-1/4" HEX BOLT 1PC
(75)3/8"x3" HEX BOLT 8PCS
(76)3/8"x2-7/8" HEX BOLT 2PCS
(77)3/8"x2-1/2" HEX BOLT 5PCS
(73)3/8"x3-7/8" HEX BOLT 1PC
(92)1/2"x3-1/4" HEX BOLT 2PCS
4. HARDWARE LIST
Page 8
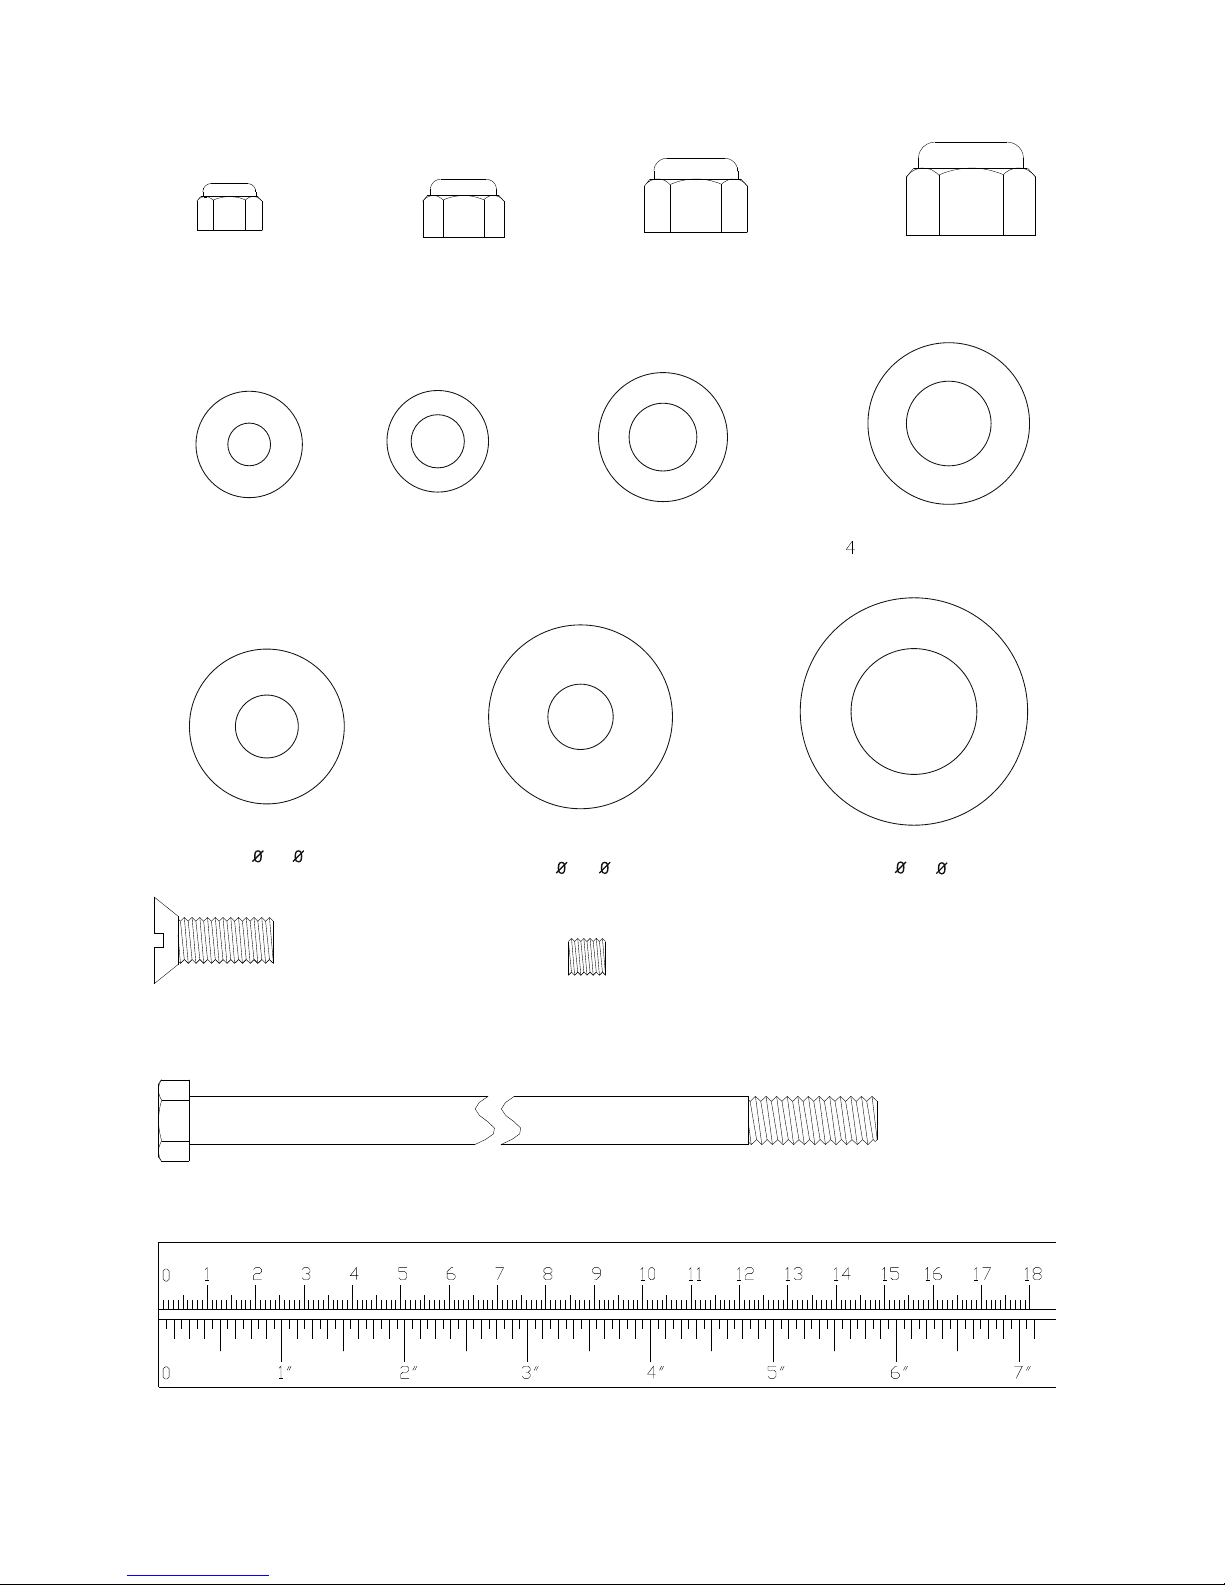
1574-8
HARDWARE LIST
(98)M8 LOCKNUT
2PCS
(99)8mm WASHER
8PCS
(106)WASHER
(T3.0X 13X 32)
1PC
mm
(89) WASHER
(T3.0X 47X 26)
1PC
(90)BIG WASHER
(T3.0X 38X 13.5)
4PCS
(93)3/8"x8-3/4" HEX BOLT 2PCS
(96)M10x25mmSCREW 1PC
(87)1/2" WASHER
4PCS
(84)1/2" LOCKNUT
6PCS
(83)3/8" LOCKNUT
32PCS
(86)3/8" WASHER
67PCS
(88)5/8" WASHER
PCS
(91)M6x8mmSCREW 2PCS
(85)5/8" LOCKNUT
4PCS
Page 9
1574-9
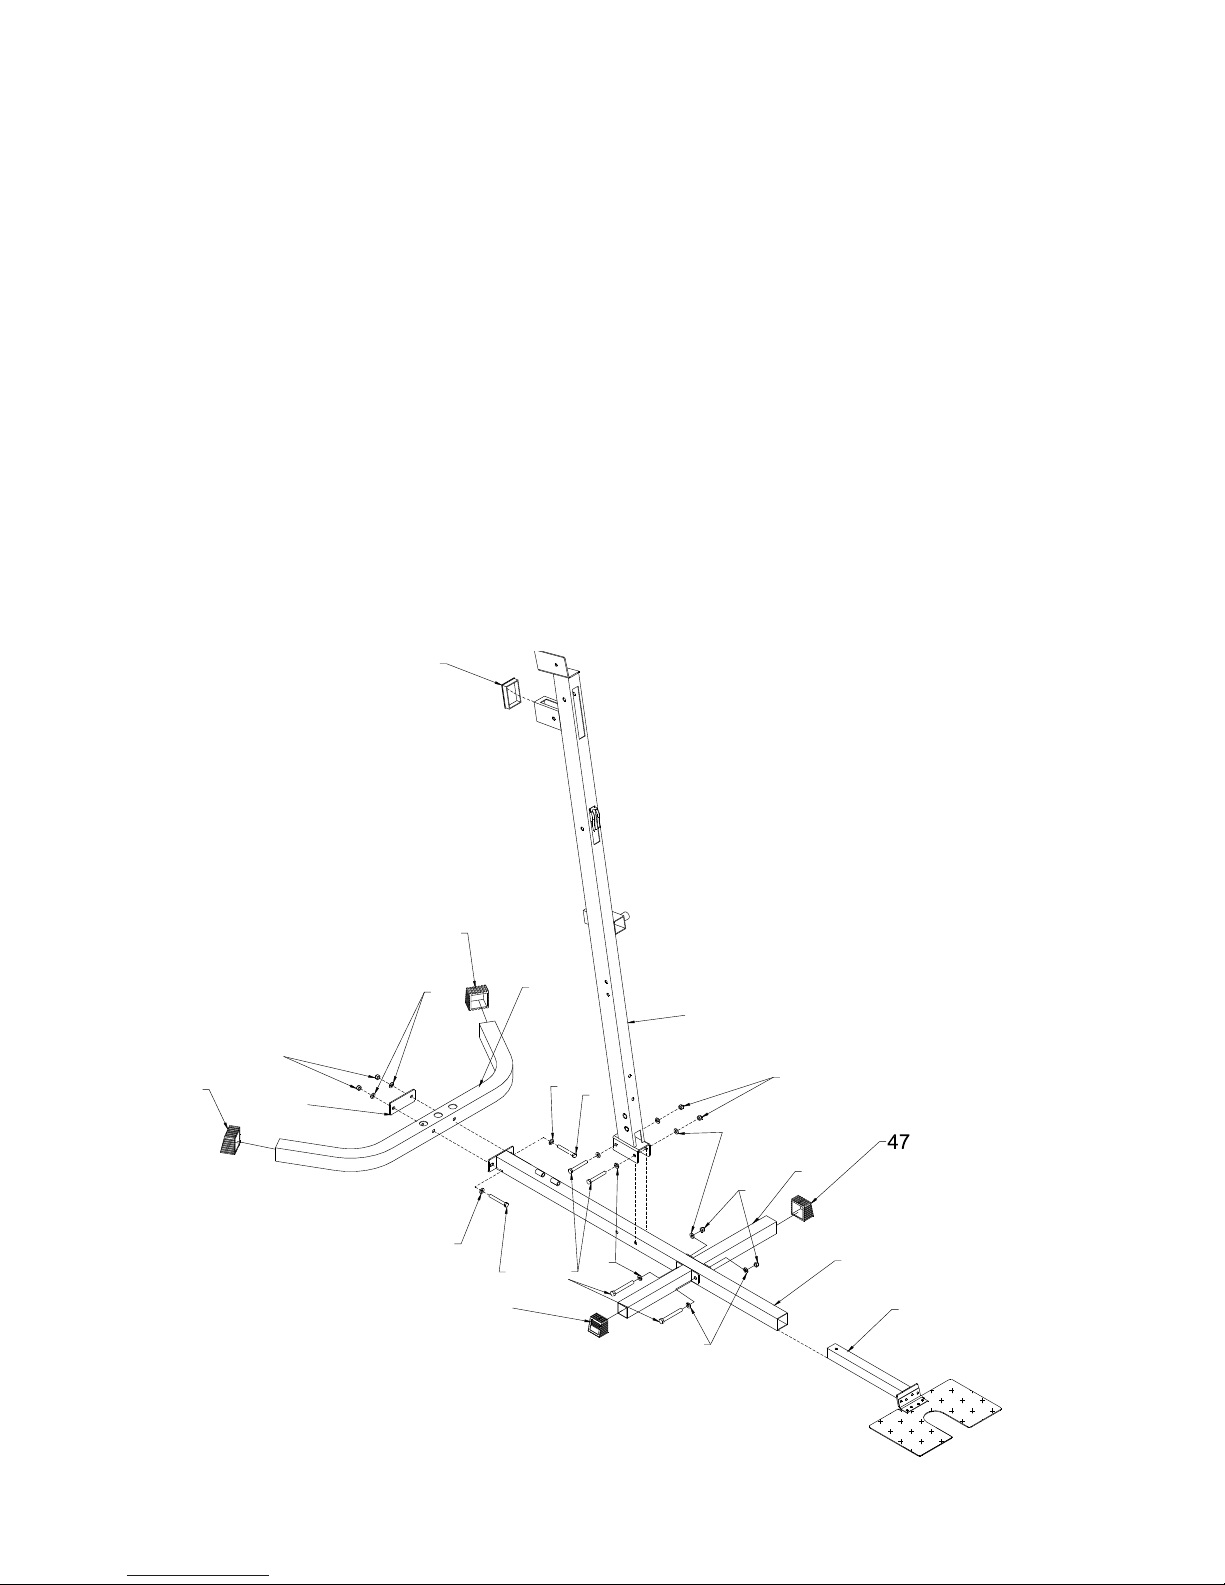
STEP 1
• Push Square End Cap (47) onto ends of Rear Base Frame (1) and Base Frame (8). Attach Connect Plate (36) and
Rear Base Frame (1) to Main Base Frame (2) using 2- 3/8”X3” hex bolts (75) 4-3/8” Washers (86) 2-3/8” Locknuts
(83).
• Plug 50x75mm Square Plug (49) onto Front Upright (7). Insert Foot Plate (10) to Main Base Frame (2).
• Attach Two Base Frame (8) to Main Base Frame (2),
• Attach Front Upright (7) to Main Base Frame (2) using 4- 3/8”X3” Hex Bolts (75) 8-3/8” Washers (86) 4-3/8”
Locknuts (83).
5. ASSEMBLY STEPS
47
83
86
47
1
2
10
7
49
83
86
36
47
75
86
75
86
83
86
75
86
8
Page 10
1574-10
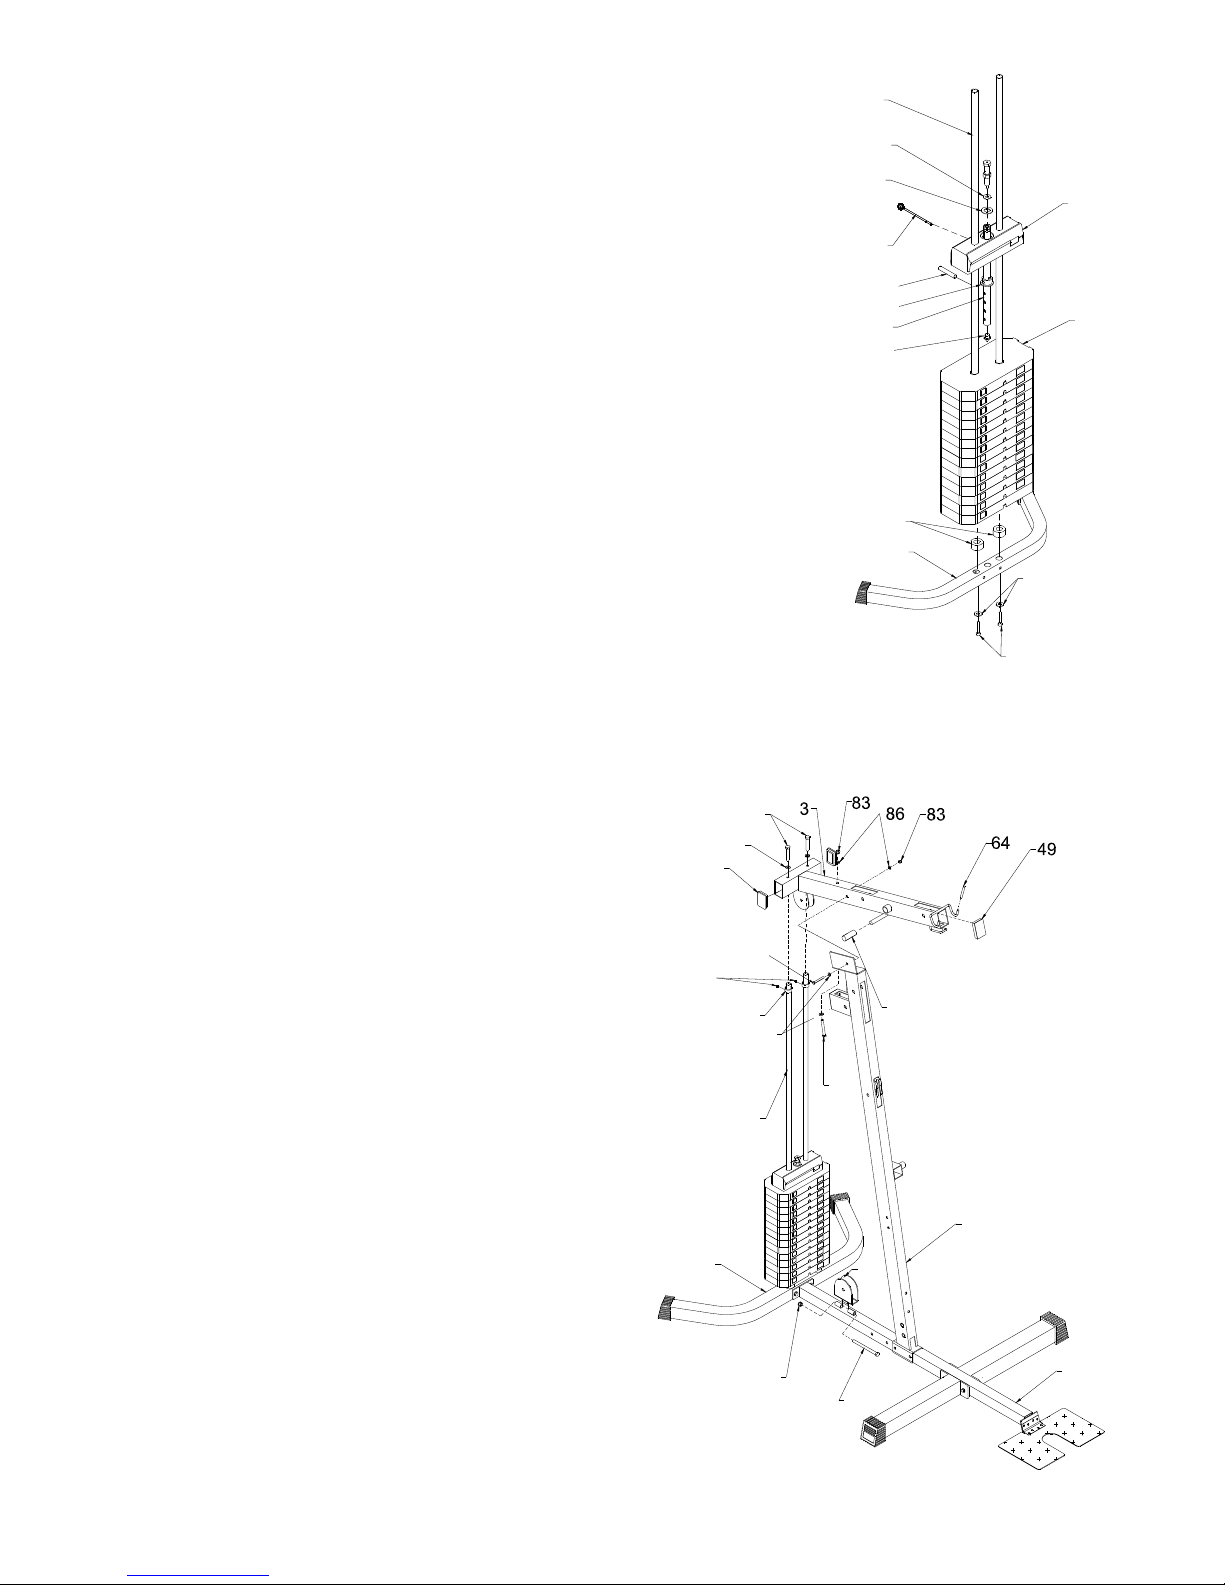
STEP 2
• Install two Chrome Tubes (9) into holes of Rear Base Frame (1) using
2-3/8”X1” Hex Bolts (82) 2-3/8” Washers (86).
• Slide two Round Donuts (48) down Chrome Tubes (9).
• Slide 14 pcs Weight Plates (26) and Weight Selection Rod (28) down
Chrome T ubes (9)
• Slide Top Weight (27) down.
• Attach Plastic Bushing (35) to Weight Selection Rod (28) with Pin (105).
• Place T3.0xø47xø26 Washer (89) and T3.0xø13xø32 Washer (106) onto
the hole of Top Weight (27).
• Attach Nut end of Top Cable to Weight Selection Rod (28).
• Install black Ball Pin (41) to Weight Selection Rod (28) as shown.
STEP 3
• Attach two Steel Bushings (59) to top of Chrome Tubes (9)
using 2- M6x8mm Screws (91)
• Attach Top Frame (3) to top of Chrome Tube (9) using
2-3/8”X1” Hex Bolts (82) 2-3/8” Washers (86).
• Attach Top Frame (3) to Front Upright (7) using
1-3/8”X3-3/4” hex bolt (74) 1-3/8”X2-7/8” Hex Bolt (76)
4-3/8” Washers (86) 2-3/8” Locknuts (83).
• Attach Single Pulley Bracket (100) to Main Base Frame (2)
using 1-3/8”X4” Hex Bolt (95) 1-3/8” Locknut (83).
• Push two Long Handle Grips (58) onto each end of Shaft of
Top Frame (3).
• Push two Little Covers (64) onto each end of Hook of Top
Frame (3).
ASSEMBLY STEPS
82
86
26
27
1
35
41
105
48
9
89
94
28
106
58
7
82
86
74
86
76
2
49
95
83
100
1
59
91
9
Page 11
1574-11
ASSEMBLY STEPS
STEP 4
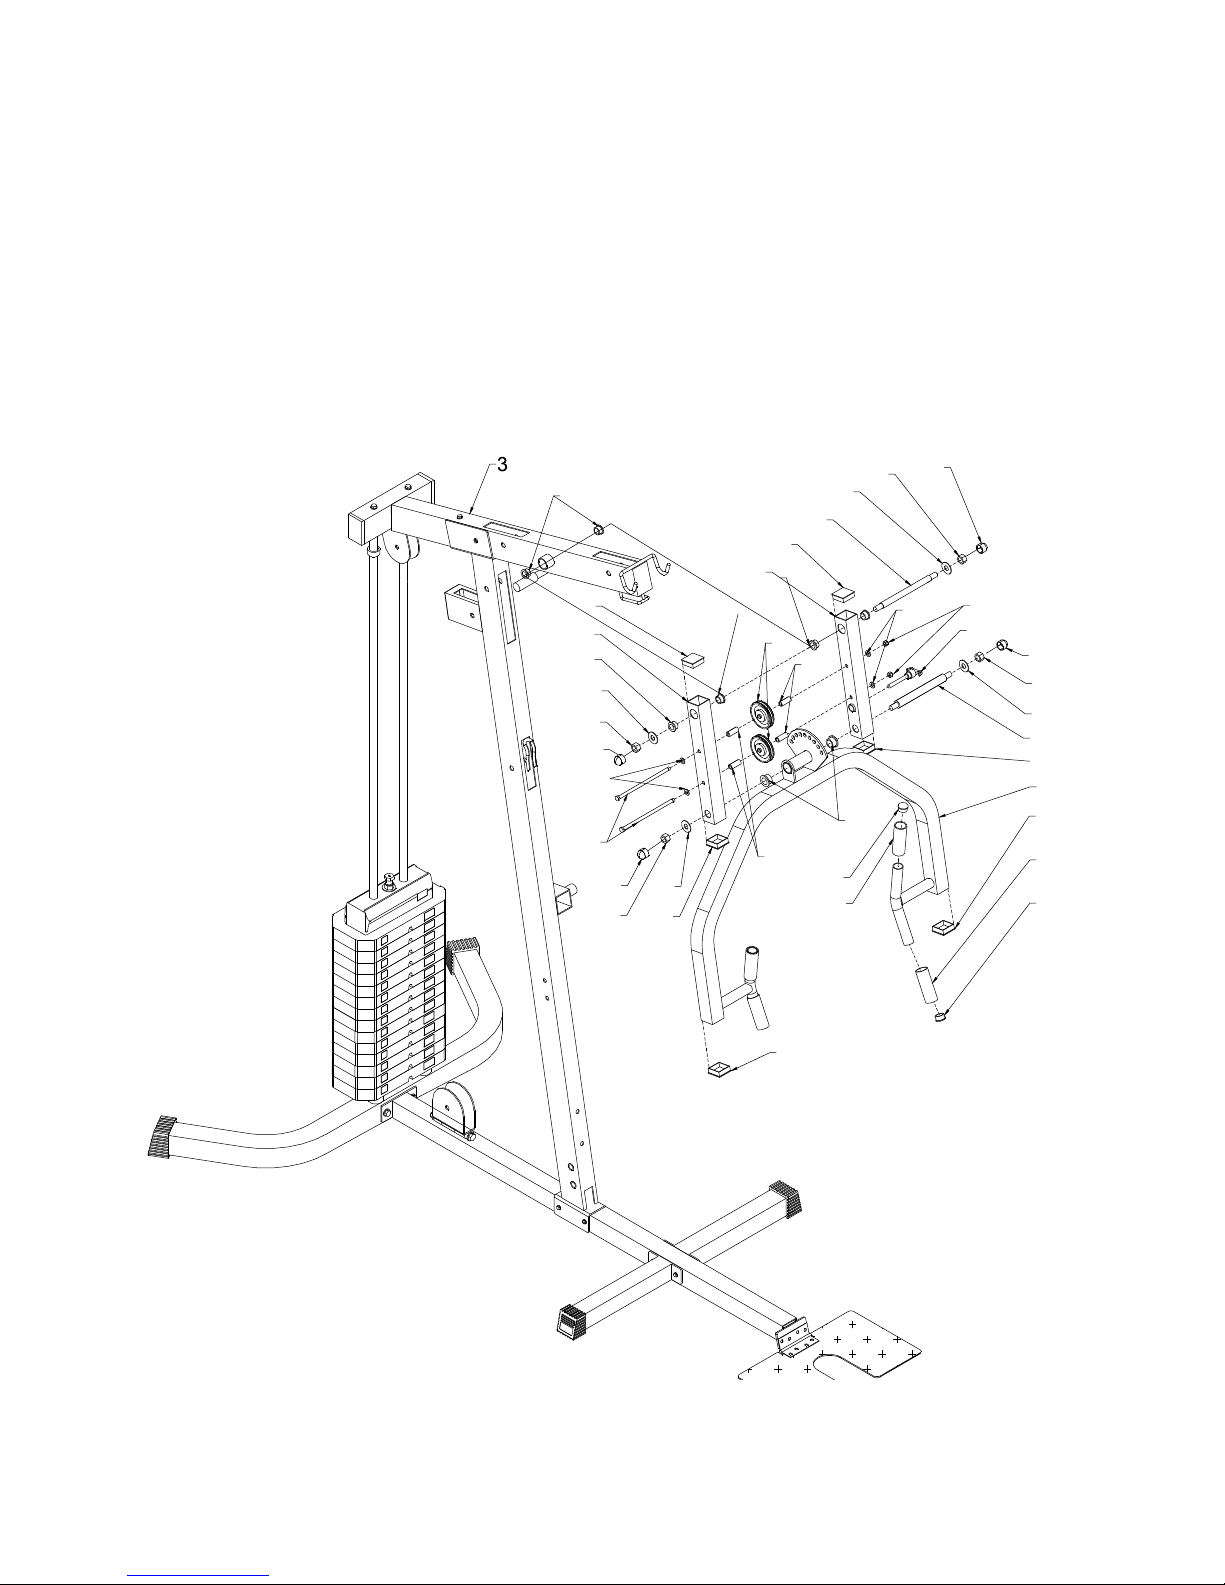
• Attach left/right Connect Frame (15, 14) to Top Frame(3) using Pivot Shaft (40) 6-Little Oil Bushings (61)
2-5/8” Washers (88) 2-5/8” Locknuts (85) 2-5/8” Plastic Dome Caps (104)
• Attach Press Arm (6) to ends of left/right Connect Frame (15, 14) using Big Pivot Shaft (39) 2-Copper Bushings (62)
2-5/8” Washers (88) 2-5/8” Locknuts (85) 1-Long Pop Pin (43). 2-5/8” Plastic Dome Caps (104)
• Install two Pulleys (46) between left/right Connect Frames (15, 14) using 2- 3/8”x8-3/4” Hex Bolts (93) 4-Long
Bushings (63) 4-3/8” Washers (86) 2-3/8” Locknuts (83)
104
39
85
50
93
104
63
86
88
85
50
62
50
52
57
104
104
43
88
85
61
57
52
50
6
86
83
40
88
85
61
14
50
46
63
88
15
61
50
Page 12
1574-12
STEP 5
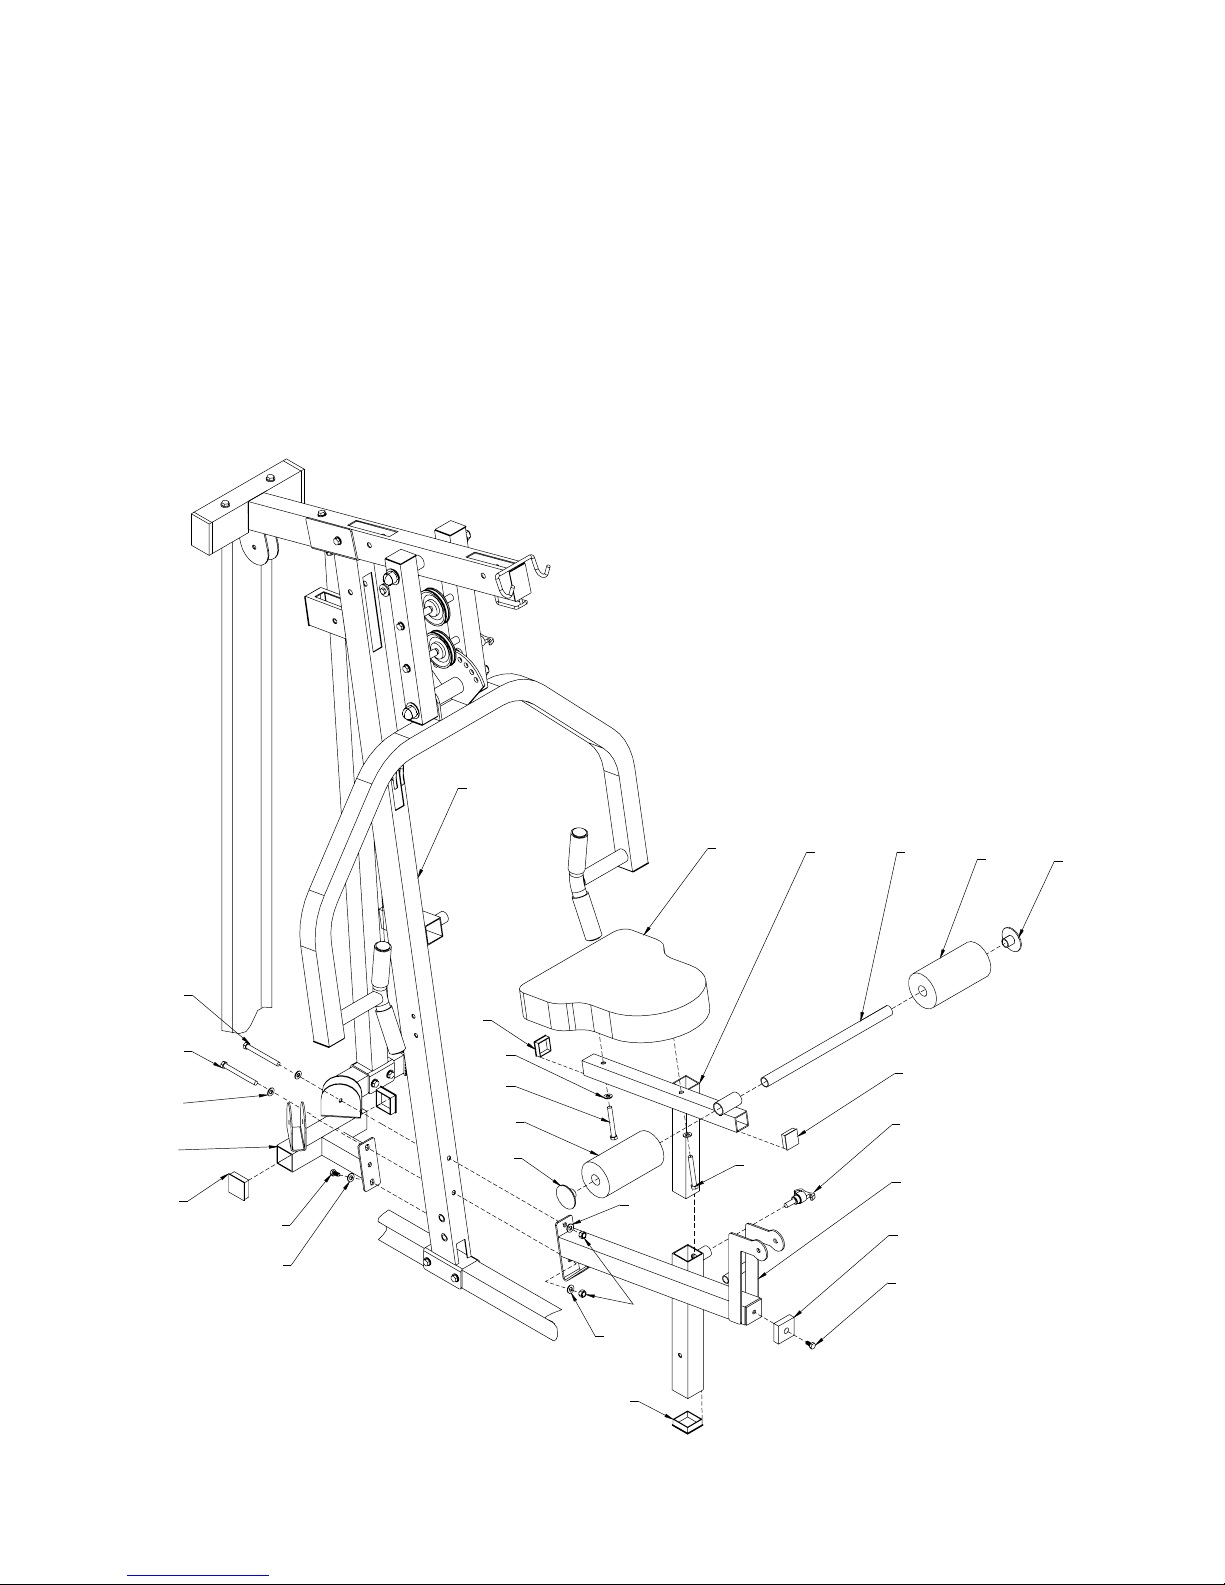
• Attach Bracket Support (16) and Seat Support Frame (11) to Front upright (7) using 1- 3/8” x 3- 3/4” Hex Bolt (74)
1- 3/8” x 3 - 7/8” Hex Bolt (73) 1- 3/8” x 1” Hex Bolt (82) 5- 3/8” Washers (86) 2- 3/8” Locknuts (83)
• Attach Seat Cushion (25) to Seat Support Frame (11) using 2-M8x53mm Hex Bolts (79) 2-M8 Washers (99).
• Attach Seat Frame (12) to Seat Support Frame (11) using Pop Pin (44).
• Insert Long Foam Rod (23l) into Bushings of Seat Frame (12) and press two Big Foam Rolls (32a), Round Caps (60)
onto Long Foam Rod (23l).
ASSEMBLY STEP
86
73
74
82
86
83
86
7
86
25
23L
32A
60
66
44
12
66
79
99
79
32A
60
11
53
96
50
50
16
Page 13
1574-13
STEP 6
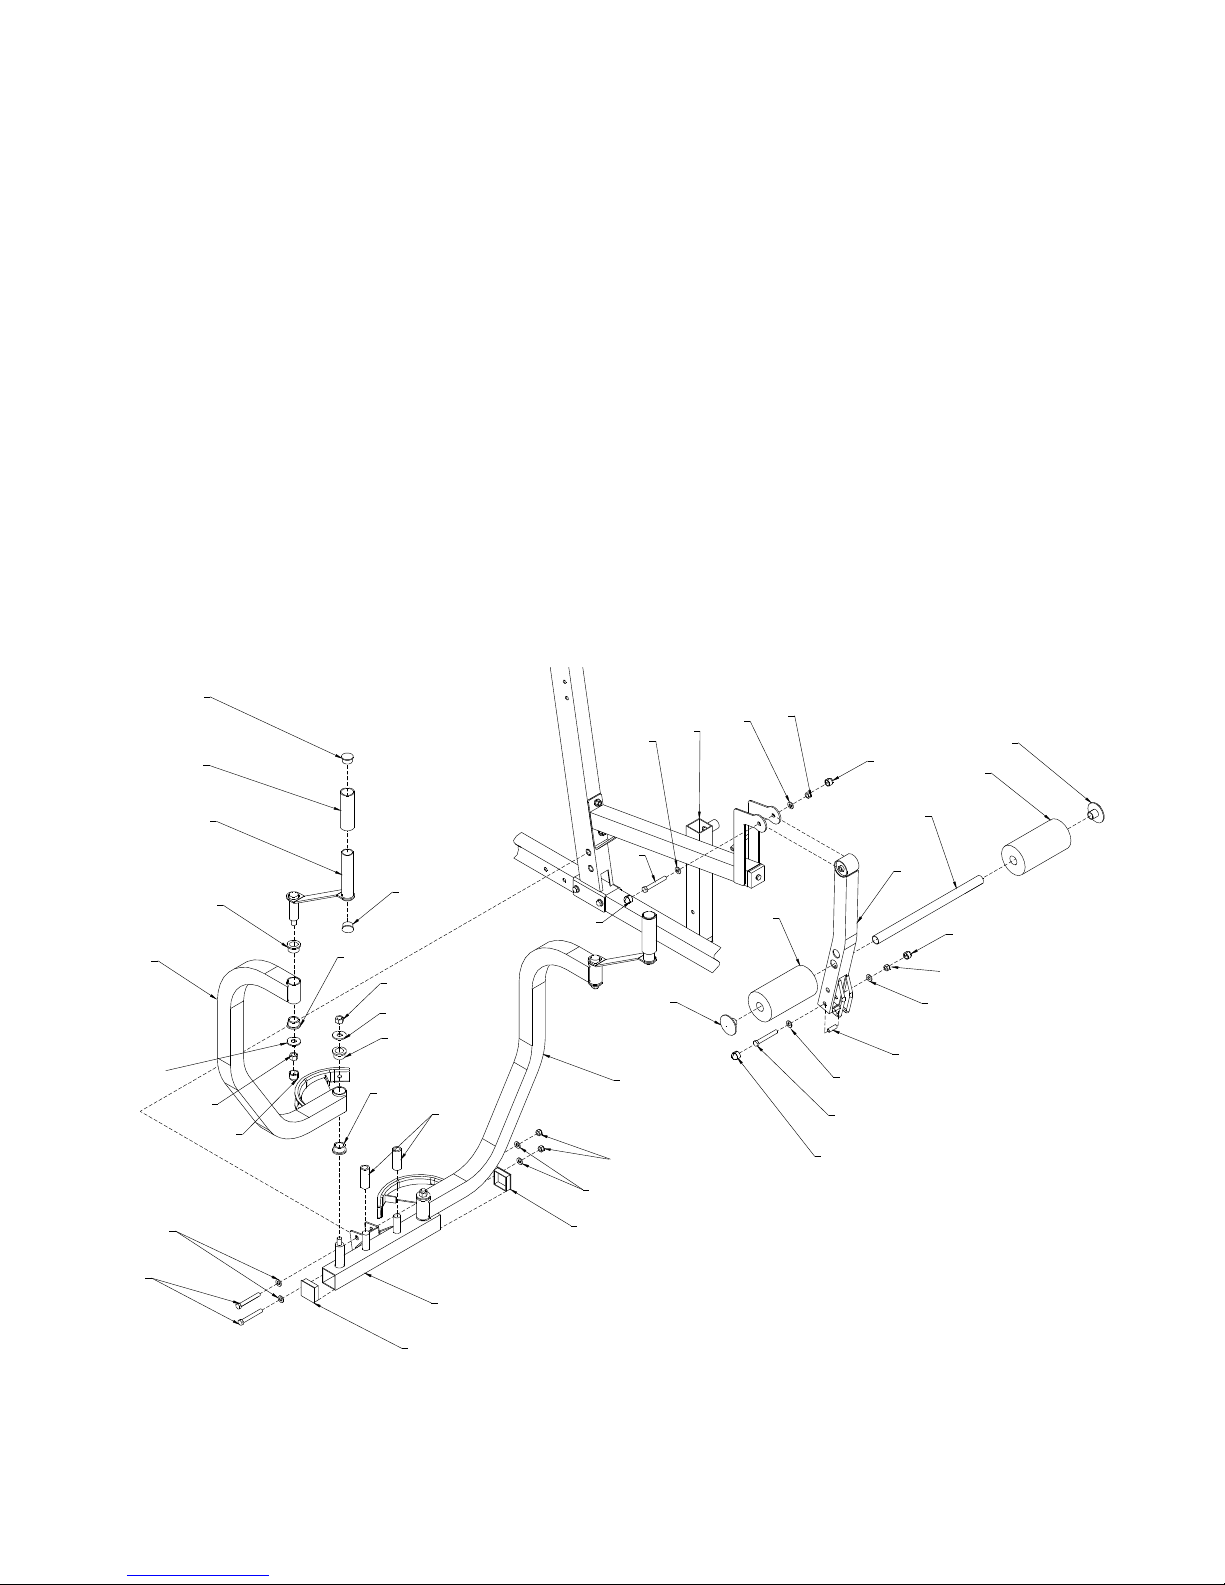
• Attach Butterfly Mount (19) to Front Upright (7) using 2-1/2”x3-1/4” Hex Bolts (92) 4-1/2” Washers (87) 2-1/2”
Locknuts (84).
• Attach left/right Press Frame (4, 5) to Butterfly Mount (19) using 4-Copper Bushings (62) 2-Big Washers (90)
2-1/2”Locknuts (84).
• Attach two Hand Tube (21) to left/right Press Frame (4, 5) 4-Copper Bushings (62) 2-Big Washers (90) 2-1/2”
Locknuts (84) 2-1/2” Plastic Dome Caps (103)
• Attach Leg Extension (20) to Seat Support Frame (11) using 1- 3/8”x2-7/8” Hex Bolt (76) 2-3/8” Washers (86) 1-3/8”
Locknut (83) 2-3/8” Plastic Dome Caps (102).
• Install one 3/8”x2-3/8” Hex Bolt (78) to lower hole of Leg Extension (20) using 2-3/8” Washers (86) 1-Long Busing
(107) 1-3/8” Locknut (83) 2-3/8” Plastic Dome Cap (102)
• Insert Short Foam Rod (23s) into holes of Leg Extension (20) and press two Foam Rolls (32), Round Caps (60)
onto Short Foam Rod (23s).
ASSEMBLY STEP
.
5
4
52
56
21
62
62
84
90
62
62
90
84
92
87
50
19
50
87
84
32B
60
23S
20
86
83
86
78
32B
60
83
86
86
76
11
52
102
102
102
102
103
55
107
Page 14
1574-14
Step 7
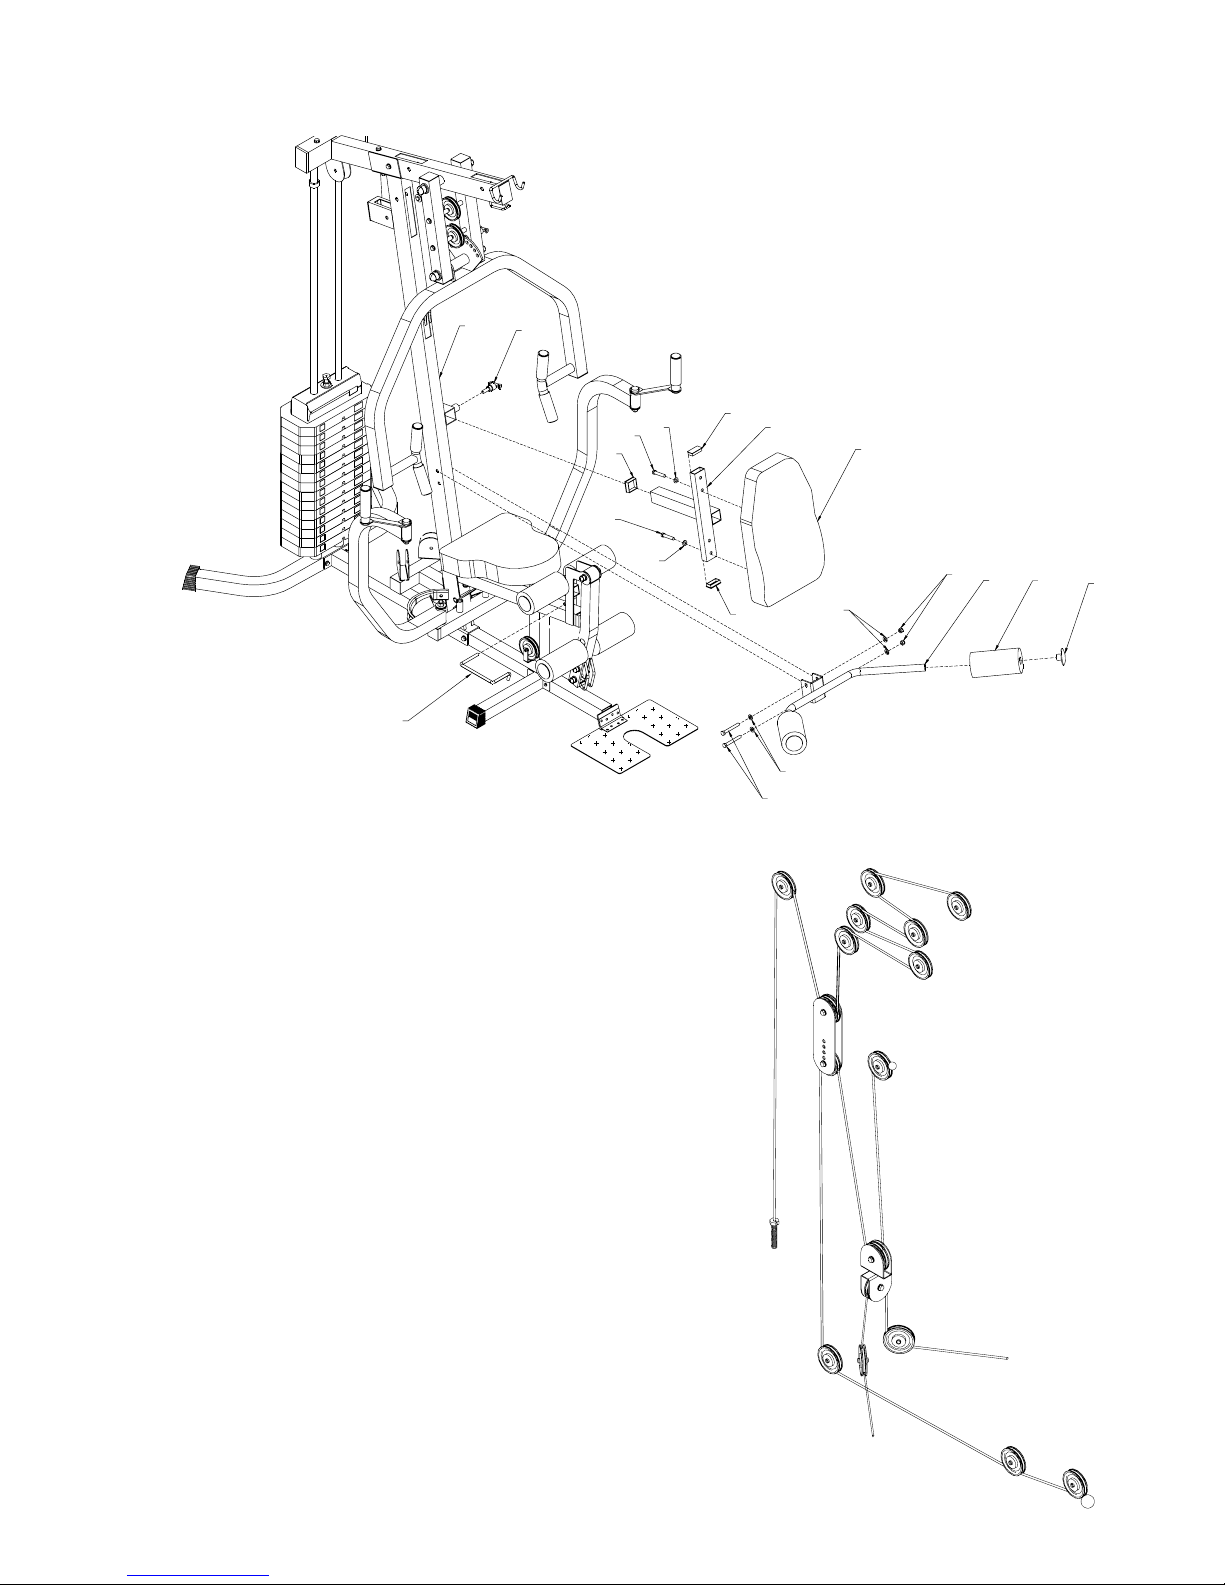
• Attach Hand Bar (17) to Front Upright (7) using 2.
3/8”x3” Hex Bolts (75) 4-3/8” Washers (86) 2-3/8” Locknuts (83).
• Press two Big Foam Rolls (32A), Round Caps (60) onto
ends of Hand Bar (17).
• Insert Backrest Support (13) into Front Upright (7) with
Pop Pin (44).
• Attach Backrest Cushion (24) to Backrest Support (13)
using 2-M8x40mm Hex Bolts (81) 2-M8 Washers (99)
• Install Lock Hook (101) onto Seat Support Frame (11)
ASSEMBLY STEP
44
7
60
32A
17
83
86
75
86
24
13
65
65
81
99
81
99
51
101
Page 15
1574-15
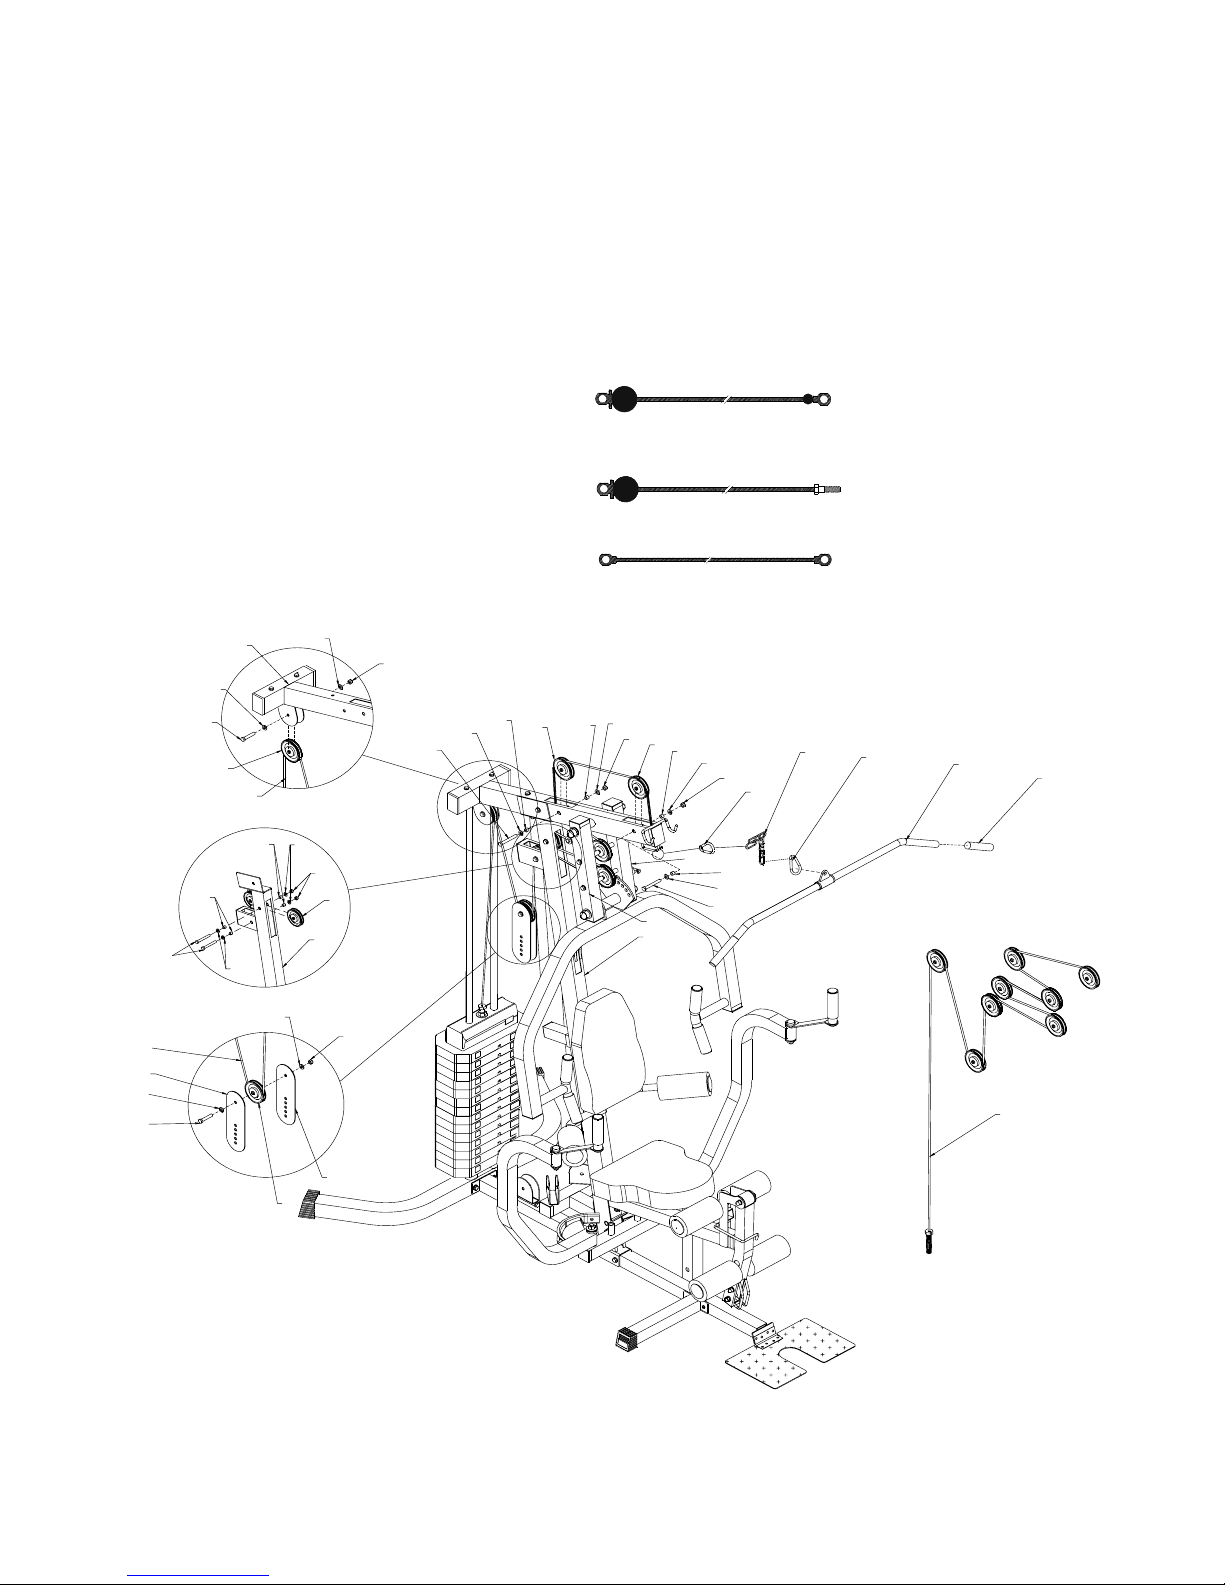
STEP 8
• Rotate Upper Cable (70) as shown. Install Pulley no. 1, 2, 4, 6 to unit using 4-3/8”X2-1/2” Hex Bolts (77) 8-Middle
Bushings (67) 8-3/8” Washers (86) 4-3/8” Locknuts (83).
• Install Pulley no 7, 8 to unit using 2 -3/8”x2” Hex Bolts (80) 4- 3/8” Washers (86) 2-3/8” Locknuts (83)
• Attach Hand Grips (54) to Lat Bar (18).
• Attach Lat Bar (18) to Ball End of Upper Cable (70) using 2-Chain Hooks (45) 1-Chain (37)
ASSEMBLY STEP
83
86
80
86
3
46
70
30
80
86
83
86
30
46
54
18
45
37
45
46
46
83
86
67
83
86
67
67
86
77
67
86
77
8
7
6
5
4
3
2
70
7
15
14
67
86
7
70
86
83
77
67
46
LOWER CABLE
UPPER CABLE
BUTTERFLY CABLE
Page 16
1574-16
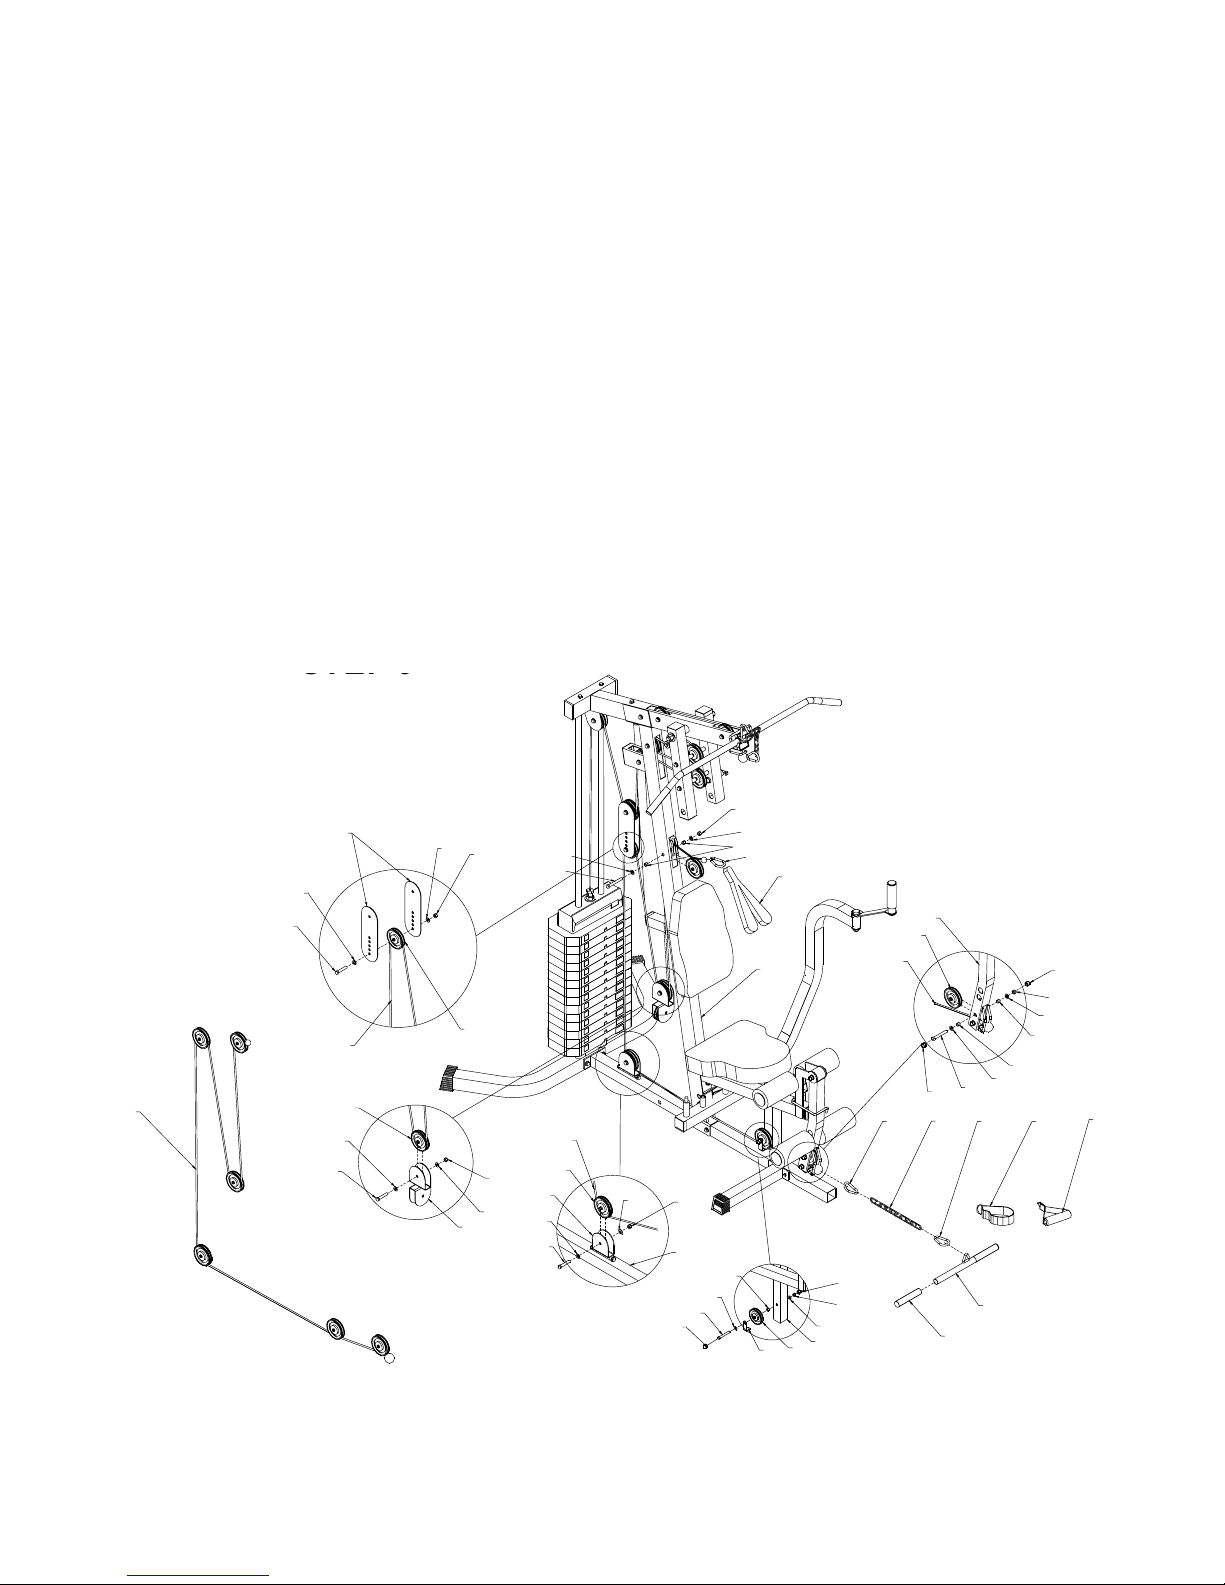
STEP 9
• Install Lower Cable (69) as shown.
• Install Pulley no. 9 to unit using 1-3/8”x2-3/8” Hex Bolts (78) 2-Little Bushings (68) 2-3/8” Washers (86) 1-3/8” Locknut
(83) 2-3/8” Plastic Dome Cap (102).
• Install Pulley No 10 to Seat Support Frame (11) using 1- 3/8”x4-1/4” Hex Bolt (72) 1-Middle Bushings (67) 1-Pulley
Hook (42) 2-3/8” Washers (86) 1-3/8” Locknut (83) 2-3/8” Plastic Dome Cap (102).
• Install Pulley no. 11, 12, 13 To Unit Using 3- 3/8”x2” Hex Bolts (80) 6-3/8” Washers (86) 3-3/8” Locknuts (83)
• Install Pulley no. 14 to unit using 1-3/8”x2-1/2” Hex Bolts (77) 2-Middle Bushings (67) 2-3/8” Washers (86) 1-3/8”
Locknut (83).
• Attach Hand Grips (54) to Curl Bar (22).
• Attach Curl Bar (22) to Ball end of Lower Cable (69) using 2-Chain Hooks (45) 1-Long Chain (38)
• Attach Ab Strap (29) to Little Ball End of Lower Cable (69)using 1-Chain Hook (45)
ASSEMBLY STEP
STEP 9
12
13
14
29
83
86
67
77
86
45
31
80
69
69
2
86
46
86
83
102
86
67
72
102
42
46
11
7
83
86
102
102
30
80
86
83
86
46
69
33
34
54
22
45
38
45
78
86
68
68
86
83
46
69
80
86
83
86
46
31
20
9
10
11
Page 17
1574-17
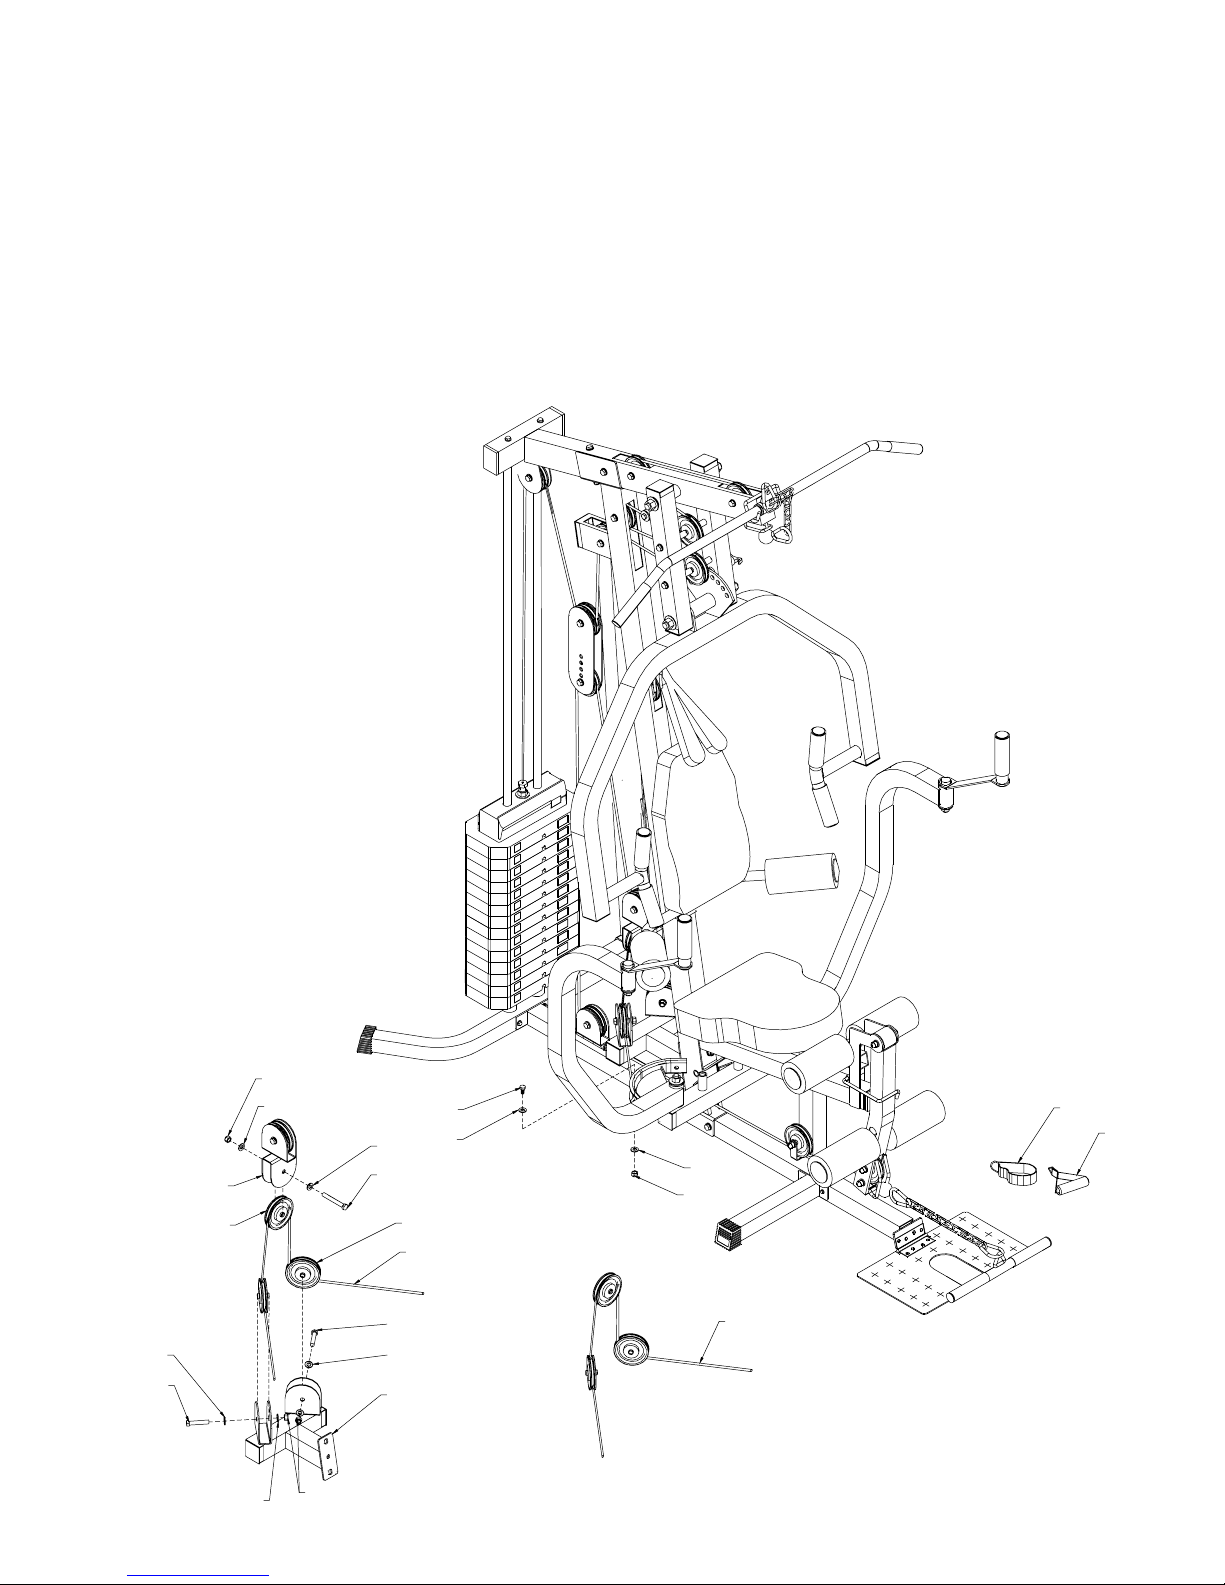
STEP 10
• Rotate Butterfly Cable (71) as shown.
• Install Pulley no. 15, 16, 17 to unit using 3- 3/8”x2” Hex Bolts (80) 6- 3/8” Washers (86) 3-3/8” Locknuts (83)
• Attach ends of Butterfly Cable (71) to left/right Press Frame (4, 5) using 2-M8x30mm Hex Bolts (97) 4-M8 Washers
(99) 2-M8 Locknuts (98).
ASSEMBLY STEP
71
33
34
98
99
99
97
80
86
86
83
31
46
46
80
86
80
86
83
86
16
71
15
16
17
Page 18
1574-18
AEROBIC EXERCISE
Aerobic exercise is any sustained activity that sends oxygen to your muscles via your heart and lungs.
Aerobic exercise improves the fitness of your lungs and heart - your body’s most important muscle.
Aerobic exercise fitness is promoted by any activity that uses your large muscle -arms, legs, or buttock, for example.
Your heart beats quickly and you breathe deeply. An aerobic exercise should be part of your entire exercise routine.
WEIGHT TRAINING
Along with aerobic exercising which helps get rid of and keep off the excess fat that our bodies can store,
weight training is an essential part of the exercise routine process. Weight training helps tone, build and strengthen
muscle. If you are working above your target zone, you may want to do a less amount of reps.
And as always consult your physician before beginning any exercise program.
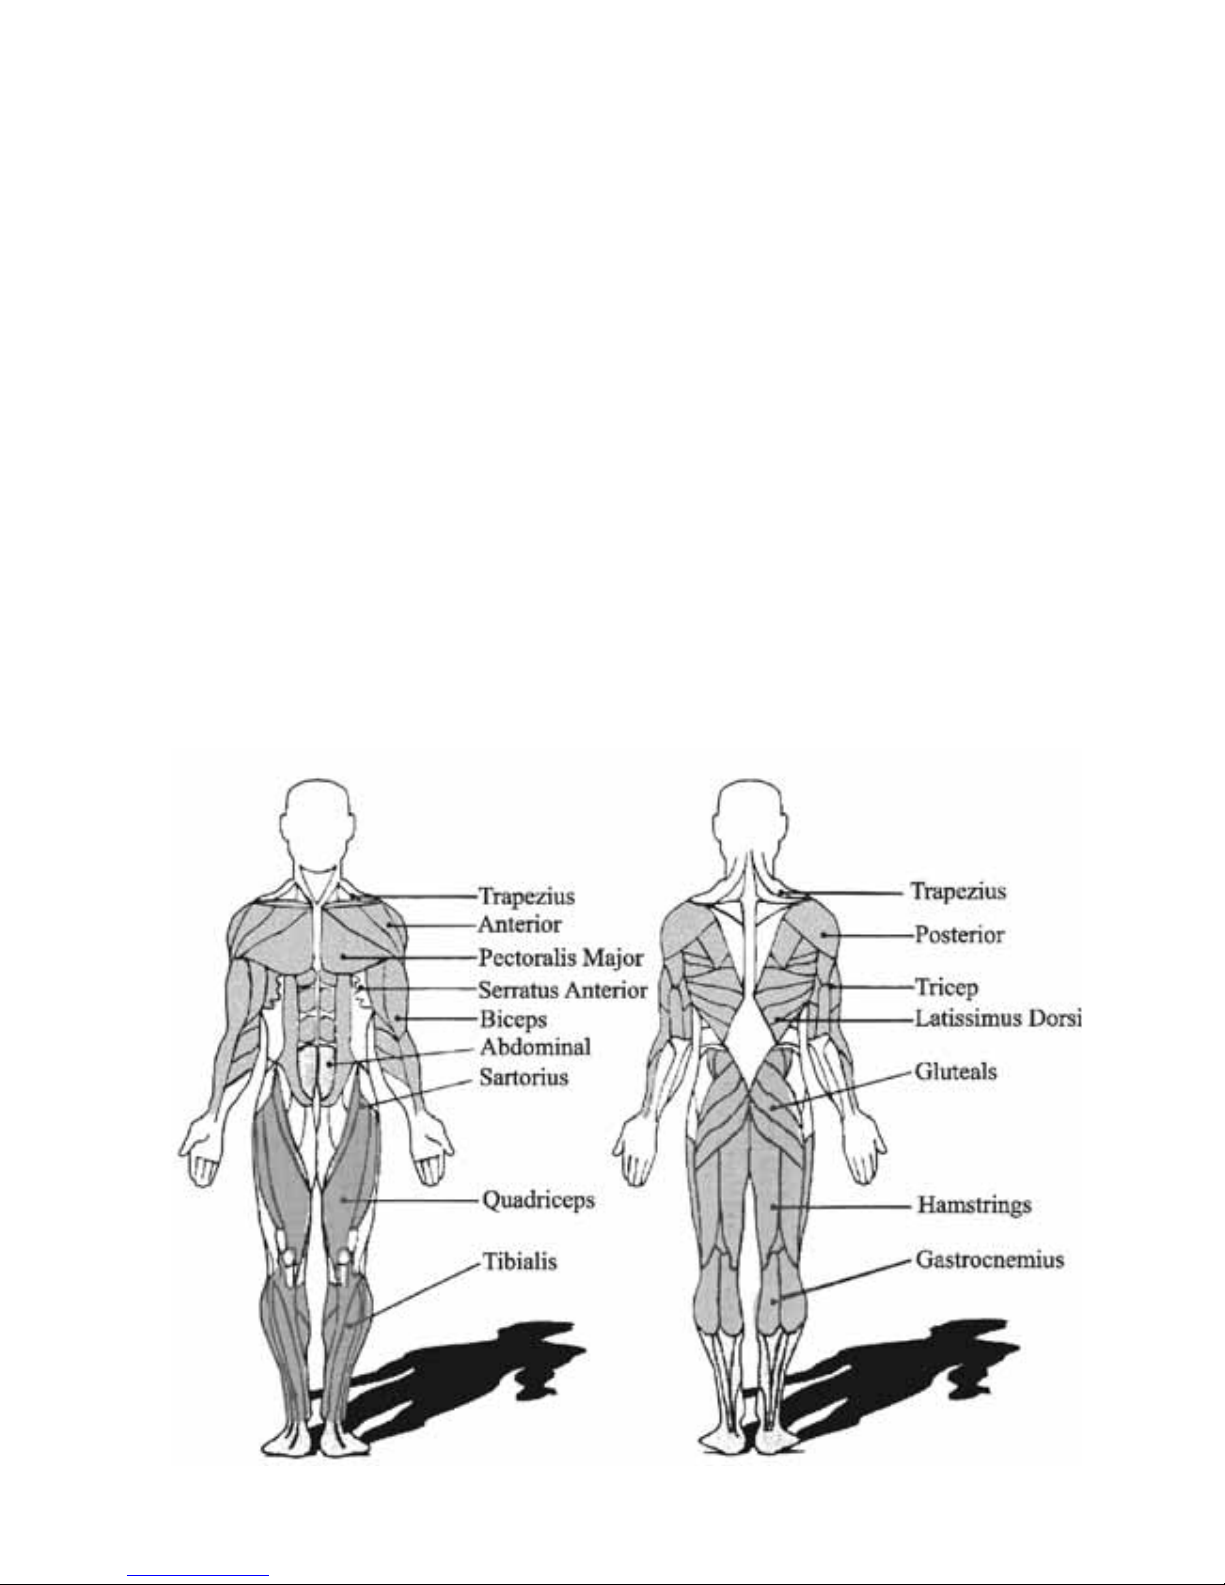
MUSCLE CHART
HOME GYMS
The exercise routine that is performed on the Home Gym will develop the lower and upper body muscle groups as well
as condition the circulatory system. These muscle groups are highlighted on the muscle chart below.
6. FITNESS TIPS AND TECHNIQUES
Page 19
1574-19
7. CONDITIONING GUIDELINES
How you begin your exercise program depends on your physical condition. If you have been inactive for several years, or
are severely overweight, you must start slowly and increase your time on the equipment; a few minutes per workout.
Initially, you may be able to exercise only for a few minutes in your target zone, however, your aerobic fitness will improve
over the next six to eight weeks. Don’t be discouraged if it takes longer. It’s important to work at your own pace. Ultimately, you’ll be able to exercise continuously for 30 minutes. The better your aerobic fitness, the harder you will have to
work to stay in your target zone. Please remember these essentials :
• Have your doctor review your training and diet programs to advise you of a workout routine you should adopt.
• Begin your training program slowly with realistic goals that have been set by you and your doctor.
• Monitor your pulse frequently. Establish your target heart rate based on your age and condition.
• Set up your equipment on a flat, even surface at least 3 feet from walls and furniture.
EXERCISE INTENSITY
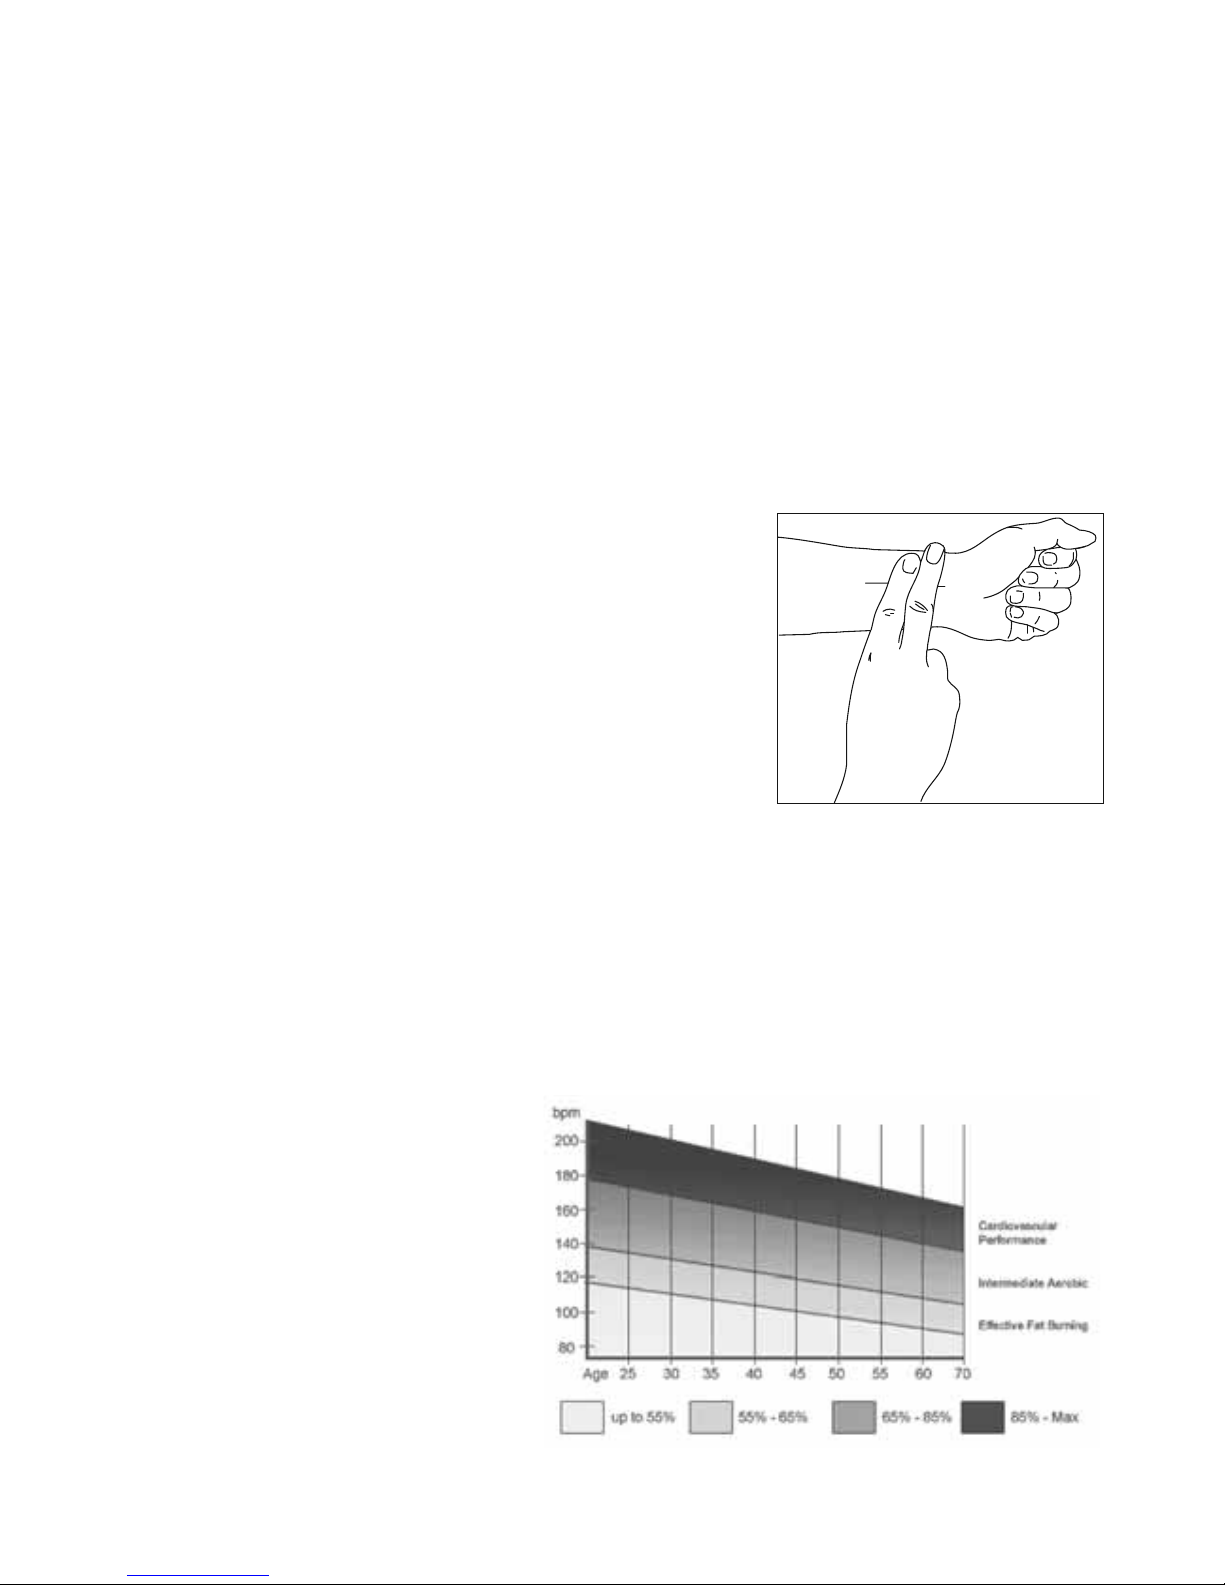
To maximize the benefits of exercising, it is important to exercise with the
proper intensity. The proper intensity level can be found by using your heart
rate as a guide. For effective aerobic exercise, your heart rate should be
maintained at a level between 65% and 85% of your maximum heart rate
as you exercise. This is known as your target zone. You can find your target
zone in the table below.
During the fir st few months of your exercise program, keep your heart rate
near the low end of your target zone as you exercise. After a few months, your heart rate can be increased gradually
until it is near the middle of your target zone as you exercise.
To measure your heart rate, stop exercising but continue moving your legs or walking around and place two fingers on
your wrist. Take a six-second heartbeat count and multiply the results by 10 to find your heart rate. For example, if your
six-second heartbeat count is 14, your heart rate is 140 beats per minute. (A six-seconds count is used because your
heart rate will drop rapidly when you stop exercising.) Adjust the intensity of your exercise until your heart rate is at the
proper level.
For more information on dieting and
training visit www.trojanhealth.co.za
Page 20
1574-20
5
4
1
2
3
8. WARM-UP AND COOL-DOWN
WORKOUT GUIDELINES
Each workout should include the following three parts:
A warm-up, consisting of 5 to 10 minutes of stretching and light exercise. A proper warm-up increases your body temperature, heart rate, and circulation in preparation for exercise.
Training zone exercise, consisting of 20 to 30 minutes of exercising with your heart rate in your training zone. (Note:
During the fir st few weeks of your exercise program, do not keep your heart rate in your training zone for longer than
20 minutes.)
A cool-down, with 5 to 10 minutes of stretching. This will increase the flexibility of your muscles and will help to prevent
post-exercise problems.
EXERCISE FREQUENCY
To maintain or improve your condition, plan three workouts each week, with at least one day of rest between workouts.
After a few months of regular exercise, you may complete up to five workouts each week, if desired. Remember, the key
to success is make exercise a regular and enjoyable part of your everyday life.
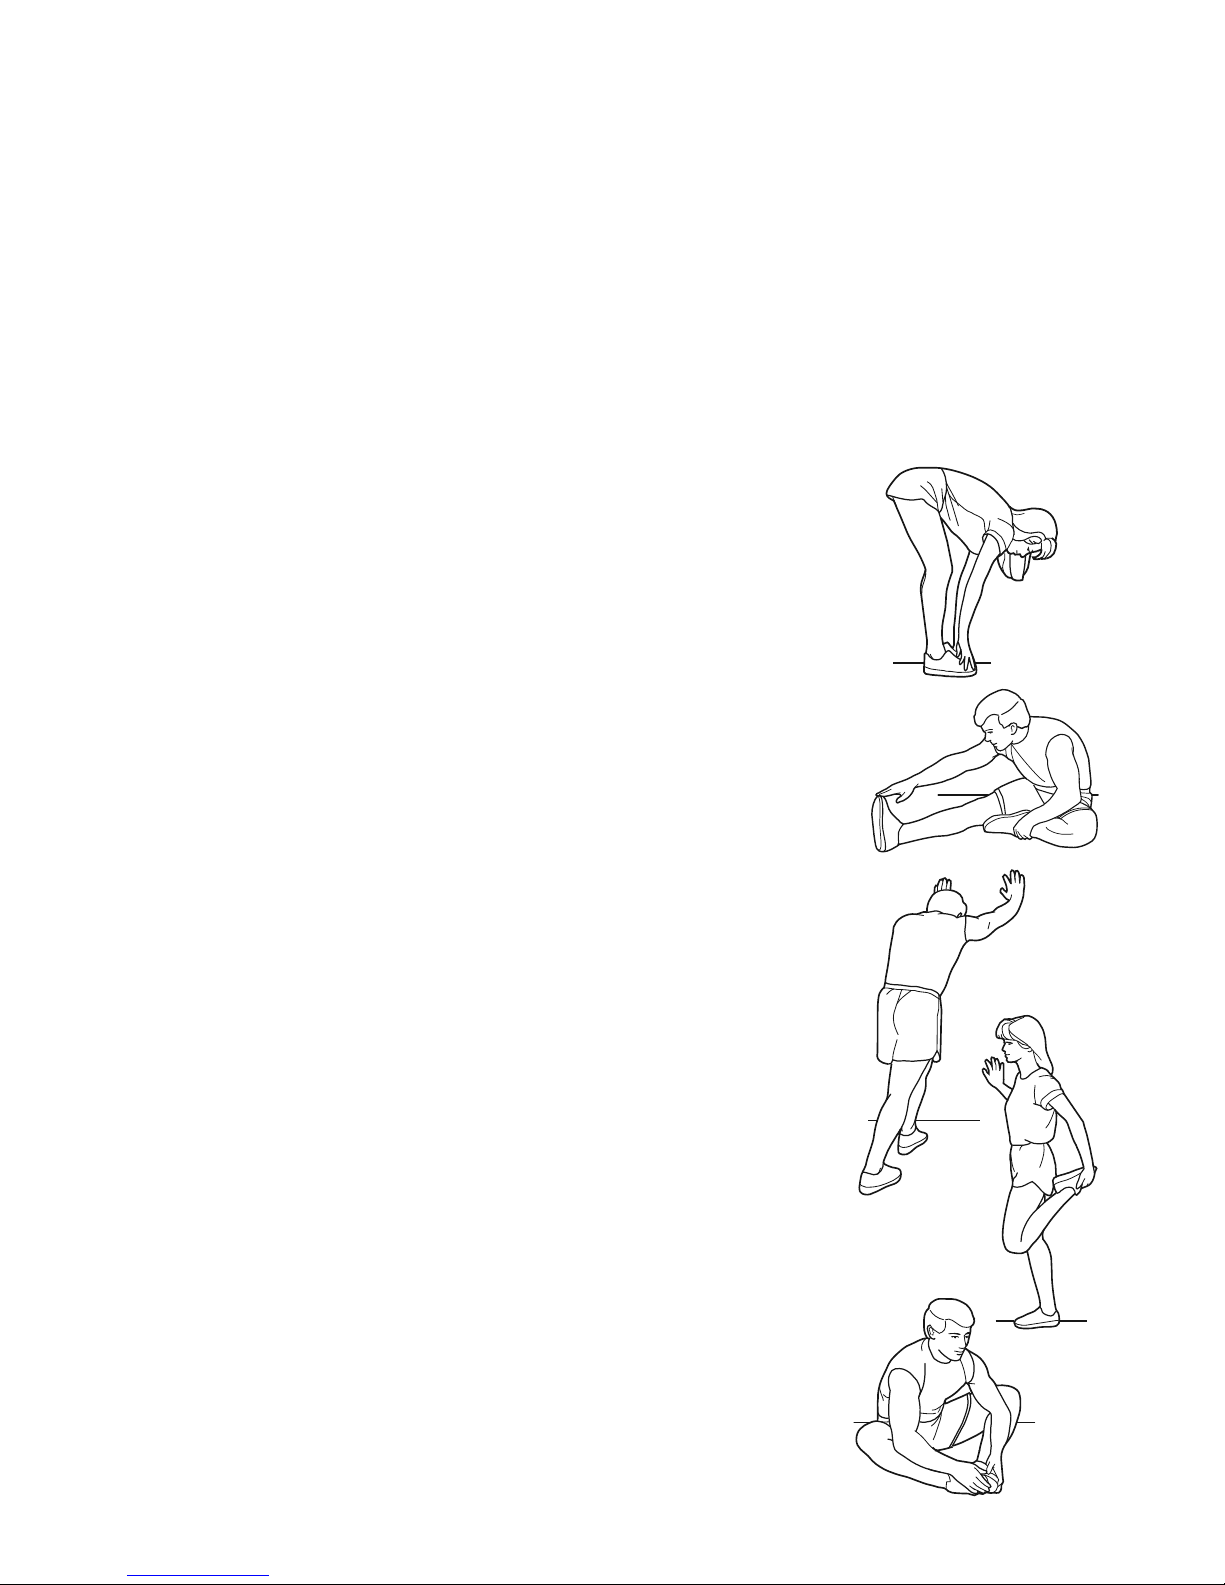
SUGGESTED STRETCHES
The correct form for several basic stretches is shown at the right. Move slowly as you
stretch-never bounce.
1. T oe T ouch Stretch
Stand with your knees bent slightly and slowly bend forward from your hips. Allow
your back and shoulders to relax as you reach down toward your toes as far as possible. Hold for 15 counts, then relax. Repeat 3 times. Stretches: Hamstrings, back of
knees and back.
2. Hamstring Stretch
Sit with one leg extended. Bring the sole of the opposite foot toward you and rest it
against the inner thigh of your extended leg. Reach toward your toes as far as possible. Hold for 15 counts, then relax. Repeat 3 times for each leg. Stretches: Hamstrings, lower back and groin.
3. Calf/Achilles Stretch
With one leg in front of the other, reach forward and place your hands against a
wall. Keep your back leg straight and your back foot flat on the floor. Bend your
front leg, lean forward and move your hips toward the wall. Hold for 15 counts, then
relax. Repeat 3 times for each leg. To cause further stretching of the achilles tendons,
bend your back leg as well. Stretches: Calves, achilles tendons and ankles.
4. Quadriceps Stretch
With one hand against a wall for balance, reach back and grasp one foot with your
other hand. Bring your heel as close to your buttocks as possible. Hold for 15 counts,
then relax. Repeat 3 times for each leg. Stretches: Quadriceps and hip muscles.
5. Inner Thigh Stretch
Sit with the soles of your feet together and your knees outward. Pull your feet
toward your groin area as far as possible. Hold for 15 counts, then relax. Repeat 3
times. Stretches: Quadriceps and hip muscles.
For more information on dieting and training visit www.trojanhealth.co.za
Page 21

1574-21
9. EXERCISE PROGRAM
DEVELOPING AN EXERCISE PROGRAMME
For the first month of training you should allow your body to adjust to its new workload. For the 2 to 4 weeks
you should only perform one work set of each exercise, only increasing the number of sets you perform after
this adjustment period.
Develop your workout according to the time available to you and remember, the more effort you put in, the
greater the benefits and the quicker you will see results.
DIET
Diet is a very important aspect of any fitness programme. A balanced diet will help you get to your goal weight.
For tips on diet, check out our website www.trojanhealth.co.za
EXERCISE TECHNIQUE
Hand Grips
There are two styles of handgrips that can be used when exercising:
• Overhand Grip
The bar is gripped with the hands reaching over the top of the bar and the palms facing in towards the body
•Underhand Grip
The bar is gripped with the hands reaching under the bar and the palms facing away from the body.
Breathing
Breathing at the correct time is an important part of weight training. Breathe out while you are putting the effort into the
movement, i.e. when you are lifting or pushing the weight. Breathe in on the return movement or the part of the movement that requires the least effort. Never hold your breathe during an exercise.
Exercise Style
All exercises should be done in a controlled manner. Do not jerk the weight around as this can lead to injury as well as
limiting the benefit of the exercise.
THE WORKOUT
The Warm Up
Always warm up thoroughly before each workout session to help minimise the risk of injury. Warm up on any Trojan
exercise bike or treadmill or any other similar machine.
Weekly Routine
Perform a weight training routine 3 times per week, ensuring a day of rest and recovery between sessions.
Page 22

1574-22
EXERCISE PROGRAM
Reps and Sets
Repetitions (Reps) is the term used to denote the number of consecutive times a certain movement is repeated without
a break, while Sets denotes how many times you should repeat that exercise in a training session e.g. 3 sets of 10 reps
means you should perform 10 reps for 1 set, have a break and then repeat another 2 sets.
Recommended rep ranges
6-8 reps Functional strength and hypertrophy (increase in muscle size)
8-12 reps Total hypertrophy (increase in muscles size)
12-15 reps Muscle-Strength endurance
SAFE USE OF YOUR EQUIPMENT
When using a barbell always ensure that there is someone to help you if you get into any difficulty on an exercise specifi-
cally when bench pressing, shoulder pressing or squatting. As you start using heavier weights, it is advised that you train
with someone as you can help each other out while training and motivate one another to achieve your goals.
Do’s and Don’ts
• Do make sure that your weights are firmly clamped to the bar.
• Do seek medical advice before starting any exercise programme.
• Do start off slowly to avoid unnecessary soreness and stiffness.
• Do remember to bend at the knees when lifting heavy weights from the floor.
• Do maintain a firm, straight back when lifting weights.
• Do remember to breath properly.
• Do warm up thoroughly before exercising.
• Don’t exercise within 2 hours of eating a large meal.
• Do ensure that there is someone to help you when you lift heavy weights.
HOW TO ASSEMBLE A DUMBBELL AND BARBELL
Load the desired weights onto the bar making sure that there is equal weight at each end. Next fit and lock the collars
next to the weights so that they do not slide along the bar.
To fit quick release collars follow the procedure below:
1. Place the collar onto the ends of the bar so that they butt up to the weights
2. Turn the levers so that they line up with the bolts but point away from the collars
3. Tighten the nut until the collar is a tight fit on the bar but is still able to slide along the bar.
4. Rotate the lever so that it folds under the bar, pointing in the opposite direction to how it started (step 2).
Page 23
1574-23
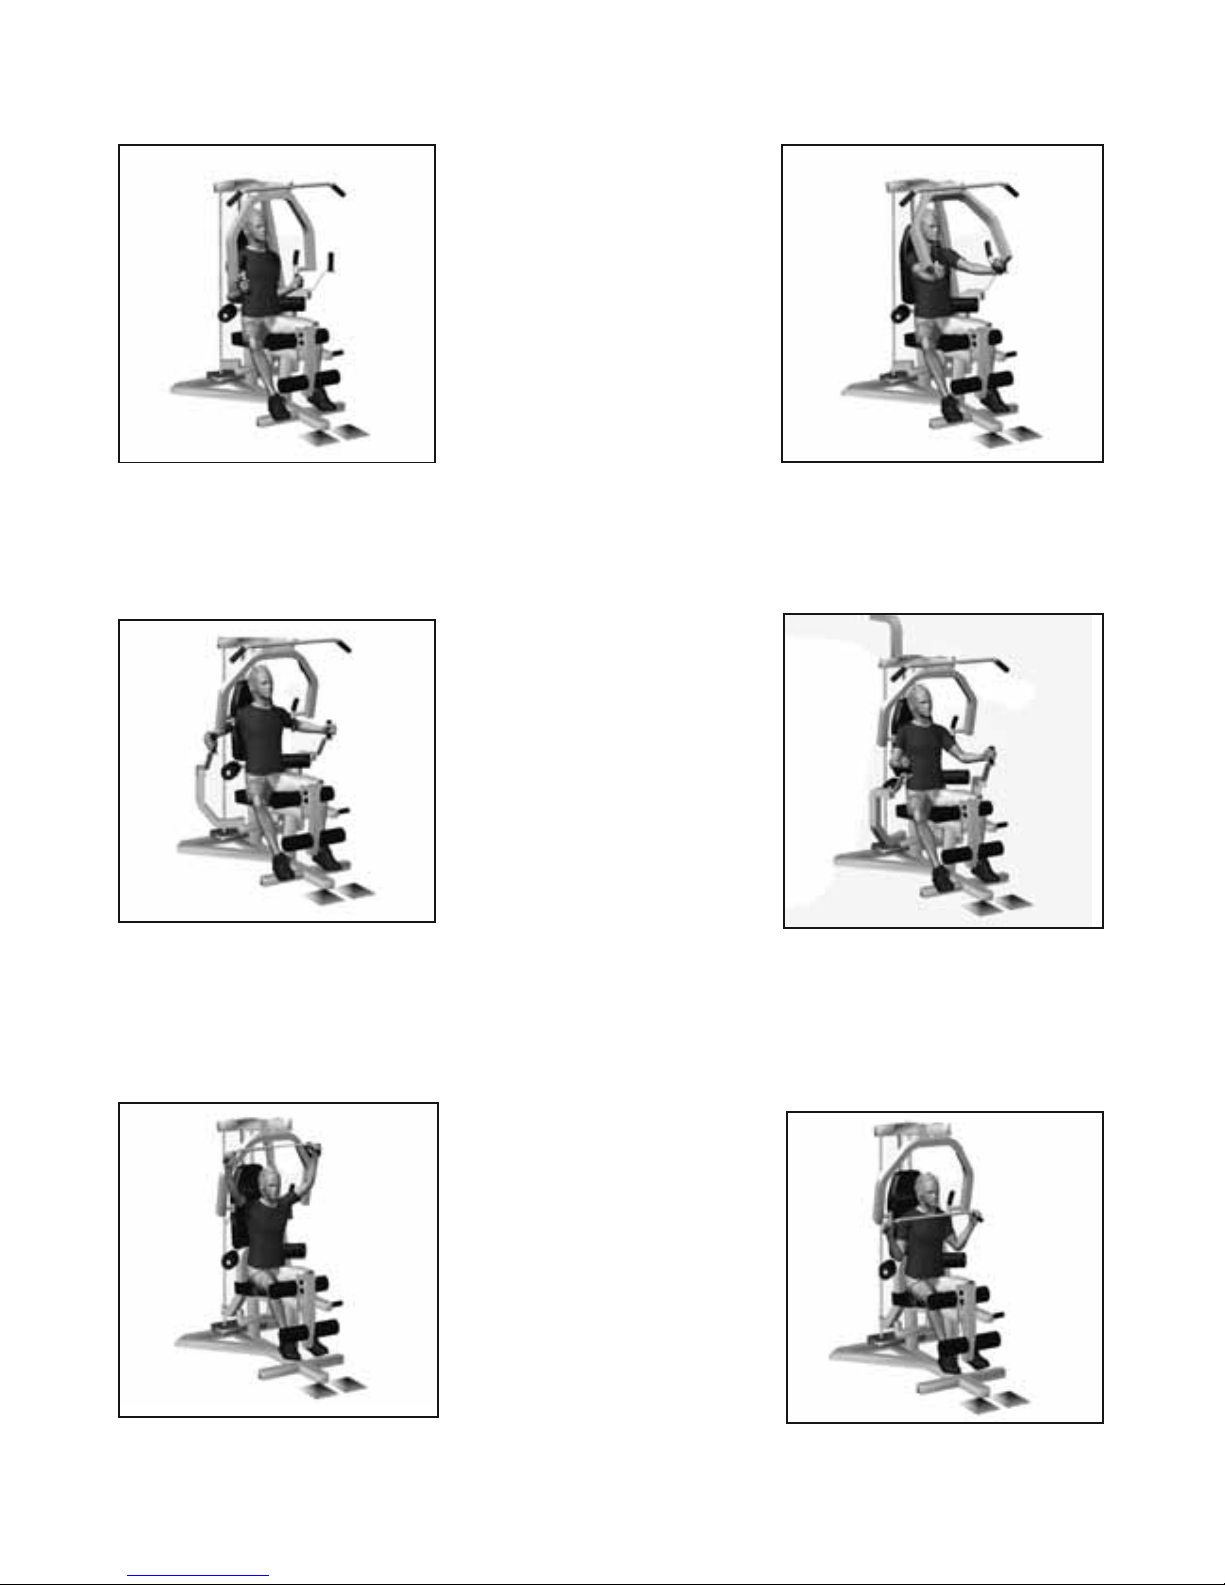
SEATED BENCH PRESS
Sit with your back against the
support. Grip the handlebars
under the butterfly arms and press
the bars away from your body.
Return the bars in a controlled
manner to the start position
SEATED FLYS
Sit with your back against the support.
Grip the butterfly arms 90° and
pull your hands towards each other
Return the bars in a controlled
manner to the start position.
LAT PULL DOWN
(FRONT)
Attach lat bar to high pulley.
In a seated position, facing away
from the machine, pull the lat bar
to the front of your chest.
Return the bar in a controlled manner to the start position.
EXERCISE PROGRAM
START POSITION FINISH POSITION
Page 24
1574-24
EXERCISE PROGRAM
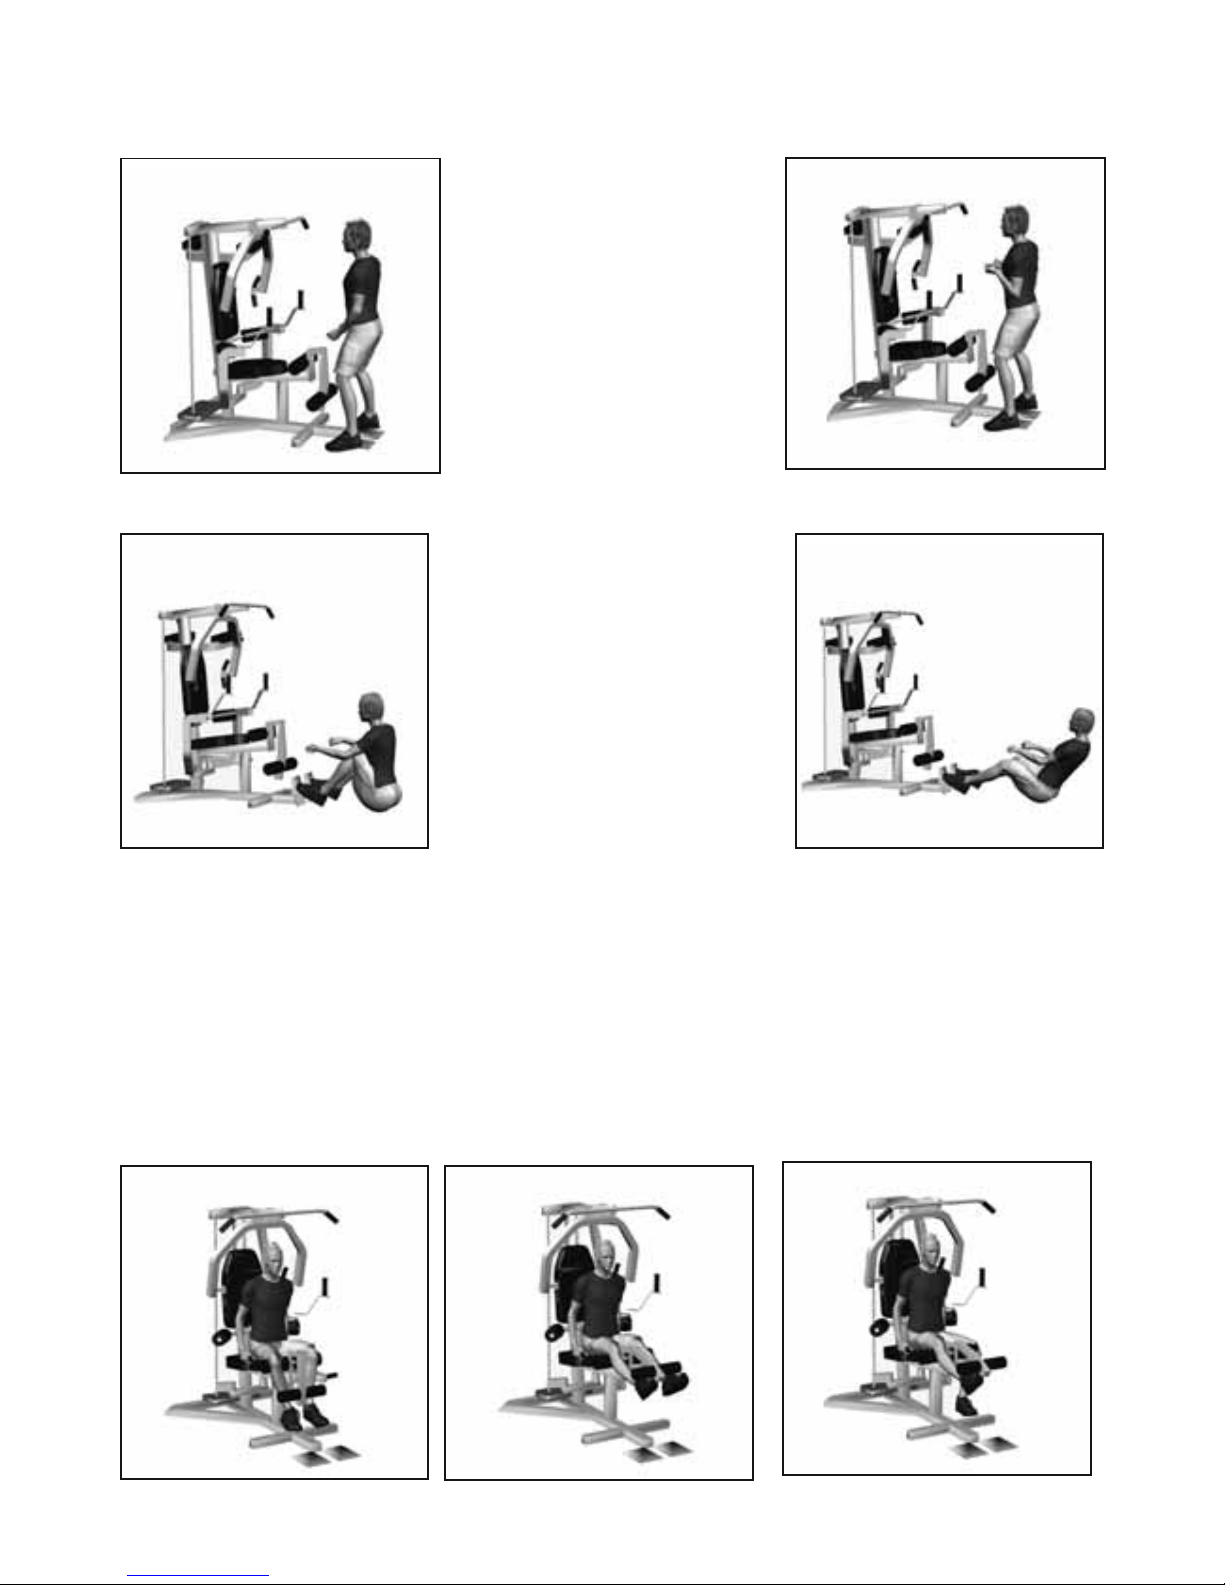
BICEP CURLS
Grip the lower lat bar.
Stand upright and using a narrow
grip, with palms facing up, curl the bar
towards your chest, using only your
biceps.
Return the bar in a controlled manner
to the start position.
LOW ROW
Use the Low Pulley and the Short Bar.
Sit with your feet against foot brace,
with your knees slightly bent. Lean
backwards keeping your lower back
straight, and pull the bar towards your
stomach.
Return the bar in a controlled manner
to the start position.
LEG EXTENSION
Sit on bench and hook legs over top roller pads and feet under bottom roller pads.
Extend both legs together and flex thighs at top of movement.
For single leg work, extend one leg at a time and flex thighs at top of movement.
Return the bottom roller pads in a controlled manner to the start position
START POSITION FINISH POSITION
Page 25

1574-25
10. FREQUENTLY ASKED QUESTIONS
Q1. How do I maintain my cables?
1. The cables work in conjunction with the pulleys. When assembling the unit; make sure not to over
tighten the pulleys. The pulleys are meant to move freely.
2. Before your workout; make sure all the cables are lined up correctly on the pulleys.
Q2. My moveable parts are not moving freely?
1. Make sure not to over tighten the oil bushes as the butterfly arms have to move freely.
2. Do not over tighten any bolt or nut which has bushes and moveable parts
Q3. My weight stack is not moving freely
1. Apply a light coating of grease to the guide tubes, as this will help reduce any unneccesary friction.
Q4. Is it possible to leave my weights on the bench once I have finished my workout?
1. It is not advisable as this could cause injury or cause the bench to fall over.
Q5. Is it possible to secure my bench to the ground?
1. Yes, provided that the area in which you are going to secure it is going to be in in a permanent location and that
the floors are not tiled
Q6. My bench is not stable
1. Ensure that all bolts are tightened and that all the end caps are on legs.
Q7. Is it a good idea to use my bench in a commercial gym?
1. No, as it is for domestic use only.
Page 26

1574-26
11. EXPLODED DRAWING
Page 27

1574-27
12. TROJAN 1 YEAR LIMITED WARRANTY
Masstores (Pty)Ltd (“the Supplier”) hereby provides a limited warranty to the original purchaser of this product (“the
Consumer”) that this product will be free of manufacturing defects in materials and workmanship which under normal,
personal, family or household use (commercial use expressly excluded) manifest themselves within the following stipulated periods from the date of purchase:
Exclusions
The warranty does not include and will not be construed to cover products damaged as a result of disaster; misuse;
commercial use; use not in accordance with the written instructions included with the product; abuse; and/or any
non-authorized modification of the product. It also does not cover replacement of the light bulbs and other expendables.
All demo models carry a 3 month warranty.
Waiver
The warranty provided herein and the obligations of the Supplier are in lieu of, and the Customer waives, all other warranties, guarantees, conditions or liabilities, express or implied, arising by law or otherwise, including without limitation, any
obligation of the Supplier in respect of any injury , loss or damage (direct, indirect or consequential) arising out of the
use of, or inability to use, this product and whether or not occasioned by the Supplier’s negligence or any act or omission
on its part.
Claims under 1 Year Limited Warranty
Within 7 days of purchase:
The faulty product will be exchanged (provided that the product is in its original packaging with all accessories).
After 7 days but within 3 months of purchase:
The Supplier may in its sole discretion either replace or repair the product.
After 3 months but within 1 year of purchase:
The Supplier may in its sole discretion either replace or repair the product. The following shall not be covered:
• Treadmills: Running Decks, Running Belts, and Rubber Arm covers
• Exercise Bikes/Spinners: Pedals, Cranks, and Rubber Arm covers
• Cross Trainers/ Ellipticals/ Steppers: Foot Rests, Cranks, Shocks, and Rubber/Foam Arm covers
• Home Gyms / Benches: Pulleys, Cables, Seats and Padding
• Trampolines: Springs, Mats, and Covers
• Rowers: Rowing Strap / Rope / Arms, Pulling Handle, Grip, Moveable Seat
Parts not mentioned in the above, are covered under warranty within the 1st year of purchase
Page 28
1574-28
Masstores (Pty) Ltd
16 Peltier Drive, Sunninghill
Sandton, Johannesburg, South Africa
Proof of Purchase
Any claim in terms of the warranty must be supported by a proof of purchase or a warranty number.
Warranty numbers can be issued through contacting our call centre on 0861 Trojan (0861 876 526),
or online at www.trojanhealth.co.za. If such proof is not available, then notwithstanding anything to the
contrary herein, the service agent’s prevailing charges for services/repairs including call-out and/or spares will
be payable by the Consumer upon collection or delivery of the repaired product.
The Consumer does not need to return the product to the store.
The Consumer shall phone the Trojan hotline on 0861 Trojan (0861 876 526) and the Supplier’s authorized agent
will at its discretion either repair the item at the Consumer’s residence or collect and repair the item at their premises.
During the warranty period the product may only be serviced and/or repaired by the Supplier’s duly
authorized agent(s).
Page 29

1574-29
13. TROJAN REPAIRS PROCEDURE
1. Procedure for repairs
Should you experience any faults or breakdowns on your Trojan equipment, please adhere to the following procedure
to have the fault rectified speedily and professionally.
• Do not return the product to the store*
• Call 0861 Trojan (0861 876526) to log the faulty product (under warranty or out of warranty)
• The operator or technical advisor will try identify the fault, and will book a service team call out.
• The service team will endevour to fix the problem in your home on an agreed date and time.
• Only if the fault cannot be repaired in the convenience of your home, will the service team take the
faulty product back to the service centre.
• Items repaired in our service centre will be returned to your home on an agreed date and time.
* Note:
Should you live in an outlying area, it may be neccessary to return the product to the store nearest to you.Our service
operator will advise you of your repair procedure.
2. Cost of Repairs
2.1 Under warranty
• Any items still under warranty will be repaired free of charge, as long as it complies with the terms and
conditions of the warranty. (refer to “warranties” section in this manual)
• Any items that need to be repaired that are NOT covered in the warranty will be for the consumer’s
expense. A quote for the repair/replacement of these items will be provided to the consumer for ap
proval prior to repairs being conducted.
2.2 Out of Warranty
• Any items that need to be repaired once the warranty has expired will be for the consumer’s expense
including call out fees. A quote for the repair/replacement of these items will be provided to the
consumer for approval prior to repairs being conducted.
Page 30

1574-30
Page 31

1574-31
Page 32

1574-32
 Loading...