

Trojan SOLITUDE 400, IRON MAN 500 Care Instructions And Assembly Manual

SOLITUDE 400
TREADMILL
TREADMILL CARE INSTRUCTIONS
AND ASSEMBLY MANUAL
TROJAN
MY SPACE MY TIME
®
#
1
HOME
FITNESS
SO
UTH A
FR
I
CA’
S
SI
N
CE
1981
CAUTION
READ ALL PRECAUTIONS AND
INSTRUCTIONS IN THIS MANUAL
BEFORE USING THIS EQUIPMENT
KEEP THIS MANUAL FOR
FUTURE REFERENCE
1 YEAR
warranty
CALL
0861 876526
0861 TROJAN
1561

INDEX PAGE
1. SAFETY INSTRUCTIONS 3
2. PRE ASSEMBLY CHECK LIST 4
3. HARDWARE LIST 5
4. ASSEMBLY STEPS 6
5. FOLDING INSTRUCTIONS 8
6. MAINTENANCE 9
7. GROUNDING INSTRUCTIONS 10
8. COMPUTER FUNCTIONS 11
9. REFERENCE TABLES 14
10. FITNESS TIPS AND TECHNIQUES 20
11. CONDITIONING GUIDELINES 21
12. WARM -UP AND COOL-DOWN 22
13. FREQUENTLY ASKED QUESTIONS 23
14. PARTS LIST 24
15. EXPLODED DRAWING 25
16. TROJAN 1 YEAR LIMITED WARRANTY 26
17. TROJAN REPAIRS PROCEDURE 28

1562-3
1. SAFETY INSTRUCTIONS
WARNING :
To reduce the risk of serious injury, read the following safety instructions before using the TROJAN SOLITUDE 400
TREADMILL.
1. Use the TROJAN SOLITUDE 400 TREADMILL only on a level surface.
2. Keep children and pets away from this equipment at all times.
3. TROJAN SOLITUDE 400 TREADMILL should not be used by persons weighing more than 120kgs.
4. The TROJANSOLITUDE 400 TREADMILL should be used by only one person at a time.
5. Be careful to maintain your balance while using, mounting, dismounting, folding, unfolding or assembling the TROJAN
SOLITUDE 400 TREADMILL, loss of balance may result in a fall and serious bodily injury.
6. Use the TROJAN SOLITUDE 400 TREADMILL only as described in the manual.
7. Before using this equipment to exercise, always do stretching exercises to properly warm up.
8. Always make sure all bolts and nuts are tightened prior to each use.
WARNING
Before starting any exercise or conditioning program you should consult with your personal physician to see if you
require a complete physical exam. This is especially important if you are over the age of 35, have never exercised before,
are pregnant, or suffer from any illness.
1562-4
2. PRE ASSEMBLY CHECK LIST
Thank you for choosing the TROJAN SOLITUDE 400 TREADMILL. We take great pride in producing this quality
product and hope it will provide many hours of quality exercise to make you feel better, look better and enjoy life to its
fullest.
Yes, it’s a proven fact that a regular exercise program can improve your physical and mental health. Too often, our busy
lifestyles limit our time and opportunity to exercise. The TROJAN SOLITUDE 400 TREADMILL provides a convenient
and simple method to begin your assault on getting your body in shape and achieving a healthier lifestyle.
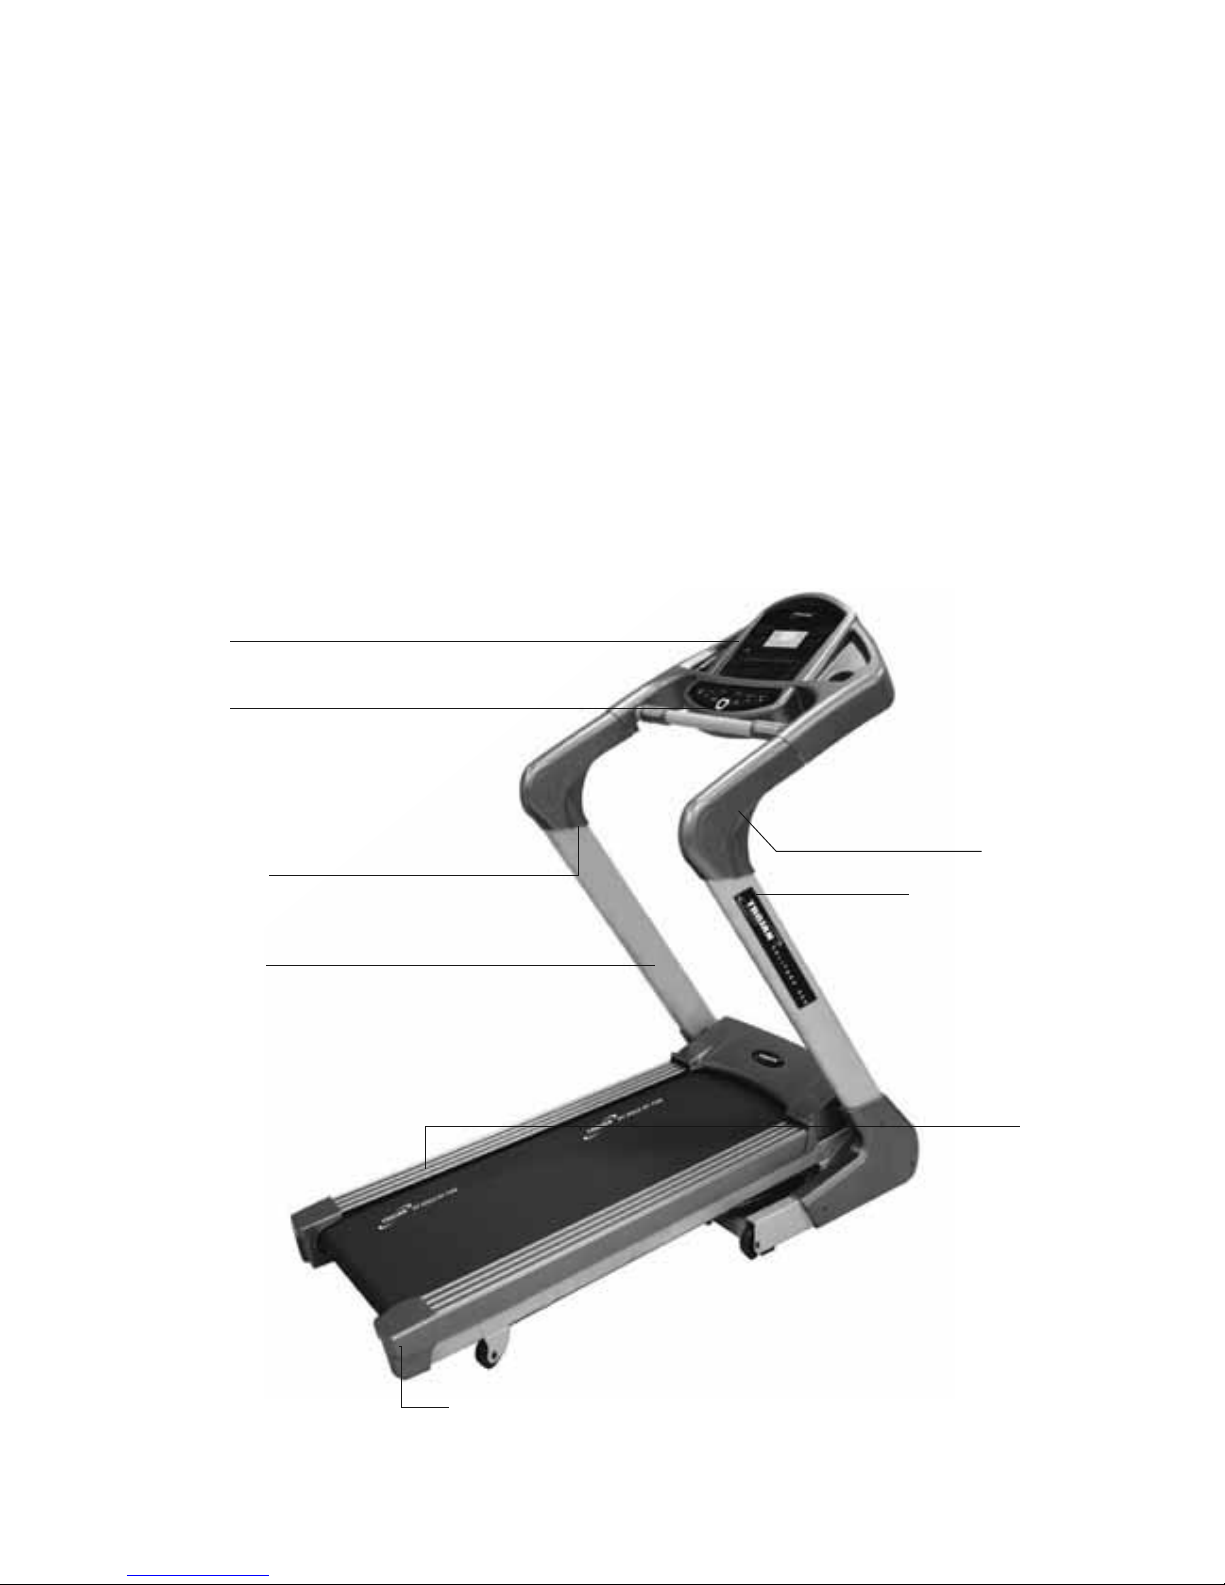
Before reading further, please review the drawing below and familiarize yourself with the parts that are labeled.
• Read this manual carefully before using the TROJAN SOLITUDE 400 TREADMILL.
Consol
Safety Key
Left Upright
Right Upright
Adjustment Box
Left Handrail
Right Handrail
Frame
1562-5
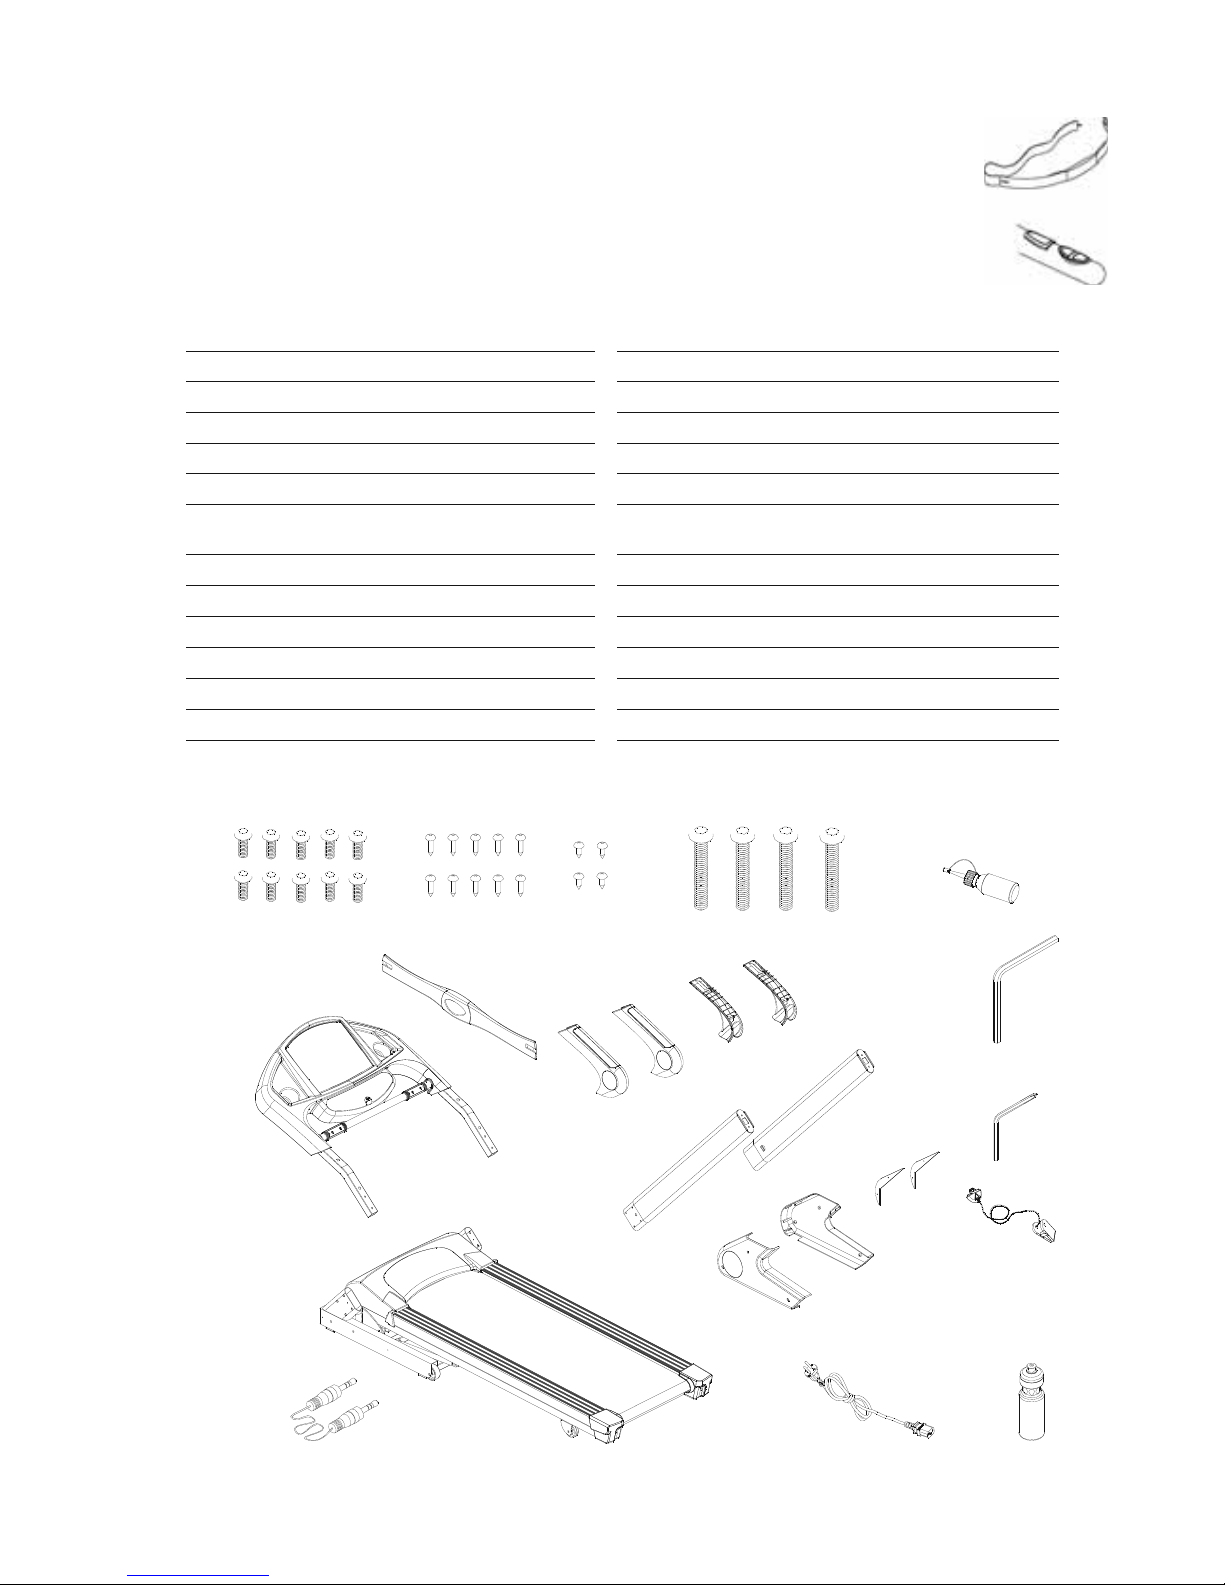
3. HARDWARE LIST
,7(0 'HVFULSWLRQ 4W\ ,7(0 'HVFULSWLRQ 4W\
$
&RPSXWHU&RQVROH
D$OOHQ%ROW 0[3[
%
)UDPH
E 6HOI 7DSSLQJ6FUHZ[ ˄˃
&
8SULJKW/
F 6HOI 7DSSLQJ6FUHZ[
' 8SULJKW5 G$OOHQ%ROW 0[3[
( 8SSHU+DQGUDLO&RYHU ˅ H 6,/,&21
) 8SSHU+DQGUDLO&RYHU ˅ I
$OOHQ :UHQFK6FUHZGULYHU
PPPP[PP
*
,QQHU'HFRUDWLRQ&RYHU
J$OOHQ:UHQFK PPPP[PP
+ 'HFRUDWLRQ&RYHU/! K 6DIHW\.H\&OLS
,
'HFRUDWLRQ&RYHU5
L 036RXQG&DEOH
˝ 3RZHU&RUG!
.
Cpuumf
/ 32/$5(PLWWHU
B
C
D
E
F
G
H
I
J
b
c
d
e
f
h
g
i
K
L
j
M
Handrail control button and heart rate strap are included in this package.
1. Heart rate can be measured on this treadmill. Attach the strap to your chest during exercise, the heart
rate value will display on the PULSE window.
2. The control button on the handrail can also be used to adjust speed and elevation. The control button
on the left handrail is for elevation while the right handrail button is for speed adjustment.
b
b
b
b
D
E
C
I
J
H
H
c
c
d
d
d
d
1562-6
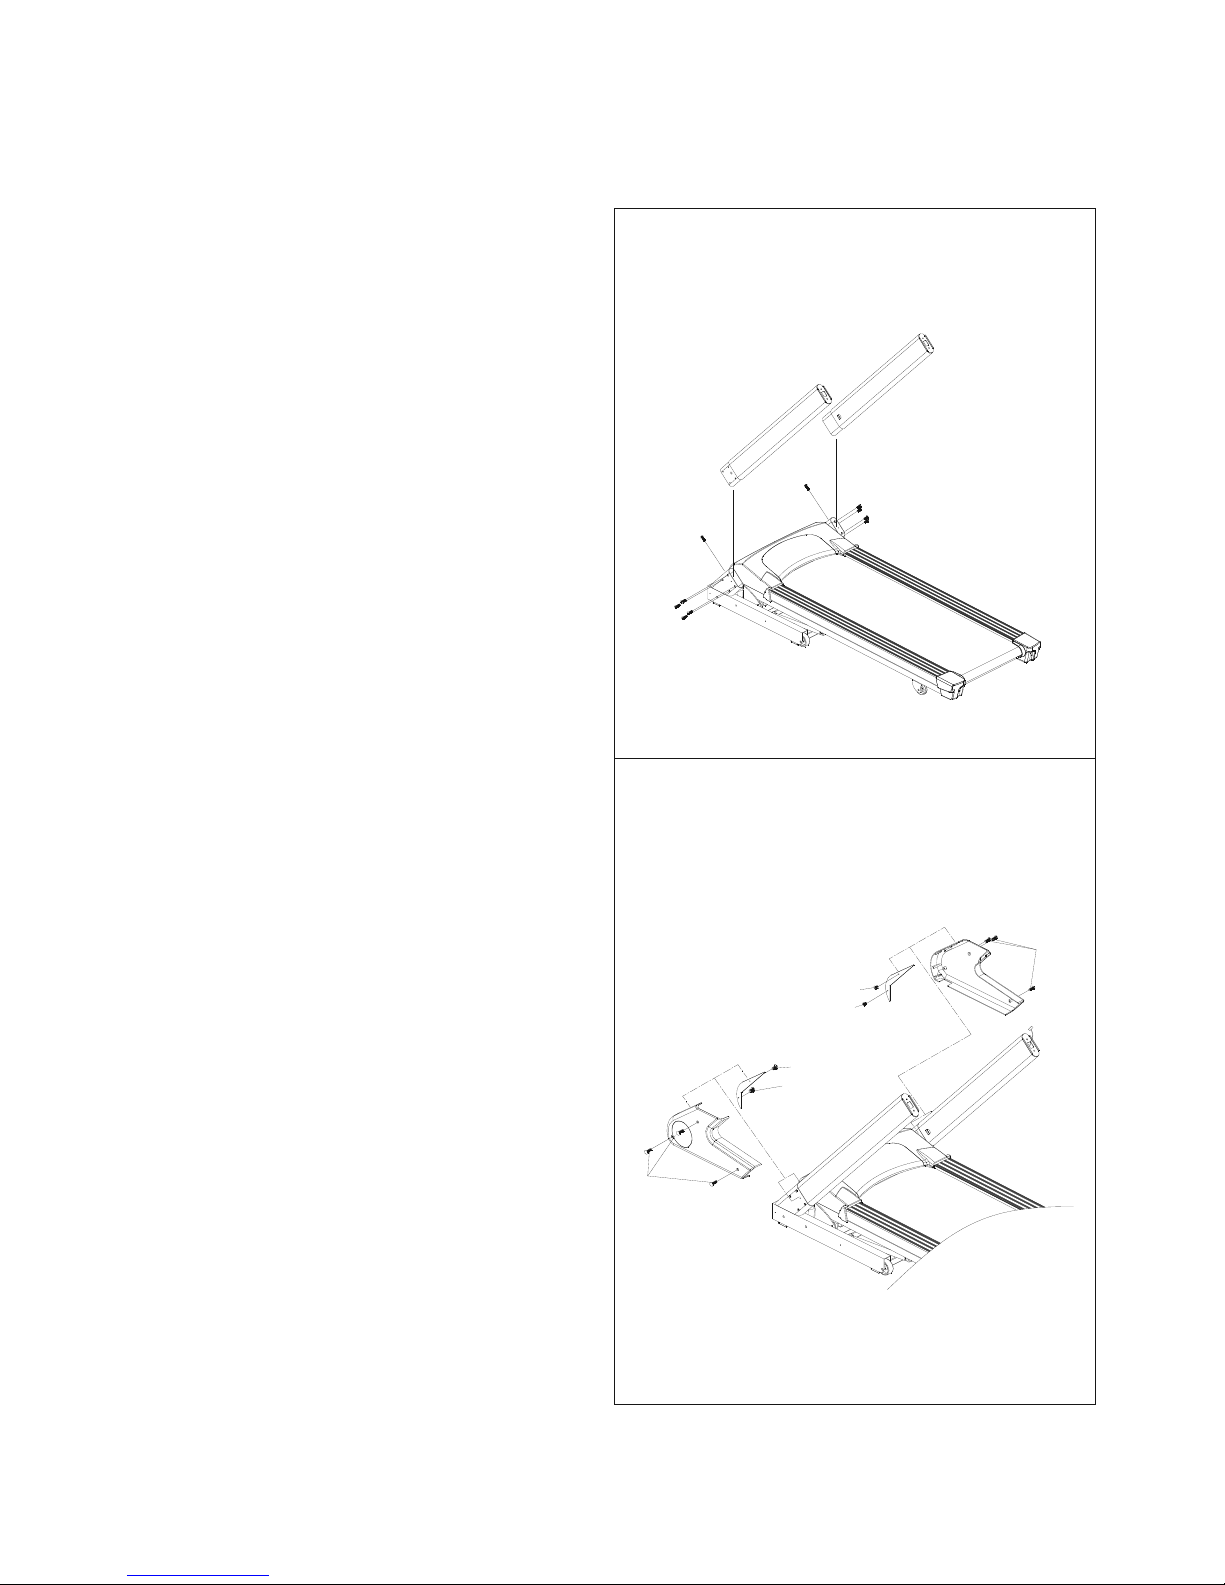
4. ASSEMBLY STEPS
Two persons are required to finish the assembly steps.
(Caution!! Please follow the assembly steps below to avoid injury).
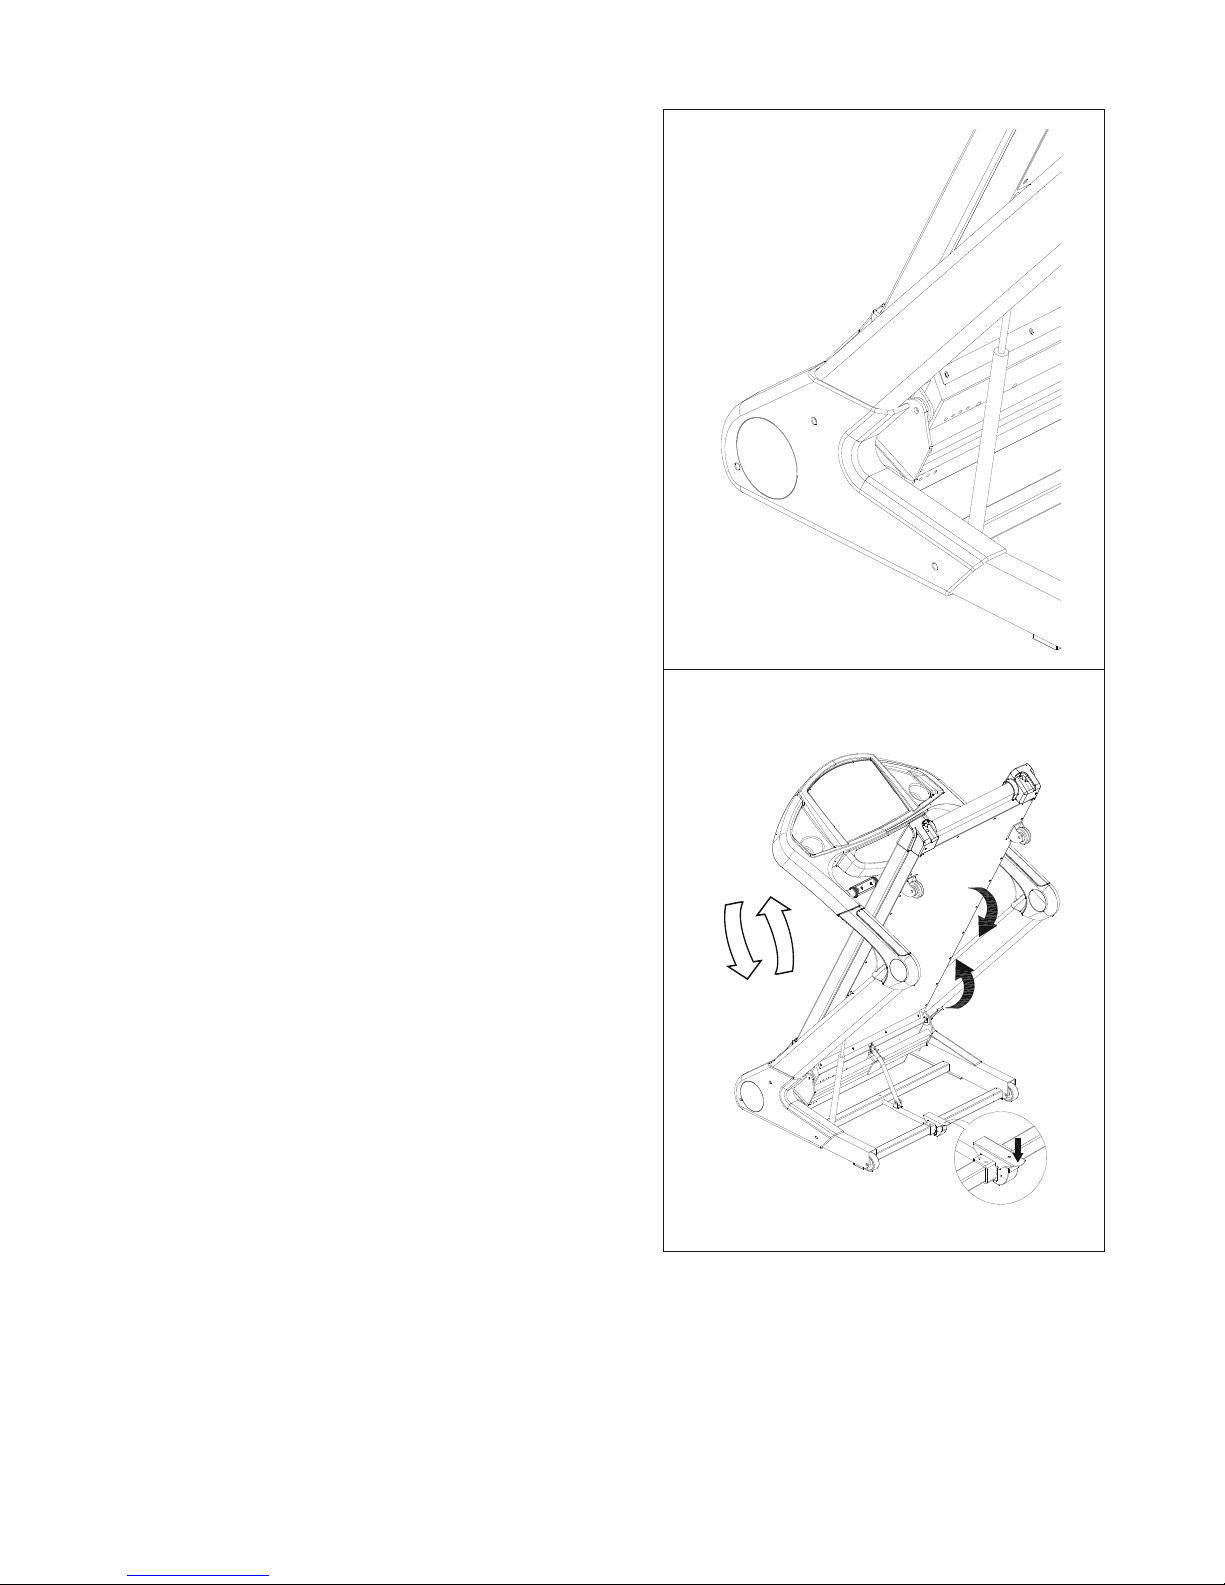
STEP 1
• After pulling out Control Wire with Guide Thread in
right Upright (C), clip it into the inside hole in right
Upright (C).
• Tighten left and right Uprights (C, D) with Allen Bolt (a)
after they are inserted into their stands
CAUTION:
Ensure that cables are not damaged during assembly or
when tightening screws.
STEP 2
• After left and right Uprights are tightened, attach left
and right Decoration Covers (G, H) to the Frame and
tighten them with Screw (b, c).
B
e
e
F
F
G
G
c
c
U
1562-7
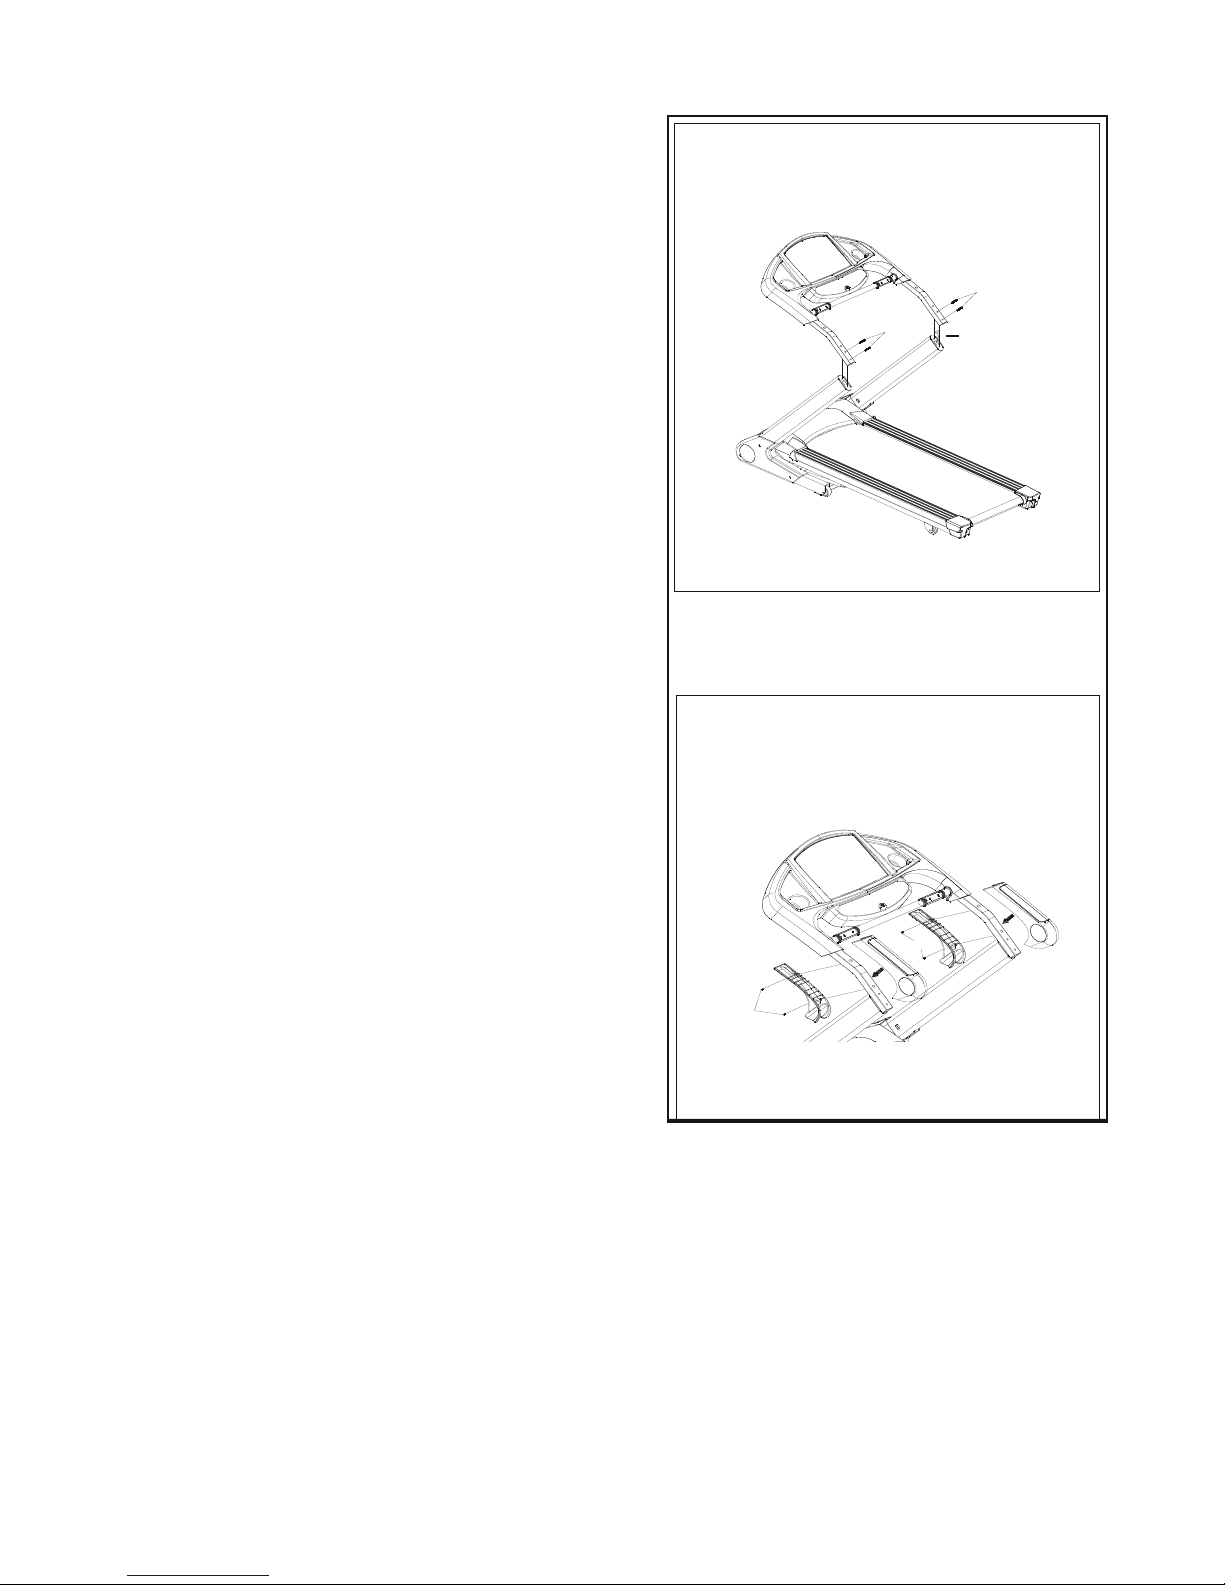
ASSEMBLY STEPS
STEP 3
• Connect Control Wire (L) in right Upright (C)
with control wire (U) of Computer Console(A).
• Thread wires into Upright (C,D) and place Computer
Console(A) on the Frame.
• Attach with Allen Bolt (d).
CAUTION:
Ensure that cables are not damaged during assembly or when
tightening screws.
STEP 4
• Attach upper and lower Handrail Covers (E, F), to Handrail.
• Attach them with Self Tapping Screw (b).
CAUTION:
Ensure that cables are not damaged during assembly or when
tightening screws.
1562-8
5. FOLDING INSTRUCTIONS
FOLDING DECK CYLINDER
Note: The Cylinder is pressurised, so extra care must be taken to
avoid contact with other objects. Note: If you damage the Cylinder,
usage could be affected.
FOLDING MECHANISM
• This treadmill can be folded away for storage. When storing
the treadmill, all power must be off. Fold the running deck
towards the console.
• Ensure that the footplate locks onto the tube of the frame.
• To open, step on the footplate to release the tube. Slowly
pull down the running deck and allow it to automatically
move in the direction shown.
• Never stand underneath the deck.
Warnings
1.To prevent any injuries, ensure that no children are near to the
machine when storing or unpacking the machine.
2. Should you want to move the machine, ensure it is locked in its
storage position, hold machine on rear adjustment boxes, and tilt
slowly onto its roller wheels
1562-9
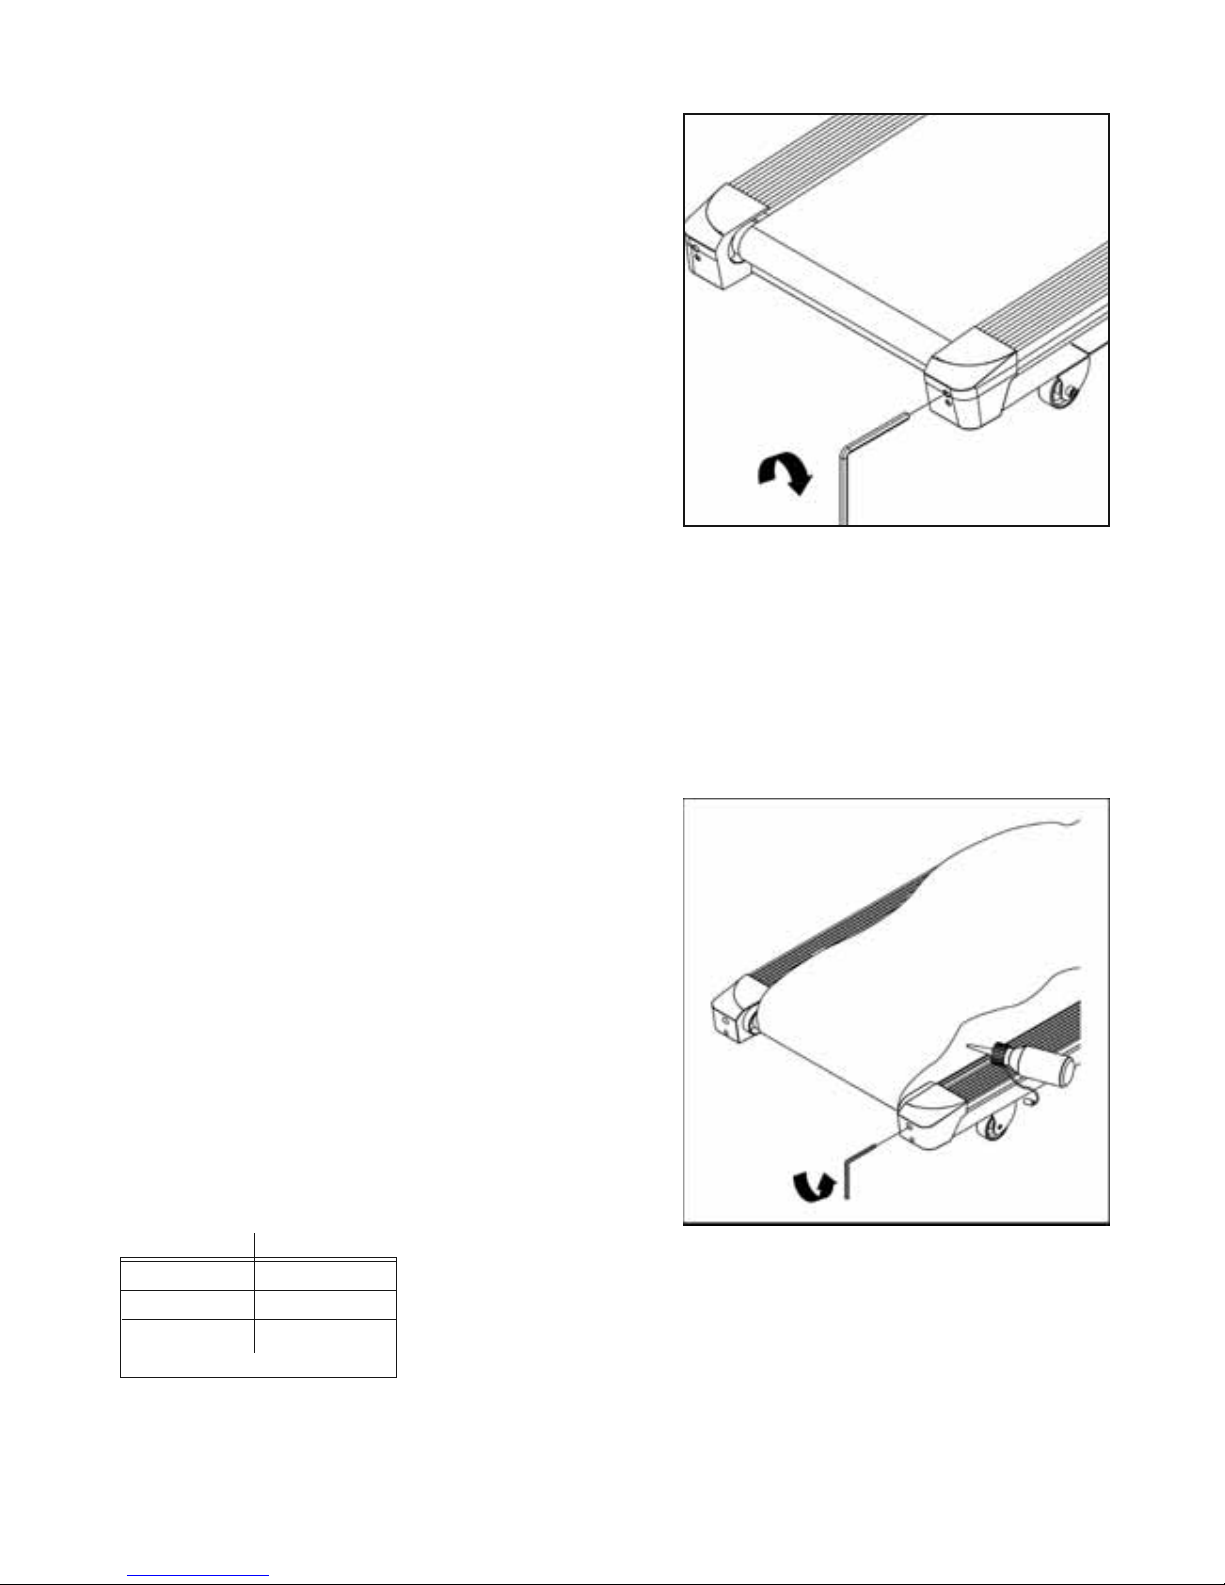
6. MAINTENANCE
RUNNING BELT NOT CENTERED
• If the running belt is not centered on the tail roller and it’s either
too far left or right, please turn off the treadmill first.
• Use 6mm Allen Wrench shaped wrench to loosen bolts within
rear adjusting boxes.
• If the running belt is tracking to the left, adjust belt to track to the
right. Tighten the left tail roller Allen screw by turning quarter
clockwise. The same procedure applies if the belt is pulling right
i.e. tighten right tail roller. Power on the treadmill after
the adjustment. If it has no obvious effect, just repeat the steps
above.
• Do not use the treadmill until the running belt returns
to the center position. Should tracking occur please use the
above mentioned steps to rectify the issue.
• Please note: The running belt might not stay precisely in the
center, but might move slightly to either the right or left side.
• When aligned properly the belt wont scratch the side rails.
LUBRICATION
• It is strongly suggested that you follow the timetable below to
apply lubrication to the running deck.
• Firstly use the 6mm wrench to loosen the bolts within the rear
adjusting boxes, pull up the running belt and evenly apply
lubrication on the center deck.
• Then adjust the belt to the center of deck and following the
above step to tighten the belt.
• Please run treadmill at low speed, after all bolts are secure, to
allow equal distribution of the lubricating oil.
• Please follow the above steps to lubricate the belt if you
experience any skid phenomena.
LUBRICA TION TIMETABLE
Speed Suggested Time
1~6 km 1 year
6~12 km 6 months
12~16 km 3 months
 Loading...