

Page 1
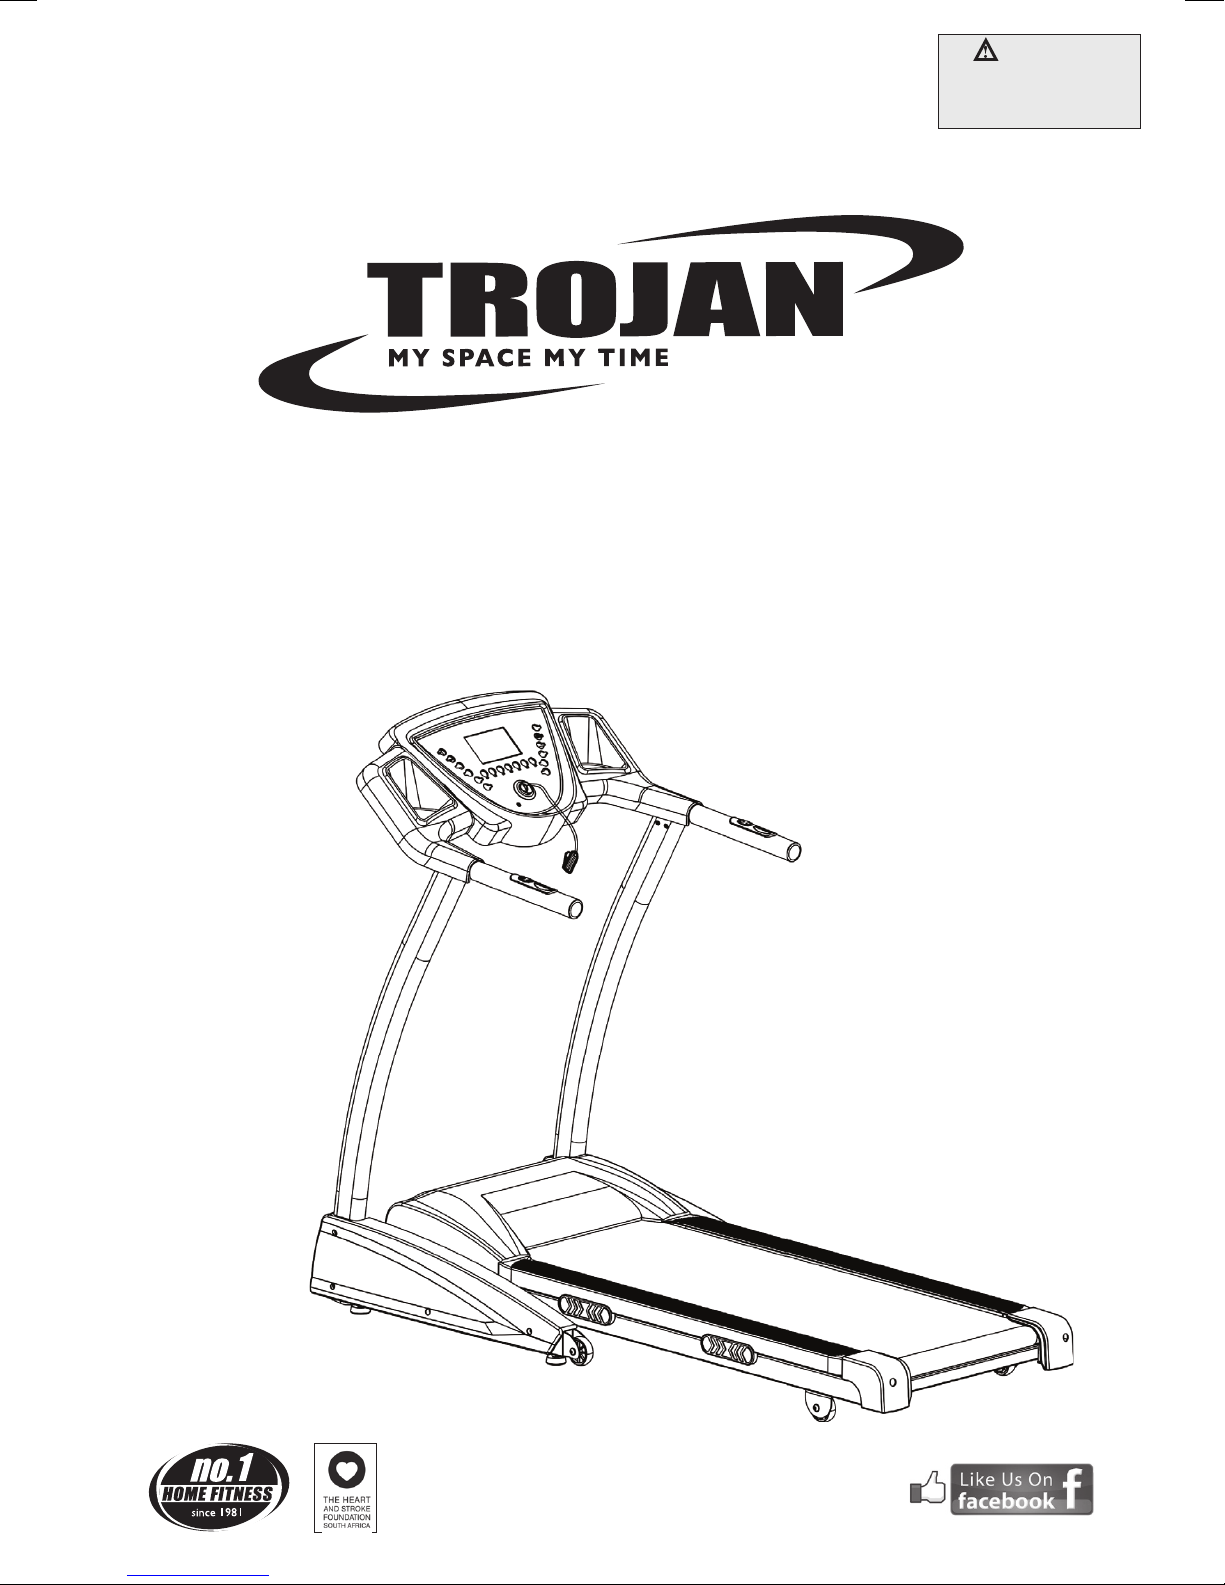
IGNITE 370
TM
CAUTION
READ ALL PRECAUTIONS AND
INSTRUCTIONS IN THIS MANUAL
BEFORE USING THIS EQUIPMENT.
KEEP THIS MANUAL FOR
FUTURE REFERENCE.
TREADMILL
USER MANUAL
Visit facebook.com/trojanhealth
www.trojanhealth.co.za
Page 2

10334
INDEX
• Important Safety Instructions ______________________________________ 3
• Grounding Instructions ___________________________________________ 5
• Pre Assembly Check List __________________________________________ 6
• Hardware & Tools List ____________________________________________ 7
• Assembly Steps _________________________________________________ 8
• Operation Instructions ___________________________________________ 11
• Pre-Set Programs _______________________________________________ 16
• Maintenance ___________________________________________________ 22
• Fitness Tips & Techniques __________________________________________ 24
• Conditioning Guidelines __________________________________________ 25
• Warm Up & Cool Down _________________________________________ 26
• Trouble Shooting _______________________________________________ 27
• Exploded Drawing ______________________________________________ 28
• Parts List ______________________________________________________ 29
• 1 Year Limited Warranty __________________________________________ 34
• Repairs Procedure ______________________________________________ 35
2
Page 3
10334
IMPORTANT SAFETY
INSTRUCTIONS
It is the sole responsibility of the purchaser of Trojan products to read the owner’s manual, warning labels and
instruct all individuals, on proper usage of the equipment. Understanding each and every warning to the fullest
is important. If any of these instructions or warnings are unclear, please contact our Trojan Call Centre on
0861 TROJAN (0861 876526), within the Republic of South Africa. International Consumers can contact us
on: +27 10 206 4405
The equipment is only intended for HOME USE and is NOT INTENDED FOR COMMERCIAL,
INSTITUTIONAL AND/OR STUDIO FACILITIES USE.
Contact Trojan with any questions regarding this classication. It is recommended that all users of Trojan be
informed of the following information prior to use.
HEALTH WARNING
• Before starting any exercise or conditioning program you should consult with your personal physician to
see if you require a complete physical exam. This is especially important if you are inactive, pregnant or
suffer from any illness.
• If at any time during exercise you feel faint, dizzy or experience pain, stop exercising immediately and
consult your physician.
• To avoid muscular pain and strain, begin each workout by stretching and warming up and end each
session by cooling down and stretching.
ACCESS CONTROL
• Trojan recommends that all tness equipment be used in a super vised area. It is recommended that
the equipment be located in an access controlled area. Control is the responsibility of the owner. Keep
children away from all equipment.
• Parents or other supervising adults must provide close supervision of children if the equipment is used in
the presence of children.
INSTALLATION
Trojan recommends that all equipment:
• Be secured to or set up on a solid, level surface to stabilise and eliminate rocking or tipping over
during training.
• Be set up inside your home away from moisture and dust (the equipment is not designed for
outdoor use).
• Be set up with sufcient ventilation to ensure proper operation.
• Be set up with sufcient space around the equipment so that all exercises can be completed safely.
It is recommended that there should be at least 1 m of space around the equipment where access is
required to exercise.
3
Page 4
10334
IMPORTANT SAFETY
INSTRUCTIONS
PROPER USAGE
• Do not use the equipment in any way other than as designed or intended by the manufacturer. It is
imperative that Trojan equipment is used properly to avoid injury.
• Injuries may result from exercising improperly or excessively.
• Your Trojan equipment should only be used by one person at a time.
• Be careful to maintain your balance while using, mounting, dismounting or assembling your Trojan
equipment to avoid injury.
• Do not attempt to adjust the seat or handlebars while you are on your Trojan equipment.
• Servicing other than the procedures in this manual should be performed by an authorised service
representative only.
INSPECTION
• Do not use or permit use of any equipment that is damaged or has worn or broken parts. For all Trojan
Equipment use only replacement parts supplied by Trojan.
• Always make sure that all nuts and bolts are tightened prior to each use.
• Maintain labels and nameplates – do not remove labels for any reason. They contain important
information.
• Equipment maintenance – preventative maintenance is the key to smooth operating equipment. Please
ensure that you follow our maintenance tips to ensure the continued correct function of your Trojan
equipment.
• Before any use, examine all accessories approved for use with the Trojan equipment for damage or wear.
• Should your Trojan equipment appear damaged or worn, do not attempt to use or repair the equipment
yourself.
• Please contact our service department on 0861 TROJAN (0861 876526) to arrange a repair.
OPERATING WARNINGS
• It is the purchaser’s responsibility to instruct all users as to the proper operating procedures of all Trojan
equipment.
• Keep children away from all moving parts. Parents must provide close supervision of children if the
equipment is used in the presence of children.
• Do not wear loose tting clothing or jewellery when using the equipment. It is also recommended that
users tie up long hair to avoid contact with moving parts.
• Ensure that anyone not using the equipment stays clear of the user, accessories and moving parts while
the machine is in operation.
USER WEIGHT LIMITATIONS
• This Trojan Ignite 370 Treadmill may not be used by persons weighing more than 120 kg.
SAVE THIS INSTRUCTION MANUAL FOR FUTURE USE AND REFERENCE
If any of these instructions or warnings are unclear please contact Trojan Customer Services on
0861 TROJAN (0861 876526) within the Republic of South Africa or visit www.trojanhealth.co.za.
4
Page 5
10334
GROUNDING INSTRUCTIONS
WARNING
• Never use a ground fault circuit interrupt (GFCI) wall outlet with this treadmill. Route the power cord
away from any moving parts of the treadmill including the elevation mechanism and transport wheels.
• Never remove any cover without rst disconnecting AC power.
• Never expose this treadmill to rain or moisture. This treadmill is not designed for use outdoors, near a
pool, or in any other high humidity environment.
This product must be grounded. If a malfunction or breakdown occurs, grounding provides a path of
least resistance for electric current to reduce the risk of electric shock. This product is equipped with a
cord having an equipment-grounding conductor and a grounding plug. The plug must be plugged into
an appropriate outlet that is properly installed and grounded in accordance with all local codes and
ordinances.
DANGER – improper connection of the equipment-grounding conductor can result in a risk of electric
shock. Check with a qualied electrician or serviceman if you are in doubt as to whether the product is
properly grounded. Do not modify the plug provided with the product. If it will not t the outlet have a
proper outlet installed by a qualied electrician.
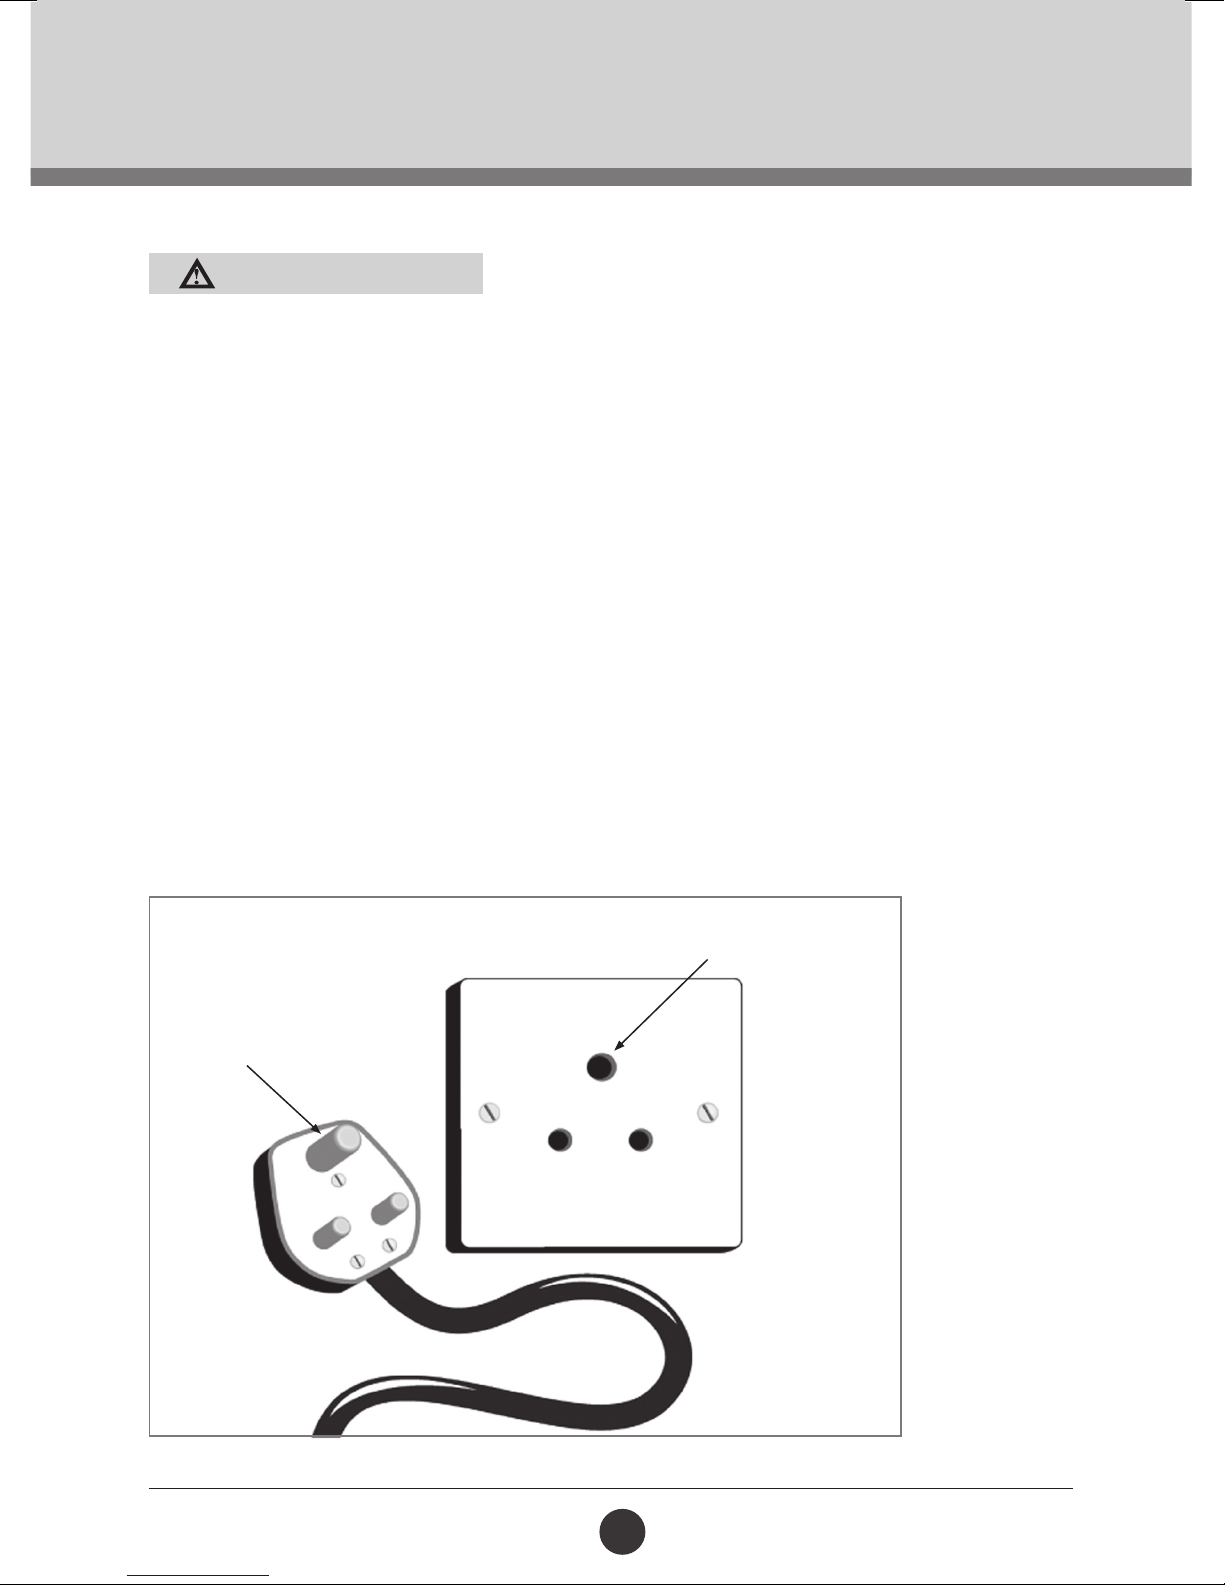
This product is for use on a nominal 220-240 volt circuit and has a grounding plug that looks like
the plug illustrated in the gure. Make sure that the product is connected to an outlet with the same
conguration as the plug. No adaptor should be used with this product.
GROUNDED OUTLET
GROUNDING PIN
5
Page 6
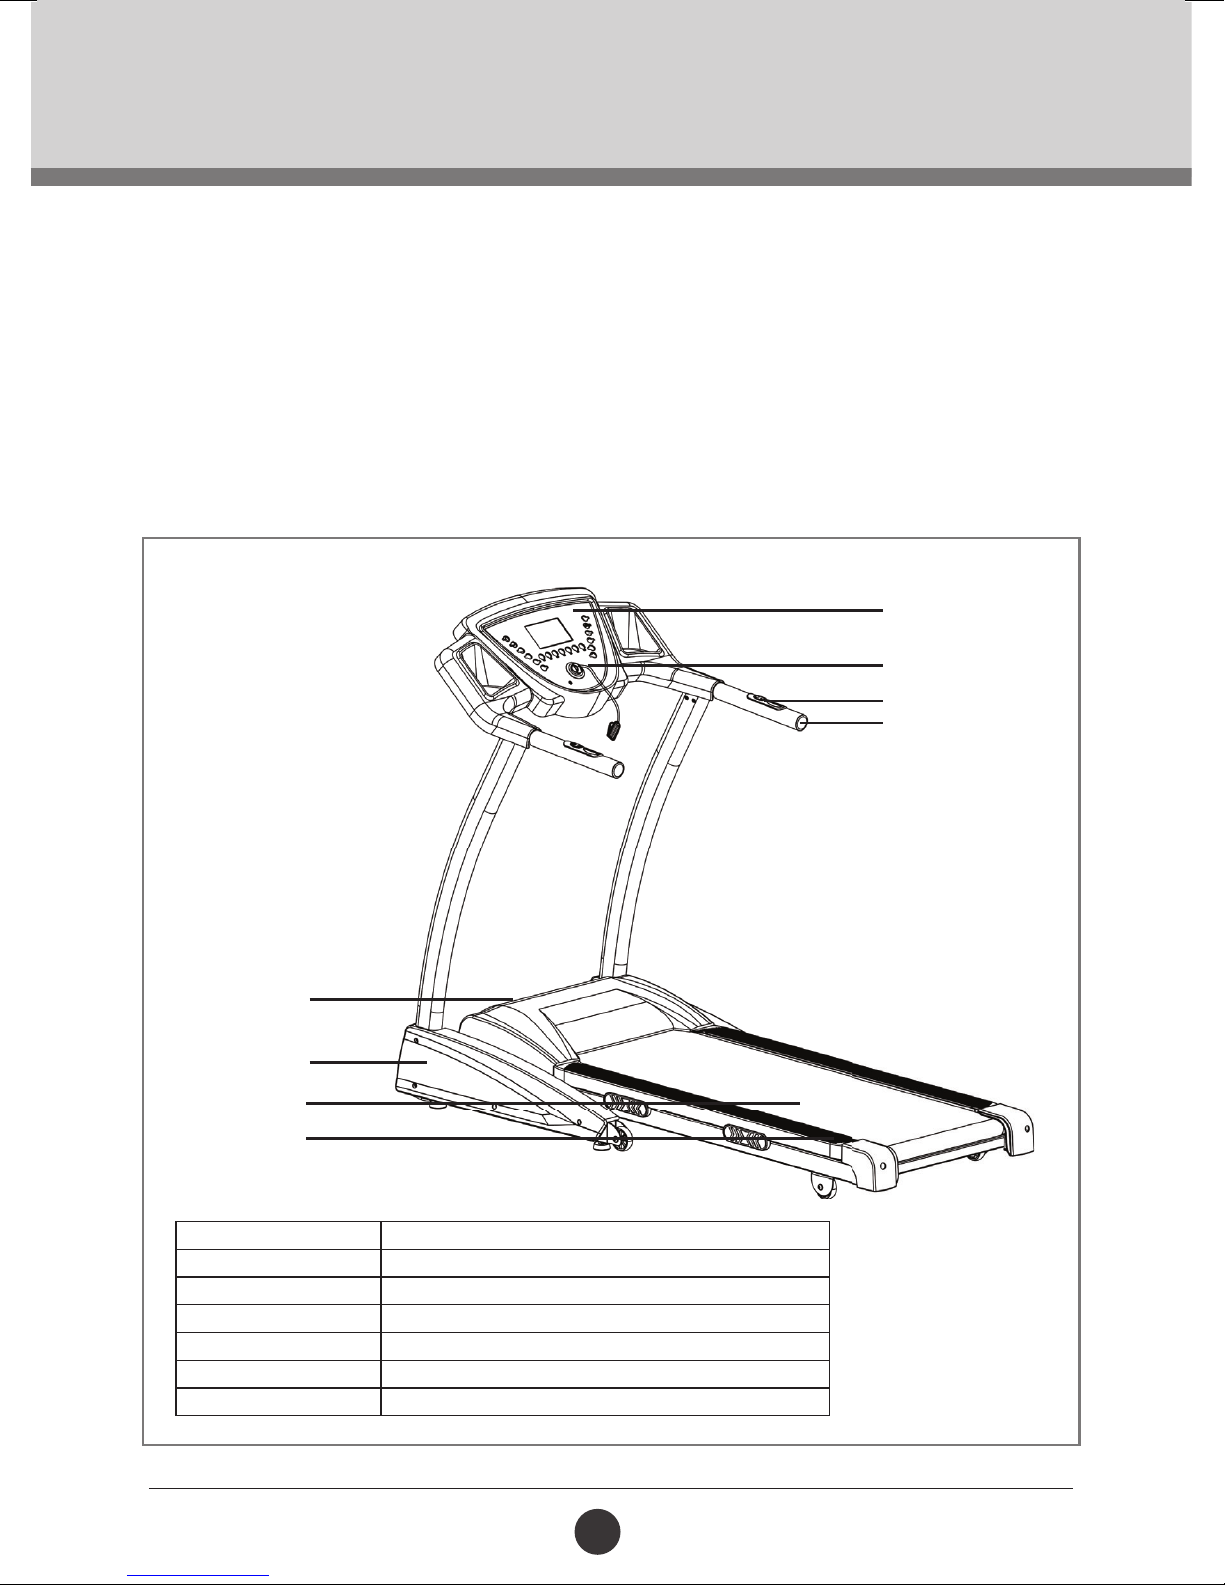
PRE ASSEMBLY CHECK LIST
Thank you for choosing the Trojan Ignite 370 Treadmill. We take great pride in producing this
product and hope it will provide many hours of quality exercise to make you feel better, look
better and enjoy life to its fullest. Yes, it’s a proven fact that a regular exercise program can improve
your physical and mental health. Too often, our busy lifestyles limit our time and opportunity to
exercise. The Trojan Ignite 370 Treadmill provides a convenient and simple method to begin your
assault on getting your body in shape and achieving a healthier lifestyle. Before reading fur ther,
please review the drawing below and familiarise yourself with the par ts that are labelled.
Read this manual carefully before using the Trojan Ignite 370 Treadmill.
Console Display
Safety Key
Heart Rate Sensor
Hand Rail
Power Switch
Side Cover
Running Deck
Side Rail
Speed: 1-16 km/h
Functions: Time / Speed / Distance / Incline / Calories / Pulse
Programs: 25 Pre-set
Elevation: 10 Levels
Running deck (mm): 1200 mm (l) x 450 mm (w)
Set-up size (mm): 1730 mm (l) x 780 mm (w) x 1340 mm (h)
User weight (mm): 120 kg (maximum)
6
10334
Page 7
10334
HARDWARE & TOOLS LIST
INSTRUCTIONS FOR ASSEMBLY
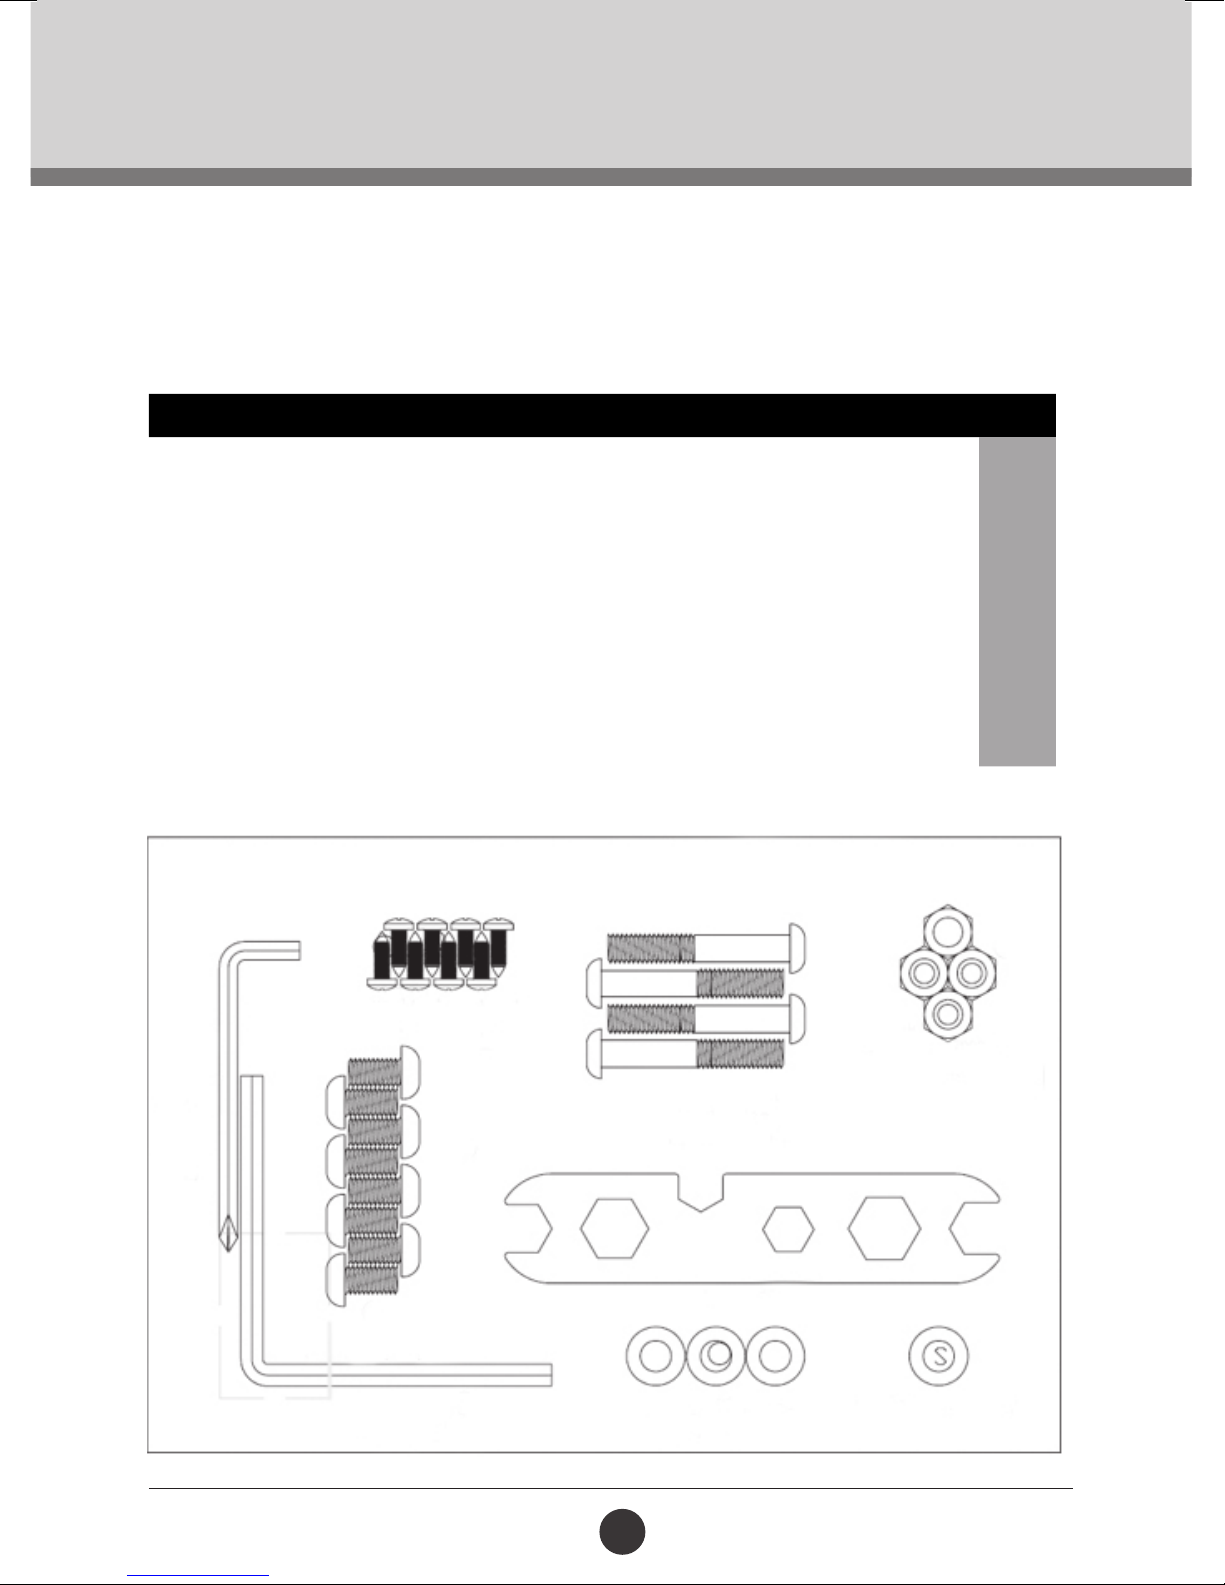
• Before you start to assemble, please check the hardware packaging to make sure all parts are included.
• Basic tools, such as spanners will be required for assembly.
No. Description Qty
57 Cross Head Screw ST4.2 x 13 mm 8 pcs
44 Cup Head Hex Screw M8 x 50 mm 4 pcs
55 Lock Nut M8 4 pcs
45 Cup Head Hex Screw M6 x 16 mm 8 pcs
51 Flat Washer Ø8 mm 4 pcs
52 Saddle washer Ø8 mm 12 pcs
Spanner 1 pcs
Hex Key 5 mm 1 pcs
Hex Key 6 mm 1 pcs
Hardware Kit B01154500
ST4, 2 x 13 mm Cross
Head Screw (57) 8 pcs
M8 Non-Metal Hex
M8 x 50 mm Cup Head
Hex Screw (44) 4 pcs
5 mm Hex Key 1 pcs
Nut (55) 4 pcs
M8 x 16 mm Cup Head
Hex Screw (45) 8 pcs
6 mm Hex Key 1 pcs
Ø8 Flat Washer-C
(51) 12 pcs
7
Spanner 1 pcs
Ø8 Saddle Washer
(52) 4 pcs
Page 8
10334
ASSEMBLY STEPS
INSTRUCTIONS FOR ASSEMBLY
• Unpack the carton and use the parts check list to check that all parts are accounted for.
• Do not dispose of the packaging material until assembly is completed.
• Tools are provided for use in assembly.
• Majority of the parts here have been preassembled at the factory.
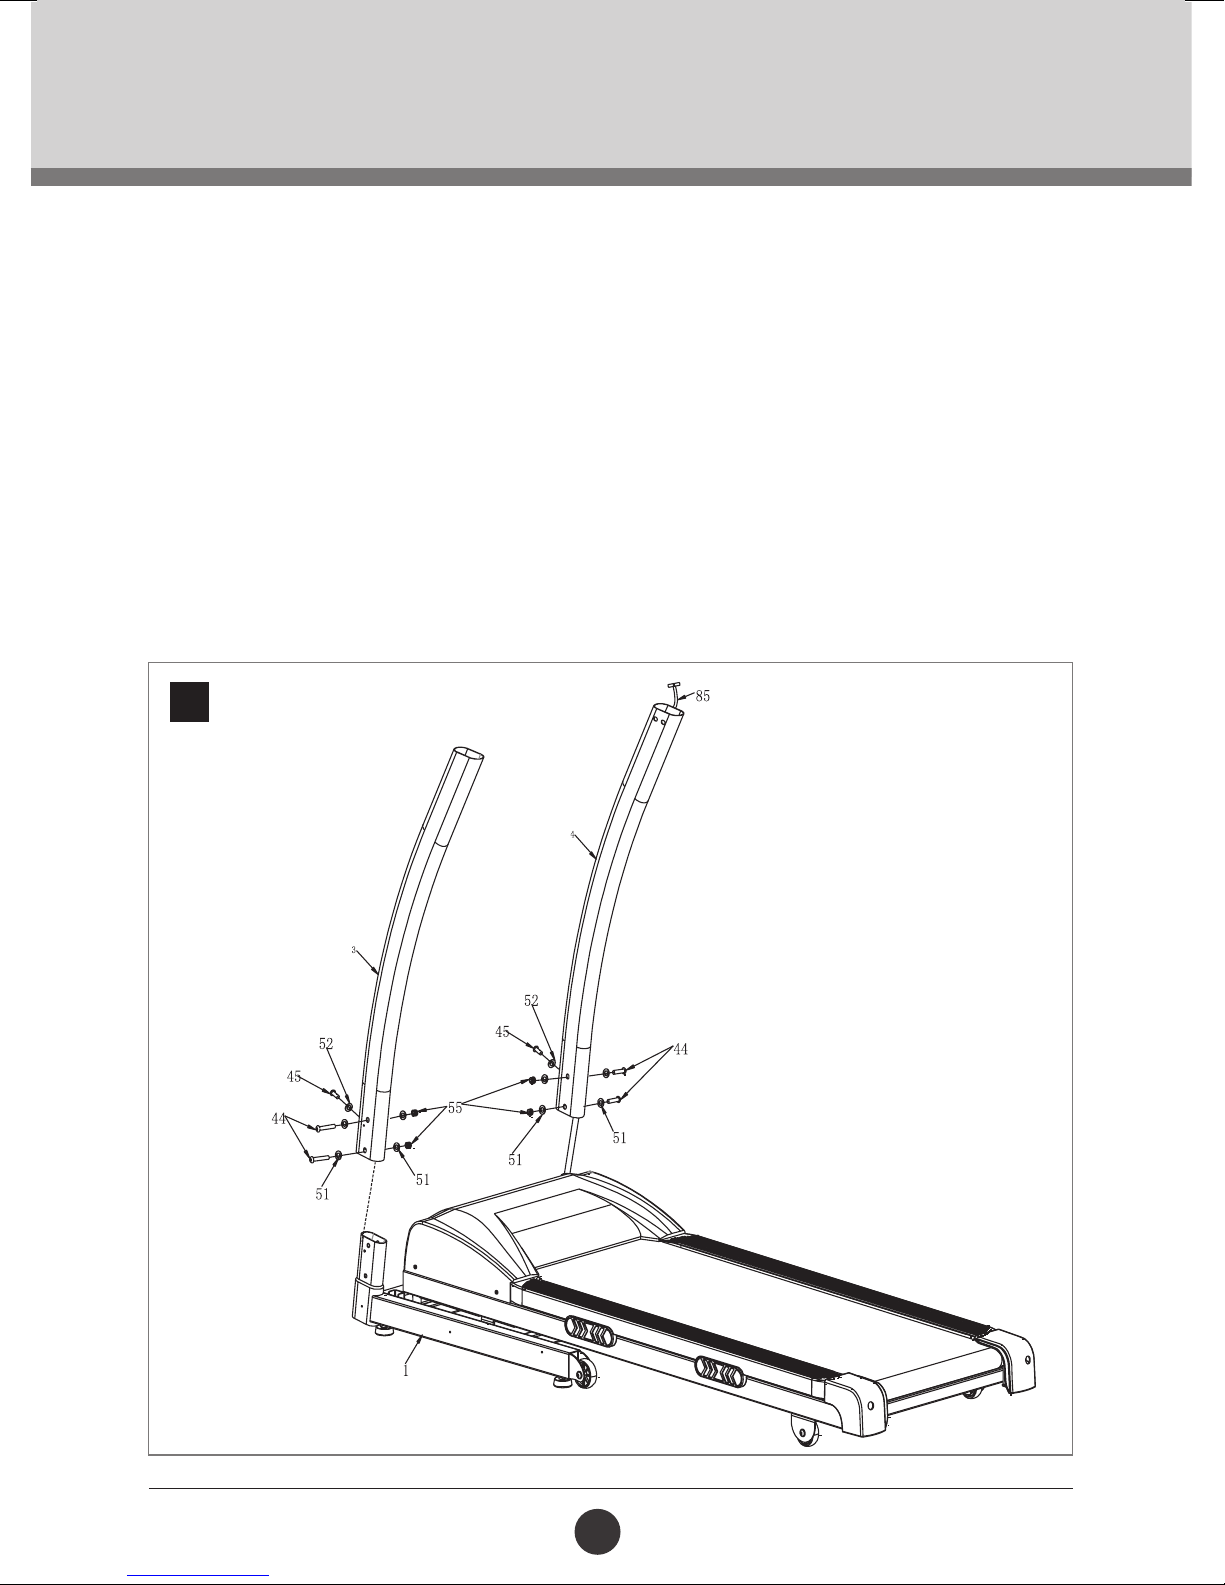
STEP 1: UPRIGHT BAR ASSEMBLY
• Pull the Base Frame Connect Wire (85) up through the Right Upright Bar (4). Connect the Left / Right
Upright Bar (3 / 4) to the Base Frame (1) with one Cup Head Hex Screw (45) and one Flat Washer
(52) on the back of the Upright Bars.
• Insert two Cup Head Hex Screw (44) and two Flat Washers (51) on the outsides of the
Upright Bars (3 / 4).
Note: Take care not to pinch the wires during this step.
1
8
Page 9
10334
ASSEMBLY STEPS
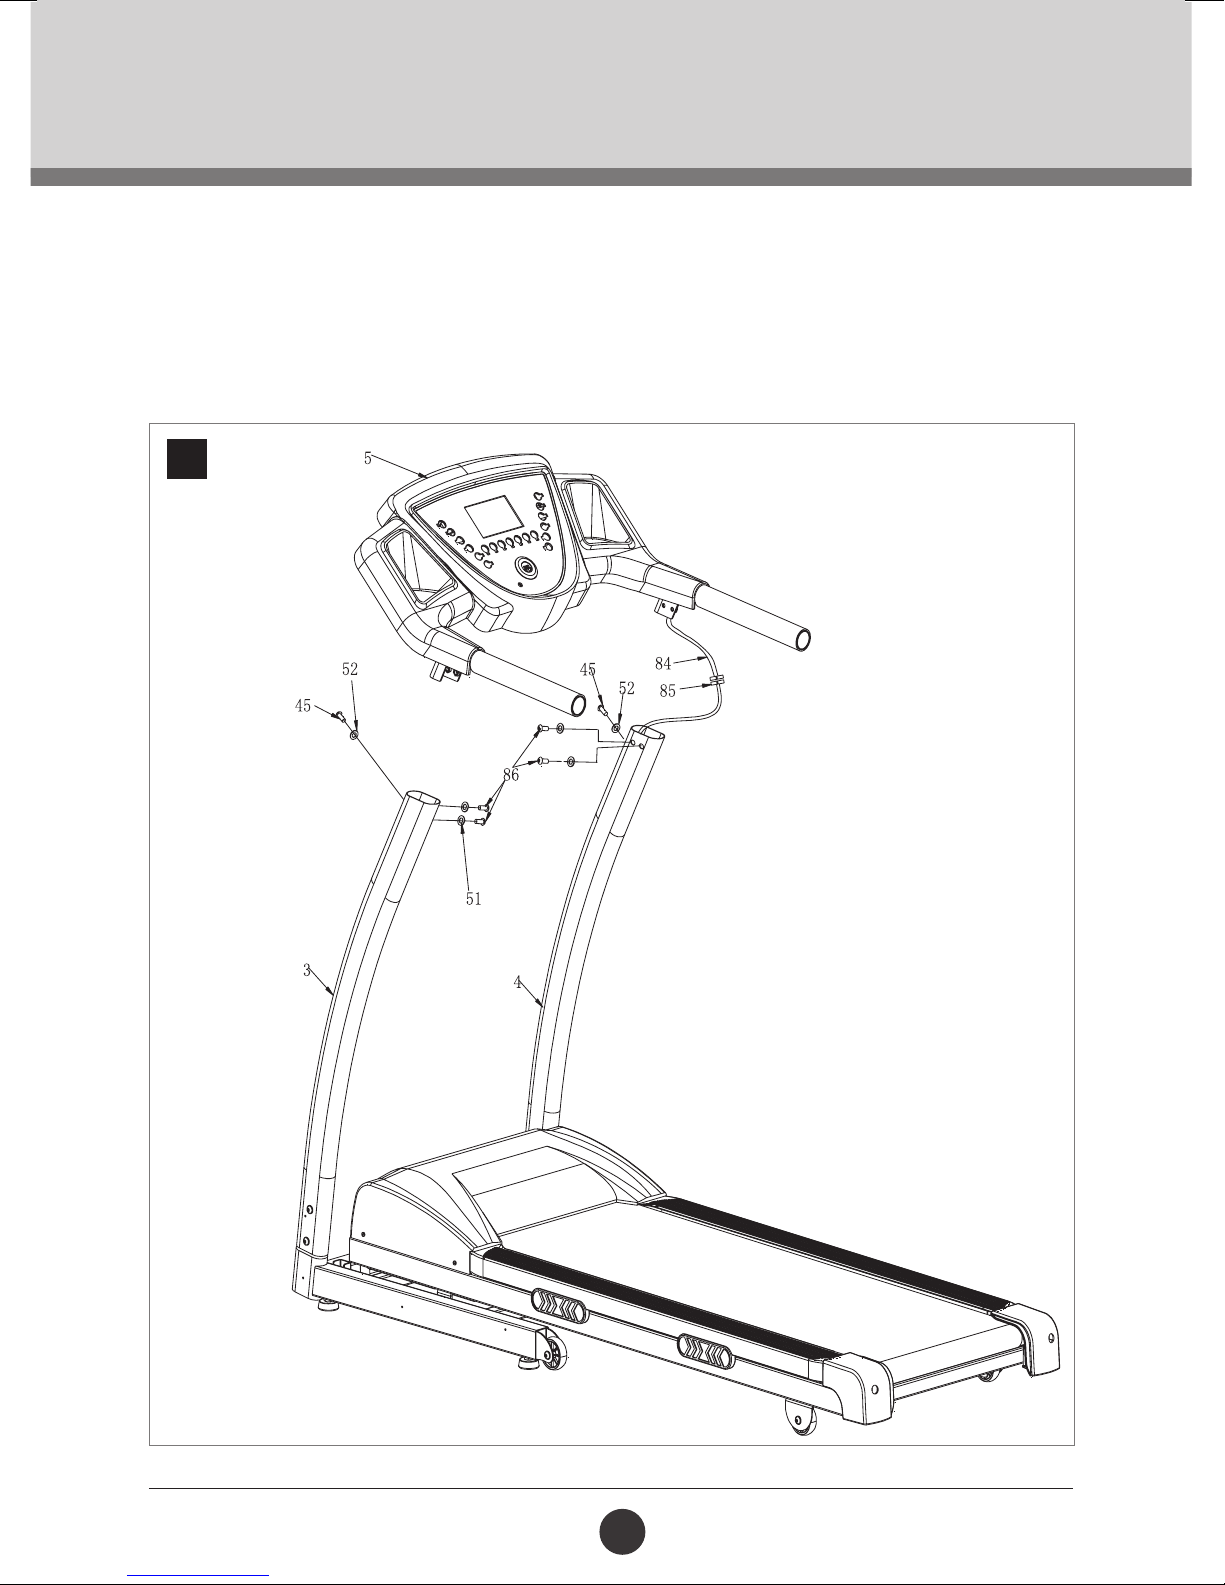
STEP 2: CONSOLE ASSEMBLY
• Connect Console Wire (84) to the Base Frame Connect Wire (85) that has been pulled up through the
Right Upright Bar (4).
• Place the Console (5) on top of the Upright Bars and secure in place with one Cup Head Hex Screw
(45) and one Flat Washer (52) on the back of the Upright Bars (3 / 4).
2
9
Page 10
10334
ASSEMBLY STEPS
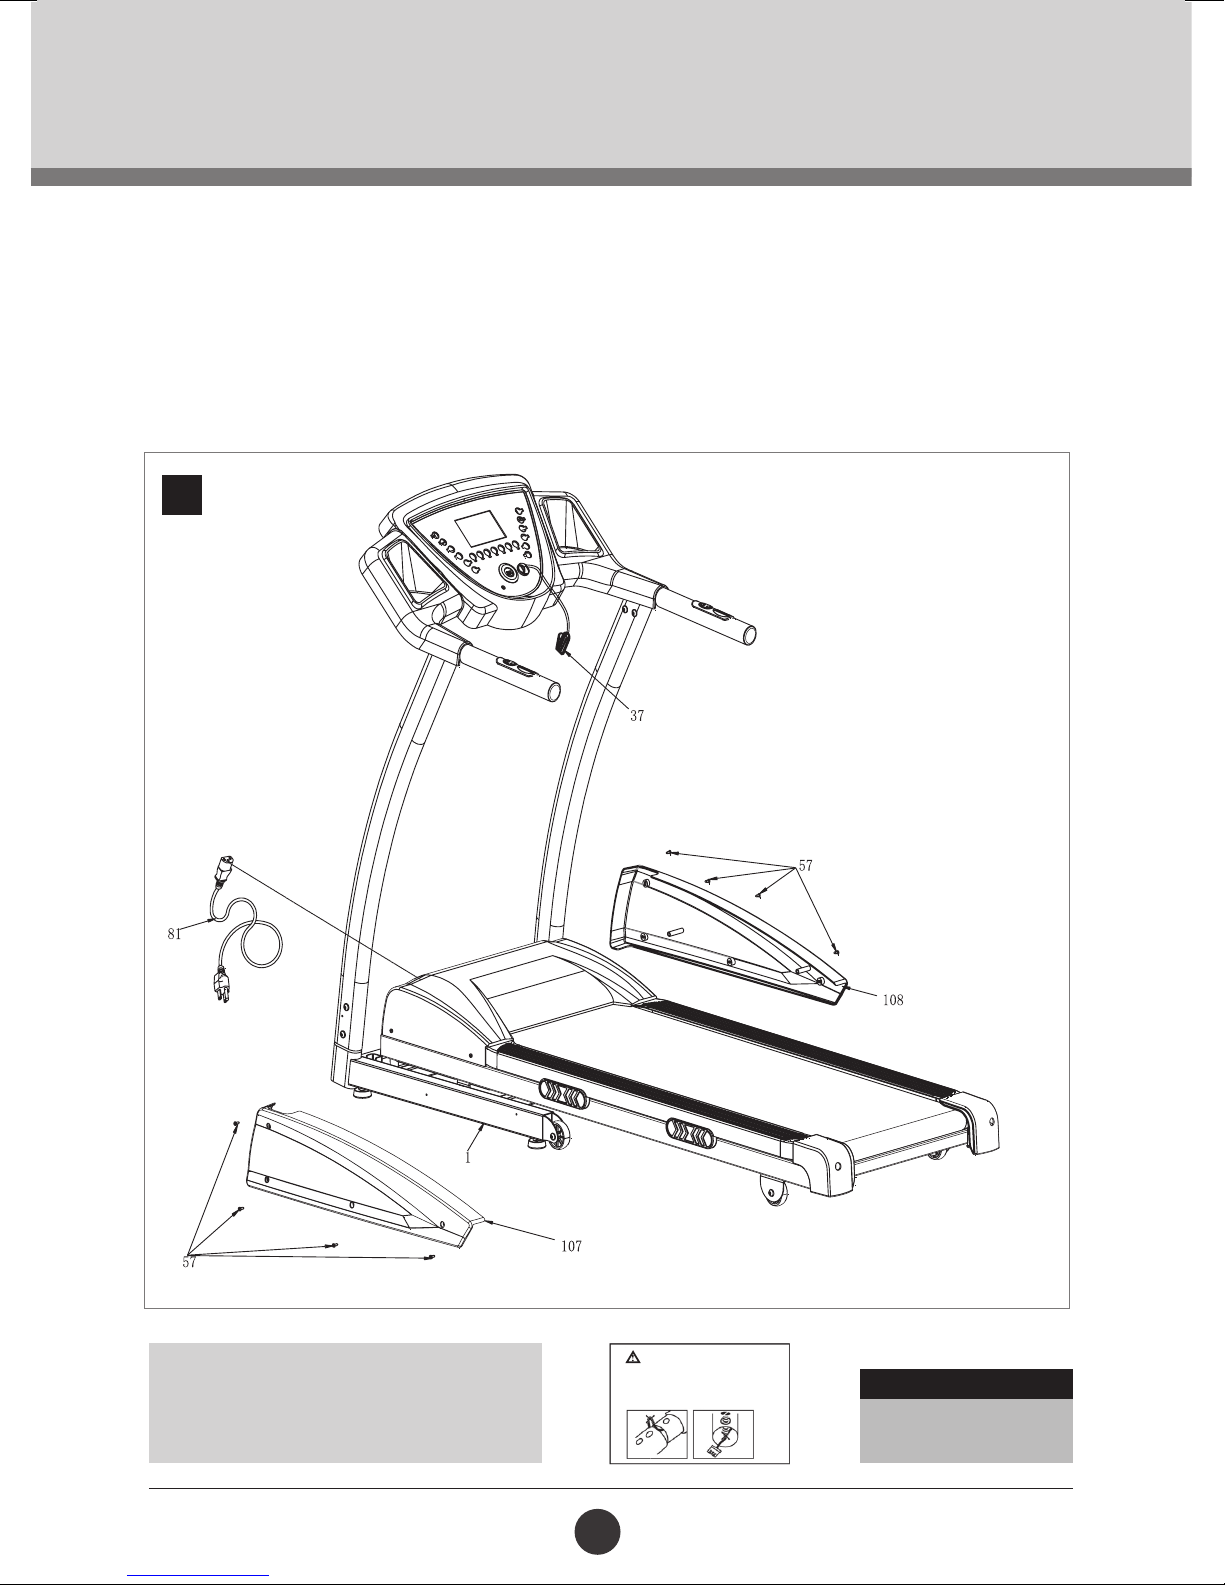
STEP 3: UPRIGHT LOWER COVER ASSEMBLY
• Attach the Left Upright Lower Cover (107) and Right Upright Cover (108) with four Cross Head
Screws (57) on either side of the Base Frame (1).
• Insert the Safety Key (37) into the slot on the Console.
• Insert the Power Cord into the slot on the rear of the Motor Cover.
3
CAUTION:
Ensure that cables are not damaged
during assembly or when
tightening screws.
CAUTION:
• Assemble product carefully
• Do not pinch or damage the wires
• Avoid damaging wires with bolts
10
Recheck
All bolts and nuts are
tightened securely
before using the machine
Page 11
10334
OPERATION INSTRUCTIONS
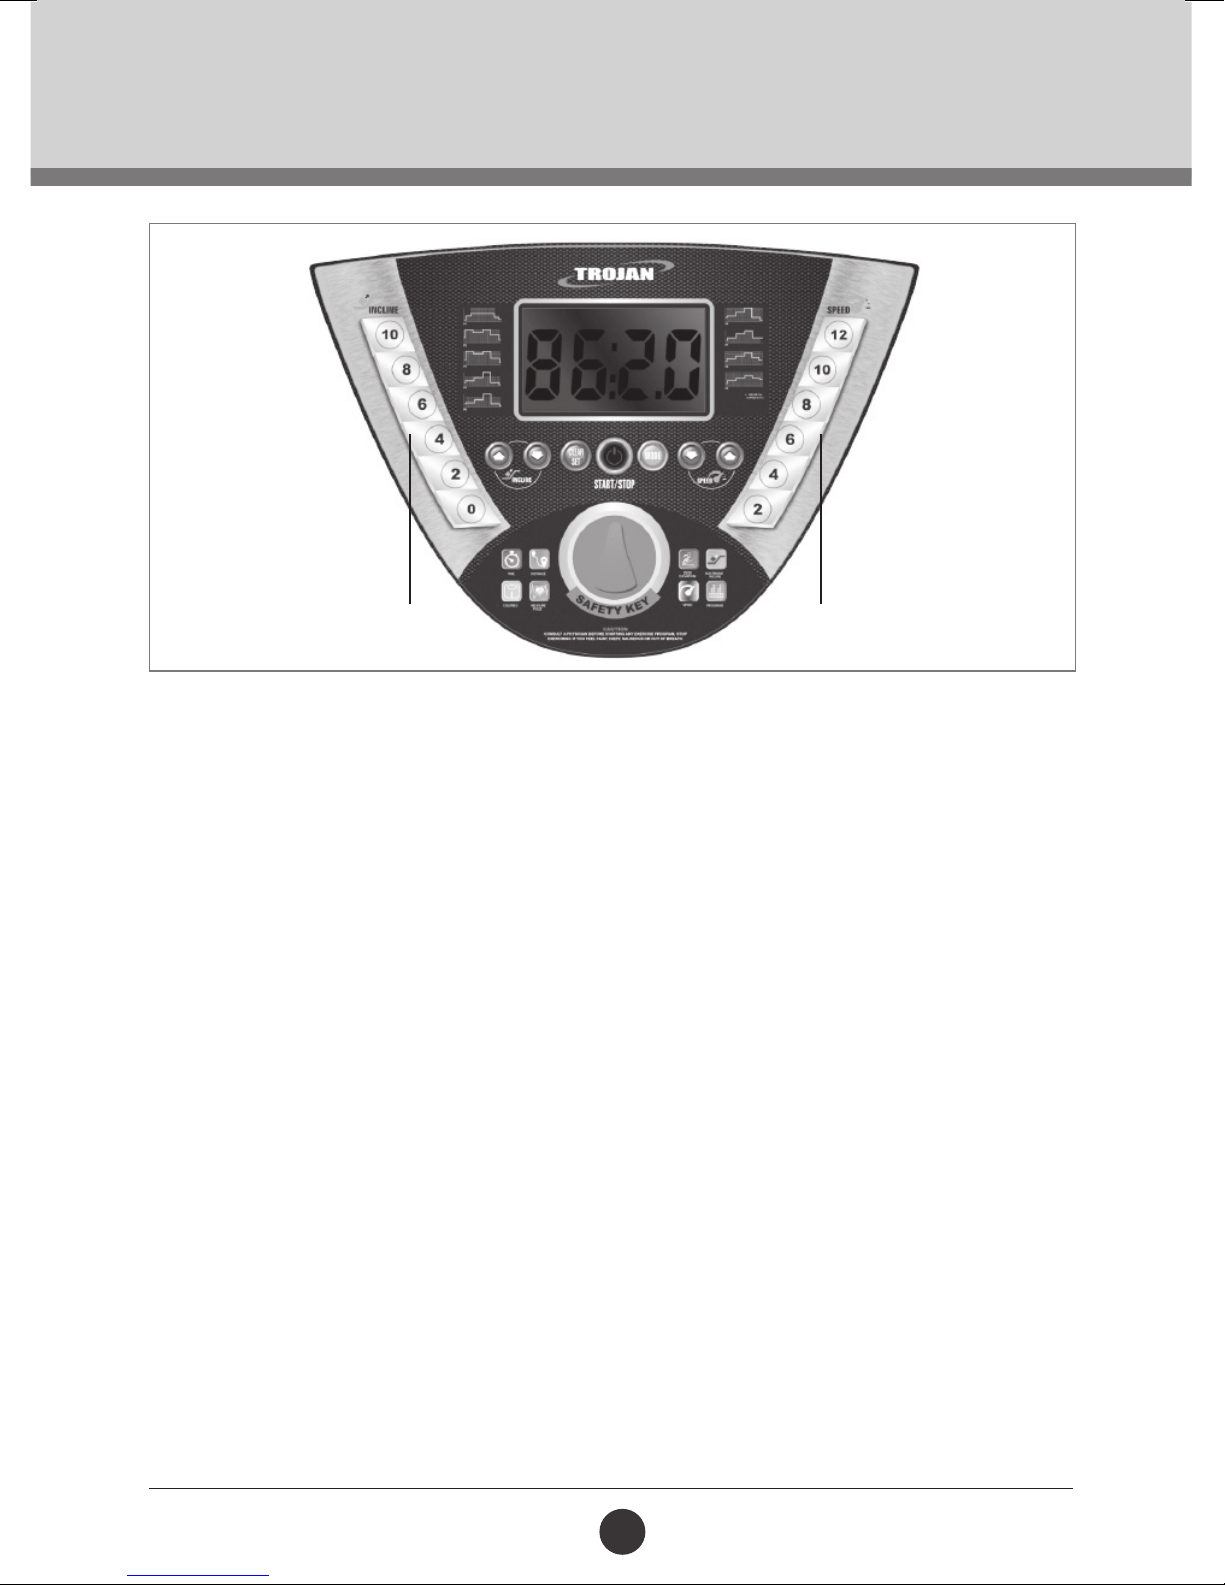
Quick Incline Keys Quick Speed Keys
BUTTON FUNCTION:
MODE
Ensure the treadmill is on and press the MODE button to choose between the pre-set programs p1-p25.
Press the CLEAR/SET button to exit.
CLEAR/SET
Ensure the treadmill is on and press the CLEAR/SET button to choose the Time, Distance or Calorie
count-down training program. While running, this button will clear the Time, Distance and Calorie values.
START/STOP
Ensure the treadmill is on and press the START/START button to start a manual running workout.
While the treadmill belt is moving, pressing this button will stop the workout and display the workout values.
Press CLEAR/SET to clear the workout values.
SPEED UP
While the running belt is moving, pressing SPEED UP will increase the speed by 0,5 km/h.
Holding down the button will rapidly increase the speed.
SPEED DOWN
While the running belt is moving, pressing SPEED DOWN will decrease the speed by 0,5 km/h.
Holding down the button will rapidly decrease the speed.
QUICK SPEED
This matrix window will show a virtual example of a 400 m running track. Once you nish running one lap,
it will beep and highlight the laps that have been done.
INCLINE UP
While the running belt is moving, pressing INCLINE UP will increase the incline by 1 level.
Holding down the button will rapidly increase the incline level.
11
Page 12

10334
OPERATION INSTRUCTIONS
INCLINE DOWN
While the running belt is moving, pressing INCLINE DOWN will decrease the incline by 1 level.
Holding down the button will rapidly decrease the incline level.
QUICK INCLINE
By pressing the QUICK INCLINE button, this will set the incline to either 0, 2, 4, 6, 8, 10 incline level by
pressing either of the buttons.
HANDRAIL SPEED +
While the running belt is moving, pressing HANDRAIL SPEED + will increase the speed by 0,5 km/h.
Holding down the button will rapidly increase the speed.
HANDRAIL SPEED –
While the running belt is moving, pressing HANDRAIL SPEED – will decrease the speed by 0,5 km/h.
Holding down the button will rapidly decrease the speed.
HANDRAIL INCLINE +
While the running belt is moving, pressing HANDRAIL INCLINE + will increase the incline by 1 level.
Holding down the button will rapidly increase the incline level.
HANDRAIL INCLINE –
While the running belt is moving, pressing HANDRAIL INCLINE – will decrease the incline by 1 level.
Holding down the button will rapidly decrease the incline level.
12
Page 13

10334
OPERATION INSTRUCTIONS
USER OPERATION:
COUNT-DOWN TRAINING
Ensure the treadmill is on and press the CLEAR/SET button to enter a TIME count-down training program,
press it again to enter DISTANCE count-down training, press it once more to enter CALORIE count-down
training. Pressing it again will exit the Count-down training programs.
1. TIME COUNT-DOWN TRAINING:
Ensure the treadmill is on and press CLEAR/SET. The TIME gure will ash indicating that the Time
Count-Down Program has been selected. This program is defaulted to 30:00. Press SPEED UP / DOWN to
select your workout time between 5 – 99 minutes. Press START/STOP to start the program at a speed of 1.0
km/h. The speed can be adjusted by pressing SPEED UP / DOWN. The workout will end once the timer has
counted down to 00:00.
2. DISTANCE COUNT-DOWN TRAINING:
Ensure the treadmill is on and press CLEAR/SET twice. The DISTANCE gure will ash indicating that the
Distance Count-Down Program has been selected. This program is defaulted to 1,0 km. Press SPEED UP /
DOWN to select your workout distance between 1,0 – 9,0 km. Press START/STOP to star t the program at
a speed of 1.0 km/h. The speed can be adjusted by pressing SPEED UP / DOWN. The workout will end once
the timer has counted down to 0,00 km.
3. CALORIE COUNT-DOWN TRAINING:
Ensure the treadmill is on and press CLEAR/SET three times. The CALORIE gure will ash indicating that
the Calorie Count-Down Program has been selected. This program is defaulted to 50 cal. Press SPEED UP
/ DOWN to select your workout calories burnt between 10 – 990 cal. Press START/S=TOP to start the
program at a speed of 1.0 km/h. The speed can be adjusted by pressing SPEED UP / DOWN. The workout will
end once the timer has counted down to 0 cal.
4. HEART RATE CONTROL (HRC) COUNT-DOWN TRAINING:
During the Stop status, press the MODE button key and a “H” will ash allow you to change the parameter
setting. The default setting is 116 bps. Press the + or – button to change your desire heart rate value. This
value can be set between 60-220 bps.
Press the CLEAR/SET button to set your desired heart rate value. Treadmill will start moving when you press
the START button. The initial speed will be 1.0 km/h and count down from 30:00 minutes. Once the time
reaches 00:00, the treadmill will stop.
While the treadmill is moving, you are able to adjust the Speed and Incline manually, but the treadmill will
automatically adjust the Speed and Incline to keep your heart at your desired value. If the value of the of your
heart rate is 5 bps less than your desired heart rate, the speed and incline settings will remain the same. If
the value of your heart rate is more than 5-25 bps than your desired heart rate, the speed will decrease by
0.2 km/h every 10 seconds, while the incline will decrease 1 level every 5 seconds. If the value of your heart
rate is more than 25 bps than your desires heart rate, the speed will decrease 0.5 km/h every 5 seconds with
the incline decreasing 1 level every 3 seconds. If the value of your heart rate is less than between 5-25 bps,
the speed will increase 0.2 km/h and the incline level will increase 1 level every 5 seconds. If the value of your
heart rate is less than between 25 bps, the speed will increase 0.5 km/h and the incline level will increase 1
level every 3 seconds.
13
Page 14

10334
OPERATION INSTRUCTIONS
GETTING STARTED
Ensure the treadmill is on by plugging it into an appropriate wall outlet and turn on the power switch on the
bottom side of the motor shield. Ensure that the Safety Key is installed, as the treadmill will not power on
without it. When the power is turned on, the treadmill will be ready to use.
SELF CHECK
When using for the rst time, it is necessary to do a Self-Check on the treadmill.
This will ensure that there are no problems with the treadmill.
How to do the Self-Check:
• Remove the safety key, press down the MODE button.
• While the MODE button is down, inser t the safety key and the treadmill will
prepare to run a Self-Check.
• Press the START/STOP button two times to begin the Self-Check. The Self-Check will nish
automatically after a couple of minutes.
Note: Do not stand on the treadmill during this process.
Quick-Start Operation
• Press the START/STOP button to begin running belt at a speed of 1,0 km/h. The speed can then be
adjusted by either pressing the SPEED UP / DOWN button to adjust the running belt to your desired
speed. You may also use any of the QUICK SPEED buttons (2, 4, 6, 8, 10 and 12 km/h) to adjust the
speed. The HANDRAIL SPEED UP / DOWN may also be used.
• While the running belt is moving at a rapid rate, pressing the START/STOP button will gradually slow
down the running belt to a stop.
• While the running belt is moving, a single press of the CLEAR/SET button will reset Time, Distance and
Calorie values.
Incline Feature
• The incline can then be adjusted by either pressing the INCLINE UP / DOWN button to adjust the
running belt to your desired incline level. You may also use any of the QUICK INCLINE buttons (2, 4, 6,
8, and 10 levels) to adjust the incline level. The HANDRAIL INCLINE UP / DOWN may also be used
• Incline may be adjusted anytime while the running belt is moving.
• The Incline can’t be adjusted if the Safety Key has been removed.
Pulse Grip Feature
• Holding both of the stainless steel hand pulse sensors on the handrails of the treadmill will display your
current Pulse (Heart Rate). A Pulse should be displayed within 15 seconds. Ensure that both your palms
are moist and have proper contact on both sensors.
Calorie Display
• This displays the cumulative calories burned at any given time during your workout.
Note: This information should only be used as reference between workouts and not
for medical purposes.
14
Page 15

10334
OPERATION INSTRUCTIONS
FOLDING AND UNFOLDING TREADMILL
Folding
First, lift the back part of the running deck up until you hear a subtle click. This has indicated that the treadmill
running deck is locked in the folded up position.
Unfolding
Ensure you have adequate space around you to accommodate the size of the running deck. Push the running
deck up slightly and release the lock to allow the running deck to drop. Stand back and let the running deck
drop down on its own.
Moving the Treadmill
While in the folded up position, grab the handrails on the treadmill, placing your foot on the main frame, pull
the treadmill towards you. This movement will place the treadmill on the wheels of the main frame.
Now you are able to manoeuvre the treadmill.
Programmable Operations
Each pre-set program has a maximum speed level that is displayed when a desired workout is chosen. The
speed that the particular program will achieve will be displayed in the Speed window. Each program has
various speed changes throughout.
To Select a Program
• Power on the treadmill and press the MODE button to choose your desired program. Press and release
the START/STOP button to begin the programs on the defaulted values.
• The speed display will show the preset speed of the selected program.
• After every one minute, the speed will be altered automatically according to the programmed value. The
speed can be altered manually at any time. 3 Seconds before the end of the program, the buzzer will
sound three times before the running belt slows down and comes to a stop.
15
Page 16
10334
PRE-SET PROGRAMS
PRE-SET PROGRAM
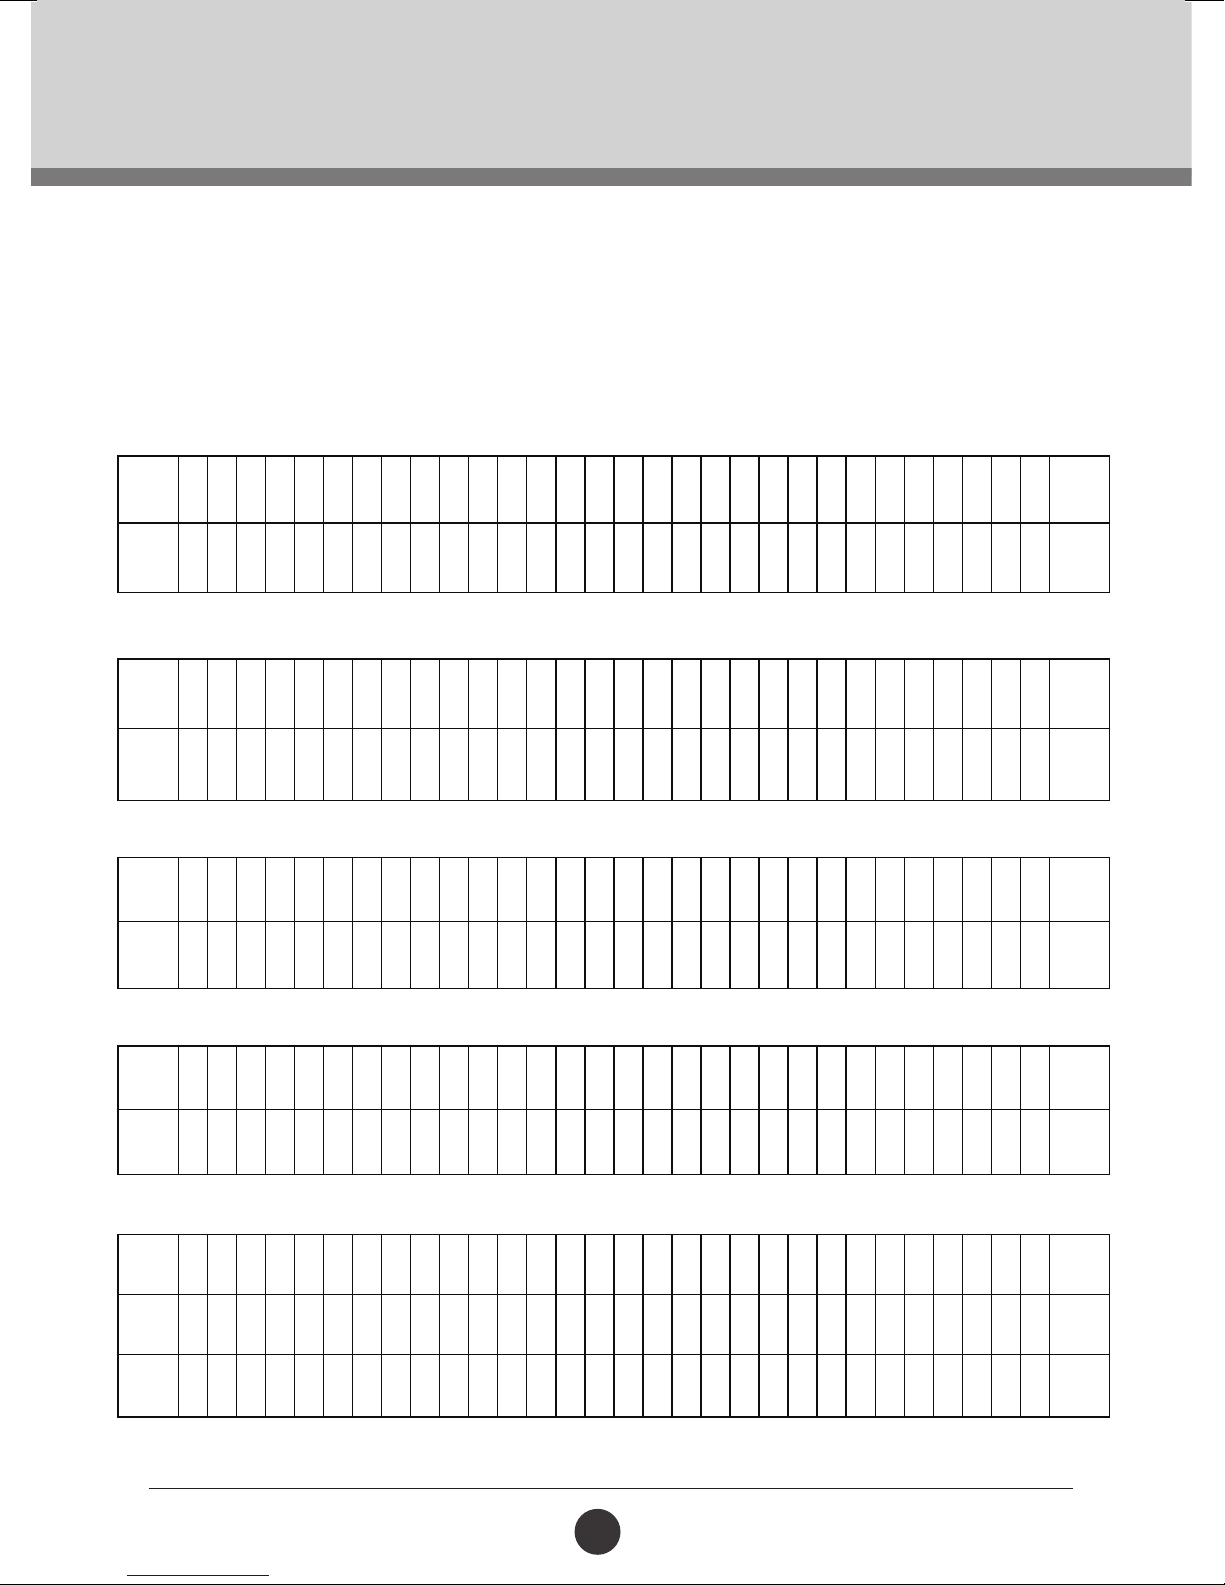
Below you will nd the Time, Speed and Incline values for each of the different 25 Pre-set Programs.
1. WALKING AND JOGGING
P1 - PRIMARY 1
TIME
(mins)
SPEED
(km/h)
1 2 3 4 5 6 7 8 9 10 11 12 13 14 15 16 17 18 19 20 21 22 23 24 25 26 27 28 29 30
1 2 2 2 2 3 3 3 3 3 3 3 3 3 3 3 3 3 3 3 3 3 3 3 3 2 2 2 1 1 STOP
P2 - PRIMARY 2
TIME
(mins)
SPEED
(km/h)
1 2 3 4 5 6 7 8 9 10 11 12 13 14 15 16 17 18 19 20 21 22 23 24 25 26 27 28 29 30 30 MINS
1 3 3 3 3 4 4 4 4 4 4 4 4 4 4 4 4 4 4 4 4 4 4 3 4 2 2 2 1 1 STOP
P3 - WALKING
TIME
(mins)
SPEED
(km/h)
1 2 3 4 5 6 7 8 9 10 11 12 13 14 15 16 17 18 19 20 21 22 23 24 25 26 27 28 29 30 30 MINS
1 3 3 3 3 4 4 4 4 4 4 4 4 4 4 4 4 4 4 4 5 5 5 5 5 3 3 3 3 3 STOP
P4 - JOGGING
30
MINS
TIME
(mins)
SPEED
(km/h)
1 2 3 4 5 6 7 8 9 10 11 12 13 14 15 16 17 18 19 20 21 22 23 24 25 26 27 28 29 30 30 MINS
1 4 4 4 4 6 6 6 6 6 6 6 6 6 6 6 6 6 6 6 6 6 6 6 6 3 3 3 2 2 STOP
P5 - INCLINE JOGGING
TIME
(mins)
INCLINE
SPEED
(km/h)
1 2 3 4 5 6 7 8 9 10 11 12 13 14 15 16 17 18 19 20 21 22 23 24 25 26 27 28 29 30 30 MINS
0 4 4 4 4 10 10 10 10 10 10 10 10 10 10 10 10 10 10 10 10 10 10 10 10 4 4 4 2 2 STOP
(0%)
1 4 4 4 4 6 6 6 6 6 6 6 6 6 6 6 6 6 6 6 6 6 6 6 6 3 3 3 2 2 STOP
16
Page 17
10334
PRE-SET PROGRAMS
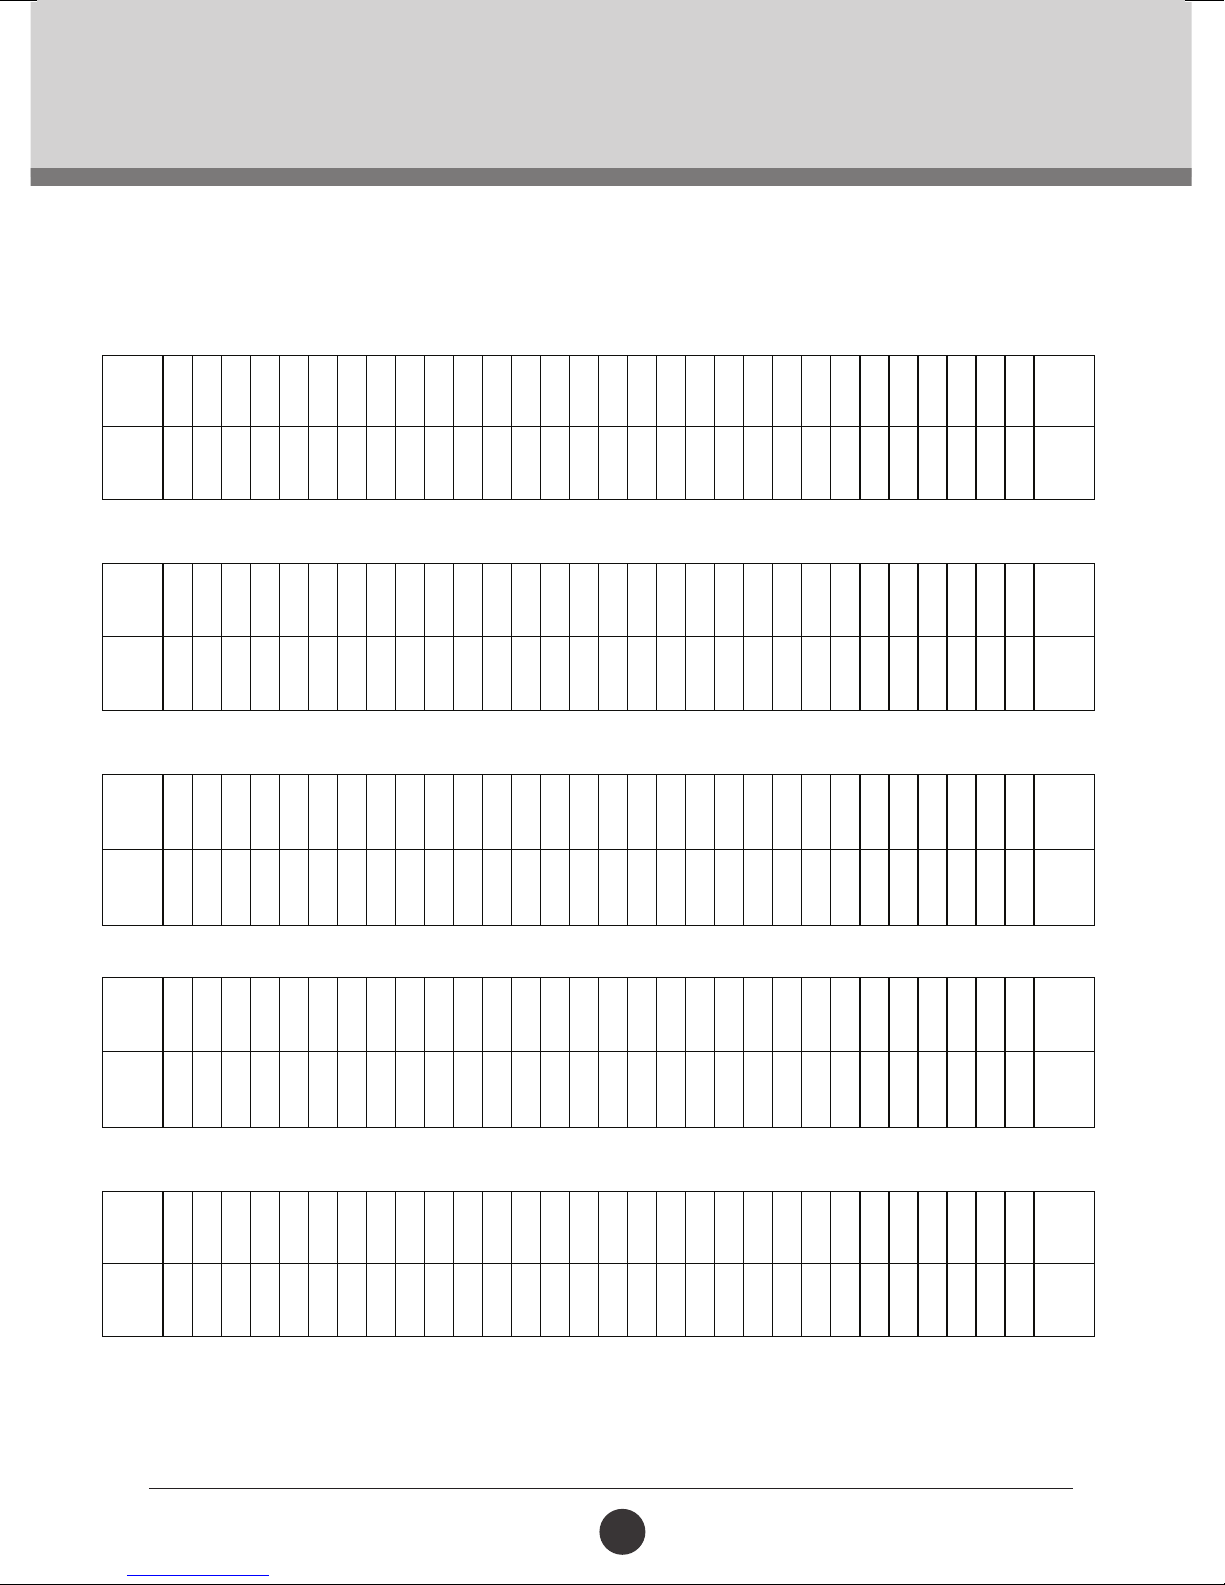
2. LONG-DISTANCE RUNNER
P6 - RUNNER 1
TIME
1 2 3 4 5 6 7 8 9 10 11 12 13 14 15 16 17 18 19 20 21 22 23 24 25 26 27 28 29 30
(mins)
SPEED
(km/h)
2 6 6 6 6 6 6 6 4 4 4 4 4 4 4 5 5 5 5 5 5 3 3 3 3 3 3 3 3 1 STOP
P7 - Runner 2
TIME
1 2 3 4 5 6 7 8 9 10 11 12 13 14 15 16 17 18 19 20 21 22 23 24 25 26 27 28 29 30
(mins)
SPEED
(km/h)
1 6 6 6 6 6 6 6 4 4 4 4 4 4 4 5 5 5 5 5 5 5 3 3 3 3 3 3 3 1 STOP
P8 - Runner 3
TIME
1 2 3 4 5 6 7 8 9 10 11 12 13 14 15 16 17 18 19 20 21 22 23 24 25 26 27 28 29 30
(mins)
SPEED
(km/h)
3 6 6 6 6 6 6 6 7 7 7 7 7 7 7 6 6 6 6 6 6 6 3 3 3 3 3 3 3 1 STOP
30
MINS
30
MINS
30
MINS
P9 - Runner 4
TIME
1 2 3 4 5 6 7 8 9 10 11 12 13 14 15 16 17 18 19 20 21 22 23 24 25 26 27 28 29 30
(mins)
SPEED
(km/h)
3 6 6 6 6 6 6 6 7 7 7 7 7 7 7 6 6 6 6 6 6 6 8 8 8 8 8 8 8 3 STOP
P10 - Runner 5
TIME
1 2 3 4 5 6 7 8 9 10 11 12 13 14 15 16 17 18 19 20 21 22 23 24 25 26 27 28 29 30
(mins)
SPEED
(km/h)
3 6 6 6 6 6 6 6 6 6 6 6 6 6 6 9 9 9 9 9 9 9 4 4 4 4 4 4 4 1 STOP
17
30
MINS
30
MINS
Page 18
10334
PRE-SET PROGRAMS
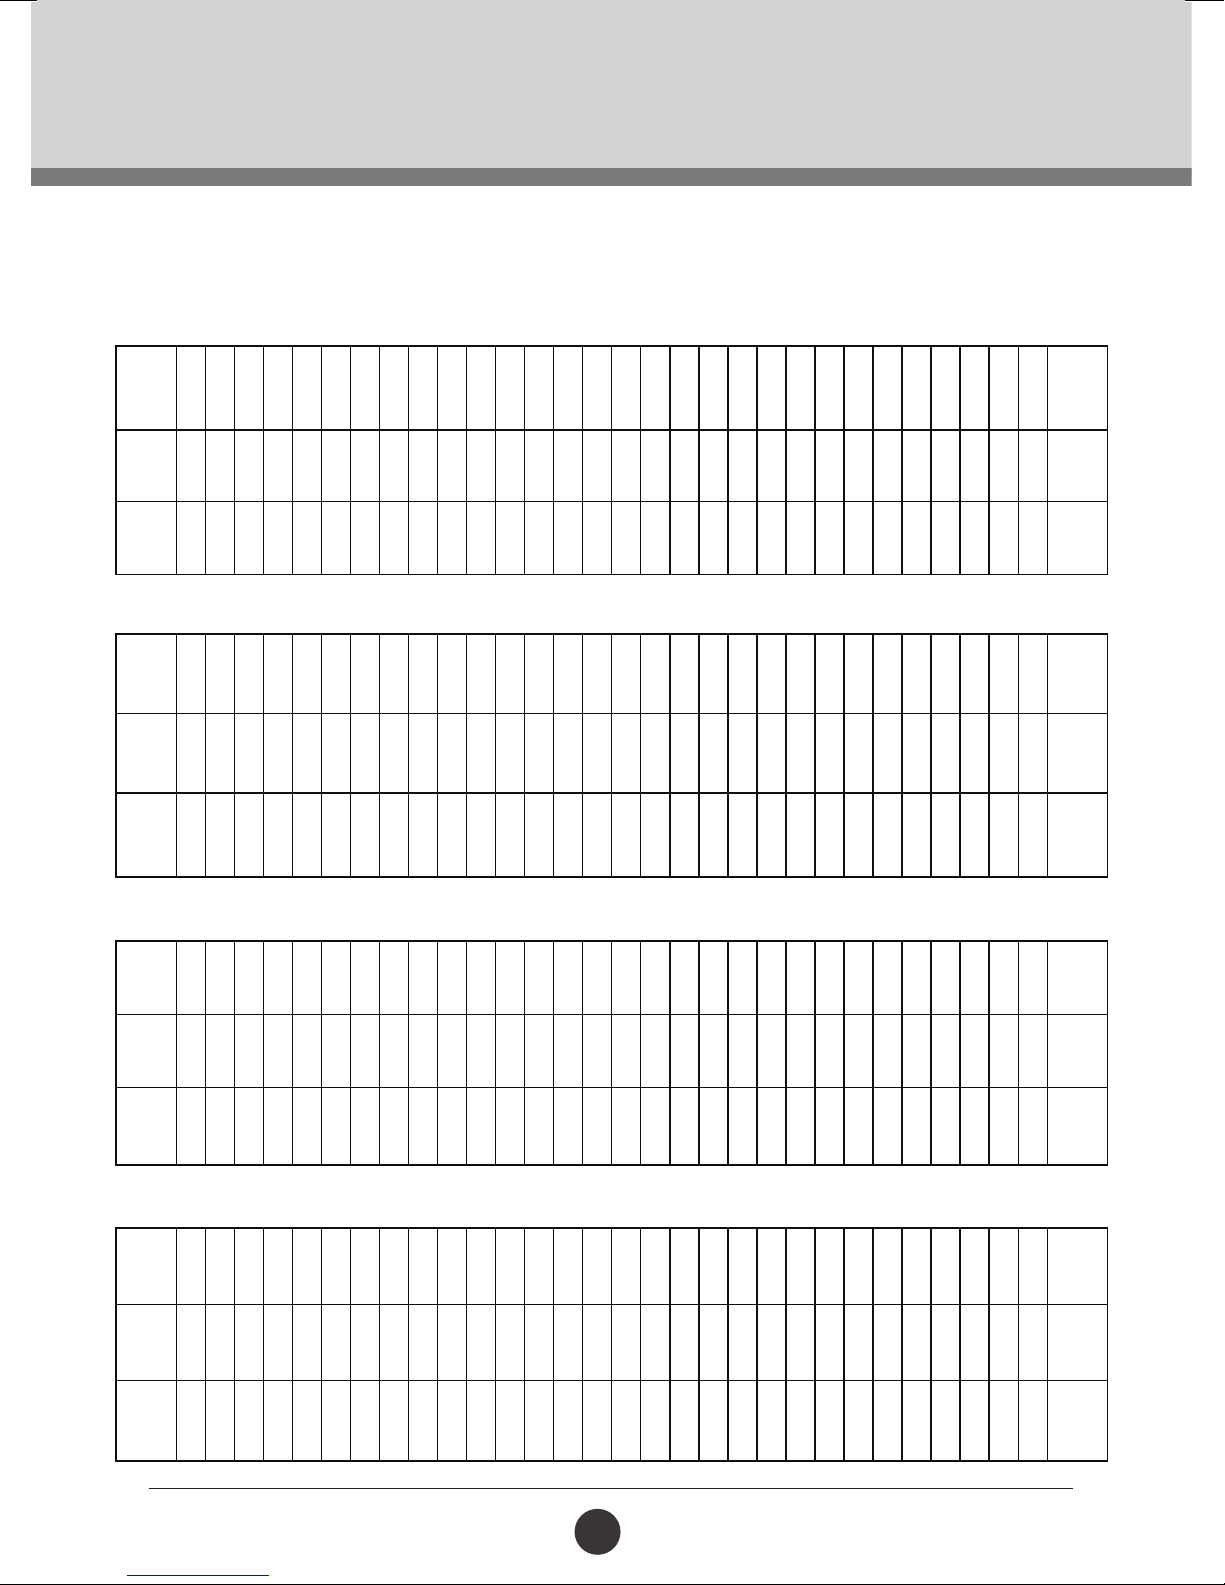
3. MIDDLE-DISTANCE RUNNER
P11 - RUNNER 1
TIME
(mins)
INCLINE
SPEED
(km/h)
1 2 3 4 5 6 7 8 9 10 11 12 13 14 15 16 17 18 19 20 21 22 23 24 25 26 27 28 29 30
0 5 5 5 5 5 5 5 4 5 5 5 5 5 5 4 5 5 5 5 5 5 5 5 5 5 5 5 5 0 STOP
(0%)
2 6 6 6 6 6 6 6 6 4 4 4 4 4 4 5 5 5 5 5 5 5 3 3 3 3 3 3 3 1 STOP
P12 - RUNNER 2
TIME
(mins)
INCLINE
SPEED
(km/h)
1 2 3 4 5 6 7 8 9 10 11 12 13 14 15 16 17 18 19 20 21 22 23 24 25 26 27 28 29 30
0 6 6 6 6 6 6 6 6 6 6 6 6 6 6 6 6 6 6 6 6 6 6 6 6 6 6 6 6 0 STOP
(0%)
2 6 6 6 6 6 6 6 5 5 5 5 5 5 5 6 6 6 6 6 6 6 3 3 3 3 3 3 3 1 STOP
P13 - RUNNER 3
30
MINS
30
MINS
TIME
(mins)
INCLINE
SPEED
(km/h)
1 2 3 4 5 6 7 8 9 10 11 12 13 14 15 16 17 18 19 20 21 22 23 24 25 26 27 28 29 30
0 8 8 8 8 8 8 8 8 8 8 8 8 8 8 8 8 8 8 8 8 8 8 8 8 8 8 8 8 0 STOP
(0%)
2 4 4 4 4 4 4 4 7 7 7 7 7 7 7 11 11 11 11 11 11 11 3 3 3 3 3 3 3 1 STOP
P14 - RUNNER 4
TIME
(mins)
INCLINE
SPEED
(km/h)
1 2 3 4 5 6 7 8 9 10 11 12 13 14 15 16 17 18 19 20 21 22 23 24 25 26 27 28 29 30
0 9 9 9 9 9 9 9 9 9 9 9 9 9 9 9 9 9 9 9 9 9 9 9 9 9 9 9 9 0 STOP
(0%)
2 4 4 4 4 4 4 4 7 7 7 7 7 7 7 12 12 12 12 12 12 12 3 3 3 3 3 3 3 1 STOP
18
30
MINS
30
MINS
Page 19
10334
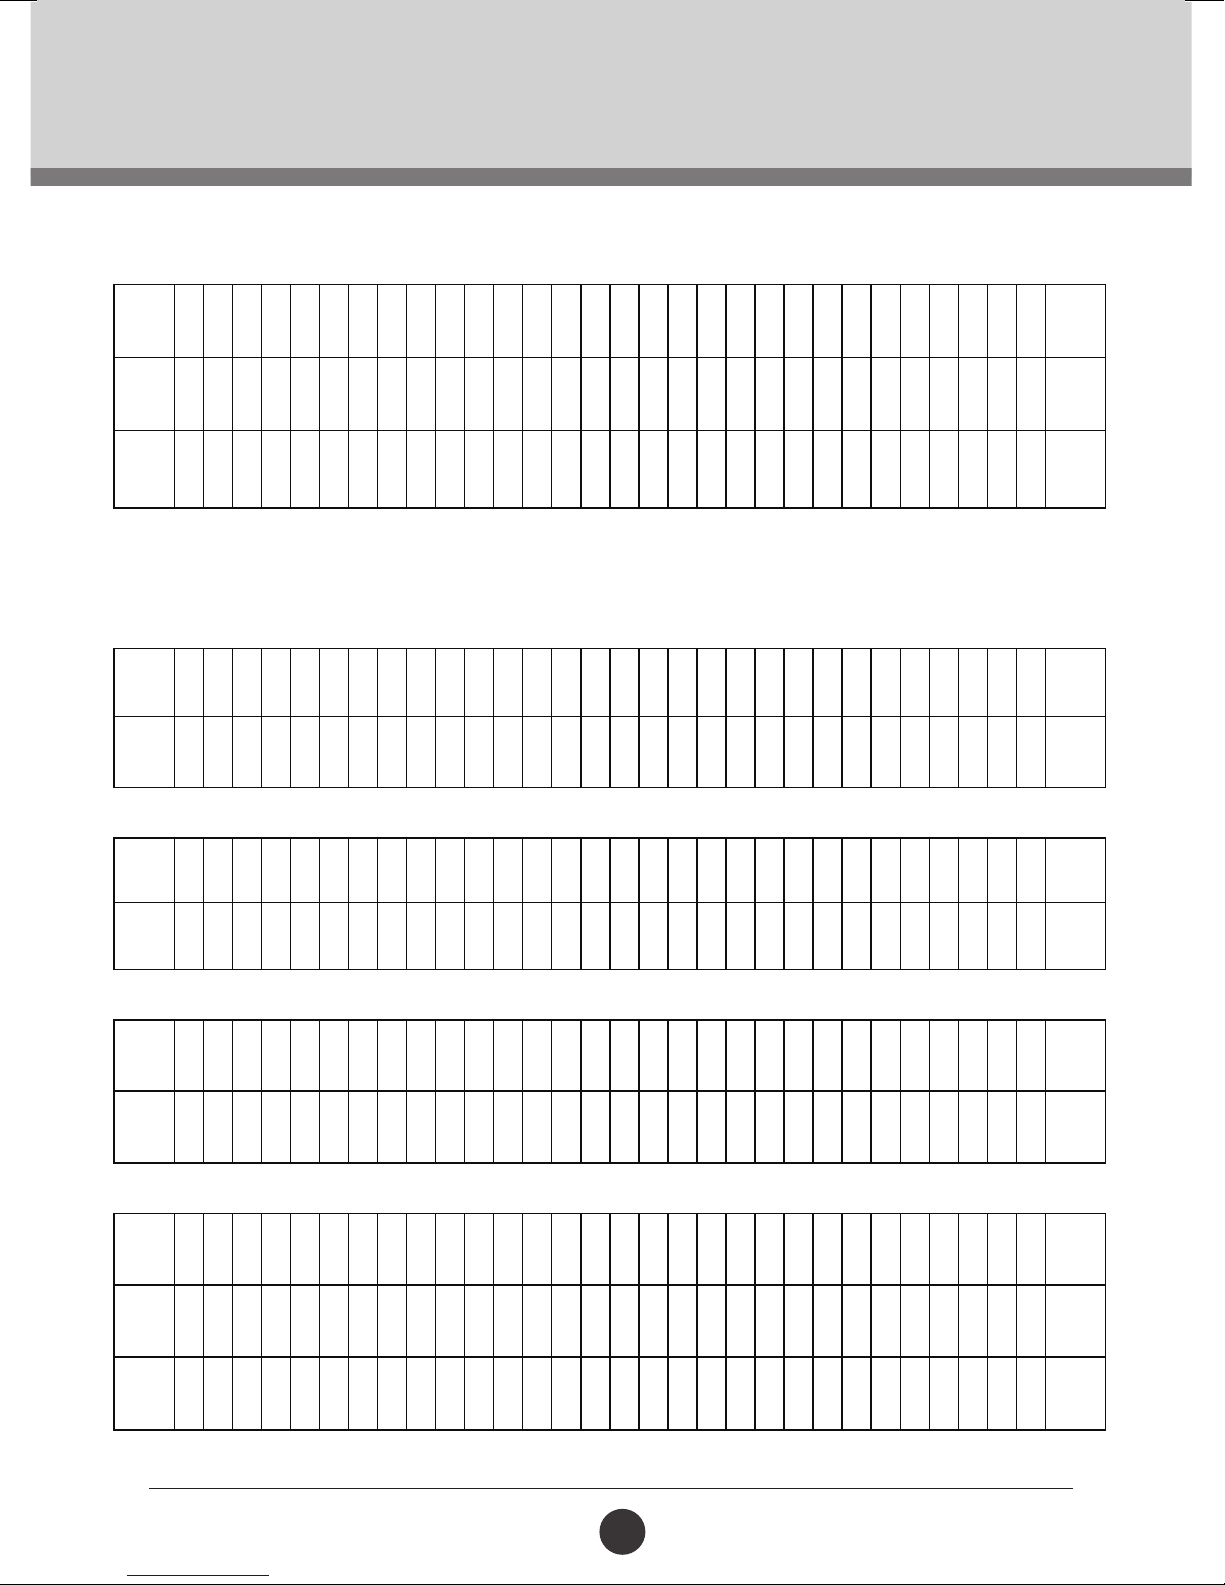
P15 - RUNNER 5
PRE-SET PROGRAMS
TIME
1 2 3 4 5 6 7 8 9 10 11 12 13 14 15 16 17 18 19 20 21 22 23 24 25 26 27 28 29 30
(mins)
INCLINE
SPEED
(km/h)
0 10 10 10 10 10 10 10 10 10 10 10 10 10 10 10 10 10 10 10 10 10 10 10 10 10 10 10 10 10 STOP
(0%)
2 4 4 4 4 4 4 4 7 7 7 7 7 7 7 12 12 12 12 12 12 12 3 3 3 3 3 3 3 1 STOP
4. SHORT-DISTANCE RUNNER
P16 - RUNNER 1
TIME
1 2 3 4 5 6 7 8 9 10 11 12 13 14 15 16 17 18 19 20 21 22 23 24 25 26 27 28 29 30
(mins)
SPEED
(km/h)
2 4 4 4 4 4 4 4 7 7 7 7 7 7 7 9 9 9 9 9 9 9 12 12 12 12 12 12 3 3 STOP
P17 - RUNNER 2
TIME
1 2 3 4 5 6 7 8 9 10 11 12 13 14 15 16 17 18 19 20 21 22 23 24 25 26 27 28 29 30
(mins)
30
MINS
30
MINS
30
MINS
SPEED
(km/h)
3 5 5 5 5 5 5 5 8 8 8 8 8 8 8 10 10 10 10 10 10 10 13 13 13 13 13 13 3 3 STOP
P18 - RUNNER 3
TIME
1 2 3 4 5 6 7 8 9 10 11 12 13 14 15 16 17 18 19 20 21 22 23 24 25 26 27 28 29 30
(mins)
SPEED
(km/h)
3 5 5 5 4 5 5 5 9 9 9 9 9 9 9 10 10 10 10 10 10 10 14 14 14 14 14 14 4 4 STOP
P19 - RUNNER 4
TIME
1 2 3 4 5 6 7 8 9 10 11 12 13 14 15 16 17 18 19 20 21 22 23 24 25 26 27 28 29 30
(mins)
SPEED
(km/h)
SPEED
(km/h)
0 3 3 3 3 3 3 3 6 6 6 6 6 6 6 10 10 10 10 10 10 10 3 3 3 3 3 3 0 0 STOP
2 4 4 4 4 4 4 4 7 7 7 7 7 7 7 9 9 9 9 9 9 9 4 4 4 4 4 4 4 4 STOP
30
MINS
30
MINS
19
Page 20
10334
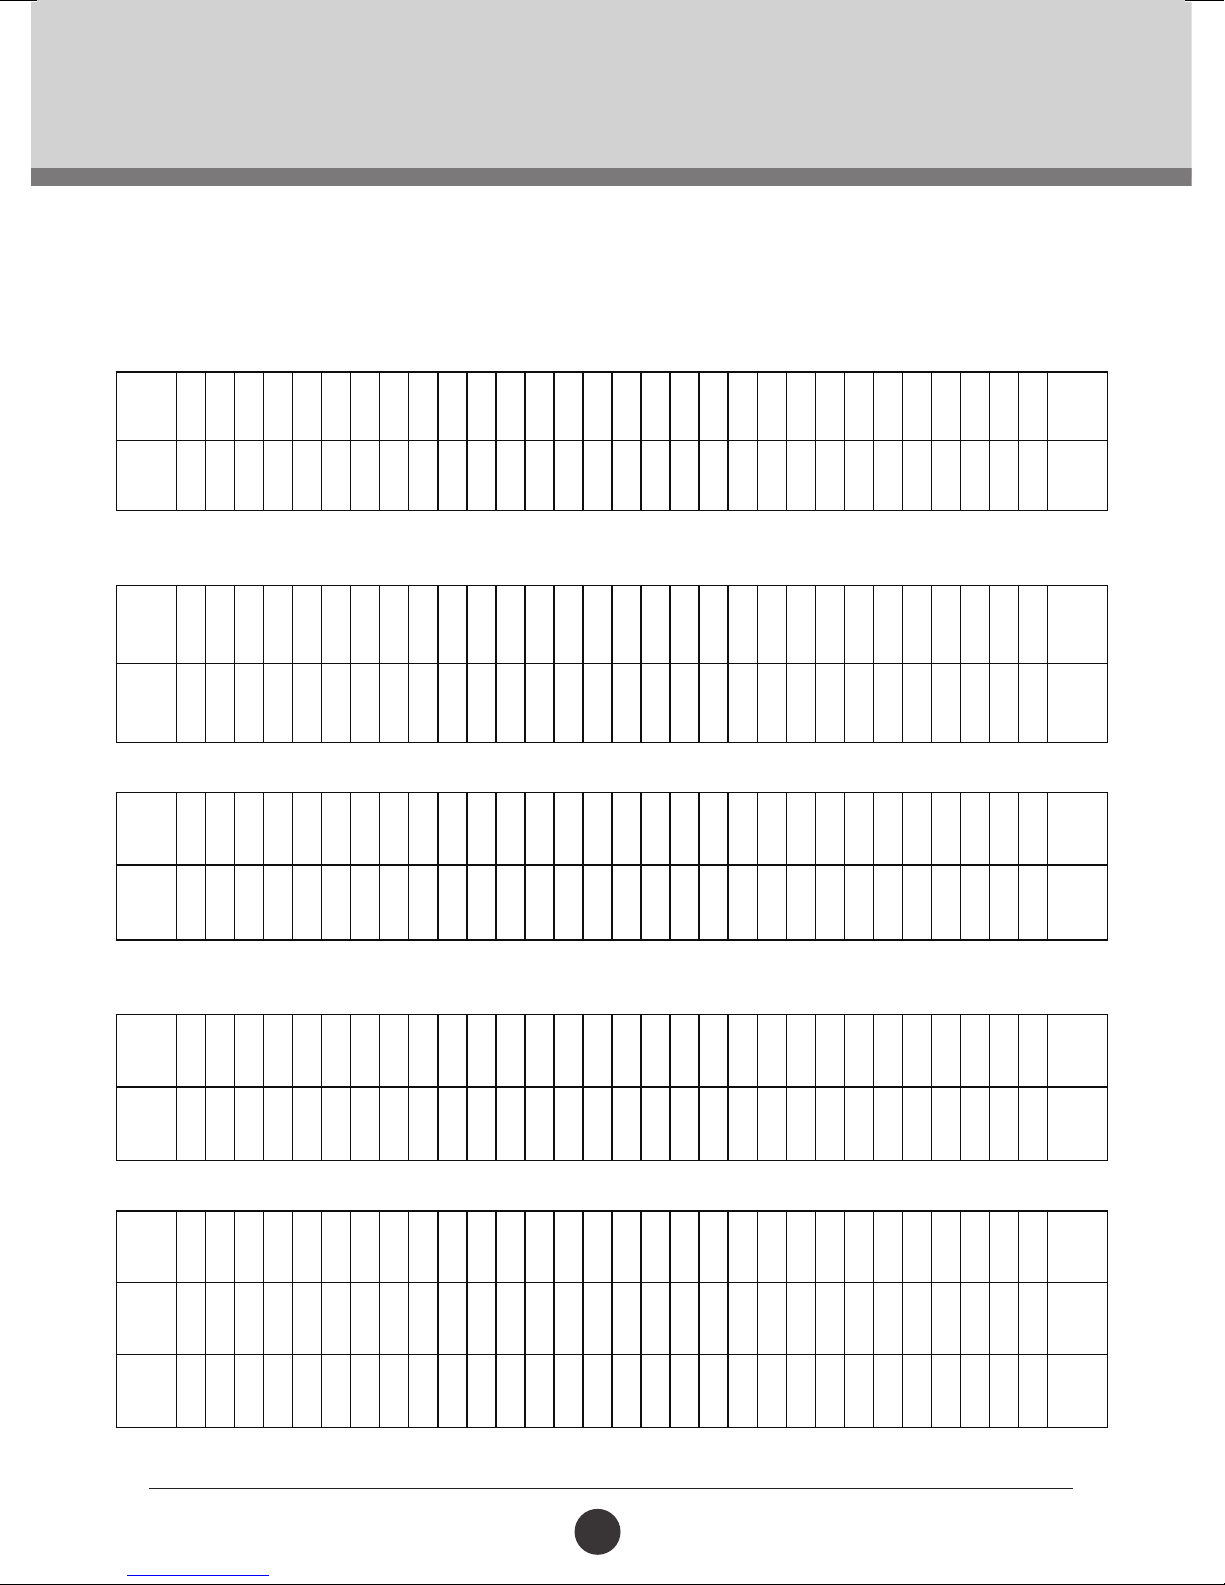
5. LADY BASED
P20 - RUNNER 1
PRE-SET PROGRAMS
TIME
(mins)
SPEED
(km/h)
1 2 3 4 5 6 7 8 9 10 11 12 13 14 15 16 17 18 19 20 21 22 23 24 25 26 27 28 29 30
3 4 4 4 4 4 4 4 7 7 7 7 7 7 7 12 12 12 12 12 12 12 12 12 12 12 12 12 4 4 STOP
P21 - RUNNER 1
TIME
(mins)
SPEED
(km/h)
1 2 3 4 5 6 7 8 9 10 11 12 13 14 15 16 17 18 19 20 21 22 23 24 25 26 27 28 29 30
2 4 4 4 4 4 4 4 5 5 5 5 5 5 5 5 5 5 5 5 5 5 12 12 12 12 12 12 4 4 STOP
P22 - RUNNER 2
TIME
(mins)
SPEED
(km/h)
1 2 3 4 5 6 7 8 9 10 11 12 13 14 15 16 17 18 19 20 21 22 23 24 25 26 27 28 29 30
2 3 3 3 3 3 3 3 4 4 4 4 4 4 4 5 5 5 5 5 5 5 6 6 6 6 6 6 7 7 STOP
P23 - RUNNER 3
30
MINS
30
MINS
30
MINS
TIME
(mins)
SPEED
(km/h)
1 2 3 4 5 6 7 8 9 10 11 12 13 14 15 16 17 18 19 20 21 22 23 24 25 26 27 28 29 30
2 4 4 4 4 4 4 4 6 6 6 6 6 6 6 8 8 8 8 8 8 8 7 7 7 7 7 7 5 5 STOP
P24 - RUNNER 4
TIME
(mins)
SPEED
(km/h)
SPEED
(km/h)
1 2 3 4 5 6 7 8 9 10 11 12 13 14 15 16 17 18 19 20 21 22 23 24 25 26 27 28 29 30
9 9 9 9 9 9 9 9 9 9 9 9 9 9 9 9 9 9 9 9 9 9 9 9 9 9 9 9 9 9 STOP
2 4 4 4 4 4 4 4 6 6 6 6 6 6 6 8 8 8 8 8 8 8 5 5 5 5 5 5 5 5 STOP
20
30
MINS
30
MINS
Page 21
10334
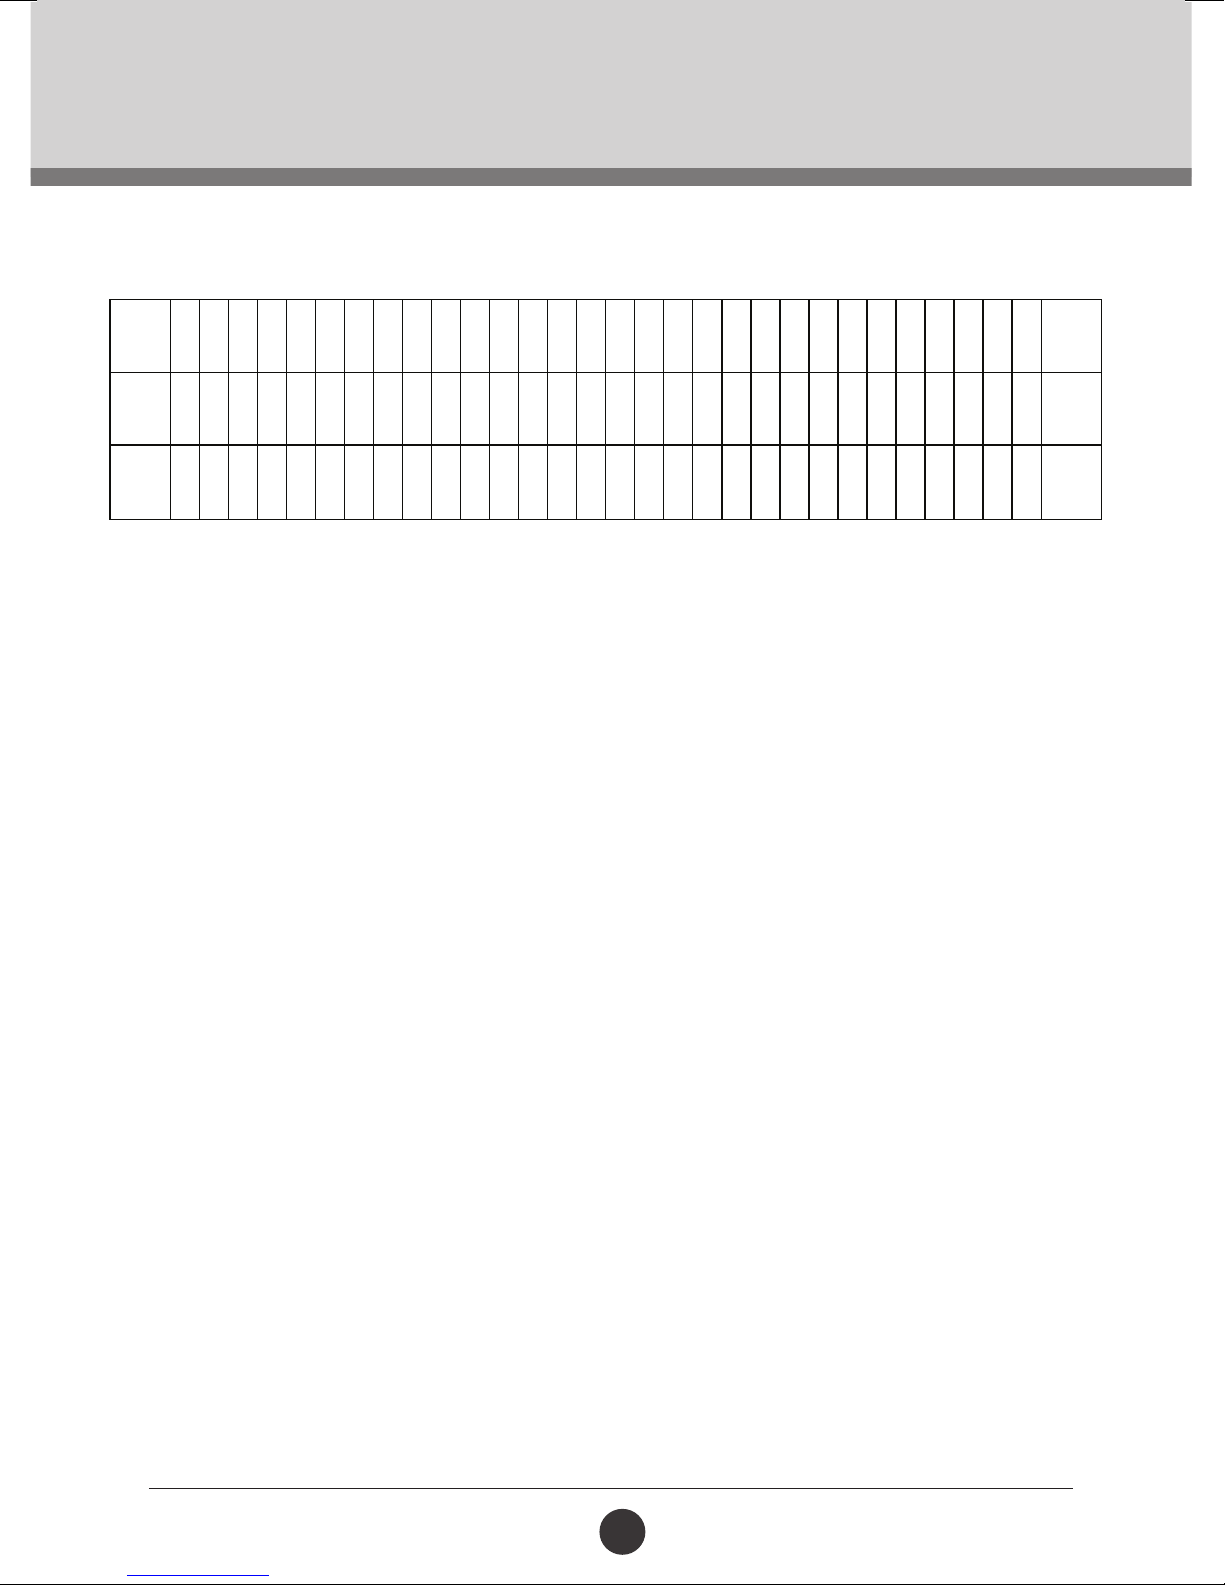
P25 - RUNNER 5
PRE-SET PROGRAMS
TIME
1 2 3 4 5 6 7 8 9 10 11 12 13 14 15 16 17 18 19 20 21 22 23 24 25 26 27 28 29 30
(mins)
SPEED
10 10 10 10 10 10 10 10 10 10 10 10 10 10 10 10 10 10 10 10 10 10 10 10 10 10 10 10 10 10 STOP
(km/h)
SPEED
2 4 4 4 4 4 4 4 6 6 6 6 6 6 6 8 8 8 8 8 8 8 6 6 6 6 6 6 5 5 STOP
(km/h)
30
MINS
21
Page 22
10334
MAINTENANCE
Proper maintenance is very impor tant to ensure your treadmill is always in top working condition.
Improper maintenance could cause damage or shorten the life of your treadmill and exceed the
Limited Warranty coverage.
Inspect and tighten all parts of the treadmill regular.ly Replace any worn parts immediately.
CLEANING
The Trojan Ignite 370 Treadmill can be cleaned with a soft cloth and mild detergent. Do not use
abrasives or solvents on plastic parts. Please wipe your perspiration off the Trojan Ignite 370
Treadmill after each use. Be careful not to get excessive moisture on the computer display panel
as this might cause an electrical hazard or electronics to fail.
Please keep the Trojan Ignite 370 Treadmill, especially the computer console, out of direct sunlight
to prevent screen damage. Please inspect all assembly bolts and pedals on the machine for proper
tightness before use. Routine cleaning of your treadmill will extend the product’s life.
STORAGE
Store the Trojan Ignite 370 Treadmill in a clean and dry environment away from children.
BELT ADJUSTMENT
Belt adjustment and tension performs two functions: Adjustment for tension and centering. The
running Deck has been adjusted properly at the factory. However transportation, uneven ooring
or other unpredicted reasons could cause the belt to shift off centre resulting in the belt rubbing
with the plastic side rail or end caps and possibly cause damage. To adjust the belt back to its
proper position please follow the directions below.
Your treadmill should require little maintenance other than to periodically apply lubricant.
Lubricating under the running Mat will ensure superior performance and extend the treadmill’s life
expectancy.
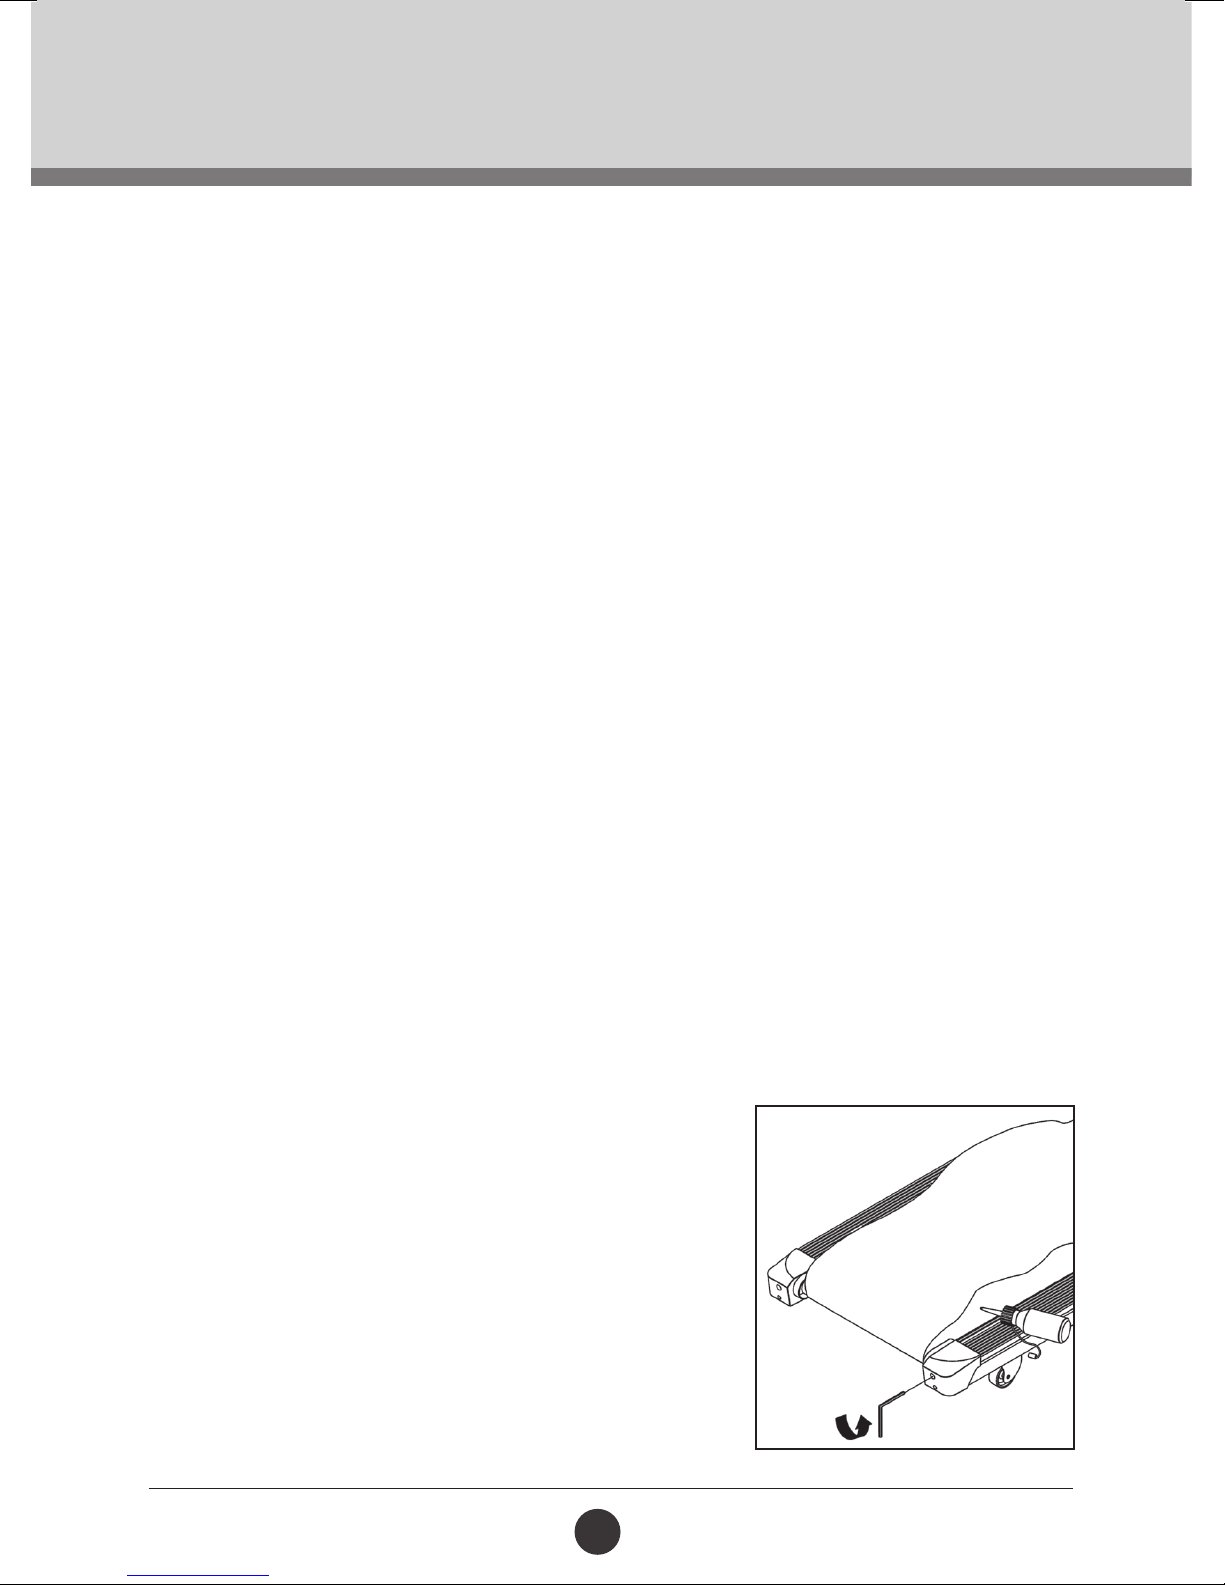
HOW TO CHECK RUNNING DECK FOR PROPER
LUBRICATION
• Lift one side of the running Mat and feel the top surface of
the treadboard.
• If the surface is slick to the touch, then no fur ther
lubrication is required.
• If the surface is dry to the touch, apply one packet of
lubricant or half of the bottle of lubricant.
22
Page 23
10334
MAINTENANCE
HOW TO APPLY LUBRICANT
• Lift one side of the running mat.
• Pour one half of the lubricant bottle under the centre of the running mat on the top
surface of the treadboard.
• Walk on the treadmill at a slow speed for 3 to 5 minutes to evenly distribute lubricant.
• NOTE: DO NOT over lubricate treadboard. Any excess lubricant that comes out should
be wiped off.
• NOTE: ONLY USE HALF THE BOTTLE OF LUBRICANT PER APPLICATION.
• NOTE: If your lubricant is nished, the treadbelt can be lubricated with Dubbin.
LUBRICATION SCHEDULE
• Check the treadboard lubrication during installation. If it’s necessary, lubricate the
treadboard using one half of the lubricant provided, before using the treadmill for the
rst time.
• If the treadmill is used on a regular basis, the running deck should be lubricated once a
month.
• If the treadmill is not used for two months or more, the treadboard must be lubricated
before use.
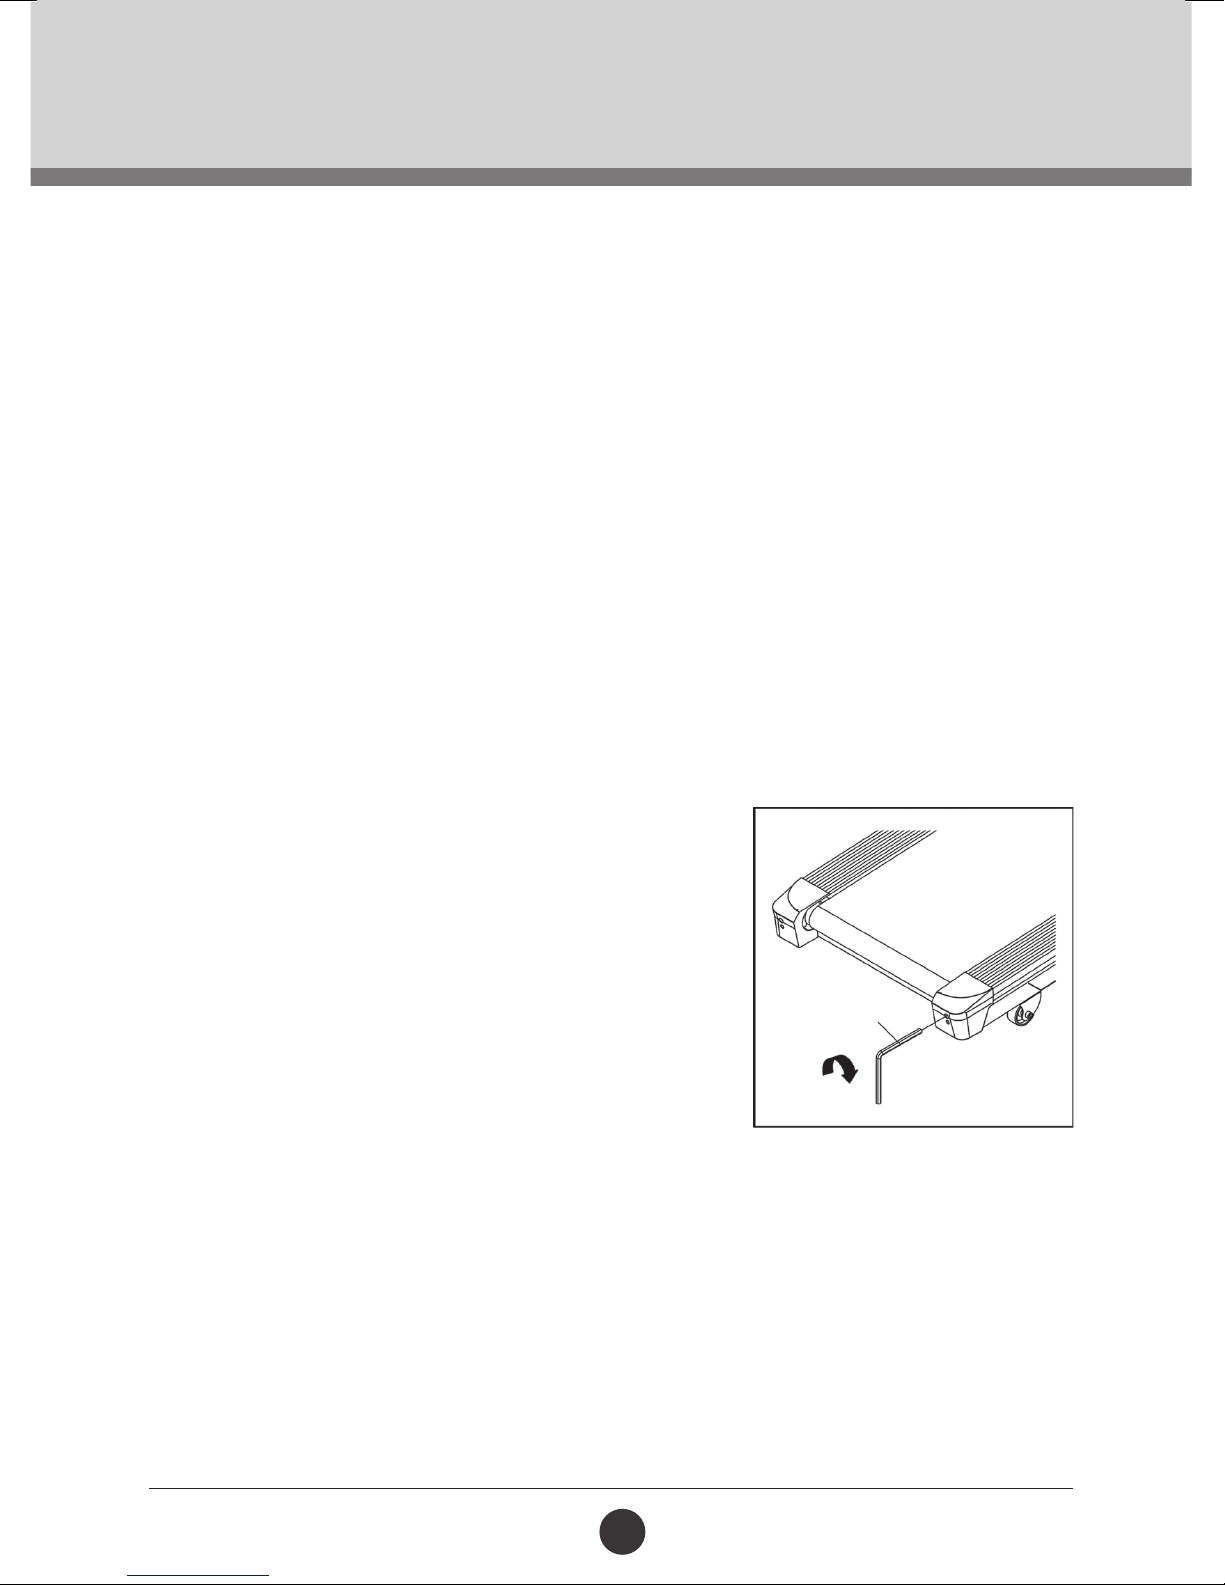
BELT TRACKING ADJUSTMENT
• If during use you notice that the running deck
either shifts to the right or the left of centre,
switch off the treadmill, remove the “Safety Key”
and unplug the equipment from the AC power
source.
• If the running deck shifts left, using Allen wrench
provided, turn the left rear roller adjustment
clockwise no more than 1/4” of a turn (if
the running belt shifts right, adjust the right rear
roller).
• Remove the Allen Key, insert the “Safety Key”
and insert the AC power cord into the
AC outlet. Turn on your treadmill and observe
after running for a few minutes to see if
the problem has been corrected.
• This may take several adjustments, so repeat the
above procedure.
23
Page 24
10334
FITNESS TIPS & TECHNIQUES
AEROBIC EXERCISE
Aerobic exercise is any sustained activity that sends oxygen to your muscles via your heart and lungs. Aerobic
exercise improves the tness of your lungs and heart − your body’s most important muscle. Aerobic exercise
tness is promoted by any activity that uses your large muscles (arms, legs, or buttock, for example). Your heart
beats quickly and you breathe deeply. An aerobic exercise should form part of your entire exercise routine.
WEIGHT TRAINING
Along with aerobic exercising which helps get rid of and keeps off excess fat that our bodies can store, weight
training is an essential part of the exercise routine process. Weight training helps tone, build and strengthen
muscle. If you are working above your target zone, you may want to do a lesser amount of reps. Always consult
your physician before beginning any exercise program.
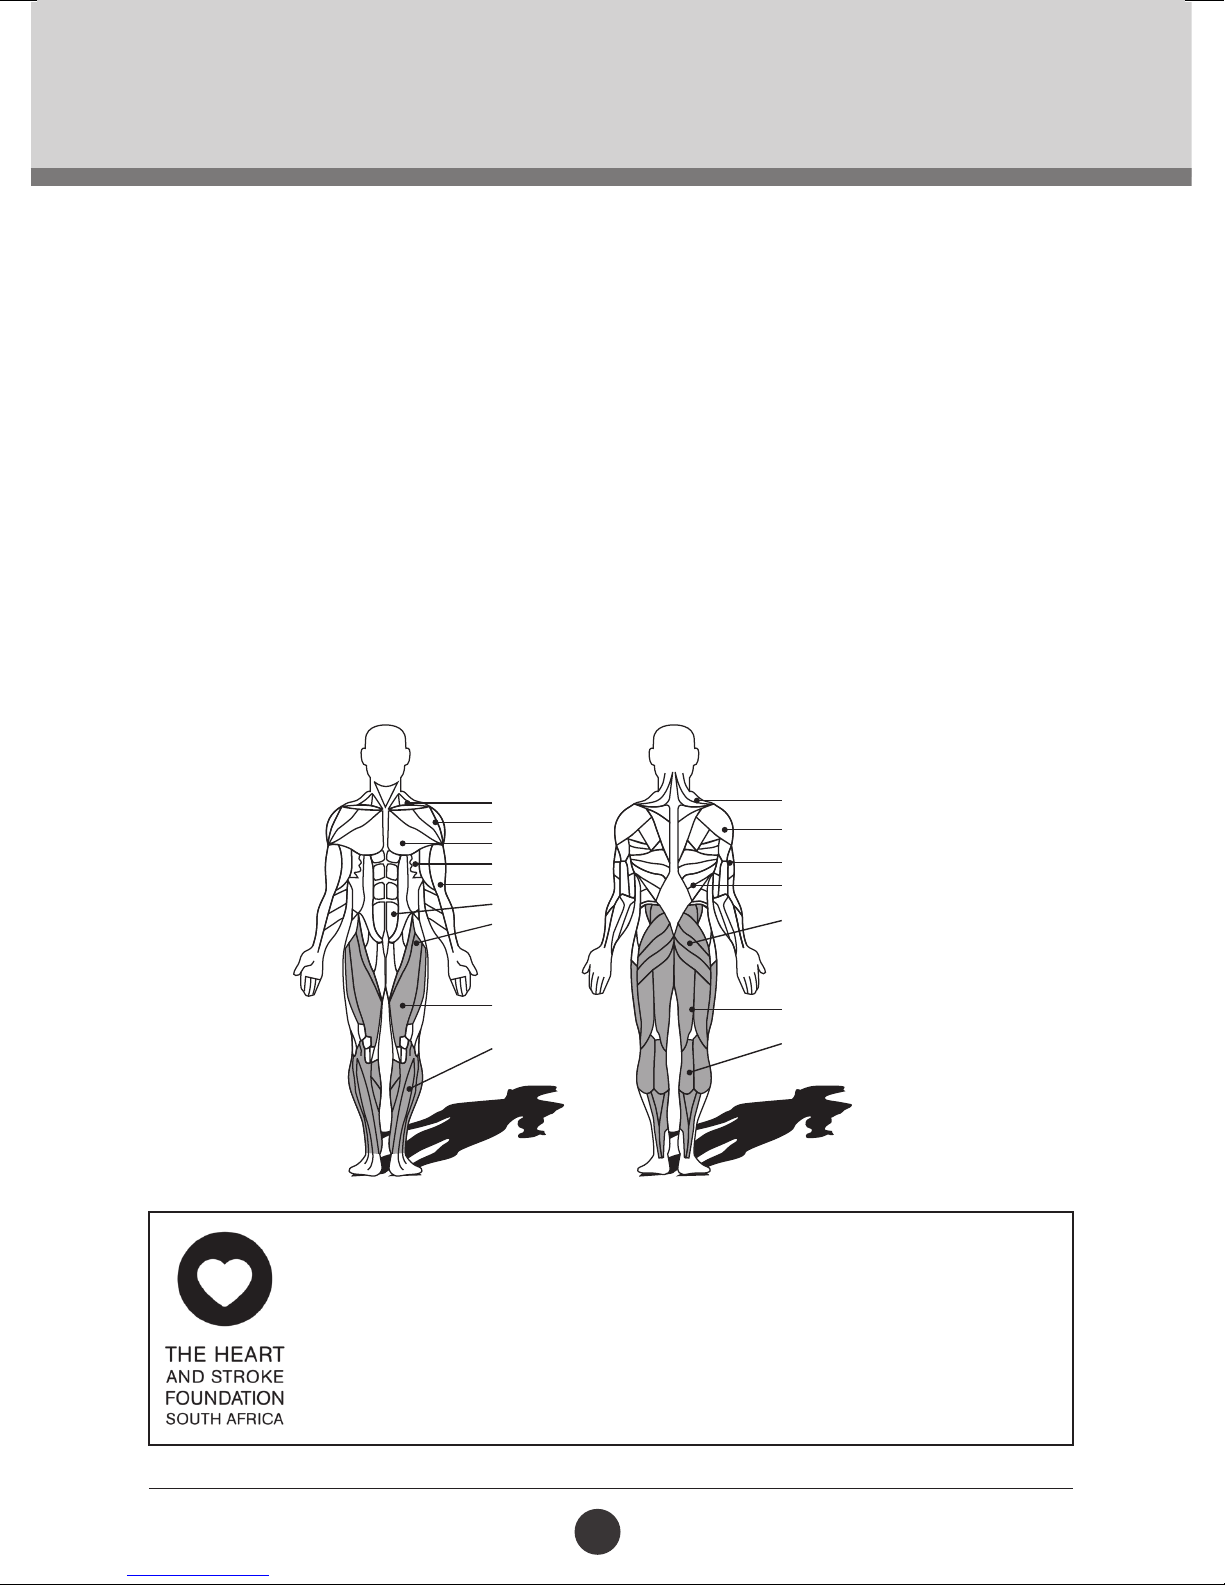
MUSCLE CHART
TROJAN IGNITE 370 TREADMILL
The exercise routine that is performed on the Trojan Ignite 370 Treadmill will develop the lower body muscle
group as well as condition the circulatory system and provide a good aerobic workout. These muscle groups
are highlighted on the muscle chart below.
Tr apezius
Anterior
Pectoralis Major
Serratus Anterior
Biceps
Abdominal
Sartorius
Quadriceps
Tibialis
Trojan and the Heart and Stroke Foundation have joined forces to KEEP SOUTH AFRICA MOVING.
The Heart and Stroke Foundation South Africa encourages all South Africans to make heart-healthy choices
that include daily physical activity, exercise and a balanced diet. Use Trojan, SA’s No. 1 selling Home Fitness
brand to give you the ability to boost your tness level and lower your risk of cardiovascular disease.
Tr apezius
Posterior
Tricep
Latissimus Dorsi
Gluteals
Hamstrings
Gastrocnemius
Visit www.trojanhealth.co.za for equipment choices and exercise programs, and
www.heartfoundation.co.za for information on how to adopt a healthy lifestyle.
24
Page 25
10334
CONDITIONING GUIDELINES
How you begin your exercise program depends on your physical condition. If you have been inactive for
several years, or are severely overweight, you must start slowly and increase your time on the equipment, a
few minutes per workout.
Initially, you may be able to exercise only for a few minutes in your target zone, however, your aerobic tness
will improve over the next six to eight weeks. Don’t be discouraged if it takes longer. It’s impor tant to work
at your own pace. Ultimately, you’ll be able to exercise continuously for 30 minutes. The better your aerobic
tness, the harder you will have to work to stay in your target zone. Please remember these essentials:
• Have your doctor review your training and diet programs to advise you of a workout routine you
should adopt.
• Begin your training program slowly with realistic goals that have been set by you and your doctor.
• Monitor your pulse frequently.
• Establish your target heart rate based on your age and condition.
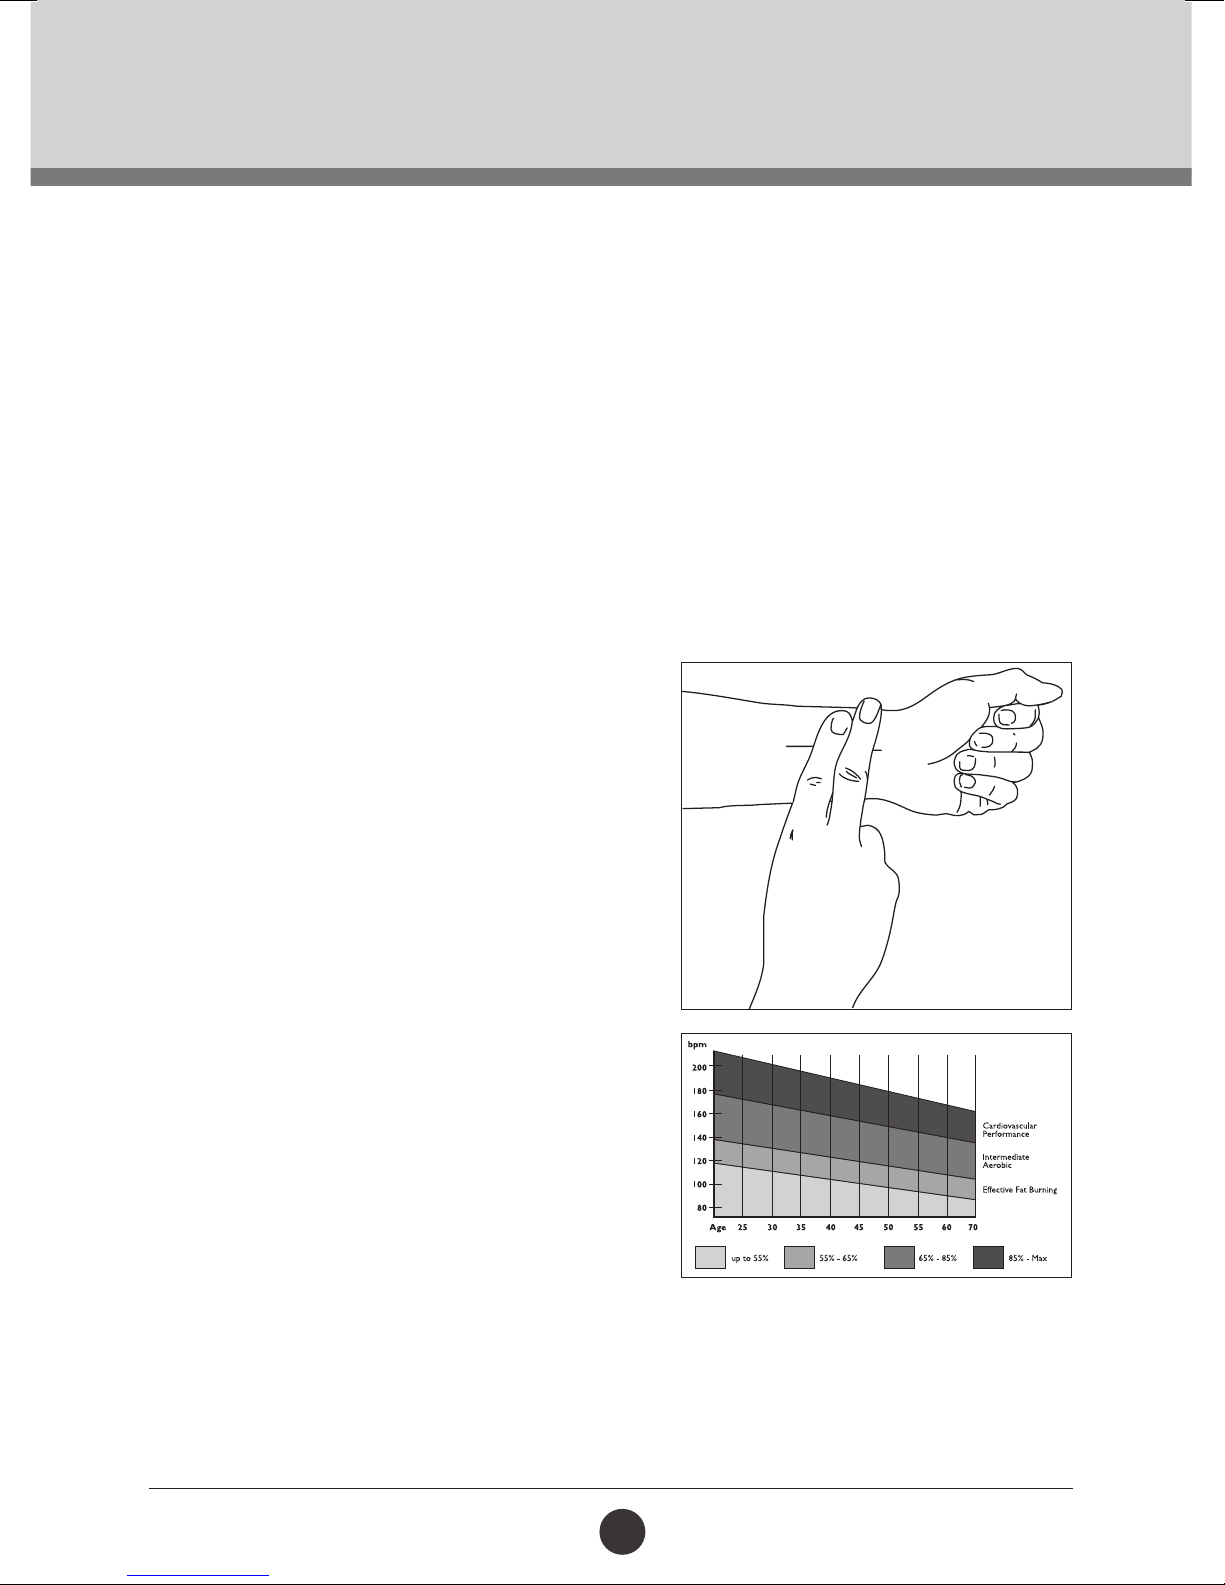
EXERCISE INTENSITY
To maximise the benets of exercising, it is impor tant to
exercise with the proper intensity. The proper intensity
level can be found by using your heart rate as a guide.
For effective aerobic exercise, your heart rate should
be maintained at a level between 65% and 85% of your
maximum heart rate as you exercise. This is known as your
target zone. You can nd your target zone in the table below.
During the rst few months of your exercise program, keep
your heart rate near the low end of your target zone as
you exercise. After a few months, your heart rate can be
increased gradually until it is near the middle of your target
zone as you exercise.
To measure your heart rate, stop exercising but continue
moving your legs or walking around and place two ngers
on your wrist. Take a six second heartbeat count and
multiply the results by 10 to nd your heart rate. For
example, if your six second heartbeat count is 14, your
heart rate is 140 beats per minute. (A six second count is
used because your heart rate will drop rapidly when you
stop exercising).
Adjust the intensity of your exercise until your heart rate is
at the proper level.
For more information visit:
www.trojanhealth.co.za
25
Page 26
10334
WARM UP & COOL DOWN
1
WORKOUT GUIDELINES
Each workout should include the following three parts:
A warm-up: 5 to 10 minutes of stretching and light exercise. A proper warm-up increases your body temperature, heart
rate, and circulation in preparation for exercise.
Training zone exercise: 20 to 30 minutes of exercising with your heart rate in your training zone. (Note: During the rst
few weeks of your exercise program, do not keep your heart rate in your training zone for longer than 20 minutes).
Cool-down: 5 to 10 minutes of stretching. This will increase the exibility of your muscles and will help to prevent postexercise problems.
EXERCISE FREQUENCY
To maintain or improve your condition, plan three workouts each week, with at least one day of rest between workouts. After
a few months of regular exercise, you may complete up to ve workouts each week, if desired. Remember, the key to success
is to make exercise a regular and enjoyable part of your everyday life.
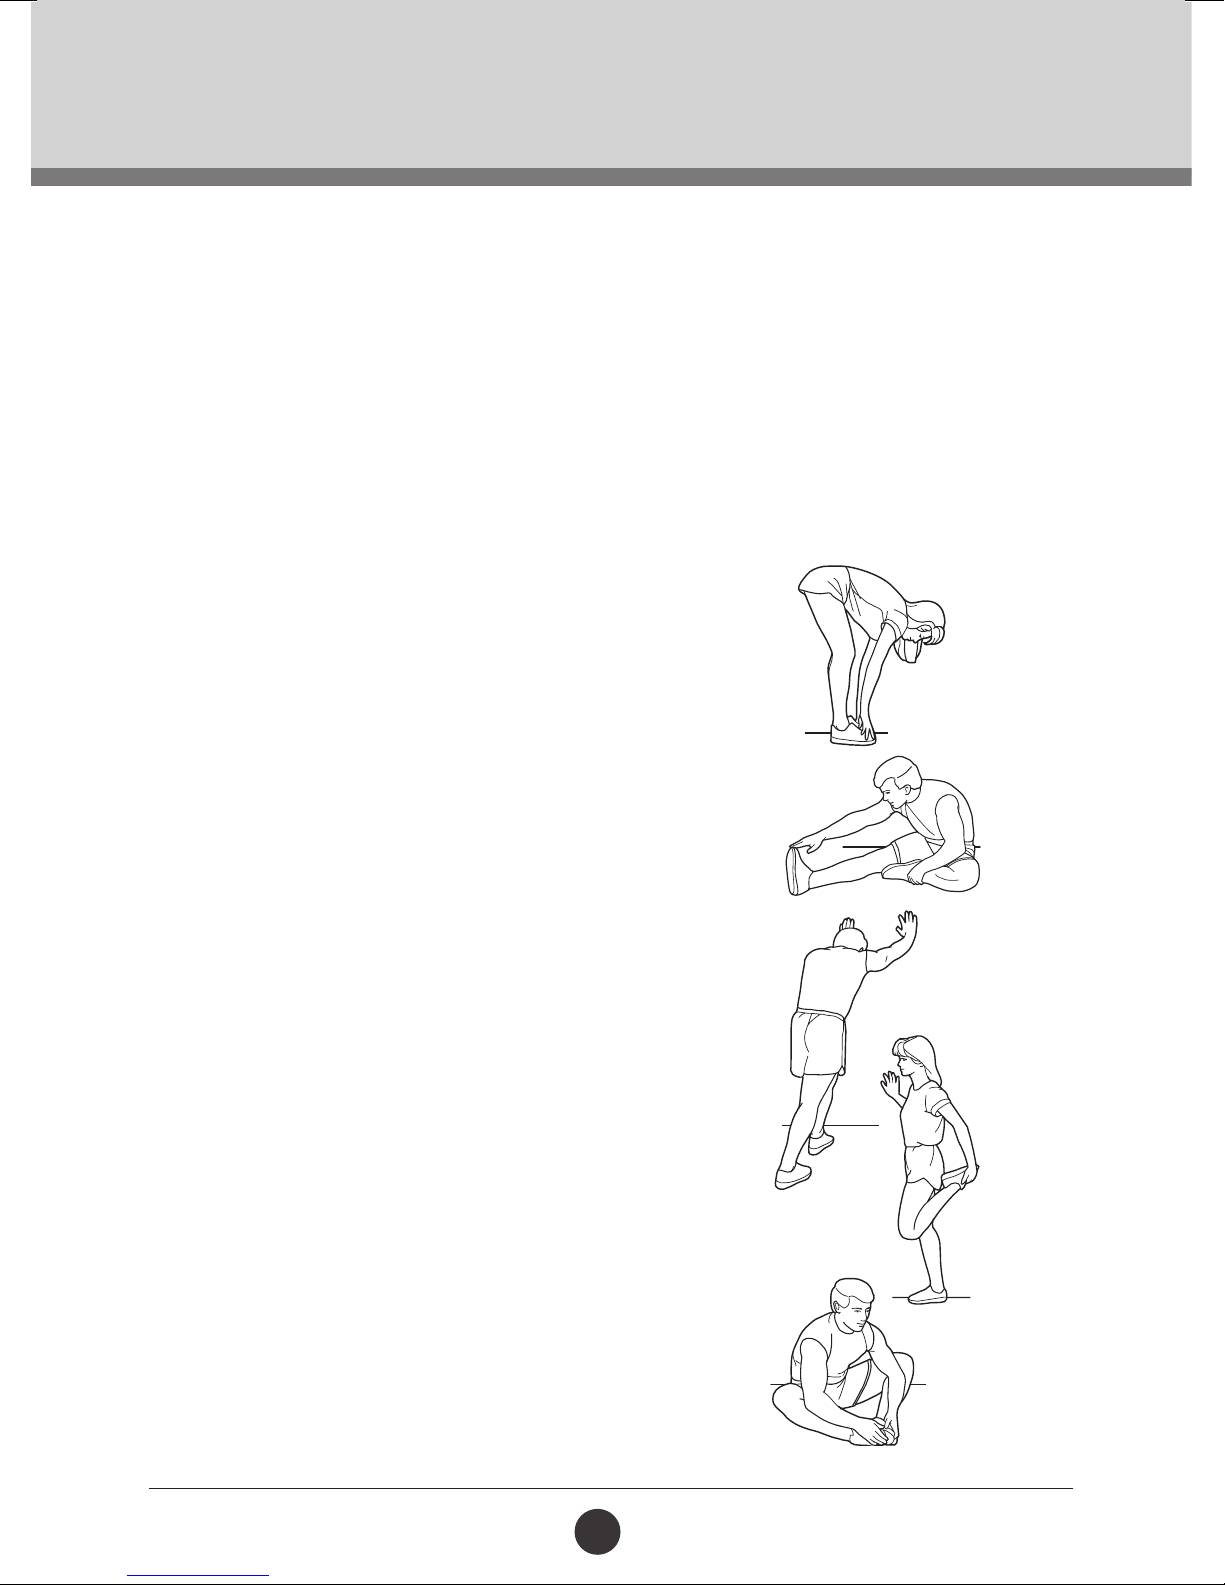
SUGGESTED STRETCHES
The correct form for several basic stretches is shown at the right.
Move slowly as you stretch, hold the position and never bounce.
1. Toe Touch Stretch
Stand with your knees bent slightly and slowly bend forward from
your hips. Allow your back and shoulders to relax as you reach
down toward your toes as far as possible. Hold for 15 counts, and
then relax. Repeat 3 times.
Stretches: Hamstrings, back of knees and back.
2
2. Hamstring Stretch
Sit with one leg extended. Bring the sole of the opposite foot
toward you and rest it against the inner thigh of your extended leg.
Reach toward your toes as far as possible. Hold for 15 counts, and
then relax. Repeat 3 times for each leg.
Stretches: Hamstrings, lower back and groin.
3. Calf/Achilles Stretch
With one leg in front of the other, reach forward and place your
hands against a wall. Keep your back leg straight and your back foot
at on the oor. Bend your front leg, lean forward and move your
hips toward the wall. Hold for 15 counts, and then relax. Repeat 3
times for each leg. To cause further stretching of the Achilles tendons, bend your back leg as well.
Stretches: Calves, Achilles tendons and ankles.
4. Quadriceps Stretch
With one hand against a wall for balance, reach back and grasp
one foot with your other hand. Bring your heel as close to your
buttocks as possible. Hold for 15 counts, then relax. Repeat 3 times
for each leg.
Stretches: Quadriceps and hip muscles.
5. Inner Thigh Stretch
Sit with the soles of your feet together and your knees outward.
Pull your feet toward your groin area as far as possible. Hold for 15
counts, and then relax. Repeat 3 times.
Stretches: Quadriceps and hip muscles.
3
4
5
26
Page 27

10334
TROUBLE SHOOTING
This treadmill is designed in a way that in the event of an electrical fault, the machine will turn off
automatically to prevent any injuries to the user and to prevent damage to the machine
(i.e. motor).
When the treadmill behaves erratically, simply reset the treadmill by turning the power switch off,
waiting for 1 minute then turning the power button back on.
If, after you have reset the treadmill, it is still not working correctly, please run the Self-Check
procedure (refer to Self-Check) to distinguish what type of error problem the machine is
encountering.
Alarm Signals
Before attempting any work on the treadmill, ensure that the power is off and the plug is removed
from the power socket.
Do not use extension leads as it may lead to power decrease and failure.
E0: Safety key not in the position
• Put the safety key in the correct position.
E1: No feedback from controller or speed sensor
• Check the condition of cables and ensure that all plugs are connected between the motor
controller and console.
• Check that the speed sensor and magnet are correctly aligned and that there are no
obstructions on the magnet. (The magnet can be found on the front roller near the motor
belt).
• If the running belt moves then displays the E1 error after 10 seconds, there is a fault with the
speed sensor.
• If the running belt does not move, replace the motor controller.
E3: Self-Check failure
If the running belt does not move, replace the motor controller.
Ensure that all plugs are connected between the motor controller and console.
Check that the speed sensor and magnet are in correct aligned and that there are no obstructions
on the magnet. (The magnet can be found on the front roller near the motor belt).
No Power
• Check fuses (They are located on the controller under the motor cover).
• Check power socket (Plug something else into the power outlet to ensure that the power
outlet is working correctly).
• Check Power Cable (You may need to take it to an electrician).
27
Page 28
10334
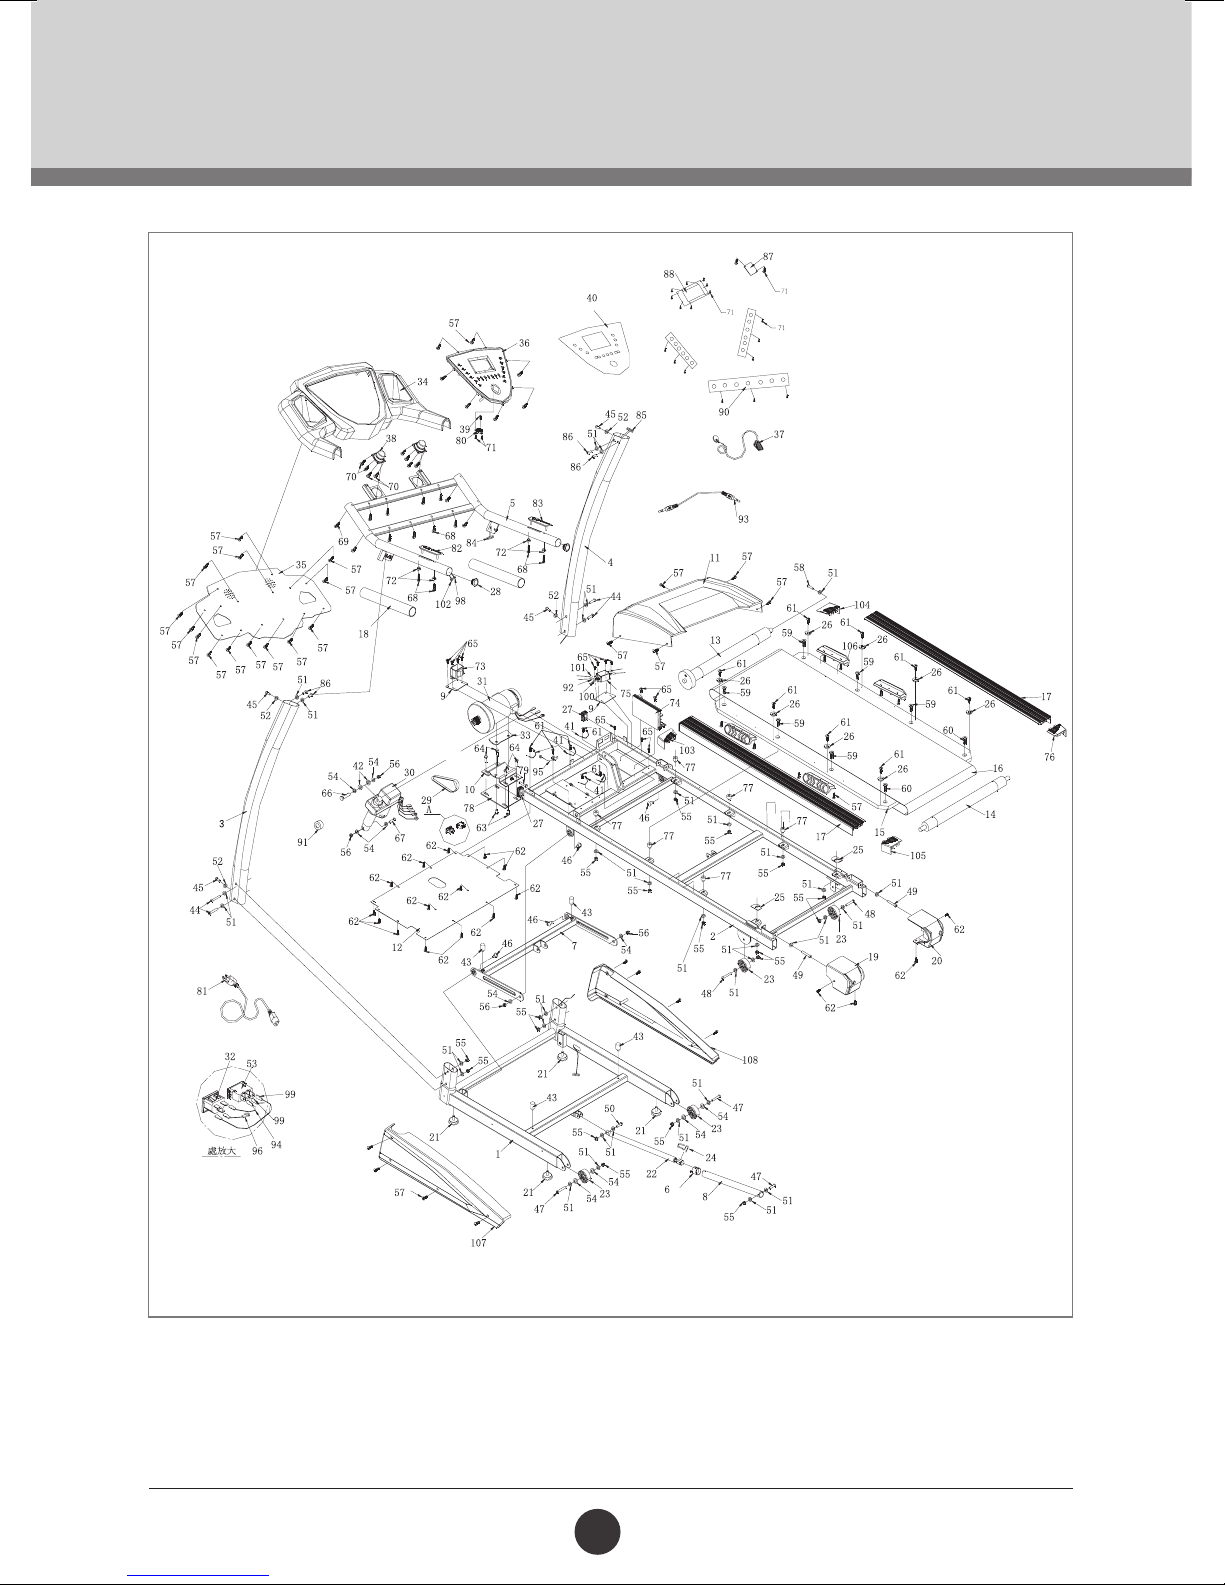
EXPLODED DRAWING
A
28
Page 29

10334
PARTS LIST
No. Description Specication Qty
1 Base Bottom Bracket 1
2 Frame 1
3 Left Upright Bar 1
4 Right Upright Bar 1
5 Console 1
6 Spring Fixed Set
7 Incline Bracket 1
8 Upper Adjustable Tube 1
9 Filter Fixed Plate 2
10 Motor Bracket 1
11 Motor Cover 1
12 Motor Lower Cover 584 mm x 375 mm x T1.6 mm 1
13 Front Roller
14 Back Roller
15 Running Deck 1082 mm x 605 mm x T18 mm 1
16 Running Belt 2555 mm x 450 mm x T1.6 mm 1
40 mm x
Ø100 mm x Ø48 mm x 553 mm
Ø46 mm x 558 mm
Ø32 mm
1
1
1
17 Side Rail 81 mm x 40.4 mm x 992 mm 2
18 Foam Cover 2
19 Left End Cap 145 mm x 97.5 mm x 103.8 mm 1
20 Right End Cap 145 mm x 97.5 mm x 103.8 mm 1
21 Adjust Pad
22 Spring
Ø44.2 mm x 35 mm
Ø22 mm x 810mm x 200 N
29
4
1
Page 30

10334
PARTS LIST
No. Description Specication Qty
23 Moving Wheel
24 Spring Clip 1
25 Running Deck Cushion 45 mm x 33 mm x T3.0 mm 2
26 Side Rail Fixed Button
27 Square Tube 50 mm x 25 mm x 1.5 mm 2
28 Circle Tube 38 mm x T1.5 mm 2
29 V-Belt 210 mm (7 tooth x 6 groove) 1
30 Incline Motor JS15 x 200 mm x 70 mm, Voltage 220V 1
31 Motor 1.25 HP, Voltage 180 V 1
32 Power Bracket 1
33 Motor Shock Plate 1 100 mm x 65 mm x T3.0 mm 1
Ø60 mm x 25 mm
Ø20 mm x 6.8 mm
4
8
34 Console 769.7 mm x 396.5 mm x 85 mm 1
35 Console Lower Cover 762.7 mm x 385 x T1.6 mm 1
36 Console Display Board 351 mm x 223.1 x 37.8 mm 1
37 Safety Key
38 Music Speaker 3W, 8Ω 2
39 Cross Head Screw ST3.5 x 13 mm 1
40 Console Sticker 1
41 Tie 4 mm x 150 mm 5
42 Bolt Plastic
43 Rubber Cushion
44 Cup Head Hex Screw M8 x 50 mm x 15 mm 4
Ø34 mm x 10 mm
Ø25 mm x Ø10.5 mm x T2.0 mm
35 mm x
Ø20 mm
1
2
4
30
Page 31

10334
PARTS LIST
No. Descriptoon Specication Qty
45 Cup Head Hex Screw
46 Hex Screw M10 x 28 mm 4
47 Cup Head Hex Screw
48 Cup Head Hex Screw M8 x 40 mm x 15 mm 2
49 Hex Screw M8 x 80 mm 2
50 Cup Head Hex Screw M8 x 35 mm 1
51 Flat Washer-C
52 Saddle Washer
53 Rocker Switch 250V AC/8A 1
54 Flat Washer-C
55 Non-Metal Hex Nut M8 mm 18
Ø16 mm
M8 x
M8 x 45 mm x
Ø8 mm
Ø8 mm
Ø10 mm
Ø20 mm
35
10
4
3
4
56 Non-Metal Hex Nut M10 mm 4
57 Cross Head Screw ST4.2 x 13 mm 43
58 Cup Head Hex Screw M8 x 55 mm 1
59 Cross Head Screw M8 x 25 mm 6
60 Cross Head Screw M8 x 35 mm 2
61 Cross Head Screw ST4.2 x 13 mm 14
62 Philips Shantou Self-Drilling Screw ST4.2 x 13 mm 26
63 Bolt Screw M8 x 12 mm 2
64 Bolt Screw M8 x 16 mm 4
65 Cross Head Screw M4 x 8 mm 13
66 Screw M10 x 50 mm x 20 mm 1
31
Page 32

10334
PARTS LIST
No. Description Specication Qty
67 Screw M10 x 65 mm x 20 mm 1
68 Cross Head Screw ST4.2 x 38 mm 12
69 Cross Head Screw ST4.2 x 20 mm 4
70 Cross Head Screw ST4.2 x 9.5 mm 8
71 Cross Head Screw ST3 x 8 mm 21
72 Heart Rate Fixed Button 4
73 Inductance (Optional) T5817-1 ACL-2.5 mH-6 A 1
74 Motor Controller AC220 V with incline B304S 1
74 Motor Controller AC110 V with incline B304S 1
75 Filter (Optional) 10 A 120/250 V-50/60 HZ 1
76 Side Rail Rear Connector 81 mm x 40.4 mm x 2.2 mm 1
77 Spring Cushion
78 Motor Shock Plate 2 155 mm x 100 mm x T3.0 mm 1
79 Screw M8 x 35 mm 1
80 Safety Key Bracket 1
81 Power Cord
82 Left Hand Pulse Set 1
83 Right Hand Pulse Set 1
84 Computer Connect Wire 700 mm x 10 PIN 1
85 Base Frame Connect Wire 1800 mm x 10 PIN 1
Ø30 mm x 20 mm, M8, 15-17 mm
Voltage 220 V,
Ø1.0 M x 2000 mm
6
1
86 Cup Head Hex Screw M8 x 12 mm 4
87 Music Board 400 mm 1
88 Main Control Board 1
32
Page 33

10334
PARTS LIST
No. Description Specication Qty
89 Audio Head Fixed Plate 400 mm 1
90 Key Button 150 mm x 8 PIN 1
91 Magnetic Circle
92 Power Cable (Yellow, Green) 200 mm 1
93 MP3 Connect Wire 380 mm 1
94 AC Input Wire(Black) 100/120 mm 1
95 Reactor Wire 900mm x 2 PIN 1
96 Power Cable (Yellow, Green) 100 mm 1
97 Pulse Plate Connect Wire 2 950 mm x 2 PIN 1
98 Pulse Plate Connect Wire 2 700 mm x 2 PIN 1
99 AC Power Cord (Red) 100 mm 2
100 AC Power Cord (Black) 120mm 1
101 AC Power Cord (Red) 120 mm 1
102 Front Shortcuts Connect Wire 700 mm x 3 PIN 2
Ø31 mm x Ø9 mm x 13 mm
1
103 Side Rail Left-Front Connector 96 mm x 40.4 mm x 2.2 mm 1
104 Side Rail Right-Front Connector 96 mm x 40.4 mm x 2.2 mm 1
105 Side Rail Left-Back Connector 81 mm x 40.4 mm x 2.2 mm 1
106 Silicone Cushion 4
107 Left Upright Lower Cover 768 mm x 195 mm x 50 mm 1
108 Right Upright Lower Cover 768 mm x 195 mm x 50 mm 1
33
Page 34
10334
1 YEAR LIMITED WARRANTY
The Manufacturer hereby provides a warranty to the original purchaser of this product (‘the Consumer’) that this product
will be free of manufacturing defects in materials and workmanship which under normal, personal, family or household use
(commercial use expressly excluded) manifest themselves within 1 year from the date of purchase.
EXCLUSIONS
• The warranty does not include and will not be construed to cover products damaged as a result of disaster, misuse,
commercial use, use not in accordance within the written instructions included with the product, abuse and/or any
non-authorised modication of the product, incorrect installation of the product or normal wear and tear.
• All demo models carry a 3 month warranty.
WAIVER
The warranty and the obligations of the manufacturer provided herein are in lieu of, and the consumer, waives all other
warranties, guarantees, conditions or liabilities, express or implied, arising by law or otherwise, including without limitation, any
obligation of the manufacturer in respect of any injury, loss or damage (direct, indirect or consequential) arising out of the use
of, or inability to use this product and whether or not occasioned by the manufacturer’s negligence or any act or omission on
its part.
PROOF OF PURCHASE
Any claim in terms of the warranty must be suppor ted by a proof of purchase or a warranty number. Warranty numbers can
be issued through contacting our Trojan Call Centre on 0861 TROJAN (0861 876526) or online at www.trojanhealth.co.za.
If such proof is not available, then notwithstanding anything to the contrary herein, the service agent’s prevailing charges for
services/repairs including call-out and/or spares will be payable by the Consumer upon collection or delivery of the repaired
product.
The Consumer does not need to return the product to the store. The Consumer should call the Trojan Call Centre on
0861 TROJAN (0861 876526) and the Manufacturer’s authorised agent will at its discretion either repair the item at the
Consumer’s residence or collect and repair the item at their premises.
During the warranty period the product may only be serviced and/or repaired by the Manufacturer’s duly authorised agent(s).
34
Page 35

REPAIRS PROCEDURE
Should you experience any faults or breakdowns on your Trojan equipment, please adhere to the following procedure to have
the fault recti ed speedily and professionally.
• Do not return the product to the store.*
• Call the Trojan Call Centre on 0861 TROJAN (0861 876526) to log the faulty product (under warranty or out of warranty).
• The operator or technical advisor will tr y identify the fault, and will book a service team call out.
• The service team will endeavour to x the problem in your home on an agreed date and time.
Only if the fault cannot be repaired in the convenience of your home, will the ser vice team take the faulty product back to the
service centre.
• Items repaired in our service centre will be returned to your home on an agreed date and time.
* NOTE:
Should you live in an outlying area, it may be necessary to return the product to the store nearest to you. Our service
operator will advise you of your repair procedure.
Cost of Repairs
Under warranty
• Any items still under warranty will be repaired free of charge, as long as it complies with the terms and conditions of the
warranty. (Refer to “warranties” section in this manual).
• Any items that need to be repaired that are NOT covered in the warranty will be for the consumer’s expense.
• A quote for the repair/replacement of these items will be provided to the consumer for approval prior to repairs being
conducted.
Out of Warranty
• Any items that need to be repaired once the warranty has expired will be for the consumer’s expense including call out
fees.
• A quote for the repair/replacement of these items will be provided to the consumer for approval prior to repairs being
conducted.
QUALITY GUARANTEE
YEAR
WARRANTY
If this product proves to be faulty during
normal use due to defective materials or
workmanship. Refer to user manual or
website for terms and conditions.
✆
www.trojanhealth.co.za
Manufactured For Masstores (Pty) Ltd.
16 Peltier Drive, Sunninghill, Ext 6, Sandton, 2146,
South Africa.
0861 876526
0861 TROJAN
Please call us for any
product queries, after
sales support, repairs
or installations.
#16M01T003
Visit facebook.com/trojanhealth
www.trojanhealth.co.za
35
10334
Page 36

10334
NOTES
36
 Loading...