

Trojan Flooded, AGM, Gel User Manual

USER’S GUIDE

Congratulations
on your purchase from Trojan Battery Company, the manufacturer of the
world’s most trusted deep-cycle batteries. The battery you purchased was
engineered by Trojan to deliver superior power, performance, durability
and reliability for use in a broad range of demanding applications. From the
T2 Technology™ in our ooded batteries to the C-Max Technology™ in the
Reliant™ AGM line, our goal is to provide clean and reliable energy storage
solutions that enhance the way people live and work around the world.

This User’s Guide
was created by Trojan’s application engineers and contains vital information
regarding proper care and maintenance of your new battery. Please read through
this User’s Guide carefully and completely before using your battery. It will help
you achieve optimum performance and long life from your new investment.
800-423-6569 Ext. 3045 / +1-562-236-3045
TECHNICAL SUPPORT

Contents
01 Safety . . . . . . . . . . . . . . . . . . 5
02 Equipment Needed. . . . . . . . . . . . 5
03 Battery Installation . . . . . . . . . . . 6
3.1 Battery Connections . . . . . . . . . . . . . 6
3.2Terminal Types . . . . . . . . . . . . . . . 6
3.4Cable Size . . . . . . . . . . . . . . . . .10
3.5Torque Values . . . . . . . . . . . . . . . .11
3.6Terminal Protection . . . . . . . . . . . . .12
3.7Connecting Batteries to Increase System Power . . .12
3.8Ventilation . . . . . . . . . . . . . . . . .13
3.9Battery Orientation. . . . . . . . . . . . . .13
3.10Battery Environment . . . . . . . . . . . .13
3.11Temperature. . . . . . . . . . . . . . . . 13
04 Preventative Maintenance . . . . . . . . 14
4.1Inspection . . . . . . . . . . . . . . . . .14
4.2Watering . . . . . . . . . . . . . . . . . 14
4.3Cleaning. . . . . . . . . . . . . . . . . .16
4.4Charging & Equalizing. . . . . . . . . . . . .16
4.4.1Boost Charging . . . . . . . . . . . . . .16
4.4.2Charging . . . . . . . . . . . . . . . .18
4.4.3Equalizing . . . . . . . . . . . . . . . .22
05 Storage . . . . . . . . . . . . . . . . . 24
5.1 Storage in Hot Environments . . . . . . . . . .24
5.2Storage in Cold Environments . . . . . . . . .24
06 How to Maximize the Performance of your
Trojan Battery . . . . . . . . . . . . . . 24
07 What to Expect from your Trojan Battery . 25
08 Trouble-Shooting. . . . . . . . . . . . . 26
8.1Preparation for Testing . . . . . . . . . . . .26
8.2On-Charge Voltage Testing . . . . . . . . . . .26
8.3Specic Gravity . . . . . . . . . . . . . . .27
8.4Open Circuit Voltage Testing . . . . . . . . . .27
8.5Discharge Testing . . . . . . . . . . . . . .28
09 Battery Recycling . . . . . . . . . . . . 29
10 Battery Acronyms . . . . . . . . . . . . 30

5
USER’S GUIDE
5
01 Safety
Since batteries deliver large amounts of power that can cause injury and even death, observing safety
rules is of paramount importance. For your safety and the safety of those around you, please observe the
following checklist when working on or around batteries.
Always Never
Always wear protective clothes, gloves & safety goggles Never smoke near batteries
Always use insulated tools when working on batteries Never wear jewelry or other metal objects when working on
or around batteries
Always check connections for proper torque Never make direct contact with the electrolyte (sulfuric acid). If this occurs,
ush with large amounts of water.
Always charge batteries in well-ventilated areas Never place objects on top of batteries, which can cause a short circuit
Always keep sparks and ames* away from batteries Never add acid to a battery
Always use largest cable size of shortest length to minimize voltage drop Never charge a frozen battery
Always ensure plates are covered in water before charging Never charge a ooded battery without securing vent caps on the cells
Always make sure charger is set for the appropriate battery type (ooded,
AGM or gel)
Never charge a battery when the temperature is above 122° F (50°C)
Always charge batteries before installing Never store batteries unless they are fully charged
Always neutralize acid spills with baking soda and water Never leave an acid spill unattended
WARNING Risk of re, explosion, or burns. Do not disassemble, heat above 70° C (160° F),
or incinerate.
02 Equipment Needed
Before installation or maintenance of your batteries, have the following equipment available:
î Proper personal protective equipment
(eye protection and acid resistant gloves)
î Distilled or treated water (deionized or
reverse osmosis)
î Insulated wrench
î Baking soda
î Terminal protector spray
î Voltmeter
î Hydrometer (deep-cycle
ooded/wet batteries)
î Discharge tester (if available)
î Battery charger
TROJAN BATTERY
6
03 Battery Installation
To ensure you install your batteries properly and safely, please use the following guidelines.
3 .1 Battery Connections
Battery cables provide the link between the batteries, equipment and charging system. Faulty
connections can lead to poor performance and terminal damage, meltdown or re. To ensure proper
connections, please use the following guidelines for cable size, torque values and terminal protection.
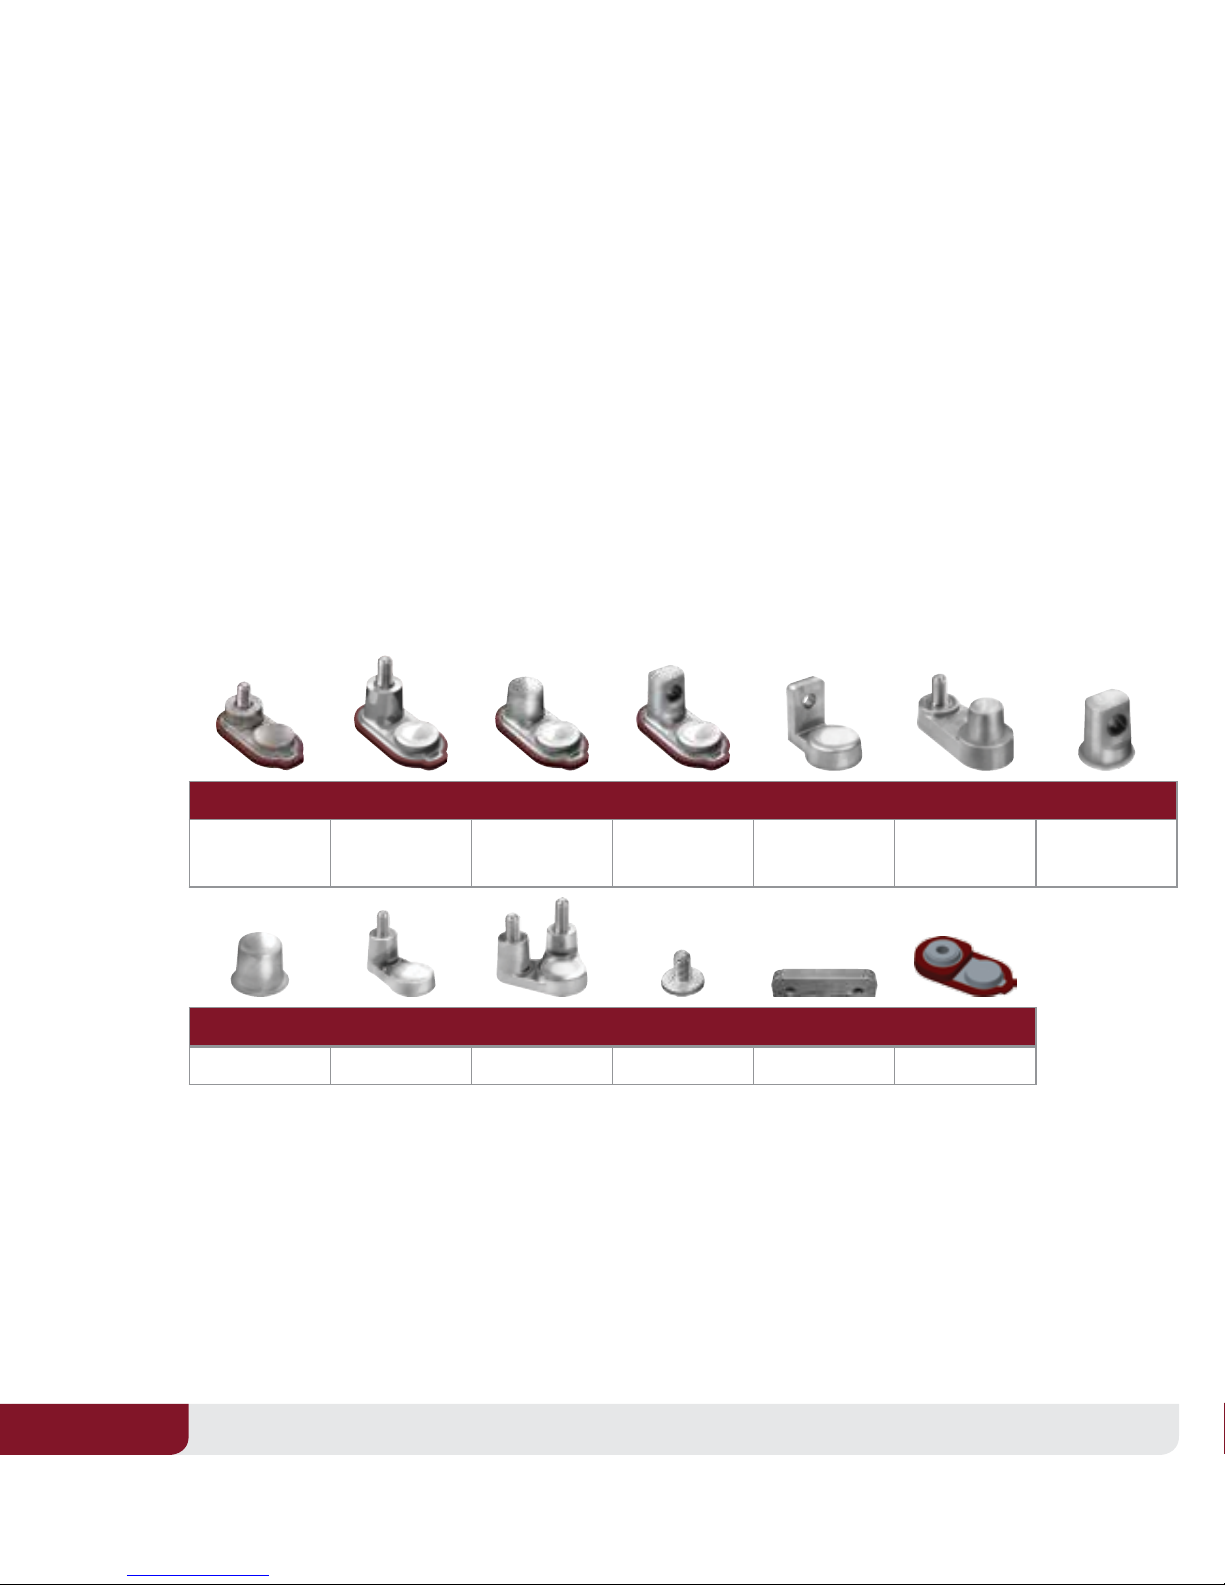
3.2 Terminal Types
Below are the various terminal types found on Trojan batteries. Refer to the appropriate terminal type
when determining proper torque in Section 3.5 below.
1 ELPT 2 EHPT 3 EAPT 4 EUT 5 LT 6 DT 7 UT
Embedded Low
Prole
Embedded High
Prole
Embedded Auto
Post
Embedded
Universal
L-Terminal Automotive Post
& Stud
Universal
8 AP 9 WNT 10 DWNT 11 ST 14 IND 15 M6/M8 15
Automotive Post Wingnut Dual Wingnut Stud Industrial
6mm/8mm Insert
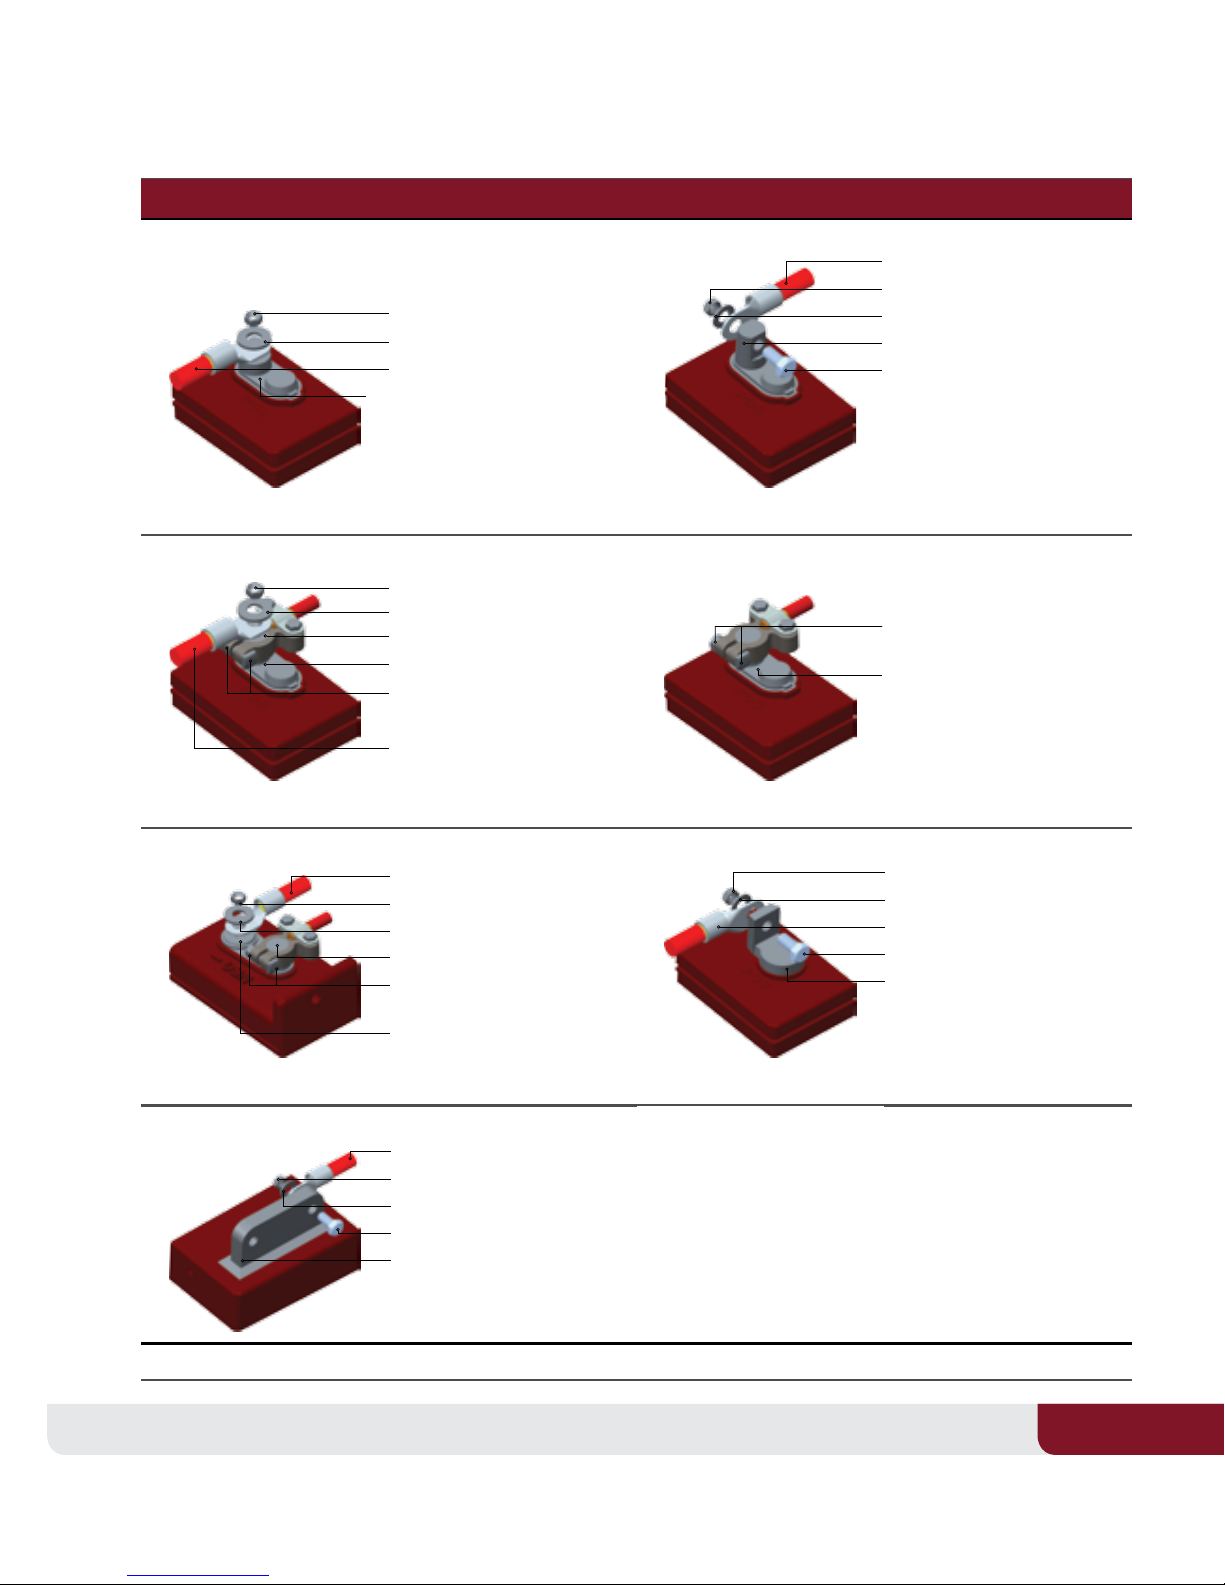
3.3 Correct Hardware* Installation
If using at washers, it is very important to ensure the battery cable lug connection is contacting the lead
surface of the terminal, and the washer is placed on top of the wire connection. Do not place washer
between the battery terminal and the battery wire, which creates high resistance and can cause
terminal meltdown. It is important that fasteners be tightened to the appropriate torque for each
terminal type, as dened in Table 2.
7
USER’S GUIDE
7
Flooded
ELPT EUT
EHPT EAPT
DT LT
IND
Images shown reect correct hardware placement. *Hardware not supplied by Trojan Battery Company.
Nut - Torque to 95 -105 in -lbs (11-12 Nm)
Nut - Torque to 95 -105 in -lbs (11-12 Nm)
Washer*
Washer*
AP Connector
Torque to 5 0-70 in-lbs (6 -8 Nm)
Cable Lug
Cable Lug
Terminal
Terminal
Stud Portion
Cable Lug
Nut - Torque to 95 -105 in -lbs (11-12 Nm)
Washer*
Terminal
Bolt
Nut - Torque to 95 -105 in -lbs (11-12 Nm)
Washer*
Cable Lug
Bolt
Terminal
Cable Lug
Nut - Torque to 10 0-120 in-lbs (11-14 Nm)
Washer*
Bolt
Terminal
Terminal
AP Connector
Torque to 5 0-70 in-lbs (6 -8 Nm)
Cable Lug
Nut - Torque to 95 -105 in -lbs (11-12 Nm)
Washer*
AP Terminal
AP Connector
Torque to 5 0-70 in-lbs (6 -8 Nm)
Stud Terminal

TROJAN BATTERY
8
AGM
LT DT
M6 M8
AP (RELIANT) AP
ST
Images shown reect correct hardware placement. All hardware supplied for Reliant AGM. Hardware for non Reliant AGM is optional.
Nut - Torque to 55-70 i n-lbs (6-8 Nm) Nut - Torque to 95 -105 in -lbs (11-12 Nm)
Washer Cable LugLock Washer
Cable Lug Lock Washer
Bolt - 20 mm AP Terminal
M8 Terminal
AP Connector
Torque to 5 0-70 in-lbs (6 -8 Nm)
Bolt - 16mm - Torque t o 85-95 in-l bs (10-11 Nm)
Washer
Lock Washer
Stud Terminal
AP Connector
Torque to 5 0-70 in-lbs (6 -8 Nm)
Lock Washer
Bolt - Torque to 85 -95 in-lbs (10 -11 Nm)
Washer
Cable Lug
Terminal
Lock Washer
Bolt - Torque to 2 5-35 in-lbs (3- 4 Nm)
Washer
Cable Lug
Terminal
LT Adapter
AP Adapter
Torque to 8 5-95 in-lbs (10 -11 Nm)
M8 Terminal
Nut
- Torque to 120 -180 i n-lbs (14-20 Nm)
Cable Lug
Terminal
AP Connector
Torque to 4 4-62 in- lbs (5-7 Nm)
Terminal
9
USER’S GUIDE
9
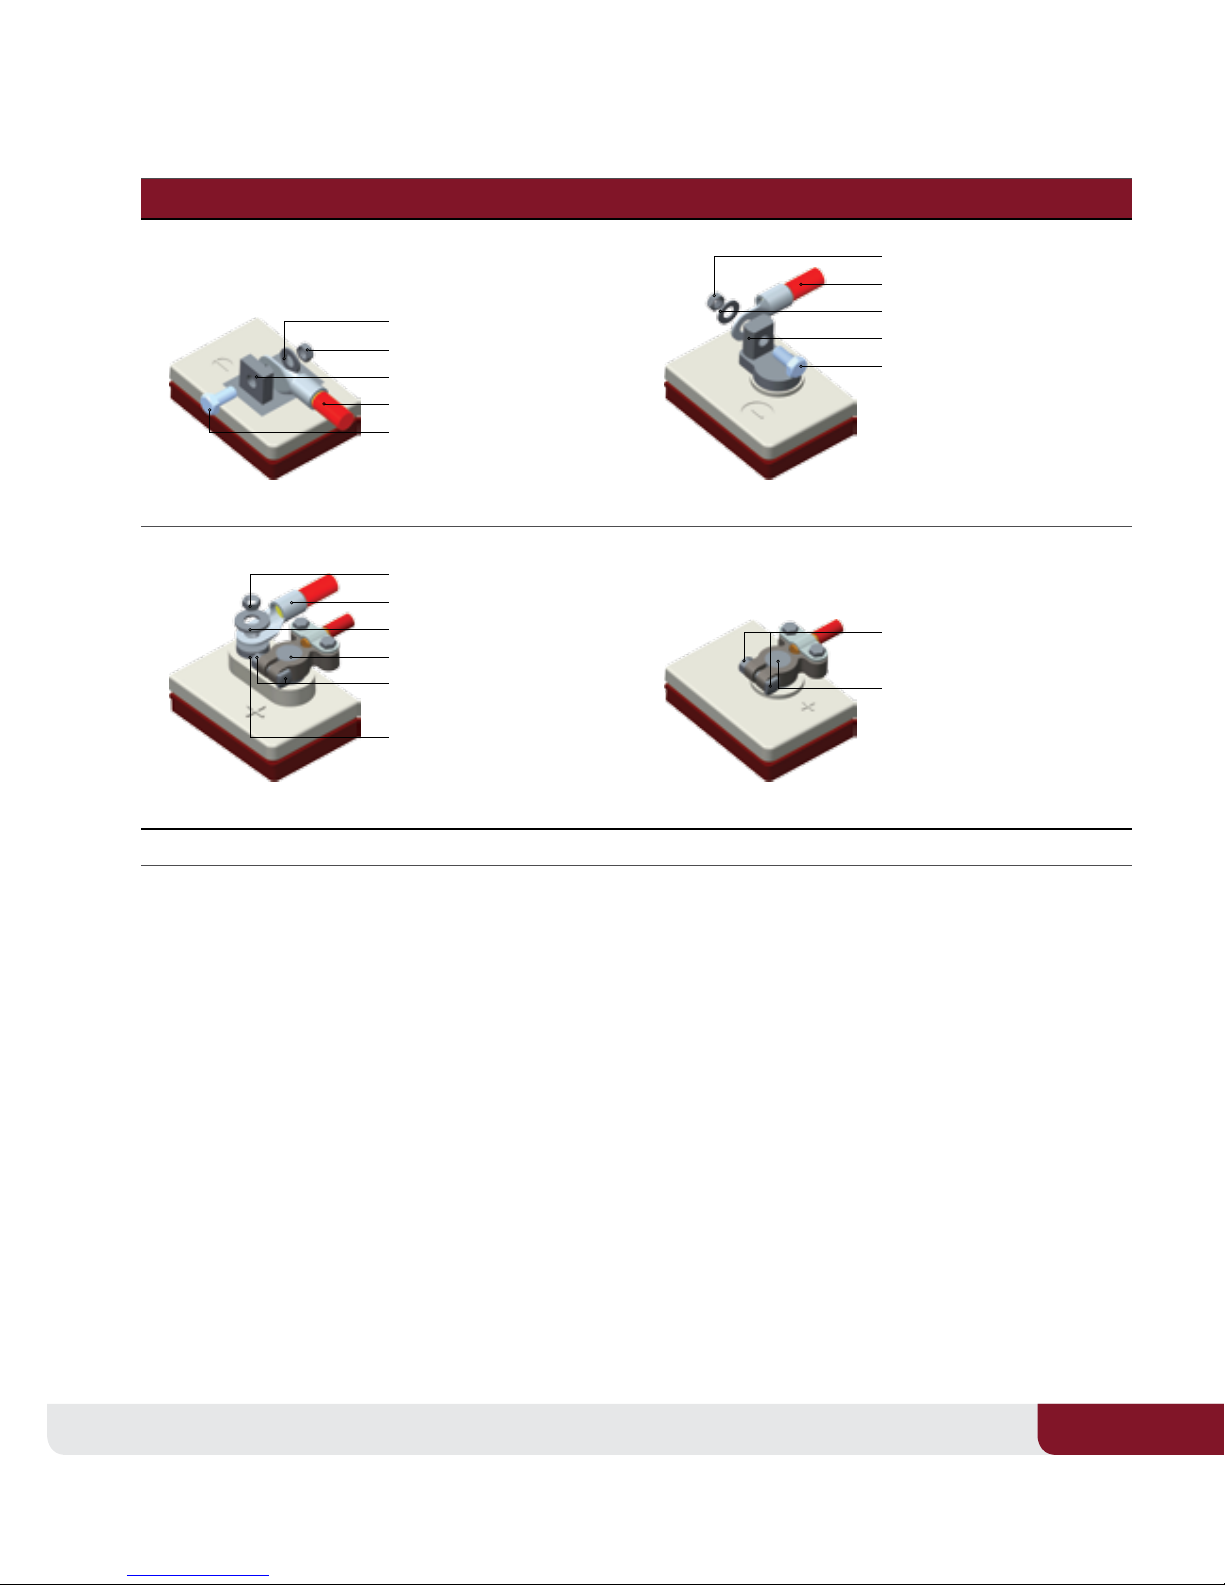
Gel
LT UT
DT AP
Images shown reect correct hardware placement. *Hardware not supplied by Trojan Battery Company.
Washer*
Nut - Torq ue to 95-105 in -lbs (11-12 Nm)
Nut - Torq ue to 95-105 in -lbs (11-12 Nm)
Nut - Torq ue to 95-105 in -lbs (11-12 Nm)
Cable Lug
Cable Lug
Terminal
Washer*
Washer*
Cable Lug
Terminal
AP Connector
Torque to 5 0-70 in-lbs (6 -8 Nm)
Terminal
Bolt
Bolt
AP Connector
Torque to 5 0-70 in-lbs (6 -8 Nm)
Stud Terminal
AP Terminal

TROJAN BATTERY
10
3.4 Cable Size
Battery cables should be sized to handle the expected load. Refer to Table 1 for the maximum amps
based on the cable/wire gauge size.
Table 1
Cable/Wire Gauge Size (AWG) Ampacity (amps)
14 25
12 30
10 40
8 55
6 75
4 95
2 130
1 150
1/0 170
2/0 265
4/0 360
Table values are for cable lengths
less than 6 feet (1829 mm). In
series/parallel battery banks, it
is preferable for all series cables
to be the same length, and all
parallel cables to be the same
length.
For more information refer to the
National Electric Code for correct
cable/wire size, which can be
located at www.nfpa.org.
 Loading...