

Page 1
Aufbauanleitung/Assembling Instruction/Instruction de montage
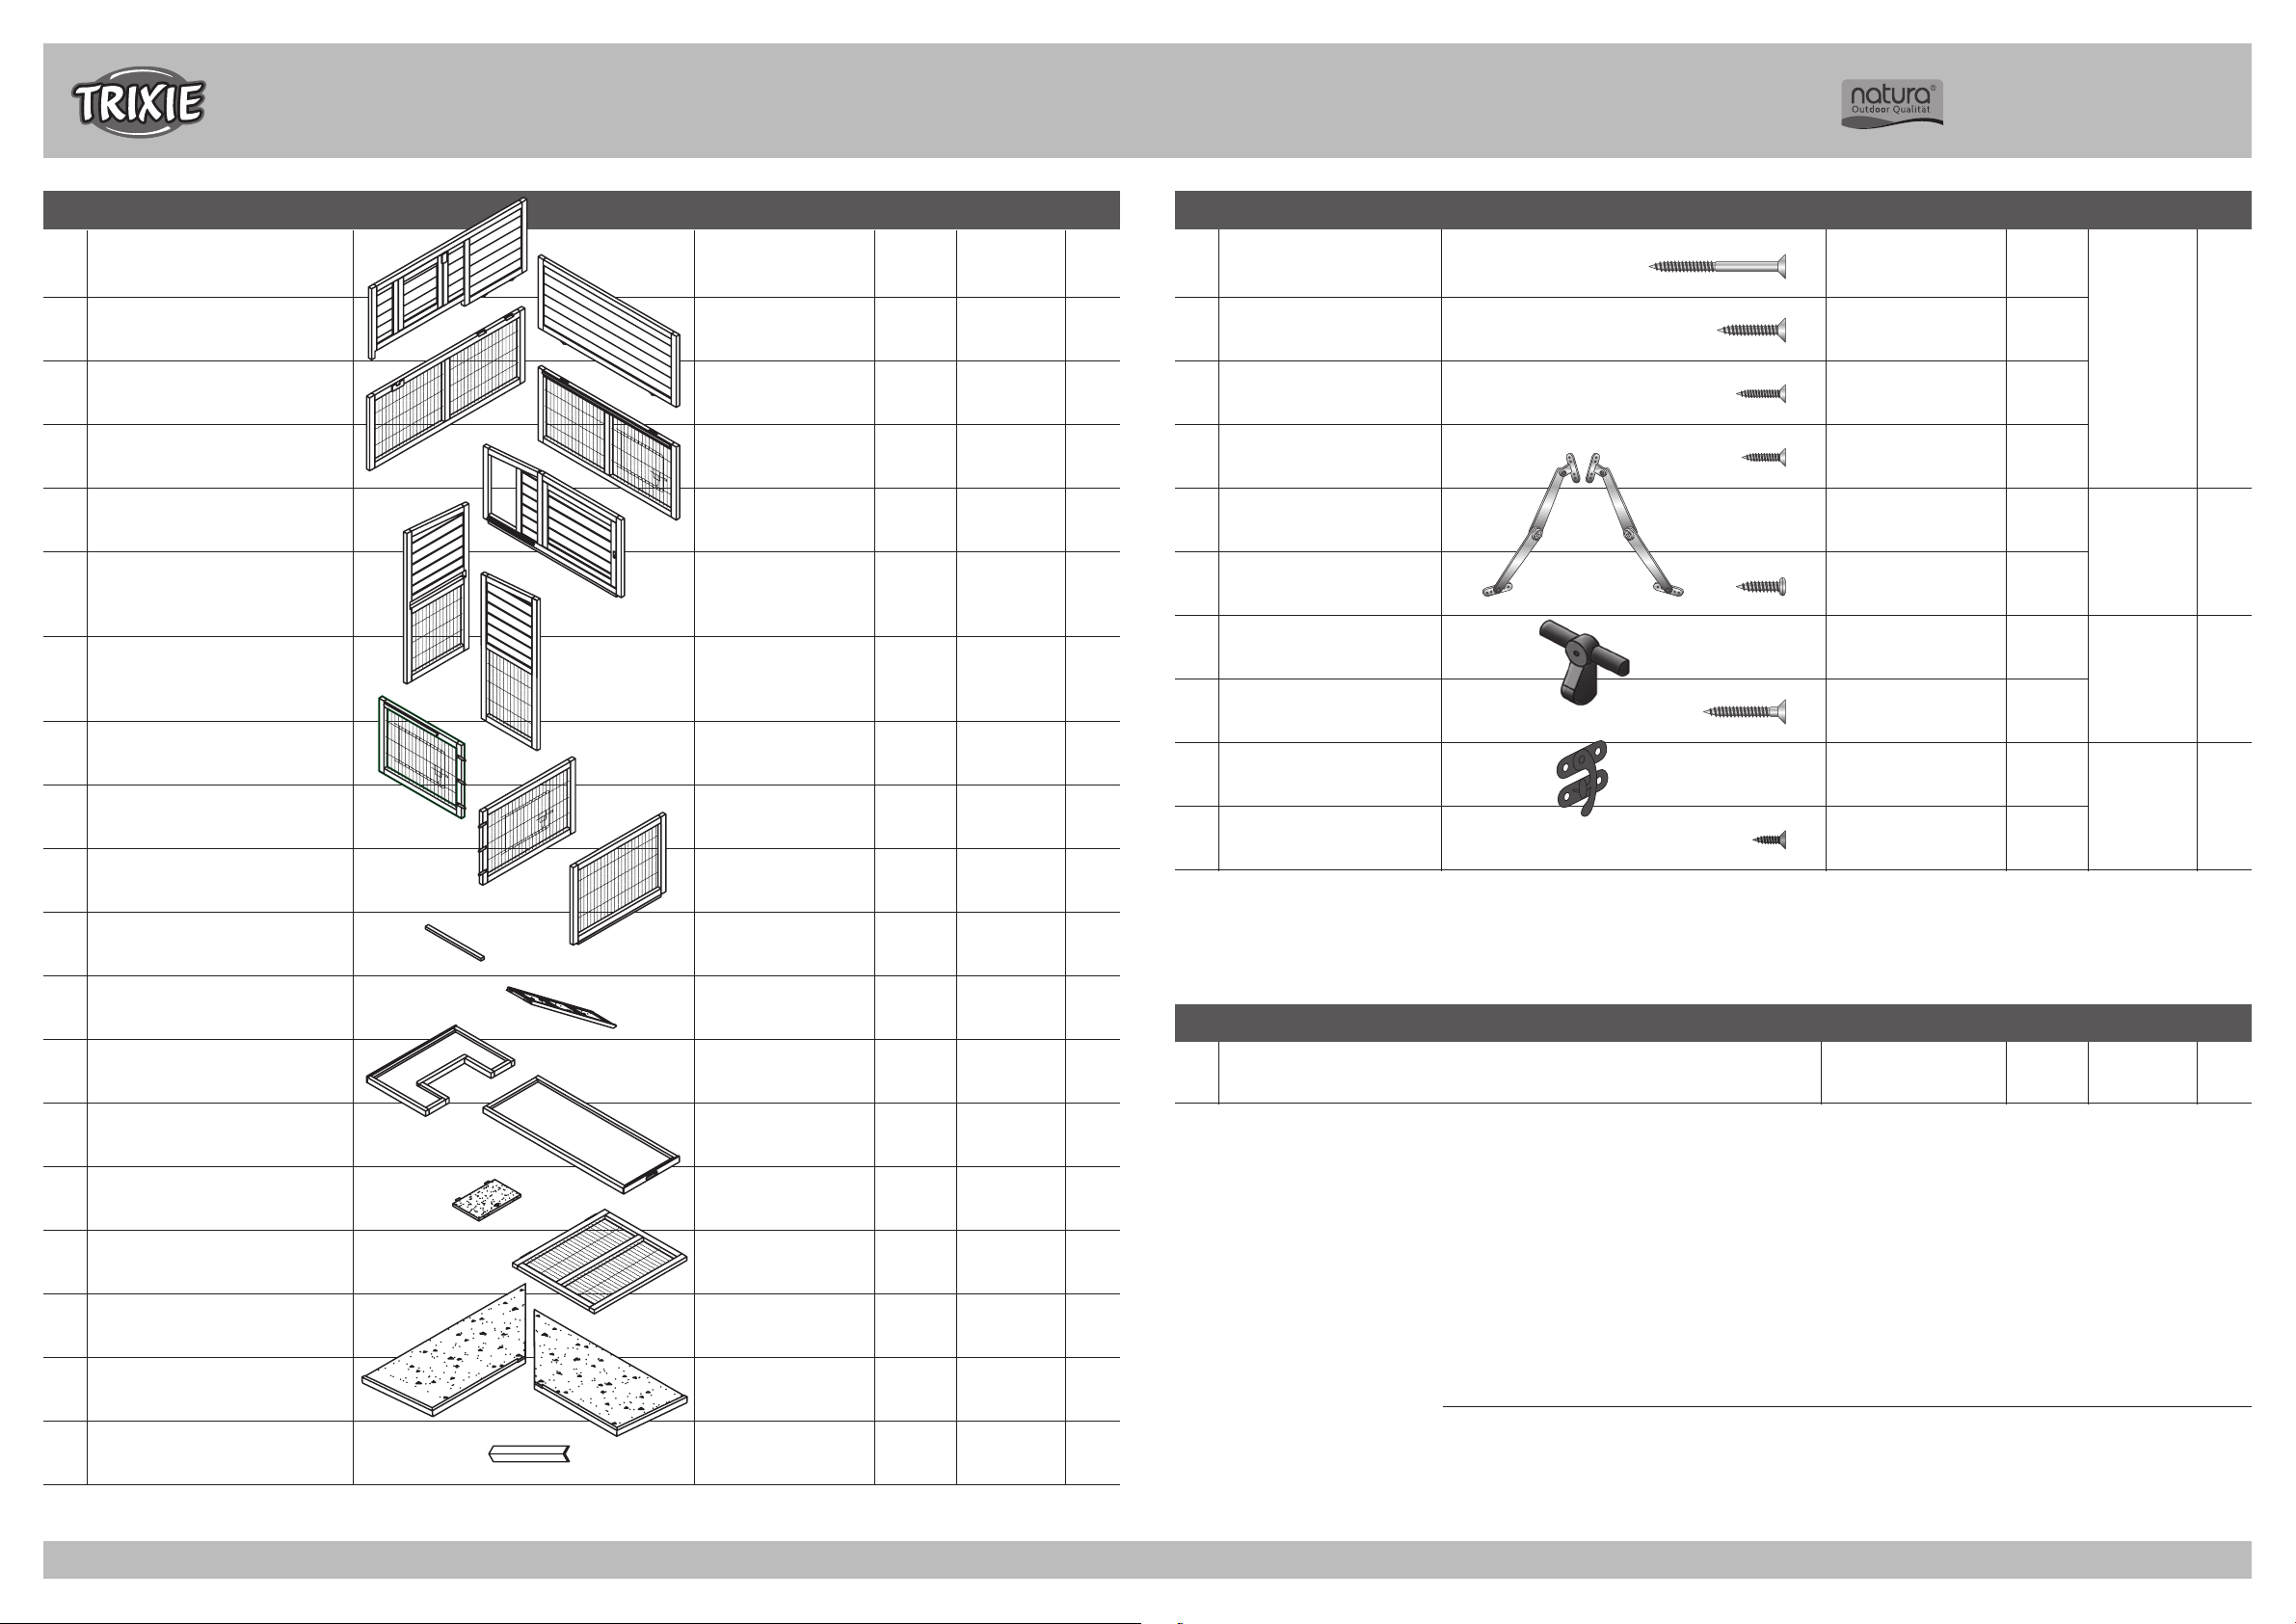
Stückliste/Part List
Beschreibung Maße Anzahl Art.-Nr. Kart.-Nr.
Pos.
Description Measurement Quantity Item Cart. No.
Kleintierstall/Small Animal Hutch
Art.-Nr./Item 62406
Beschreibung Größe Anzahl Art.-Nr. Kart.-Nr.
Pos.
Description Size Quantity Item Cart. No.
1 Rückwand Stall, oben
Back wall hutch, top
.
2 Seitenwand Schlafhaus, oben, rechts
Back wall sleeping house, top, right
.
3 Rückwand Auslauf, unten
Back wall enclosure, bottom
.
4 Seitenwand Auslauf, unten, rechts
Side wall enclosure, bottom, right
.
5 Seitenteil Schlafhaus, oben, links
Side part sleeping house, top, left
.
6 Vorderteil, rechts
Front part, right
.
7 Seitenteil, hinten, links
Rear side part, left
.
8 Vorderteil Auslauf, unten links
Front part hutch, left below
.
9 Seitenteil Auslauf, vorne links
Side part hutch, left front
.
10 Vordere Stallwand, oben, links
Front wall of hutch, top, left
.
11 Leiste für Rampe
Batten for ramp
.
12 Rampe
Ramp
.
13 Ausziehbare Bodenwanne, hinten
Drawer with plastic inlay, back
.
14 Ausziehbare Bodenwanne, vorne
Drawer with plastic inlay, front
.
15 Bodenluke für Rampe
Flap for Ramp
.
16 Dach für Auslauf
Roof for enclosure
.
17 Dachplatte, hinten
Roof plate, back
.
18 Dachplatte, rechts
Roof plate, right
.
19 Firstleiste
Ridge bar
.
1105 × 438 × 25 mm 1 62406-10 1
984 × 438 × 25 mm 1 62406-20 1
1105 × 450 × 25 mm 1 62406-30 1
984 × 450 × 25 mm 1 62406-31 1
984 × 477 × 25 mm 1 62406-21 1
444 × 929 × 25 mm 1 62406-22 1
398 × 927 × 25 mm 1 62406-11 1
586 × 450 × 25 mm 1 62406-32 2
661 × 450 × 25 mm 1 62406-33 2
661 × 477 × 25 mm 1 62406-12 2
397 × 23 × 15 mm 1 62406-42 2
754 × 172 × 20 mm 1 62406-43 1
636 × 420 × 50 mm 1 62406-40 2
1005 × 396 × 50 mm 1 62406-41 1
297 × 185 × 15 mm 1 62406-44 1
659 × 583 × 25 mm 1 62406-25 2
1155 × 503 × 35 mm 1 62406-50 1
1077 × 503 × 35 mm 1 62406-51 1
751 × 80 × 12 mm 1 62406-52 1
A Senkkopfschraube
Countersunk screw
.
B Senkkopfschraube
Countersunk screw
.
C Senkkopfschraube
Countersunk screw
.
D Senkkopfschraube
Countersunk screw
.
E Fangband, links/rechts plus 16 Schrauben F
Check strap, left/right plus 16 screws F
.
F Linsenkopfschraube
Lenshead screw
.
G Verschlussriegel plus 1 Schraube H
Locking bolt plus 1 screw H
.
H Senkkopfschraube
Countersunk screw
.
I Verschlussriegel, vorne plus 4 Schrauben J
Locking bolt, front plus 4 screws J
.
J Senkkopfschraube, schwarz
Countersunk screw, black
.
Weitere bereits vormontierte Teile (als Ersatzteile separat erhältlich)
Other parts already assembled (spare parts separately available)
Beschreibung Größe Anzahl Art.-Nr.
Description Size Quantity Item
Scharnier, für Dach
Hinge, for roof
.
Sie finden eine französische und italienische Anleitung unter der jeweiligen Artikel-Nummer auf www.tri×ie.de.
D
Please find instructions in French and Italian under the corresponding item number at www.tri×ie.de.
G
Vous trouverez les informations détaillées en français et en italien à chaque référence d’article, sur notre site www.tri×ie.fr.
F
Le istruzioni in italiano e francese sono disponibili selezionando il codice dell’articolo sul nostro sito www.tri×ie.it.
I
4 × 50 mm 22+1
4 × 25 mm
3 × 18 mm
3 × 16 mm
28 cm 1/1
4 × 16 mm 16+1
70 mm
4 × 30 mm
214 × 30 × 30 mm
3 × 12 mm
7,6 cm 5 6235-74
4+1
8+1
24+1
62406-60 1
-
2
-
2
1
-
4
190615 81860
TRIXIE Heimtierbedarf · Industriestraße 32 · 24963 Tarp · GERMANY · www.tri×ie.de
Page 2
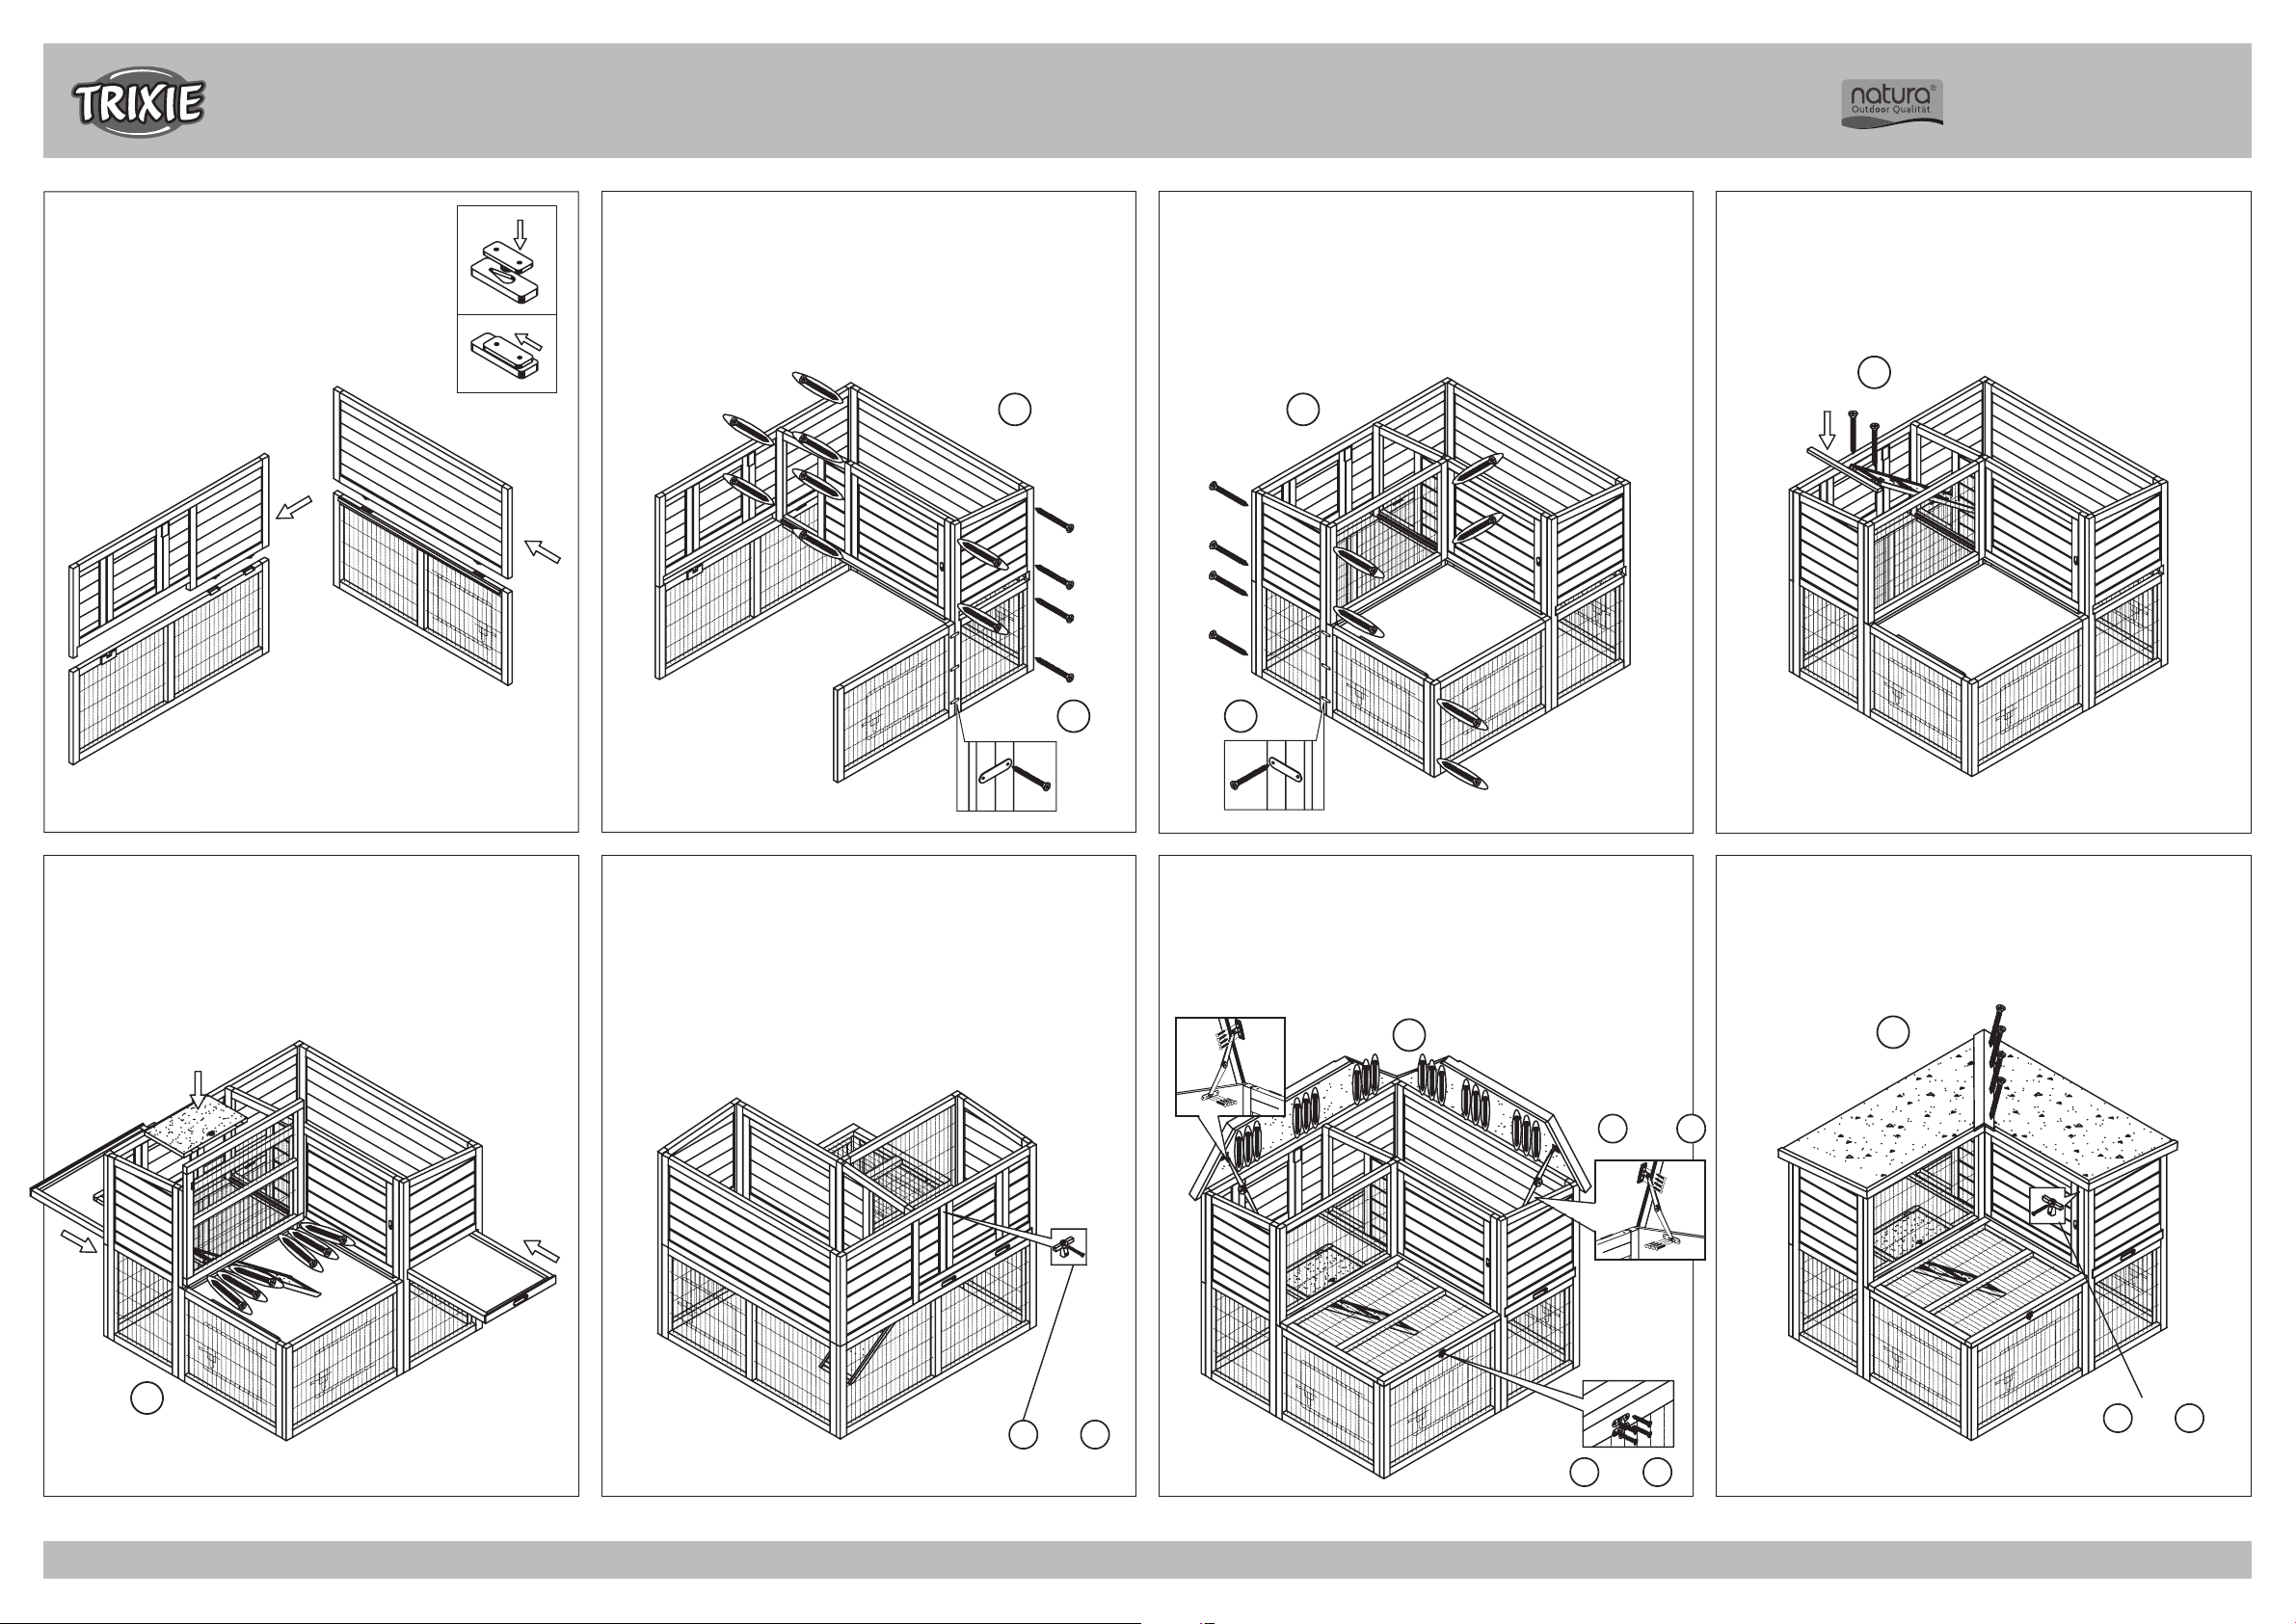
Verbinden Sie die obere Rückwand (1) mit der unte-
D
ren Rückwand (3) und die obere Seitenwand (2) mit
der unteren Seitenwand (4).
Fix the upper back wall (1) together with the lower
G
back wall (3) and the upper side wall (2) together
with the lower side wall (4).
Aufbauanleitung/Assembling Instruction/Instruction de montage
Aufbauanleitung/Assembling Instruction
Verschrauben Sie nun die Teile (1–4) mit dem oberen linken Seitenteil
D
des Schlafhauses (5) und
danach das untere linke Vorderteil des Auslaufs (8) an den drei Verbindern.
Screw the parts (1–4) to the top left side part of the sleeping house
G
(5) and the right front part (6). Afterwards fix the left front part
below (8) with the help of the three connectors.
dem rechten Vorderteil (6). Montieren Sie
12 × 10 ×
A A
Jetzt fügen Sie das hintere linke Seitenteil (7) und die vordere Stall-
D
wand oben links (10) hinzu.
teil des Auslaufs (9) an den drei Verbindern und fixieren Sie die Teile
an der linken vorderen Ecke.
Now add the rear left side part (7) and the front wall of hutch (10) top
G
left.
After
that fix the left front part below (9) with the help of the
three connectors and fix the parts at the left corner.
Montieren Sie danach links das Seiten-
Kleintierstall/Small Animal Hutch
Fügen Sie die Leiste (11) ein und befestigen Sie die Rampe (12)
D
daran.
Insert the batten (11) and fix the ramp (12) to the batten.
G
2 ×
D
Art.-Nr./Item 62406
1.
Schieben Sie die Bodenwannen (13/14) ein. Legen Sie die Bodenluke
D
(15) ein. Schrauben Sie die Scharniere des Daches für den Auslauf (16)
an die Vorderseite des Stalles.
Slide in the drawers (13/14). Insert the floor hatch (15). Screw the
G
hinges of the roof for the enclosure (16) to the front side of the
hutch.
2.
Schrauben Sie einen der Verschlussriegel (G) neben die hintere
D
Stalltür.
Screw one of the locking bolts (G) beside the hutchs back door.
G
3 ×3 ×
DD
3.
Schrauben Sie die Scharniere der Dachplatten (17/18) an die Rück-
D
wand und die rechte Seite des Stalles. Befestigen Sie das linke und
das rechte Fangband (E) an den Innenseiten der Dachplatten und den
Wänden (6/7) und montieren Sie den vorderen Verschlussriegel (I).
Screw the hinges of the roof plates
G
right side wall. Screw the left and the right check strap (E) to the inner
sides of the roof plates and
the walls (6/7) and fix the
frontal locking bolt (I).
18 ×
C
(17/18)
to the back wall and the
+ 16 ×2 ×
E F
4.
Zuletzt bringen Sie die Firstleiste (19) an der rechten Dachplatte
D
(18) an und
Schlafhaustür.
Finally fasten the ridge bar (19) to the right roof plate (18) and s
G
the second locking bolt (G) beside the door of the sleeping house
schrauben den zweiten Verschlussriegel (G) neben die
4 ×
B
crew
.
6 ×
C
+ 1 ×1 ×
G H
+ 4 ×1 ×
5.
190615 81860
6.
7.
TRIXIE Heimtierbedarf · Industriestraße 32 · 24963 Tarp · GERMANY · www.tri×ie.de
I
J
8.
+ 1 ×1 ×
G H
 Loading...