

Page 1
Aufbauanleitung/Assembling Instruction/Instruction de montage
Beschreibung Maße Anzahl Art.-Nr.
Pos.
Description Measurement Quantity Item
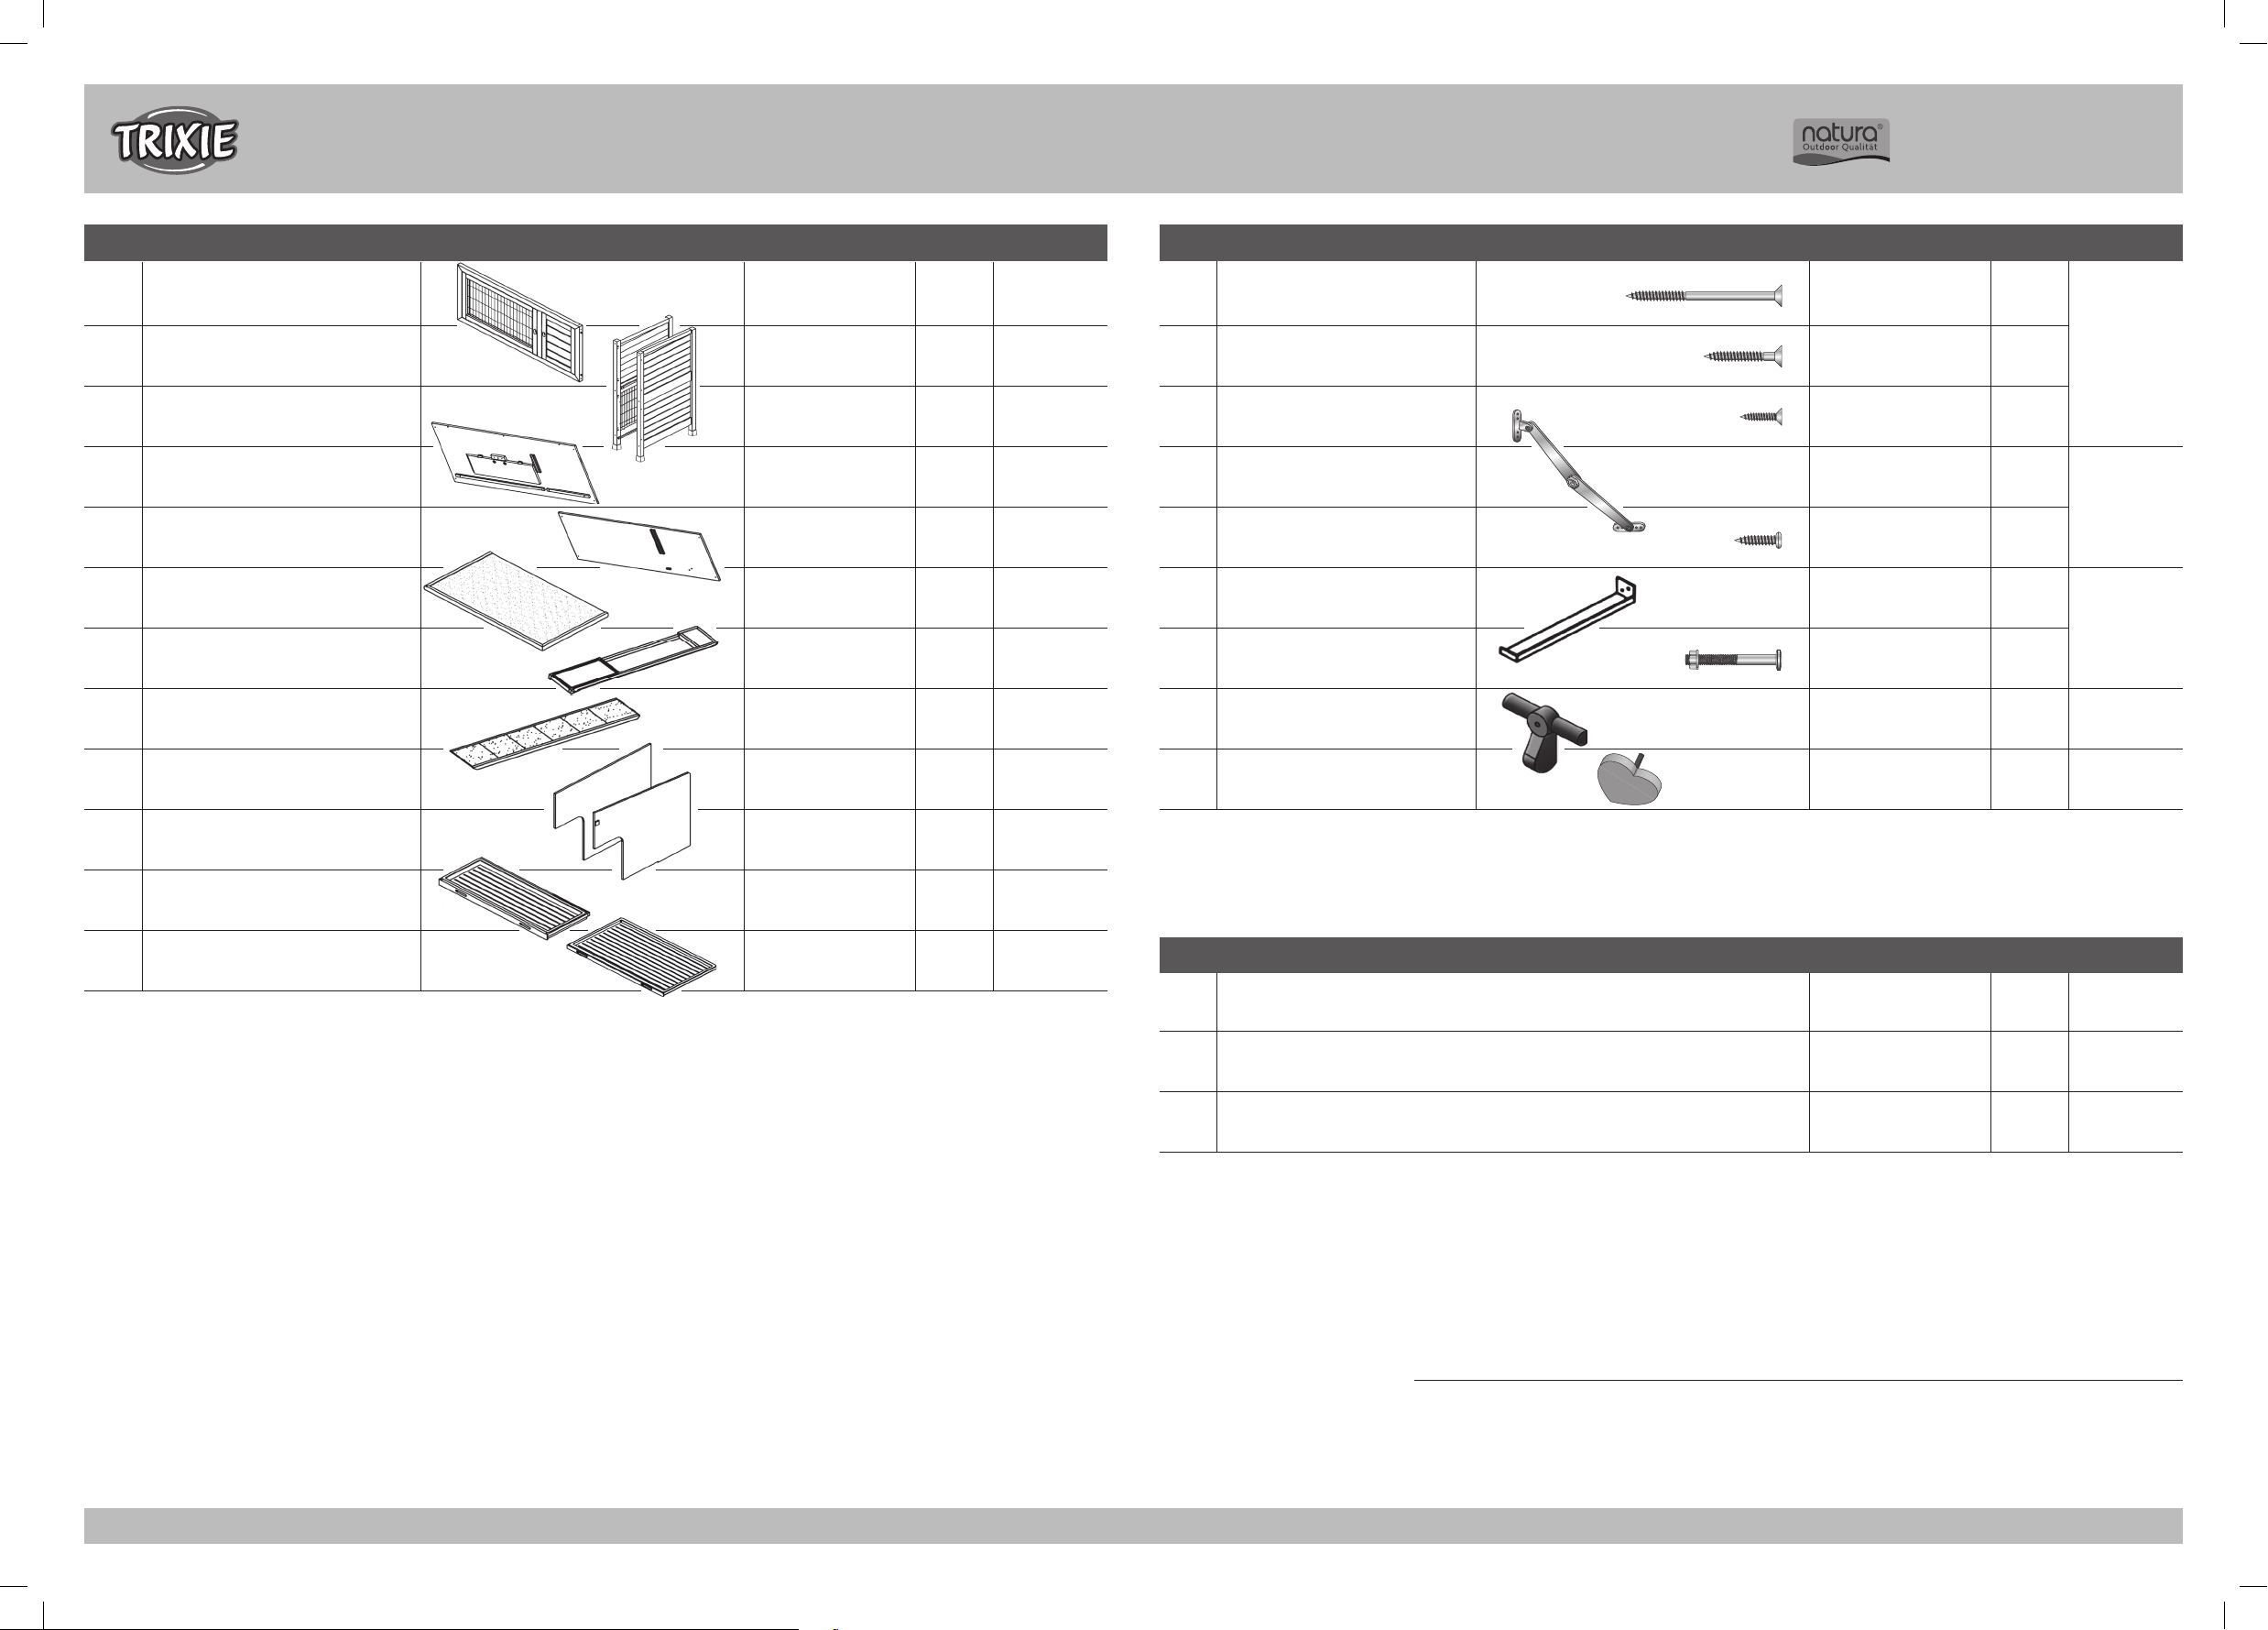
Stückliste/Part List
Beschreibung Größe Anzahl Art.-Nr.
Pos.
Description Size Quantity Item
Kleintierstall/Small Animal Hutch
Art.-Nr./Item 62402
1 Vorderteil inkl. Tür, oben/unten
Front parts with door, top/bottom
.
2 Seitenteil, links
Side panel, left
.
3 Seitenteil, rechts
Side panel, right
.
4 Rückwand, oben
Back wall, top
.
5 Rückwand, unten
Back wall, bottom
.
6 Dach, inkl. Scharniere
Roof , including hinges
.
7 Hintere Bodenplatte
Rear hatch
.
8 Rampe
Ramp
.
9 Trennwand, oben
Upper partition
.
10 Trennwand, unten
Lower partition
.
11 Ausziehbare Bodenwanne, oben
Drawer with plastic inlay, top
.
12 Ausziehbare Bodenwanne, unten
Drawer with plastic inlay, bottom
.
1015 × 445 × 25 mm 2 62402-10
1075 × 565 × 35 mm 1 62402-30
1075 × 565 × 35 mm 1 62402-31
1085 × 505 × 30 mm 1 62402-20
1085 × 425 × 25 mm 1 62402-21
1160 × 650 × 40 mm 1 62402-50
1010 × 180 × 33 mm 1 6235-31
890 × 150 × 20 mm 1 62402-41
535 × 430 × 8 mm 1 62402-32
535 × 430 × 8 mm 1 62402-33
1010 × 383 × 50 mm 1 62402-40
1010 × 565 × 30 mm 1 62402-43
A Senkkopfschraube
Countersunk screw
.
B Senkkopfschraube
Countersunk screw
.
C Senkkopfschraube
Countersunk screw
.
D Fangband, rechts plus 8 Schrauben E
Check strap, right plus 8 screws E
.
E Linsenkopfschraube
Lenshead screw
.
F Metallfixierung für Rampe plus 1 Schraube G
Metal fixation for ramp plus 1 screw G
.
G Linsenkopfschraube mit Mutter
Lenshead screw with nut
.
H Verschlussriegel plus je 1 Schraube B
Locking bolt plus 1 screw B for each
.
J Verriegelungsherz
Lock heart-shaped
.
Weitere bereits vormontierte Teile (als Ersatzteile separat erhältlich)
Other parts already assembled (spare parts separately available)
Beschreibung Größe Anzahl Art.-Nr.
Description Size Quantity Item
Scharnier, schmal, für kleine Tür
Hinge, narrow, for small door
.
Scharnier, für Tür oder Dach
Hinge, for door or roof
.
Scharnier, für Dach
Hinge, for roof
.
3,8 × 60 mm 8+1
3,8 × 30 mm
3 × 16 mm
28 cm 1
3,8 × 16 mm 8+1
214 × 30 × 30 mm
M4 × 35 mm 1+1
7 cm
5,5 cm
3,8 cm 2 6235-70
5 cm 8 6235-72
7,6 cm 2 6235-74
15+1
2+1
6240-60
-
1
6240-60
2 -
1 -
Sie finden eine französische und italienische Anleitung unter der jeweiligen Artikel-Nummer auf www.tri×ie.de.
D
Please find instructions in French and Italian under the corresponding item number at www.tri×ie.de.
G
Vous trouverez les informations détaillées en français et en italien à chaque référence d’article, sur notre site www.tri×ie.fr.
F
Le istruzioni in italiano e francese sono disponibili selezionando il codice dell’articolo sul nostro sito www.tri×ie.it.
I
261113 81860
TRIXIE Heimtierbedarf GmbH & Co. KG · Industriestraße 32 · 24963 Tarp · GERMANY · www.tri×ie.de
Page 2
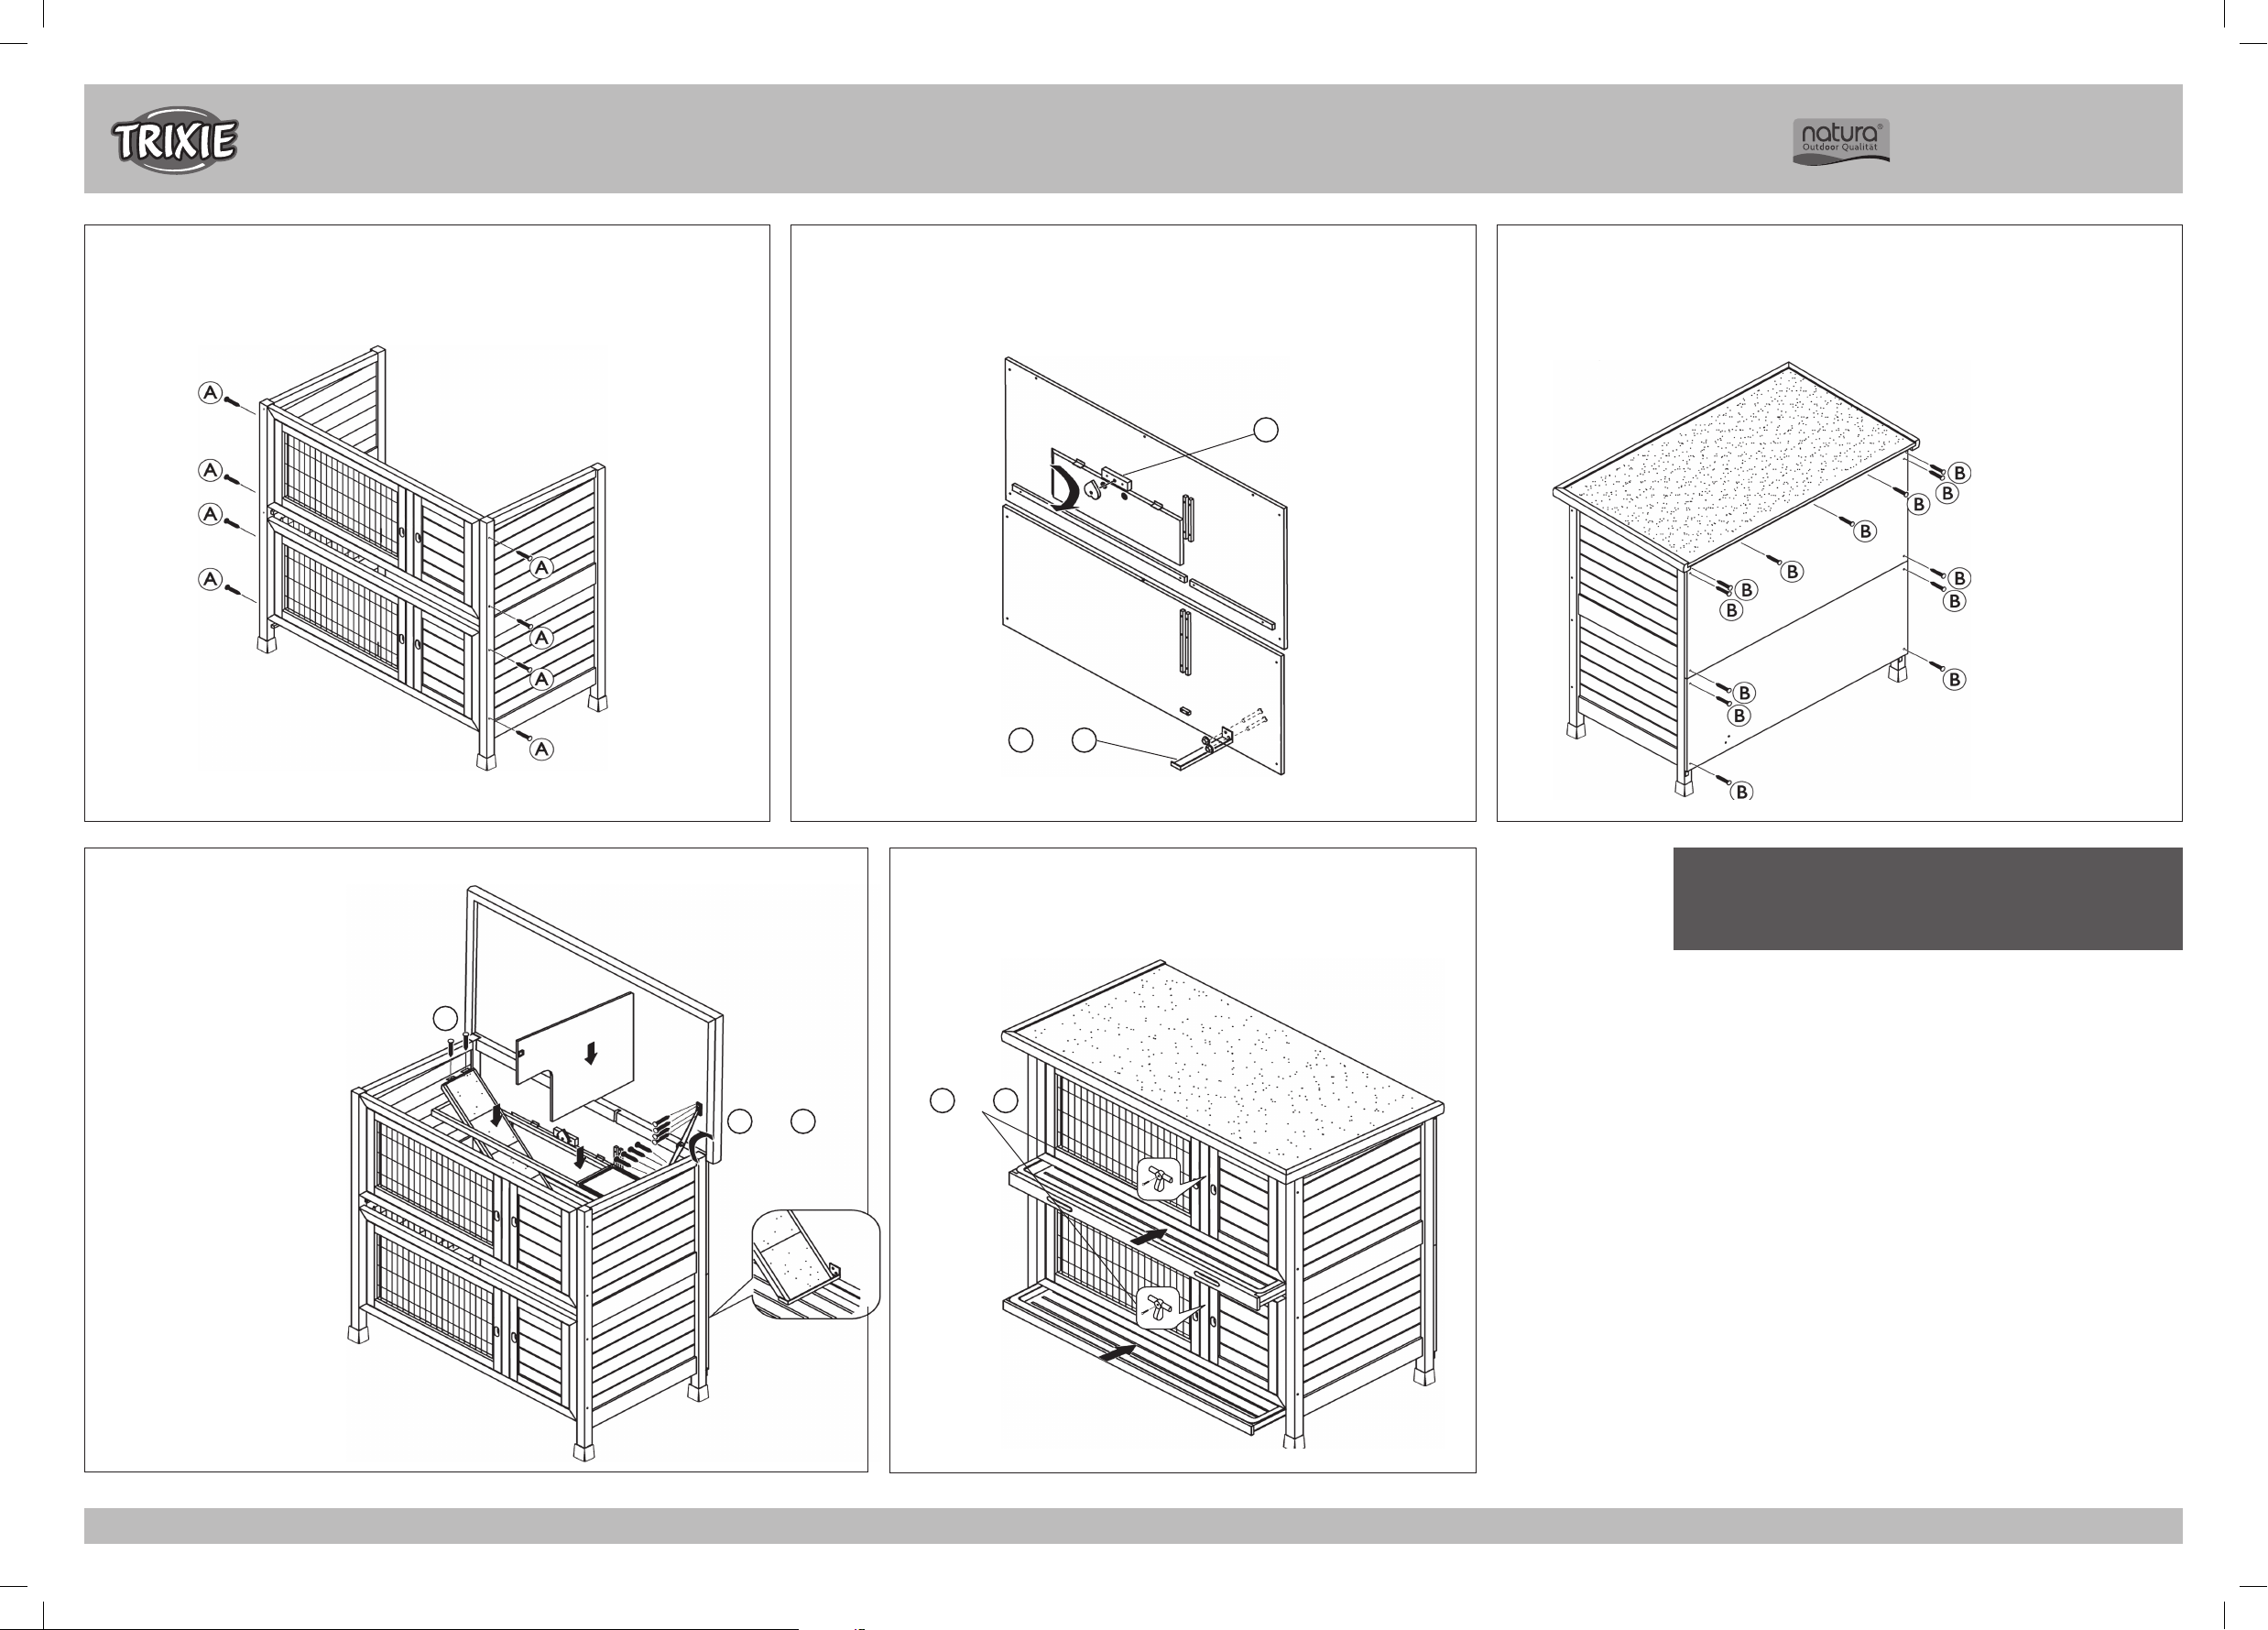
Verschrauben Sie das linke und rechte Seitenteil (2/3) mit dem oberen und unteren Vorderteil (1).
D
Screw the left and right side panel (2/3) with the upper and lower front parts (1).
G
Aufbauanleitung/Assembling Instruction/Instruction de montage
Aufbauanleitung/Assembling Instruction
Befestigen Sie den herzförmigen Riegel (J) am oberen Teil der Rückwand (4). Die Metallfixierung
D
für die Rampe (F) muss an die untere Kante der unteren Rückwand (5) geschraubt werden.
Fix the heart-shaped lock (J) to the upper part of the back panel (4). The metal fixation of the
G
ramp (F) has to be fixed to the lower edge of the back panel (5).
J
Kleintierstall/Small Animal Hutch
Verschrauben Sie nun die beiden Teile der Rückwand (4/5) mit den Seitenteilen (2/3) und be-
D
festigen Sie das Dach (6).
Screw both back walls (4/5) with the side panels (2/3) and fix the roof (6).
G
Art.-Nr./Item 62402
1.
Öffnen Sie das Dach (6) und befestigen Sie das
D
Fangband (D). Setzen Sie die hintere Bodenplatte (7) ein, schieben Sie die Rampe (8) durch die
Öffnung und schrauben Sie diese fest, so dass
der Fuß der Rampe in der Metallfixierung (F)
steht. Setzen Sie die obere Trennwand ein (9).
Open the roof (6) and fix the
G
check strap (D). Insert the rear
hatch (7), put in the ramp (8)
and tighten it. The foot of the
ramp has to stand in the metal
fixation (F). Insert the upper
partition (9).
2 ×
+ 2 ×
F G
2. 3.
Schrauben Sie die Verschlussriegel (H) zwischen die Türen. Abschließend schieben
D
Sie die obere und die untere ausziehbare Bodenwanne (11/12) ein.
Screw the locking bolts (H) between the doors. Insert the upper and lower dra-
G
wer with plastic inlay (11/12).
Wenn Sie den Stall mit getrennten Ebenen nutzen möchten, entfer-
D
nen Sie bitte die Rampe und schließen Sie die Bodenluke.
To get two separate floors remove the ramp and close the hatch.
G
C
+ 2 ×2 ×
B
D
+ 8 ×
H
E
4.
261113 81860
5.
TRIXIE Heimtierbedarf GmbH & Co. KG · Industriestraße 32 · 24963 Tarp · GERMANY · www.tri×ie.de
 Loading...