

Trixie 62335 User Manual [de]
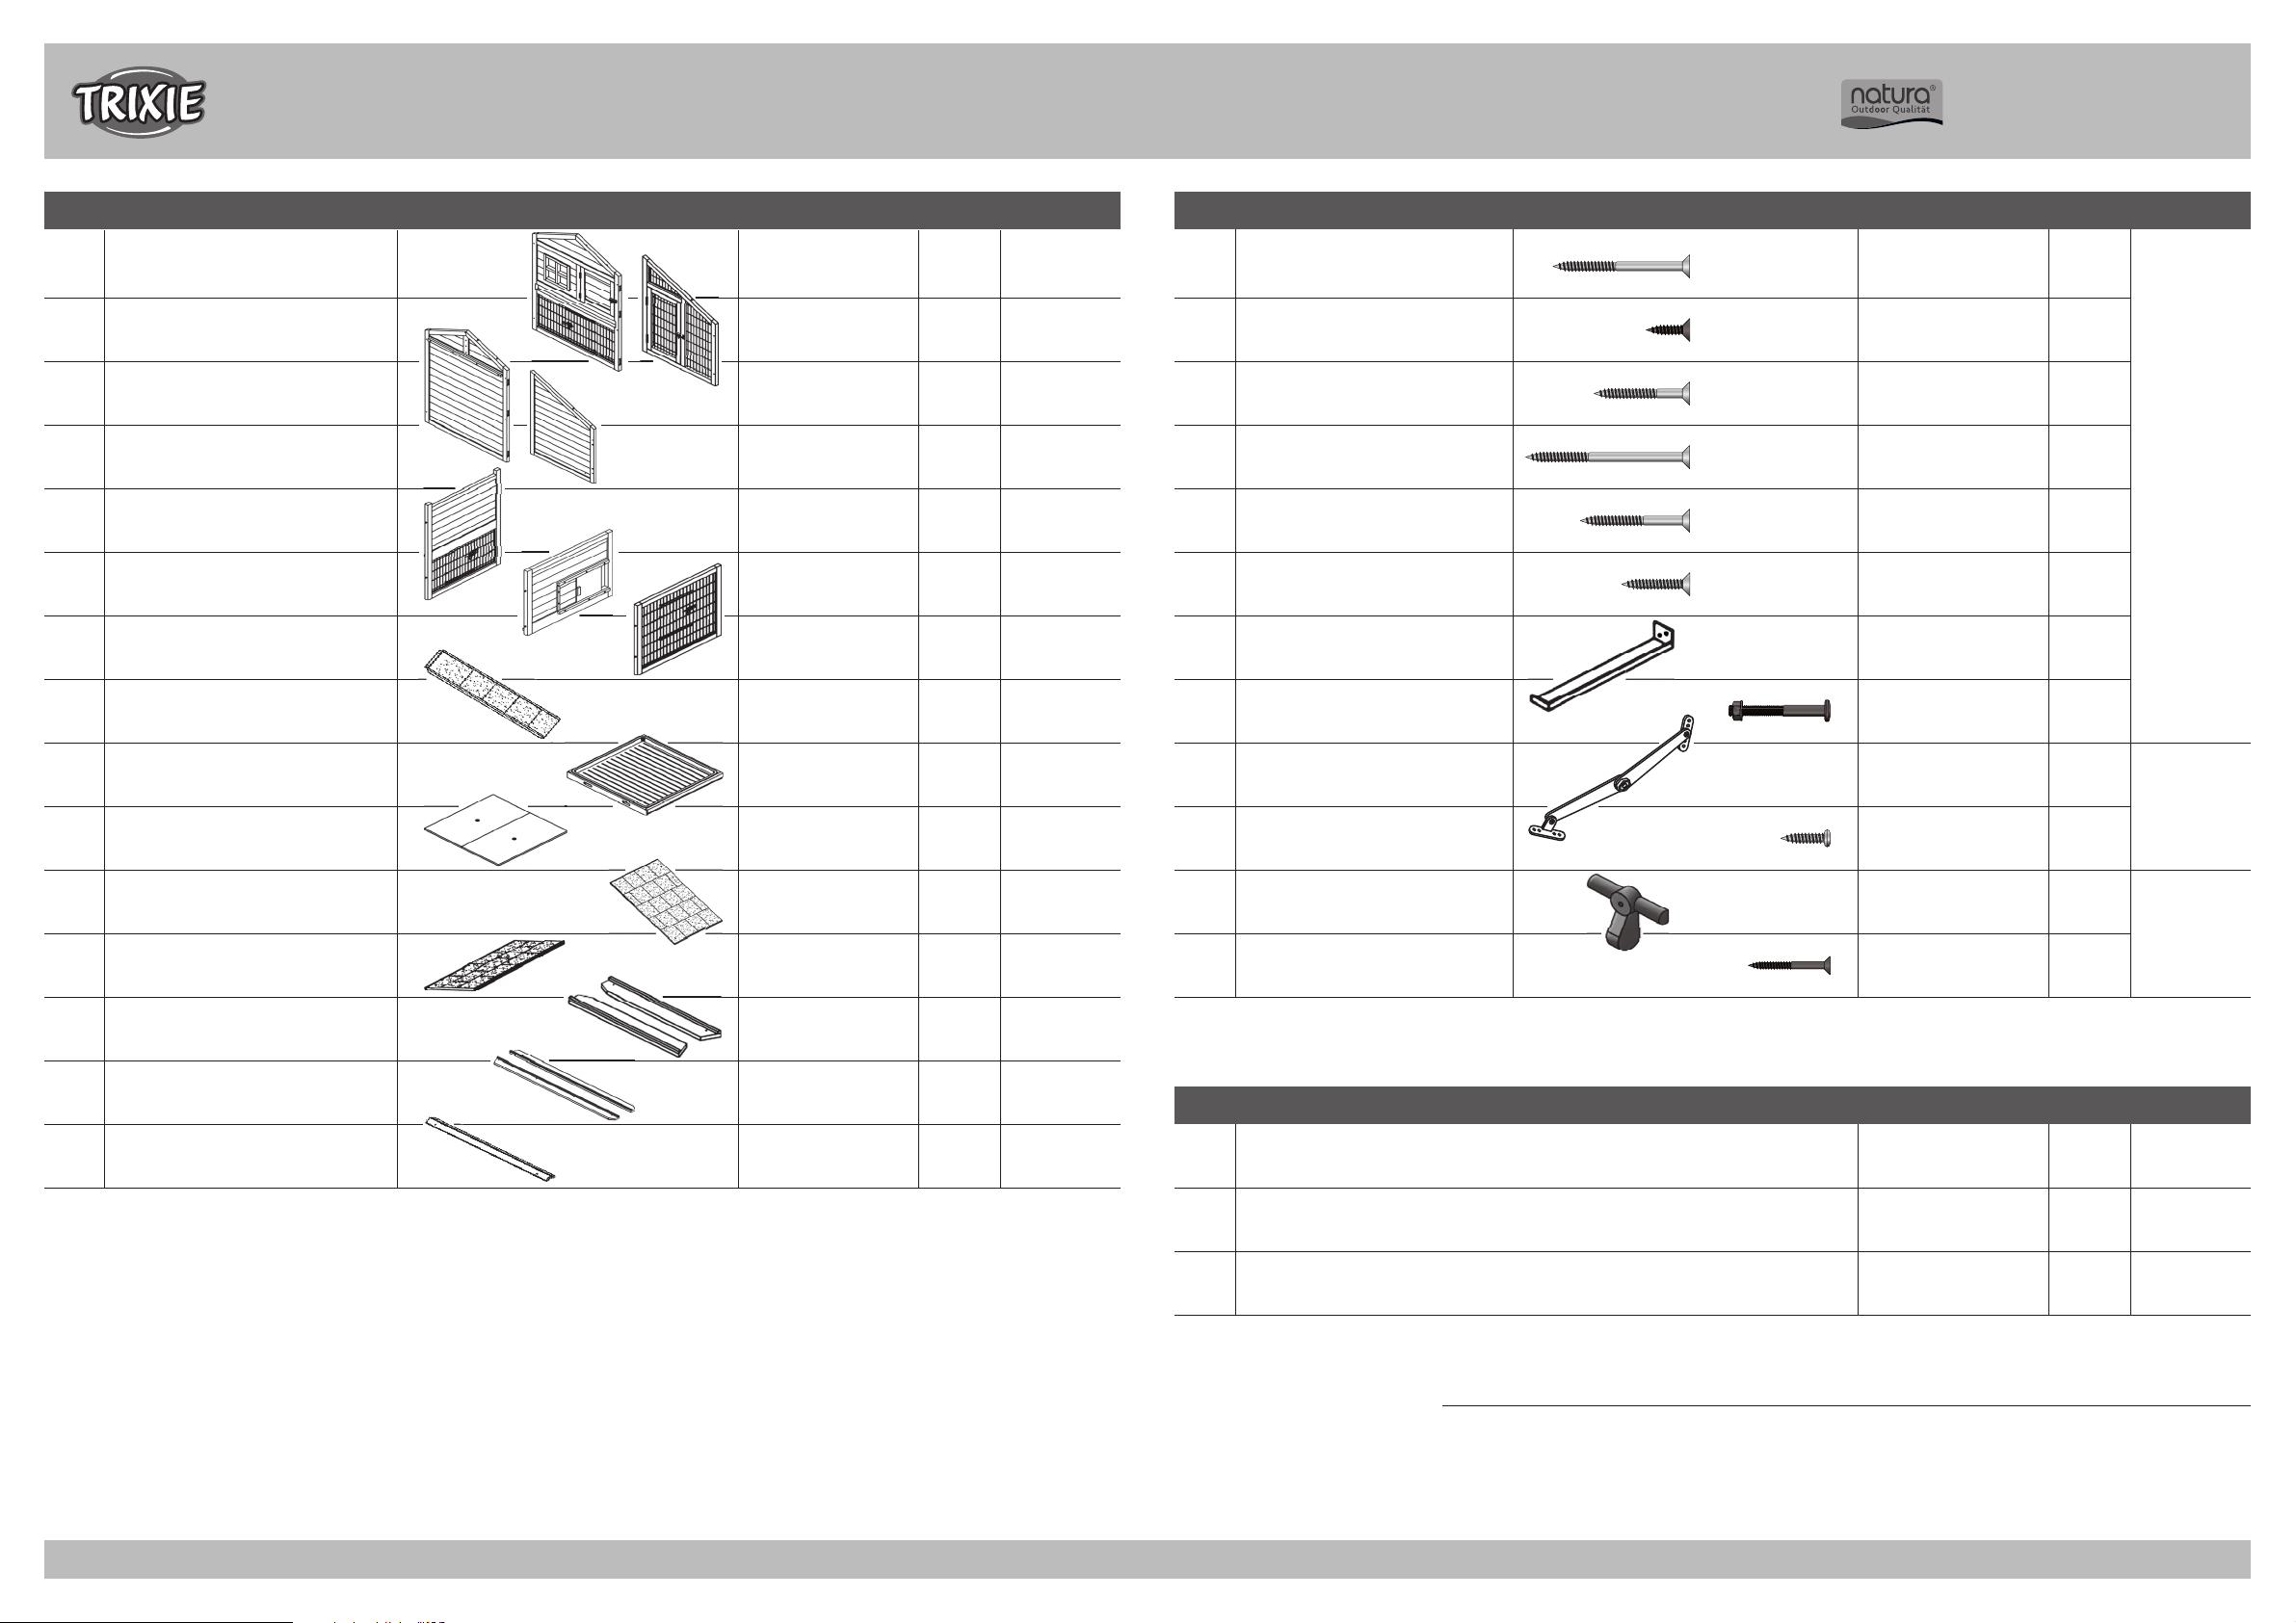
A Senkkopfschraube
Countersunk screw
M3,8 × 50 mm 14+1
.
B Senkkopfschraube, schwarz
Countersunk screw, black
M3,8 × 16 mm 2+1
.
C Senkkopfschraube
Countersunk screw
M3,8 × 35 mm 8+1
.
D Senkkopfschraube
Countersunk screw
M3,8 × 60 mm 2+1
.
E Senkkopfschraube
6233-60
Countersunk screw
M3,8 × 40 mm 12+1
.
F Senkkopfschraube
Countersunk screw
M3,8 × 25 mm 4+1
.
G Metall Fixierung plus 2 Schrauben H
Metal fi xation, incl. screws plus 2 screws H
214 × 30 × 30 mm 1
.
H Linsenkopfschraube mit Mutter, schwarz
Lenshead screw with nut, black
M4 × 35
2+1
.
I Fangband, rechts plus 8 Schrauben J
Right check strap plus 8 screws J
28 cm 1
.
J Linsenkopfschraube
6235-60
Lenshead screw
M3,8 × 16 mm 8+1
.
K Verschlussriegel plus je 1 Schraube L
Locking bolt plus 1 screw L for each
7 cm
2
.
L Senkkopfschraube, schwarz
6235-56
Countersunk screw, black
M3,8 × 30 mm 2+1
.
Weitere bereits vormontierte Teile (als Ersatzteile separat erhältlich)
Other parts already assembled (spare parts separately available)
Scharnier für Tür des Auslaufs, inkl. Schrauben
Hinge for door of enclosure, incl. screws
5 cm 2 6235-72
.
Scharnier für Tür des Stalls, inkl. Schrauben
Hinge for door of the hutch, incl. screws
3,8 cm 2 6235-70
.
Scharnier für Dach des Stalls, inkl. Schrauben
Hinge for roof of the hutch, incl. screws
7,6 cm 3 6235-74
.
1 Vorderteil, links
Front panel, left
760 × 1040 × 25 mm 1 62335-10
.
2 Vorderteil, rechts
Front panel, right
630 × 850 × 25 mm 1 62335-11
.
3 Rückwand, links
Back panel, left
760 × 1040 × 25 mm 1 62335-20
.
4 Rückwand, rechts
Back panel, right
630 × 850 × 25 mm 1 62335-21
.
5 Seitenteil, links
Left side panel
660 × 860 × 25 mm 1 62335-30
.
6 Mittelwand
Middle-panel
660 × 520 × 25 mm 1 62335-34
.
7 Seitenteil, rechts
Right side panel
660 × 560 × 25 mm 1 62335-31
.
8 Rampe
Ramp
670 × 20 × 170 mm 1 62335-41
.
9 Ausziehbare Bodenwanne
Drawer with plastic inlay
710 × 50 × 690 mm 1 62335-40
.
10 Mittelboden, 2-tlg.
Mid-fl oor, two-part
710 × 12 × 655 mm 1 62335-60
.
11 Dachplatte, rechts
Right roof part
1165 × 12 × 765 mm 1 62335-51
.
12 Dachplatte, links
Left roof part
465 × 12 × 765 mm 1 62335-50
.
13 Abschlussleiste Dach, links
Final batten for roof, left
470 × 60 × 25 mm 2 62335-62
.
14 Abschlussleiste Dach, rechts
Final batten for roof, right
1160 × 60 × 25 mm 2 62335-63
.
15 Dachfi rst
Roof ridge
70 × 8 × 740 mm 1 62335-61
.
Pos.
Beschreibung Maße Anzahl Art.-Nr.
Description Measurement Quantity Item
Pos.
Beschreibung Größe Anzahl Art.-Nr.
Description Size Quantity Item
Aufbauanleitung/Assembling Instruction/Instruction de montage
Hühnerstall/Chicken Coop/Poulailler
Art.-Nr./item/article 55961
TRIXIE Heimtierbedarf GmbH & Co. KG · Industriestraße 32 · 24963 Tarp · GERMANY · www.trixie.de
181013 87980
Stückliste/Part List
Sie fi nden eine französische und italienische Anleitung unter der jeweiligen Artikel-Nummer auf www.trixie.de.
Please fi nd instructions in French and Italian under the corresponding item number at www.trixie.de.
Vous trouverez les informations détaillées en français et en italien à chaque référence d’article, sur notre site www.trixie.de.
Le istruzioni in italiano e francese sono disponibili selezionando il codice dell’articolo sul nostro sito www.trixie.de.
Beschreibung Größe Anzahl Art.-Nr.
Description Size Quantity Item
Kleintierstall/Small Animal Hutch
Art.-Nr./Item 62335
Aufbauanleitung/Assembling Instruction/Instruction de montage
Hühnerstall/Chicken Coop/Poulailler
Art.-Nr./item/article 55961
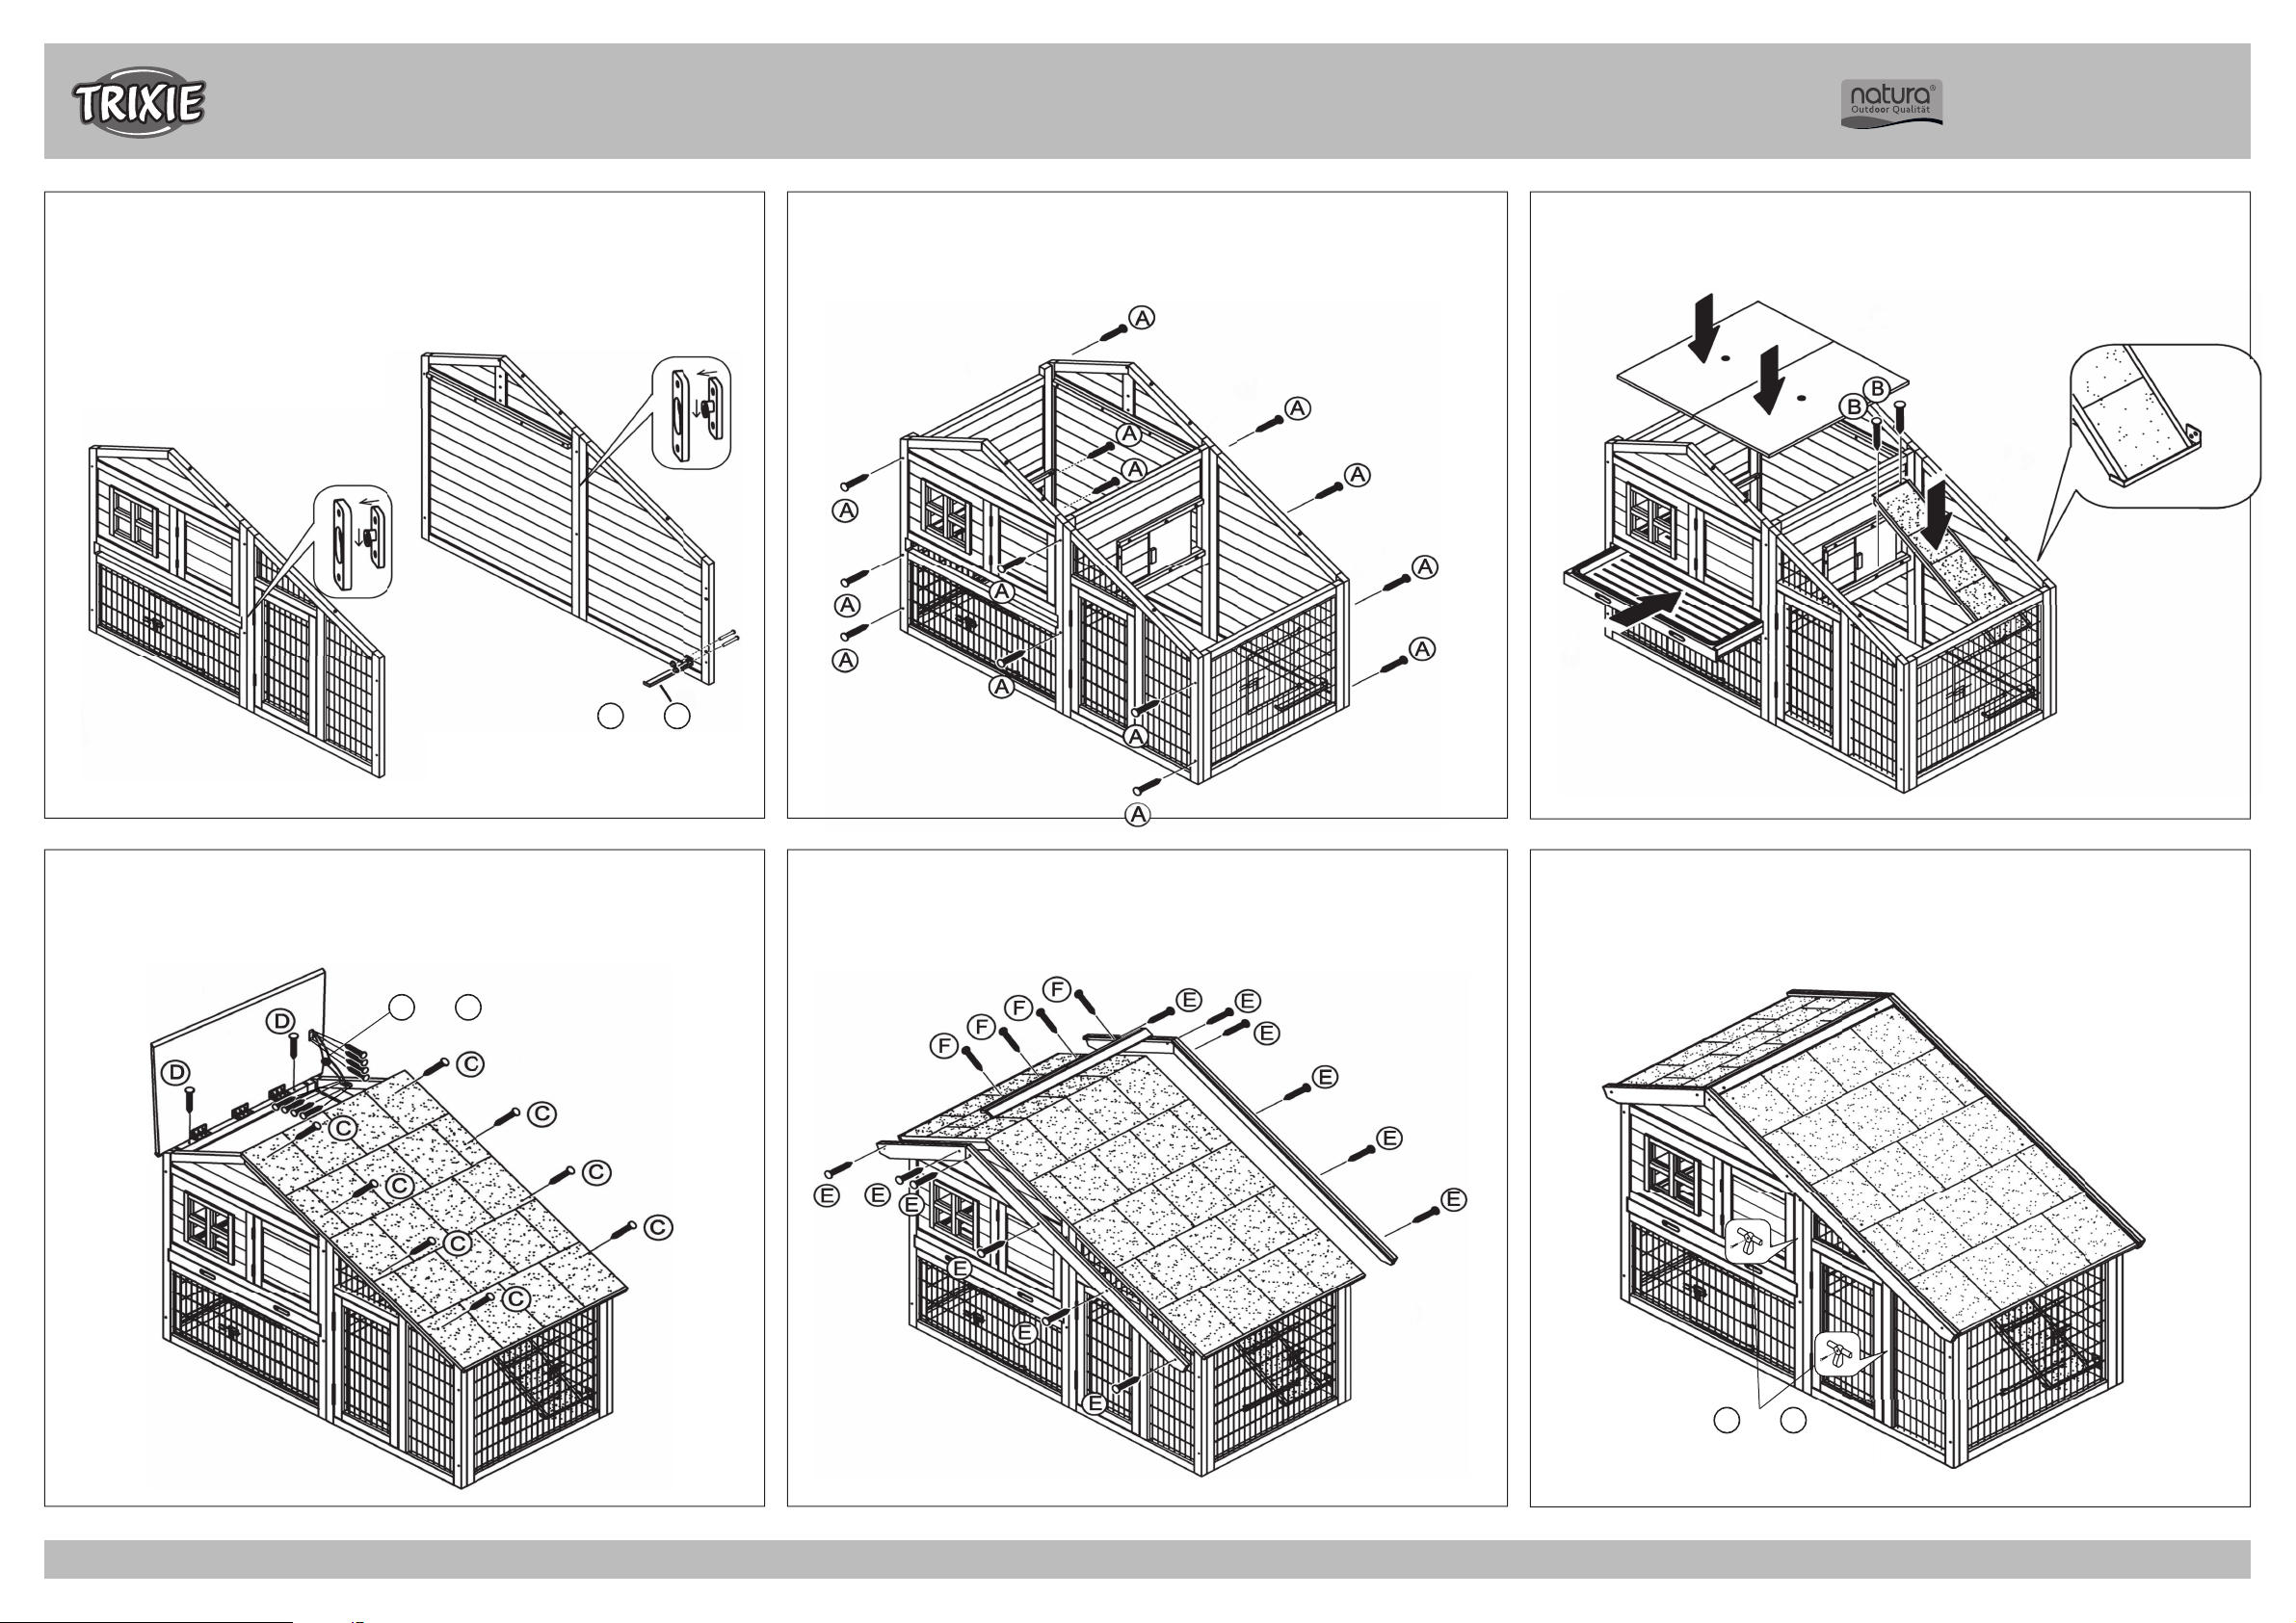
Verbinden Sie das linke (1) und das rechte Vorderteil (2) mit der Kunststoff-Steckverbindung,
sowie auch die linke (3) und rechte Rückwand (4). Befestigen Sie die Metall-Fixierung (G) am
unteren Rand der rechten Rückwand.
Connect the left (1) and right front panel (2) by plastic cam-lock, as well as the left (3) and right
back panel (4). The metal fi xation (G) has to be fi xed to the lower edge of the right back panel.
Befestigen Sie den rechten Teil des Daches (11), dann verschrauben Sie die linke Seite (12). Mon-
tieren Sie nun das Fangband (I) an der Innenseite des Daches und der Rückwand.
Fix the right part of the roof (11), then screw the left part (12). Now screw the check strap (I) on
the inner side of the roof and the back wall.
Setzen Sie die Rampe (8) ein und schrauben Sie sie fest. Danach wird die Bodenwanne (9) eingeschoben und der Mittelboden (10) eingesetzt.
Put in the ramp (8) and tighten it. Insert the drawer (9) and as well as the mid-fl oor (10).
Schrauben Sie die Verschlussriegel (K) neben die Türen.
Screw the locking bolts (K) beside the doors.
Befestigen Sie zuerst die beiden Seitenteile (5/7) sowie die Mittelwand (6) mit der Vorderseite.
Danach schrauben Sie die Rückwand fest.
First fasten both side panels (5/7) as well as the middle panel (6) with the front. Then screw the
back wall.
Jetzt befestigen Sie noch die Abschlußleisten (13/14) an den Dachüberständen und verschrau-
ben den Dachfi rst (15) mit der linken Dachhälfte.
Fasten the fi nal battens (13/14) at the eaves and fi x the roof ridge (15) on the left roof part.
TRIXIE Heimtierbedarf GmbH & Co. KG · Industriestraße 32 · 24963 Tarp · GERMANY · www.trixie.de
041113 87980
Aufbauanleitung/Assembling Instruction
1.
4.
2.
5.
3.
6.
Kleintierstall/Small Animal Hutch
Art.-Nr./Item 62335
GH
+ 2 ×
KL
+ 2 ×2 ×
I
J
+ 8 ×
 Loading...