

Page 1
Aufbauanleitung / Assembling Instruction & Stückliste / Parts list
Item No.
62324
Pos. No.
Measurement
Quantity
Item No.
Pos. 4
Side panel, left, front
25 x 986 x 529 mm
1
62324-30
Drawer with plastic inlay, back
side panel. Fix the heart lock and screw the metal fixation to
Schnellverbindern und verschauben Sie diese. Danach verbinden
Art Nr. /
Pos. Nr. /
Pos. 1
Pos. 2
Pos. 3
Pos. 4
Pos. 5
Pos. 6
Pos. 7
Pos. 8
Natura Kaninchenstall XXL,
2 Etagen
Beschreibung / Description
Vorderteil, oben
Front part, top
Vorderteil, unten
Front part, bottom
Verbindungsleisten, Vorderwand
Connecting beam, front panel
Seitenteil, links, vorne
Oberes Seitenteil, links, hinten
Upper side panel, left, back
Unteres Seitenteil, links, hinten
Lower side panel, left, back
Leiste für Seitenteil, links, vorne
Beam for side panel, left, front
Seitenteil, rechts, vorne
Side panel, right, front
135 × 115 x 112 cm
Abmessung /
1156 x 575 x 25 mm 1 62324-10
1156 x 446 x 25 mm 1 62324-11
30 x 992 x 25 mm 2 62324-12
25 x 986 x 529 mm 1 62324-30
25 x 476 x 450 mm 1 62324-31
25 x 510 x 450 mm 1 62324-32
478 x 40 x 35 mm 2 62324-35
25 x 986 x 529 mm 1 62324-33
Anzahl /
Art. Nr. /
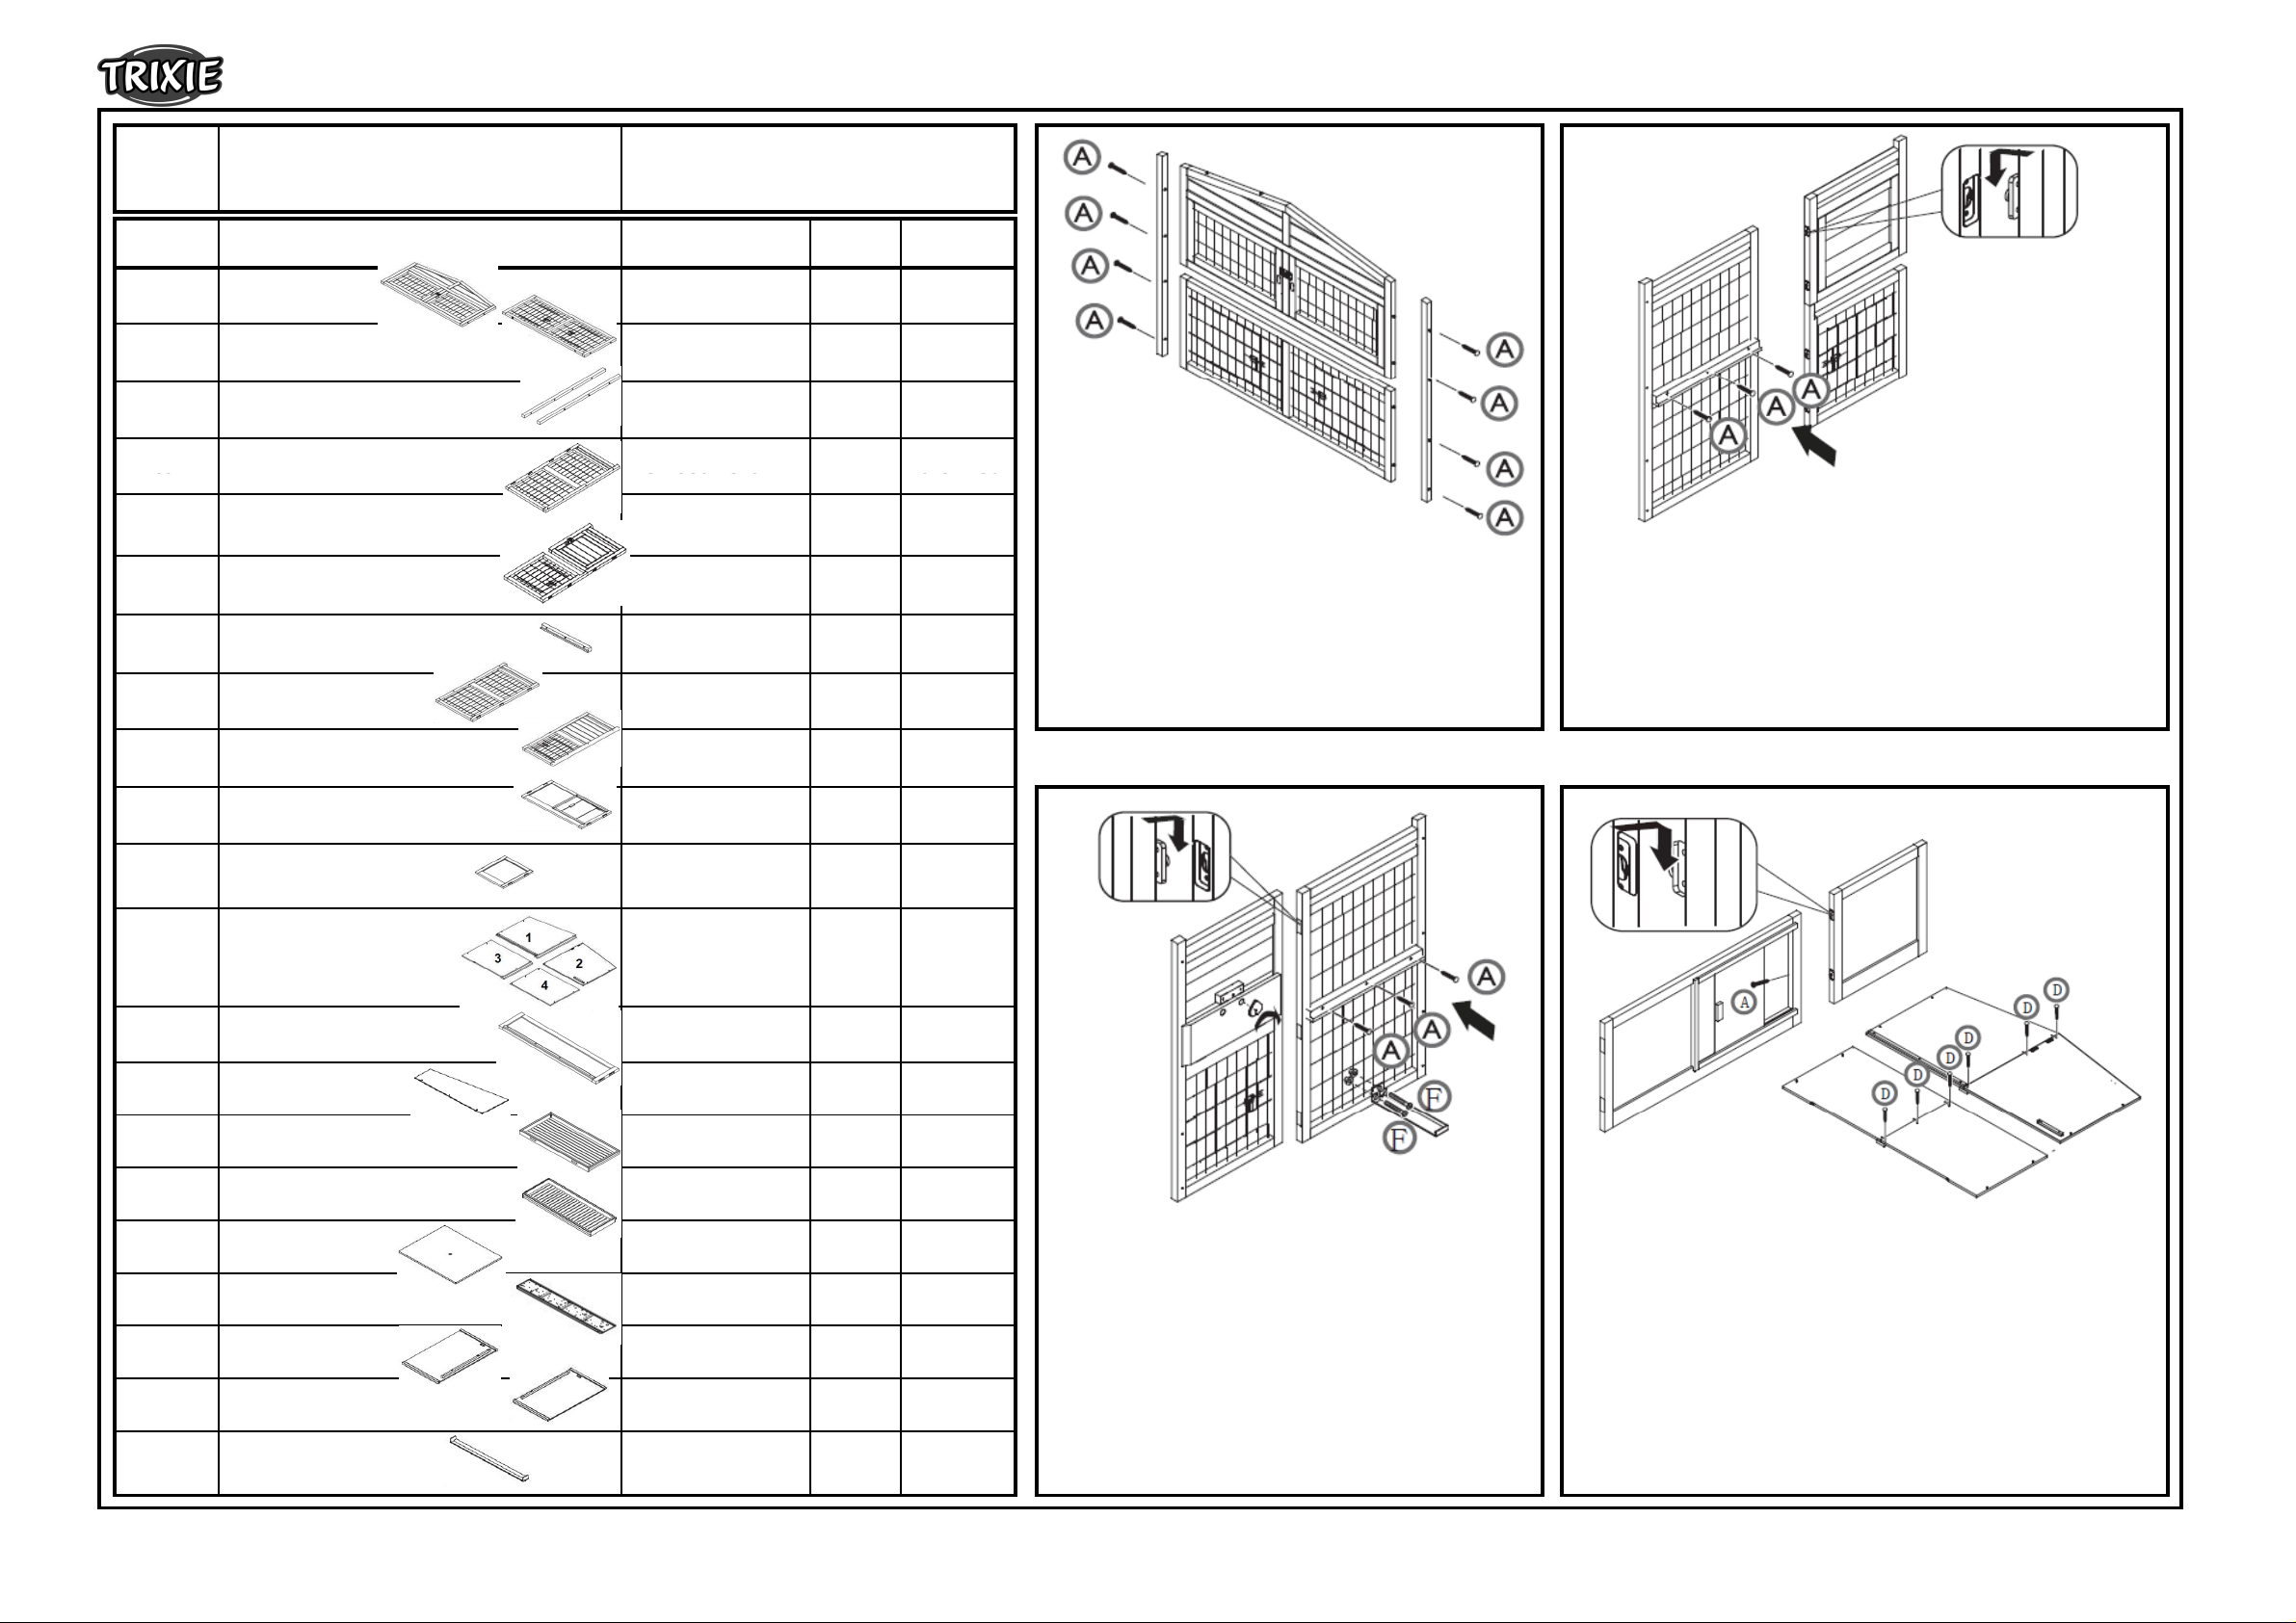
1. Verschrauben Sie das obere und das untere
Vorderteil mit Hilfe der langen Verbindungsleisten.
Screw the upper and the lower front part with the help of
the long connecting beams.
2. Verbinden Sie das vordere und das hintere Teil der linken
Seitewand mit den Schnellverbindern. Schrauben Sie die kurze
Leiste in die Mitte des linken, vorderen Seitenteils.
Connect the front and back of the left side panel with the cam-lock. Fix
the short beam in the middle of the left front side panel.
Pos. 9
Pos. 10
Pos. 11
Pos. 12
Pos. 13
Pos. 14
Pos. 15
Pos. 16
Pos. 17
Pos. 18
Pos. 19
Pos. 20
Seitenteil, rechts, hinten
Side panel, right, back
Trennwand mit Schiebetür, links
Partition with slide door, left
Trennwand, rechts
Partition, right
Rückwand, vielteilig
Back wall, four-part
Verbindungsrahmen, oben
Connecting frame, top
Obere Trennwand
Upper division wall
Ausziehbare Bodenwanne, vorne
Drawer with plastic inlay, front
Ausziehbare Bodenwanne, hinten
Mittelboden
Mid floor
Rampe
Ramp
Dachplatte, links
Roof, left
Dachplatte, rechts
Roof, right
25 x 986 x 450 mm 1 62324-34
826 x 387 x 38 mm 1 62324-36
390 x 387 x 30 mm 1 62324-37
658 x 624 x 38 mm
633 x 624 x 25 mm
658 x 460 x 28 mm
633 x 460 x 13 mm
38 x 220 x 954 mm 1 62324-45
605 x 236 x 5 mm 1 62324-46
1150 x 57 x 528 mm 1 62324-43
1083 x 57 x 426 mm 1 62324-44
585 x 13 x 474 mm 2 62324-42
147 x 19 x 940 mm 1 62324-41
673 x 57 x 1118 mm 1 62324-50
673 x 57 x 1118 mm 1 62324-51
1
1) 62324-20
2) 62324-21
3) 62324-22
4) 62324-23
3. Verbinden Sie das vordere und das hintere Teil der
rechten Seitewand mit den Schnellverbindern.
Schrauben Sie dann die kurze Leiste in die Mitte des
rechten, vorderen Seitenteils.
Connect the front and back of the right side panel with the
cam-lock. Fix the short beam in the mid of the right front
4. Kombinieren Sie die beiden Teile der Trennwand mit den
Sie die 4 Teile der Rückwand.
Combine the left and right partition with the cam-lock and screw it.
Then connect the 4 parts of the back panel.
Pos. 21
190411
190411
Dachfirst
Roof ridge
90 x 60 x 1150 mm 1 62324-52
TRIXIE Heimtierbedarf GmbH & Co. KG
TRIXIE Heimtierbedarf GmbH & Co. KG
the lower edge of the right front side panel.
87980
87980
Page 2
Aufbauanleitung / Assembling Instruction & Stückliste / Parts list
G
Countersunk screw
4
Hinge, for roof
Hinge, for roof
ein. Setzen Sie die Rampe ein
Mittelboden ein und
Insert the front and back drawer.
Kleinteileset / Small parts
A 22
B 9
C 9
Senkkopfschraube
Countersunk screw
D 9
E 3
62324-60
F
G
Linsenkopfschraube mit Mutter
Rounded head screw with nut
Senkkopfschraube
Fixierung für Rampe
Fixation for ramp
Verriegelungsherz
Lock heart
Fangband, links/rechts
Check strap, left/right
weitere bereits vormontierte Teile (als Ersatzteile separat erhältlich) /
other parts already assembled (spare parts separately available)
Scharnier, für Tür
Hinge, for door
Scharnier, für Dach
Scharnier, schmal, für kleine Tür
Hinge, for door
3-Wege Verschlussriegel
3-way locking bolt
5 cm 6 6235-72
7,6 cm 4 6235-74
3,8 cm 2 6235-70
5,5 cm 1 6235-52
3
4
1
1 6235-51
1/1
6235-61
6235-60
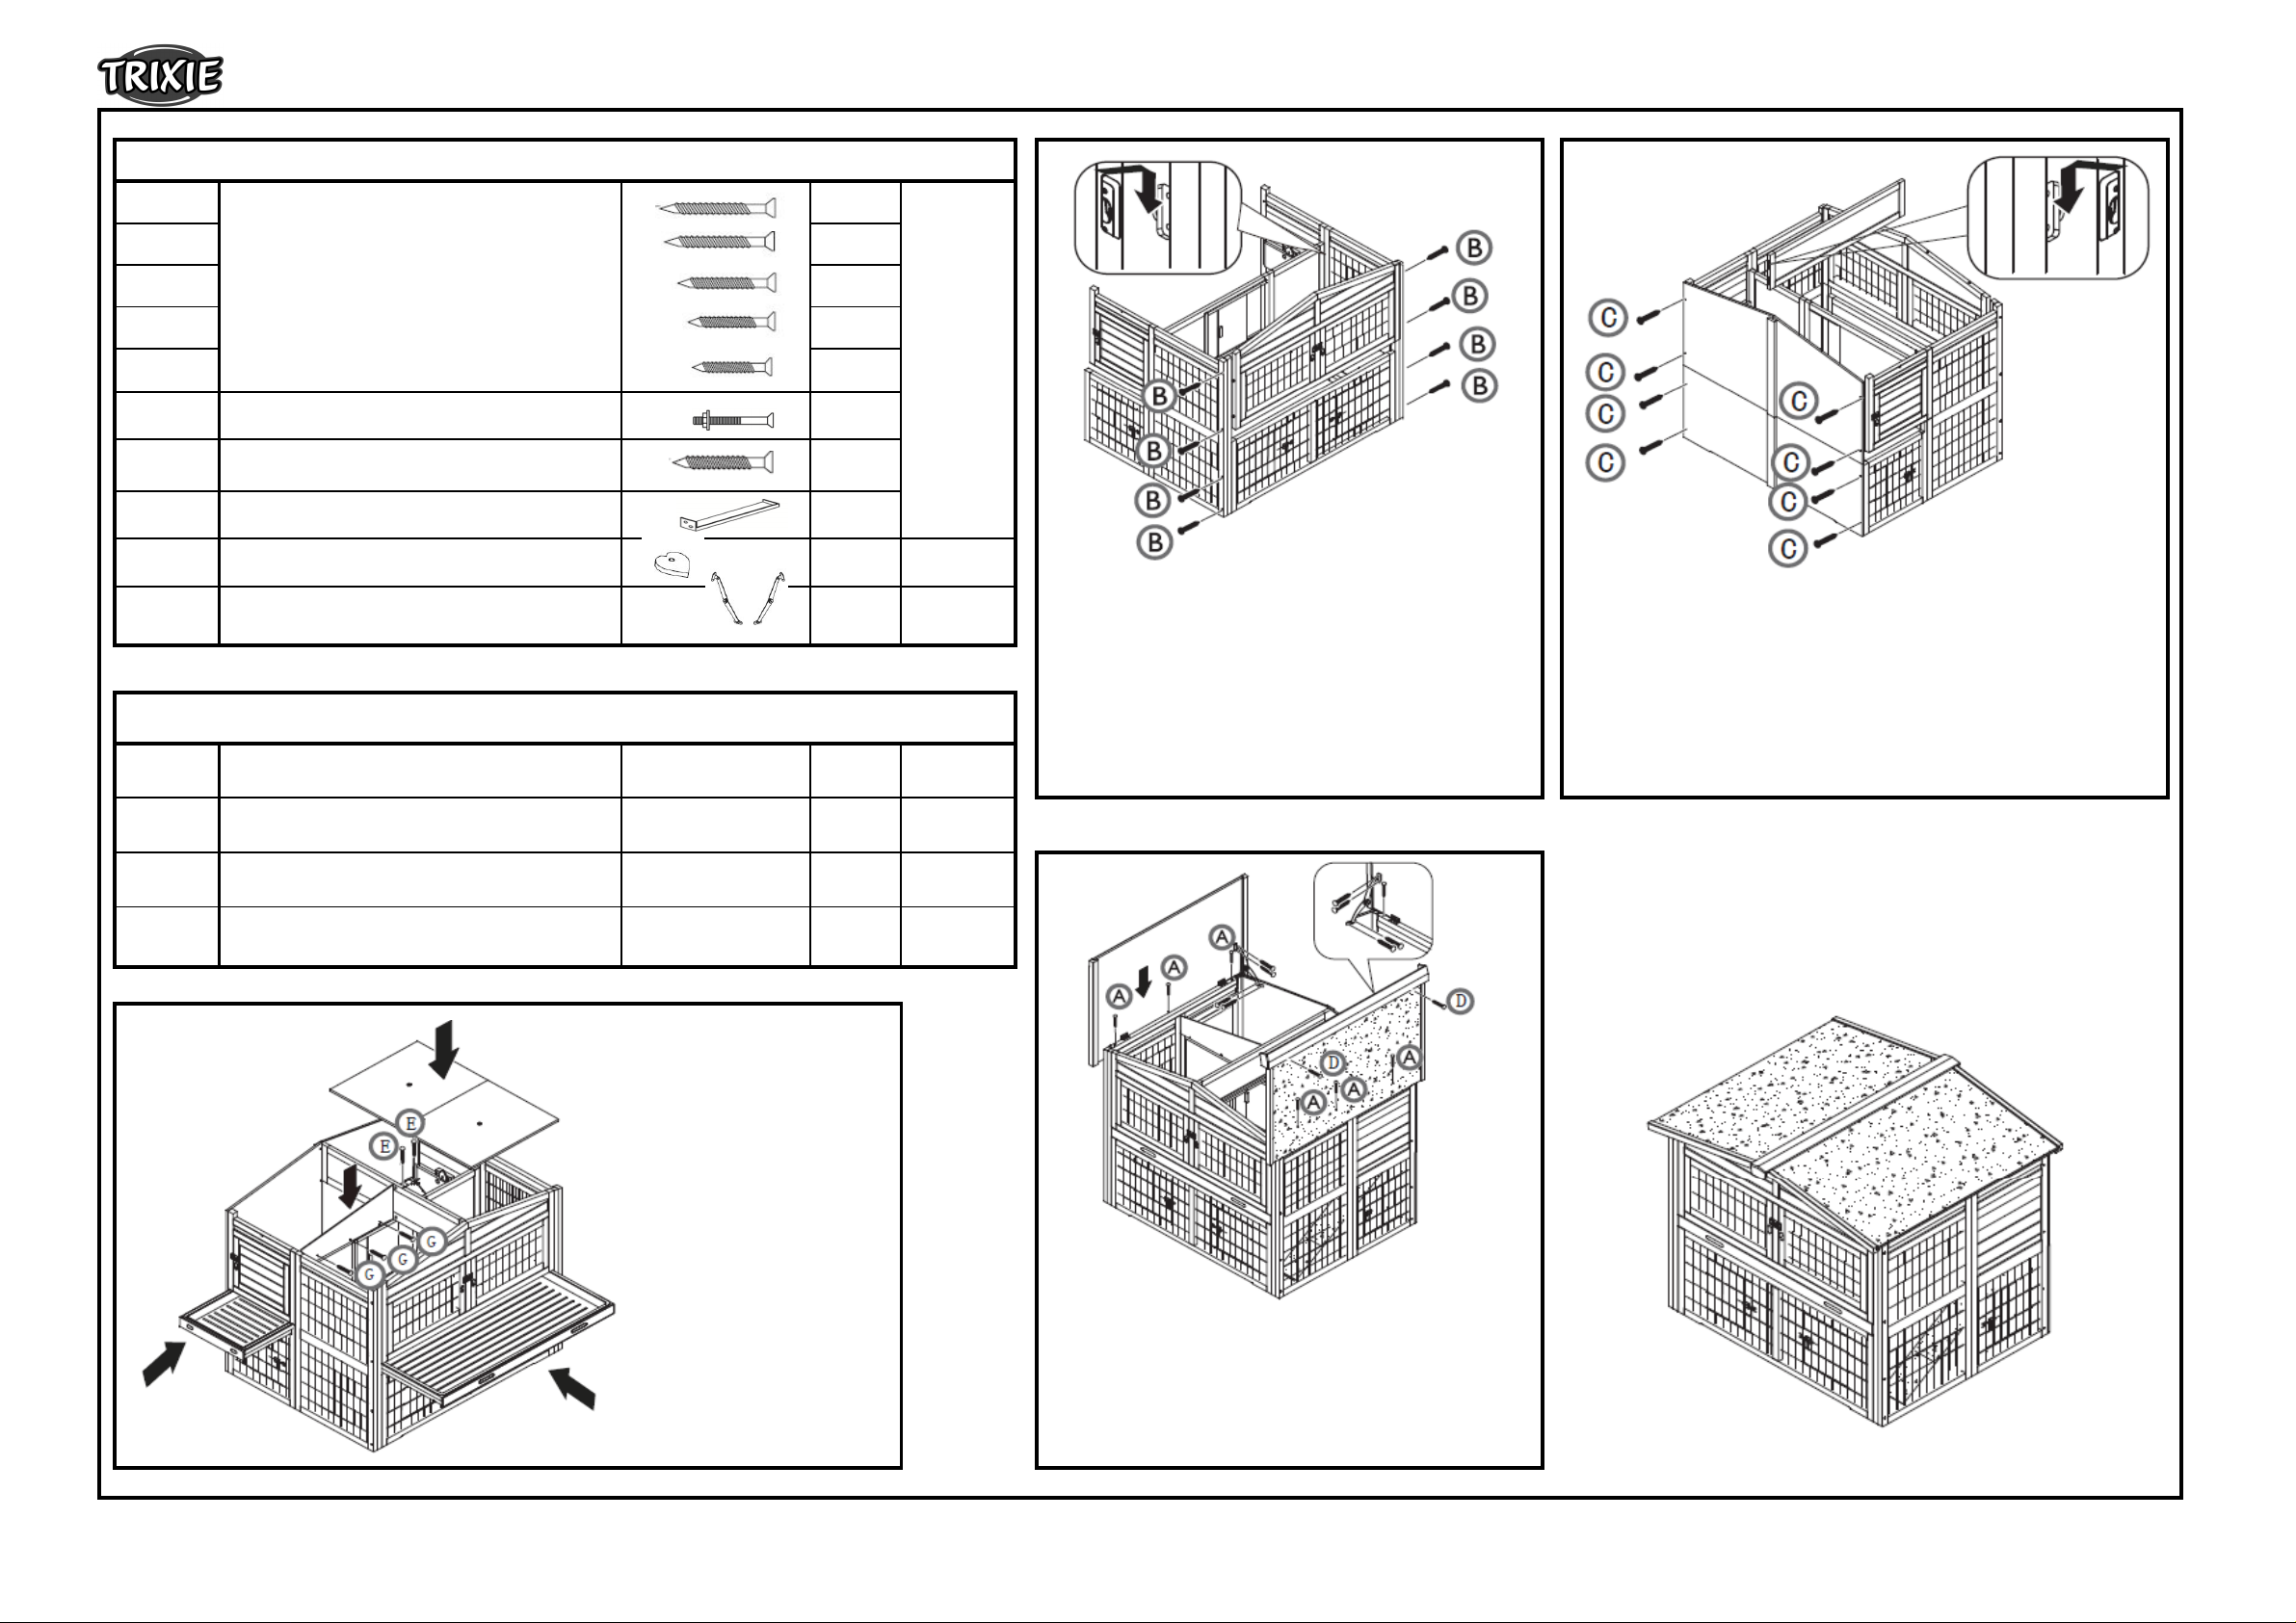
5. Schrauben Sie nun auch die beiden Seitenteile an
die langen Verbindungsleisten. Verbinden Sie dann
die Trennwand und die Seitenteile mit Hilfe der
Schnellverbinder.
Screw the side panels with the long beams. Connect the
partition with the side panel by cam-lock.
6. Verschrauben Sie die Rückwand mit den Seitenteilen und
fixieren Sie den Verbindungsrahmen an Vorder- und Rückseite
mit den Schnellverbindern.
Screw the back panel with the side panels. Connect the connecting
frame with front and back panel by cam-lock.
190411
190411
7. Schieben Sie die vordere
und die hintere Bodenwanne
und schrauben Sie sie fest.
Danach legen Sie bitte den
verschrauben die obere
Trennwand.
Put in the ramp and tighten it.
Insert the mid-floor and screw
the upper division wall.
8. Befestigen Sie die beiden Dachplatten und danach
die beide Fangbänder. Schrauben Sie zum Abschluss
den Dachfirst an eine Seite der Dachplatten.
Fix the two parts of the roof. Screw the check straps and
then fix the roof ridge to one side of the roof.
TRIXIE Heimtierbedarf GmbH & Co. KG
TRIXIE Heimtierbedarf GmbH & Co. KG
87980
87980
 Loading...