

Page 1
Schnellzugwagenset „Merkur“
23420
Page 2

2
Kurzkupplung tauschen
Mit einer Pinzette die beiden Enden der Kupplung
zusammendrücken und dabei aus dem Kupplungsschacht herausschieben.
Replacing the Close Coupler
Press both ends of the coupler together with a
pair of tweezers and then push the coupler out of
the coupler pocket.
Echanger l’attelage court
A l’aide d’une pincette, presser les deux extré
mités de l’attelage l’une contre l’autre tout en le
poussant hors du boîtier.
Kortkoppeling vervangen
Met een pincet de beide uiteinden van de kop
peling naar elkaar toe drukken en daarbij uit de
koppelingsschacht trekken.
Sustitución del enganche corto
Unir a presión con unas pinzas ambos extremos
del enganche, empujándolo al mismo tiempo
hacia afuera de la caja del enganche.
Sostituzione del gancio corto
Con una pinzetta si premano insieme entrambe
le estremità del gancio e facendo ciò lo si spinga
fuori dall’innesto portagancio.
Page 3

3
Tauschen von Radschleiferkontakten
In diesem Fall wird das Drehgestell komplett mit
Radschleifer und Radsätzen angeboten.
Replacing Electrical Wheel Contacts
The truck complete with wheel contacts and
wheel sets is offered for this situation
Echanger des frotteurs de roue
Dans ce cas, le bogie est proposé « complet »,
avec frotteurs de roue et essieux montés
Vervangen van de wielsleepcontacten
In dat geval wordt het complete draaistel met
wielslepers en wielassen vervangen.
Sustitución de los contactos del patín de la
rueda
En este caso, el bogie se ofrece completo con
patín de rueda y ejes montados.
Sostituzione dei contatti striscianti sulle ruote
In questo caso viene fornito il carrello completo
con contatti striscianti sulle ruote ed assi con
ruote.
Byte av hjulaxelblecken
I detta fall rekommenderas att byta hela boggien,
komplett med hjulaxelbleck och hjulaxlar.
Udskiftning af hjulslæbeskokontakter
I dette tilfælde tilbydes bogien komplet med
hjulslæbesko og hjulsæt.
Byte av kortkoppel
Pressa samman kopplets ändar med en pincett
och dra samtidigt ut kopplet ur koppelschaktet.
Udskiftning af kortkobling
Tryk de to ender af koblingen sammen med en
pincet og skub den derved ud af koblingsskak
-
ten.
Page 4

4
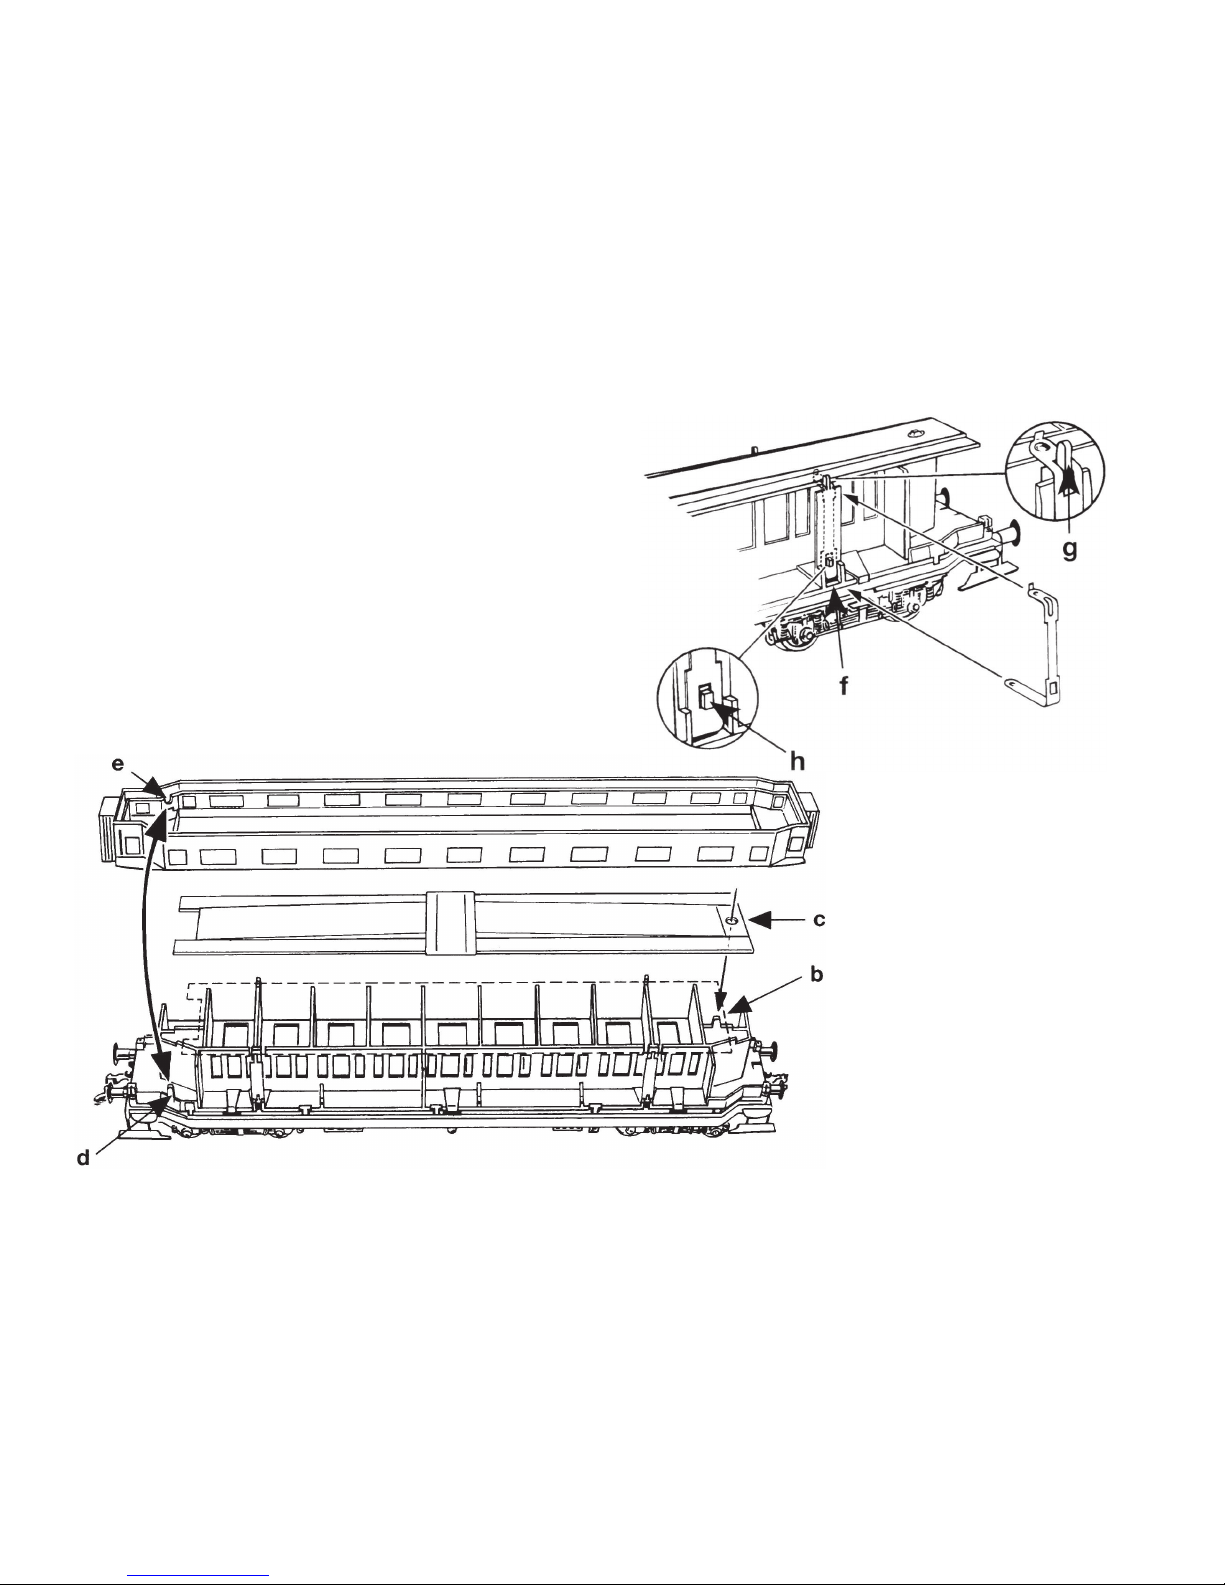
3.
Tausch einer defekten Glühbirne
Erhältlich ist die Glühbirne im Fachhandel unter
der Nummer 113579.
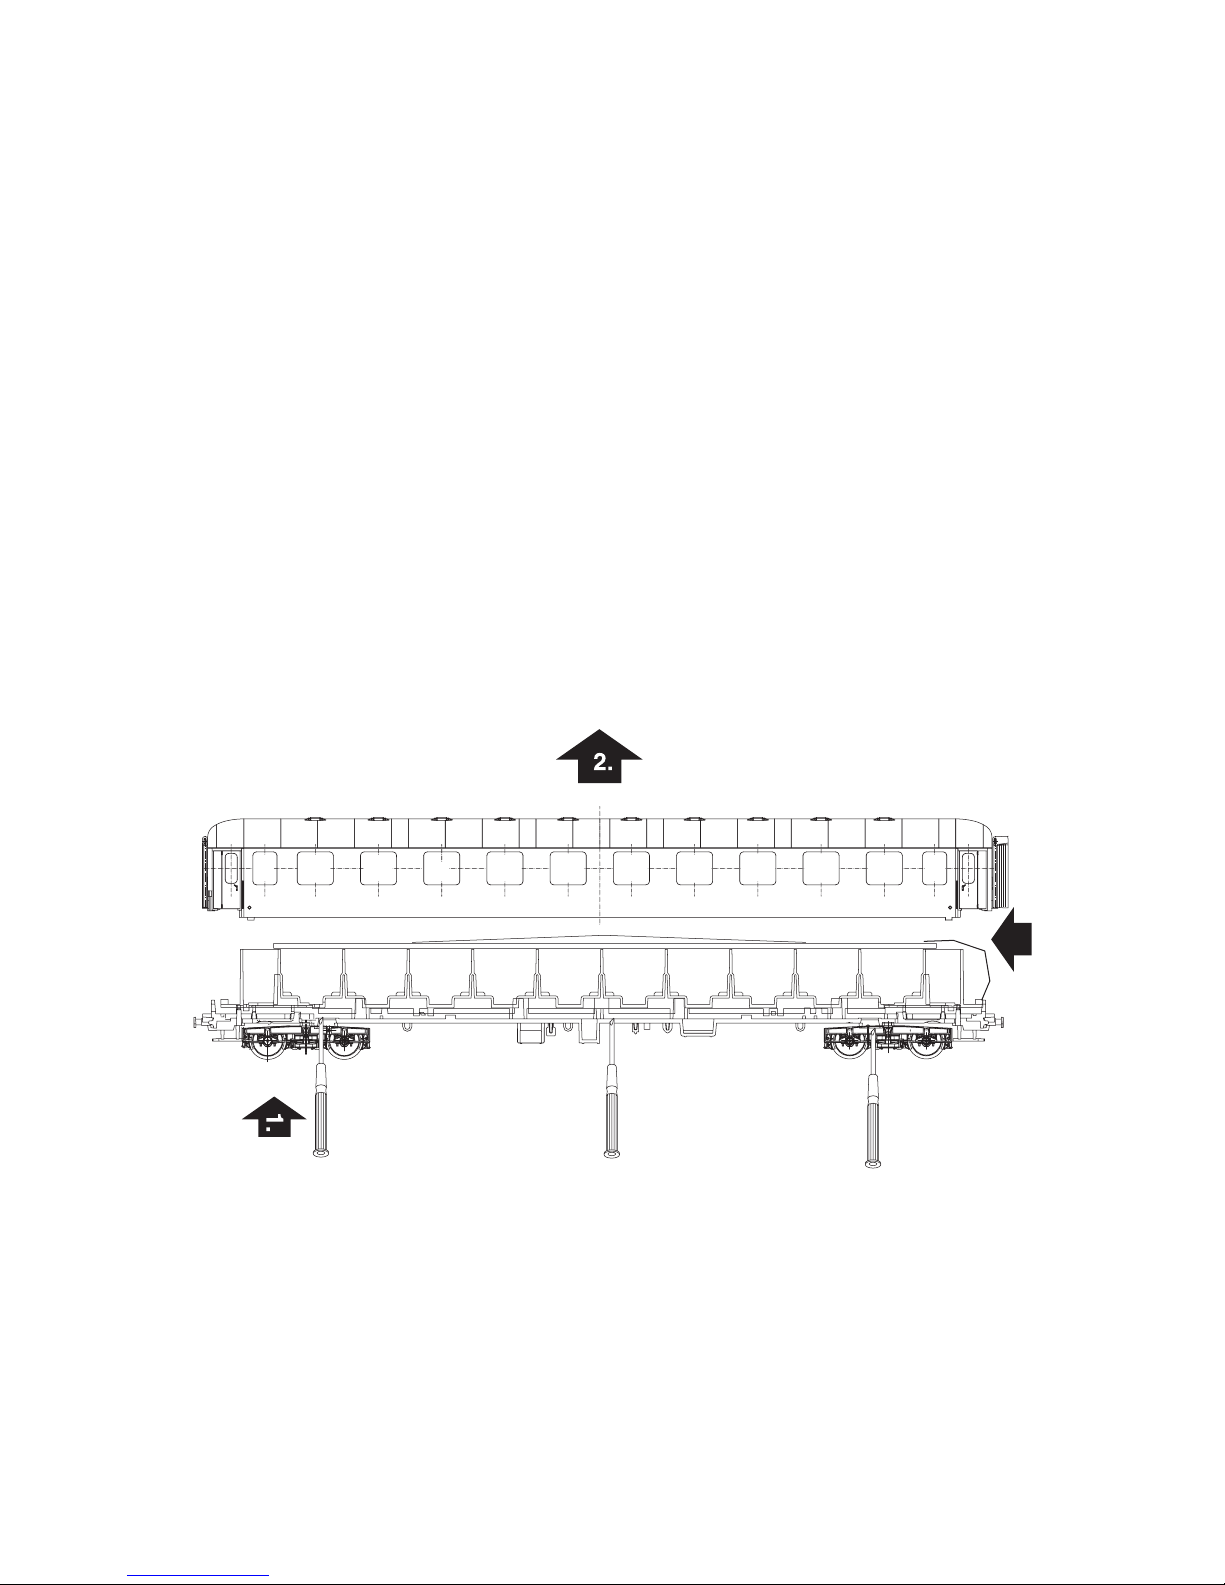
Mit flachem Schraubenzieher an den 3 Öffnungen
pro Seite im Wagenboden den Aufbau abhebeln.
Kabel am Leuchstab ablöten. Kontaktbügel mit
flachem Schraubenzieher am Punkt g nach unten
drücken, dadurch am Vorsprung h ausrasten.
Dann am Punkt g den Kontaktbügel vorsichtig
nach oben ziehen und dadurch vom Zapfen der
Inneneinrichtung lösen. Kontaktbügel lässt sich
jetzt ganz abziehen. Zweiten Kontaktbügel auf
der gleichen Wagenseite ebenso lösen. Leucht
stab lässt sich von der Inneneinrichtung abnehmen. Silberfolie und Klebefolie in Leuchtstabmitte
abziehen, Glühbirne tauschen. Neue Klebefolie,
dann Silberfolie aufziehen. Leuchtstab zwischen
Kontaktbügel einer Wagenseite und Inneneinrichtung stecken. Darauf achten, dass Bohrung c
im Leuchstab auf Zapfen b der Inneneinrichtung
kommt, gewölbte Seite des Leuchtstabes nach
oben.
Wiederaufsetzen der Kontaktbügel:
Page 5
5
Zuerst den Kontaktbügel unten in die Aussparung
f der Inneneinrichtung locker einstecken, dann
am Zapfen g einhängen. Kontaktbügel etwas
nach unten ziehen und am Vorsprung h einrasten.
Kabel wieder anlöten und Wagen zusammenbauen.
Page 6
6
3.
Replacing a Defective Light Bulb
The light bulb is available under item no. 113579
at your authorized dealer.
Lift the body off with a flat-blade screwdriver at
the 3 openings in the floor on both sides of the
car. Leave the interior details piece on the car
floor. Unsolder the wire at the light diffuser. Pull
down the contact bracket with a flat screwdriver
at Point „g“, then unsnap it at Projection „h“.
Then, carefully lift the contact bracket at Point
„g“ and loosen from the pin at Point „g“ on the
interior detail piece. The contact bracket can
now be removed completely. Loosen the second
contact bracket on the same side of the car in the
same manner. The light diffuser can be removed
from the interior detail piece. Remove the silver
film and the adhesive film in the center of the light
diffuser, and replace the light bulb. Apply new
adhesive film and then siver film. Insert the light
diffuser between the contact brackets on one
side of the car and the interior detail piece. Make
sure that the Hole „c“ in the light diffuser comes
on the Pin „b“ on the interior detail piece and that
the arched side of the light diffuser faces up.
Putting the contact brackets back in place:
Page 7

7
First, plug the contact bracket loosely below
in the Cutout „f“ on the interior detail piece,
then hang it on the pin. Pull the contact bracket
somewhat down and snap it into place on Projection „h“. Solder the wire back into place and
re-assemble the car.
Page 8

8
3.
Echange d’une ampoule défectueuse
L’ampoule est vendue dans les magasins spécialisés sous la réf. 113579.
Utilisez tournevis plat comme levier au niveau des
trois ouvertures dans le plancher de chaque côté
de la voiture pour retirer la caisse.
Laissez l’aménagement intérieur en place.
Dessouder les câbles de la barrette d’éclairage.
A l’aide d’un tournevis, soulever l’étrier de
contact au point g, ce qui entraîne son désencliquetage au niveau de la saillie h. Au point g, tirer
l’étrier de contact avec précaution vers le haut
et le détacher ainsi du pivot de l’aménagement
intérieur. L’étrier de contact peut alors être
entièrement retiré. De la même manière, détacher
le second étrier de contact sur le même côté
de la voiture. La barrette d’éclairage peut être
retirée de l’aménagement intérieur. Retirer la
feuille d’aluminium et le papier autocollant du
milieu du tube, changer l’ampoule. Coller le
nouveau la nouvelle papier autocollant et la feuille
d’aluminium. Enficher la barrette d’éclairage entre
l’étrier de contact de l’un des côtés de la voiture
et l’aménagement intérieur. Veiller à ce que le
perçage c dans la barrette d’éclairage concorde
Page 9

9
avec le pivot b de l’aménagement intérieur, face
convexe de la barrette d’éclairage vers le haut.
Remise en place de l’étrier de contact :
Commencer par enficher l’étrier de contact en
bas dans l’encoche f de l’aménagement intérieur
sans contrainte, puis l’accrocher au pivot g.
Tirer l’étrier de contact légèrement vers le bas et
l’encliqueter à la saillie h. Ressouder les câbles et
remonter la voiture.
Page 10

10
3.
Vervangen van een defect lampje
Het gloeilampje is bij uw dealer verkrijgbaar onder
het nummer 113579.
Met een platte schroevendraaier bij de drie
openingen, aan elke zijde in de rijtuigbodem, de
opbouw oplichten. Binneninrichting op de rijtuig
-
bodem laten zitten.
De draad aan de lichtstaaf los solderen. De con
tactbeugel met een platte schroevendraaier bij
punt g oplichten, daarna van het vooruitstekende
deel h losklikken. Dan bij punt g de contactbeugel
voorzichtig naar boven trekken en zodoende losmaken van de stiften van de binneninrichting. De
contactbeugel kan nu geheel verwijderd worden.
De tweede contactbeugel aan dezelfde rijtuigzijde
op dezelfde wijze verwijderen. De lichtstaaf kan
nu van de binneninrichting genomen worden. Ver
wijder de aluminiumfolie en het plakband in het
midden van de lichtstaaf en vervang de defecte
lamp. Nieuwe plakband en aluminiumfolie aanbrengen. De lichtstaaf tussen de contactbeugel
aan een rijtuigzijde en de binneninrichting steken.
Let er op dat de uitsparing c in de lichtstaaf op de
stift b van de binneninrichting valt, de bolle kant
van de lichtstaaf naar boven.
Contactbeugels weer plaatsen:
Page 11

11
eerst de contactbeugel losjes in de uitsparing f
van de binneninrichting plaatsen, dan in de stift
g hangen. De contactbeugel iets naar beneden
trekken en in het uitsteeksel h klikken. De draden
weer vast solderen en het rijtuig weer in elkaar
zetten.
Page 12

12
3.
Sustitución de una lámpara de incandescencia
La lámpara de incandescencia está disponible en
distribuidores especializados con el número de
pedido 113579.
Desmontar, apalancando con un destornillador
plano por las 3 aberturas de cada lado de los
bajos del coche, la superestructura del mismo.
Dejar el equipamiento interior sobre los bajos del
coche.
Desoldar el cable del tubo fluorescente.
Retirar hacia arriba el estribo de contacto apalan
-
cándolo con un destornillador plano por el punto
g y de este modo desenclavarlo del voladizo h.
A continuación, tirar del estribo de contacto por
el punto g con cuidado hacia arriba y de este
modo desengancharlo del pivote del equipami
ento interior. Ahora, puede retirarse totalmente
el estribo de contacto. Soltar el segundo estribo
de contacto de idéntico lado del coche. Ahora
puede retirarse el tubo fluorescente del equipamiento interior. Retirar la lámina de plata y la
lámina adhesiva del centro del punto fluorescente
y sustituir la lámpara de incandescencia. Colocar
una lámina adhesiva y una lamina de plata nueva.
Enchufar el tubo fluorescente entre el estribo de
Page 13

13
contacto de un extremo del coche y el equipamiento interior. Asegurarse de que el agujero c
del tubo fluorescente encaje en el pivote b del
equipamiento interior, con el lado abombado del
tubo fluorescente apuntando hacia arriba.
Recolocación de los estribos de contacto:
En primer lugar, enchufar flojo el estribo de
contacto inferior en la abertura del equipamiento
interior y luego engancharlo en el pivote g. Tirar
del estribo de contacto ligeramente hacia abajo
y engatillarlo en el saliente h. Volver a soldar el
cable y ensamblar el coche.
Page 14

14
3.
Sostituzione di una lampadina difettosa
La lampadina è disponibile dal rivenditore specia
-
lista sotto il numero 113579.
Con un cacciavite piatto applicato alle tre
aperture per lato nel pavimento della carrozza si
faccia sollevare la sovrastruttura. Lasciare stare
l’arredamento interno sopra il pavimento della
carrozza.
Dissaldare il cavetto dalla guida luminosa.
Disinnestare verso l’alto la staffa di contatto con
un cacciavite piatto nel punto g, liberandola in
tal modo dalla sporgenza h. Poi nel punto g si tiri
con cautela la staffa di contatto verso l’alto ed
in tal modo la si liberi dai perni dell’arredamento
interno. Adesso la staffa di contatto si può
staccare completamente. Si liberi ugualmente la
seconda staffa di contatto sullo stesso lato della
carrozza. La guida luminosa si può smontare
dall’arredamento interno. Si stacchino il foglio
argenteo e il foglietto adesivo al centro della
guida luminosa, si sostituisca la lampadina. Si
stenda sopra un nuovo foglietto adesivo e il
foglio argenteo. Si innesti la guida luminosa tra la
staffa di contatto ad una estremità della carrozza
e l’arredamento interno.
Si faccia attenzione affinché il foro c nella guida
Page 15

15
luminosa arrivi sopra il perno b dell’arredamento
interno, con il lato arrotondato della guida di luce
verso l’alto.
Innestare nuovamente la staffa di contatto:
Innestare dapprima in modo lasco la staffa di con-
tatto sotto nella cavità f dell’arredamento interno,
poi agganciarla sul perno g. Tirare un poco verso il
basso la staffa di contatto ed innestarla sulla sporgenza h. Saldare nuovamente il cavetto e montare
nuovamente assieme la carrozza.
Page 16

16
3.
Byte av en defekt glödlampa
Lämpliga glödlampor finns hos Din Märklinhand
-
lare, produktnummer 113579.
Använd smala, platta skruvmejslar, som försiktigt
sticks in i de 3 därför av sedda öppningarna i
vagnens underrede och bänd/lyft mycket försik
tigt loss vagnens kaross. Låt vagnens inredning
sitta kvar på vagnsunderredet. Löd loss kabeln
från ljusstaven. Lyft/bänd försiktigt upp kontaktbygeln med en platt, smal skruvmejsel på punkt
g, så bygeln lossar ur fästet, här markerat: h.
Dra därefter kontaktbygeln försiktigt uppåt, på
punkt g, så den släpper från vagnsinredningens
tappar. Kontaktbygeln kan nu lossas helt. Lossa
nu den andra kontaktbygeln på samma sida av
vagnen på samma sätt. Ljusstaven kan nu lossas
från vagnsinredningen. Silverfolie och klisterfolie
i ljusstavens mitt avlägsnas och glödlampan
byts ut. Anbringa ny silverfolie och klisterfolie.
Montera/stick in ljusstaven mellan kontaktbygeln
på ena vagnssidan och vagnsinredningen. Vid
detta moment måste man vara noga med att
passa in ljusstavens urborrning, markerad c, på
inredningens därför avsedda tapp, här markerad
Page 17

17
b. Observera att ljusstavens välvda sida ska vara
uppåt.
Sätt därefter tillbaka kontaktbyglarna.
Montera först kontaktbygeln genom att sticka in
den i urtaget, markerat f, nedtill i vagnsinrednin
gen. Häng därefter upp den på tappen markerad
g. Pressa sedan försiktigt ned kontaktbygeln en
aning, så att den låser fast i urtaget, markerat h.
Löd åter fast kabeln och sätt ihop vagnen igen.
Page 18

18
3.
Udskiftning af en defekt glødepære
Glødepæren kan købes hos forhandlerne under
nummeret 113579.
Løft overbygningen af med en flad skruetrækker
i de 3 åbninger på hver side i vognbunden. Lad
den indvendige del forblive på vognbunden.
Lod ledningen af lysstaven. Løft kontaktbøjlen
opad med en flad skruetrækker ved punkt g,
og tag den ud af fremspringet h. Træk derefter
kontaktbøjlen forsigtigt opad ved punkt g og
løsn den derved fra tapperne i den indvendige
del. Nu kan kontaktbøjlen trækkes helt af. Løsn
den anden kontaktbøjle på den samme vognside
på samme måde. Lysstaven kan tages af den ind
vendige vogndel. Træk sølvfolien og klæbefolien
af lysstavens midte, og udskift glødepæren. Træk
ny klæbefolien og sølvfolien på. Indsæt lysstaven
mellem kontaktbøjlerne på en vognside og den
indvendige del. Sørg for, at boringen c i lysstaven
kommer ned over tappen b i den indvendige del,
den bølgede side af lysstaven opad.
Page 19

19
Genmontering af kontaktbøjlene:
Indsæt først kontaktbøjlen løst nederst i udspa
ringen f på den indvendige del, og hægt den
derefter på tappen g. Træk kontaktbøjlen en
smule nedad og indsæt den i fremspringet h. Lod
ledningen på igen og saml vogen.
Page 20

Trix Modelleisenbahn GmbH & Co. KG
Stuttgarterstr. 55-57
73033 Göppingen
www.trix.de
110747 05 07 Ni Ef
Änderungen vorbehalten
© by Trix GmbH & Co KG
 Loading...