

Page 1
trivum technologies GmbH
Eierstraße 48
70199 Stuttgart
[email protected]
www.trivum.com
www.facebook.com/trivumtechnologies
V201704 - Errors and specications subject to change without notice.
Further documentation and troubleshooting
To nd helpful log les in support cases:
– Open the TouchPad Setup Tool.
– Click Reports.
Please visit also our website for the latest documentation,
videos and information:
http://www.trivum.com
http://service.trivum.com
If support is needed
Please contact your local trivum dealer or write to:
Download links:
trivum ServerAdmin Tool (Windows):
http://service.trivum.com/win-admintool
How to update your trivum v8 to v9?
http://service.trivum.com/v9-update
i Note: The remote maintenance of all trivum devices is
activated by default. For disabling remote maintenance:
– Open the MusicCenter WebCong.
– Click Basic Setup.
– Uncheck Enable trivum remote support.
Quick Installation Guide for
TouchPad 7“
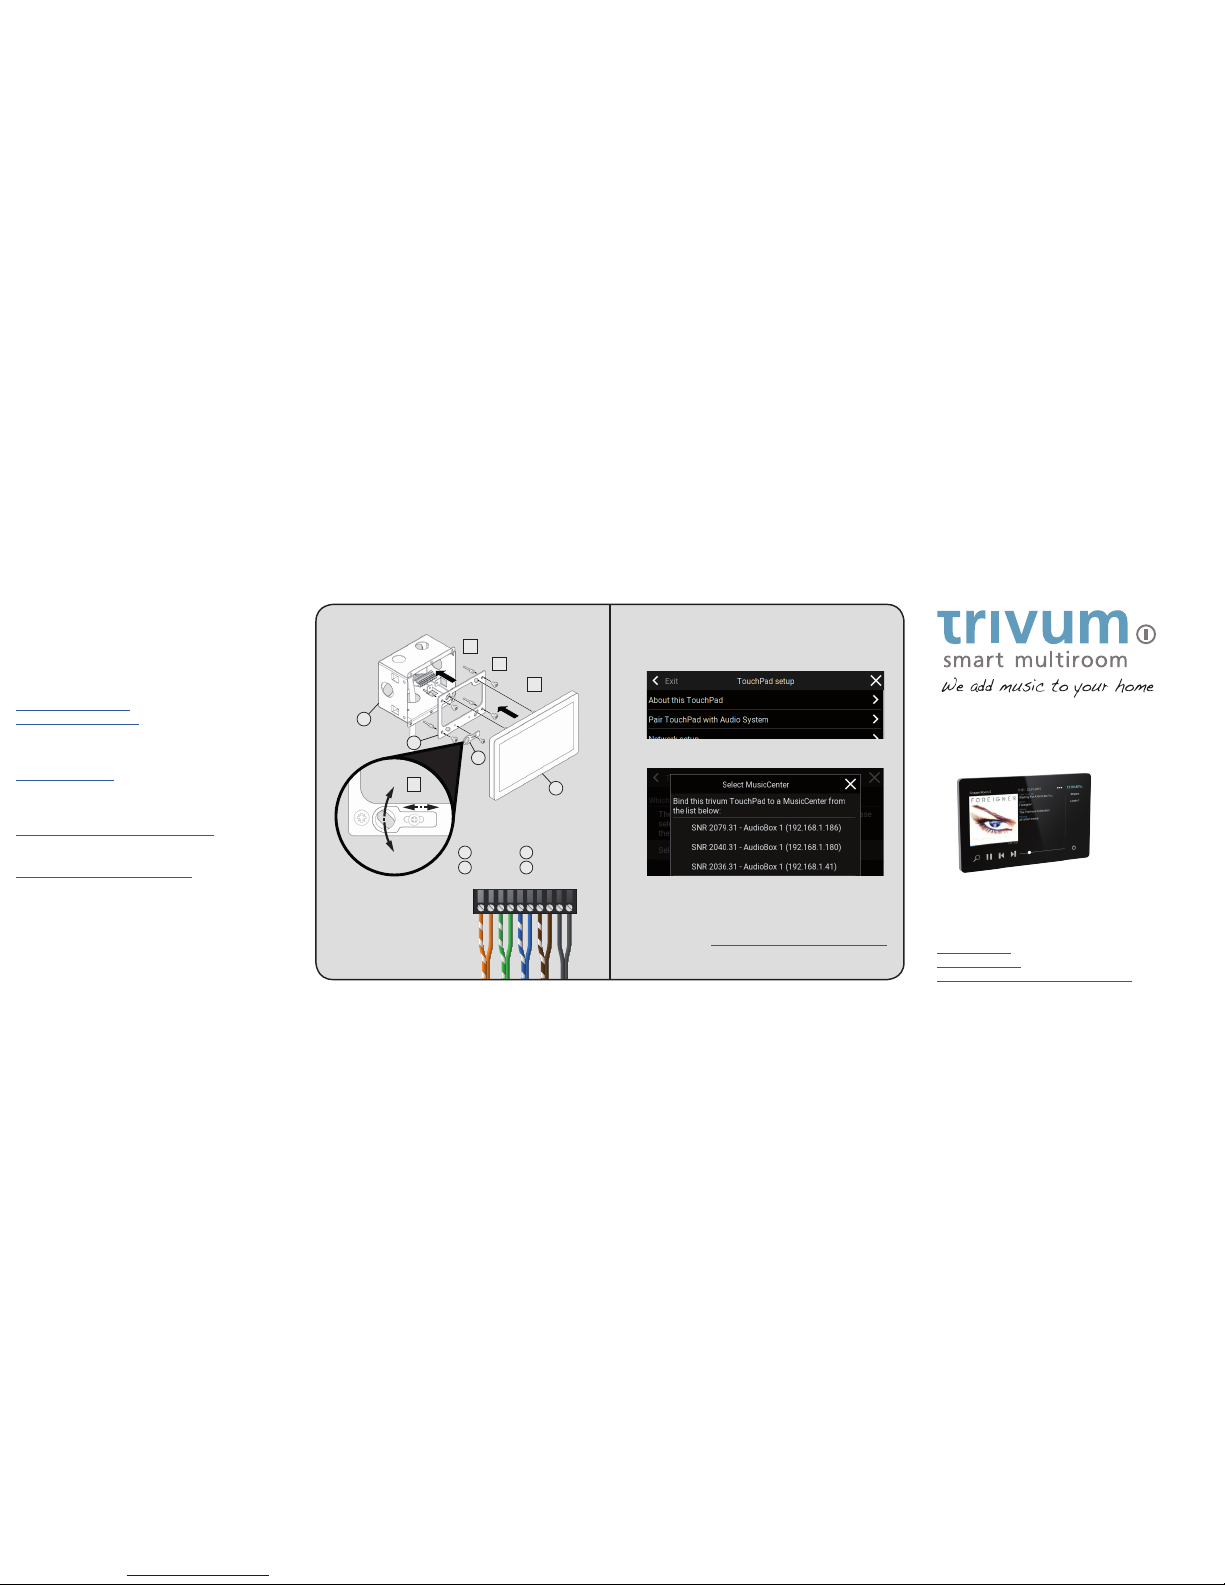
1. Mounting
3. MusicCenter binding
– Wait a few seconds until the TouchPad has booted
– On the starting screen press Pair TouchPad with
Audio System
– Press Select... and select your preferred trivum
MusicCenter from the pop-up menu
i Note: If you want to have the full functionality
of your TouchPad 7” please make sure your trivum
multiroom system is running version 9.
How to update: http://service.trivum.com/v9-update
v
9
Optimized for:
Connector TouchPad side
1
Wall box 4.3“
2
Adapter plate
3
7“ TouchPad
4
Adjustment aid
A
D
B
C
1
2
3
4
Page 2

Quick Installation Guide for TouchPad 7“
Required components for installation:
– Cat-5 cable
– wall box 4.3“ (dimensions 104x82x62mm)
– PoE Switch
To use the TouchPad in connection with trivum
Multiroom Audio System:
– trivum device(s) (e.g. RP, FLEX, AudioBox, ...)
– network DHCP capable router
– music archive (network share, NAS)
Optional components:
– internet connection (required for software updates and
remote support)
– KNX/IP-Router (required for using the TouchPad as
a KNX room controller)
1. Mounting the TouchPad 7“
1.1 Mount the wall box 4.3“.
1.2 Screw the four short screws with the four distance bolts
on the adapter plate. A
1.3 Adjust the adapter plate in the wall box to set a proper
distance between the TouchPad and the wall. B
1.4 Connect the Cat-5 cable (see illustration
„Connector TouchPad side“ on the backside) and plug in.
1.5 Insert the TouchPad in the wall box. C
l Tip: TouchPad 7” is usable in landscape or portrait mode
1.6 The adjustment aid should be positioned so that the
TouchPad is in balance. D
2. Linking the TouchPad to a trivum device
To link the TouchPad to your trivum device:
2.1 Wait a few seconds until the TouchPad has booted.
2.2 On the starting screen press
Pair TouchPad with Audio System.
2.3 Press Select... and select your preferred trivum
MusicCenter from the pop-up menu.
3. Conguring the TouchPad
The trivum TouchPad has to be congured via web browser.
To identify the TouchPads IP please go on the TouchPad:
3.1 Press on the right upper corner trivum.
3.2 Press settings -> Touchpad settings -> Info.
3.3 Open your web browser and type in the IP to open the
trivum TouchPad WebCong
4. Use your TouchPad as music controller
and KNX room controller
Per default the TouchPad is congured as trivum audio
controller without any need for KNX.
If your home has a KNX installation, you can use the
7"TouchPad as a smart KNX room controller. You can add
simply embedded web objects (e.g. weather forecast,
webcams etc.) or KNX objects like dimmer, switches,
shutters etc. via the trivum TouchPad WebCong. The KNX
programming of the TouchPad is done via the web browser.
No need for extra KNX software.
4.1 Open the trivum TouchPad WebCong.
4.2 Click KNX Settings.
4.3 Enable Use KNX/IP.
4.4 Go back to the TouchPad WebCong main page.
4.5 Click Page Editor.
4.6 Move the mouse over the square where you want to
place your button and click the “plus-button”
4.7 Choose your preferred APPS or KNX BUTTONS
4.8 Enter the specic settings for this app or the KNX
group addresses for this KNX button
You nd further informations for KNX on:
http://service.trivum.com/knx
l Tip: Tap on the date to quickly switch between the
music view and the KNX view.
l Tip: You can set the default mode of the TouchPad
(audio controller / KNX room controller)
– Open the trivum TouchPad Setup Tool.
– Click Basic Setup.
– Enable the checkbox TouchPad mode.
Backup your conguration
Once you have completed the setup, we recommend you
to make a backup of your conguration:
– Open the TouchPad WebCong.
– Click Backup/Restore -> Export/import conguration.
– Follow the instructions.
 Loading...