

Page 1
24
Page 2
7
7
7
7
8
9
12 ( ........................... USB
14
15
1
1
3
4
4
5
5
6
DLED 1
DLED
LED
LED
ً
ً ً
3.0 12 50/60 100-240 10
.HDMI
HD 11
12
ً
.VGA , HDMI, AV, USB, and TV
.
USB
13
14
15
16
2
3
4
5
6
7
8
9
ّ
WarningAttention
1
Page 3
Warning
DVD
ً
ً
.
ً
ً
ً
.
ً
4:3
ً
ً
ً
2
ً
Page 4
Page 5
ﺔﻳﺬﻐﺘﻟﺍ ﺓﺭﺍﺩ
ﺖﻟﻮﻓ
ﺔﻴﺴﻴﺋﺮﻟﺍ ﺓﺭﺍﺪﻟﺍ
4 3 2 1
220
~
+
-
-
- - -
30 30
10
10 10 10
7
10
4
Page 6
10,8
DC OUT
10
9
1
R
W
ANT
Y
R
W
VIDEO
AV1 IN
AUDIO
R L
VIDEO
AV2 IN
8
AUDIO
R L
HDMI
7 3 6
VGA
5
.10
VGA AUDIO
IN
4
2
SOURCE
MENU POWER
7
VOL- VOL+ CH- CH+
12
5 6 3 4
SOURCE
MENU POWER
1 2
5634
4
3
6
5
1
2
7
VOL-
4
VOL+
3
CH-
VOL- VOL+ CH- CH+
SOURCE
POWER
7
CH+
MENU
6
5
1
2
7
4
3
6
5
1
2
7
4
3
6
5
1
2
7
1
2
3
4
5
6
7
4
3
6
5
1
2
7
Page 7

A-B :
FB
1 .
2 .
3.
4.
5.
6.
7.
8.
9.
10.
.Freeze :
11.
12.
13.
14.
15.
19.
20.
21.
22.
23.
24.
25.
26.
27.
28.
29.
30.
31.
32.
33.
Standby :
Source :
RED :
BLUE :
GREEN :
YELLOW :
CH LIST :
S-MODE :
FAV LIST :
P.MODE :
ZOOM :
REPEAT :
PREV.
18
17.
FF
NEXT
OSD
.
ENTER :
Mute :
VOL+ :
VOL- :
.
:
PROG+
PROG-
:
16.
MENU :
EXIT :
:
PALY/PAUSE
STOP
FAV+ :
0-9 :
Display :
Recall :
6
Page 8
1.5 AAA
ً
ً
" "
" "
" CH+/CH- "
ﻝﺎﺧﺩﺇ
OK
SOURCE
" / "
MENU OK
MENU
" VOL+/VOL- "
" "
" / "
" / "
MENU
7
MENU
" / "
" CH- "
" CH+/CH- "
" VOL+/VOL- "
.5
.6
1
2
3
4
Page 9
:
1
ﺓﺎﻨﻗ
OK
ﻝﺎﺧﺩﺇ
ﻲﻟﻵﺍ
.
/
.
،
ATV
:
PAL/SECAM
DK/BG/MN/I
:
:
:
:
AFC
:
.
CH+-
/
.
8
.
.
.
RED
/
.
YELLOW
:
FAV
.
.
BLUE
OK
/
/
ﺞﻣﺎﻧﺭﺑﻟﺍ
GREEN
: .
MENU
:
Ok
Page 10
ﺓﺭﻮﺼﻟﺍ
ﻚﻳﺮﲢ ﺔﻤﺋﺎﻘﻟﺍ ﻝﺎﺧﺩﺇ ﺝﻭﺮﺧOK
ﺓﺭﻮﺼﻟﺍ ﻂﳕ
ﻦﻳﺎﺒﺗ
ﻉﻮﻄﺳ
ﻥﻮﻠﻟﺍ
ﻥﻮﻠﻟﺍ ﺯﺎﻴﺤﻧﺍ
ﺓﺪﺣ
ﺔﻴﻧﻮﻠﻟﺍ ﺓﺭﺍﺮﳊﺍ
ﺀﺎﺿﻮﻀﻟﺍ ﻒﻴﻔﺨﺗ
ﻡﺪﺨﺘﺴﻣ
50
50
50
50
50
ﻂﺳﻮﺘﻣ
ﻂﺳﻮﺘﻣ
Page 11

ﺕﻮﺼﻟﺍ
ﺕﻮﺼﻟﺍ ﻂﳕ
ﺔﻘﺒﻄﻟﺍ ﻲﻟﺎﻋ
ﺮﻴﻬﺟ
ﻥﺯﺍﻮﺗ
ﻡﺪﺨﺘﺴﻣ
50
50
0
ﺖﻗﻮﻟﺍ
ﻚﻳﺮﲢ
ﺔﻤﺋﺎﻘﻟﺍ ﻝﺎﺧﺩﺇ
OK
ﺝﻭﺮﺧ
-- -- -- --
ﻞﻤﻌﻳ ﻻ
ﻞﻤﻌﻳ ﻻ
ﻞﻤﻌﻳ ﻻ
ﺔﻴﻧﺎﺛ 15
ﻚﻳﺮﲢ
ﺔﻤﺋﺎﻘﻟﺍ
OK
ﻝﺎﺧﺩﺇ
ﺝﻭﺮﺧ
Page 12
ﺕﺍﺭﺎﻴﺧ
ﺔﺷﺎﺸﻟﺍ ﻰﻠﻋ ﺽﺮﻌﻟﺍ ﺔﻐﻟ
ﺔﺒﺴﻧ
ﺀﺎﻗﺭﺰﻟﺍ ﺔﺷﺎﺸﻟﺍ
ﻢﻜﺤﺘﻟﺍ ﺢﻴﺗﺎﻔﻣ ﻞﻔﻗ
ﻂﺒﻀﻟﺍ ﺓﺩﺎﻋﺇ
(USB) ﺞﻣﺍﺮﺒﻟﺍ ﺚﻳﺪﲢ
ﺔﻴﺑﺮﻌﻟﺍ
16:9
ﻞﻴﻐﺸﺗ
ﻞﻤﻌﻳ ﻻ
ﺔﺷﺎﺷ
ﻚﻳﺮﲢ
ﺔﻤﺋﺎﻘﻟﺍ
OK
ﻲﺋﺎﻘﻠﺗ ﻂﺒﺿ
ﻲﻘﻓﺃ ﻂﳕ
ﻱﺩﻮﻣﺎﻋ ﻂﳕ
ﺔﻋﺎﺴﻟﺍ
ﺭﻮﻃ
ﻝﺎﺧﺩﺇ
ﺝﻭﺮﺧ
50
50
50
65
ﻚﻳﺮﲢ ﺔﻤﺋﺎﻘﻟﺍ
ﻝﺎﺧﺩﺇ ﺝﻭﺮﺧ
OK
Page 13
)(
)(
:
MP3
USB
- 1
JPEG; BMP
.
MPEG-1 / MPEG-2 (.DAT/ .MPG/ .VOB/ .AVI)
.txt
.
ﺭﻮﺼﻟﺍ
ﺓﺩﻮﻋ
ﻰﻘﻴﺳﻮﻣ
.
.)/ (USB
. 1
. 2
MUSIC"
"
:
USB
Source
PHOTO
،"
،"
،MOVIE"
FAT32
.
ﻢﻠﻴﻓ
ﺺﻧ
FAT
،
MEDIA
TEXT "
.
SOURCE
ﺓﺩﻮﻋ
1920*1200.jpg 1080*768.jpg
ﺭﻮﺼﻟﺍ
Resolution: 5745x5121
Size: 5252 Kbytes
Panel1
Date: .... / .. / ..
Time: .. : .. : ..
. 3
ﻑﺎﻘﻳﺇ
"
Return
.
12
ﻑ ﺬﺣ
."
PHOTO
.
.
" DISPALY "
.
.
Page 14
ﺺﻧ
ﺔﻘﺑﺎﺴﻟﺍ ﺔﺤﻔﺼﻟﺍ
ﻢﻠﻴﻓ
Page 15
14
Page 16

2436TDO3P0
OR
2436TDL3P0 OR 2436TDP3P0
80
145
335
365
555
555
2.3
15
i
Page 17
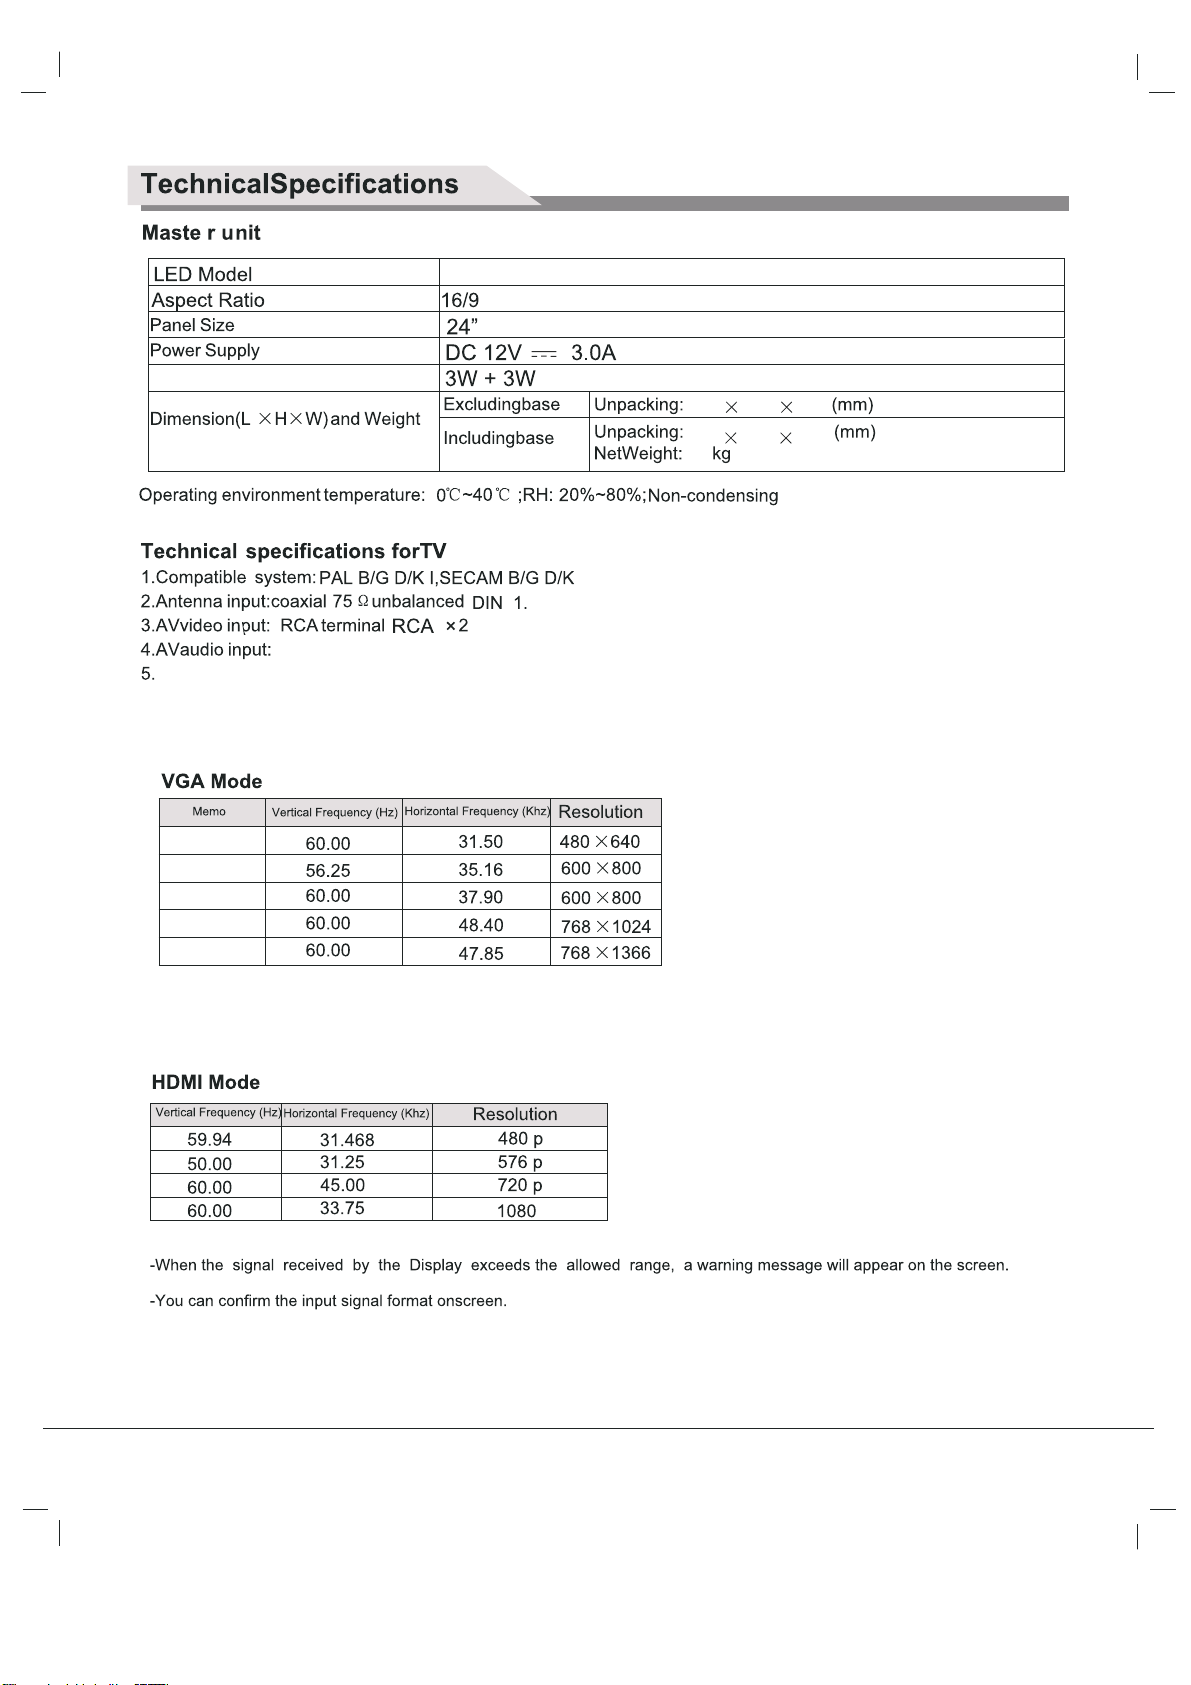
Power Consumption of Speaker
Stereo Audio x 2 RCA,x1(Phone Jack for VGA)
HDMI Connector x 1
6.
VGA(D-Sub 15 Pin Type) x 1
7.
USB x 1
2436TDO3P0 OR 2436TDL3P0 OR 2436TDP3P0
80
145
335
365
555
555
2.3
Note: Youre suggested to use the VGA connecting cord of not more than 5 meters to ensure the appropriate picture quality
i
Note:the specification shown above may change without notice for quality improvement.
15
Page 18

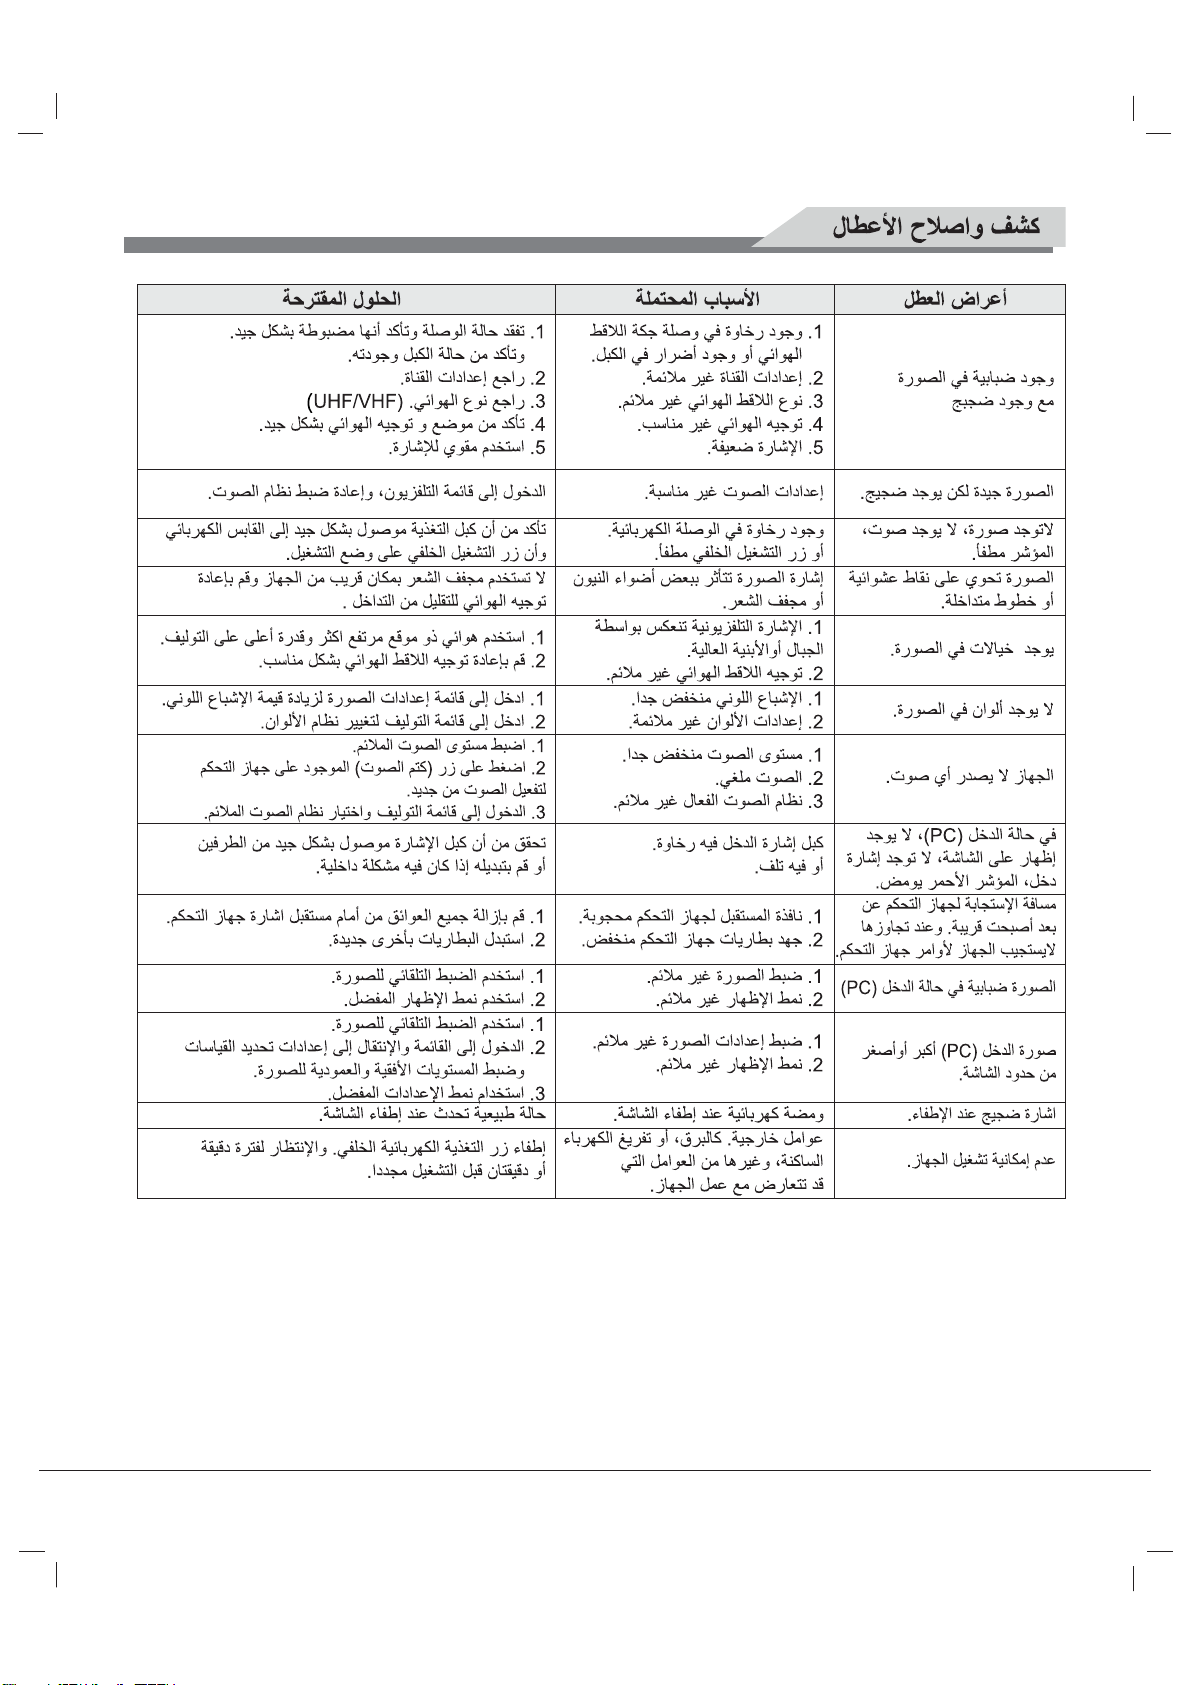
Simple Troubleshooting
If the display fails or the performance changes dramatically , check the display
in accordance with the following instructions. Remember to check the periphe rals
to pinpoint the source of the failure.
Symptom
Power cannot be turned
on.(Power indicator
does not light.)
No Input Signal
message appears.
The remote control does
not function properly.
Flashing spots or stripes
appear on the screen.
Image co
lour or quality
deteriorates.
Solution
-Check that both ends of the power cable are
plugged into the socket appropriately and the wall
socket is operational
-Check that the signal line is connected properly .
-Check that the power of the relevant peripherals is
turned on.
-Check that the Input option that has been selected
matches with the
input signal.
-Check the batteries are not drained.(Use new
batteries.)
-Check that the remote control is within the operating
range.
-Check that the remote control is pointed to the
remote control window on
the display .
-Check that there are no obstacles between the
remote control and the remote control window.
-Check that there are no emission (Car, HV cable or
Neon lamp) or other possible interference sources.
-Check that a
ll the video settings are adjusted
appropriately, such as brightness, contrast, colour
etc.
-For more information about video settings, refer
to OSD Functions in Chapter 2.
Screen position and
size are incorrect.
Image or colour is
incorrect.
Display warning
message.
-Check that the screen position and size is adjusted
appropriately.
-Check that the signal line is connected properly .
-When connecting to a PC, you can change the
resolution of the PC to acquire the correct image.
The discrepancy of the PC o
utput signal may
the display of the image.
-Check that the input signal line is properly ixed.
-Select the correct input signal.
-For more information, refer to Supported Signal
Modes in Chapter 4.
14
Page 19

Multimedia
2.6. 5 MUS
A.Press or to select f older or ile , p re s
press REC
IC
to return previous folder .
ALL
button to enter next folder,
s OK
B.Press or to select the MUSIC that you want,press OK button to select
playlist than press button to play.
C.Press Display button to the media item.
D.Press or button to highlight the media and than press OK butt on
MUSIC
De lete
2.6.6 MOVIE
A.Press or to select f older or ile , p ress OK button to enter next folder , press RECALL
to return pr evious folder.
B.Press or to select the MOVIE that you want ,press OK button to select playlist then
press button
C.Press Dis pl ay button to the media item.
D.Press or button to highlight the media and than press OK button
to play.
TEXT
Delete
1. Read these instructions.
2.Keep th ese instructions.
3.Heed all warnings.
4.Follow all instructions.
5.Do not use this apparatus near water.
6.Clean only with dry cloth.
Size :3KByt es
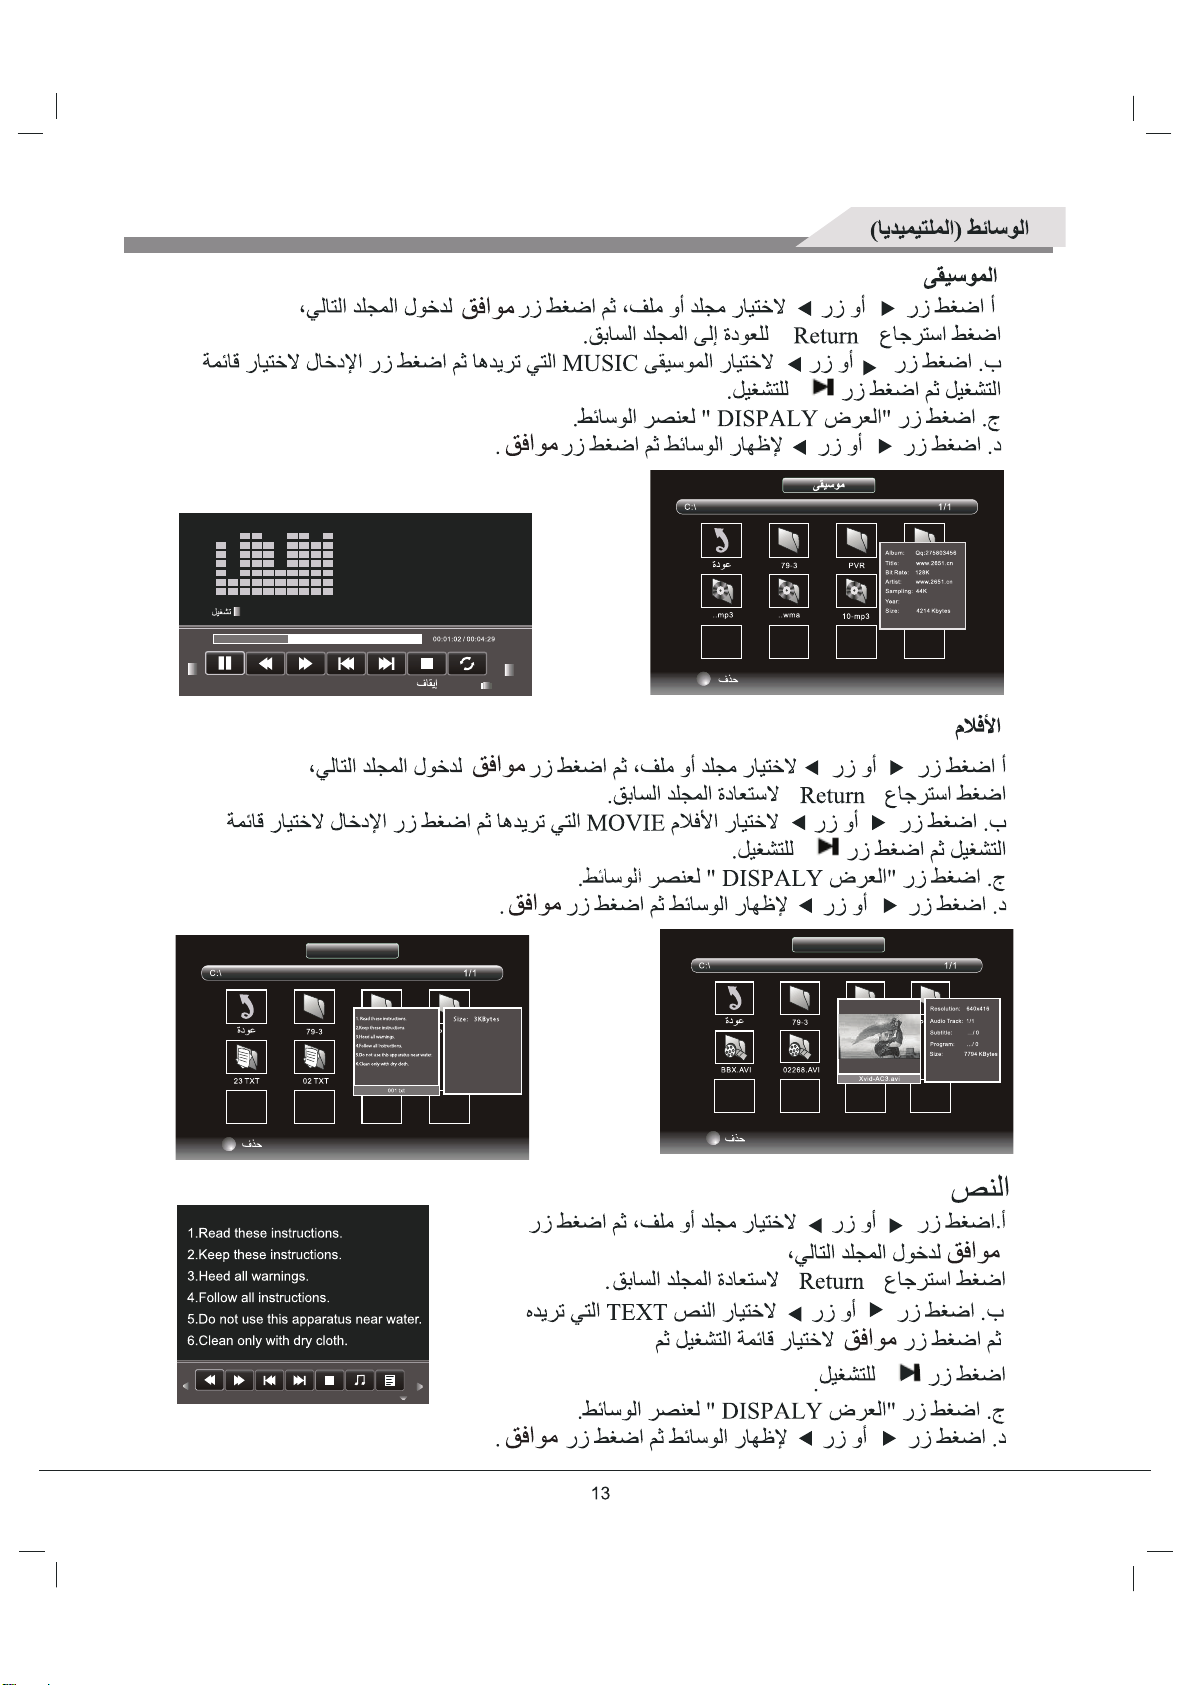
2.6.7 TEXT
A.Press or to select folder or ile, pr ess OK button
to enter next folder,
B.Press or to select the TEXT that you want , press OK
button to select play l ist then press button to play
C.Press Dis p
D.Press or button to highlight the media and than
press OK button
press RECALL to return
ay
l
button to the media item.
previous folder.
.
13
MOVIE
Del ete
Page 20
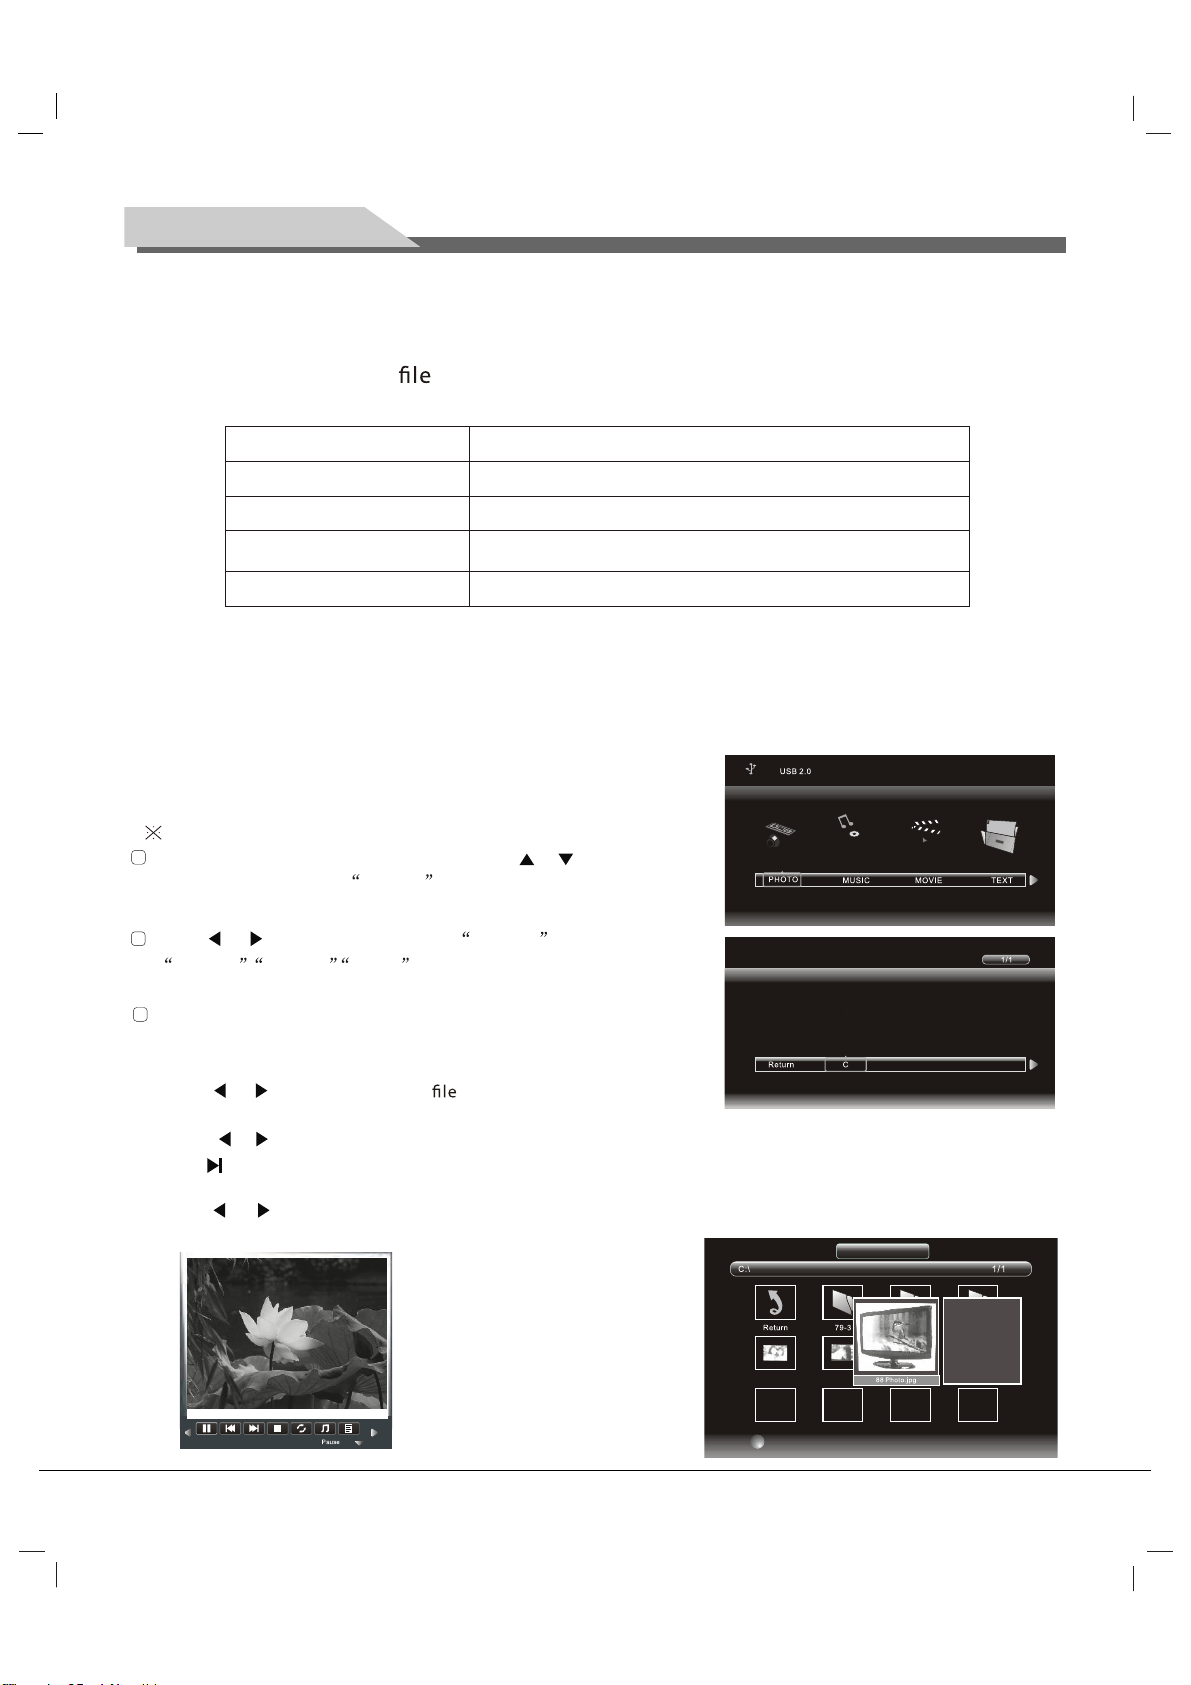
Multimedia
2.6.1 MEDIA Function
A .Supp
ort multi media :
Multi media data Format
Photo
JPE
G ;
BMP
Music MP3
Video
MPEG-1 /MPEG-2 .(DAT. /MPG. /VOB. /AVI)
TXT. txt
B .USB don't connect PC.
C .Compatible USB devices :The format is FAT or FAT32.
D .We cannot guarantee compatibility (operation and/or bus power ) with all USB
mass storage devices and assumes no responsibility for any loss of data that
may occur when connected to this unit.
2.6.3 USB Funct
djustment of the USB
A
1
Press the SOURCE button ,and then press or
button to highlight the MEDIA itema ndt hen
p ress
Press or button to highlight the
2
MUSIC , MOVIE , TEXT item and then press
Ok button.
3
Press the
button.
ok
SOURCE button
ion
exit.
to return or
PHOTO ,
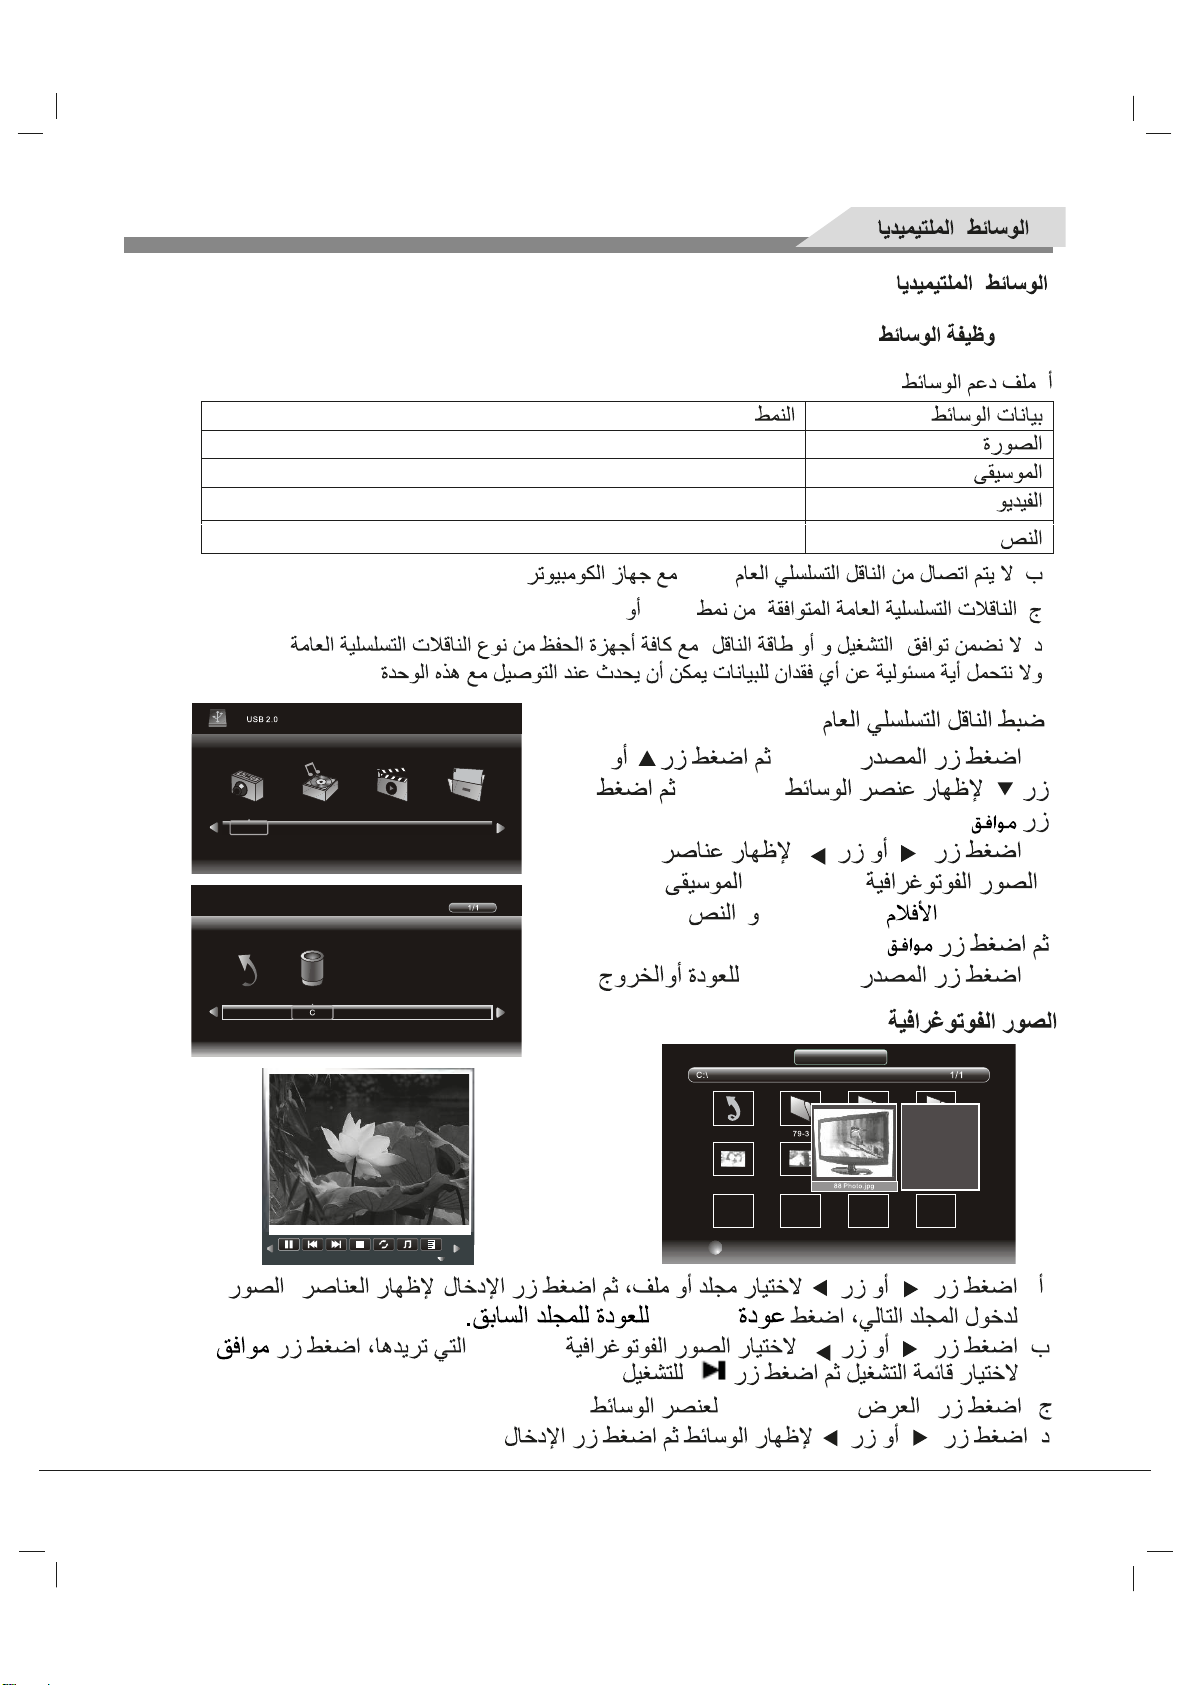
2.6. 4 PHOTO
A.Press or to select f older or , press Ok
button to enter next
B.Press or to select the PHOTO that you want ,press Ok button
press button to play.
C.Press Display button to the media item.
D .Press or button to highlight the media and than
folder ,press RECALL
to return
previous folder.
press Ok
to select
button .
pla yl ist then
PHOTO
12
1920 *1200 .jpg 1080 *768 .jpg
Delete
Resol ution : 5745 x5121
Size: 5252 K bytes
Pan el1
Date: .... / . . / ..
Time: .. : .. : ..
Page 21
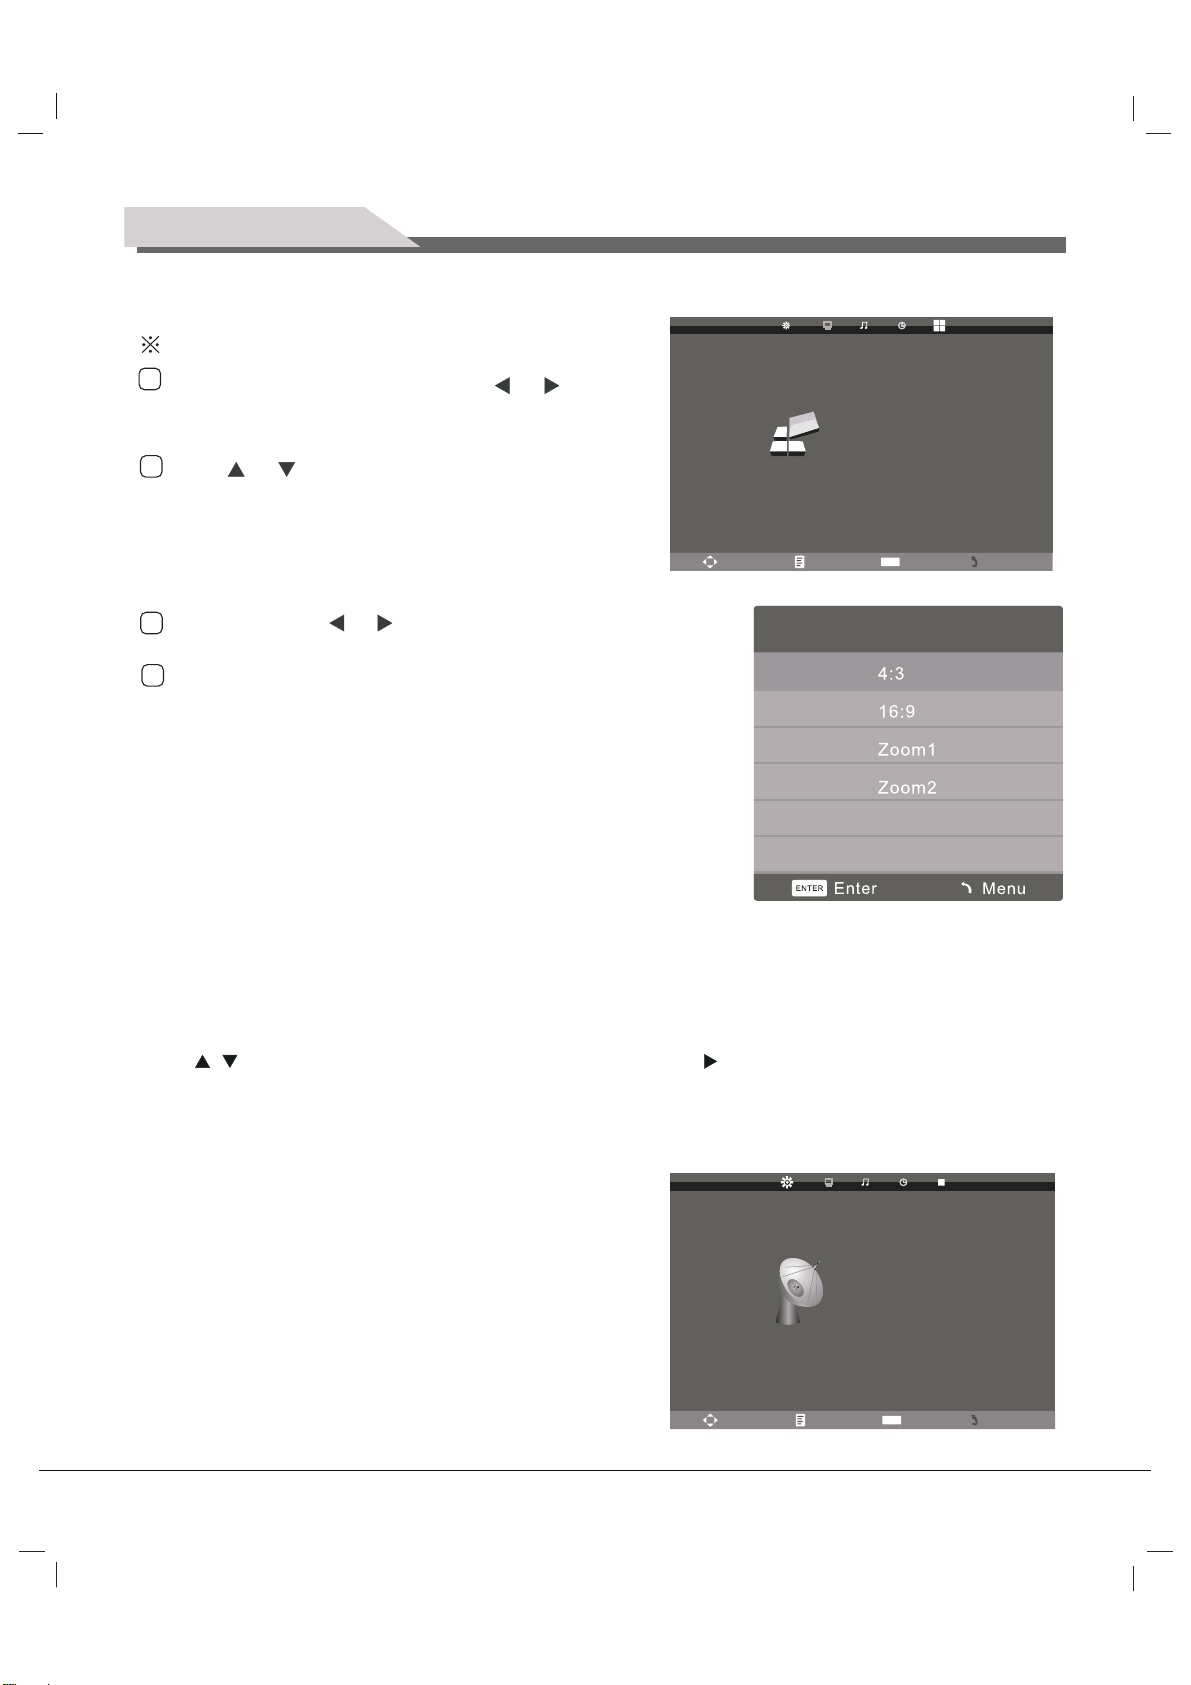
BasicOperations
2.4.5
OPTION Function
Adjustment of the OPTION
1
2
3
4
OSD Language
In
button to change
Aspect Ratio
the Menu
Press
button to the " item.
Press
"OSD Language ",
"Key Lock",
item and
In Sub-menu Press
Press
"OPTION "menu, select "
or button to highlight the
"Reset"
then press Ok
the Menu
the
button, and then press
OPTION
"
"TTX
Language ,"" Scale"
“Software Update(USB),"or
button
or
button to return or exit .
OSD
setting
to enter
button to
Adjust
Language andthen press Ok
or
,
"Blue Screen,"
Sub-menu.
different setting.
"
OSD Language
TTX Language
Scale
OPTION
Move Menu Enter Exit
Blue Screen
Keyboard Lock
Reset
Software Update)USB(
OK
SCALE
English
West
16:9
On
O
In the" OPTION "menu ,select "Aspect Ratio "and then press Ok button to
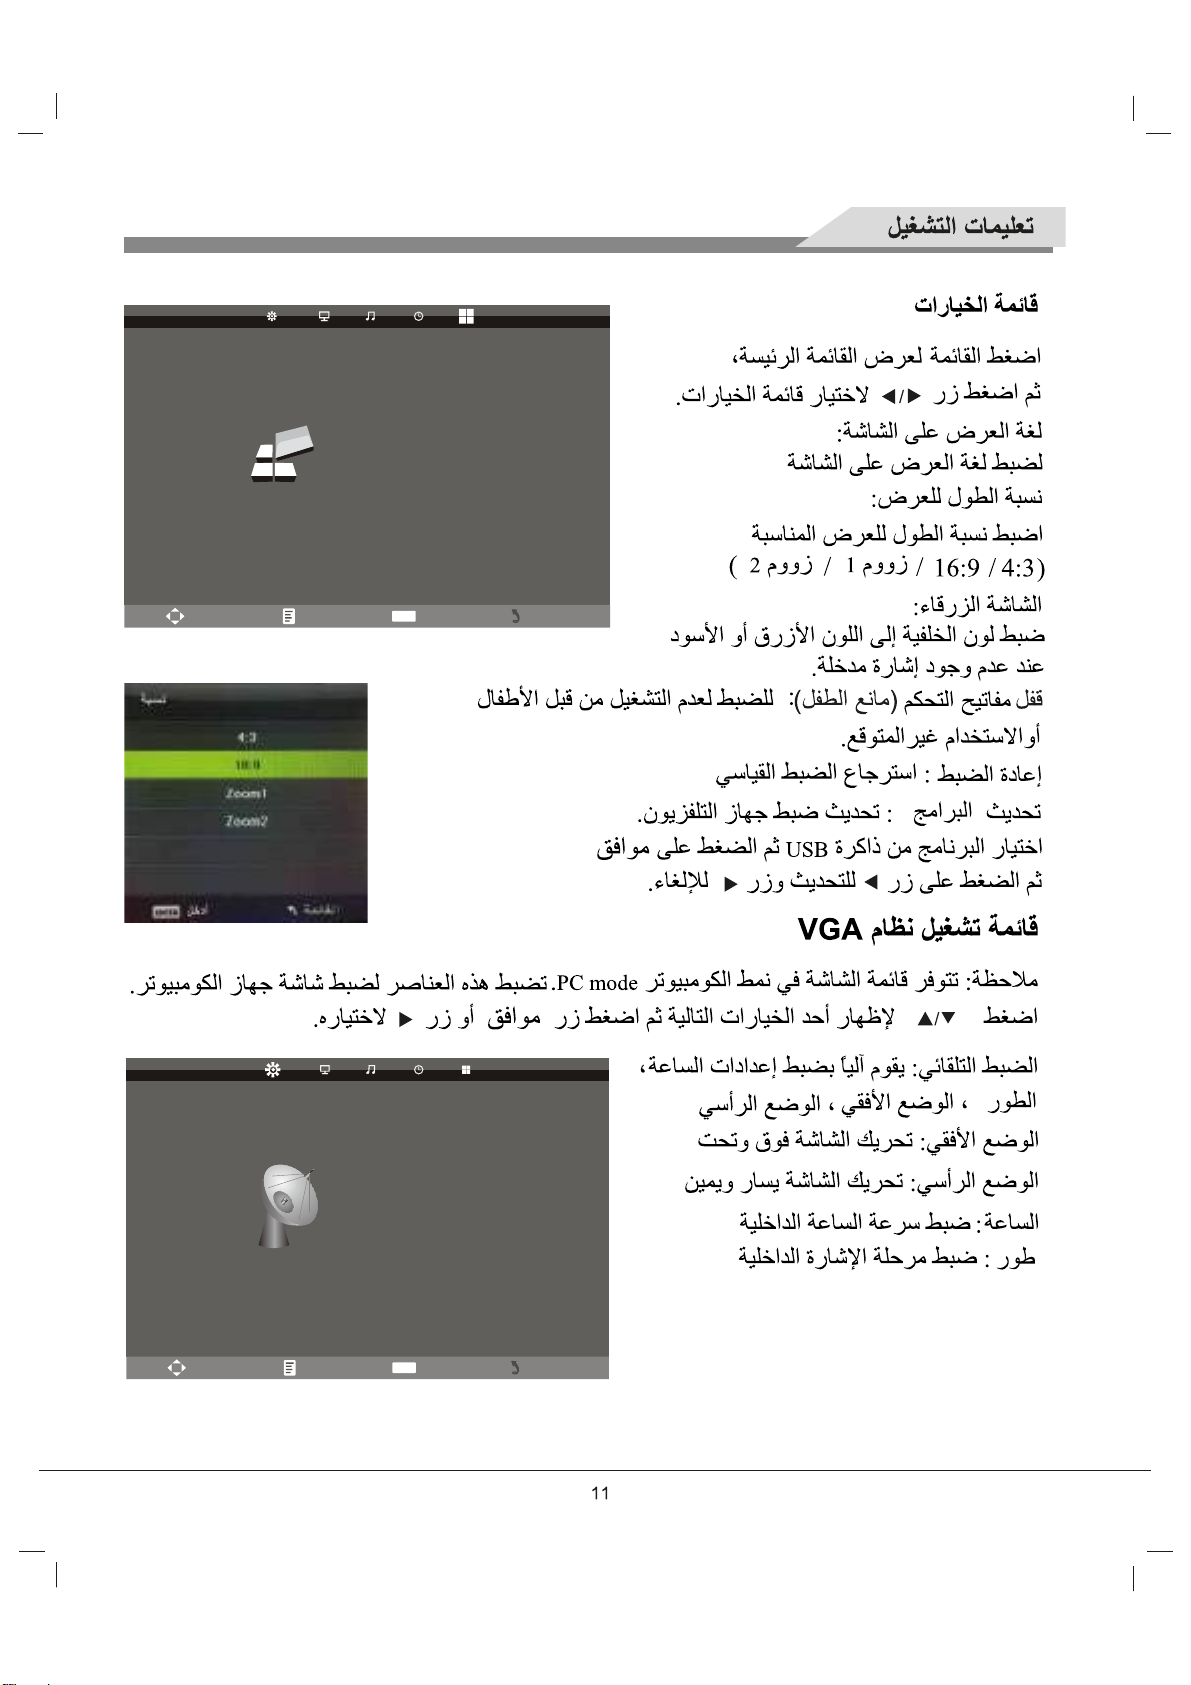
2.5 SCREEN MENU
Note :the Screen Menu is available in PC mode. Those items are set to adjust the pc Screen .
Press to highlight
Auto Adjust :
/
Automatically adjust Clock,Phase,
one of the
following options,then press
Ok or to
H-Position ,and V-Position settings.
change the setting.
select it
.
Horizontal Pos : Shift the screen up or down.
Vertical Pos :
Phase :
Shift the screen left or right.
Adjust the internal sampling clock rate.Clock :
Adjust the
internal signal phase.
11
Auto Adjust
Horizontal Pos.
SCREEN
Move Menu Enter Exit
Vertical Pos.
Clock
Phase
50
50
50
65
OK
Page 22
Basic Operations
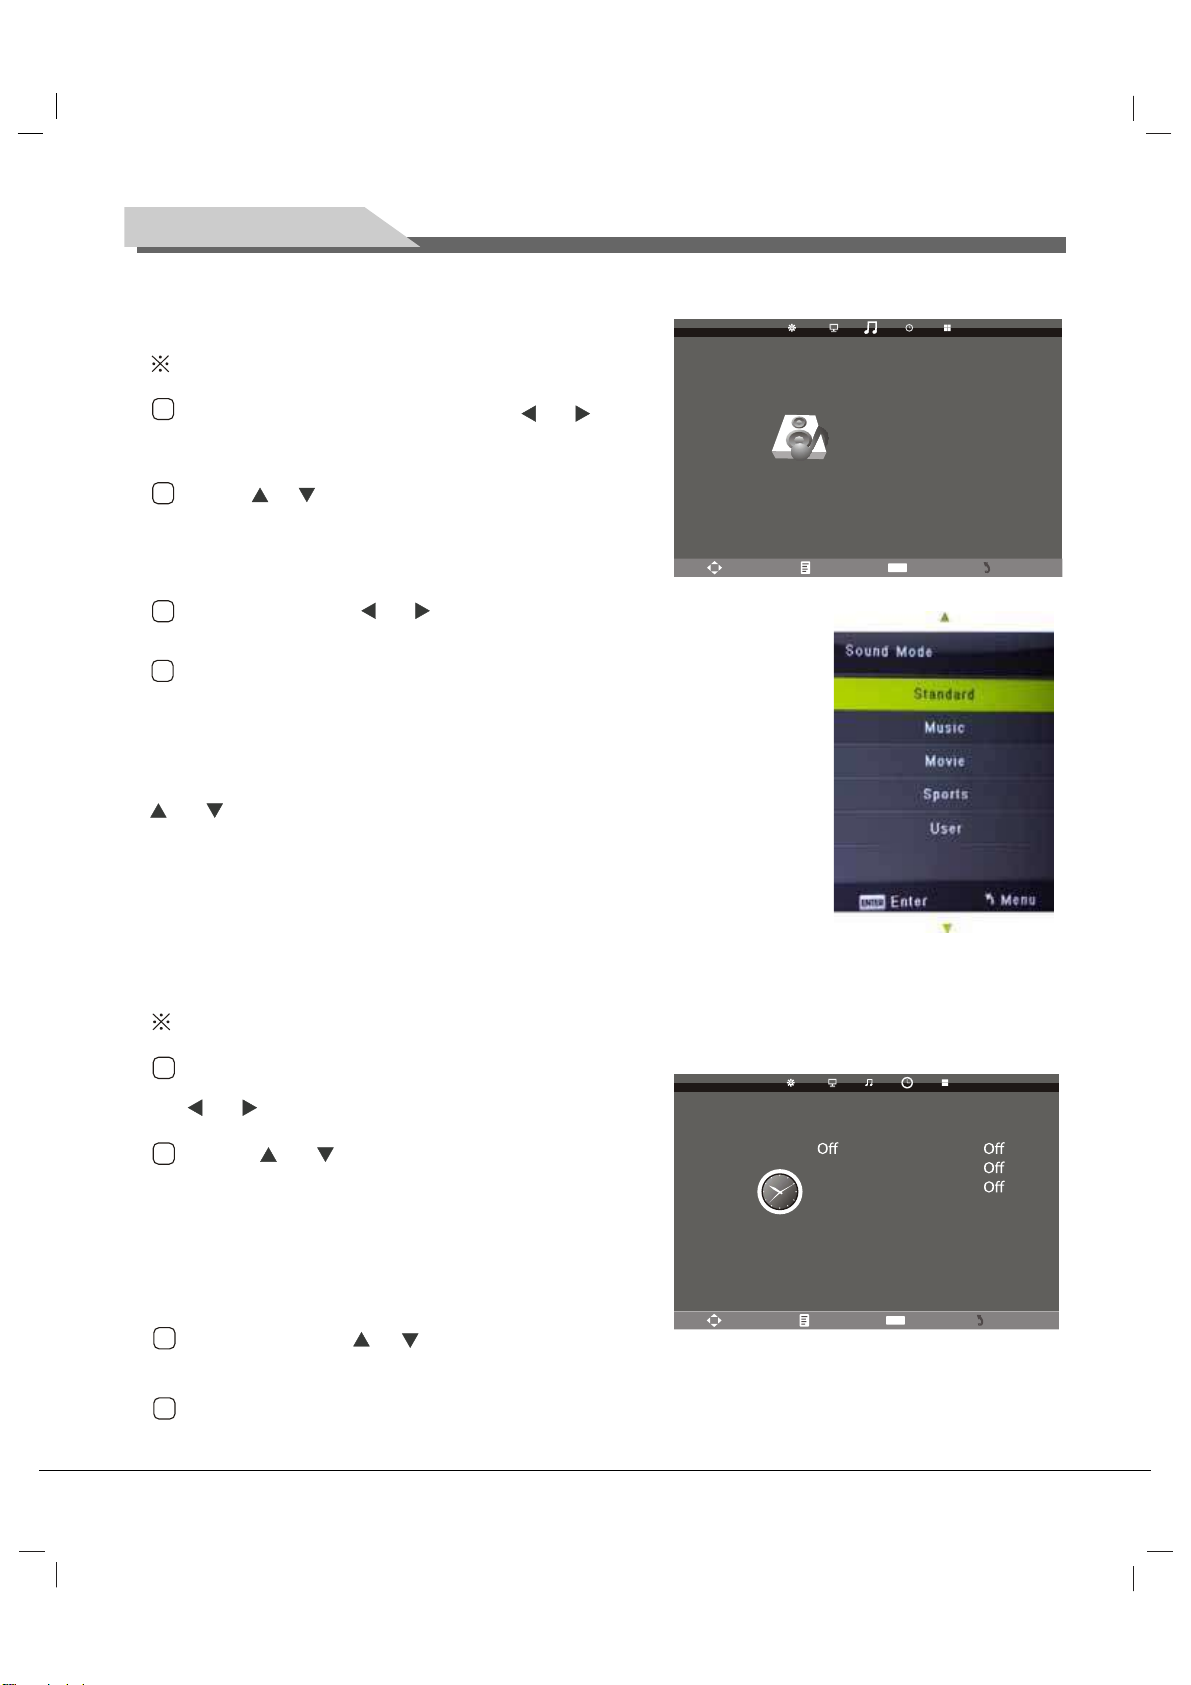
2.4.3 SOUND Function
Adjustment of the SOUND
1
Press the Menu
button to the "SOUND " item.
2
Press
" B alance" ,
then press
In Sub-menu Press
3
4
Press the Menu button to return or exit.
button, and then press
or button to highlight the
" Auto V olume " ,
OK
button to enter Sub-menu.
or
"Sound Mode"
"Surround Sound"
button to
adjust different setting.
Sound Mode
In the " SOUND " menu, select " Sound Mode "
or
"Standard", "Music",
button to change
the setting:
"Movie", "Sports", "User"
or
and then
press
Sound Mode
Treble
Bass
SOUND
Move Menu Enter Exit
Balance
OK
User
50
50
0
2.4.4 TIME Function
Adjustment of the TIME
1
Press the Menu button, and then press
button to the " TIME " item.
or
Press
2
“Clock” , “Off Time” , “ On Time” ,
“Sleep Timer “ or ”OSD Timer”
item and then press
enter sub-menu.
3
In Sub-menu Press
adjust different setting.
4
Press the Menu button to return or exit.
or button to highlight the
OK
button to
or
button to
10
Clock
Time
On Time
TIME
Move Menu Enter Exit
Sleep Timer
OSD Timer
OK
-- -- -- --
15 S
Page 23

Basic Operations
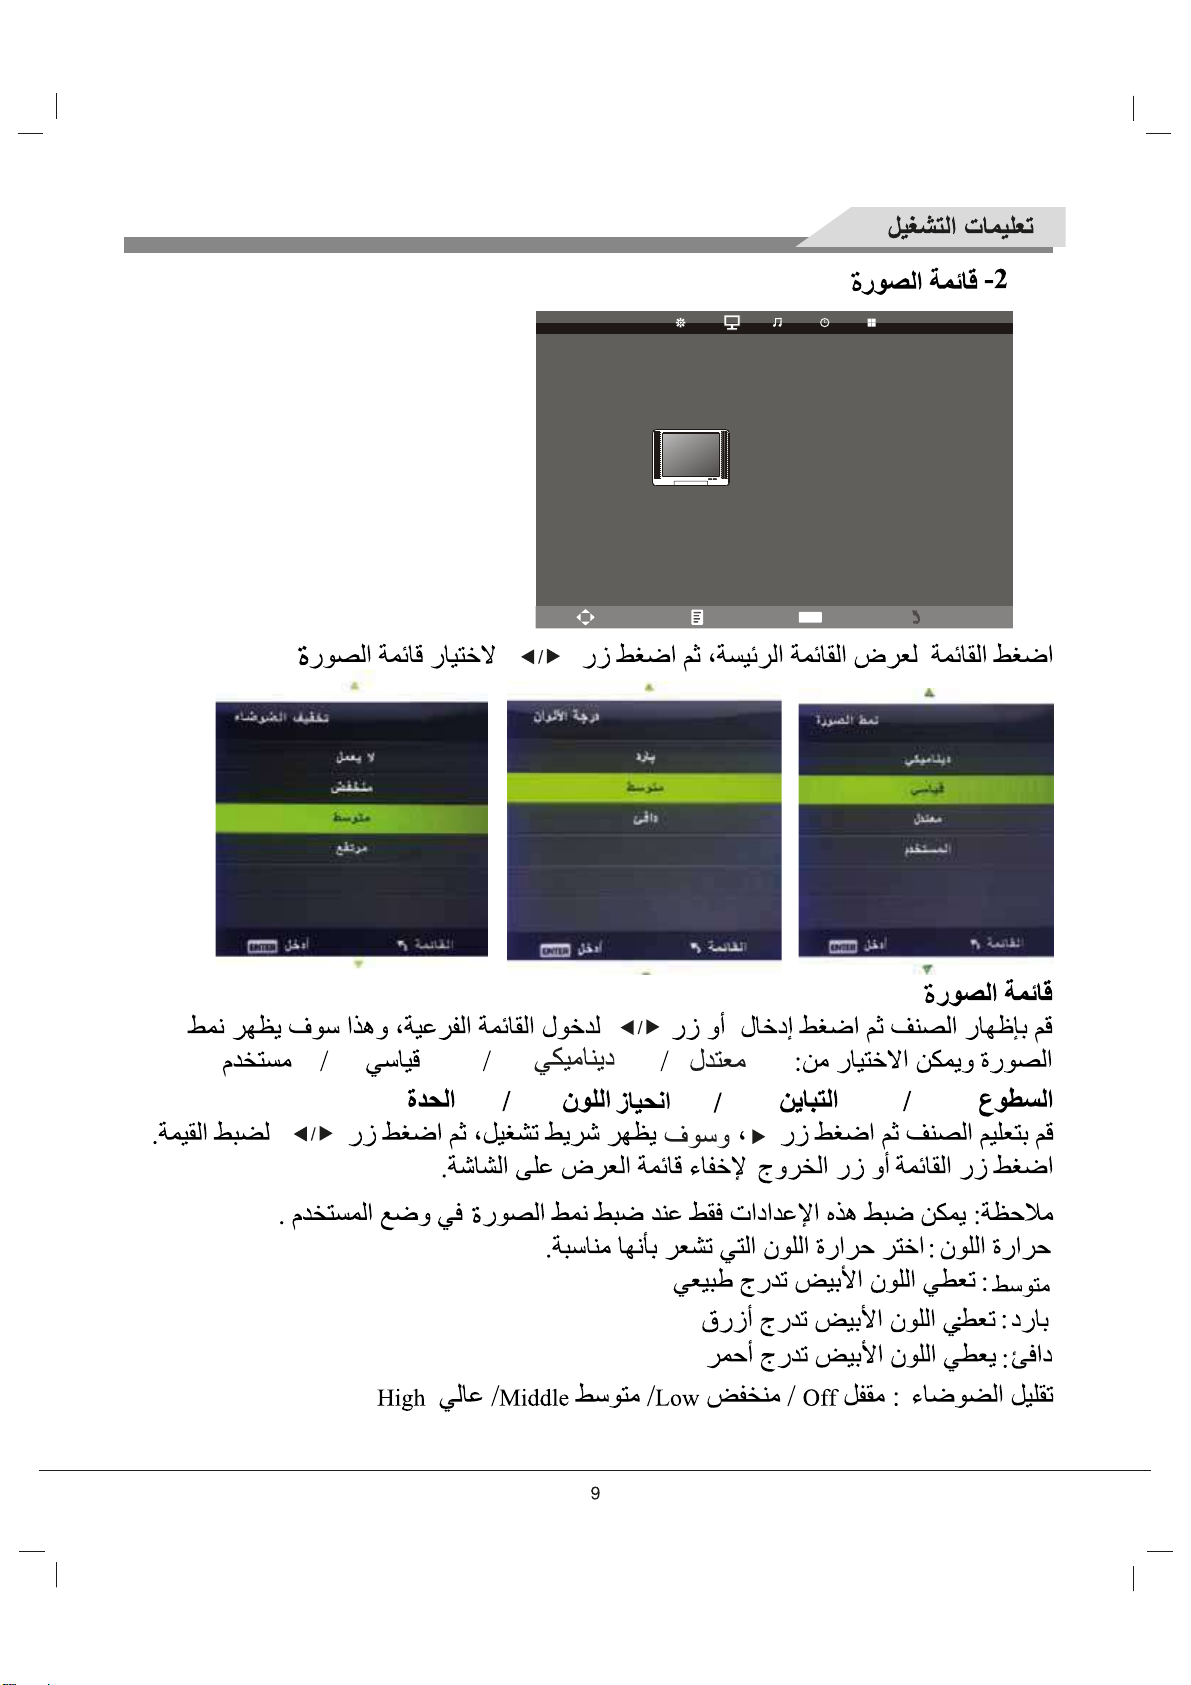
2.4.2 PICTURE Function
Adjustment of the PICTURE.
1
Press the Menu button, and then press
"
PICTURE
Press
2
"Color Temperature
item and then press OK button to
"
item.
or button to highlight the "Picture Mode" ,
"," Noise Reduction "
enter Sub-menu.
or
button to the
Picture Mode
Contrast
Brightness
PICTURE
Move Menu Enter Exit
Color
Tint
Sharpness
Color Temperature
Noise Reduction
OK
User
50
50
50
50
50
Medium
Middle
3
In Sub-menu Press
Press the
4
In the " PICTURE" menu, select "Picture Mode"
and then press
Color Temperature
In the PICTURE menu,select
and then press
"Cool", "Medium", "Warm".
Noise Reduction
In the PICTURE menu,select oise Reduction "
"Off", "Low", "Middle", "High".
Menu
OK
OK
or
button to return or exit.
Button
to change
button to change
"
adjust different setting.
button to
the setting.
Color Temperature
the setting:
"N
" " " "
and then press
"
button to change
OK
the setting:
9
Page 24
Basic Operations
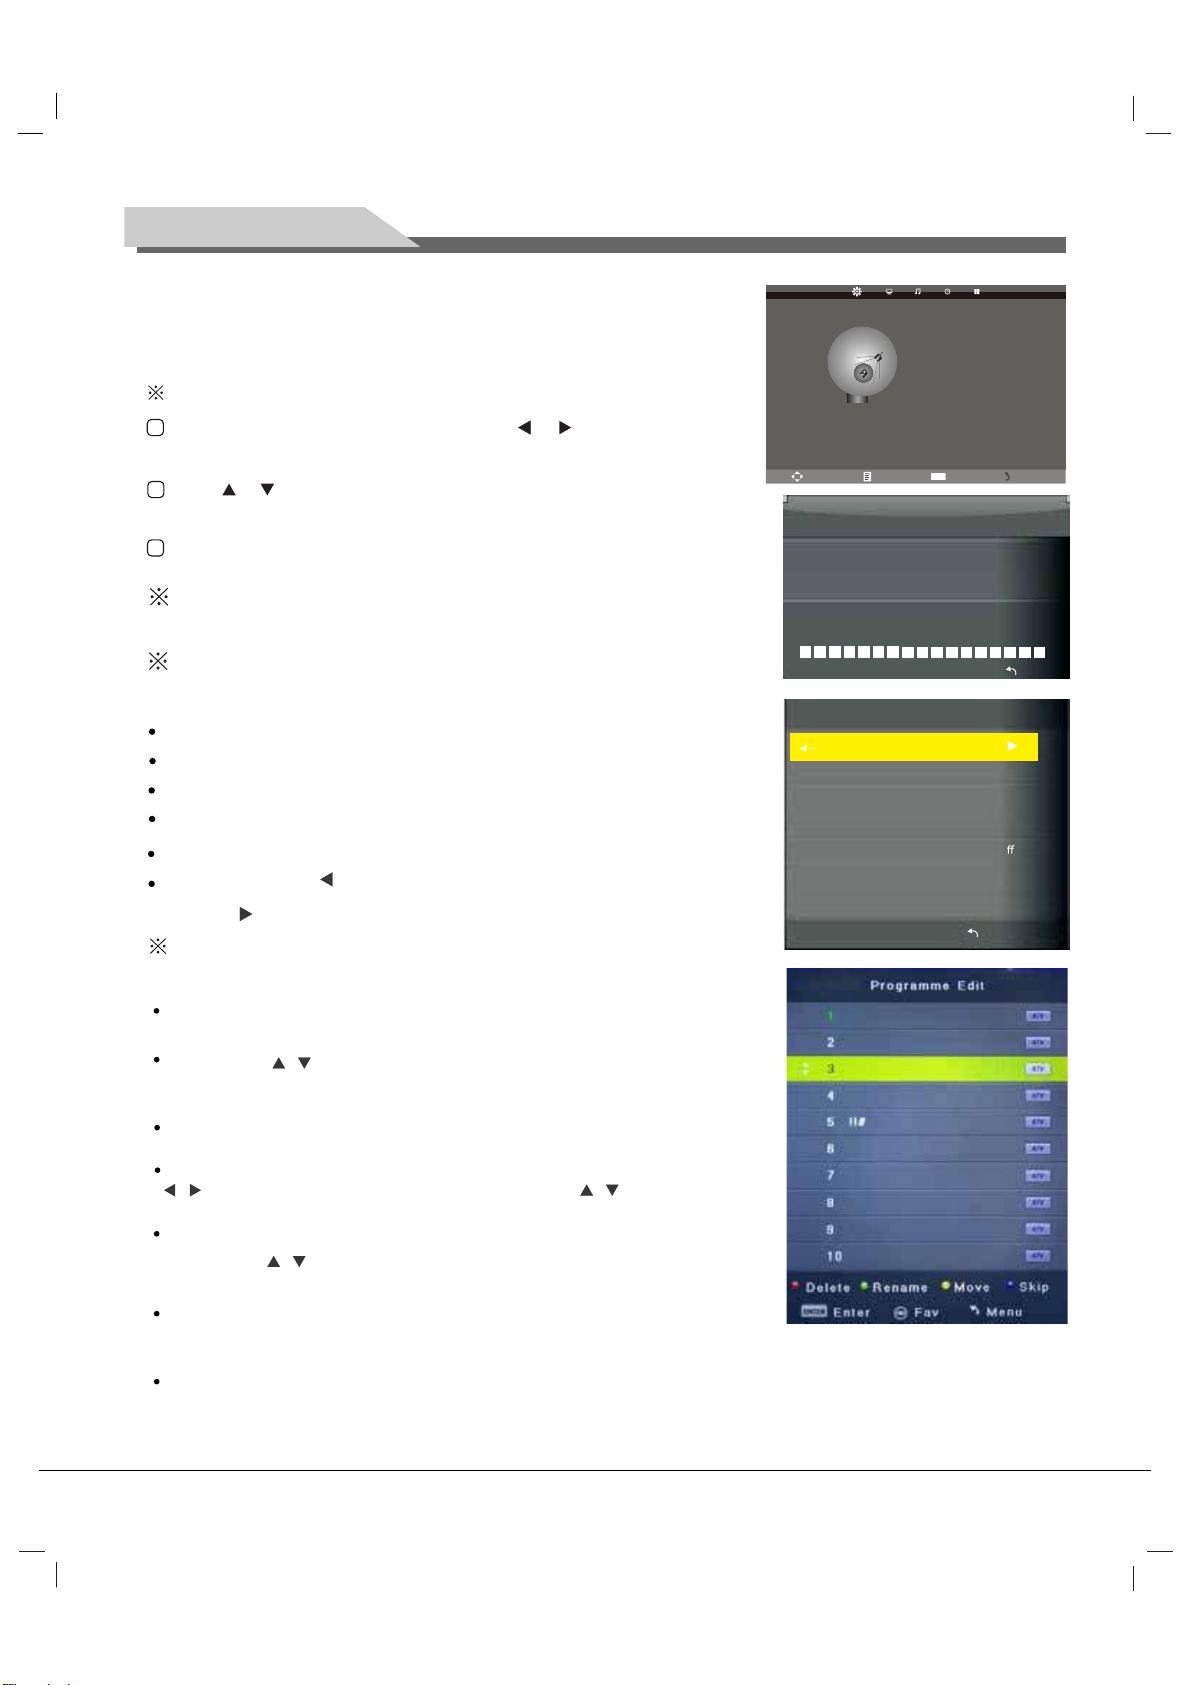
2.4 Menu Functions
(All the initial setting of menu, please consult the actual object.
User manual only detailedly describe how to operate the device)
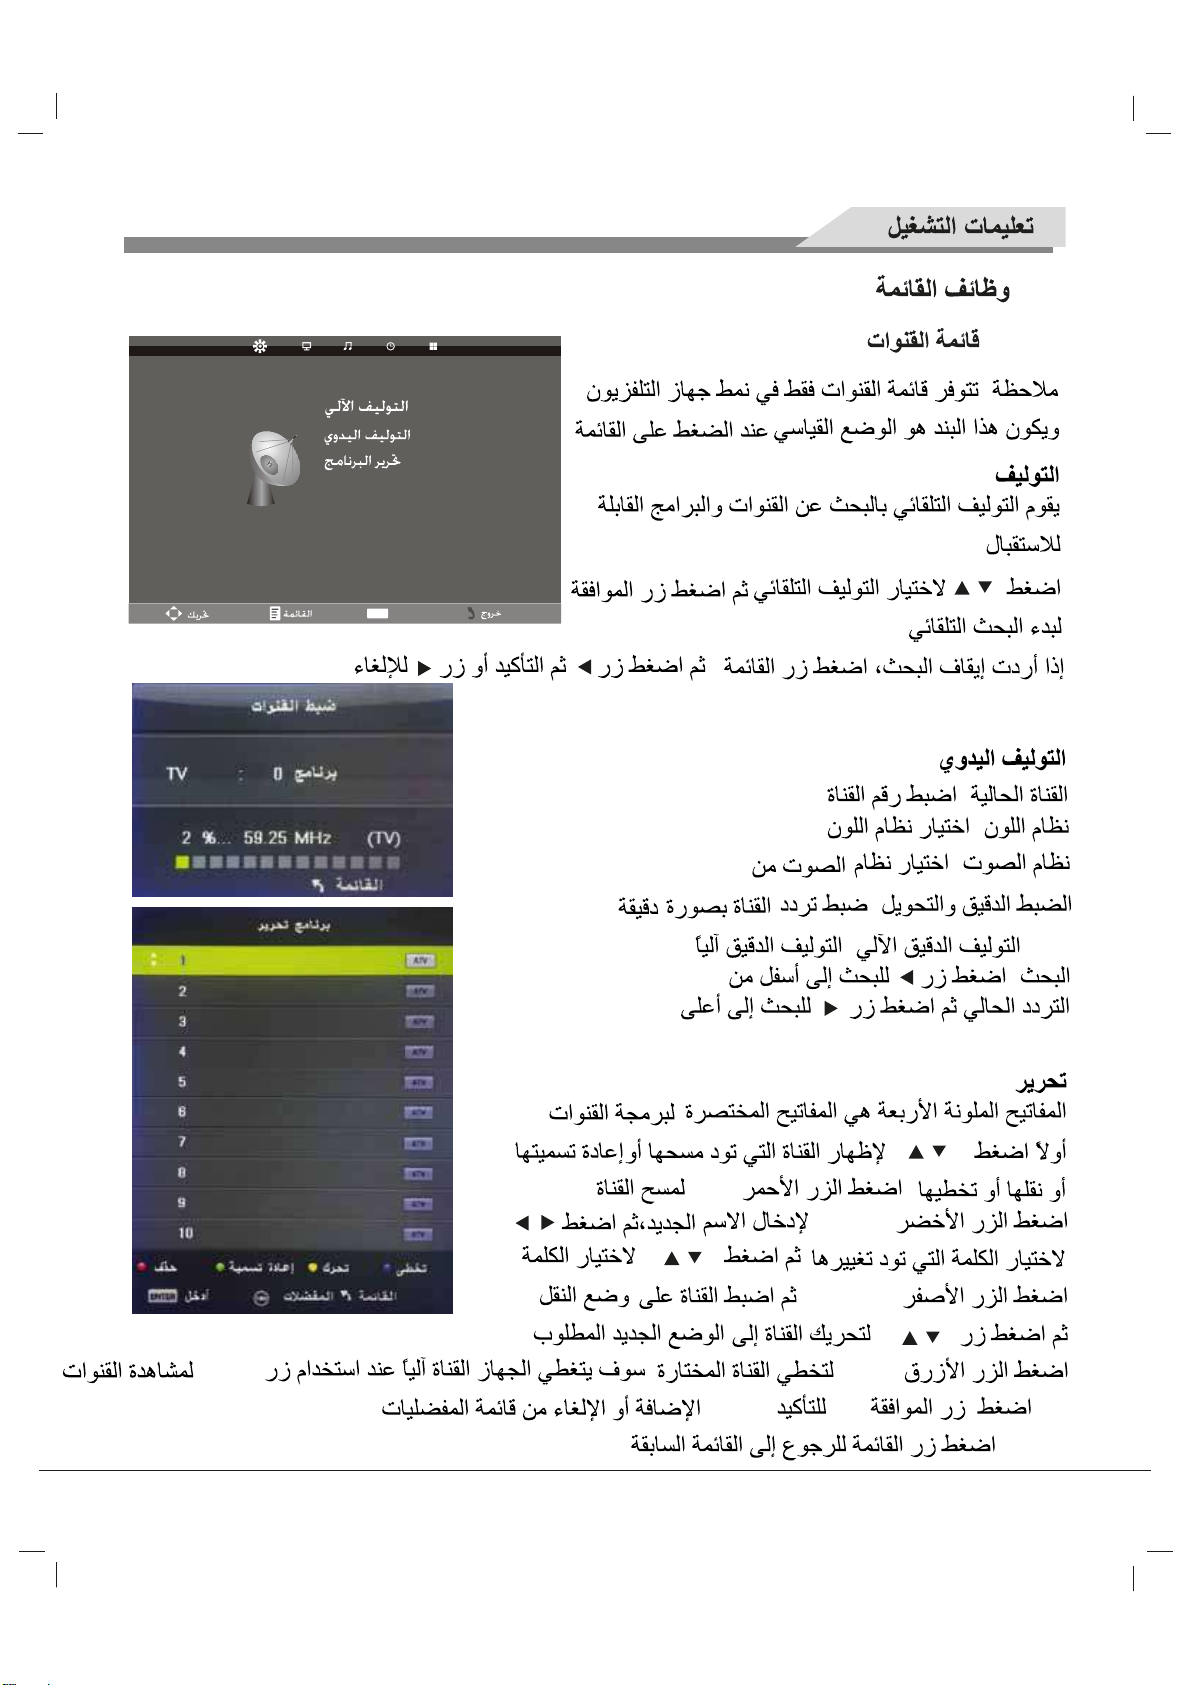
2.4.1 CHANNEL Function
Adjustment of the CHANNEL
CHANNEL
Auto Tuning
Manual Tuning
Programme Edit
1
Press the Menu button, and then press
or button to
the " CHANNEL" item.
Press or button to highlight the
2
"Auto Tuning","ATV Manual Tuning",
"Programme Edit", then press OK button to change the setting.
3
Press the Menu button to return or exit.
Tuning "
In the "CHANNEL" menu, select
" Auto
and then press
OK button to auto search and store the channels.
In the " CHANNEL " menu, select
OK
Button to change the setting.
Current CH
Color system
Sound System
Fine-Tune
AFC
Automatic Fine tuning.
Search
Set the channel number
Select the color system
Select the sound system (DK/BG/M/N/I)
Adjust the frequency of the
Press
to seach down from the
Manual Tuning "
" ATV
and then press
PAL/SECAM
channel finely .
current frequency, and
press to search up.
In the " CHANNEL" menu, select
b u t t o n t o change the setting.
OK
" Program edit" and then press
The four colored key is the shortcut key for programming the channel.
Move Menu Enter Exit
OK
Channel Tuning
TV : 5Programme(s)
44%... 433.75MHZ (TV)
Menu
ATV Manual Tuning
Current CH 1
Color System PAL
So und System DK
Fine-Tune 49.75MHZ
AFC O
Se arch
+
Menu
First
press to highlight the channel you
/
want to
d e l e te or rename or move or skip, then:
P
ress the buttont o d elete t hec hannel.
Press the buttonto e nter th er ename
/
to select the word you
Press the button to set the channel
T h e n p r e ss to move it
Press the button to skip the select channel.
Red
Green
Yellow
/
Blue
state, th en p r e s s
want to change, and to select word.
/
to moving
state.
to the position you want to put.
(Your TV set will skip
the channel automatically when using CH+/- to view the channels.)
Fav Add or Delete the channel to your faverate list.
8
Page 25

Remote Control
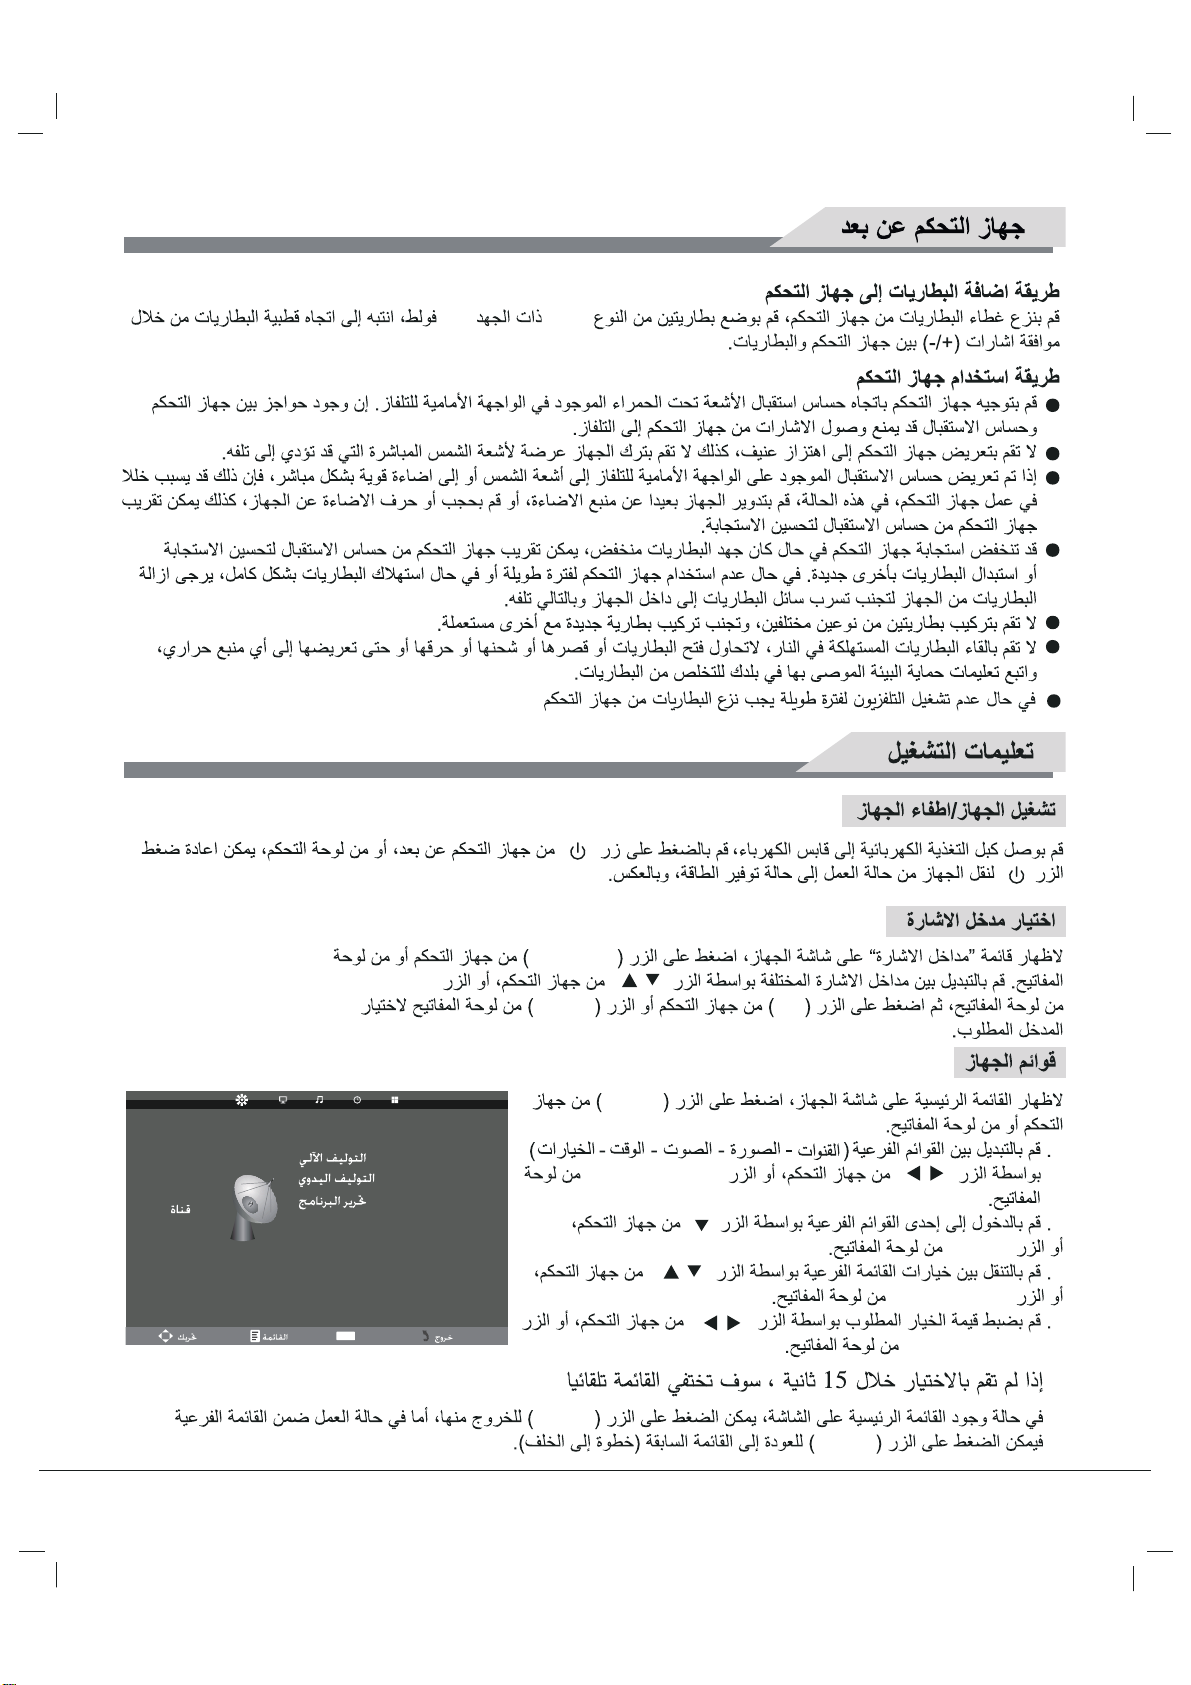
Installing battery
Remove the battery cover, and insert two AAA (1.5V) batteries; make sure that the polarity of the battery is
consistent with the marks "+/-" in the battery slot.
Precautions of remote control usage
Point the remote control to the receiver window. The objects between remote control and the receiver
window may disturb the normal operation.
Keep the remote control away from strong vibration. In addition, do not set or put the remote control in
direct sunshine, which may result in deformation of the remote control
The remote control may be invalid if the receiver window is in direct sunshine or strong light; in this case,
please adjust the angle of the light or the device, or approach the remote control to the receiver window.
The effective range of the remote control may be affected if the battery voltage is low; in this case, please
replace with a new battery; if the remote control won't be used or battery voltage is too low, please take out
the battery to avoid corrosion due to battery liq
Do not mix different types of batteries, or used and new batteries.
Do not throw the batteries into fire, charge or break up, or charge, short circuit, disassemble, heat or burn
the used batteries. Please follow the environmental protection regulations to disposal of the batteries.
Remove batteries when the remote is not used for a long time.
uid leakage.
.
Basic Operations
Turning on/Standby
Insert the power plug into the outlet. Press " " button on the TV set, and press " " key on the remote control
or on the control panel to turn on the TV set. Press " " key again to switch the TV set to standby state.
Signal source selection
Press '' '' key either
''Input Source'' will be displayed on the screen. Then press " / " key on remote control
or " / " key on the control panel to choose the signal source. Press '' '' key on the
remote control or '' " key on the co
source to the signal source you choose.
SOURCE
CH+ CH- OK
MENU
on the remote control or on the control panel. The menu of
ntrol panel and TV will switch the current signal
Menu operation description
'MENU
Press ' '' key on the remote control or on the control panel,
then the TV will display the main menu.
r '' / '' key on
Press " / " key on the remote control o
1
the control panel to select the adjustment sort menu, which
includes 4 sorts: PICTURE, SOUND, OSD, TV.
2
Press " " key on the remote control or '' '' key on the control
panel to enter the adjustment sort menu.
Press " / " key on the remote control or '' / '
3
control panel to select what is needed to adjust in sort menu.
4
Press key on the remote control or '' / '' key onVOL+ VOL-
" / "
The control panel to adjust the value or setting.
If you do not make a selection within 15 seconds, the menu will close A utomatically.
5
Press the Menu button to return or exit OSD menu.
6
VOL+ VOL-
CH-
CH+ CH-
' key on the
Auto Tuning
Manual Tuning
CHANNEL
Move Menu Enter Exit
Programme Edit
OK
7
Page 26
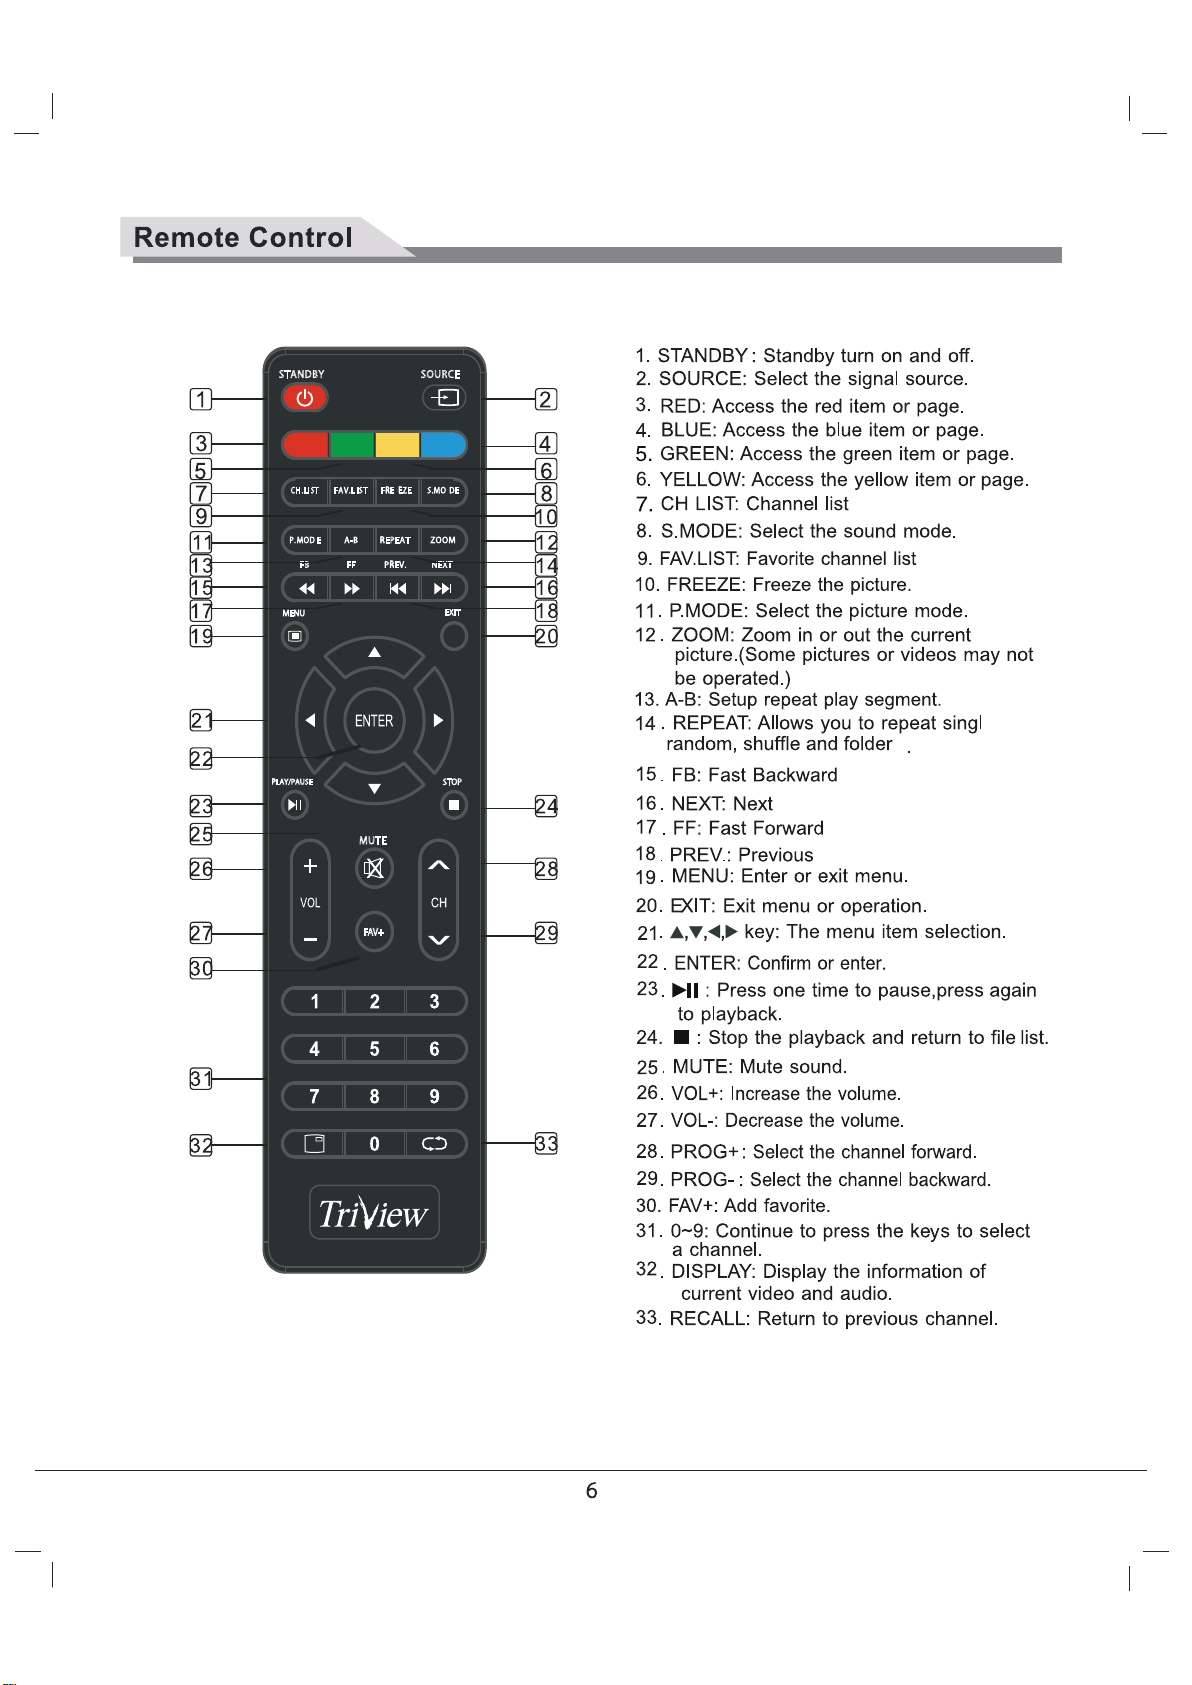
STANDBY SOURCE
CH.LI ST
FAV.LIST FRE EZE
A-B REPEAT
P.MODE
FB FF PREV. NEXT
S.MO DE
ZOOM
MENU
PLAY/PAUSE
EXIT
STOP
MUTE
FAV+
Page 27
Inputs and Outputs
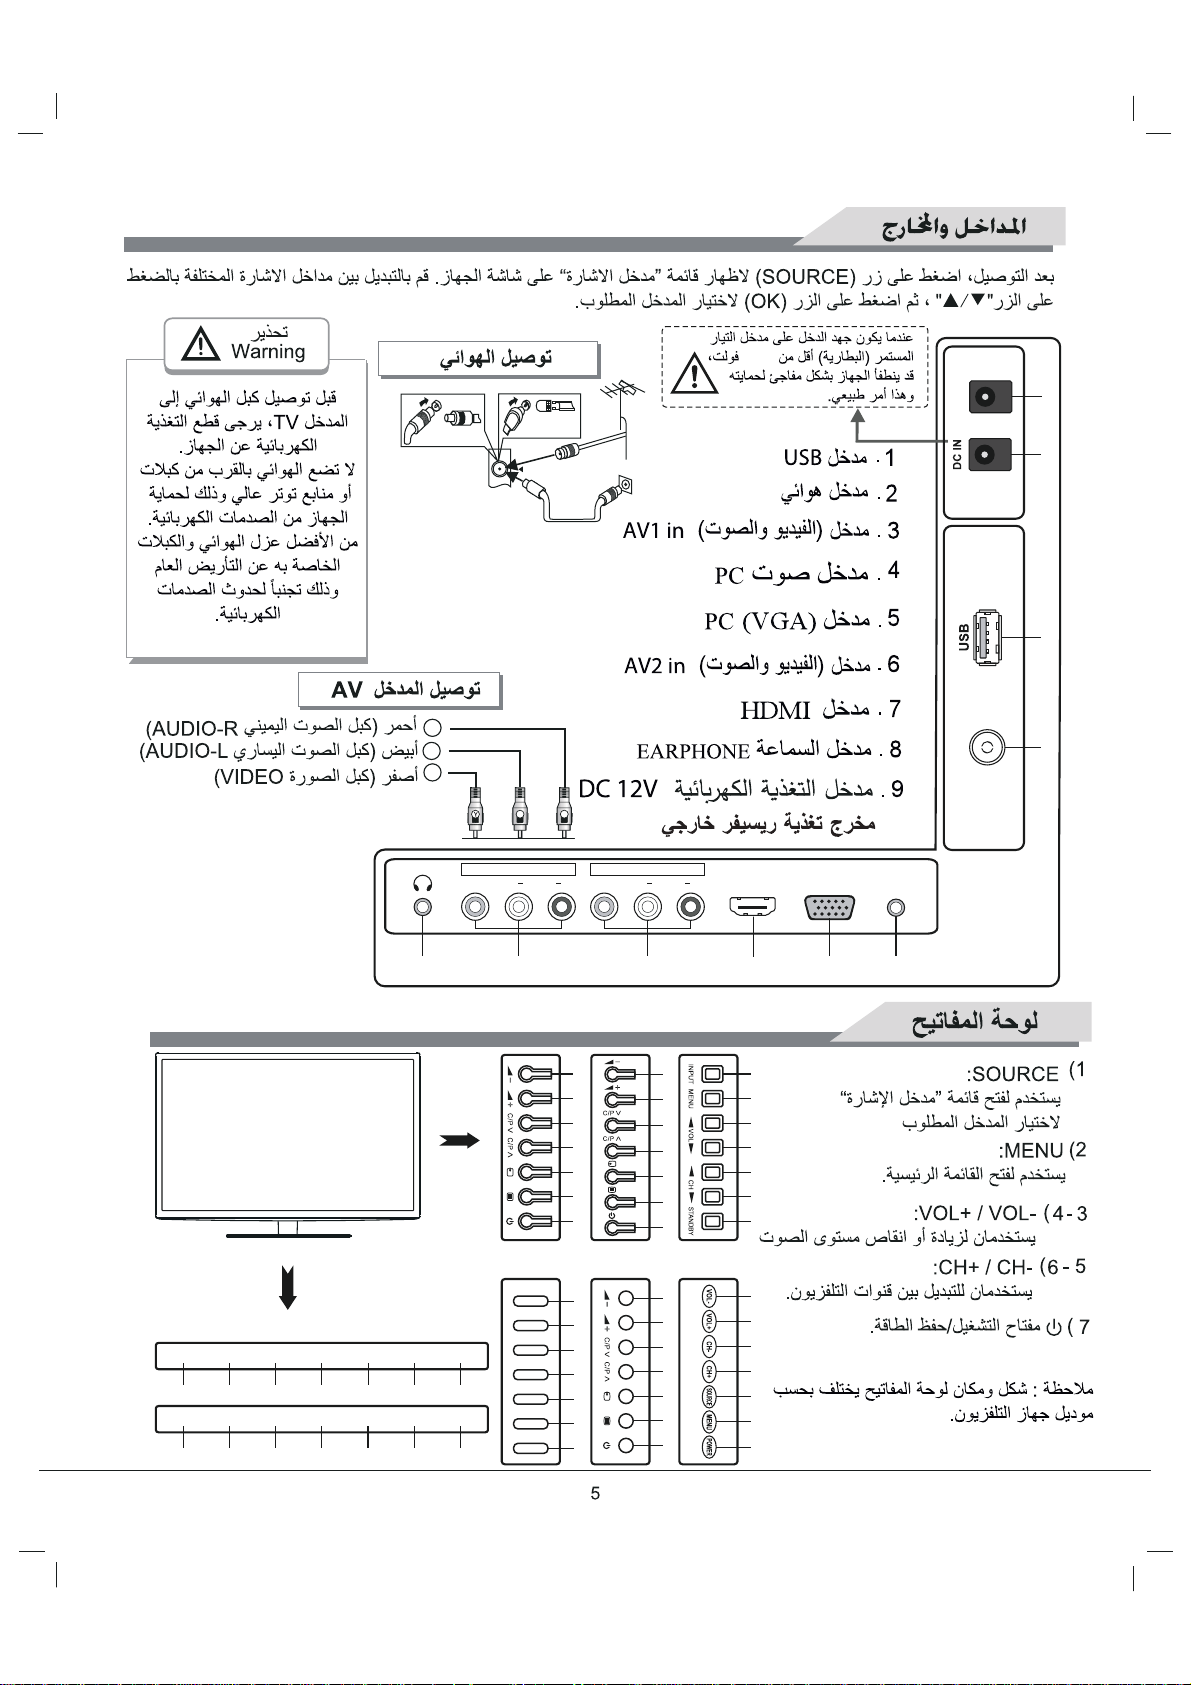
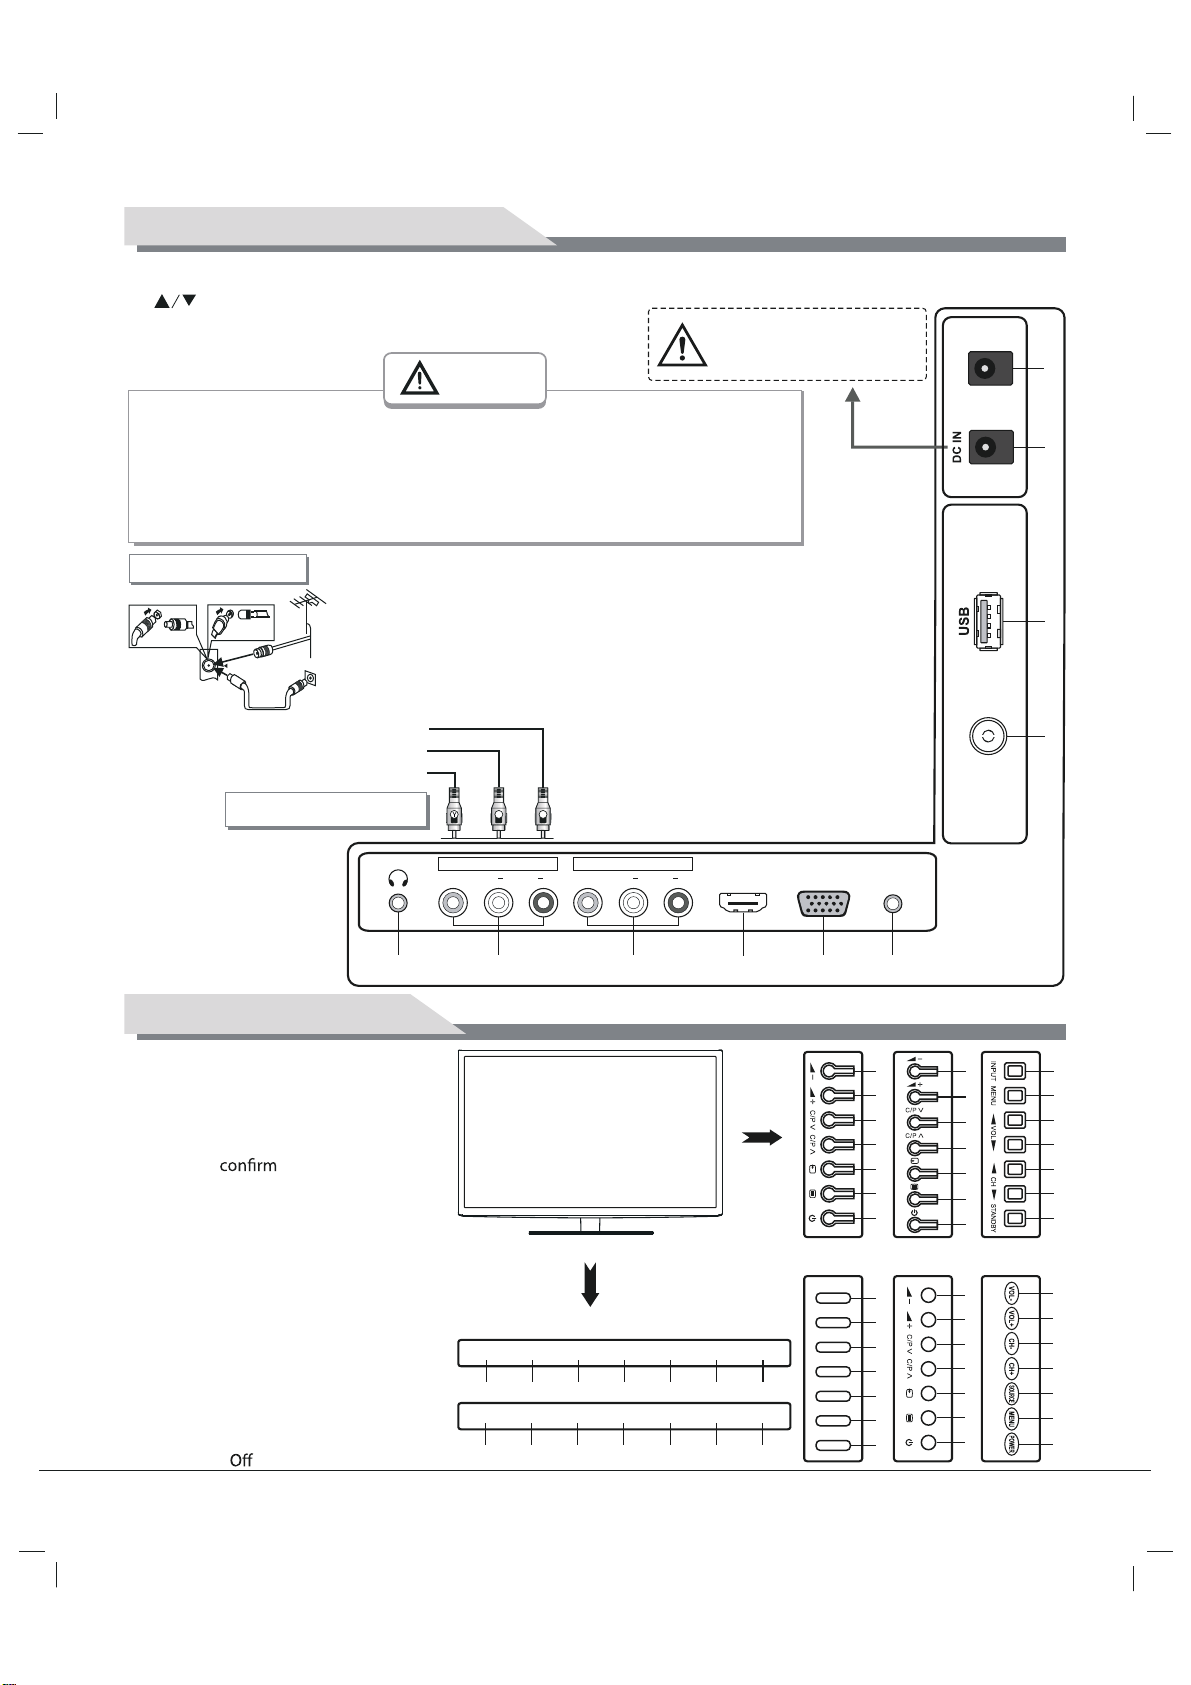
After connected, press "SOURCE" key, then menu of signal
"
"
to
confirm.
key to select the input signal, and press OK key
The connecting mode is shown in the figure.
" "
source will be displayed on the screen.
When the power supply of DC IN
is lower than 10.8V, it is normal if
shutdown protection occurs.
Warni ng
W hen c o nne c tin g ou td o or a n te nna to s ig nal por t o f the T V s et, pl eas e
tu rn o ff th e ma in p owe r s wi tc h of th e T V s et f irs t. D o n o t a ppr oac h the
outdo o r an te n na to h igh volta g e ma i ns powe r line to avoid el ec tr ic s h oc k .
T he w ire d ne tw ork a n te nna c o n nec ted to th is T V s e t mus t be i s ol a te d
fr o m the protec tiv e gro u ndi ng, o r el s e it wi ll c a u s e fir e or o th er h a zards .
1.
USB
A ntenn a c o nne c ti on
RF
Red (AUDIO-R signal cable)
White (AUDIO-L signal cable)
Yellow (VIDEO signal cable)
AV i nput c on n ec tion
VIDEO
W
AV1 IN
AUDIO
R
10. DC Out to external receiver (12V)
VIDEO
R L
IN (USB input port)
2. TERMINAL ANTENNA (75 OHM)
TV signal input port.
3. AV1 IN ( AV1 input port)
4. VGA AUDIO IN (VGA audio input port)
5. VGA (RGB signal input port)
6.
AV2 IN ( AV2 input port)
7.HDMI (HDMI signal input port)
8.EARPHONE OUT (Earphone output port)
9. DC IN (DC +12V input port)
AV2 IN
AUDIO
HDMI
R L
VGA
VGA AUDIO
IN
Press the
DC OUT
ANT
10
9
1
2
8
P a nel C o ntro l K ey s
1. SOURCE BUTTON
To switch SOURCE mode by pressing
the SOURCE button on the remote
control, and press
button to select iterms, then press the OK
button to
2. MENU BUTTON
To select menu.
3. VOLUME UP BUTTON
To increase the sound volume level.
4. VOLUME DOWN BUTTON
To decrease the sound volume level.
5. PROGRAM UP BUTTON
To select the next higher programme .
6. PROGRAM DOWN BUTTON
To select the next lower programme .
7. STANDBY BUTTON
Switch On/
the Up or Down arrow
.
the TV when at standby mode.
MENU POWER
SOURCE
7
VOL- VOL+ CH- CH+
12
5
5 6 3 4
SOURCE
MENU POWER
1 2
5634
7 3 6
VOL- VOL+ CH- CH+
5
VOL-
VOL+
CH-
CH+
SOURCE
MENU
POWER
7
4
4
3
6
5
1
2
7
4
3
6
5
1
2
7
4
3
6
5
1
2
7
4
3
6
5
1
2
7
1
2
3
4
5
6
7
4
3
6
5
1
2
7
Page 28
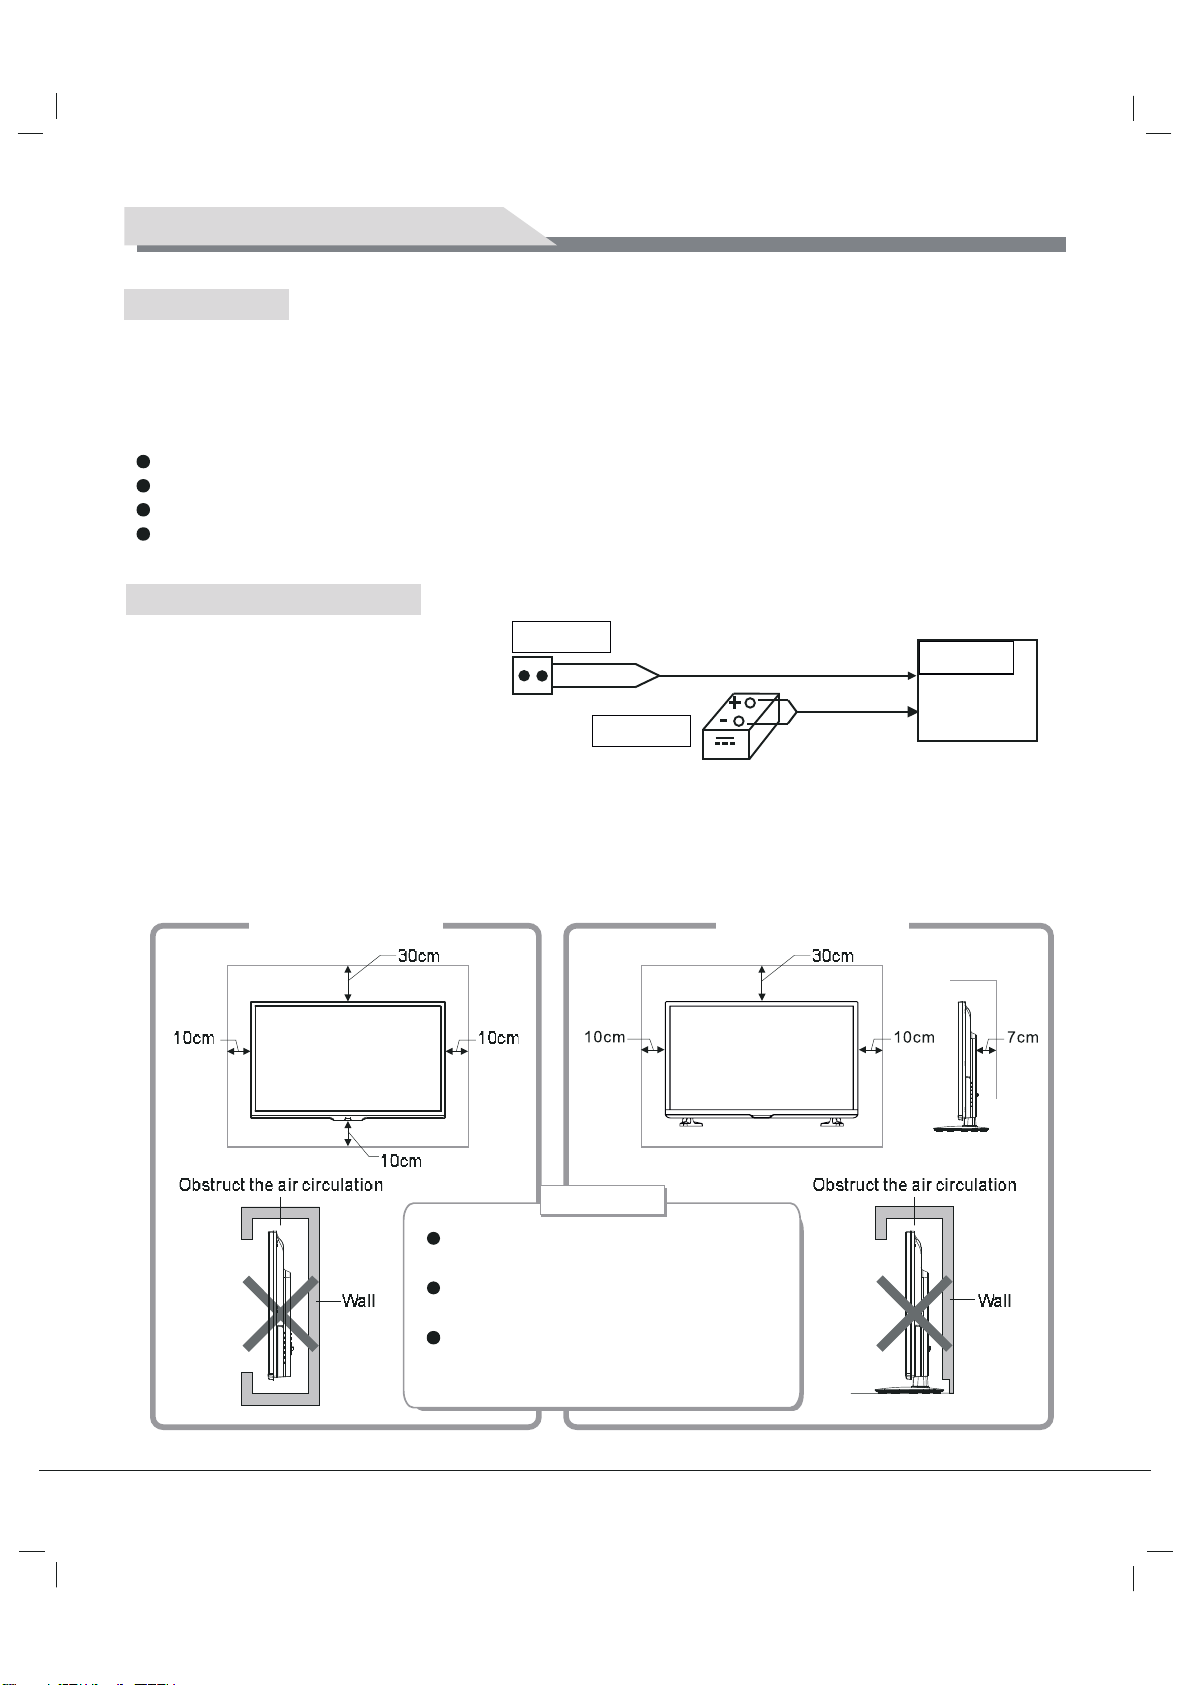
Mounting a nd C onnec tin g
P ac king l is t
1. The TV set; 2. User Manual; 3: Remote control; 4: Power
Mounting the T V s et
Insert the base into the support hole in the rear enclosure in the arrow direction shown in the picture, aligning
the screw hole in the rear enclosure and the screw hole in the base, and then tighten the screw.
The TV set should be mounted near the AC power socket for easy plugging and unplugging.
For your safety, please select appropriate wall mount bracket or base.
To avoid hurt, it is required to place the TV set on stable plane, or fix on firm wall.
Ask qualified personnel to mount the TV set on the wall. Improper mounting may result in instable TV set.
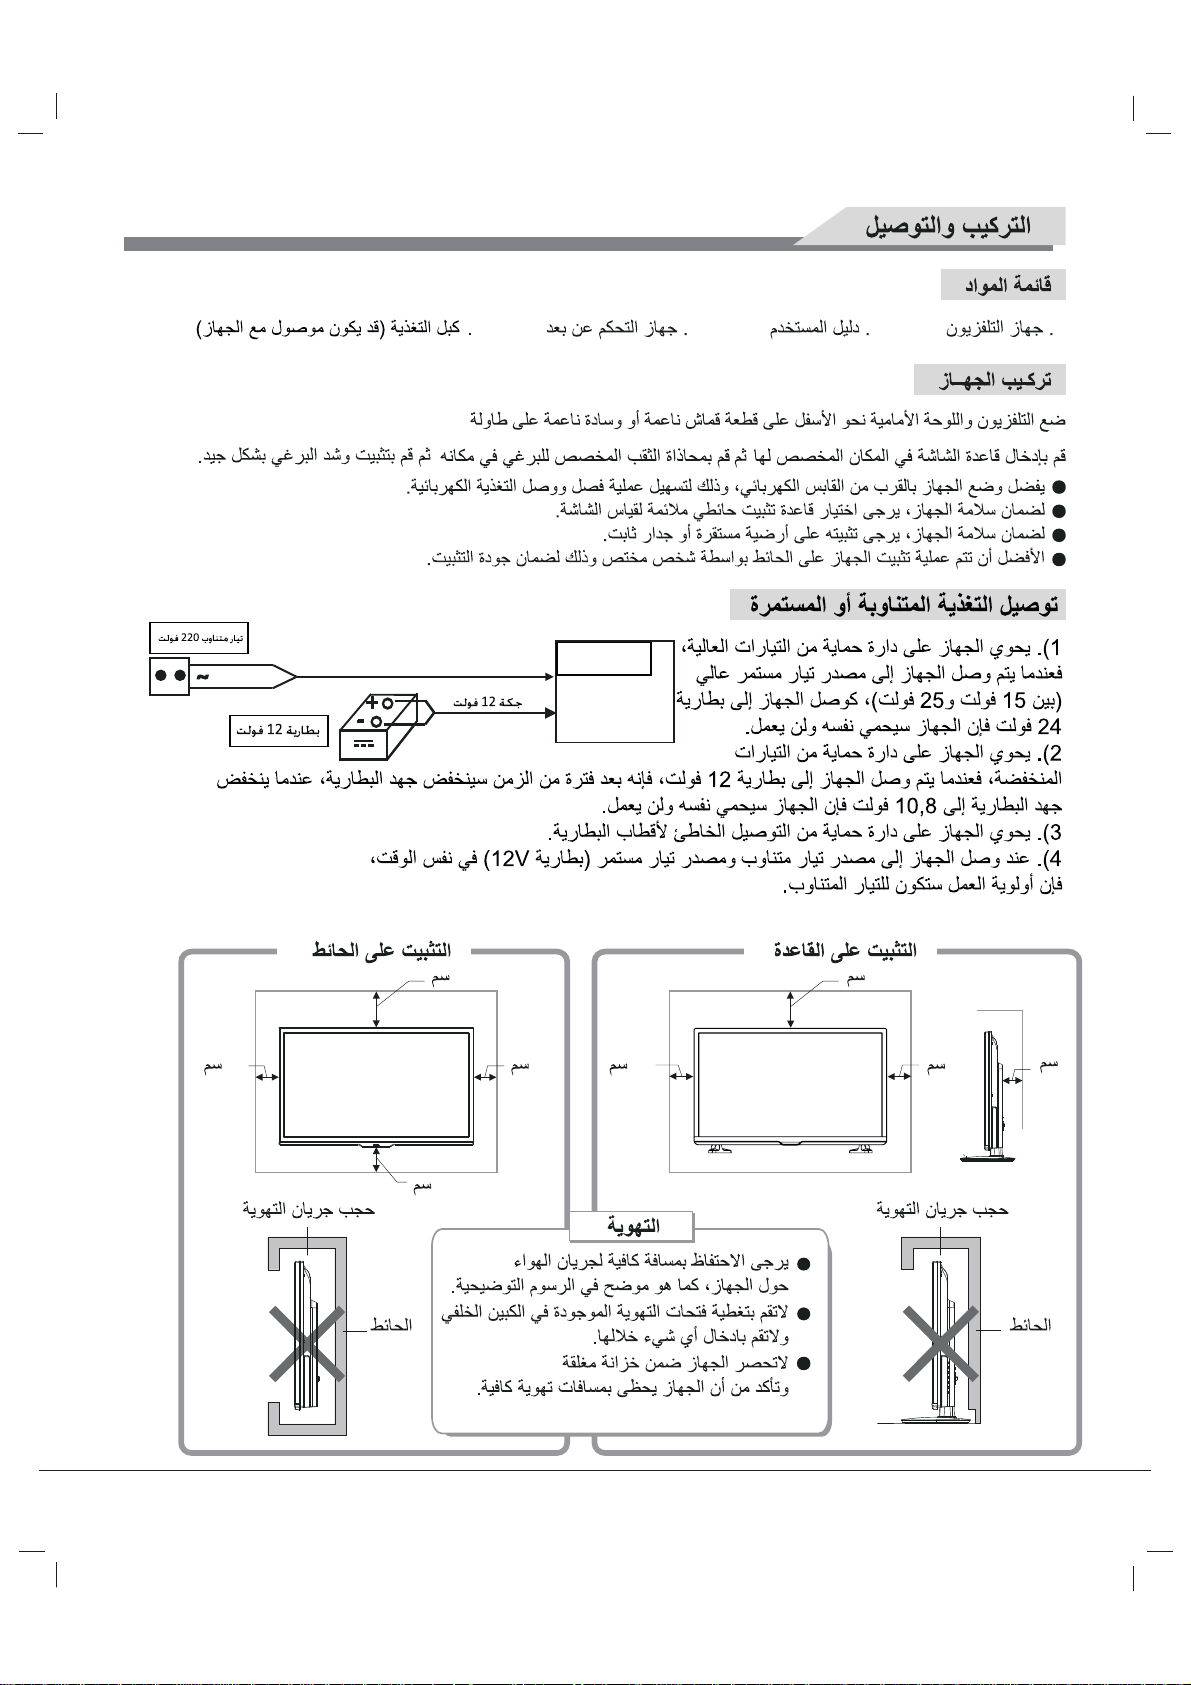
AC / DC Power Connectivity
~
12V Storage Baery
1. With “over voltage” protection, means
220 V power plugs
when user use high voltage
(15v<voltage<25v), such as 24V storage
battery, TV will protect himself by not working
automatically.
2. With “less voltage” protection, means,
the 12v DC supply use after some time, the battery will decrease voltage, when the voltages decrease to 10.8v,
TV will protect himself by not working automatically.
3. Add the protection circuit of wrong polarity.
4. When the AC and DC supply power at the same time, the AC will be prior use.
Cord (or ttached to TV set)
+
-
- - -
12V Connector
220V
Power part
Main part
Mo unt o n th e wall
Mo unt o n th e bas e
Ven tilation
Please keep this space at least around
the TV as shown in the figure.
,
Do not cover the air vents or insert any
object into the enclosure.
Do not put the device in limited space,
e.g. bookcase or embedded closet,
unless the TV set is properly ventilated.
4
Page 29

S afety wa rning and notic e
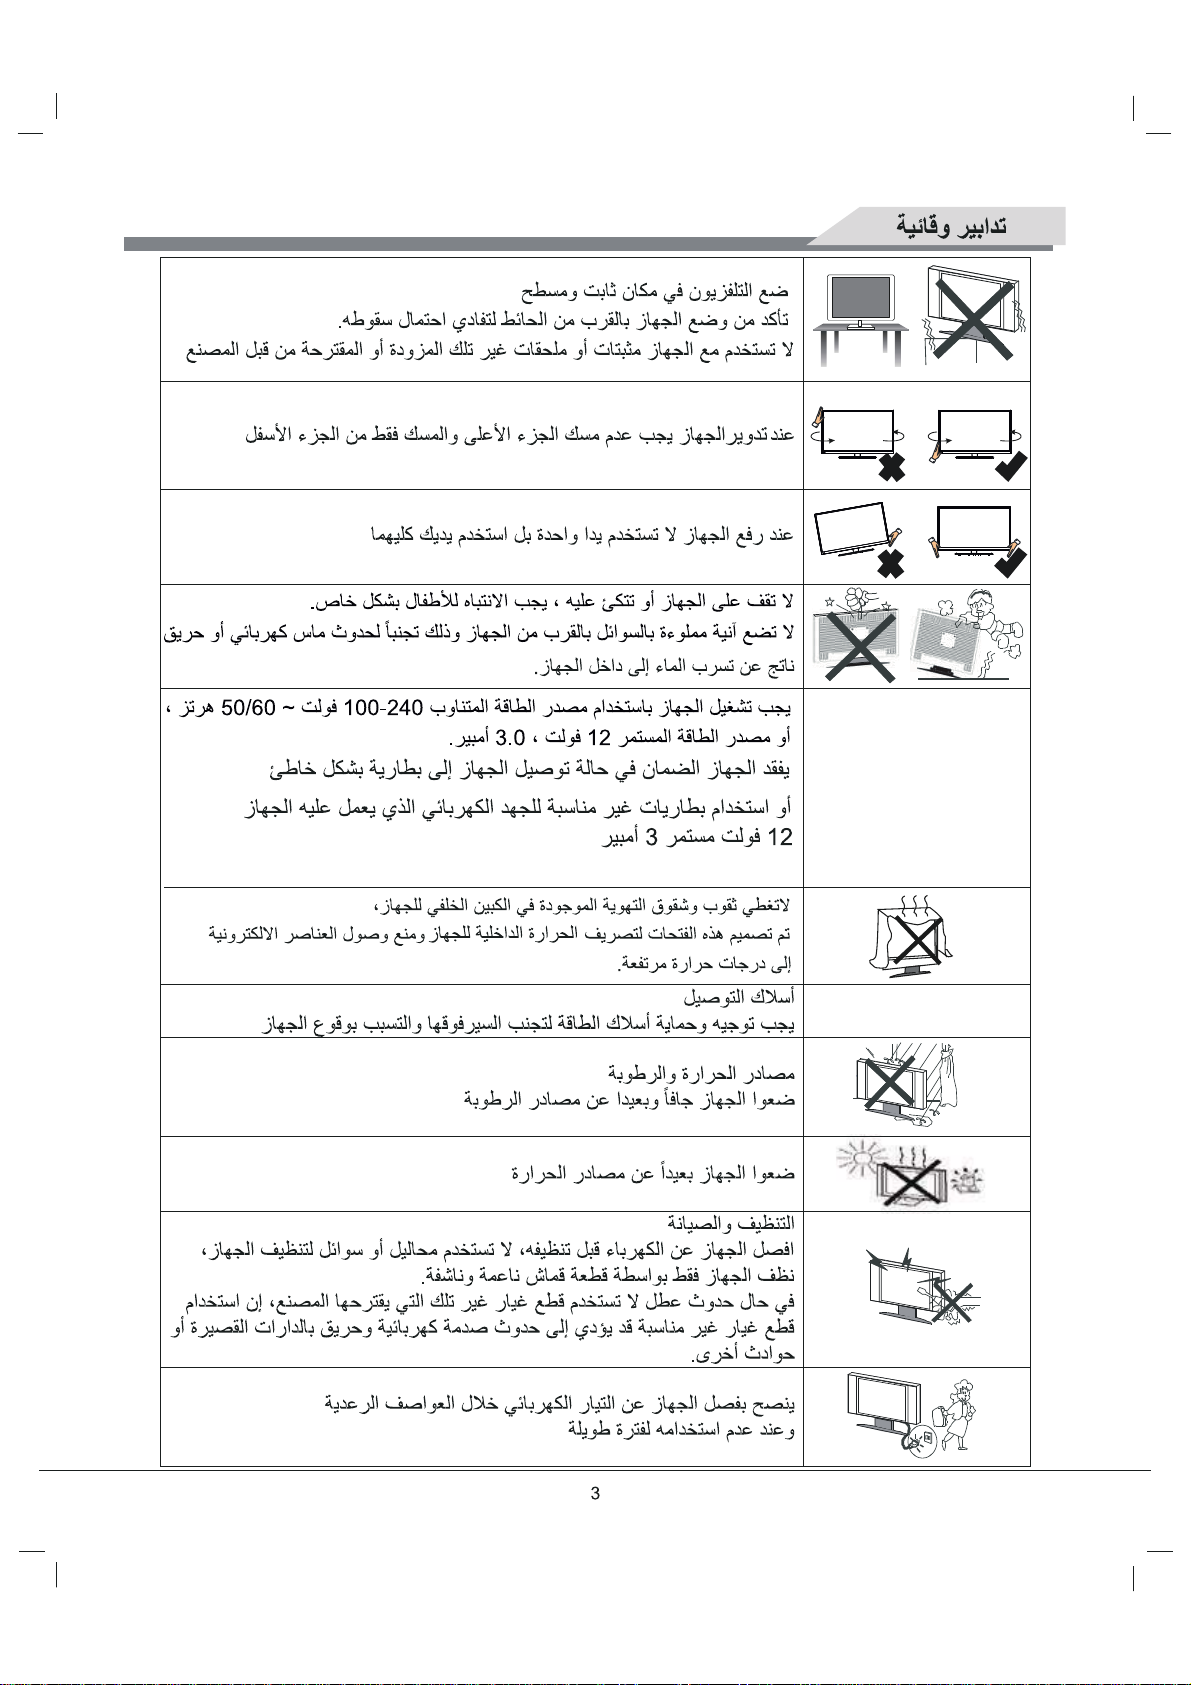
Place the TV on a m and t surface
Ensure the TV is positioned close to the wall to avoid it falling when pushed.
Do not use the with others xations than those provided or suggested by the
manufacturer.
When you turning the TV set,do not hold the top side of the TV set ,you should
hold the bottom side .
When you lifting the TV set,do not use one hand to handle it,you should lift the
TV set by two hands.
Never stand on or lean on the TV set, You should pay special attention to children.
Do n ot put the c onta iner filled wi th water o n the T V s et, to avoid ele c tri c s hoc k
or f ire c au s ed by water drop of s pla s hin g.
The TV set must be run using AC power supply 100-240 V ~ 50/60 Hz, or the DC power supply
12 VDC, 3.0 A.
TV set
TV set
TV set
TV set
, 12VDC, 3.0A.
Do not block or cover the ventilation openings on the monitor
The slots on the case is designed to release heat so as to assure that all inside
components will not reach an
a long time. Please do not cover the holes while place it.
Power cord and cables must be properly routed and protected to prevent people from stepping
on them and causing the to fall.
Keep the dry and away from humidity.
TV set
TV set
extra high temperature and can work normally for
Keep the away from heat sources.
Unplug the before cleaning it. Do not use solvents or liquids to clean the
Only clean the with a soft and dry cloth.
In case of troubleshooting, does not use spare parts other than those suggested by the
manufacturer. Using inadequate spare parts can lead to electric shocks short-circuits or
other incidents.
TV set
TV set TV set
TV set
Unplug the TV during lighting storms or when unused for long periods of time.
3
Page 30

S afe ty Wa rning a nd No tic e
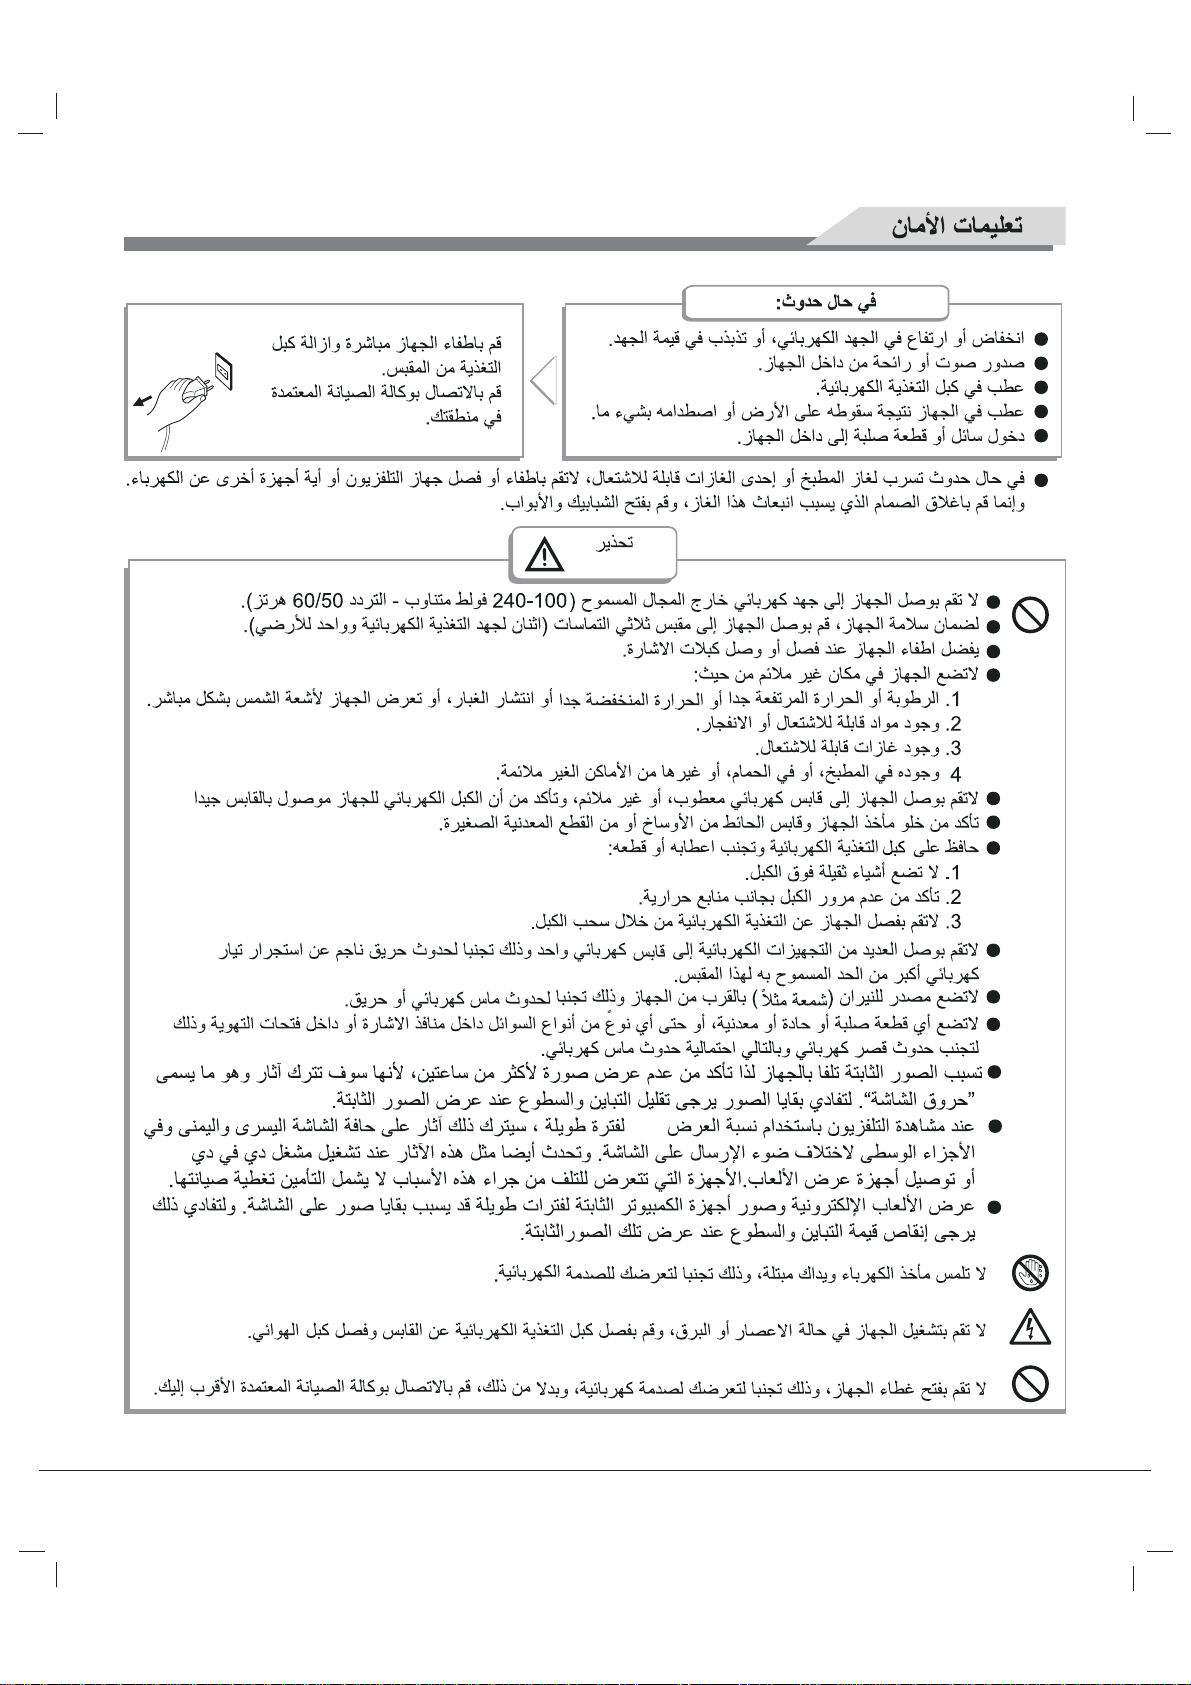
Unde r F oll owi ng C ond itions
Power failure or unstable voltage.
Abnormal sound or smell from the device.
AC power cord is damaged.
TV set is damaged due to falling off, knock or impact.
Any liquid or foreign matters enter into the TV set.
If c o al g a s o r othe r fla m mabl e ga s es leak , do no t u npl ug the pow er c or d of th e TV s et o r other e lec tric
app lia n c e s ; in s te ad, c l o s e th e valv e of th e ga s im medi ately a n d op en the doo r s an d windo ws .
Warni n g
Turn off the TV set immediately,
unplug the power cord from the
power outlet, and contact
authorized maintenance
personnel.
Only u s e 240 VAC , 60/50H z pow er s upply.
T his T V m u s t b e conn e c te d to a thr e e p in s oc k et outle t f or s a fety.
A ll c a b les c an b e conn e c te d o r pull ou t o n ly a f te r po wer s upply i s turn ed o ff.
Do n ot fi x th e T V s et on ins ta b le pos ition,
Do n ot p u t the T V s et in th e en v iron m ent:
1. W i th di rect s un s hin e, mo is tur e , ove r heatin g, or h eavy d u s t;
2.
3.
4.
Do n ot us e dama g ed o r im pro p er p owe r s o c k et, a n d e n s ur e that the p lug a nd s oc k et a r e
c onne c t
K ee p the powe r pl ug a n d s o c k e t free of dus t a n d me ta l pi ec es .
Do n ot dam a ge the pow er c ord :
1. It is proh ibi te d to r e fi
2.
3.
4.
Do n ot c o nne c t too m any a p pli ances to one powe r s tri p, o r els e i t m ay c aus e fir e du e to hi gh
po w er c on s ump tion.
Do n ot l e t o pen fla m e app roach the T V s et, or e ls e it m a y c a us e ele c tri c s hoc k or f ire.
Do n ot p e n etrate any s ha r p object, me ta l or l iqu id into the s ig n al c on necto r or a ir v e nts , to
avoi d s h o rt c ir c u i
Motionless picture might cause permanent destruction to the display. Be sure not to display
motionless picture on the LED
to appear , which is called "screen burns". To avoid such picture remnants, please decrease
the "contrast" and "brightness" of the display when displaying motionless picture.
While watching TV program
the screen's left, right and center parts because of t transmition of the light on the
screen.Similar impact
Products destroyed by these reasons can't be guaranteed for maintenance.
Do n ot to uc h the plu g wi th wet h a nds , or e ls e it m a y c a us e ele c tric s ho c k.
Do n ot tu rn o n the T V s e t in thu n der s to rm w eather ; i ns tea d , unp lug th e po wer plu g and antenn a
c onne c tor to a void li ghtnin g s tr i k e.
Do n ot dis as s e mbl e the T V s e t by y o u r s el f, o r els e i t may caus e ele c tr i c s ho c k o r fi r e. C ontact
qua li f ied per s onn e l f or m a intena n c e .
10 0-
or e ls e it m a y c a us e falling off, da m age, or e v e n
With f lamm a ble or e x plo s iv e s ub s ta nc e;
With f lamm a ble or c o r r os i v e ga s ;
In bathro o m, k itc he n , etc.
ed prop erly.
t th e po wer c o rd;
Do n ot p u t h eavy ob jec t o n the p owe r c ord;
K ee p the powe r c ord a way f rom h eat s ourc e;
Do n ot d rag th e po w er c or d wh en u nplu ggi ng .
t and prod uc t dama g e as well as ele c tri c s hoc k.
TV for more than 2 hours, because it would cause picture remnants
in 4:3 size mode for a long time, there would be traces on the edge of
on the
screen will occur when playing DVD
und ercool ing
or connecting games control.
fi r e.
2
Page 31

C o nte n ts
F e atu res
S afe ty warn ing a nd n otic e
Packing list 4
Mounting the TV set 4
Inputs and Outputs
P a n el C o n tro l K e y s
R em o te C o n tr ol
1
1
3
5
5
6
B as i c O per a ti o ns
Turning on/Standby 7
Signal source selection 7
Menu operation description 7
Program scanning 8
Menu setting list 9
USB multimedia function 12
Tro u ble s ho o ti ng
Te c h n ical S pec ific ation s
7
14
15
F e a tur es
1. L D panel with no glint and low radiation can ease eyes' fatigue and protect eyes.
E
2. High-quality L D with DLED backlight panel is adopted with high brightness, high contrast, wide viewing
angle, and super fast response time. Super fast response time can greatly eliminate the shadow of moving
images.
3. TV/Monitor with two in one and multiple input ports can easily switch among the modes.
4. De-interlacing image disposal is adopted. Today's most advanced techniq
can completely improve the saw tooth and vague edges of the athletic picture.
5. There are four smart sound modes and four smart image modes.
6. Dynamic contrast technology can obviously improve the definition and contrast of the picture
7. Tuner for frequency synthesis can support full auto search and manual search.
8. With perfect timing function, you can set time to turn off. It will be turned off in state of no signals, too.
9. Auto Adjustment
complicated adjustment in PC mode.
The TV set can be played with AC power supply 100-240V ~ 50/60 Hz, or with DC power supply 12VDC, 3.0 A.
10.
11. Support hi-definition HDMI.
12. All functions can be realized with remote control, which is really a convenient operation.
13. Power is designed to save energy.
14. Input ports include VGA,HDMI, V, USB and TV.
15.
Supports USB
16.
U .
ltra-thin and super narrow design
E
ue for movement compensation,
can help you to setup the image into the best performance in a few seconds instead of
A
interface.
USB Support Full HD Streaming media.
S afe ty war ning a nd notic e
Thank you to choose the L D TV with LED backlight made by our company, a valuable product with excellent
quality and multiple functions. This machine will bring you more audiovisual enjoyment. Its design can insure
user's safety. All machine are strictly tested before leaving factory. But incorrect use can lead to electric shock
or fire. In order to ensure safety and extend its life, please
using it and comply with the following safety instructions. Please k
Warni n g
Indicate the behaviors that must be
prohibited
E
May result in casualties
read carefully before
the manual and marking label
ep the user manual for later use.
e
A t tenti o n
Indicate the operations that must be
performed
1
May result in personal injury or
property losses
Page 32

24
 Loading...