

Page 1
INTRODUCTION
Welcome to the TRUEresult Blood Glucose
Monitoring System
Our Commitment to You
TRUEresult is a simple, accurate way to test whole
blood glucose (sugar) level, anytime, anywhere.
Our goal is to provide quality healthcare products
and dedicated customer service. For questions
about TRUEresult products, please see cover for
phone number.
is booklet contains all the information needed
to get the most from the TRUEresult System. To
start testing quickly, please see the Quick Reference
Guide found inside the cover of this Owner’s
Booklet.
Please read complete Owner’s Booklet and
all product Instructions for Use before
using the System.
1
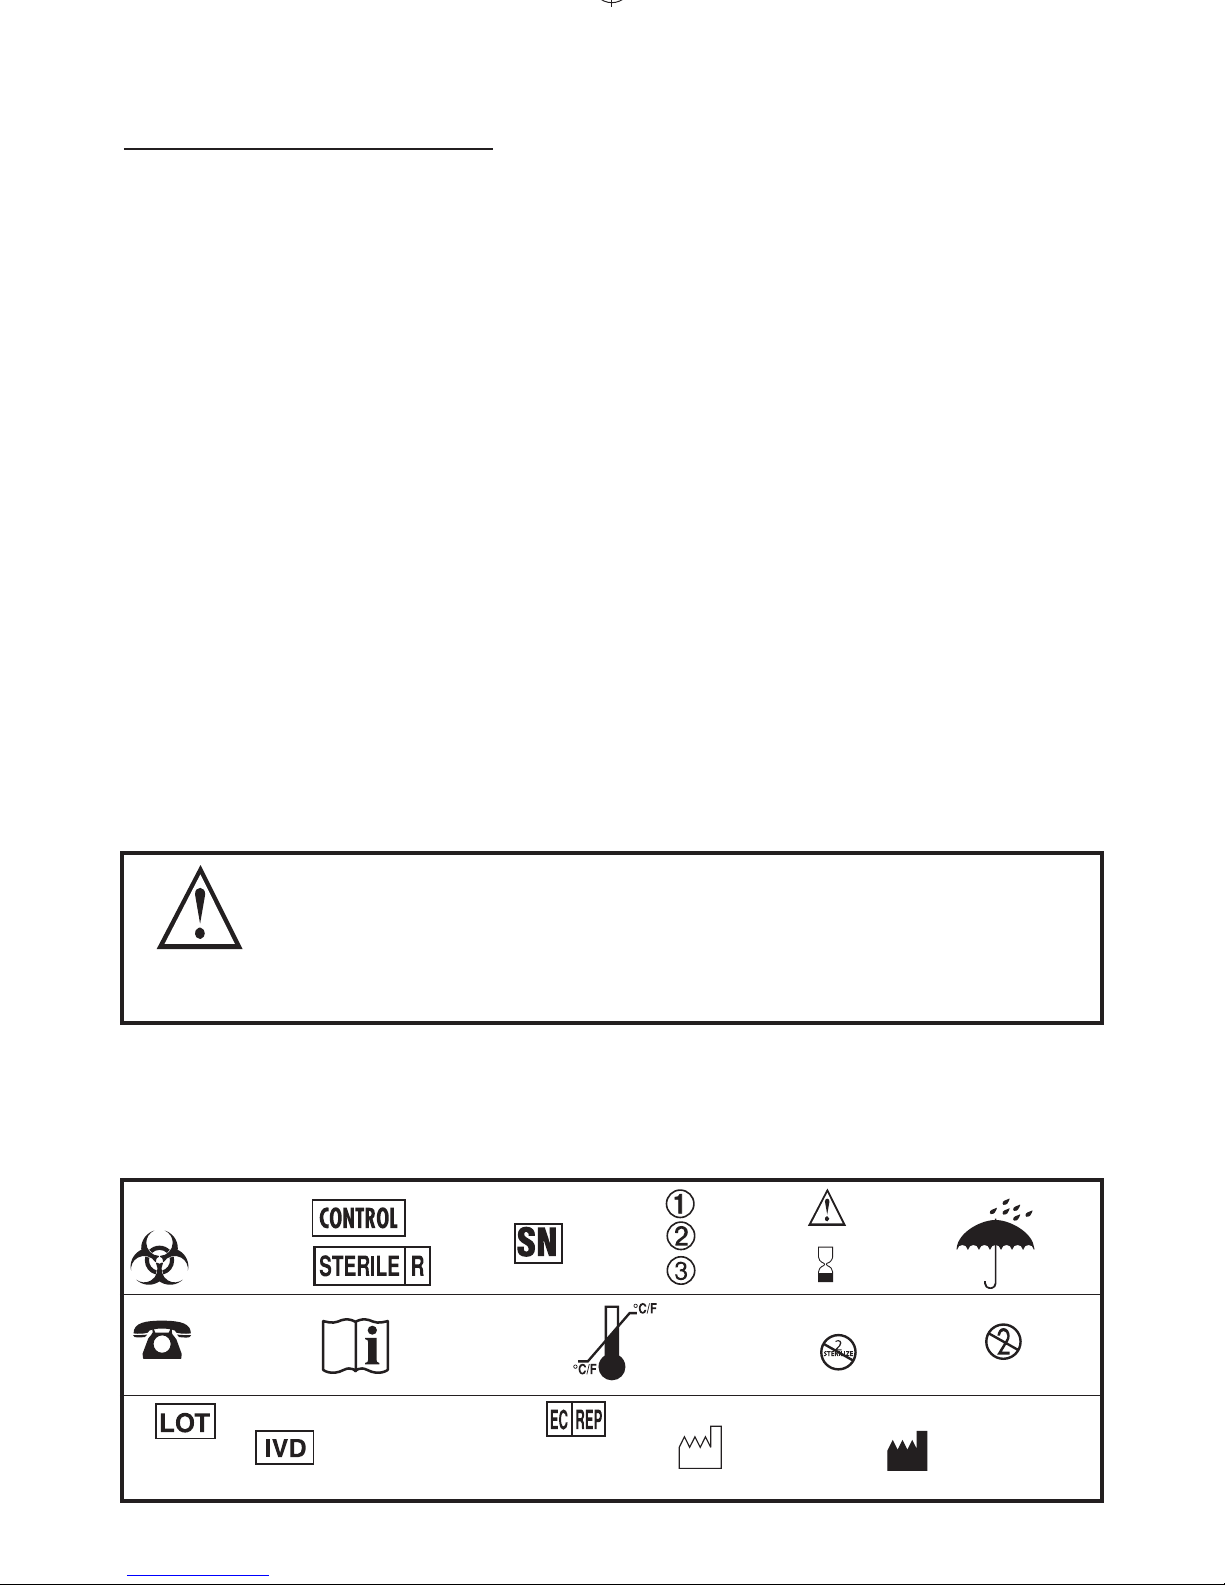
Use By
Date
For in vitro
Diagnostic
Testing Only
Lot
Number
Authorised
Representative
SYMBOLS:
Keep
Dry
Caution
Single
Use
Only
Attention! Read
Instructions
for Use.
Sterile
Control
Storage
Temperature
Range
Manufactured
By
Serial
Number
Control
Level
Biological
Risk
Do Not
Resterilise
For
Assistance
Call
Date of
Manufacture
Page 2

2
IMPORTANCE OF BLOOD GLUCOSE MONITORING
e more you know about diabetes, the better
you will be able to take care of yourself. A Doctor
or Healthcare Professional will determine target
ranges for blood glucose results and how oen to
test. Having most results within the target ranges
shows how well a treatment plan is working to
control glucose levels. Keeping most results within
the target ranges helps slow or stop complications
of diabetes.
NEVER change a treatment plan without consulting
with a Doctor or Healthcare Professional.
Use of the TRUEresult Blood Glucose Monitoring
System in a manner not specied in this Owner’s
Booklet is not recommended and may aect your
ability to determine true blood glucose levels.
e TRUEresult System is an in vitro
(outside body) quantitative system that is used for
self-testing and point-of-care testing of only human
whole blood. e most accurate results come from
using fresh whole blood taken from the ngertip or
forearm (capillary) or from the vein (venous).
Page 3

3
What you need to know when using the
TRUEresult System:
• Read all product instructions for use before
testing.
• Use only TRUEresult Test Strips and TRUEresult
Control Solution with TRUEresult Meter.
• To help prevent false high results, wash hands
before using the System to test blood, especially
aer handling fruit or other foods containing
sugar.
• Perform Control Tests before performing a blood
glucose test for the rst time (see Control Test).
• Remove only one Test Strip at a time from vial
when testing. Recap vial immediately aer removing Test Strip.
• NEVER reuse Test Strips. NEVER wipe Test
Strips with water, alcohol or any cleaner. DO
NOT attempt to clean and re-use Test Strips.
Reuse of Test Strips will cause inaccurate results.
• NEVER add a second drop of sample to Test
Strip. Adding more sample to the Test Strip gives
an error message.
• Venous whole blood collected into sodium or
lithium heparin blood collection tubes may be
used for testing by Healthcare Professionals.
Use of EDTA blood collection tubes is not
recommended and may cause low results. Mix
tube contents gently before using.
Page 4

4
IMPORTANT HEALTH and SAFETY
INFORMATION:
e TRUEresult Blood Glucose Monitoring System
is for one person use ONLY. DO NOT share
your Meter or your Lancing Device with anyone,
including family members. DO NOT use on more
than one person. ALL parts of the TRUEresult Blood
Glucose Monitoring System could carry bloodborne pathogens aer use, even aer cleaning and
disinfection.
2,3
For cleaning and disinfecting the Meter, see Care,
Cleaning/Disinfecting. For cleaning and disinfecting
the lancing device, see the lancing device’s
Instructions for Use.
We suggest cleaning the Meter when visibly dirty
or if blood is on the Meter. Wash your hands
thoroughly with soap and warm water aer
handling the Meter, lancing device, or Test Strips
as contact with blood presents an infection risk.
Reuse of devices labeled for single-use may result
in product contamination and patient infection.
Page 5

5
•
DO NOT perform capillary blood glucose
testing on critically ill patients. Capillary blood
glucose levels in critically ill patients with reduced
peripheral blood ow may not reect the true
physiological state. Reduced peripheral blood ow
may result from the following conditions (for
example):
4
~ shock
~ severe hypotension
~ severe dehydration
~ hyperglycaemia with hyperosmolarity,
with or without ketosis.
• Do not use TRUEresult for the diagnosis of
diabetes or for testing blood glucose in neonates
(newborns).
•
Do not use TRUEresult System during a xylose
absorption test. is may falsely raise glucose
results.
5
Please check with your Doctor before
using TRUEresult.
Page 6

6
TABLE OF CONTENTS
Phone Number, Fast Test Guide,
Expected Results ........................................... see covers
Introduction and Important Information ...........1
Know the System ..................................................8
Meter .......................................................................8
Test Strip ...............................................................11
Control Solution ..................................................13
Getting Started ....................................................14
Quality Control Testing ......................................15
Automatic Self-Test .............................................15
Control Test .........................................................16
How to Test Control Solution ...........................17
Testing Blood ......................................................20
Obtaining a Blood Sample .................................20
How to Test Blood Glucose ...............................22
Unusual Blood Glucose Test Results ................25
Ketone Test Alert .................................................26
TRUEresult System and Laboratory Testing ...27
Memory................................................................28
View Averages (7-, 14-, and 30-day) ................28
View Results .........................................................29
Page 7

7
Meter Set Up ........................................................30
Set Ketone Test Alert ..........................................32
Set Testing Reminders ........................................32
Care, Cleaning/Disinfecting ...............................34
Meter Care ............................................................34
Control Solution Care .........................................35
Test Strip Care .....................................................35
Changing Battery .................................................36
Troubleshooting ..................................................37
Messages................................................................38
Technical Information ........................................40
Performance Characteristics ..............................40
System Specications ..........................................44
Operating Range ..................................................44
Chemical Composition .......................................44
EMC Safety Information ....................................45
References ............................................................46
Notes ....................................................................47
Page 8
8
KNOW THE SYSTEM
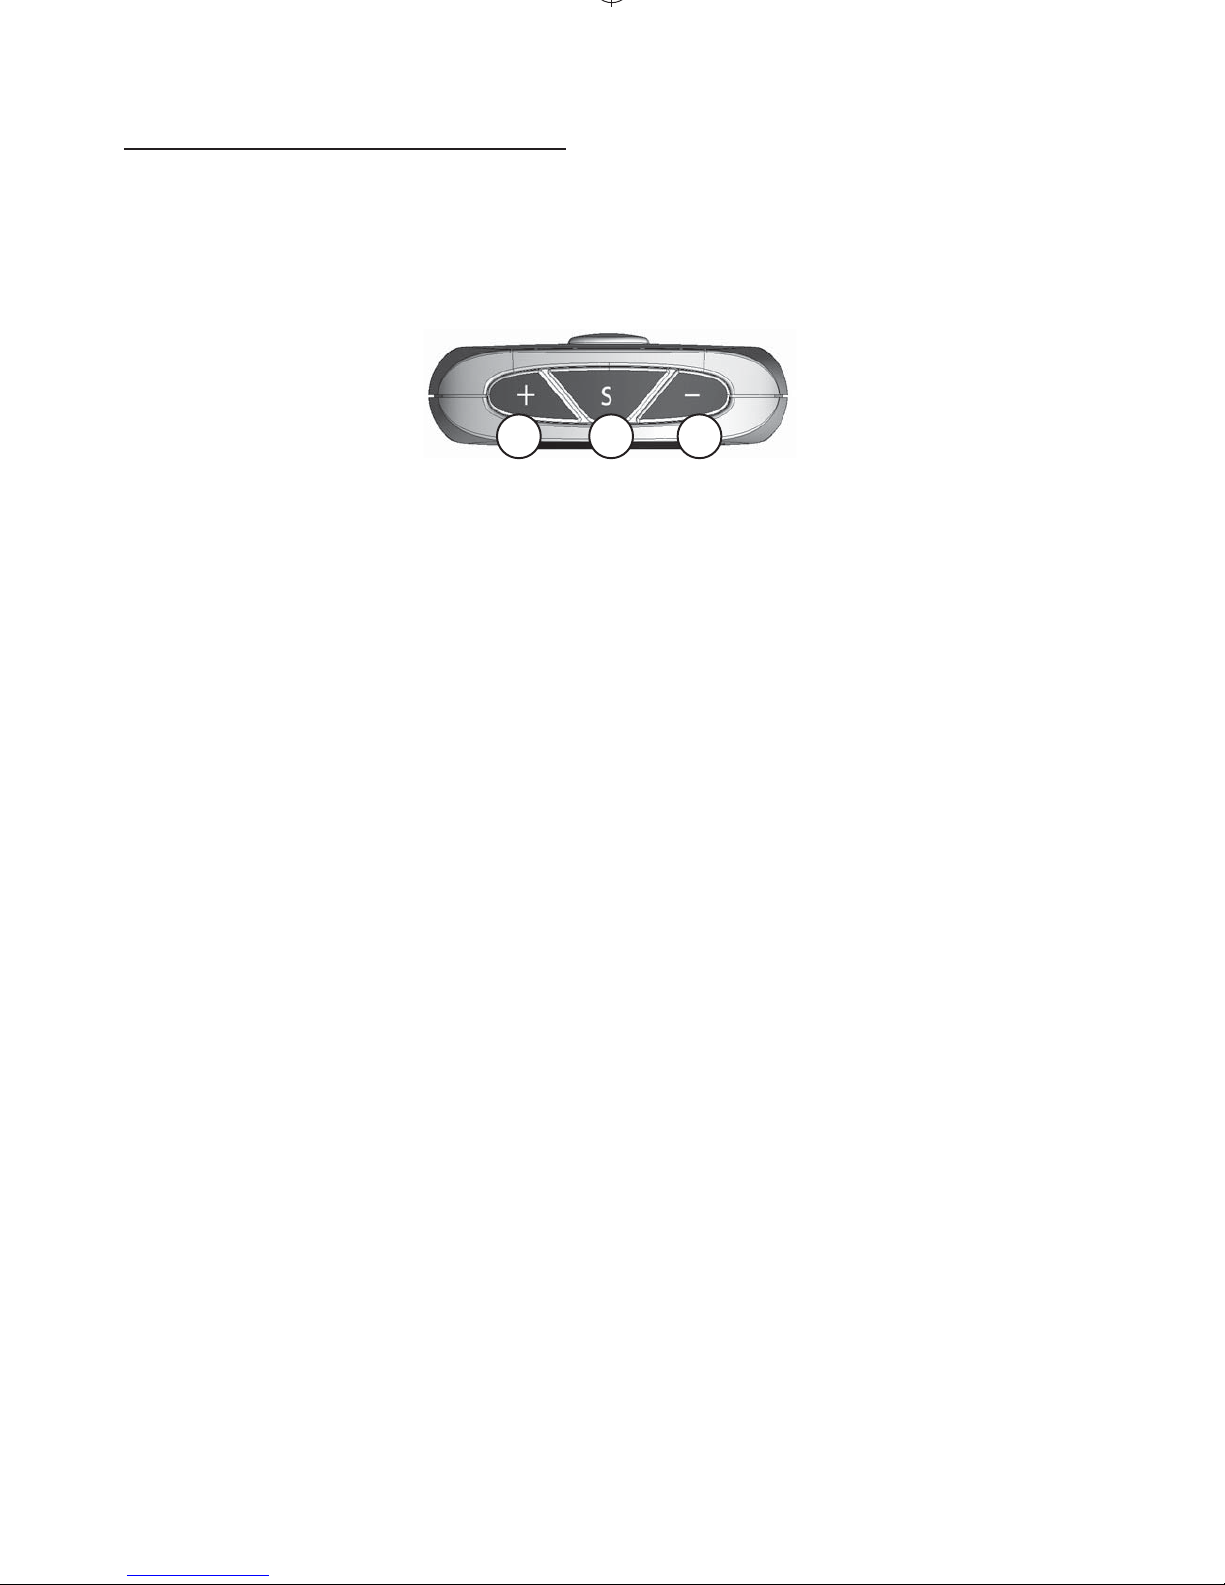
Meter
“ + ” Button
Increase numbers in Time/Date Set Up for Meter
and Testing Reminders; turn on Testing Reminders
and Ketone Test Alert; add ALT Symbol; move
forward by date/time when viewing results in
Memory.
“ S ” Button
Turn Meter on to view Average values, to view
results in Memory, and to access Meter Set Up.
“ - ” Button
Decrease numbers in Time/Date Set Up for Meter
and Testing Reminders; turn o Testing Reminders
and Ketone Test Alert; remove ALT Symbol; move
backward by date/time when viewing results in
Memory.
Top of Meter
1 32
Page 9
4
5
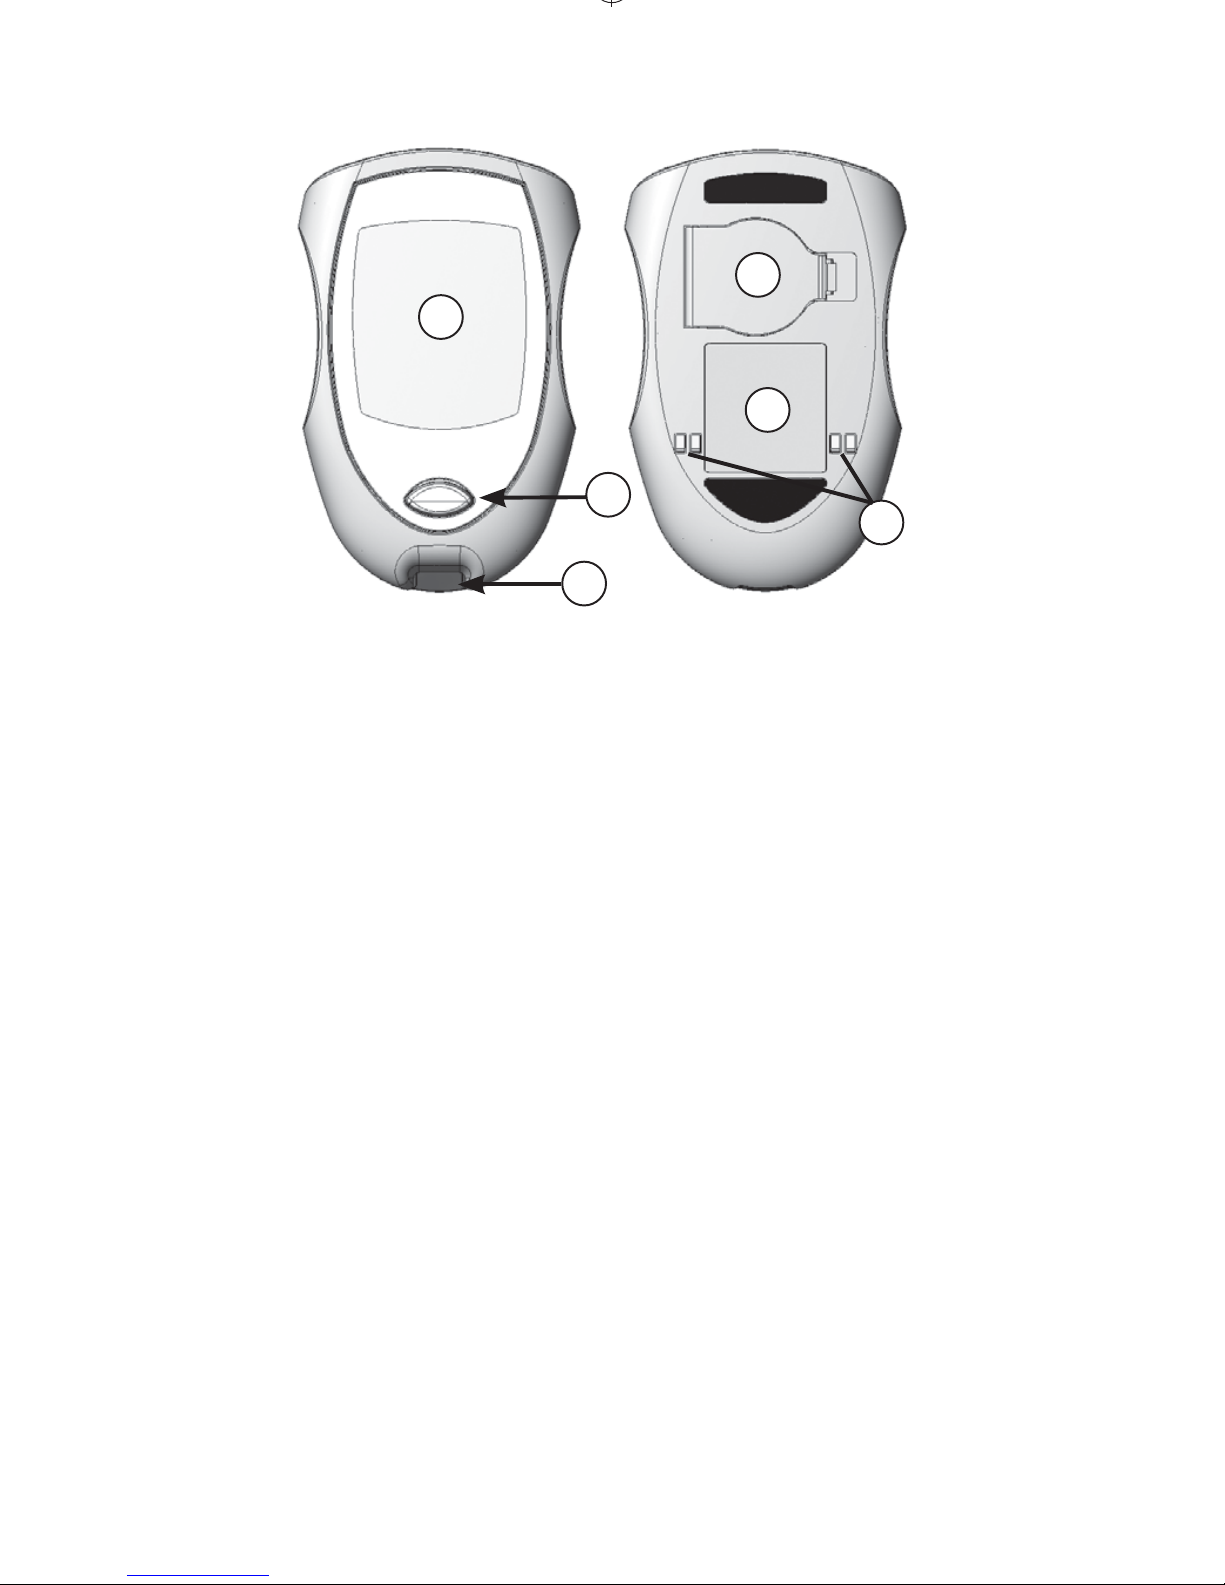
Back of Meter
6
Display Screen
Shows test results, messages, user prompts, other
information.
Test Port
Insert TRUEresult Test Strip here.
Strip Release Button
Releases Test Strip aer testing.
Battery Door
Use one non-rechargeable 3V lithium battery
(#CR2032), positive (“+”) side up (see Changing
Battery).
Meter Label
Contains serial number of Meter. Identies Meter
when calling for assistance.
Docking Station Contacts
Contacts used for uploading Meter results to a
computer using a Docking Station (Please call for
availability).
9
2
1
Front of Meter
3
Page 10
10
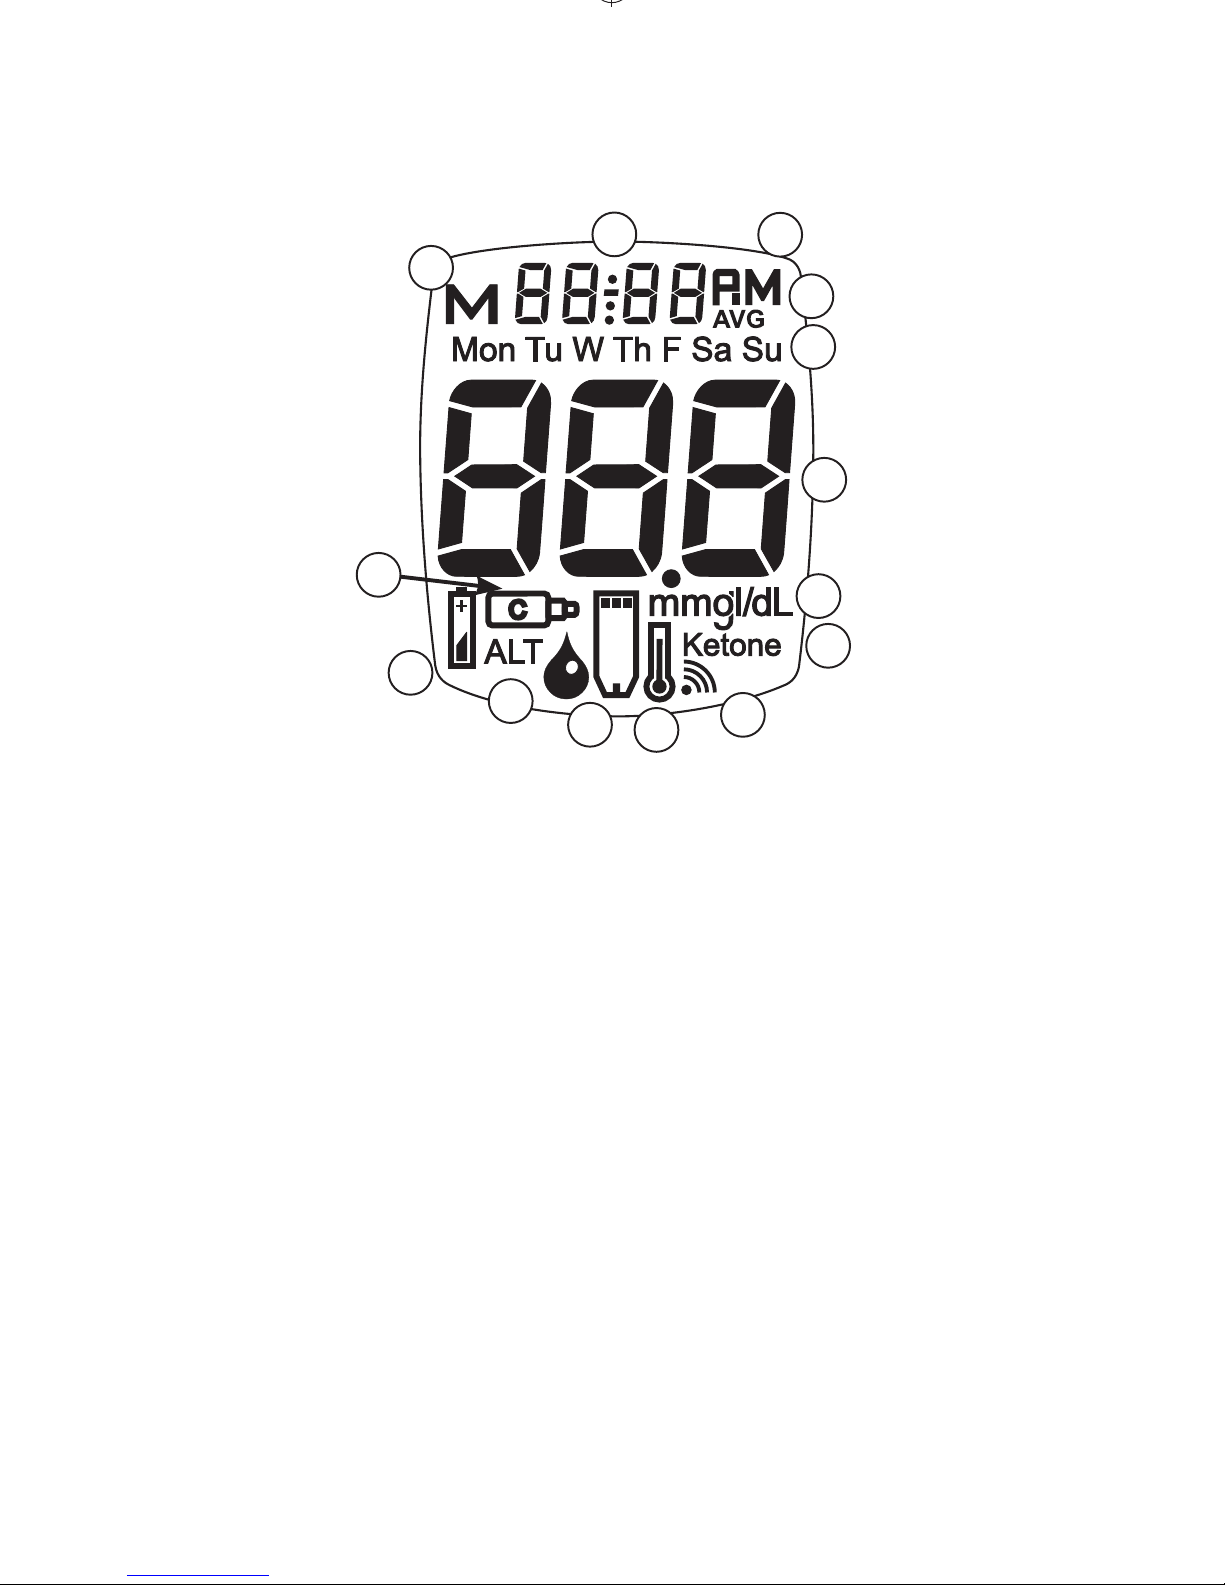
Meter Display
Full Display Screen
1. Memory Symbol
2. Time, Date
3. Time is AM/PM
(Note: Not seen if factory set to 24 hour clock.)
4.
Result is from 7-, 14-, and 30-day Average
5. Day of Week
6. Test Result
7. Unit of Measure
(Note: Factory set, cannot be changed by user.)
8. Ketone Test Alert Symbol
9.
Testing Reminder Symbol
10. Temperature Symbol
11.
Drop Symbol - Apply blood or Control Solution
12. Alternate Site (ALT) Symbol
13. Battery Symbol
14. Control Symbol
3
4
2
1
7
6
5
8
9
10
11
12
13
14
Page 11
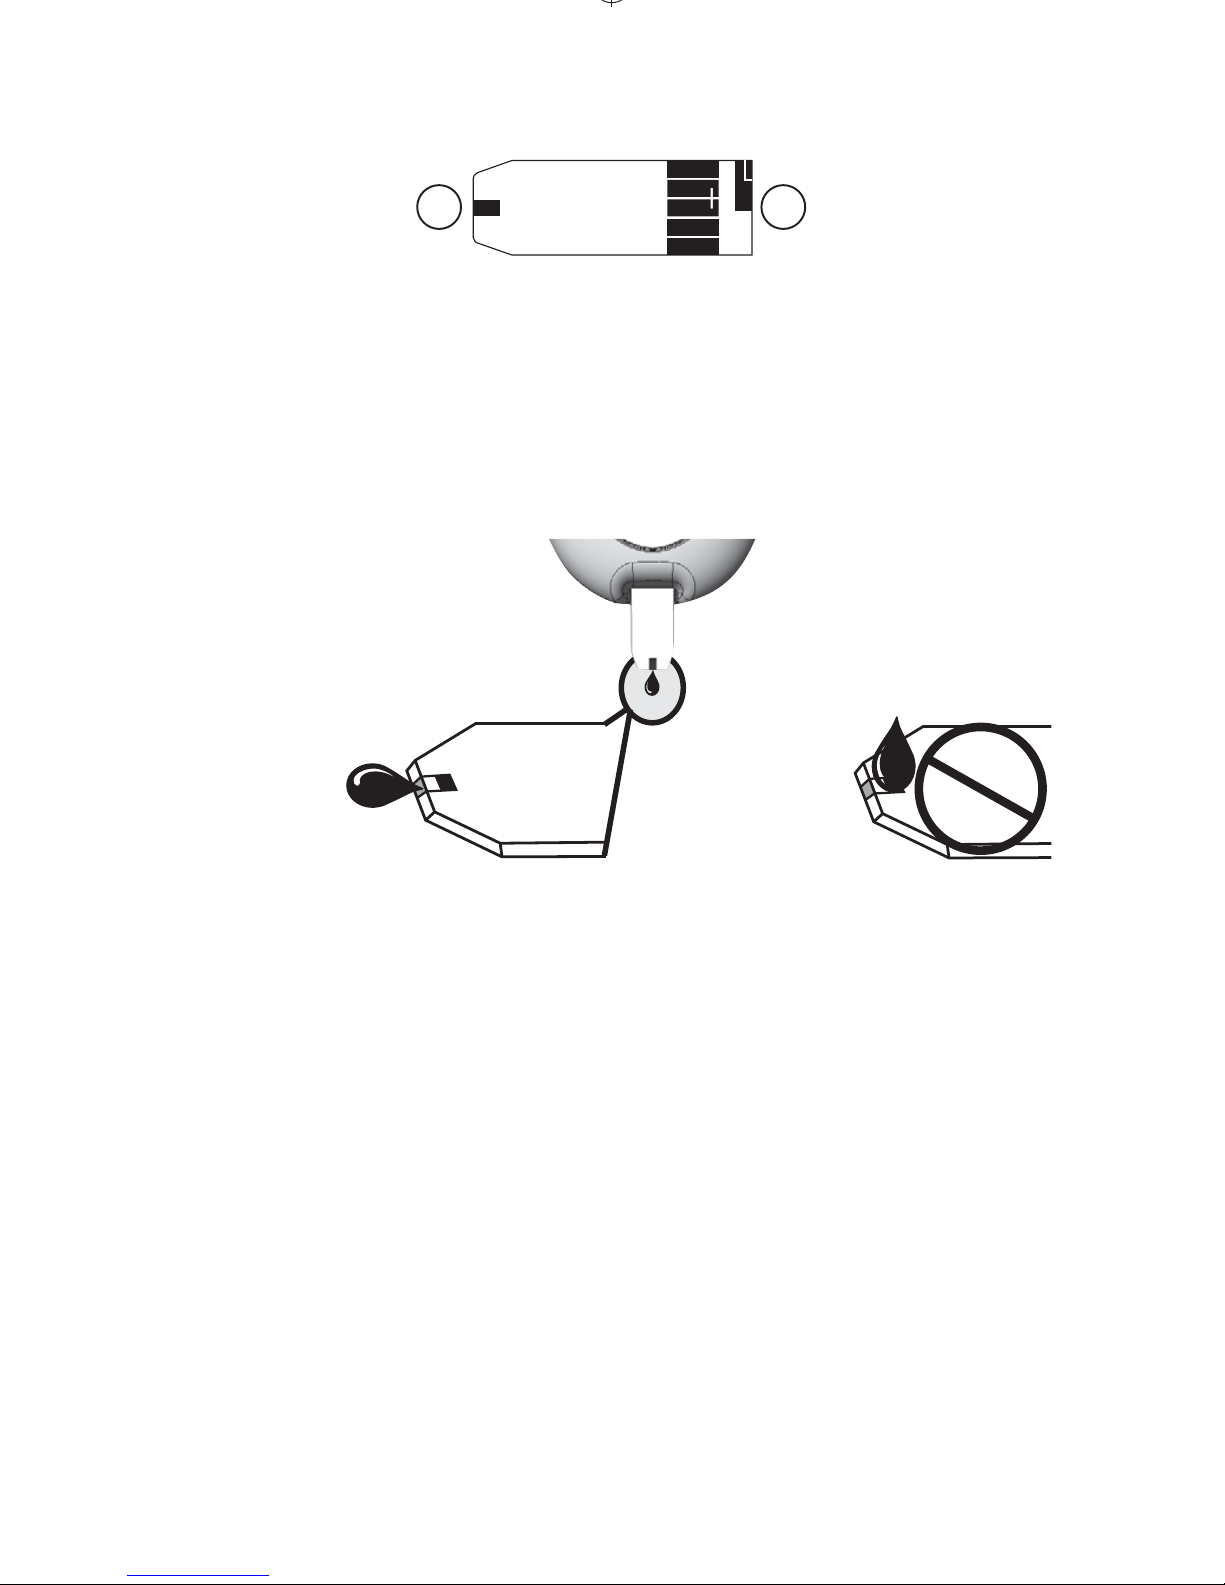
11
Contact End -
Insert into Test Port with blocks
(contacts) facing up
.
Sample Tip -
Touch to top of sample (fresh,
capillary or venous blood or Control Solution)
aer inserting Contact End into Meter.
Sample Placement
Correct Incorrect
•
Do not touch Sample Tip to drop of sample
unless Contact End is inserted into Meter.
• Do not apply blood or Control Solution to top
of Test Strip.
• Do not smear or scrape drop with Test Strip.
• Do not apply more sample to the Test Strip
aer testing begins.
• Do not insert Sample Tip with sample into
Meter for testing. May damage Meter.
Test Strip
12
Top of Test Strip
Page 12
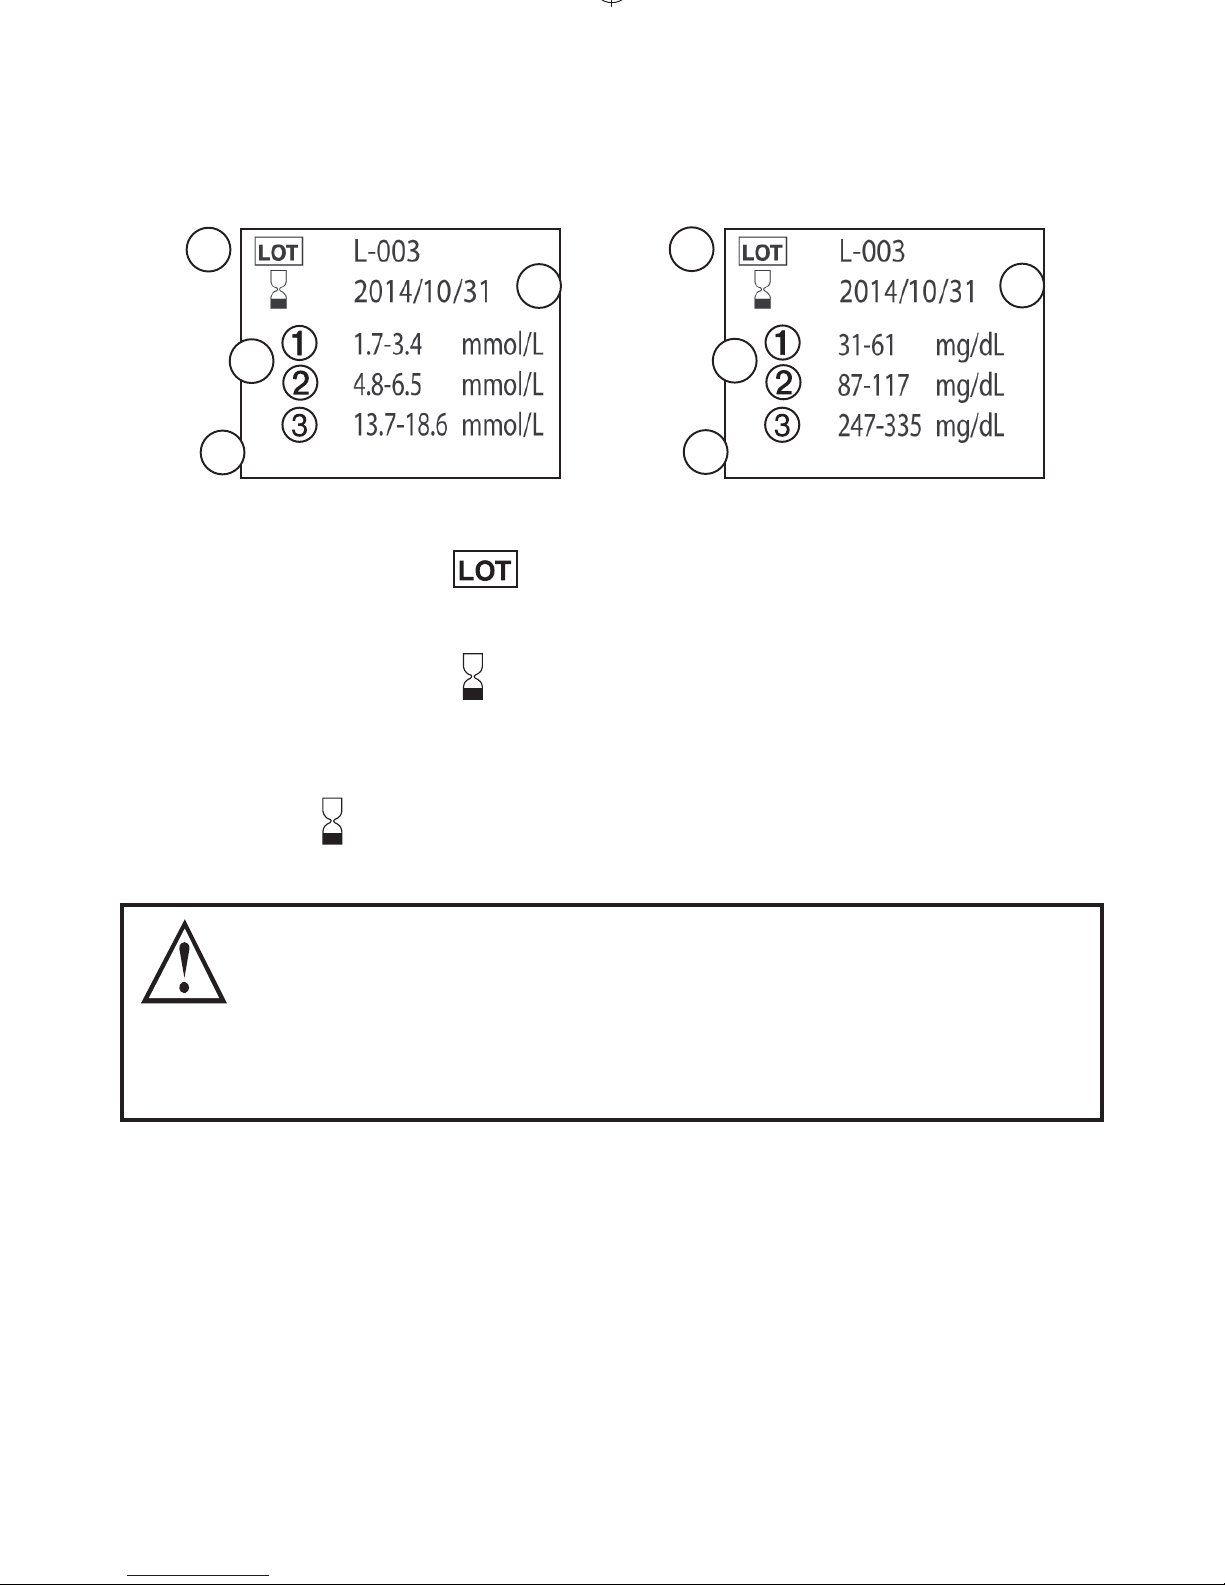
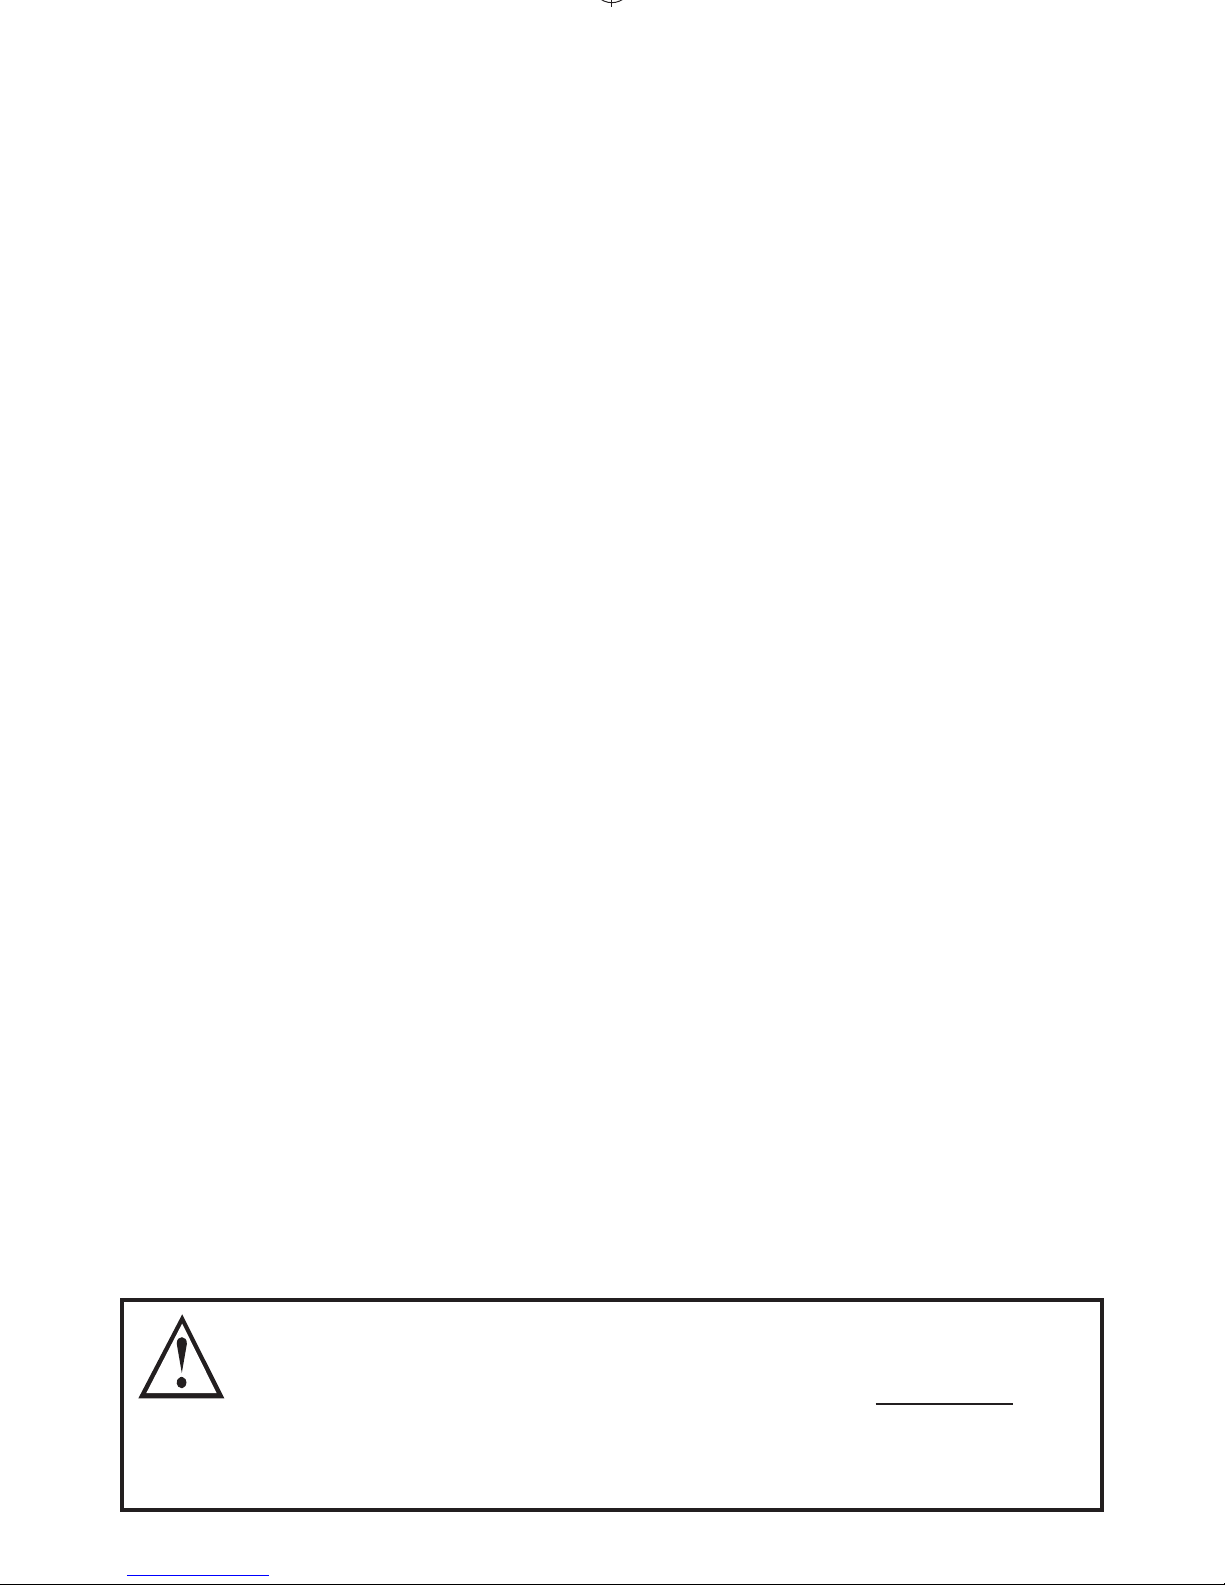
Lot Number ( ) - Used for identication
when calling for assistance.
Use By Dates ( ) - Write date rst opened on
vial label. Discard vial and unused Test Strips if
either 4 months aer rst opening or date printed
next to on vial label has passed, whichever
comes rst.
Use of Test Strips or Control Solution past
the Use By Dates may give incorrect test
results. Discard out-of-date products and test
with new products.
Control Test Range - Range of numbers in
which Control Test result must fall to assure the
System is working properly.
12
Test Strip Vial Label
1
2
2
3
May 30, 2014
1
2
2
3
May 30, 2014
or
Page 13
13
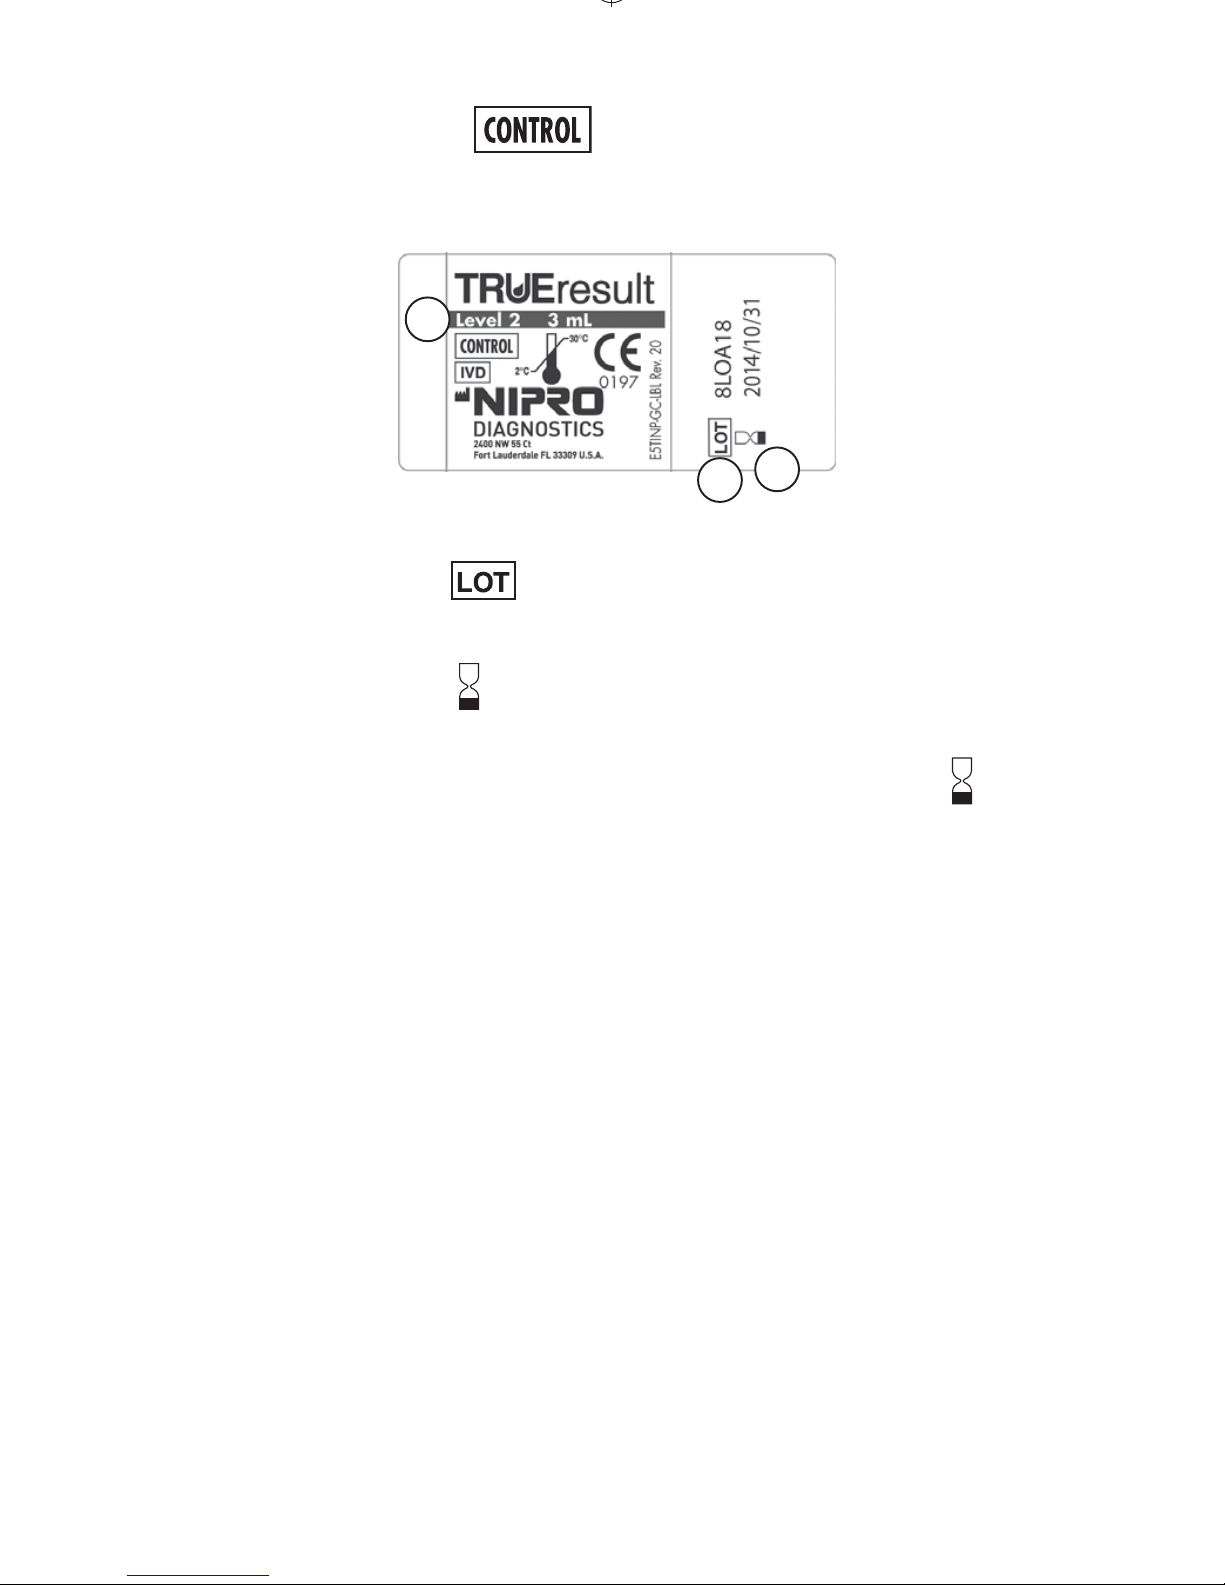
Control Solution Bottle Label
Lot Number ( ) - Used for identication
when calling for assistance.
Use By Dates ( ) - Write date rst opened on
bottle label. Discard bottle if either 3 months
aer rst opening or date printed next to on
bottle label has passed, whichever comes rst.
Control Solution Level (1, 2 or 3) - Testing
at least 2 levels of Control Solution is
recommended. Call the number on the cover of
this Booklet for information on how to obtain
dierent levels of Control Solution.
1
2
3
May 30, 2014
Control Solution
Page 14

GETTING STARTED
e TRUEresult Meter comes with pre-set time, date,
Ketone Test Alert and all Testing Reminders o. Before
using Meter for the rst time or aer bat tery is changed,
check to make sure all of the Meter pre-set functions are
correct. Update any setting as needed (see Meter Set Up).
e Meter turns on when a Test Strip is inserted into the
Test Port or when “ S ” Button is pressed and released (see
Memory and Meter Set Up). Meter turns o when the Test
Strip is released from the Meter, “ S ” Button is pressed and
held for 20 seconds, or aer 2 minutes of non-use.
Always check your supplies before using.
• Check Meter for damage (cracked Display, missing
buttons, etc.). If damage is seen, do not use Meter. Call
for assistance.
• Check Test Strip vial for damage (cracked vial, broken
vial, etc.). Discard damaged vial and all contents (Test
Strips) and use a new vial of Test Strips for testing.
•
Write date rst opened on Test Strip vial. Check Use By
Dates (written and printed) before using any Test Strips
from the vial. Do not use if 4months aer rst opening
(written date) or if printed Use By Date has passed.
• Check Control Solution bottle for any leaks or broken
cap. Discard bottle and open a new one for testing.
• Write date rst opened on Control Solution bottle
label. Check Use By Dates (written and printed) before
using. Do not use if 3 months aer rst opening
(written date) or if printed Use By Date has passed.
14
Page 15
15
Quality Control Testing
To assure you are getting accurate and reliable results,
TRUEresult oers two kinds of quality control tests.
ese tests let you know that your TRUEresult System
is working properly and your testing technique is good.
Automatic Self-Test
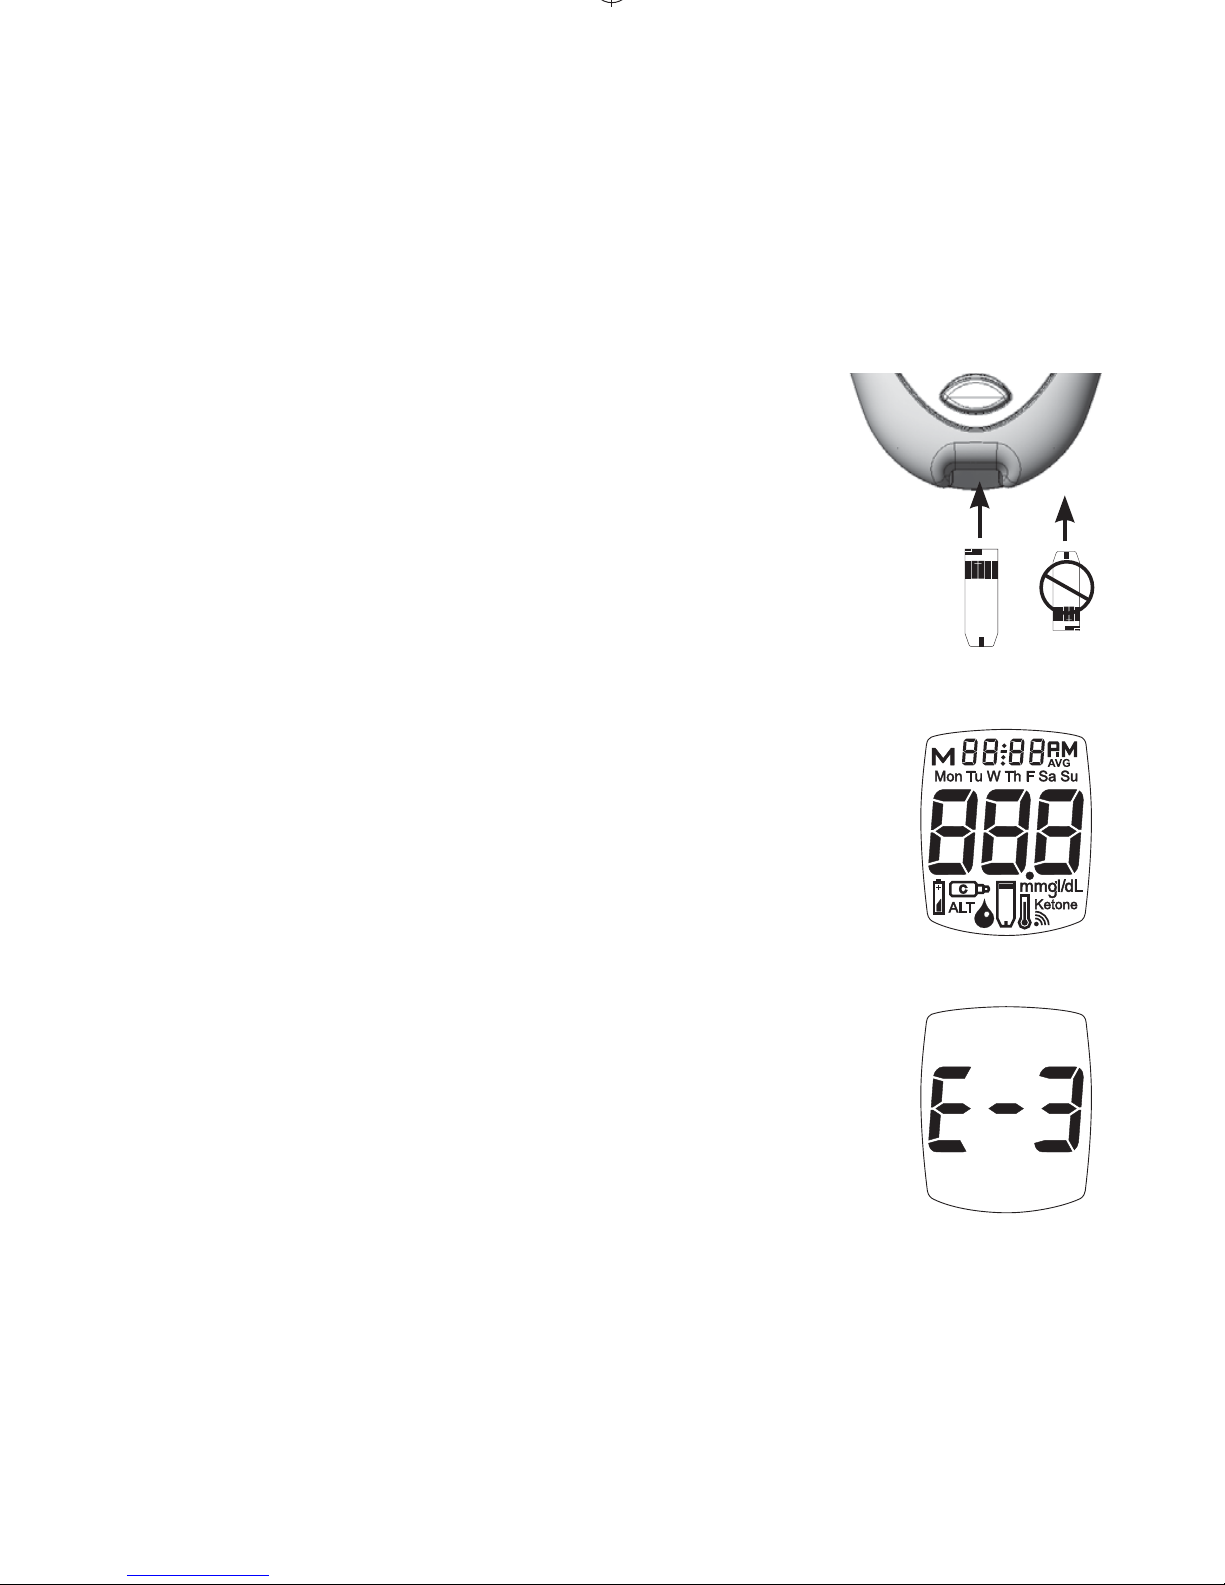
An Automatic Self-Test ensures that
the Meter is working correctly.
1. Wash hands and dry thoroughly.
2. Remove one Test Strip from the
Test Strip vial and insert Test Strip
into the Meter.
3.
Meter turns on. e full Display
appears and is replaced by the time
and the blinking Drop Symbol. e
Meter is working correctly and is ready
to perform a Control or blood test.
Do not use Meter if:
•
e full Display does not appear
(segments are missing),
•
e blinking Drop Symbol does not appear, or
•
An error message appears in the Display.
See Troubleshooting or call for assistance (see cover
of this Booklet for phone number).
Full Display
Contacts
Facing Up
Page 16
16
Control Test
e Control Test checks that the System is working
correctly and testing technique is good. Use ONLY
TRUEresult Control Solution to perform Control
Tests. Perform Control Tests:
•
For practice before using the System for the rst
time,
•
When opening a new vial of Test Strips,
•
Occasionally as a vial of Test Strips is used,
•
If a Test Strip vial has been le opened or le in
extreme heat, cold, or humidity,
•
Whenever a check on performance of the System is
needed,
•
If results seem unusually high or low,
•
If Meter damage is suspected (Meter was dropped,
crushed, wet, etc.).
Performing Control Tests with more than one level
of Control Solution is recommended to ensure that
your System is working properly. ree levels of
TRUEresult Control Solution are available. Contact
place of purchase or use the number on the cover of
this Booklet for more information on how to obtain
dierent levels of Control Solution.
Ranges printed on Test Strip vial label are
for Control Test results only and are not
suggested levels for your blood glucose. Do
not drink Control Solution.
Page 17
17
How to Test Control Solution
Use ONLY TRUEresult Control
Solution with the TRUEresult Meter.
1. Check supplies. See Getting Started.
2. Allow Control Solution, vial of Test
Strips and Meter to adjust to room
temperature (20°C-25°C).
Note: Running a Control Test at
temperatures outside the range
listed above may cause Control
Solution to read as a blood test.
3. Wash hands. Dry thoroughly.
4. Gently swirl or invert Control Solution bottle to
mix. DO NOT SHAKE!
5. Remove one Test Strip from vial. Close Test
Strip vial immediately. Use Test Strip quickly
aer removal from vial.
Note: If Test Strip has been out of the
vial too long before testing, an
error message appears upon
insertion of the Test Strip into the
Meter. Release and discard old
Test Strip. Use new Test Strip for
testing.
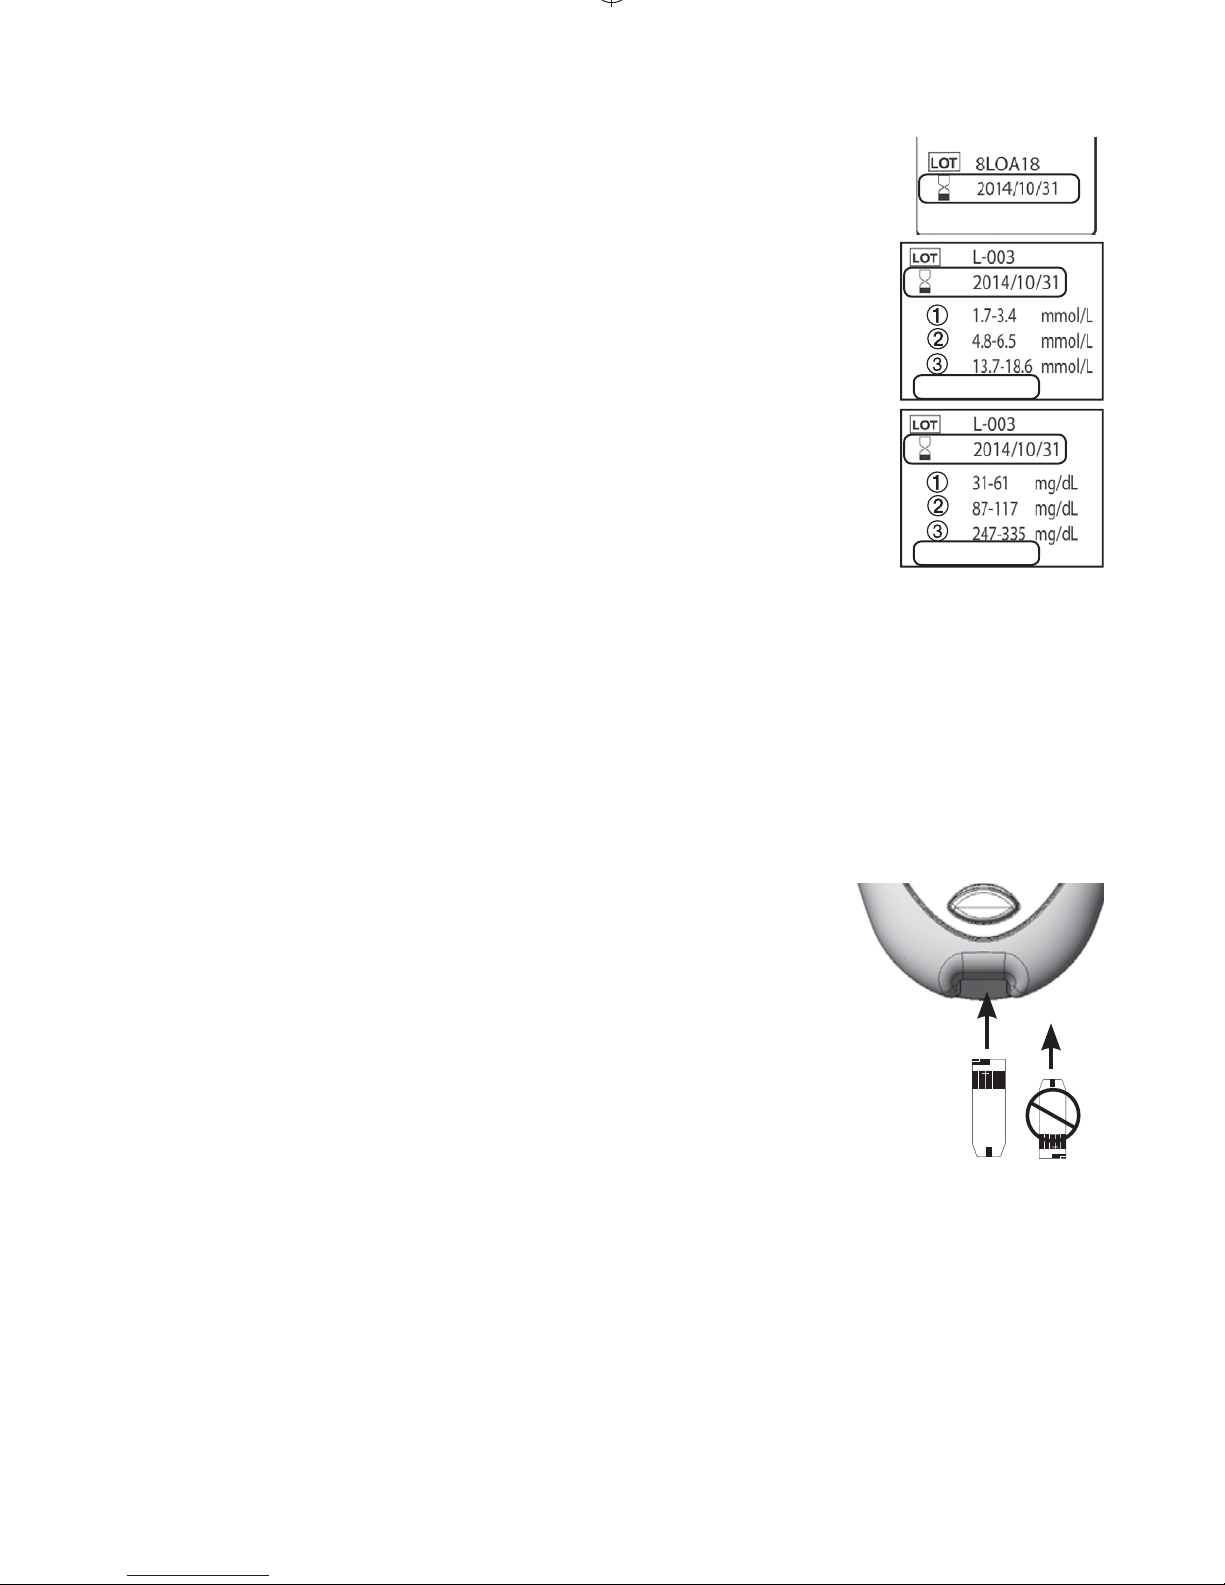
6. Insert Test Strip into Meter. Meter turns on
and shows blinking Drop Symbol and time. Do
not remove Test Strip.
Contacts
Facing Up
May 30, 2014
May 30, 2014
Page 18
18
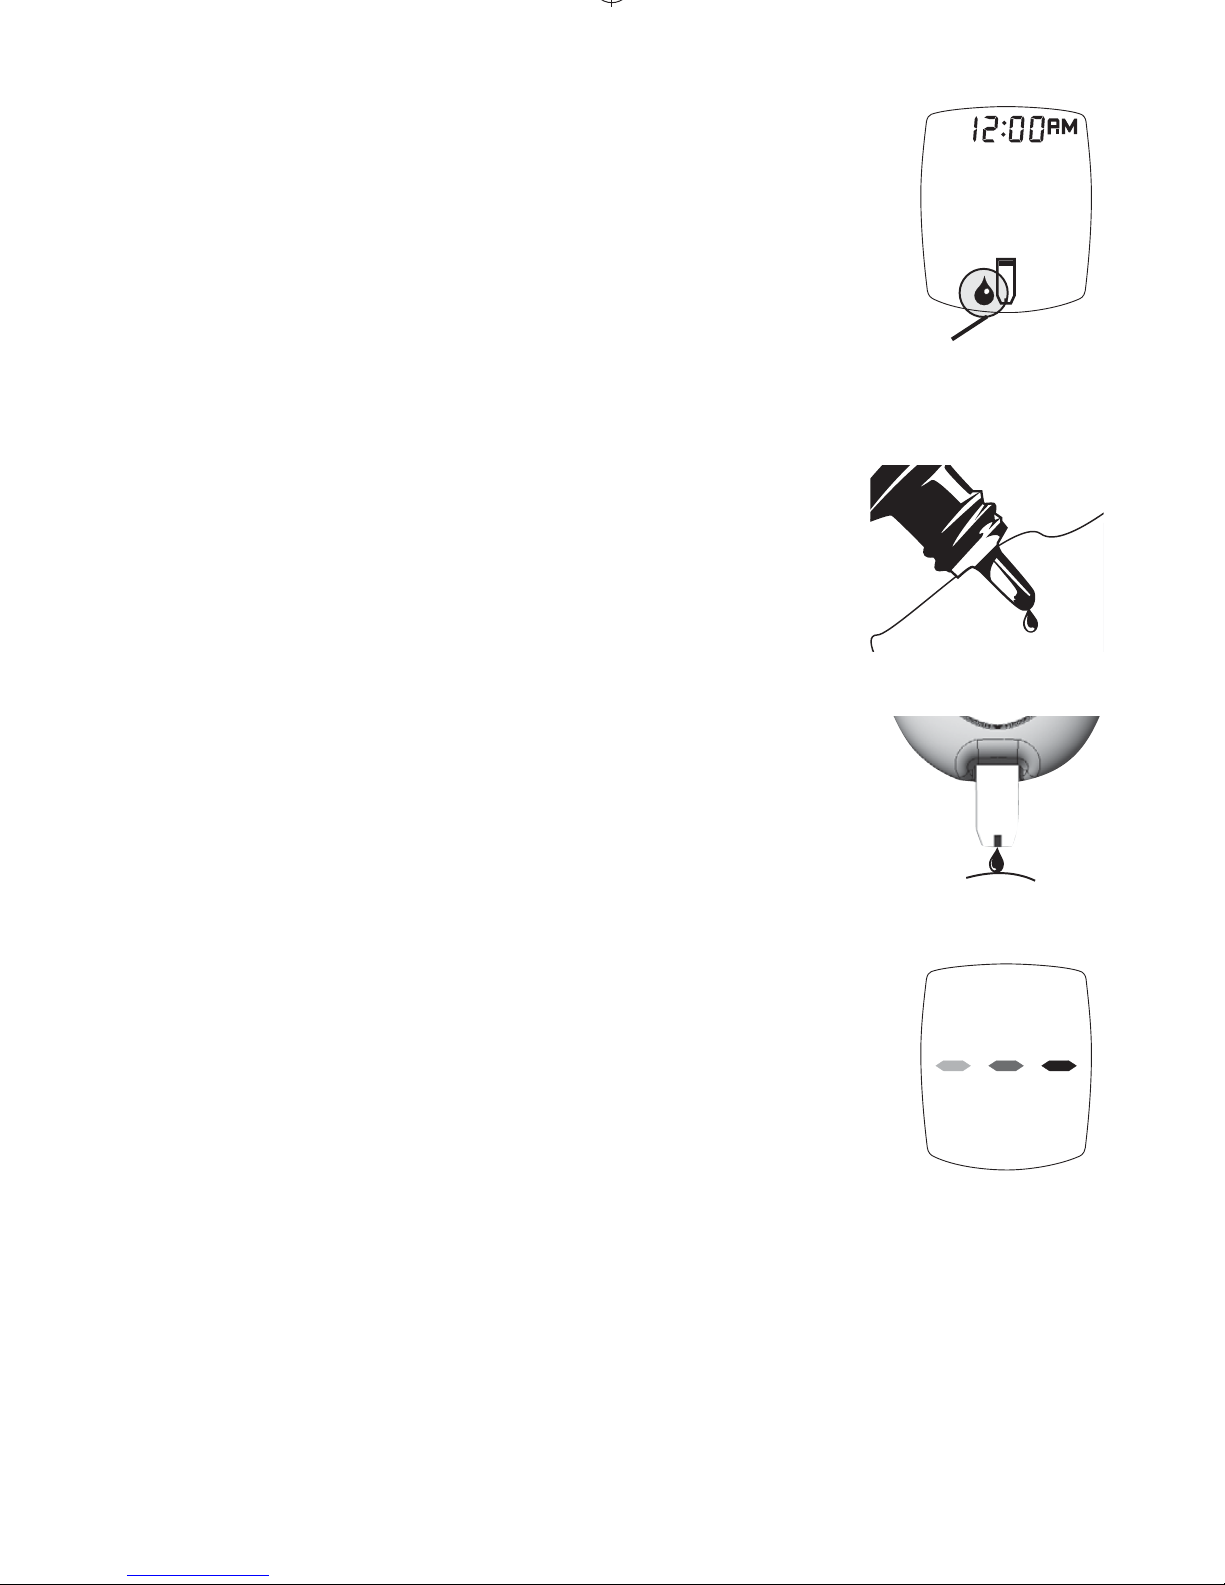
7. With cap removed, turn Control
Solution bottle upside down.
Gently squeeze one drop of Control
Solution onto a clean tissue. Wipe
o bottle tip with the tissue.
Note:
If Test Strip is removed before testing
is nished, an error message appears.
Release and discard old Test Strip.
Use new Test Strip for testing.
8.
Gently squeeze a drop of Control
Solution onto a small piece of
unused aluminum foil or clear
plastic wrap. Discard foil or plastic
wrap aer use.
Note:
Do not put drop on top of the Test
Strip.
9.
With Test Strip still in Meter, touch
Sample Tip to top of the drop of
Control Solution. Allow drop to be
drawn into Test Strip. Remove Test
Strip from drop when Meter beeps.
Dashes appear across the Display to
show Meter is testing.
Note: If Meter does not beep or begin testing soon
aer drawing up sample, release and discard
Test Strip. Repeat test with new Test Strip. If
problem persists, see Troubleshooting.
10. Aer testing is nished, the result appears in the
display with the Control Symbol.
Drop Symbol
Meter Testing
Page 19
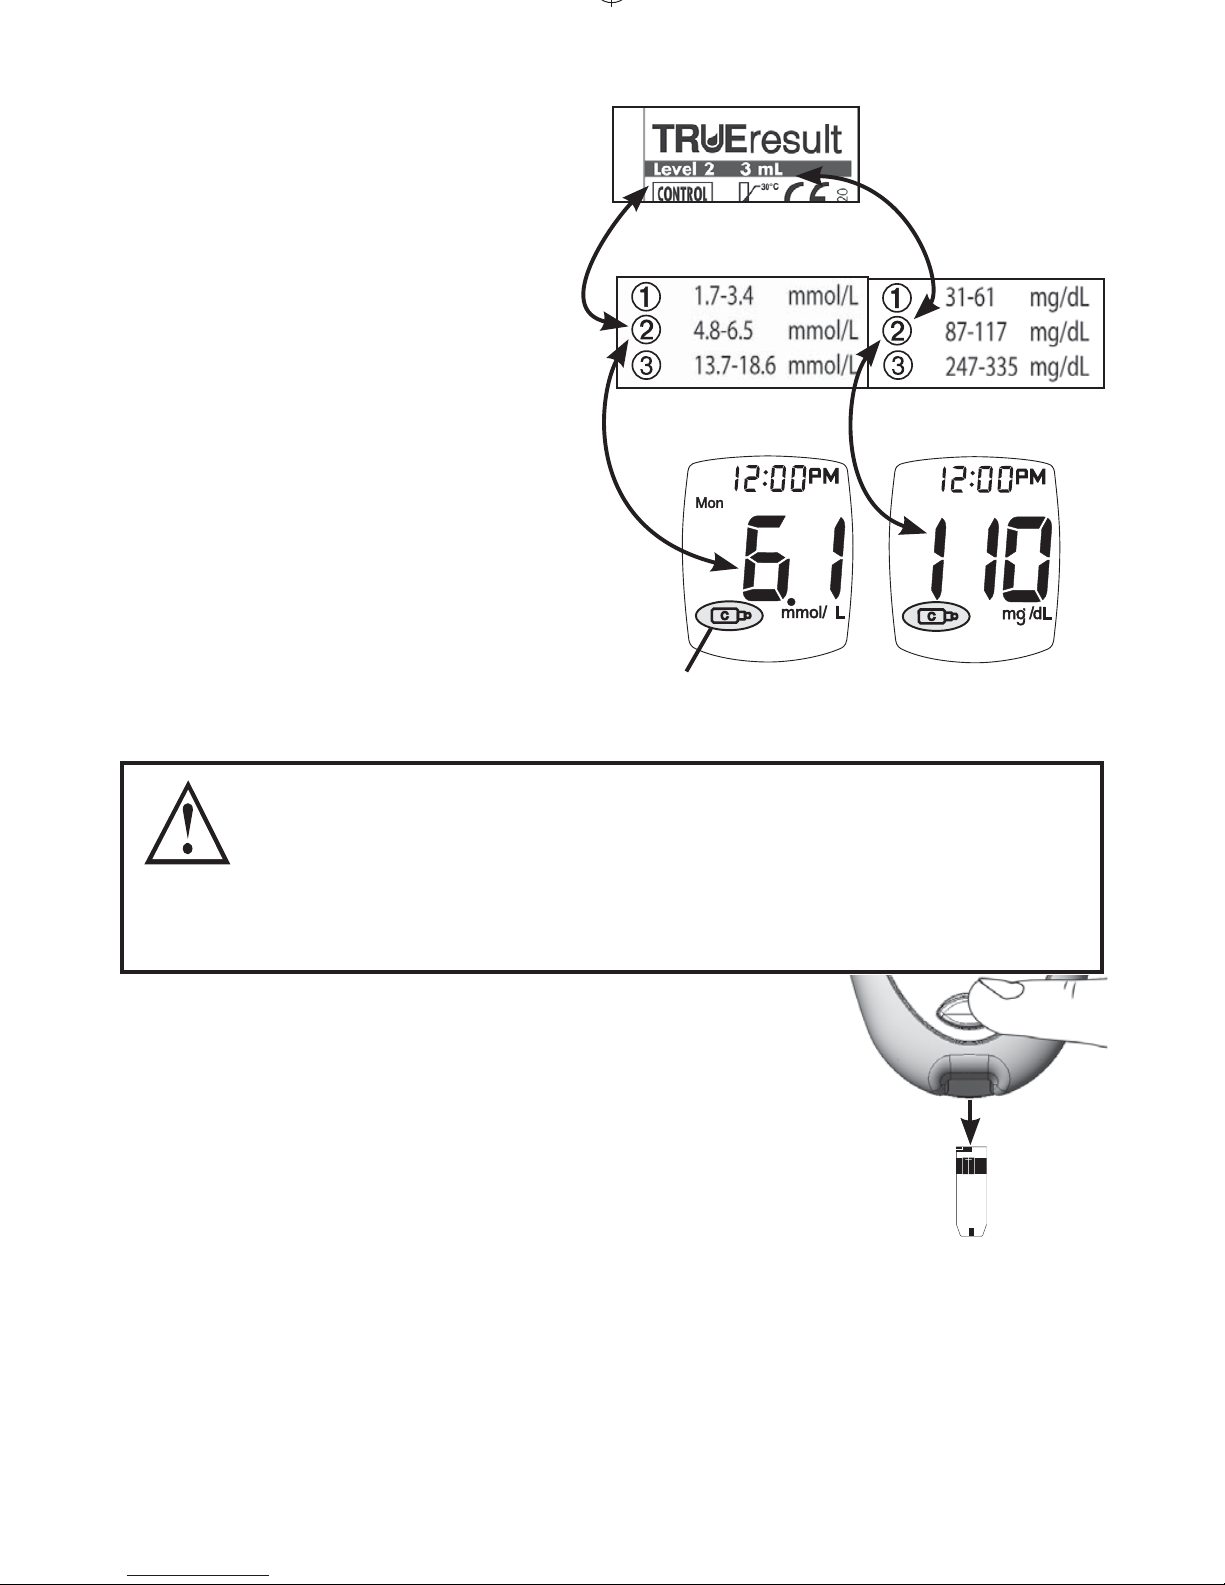
11.
Compare result to
Control Test Range
printed on Test Strip
vial label for Control
Solution Level you
are using.
If result is in range,
System can be used for
testing blood. If result
does not fall within range,
repeat test using a new
Test Strip.
If result is still outside range aer a second
Control Test, System should not be used for
testing blood. Call for assistance (see cover for
phone number).
12.
Aer result is shown, Strip Release
Button ashes. Hold Meter with Test
Strip pointing down. Press Strip Release
Button to release and discard Test Strip
in appropriate container. Meter turns o.
Recap Control Solution bottle tightly.
Note:
Removing Test Strip before result displays cancels
the test. An error message appears and the result
is not stored in Memory. Retest with a new Test
Strip and do not remove before result is displayed.
19
Control Symbol
Test Strip
Vial Label
Control Solution
Bottle Label
Page 20
20
TESTING BLOOD
Obtaining a Blood Sample
Refer to lancing device’s Instructions for Use for
detailed instructions.
e lancing device is for single patient use
ONLY. For cleaning/disinfecting your lancing
device see Lancing Device Care in the lancing
device’s Instructions for Use. Wash your hands
thoroughly with soap and warm water aer
handling the Meter, lancing device, or Test Strips.
Contact with blood presents an infection risk.
• NEVER share lancets or lancing device.
• Lancets are for single use only. Do not reuse lancets.
• To help prevent false high results, wash hands
before using the System to test blood, especially aer
handling fruit or other foods containing sugar.
From Fingertip
1. Prepare ngertip by washing hands in warm, soapy
water. Rinse well. Dry thoroughly.
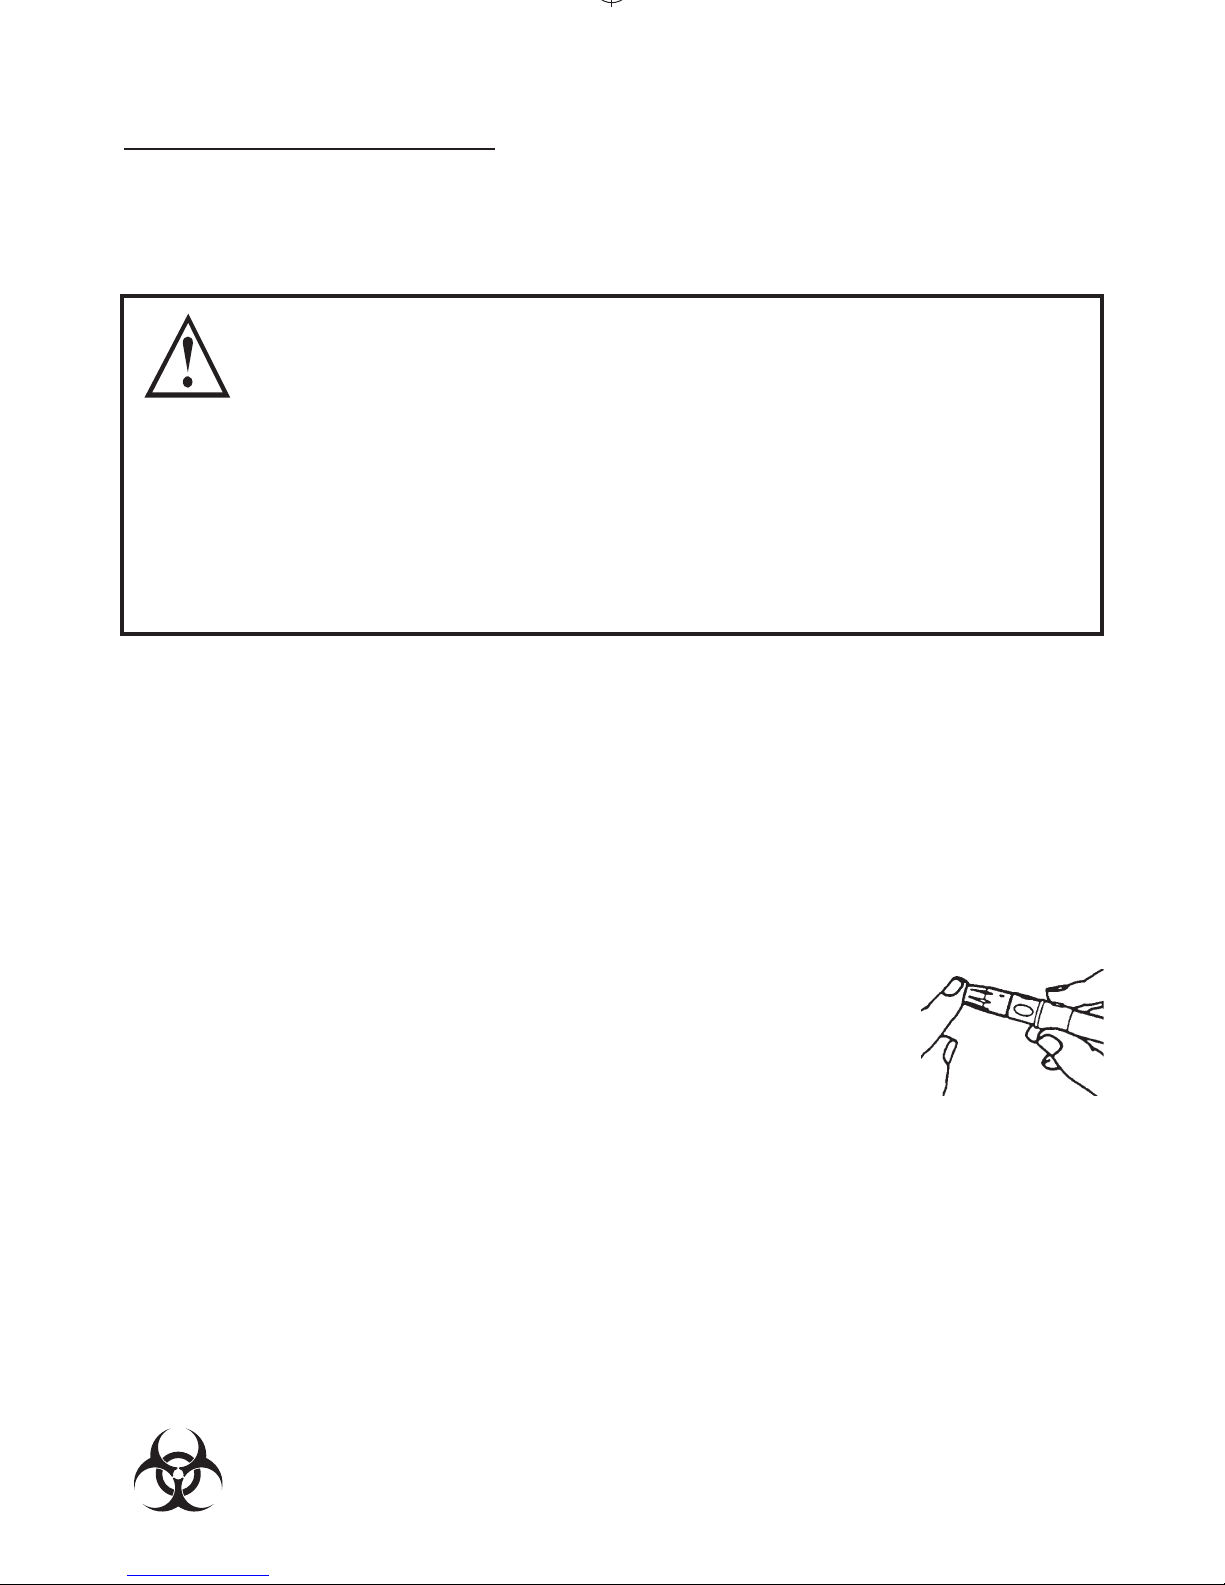
2. Place end of lancing device equipped with
lancet against tip of nger. Lance ngertip.
3. Set lancing device aside. To help blood drop form,
lower hand to waist level, gently massage nger from
palm to ngertip. Allow blood drop to form before
attempting to apply to Test Strip.
4. Recap and remove used lancet from lancing device.
Discard used lancet into appropriate container.
Note: Treat used Test Strips and lancets as a biological
risk. Dispose used Test Strips and lancets in
approved container.
Page 21

21
From Forearm
Note: Some lancing devices include a special end cap
for alternate site testing. Check lancing device’s
Instructions for Use.
1. Select area to be lanced. Wash with soap and warm water,
rinse and dry thoroughly.
2. Rub area vigorously or apply a warm dry compress to
increase blood ow.
3. Place end of lancing device equipped with lancet
rmly against forearm. Press trigger button.
Apply rm pressure on lancing device for 10
seconds. Allow blood drop to form before
attempting to apply to the Test Strip.
4. Recap and remove lancet from lancing device. Discard
used lancet into appropriate container.
Important Notes Regarding Forearm Testing
6
• Check with your Doctor or Healthcare Professional to see
if forearm testing is right for you.
• Results from forearm are not always the same as results
from ngertip.
• Use ngertip instead of forearm for more accurate results:
- Within 2 hours of eating, exercise, or taking insulin,
- If your blood sugar may be rising or falling rapidly
or your routine results are oen uctuating,
- If you are ill or under stress,
- If your forearm test results do not match how you feel,
- If your blood sugar may be low or high,
- If you do not notice symptoms when blood sugar
is low or high.
Page 22
22
How to Test Blood Glucose
1. Check supplies. See Getting Started.
2. Wash hands (and forearm for alternate site
testing). Rinse well and dry thoroughly.
3. Remove one Test Strip from vial. Close vial
immediately. Use Test Strips quickly aer
removal from vial.
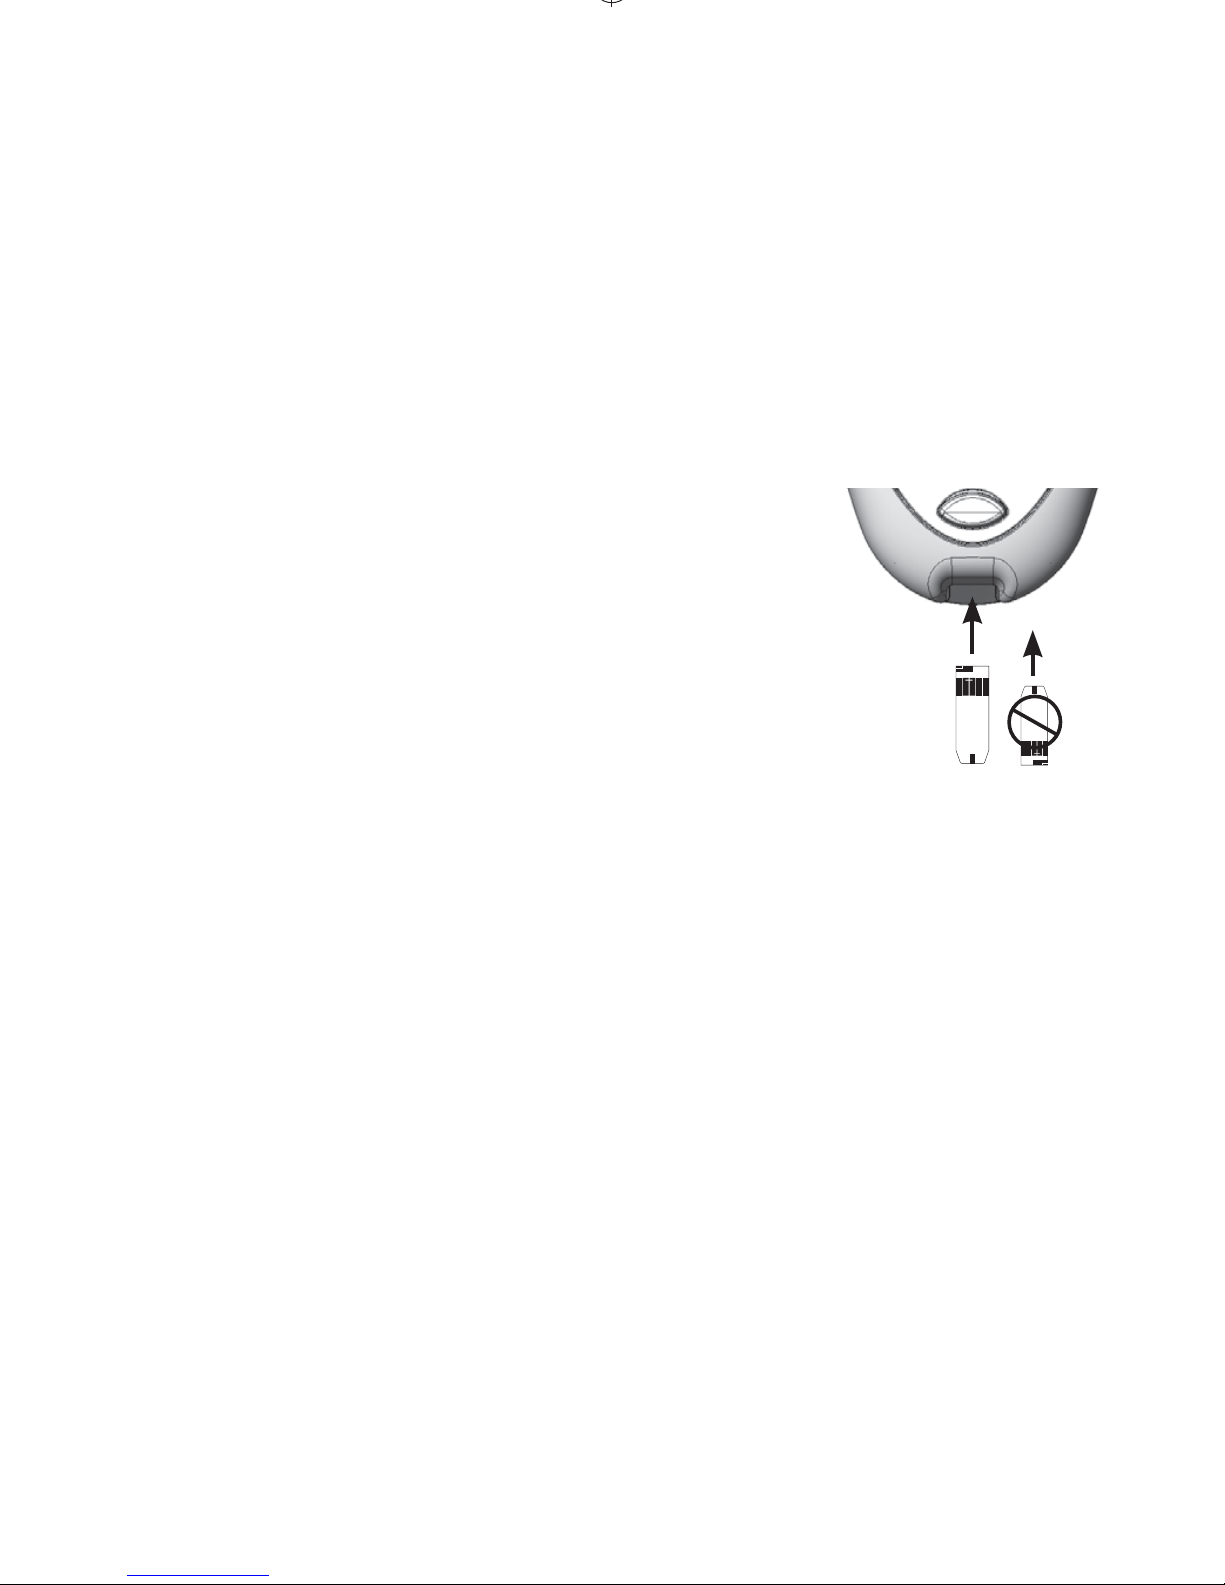
4. With Meter o, insert Test Strip
Contact End (blocks facing
up) into Meter. Meter turns on
and shows the Drop Symbol in
the Display. Keep Test Strip in
Meter until testing is nished.
---Alternate Site Testing---
To mark test as alternate site (forearm) result,
press “+” Button. ALT Symbol appears in
the Display. Press “-” Button to remove ALT
Symbol.
Note: If Test Strip has been out of the vial too long
before testing, an error message appears
upon insertion of the Test Strip into the
Meter. Release and discard old Test Strip.
Use new Test Strip for testing.
Page 23
5. Lance ngertip or forearm. Allow drop to form
(see Obtaining a Blood Sample).
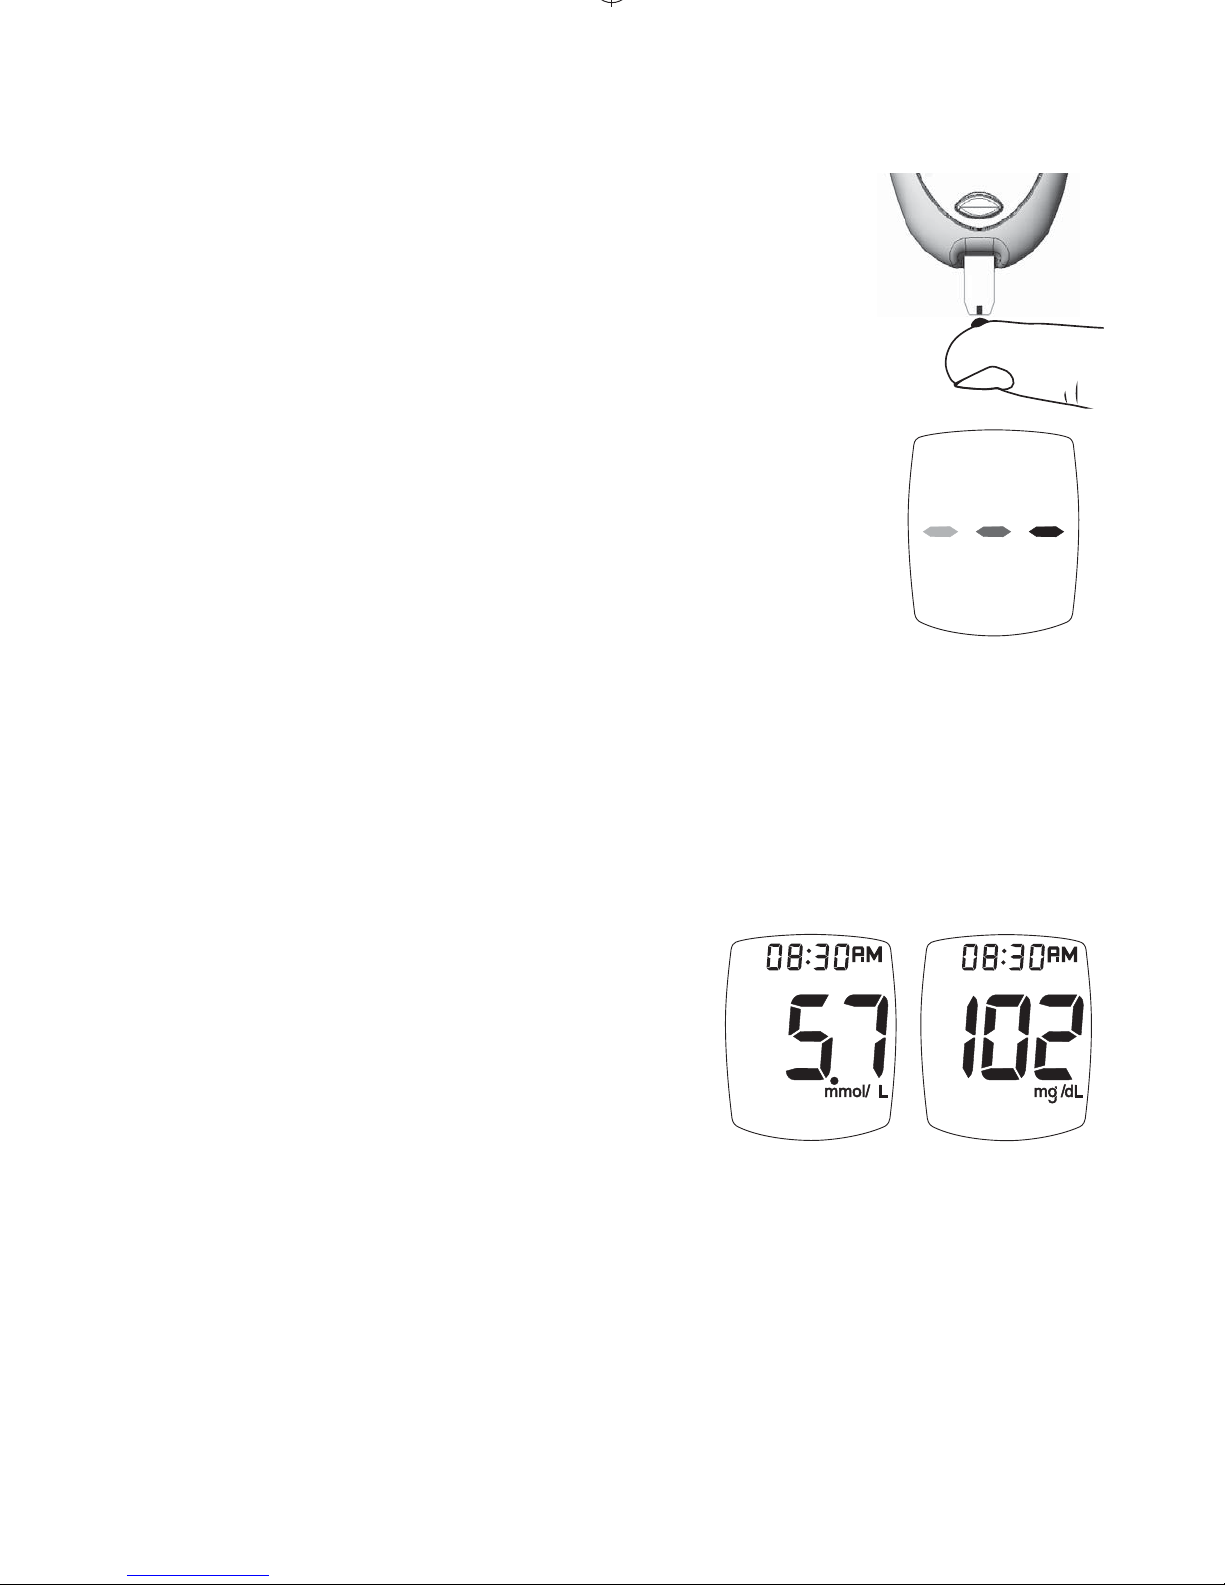
6. With Test Strip still in Meter, touch
Sample Tip to top of blood drop
and allow blood to be drawn into
Test Strip. Remove from blood drop
immediately aer the Meter beeps
and dashes appear across Meter
Display.
Note: If Meter does not beep or begin testing soon
aer touching blood drop to Sample Tip,
discard Test Strip. Repeat test with new
Test Strip and new blood drop. If problem
persists, see Troubleshooting.
7. Aer the test is nished,
result is displayed with date
and time. e Strip Release
Button ashes. Record
result in log book.
23
Page 24
24
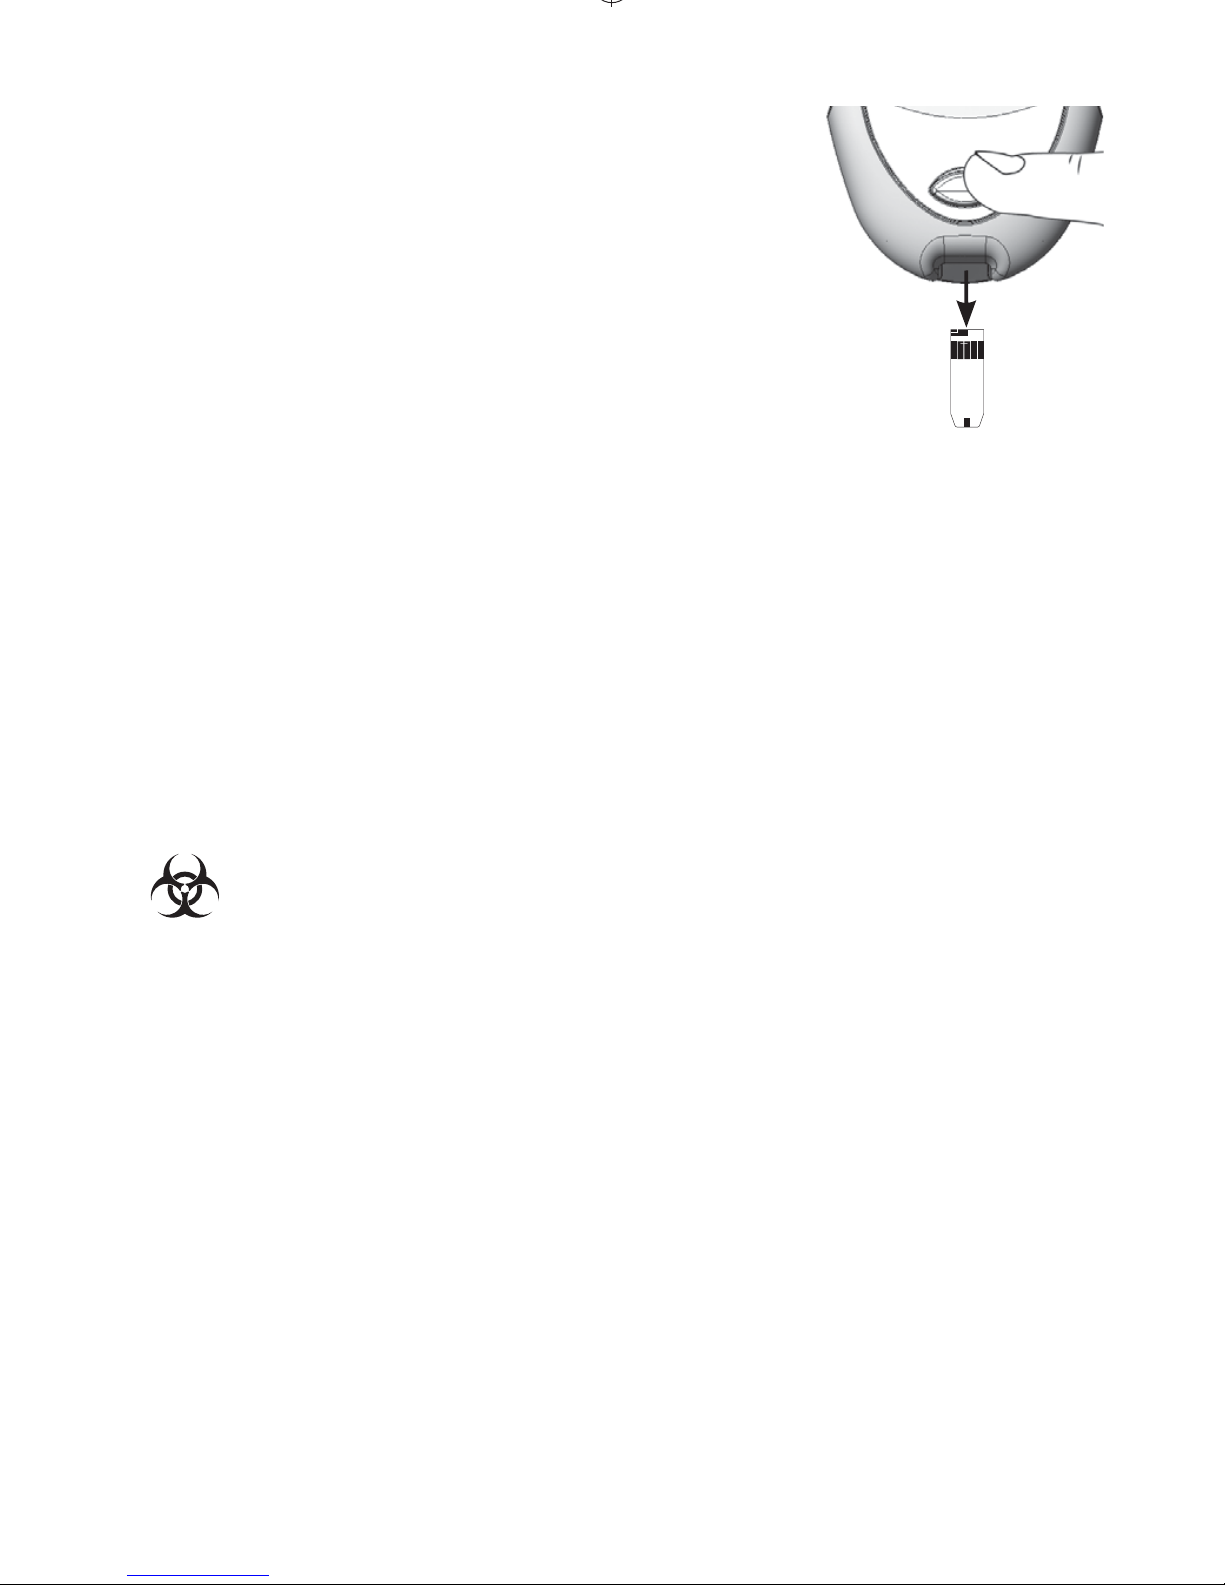
8. Hold Meter with Test Strip
pointing down. Press Strip
Release Button to discard
Test Strip in the appropriate
container.
Note: Removing Test Strip before result displays
cancels the test. An error message appears
and result is not stored in Memory. Retest
with a new Test Strip and do not remove
before result is displayed.
9. Meter turns o. Result is stored in Memory
with day, date and time.
Note: Treat used Test Strips and lancets as a
biological risk. Dispose used Test Strips and
lancets in approved container.
Page 25
25
Unusual Blood Glucose Test Results
If you have symptoms of low or high glucose, check
your blood glucose immediately. If your result does
not match the way you feel, repeat test. If your
results still do not match the way you feel, call your
Doctor or Healthcare Professional.
• Low blood glucose (hypoglycaemia) symptoms
may be trembling, sweating, intense hunger,
nervousness, weakness, and trouble speaking.
•
High blood glucose (hyperglycaemia) symptoms
may be intense thirst, a need to urinate oen, a
dry mouth, vomiting and headache.
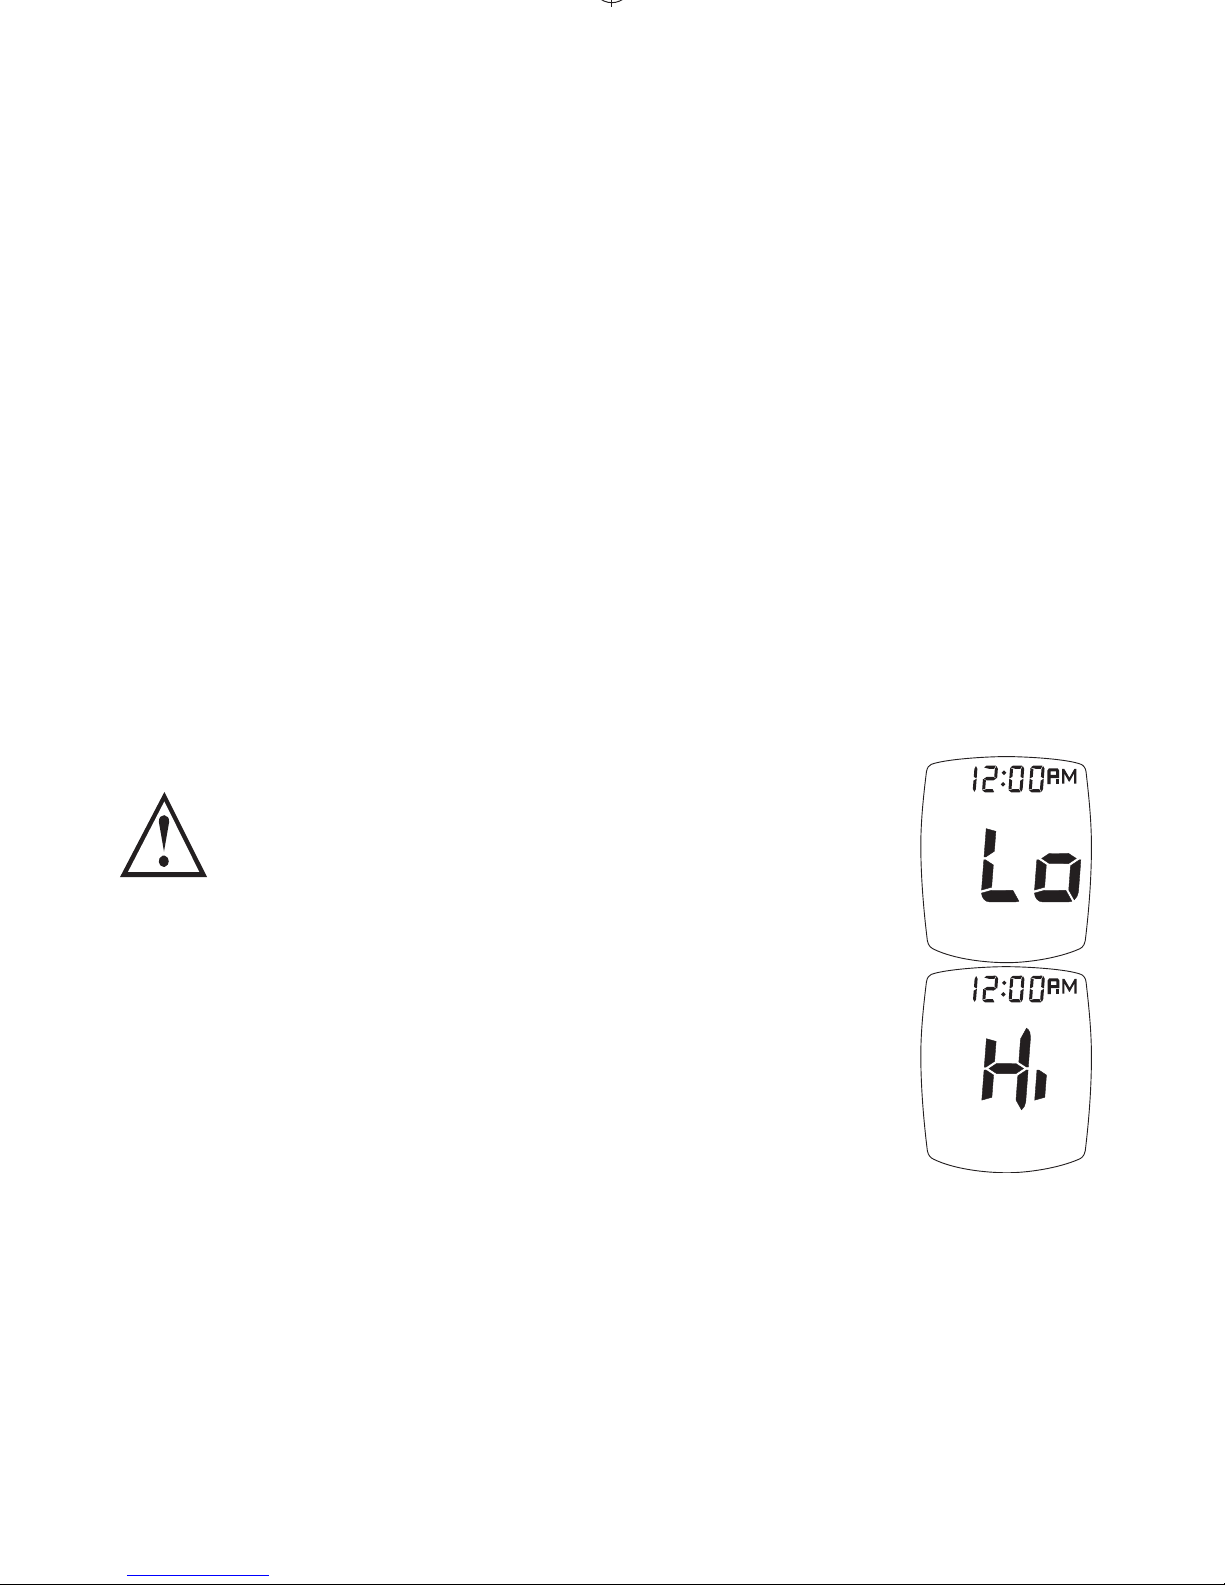
Meter reads blood glucose levels from
1.1-33.3 mmol/L (20-600 mg/dL).
If blood test result is less than 1.1
mmol/L (20 mg/dL), “Lo” appears in
Meter Display.
If blood test result is greater than 33.3
mmol/L (600 mg/dL), “Hi” appears in
Meter Display.
ALWAYS repeat test to conrm Low (“Lo”) and
High (“Hi”) results. If results still display “Lo” or
“Hi”, call your Doctor or Healthcare Professional
immediately.
Note: “Lo” results are included in the Average as
1.1 mmol/L (20 mg/dL). “Hi” results are
included as 33.3 mmol/L (600 mg/dL).
Page 26
26
Ketone Test Alert
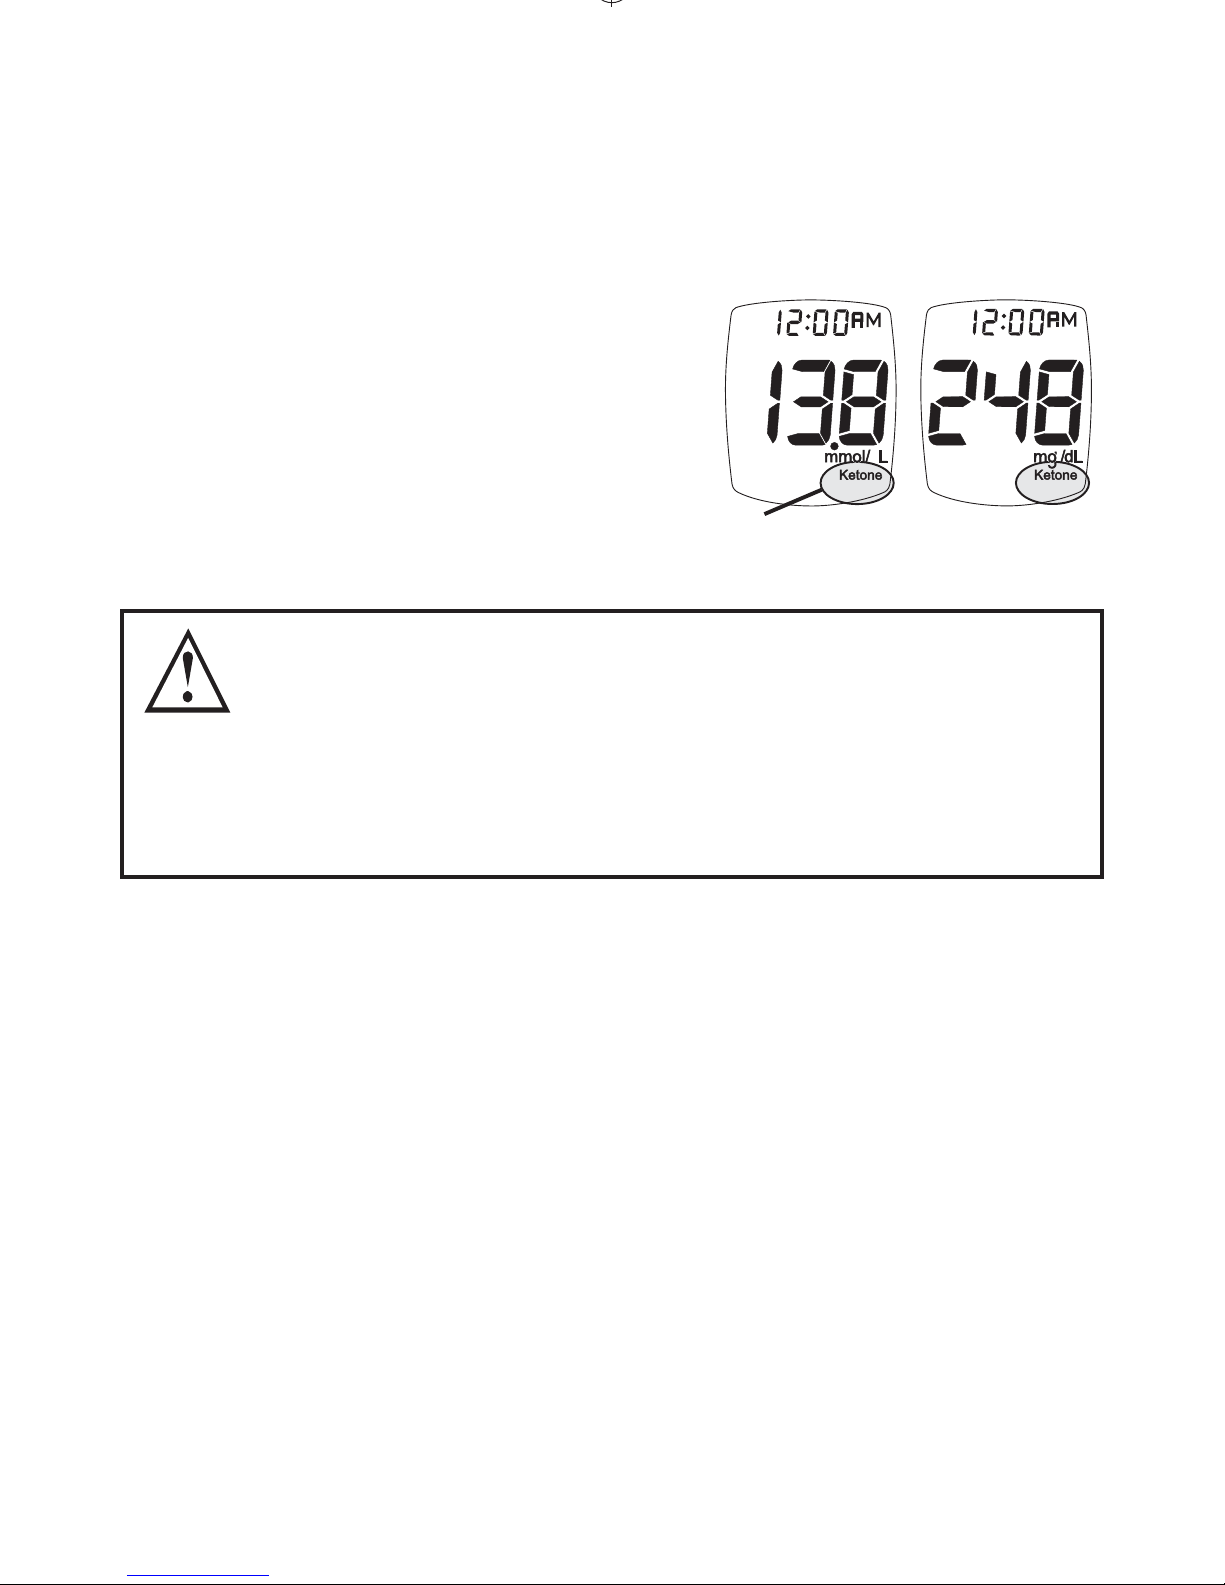
If blood glucose test result is
greater than 13.3 mmol/L
(240 mg/dL), and Ketone
Test Alert is turned on,
“Ketone” appears in Display
with glucose result (see Set
Ketone Test Alert).
When the Ketone Alert Symbol is shown,
it does not mean that ketones have been
detected in blood. Perform a ketone test per
the health plan as prescribed by the Doctor
or Healthcare Professional.
Ketone Test
Alert
Page 27

TRUEresult System and Laboratory Testing
e most accurate results come from using
fresh, capillary whole blood from the ngertip
or forearm. Venous whole blood collected into
sodium or lithium heparin blood collection
tubes may be used for testing by Healthcare
Professionals. Use of EDTA blood collection tubes
is not recommended and may cause low results.
Mix tube contents gently before using.
When comparing results between TRUEresult and
a laboratory system, perform a TRUEresult blood
test within 30 minutes of laboratory test. Diabetes
experts have suggested that 95% of glucose meter
results should agree within 0.83 mmol/L
(15 mg/dL) of a laboratory method when the
glucose concentration is less than 5.55 mmol/L
(100 mg/dL), and within 15% of a laboratory
method when the glucose concentration is 5.55
mmol/L (100 mg/dL) or higher.
7
If the patient
has recently eaten, ngerstick results from the
TRUEresult System can be up to 3.9 mmol/L
(70 mg/dL) higher than venous laboratory results.
8
27
Page 28
28
MEMORY
View Averages (7-, 14-, and 30-Day)
e Averages feature allows you to view the
average of all blood glucose results within a
7-, 14-, and 30-day period. Results marked as
Control Test results are not included in the
Averages.
Note:
If a Control Test is
performed outside the
recommended testing
temperature (see How to
Test Control Solution),
the Control Solution may
read as a blood test and be
included in the Averages.
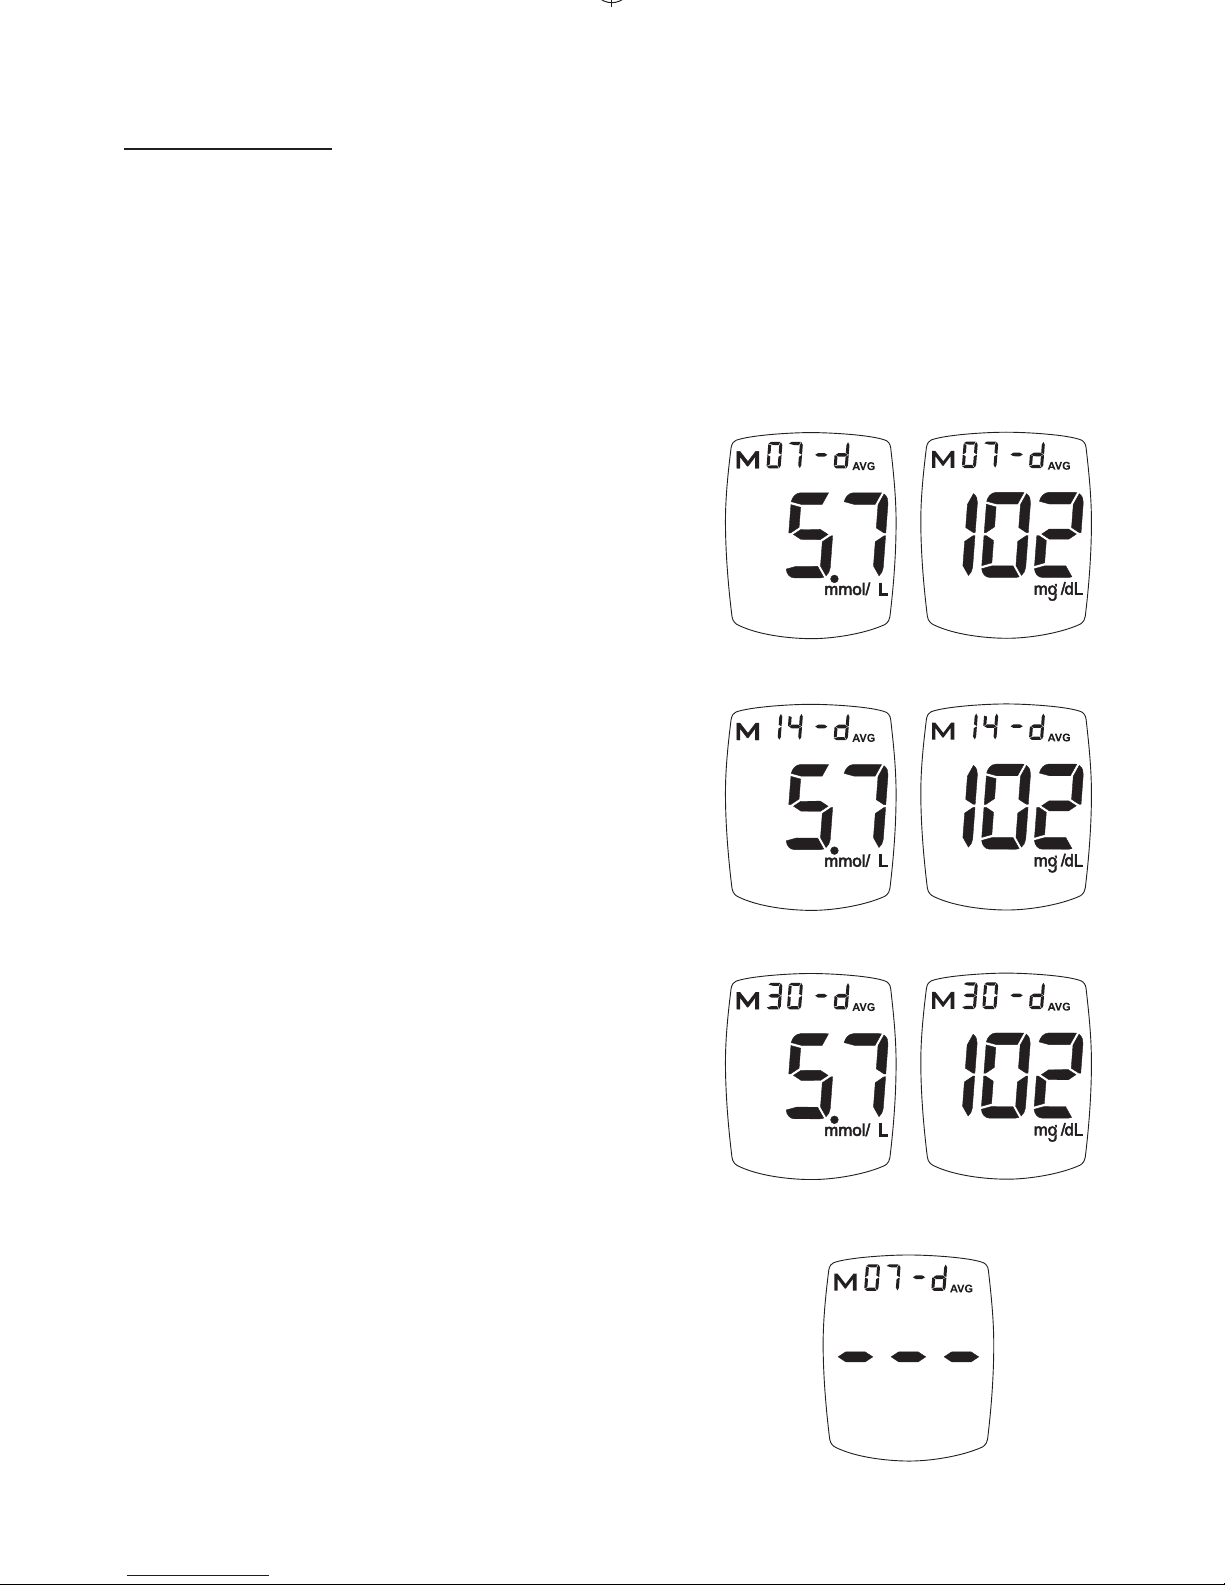
Start with Meter o. Press and
release “ S ” Button. Display
scrolls through 7-, 14-, and
30-Day Average values.
Note: If there are no Average
values, three dashes are
displayed for 7-, 14-, and
30-day Averages.
No Average
7-Day Average
14-Day Average
30-Day Average
Page 29
29
Ketone Test
Alert
Control Symbol
Alternate Site
Symbol
View Results
Memory stores 500 total blood and Control Test
results, which are displayed from most recent to
oldest. When the Memory is full, the oldest result is
replaced with the newest result.
1.
Press and release “ S ” Button. Meter displays 7-,
14-, and 30-day Averages.
2. Press and release “ S ” Button again to view most
recent result in Memory. If there are no results in
Memory, dashes appear with the Memory Symbol.
3.
Press “ + ” Button and release
to advance to the next result.
Press “ + ” Button to scroll
forward through blood results or
“ - ” Button to scroll backwards
through blood results.
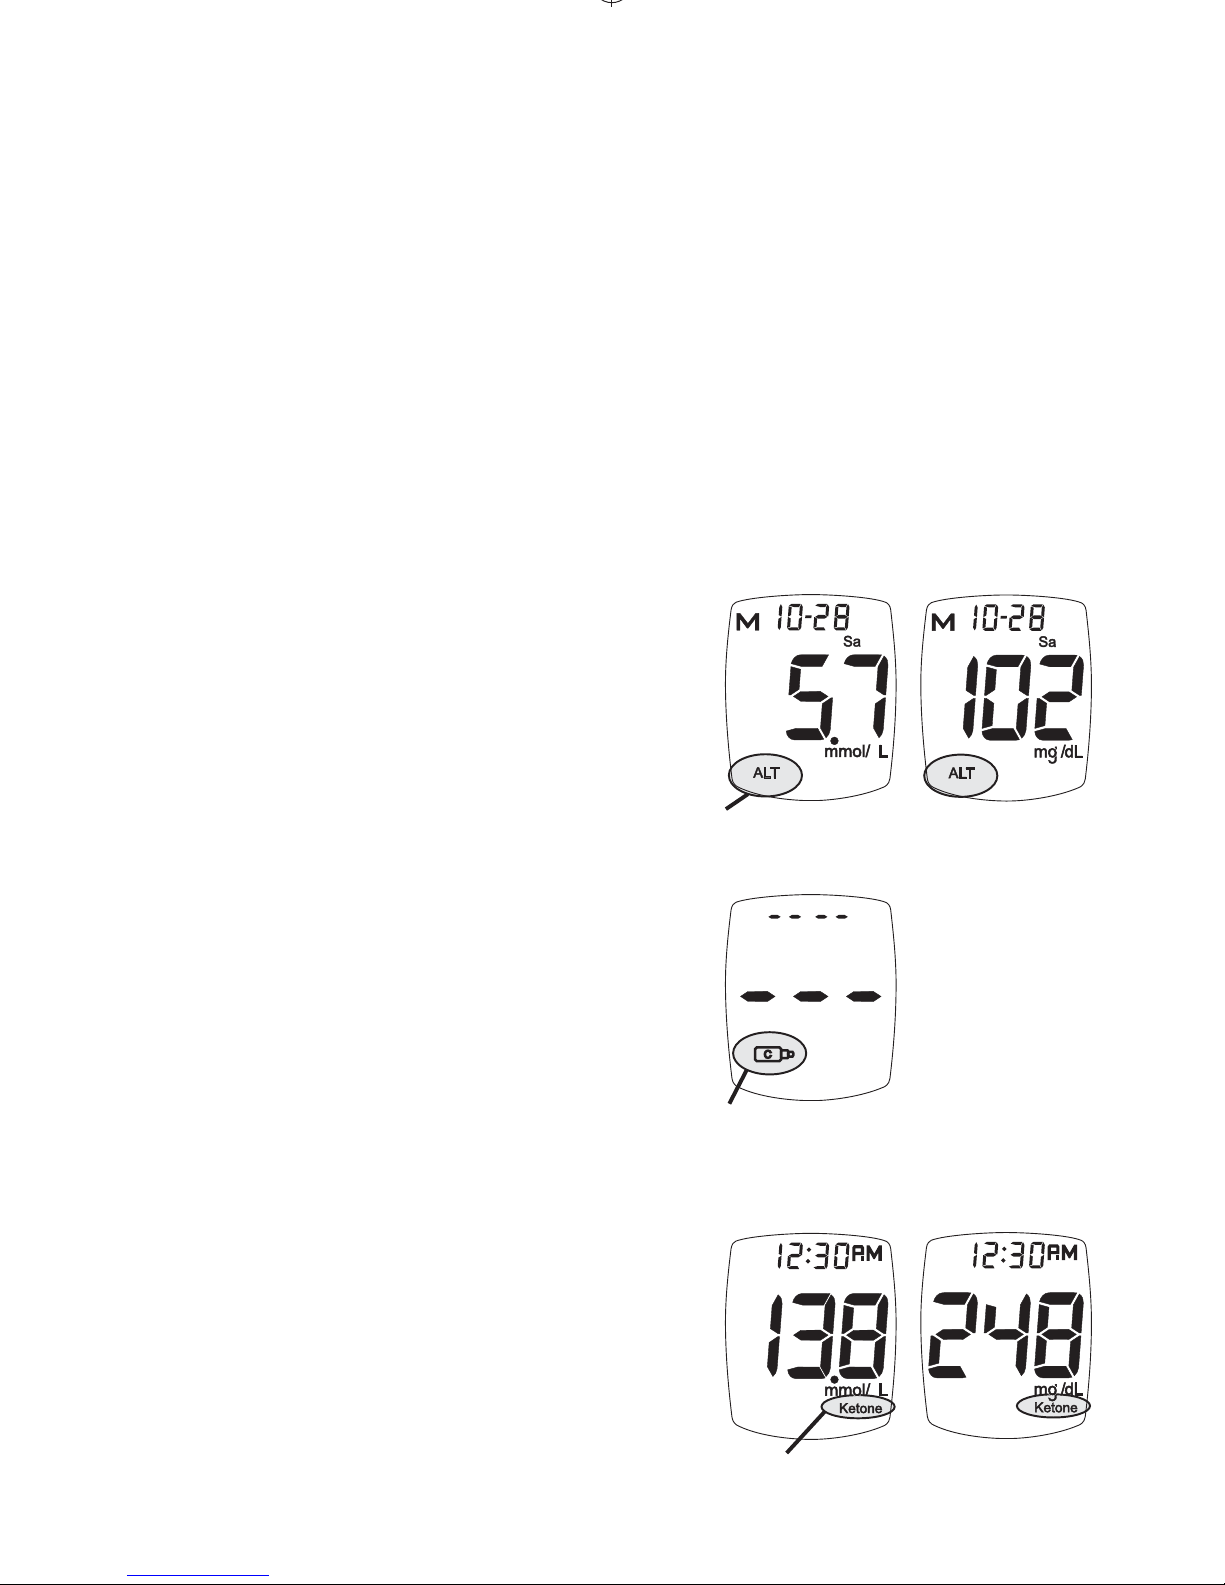
• Test results marked as
alternate site display ALT
Symbol.
• Control Test results display the
Control Symbol. If no Control
Test has been done Display
shows dashes and the Control
Symbol.
• Test results above 13.3 mmol/L
(240 mg/dL) display Ketone
Test Alert Symbol, when
Ketone Test Alert is turned on
during Meter Set Up.
Page 30
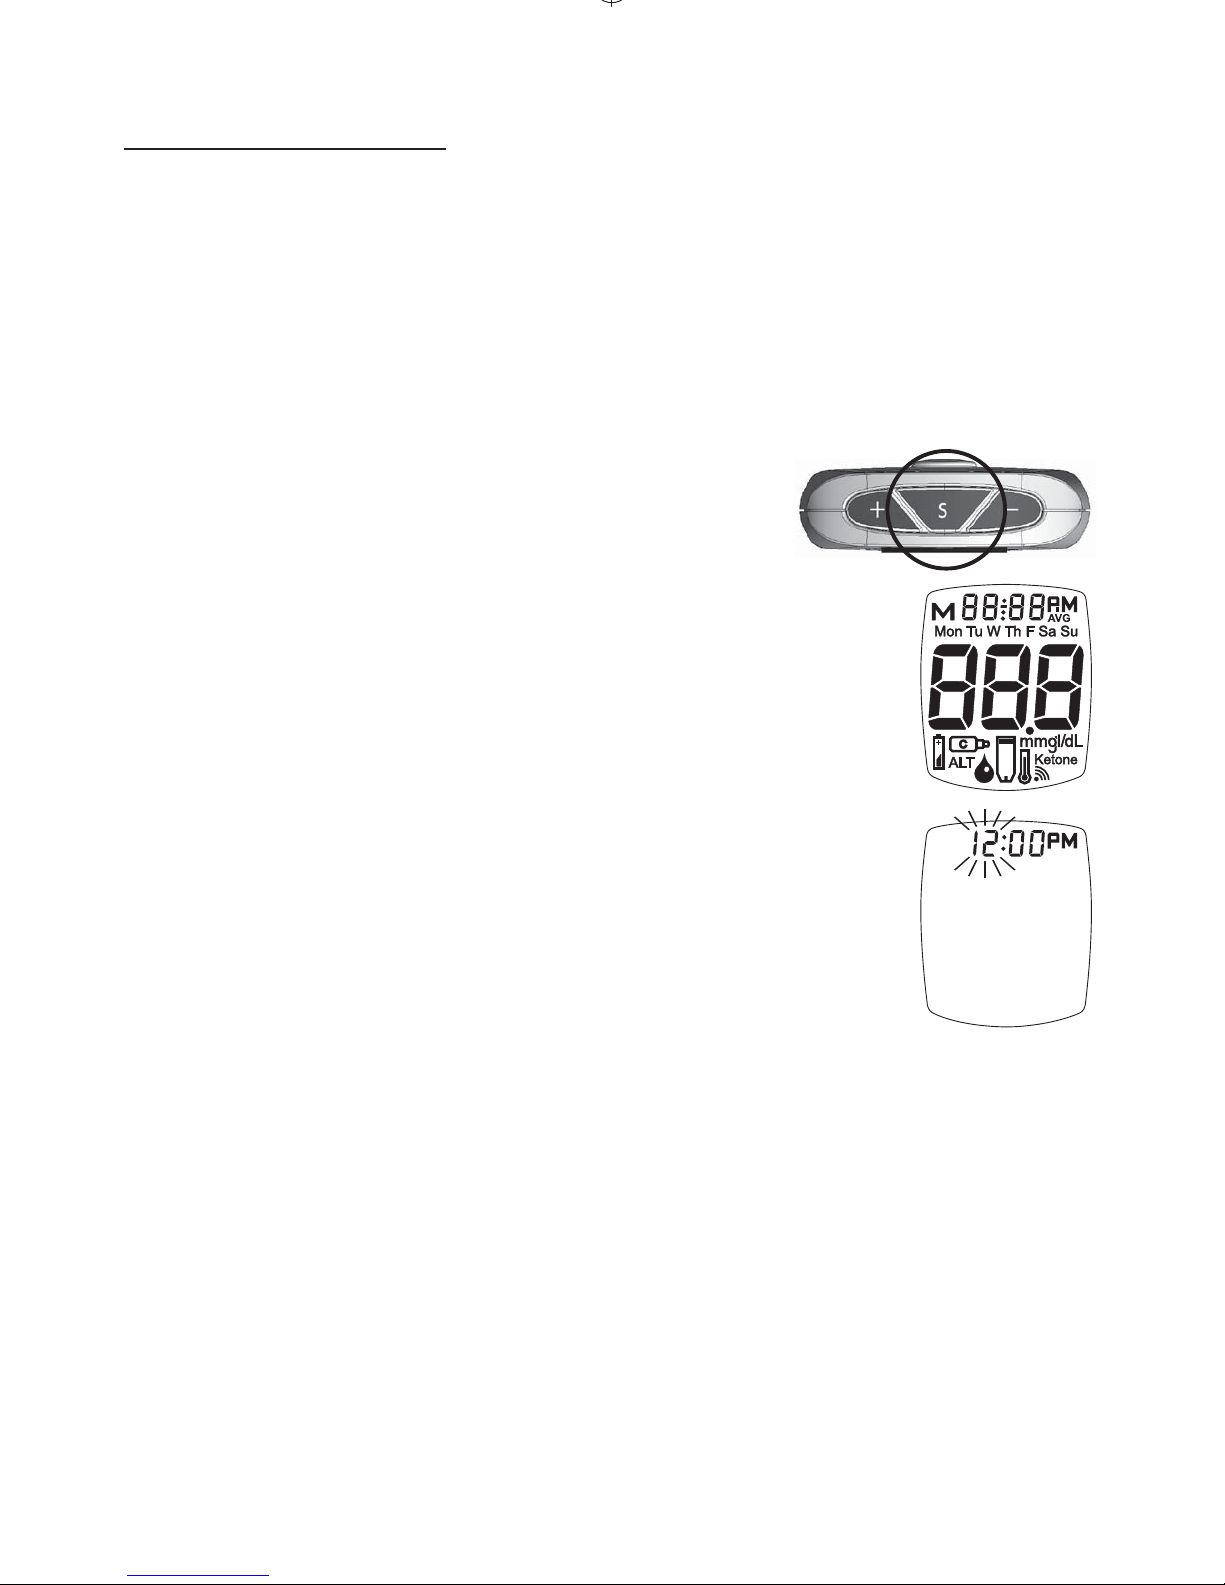
METER SET UP
Meter Set Up is to be used if changes need to be
made to the pre-set time and date, to turn on the
Ketone Test Alert and Testing Reminders, or if
settings need to be reset because of battery change.
Note: Meter turns o aer 2 minutes of non-use.
If Meter turns o at any time during Set Up,
all settings are saved. e
Meter takes you back to
Step #1.
1. Press and hold “ S ” Button until
the full Display is shown and a tone
sounds (around 5 seconds). Release
“ S ” Button.
2. e hour ashes. Press the “ + ”
Button to scroll up the hour or the
“ - ” Button to scroll down the hour.
Release “ + ” or “ - ” Button when
the correct hour displays.
Like many alarm clocks, to set the
hours for “AM” or “PM”, the hours
must scroll until the correct hour
with “AM” or “PM” displays. Press
“ S ” Button and release to save the
hour and go to the next step.
Note: Clock is factory set for either 12 hour or 24
hour clock. is feature cannot be changed.
30
Page 31
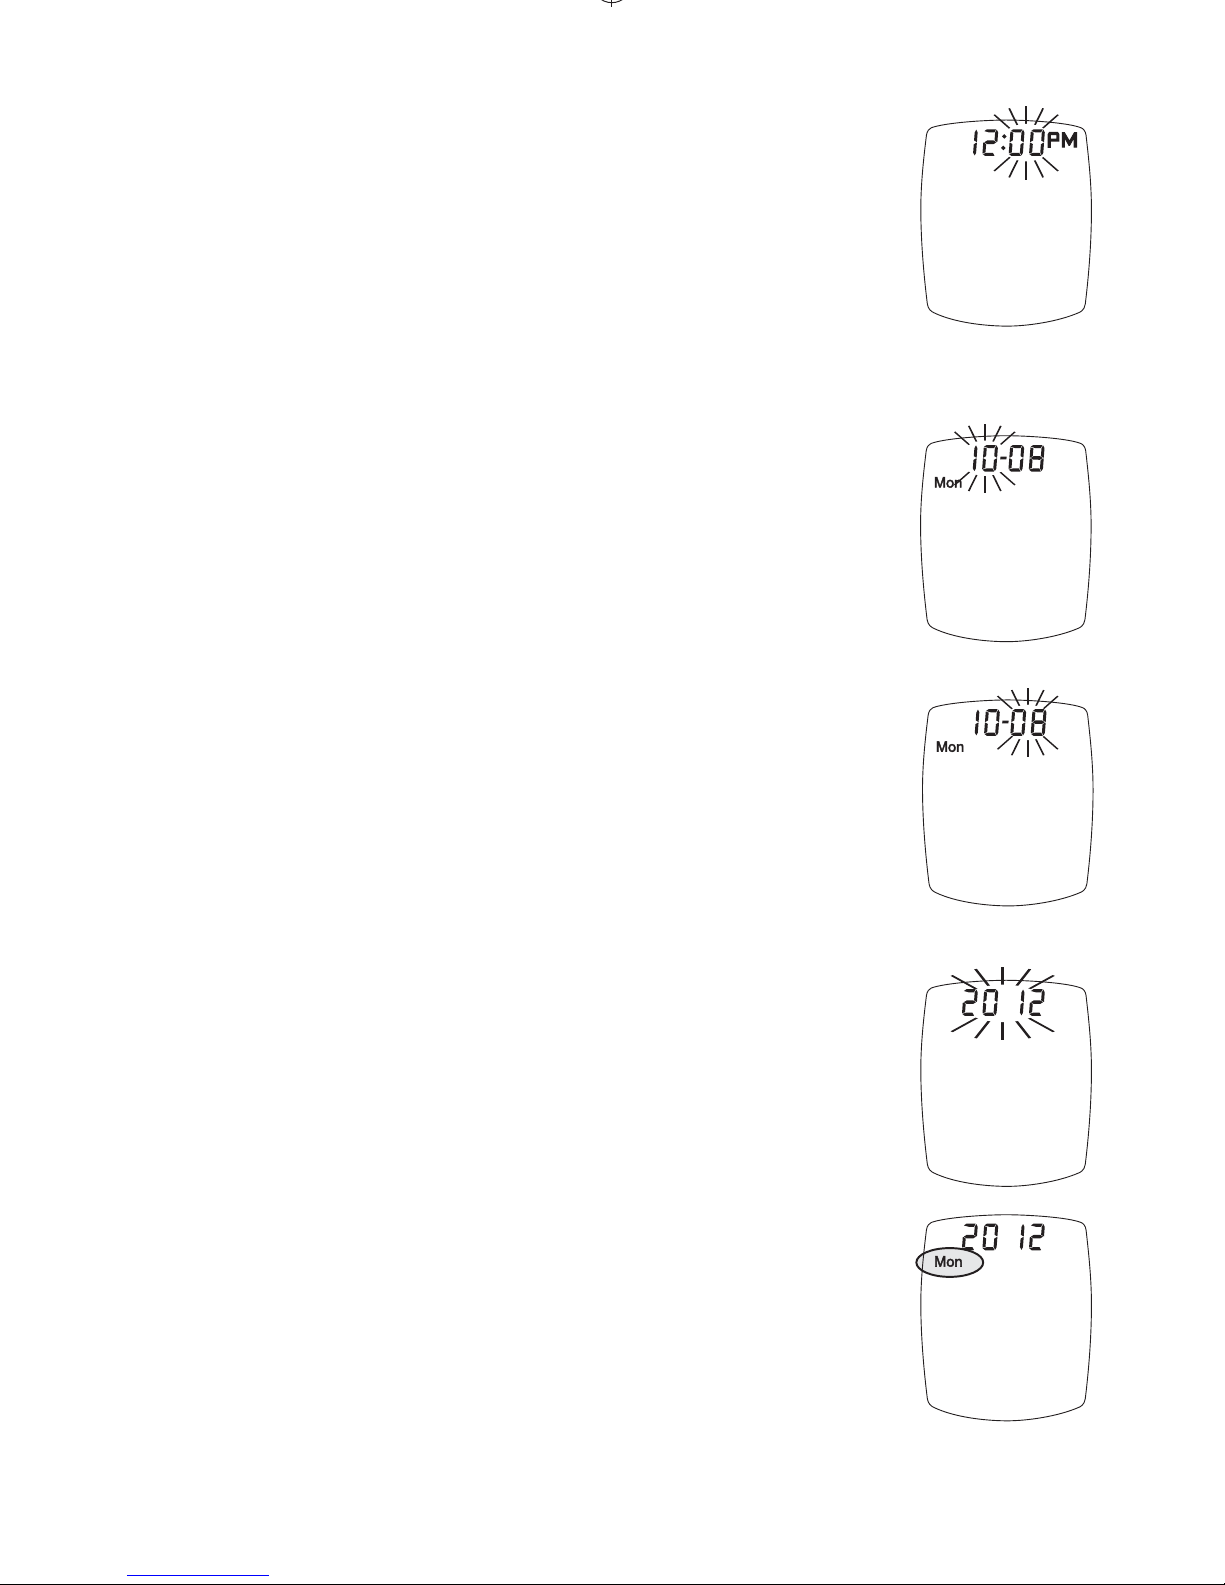
3.
e minutes ash. Slowly press the “ + ”
Button to scroll minutes up or the “ - ”
Button to scroll minutes down. Release
“ + ” or “ - ” Button when the correct
minutes are displayed. Press “ S “ Button
and release to save the minutes and go
to the next step.
4.
e month (number) ashes.
Slowly press and release the “ + ”
Button to increase the month and the
“ - ” Button to de crease the month.
Press and release “ S ” Button to save
the month and go to the next step.
5. Slowly press and release the “ + ”
Button to increase the day and the
“ - ” Button to de crease the day.
Press and release ” S ” Button to
save the day and go to the next step.
6.
Slowly press and release the “ + ”
Button to increase the year or the “ - ”
Button to decrease the year. Press and
release the “ S ” Button to save the year.
Note: Day of the week (Mon, Tue,
Wed, u, Fri, Sat, Sun) selfadjusts when month, day or year
are changed.
Note:
Meter beeps every time a setting is
conrmed (“ S ” Button is pressed).
31
Page 32
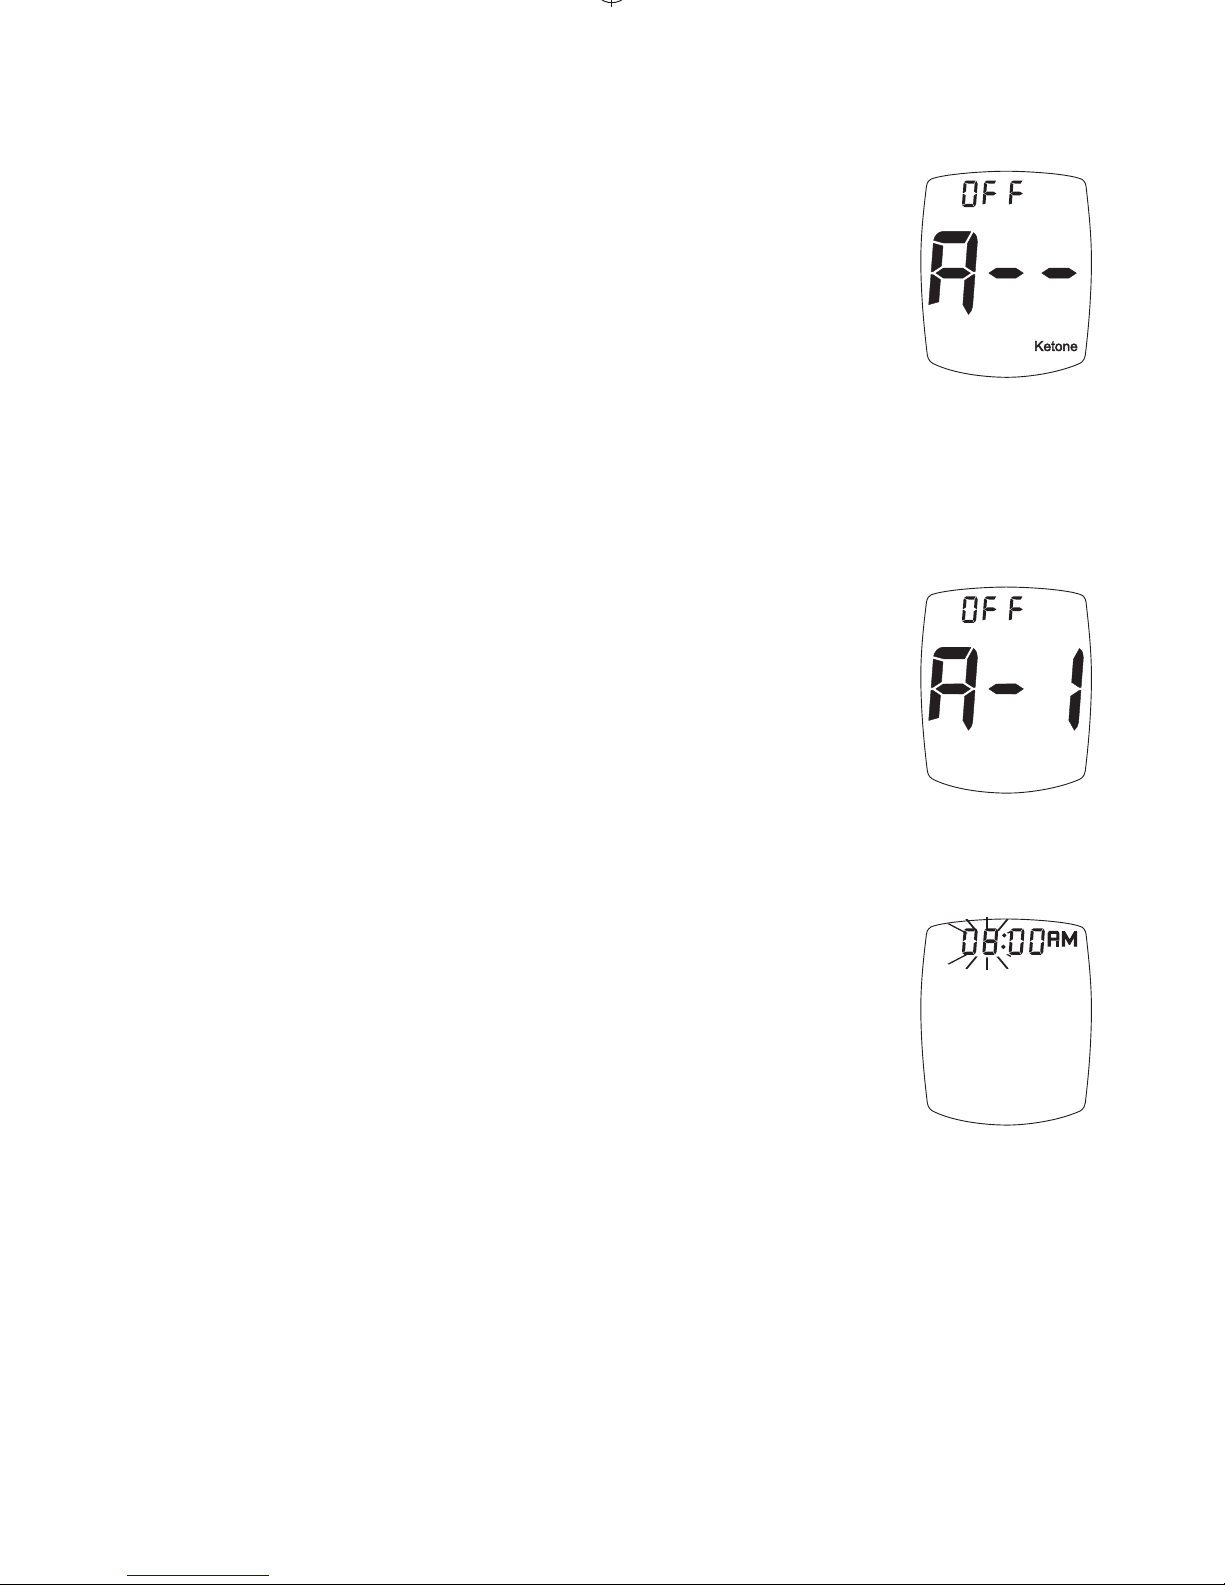
Set Ketone Test Alert
7. Aer setting year, press “ + ” or
“ - ” Button to turn Alert on or o.
Press “ S ” Button to set and go to
the Testing Reminders.
Set Testing Reminders
Up to four Testing Reminders per day may be set.
Reminder sounds at set time for 10 seconds.
To set the Testing Reminders:
8.
Aer pressing “ S ” Button to set
Ketone Test Alert, Display shows rst
Reminder setting (A-1). Press “ + ”
Button (on) or “ - ” Button (o) to turn
Reminder on or o.
9. If “on” is chosen, press “ S ” Button.
e hour ashes. Press the “ + ”
Button to scroll up the hour or
the “ - ” Button to scroll down the
hour. Release “ + ” or “ - ” Button
when the correct hour displays. Like
many alarm clocks, to set the hours
for “AM” or “PM”, the hours must
scroll until the correct hour with
“AM” or “PM” displays. Press “ S ”
Button and release to save the hour
and go to the minutes set up.
If “o” is chosen and the “ S ” Button is
pressed, the Meter goes to the next Testing
Reminder.
32
Ketone Test
Alert
Page 33
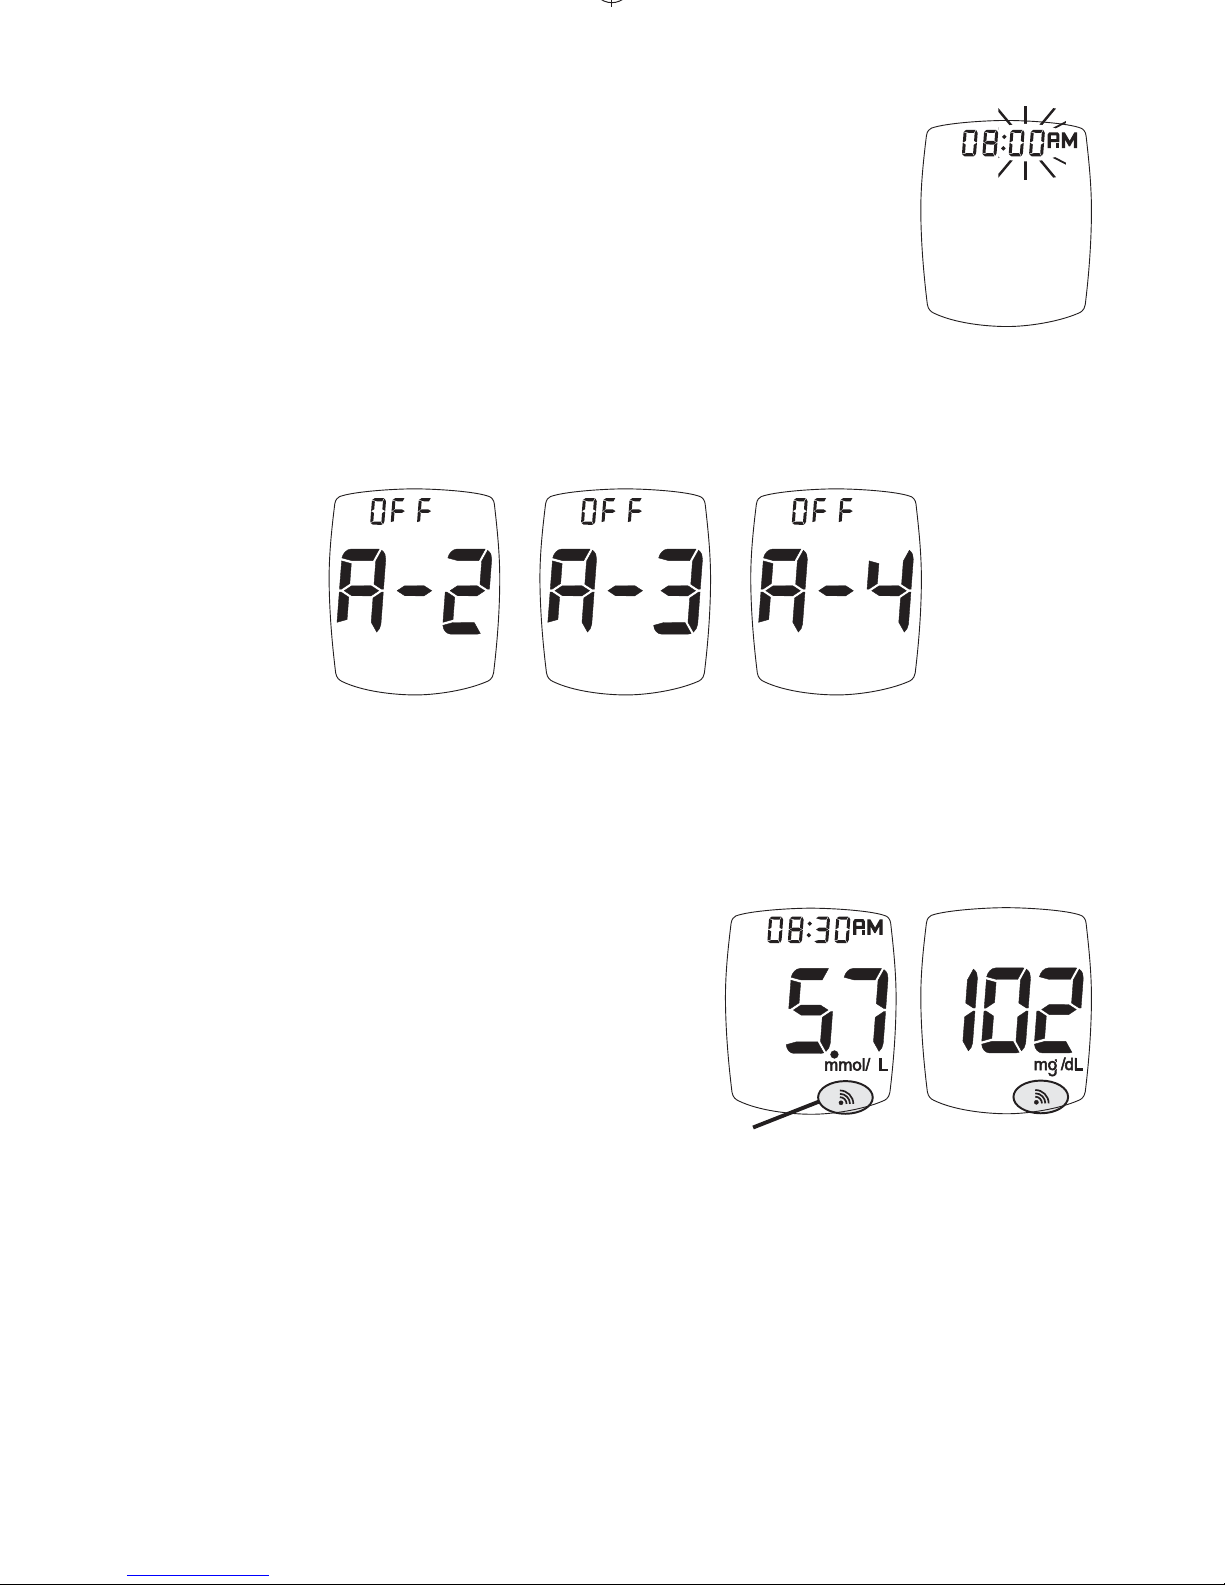
10. e minutes ash. Press “ + ”
Button or “ - ” Button to set the
minutes. Press “ S ” Button to set.
11. Turn Reminders on and repeat setting the time
for next 3 Reminders (if needed).
12. Press and hold “ S ” Button when
nished to turn o Meter. Meter
turns o aer 2 minutes of non-use.
Note: If Testing Reminders
are set, the Testing
Reminder Symbol
appears in all Displays.
33
Testing
Reminder Symbol
Page 34

34
CARE, CLEANING/DISINFECTING
Caring for TRUEresult
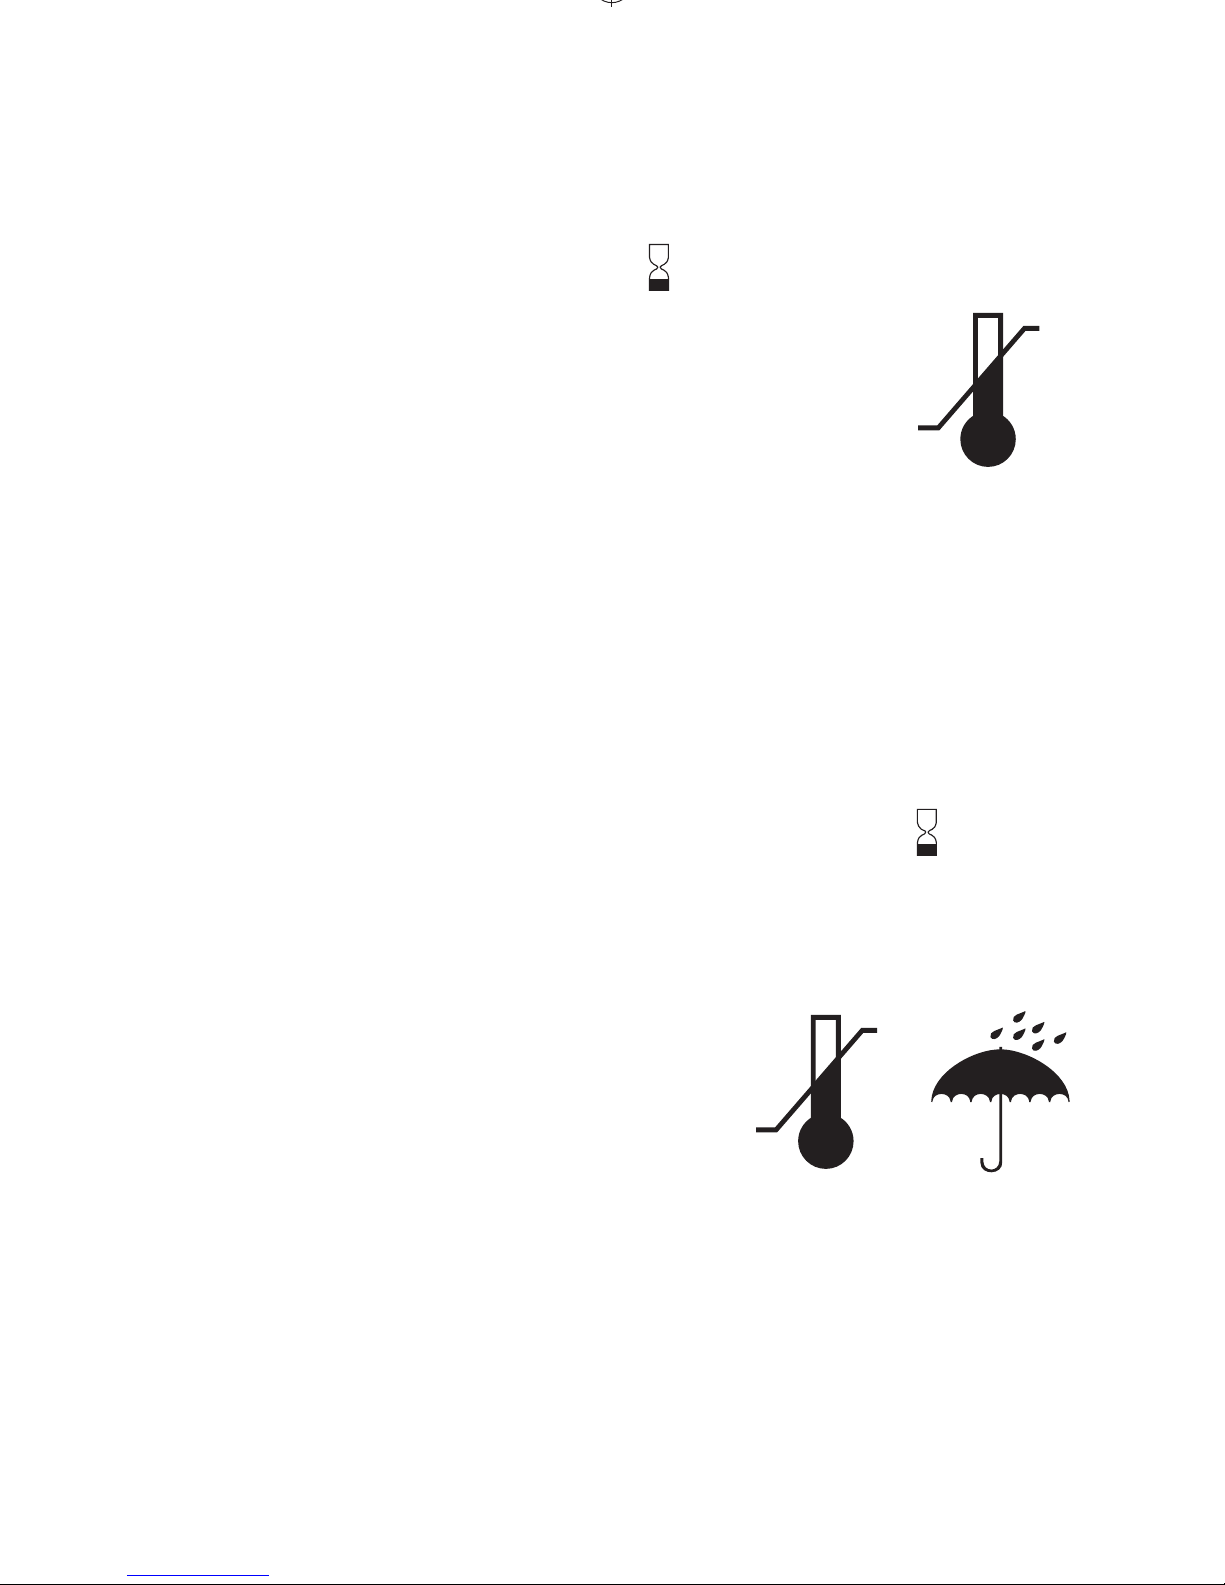
• Store System (Meter, Control Solution, Test
Strips) in Carrying Case to protect from liquids,
dust and dirt.
• Store in a dry place at
2°C-30°C (room temperature).
• DO NOT REFRIGERATE
OR FREEZE.
Meter Care
• Do not keep meter in an area where it may be
crushed (i.e. back pocket, drawer, bottom of bag,
etc.).
Cleaning removes blood and soil, disinfecting
removes infectious agents.
To Clean the Meter:
• Clean the Meter when visibly dirty or if blood is
on the Meter.
• Never put Meter in liquids or allow any liquids to
enter the Test Port.
• Wipe Meter with a clean, lint-free cloth
dampened with 70% Isopropyl alcohol.
• Let Meter air dry thoroughly before using to test.
• Do not use bleach to clean the Meter.
For assistance call the phone number on the cover of
the Owner’s Booklet.
2°C
30°C
Page 35
35
Control Solution Care
• Write date opened on Control Solution label.
Discard if either 3 months aer rst opening or
aer date printed next to on bottle label has
passed, whichever comes rst.
• Store at 2°C-30°C (room temperature).
DO NOT REFRIGERATE
OR FREEZE.
• Aer use, wipe bottle tip clean and recap tightly.
Test Strip Care
• Store Test Strips in original vial only. Do not
transfer old Test Strips to new vial or store Test
Strips outside of vial.
•
Write date opened on Test Strip vial. Discard
unused Test Strips from vial if either 4 months aer
rst opening or aer date printed next to on vial
label has passed, whichever comes rst. Use of Test
Strips past either date may give incorrect results.
• Close vial immediately aer removing Test Strip.
• Store in a dry place below
30°C (room temperature).
DO NOT REFRIGERATE
OR FREEZE.
• Do not reuse Test Strip. NEVER wipe Test Strips
with water, alcohol or any cleaner. DO NOT
attempt to clean and re-use Test Strips. Reuse of
Test Strips will cause inaccurate results.
• Do not bend, cut or alter Test Strips in any way.
2°C
30°C
1°C
30°C
Page 36
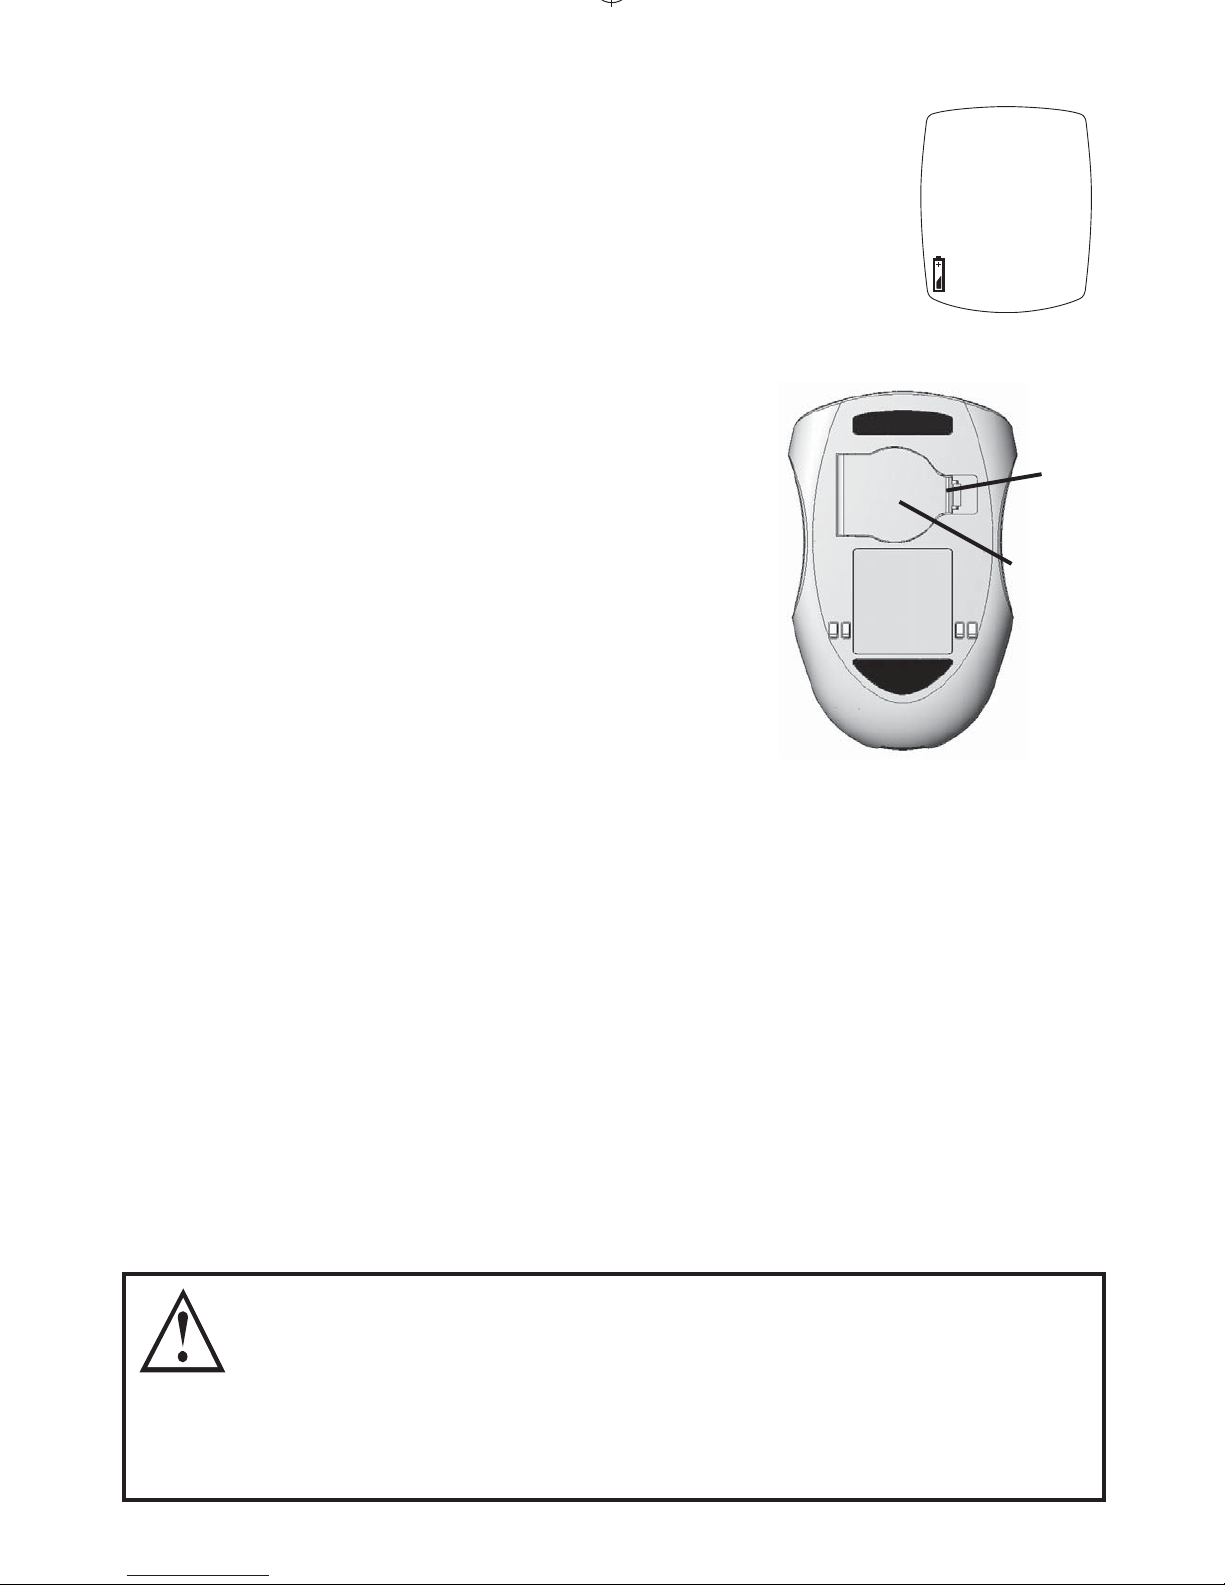
Battery
Door
Tab
36
Changing Battery
A low battery displays Battery Symbol
while continuing to function.
A dead battery displays Battery Symbol,
beeps, and then turns o.
To replace battery:
1. Li tab on Battery Door.
2. Turn Meter over, tap gently on
the palm of your other hand
to loosen and remove battery.
3. Discard old battery into
appropriate container.
4. Insert new battery, positive (“+”)
facing up. Close Battery Door.
Note: Use non-rechargeable 3V lithium battery
(#CR2032).
5.
Press “ S ” Button to turn Meter on and check
time, date, and Testing Alerts and Reminders (see
Meter Set Up). If Meter does not turn on, check
that battery was installed properly. If not, remove
and reinsert battery and turn Meter on by pressing
“ S ” Button. Call for assistance if problem persists.
Low
Batteries might explode if mishandled or incorrectly
replaced. Do not dispose of battery in re. Do not
take apart or attempt to recharge battery. Dispose
according to local/country specic regulations.
Page 37
37
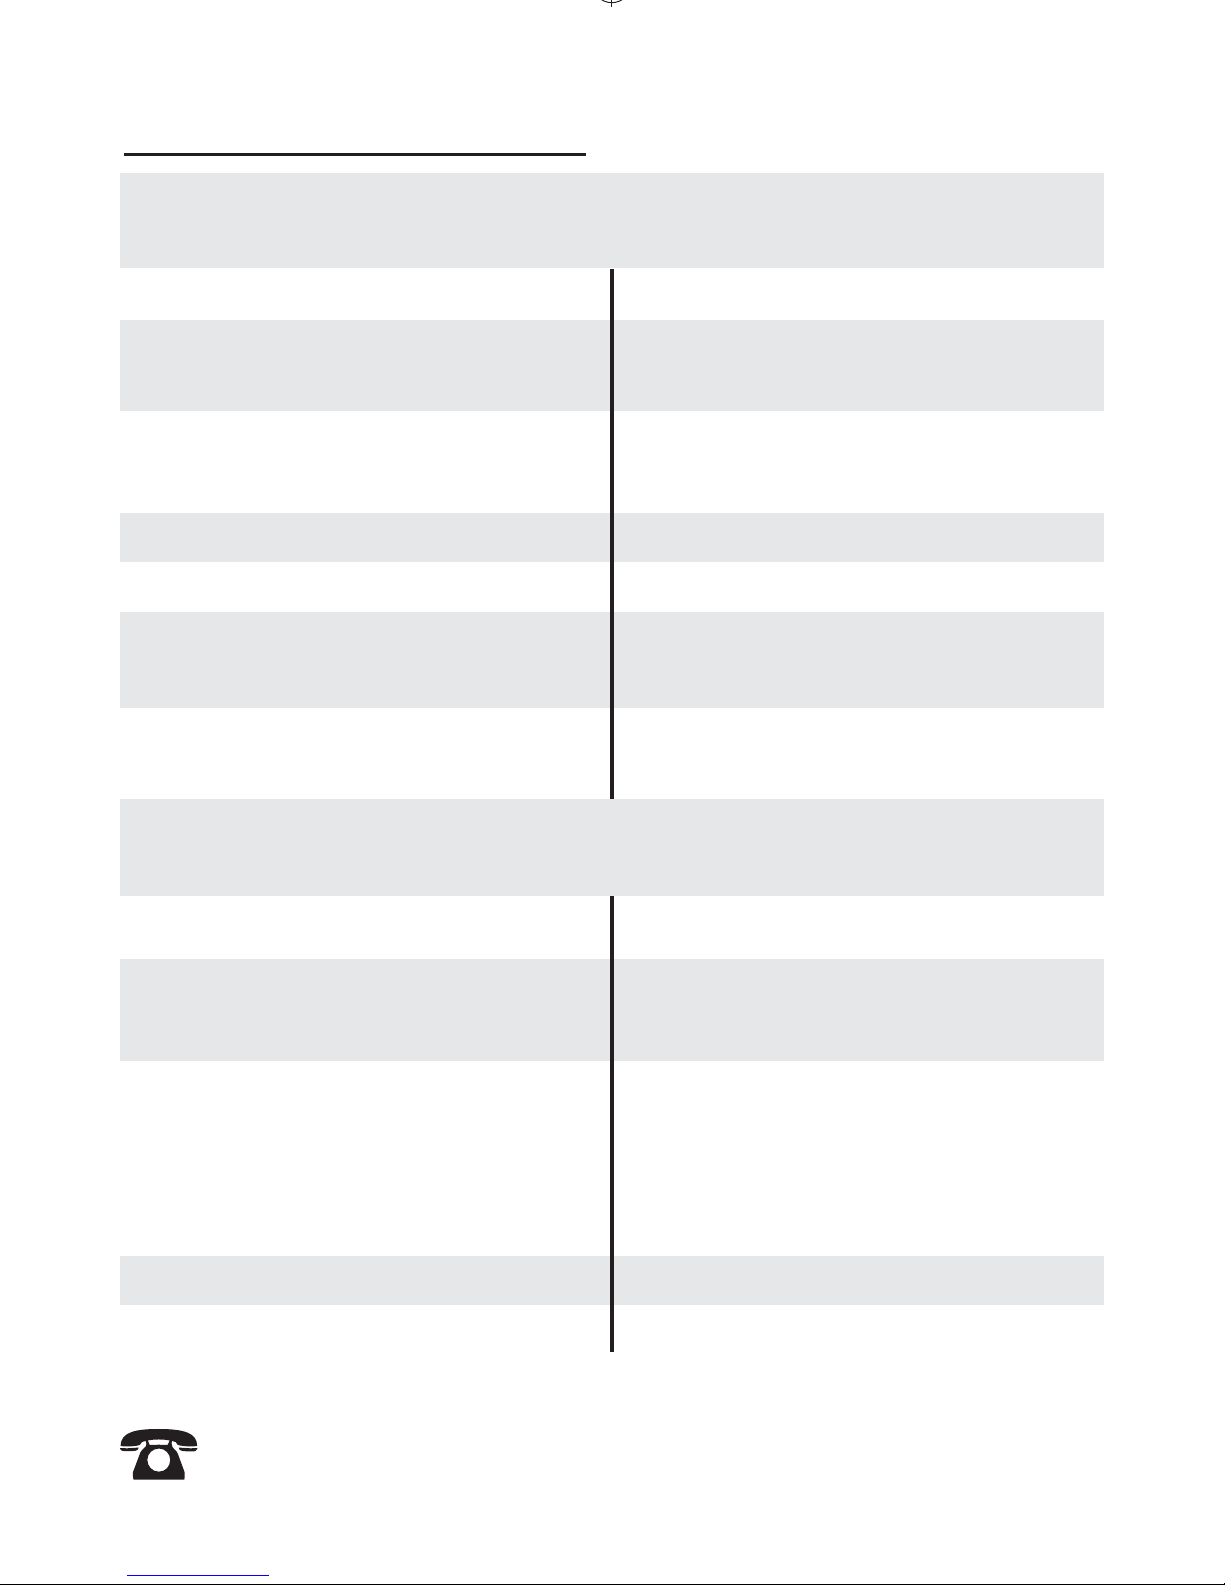
Action
Remove Test Strip.
Re-insert correctly.
Remove Test Strip. Re-insert
Test Strip fully into Meter.
Repeat with new Test Strip.
Replace battery.
Battery positive (“+”)
side must face up.
Call for assistance.
Action
Repeat test with new Test
Strip and larger drop.
Repeat test with new
Test Strip. Apply sample
within 2 minutes of
inserting Test Strip.
Repeat with new Test Strip.
Call for assistance.
Reason
Test Strip inserted upside
down or backwards
Test Strip not fully
inserted
Test Strip Error
Dead or no battery
Battery in backwards
Meter Error
Reason
Sample drop too small
Sample applied aer two
minute shut-o
Problem with Test Strip
Problem with Meter
TROUBLESHOOTING
1) Aer inserting Test Strip, Meter does not turn on.
2) Aer applying sample, test does not start/
Meter does not beep or begin testing.
For assistance, see cover for phone number.
Page 38
38
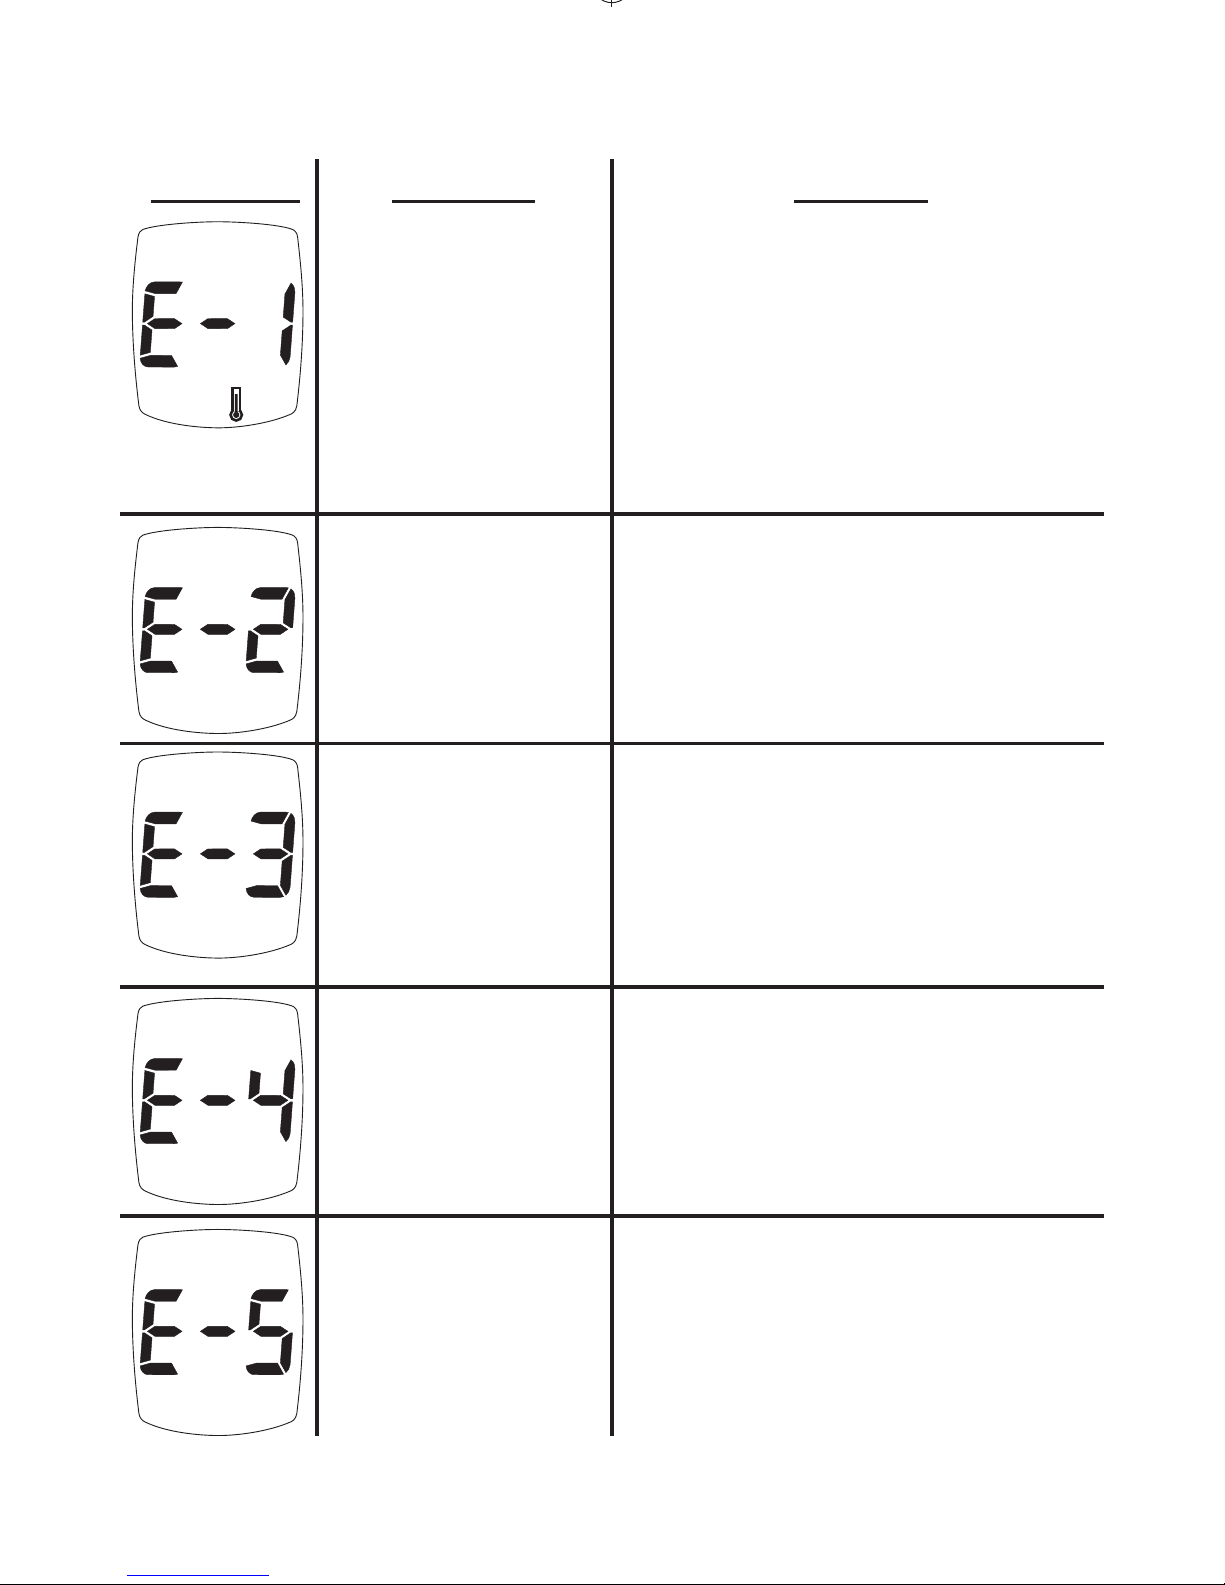
Messages
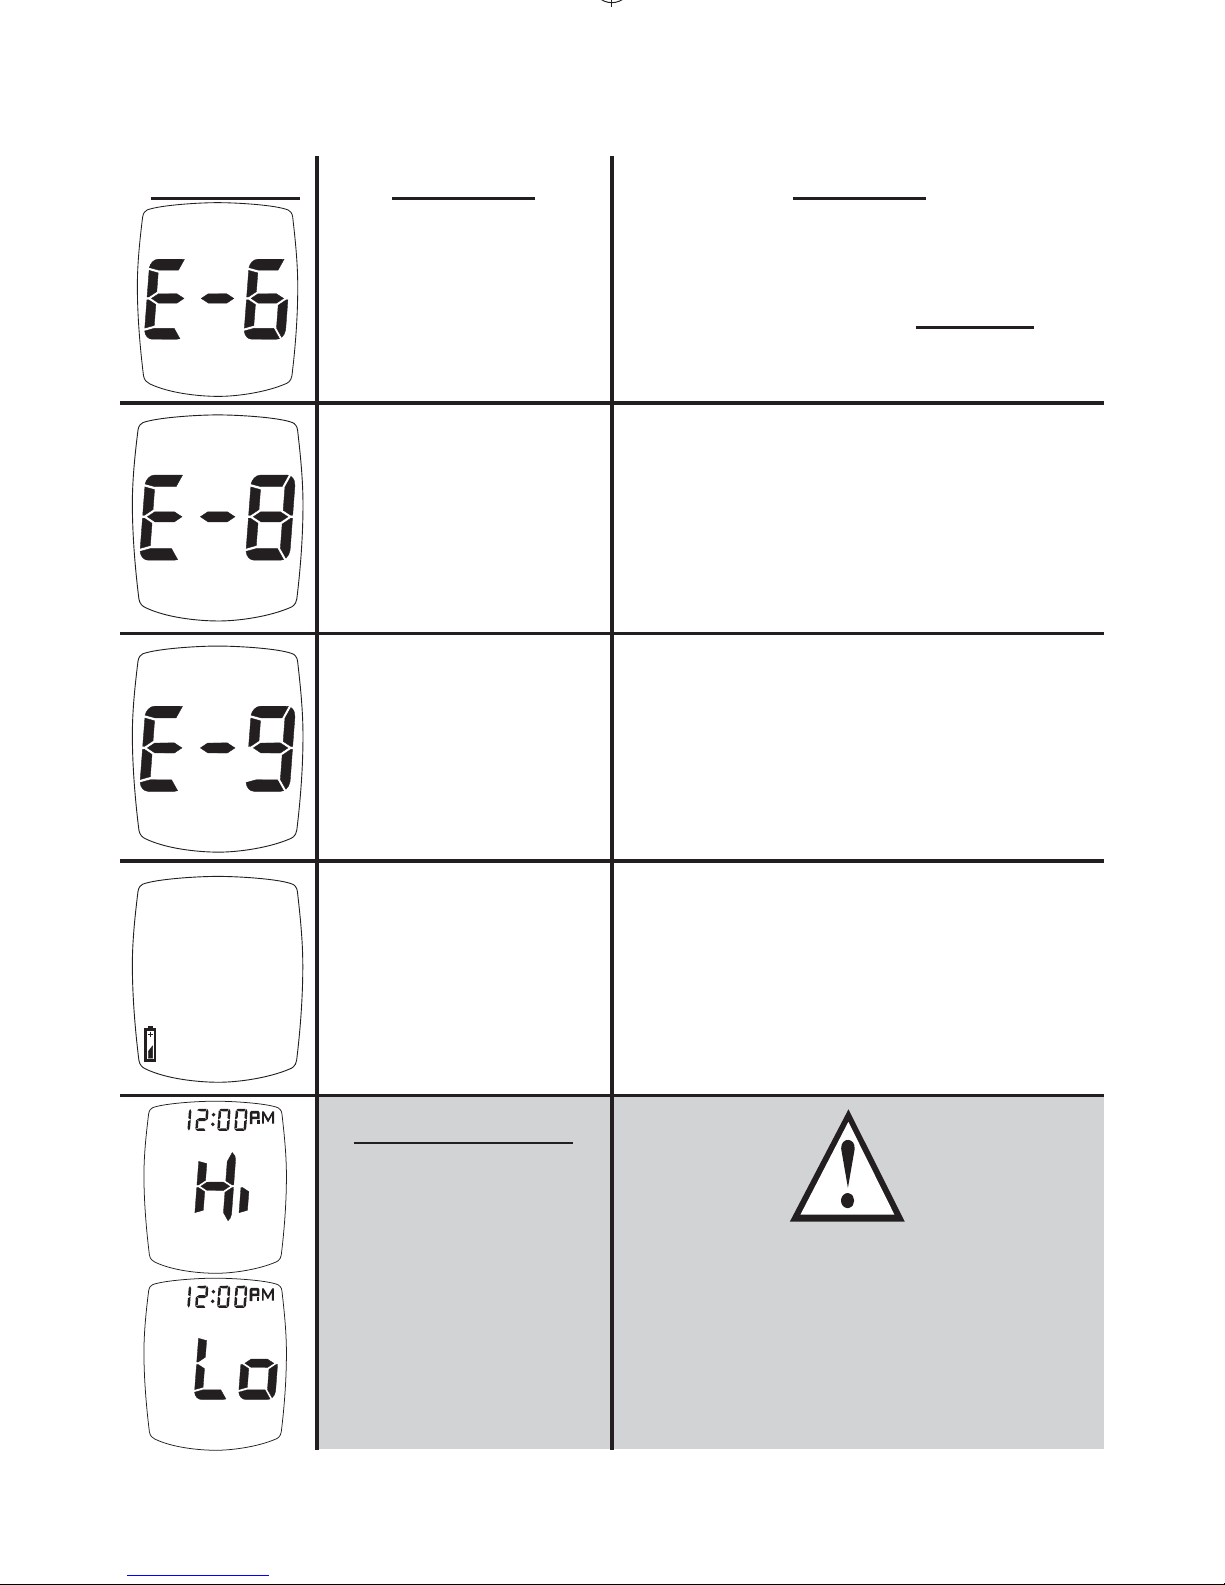
Display
Reason
Temperature
Error
•
Too Cold/
Too Hot
Sample Not
Detected or
Using Wrong
Test Strip
Used Test
Strip
or Test Strip
Outside of
Vial Too Long
Meter
Error
Test Strip Error,
Very high blood
glucose result
(higher than
33.3 mmol/L
(600 mg/dL)
Action
Move Meter and Test
Strips to area between
10°C-40°C; wait 10
minutes for System to
reach room temperature
before testing.
Retest with new
Test Strip and
larger sample.
Repeat with new Test
Strip. Make sure sample
is touched to edge of Test
Strip (not top). If error
persists, call for assistance.
Call for
assistance.
Retest with new Test Strip. If error
persists, call for assistance. If you
have symptoms such as fatigue, excess
urination, thirst, or blurry vision
follow your healthcare professional’s
advice for high blood glucose.
Page 39
39
If error message still appears, any other error message appears, or
troubleshooting does not solve the problem, call for assistance.
Display Action
Retest with new Test
Strip. Make sure result
is displayed before
removing Test Strip.
Result was not recorded
in Memory. Retest with
a new Test Strip. If error
persists, call for assistance.
Call for assistance.
Low: About 50 tests can be
done before battery dies.
Dead: Battery Symbol appears and
beep sounds before Meter turns o.
Change the battery.
Retest with new Test Strip.
If result is still “Hi”
(High) or “Lo” (Low)
contact Doctor
immediately.
Messages (continued)
Reason
Test Strip
Removed
During Test
Memory
Error
Communication
Error
Low or
Dead
Battery
Out of Range
High Results
> 33.3 mmol/L
(600 mg/dL)
Low Results
< 1.1 mmol/L
(20 mg/dL)
Page 40

40
Performance Characteristics
5
Precision: Precision describes the variation between results. ere are
two types of precision results measured, repeatability (using blood) and
intermediate precision (using control solution).
Repeatability: N=100
Mean (mmol/L) 3.4 5.1 8.5 12.1 19.2
Mean (mg/dL) 62 91 153 218 345
SD (mmol/L) 0.11 0.14 0.27 0.37 0.66
SD (mg/dL) 2.0 2.6 4.8 6.6 11.9
%CV 3.2 2.9 3.1 3.0 3.4
Intermediate Precision: N=100
Mean (mmol/L) 3.1 7.6 19.5
Mean (mg/dL) 56 136 351
SD (mmol/L) 0.09 0.24 0.69
SD (mg/dL) 1.7 4.3 12.4
%CV 3.1 3.2 3.5
System Accuracy: Diabetes experts have suggested that 95% of glucose
meter results should agree within + 0.83 mmol/L (15 mg/dL) of the
medical laboratory values at glucose concentrations below 5.55 mmol/L
(100 mg/dL) and within + 15% of the medical laboratory values at glucose
concentrations at or above 5.55 mmol/L (100 mg/dL). e tables below
show how oen healthcare professionals (HCP) and users achieve these
goals using capillary fingertip and forearm blood samples when glucose
results are not fluctuating. e laboratory reference instrument is the
Yellow Springs Instrument (YSI) Model 2300.
Page 41
41
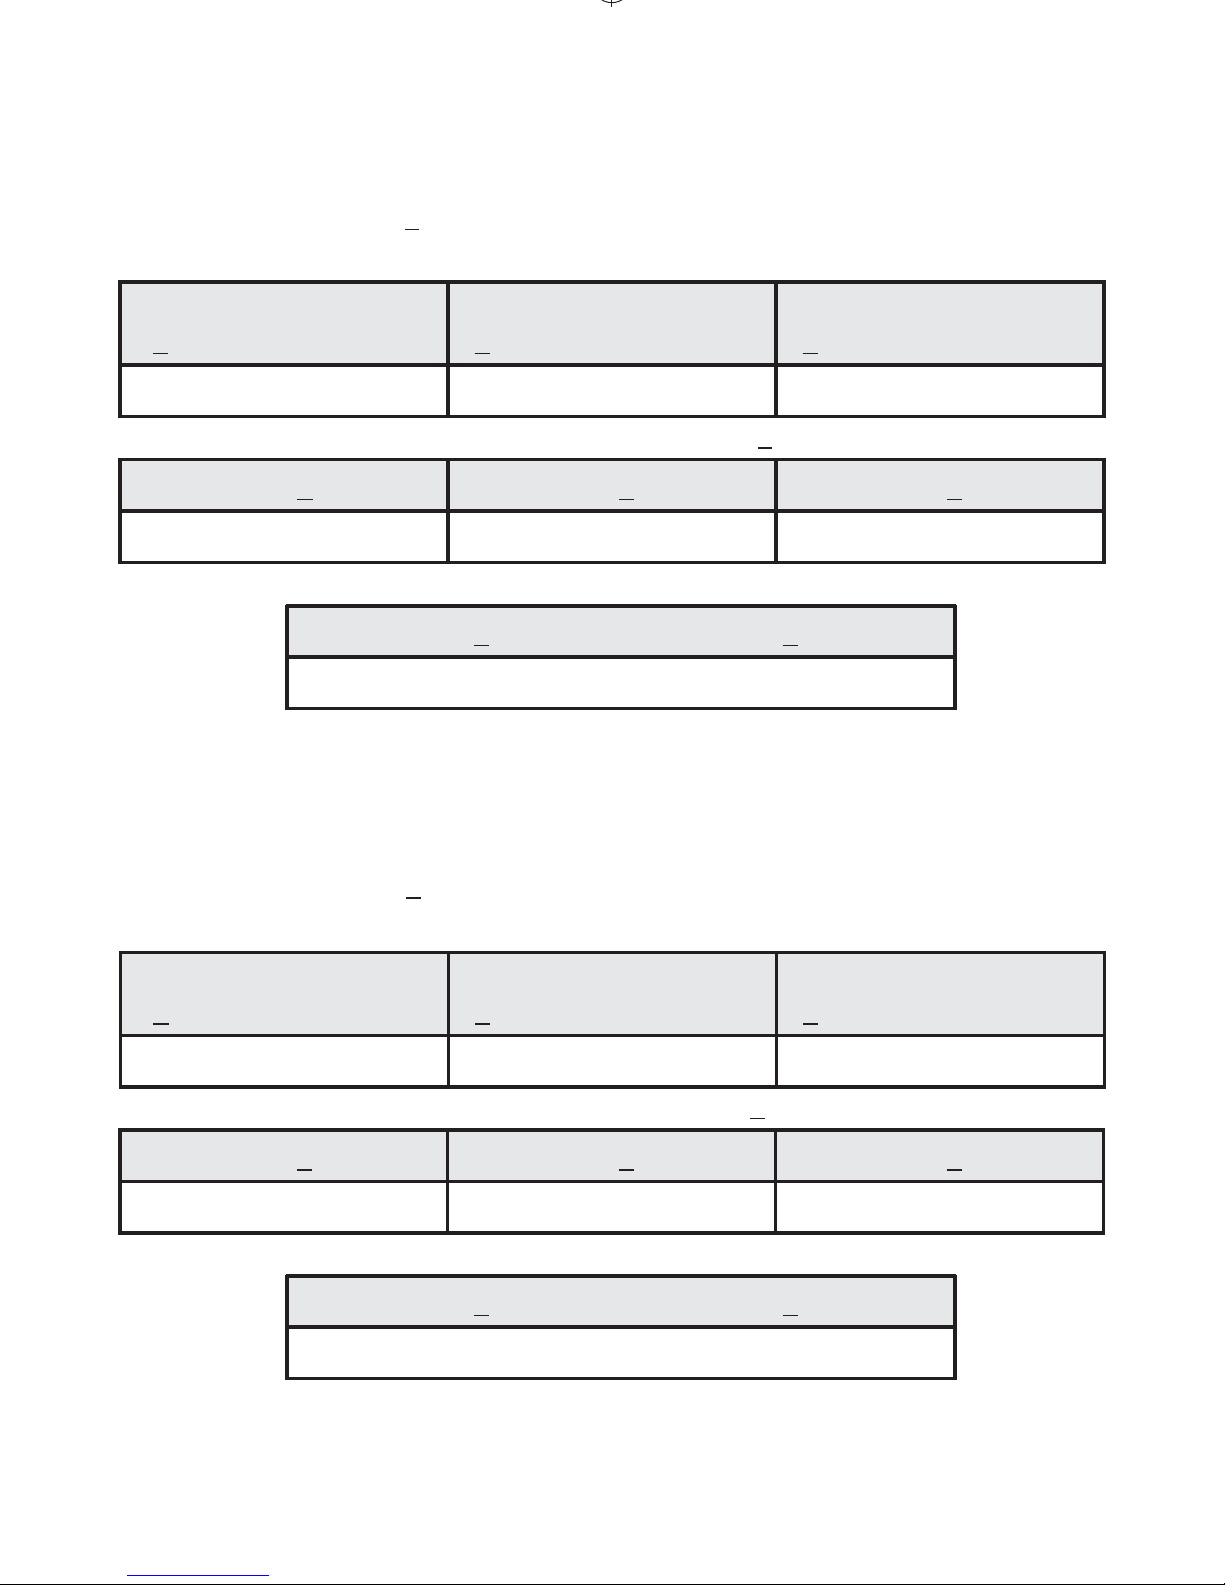
For Healthcare Professionals
99.3% of TRUEresult fingertip values performed by healthcare professionals (HCP) fell within
0.83 mmol/L (15 mg/dL) of the YSI results at glucose levels < 5.55 mmol/L (100 mg/dL) and
within 15% at glucose levels > 5.55 mmol/L (100 mg/dL).
Fingertip Samples (HCP vs. YSI) for glucose concentrations < 5.55 mmol/L (100 mg/dL)
Within
+ 0.28 mmol/L (5 mg/dL)
Within
+ 0.56 mmol/L (10 mg/dL)
Within
+ 0.83 mmol/L (15 mg/dL)
74/180 (41%) 155/180 (86%) 178/180 (98.8%)
Fingertip Samples (HCP vs. YSI) for glucose concentrations > 5.55 mmol/L (100 mg/dL)
Within + 5% Within + 10% Within + 15%
272/420 (65%) 395/420 (94%) 418/420 (99.5%)
Fingertip Samples for glucose concentrations between 1.1-33.3 mmol/L (20-600 mg/dL)
Within + 0.83 mmol/L (15 mg/dL) or + 15%
596/600 (99.3%)
Forearm Samples (HCP vs. YSI) for glucose concentrations < 5.55 mmol/L (100 mg/dL)
Within
+ 0.28 mmol/L (5 mg/dL)
Within
+ 0.56 mmol/L (10 mg/dL)
Within
+ 0.83 mmol/L (15 mg/dL)
18/28 (64%) 26/28 (93%) 28/28 (100%)
Forearm Samples (HCP vs. YSI) for glucose concentrations > 5.55 mmol/L (100 mg/dL)
Within + 5% Within + 10% Within + 15%
50/72 (69%) 64/72 (89%) 72/72 (100%)
Parkes Error Grid: 100% of individual fingertip glucose measured values performed by healthcare
professionals fell within Zone A of the Parkes Error Grid (PEG).
100% of TRUEresult forearm values performed by healthcare professionals (HCP) fell within
0.83 mmol/L (15 mg/dL) of the YSI results at glucose levels < 5.55 mmol/L (100 mg/dL) and
within 15% at glucose levels > 5.55 mmol/L (100 mg/dL).
Forearm Samples for glucose concentrations between 1.1-33.3 mmol/L (20-600 mg/dL)
Within + 0.83 mmol/L (15 mg/dL) or + 15%
100/100 (100%)
Parkes Error Grid: 100% of individual forearm glucose measured values performed by healthcare
professionals fell within Zone A of the Parkes Error Grid (PEG).
Page 42
42
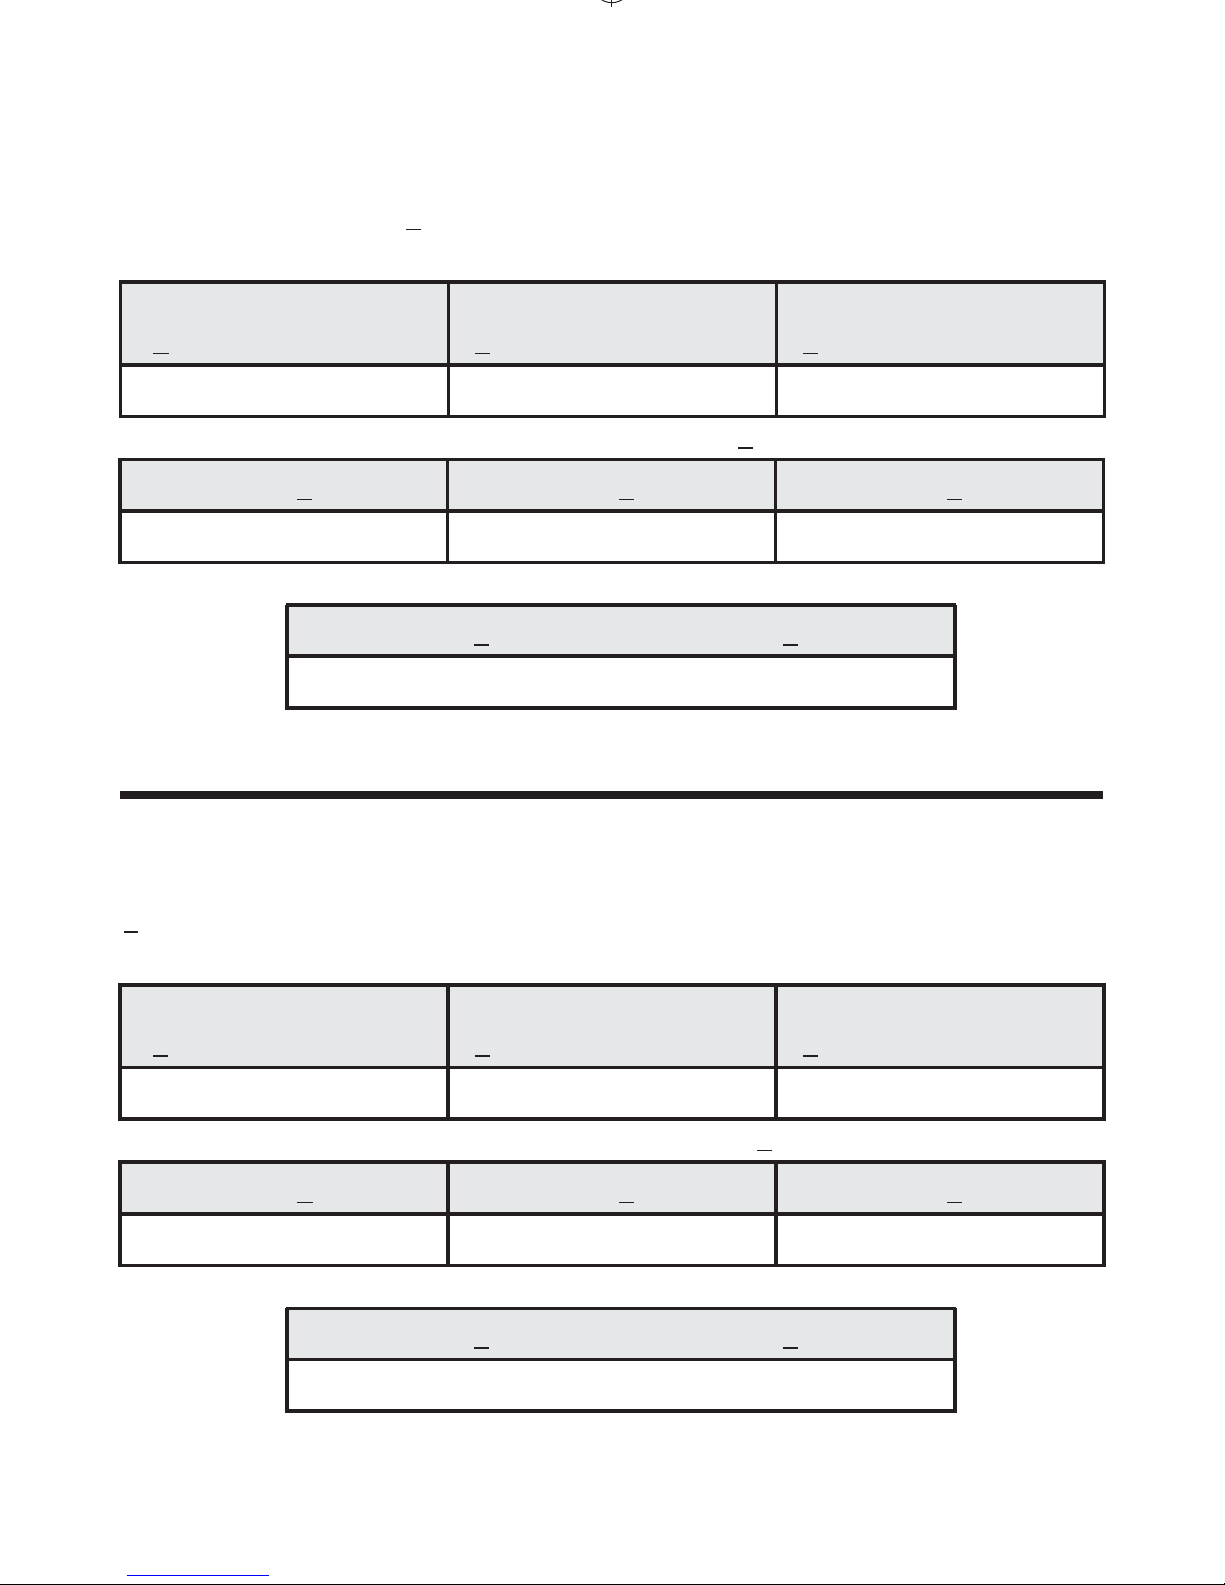
Venous Samples (HCP vs. YSI) for glucose concentrations < 5.55 mmol/L (100 mg/dL)
Within
+ 0.28 mmol/L (5 mg/dL)
Within
+ 0.56 mmol/L (10 mg/dL)
Within
+ 0.83 mmol/L (15 mg/dL)
10/28 (35.7%) 18/28 (64.3%) 28/28 (100%)
Venous Samples (HCP vs. YSI) for glucose concentrations > 5.55 mmol/L (100 mg/dL)
Within + 5% Within + 10% Within + 15%
126/214 (58.9%) 191/214 (89.3%) 213/214 (99.5%)
Venous Blood
99.6% of TRUEresult venous values performed by healthcare professionals (HCP) fell within
0.83 mmol/L (15 mg/dL) of the YSI results at glucose levels < 5.55 mmol/L (100 mg/dL) and
within 15% at glucose levels > 5.55 mmol/L (100 mg/dL).
Venous Samples for glucose concentrations between 1.1-33.3 mmol/L (20-600 mg/dL)
Within + 0.83 mmol/L (15 mg/dL) or + 15%
241/242 (99.6%)
Parkes Error Grid: 99.6% of individual venous glucose measured values performed by healthcare
professionals fell within Zone A and 0.4% fell within Zone B of the Parkes Error Grid (PEG).
For Consumers
99% of TRUEresult fingertip values performed by users fell within 0.83 mmol/L (15 mg/dL) of the
YSI results at glucose levels < 5.55 mmol/L (100 mg/dL) and within 15% at glucose levels
> 5.55 mmol/L (100 mg/dL).
Fingertip Samples (User vs. YSI) for glucose concentrations < 5.55 mmol/L (100 mg/dL)
Within
+ 0.28 mmol/L (5 mg/dL)
Within
+ 0.56 mmol/L (10 mg/dL)
Within
+ 0.83 mmol/L (15 mg/dL)
11/23 (48%) 21/23 (91%) 23/23 (100%)
Fingertip Samples (User vs. YSI) for glucose concentrations > 5.55 mmol/L (100 mg/dL)
Within + 5% Within + 10% Within + 15%
38/77 (49%) 66/77 (86%) 76/77 (99%)
Fingertip Samples for glucose concentrations between 1.1-33.3 mmol/L (20-600 mg/dL)
Within + 0.83 mmol/L (15 mg/dL) or + 15%
99/100 (99%)
Parkes Error Grid: 100% of individual fingertip glucose measured values performed by users fell
within Zone A of the Parkes Error Grid (PEG).
Page 43
43
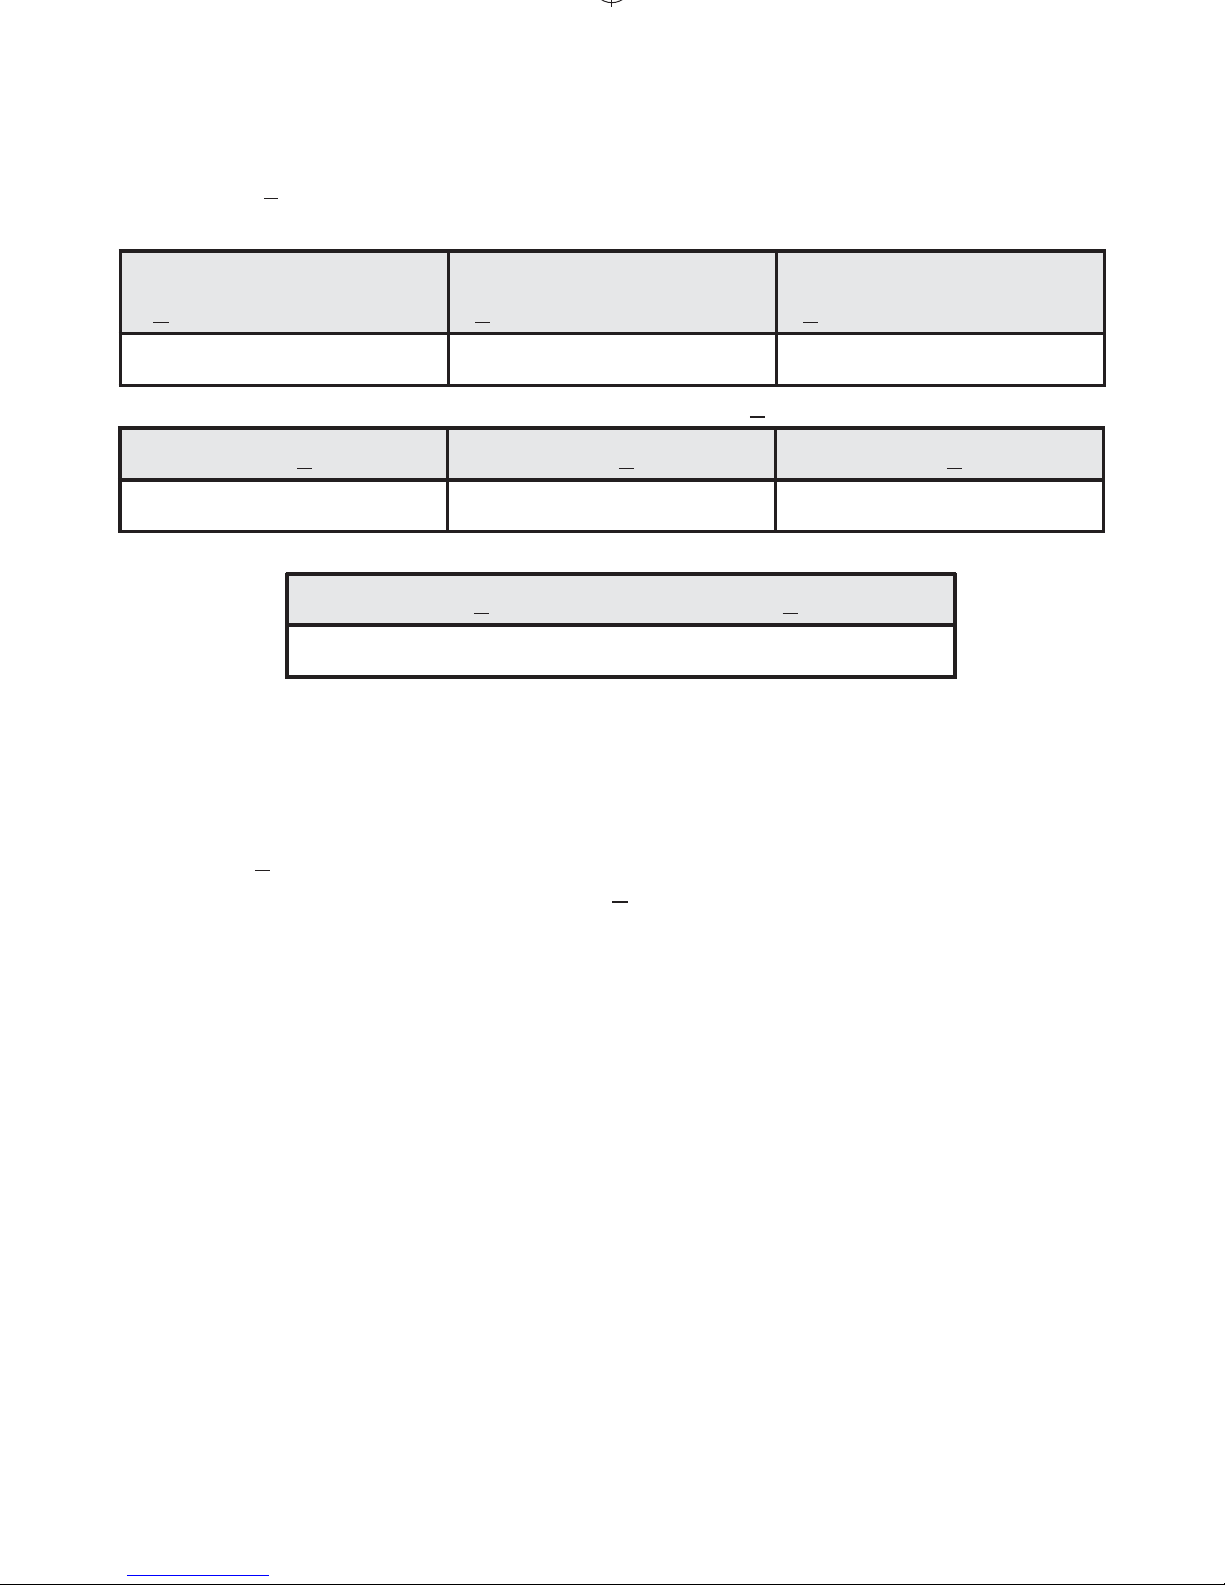
Forearm Samples (User vs. YSI) for glucose concentrations < 5.55 mmol/L (100 mg/dL)
Within
+ 0.28 mmol/L (5 mg/dL)
Within
+ 0.56 mmol/L (10 mg/dL)
Within
+ 0.83 mmol/L (15 mg/dL)
16/28 (57%) 23/28 (82%) 28/28 (100%)
Forearm Samples (User vs. YSI) for glucose concentrations > 5.55 mmol/L (100 mg/dL)
Within + 5% Within + 10% Within + 15%
42/72 (58%) 61/72 (85%) 72/72 (100%)
100% of TRUEresult forearm values performed by users fell within 0.83 mmol/L
(15 mg/dL) of the YSI results at glucose levels < 5.55 mmol/L (100 mg/dL) and within 15% at
glucose levels > 5.55 mmol/L (100 mg/dL).
Forearm Samples for glucose concentrations between 1.1-33.3 mmol/L (20-600 mg/dL)
Within + 0.83 mmol/L (15 mg/dL) or + 15%
100/100 (100%)
Parkes Error Grid: 100% of individual forearm glucose measured values performed by users fell
within Zone A of the Parkes Error Grid (PEG).
User Performance Evaluation: A study evaluating glucose values from fingertip capillary blood
samples obtained by 100 lay persons showed the following results:
100% within + 0.83 mmol/L (15 mg/dL) of the medical laboratory values at glucose concentrations
below 5.55 mmol/L (100 mg/dL) and 99% within + 15% of the medical laboratory values at glucose
concentrations at or above 5.55 mmol/L (100 mg/dL).
Page 44

44
SYSTEM SPECIFICATIONS
Result Range: 1.1-33.3 mmol/L (20-600 mg/dL)
Sample Size: Minimum 0.5 microlitre (0.5 μL)
Sample:
Fresh capillary whole blood, venous blood drawn in
sodium or lithium heparin blood collection tubes,
or Control Solution.
Test Time: Results in as little as 4 seconds
Result Value: Plasma values
Assay Method: Electrochemical
Power Supply: One 3V lithium battery
#CR2032 (non-rechargeable)
Battery Life: Approximately 2146 tests or 1.5 years
Automatic shut-o: Aer two minutes of non-use
Weight: 47 grams
Size: 89 x 55 x 17 mm
Memory Size: 500 glucose results
Operating Range (Meter & Test Strips):
Relative Humidity: 10-90% (Non-condensing)
Temperature: 10°C-40°C
Haematocrit: 20-55%
Altitude: 3094 metres
Note: Use within specied
environmental conditions only.
Chemical Composition
TRUEresult Test Strips: Glucose dehydrogenase-FAD
(Aspergillus sp.), mediators, buers and stabilisers.
TRUEresult Control Solution: Water, d-glucose,
buers, viscosity enhancing agent, salts, dye and
preservatives.
Page 45

45
EMC Safety Information
is meter meets the electromagnetic immunity
requirements as per ISO 15197:2013 Annex A. It meets
the electromagnetic emissions requirements as per
EN 61326 series. Interference from the meter to other
electronically driven equipment is not anticipated. e
electromagnetic environment should be evaluated prior
to operation of the device.
Do not use the meter in a very dry environment,
especially one in which synthetic materials are present.
Do not use the meter close to sources of strong
electromagnetic radiation, as these may interfere with
the proper operation.
Page 46

REFERENCES
1. Joslin Diabetes Center. Goals for Blood Glucose Control
[Electronic Version]. Retrieved February 16, 2012 from
http://www.joslin.org/info/Goals-for-Blood-GlucoseControl.html.
2. FDA Public Health Notication: Use of Fingerstick Devices
on More than One Person Poses Risk for Transmitting
Blood Borne Pathogens: Initial Communication Update
11/29/2010 [Electronic Version]. Retrieved February 22,
2012 from http://www.fda.gov/MedicalDevices/Safety/
AlertsandNotices/ucm224025.htm.
3. CDC Clinical Reminder: Use of Fingerstick Devices
on More than one Person Poses Risk for Transmitting
Bloodborne Pathogens [Electronic Version]. Retrieved
February 22, 2012 from
http://www.cdc.gov/injectionsafety/FingerstickDevicesBGM.html.
4. Atkin, S.H., et. al. Fingerstick Glucose Determination in
Shock. Annals of Internal Medicine, 114:1020-1024 (1991).
5. Data on le.
6. U.S. Food and Drug Administration. Blood Glucose
Meters, Getting the Most Out of Your Meter.
[Electronic Version]. Retrieved July 6, 2009: www.
fda.gov/MedicalDevices/Safety/ AlertsandNotices/
TipsandArticlesonDeviceSafety/ucm109371.htm.
7. International Organization for Standardization. In vitro
diagnostic test systems. Requirements for blood-glucose
monitoring system for self-testing in managing diabetes
mellitus. Reference number ISO 15197:2013 (E). Geneva:
International Organization for Standardization; 2013.
8. Larsson-Cohn U: Dierence between capillary and venous
blood glucose during oral glucose tolerance tests. Scand J
Clin Lab Invest 36:805-808, 1976.
46
Page 47

47
NOTES:
Page 48

48
E4INP03FDA Rev. 30
NOTES:
 Loading...