

Page 1

USER MANUAL
Page 2

WELCOME WORD
Congratulations on your purchase! We are confident that you will enjoy riding your
new Trivel tricycle as we spent a great deal of time designing it with you in mind!
ABOUT US
For over 25 years, the passionate,
dedicated Trivel team has been
designing and manufacturing
tricycles for reduced mobility
children and adults, thus providing
them with hours of fun and
pleasure. We can install a wide
range of custom components onto
your tricycle, so it is fully adapted to
the user’s specific needs.
This manual will get you through the necessary information about safety, usage, and
maintenance of your new tricycle so you can experience the most of it, for many years.
Please read this manual thoroughly before you go for your first ride and keep in handy
for future reference.
If some instructions remain unclear to you, please do not hesitate to contact us or
your dealer for further explanation.
2 | Trivel.com
To learn more about our products,
parts, accessories and services,
please visit www.trivel.com
Page 3

TABLE OF CONTENTS
Welcome word ..............................................
About us ..........................................................
Table of Contents ..........................................
A word on safety ...........................................
Before your first ride ....................................
Before each ride ............................................
Setting your position on your Trivel .....................................
Setting the seat position and angle .....................................
Setting the backrest height and angle ...............................
Setting the handlebar position ..............................................
Riding basics ..................................................
Turning ................................................................................................
Going uphill ......................................................................................
Braking ................................................................................................
Using gears .......................................................................................
Riding in wet condition ..............................................................
Riding at night.................................................................................
2
Riding with feet securing devices ...........................................
2
Using the Power assistance system ..........
3
Safety warnings ................................................................................
4
Notice to the user ............................................................................
7
Description of the components ...............................................
7
Getting started ..................................................................................
9
Using the LCD Panel functions .................................................
10
Turning the power assist system on ......................................
12
Choosing an assistance mode ..................................................
Operating range and battery usage optimisation ............
13
Removing or inserting the battery .........................................
14
Charging the battery of your electric
15
power assist system........................................................................
16
Storing the battery ..........................................................................
17
Minimum battery maintenance schedule ..........................
17
Troubleshooting (Electric assistance system) ....................
23
Error codes ..........................................................................................
24
Maintenance and adjustments ..................
24
Tools, products and protective gear needed .....................
25
Preventive maintenance ..............................................................
25
Tire pressure adjustment .............................................................
26
Changing a punctured inner tube ..........................................
29
Brake adjustments ...........................................................................
32
Derailleurs adjustments ................................................................
35
Quick release binder system adjustment ............................
38
Folding the stem ..............................................................................
38
Lubricating the chain .....................................................................
41
Washing your Trivel .........................................................................
42
Storing your Trivel ............................................................................
Normal wear.......................................................................................
44
Troubleshooting .............................................
45
Warranty terms ...............................................
46
47
47
48
49
50
50
52
54
59
64
67
68
69
70
71
72
76
Trivel.com | 3
Page 4

A WORD ON SAFETY
Trivel puts a great effort in developing
the safest product possible. Riding
a tricycle, like most other sporting
activities, involves some risks. People who
engage in this activity must be aware of
those risks and fully assume them.
A Trivel is a very safe and stable vehicle
thanks to its three-wheel triangular
platform design. Although it is propelled
in a similar way than a regular two-wheel
bicycle, its handling characteristics are
significantly different. Make sure to read
and understand the Riding Basics section
of this manual to learn about important
advices on how to operate such a vehicle
before your first ride.
Most of the accidents are caused by
human factors such as bad judgment
of a hazardous situation, improper
handling or neglecting the equipment’s
mechanical maintenance.
4 | Trivel.com
Many serious injuries can be prevented
only by wearing adequate protective
equipment such as a homologated
helmet.
Respecting the local road laws and
getting to know how to properly use and
maintain your tricycle with the help of
this manual will also help significantly to
reduce the risks of injuries.
It is the rider’s responsibility to fully
understand the usage of the equipment
he or she is operating.
In the case of a child operating the
tricycle, it is the responsible adult’s duty
to educate on local public road laws,
supervise safe riding activity and ensure
the proper fit, adjustment and good
mechanical condition of the equipment.
The following signs will be used
throughout the manual. They represent
Warnings and Cautions about important
or hazardous situations that must be fully
understood to avoid damage to your
equipment, personal injuries or even
death.
This sign indicates a serious
warning about a potential
risk of injury or death or
other safety information
This sign indicates cautions
about the proper use of the
equipment or other
important information
For everything related to the
use, maintenance and
storage of a Power assisted
system, please refer to the
section Power assistance
system instructions
Page 5

Check all component connections
and accessories attachment before
every ride. Do not ride your tricycle
with loose components or
accessories. Take the tricycle to your
dealer if necessary.
Always wear a homologated
helmet, it could save your life. Make
sure it is properly attached and
positioned on your head.
Always place user’s feet safely on
pedals. Use adequate pedal
attachment system if needed.
If using a backrest, harness or any
other support system, make sure to
properly tighten the belts and
straps on user.
Make sure the user’s toes are not
allowed to touch the ground at any
time.
Choose bright, visible clothing.
Preferably closely tted to your body
to avoid entanglement into
components.
Lace shoes properly.
Trivel is not responsible for
accidents caused by the use or
handling when tricycle is towed by
an adult’s regular bike, or by its
capsizing when the child gets o
his or her tricycle or when he or she
activates the brakes.
When riding on public roads,
always ensure you are visible to
other road users. Make sure your
tricycle has all the reectors or
lights that are required by the local
laws. A safety pennant ag is also
recommended for extra visibility.
Never ride under the inuence of
alcohol or illicit substances. This
could seriously impair your
judgment, reexes or balance and
may lead to prosecutions, serious
injuries or even death.
Never carry a second passenger on
your tricycle unless that is with an
approved accessory equipment.
Do not carry anything on the
handlebars or between your legs as
this could seriously impact your
balance or get caught in the wheels
and may cause serious injury or
death. Use the provided cargo
compartment is your tricycle is
equipped
with such.
Make sure your tricycle is properly
tted to you and that you are fully
able to control it.
Adapt your riding style and
behaviour to each type of terrain,
situation, and weather condition.
Trivel.com | 5
Page 6

This product and its components
were not designed to be used for
extreme conditions or stunts. Do
not engage in aggressive riding or
jumps.
Do not use for downhill.
Trivel is not responsible for
accidents caused by the use of
towing equipment.
Avoid riding on wet or icy ground if
possible. Wet and icy ground
seriously reduces traction between
tires and road surface. If you must,
take extra caution as the risk of
slipping and falling is much higher
especially when turning and
braking.
Avoid riding at night if possible.
Your vision is seriously reduced in
the dark and you may not see
obstacles coming at you in time to
avoid them. Other road vehicles
might also not be able to see you
and this can cause very dangerous
situations potentially leading to
serious injuries or even death.
When riding with children, always
keep a close eye on them and try to
stay away from potential
hazardous situations such as stairs,
steep descents, curbs, trac, etc.
Show a good example by following
all safety recommendations.
Avoid direct contact with sea water
and your equipment. Wipe o any
sea spray particles or sand
whenever possible. Calcium can
quickly damage important
component of your tricycle.
Always lock your tricycle to an
immovable object with a highquality bicycle lock when left
unattended. It is also recommended
to lock any component with a quick
release attachment device.
Take note of your product serial
number and store it somewhere
secured. This unique identication
number can be required by Trivel
customer service for warranty
purpose. It can also help proving
your ownership of the equipment to
your insurance company or local
police service in case it is stolen.
This product may contain
chemicals known to the state of
California to cause cancer and birth
defects or other reproductive harm,
including paint, lubricants, and
various metals. Wash hands
thoroughly after handling this
product. (California Prop 65).
6 | Trivel.com
Page 7

BEFORE YOUR FIRST RIDE
BEFORE EACH RIDE
Congratulations, you are about to experience a great feeling;
riding a Trivel! To ensure you have a pleasant first ride, please
make sure to follow these simple instructions:
1. Read or have someone read to you this manual’s Safety Warnings
and Riding Basics sections. Only until these sections have been fully
understood is it recommended to go for your first ride.
2. Adjust the seat, backrest, and handlebars to the recommended
position for you. See Adjusting your Trivel section to learn how.
3. Proceed to a safety check on the equipment. See Equipment Safety
check on the following chapter.
4. You’re good to go! Put your helmet on and enjoy the ride!
It is strongly recommended that you choose a private or
closed-circuit road without major inclines or heavy vehicles
get to know how your Trivel handles and how control
components such as the brakes and derailleurs feel.
EQUIPMENT SAFETY CHECK
Proceed to the following Equipment safety check before going
for a ride.
1. Check components attachment
a. Check front wheel attachment by lifting the front end of your
Trivel and firmly hitting down on the top of the wheel. There
should be no movement of the wheel. Tighten the nuts or
quick-release binding system if the wheel moves or gets off
the fork. See the quick-release binder adjustment section for
instructions.
b. Check handlebars, seat, backrest and all other attachment
systems for unwanted movement. Tighten loose components
if needed.
See the Setting your position on your Trivel section
forinstructions.
Trivel.com | 7
Page 8

2. Check brakes function
a. Pull the brake levers with full strength
and make sure the brakes are stopping
the wheels from spinning efficiently.
b. Brake pads should reach the rim
around the first third of the brake lever
stroke.
c. The brake lever should not get in
contact with the grip.
d. The wheel should be able to spin freely
when the brake lever is released.
If these conditions are not met, an
adjustment of your brakes is required. See
brake adjustment section for instructions.
3. Check tire pressure
a. Use a pressure gage or connect a
pump with a pressure gage to each
tire’s valve to get a pressure reading.
Make sure the pressure is within the
tire’s recommended pressure value.
This information is engraved on each
tire’s sidewall. Adjust pressure with a
pump if it is below the recommended
minimum pressure.It is normal for
a tire to lose a bit of its air pressure
after a while. However, if your tire is
completely flat (out of air pressure),
it is likely that its inner tube has been
punctured. You will need to repair
or replace the inner tube before you
can go for a ride. See tire pressure
adjustment and puncture repair
section for instructions.
4. Check the chain’s lubrication
a. Spin the chainwheel backwards and
visually inspect the chain for proper
lubrication. A squeaking sound when
the chainwheel is spinning is also an
easy symptom to spot that tells you
that your chain needs to be lubricated.
In doubt, add some lubricant. See
the Lubricating the chain section for
instructions.
If possible, always ride with
someone else. This way, in the case
of an accident, one can call for
assistance and wait along with the
injured rider.
If you are going by yourself, tell
someone you know about your
itinerary and expected return time.
Bring a cellular phone if possible.
If using a power assist system, think
about the planned distance of your
ride and battery autonomy. Adapt
your power assist level accordingly.
See Optimizing your battery life
section in Getting Started chapter
for more details on how to increase
your range.
8 | Trivel.com
Page 9
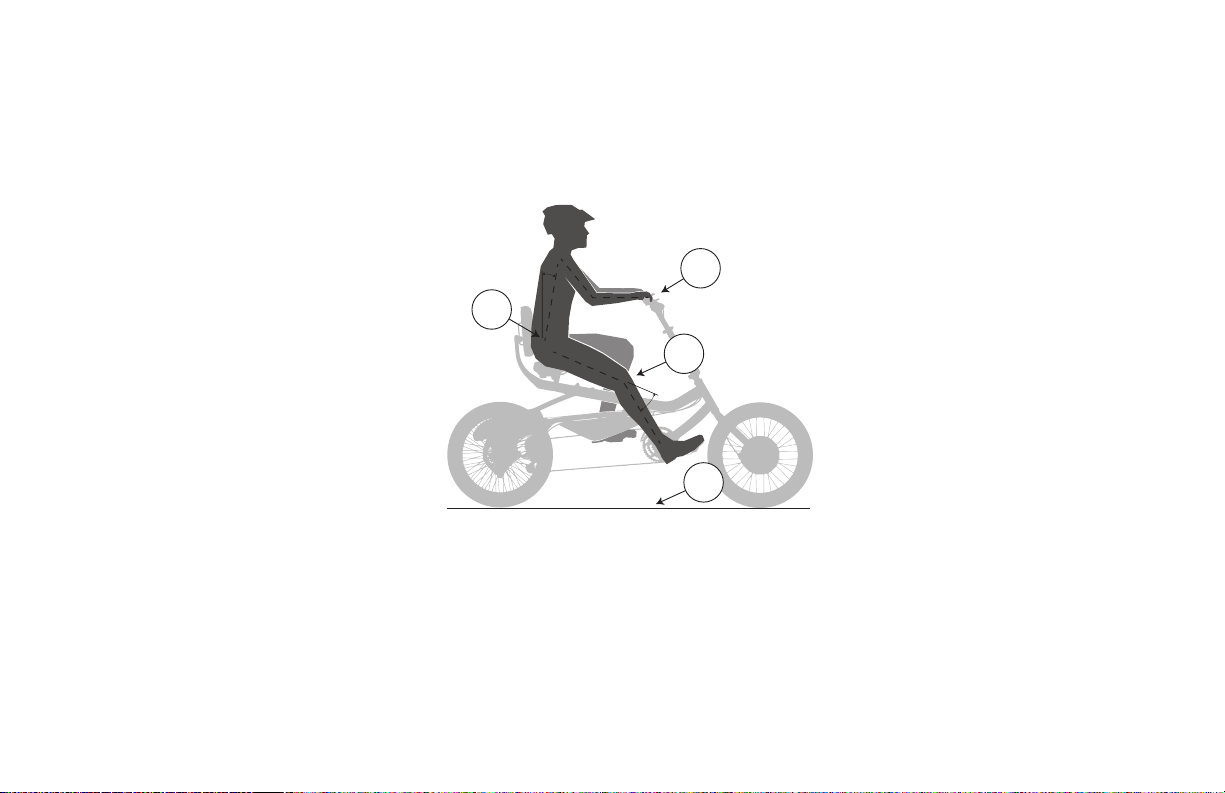
SETTING YOUR POSITION ON YOUR TRIVEL
Comfort is key to a pleasant ride. Your Trivel is offering many ergonomic adjustments to ensure your position is optimal.
Werecommend the following key points for a proper positioning.
1
4
2
3
1. Adjust handlebar height so the forearms are parallel to the ground when the user is sitting.
2. Set the seat position so that there is a slight bend of the knee when the pedal is at the farthest point.
3. The user must be able to reach the ground with the foot while sitting in case of emergency.
4. Adjust the saddle and backrest height and angle so that the user’s torso angle is close to be vertical (depending on riding style and preference).
Trivel.com | 9
Page 10
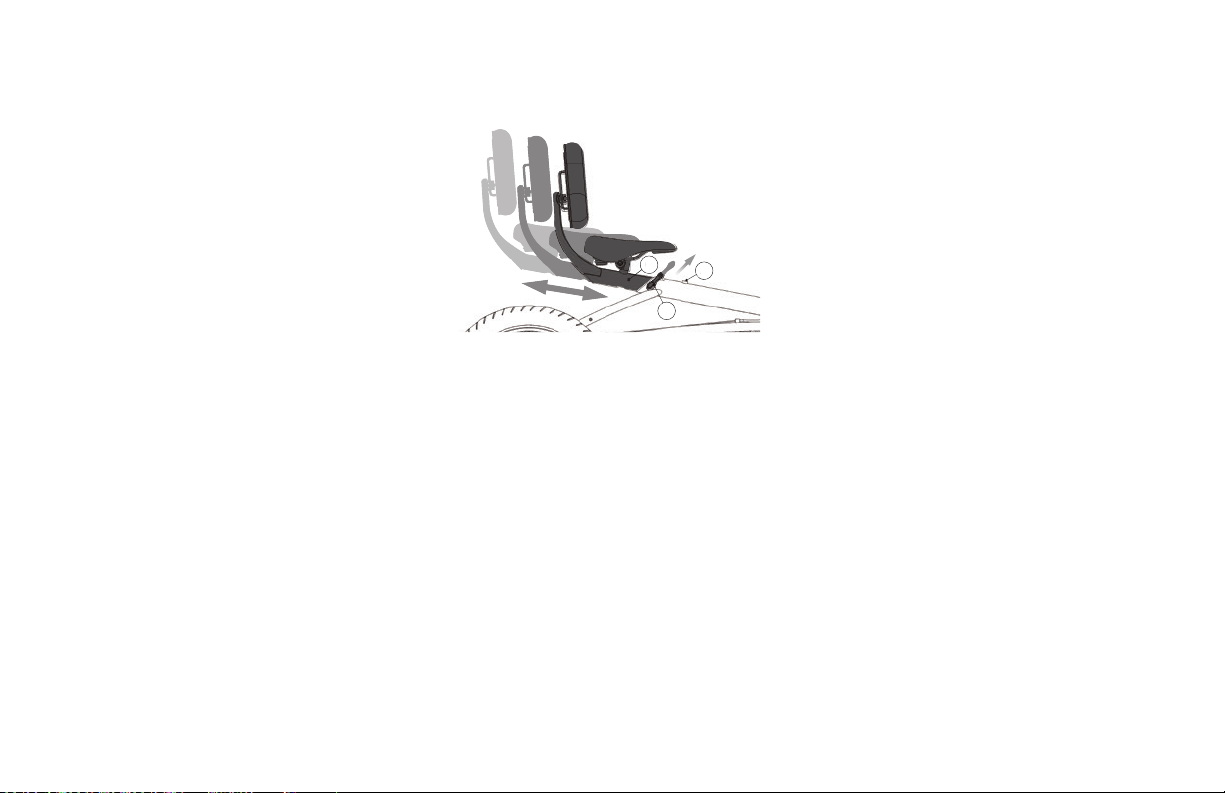
B
C
SETTING THE SEAT POSITION AND ANGLE
The seat position is the principal setting
that can be adjusted to modify the user’s
position.
Moving it back or forth will change the
torso angle and leg extension when
pedalling so an optimal control and
pedalling efficiency can be obtained.
For a more active position, we
recommend that the seat be adjusted so
that the user has a slightly bent forward
torso angle as well as an approximate
knee angle of 25 degrees when the pedal
is at its farthest point when pedalling.
For a more relaxed position, the seat can
be moved forward, thus allowing less leg
extension and an upright or laid-back
torso angle.
A. Anti rotation screw
B. Quick release binder lever
C. Seat beam
Set seat position by moving the Seat
Beam (C) forward or backward along the
frame.
C
A
B
1. Loosen the seat beam anti rotation set
screw (A) using an Allen key
2. Pull the quick release binder lever (B) to its
open position to free the seat beam (C)
3. Adjust seat position to the desired distance
from the chainwheel
4. Push the quick release binder lever (B) back
to its closed position to lock the seat beam
(C) into the new position
5. Tighten the seat beam anti rotation set
screw (A) with the Allen key
10 | Trivel.com
Page 11
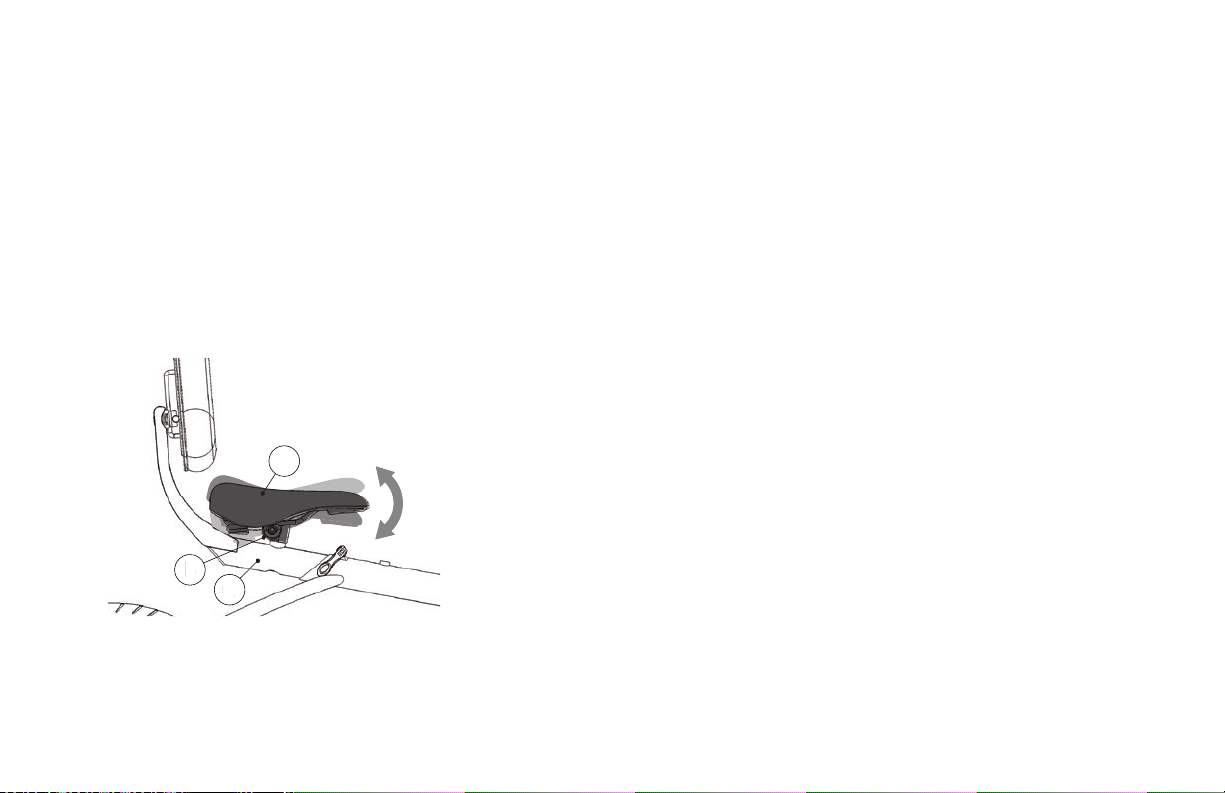
The seat angle can be adjusted to your
personal preference whether you wish
for a straight, upright position or a more
relaxed, laid back seating position. You
should also consider adjusting the
backrest height and angle accordingly.
1. Loosen the seat carrier clamp (B) using
a wrench until the saddle (A) can rotate
freely
2. Rotate the saddle (A) upward of downward
to the desired angle
Set the seat angle by rotating the seat (A)
upward or downward along the seat
carrier clamp (B).
A
B
C
A. Seat
B. Seat carrier clamp
C. Seat beam
3. Re-center the saddle (A) along the seat
beam (C) if it is unaligned
4. Tighten the seat carrier clamp (B) using a
wrench until the saddle (A) is locked tightly
into its new position.
Trivel.com | 11
Page 12
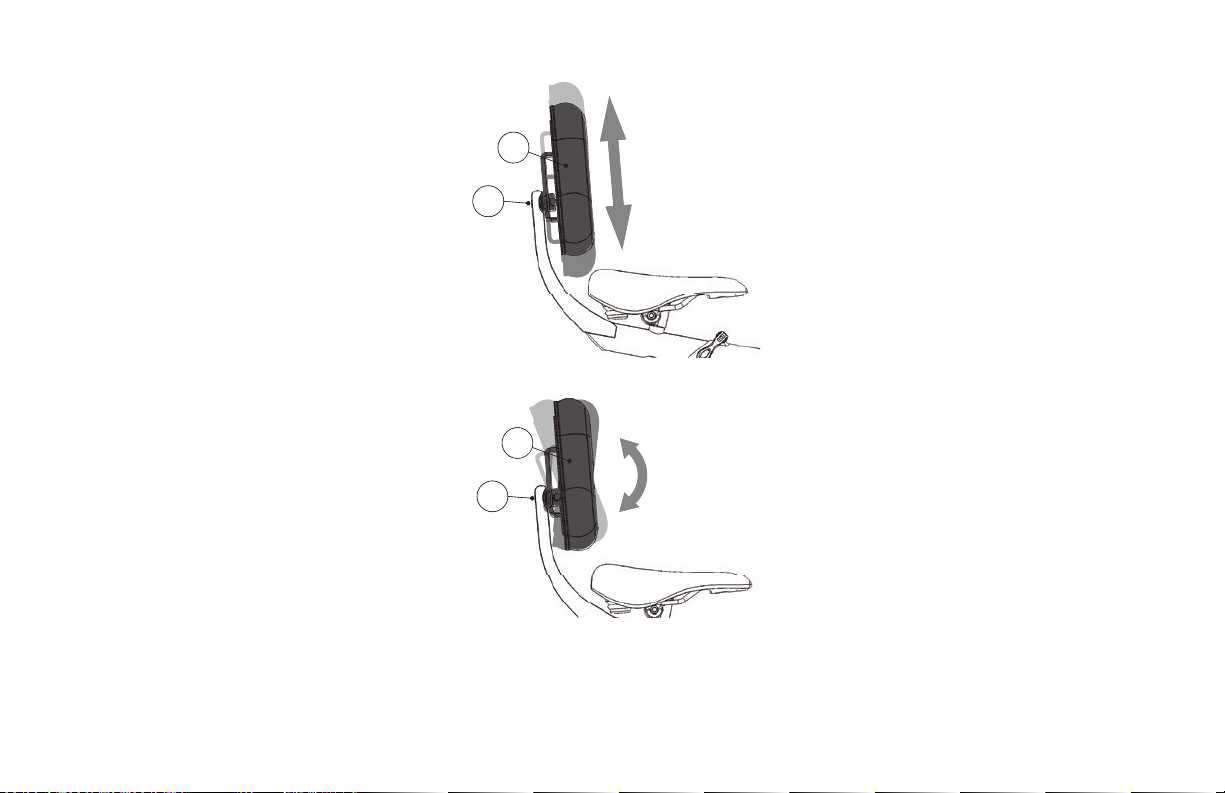
SETTING THE BACKREST HEIGHT AND ANGLE
The backrest height and angle are
adjusted at the same time using just one
tool from the back of the backrest.
The backrest height can be adjusted to
reach your lower back precisely where it
needs the most support. The angle should
be adjusted along with the saddle for an
upright or a more laid-back position.
B
A
B
A
A. Backrest carrier clamp bolt
B. Backrest
1. Loosen the backrest carrier clamp (A) using
an Allen key until the backrest (B) can
move freely
2. Move the backrest to the desired height
and angle
3. Tighten the backrest in the new position
using the Allen key
12 | Trivel.com
Page 13
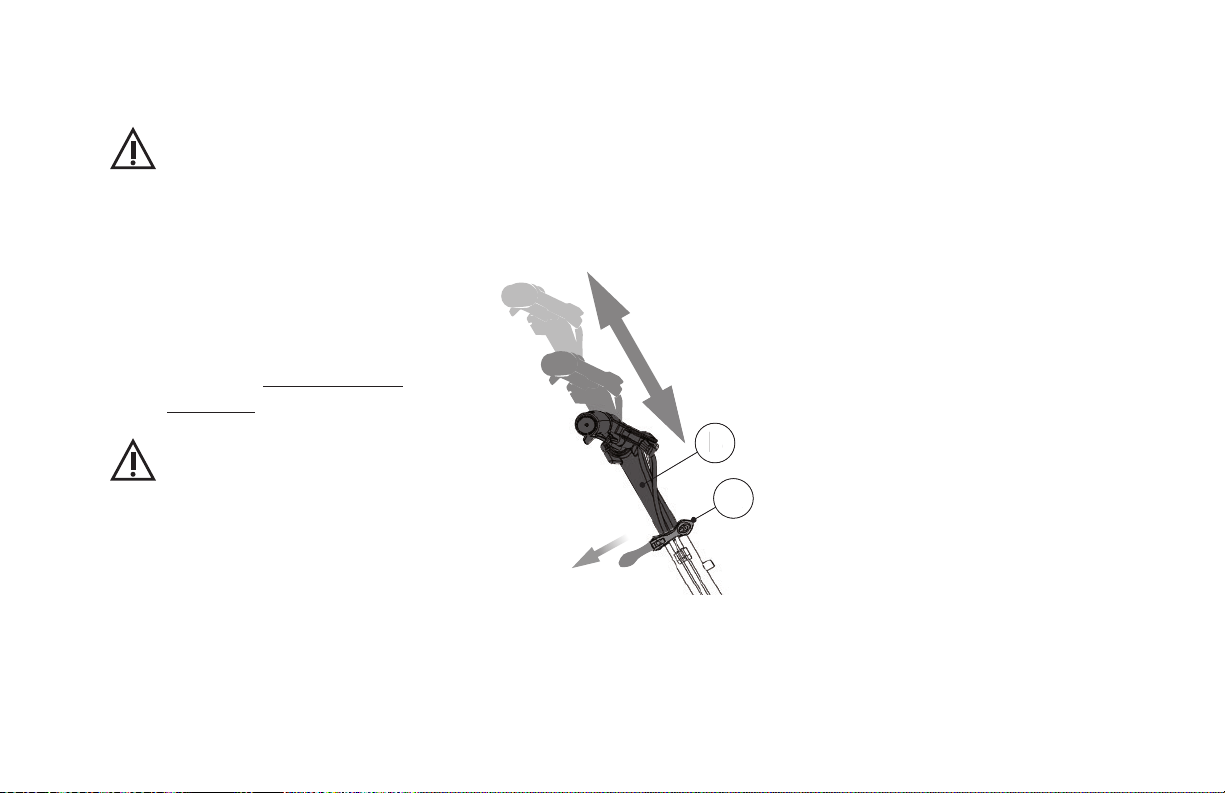
SETTING THE HANDLEBAR POSITION
Make sure to fully understand how
to use and adjust a quick release
lever before setting the handlebar
position. Failure to properly use this
mechanism can result into the
dismantling of the stem assembly
and lead to a loss of control and
serious injuries. Instructions on how
to use a quick release lever can be
found in the Maintenance and
adjustment section.
Never lift the stem above the
minimum insertion mark engraved
on the lower part of the stem.
Lifting the stem above this mark
can result into the dismantling of
the stem assembly and lead to a
loss of control and serious injuries.
You can easily move the stem (B) up or
down using only the quick-release lever
(A). The stem should be positioned so
that the user has his forearms parallel
to the ground when he holds the
handlebars.
B
A
A. Quick release binder lever
B. Stem
1. Pull the quick release binder lever (A) to its
open position to free the stem (B)
2. Adjust the stem position to the height
required to meet the recommended
arm position
3. Check alignment of the handlebars
with the front wheel. Realign if
not perpendicular.
4. Push the quick release binder lever (A)
back to its closed position to lock the stem
(B) into the new position
Trivel.com | 13
Page 14

RIDING BASICS
RIDE MORE EASILY
Congratulations on choosing to ride
differently! Compared to a regular
bicycle, riding a Trivel, with its reclined
position offers several benefits.
RIDE MORE COMFORTABLY
A reclined position relieves pressure
on your wrists, preventing pain and
numbness due to the compression on
the hand’s nerves. This position also
allows for greater support of the lower
back, thus helping reduce spine related
pain often experienced by riders with less
flexibility on a regular bicycle. At last, an
upright torso angle virtually eliminates
the cervical spine pain due to the stress
on the neck that often felt with the
traditional bicycle positioning.
A Trivel is an excellent option for people
who are new to cycling, those who have
a bit less balance or riders who wants
to experience a new type of riding. Our
distinctive three wheeled platform puts
the user in a lower and more centered
position along the wheelbase, allowing
for fun, easy, free coasting and amazing
cornering capabilities.
RIDE LONGER
With less pain you will get higher
endurance and will be able to go for
longer rides. Breathe more easily with the
upright position and enjoy the sceneries
with the excellent peripherical view that
this position provides.
14 | Trivel.com
Page 15
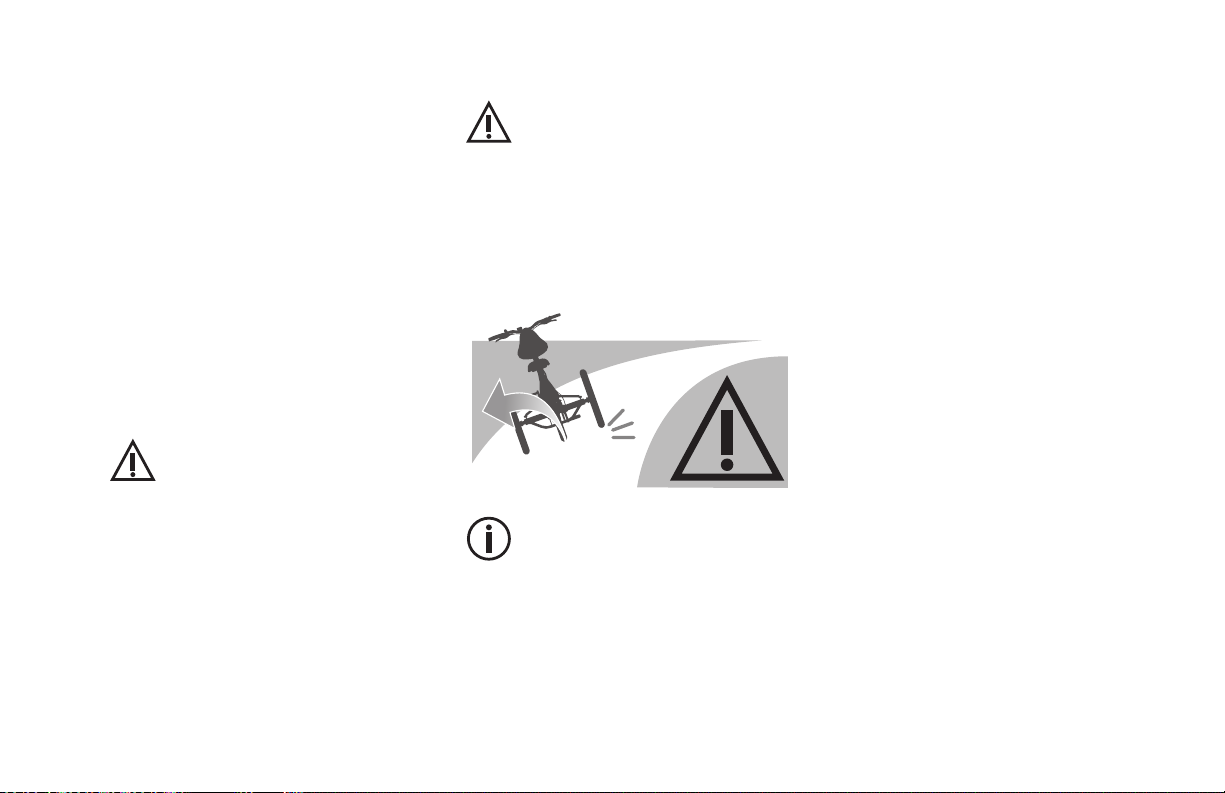
TURNING
Practice safe turning first by controlling
your speed at all time and especially
before going into a curve. It is of the
upmost importance that the user gets
to know how a Trivel vehicle handles
curves at different speeds and on
different surfaces. As it was previously
recommended in this notice, the user
should ride his or her Trivel on a closedcircuit road several times before going on
a ride involving the use of public roads.
A three wheeled vehicle is not able
to lean like a two-wheeled vehicle
can when turning. You should
always allow more time for braking
when approaching a curve. Taking
a curve at a high speed can lead to
a loss of control and braking
capacity that can result in serious
injuries.
If the speed is too high while taking
a curve, there is a risk of tipping
sideways. It is the responsibility of
the user to be in control of his speed
and to brake suciently before
taking a curve. The user must avoid
tipping at all time.
In a situation where going into a
curve at high speed can’t be
avoided, it is recommended that the
rider leans his or her body weight
slightly inside the direction of the
curve to help prevent tipping.
Trivel.com | 15
Page 16
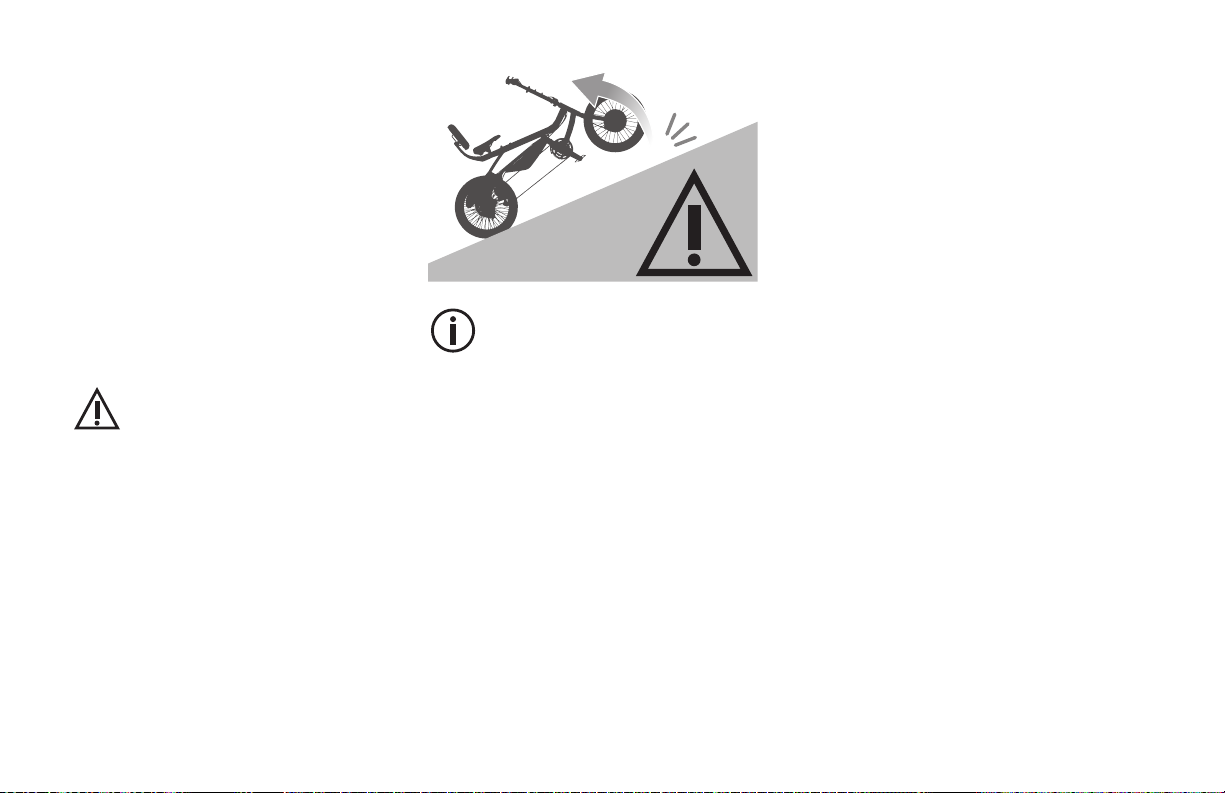
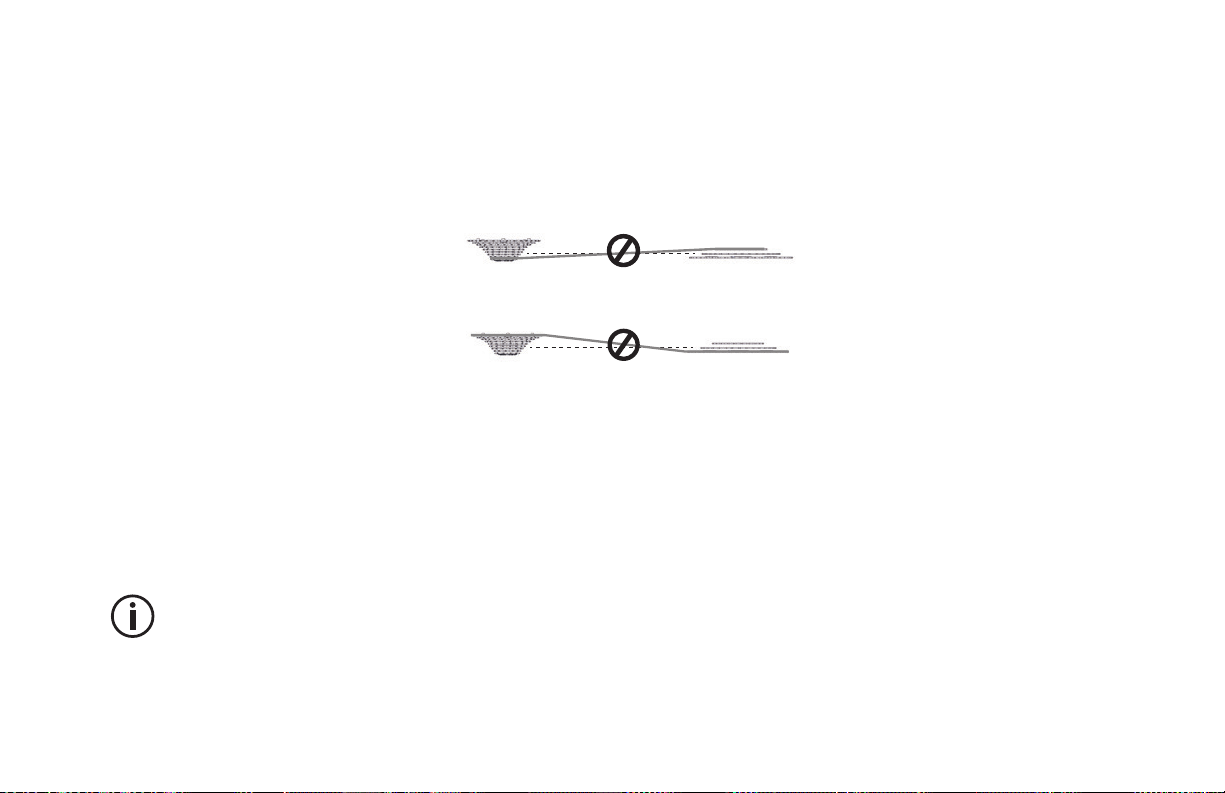
GOING UPHILL
Your Trivel has been designed with a
wheelbase length that allows a rider to
safely take on most inclines. However, it
is recommended to avoid inclines over
8 % (roughly 5 degrees angle). Before
going for a ride that may include big
inclines, get to know your itinerary and if
needed, look for an alternative route with
a gentler incline.
If the incline is too steep, there is a
risk of tipping backwards, which
can lead to the loss of the front
brake function and/or a risk of
serious injuries. It is the
responsibility of the user to know
his or her itinerary beforehand and
plan a safe route. The user must
avoid tipping at all time.
In a situation where a rider is
attempting an incline over the
vehicle tipping point limit, it is
recommended that the rider leans
his or her body weight slightly
forward to help prevent tipping.
16 | Trivel.com
Page 17

BRAKING
How to brake efficiently
Efficient braking will improve your riding
and make you safer. Before your first ride,
you should get to know how the brakes
work, how powerful and responsive they
are, and which side is front, which side is
rear.
Keep in mind that the braking
distance needed to come to a
complete stop is likely to be longer
when riding a Trivel compared with
a traditional bicycle.
1. Use both front and rear brakes
simultaneously
2. Apply force progressively on the brake
levers(modulate the braking force in
between front and rear brake)
3. Understand that the front brake is
responsible for most of the braking duty
4. Avoid putting so much force on the brake
levers as to lock the wheel and skid
5. Understand that the braking power is at its
peak at the point where the wheel is about
to lock but is reduced drastically when
itdoes
6. Anticipate braking time according to your
speed, weather condition and the riding
track surface
7. Avoid braking while taking a curve. Instead,
brake before taking a curve and release
brake while turning
USING GEARS
Knowing how and when to shift gears
will make your riding experience better.
Shifting gears frequently to adapt your
pedalling cadence to your speed can
help prevent muscular fatigue, joint
injuries, and extend the drivetrain use life.
Your Trivel is equipped with an efficient
and reliable gear transmission system.
To make the best out of it, you should
understand how it works and how to use
it properly.
Trivel.com | 17
Page 18
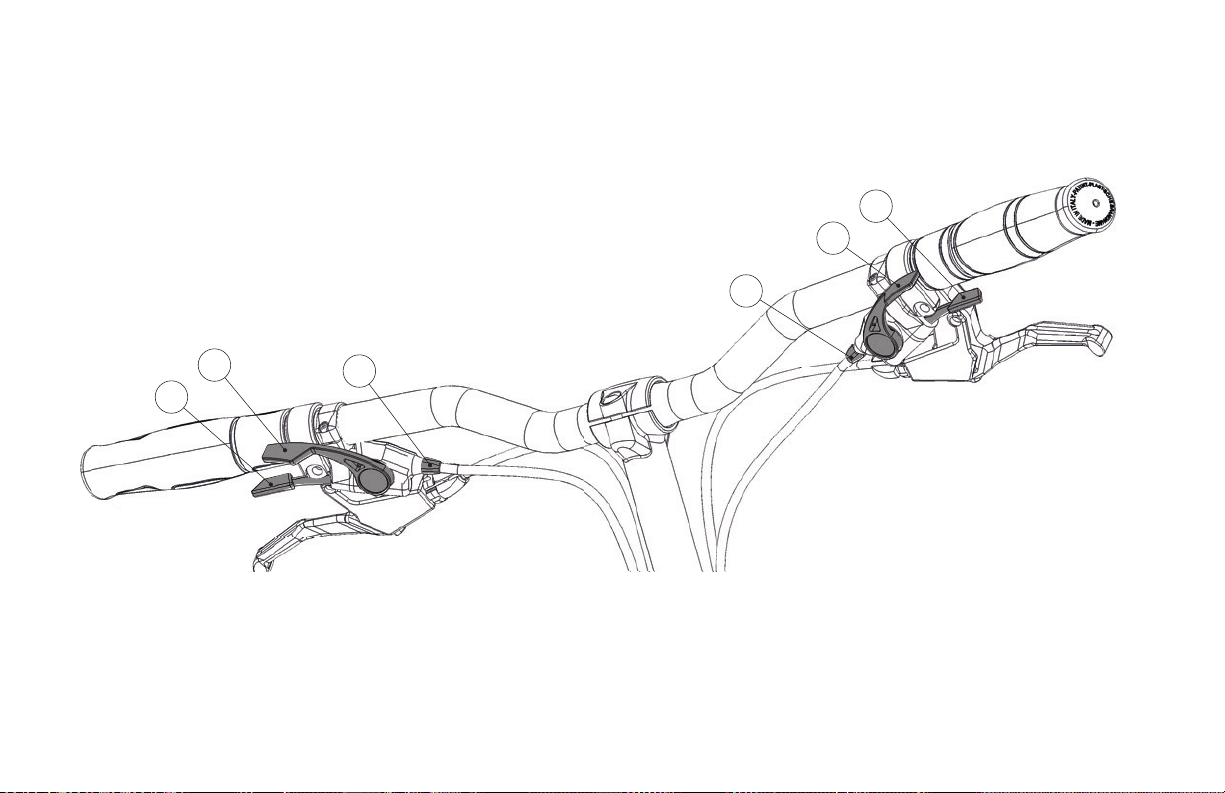
What’s what ?
Shifters(Trigger type) components terminology
F
E
D
B
A
A. Front derailleur down shift lever
B. Front derailleur up shift lever
C. Front derailleur cable tension
adjustment barrel
18 | Trivel.com
C
D. Rear derailleur cable tension
adjustment barrel
E. Rear derailleur down shift lever
F. Rear derailleur up shift lever
Page 19
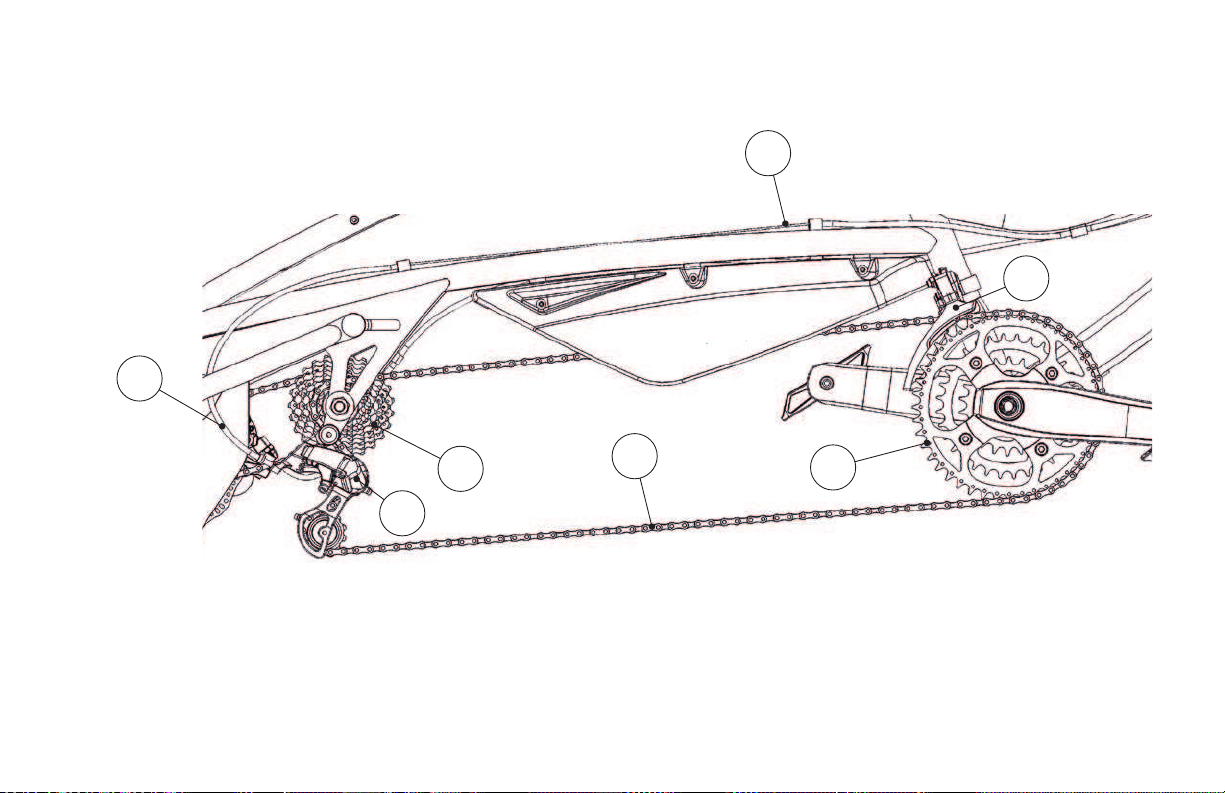
Gear transmission components terminology
A
E
G
A. Rear derailleur cable housing
B. Rear derailleur
C. Cassette
D. Chain
E. Rear derailleur cable
B
C
F. Chainwheel
G. Front derailleur
D
F
Trivel.com | 19
Page 20
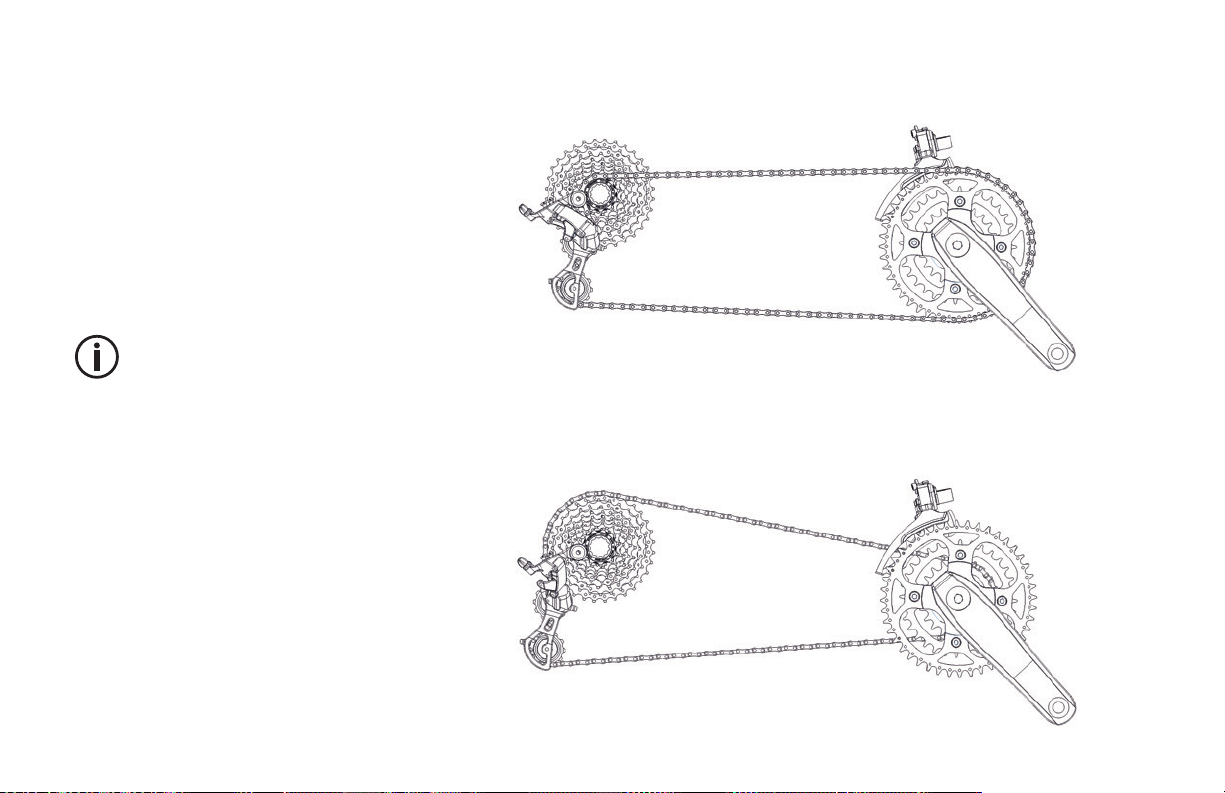
How it works
The shifter levers either pull or release
cable, causing the front or rear derailleur
to move sideways pushing the chain
from a sprocket to another thus
operating a change of gear.
A gear change can’t be made when the
rider is not pedalling.
T
here are several types of
transmission systems and many
possible combinations. If the system
tted on your Trivel is not sucient
for your level of tness, preferred
route, or personal preference, ask a
qualied technician for possible
upgrades.
Highest gear combination(Largest front chainwheel/Smallest rear sprocket)
High speed – Requires more effort – Good to go fast
Lowest gear combination (Smallest front chainwheel/Largest rear sprocket)
20 | Trivel.com
Low speed – Requires less effort – Good for riding uphill
Page 21
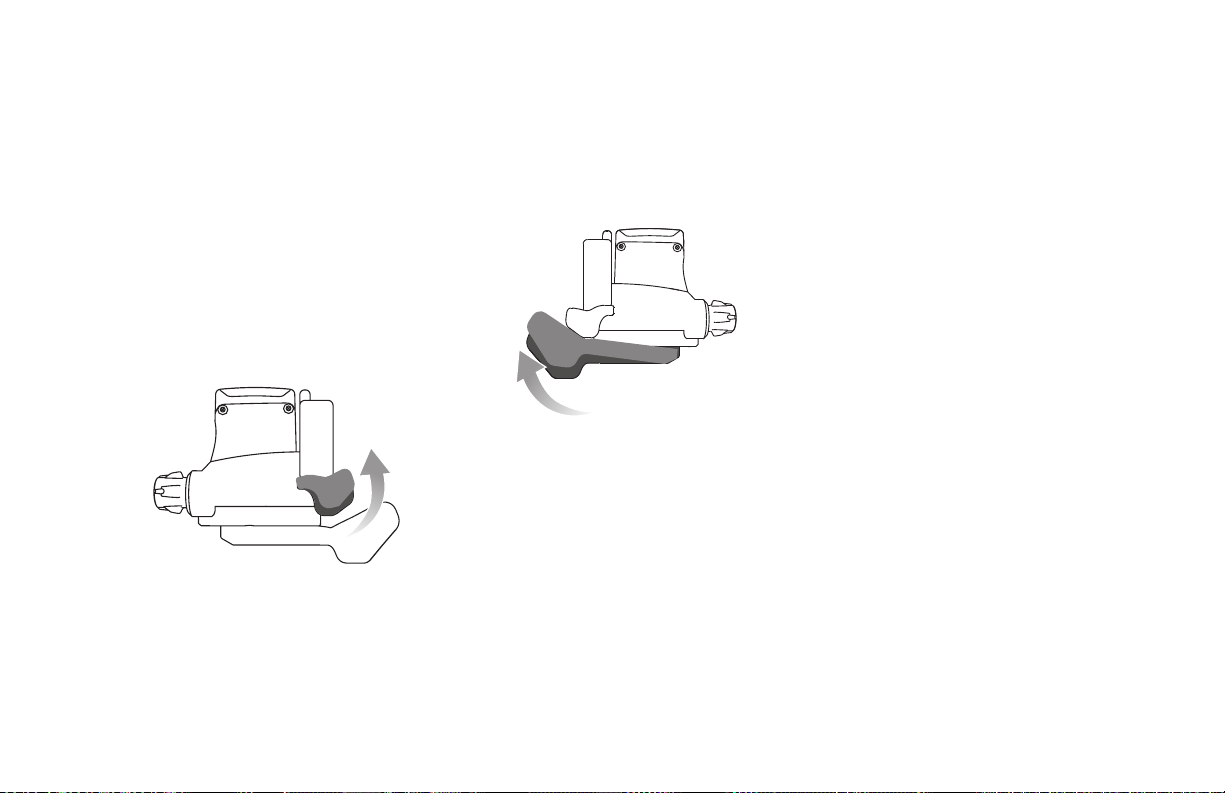
Shifting up
As you accelerate and gain speed, it
is time to shift up if you want to keep
going faster. Shift up progressively
until you reach your desired speed and
comfortable pedalling cadence.
Shift up by small increments with the rear
derailleur, using the index lever on your
right-hand side.
Shift up by a large step with the front
derailleur, using the thumb lever on your
left-hand side.
Trivel.com | 21
Page 22
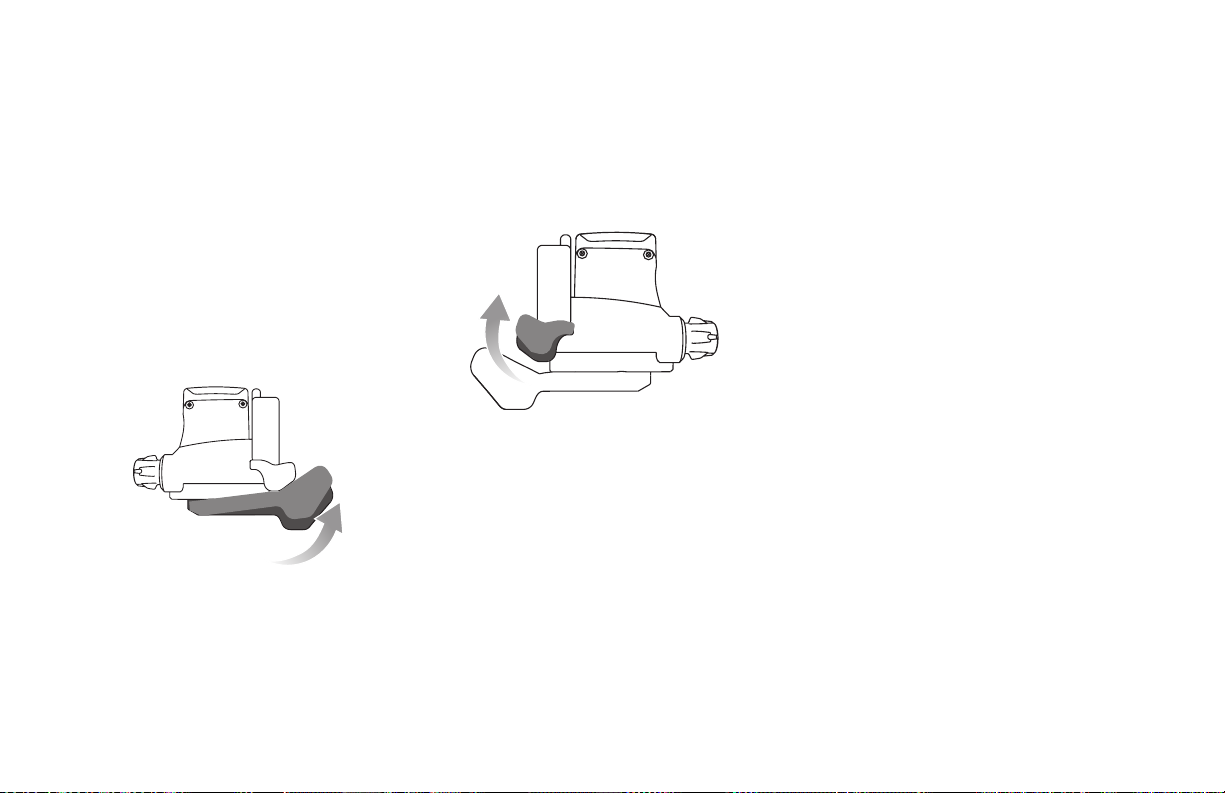
Shifting down
As the incline or headwind increases, or
when fatigue is felt, it takes more effort
to pedal. It is then time to shift down
to maintain a comfortable pedalling
cadence and keep going.
Shift down by small increments with the
rear derailleur, using the thumb lever on
your right-hand side.
Shift down by a large step with the front
derailleur, using the index lever on your
left-hand side.
22 | Trivel.com
Page 23
How to shift gear efficiently
RIDING IN WET CONDITION
1. Avoid shifting gear when the chain is under
heavy tension. Reduce your pedalling power
briefly when changing gear.
2. Avoid accelerating on a high gear. Instead,
start off with a low gear and shift up
progressively to avoid putting too much
tension on the chain.
3. Avoid ‘’crossing the chain’’ by alternating rear
derailleur gear change and front derailleur
gear change.
4. Think of shifting down before coming to a
complete stop so you can start off again on
an easy gear and prevent premature wear to
the system.
If the chain suddenly drops from its
gear, stop pedalling immediately.
Carefully get it back on the gear
manually to avoid damaging the
frame and components.
The following gear combinations should
be avoided to prevent premature wear of
the transmission components :
Small chainring - Small sprocket
Large chainwheel - Large sprocket
Try to avoid riding in wet weather if
possible as this seriously increases the
risk of losing control and falling.
Tires contact with the ground and
braking efficiency is greatly reduced on
wet conditions. Slow down, start braking
early and more gently, take extra caution
when turning.
Water coming into your eyes can reduce
your vision field. Wear proper eyewear.
Trivel.com | 23
Page 24

RIDING AT NIGHT
RIDING WITH FEET SECURING DEVICES
Try to avoid riding at night as this adds
several risks.
Make sure you are visible to the others and
that you can also see them well. Reflectors
included with your bike are a minimal
safety device and it is recommended that
you use a proper set of lights on your
bike(Depending on where you live this
could be mandatory by the law).
Wear bright colored clothes and
equipment and always check to confirm
that people see you before attempting a
manoeuvre. Always ride defensively and
first consider that people don’t see you.
Be careful while riding with feet securing
devices such as toe-clips or clipless pedals.
Although they may help increase your
performance, there is a learning period
necessary before being able to safely use
these devices. Start progressively and adjust
the strap tightness or spring accordingly.
24 | Trivel.com
Page 25

USING THE POWER
ASSISTANCE SYSTEM
SAFETY WARNINGS
Always use the original equipment
provided to operate and charge the
system. For replacement parts, contact
Trivel or your dealer.
system LCD screen unit for a long
period. Learn how to operate the
system without looking or with only a
quick glance.
The electric power assist system
equipped on your Trivel is a safe and
reliable set of components that complies
with safety regulations.
There are a few safety precautions to
follow to minimize the risks and dangers
from electrocution, fire hazard and injury.
If your Trivel is equipped with an electric
power assist system, please make sure
to read and understand the following
warnings :
Do not alter or disassemble any
component of the power assist
system. Service and maintenance
must always be performed by a
qualied technician.
An electric power assisted tricycle
handles dierently than a human
powered only tricycle. The acceleration
can be surprisingly eective, and you
should get familiar with its behavior
progressively before riding on public
roads.
An electric power assisted tricycle is
heavier than a human powered only
tricycle. Always keep that in mind when
evaluating the required distance
needed for braking. It may be longer
than what you are used to. This also
calls for more attention to the
maintenance of your brake system and
tires.
Always look ahead of you while riding.
Avoid looking at the power assist
A power assisted bicycle might not
suited for use by children or certain
persons with reduced physical or
mental capabilities. Make sure to
consult a specialist to help you decide
whether it is suitable or not.
Laws and regulations regarding the
speed limitation and use of a power
assisted vehicle varies among countries
and even sometimes among states and
provinces. Make sure you know,
understand, and comply to local laws
and regulations.
Always follow the instructions
contained in this manual in the Power
assistance system instructions section
when operating, charging, and storing
the battery or charger unit.
Trivel.com | 25
Page 26

NOTICE TO THE USER
Trivel notifies the owner or the user of an
electrically assisted vehicle of the Trivel
disclaimer of responsibility and of the risks and
danger of the use of such a product and of the
means to protect against them following its
purchase from an authorized Trivel dealer.
Compliance of products to applicable
legislation
Trivel warrants its electrically assisted vehicle
conform to laws and norms applicable in the
province of Québec, Canada. For any purchase
with a view to using it outside the province
of Québec, the owner must personally verify
the details of the legislation effective in the
country, state, territory or province concerned,
for the applicable norms, declarations,
interdictions and other requirements of said
legislations. The liability of Trivel shall not be
engaged in case of non-compliance with
the legislation of the country, the state, the
territory or the province where the product
is delivered and/or utilized, it is the owner’s
responsibility to check with local authorities.
Safety precautions during use
Trivel recommends that the owner operate the
vehicle and ride it on a closed circuit course for
a duration of between six(6) and twelve(12)
hours, depending on the user’s level of
experience, to allow the owner to become
familiar with the operation of the vehicle, to
develop sufficient knowledge and ability and
to become so familiar with it that the user
will be provided with a level of safety that is
to be expected. Electrically assisted vehicles
were not designed, developed, distributed,
or sold for professional use or to be used
commercially, nor to be used for stunts, ramp
acrobatics, jumps, aggressive riding or riding in
excessively rigorous conditions such as: winter
conditions(with the product in contact with
ice, water, salt, sand and calcium) and tropical
conditions, (contact with sea salt or riding with
heavy loads), or for any other similar activities.
Consequently, non-compliance with these
instructions and recommendations renders
Trivel warranties null and void and exonerates
Trivel from any liability toward the owner.
Information regarding risks
and dangers and ways to guard
against them
In order to minimize all risks and dangers
from electrocution and to guard against
any fire, burn, damage, prejudice, injury or
injury that could cause death and that could
result directly or indirectly from the battery of
the electrically assisted vehicle, the general
precautions regarding electrical devices are
applicable. The slightest electrical discharge
can cause serious injuries and you must
read all the instructions with care. Without
limiting the generality of the preceding, and
in addition to the instructions in the Owner’s
Manual, Trivel recommends that you never
touch hot surfaces, use only the battery and
the original charger recommended by Trivel,
always use the specific charging equipment to
26 | Trivel.com
Page 27

charge the battery, never expose the battery or
the charger to heat, never dismantle or modify
the battery or the charger, do not expose the
battery or the charger to liquids, do not use
a damaged battery or charger, stop charging
the battery if the charge is incomplete at the
end of the theoretical charging time, stop
use of the battery and charger if they emit an
unusual odour, become hotter than usual or
if something seems abnormal, never leave
the battery and charger where they can be
reached by children, and here we urge that
extreme vigilance is necessary in this regard,
never touch the battery or charger with wet
hands, never turn on the battery or charger
if they have damaged cables or tie downs
or if the battery or charger have any kind of
malfunction or have been damaged in any
way, always take the battery and charger back
to the dealer for maintenance, examination,
repair or setting, always make sure to correctly
connect the charger to the battery and the
charger only to alternating current of 110V
A.C., do not use a battery or charger if they are
dusty, do not use the charger with other than
the specified current, do personally check the
battery and charger for any damage, do not
leave the battery and charger near an electrical
heating appliance, a gas or microwave
appliance, do not touch the charger or the
battery for too long during battery charging,
do not position the charger or the battery in
an unstable manner and do not cover the
battery or the charger or hang anything from
them and never use the battery and charger
for any use other than the one for which they
have been designed.
In order to minimize all risks and dangers
and to guard against any damage, prejudice,
injury and injury that could cause death, Trivel
recommends to the owner to ride carefully on
bicycle paths and not on public roads.
Even if the local competent authorities allow
riding on public roads, the owner will do so
at his or her risk and peril. In addition to the
general rules that apply to riding on bicycle
paths or public roads, the Highway Safety
Code, L.R.Q. chap. C-24.2 contains special
provisions for users of electrically assisted
vehicles and these must be followed to protect
against all risks and dangers that are inherent
to the use of such vehicles.
The equipment must be checked periodically
by your dealer as part of regular maintenance
and to spot stress and/or potential failures
including but without limiting the generality of
the preceding, cracks, deformations, corrosion,
paint chipping dents and for any other
indications of potential problems, improper
use or abuse. These periodic inspections are
proven essential safety measures that can
prevent accidents and injuries to the owner.
Negligence or non-compliance with these
regulations can cause serious injuries to the
owner and may, in certain cases, cause death.
Consequently, non-compliance with these
instructions and recommendations renders
the warranties given by Trivel null and void and
exonerates Trivel from all liability toward the
owner.
Trivel.com | 27
Page 28

General disclaimer of responsibility
Trivel shall not be responsible for damages
of any kind, whether material, immaterial or
corporal, sustained by the owner including
loss of time, loss of income, trouble and
inconvenience that might result from:
1. Improper operation of the vehicle
2. Non-compliance with the instructions and
recommendations contained in this notice
Any handling-related incident whether
involving error or not
3. Any abnormal use or use which does not
conform to the vehicle’s designed purpose.
4. Any cause of exterior origin
Trivel advises the owner that using an
electrically assisted vehicle entails inherent
risks and dangers that the owner agrees to
assume completely whatever their nature. The
owner accepts to hold Trivel harmless from
any liability and to solely assume liability for
any damage of whatever nature that he might
sustain or that he or she might cause to a third
party.
The owner renounces any claim and any
procedure, of whatever nature, against Trivel, in
the event of losses, damages or injuries of any
kind that he or she might sustain while using
the equipment and this applies before, during
and after said use.
Applicable laws and competent
tribunals
All disputes or disagreements that might
arise following the purchase of the electrically
assisted vehicle from a dealer shall be subject
to the laws that apply in the province of
Québec, Canada. Parties shall elect domicile
in the Montréal Judicial District, province
of Québec, for the hearing of any claim
pertaining to interpretation, application,
conclusion, terms, validity and effects of the
warranty.
28 | Trivel.com
Page 29
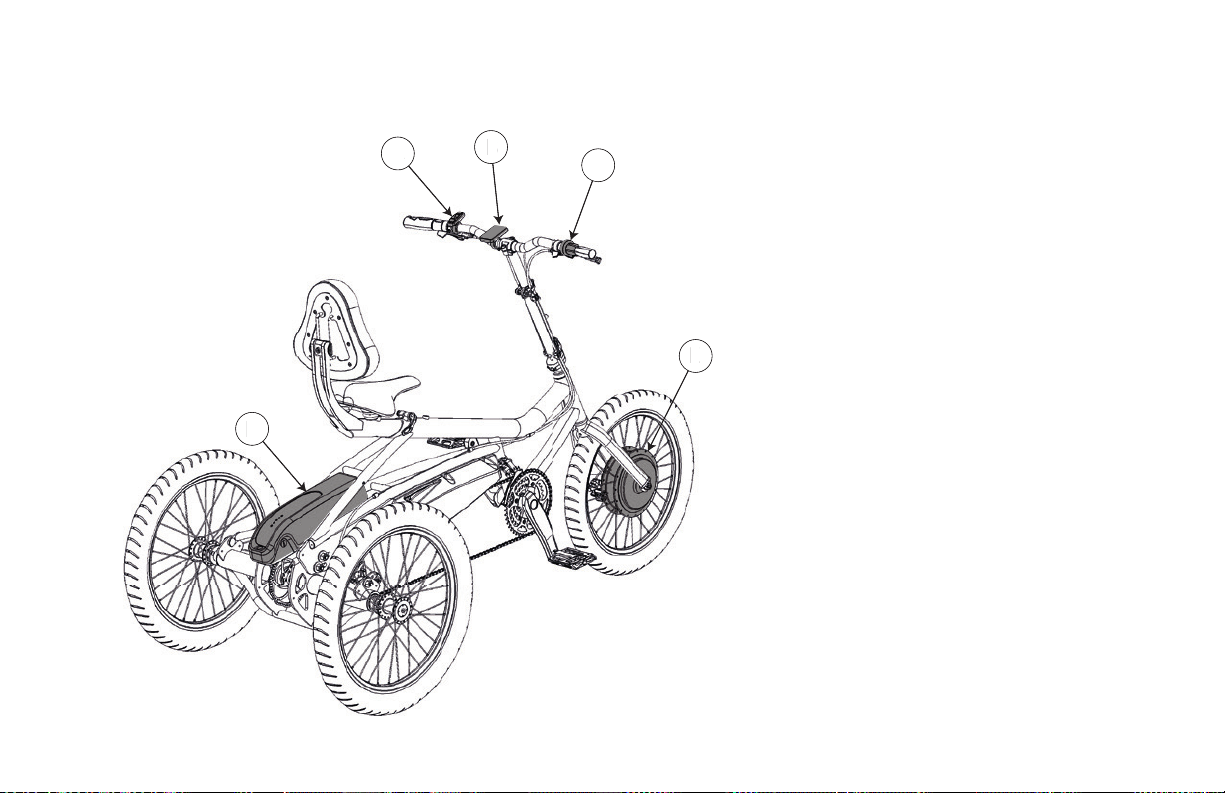
DESCRIPTION OF THE COMPONENTS
D
A
B
C
E
A. Controller
B. LCD Panel
C. Throttle
D. Battery
E. Hub motor
Trivel.com | 29
Page 30
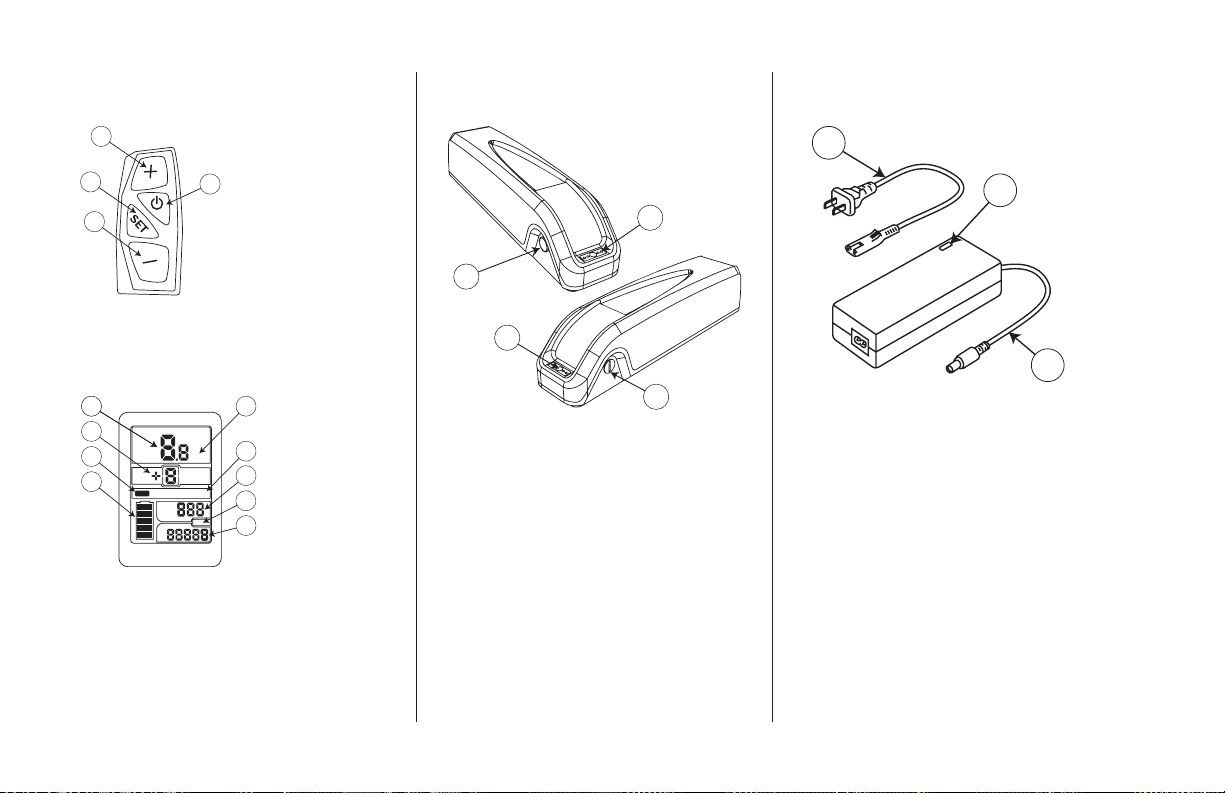
D
Controller
A
C
Battery
Charger unit
A
C
D
LCD Panel
A
A
B
C
D
MODE
A. Upbutton
B. Power button
B
C. Setting/Mode button
D. Down button
B
B
C
A
A. Current speed
E
B. Current power
F
KM/H
POWER
TRIP
KM
ODO
assist mode
G
C. Current mode
H
D. Battery charge
I
level
E. Speed unit
F. System status
G. Trip distance
H. Odometer unit
I. Odometer
A. Battery level check button
B. LED battery level indicator
C. Charging port
D. Key lock
Type: Lithium-Ion,
Quick charge Rated Voltage: 48V
Current: 10.4A
Capacity: 500Wh
Operating temperature: 0°C to 30°C (32°F to 86°F)
Storing temperature range: 10°C to 25°C
(50°F to 77°C)
A. AC Power cord
B. Charger status LED indicator
C. Charging plug
30 | Trivel.com
Page 31
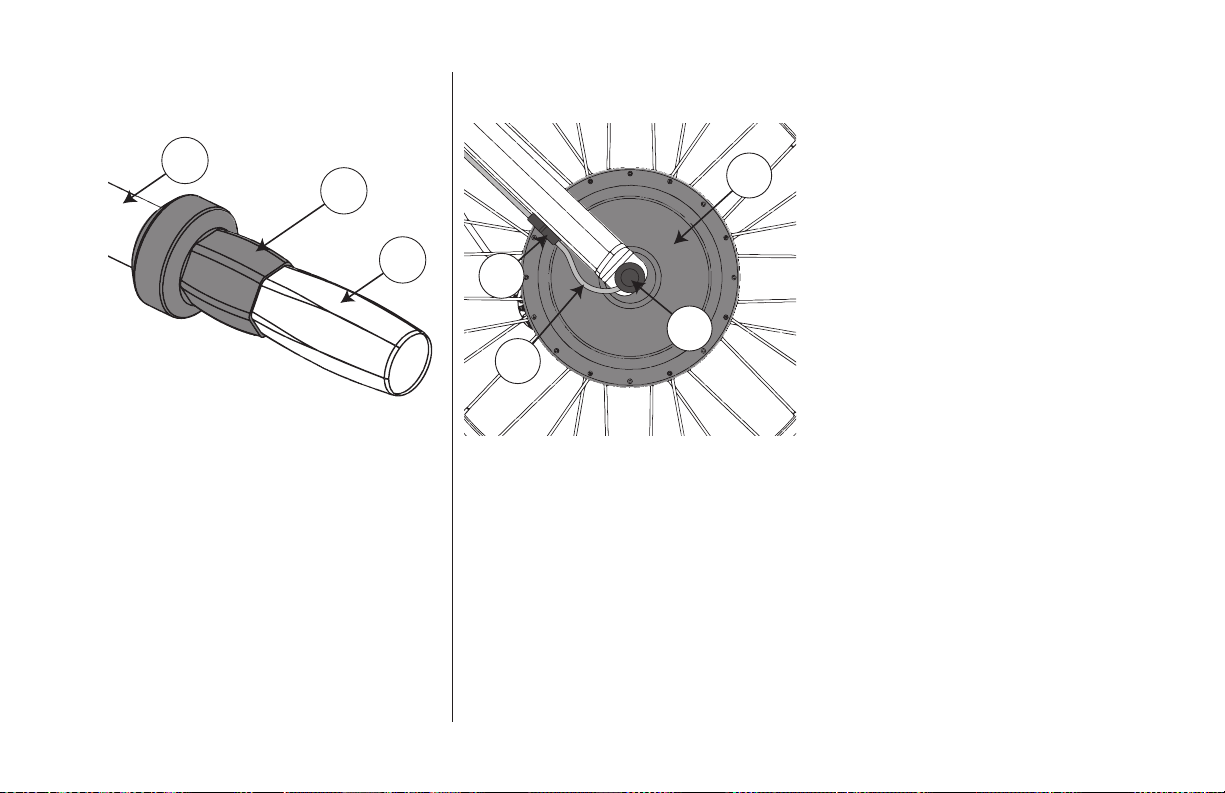
Throttle
Hub motor*
A. Handlebar
B. Throttle
C. Grip
A
B
A
C
D
B
C
A. Hub motor casing
B. Axle nut cover
C. Power cord
D. Power cord coupler
* All specications listed above are subject to change without notice.
Trivel.com | 31
Page 32
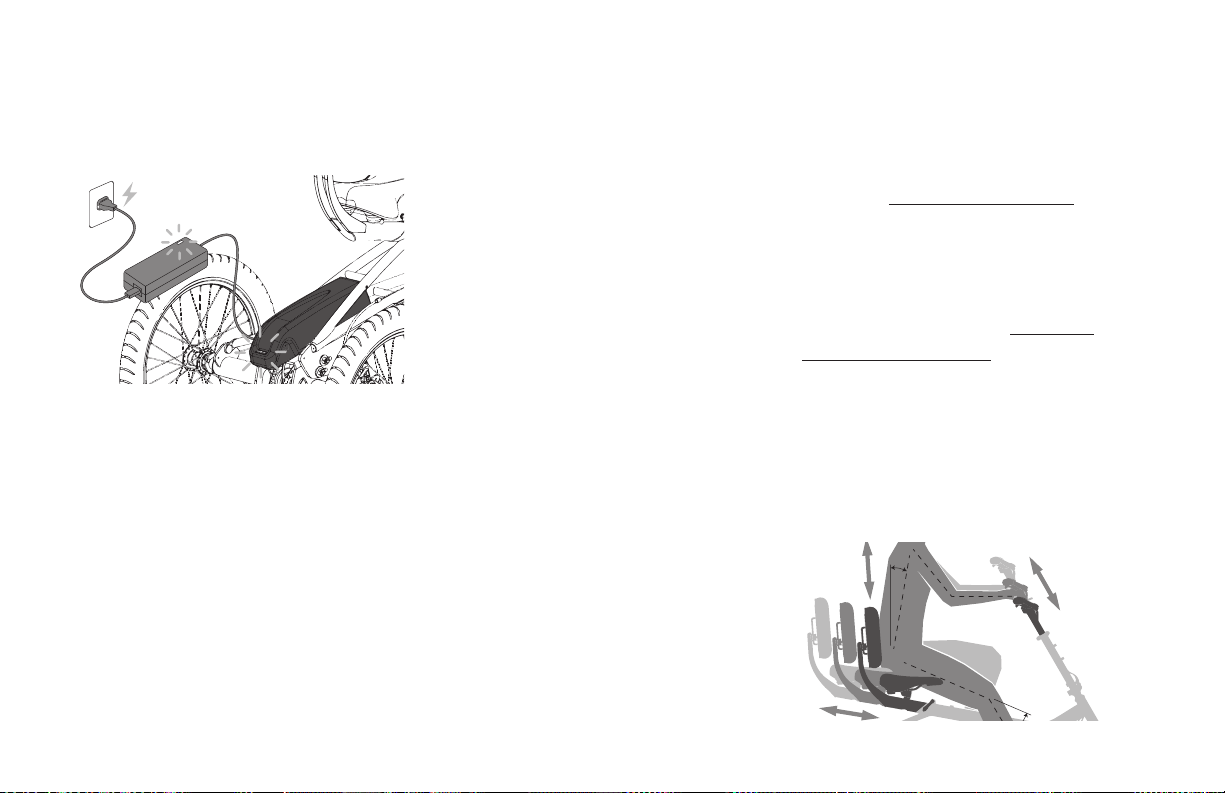
GETTING STARTED
Step 2: Adjust your position
Step 1: Charge the battery
1. Connect the AC power plug into
the charger.
2. Plug the AC power plug into an electrical
outlet. The LED indicators on the charger
will light up.
3. Connect the charging plug into the
battery’s left side charging port. The
LED indicators on the battery will blink,
confirming that charging is underway. Let
the battery charge until it is full.
4. The light on the charger will turn green
when fully charged.
5. Pull the charging plug from the battery
port and replace the rubber protector cap.
1. Slide the seat beam back or forth into the
frame so you have a proper leg extension.
See section Setting your seat position
for instructions.
2. Move the backrest support up or down
along the rail and adjust the angle to
your preference. See section Setting the
backrest height and angle for instructions.
3. Raise or lower the upper stem assembly to
find a comfortable handlebar height.
4. Make sure all the tightening levers and
bolts are tight.
32 | Trivel.com
Page 33
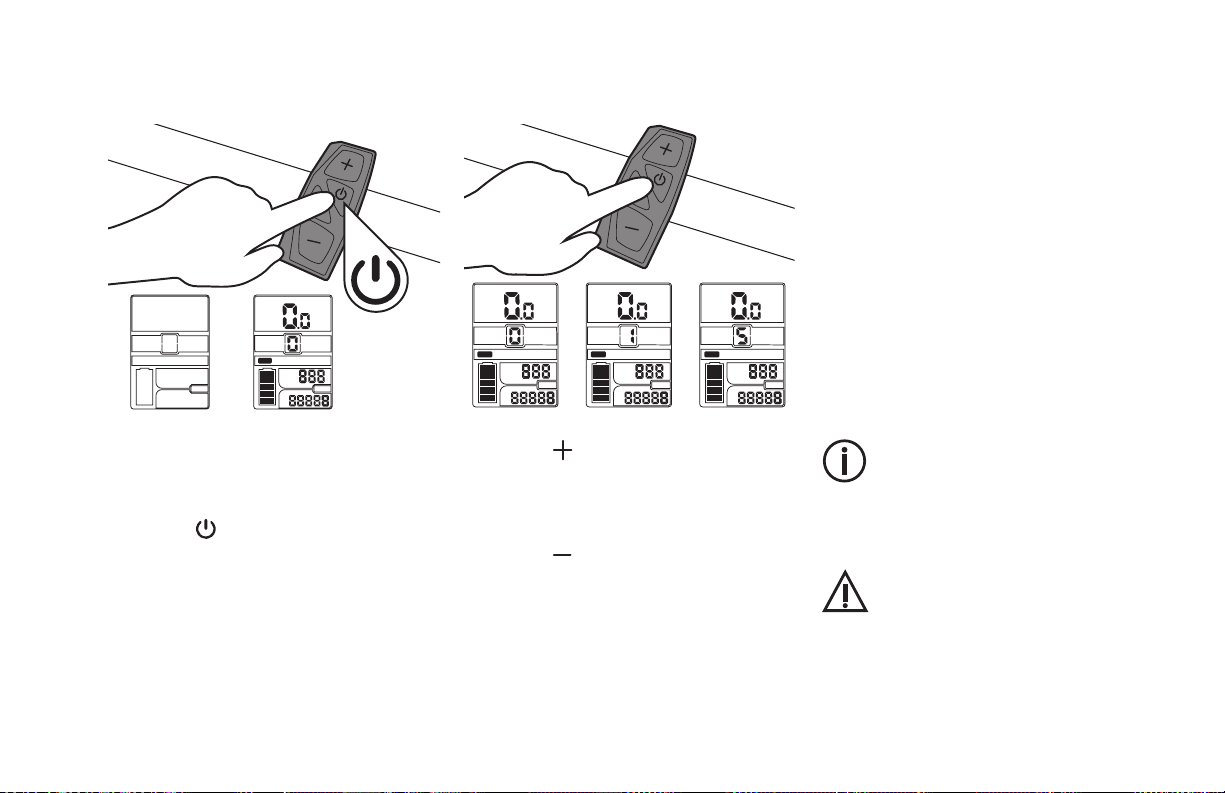
Step 3: Turn the system ON
SET
Step 4: Choose an assistance level
KM/H
MODE
POWER
TRIP
KM
ODO
1. Get seated and put at least one foot
on the ground.
2. Press the Power button on the
controller until the LCD Panel lights up.
KM/H
MODE
POWER
TRIP
KM
ODO
KM/H
MODE
MODE
POWER
TRIP
KM
ODO
TRIP
ODO
1. Press the button on the controller to
switch to a higher power assistance level
(0 to 5).
2. Press the button on the controller to
switch to a lower power assistance level.
KM/H
POWER
KM
Level 1 provides the least power
assistance, while level 5 provides the
most. Level 0 provides no power
assistance.
Be careful if you choose to start o
with a high level of power
assistance as the rst pedal
strokemay result in a surprisingly
powerful acceleration.
Trivel.com | 33
Page 34
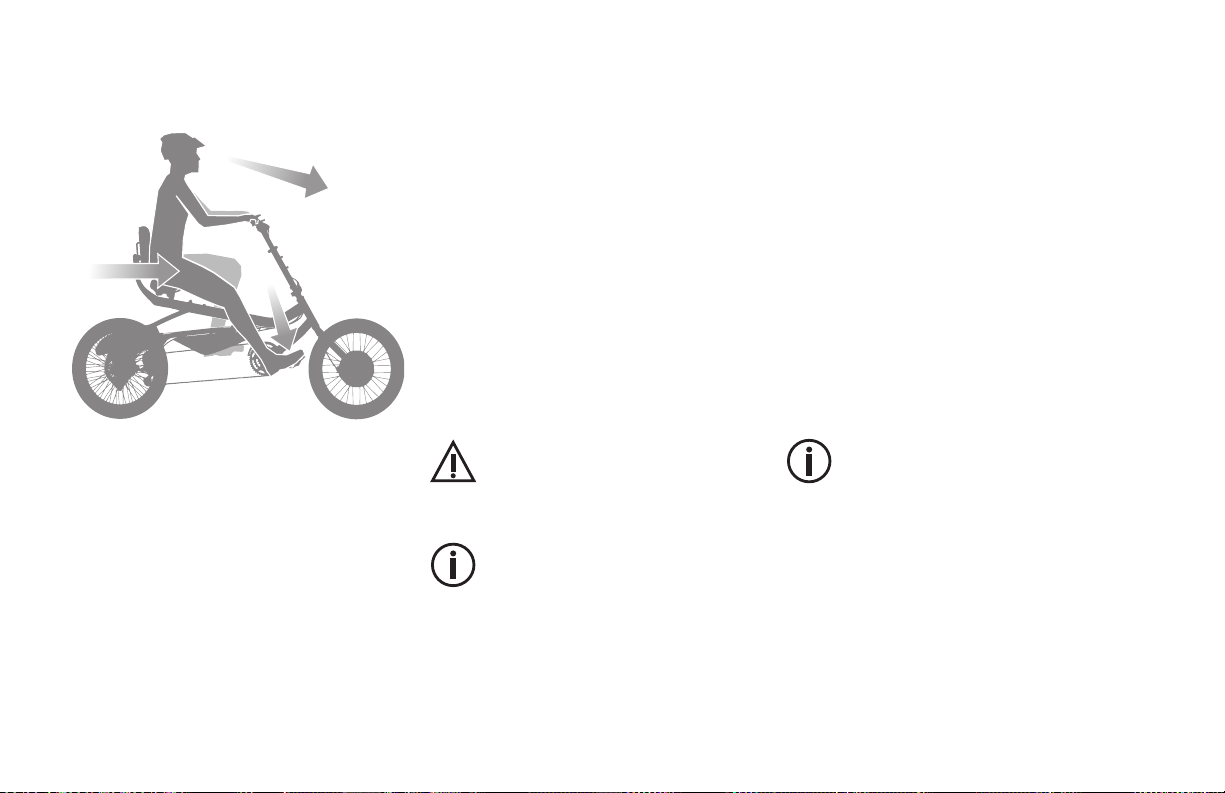
Step 5: Start off!
1. Make sure the way is clear in front of you.
2. Hold on firmly to the handlebar and push
on the pedals. The power assistance will
kick in quickly.
34 | Trivel.com
Make sure the battery is securely
locked on the frame before getting
started!
Every time the power assistance
system is turned OFF, the assistance
mode and level will reset and return
to 0 once the system is turned ON
again.
Check your battery charge level
before going for a ride! Don’t run
out of power far away from home!
Page 35
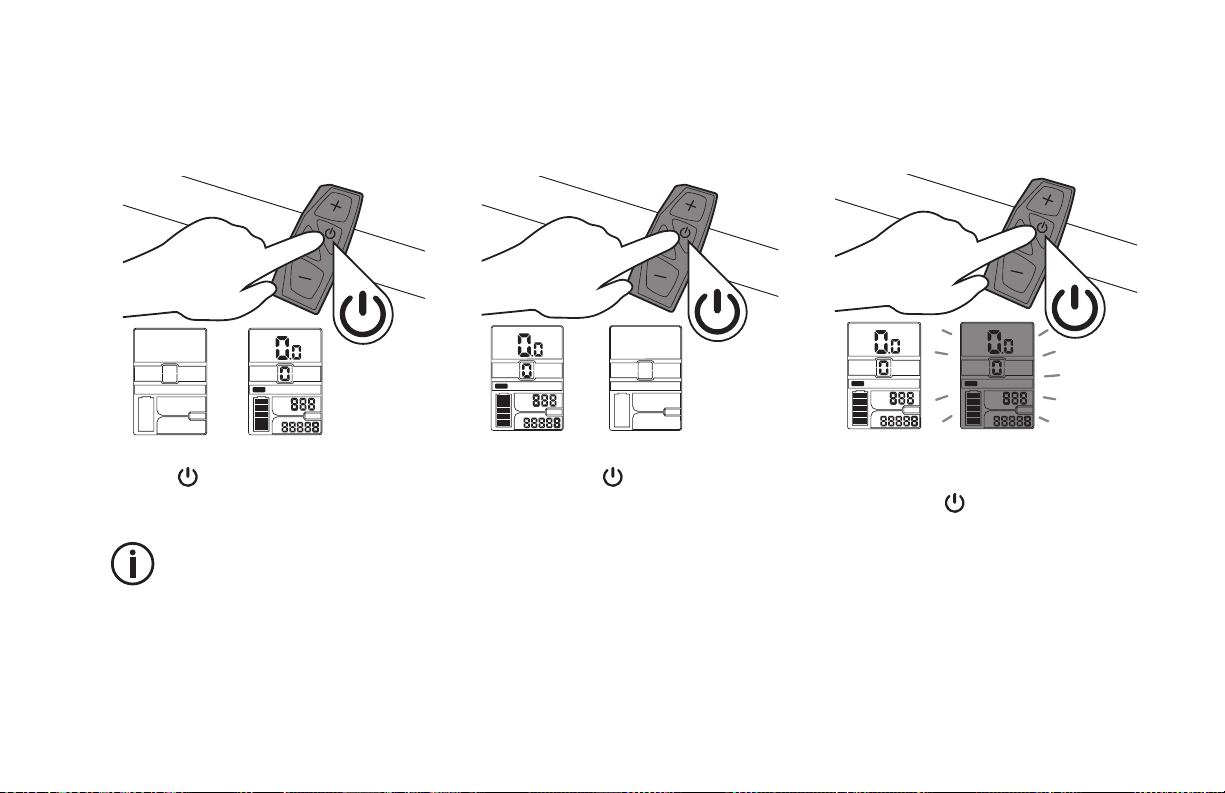
USING THE LCD PANEL FUNCTIONS
Turning the LCD Panel ON
KM/H
MODE
POWER
TRIP
KM
ODO
Press the Power button on the controller
to turn the LCD Panel ON.
x1
The LCD Panel with shut down
automatically after 5 minutes
without operation or input in order
to save battery capacity.
Turning the LCD Panel OFF
KM/H
MODE
POWER
TRIP
KM
ODO
Press and hold the Power button on the
controller for 3 seconds to turn the LCD
PanelON.
(3 sec)
Activate the backlight
KM/H
MODE
POWER
TRIP
KM
ODO
Once the LCD Panel has been turned ON,
shortly press the Power button on the
controller to turn backlight ON.
KM/H
MODE
POWER
TRIP
KM
ODO
x1
Trivel.com | 35
Page 36
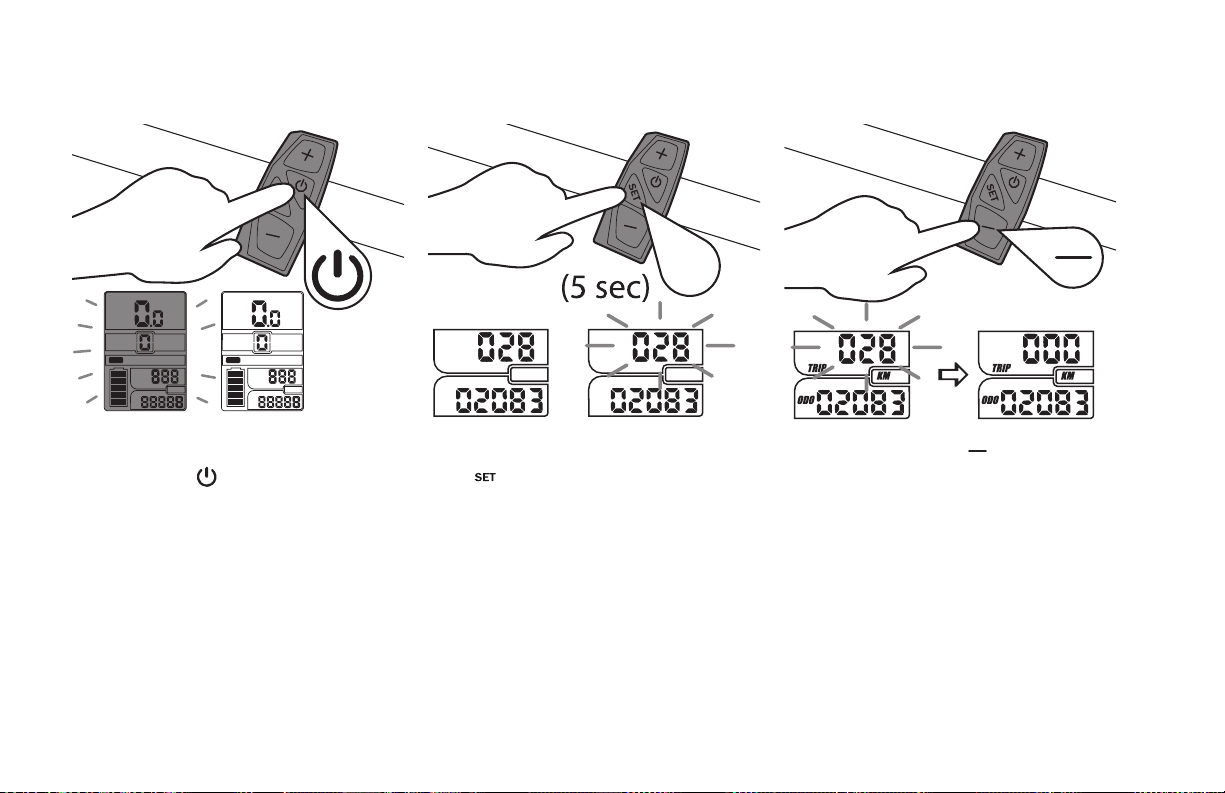
Deactivating the backlight
x1
SET
To clear the Trip Distance value
SET
KM/H
MODE
POWER
TRIP
KM
ODO
KM/H
MODE
POWER
TRIP
KM
ODO
Once the backlight has been turned ON,
shortly press the Power button on the
controller to turn it OFF.
36 | Trivel.com
ODO
TRIP
KM
ODO
TRIP
KM
1. While the LCD Panel is ON, press and hold
the Set button on the controller for 5
seconds until the Trip Distance value
flashes.
2. Then shortly press the button to reset
the value to zero.
Page 37
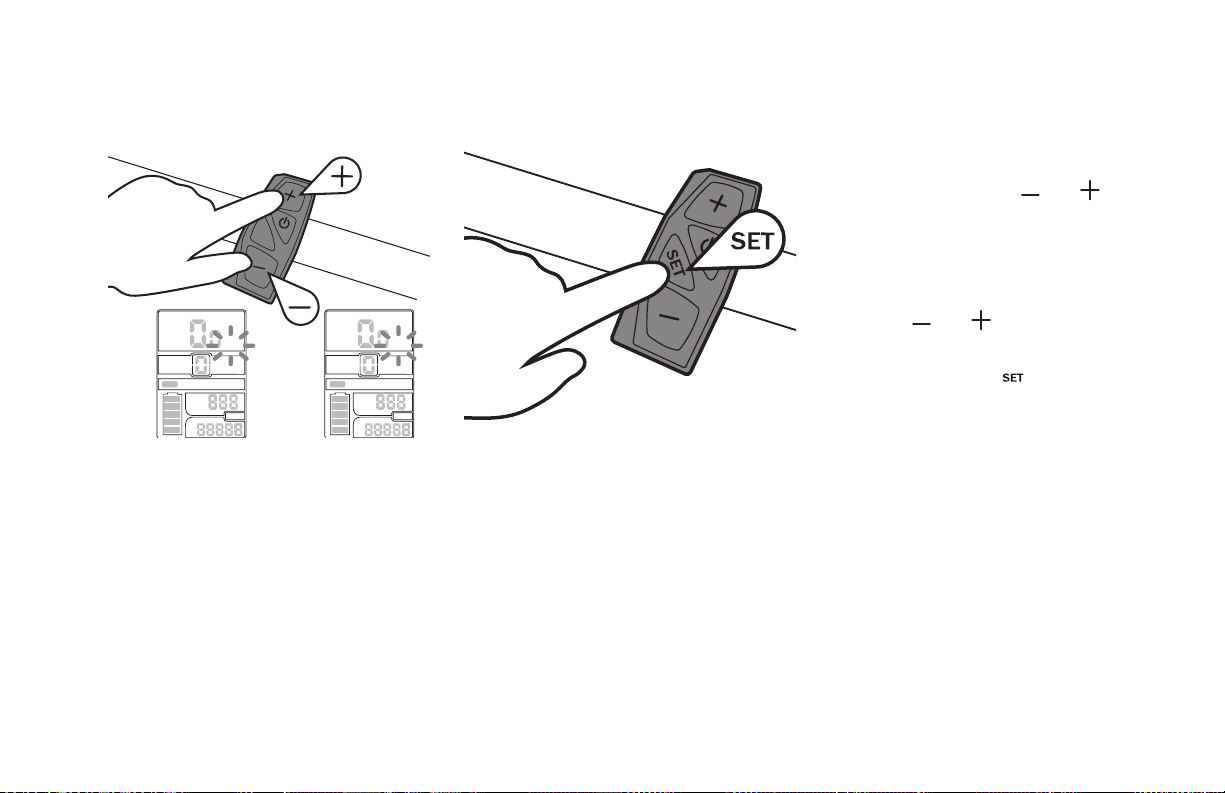
To change the speed and
distance unit
SET
KM/H
POWER
MODE
TRIP
ODO
(5 sec)
MODE
POWER
TRIP
ODO
1. While the LCD Panel is ON, press and hold
simultaneously both the and
buttons on the controller for 5seconds
until the Unit value flashes.
2. Switch to the desired Unit (Km/h or Mph)
MPH
using the and buttons
3. Then shortly press the button to save
the new Unit to be displayed.
Trivel.com | 37
Page 38
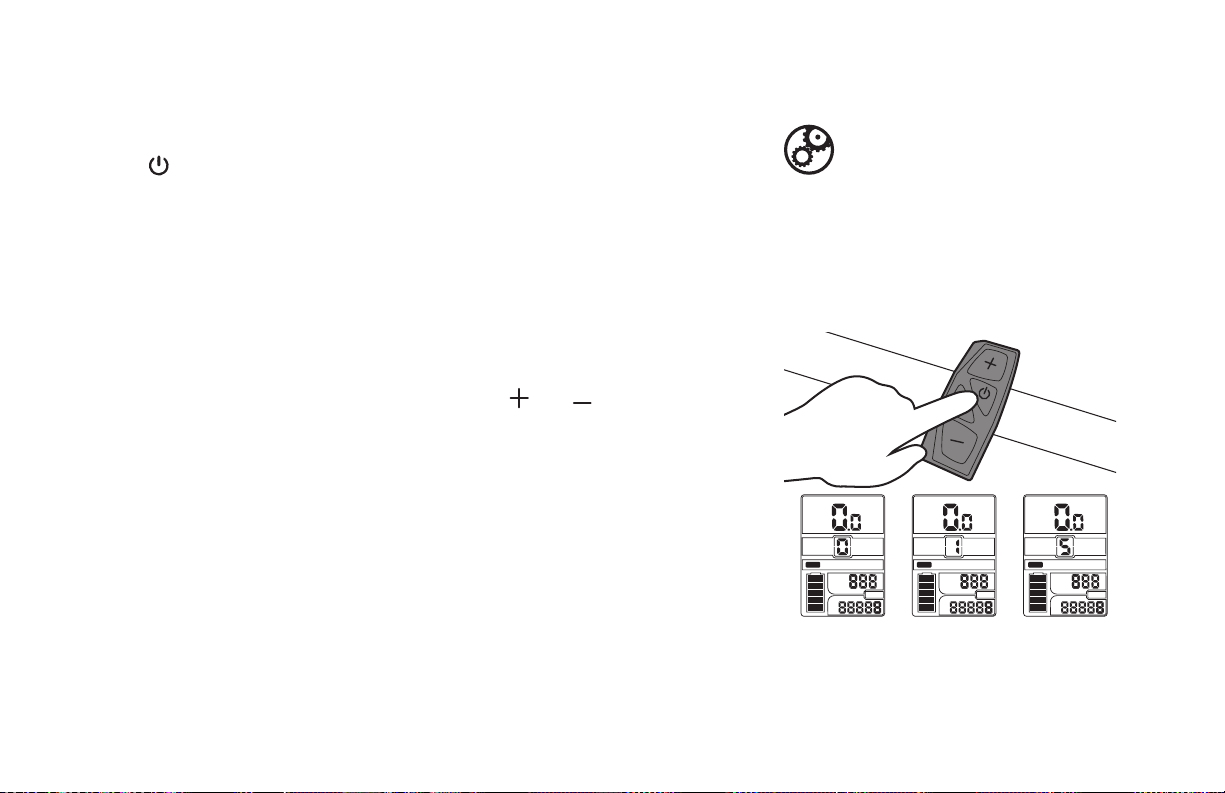
TURNING THE POWER ASSIST SYSTEM ON
CHOOSING AN ASSISTANCE MODE
To activate the power assistance system,
press the
power button on the
controller. The LCD panel will light on and
show Assistance mode 0.
The LCD Panel unit shows which mode
you’re in. Use a power assistance
level according to the current riding
conditions. Use a higher assistance level
when going uphill or against a head
wind and switch to a lower assistance
level if you are riding on a flat road or
with a tail wind to save your battery.
Switch through power assist modes
using the
and buttons on the
controller.
Assistance mode: Use this mode
whenever you wish to benet from
electrical assistance, which makes
pedalling easier. Compared to
No-pedalling mode, this mode
gives you longer range for the same
charge.
KM/H
MODE
POWER
TRIP
KM
ODO
KM/H
MODE
POWER
TRIP
KM
ODO
KM/H
MODE
POWER
TRIP
KM
ODO
38 | Trivel.com
Page 39
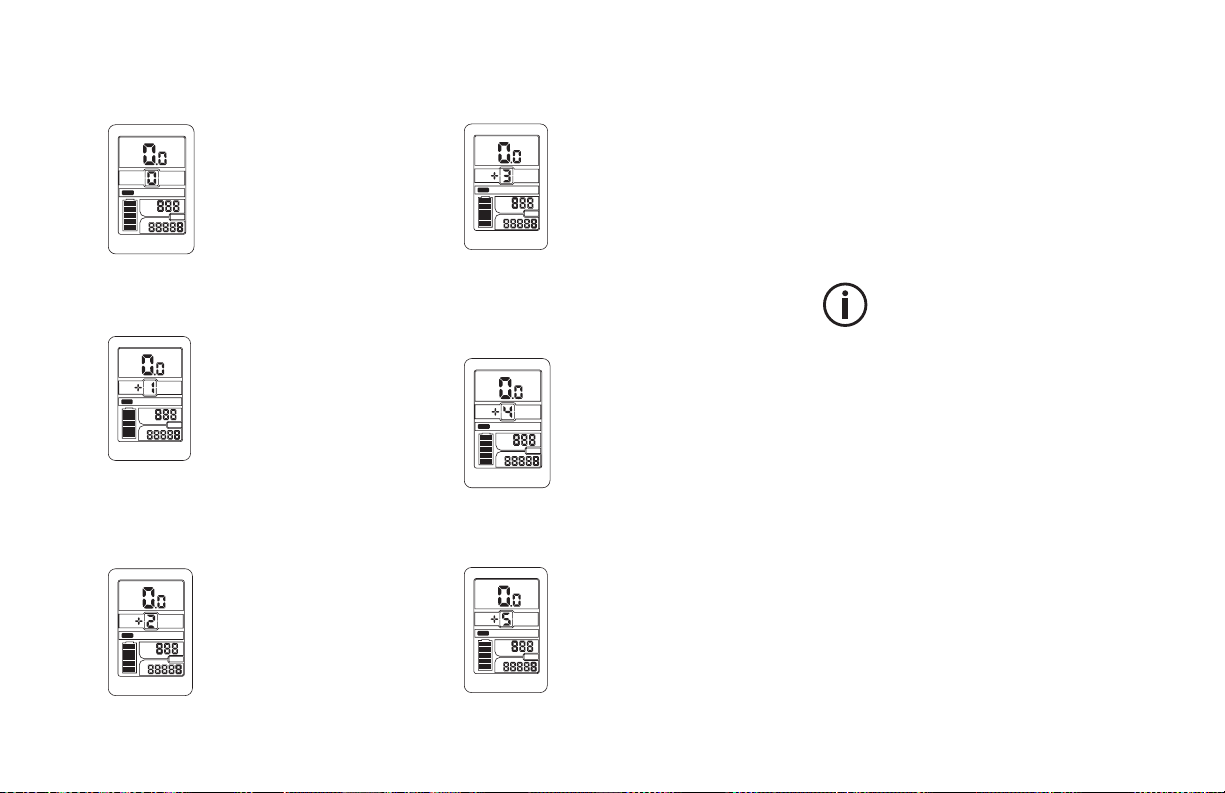
Mode 0
Mode 3
No-Pedalling mode
MODE
TRIP
ODO
Mode 1
MODE
TRIP
ODO
Mode 2
MODE
TRIP
ODO
This is the mode when you
KM/H
pedal without throttle or
POWER
any assistance, the motor
KM
will never turn ON.
When pedalling, the motor
KM/H
gives you assistance up to 10
POWER
Km/h (6 mph). This means
KM
moving forward at low speed
on a level road, for example,
will require slightly less effort.
When pedalling, the motor
KM/H
gives you assistance up to 15
POWER
Km/h (10 mph). This means less
KM
effort for you if you are travelling
at low speed on a level road
with a slight headwind.
MODE
TRIP
ODO
Mode 4
MODE
TRIP
ODO
Mode 5
MODE
TRIP
ODO
When pedalling, the motor
KM/H
gives you assistance up to
POWER
20 Km/h (12 mph). This
KM
means you will not have to
exert yourself as much to go
up a slight hill.
When pedalling, the motor
KM/H
gives you assistance up to
POWER
25 Km/h (15 mph). This will
KM
help you go up a goodsized hill.
When pedalling, the motor
KM/H
gives you assistance up to 30
POWER
Km/h (19 mph). This means
KM
you will find it easier to go up
steep hills or move forward
against strong headwinds.
From a stop or while in motion, simply
turn the Throttle Handle(on the right) to
move forward. To reach the top of some
of the hills, it may be possible to have to
pedal as well.
The No-Pedalling mode might not
be available in some area,
depending on the local regulations!
The range will be reduced depending
on the type of roadway, the number of
slopes and the degrees of inclination, the
direction and the force of wind, the tire
pressure and the weight of the user.
Trivel.com | 39
Page 40

Manual mode without pedalassistance or throttle
When you select the 0 mode from
the LCD Panel, the Assistance and the
Throttle will not be active, but you will
have access to the Panel information,
speed, distance, etc.
To turn the electrical power OFF entirely,
simply press the -/O on the right side of
the battery.
Cruise control: This mode allows
you to maintain a steady desired
speed without pedalling.
KM/H
MODE
POWER
TRIP
KM
ODO
To activate Cruise control mode:
Turn the Throttle Handle (on right
handlebar) until the desired speed is
attained, maintain this speed for a few
seconds then press
button until you
see a "C" on the LCD panel then you can
release the button the Cruise control is
activate. You can now release the Throttle
Handle and the speed will be maintained.
To deactivate the Cruise Control, simply
press one of the brake levers.
40 | Trivel.com
Page 41

OPERATING RANGE AND BATTERY USAGE
OPTIMISATION
Operating range
Battery usage optimisation
There are a few things that can help you
make the most of a battery charge:
The estimated operating range* of your
electrically assisted Trivel is as below:
1. Under No Pedalling Mode: 15 to 40 km
2. Under Level 2 Pedal Assist Mode: 50 to 90 km
* Unfortunately, it is impossible to provide
a perfectly precise operating range value
for a battery charge as there are numerous
unforeseeable factors involved in every
type of terrain, rider behavior, equipment
adjustment, battery condition and weather
hazards. These estimated distances were
calculated under ideal conditions. As for an
85 kg or 187 lbs. person riding on paved and
level roads, without headwinds, and with
tires inated to manufacturer’s specications
(see recommended pressure on side of tire),
and riding at a steady speed of 20 km/h.
The distance you can ride with a
single battery charge varies greatly
depending on several factors.
Selected power assistance mode,
road incline, wind strength, and air
temperature amongst other factors,
aect the battery autonomy.
Irregular ground types also
inuence your operating range. Per
example, a loose ground surface
such as a gravel road increase the
tires rolling resistance and therefore
require more power, thus quickly
reducing battery power.
1. Use the power assistance mode you need for
each condition during your ride (you may not
need maximum assistance while riding on flat
ground or with a tail wind).
2. Down shift to a lower gear before coming
to a complete stop, then you can start off
again on an easy gear combination and shift
up progressively as you gain speed. This will
make it much easier for the motor to assist
your acceleration and help preserve your
transmission components as well.
3. Keep your tires inflated at the recommended
pressure (this will significantly reduce the
rolling resistance of your tires and require less
power from the battery).
4. Only bring the necessary equipment to keep
your overall weight as low as possible.
Trivel.com | 41
Page 42
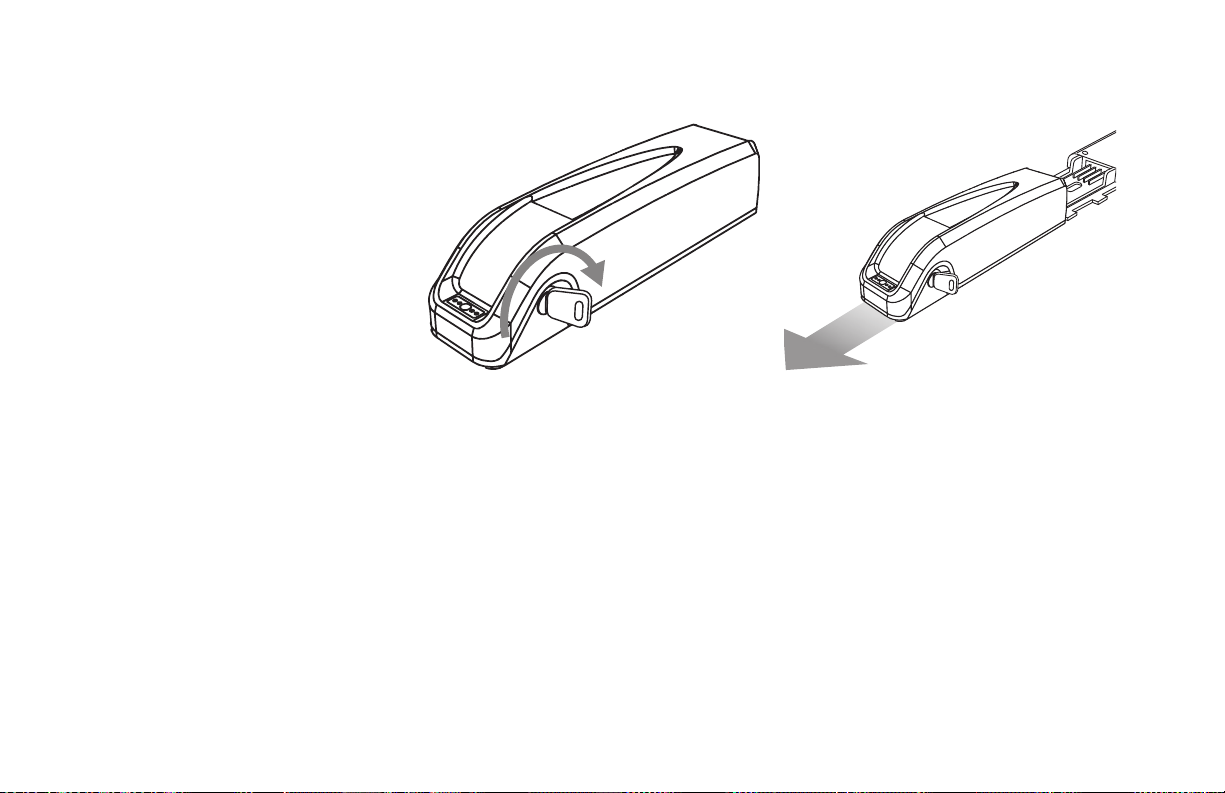
REMOVING OR INSERTING THE BATTERY
It is recommended to remove the battery
from the frame for charging or for storing
it for a long period.
To remove the battery:
42 | Trivel.com
1. Insert the key into the key lock of the
battery.
2. Turn the key for half a turn, counter
clockwise(to the left) to unlock the battery.
3. Firmly and carefully pull the battery along
the battery holder bracket towards the
back.
Page 43
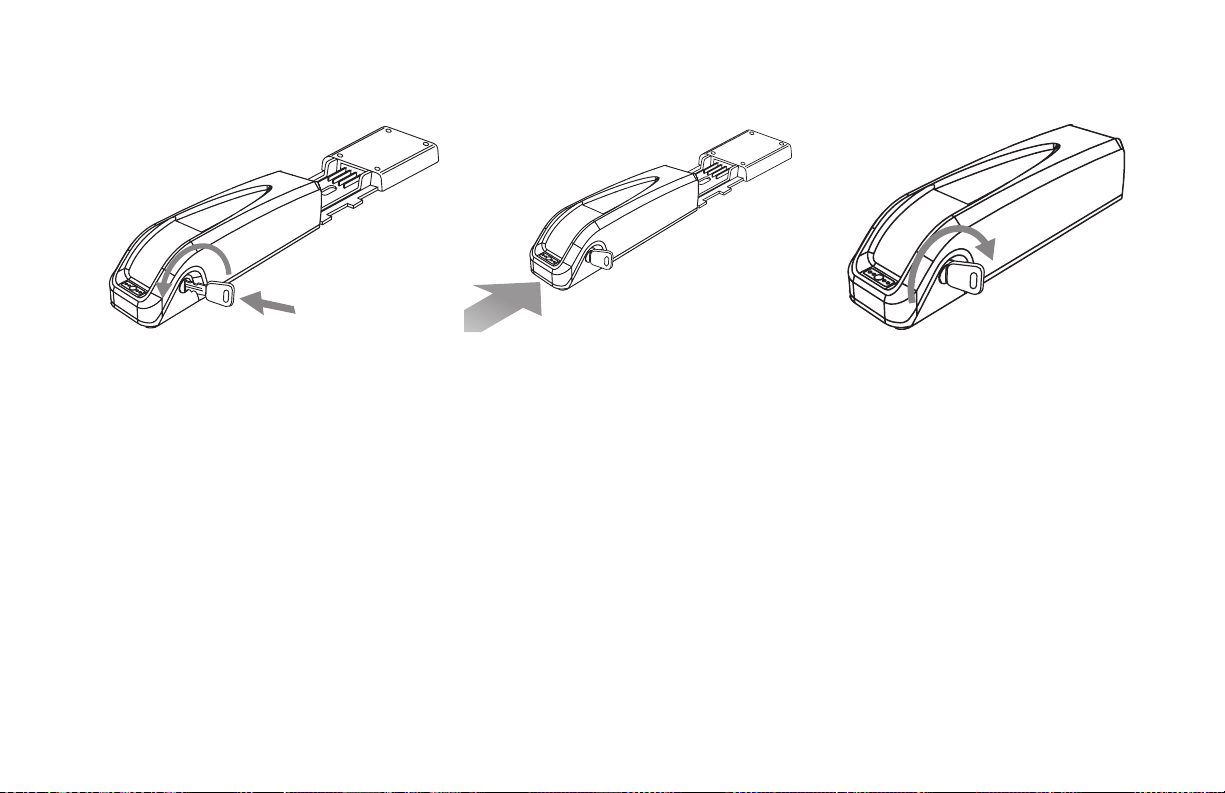
To Insert the battery:
1. Insert the key into the key lock of the
battery.
2. Turn the key for half a turn, counter
clockwise (to the left) to unlock the battery.
3. Check the battery holder bracket to ensure
there isn’t any water or dirt accumulation
on the connectors.
4. Carefully align and push firmly on the
battery along the battery holder bracket
towards its stopper.
5. Turn the key for half a turn, clockwise (to
the right) to lock the battery in position.
Trivel.com | 43
Page 44

CHARGING THE BATTERY OF YOUR ELECTRIC
POWER ASSIST SYSTEM
When should the battery be charged?
It is recommended to charge the battery
as needed. For instance, if you only use
your electric vehicle during brief periods
of time and for short rides, the battery
may be recharged following several such
rides.
If, on the other hand, you are planning
a long ride of 40 km/25 miles or more,
it is recommended to fully charge your
battery before leaving.
Generally speaking, if the battery charge
indicator on the handlebar or on the
battery indicates there is less than a 50 %
charge remaining, charging of the battery
is recommended.
You may charge your battery at any time,
as this type of battery does not have any
‘memory effect’ and the charger is of the
‘smart type’; it will stop charging by itself
once the battery is fully charged.
The battery must be charged at least
every two months.
A full charge of a battery when
empty should take a maximum of
8hours to complete.
If your battery is not fully charged
after 8hours, unplug it immediately
and contact a Trivel authorized
dealer for a charger battery
malfunction diagnostic.
Never leave the battery connected
to the charger for more than 24
hours!
To charge the battery:
1. Connect the AC power plug into the
charger.
2. Plug the AC power plug into an electrical
outlet. Check that the LED indicator on the
charger lights up to confirm that power is
going through.
3. Lift the rubber protector cap and Connect
the charging plug into the socket on the
battery.
4. Check that the LED indicators on the
battery are flashing to confirm that
charging is underway.
5. Let battery charge until it is fully charged.
6. Pull the charging plug from the battery
and replace the rubber protector cap.
44 | Trivel.com
Page 45

STORING THE BATTERY
How to store the battery?
What should be done to maintain the
battery in good condition?
During the long periods when you will
not be using your Trivel such as the
winter season, store the battery inside
your house after charging it completely
for 8 hours; afterward, you must charge
your battery for one hour each month or
for two hours every two months.
Always use the lithium charger
supplied by Trivel with a Trivel
lithium battery, otherwise your
charger and your battery might be
damaged.
Do not expose it to extremes of heat
(more than 40°C / 105°F) or cold
(-10°C / 14°F) or to damp conditions
(rain, water, garage, shed, hangar or
unheated basement).
Even though your battery is of the socalled ‘no-memory’ type, it is advisable
to recondition it at regular intervals
by running it down and recharging it
completely (8 hours).
Avoid using an electrically assisted
vehicle during extreme conditions
(for your safety and for proper
functioning of the equipment).
Avoid salt, sand, calcium, water and
ice and your system will perform
much better. using your bicycle in
such conditions would void your
warranty.
Never leave the battery connected
to the charger and to electrical
power outlet for more than 24
hours. This could damage the
charger and the battery. Never
connect your battery and your
charger to an electrical outlet for an
overly long period of time (during
the whole winter for instance). This
will damage your battery and your
charger. this must absolutely be
avoided.
Trivel.com | 45
Page 46

MINIMUM BATTERY MAINTENANCE
SCHEDULE
It is essential that you look after your
battery maintenance at regular intervals.
This is particularly important during the
off season, when you are likely not using
your Trivel for long periods.
48V Lithium Battery
Your battery must maintain a minimum
voltage of 40 volts. If the voltage goes
below 30 volts, the battery could become
irrecoverably damaged and might no
longer be able to accept a full charge.
To keep the battery under proper
warranty, follow this maintenance
procedure:
If using your Trivel seasonably, following
your last long ride of the season, you
should immediately charge your battery
for eight (8) hours. Then, during the off
months, charge the battery for 2 hours
every two months.
46 | Trivel.com
Page 47

TROUBLESHOOTING
(ELECTRIC ASSISTANCE SYSTEM)
ERROR
CODE
DESCRIPTION
Error codes
When the system detects an abnormality,
the power assistance will be interrupted,
and the LCD Panel will display an error
code. Below is a list of error codes
and their relative description. It can
be used for reference in order to help
communicate with a technician.
The power assistance system will not
be functional again until the issue is
addressed and solved. Do not ride your
Trivel if an error code shows up until it is
solved.
Please communicate with a qualified
technician and book an appointment for
service when an error code shows up.
2 Current abnormality or damaged
operating system
3 Motor locked up
4 Low voltage
5 Brake sensor abnormality
6 Motor abnormality
7 Throttle abnormality
8 Error 358
9 Over voltage
10 Communication with controller
abnormality
15 Communication with LCD Panel
abnormality
Trivel.com | 47
Page 48

MAINTENANCE AND
ADJUSTMENTS
Proper and regular maintenance of your
Trivel is key for your safety and to ensure
good functionality of the mechanical
components over time. Follow these
instructions and make sure to take your
Trivel to your dealer for evaluation and
servicing at regular intervals.
Many regular maintenance operations
and adjustments can be accomplished at
home with only a few tools. If you are not
familiar with tools and bicycle mechanics
or if you are not entirely confident with
your skills, we strongly recommend that
you ask someone with the proper skills
and experience to help you. A qualified
technician at your dealer can also help
you for that task.
Note that some adjustments and repairs
are better left to a qualified technician.
These operations either require specific
tools or expertise that only an approved
Trivel dealer have and therefore, we
strongly recommend that they are only
accomplished by one. These adjustments
or repairs will be noted as such in this
chapter.
To learn more, contact your Trivel
representative.
A qualied Trivel technician must
ensure the initial adjustment of
your Trivel.
Do not tighten screws with air or
electric tools; the nal tightening
must be manual.
Do not modify the frame in any
way. Drilling and grinding can
cause severe structure damages
and will automatically cancel the
guarantee.
Do not use any locking rings other
than those designed and approved
by Trivel.
The latest version of this manual is
available on our website at
www.trivel.com
48 | Trivel.com
Page 49

TOOLS, PRODUCTS AND PROTECTIVE
GEAR NEEDED
All of these tools might not be needed
depending on your Trivel model
specications.
Some tools not listed here might also
be needed depending on your Trivel
model specications.
Tools
1. Screwdriver for Phillips head bolts
(small and medium sizes)
2. Metric Allen keys (sizes 2 mm to 8 mm)
3. Metric wrench keys (sizes 8 mm to 17 mm)
4. Torque wrench (low torque range)
Protective gear
1. Protective vinyl gloves
2. Protective googles
3. Mechanics apron
4. Clean rags
Trivel components and accessories use
metric size standard hardware. Do not
attempt to perform mechanical work
with other sizes of tools or hardware,
you may damage bolts and
components.
Maintenance of your Trivel requires to
handle some chemical products that
can be hazardous to your health.
Make sure to follow the products safety
recommendations and wear adequate
protective gear when doing some
mechanical work and maintenance.
5. Air pump with pressure gauge
Lubricants and cleaning products
1. Bio chain lubricant (wet or dry grade)
2. Bio degreaser spray for metal parts
3. Lubricant spray for metal parts
4. PTFE lubricant
5. Isopropyl alcohol spray
Trivel.com | 49
Page 50
PREVENTIVE MAINTENANCE
TIRE PRESSURE ADJUSTMENT
1. Always maintain tire pressure as
recommended by manufacturer. You’ll find
this information on the tire’s sidewall.
2. Ensure gearing systems are well lubricated
3. Make sure all nuts and bolts are tightened
4. Clean tricycle after riding in calcium or salt
to prevent corrosion
5. Protect tricycle from rain and snow
6. Check brakes regularly to ensure safe
braking
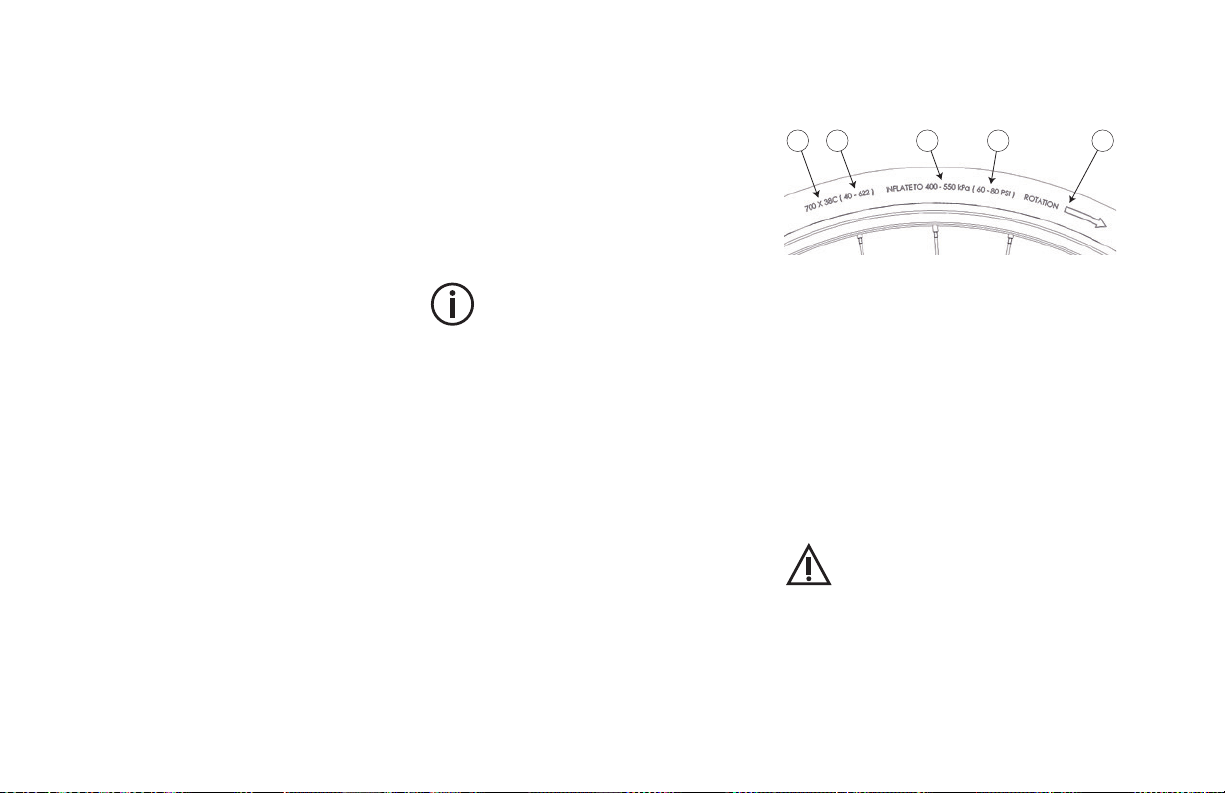
Regularly check the pressure of your tires
so that they have the correct pressure as
recommended by the manufacturer (the
recommended pressure is shown on the
side of the tire as shown below):
Riding with insucient pressure
could reduce the autonomy of the
power assist system.
A B C D E
A. Commercial tire size naming (ex: 16x1.25, 20x2.10,
24x1.95, 26x1.95, 700x38C, etc.)
B. International standard ETRTO tire size naming (tire
and rim width per diameter interface, in millimeters)
C. Manufacturer’s recommended tire pressure range
(kPa unit)
D. Manufacturer’s recommended tire pressure range
(PSIv unit)
E. Tire’s intended rotation direction
Riding with an insucient pressure
can lead to a puncture of the inner
tube and / or damage to the tire
and rim.
50 | Trivel.com
Page 51
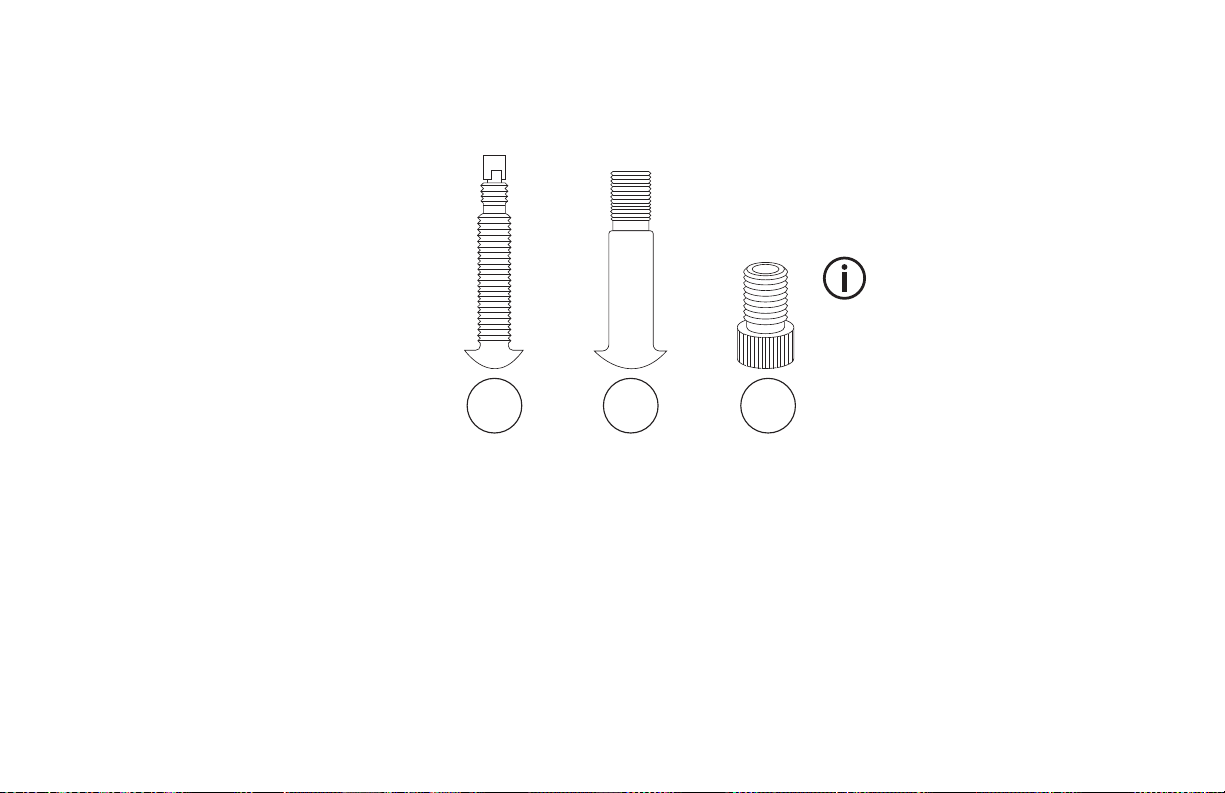
Identifying the type of valve your
Trivel is fitted with:
There are two major modern types
of valves; Presta (French) or Schrader
(American). The illustration below shows
the difference.
A
A. Presta valve (also known as French type)
B. Schrader valve (also known as
American type)
C. An adaptor can be used to transform a Presta valve
into Schrader valve.
B
C
Most bicycle pumps can be used
with both types of valves, whether it
is through a dual-type pump head
or by reorienting the pump’s head
rubber joint. Ask a qualied
technician if unsure how to use a
pump.
Trivel.com | 51
Page 52

CHANGING A PUNCTURED INNER TUBE
You might eventually experience a
sudden or slow loss of air pressure from
a wheel. It may come from rolling over
sharp objects such as broken glass,
thorns, etc. or hitting an obstacle with
insufficient air pressure. In both cases, the
inner tube has been punctured and will
need to be fixed or replaced.
It is normal for a wheel to lose air
pressure after some time. You may
notice after a long period of storage
that the tires are almost completely
at. That doesn’t mean you need to
change the inner tube. Re-inate
your tire to the recommended tire
pressure from time to time to avoid
puncture.
We strongly recommend replacing
a punctured inner tube by a new
one instead of attempting to patch
repair an old tube. The reason is
that a tube repair is often weak,
and air can often leak from a
repaired tube. A new tube is a time
saving, rather cheap and safe
solution. Don’t worry, your old tube
will get recycled if you leave it at a
bike shop. Alternatively, it is also
possible to use it as an attachment
strap.
For a front wheel at or tire
replacement on a model equipped
with an electrical power assistance
system, the front wheel will have to
be removed with the motor. Only a
Trivel-trained person is qualied to
perform this work without causing
damages. It is thus strongly
recommended that the owner
contact an authorized Trivel
representative to have the work
performed. Should this not be done,
the owner shall not hold the
company liable for any damages
caused by an improper procedure
by a person who is unqualied and
not authorized by Trivel.
52 | Trivel.com
Page 53

What material will you need?
Follow this procedure to get back on track:
1. A puncture repair kit or a compatible
new inner tube (make sure to purchase a
compatible tube by giving all the relevant
information regarding the size of the
tire and type of valve at the moment of
purchase).
2. A set of tire levers (bike tire specific model
in plastic material is recommended, do
not use metallic motocross tire levers or
a screwdriver as it will likely damage the
tube and / or rim).
3. An air pump designed for bicycle use with
a pressure gauge.
1. (Front wheel): Remove the wheel from the
fork.(Rear wheels): Lift the rear end of the
Trivel and proceed without removing the
wheel from the frame.
2. Detach the tire from the rim first using tire levers
3. Remove the inner tube and locate
the puncture
4. Find the corresponding location of the
puncture outside and inside the tire
5. Check for any sharp objects remaining
stuck in the tire (if any, remove it or replace
tire if its too damaged)
6. Fix the punctured inner tube with a
puncture repair kit or get a new one
7. Pre-inflate the new or repaired inner
tube to a low pressure just enough so it
stays round
8. Insert the inner tube inside the tire
9. Put the tire back on the rim making sure
the tire thread is facing forward
10. Inflate tire to recommended pressure
while checking for an even position of the
tire on the rim
11. (Front wheel): Replace the wheel inside the fork
Trivel.com | 53
Page 54
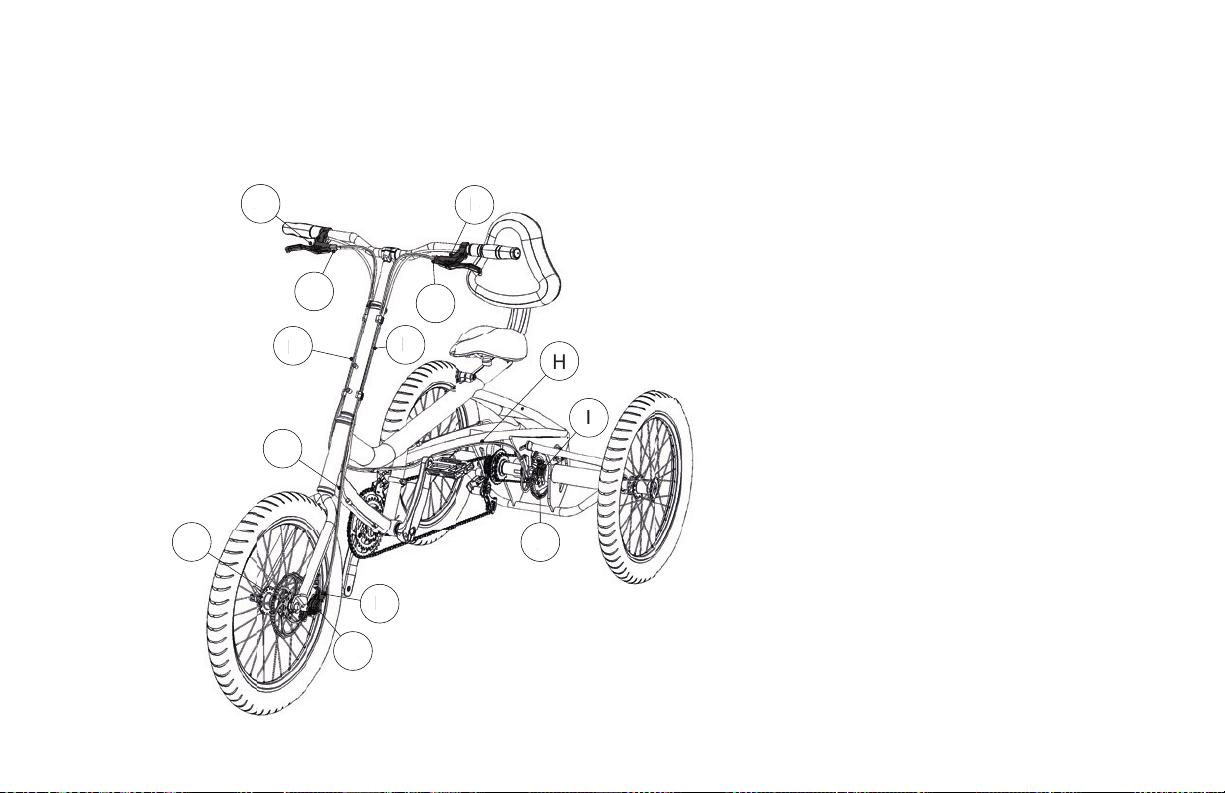
BRAKE ADJUSTMENTS
J
A view of a typical braking system (cable actuated disc brake system shown)
54 | Trivel.com
M
A
C
E
F
G
K
L
B
D
H
I
J
A. Rear brake lever*
B. Front brake lever*
C. Rear brake lever adjuster barrel
D. Front brake lever adjuster barrel
E. Rear brake cable
F. Front brake cable
G. Front brake cable housing
H. Rear brake cable housing
I. Rear brake caliper
J. Rear brake rotor
K. Front brake adjuster barrel
L. Front brake caliber
M. Front brake rotor
* Front and rear brake side position may be
dierent in some countries (i.e.: Australia,
New Zealand, UK, Japan, etc.)
Page 55
C
D
A
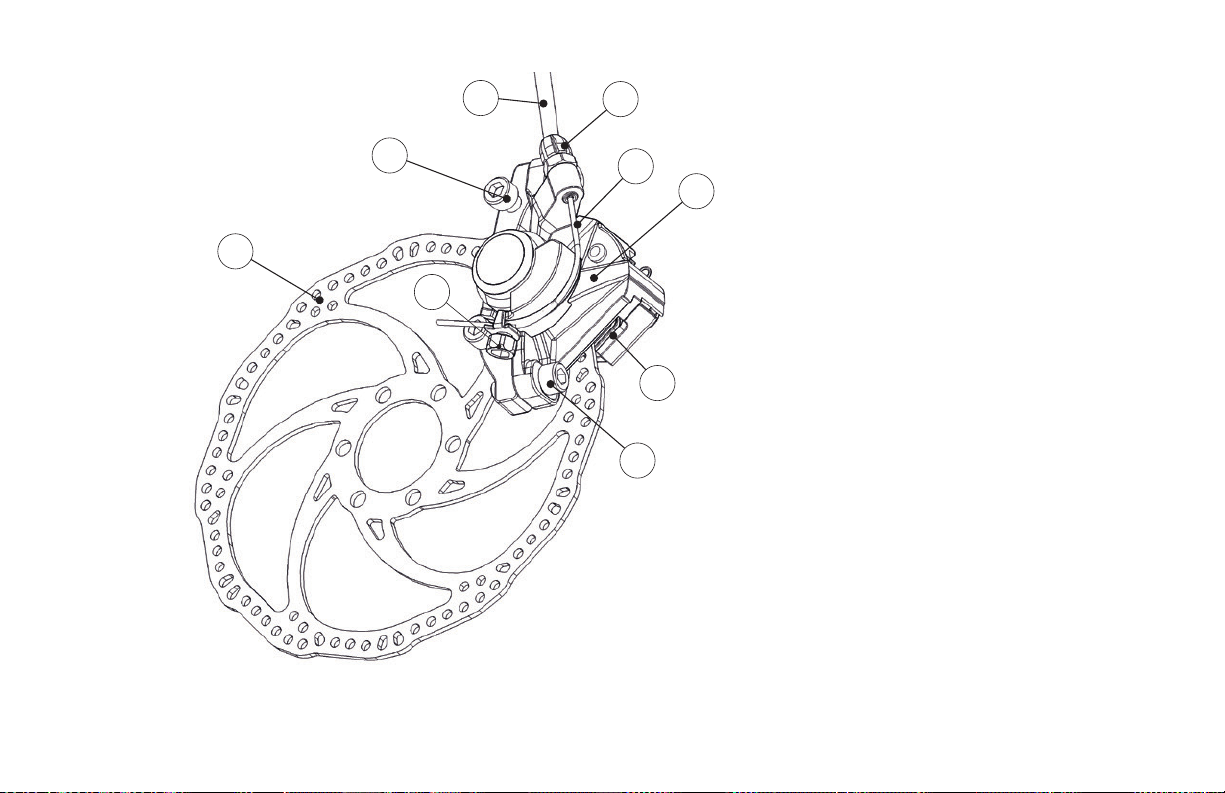
Components of a Disc Brake
B
F
G
E
A. Rotor
B. Caliper attachment bolts
H
I
C. Cable housing
D. Cable tension adjustment barrel
E. Cable pinching bolt
F. Cable
G. Caliper body
H. Brake pads
I. Caliper centering bolts
Trivel.com | 55
Page 56
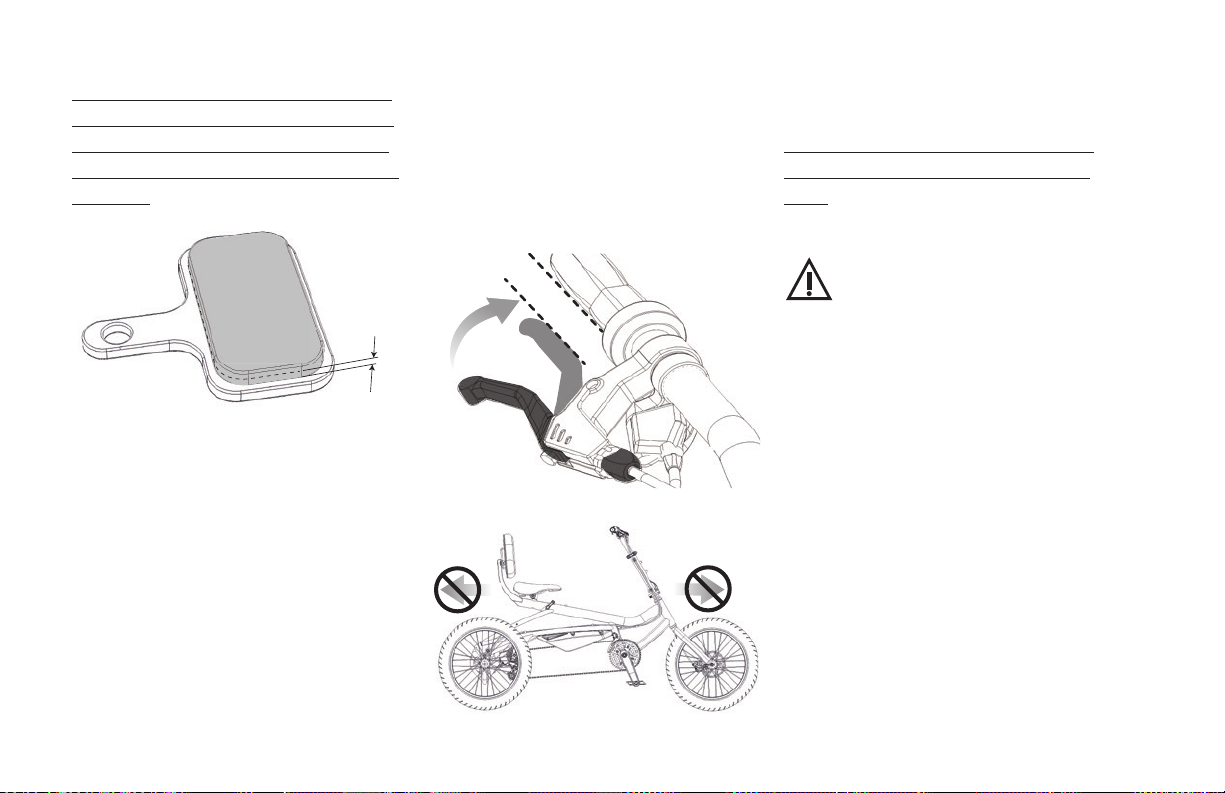
The brake pads should be replaced by a
qualified technician when their material
thickness have reached 1 mm or below
or if they have been contaminated by oil
or grease!
The brakes on your Trivel have been
minutely adjusted by a qualified
technician before being handed to you at
the time of purchase.
It is normal, however, for brakes to wear
off with time and their power will fade
out as the brake pads material diminish.
For this reason, and for your safety, it is
necessary to check your brakes before
each ride and adjust them if needed.
Check the brakes function:
Firmly pull the brakes levers. There should
be a gap of at least 1 cm between the
grip and the lever and the vehicle should
not move when pushed back or forth.
If these conditions are not met, do not
use your Trivel before having fixed the
issue! Begin with a basic cable tension
and brake pads position adjustment.
Do not attempt to adjust the brakes
by yourself if you don’t fully
understand this section or if you are
not condent in your mechanical
skills. We strongly recommend that
you only have your brakes adjusted
by a qualied technician. Poorly
adjusted brakes can lead to a loss of
controland result in serious injuries.
56 | Trivel.com
Page 57
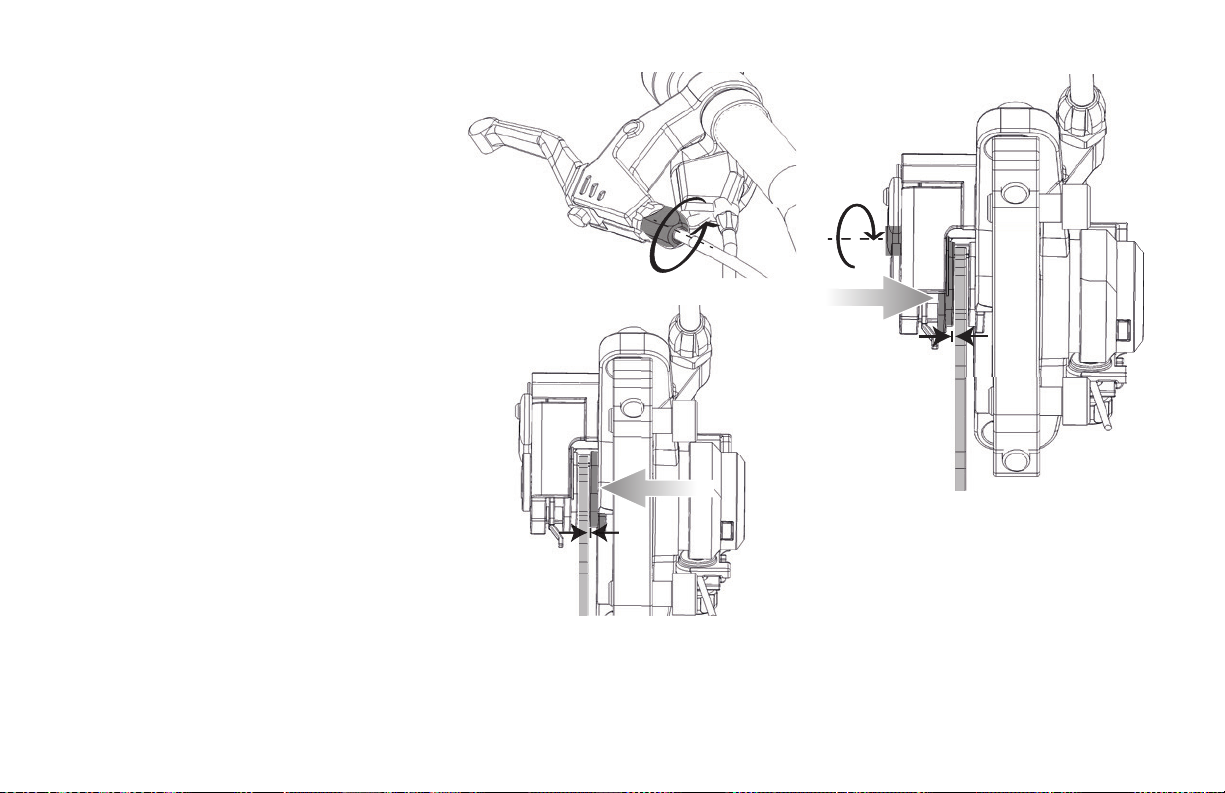
To adjust the brake pads position:
Adjust both brake pads position
(outboard and inboard) so they sit as
close as possible to the rotor without
rubbing it when the wheel is spinning.
1. Turn the adjustment barrel on the brake
lever counter clockwise to move the
outboard brake pad closer to the rotor.
2. Move the inboard brake pad closer to the
rotor by using the corresponding tool or
knob on the inboard piston clockwise
(Loosen the anti-rotation set screw if
there’s one first, and make sure to tighten it
again after the adjustment).
Trivel.com | 57
Page 58

If these adjustments did not fix the
braking power issue, do not ride your
Trivel before having it inspected by a
qualified technician!
Models equipped with hydraulic
brakes do not require this last
adjustment as the oil pressure in the
system will maintain a steady
braking power until the brake pads
have worn out and need to be
replaced. It is however possible to
adjust the brake lever reach if
needed. Refer to your brake model
manufacturer’s instructions.
Disc brakes have a burn-in period
until they reach their maximal
power. Make sure you understand
this phenomenon and expect a
change in braking power from the
moment of purchase or
replacement of brake pads and
later use.
Never touch a disc rotor that is
moving or immediately after its use.
The disc heats up signicantly when
braking and this could lead to
serious injuries.
Hydraulic disc brakes are very
powerful, and the user should be
especially careful when using them.
A small force on the brake lever
results in powerful braking so make
sure you only apply moderate,
progressive force to the brake levers.
If someone should use your Trivel, it
is recommended that you also
advise them about this
characteristic.
When hydraulic disc brakes are used
continuously (ex. going down a
long descent), the uid inside the
circuit will heat up and can cause a
phenomenon called ‘’vapour lock’’.
Heat build up signicantly reduces
braking force until the brake is
released and allowed to cool down.
Prolonged overheating can damage
the brake. If you plan to go down
long descents often, it is
recommended that you use a larger
diameter of disc helping to dissipate
heat quicker or a heavy-duty
designed disc brake model.
58 | Trivel.com
Page 59

DERAILLEURS ADJUSTMENTS
We recommend that you do not
attempt to adjust the derailleurs by
yourself if you don’t fully understand
this section or if you are not
condent in your mechanical skills.
A poorly adjusted derailleur can
damage the transmission system.
Both front and rear derailleurs on your
Trivel have been minutely adjusted by a
qualified technician before being handed
to you at the time of purchase.
After a few rides however, the cables can
stretch out a little bit and readjustment
of their tension become necessary for
optimal derailleur alignment with the
gears and shifting performance.
Adjusting a derailleur alignment with the
gears by correcting the cable tension is
somehow simple and can be achieved
without any tool.
Here’s how to check if it is necessary to
adjust front and rear derailleur alignment
and how to fine tune the cable tension.
Trivel.com | 59
Page 60
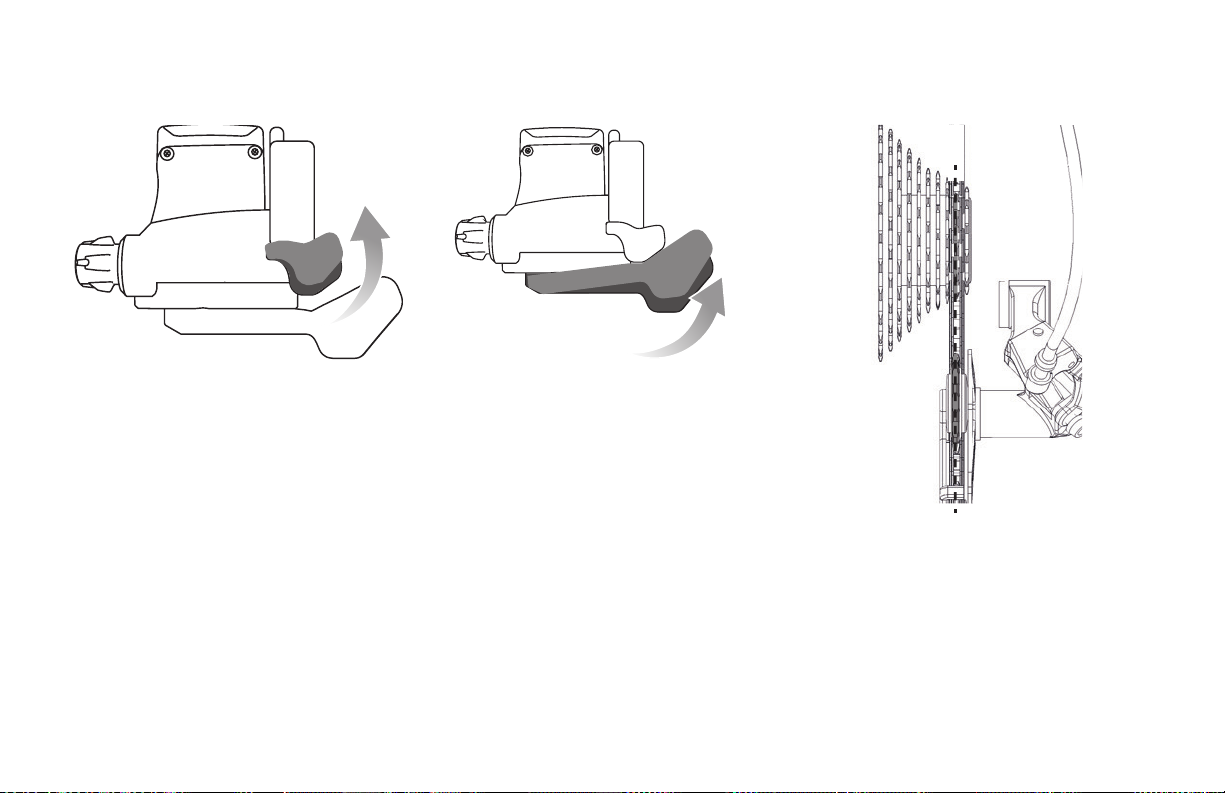
To check the rear derailleur’s alignment:
1. Use the right-hand side shifter to put the
chain on the highest rear gear (smallest
sprocket on the freewheel).
60 | Trivel.com
2. Shift down of one gear by pushing a single
click on the shifter’s thumb lever.
3. Check that the rear derailleur’s upper
pulley alignment with the second gear of
the freewheel (as shown below).
If the upper pulley is not perfectly aligned
with the corresponding gear, it can be
corrected by adjusting the cable tension.
Page 61
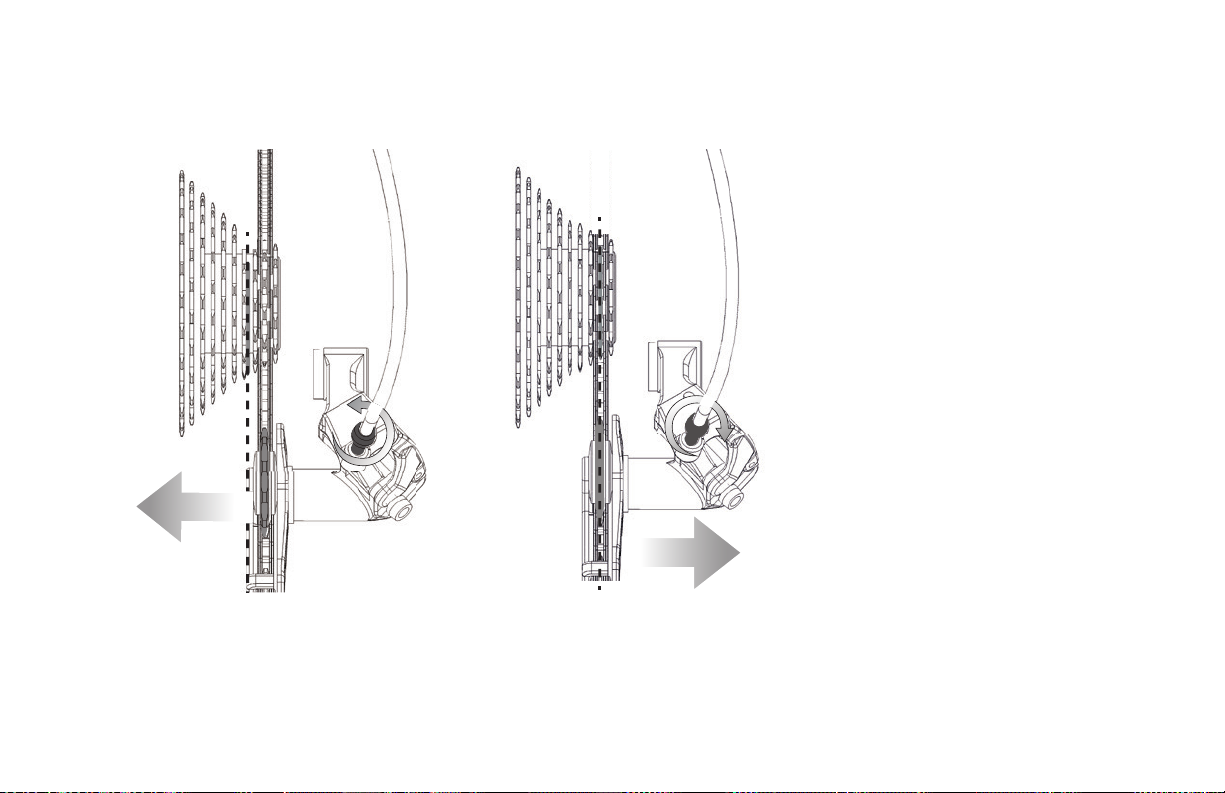
To adjust the rear derailleur’s
alignment:
1. Turn the rear derailleur’s barrel adjuster
counter-clockwise to increase cable
tension and move the derailleur pulleys to
the left.
2. Turn the barrel adjuster clockwise to
decrease cable tension and move the
derailleur pulleys to the right.
Trivel.com | 61
Page 62
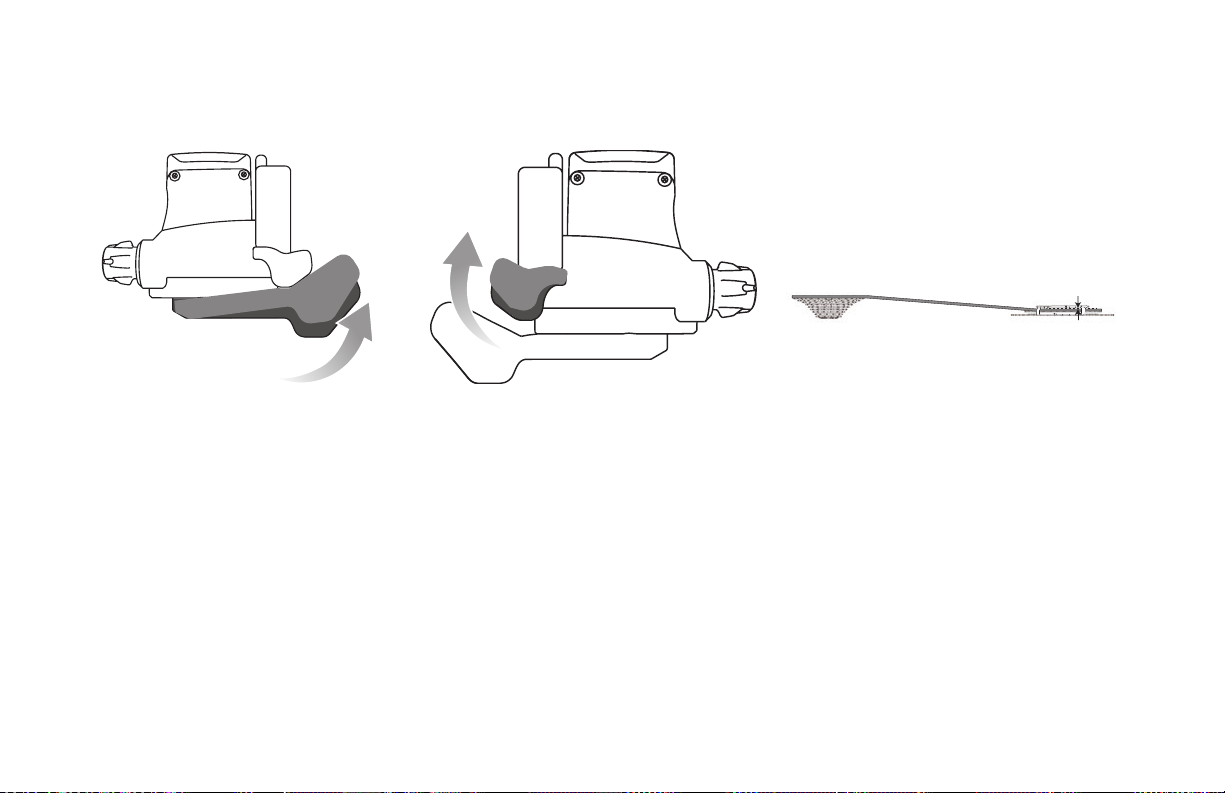
To check the front derailleur’s
alignment:
1. Use the right-hand side shifter to put the
chain on the lowest rear gear (biggest
sprocket on the freewheel).
62 | Trivel.com
2. Use the left-hand side shifter to put the
chain on the middle front gear.
3. Check that the front derailleur’s cage
inside surface is as close as possible to the
chain without touching it. Recommended
distance is 0.5 to 1 mm (as shown below)
Page 63
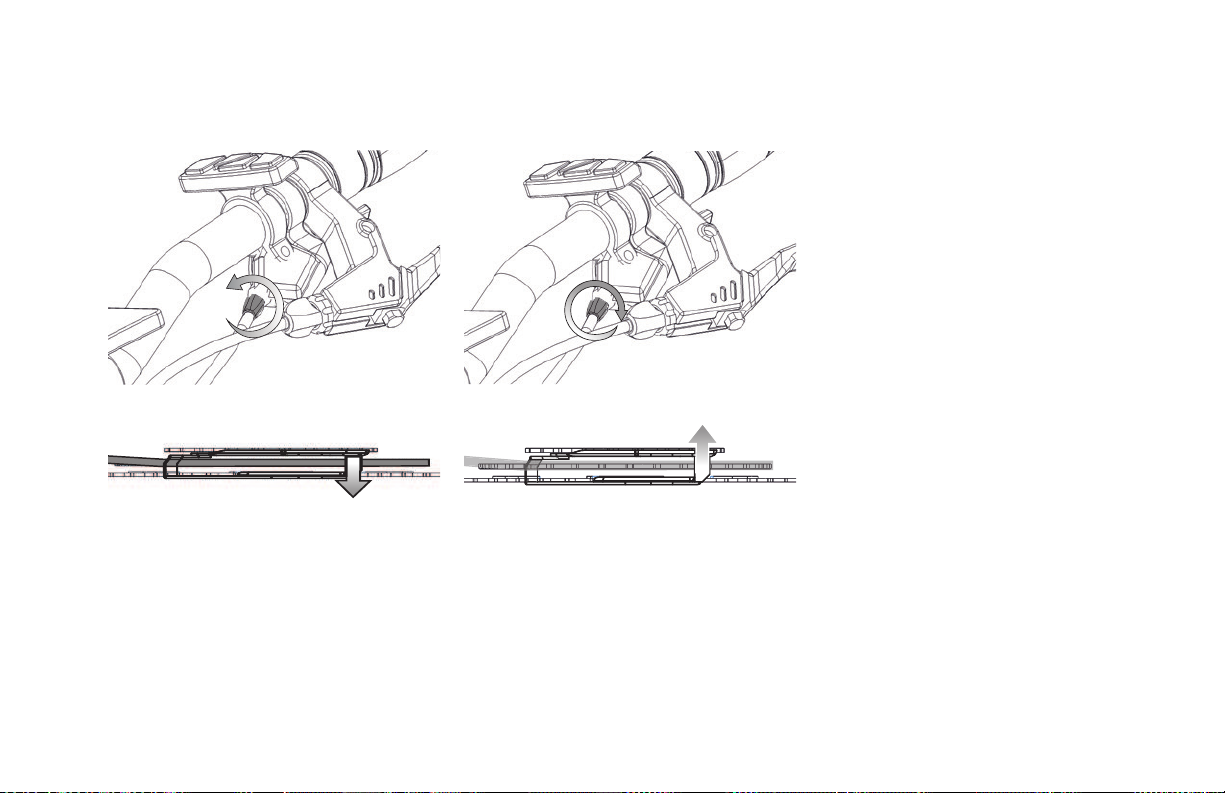
To adjust the front derailleur’s
alignment:
1. Turn the left shifter barrel adjuster
counter- clockwise to increase cable
tension and move the front derailleur cage
closer to the chain.
2. Turn the barrel adjuster clockwise to
decrease cable tension and move the
derailleur cage away from the chain
Trivel.com | 63
Page 64
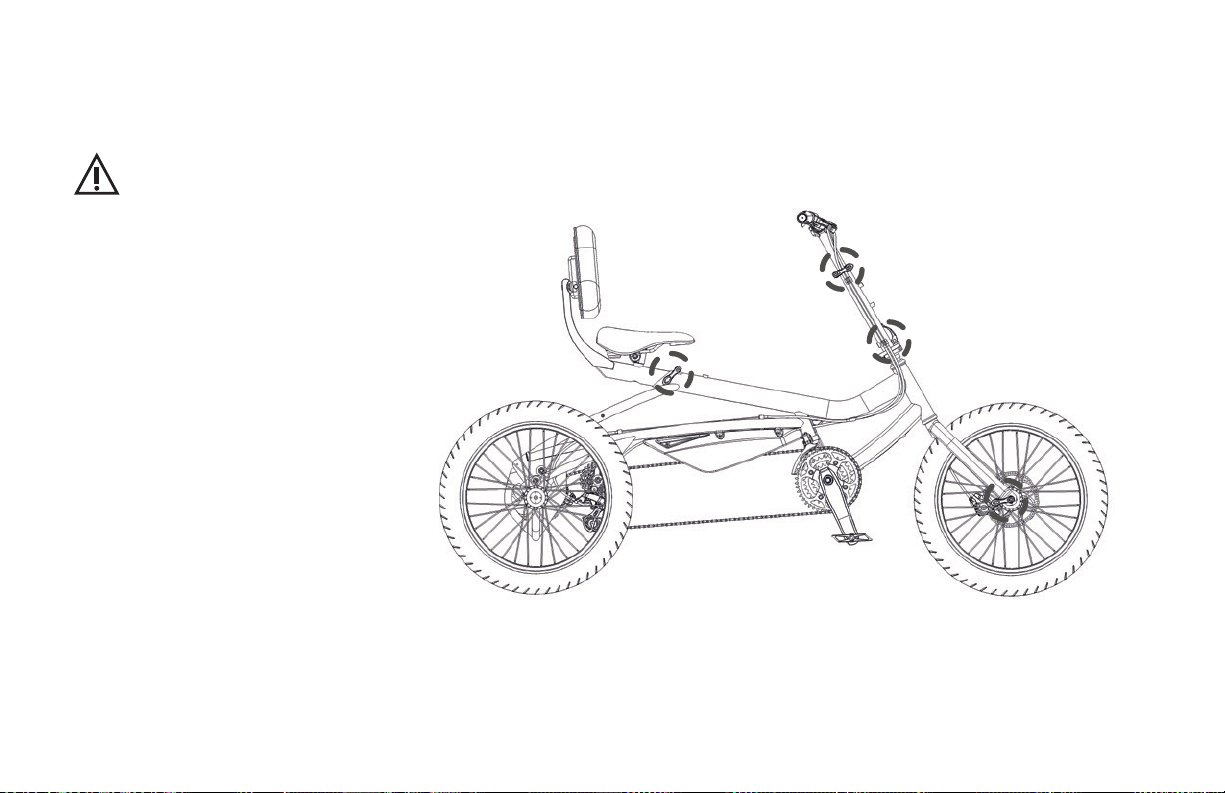
QUICK RELEASE BINDER SYSTEM
ADJUSTMENT
A quick-release attachment system is
a very safe and reliable mechanism.
However, it needs to be properly
adjusted to ensure its eciency and
your safety. Make sure you understand
its function before using it.
This type of binder is most commonly
used to attach wheels to the frame and
fork as well as to tighten adjustable
components such as the seat beam and
handlebar’s stem. They allow for quick
tool-free adjustments.
Common locations of quick-release levers mechanisms:
64 | Trivel.com
Page 65
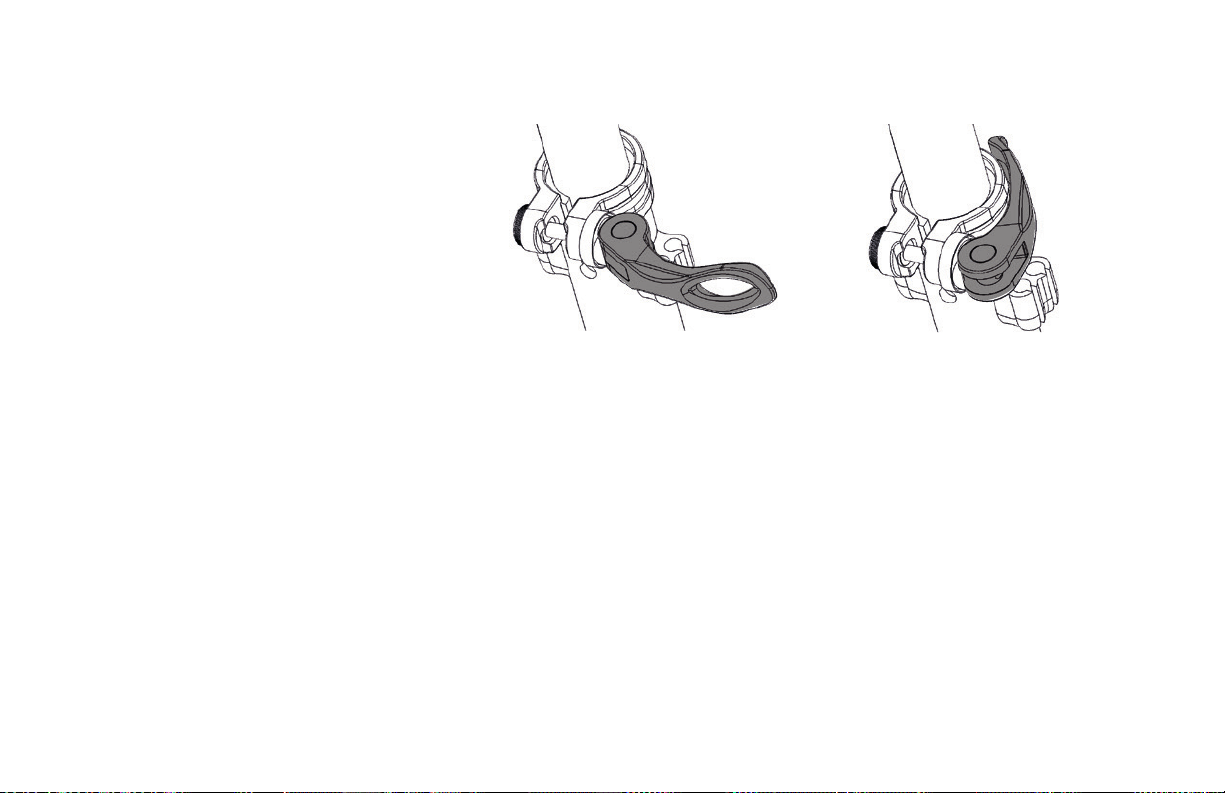
How does it work?
A quick release lever attachment system
uses what is called a ‘’ cam ’’ mechanism.
Contrarily as a ‘’ regular ’’ tightening lever,
this system is tightened by pushing the
lever laterally, not turning it radially.
It is important to understand this
principle in order to tighten the
attachments in a safe way and to avoid
permanent damage to the components.
1. Quick Release lever in closed (tightened)
position
2. Quick Release lever in opened (loose)
position
Trivel.com | 65
Page 66
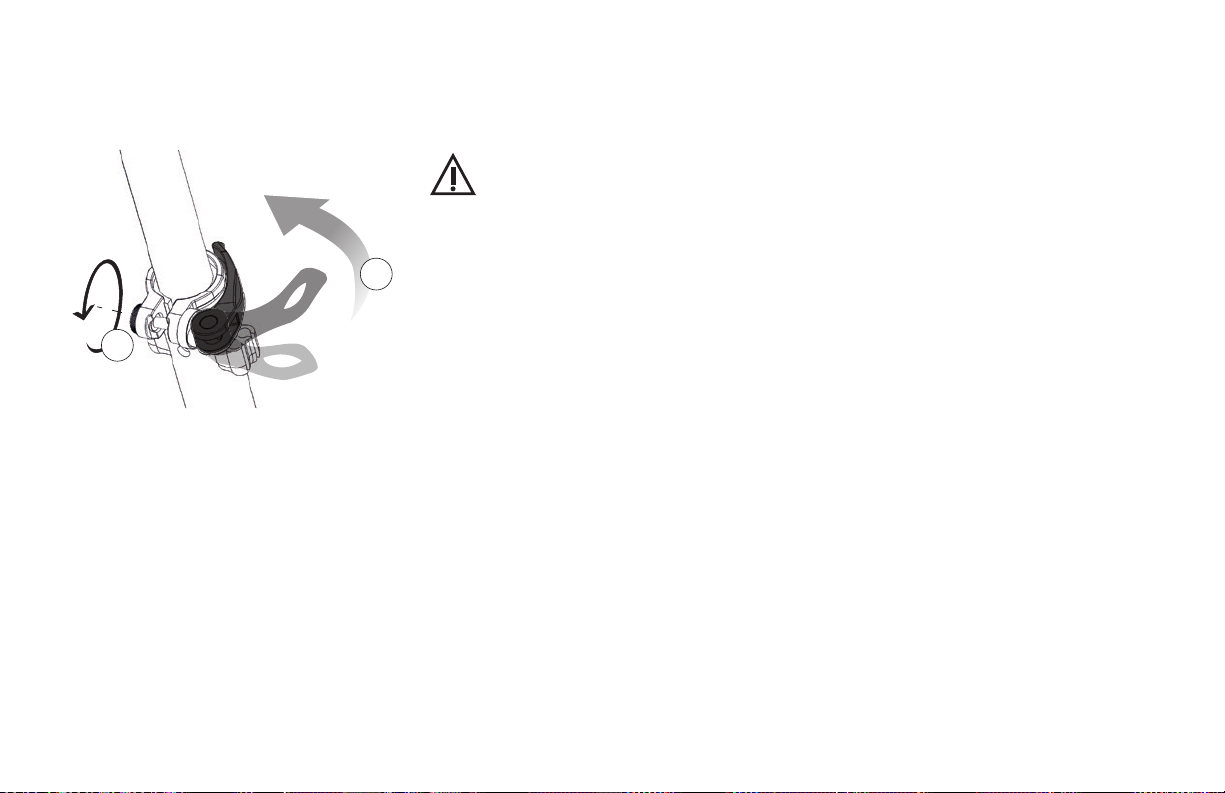
To tighten a quick release attachment
system:
2
1
1. Tighten the adjustment barrel so that a
significant* amount of force is required to
push the lever in closed position.
2. Firmly push the lever in closed position
with the palm of your hand.
* The precise force value required to push the lever so that the
attachment system is eciently tightened can vary with time and
from one system to another. It is recommended that you test the
attachment of the components each time it is opened and closed.
A poorly tightened quick release
attachment can lead to a
disconnection of the components
and result in serious injuries.
66 | Trivel.com
Page 67
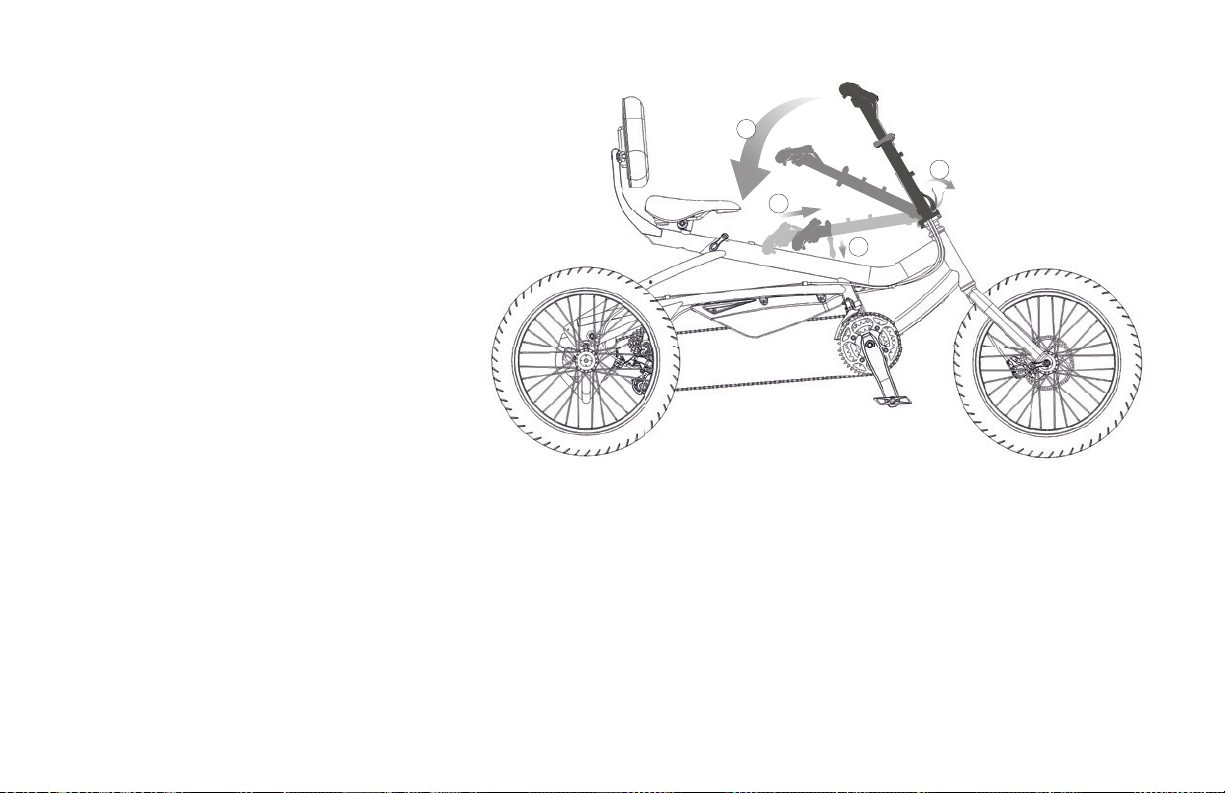
FOLDING THE STEM
On some Trivel models, it is possible to
fold the stem. Once folded, it is much
more compact for storage and easier to
put in a car booth for transportation.
In order to fold the stem, refer to
the specific instructions provided
separately and make sure to respect the
corresponding safety warnings.
2
1. Undo the quick release attachment lever
(Push the safety button device priorly if
required).
2. Fold down the stem and handlebar
assembly (Caution not to let it drop heavily
as it could dent the frame’s paint finish).
1
4
3
Optional:
3. Undo the quick release lever of the upper
part of the stem.
4. Push the sliding part further inside the
stem to make it more compact.
Trivel.com | 67
Page 68

LUBRICATING THE CHAIN
How to proceed:
When to lubricate?
Lubricate your chain before storing for a
long period, after it has been in contact
with water, after washing your Trivel, after
a muddy off-road ride or after about 250
km in normal conditions.
The chain should be lubricated with a
bike specific lubricant. Do not use grease
or motor oil.
Your local bike dealer can recommend
the best type of lubricant for your chain
based on your location and your type of
riding.
Apply a small amount of lubricant over
the full length of the chain by gently
pouring oil over the chain while slowly
rotating the pedal counter clockwise.
Let the lubricant penetrate the chain links
for a few minutes and remove excess
lubricant on the outside of the chain with
a cloth. This will prevent dust or sand to
stick to the chain and keep it running
smooth.
Be careful not to put lubricant on brake
system components such as the disc
brake rotors or the rim’s sidewalls as
this could negatively affect braking
performance. If you accidently do,
promptly clean the component with
rubbing alcohol on a cloth (Warning: Do
not use car brake cleaner or degreaser on
disc brake system).
68 | Trivel.com
Page 69

WASHING YOUR TRIVEL
To wash your Trivel:
Keeping your Trivel clean is an easy
and simple way to help extend its
performance and look.
1. Remove the battery if your Trivel is
equipped with an electric power assistance
system.
2. Find a proper area where there is no dust.
3. Fill a bucket with warm water and mix a
biodegradable dishwashing liquid or other
soft soap.
4. Clean transmission components such as
chain, sprockets, and chain rings first with
degreaser using specially designed brushes
or a dedicated cloth.
5. Thoroughly wash the frame and
components from top to bottom with
soapy water using a soft brush.
6. Rinse with water at low pressure
(Do not use a pressure washer as it can get
water into sealed components).
7. Dry the chain with a clean cloth and relubricate it before letting to it to air dry.
Never apply degreaser or lubricant
on disc rotor or brake pads. If
degreaser or lubricant gets on a
brake pad, it might need to be
replaced.
Disc rotors, if needed, should only
be cleaned with isopropyl alcohol
on a clean cloth. Do not use car
brake cleaner uid.
Trivel.com | 69
Page 70

STORING YOUR TRIVEL
It is recommended to store your Trivel in a
tempered dry place, preferably indoor or
inside a locked shed.
Make sure the chain and other corrosionsensitive components have been
lubricated before storing your Trivel for a
prolonged period as rust can accumulate
quickly in humid condition.
Be careful to store your Trivel away from
other objects that may get in contact with
impact-sensitive components such as
wheels and derailleurs.
Check that there is sufficient pressure in
the tires so the rubber doesn’t degrade
over a long storage period.
If you plan to leave your Trivel outside, we
recommend that you lock it and cover
it with a tarp to protect from water and
allow air circulation.
Do not store the battery in a place
where temperature and humidity
levels and not controlled. Ideal
place of storage is inside, at a
normal ambient temperature.
70 | Trivel.com
Page 71
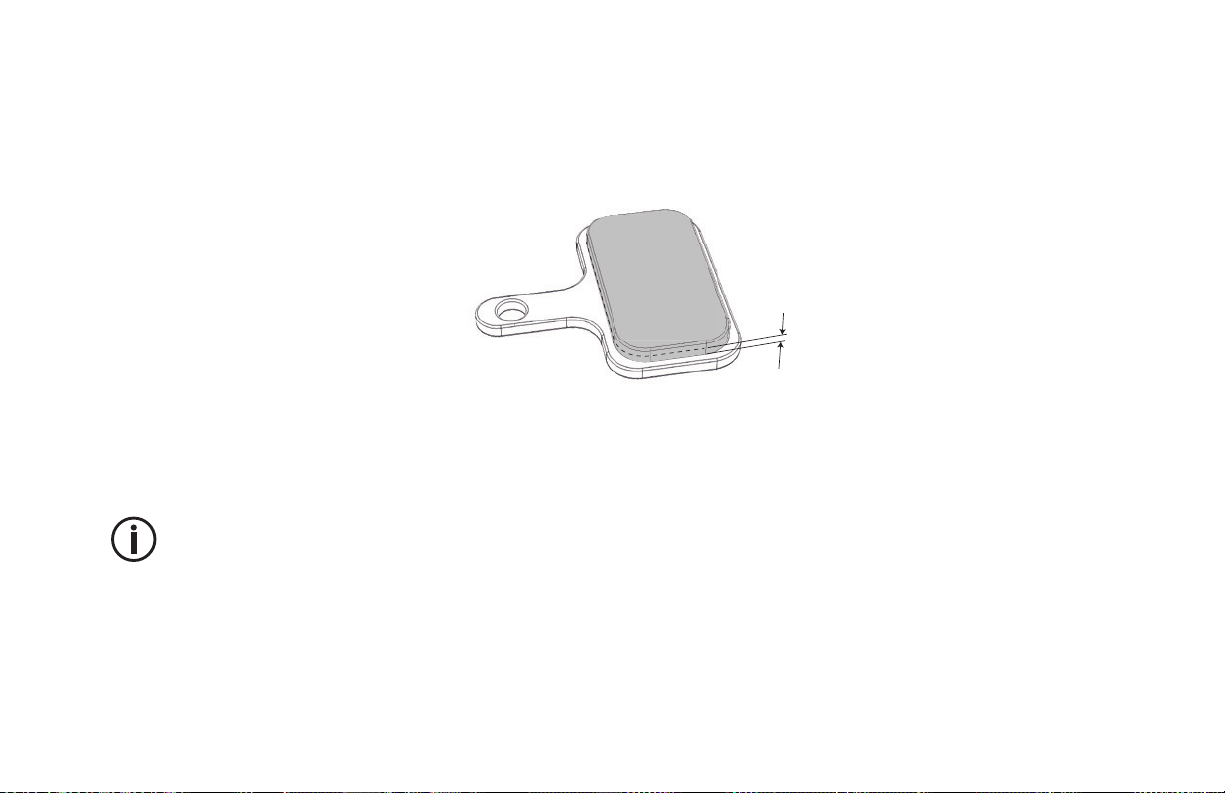
NORMAL WEAR
Brake pads
Tires
Some components on your Trivel will wear
due to their normal usage. Brake pads, chain,
tires and rims, amongst other, are subject to
normal wear.
Those components should be replaced
before they are completely worn out to
preserve safety and perf ormance as well as
to prevent damage to other components of
your equipment.
Components subject to normal wear usually
have a wear indicator integrated or at least a
dedicated tool available to check wear.
Periodic inspection of your Trivel by
a qualied technician is
recommended to spot worn out
components and identify
compatible replacement parts
Replace disc brake pads when material
thickness reached 1 mm or less.
Chain
It is generally recommended to replace
a chain before it has been stretched by
0.75% of its initial length. A qualified
technician has the knowledge and tool to
measure your chain stretch.
Replace tire when thread is not
visible anymore or if it has suffered an
unrepairable puncture or damage.
Rims
Replace a rim (or complete wheelset)
when it was damaged to a point where it
is not repairable by a qualified technician
or when it shows signs of structural
failure such as cracks around the spoke
holes.
Trivel.com | 71
Page 72

TROUBLESHOOTING
PROBLEM POSSIBLE CAUSES SOLUTION
Rear gears not shifting correctly • Derailleur is not synchronized with shifter
• Derailleur hanger is bent
• Friction in the cable housings
• Dirt or corrosion in the shifter
• Chain is damaged
Front gears not shifting correctly • Derailleur is not synchronized with shifter
• Derailleur position is wrong
• Friction in the cable housings
• Dirt or corrosion in the shifter
• Chain is damaged
Chain drops...
• From smallest rear sprocket
• From largest rear sprocket
• From smallest front chainring
• From largest front chainring
• Rear derailleur high (H) limit is too loose
• Rear derailleur low (L) limit is too loose
• Front derailleur high (H) limit is too loose
• Front derailleur low (L) limit is too loose
72 | Trivel.com
• Adjust cable tension
• Align derailleur hanger
• Lubricate or replace cable housing
• Lubricate or replace shifter
• Fix or replace chain
• Adjust cable tension
• Adjust derailleur alignment and height
• Lubricate or replace cable housing
• Lubricate or replace shifter
• Replace chain
• Turn high (H) limit bolt clockwise
• Turn high (L) limit bolt clockwise
• Turn high (H) limit bolt clockwise
• Turn high (L) limit bolt clockwise
Page 73

PROBLEM POSSIBLE CAUSES SOLUTION
Chain won’t reach...
• The smallest rear sprocket
• The largest rear sprocket
• The smallest front chainring
• The largest front chainring
• Rear derailleur high (H) limit is too tight
• Rear derailleur low (L) limit is too tight
• Front derailleur high (H) limit is too tight
• Front derailleur low (L) limit is too tight
• Turn high (H) limit bolt counter clockwise
• Turn high (L) limit bolt counter clockwise
• Turn high (H) limit bolt counter clockwise
• Turn high (L) limit bolt counter clockwise
Chain skips • Chain is worn out
• One or many sprockets worn out
• One or many chainrings worn out
• Sprocket or chainring has a broken tooth
Weak braking • Brakes are not properly adjusted
• Brake pads are worn out
• Rim or disc is dirty
Hydraulic disc brakes
• Brake fluid is missing
• Air bubble in the hydraulic line
Vibrations while braking • Loose headset bearings
• Brake are not properly adjusted
• Brake pivots are loose
• Rim or disc rotor wobbling
• Front wheel not properly attached
• Replace chain
• Replace sprockets
• Replace chainrings
• Replace sprocket or chainring
• Adjust brakes
• Replace brake pads
• Clean rim or disc
• Add brake fluid
• Bleed the hydraulic line
• Adjust headset bearings
• Adjust brakes / Add an angle (toe-i n)
• Tighten brake pivots
• Align or replace rim or disc rotor
• Align and tighten front wheel into fork
Trivel.com | 73
Page 74

PROBLEM POSSIBLE CAUSES SOLUTION
Squeaking sound when braking • Brake pads are wet or dirty
• Brake pads are not properly adjusted
• Brake pads are worn out
• Rim is wet or dirty
Disc brakes
• Disc rotor is wet or dirty
• Brake pads are glazed or oil contaminated
• Brake pads are worn out
• Disc rotor is wobbling
• Disc rotor attachment is loose
• Brake caliper is loose
Rubbing sound when riding • Brake pads are rubbing against rim or disc
• Rim or disc rotor is rubbing against brake pads
• Chain in crossed gear combination
• Object interfering with wheels or crank arms
Creaking sound when pedalling • Loose or dirty bottom bracket
• Loose crank arms
• Damaged pedals bearings
• Chain is dirty or rusted
• Stiff chain link
• Chain tension too high (for single speed bike)
• Clean or replace brake pads
• Adjust brake pads / Add an angle (toe-in)
• Replace brake pads
• Clean the rim
• Clean disc rotor
• Sand or replace brake pads
• Replace brake pads
• Align or replace disc rotor
• Tighten disc rotor attachment
• Tighten brake caliper bolts
• Adjust brake pads spacing
• Align rim or disc rotor
• Shift gear to another combination
• Remove interfering object
• Tighten and clean bottom bracket
• Tighten crank arms
• Fix or replace pedals
• Clean and lubricate chain
• Fix or replace chain
• Adjust chain tension
74 | Trivel.com
Page 75

PROBLEM POSSIBLE CAUSES SOLUTION
Poor handling • Headset bearings are too tight
• Wheels not centered in frame and fork
• Stem / handlebar is misaligned with fork
• Fork is bent
• Frame is bent
Frequent flats • Riding with a too low pressure (pinch flat)
• Sharp object stuck inside tire
• Damaged inner tube
• Damaged tire
• Rim tape misplaced
• Adjust headset bearings
• Center wheels in frame and fork
• Align stem / handlebar with fork
• Fix or replace fork
• Fix or replace frame
• Increase tire pressure
• Remove and fix or replace inner tube
• Fix or replace inner tube
• Fix or replace tire
• Reposition rim tape
Trivel.com | 75
Page 76

WARRANTY TERMS
Warranty against apparent anomaly
Propulsion system warranty
By the present, Trivel gives notice to the
owner or the user of an Electrically Assisted
Vehicle of the provisions of the limited
warranty that Trivel offers the owner
following the purchase of the equipment
from an authorized Trivel dealer.
Warranty against hidden defects
Trivel warrants to the owner that its
equipment, when new, is exempt from hidden
defects. Should the owner discover what he
believes is a hidden defect, he must notify
Trivel in writing within three (3) days from
the moment when he or she first becomes
aware of said defect in order to give Trivel the
opportunity to correct said defect if possible, at
the sole discretion of Trivel and provided Trivel
can establish said hidden defect is present
before the expiration of the warranty.
The owner must verify the apparent
condition, the quantity and the contents
of the equipment following the purchase
and, on the same day, must immediately
proceed with a complete inspection of it
with the help from the owner’s manual.
If there is damage, if a part is missing or is
damaged, if the equipment is broken, or if
there are other problems of the same kind
(hereafter known as: ‘Apparent anomaly’),
the owner must contact the dealer
immediately and notify Trivel within three
(3) days from the date of purchase from
the dealer by registered letter, a receipt for
which must be kept for reference. Should
the owner not advise of the Apparent
anomaly within the prescribed time
period, Trivel shall not be responsible for
any prejudice suffered by the owner due to
the Apparent anomaly and the equipment
shall be deemed free of any Apparent
anomaly when purchased and the owner
deemed satisfied with the purchase.
Trivel warrants to the owner that the
propulsion system included with the
equipment, when new, is in good
working condition. This warranty
shall expire twenty-four (24) months
following the purchase date of the
equipment from the dealer. The
propulsion system is defined as including
the control display, the accelerator
components, the motor, the wiring
cluster parts and the electric cables.
76 | Trivel.com
Page 77

Frame
Trivel warrants to the owner that the
frame of the electrically assisted vehicle
when new, is free from defects in materials
and workmanship. This warranty shall
expire thirty-six (36) months following
the purchase date of the equipment
from the dealer. The frame excludes the
battery, all the electric components, the
paint and finish, the front fork, the wheels,
the tires, the drive train, the brakes, the
saddle post, the handlebar and stem and
any suspension component or part.
Useful life warranty
As for any other consumer good, the
electrically assisted vehicle has a useful life
cycle. The length of the useful life cycle can
vary depending on the criteria chosen for
workmanship and materials of the equipment
as well as the kind of use and frequency
to which the vehicle has been subjected.
However, Trivel advises the owner that the
maintenance and upkeep performed on the
equipment during its useful life cycle are very
important as a means of prolonging the useful
life cycle of the product. Consequently, Trivel
advises the owner that the equipment must be
checked periodically by the dealer as general
maintenance of the product and as a means
of detecting stress and/or potential failures
including, but without limiting the generality
of the preceding, cracks, deformations,
corrosion, paint chipping, dents and any other
indications of potential problems, improper
use or abuse. These regular verifications are
important safety checks and they are essential
in helping to prevent accidents, bodily injury
and premature reduction of the useful product
life cycle of the equipment.
Merchandise return policy during
warranty period
If a defect occurs during the warranty
period, the parts (batteries, controller, or
any other parts of the bicycle) will have
to be shipped to Trivel directly from an
authorized Trivel retailer and, following
repairs, Trivel shall ship the parts back
without charge to the retailer exclusively. If
the shipping address is different than the
nearest Trivel retailer’s the customer shall
have to pay shipping costs both to and
from said different address.
Validity of the limited warranty
The Trivel limited warranty is conditional to
the equipment having been handled and
maintained adequately by the owner in
accordance with the notices to the owner
and the instructions printed in the owner’s
manual and on the equipment having
been stored in appropriate conditions and
at an adequate temperature given the
specific characteristics of the equipment.
To be able to benefit from the terms and
conditions of the limited warranty offered
by Trivel, the owner must fill a Trivel limited
warranty form (which can be found at
an authorized Trivel dealer and on Trivel
website) and return it to the dealer with a
Trivel.com | 77
Page 78

copy of the invoice obtained at the time of
purchase to Trivel within thirty (30) days of
the purchase date.
Without limiting the generality of the
preceding, the Trivel limited warranty
excludes components of the vehicle that
are damaged by an error or negligence in
the maintenance of the equipement and
its components or resulting from a use
that does not conform to the notice to the
owner and to the Trivel owner’s manual
by the owner. With the exception of the
parts specifically mentioned in the present
limited warranty, the purchase of the
electrically assisted vehicle is made at the
risk and peril of the owner.
During the warranty period, should
there be a problem with your product,
you should have repairs made by
an authorized trivel retailer in order
to conserve your rights under the
warranty.
Example: For a front wheel flat or tire
replacement on a model equipped with
an electrical power assistance system, the
front wheel will have to be removed with
the motor. Only a Trivel-trained person
is qualified to perform this work without
causing damages. It is thus strongly
recommended that the owner contact an
authorized Trivel representative to have
the work performed. Should this not be
done, the owner shall not hold Trivel liable
for any damages caused by an improper
procedure by a person who is unqualified
and not authorized by Trivel.
The warranty is non-transferrable
Trivel warrants to the owner that the
battery included with the vehicle, when
new, is in good working order. This
warranty shall expire twenty-four (24)
months following the purchase date of the
equipment for a Lithium battery.
Make sure that the battery was new
when purchased. The year of the battery
is within the serial number.
The battery must be charged at least
every two months.
Should these instructions not be
followed, there is a risk of battery
malfunction and this will not be covered
by the limited warranty.
78 | Trivel.com
Page 79

Trivel.com | 79
Page 80

USER MANUAL
1 877 6877676 | TRIVEL.COM
 Loading...