

TRIUMPH BOARD 55” MULTI Touch LED LCD, 70” MULTI Touch LED LCD, 65” MULTI Touch LED LCD, 84” MULTI Touch LED LCD, 55” User Manual
...
User Manual v 1.5
January 2014
MULTI Touch LED LCD Series
TRIUMPH BOARD 55” MULTI Touch LED LCD
TRIUMPH BOARD 65” MULTI Touch LED LCD
TRIUMPH BOARD 70” MULTI Touch LED LCD
TRIUMPH BOARD 84” MULTI Touch LED LCD
TRIUMPH BOARD a.s., Neklanova 122/15, 128 00 Praha 2, Czech Republic, European Union, www.triumphboard.com

1
Contents
1)
Safety Warning ..................................................................................................................................... 4
2) Product Description ............................................................................................................................... 6
3) Technical specifications ........................................................................................................................ 7
4) Installation ........................................................................................................................................... 10
4.1) Package content .............................................................................................................................. 10
4.2) Control Panel ................................................................................................................................... 11
4.3) Terminal Interface ........................................................................................................................... 12
4.4)
Remote
control
............................................................................................................................. 14
4.5) Remote Control Buttons Function Description ................................................................................ 15
4.6) Remote Control Instruction .............................................................................................................. 17
5) Connecting and Setting ....................................................................................................................... 18
5.1) External Computer and Touch Connecting .................................................................................... 18
5.2) Suggest configuration of internal / external computer ..................................................................... 19
5.3) TV Aerial (optional) .......................................................................................................................... 19
5.4) A/V Connection ............................................................................................................................. 19
5.4.1) AV IN ......................................................................................................................................... 19
5.4.2) S-VIDEO ................................................................................................................................... 20
5.4.3) YPbPr ........................................................................................................................................ 20
5.4.4) HDMI1/HDMI2 .......................................................................................................................... 21
5.4.5) Coaxial Connecting ................................................................................................................... 21
5.4.6) VGA OUT .................................................................................................................................. 22
5.4.7) AV OUT .................................................................................................................................... 22
5.4.8) USB Device ............................................................................................................................. 23
5.4.9) Network Cable ....................................................................................................................... 23
5.4.10) Microphone ............................................................................................................................ 23
5.4.11) RS232 connecting (optional, part of TV Tuner) ...................................................................... 23
5.4.12) Internal PC basic operations: ................................................................................................. 24
6) Menu Operation .................................................................................................................................. 25
6.1) Input source ..................................................................................................................................... 25
6.2) First time Installation ........................................................................................................................ 25
6.3) Auto Tuning ...................................................................................................................................... 26
6.4) Channel Menu
................................................................................................................................ 26
6.4.1) DTV ManuaI Tuning ATV ManuaI Tuning ................................................................. 27
6.4.2) Program
Edit
............................................................................................................................ 27
6.4.3) Signal Information
.................................................................................................................. 28
6.4.4) Cl lnformation ............................................................................................................................ 28

2
6.4.5) Screen Menu
.......................................................................................................................... 28
6.5) Picture
Menu
.................................................................................................................................. 29
6.6) Sound
Menu
.................................................................................................................................... 30
6.7) Time
Menu
..................................................................................................................................... 30
6.8) Lock Menu ....................................................................................................................................... 31
6.8.1) Block Program .......................................................................................................................... 31
6.9) Setup
Menu
.................................................................................................................................... 32
6.10) EPG ............................................................................................................................................... 32
7) Troubleshooting .................................................................................................................................. 34
7.1) Software Reinstallation .................................................................................................................... 35
7.2.) Turning off the Touch keyboard in Windows .................................................................................. 36
8) Software protocols .............................................................................................................................. 37
8.1) Description ....................................................................................................................................... 37
8.2) Protokol ............................................................................................................................................ 38
9) Care and Maintenance ........................................................................................................................ 42
10) Repair Service and Contacts .......................................................................................................... 43

3
DECLARATION OF CONFORMITY
We TRIUMPH BOARD a.s., Neklanova 122/15, 128 00 Praha 2
Declare under sole responsibility that the product:
TRIUMPH BOARD MULTI Touch LED LCD Series
Model: 55” MULTI Touch LED LCD / 65” MULTI Touch LED LCD
70” MULTI Touch LED LCD / 84” MULTI Touch LED LCD
EAN: 8592580111167, 8592580111266, 8592580111310, 8592580111235 /
8592580111174, 8592580111273, 8592580111327, 8592580111242
8592580111181, 8592580111280, 8592580111334, 8592580111297 /
8592580111150, 8592580111198, 8592580111341, 8592580111303
is in conformity of essential requirements of EU directives:
EU Standards
EN 55022:2010
EN 55024:2010
EN 55013:2001+A1:2003+A2:2006
EN 55020:2007+A11:2011
EN 61000-3-2:2006+A1:2009+A2:2009
EN 61000-3-3:2008
In the configuration tested, the EUT complied with the standards specified above.
Place of Issue: Prague
Datum of issue: 25
th
March 2013
Ing. Ondřej Kryšpín, Chairman of the Board of Directors
Note: Translation from original CE

4
1) Safety Warning
Before operating the unit, please read this manual thoroughly, and retain it for future
reference.
Placement
• Do not place the unit on an unstable cart, stand, tripod, bracket, table, or shelf. Do
not expose the unit to direct sunlight and other sources of heat.
• Do not put the unit near appliances that create magnetic fields. Do not handle liquids
near or on the unit.
• Never spill liquid of any kind into the unit
• Do not put heavy objects on top of the unit.
Power Supply
• Check that the unit’s operating voltage is identical with your local power supply.
• Please unplug power supply and aerial plug when there is a thunder-storm or
lightning.
• Please unplug power supply, when there is nobody at home or when the unit will not be
used over an extended period. Please keep power cord from physical or mechanical
damage.
• Please use exclusive power cord, don't modify or lengthen it.
• Please check and ensure AC source is appropriately earthed.
• For 55”/65”/70” display equipment: Fuse in inlet, 4A, 250 VAC.
• For 84” display equipment: Fuse in inlet, 6.3A, 250 VAC.
LCD Screen
• Never use any other tough or sharp object to replace the plastic stylus / writing pen.
• Unplug the power supply plug before cleaning.
• Clean the screen with a soft dustless and dry cloth.
• Never use water or the spray type detergent to clean the unit.
• For deep clean, contact an authorized service center.
• Please don't display the high brightness image on the screen for extended periods.
Sight Distance
• The best distance between audience and screen is 5-7 times that of screen diagonal.
• The best viewing angle between audience and screen is less than 176 degrees.
Temperature
• Do not place the unit near or over a radiator or heater.
• If your unit is suddenly moved from a cold to a warm place, unplug the power cord for
at least two hours so that moisture that may have formed inside the unit can dry
completely.
Humidity
• Do not expose machine to rain, damp or place near water.
• Ensure the indoor drying and cool.
Ventilation
• Keep the ventilation openings clear.
• Ensure that the unit has enough space for all round ventilation, recommended value:
left, right and back >10cm, top> 20cm.
Earphone
• Extended use of earphones on high volume will affect hearing. Before using

5
earphones, please turn down the volume in advance.
Standby
• Unit will enter standby mode after double-clicking the standby key for switching off
internal PC. The LED indicator in the right / bottom corner of the frame illuminates orange
in standby mode.
Battery
• Please dispose of batteries responsibly.
• Please don't let children touch the batteries.
• Do not throw batteries into a fire.

6
2) Product Description
TRIUMPH BOARD MULTI Touch LED LCD Series
TRIUMPH BOARD MULTI Touch LED LCD are fully integrated, professional, multi touch FULL HD LED LCD
Monitors. The IR LED optical technology enables six finger touches simultaneously using fingers, stylus or
even a pointer.
TRIUMPH BOARD MULTI Touch LED LCD are an effective presentations tool to show pictures, data,
presentations, thoughts, ideas and business forecasts interactively. Engage the audience with the
presentation with direct control of the computer through the LED LCD MULTI Touch Monitor.
TRIUMPH BOARD MULTI Touch LED LCD – no need for a projector! Easy installation! No limitations
caused by light conditions! Elegant and stylish appearance!
TRIUMPH BOARD MINI PC for MULTI Touch LED LCD Series
TRIUMPH BOARD MINI PC is a powerful, fully integrated personal computer for TRIUMPH BOARD LED
LCD MULTI Touch Series.
TRIUMPH BOARD MINI PC is equipped with Intel i5 processor, Intel graphics card and 4 GB RAM, which
ensures high power for running current software. 500 GB hard disk provides sufficient capacity for saving
and storing user´s data.
TRIUMPH BOARD MINI PC is an ideal specification for TB Comenius Office, MyScript Stylus, RMeasiteach
Next generation and Display Note software bundle which are delivered together with the TRIUMPH BOARD
LED LCD Monitors.
Mini PC (optional) LED LCD monitor

7
3) Technical s pecifications
TRIUMPH BOARD 55“ MULTI Touch LED LCD
EAN
:
8592580111167,8592580111266,
8592580111310,8592580111235
Screen Type:
TFT LCD/ A Standard/ LED backlight
Resolution:
1920 x1080
Refreshing Sequence:
6,5 ms, 100/120 Hz, 4000:1
Display Area:
1209.6(H) × 680.4(V)
Outline Dimension:
1369 x 828 x 104 mm
Package Dimension:
1490 x 1010 x 240 mm
Net / Gross weight:
47/65 kg
TRIUMPH BOARD 65“ MULTI Touch LED LCD
EAN
:
8592580111174,8592580111273,
8592580111327,8592580111242
Screen Type:
TFT LCD/ A Standard/ LED backlight
Resolution:
1920 x1080
Refreshing Sequence:
8 ms, 100/120 Hz, 4000:1
Display Area:
1428.48 (H) x 803.52 (V)
Outline Dimension:
1591 x 961 x 110 mm
Package Dimension:
1728 x 1140 x 250 mm
Net / Gross weight:
66/85 kg
TRIUMPH BOARD 70“ MULTI Touch LED LCD
EAN
:
8592580111181,8592580111280,
8592580111334,8592580111297
Screen Type:
TFT LCD/ A Standard/ LED backlight
Resolution:
1920 x1080
Refreshing Sequence:
4 ms, 120 Hz, 4000:1
Display Area:
1538.880 (H) x 865.620 (V)
Outline Dimension:
1713 x 1035 x 98 mm
Package Dimension:
1840 x 1210 x 295 mm
Net / Gross weight:
71/94 kg
TRIUMPH BOARD 84“ MULTI Touch LED LCD
EAN
:
8592580111150,8592580111198,
8592580111341,8592580111303
Screen Type:
TFT LCD/ A Standard/ LED backlight
Resolution:
3840 x 2160 supp. by panel
1920 x 1080 supp. by MINI PC
Refreshing Sequence:
5 ms, 120 Hz, 1600:1
Display Area:
1860.48 (H) x 1046.52 (V)
Outline Dimension:
2005.3 x 1191.5 x 122.9 mm

8
Package Dimension:
2168 x 1508 x 318 mm
Net / Gross weight:
118/148 kg
Touch System
Sensing Type:
Infrared Transmission (multi-touch)
Response Time:
< 8ms (typ)
Response Area:
> ø 5mm
Scan Frequency:
100Hz
Output Coordinates:
4096×4096
Communication Mode:
Full-speed USB
Writing Facility:
Any Opaque Object that > ø 5mm
Writing Screen:
Mohs hardness of 7
PC System :
Optional
TV Tuner:
Optional, ATV/DVB-T
Inputs and Outputs
HDMI:
2
S-Video:
1
Coaxial:
1
Audio IN:
2
VGA IN:
2
AV OUT:
1
Touch OUT:
1
CI IN:
1
AV IN:
1
Component:
1
AC IN:
1
Power:
1
Sound System
Power Amplif y:
30W
Number of Sound box:
2
Sound:
Surround
Power
Power Requirements:
100 – 240 V AC 50/60 Hz
Overall Power Consumption:
< 500 W
Standby Power Consumption:
< 0,5 W

9
Ambient Condition
Operation Temperature
0 – 40 °C
Operation Humidity:
10 – 90% RH
Storage Temperature:
- 10 C to 60 °C
Storage Humidity:
10 – 95% RH
TRIUMPH BOARD MINI PC6 for MULTI Touch LED LCD Series
EAN:
8592580111594
Processor:
Intel i5
Graphics:
Integrated Intel HD4000
Sound Card:
Integrated High Definition AudioStereo
Networking:
Integrated 10/100/1000 Mbps adapted
Memory:
4 GB DDRIII
Hard Drive:
500 GB SATA
WIFI:
802.11 a/b/g/n, 2x2, dual-band WiFi 2,4/5 GHz
+ Bluetooth 4.0
USB:
4x USB 2.0 and 2x USB 3.0
Lan Port (RJ45):
1
VGA Out:
1
Audio:
Side Headphone and Mic Ports
Net / Gross Weight:
1/1,3 kg
Processor:
Intel i5

10
4) Installation
4.1) P ackage content
MULTI Touch LED LCD
Quick User Guide, User Manual, SW Manual, Styluses, Battery, Remote Control, Power Cords, VGA
Cable, USB Cable, Audio Cable and USB Flash Drive with software packages.
Quick User Guide, User Manual, SW Manual
2x Stylus
Batteries
Remote control
Power Cord (EU , UK, US ) VGA Cable USB Cable Audio Cable
USB Flash Drive

11
4.2) Control Panel
Number Item Function Description
1
Power on/off
2 INPUT Select signal source
3 MENU OSD Menu on/off
4 CH.
Switch between channels according to channel number
order. Move between OSD items menu up and down
5 VOL+/-
Volume adjust. Set value of the item in the OSD menu, move
left, right
6
Remote control signal
receiver
Receive the remote control signal. After pressing the button
on the remote control LED flashes.
7 Power indicator
Indicator color shows the status of power on/off. (on - green /
standby mode - orange / off - off)

12
4.3) Terminal Interface
Number Item Function Description
1
TV Motherboard Upgrade Interface
2 HDMI IN High Definition Multimedia Interface
3 AUDIO IN Connect PC Audio from external sources
4 VGA IN Connect PC Image from external sources
5 TOUCH OUT
Signal input for touch function of external computer. An
external computer can be controlled in WIN7/8 via LED LCD
Monitor without external driver if the devices are connected
via USB cable. For calibration and settings of the external
device to install Touch Service Driver.
6 AV IN Compound video, Audio-IN
7 RF IN
CATV interface / antenna input. Only for analog and digital
TV mode
8 COAXIAL Coaxial output for audio devices
9 RS 232
Configuration serial interface used for data transfer and
device control
10 AV OUT Audio/Video-OUT to an external display device
11 S-VIDEO S-VIDEO input (The Audio-IN share with AV)
12 COMPONENT YPbPr signal input, connect DVD, set -top -box with YPbPr
13 AC IN AC source input
14
Power supply switch, Turn
the AC source on and off
Power supply switch, Turn the AC source on and off
14

13
15 CI IN Digital TV CI card slot
16
WIFI and Bluetooth antenna interface
17 LAN IN Standard net office, Connect Rj45 net interface
18 AUDIO OUT Connect audio cable to the external device audio input
19 MIC Connect a collect device with microphone
20 VGA OUT Connect External Display VGA-IN to the output device
21
Connect USB device 2.0, such as Hard Disk, USB keyboard
mouse etc.
22
Connect USB device 3.0, such as Hard Disk, USB keyboard
mouse etc.
NOTE: Do not include interface 16, 17, 18, 19, 20, 21 a 22 if unit excludes internal PC and 7, 9
without TV Tuner.

14
4.4)
Remote
control

15
4.5) Remote Control Buttons Function Description
Number Item Function Description
1 Press to POWER ON/OFF; Extended press 5s to shut down
2
Mute ON/OFF
3 SLEEP Set the sleep time, 0-240 minutes range
4 DISPLAY Display the information of the current source
5 P. MODE Picture mode selection
6 S. MODE Sound Mode selection
7 Numeric button TV channel numeric input button
8 , ALT + TAB
TV channel switch button; Internal PC programs window
switch button
9 0 TV numeric input button
10 , ALT + F4
Return to previous channel; Internal PC programs window
close button. Pressing the button on the internal computer
WINDOWS Desktop will turn off internal computer
11 INPUT Source selected button
12 MENU Menu display, input source selection
13 RESET/ASPECT
Press reset touch frames under the PC, HDMI, VGA source;
Adjust the picture ratio. Easy Service Driver must be
installed.
14 RED/ALT
TV source button; ALT key in WINDOWS mode of internal
computer
15 GREEN/TAB
TV source button; TAB key in WINDOWS mode of internal
computer
16 YELLOW/DESKTOP
TV source button; Fast switch to internal PC WINDOWS
Desktop button.
17 BLUE/BACKSPACE TV source button; Internal PC BACKSPACE button.
18
,
Internal PC Windows START button,
19 Internal PC menu button; mouse right-click function
20
Direction button, press to go up in OSD menu and
WINDOWS internal PC mode
21
Direction button, press to go left in OSD menu and
WINDOWS internal PC mode
22
Direction button, press to go right in OSD menu and
WINDOWS internal PC mode

16
23
Direction button, press to down in OSD menu and
WINDOWS internal PC mode
24 ENTER Enter button, press to select status. Left mouse- click function
25
D. USB
Startup the writing software; Fast to choose the writing pen.
26 ESC/EXIT, D. SETUP
ESC/EXIT button, Press to exit current status; DVD menu
button
27 EPG Digital program guide
28 FAV´, SPACE Favorite channel, Space button
29 CH. +, CH.- Channel add and subtract
30 VOL+,VOL- Volume increase and decrease
31
F1 Function button; Teletext display\overlay\close butt on
32
F2 Function button; Teletext conceal button
33
F3 Function button; Teletext index button
34
F4 Function button; Teletext zoom in button
35
F5 Function button; Teletext lock button
36
F6 Function button; Teletext sub-page button
37
ANGLE´ F7´
F7 Function button; Display the concealed teletext button
38 SUBTITLE´ F8´ digital TV sub-title button; F8 Function button
39
F9 Function button;
40 GOTO´ F10´ RADIO F10 Function button; Digital TV radio button
41 AUDIO´ F11´ NICAM Audio channel select; F11 Function button; Nicam button
42 REPEAT´F12´ AUTO F12 Function button; Auto adjust the picture button
NOTE: All functions related to the computer cannot work if the unit does not have the internal PC.

17
4.6) Remote Control Instruction
a) Insert the Batteries
Remove the cover on the rear of the remote control
Insert two “AAA” batteries and observe the respect the polarities: + on the
battery against +,- on the battery against - . Please do not mix new and old
batteries.
Replace the cover by aligning the base of the remote control and pressing it back into
place.
b) Remote control area
The range of remote control receiver is as shown. Please throw the scrap batteries into the
recycle bin by way of environmental protection.
CAUTION
RISK OF EXPLOSION IF BATTERY IS REPLACED BY AN INCORRECT TYPE
DISPOSE OF USED BATTERIES ACCORDING TO THE INSTRUCTION.

18
5) Connecting and Setti ng
CAUTION
FOR THE SAFETY OF YOU AND YOUR UNIT, PLEASE DO NOT CONNECT ANY POW ER
SUPPLY BEFORE THE EXTERNAL DEVICE IS PREPARED
5.1) Exte rnal Compute r and Touch Connecting
a) Connect a VGA cable (15pin) between the VGA and external PC
b) Connect an earphone cable between the PC and audio at the same time
c) Connect a USB cable between the external PC and USB terminal (Touch out)
d) Plug the POWER cord and switch it on from the rear panel
e) Startup the external computer
f) Press to turn the power on
g) When using a laptop redirect the output to LED LCD Monitor press functional "F” key. The
value of the „F“ key varies by notebook manufacturers.
h) If picture signal of external computer is not detected automatically press INPUT to
switch to VGA1 / VGA2 source
i) For calibration and settings of the external device to in s tall Touch Service Driver
NOTE: The best resolution of external computer input is 1920*1080
The unit can connect with the external PC via HDMI. After connection, press the INPUT
button and switch on the source computer (HDMI1 / HDMI2) signal. When using the
appropriate drivers for your graphics car d with HDMI connection and HDMI cable (video /
sound) does not need to use extra audio cable for audio.

19
5.2) Suggest configuration of internal / external computer
• 2.0 GHz Processor
• 1GB RAM Memory
• More than 256 color display card
• 1GB Available Hard Drive
• VGA-OUT/HDMI-OUT
• Audio-OUT
• USB Interface
Support Resolution 800*600, 1024*768, 1920*1080
5.3) TV Aerial (optional)
a) Connect a RF cable with CATV terminal
b) Plug the POWER cord and switch it on from the rear panel
c) Press to turn the power on
d) Press INPUT switch to TV source (ATV / DTV)
e) Press MENU and select auto tuning
5.4) A/V Connection
5.4.1) AV IN

20
a) Connect AV cable with the device with AV-OUT (Yellow is Video, Red is Audio-
R/right, White is Audio-L/left )
b) Plug the POWER cord and switch it on from the rear panel of LED LCD Monitor.
c) Press to turn the power on
d) Press INPUT switch to AV source
5.4.2) S-VIDEO
a) Connect S-VIDEO cable with the device with S-VIDEO.
b) Connect the audio cable for audio (red connector is Audio-R (right), white connector is the
Audio-L (left))
c) Plug the POWER cord and switch it on from the rear panel of LED LCD Monitor.
d) Press to turn the power on
e) Press INPUT switch to S-VIDEO source
5.4.3) YPbPr

21
a) Connect an YPbPr cable with the device with YPbPr
b) Connect the audio cable for audio (red connector is Audio-R (right), white connector is
Audio-L (left))
c) Plug the POWER cord and switch it on from the rear panel
d) Press to turn the power on
e) Press INPUT switch to YPbPr source
5.4.4) HDMI1/HDMI2
a) Connect a HDMI cable with the device with HDMI
b) Using the appropriate drivers for your graphics card with HDMI output and HDMI cable
(video / sound) does not need to use extra audio cable for audio.
c) Plug the POWER cord and switch it on from the rear panel
d) Press to turn the power on
e) Press INPUT switch to HDMI source
5.4.5) Coaxial Connecting
a) Connect a Coaxial cable with the device with coaxial connector for audio.
b) Plug the POWER cord and switch it on from the rear panel.
c) Press to turn the power on

22
5.4.6) VGA OUT
a) Connect a VGA cable with the device with VGA, Connect an audio cable with the
Audio OUT
b) Plug the POWER cord and switch it on from the rear panel
c) Press to turn the power on
d) Press INPUT switch to HDMI source
e) Setup the VGA OUT or Multi-Screen in the WINDOWS, mouse right-click on Desktop,
run Screen Resolution item of internal computer.
NOTE: VGA-OUT can output the image in the internal computer only
5.4.7) AV OUT
Connect other display

23
Connect other display
AV OUT output the picture and sound of TV S-VIDEO and AV source to external display.
5.4.8) USB Device
Connection of USB devices
For control of internal computer
5.4.9) Network Cable
5.4.10) Microphone
5.4.11) RS232 connecting (optional, part of TV Tuner)

24
After connecting the external control system and unit, you can cont rol ex terna lly some of the
functions such as power on/off or adjust the volume etc.
5.4.12) Internal PC basic operations:
a) Wait about 30 seconds after the machine connects to the mains, press POWER get the
unit ready in standby mode.
b) Then press the button , internal computer will start.
c) To switch the internal computer off double-press

25
6) Menu Operation
6.1) Input source
All input sources are avai la ble only with connected TV Tuner
NOTE: For detail input source, please confirm with the TV set.
a) Press INPUT to display the input source list
b) Press or INPUT to select the input source you want to choose
c) Press ENTER to enter the input source
d) Press EXIT to quit
6.2) First time Installation
a) Press to select OSD Language, press OK to select language and to enter sub-menu
b) Press to select Country, press OK to start tuning.

26
6.3) Auto Tuning
6.4) Channel Menu
Press MENU to display the main menu and press to select
the
item.

27
NOTE:
a)
Channel Menu
is available only in TV
mode.
b)
Signal Information
and
CI I
nformation
are available only for DTV with
signal.
Auto Tuning For details see page 25.
DTV ManuaI Tuning Search for available digital channels manually.
ATV Manual Tuning Search for available analog channels manually.
Program Edit Set channels to favorite or edit the label of channels, for details see page 26.
Signal lnformation Display the information of current program.
CI lnformation Display the information of the Cl card.
6.4.1) DTV ManuaI Tuning ATV ManuaI Tuning
On
6.4.2) Program
Edit
The four colored key is the shortcut key for programming the channel.
a) First press to highlight the channel you want to delete or move or skip, then:
b) Press the RED button to delete the channel.
c) Press the YELLOW button to select and press to move the channel.
d) Press the BLUE button to skip the select channel.
(Your TV set will skip the channel automatically when using CH+/- to view the channels.)
e) Press Fav Add or Delete the channel to your favorite list.

28
6.4.3) Signal Information
Press button to select
Signal Information, the
press the OK button to see
the detail
information
about the
signal.
6.4.4) Cl lnformation
Press
button to select Cl lnformation then press OK button to display details
if you have
inserted the CI card.
6.4.5) Screen Menu
Screen Menu is available only in PC D815 or DVI mode. When DVI signal input, only Horizontal
Position and Vertical Position can be adjusted.
29
Press to highlight one of the following options, then press ENTER to select it.
Auto Adjust Automatically adjust H-Offset, V-Offset, Size, Phase settings.
In order to get a good result, you should open a “filling the screen” picture before executing
Auto Adjust.
H-Offset Shift the screen slightly to left or right
V-Offset Shift the screen slightly up or down
Size Adjust the picture size
Phase Adjust the DB15 picture signal sampling phase. It can affect the definition. Wrong value can
result to the interference
Position Reset Reset the parameters of current menu to defauIt value
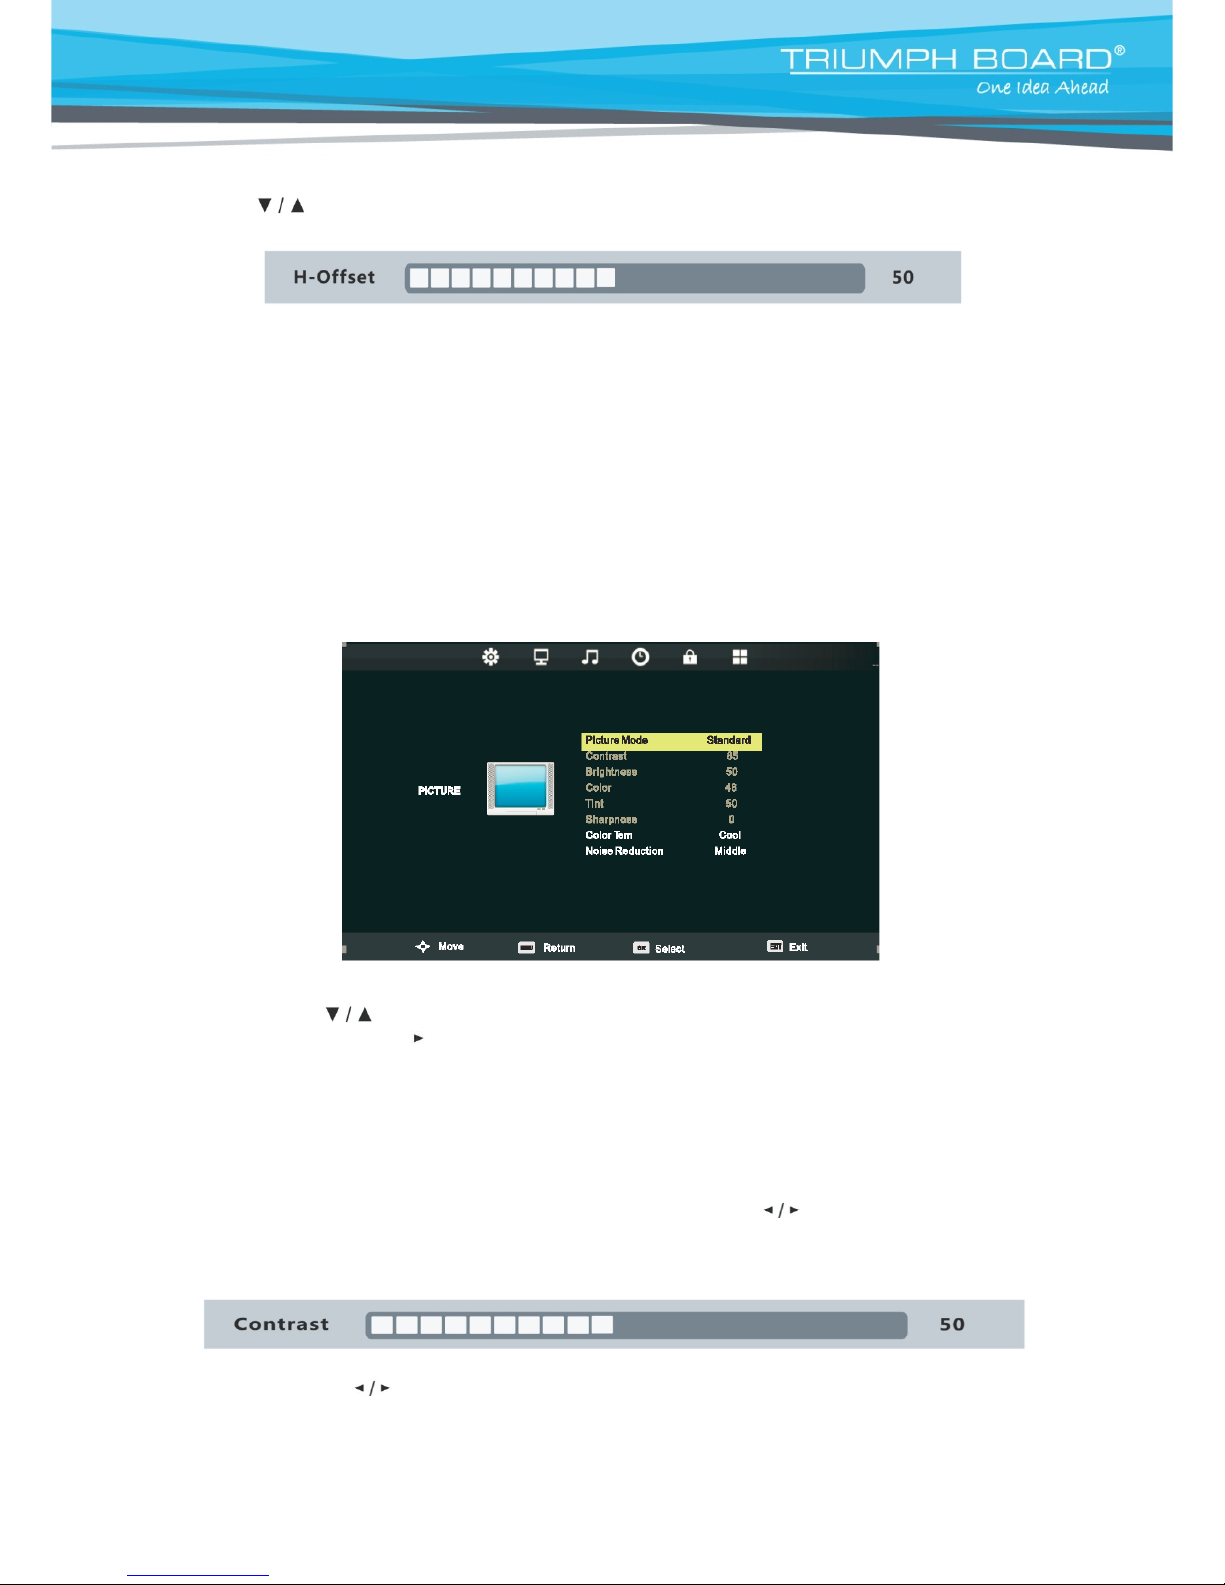
6.5) Picture
Menu
a) Press to highlight one of the following options
b) Press ENTER or enter next sub-menu to adjust it
c) Press EXIT to clear on-screen menu or MENU back to the previous menu
Picture Mode
When Picture Mode is set to Personal, the following settings can be manually adjusted
Press P.MODE shortcut button on the remote control to select picture mode directly
Contrast/Brightness/Color/Tint/Sharpness
Highlight the item and press and a process bar appears then press to adjust the value. Tint is
available in analog TV or NTSC-system AV or S video modes
Press MENU to back the Picture Settings menu
Color Tem Press to select the color temperature that you feel comfortable
Normal Basicall y will be acc epted b y most people
Cool means a high color temperature that will feel cool
Warm means a low color temperature that will feel warm

30
Noise Reduction Off/Low/Medium/High
You can clear up analog TV signal by reducing the dot noise. This feature is not available at PC or
Media source.
120 Hz
Pass – higher touch speed (default)
AV – higher touch performance
6.6) Sound
Menu
Sound Mode Standard/Dynamic/Sports/Personal
Only in Personal mode, the follow items can be adjusted.
Bass Adjust the low frequency band response.
Treble Adjust the high frequency band response.
Balance Adjust the level of sound coming from the left or right speaker.
Auto Volume Set to reduce the fluctuation of the sound between channels and programs
automatically.
SPDIF MODE Off Auto PCM. Select the SPDJF mode.
AD Switch Set AD switch on or off.
6.7) Time
Menu
Press MENU to display the main menu and press
to
select the Time
Menu.

31
Clock and Time Zone can be used only in DTV mode
CIock It will get tim e f rom the digital input signal
Time Zone Select the time zone of your for region
NOTE: Clock and Time Zone display only for DTV mode
Sleep Time Select the time in minutes that you want the TV to shut off automatically after you set
the time. Cancel by setting it to Off
Auto SIeep Select the time in hours that you want the TV to remain on after your last operation.
Cancel by setting it to Off
OSD Timer Select the time in seconds that you want the on-screen-display to remain on after your
last operation
6.8) Lock Menu
Press MENU to display the main menu and press to select the Lock Menu
Lock System The default password is “0000”, and the master password is “4711”. The following
items will work only when Lock system is set to ON
Set Password You can set a new password
Block program You can view the locked program by entering the password
Parental Guidance Set the TV rating based on age
6.8.1) Block Program

32
Press to select the program then press the green button to lock it
NOTE: If program is locked, you should enter password to view
6.9) Setup
Menu
Some menu items are available only with a digital or analog tuner connected.
Press MENU to
display
the main
menu,
and
press to
select the Setup
Menu.
OSD language Set on-screen-display menu language.
TT Language Set Tele-text language.
Hearing Impaired Set the hearing impaired mode on or off
PVR File System check and set the PVR file system
Record List Select to view the record list.
Aspect Ratio Set the display aspect ratio till the picture is fit onto the screen. The options are
different according to different input source.
BIue Screen Set the screen background color blue or not when no valid signal input. When
analog TV input and has no signal, snow noise will display if this option is cleared.
First Time Installation For detail, see page 24
Reset Recall the factory settings
Software Update (USB) Update your TV FW set by downloading update file "**.bin. in USB
6.10) EPG
Press the EPG button on the remote control to enter EPG menu

33
a) Press the RED button to enter the Record menu. You can setup a timer for scheduled
recording
b) Press the GREEN button to display the detail information about program
c) Press the YELLOW button to display the schedule list which will show all the timers you
have set for reminding and recording
d) Press the BLUE button to setup a timer for reminding if you want the TV to remind you to
watch a specified program when it´s going to start
NOTE: When the time appointment is in conflict a warning message will appear

34
7) Troubleshooting
Remote control out
of order
1.Check whether there is an object between remote control and TV receiver
2.Check whether the batteries polarities in remote control are correct
3.Check whether the batteries are drained
The unit shuts
down automatically
1.Sleeping mode setting
2.Check whether there is a sudden power failure
3.Check for signal to system and control
Internal PC mode
Out of signal
1. Check display setting. Press INPUT button to select PC source
2. Check the resolution
3. Adjust the Hs & Vs (synchronization) in the menu. Press the MENU
button on the
remote control and choose in menu SCREEN horizontal and vert ical sync. Only in
the case of VGA connections.
Background
streaking
1. Choose auto adjust
2. Adjust clock and phase. Press the MENU button on the remote c ontr ol and
choose in menu SCREEN horizontal and vertical sync. Only in the case of VGA
connections.
False color
1. Check the VGA
2. Adjust Chroma, brightness and contrast. Press the P. MODE button on the
remote control and set Chroma, brightness and contrast.
Unsupported
format
1. Choose auto adjust
2. Adjust clock and phase
Touch Function
Touch function
void
1.Check Touch Service driver is installed correctly
2.Reinstall driver
3.Check whether the touch pen is working properly
Video not working properly
No picture/No
sound
1.Check POWER status
2.Check the signal cable
3.Check if the internal PC is turned on

35
Picture trembles
1.Check the signal cable
2.Check for other electronics interrupting signal
Poor picture
1. Adjust Chroma, brightness and contrast in the menu. Press the P. MO DE button
on the remote
control and set Chroma, brightness and contrast.
2.Check the signal cable
Audio not working properly
No sound
1. Check the mute key.
2. Adjust volume.
3. Check the audio cable.
Only o ne speaker
works
1. Adjust sound balance in the menu. Press MENU on the remote control, choose
SOUND item and BALANCE
2. Check the setting in sound control panel of computer.
3. Check the audio cable.
VGA-OUT
silence
1. Check for proper audio connection.
7.1) Software Reinstallation
All software packages that come with the MULTI Touch LED LCD are already installed on the internal MINI
PC (optional). If it is necessary to reinstall the software use an USB Flash Drive with software in USB ports
in MINI PC or in your external PC.
There is also possible to reinstall all programs from disk E in your internal MINI PC if was supplied with the
LED LCD screen (optional). Just simply click on “Computer” icon where you find three system disks: C,
D and E.
There are all programs in installation files added on disk E which you can use for reinstalling – e.g. in case
you reinstall your Operating system.

36
7.2.) Turning off the Touch keyboard in Windows
All TRIUMPH BOARD LED LCD Monitors are equipped with the best in class handwriting recognition
software MyScript Stylus and this premium software can be used optionally with any kind of text box.
The icon of this software will pop-up automatically.
See also the MyScript Stylus User Guide (help file) in MyScript St ylus folder on USB Flash Drive.
Active Touch keyboard feature in Windows can interfere with MyScript Stylus. We recommend you to
deactivate Windows Touch keyboard to use it properly:
1. Click on “Start” and choose “Control Panel”
2. Search and click on “Tablet PC settings”
3. Choose “Other”
4. Click on “Go to Input Panel Settings”
5. In “Opening” t ab dese lec t:
For tablet pen input, show the icon next to the text box
Use the Input Panel tab
6. Click OK
37
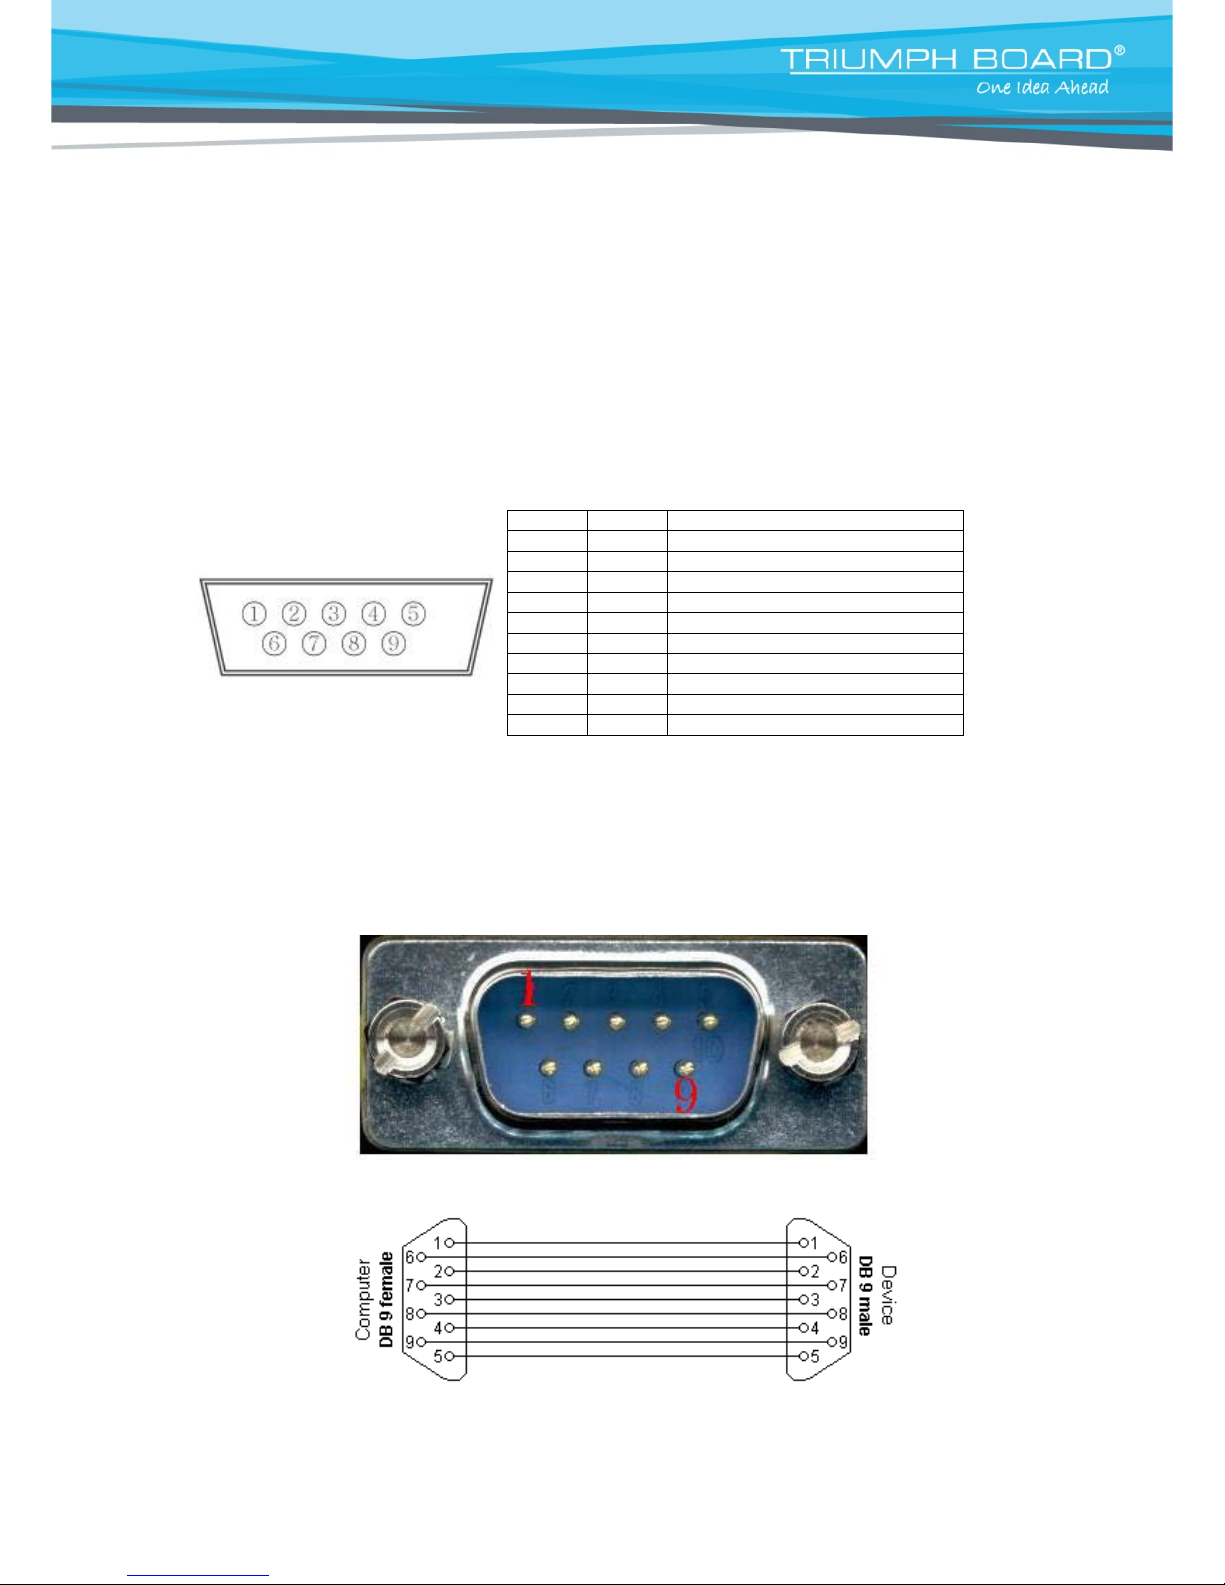
8) Software protocols
This document describes the hardware interface specification and software protocols of RS232 interface
communication between LED LCD and PC or other control unit with RS232 protocol.
8.1) Description
Hardware specification
LED LCD communica tio n po rt is in the rear side, near the Tuner.
1) Connector type: DSUB 9 Pin Male
2) Pin Assignment
Male DSUB 9Pin
(outside view)
Pin #
Signal
Remark
1
NC 2
TXD
Output to TV
3
RXD
Input from TV
4
NC
5
GND
6
NC 7
NC 8
NC 9
NC
frame
GND
Pin2 is TXD,Pin3 is RXD. Pin to Pin connection as below.

38
Seriál port communication setting:
Baud Rate Select: 9600bps (fixed)
Data bits: 8bits (fixed)
Parity: None (fixed)
Stop Bits: 1(fixed)
8.2) Protokol
Command format:
No.
Content
Description
Remark
1
0xAA
Head
fixed value
2
0xBB
fixed value
3
0xCC
fixed value
4 Main
5 subcommand
6
0x00
Length
valid data
7
checksum
checksum
Sum from No.4 to No.6.
8
0xDD
End
fixed value
9
0xEE
fixed value
10
0xFF
fixed value
IR code table:
Function
Mode
Code
Remark
Power
on/off
ON AA BB CC 01 00 00 01 DD EE FF
Customers need to open this “remote
wake up” function in factory menu.
Press “Menu+1379”>DEBUG>Item 6
switch on.
OFF
AA BB CC 01 01 00 02 DD EE FF
Switch
input signal
ATV
AA BB CC 02 01 00 03 DD EE FF
DTV
AA BB CC 02 02 00 04 DD EE FF
AV
AA BB CC 02 09 00 0B DD EE FF
YPBPR
AA BB CC 02 0B 00 0D DD EE FF
VGA1
AA BB CC 02 03 00 05 DD EE FF
VGA2
AA BB CC 02 04 00 06 DD EE FF
HDMI1
AA BB CC 02 06 00 08 DD EE FF
HDMI2
AA BB CC 02 07 00 09 DD EE FF
USB
AA BB CC 02 05 00 07 DD EE FF
PC
AA BB CC 02 08 00 0A DD EE FF
SV
AA BB CC 02 0A 00 0C DD EE FF
Volume
000—100 AA BB CC 03 00 xx ** DD EE FF
xx=volume vale. For example
xx=30(DEC)=1E(HEX),so xx=1E.
**=03+00+1E(HEX)=21
MUTE
AA BB CC 03 01 00 04 DD EE FF
UNMUTE
AA BB CC 03 01 01 05 DD EE FF
Aspect
16:9
AA BB CC 08 00 00 08 DD EE FF
4:3
AA BB CC 08 01 00 09 DD EE FF
ZOOM1
AA BB CC 08 02 00 0A DD EE FF

39
ZOOM2
AA BB CC 08 03 00 0B DD EE FF
AUTO
AA BB CC 08 04 00 0C DD EE FF
14:9
AA BB CC 08 05 00 0D DD EE FF
Panorama
AA BB CC 08 06 00 0E DD EE FF
Point to point
AA BB CC 08 07 00 0F DD EE FF
JUST SCAN
AA BB CC 08 08 00 10 DD EE FF
Channel in
TV
ATV 00-99 AA BB CC 05 00 XX ** DD EE FF
XX is Channel No.;** is XX+05,the
result is hexadecimal.
DTV 000-100 AA BB CC 06 YY XX ** DD EE FF
YY is the high part of the Channel, and
XX is the low part. **=06+YY+XX,
the result is hexadecimal.
PC Power
on/off
ON
AA BB CC 09 01 00 0A DD EE FF
OFF
AA BB CC 09 00 00 09 DD EE FF
Remote
control
function
(Part 1)
SLEEP
AA BB CC 07 00 00 07 DD EE FF
DISPLAY
AA BB CC 07 01 00 08 DD EE FF
P.MODE
AA BB CC 07 02 00 09 DD EE FF
S.MODE
AA BB CC 07 03 00 0A DD EE FF
NUM_1
AA BB CC 07 04 00 0B DD EE FF
NUM_2
AA BB CC 07 05 00 0C DD EE FF
NUM_3
AA BB CC 07 06 00 0D DD EE FF
NUM_4
AA BB CC 07 07 00 0E DD EE FF
NUM_5
AA BB CC 07 08 00 0F DD EE FF
NUM_6
AA BB CC 07 09 00 10 DD EE FF
NUM_7
AA BB CC 07 0A 00 11 DD EE FF
NUM_8
AA BB CC 07 0B 00 12 DD EE FF
NUM_9
AA BB CC 07 0C 00 13 DD EE FF
NUM_0
AA BB CC 07 0D 00 14 DD EE FF
-/--
AA BB CC 07 0E 00 15 DD EE FF
CH_RETURN
AA BB CC 07 0F 00 16 DD EE FF
ASPECT
AA BB CC 07 10 00 17 DD EE FF
SOURCE
AA BB CC 07 11 00 18 DD EE FF
MENU
AA BB CC 07 12 00 19 DD EE FF
EXIT
AA BB CC 07 13 00 1A DD EE FF
UP
AA BB CC 07 14 00 1B DD EE FF
DOWN
AA BB CC 07 15 00 1C DD EE FF
LEFT
AA BB CC 07 16 00 1D DD EE FF
RIGHT
AA BB CC 07 17 00 1E DD EE FF
ENTER
AA BB CC 07 18 00 1F DD EE FF
CH+
AA BB CC 07 19 00 20 DD EE FF
CH-
AA BB CC 07 1A 00 21 DD EE FF
VOL+
AA BB CC 07 1B 00 22 DD EE FF
VOL-
AA BB CC 07 1C 00 23 DD EE FF
FAV
AA BB CC 07 1D 00 24 DD EE FF
EPG
AA BB CC 07 1E 00 25 DD EE FF
TV/R
AA BB CC 07 1F 00 26 DD EE FF
NICAM
AA BB CC 07 20 00 27 DD EE FF
RECORD
AA BB CC 07 21 00 28 DD EE FF
SUBTITLE
AA BB CC 07 22 00 29 DD EE FF
AUTO
AA BB CC 07 23 00 2A DD EE FF
RED
AA BB CC 07 24 00 2B DD EE FF
GREEN
AA BB CC 07 25 00 2C DD EE FF

40
YELLOW
AA BB CC 07 26 00 2D DD EE FF
BLUE
AA BB CC 07 27 00 2E DD EE FF
TTX_MODE
AA BB CC 07 28 00 2F DD EE FF
TTX_UPDATE
AA BB CC 07 29 00 30 DD EE FF
Remote
control
function
(Part 2)
TTX_SIZE
AA BB CC 07 2A 00 31 DD EE FF
TTX_HOLD
AA BB CC 07 2B 00 32 DD EE FF
TTX_INDEX
AA BB CC 07 2C 00 33 DD EE FF
TTX_REVEAL
AA BB CC 07 2D 00 34 DD EE FF
TTX_SUBPAG
E
AA BB CC 07 2E 00 35 DD EE FF
TTX_PAGE_U
P
AA BB CC 07 2F 00 36 DD EE FF
TTX_PAGE_D
OWN
AA BB CC 07 30 00 37 DD EE FF
TTX_MIX
AA BB CC 07 31 00 38 DD EE FF
PAUSE
AA BB CC 07 32 00 39 DD EE FF
STOP
AA BB CC 07 33 00 3A DD EE FF
BACKWARD
AA BB CC 07 34 00 3B DD EE FF
FORWARD
AA BB CC 07 35 00 3C DD EE FF
PREV
AA BB CC 07 36 00 3D DD EE FF
NEXT
AA BB CC 07 37 00 3E DD EE FF
REPEAT
AA BB CC 07 38 00 3F DD EE FF
GOTO
AA BB CC 07 39 00 40 DD EE FF
DVD
Function 1
(optional)
DVD_PALY_P
AUSE
AA BB CC 04 00 00 04 DD EE FF
DVD_PAUSE
AA BB CC 04 01 00 05 DD EE FF
DVD_STOP
AA BB CC 04 02 00 06 DD EE FF
DVD_FF
AA BB CC 04 03 00 07 DD EE FF
DVD_FR
AA BB CC 04 04 00 08 DD EE FF
DVD_PREV
AA BB CC 04 05 00 09 DD EE FF
DVD_NEXT
AA BB CC 04 06 00 0A DD EE FF
DVD_1
AA BB CC 04 07 00 0B DD EE FF
DVD_2
AA BB CC 04 08 00 0C DD EE FF
DVD_3
AA BB CC 04 09 00 0D DD EE FF
DVD_4
AA BB CC 04 0A 00 0E DD EE FF
DVD_5
AA BB CC 04 0B 00 0F DD EE FF
DVD_6
AA BB CC 04 0C 00 10 DD EE FF
DVD_7
AA BB CC 04 0D 00 11 DD EE FF
DVD_8
AA BB CC 04 0E 00 12 DD EE FF
DVD_9
AA BB CC 04 0F 00 13 DD EE FF
DVD_0
AA BB CC 04 10 00 14 DD EE FF
DVD_10
AA BB CC 04 11 00 15 DD EE FF
DVD_RETUR
N
AA BB CC 04 12 00 16 DD EE FF
DVD_EJECT
AA BB CC 04 13 00 17 DD EE FF
DVD_A_B
AA BB CC 04 14 00 18 DD EE FF
DVD_ZOOM
AA BB CC 04 15 00 19 DD EE FF
DVD_SUBTIT
LE
AA BB CC 04 16 00 1A DD EE FF
DVD_DISPLA
Y
AA BB CC 04 17 00 1B DD EE FF

41
DVD_AUDIO
AA BB CC 04 18 00 1C DD EE FF
DVD_ANGLE AA BB CC 04 19 00 1D DD EE FF
DVD
Function 2
(optional)
DVD_MENU
AA BB CC 04 1A 00 1E DD EE FF
DVD_TITLE
AA BB CC 04 1B 00 1F DD EE FF
DVD_UP
AA BB CC 04 1C 00 20 DD EE FF
DVD_DOWN
AA BB CC 04 1D 00 21 DD EE FF
DVD_LEFT
AA BB CC 04 1E 00 22 DD EE FF
DVD_RIGHT
AA BB CC 04 1F 00 23 DD EE FF
DVD_ENTER
AA BB CC 04 20 00 24 DD EE FF
DVD_GOTO
AA BB CC 04 21 00 25 DD EE FF
DVD_REPEAT
AA BB CC 04 22 00 26 DD EE FF
DVD_SETUP
AA BB CC 04 23 00 27 DD EE FF
DVD_DEVICE
AA BB CC 04 24 00 28 DD EE FF
DVD_PROG
AA BB CC 04 25 00 29 DD EE FF
DVD_CARD
AA BB CC 04 26 00 2A DD EE FF

42
9) Care and Maintenance
With proper care, your unit will give you many years of service. Please follow these guidelines to get the
maximum performance from your unit.
a) Cleaning
Unplug the unit from the wall outlet before cleani ng or pol ishi ng it
Do not use liquid cleaners or aerosol cleaners
Use a cloth lightly dampened with water for cleaning the exterior of the unit
Repeat several times, do not handle liquids near or on the unit
b) Don't use machine for a long time
Don't use system for long periods of time, please unplug unit when not in use
To prevent system failures and power supply surges use power surge protector
c) Display modes
YPbPr Mode
Resolution / Display Mode Vertical frequency (Hz)
480p / 480i 60
576p / 576i 50
720p 50/60
1080i 50/60
1080p 50/60
VGA Mode
Resolution / Display Mode Vertical frequency (Hz)
640*480 / 800*480 60
1024*768 / 1280*800 60
1920*1080 50/60
HDMI / PC Mode
Resolution / Display Mode Vertical frequency (Hz)
480p / 480i 60
576p / 576i 50
720p 50/60
1080i 50/60
1080p 50/60

43
10) Repair Service and Contact s
Please contact your local supplier for the warranty and technical service or find all warranty
conditions and service partners on our website www.triumphboard.com
. For any questions
please email us to info@triumphboard.com
TRIUMPH BOARD a.s.
Neklanova 122/15
128 00 Praha 2
Czech Republic
EU
Phone: +420 224 910 221
Fax: +420 224 910 218
E-mail: info@triumphboard.com
www.triumphboard.com
Notices
Every effort ha s been made to e ns ure all information contai ne d in this user guide is correct, but
the accuracy or completeness is not guaranteed. Before using this product, you must evaluate
it and determine if it is suita ble for your intended applicat ion. You assu me all risks and liability
associated with such use. Any statements related to this p roduct which is not contained in this
manual or any contrary sta tements containe d on your purchase order sha ll have no force of
effect unless expressly agreed upon, in writing, by this company.
Without this company permission, reproduction or reprinting this user guide or any part is
prohibited.
 Loading...