

Page 1
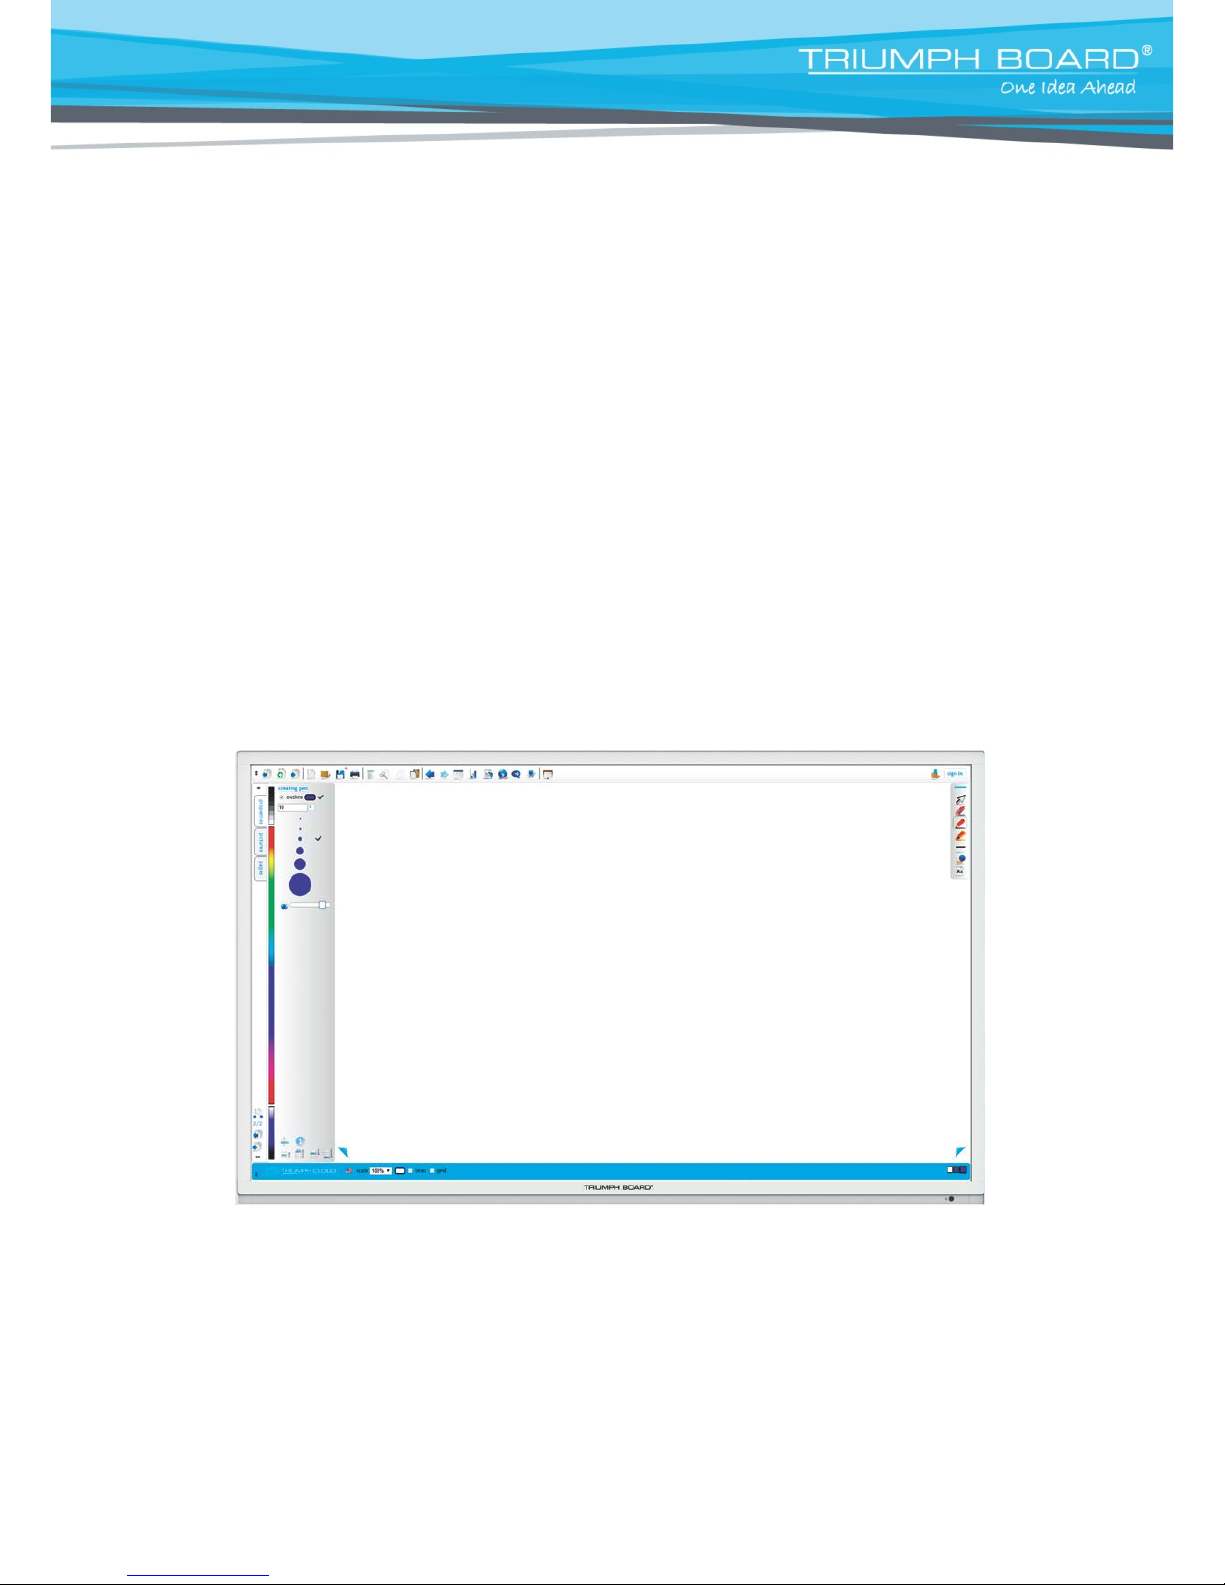
User Manual
INTERACTIVE FLAT PANEL
55”/ 65”/ 70”
2016
Page 2

2
Contents
1. Product Description .............................................................................................. 4
2. Technical Specifications ...................................................................................... 5
3. Safety Warning ...................................................................................................... 8
Placement .......................................................................................................................................... 8
Power Supply .................................................................................................................................... 8
Screen ................................................................................................................................................ 8
Range of Visibility ............................................................................................................................. 8
Temperature ...................................................................................................................................... 8
Humidity ............................................................................................................................................. 8
Ventilation .......................................................................................................................................... 9
Headphones ...................................................................................................................................... 9
Standby .............................................................................................................................................. 9
Battery ................................................................................................................................................ 9
Caution ............................................................................................................................................... 9
Notes for Cleaning ............................................................................................................................ 9
Notes for Maintenance ..................................................................................................................... 9
4. Preparing for Installation ................................................................................... 10
Unpacking ........................................................................................................................................ 10
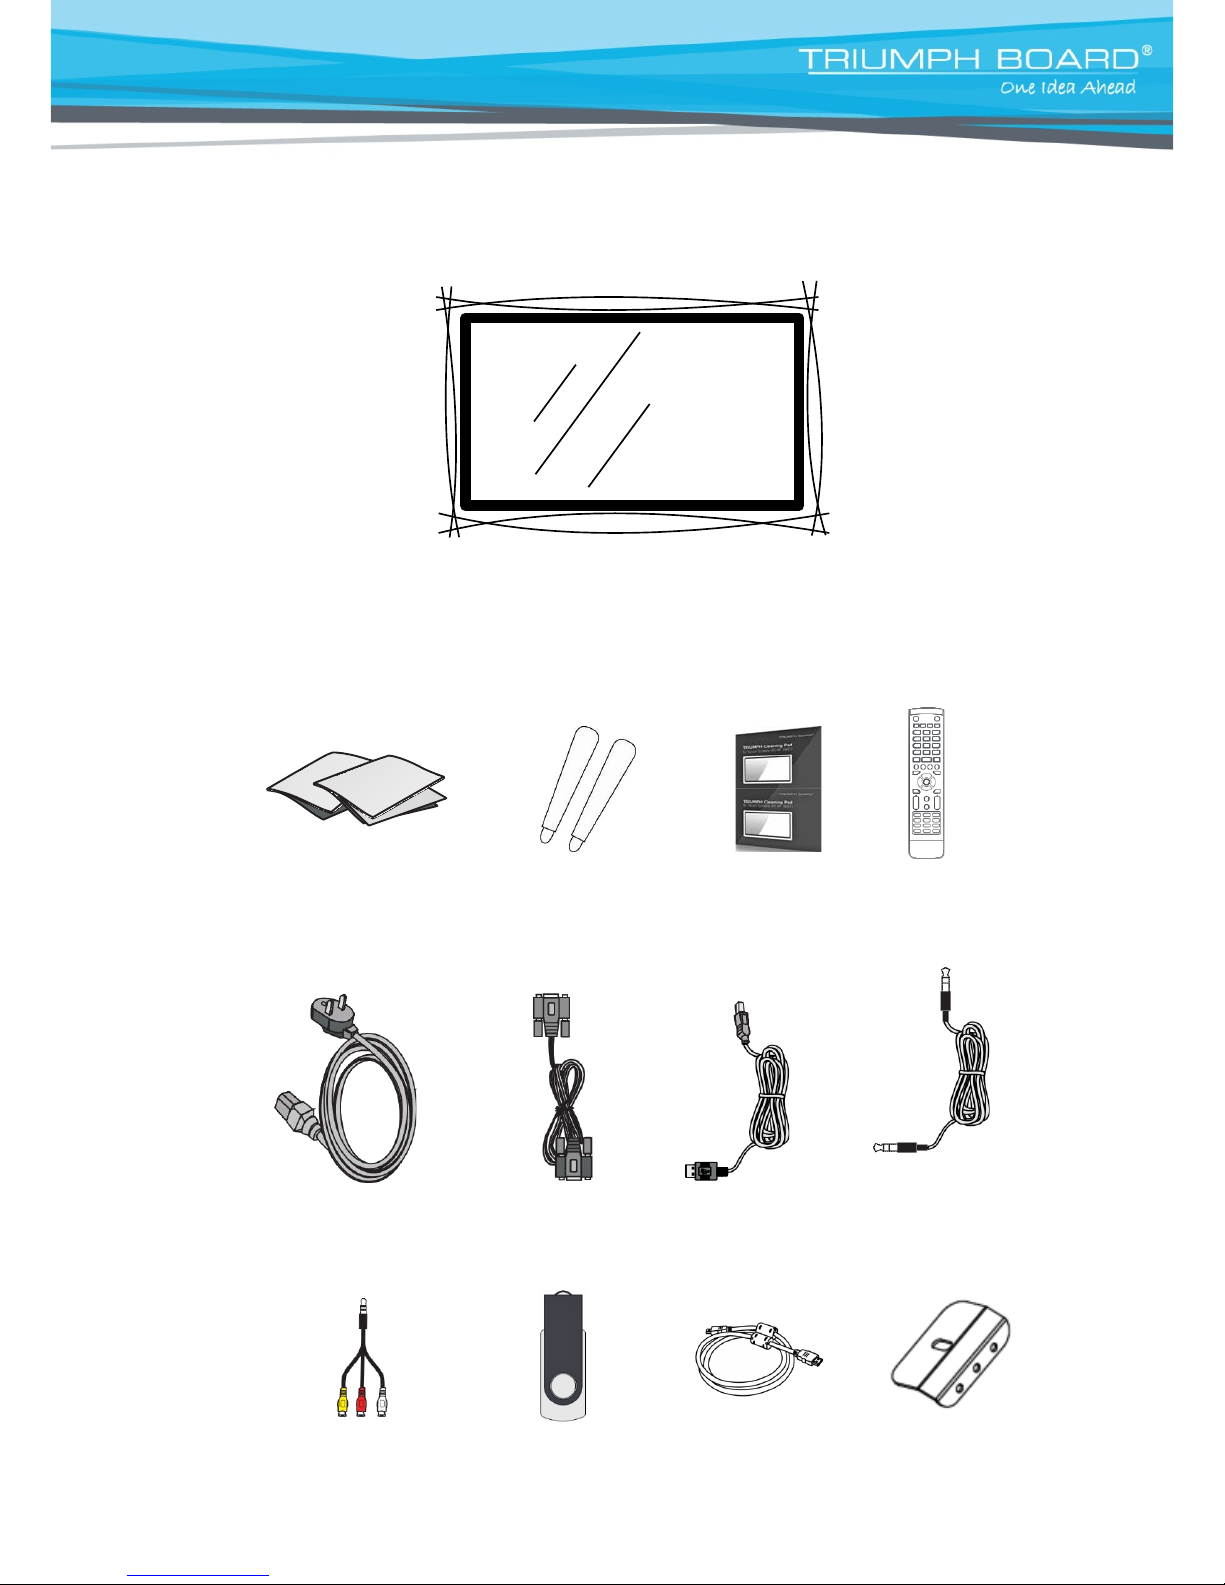
Accessories ..................................................................................................................................... 10
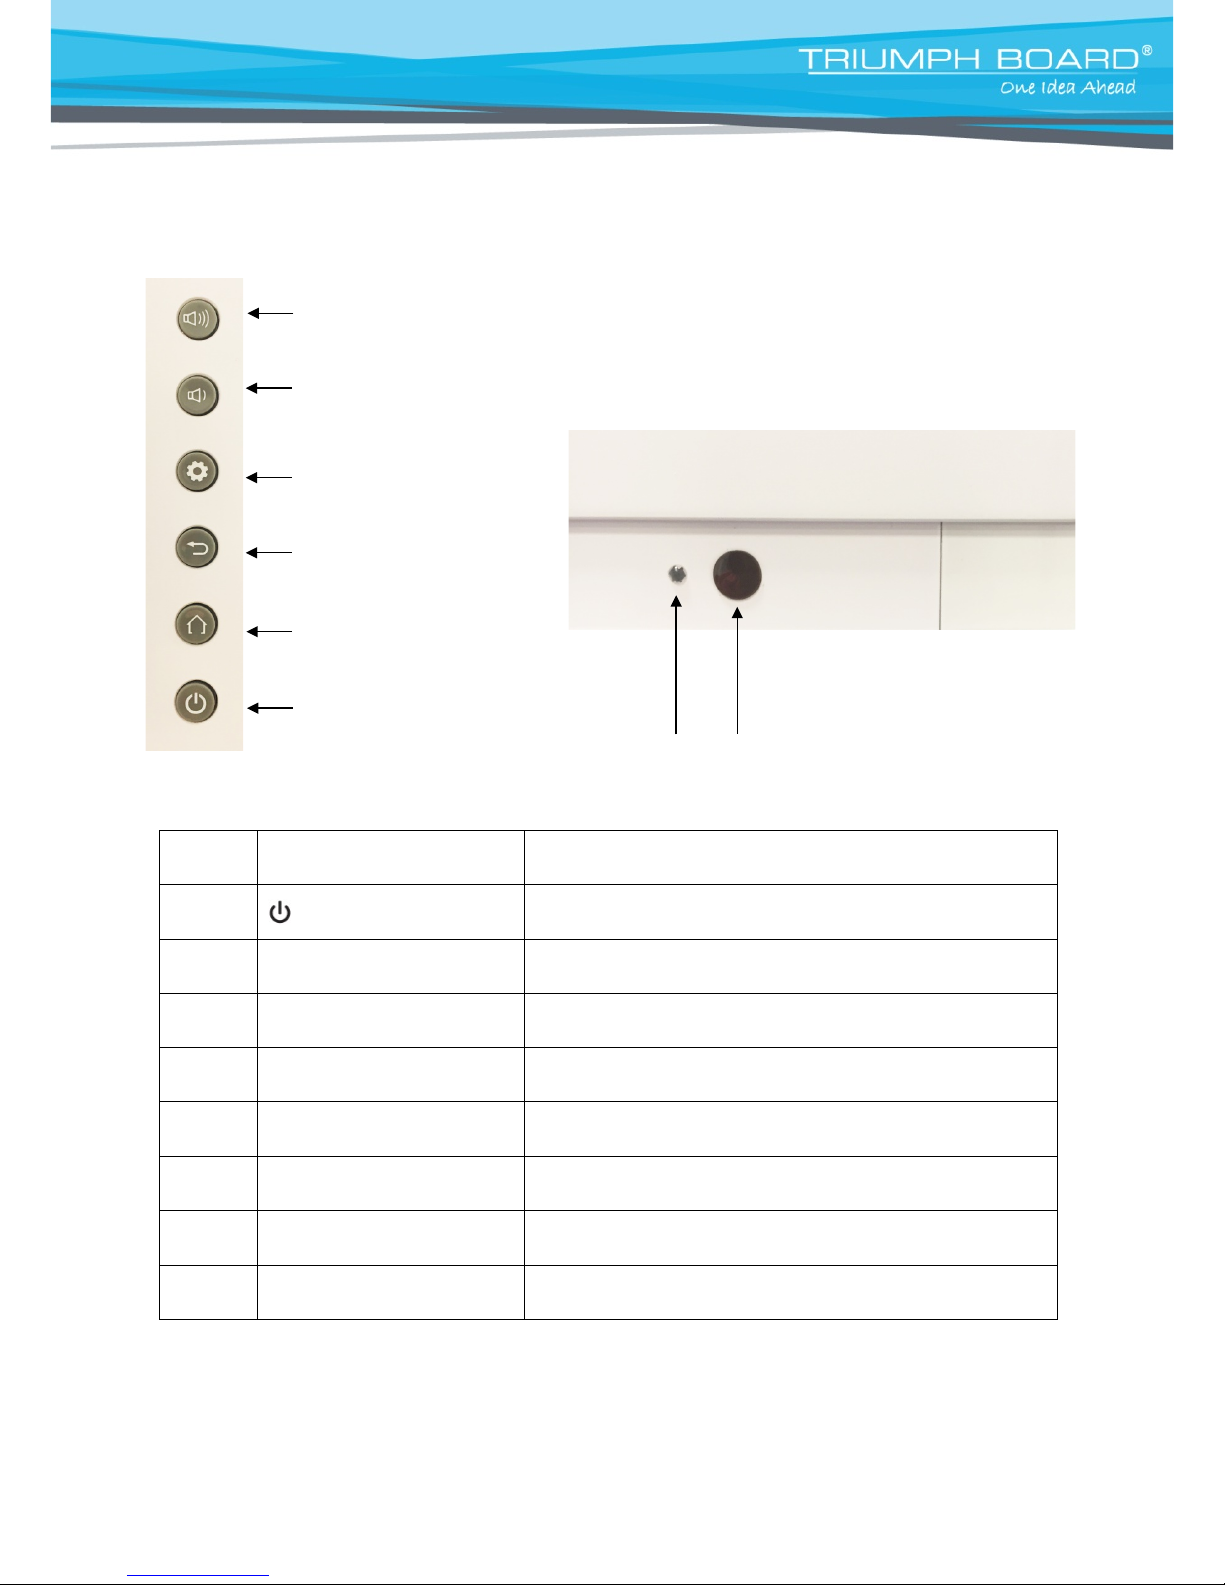
Control Panel ................................................................................................................................... 11
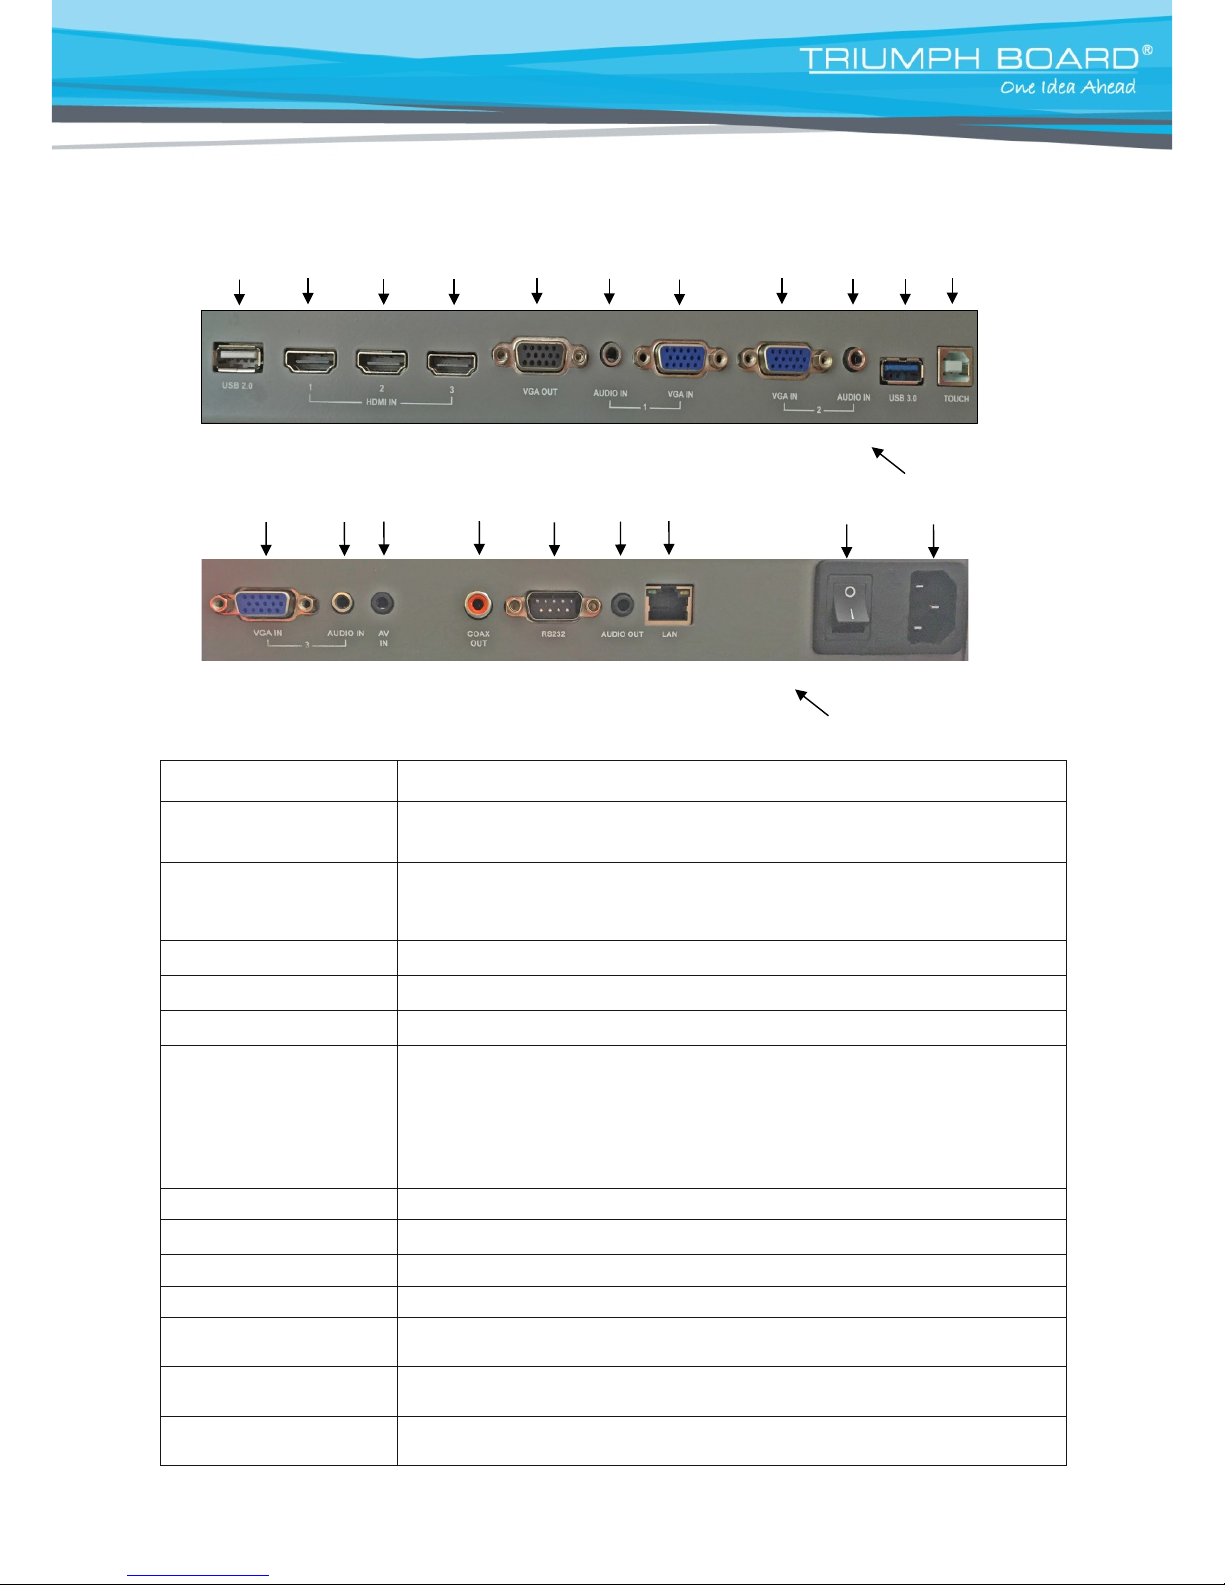
5. IFP Interface Inputs, Outputs ............................................................................. 12
Mini PC 10A Inputs, Outputs (optional) ....................................................................................... 13
6. Remote
control
................................................................................................... 14
Remote control button
instructions
........................................................................................... 14
Detailed function description of remote control buttons ........................................................... 15
Remote control use instructions ................................................................................................... 16
Install Batteries ............................................................................................................................... 16
Range of remote control ................................................................................................................ 16
7. Connection and Setting ...................................................................................... 17
External Computer and Touch Connection .................................................................................. 17
Audio and video equipment ........................................................................................................... 18
AV ..................................................................................................................................................... 18
HDMI1 / HDMI2 / HDMI3 .................................................................................................................. 18
Coaxial connection ......................................................................................................................... 19
Video output connection ................................................................................................................ 19
VGA output connection .................................................................................................................. 19
USB Equipment connection .......................................................................................................... 20
Network cable connection ............................................................................................................. 20
Microphone connection ................................................................................................................. 20
WAN connection ............................................................................................................................. 20
Page 3

3
RS232 Serial port connection ........................................................................................................ 21
8. Menu Operation................................................................................................... 22
One Touch menu operation ........................................................................................................... 22
Settings menu ................................................................................................................................. 22
Input settings .................................................................................................................................. 22
Volume and Brightness settings ................................................................................................... 23
Audio settings ................................................................................................................................. 23
Display settings .............................................................................................................................. 24
Screen settings ............................................................................................................................... 25
9. More Settings (Advanced settings) ................................................................... 26
Advanced settings menu ............................................................................................................... 26
System tool menu ........................................................................................................................... 27
10. Android System Interface ................................................................................ 28
Main Interface .................................................................................................................................. 28
TB Finder ......................................................................................................................................... 29
Browser ............................................................................................................................................ 30
Settings ............................................................................................................................................ 30
Apps ................................................................................................................................................. 30
TB Comenius Lite ........................................................................................................................... 31
11. Multimedia File Playback Interface .................................................................. 32
Image play ...................................................................................................................................... 32
Audio play ..................................................................................................................................... 32
Video play ...................................................................................................................................... 33
13. Troubleshooting ................................................................................................ 34
14. Software protocols ........................................................................................... 35
15. Maintenance ...................................................................................................... 40
16. Display mode .................................................................................................... 40
17. Repair Service and Contacts ........................................................................... 41
Page 4

4
1. Product Description
TRIUMPH BOARD INTERACTIVE FLAT PANEL
TRIUMPH BOARD INTERACTIVE FLAT PANEL is a fully integrated, professional, multi-touch FULL
HD IFP. The IR LED optical technology enables ten finger touches simultaneously using fingers,
stylus or even a pointer.
TRIUMPH BOARD INTERACTIVE FLAT PANELs are an effective presentation tool for showing
pictures, data, presentations, thoughts, ideas and business forecasts interactively. Engage the
audience with the presentation with direct control of the computer through the INTERACTIVE FLAT
PANEL.
TRIUMPH BOARD MINI PC10A for INTERACTIVE FLAT PANEL (optional)
TRIUMPH BOARD 10A is the powerful, fully integrated personal computer for the TRIUMPH BOARD
INTERACTIVE FLAT PANEL.
TRIUMPH BOARD PC10A is equipped with an Intel i5 processor, integrated graphics and 4 GB RAM,
which ensures high power for running current sof tware. A 500 GB hard disk provides sufficient
capacity for saving and storing user data.
TRIUMPH BOARD MINI PC10A is the ideal addition to TRIUMPH CLOUD, and the Displ ay Note
software bundle which are delivered together with the TRIUMPH BOARD IFP.
Page 5

5
2. Technical Specifications
TRIUMPH BOARD 55” INTERACTIVE FLAT PANEL
EAN:
8592580112348
Screen Type:
TFT LCD/ A Standard/ LED backlight
Resolution:
1920 x1080
Refresh rate:
6 ms, 60 Hz, 1200:1
Display Area:
1209.6(H) × 680.4(V)
Outline Dimensions:
1304 x 800 x 104 mm
Package Dimensions:
1580 x 970 x 215 mm
Net / Gross weight:
39/55 kg
TRIUMPH BOARD 65” INTERACTIVE FLAT PANEL
EAN:
8592580112355
Screen Type:
TFT LCD/ A Standard/ LED backlight
Resolution:
1920 x1080
Refresh rate:
6 ms, 60 Hz, 1400:1
Display Area:
1428.48 (H) x 803.52 (V)
Outline Dimensions:
1523 x 924 x 104 mm
Package Dimensions:
1710 x 1140 x 215 mm
Net / Gross weight:
53/72 kg
TRIUMPH BOARD 70” INTERACTIVE FLAT PANEL
EAN:
8592580112362
Screen Type:
TFT LCD/ A Standard/ LED backlight
Resolution:
1920 x1080
Refresh rate:
8 ms, 60 Hz, 4000:1
Display Area:
1549.44 (H) x 871.56 (V)
Outline Dimensions:
1665 x 1015 x 104 mm
Package Dimensions:
1940 x 1200 x 215 mm
Net / Gross weight:
64/87 kg
Touch System
Sensing Type:
Infrared Transmission (multi-touch)
Response Time:
< 15ms
Response Area:
Single point, opaque objects of any diameter
≥5mm
Multi-point, opaque objects of any diameter ≥8mm
Scan Frequency:
200Hz
Output Coordinates:
32767×32767
Communication Mode:
Full-speed USB
Writing Screen:
Mohs hardness of 7
PC System:
mini PC10A (Optional)
Page 6

6
Inputs and Outputs
HDMI:
3
CVBS:
1
R/L(CVBS):
1
Coaxial Digital Audio Output:
1
Audio IN:
3
VGA OUT:
1
VGA IN:
3
RS232
1
Touch OUT:
1
Audio Output (headphone)
1
USB 2.0:
1
USB 3.0:
1
LAN (RJ45)
1
AC IN:
1
Power:
1
Sound System
Power Amplification:
2x10W
Sound:
Surround
Power
Power Requirements:
100 – 240 V AC 50/60 Hz
Overall Power Consumption:
< 200 - 350 W *
Standby Power Consumption:
< 0,5 W
* depends on the model
Ambient Conditions
Operation Temperature
0 – 40 °C
Operation Humidity:
10 – 90% RH
Storage Temperature:
- 20 C to 60 °C
Storage Humidity:
10 – 95% RH
TRIUMPH BOARD MINI PC10A for IFP
EAN:
8592580112164
Processor:
Intel i5
Graphics:
Integrated Intel® HD Graphics
Sound Card:
Integrated High Definition Audio Stereo
Networking:
Integrated 10/100/1000 Mbps adapted
Memory:
4 GB DDRIII
Hard Drive:
500 GB SATA
WIFI:
802.11 ac, WiFi 2,4/5 GHz + Bluetooth 4.0
USB:
4x USB 2.0 and 2x USB 3.0
Page 7

7
Lan Port (RJ45):
1
VGA Out:
1
Mini Display Port
1
HDMI Output
1
Audio:
Operation System:
Side Headphone and Mic Ports
Microsoft Windows 10 Professional (OEM)
64-bit MultiLang
Net / Gross Weight:
1.8 / 2.14 kg
Android System
System Version
Android 4.2.1
CPU
ARM Cortex A9 dual-core CPU
GPU
Quad-Core
RAM
1.5GB
ROM
8GB
Page 8

8
3. Safety Warning
Before using the device, please read the instructions carefully.
Placement
• Do not put the device on surfaces that are unstable, easy to tilt or which can fall.
• Do not put the device in places with direct sunlight, or near sources of heat, such as
electric heaters or strong light sources.
• Do not use the device next to radiation emitti ng equipment.
• Do not put the device in damp places or places where it might be exposed to moisture or
liquids.
• Do not insert any items inside of the device.
• Do not place heavy objects on the device.
Power Supply
• Please verify compatibility between the voltage value on back shell nameplate and the
main power supply voltage value.
• In case of thunderstorm and lightning weather, please unplug power cord and antenna
plug.
• When no one is indoors or the device will not be in use f or an extended period of time,
please unplug the power cord.
• Please protect the power cord from physical or mechanical damage.
• Please use the special power cord, and do not modify or extend the power co rd.
• Please check and make sure the AC power ground wi re i s c onnected.
Screen
• When writing on screen, please do not use hard or sharp objects instead of styluses.
• When the screen requires cleaning, please unplug the power cord first.
• Please use a soft, dust-free, dry cloth to wipe the screen.
• Do not use water or a spray cleaner to clean the device.
• Please contact the service center for internal cleaning of the device.
• Do not display image with high brightness on the screen for a long time.
Range of Visibility
• The best distance between eyes of viewer and scre en is 5 to 7 times of screen diagonal.
• The best viewing angle between eyes of viewer and l i st ener and screen is within 176
degrees up and down, left and right.
Temperature
• Do not place the device near an electric radiator or heating uni t.
• When moving the device from a low temperature area to a high t em perat ure area, before
connecting the device to power, please leave the device idle in the new environment for
some time to allow for temperature adjustment, i n order to sufficiently diffuse internal
condensation prior to powering on.
• The Device's normal working temperature is 0 ~ 40
°C, storage temperature is -20~60°C
Humidity
• Do not expose the machine to rain, moisture, or places near water.
• Please make sure the indoor environment is dry and cool, the machine’s normal working
humidity is 10~90%, storage humidity is 10~90%.
Page 9

9
Ventilation
• Please place the machine in ventilated places, and ensure machine's good heat
dissipation.
• Please ensure ventilation spaces 10 cm on the sides and back, and 20 cm on the top of
the machine.
Headphones
• Extended use of headphones at high volumes may damage hearing.. If external
headphones/earbuds are needed, please turn dow n the machine volume in advance.
Standby
• The standby button on the front of device body will not
completely shut off the device, but only place the device in
standby mode
.
Battery
• Please dispose of used batteries in the proper ma nner and
recycle.
• To avoid danger, please do not let children touch the bat tery,
and do not put the battery into water.
Caution
• This product is a Level 4 product, and may cause radi o
interference in the living environment. In thi s ca se, the user
may be required to take practical measures to mitigate the
effects.
Notes for Cleaning
• There are vents on back cover, please do not use an y liquid
on or spray this area directly during cleaning.
Power Switch Status Signs
• “I” means power on, “O” means power off.
Notes for Maintenance
• This machine can only be maintained by certified engineer.
Page 10
10
4. Preparing for Installation
Unpacking
Accessories
Quick start guide, styluses, cleaning pads, remote control, power cords (UK, US, EU), VGA
cable, touch OUT USB, headphone cable, AV cable, USB Flash Drive and VC Camera Bracket.
Quick Start Guide
2x Stylus
Cleanning
Pads
Remote control
Power Cord (US, UK, EU)
AV Cable
VGA Cable
USB Flash Drive
USB Cable
a
Headphone Cable
HDMI Cable
VC Camera Bracket
Page 11
11
Control Panel
6
5
4
3
2
1
7 8
Number Item Function Description
1
Power on/off
2 HOME HOME button: back to main interface
3 BACK Return button: return to previous menu level
4 MENU Menu button: call up function menu
5 VOL - Volume down button: turn volume down
6 VOL + Volume up button: turn volume up
7 Power indicator
Indicator color shows the status of power on/off (on -
green / standby mode - orange / off - off)
8
Remote control signal
Receiver
Receive the remote control signal.
Page 12
12
5. IFP Interface Inputs, Outputs
1 2 2 2 3 4 5 5 4 1 6
right side of IFP
5 4 7 8 9 10 11 12 13
right bottom side of IFP
Ports Description of Function
1. USB 2.0
USB 3.0
Connect USB devices such as mobile hard disk, USB disk, USB keyboar
d
and mouse, USB drives, etc.
2. HDMI IN
High-definition multimedia interface signal input, for connecting to
PC (personal computer) with HDMI output, set-top box, or other
video
device and can also implement touch function.
3. VGA OUT
Connected to display devices with VGA input function
4. AUDIO IN
External computer audio input
5. VGA IN
External computer image input
6. TOUCH
External computer touch signal input. Default touch function is available
under internal computer. When connecting an external computer, in
addition to connecting external computer VGA and audio signals, the
external computer's USB port needs to be connected to the equipment.
Under the condition that driver is installed, the external computer can be
touch controlled through the equipment (touch function is effective in PC
,
VGA and HDMI channel by default)
7. AV IN
Composite video and audio input
8. COAX OUT
Coaxial output
9. RS232
Serial interface, used for mutual transfer of data between devices
10. Audio Out
3,5mm connector Audio Out
11. LAN
LAN interface, connecting RJ45 terminals.
(This network port is only used for Android system)
12. POWER SWITCH
Power switch, to open and shut down AC power suppl y ON/OFF
13. AC IN
AC power input, connecting AC power supply
Page 13
13
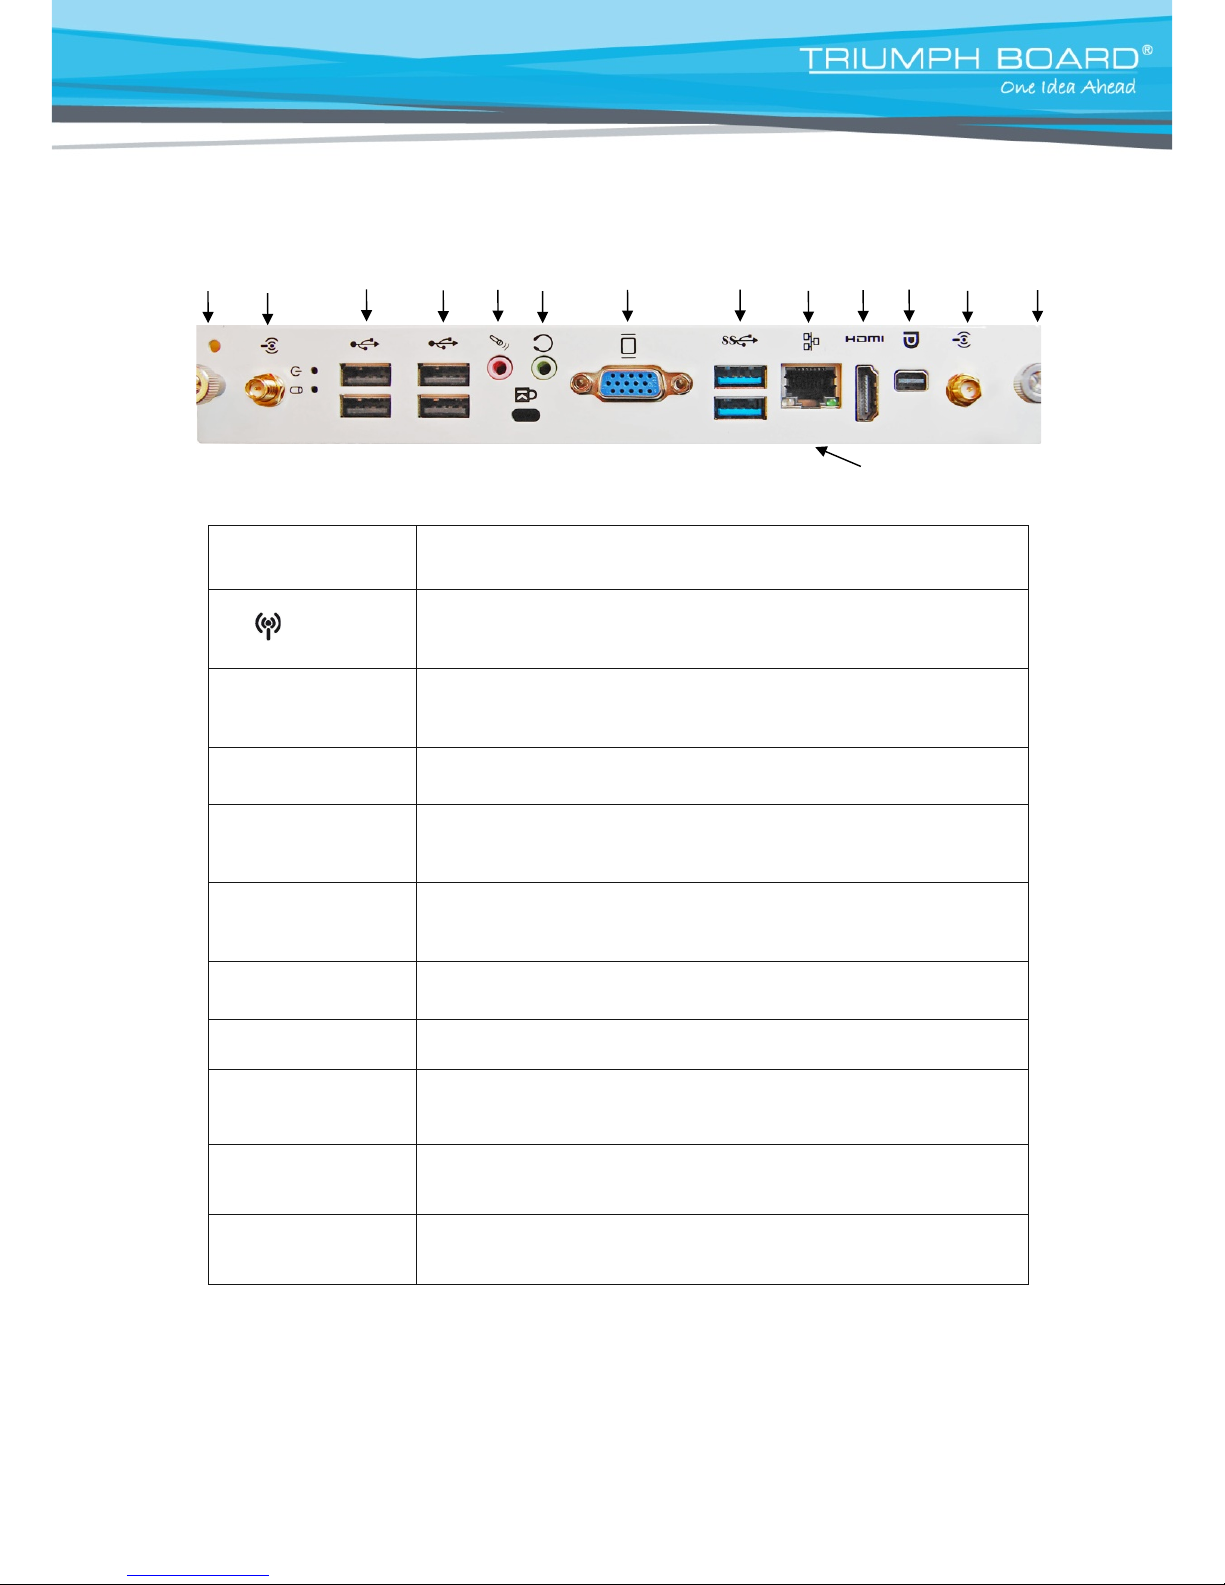
Mini PC 10A Interface Inputs, Outputs (optional)
23 14 22 22 21 20 19 18 17 16 15 14 23
)
Mini PC 10A (optional)
Ports Description of Function
14.
WIFI antenna interface
15. MINI DISPLAY
PORT OUT
Connection to device with Displa y Port input function
16. HDMI OUT
Connection to devices with HDMI input function
17. LAN (RJ45)
Network interface, connecting RJ45 port to connect to the Internet
.
(This network port is only used for PC)
18. USB 3.0
USB 3.0 interface to connect USB devices, such as mobile hard
disk, U disk, USB keyboard and mouse, USB drives, etc.
19. VGA OUT
Connection to display device with VGA input function
20. EARPHONE
Connected to device with headphone input function
21. MIC
Connect to device with microphone voice collection
(used for recording function)
22. USB 2.0
USB 2.0 interface to connect USB devices, such as mobile hard
disk, U disk, USB keyboard and mouse, USB drives, etc.
23. SCREWS
Screws for fixing the Mini PC into the slo t of IFP.
Page 14
14
6. Remote
Control
Remote control button
instructions
14
Page 15
15
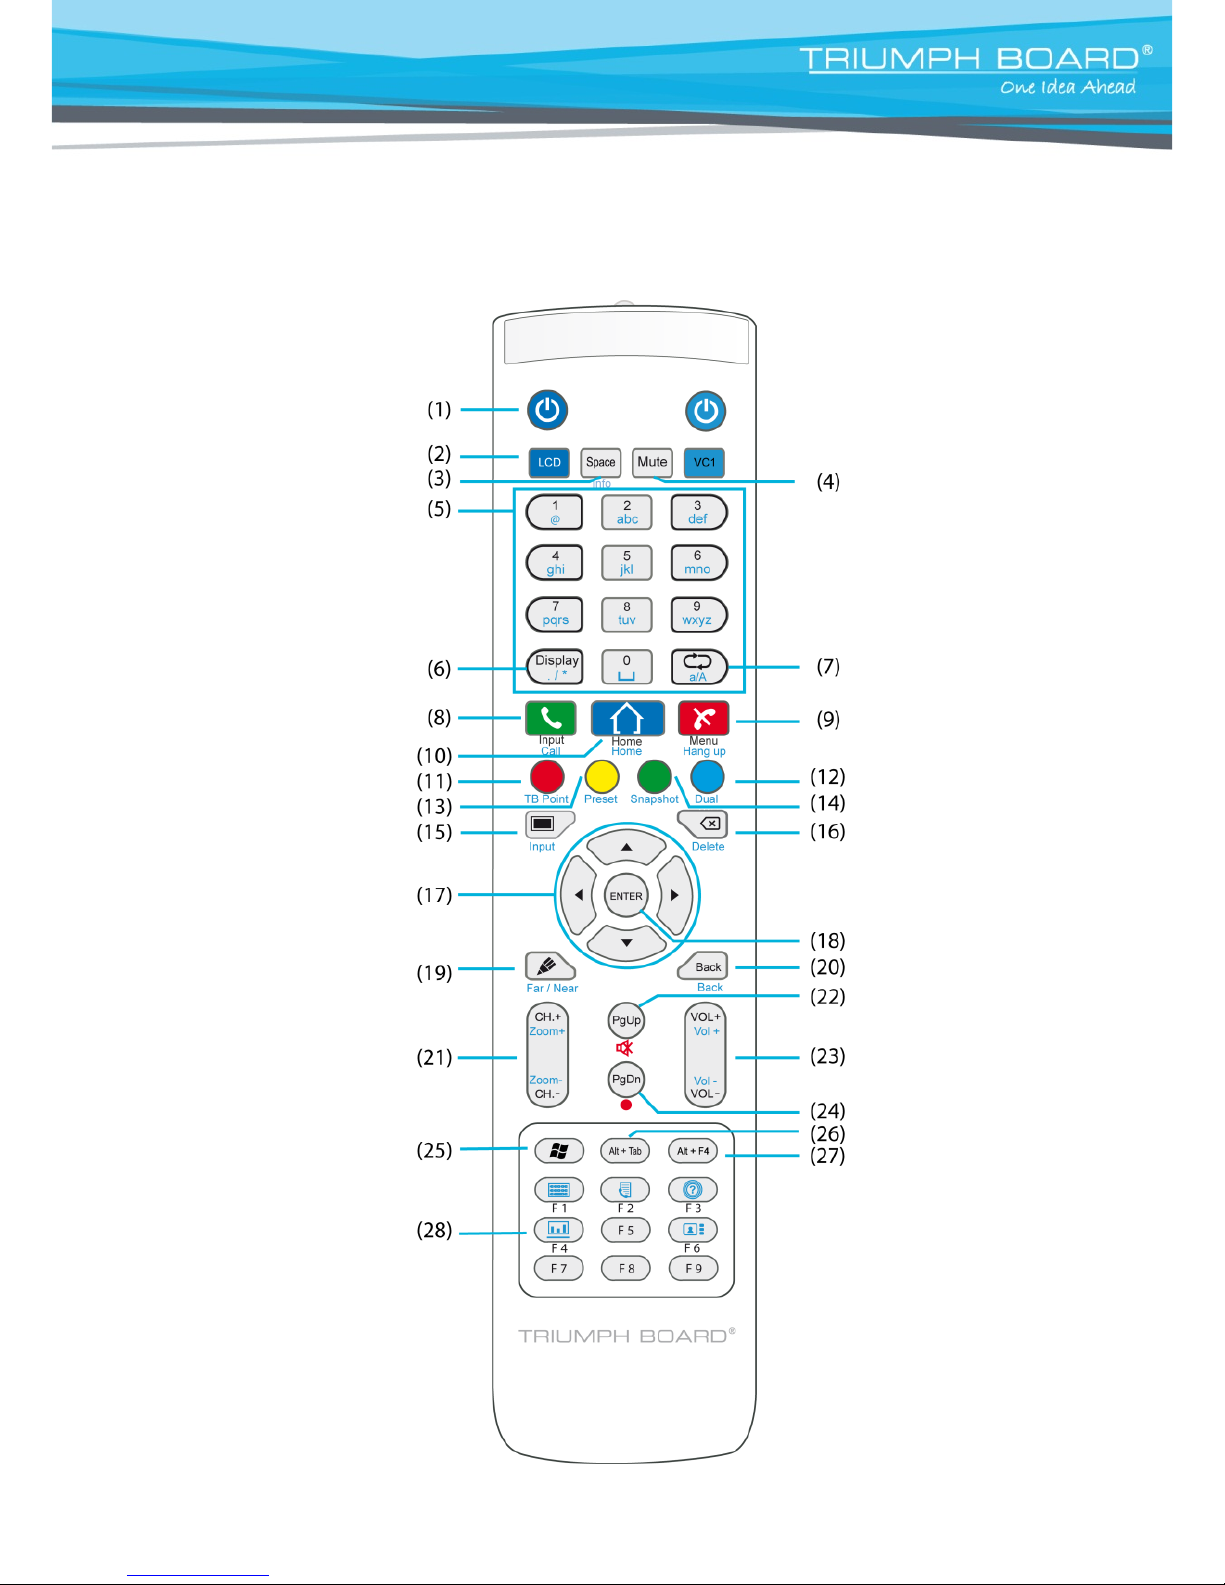
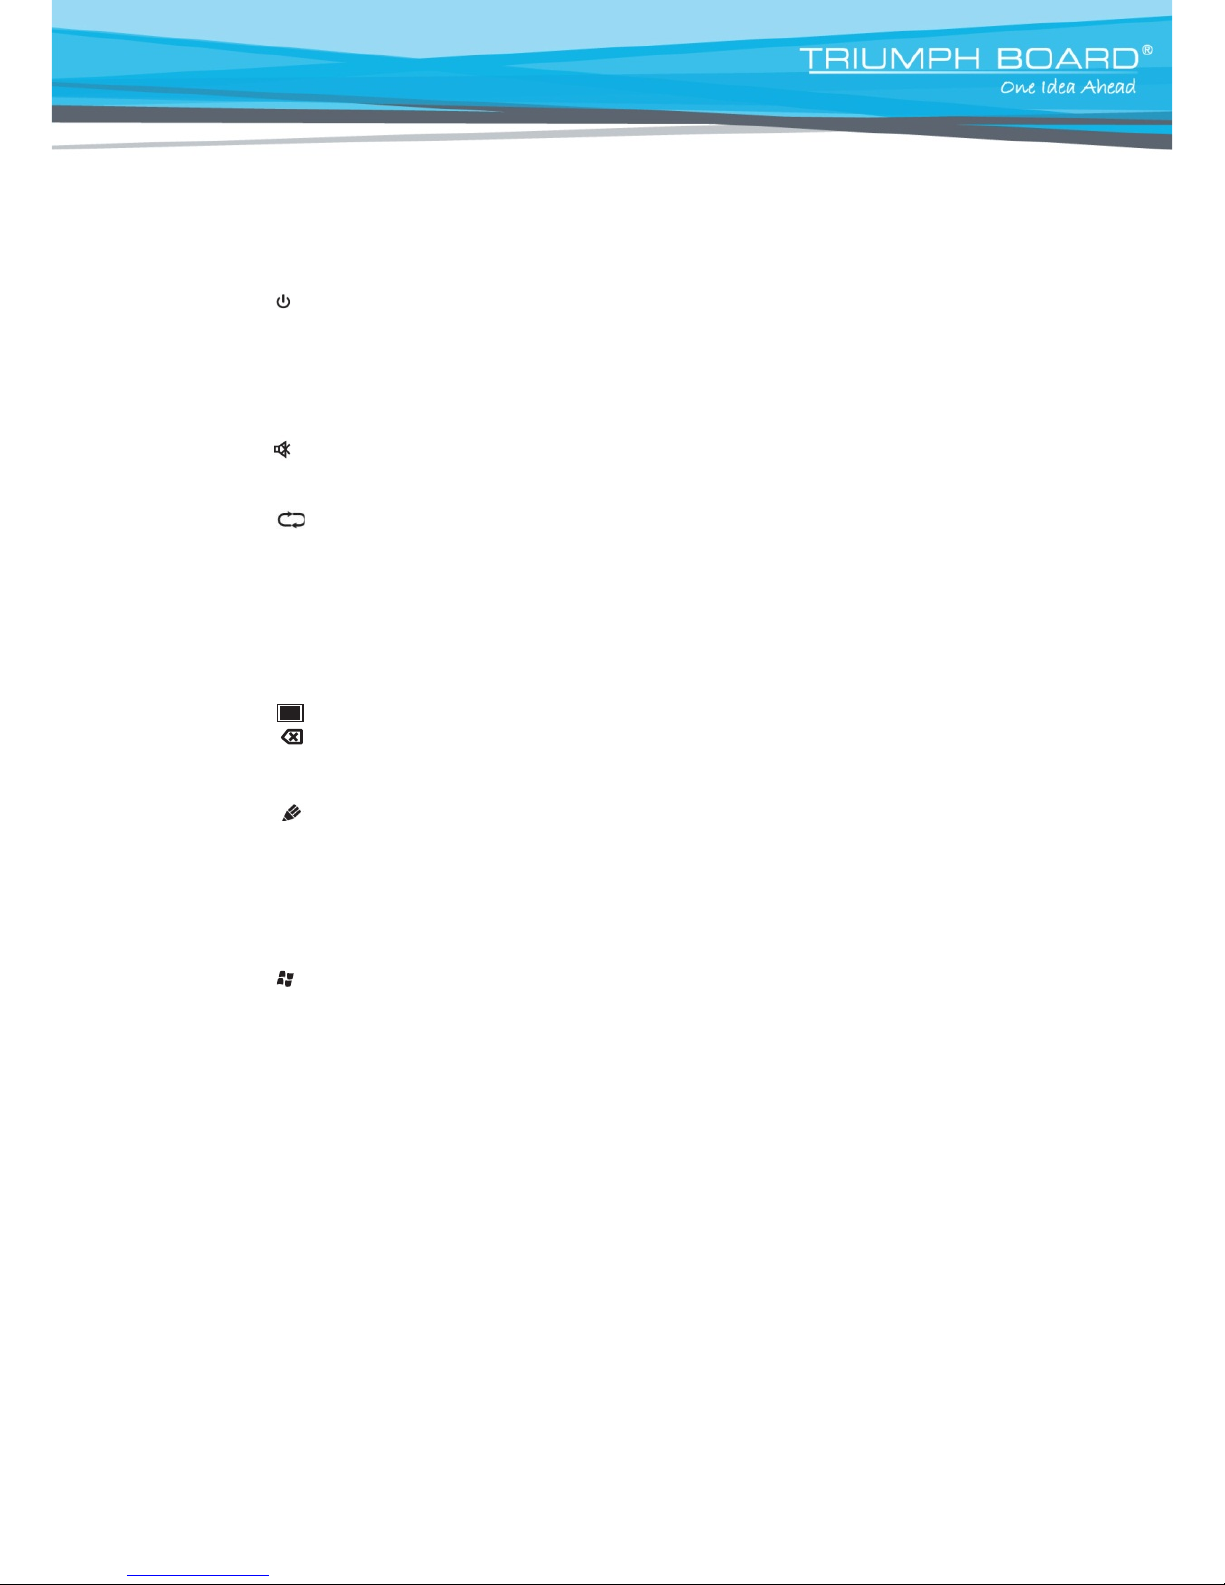
Detailed function description of remote control buttons
1. : Press this button to enter standby mode when power is on; Click this button to
switch on in standby mode
2. LCD: Press this bu tton to control your LED LCD screen.
Note: Your Remote control has been set-up automatically for the function of your
LED LCD.
3. SPACE: Built-in computer Space key
4. : Mute switch
5. NUMERIC KEYS: Numeric input keys
6. DISPLAY: Display channel information
7. : Function button
8. INPUT: Input signal source selection key, choose di fferent sources as needed
9. MENU: Set ting menu button, press this b utton to pop up
10. HOME: Android system main screen button
11. RED: TV function bu tton, Lock/Unlock touch function
12. BLUE: TV function bu tton
13. YELLOW: TV function bu tton
14. GREEN: TV func tion button
15. :Single key for blank screen
16. :Backspace key
17. Direction keys
18. ENTER: Confirmation key, press this key to confirm mode selection
19. Quickly start writing software (TBC Lite in Android), sel ect writing pen quickly if
software is running
20. BACK: Return key
21. CH. +, CH.-: Function button
22. PG UP: Built-in computer page (previous page)
23. VOL+,VOL-: Volume switch key
24. PG DN: Built-in computer page (next page)
25. : Built-in computer Windows key
26. ALT+TAB: Built-in computer spacebar Alt + Tab
27. ALT+F4: Built-in c omputer program window close button
28. F1-F8: Built-in computer F1 – F9 function keys
NOTE: In case of no built-in computer, all function keys relating to the computer are regarded as
having no operating functions.
Page 16
16
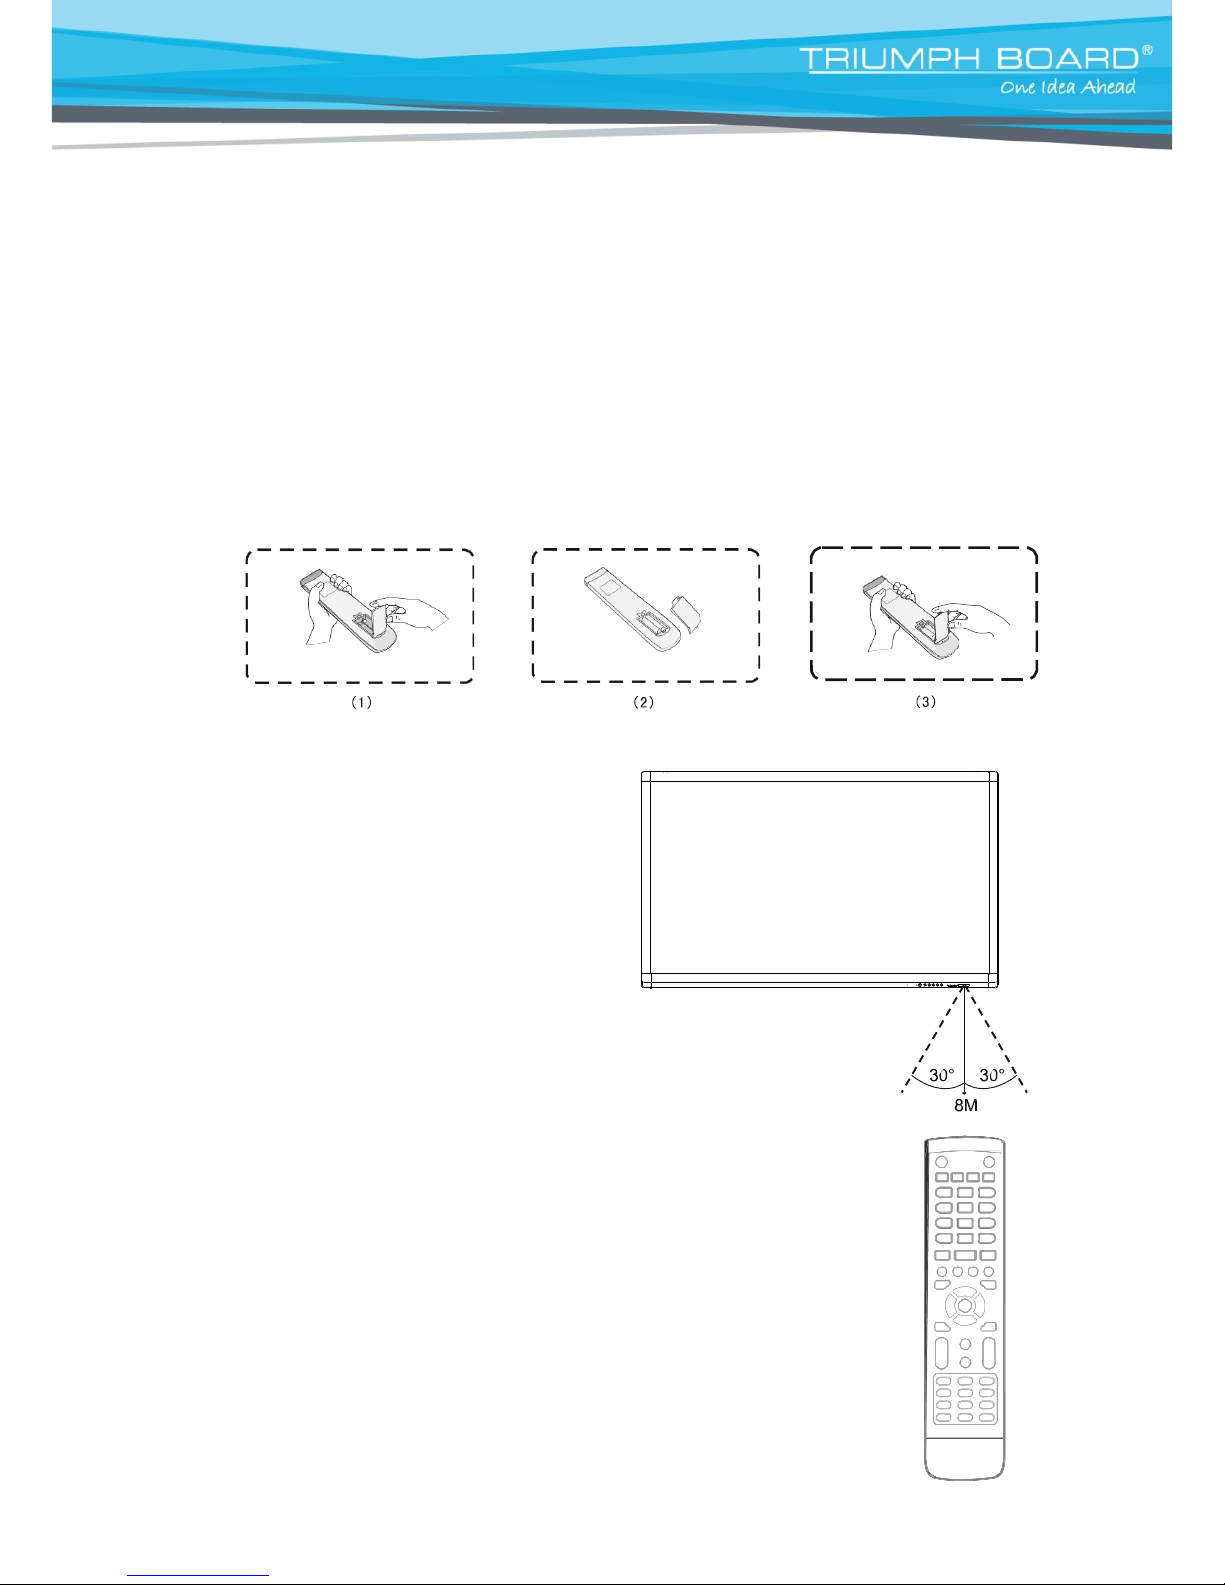
Remote Control Use Instructions
Install Batteries (batteries not included)
1) Open back cover of battery compartment on the back of remote control
2) Install AAA type batteries according to the corresponding electrode, make
sure battery positive and negative poles are correctl y plac ed ("+"to"+", "-" to
"-"), please do not mix old and new batteries
3) After batteries are installed, close the back cover of battery compartment, and snap the clip
fastener shut against the bottom of the remote.
Range of remote control
Remote control can function normally within the range of 8 meters distance, 30
degrees left and right from the remote control receiver; in order to protect the
environment, please dispose of waste batteries in a designated recycling box.
CAUTION
RISK OF EXPLOSION IF BATTERY IS
REPLACED WITH AN INCORRECT TYPE
DISPOSE OF USED BATTERIES
ACCORDING TO THE INSTRUCTIONS
Page 17
17
7. Connection and Set Up
CAUTION
For the safety of you and the device, please do not conne ct any power cord before the external
device has been prepared.
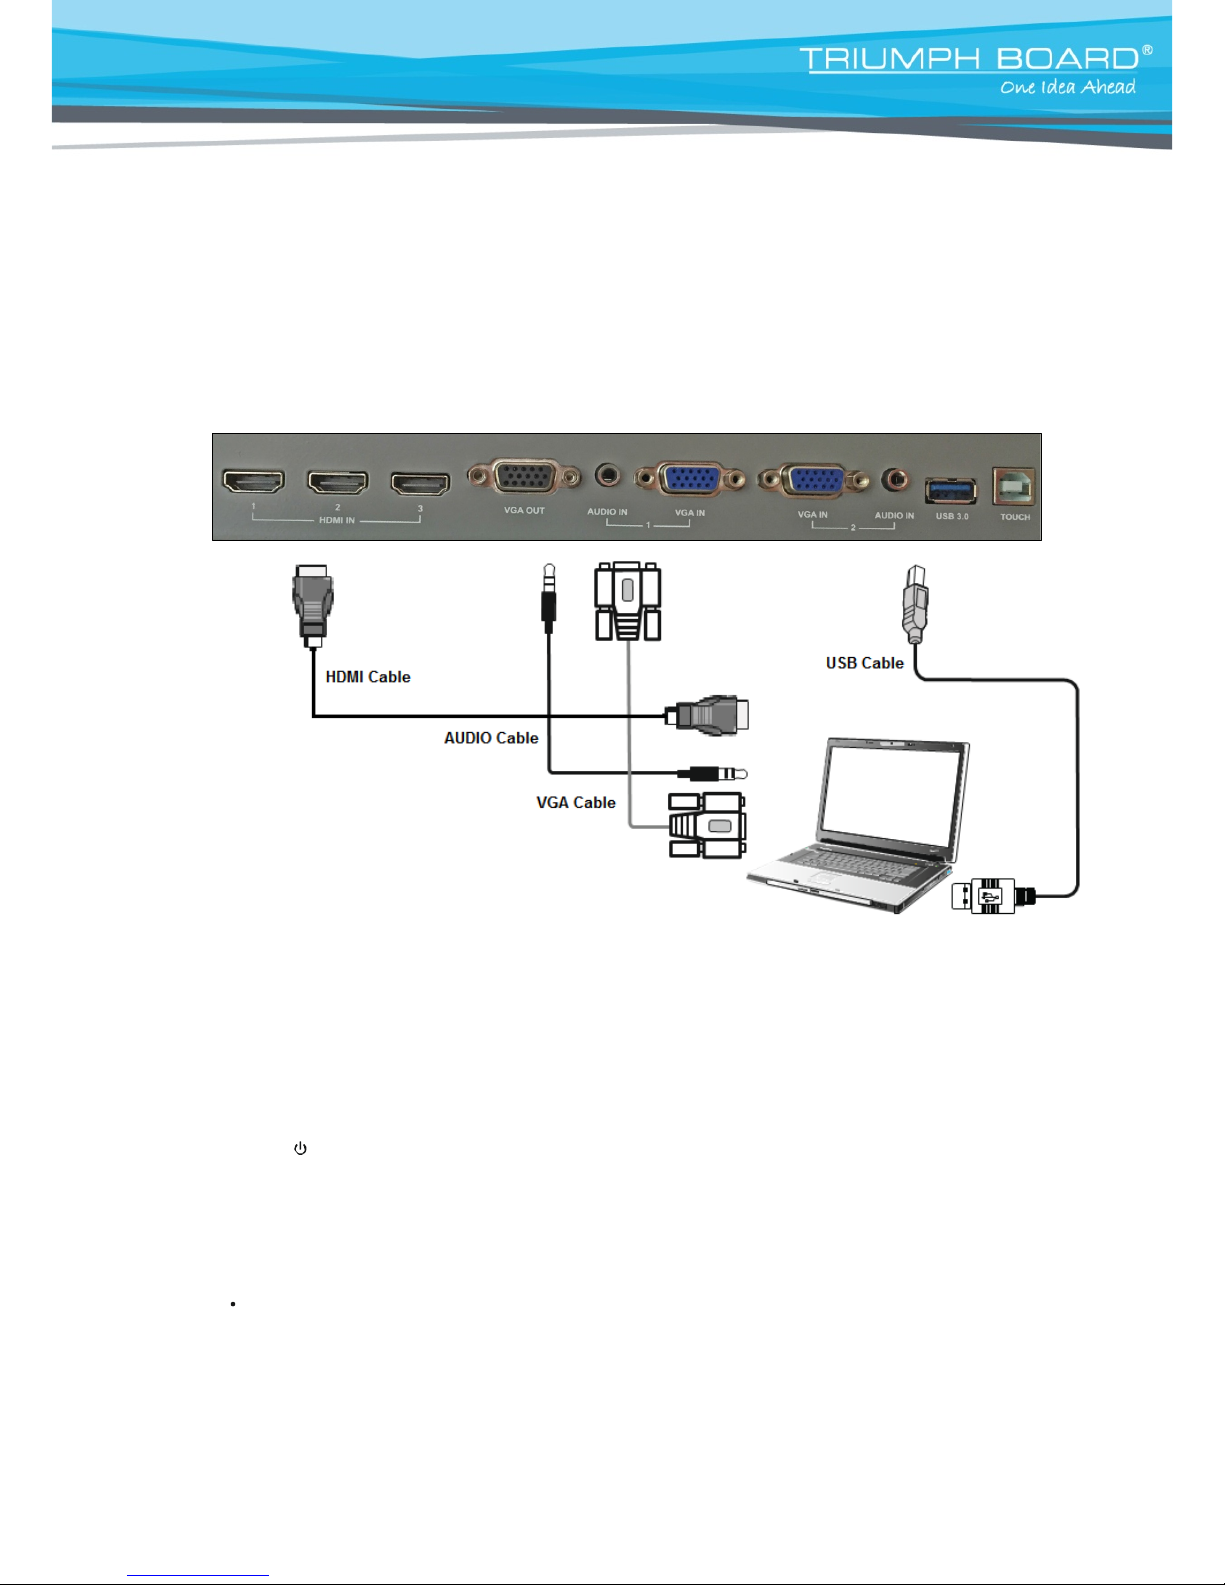
External Computer and Touch Connection
(1) Use VGA line to connect to VGA output port of external computer, and
meanwhile use headphone audio line to connect to external computer
audio output interface.
(2) Use USB line to connect to external computer USB port.
(3) After connection is completed, plug in power cor d, and switch POWER
to on.
(4) Start external computer.
(5) Press key, and the equipment is powered on.
(6) Press the INPUT key to switch to VGA channel.
NOTE:
External computer input, equipment's best resoluti on is 1920x1080.
External computer can also connect to the equipment through the HDMI cable
Recommended computer configuration:
2.0GHZ Processor, 1GB Memory, min. 256 color displ ay card
1GB Available Hard Drive, Support Resolution 80 0*600, 1024*768
VGA-OUT/HDMI-OUT, Audio-OUT, USB Interface
Page 18
18
Audio and video equipment
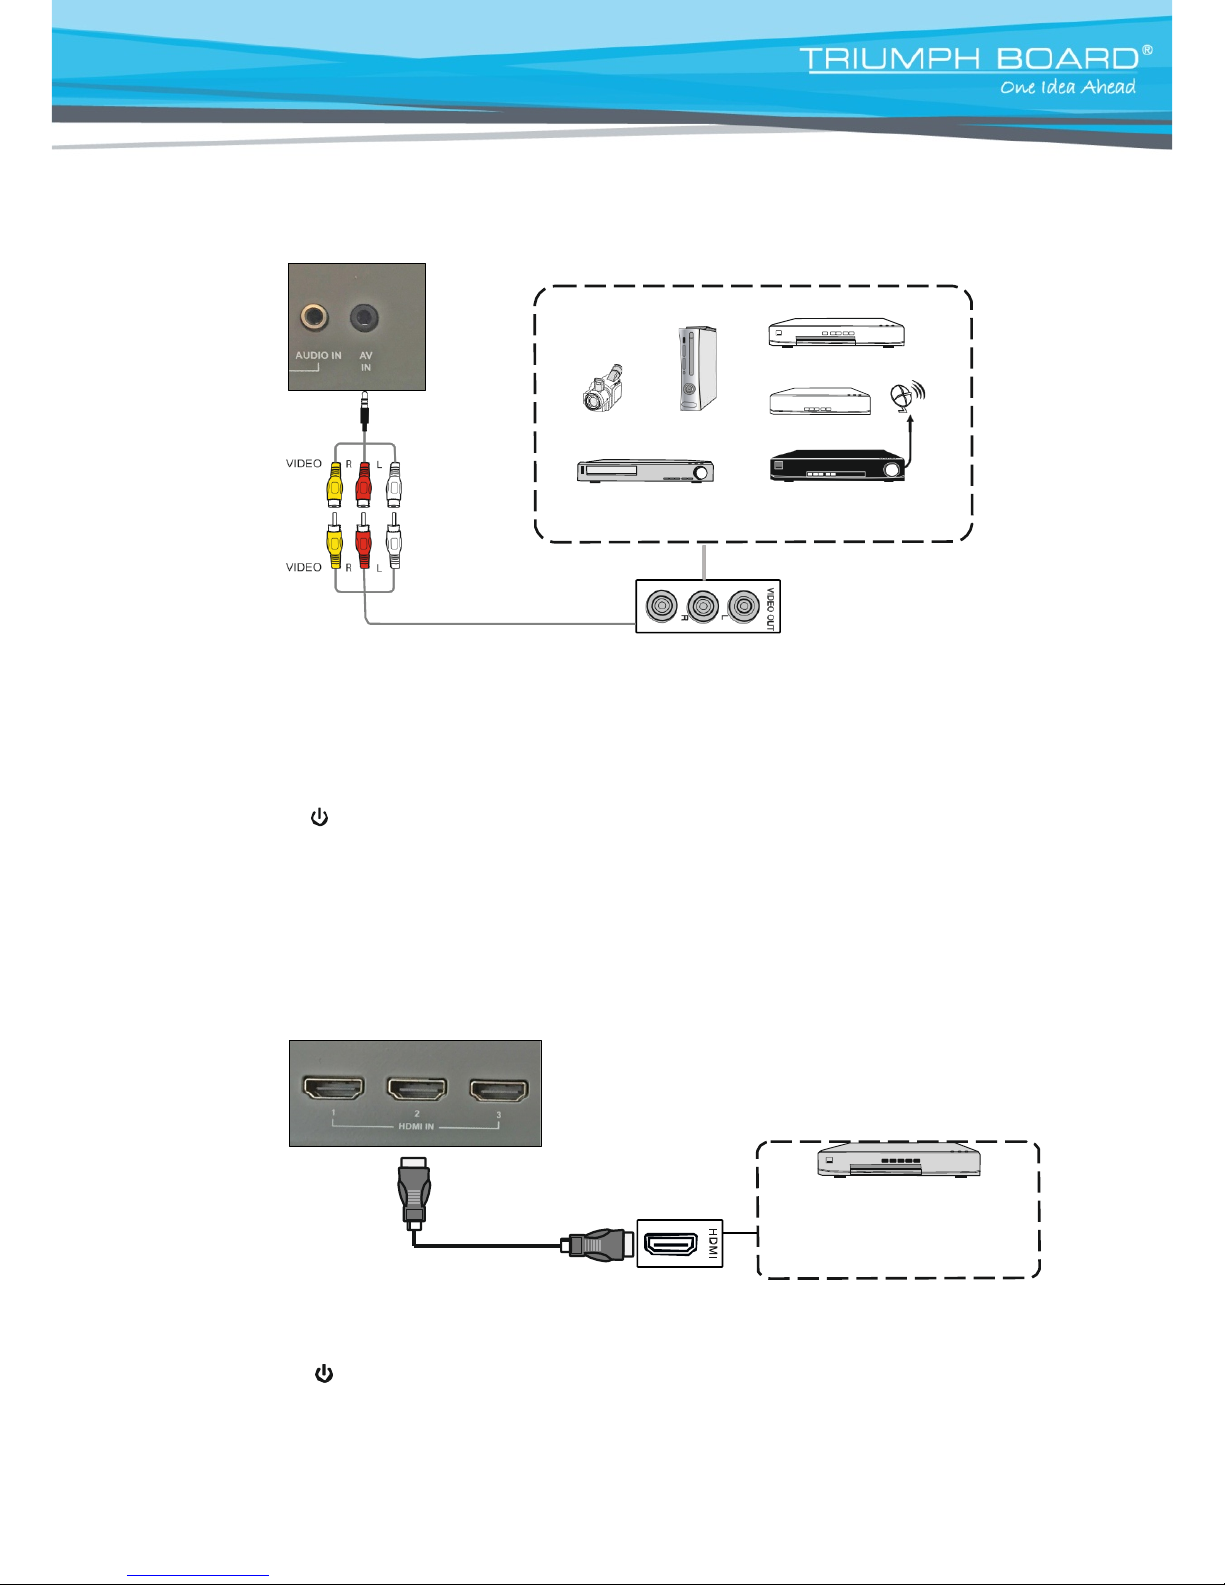
AV
(1) Use AV audio and video lines to connect audio and video equipment with AV output
(yellow for video, red for right sound channel, and white for left sound channel)
(2) After line connection, plug in power cord, and switch power to On
(3)
Press to turn equipment ON
(4) Press INPUT key to switch to CVBS
port
HDMI1 / HDMI2 / HDMI3
)
(MHL)
DVD Disc Player
HDMI cable
(1) Use HDMI line to connect audio and video equipment with HDMI output
(2) After line connection, plug in power cord, and switch power On
(3) Press to turn equipment ON
(4) Press INPUT key to switch t o HDMI port
Page 19
19
HDMI
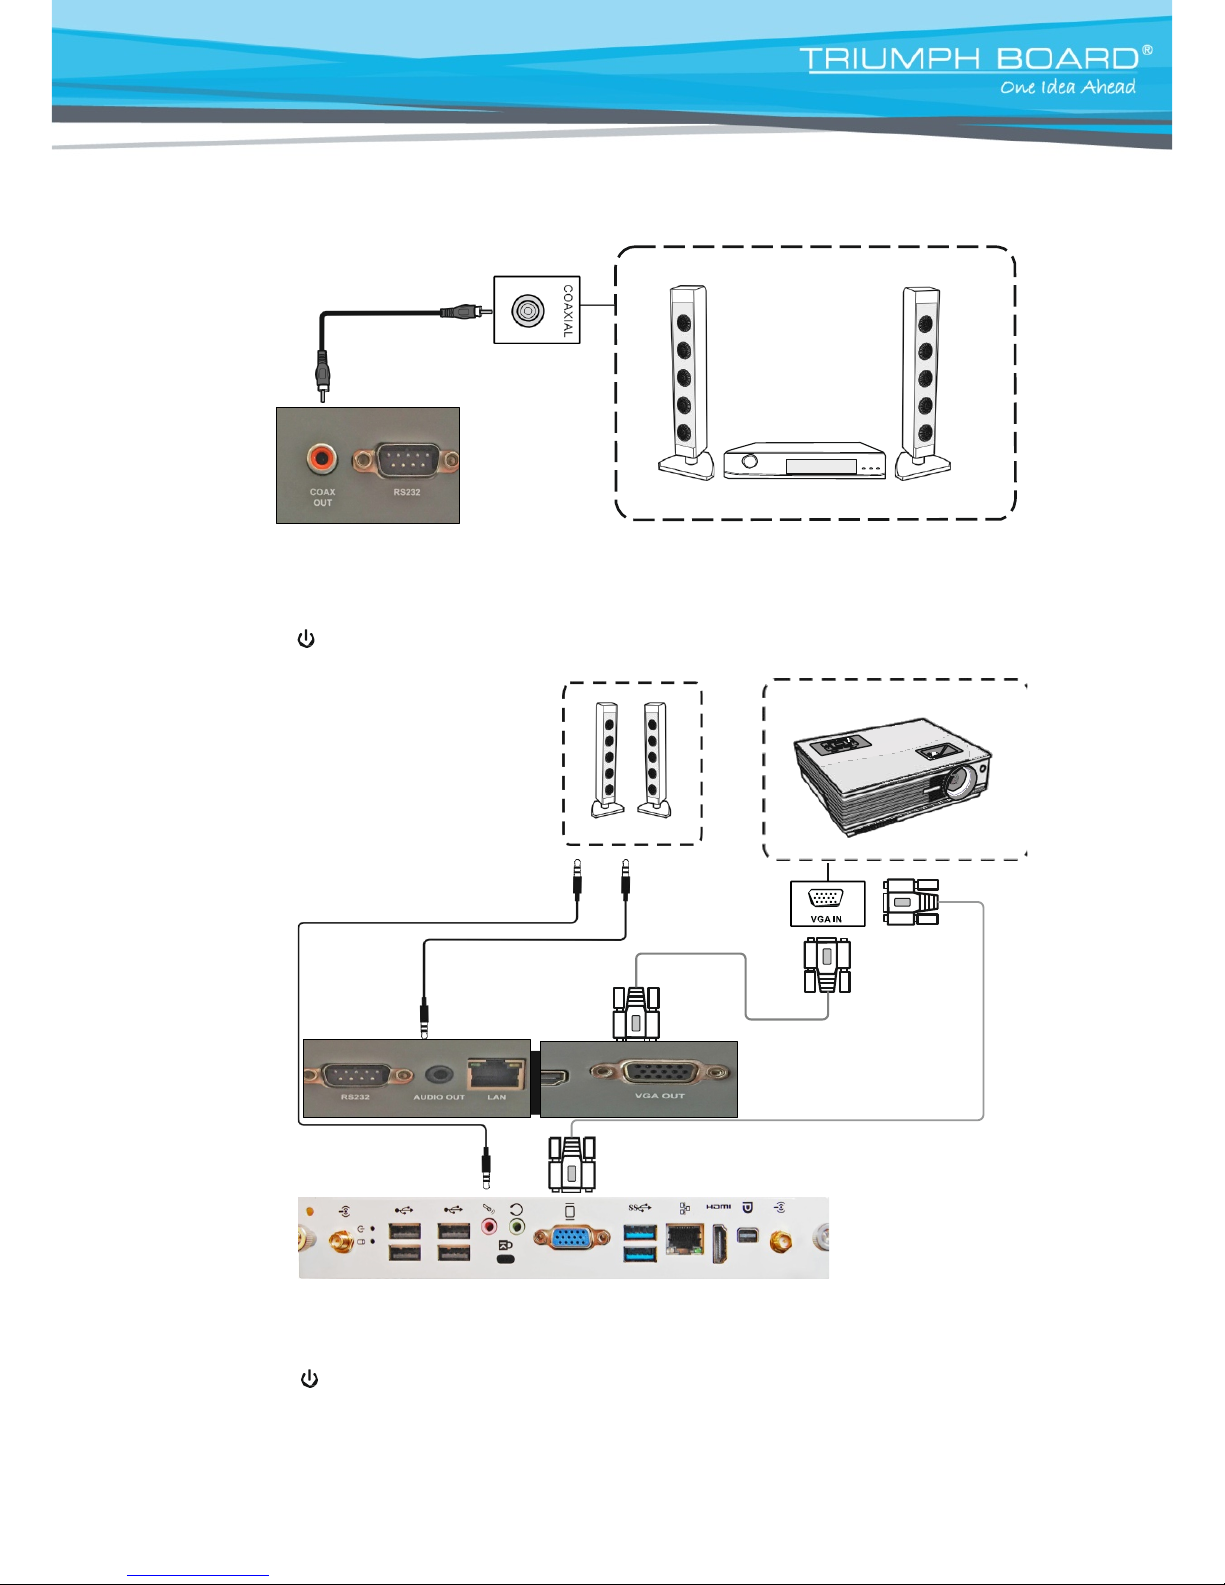
Coaxial connection
(1) Use coaxial line to connect audio device with coaxial input
(2) After line connection, plug in power cord, and swit ch power to ON
(3) Press to turn equipment on
Video output connection
VGA output connection
Mini PC 10A (optional)
(1) Use VGA l ine to connect display devices with VGA input, and use
headphone line to connect sound output
(2) After line connection, plug in power cord, and switch power to On
(3) Press to turn equipment on
(4) Press INPUT key to switch t o P C port
(5) Set internal computer as VGA output or multi-screen display TV
Note: VGA OUT of TV outputs VGA IN graphics and sound
Page 20
20
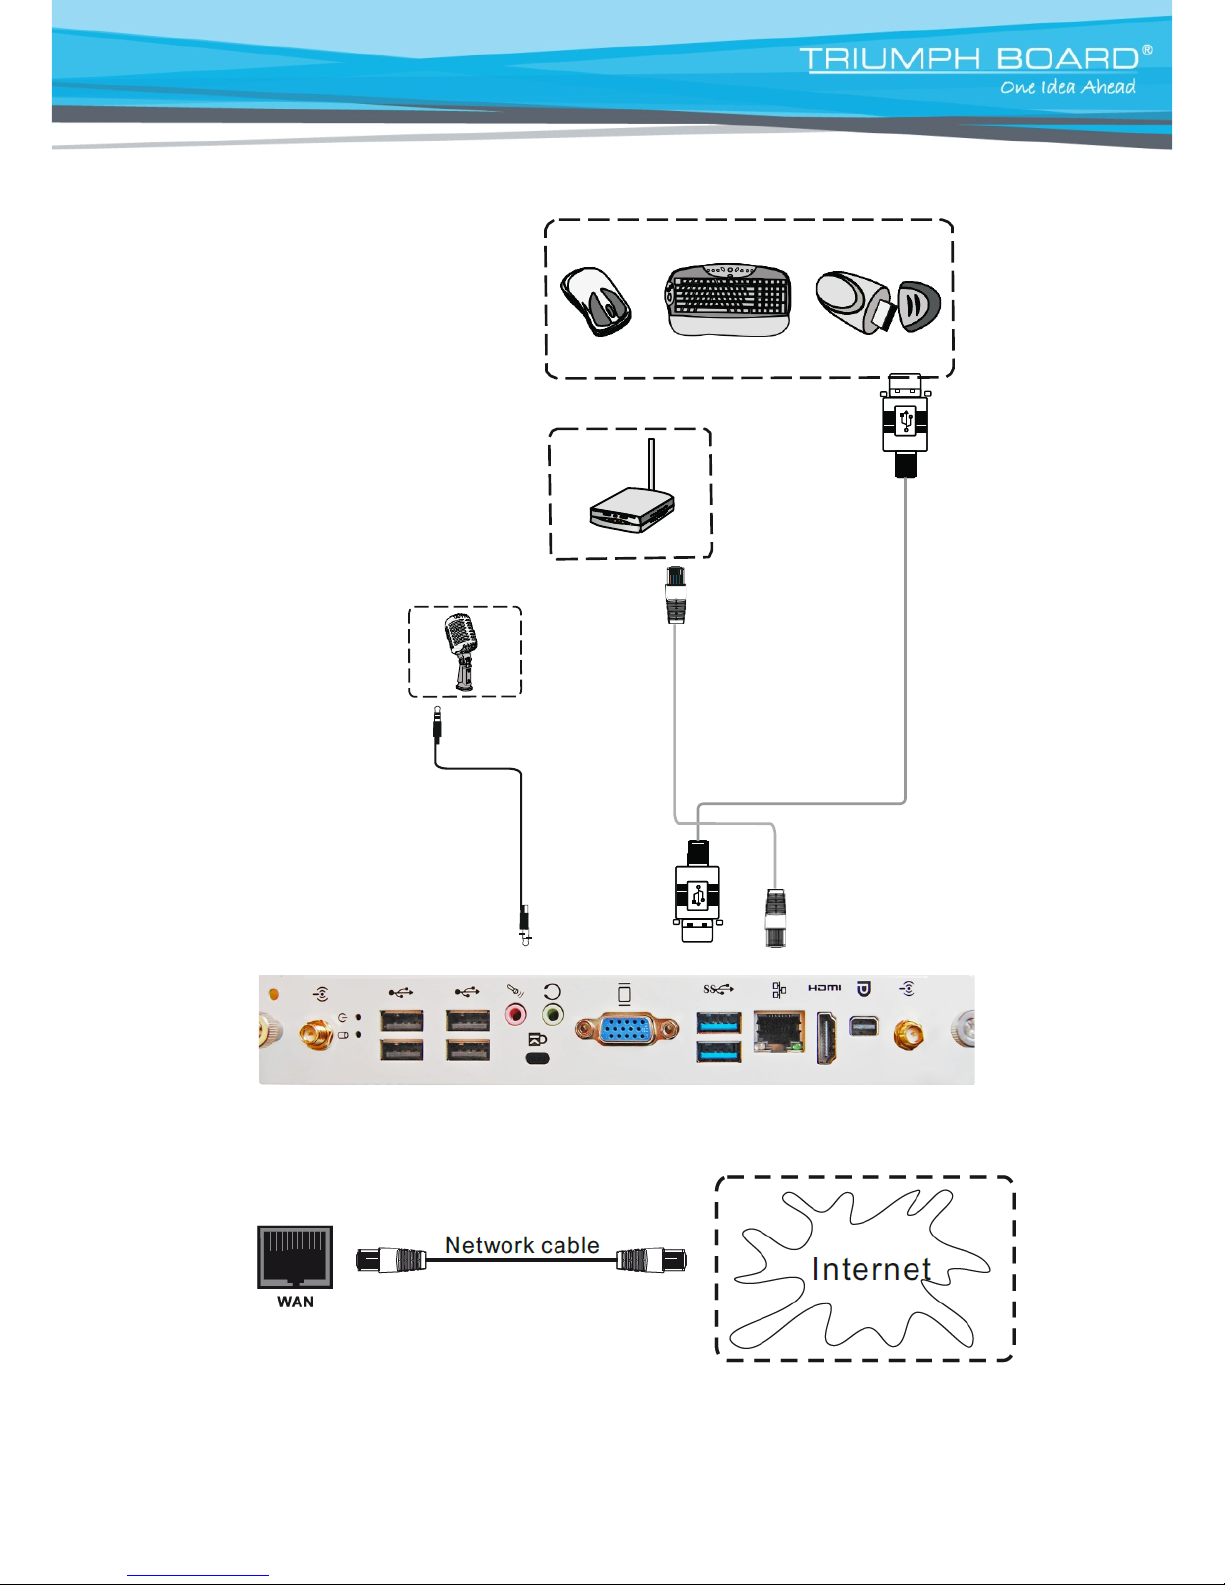
USB Equipment connection
Network cable connection
Microphone connection
WAN connection
NOTE: If the user wants the built-in computer and android system to connect to t he
Internet at the same time.
Page 21
21
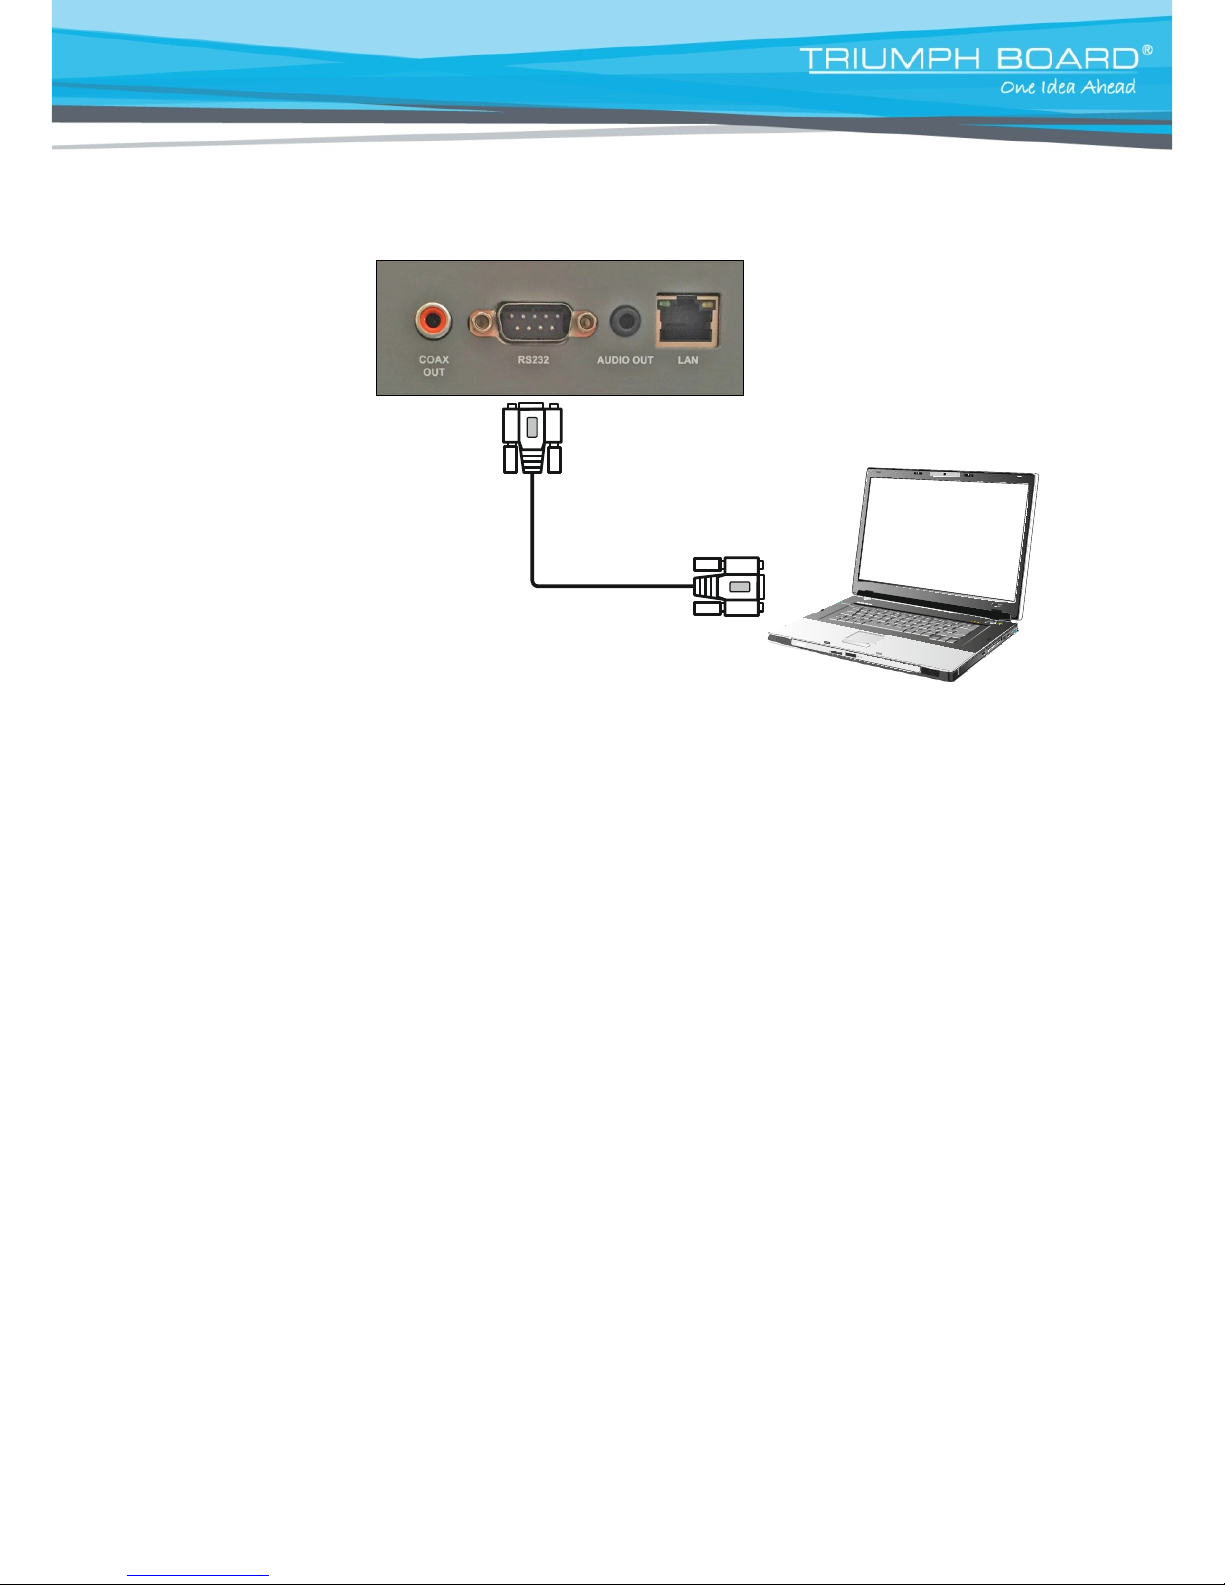
RS232 Serial port connection
Serial port line
Computer
After using the serial port line to connect central control equipment and the device, certain functions of
the device can be controlled via the central control device, such as: device ON/OFF, and adjustment of
sound volume, etc.
Basic PC Operations:
1. If the TV is on and the computer is not started, press INPUT key to switch
from channels other than PC to the PC channel, then turn on the computer.
2. When the computer is on, hold down POWER key for 2 seconds , click to
select "Confirm" in the pop-up reminder menu to sh ut down the TV and
computer simultaneously.
3. Under the PC channel when it is on, touch to select " WI NDOWS" button
on the lower left of the desktop or press "WINDOWS" key on remote control,
and then select "power off" item, to turn off computer without turning off TV.
Page 22
22
8. Menu Operation
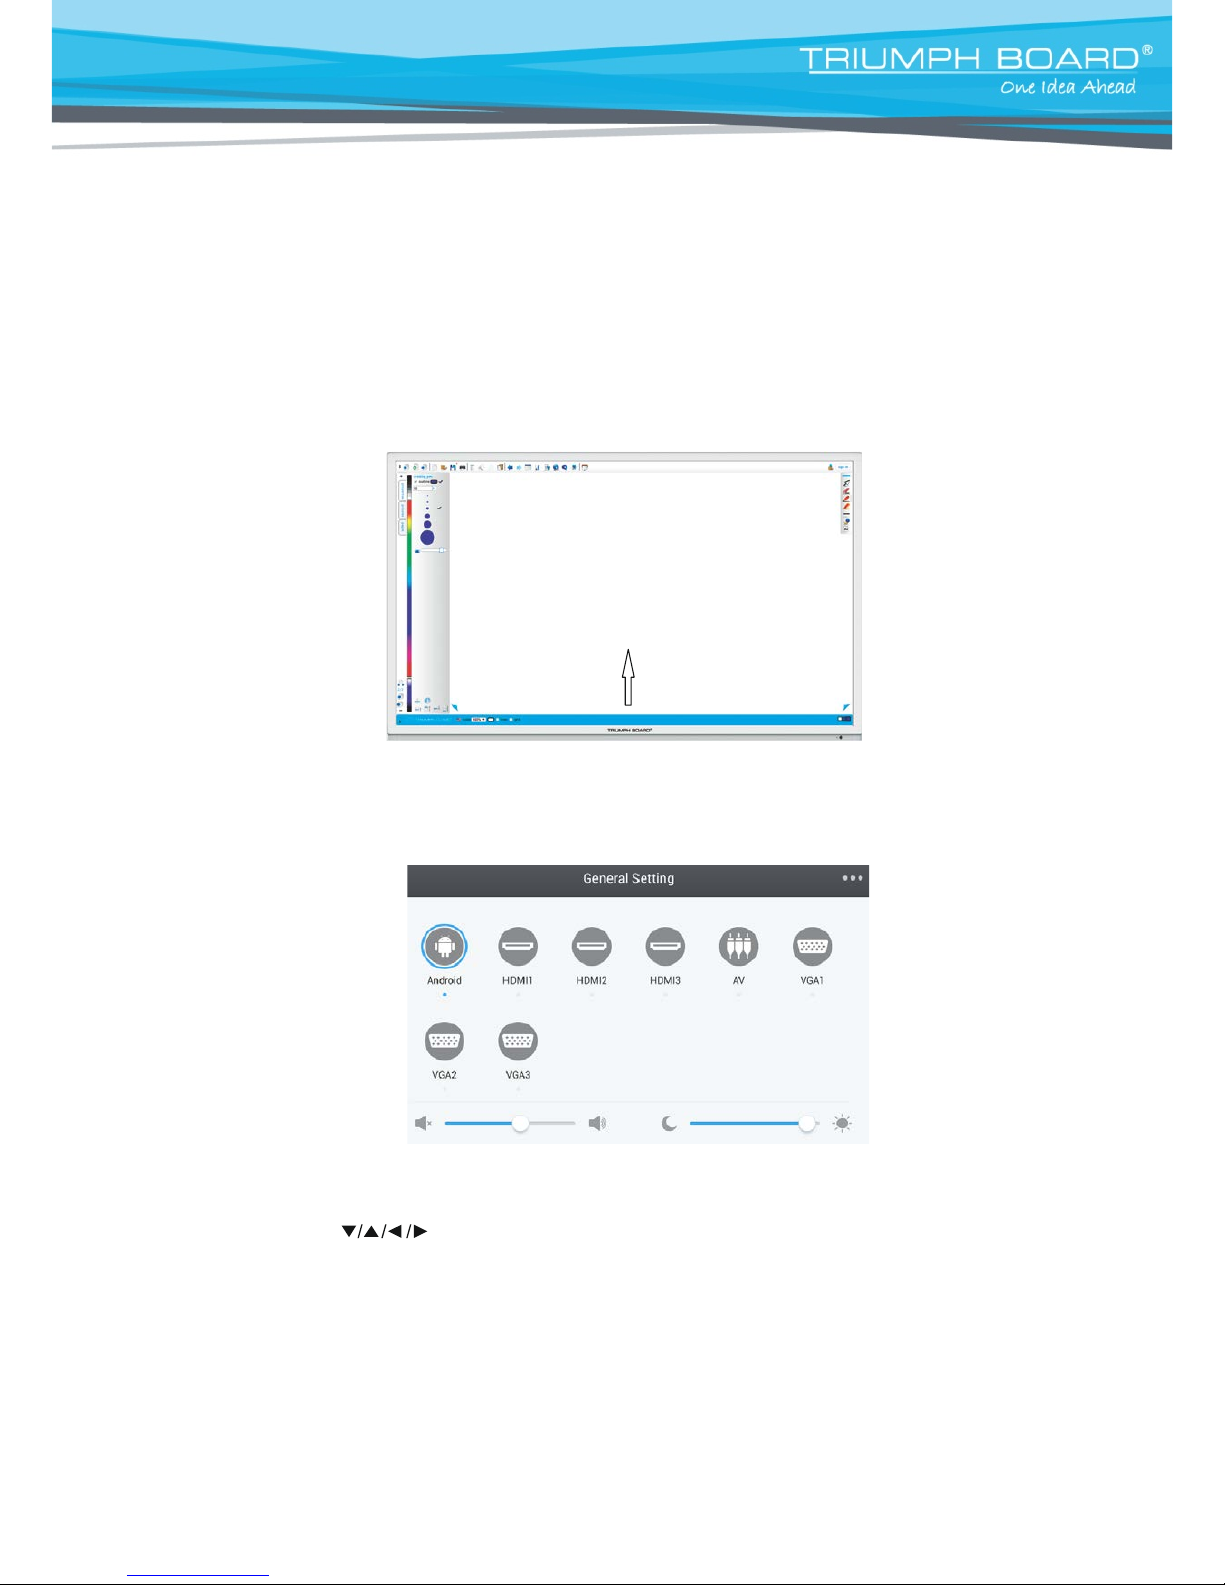
One Touch Menu Operation
Call up method
Take middle point position on the bottom of display screen as the starting point,
use finger or stylus to drag towards screen c enter position to call up touch menu,
as shown below.
Settings menu
Input Settings
• Press INPUT button on remote control or via above “A” touch method to call up General Setting menu;
Press button on the remote control to select the channel you need;
• Press the Enter button on the remote control, or click directly to confirm selected input
channel;
Press return key on the remote control, or click blank area outside menu to exit menu.
Note: PC channel will only display whe n you connect the built-in computer.
Page 23
23
Volume and Brightness Settings
• Press INPUT button on the remote control or via touch A method to call up Input Setting menu;
• Press button on the remote control or drag volume adjustment progress bar to adjust volume
• Press button on the remote control or drag brightness adjustment progress
bar to adjust
• Press return key on the remote control, or click blank area outside menu to exit menu.
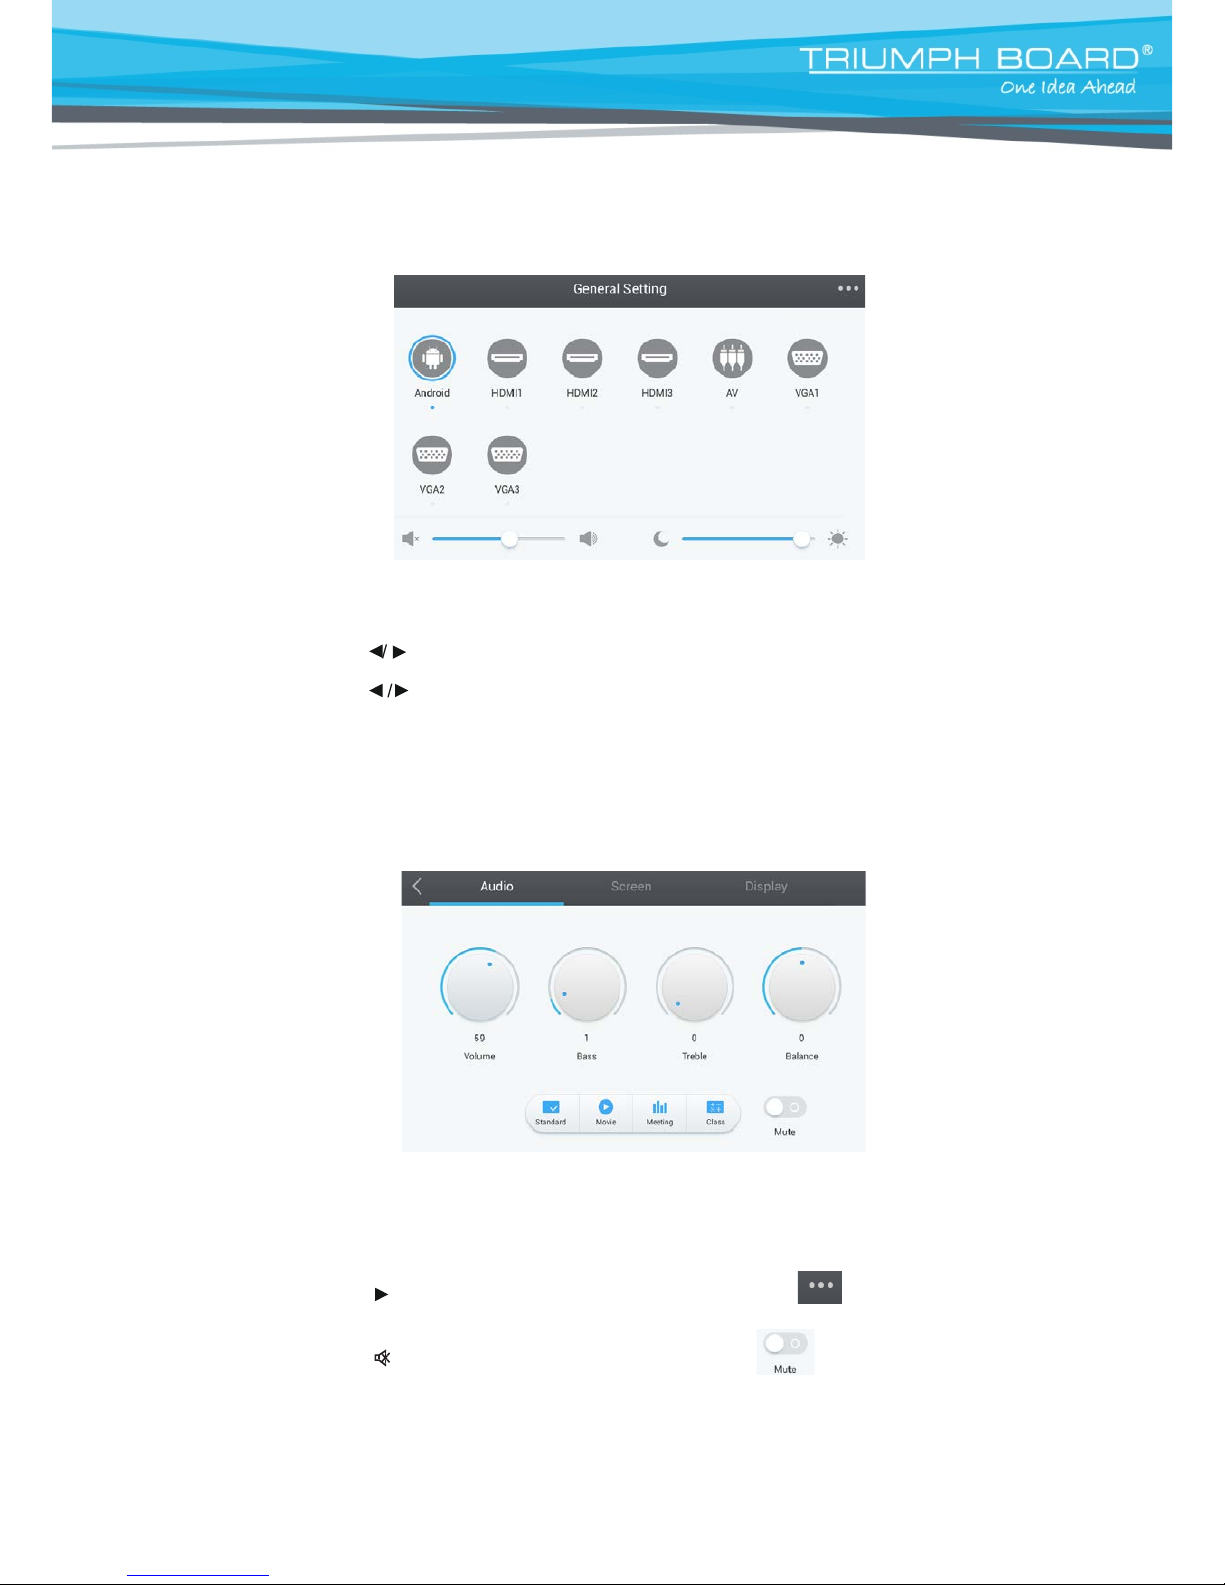
Audio Settings
• Press INPUT button on remote control or use touch method A to call up the General Setting menu;
• Press button on the remote control or click General Setting “ ” icon directly to enter
Audio Setting menu;
• Press button on the remote control or click mut e i c on “ “ to Mute On/Off
• Press return key on the remote control, or click blank area outside menu to exit menu.
Page 24
24
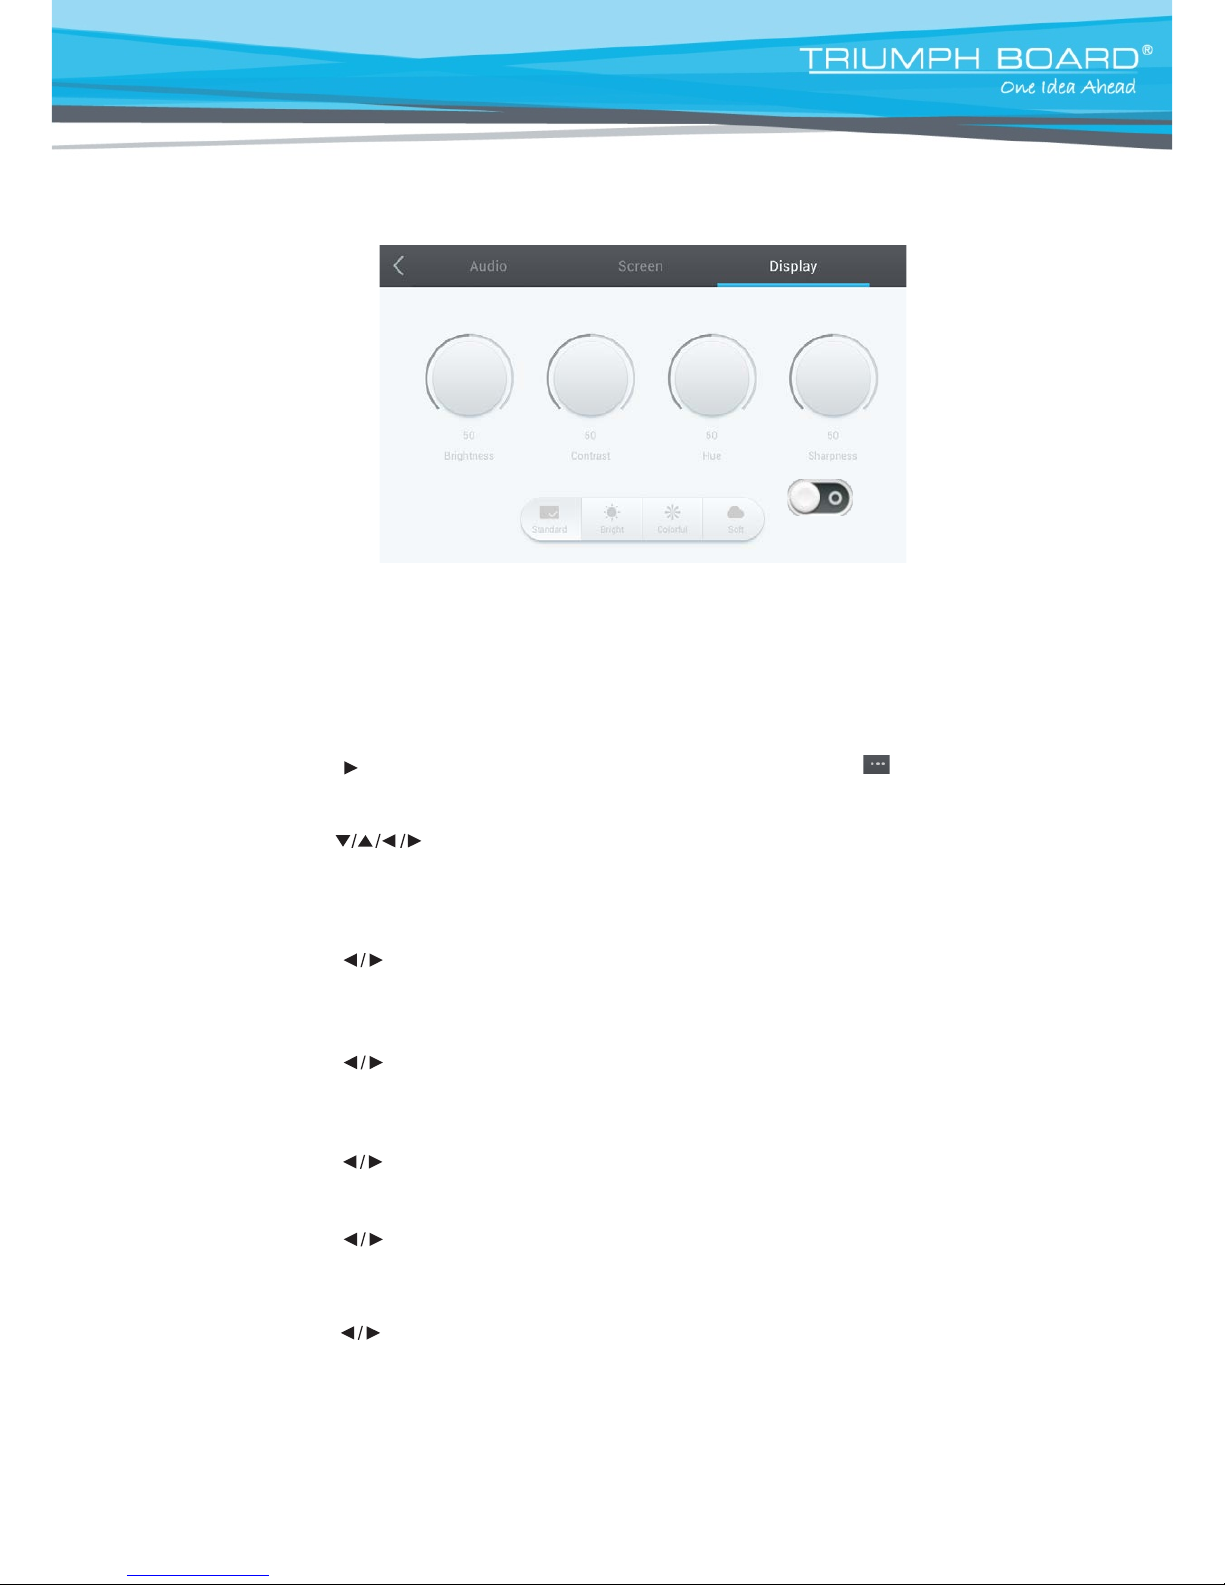
Display Settings
• Press INPUT button on the remote control or via touch use method A to call up the General Setting
menu;
• Press button on the remote control under General Setting menu or click “ ”icon
with touch pen to enter the Display Setting menu;
• Press button on the remote control or click directly to select and
adjust each option;
• Press return key on the remote control, or click blank
area outside menu with touch pen to exit
menu.
Brightness
•
Press button on the remote control or directly drag icon with touch pen to adjust brightness
of
image;
Contrast
•
Press button on the remote control or directly drag icon with touch pen to adjust contrast
of
image;
Hue
•
Press button on the remote control or directly drag icon with touch pen to adjust
hue of image;
Sharpness
•
Press button on the remote control or directly drag icon with touch pen to adjust sharpness of
image;
Standard, Bright, Colorful, Soft image presets
•
Press button on the remote control or directly click on
presets icons to change image presets
Page 25
25
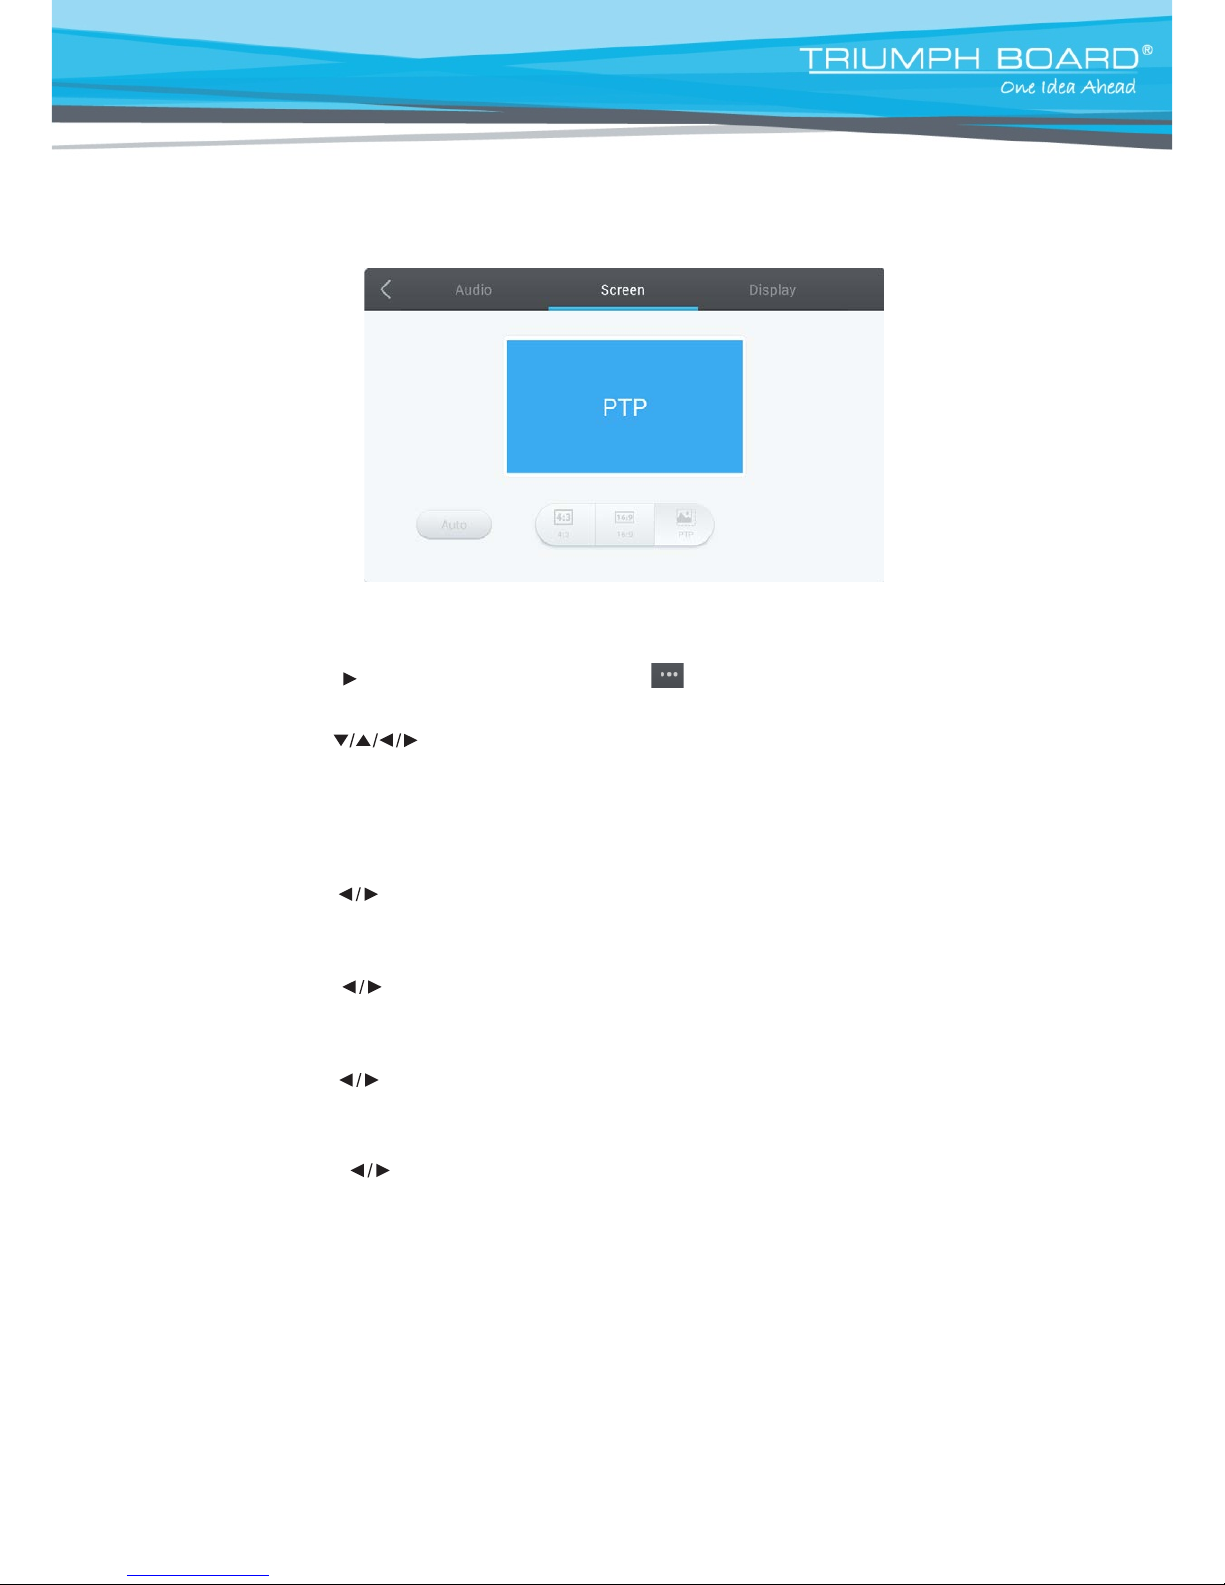
Screen Settings
• Under channels other than Android, press Menu button on the remote control or via touch A method to
call up General Setting menu;
• Press button on the remote control or click “ ” icon directly. Press Menu on remote
control to enter Screen Setting menu;
• Press button on the remote control or click directly wit h touch pen to select and adjust each
option;
•
Press return key on the remote control, or click blank area outs i de menu with touch pen to exit
menu.
Aspect ratio 4:3
• Press button on the remote control or click on icon direct ly with touch pen to change aspect ratio
of
image.
Aspect ratio 16:9
• Press button on the remote control or click on icon directly with touch pen to change aspect
ratio of
image.
PTP
•
Press button on the remote control or click on icon directly with touch pen to cha nge aspect
ratio of
image.
Auto aspect ratio
• Press button on the remote control or click on icon directly with touch pen to change aspect
ratio of
image.
Note: Different options in different channels can't be adjusted, please select according to actual situation.
Page 26
26
9. More Settings (Advanced settings)
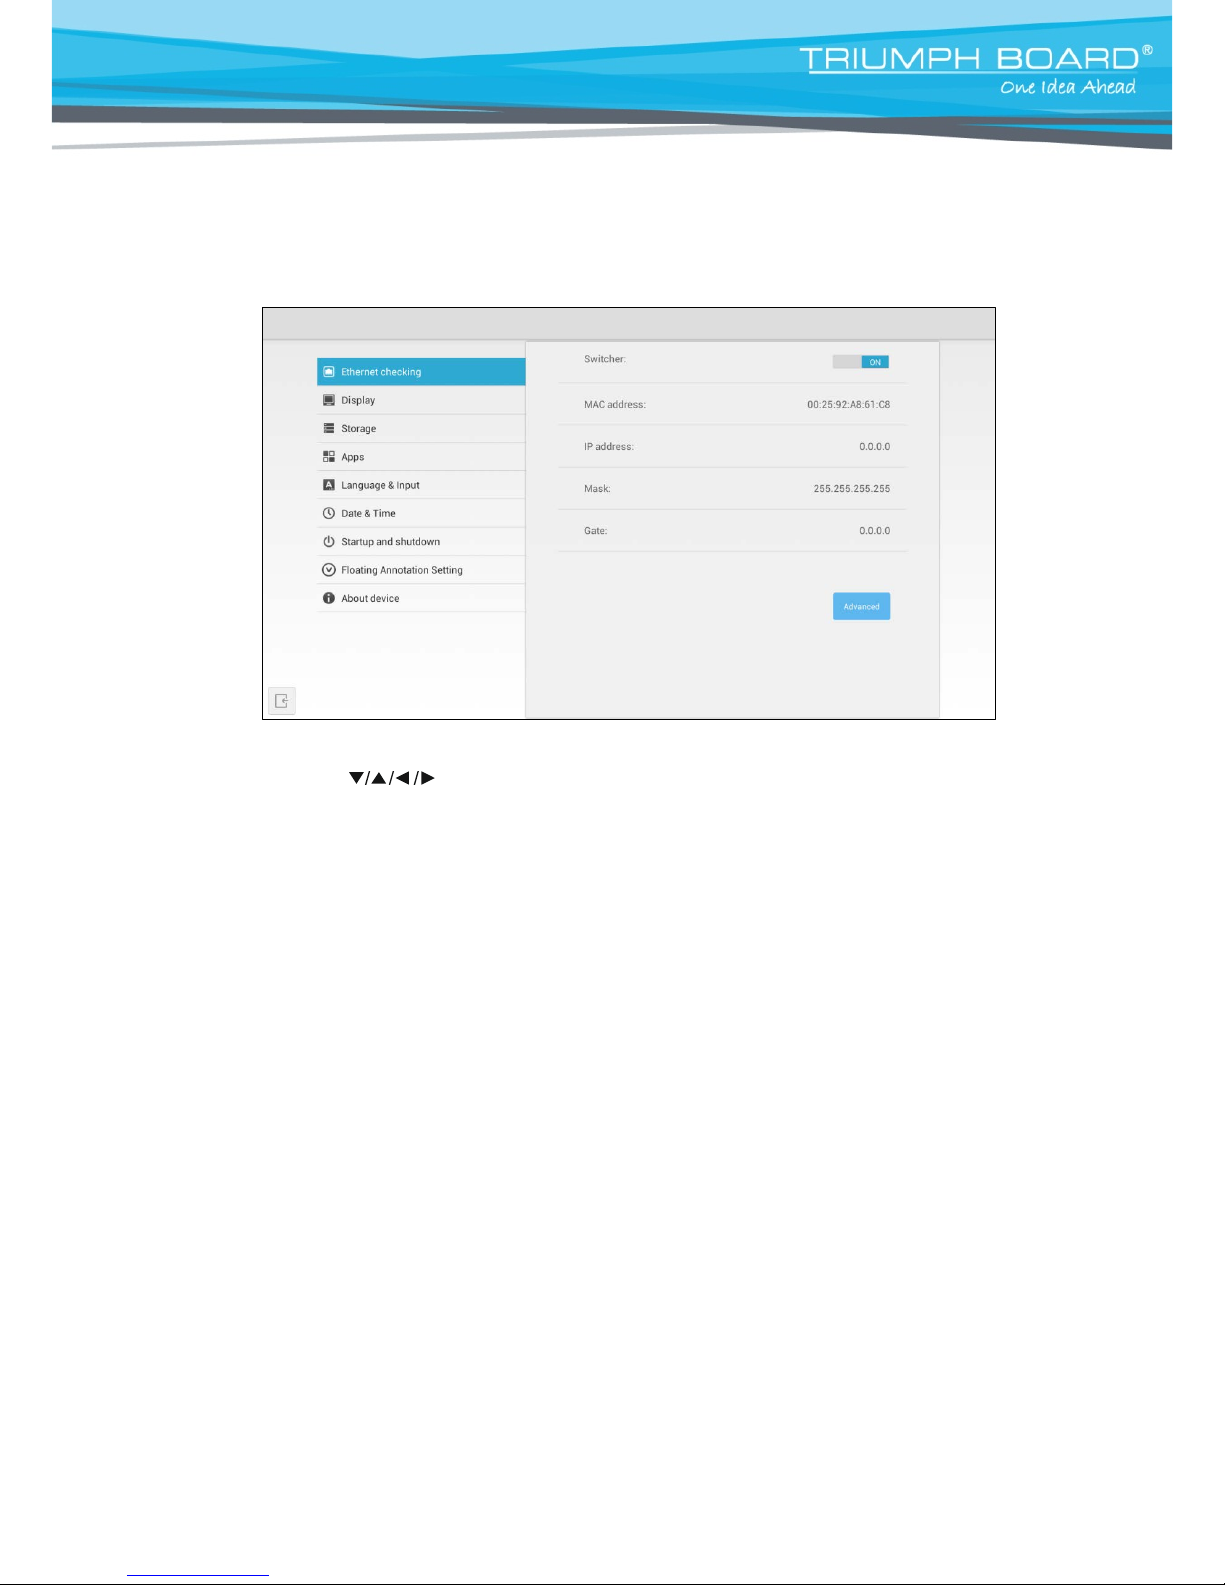
Advanced settings menu
• Under Apps menu, click on Settings call up Advanced settings menu;
• Press button on remote control or click directly to select each option;
Press return key on remote control or front panel of equipment to exit menu.
Ethernet Checking
View the current network connection status and the network parameters of the device.
Display
Adjust equipment display brightness/system wallpaper and system font size.
Storage
View the system storage information.
Apps
Display each application in Android system memory.
Language & Input
Adjust display language and input method settings of Android system.
Date & Time
Under Android system, set system time and format (time can be automatically
obtained or manually set).
Startup and Shutdown
Adjust Launch setting and Timer switch
Floating Annotation Setting
Adjust Annotation menu
About
Device
Display Android system software version information.
Page 27
27
System tool menu
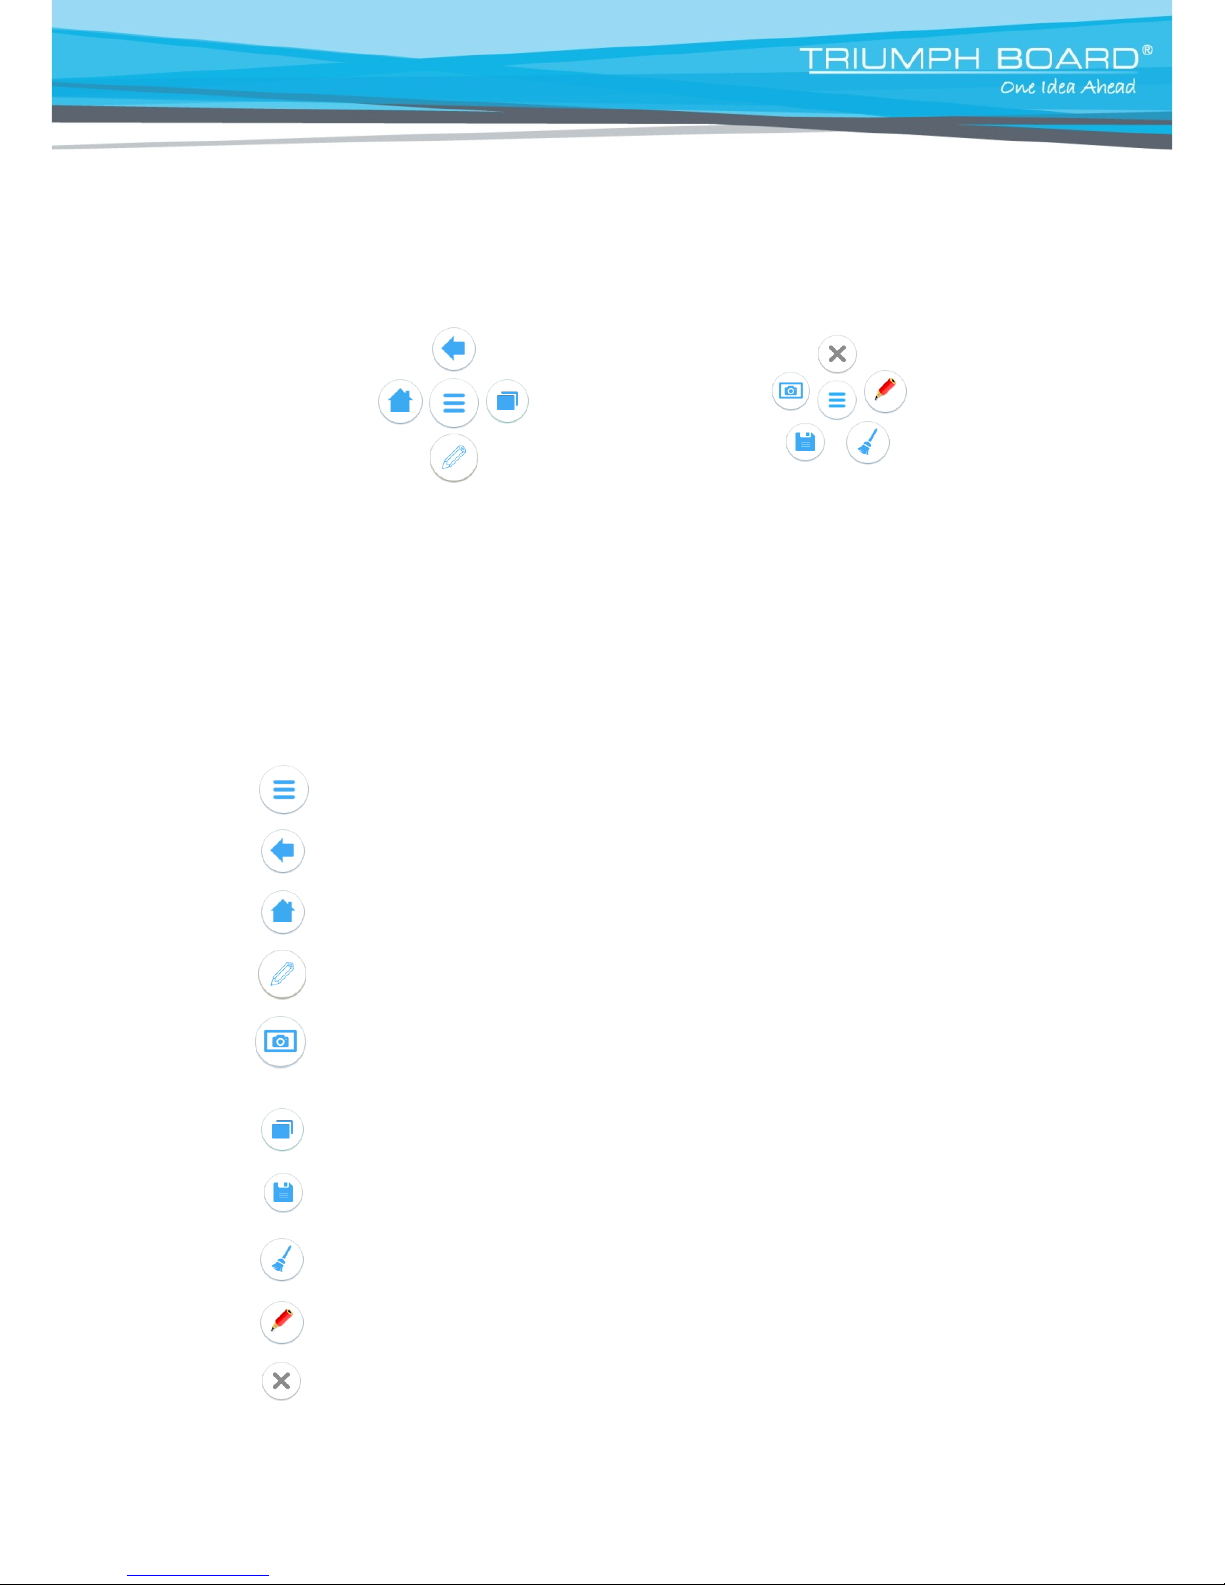
Fig.1 Fig.2
• Place two fingers on the screen (about 20~50mm apart) and keep in position
more than two seconds under any channel to call up System tool menu
(Figure1);
• In System tool menu, menu is shown in Figure 2.
• In System tool menu , input only using your fingers; stylus and remote control
cannot perform annotation.
System tool menu icon Pop up/hide sub-menu icons
Main back icon Click to return to previous operation interface
Main home icon Click to return to main interface of Android system
Mark pen icon Click to make annotation in the picture
Screen Zoom icon Click to Zoom in/out actual screen
Apps icon Click to quick access to aplications
Screenshot icon Click for screens hot of actual screen image
Screenshot storage location: TB Finder/Notes/Mark
Mark clean icon Click to delete annotation in the pict ure
Red mark pen icon Red color annotation, click to change color
Close icon Click to close system tool menu
Page 28
28
10. Android System Interface
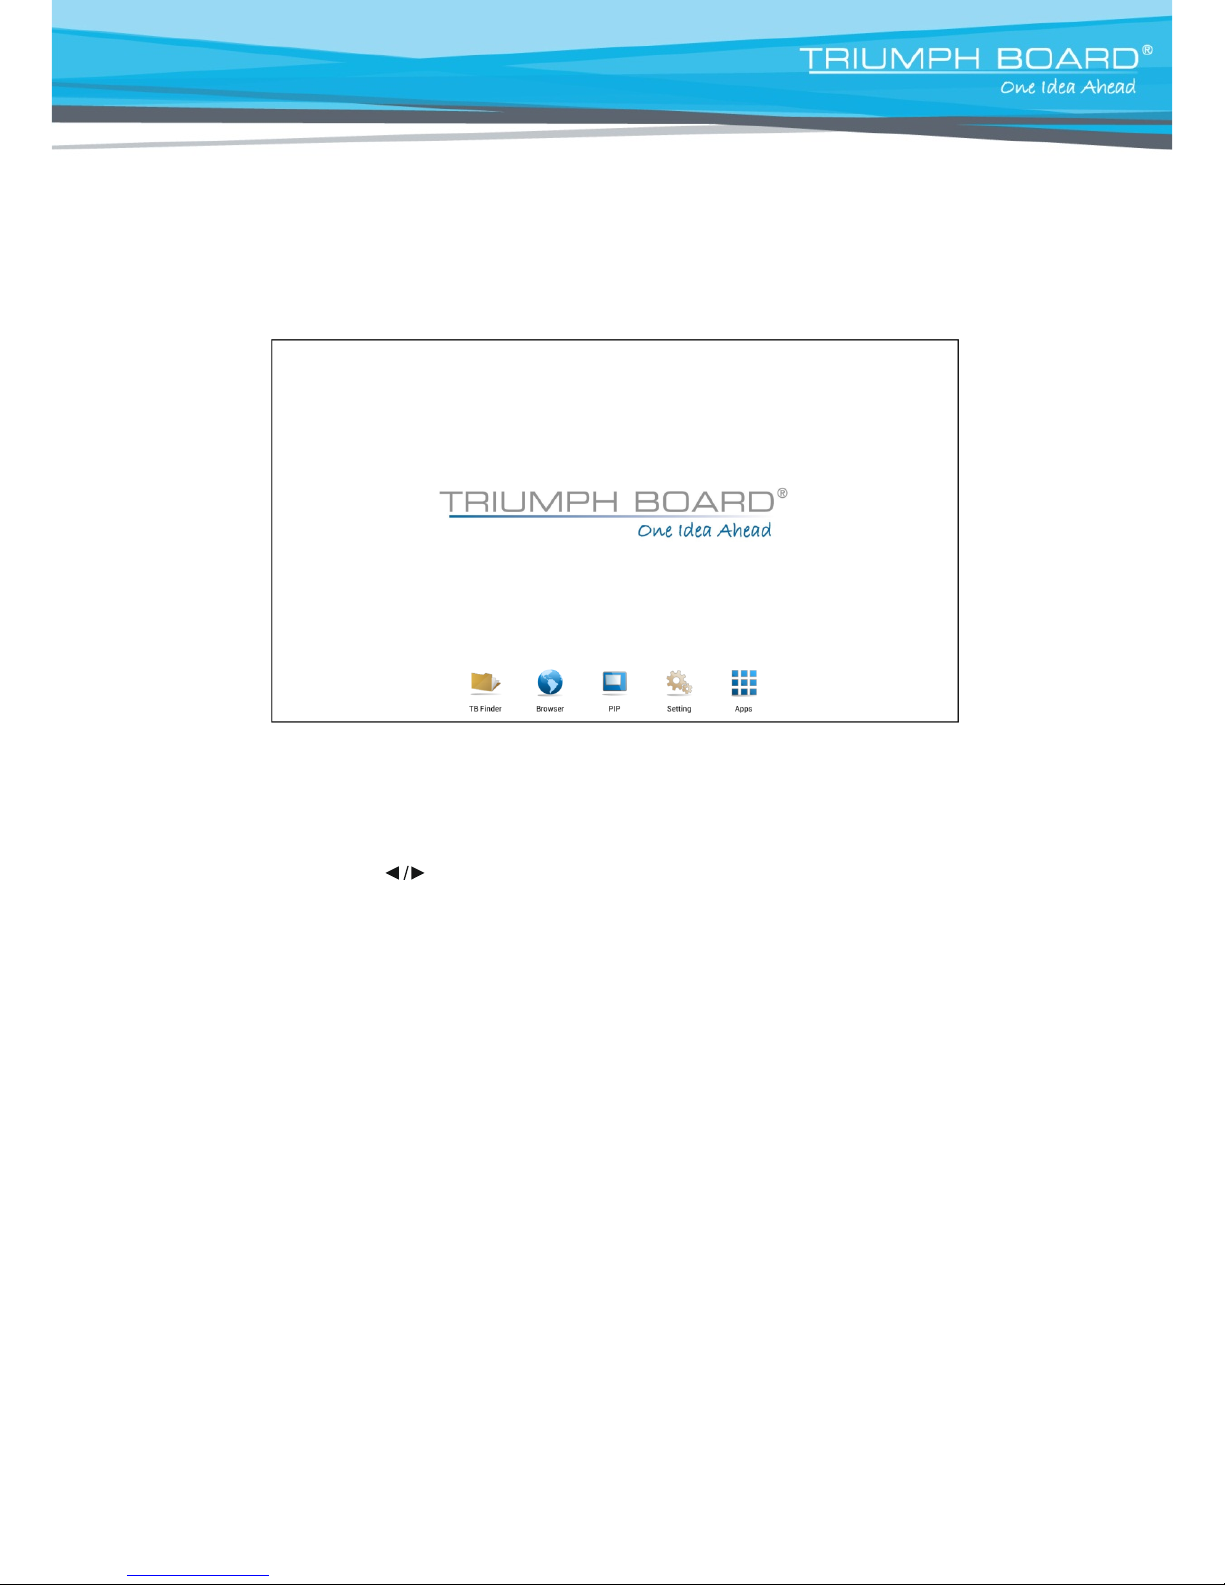
Main Interface
• Switch to Android channel to display main interface as shown above;
• Press key on the remote control to select icon below, and press Enter
key to enter corresponding program, or click on the associated icon directly to
enter the program;
• In any program, press the Home button on the remote control or <Home key> on
the side frame of the IFP to return to the main interface.
Page 29
29
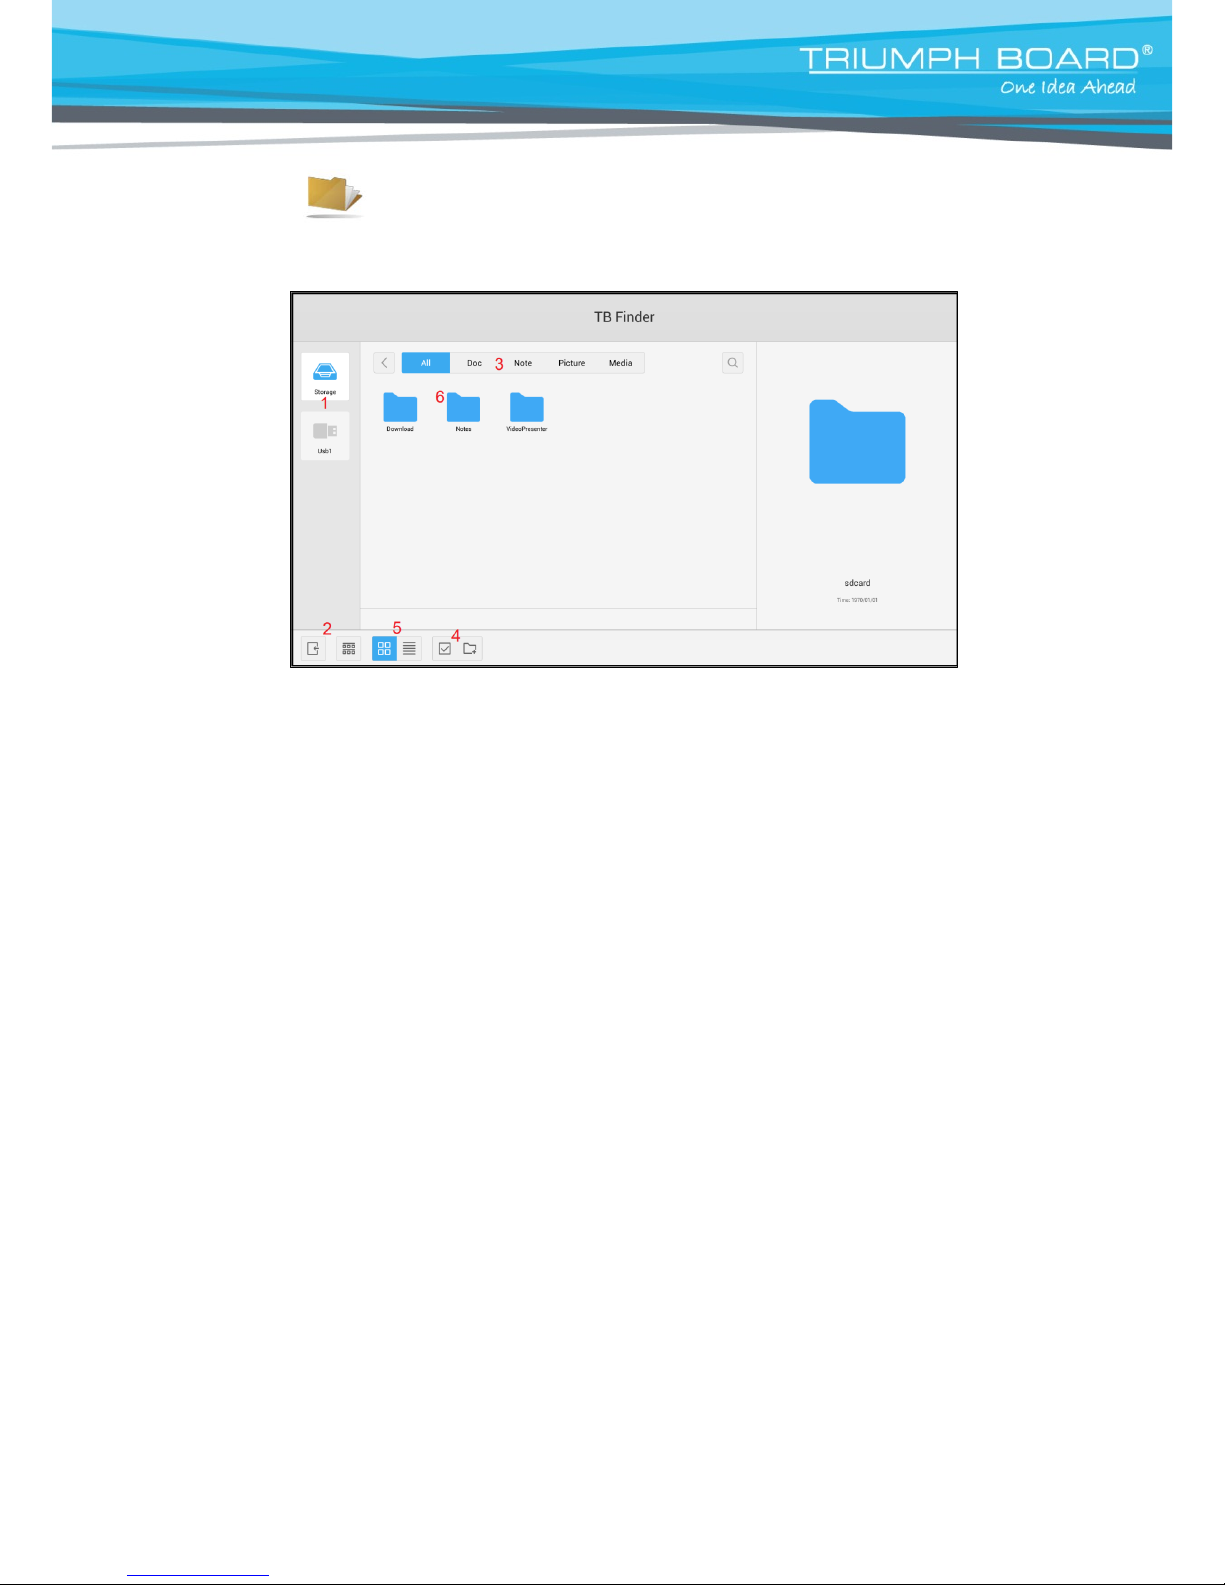
TB Finder
Display files in Android system memory and Android system external storage.
1. Storage device display Click with touch pen to enter corresponding storage devices
area
2. Menu/exit menu Click menu icon with touch pen to pop up menu options
{order (type/size/time)}
Click exit icon with touch pen to directly exit resource
browse.
3. File type menu All: all types of files
Doc: Office files
Note: files with your mark
Picture: image files
Media: audio-video files
4. File operation menu Can perform basic operationson a file such as
select/delete/create/copy/cut
5. File arrangement menu Divided into two arrangement modes by icon and by list
6. Main display area Display files corresponding to type
of storage (Storage,
USB flash disk etc.)
Page 30
30
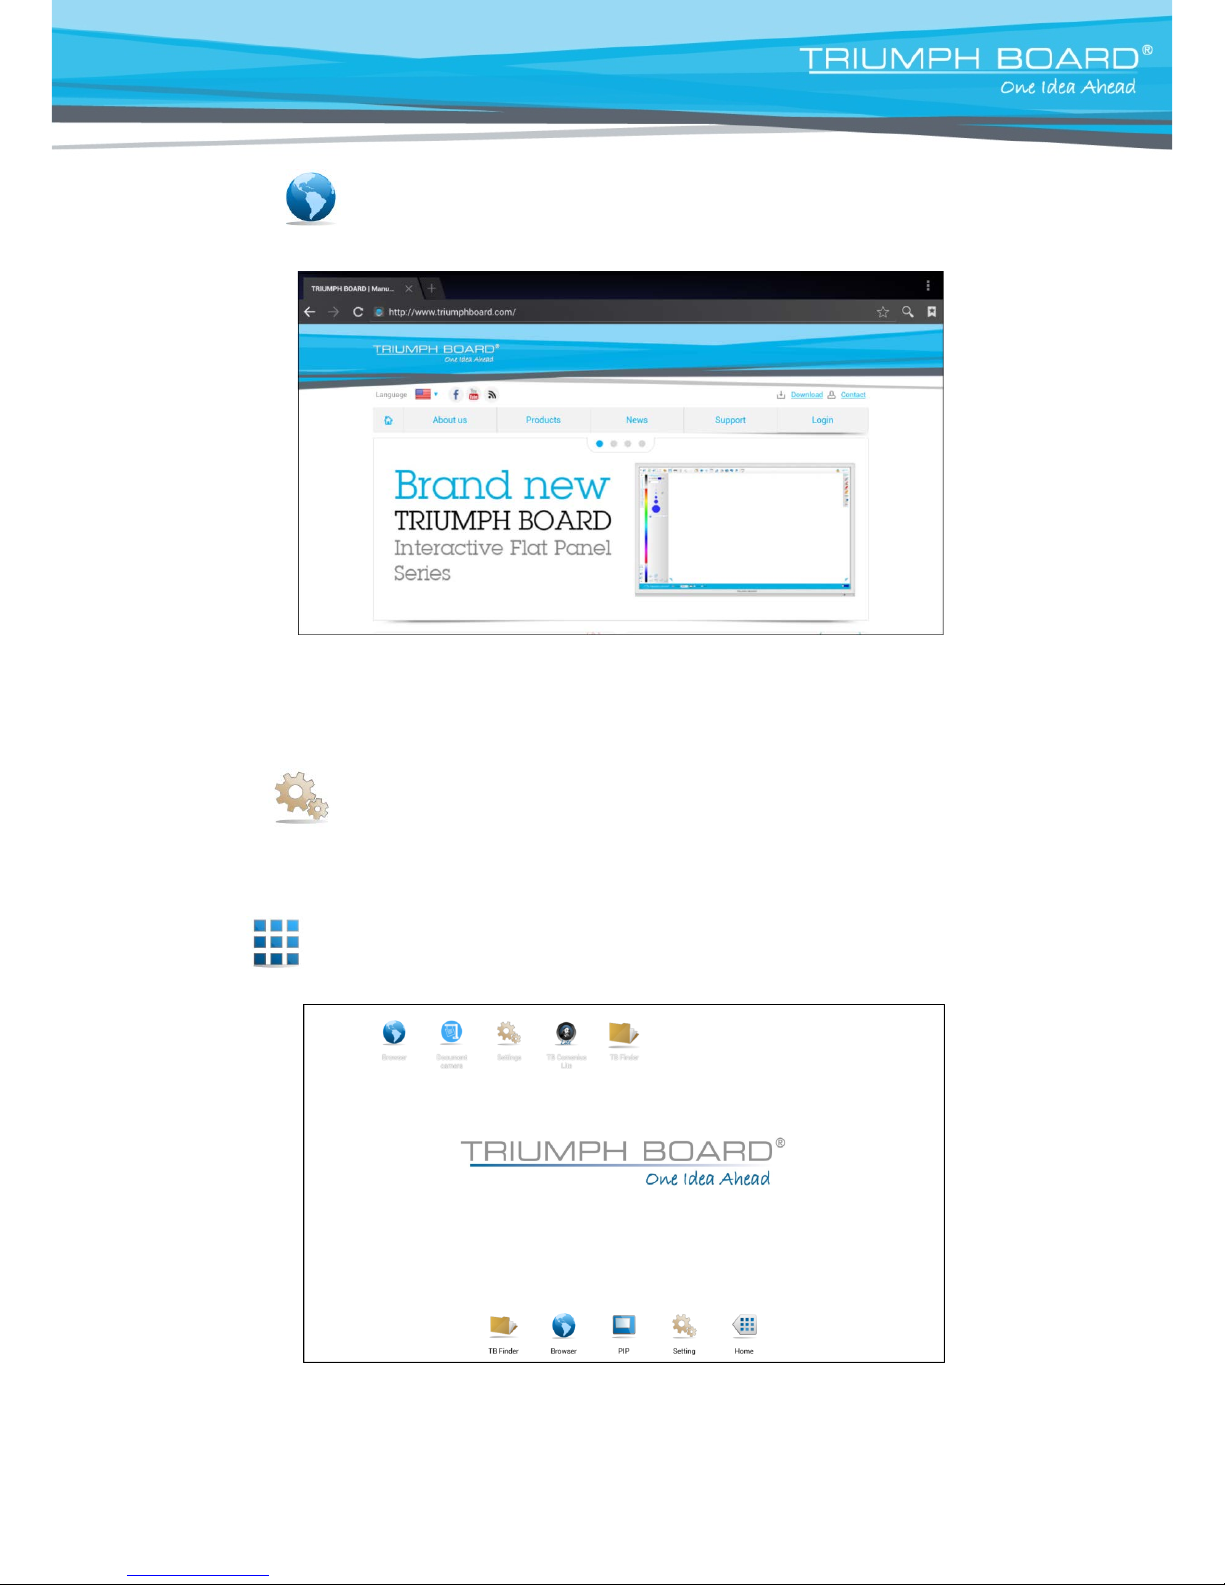
Browser
• In the connected network state, enter web browsing for surfing the internet,
click on "x" symbol in the upper left corner to close it.
Settings (Advanced Settings)
• Shortcut Settings in settings menu, see page 25.
Apps
Caution!
Please note that you cannot install your own applications into the Apps section!
Each application must be suitable for screen resolution and hardware specifications, as some
apps may have display or performance problems!
TRIUMPH CLOUD
Page 31
31
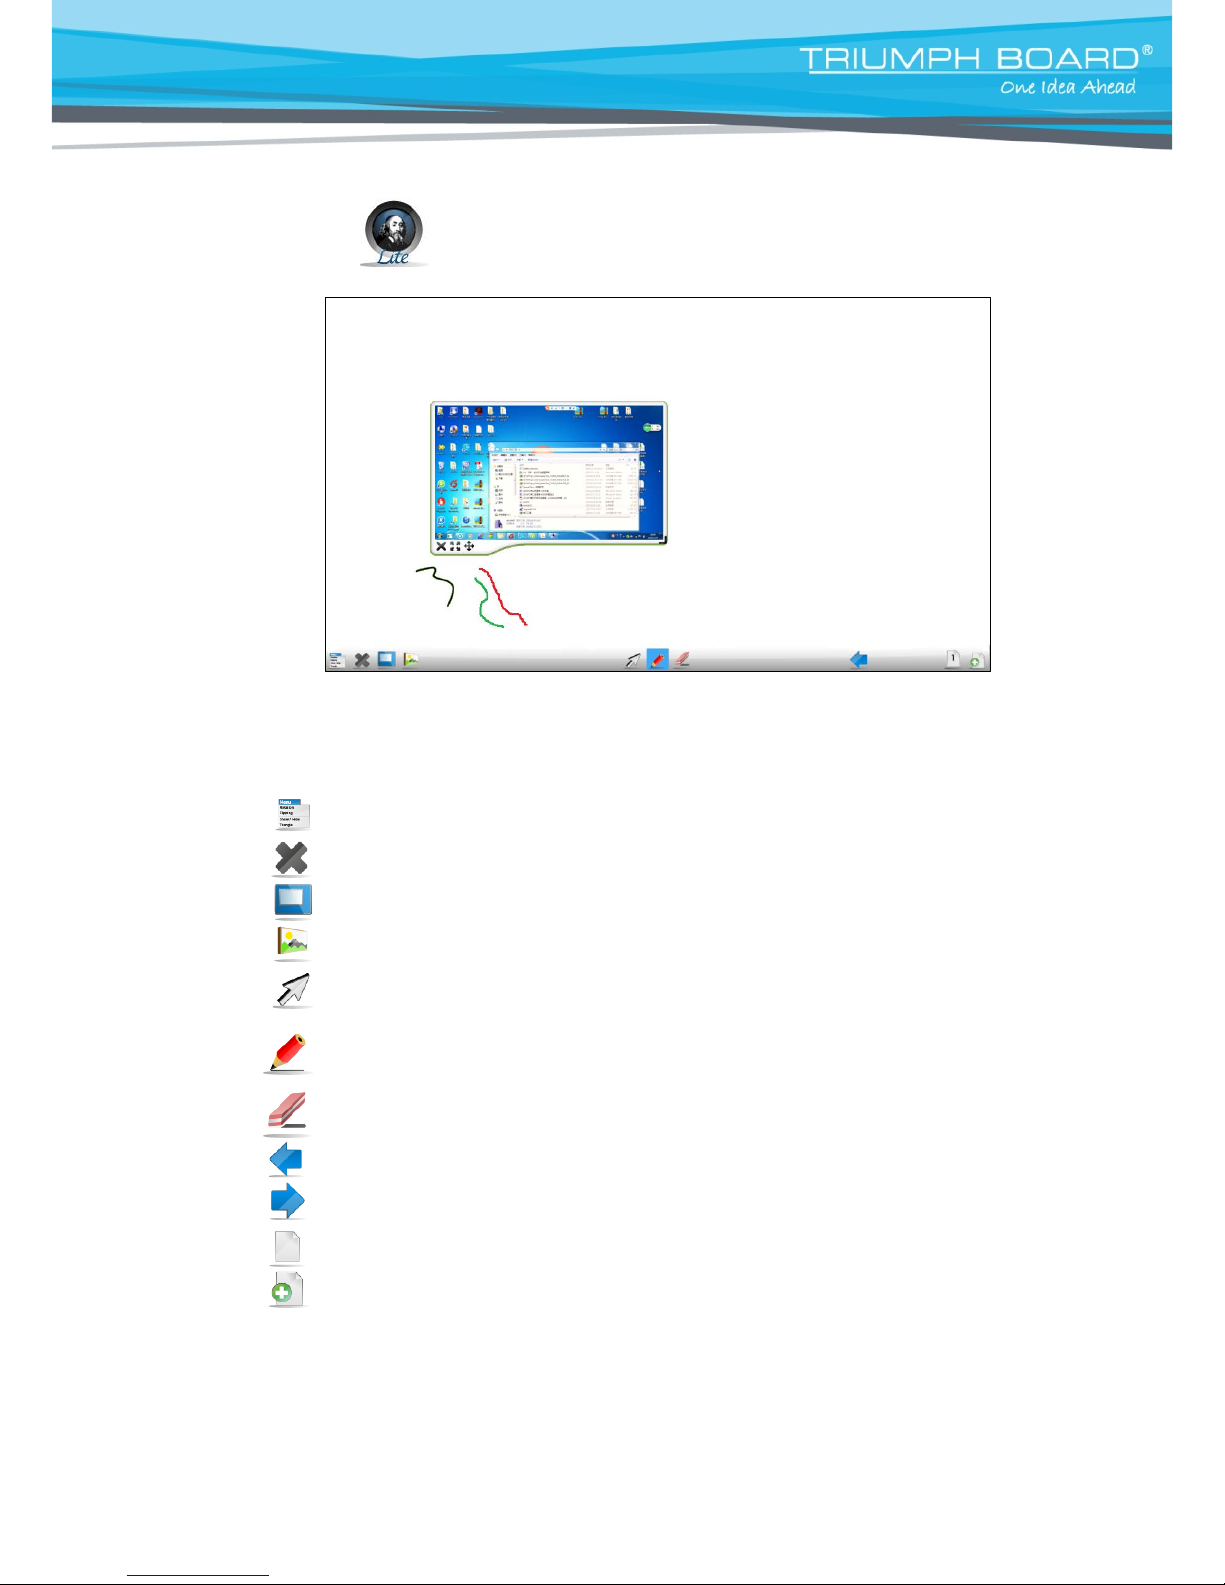
TB Comenius Lite
Menu icon Click to bring up sub-menu (change background/save)
Exit icon Click to exit TB Comenius Lite software
Picture in picture Click to brig up picture in picture interface, see page 30
Image import icon Click to import required image from memory card
Select icon Click to select Whiteboard writing symbols,
can click or check to select
Brush icon Click to write, press long for three seconds to enter settings
screen, to set brush color and thickness
Eraser icon Click to erase writing symbols, can be erased by box selection
Undo icon Click to cancel previous step
Redo icon Click to restore previous step
Page icon Display writing page number displayed by current picture
Add page icon Click to add a new page of writing or image
Page 32
32
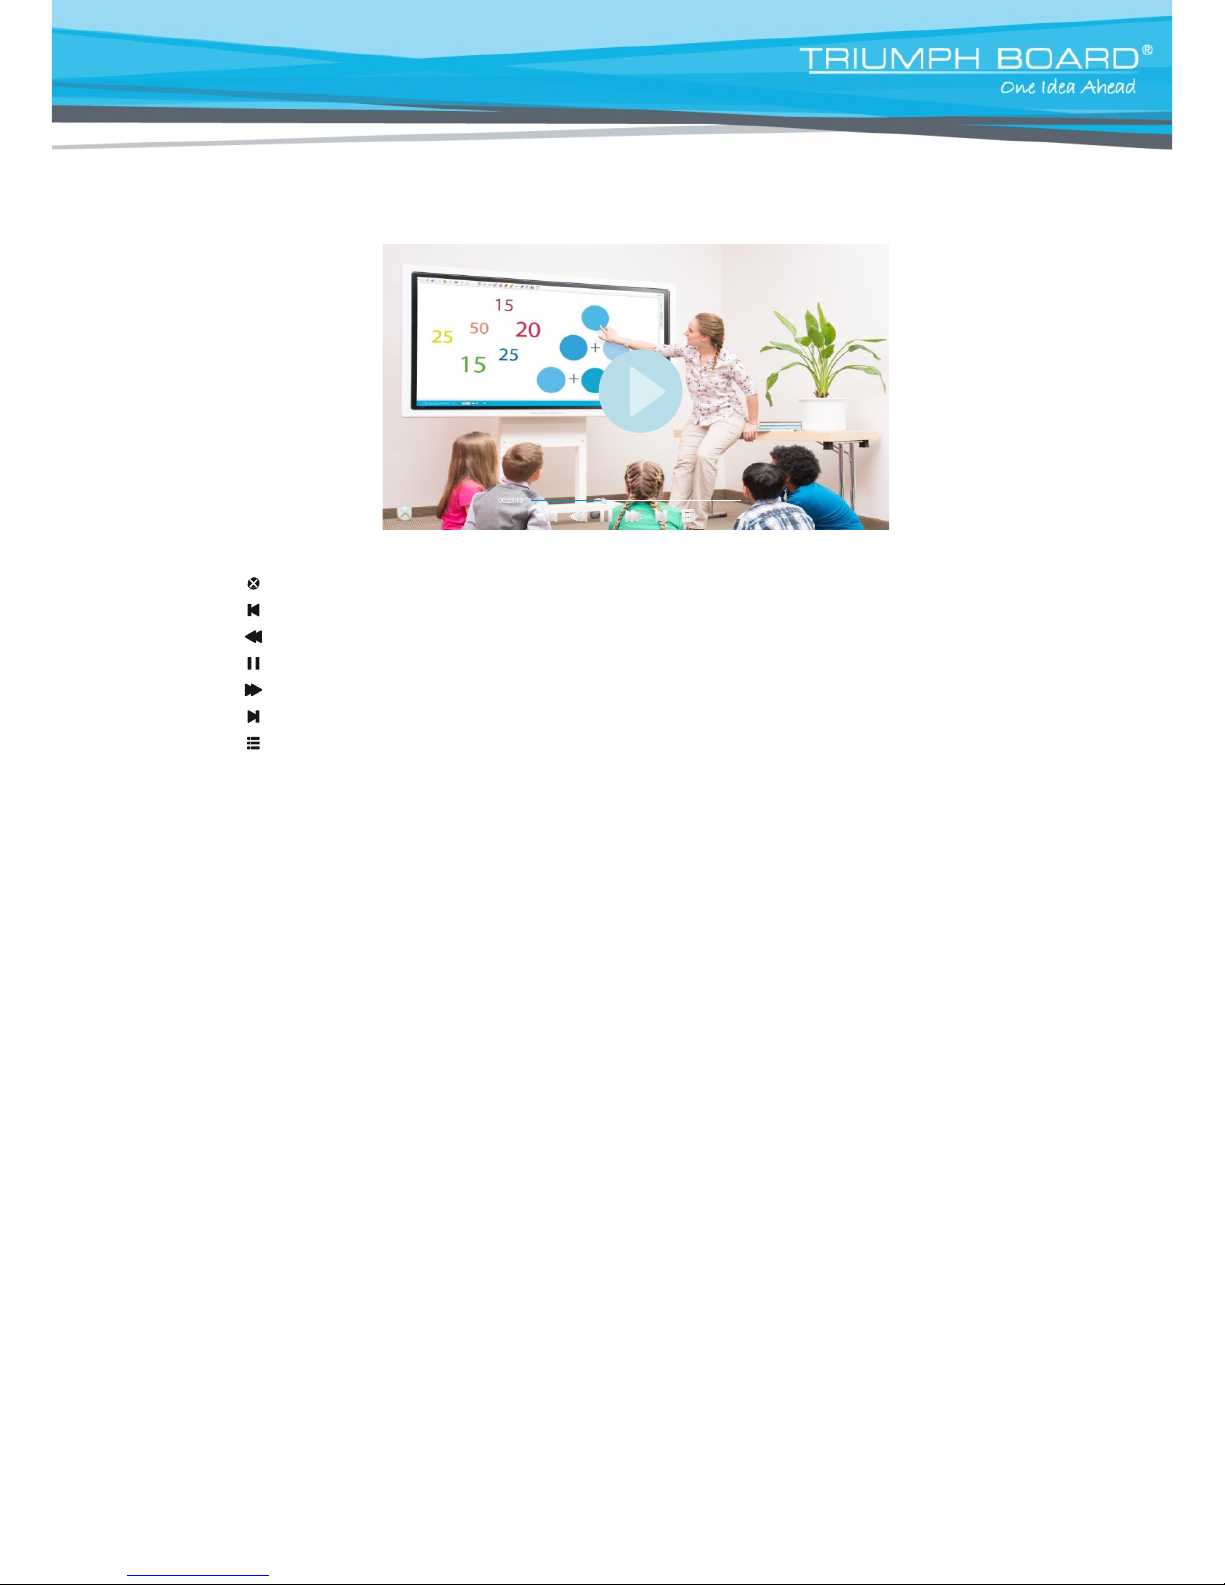
11. Multimedia File Playback Interface
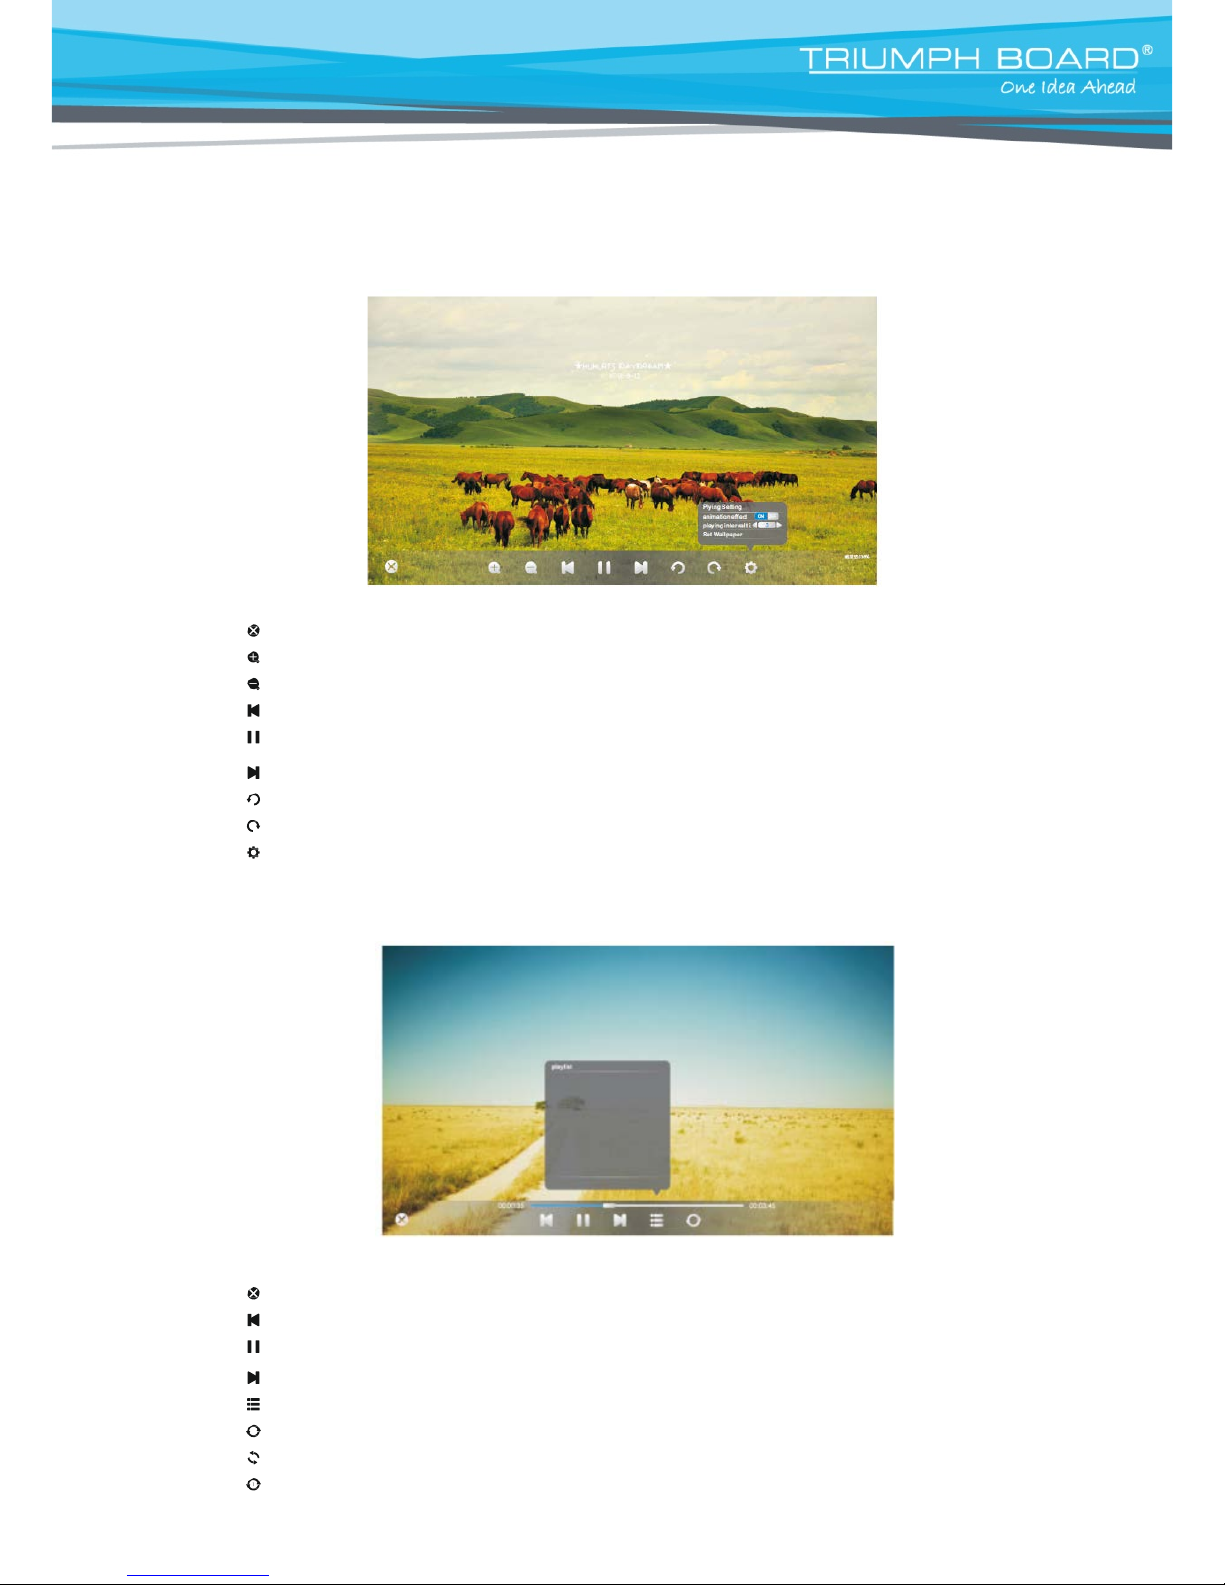
Image play
Close current picture
Magnify current picture
Reduce current picture
Display previous picture
Play/pause
Play next picture
Counterclockwise rotate current picture displayed
Clockwise rotate current picture displayed
Play setting {Animation effect (on/off)/Slide time interval/Set as wallpaper}
Audio play
Close current audio file
Play previous audio
Play/pause file
Play next audio file
Playlist
Loop play
Random play
Single play
Page 33
33
Video play
Close current video file playing
Play previous video
File Fast backward
Play/pause
Fast Forward
Play next audio file
Playlist
Page 34
34
13. Troubleshooting
Board fails to work normally
Remote control failure
1. Check whether there are other objects between remote control and television remote control receiving
window, blocking signal transmission and thus leading to failure of remote control.
2. Check whether the battery terminal in the remote control is correctly connected.
3. Check whether remote control needs battery replacement.
Device automatically
shuts down
1. Check whether the sleep function is set or not.
2. Check whether there has been a sudden power outage.
3. Check whether there is no signal automatic shutdown.
PC mode
Signal out of range
1. Check whether display is set correctly.
2. Check whether resolution is the best resolution.
3. Adjust line and field synchronization in menu.
Background has
vertical lines or streaks
1. Select automatic correction in menu.
2. Adjust clock and phase position in menu.
Image lack of color,
color is incorrect
1. Check whether VGA is not securely connected or has a quality problem.
2. Adjust color and brightness or contrast in menu.
Display format that is
not supported
1. Select automatic correction in menu.
2. Adjust clock and phase position in menu.
Touch Function
Touch function invalid
1. Check whether touch driver is installed and started.
2. Check whether the size of article touched is comparable with finger.
Touch positioning not
correct
1. Check whether driver is properly installed and make correction.
2. Check whether touch using finger or stylus is facing the screen.
Video Malfunctions
No picture and no sound
1. Check whether the device is in active mode.
2. Check whether the signal wire is plugged in securely, using the corresponding INPUT.
3. If in internal computer mode, check whether internal computer is running.
With horizontal or
vertical stripes or
image distortion
1. Check whether signal wire is securely connected.
2. Check whether other electronic equipment or power tools are placed around the device.
No color, color is weak
or image is weak
1. Adjust color and brightness or contrast in menu.
2. Check whether signal wire is securely connected.
Audio Malfunctions
Image but no sound
1. Check whether mute button is pressed for mute.
2. Press VOL. + / - to adjust volume.
3. Check whether audio line is connected correctly.
Only one speaker has
sound
1. Adjust sound balance in menu.
2. Check whether computer sound control panel only sets up one sound channel.
3. Check whether audio line is connected correctly.
VGA output without
sound
1. Check whether an external device is connected with headphone cable.
Page 35
35
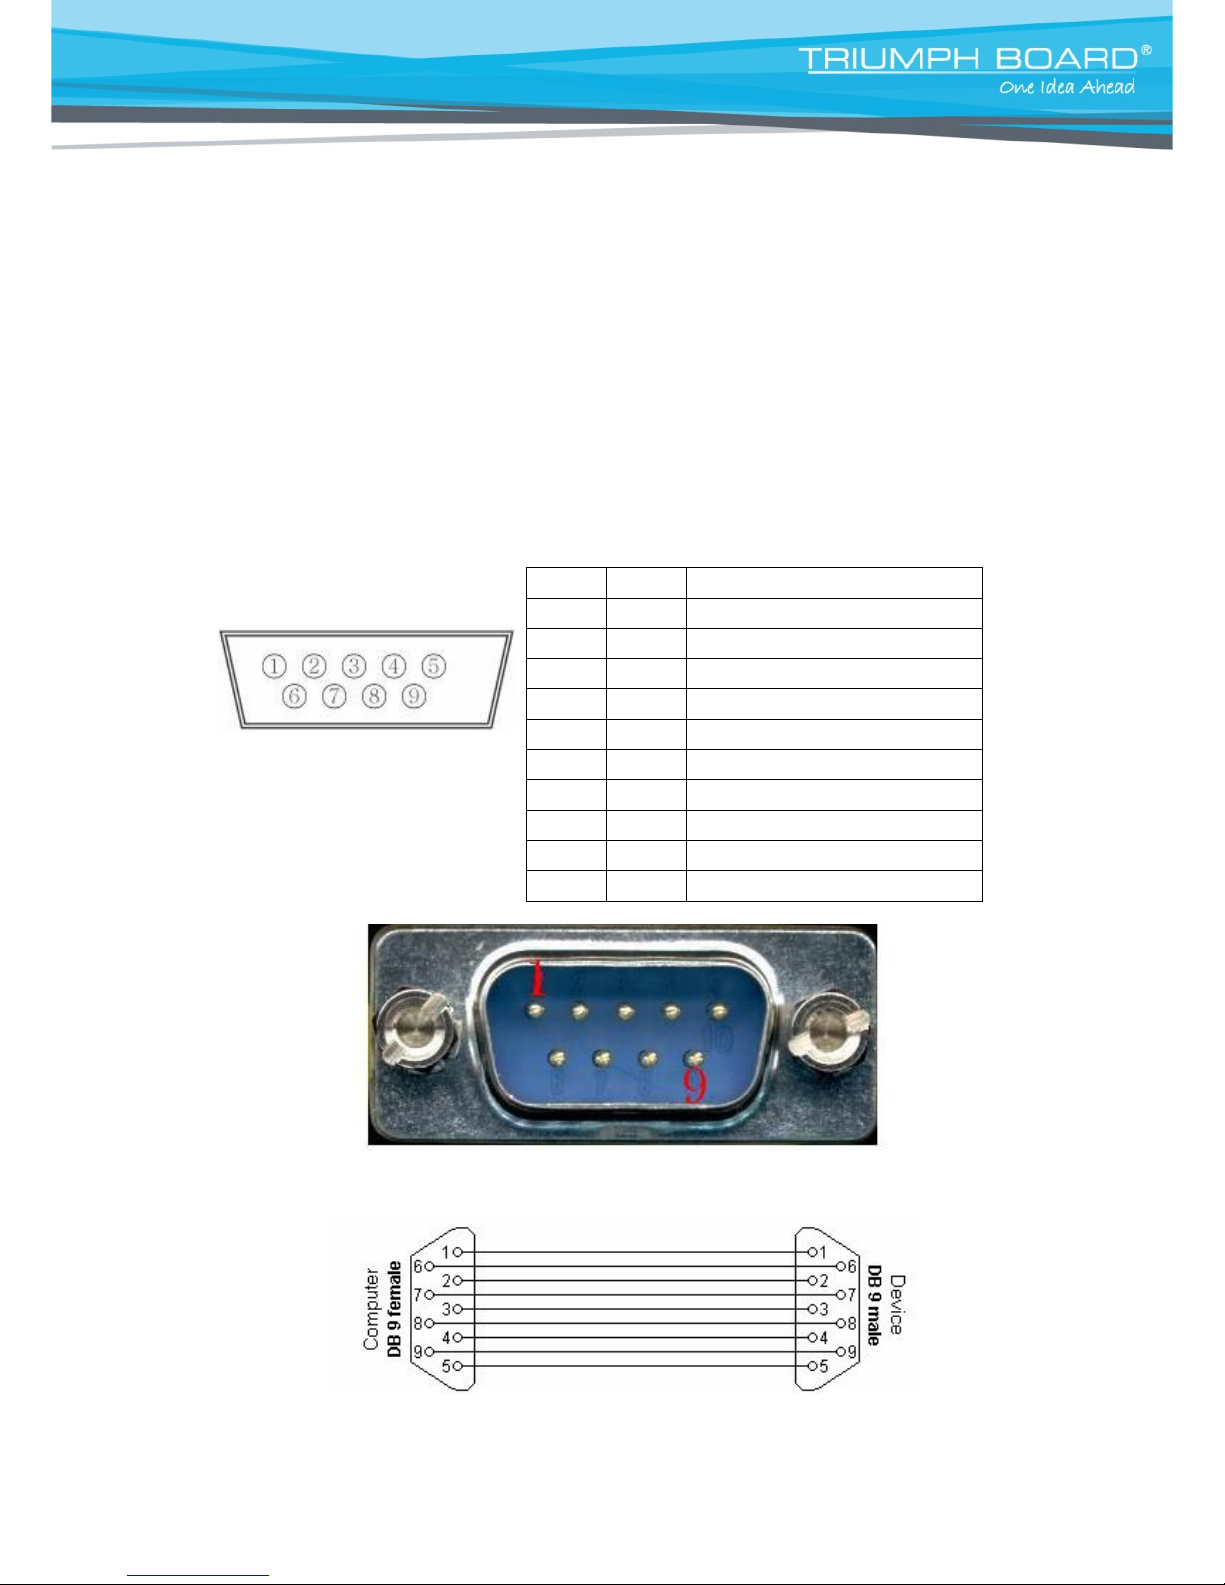
Pin # Signal Remark
1 NC
2 TXD Output to TV
3 RXD Input from TV
4 NC
5 GND
6 NC
7 NC
8 NC
9 NC
frame GND
14. Software protocols
This document describes the hardware interface specification and software protocols of the
RS232 interface communication between LED LCD and PC or other control unit with RS232 protocol.
14.1 Description
Hardware specification
LED LCD communication port is on the rear bottom side
(1) Connector type: DSUB 9 Pin Male
(2) Pin Assignment
Male DSUB 9Pin
(outside view)
Pin2 is TXD,Pin3 is RXD. Pin-to-Pin connection as below.
Page 36
36
Serial port communication setting:
Baud Rate Select: 9600bps (fixed)
Data bits: 8bits (fixed)
Parity: None (fixed)
Stop Bits: 1(fixed)
Protocols
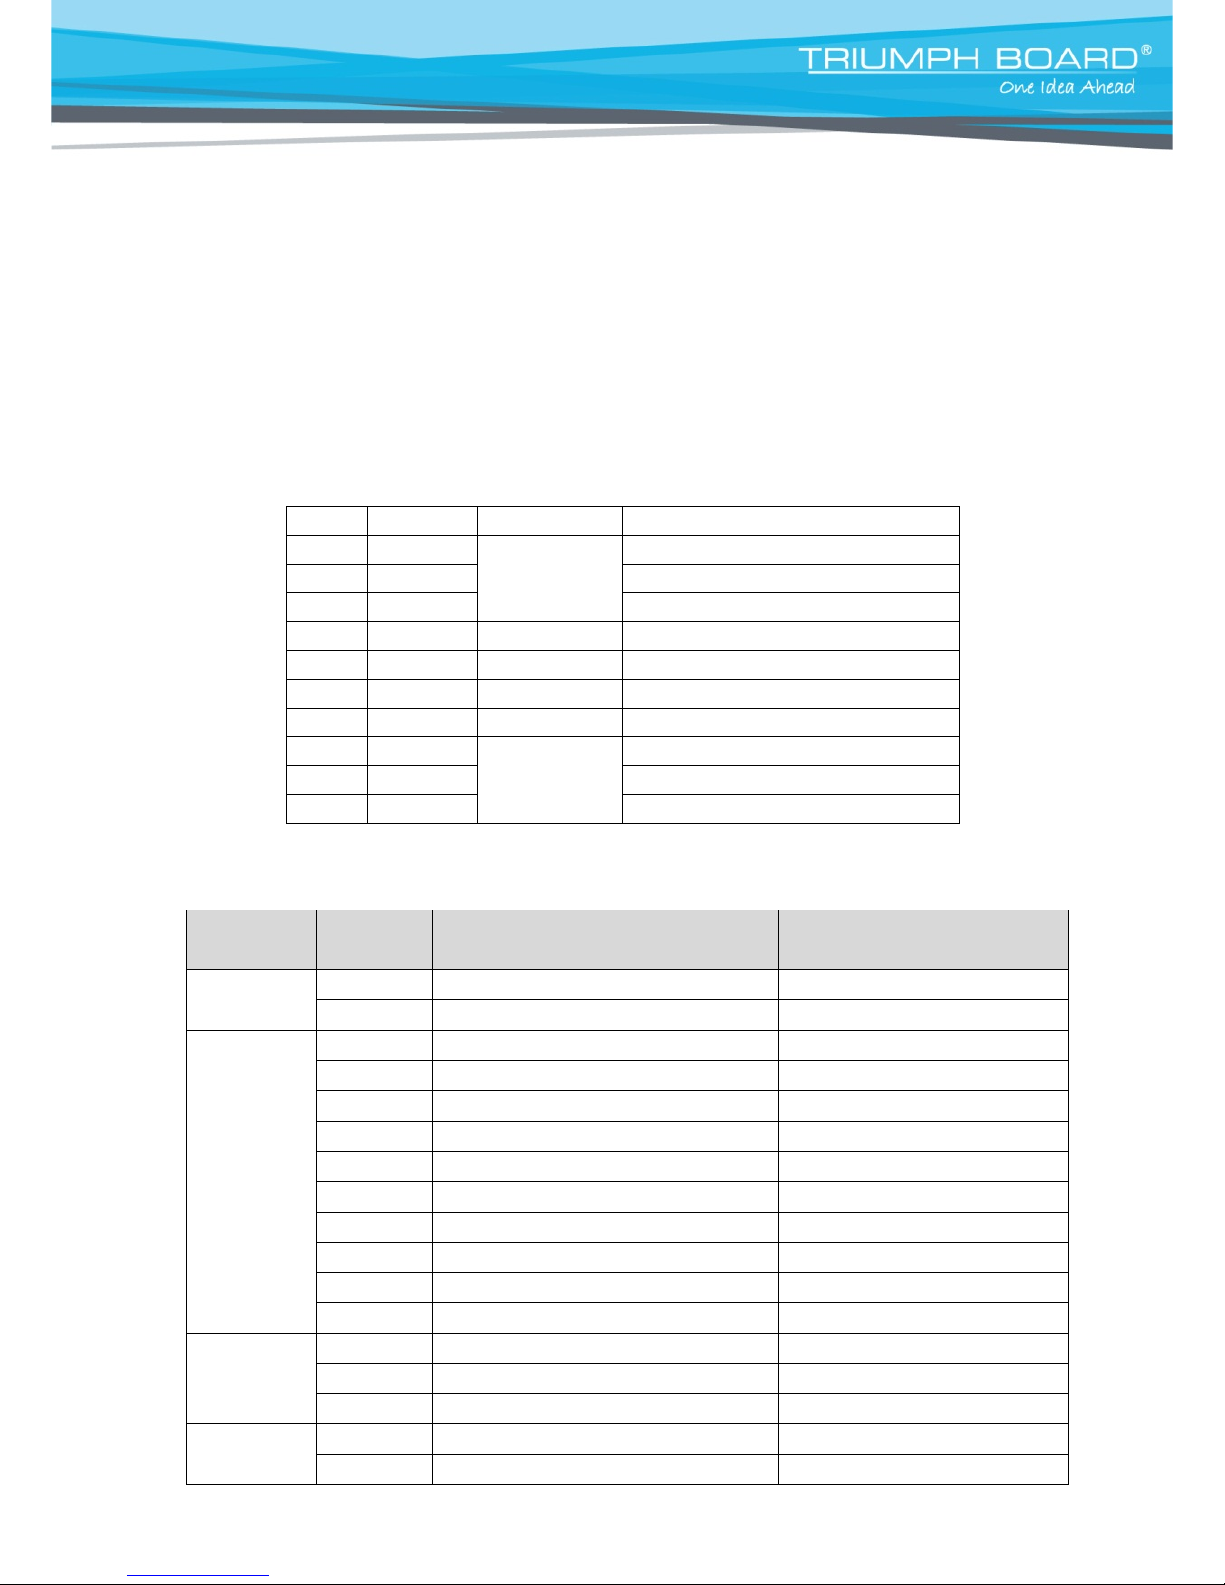
Command Format
No. Content
Description Remar
1 0xAA
Head
fixed value
2 0xBB
fixed value
3 0xCC
fixed value
4
Main command
5
subcommand
6 0x00 Length
valid data
7 checksum
checksum
Sum from No.4 to No.6.
8 0xDD
End
fixed value
9 0xEE
fixed value
10 0xFF
fixed value
IR Code list
Function
Mode
Code
Note
Power
ON
AA BB CC 01 00 00 01 DD EE FF
OFF
AA BB CC 01 01 00 02 DD EE FF
Channels
TV
AA BB CC 02 01 00 03 DD EE FF
CVBS
AA BB CC 02 02 00 04 DD EE FF
VGA3
AA BB CC 02 0B 00 0D DD EE FF
VGA1
AA BB CC 02 03 00 05 DD EE FF
VGA2
AA BB CC 02 04 00 06 DD EE FF
HDMI1
AA BB CC 02 06 00 08 DD EE FF
HDMI2
AA BB CC 02 07 00 09 DD EE FF
HDMI3
AA BB CC 02 05 00 07 DD EE FF
PC
AA BB CC 02 08 00 0A DD EE FF
Android
AA BB CC 02 0A 00 0C DD EE FF
Volume
000—100 AA BB CC 03 00 xx ** DD EE FF
MUTE
AA BB CC 03 01 00 04 DD EE FF
UNMUTE AA BB CC 03 01 01 05 DD EE FF
Aspect
16:9 AA BB CC 08 00 00 08 DD EE FF
4:3 AA BB CC 08 01 00 09 DD EE FF
Page 37
37
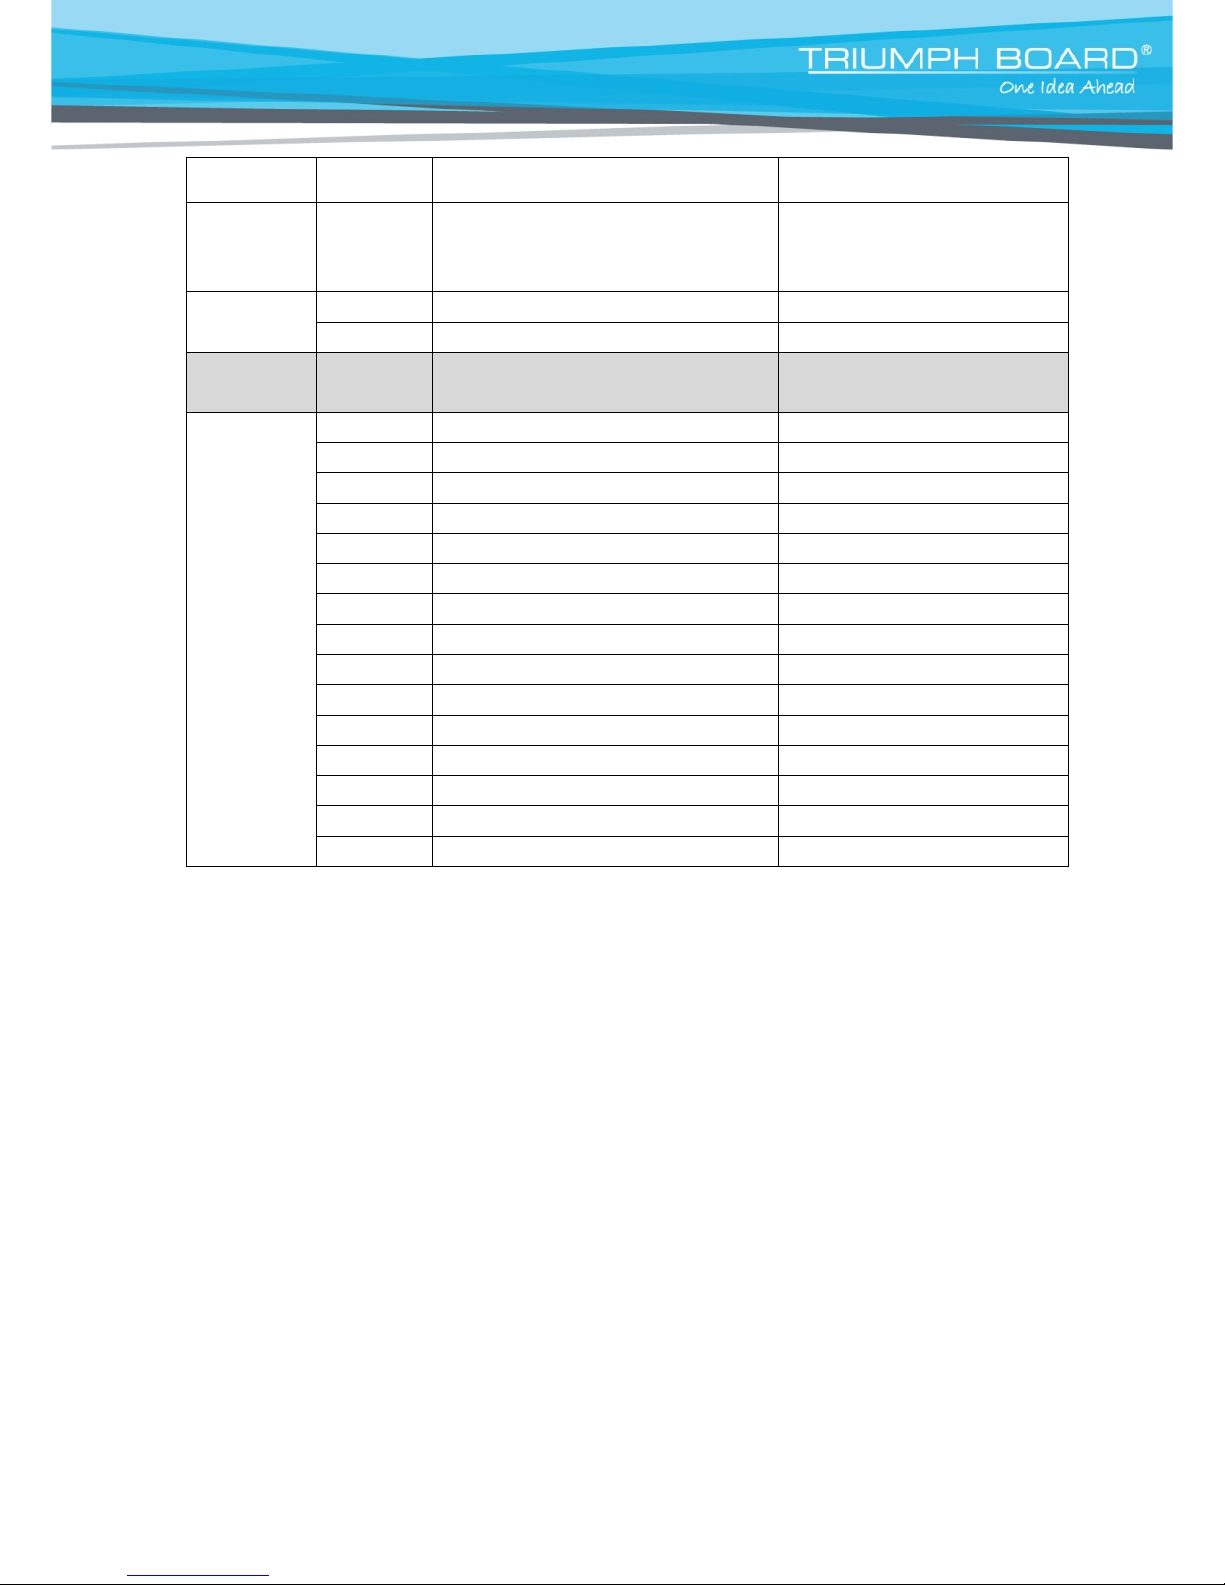
Point to
point
AA BB CC 08 07 00 0F DD EE FF
TV
channels
ATV 00-99 AA BB CC 05 00 XX ** DD EE FF
Power
of PC
ON AA BB CC 09 01 00 0A DD EE FF
OK OFF AA BB CC 09 00 00 09 DD EE FF
OK
Function
Mode
Code
Note
Function of
Remote
Control
WIN AA BB CC 07 0B 00 12 DD EE FF
Space
AA BB CC 07 46 00 4D DD EE FF
Alt+Tab
AA BB CC 07 1D 00 24 DD EE FF
Alt+F4
AA BB CC 07 1F 00 26 DD EE FF
NUM_1
AA BB CC 07 00 00 07 DD EE FF
NUM_2
AA BB CC 07 10 00 17 DD EE FF
NUM_3
AA BB CC 07 11 00 18 DD EE FF
NUM_4
AA BB CC 07 13 00 1A DD EE FF
NUM_5
AA BB CC 07 14 00 1B DD EE FF
NUM_6
AA BB CC 07 15 00 1C DD EE FF
NUM_7
AA BB CC 07 17 00 1E DD EE FF
NUM_8
AA BB CC 07 18 00 1F DD EE FF
NUM_9
AA BB CC 07 19 00 20 DD EE FF
NUM_0
AA BB CC 07 1B 00 22 DD EE FF
Display
AA BB CC 07 1C 00 23 DD EE FF
Page 38
38
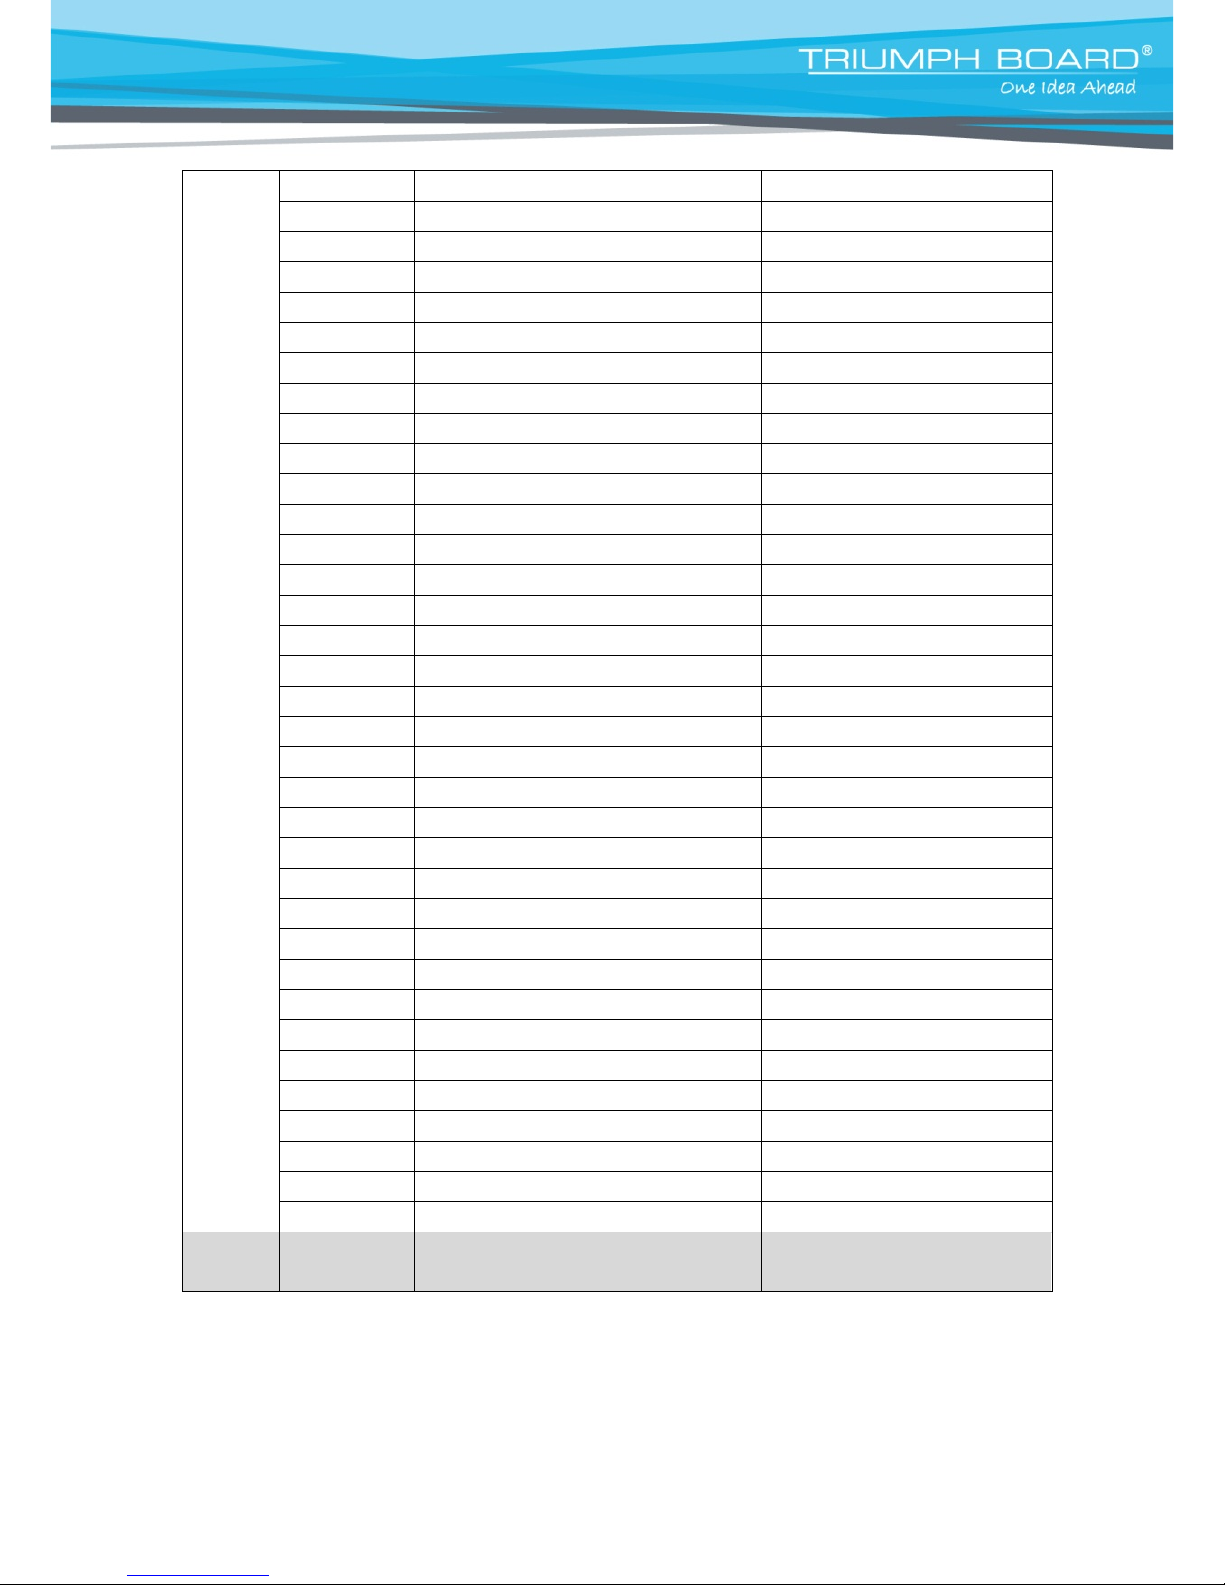
Refresh
AA BB CC 07 4C 00 53 DD EE FF
Input
AA BB CC 07 07 00 0E DD EE FF
Home
AA BB CC 07 48 00 4F DD EE FF
Menu
AA BB CC 07 0D 00 14 DD EE FF
Delete
AA BB CC 07 40 00 47 DD EE FF
Energy
AA BB CC 07 4E 00 55 DD EE FF
UP AA BB CC 07 47 00 4E DD EE FF
DOWN
AA BB CC 07 4D 00 54 DD EE FF
LEFT
AA BB CC 07 49 00 50 DD EE FF
RIGHT
AA BB CC 07 4B 00 52 DD EE FF
ENTER
AA BB CC 07 4A 00 51 DD EE FF
Point
AA BB CC 07 06 00 0D DD EE FF
Back
AA BB CC 07 0A 00 11 DD EE FF
CH+
AA BB CC 07 02 00 09 DD EE FF
CH- AA BB CC 07 09 00 10 DD EE FF
VOL+
AA BB CC 07 03 00 0A DD EE FF
VOL-
AA BB CC 07 41 00 48 DD EE FF
PageUp
AA BB CC 07 42 00 49 DD EE FF
PageDown AA BB CC 07 0F 00 16 DD EE FF
F1
AA BB CC 07 45 00 4C DD EE FF
F2
AA BB CC 07 12 00 19 DD EE FF
F3
AA BB CC 07 51 00 58 DD EE FF
F4
AA BB CC 07 5B 00 62 DD EE FF
F5 AA BB CC 07 44 00 4B DD EE FF
F6 AA BB CC 07 50 00 57 DD EE FF
F7 AA BB CC 07 43 00 4A DD EE FF
F8 AA BB CC 07 1A 00 21 DD EE FF
F9 AA BB CC 07 04 00 0B DD EE FF
F10
AA BB CC 07 59 00 60 DD EE FF
F11
AA BB CC 07 57 00 5E DD EE FF
F12
AA BB CC 07 08 00 0F DD EE FF
RED
AA BB CC 07 5C 00 63 DD EE FF
GREEN
AA BB CC 07 5D 00 64 DD EE FF
\
YELLOW
AA BB CC 07 5E 00 65 DD EE FF
\
BLUE
AA BB CC 07 5F 00 66 DD EE FF
\
Function
Mode
Code
Note
Page 39
39
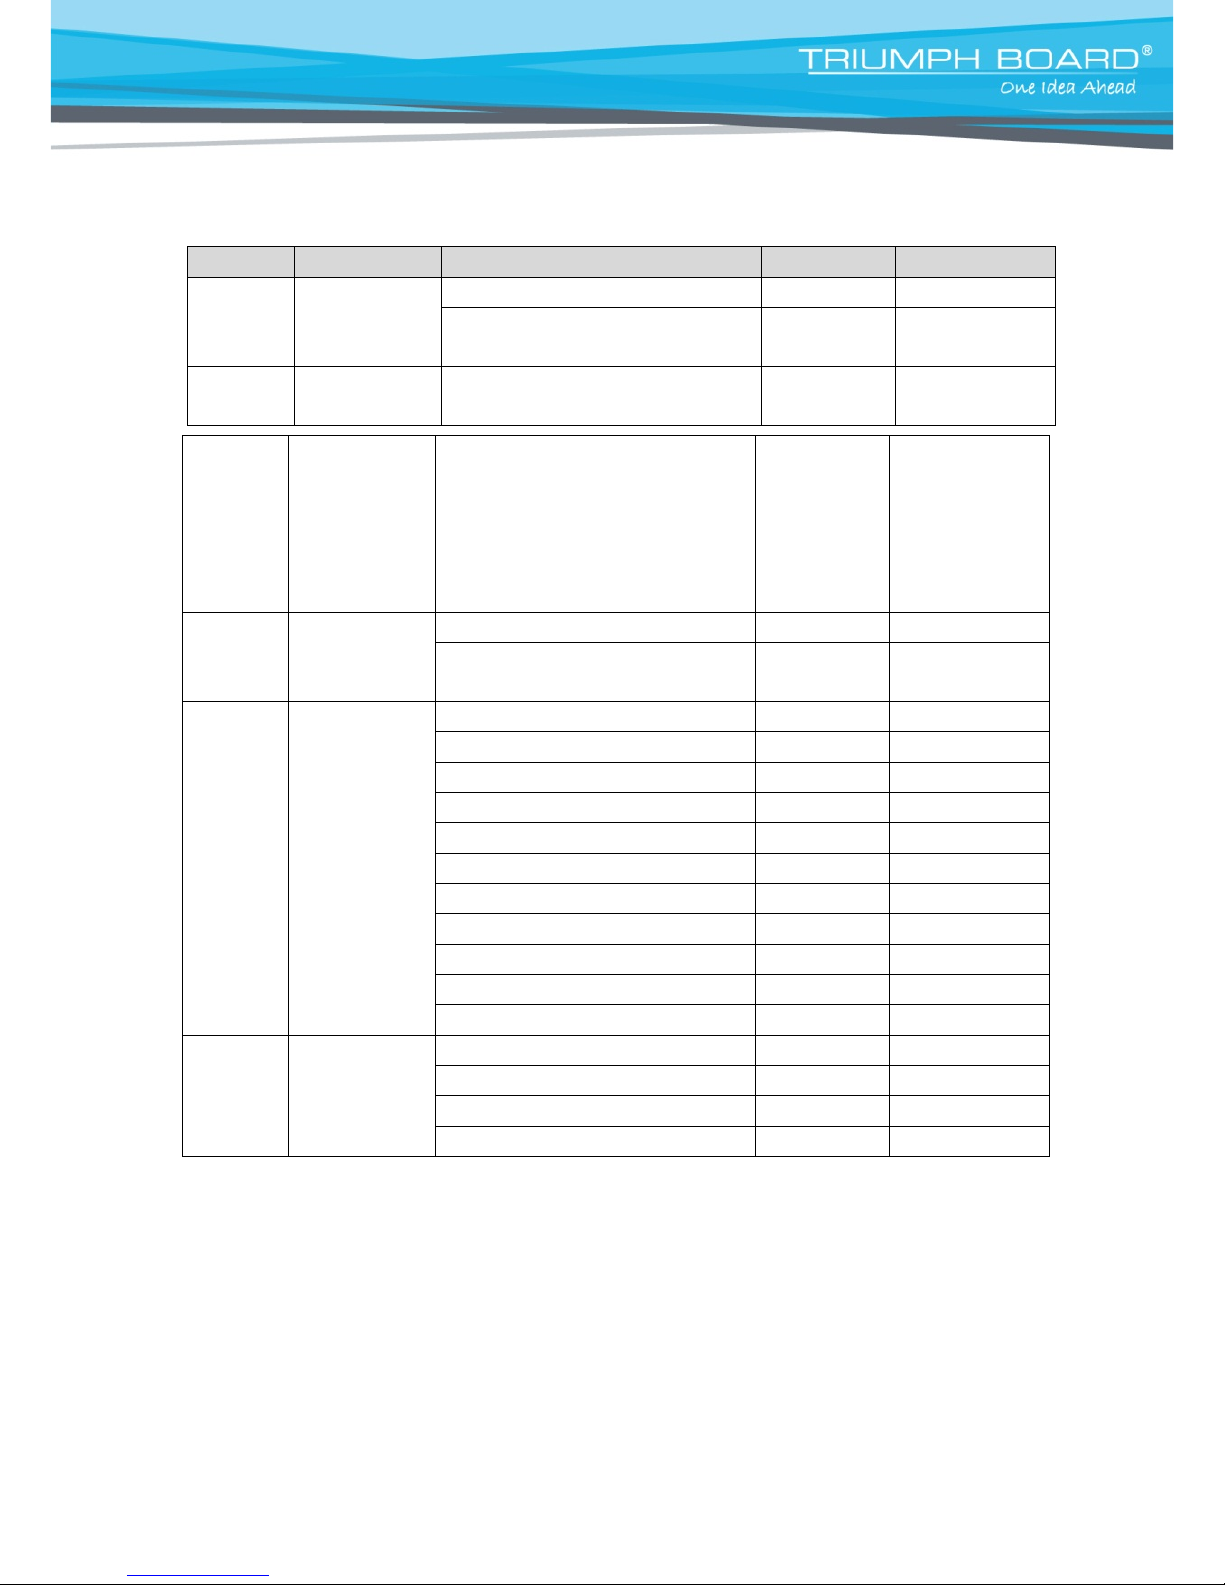
Status Check Codes:
Function
Search Code Reply
Code
Status
Example
Check
Power
Status
AA BB CC 01 02
00 03 DD EE FF
AA BB CC 80 00 00 80 DD EE FF
ON
AA BB CC 80 01 00 81 DD EE FF
OFF
Check
volume
AA BB CC 03 02
00 05 DD EE FF
AA BB CC 82 00 xx ** DD EE FF
Volume is xx
xx=the amount
of volume. EX.
The volume is
30(decimal)=1E
(Hexadecimal),
xx=1E,**=03+00
+1E(Hexadecim
al)=21
Check
audio
status
AA BB CC 03 03
00 06 DD EE FF
AA BB CC 82 01 00 83 DD EE FF
MUTE
AA BB CC 82 01 01 84 DD EE FF
UNMUTE
Check
input
status
AA BB CC 02 00
00 02 DD EE FF
AA BB CC 81 01 00 82 DD EE FF TV
AA BB CC 81 02 00 83 DD EE FF AV
AA BB CC 81 03 00 84 DD EE FF VGA1
AA BB CC 81 04 00 85 DD EE FF VGA2
AA BB CC 81 05 00 86 DD EE FF HDMI3
AA BB CC 81 06 00 87 DD EE FF
HDMI1
AA BB CC 81 07 00 88 DD EE FF
HDMI2
AA BB CC 81 08 00 89 DD EE FF
PC
AA BB CC 81 0A 00 8B DD EE FF
ANDROID
AA BB CC 81 0C 00 8D DD EE FF WHDI
AA BB CC 81 0B 00 8C DD EE FF VGA3
Check P
C
status
AA BB CC 09 02
00 0B DD EE FF
AA BB CC 83 00 00 83 DD EE FF ON
AA BB CC 83 01 00 84 DD EE FF OFF
AA BB CC 83 02 00 85 DD EE FF SLEEP
AA BB CC 83 03 00 86 DD EE FF
Hibernate
Page 40
40
15. Maintenance
Proper maintenance can prevent many early defects. Regular, careful cleaning can keep the device
like brand- new.
Please unplug power plug before cleaning and maintenance, to prevent electric shock.
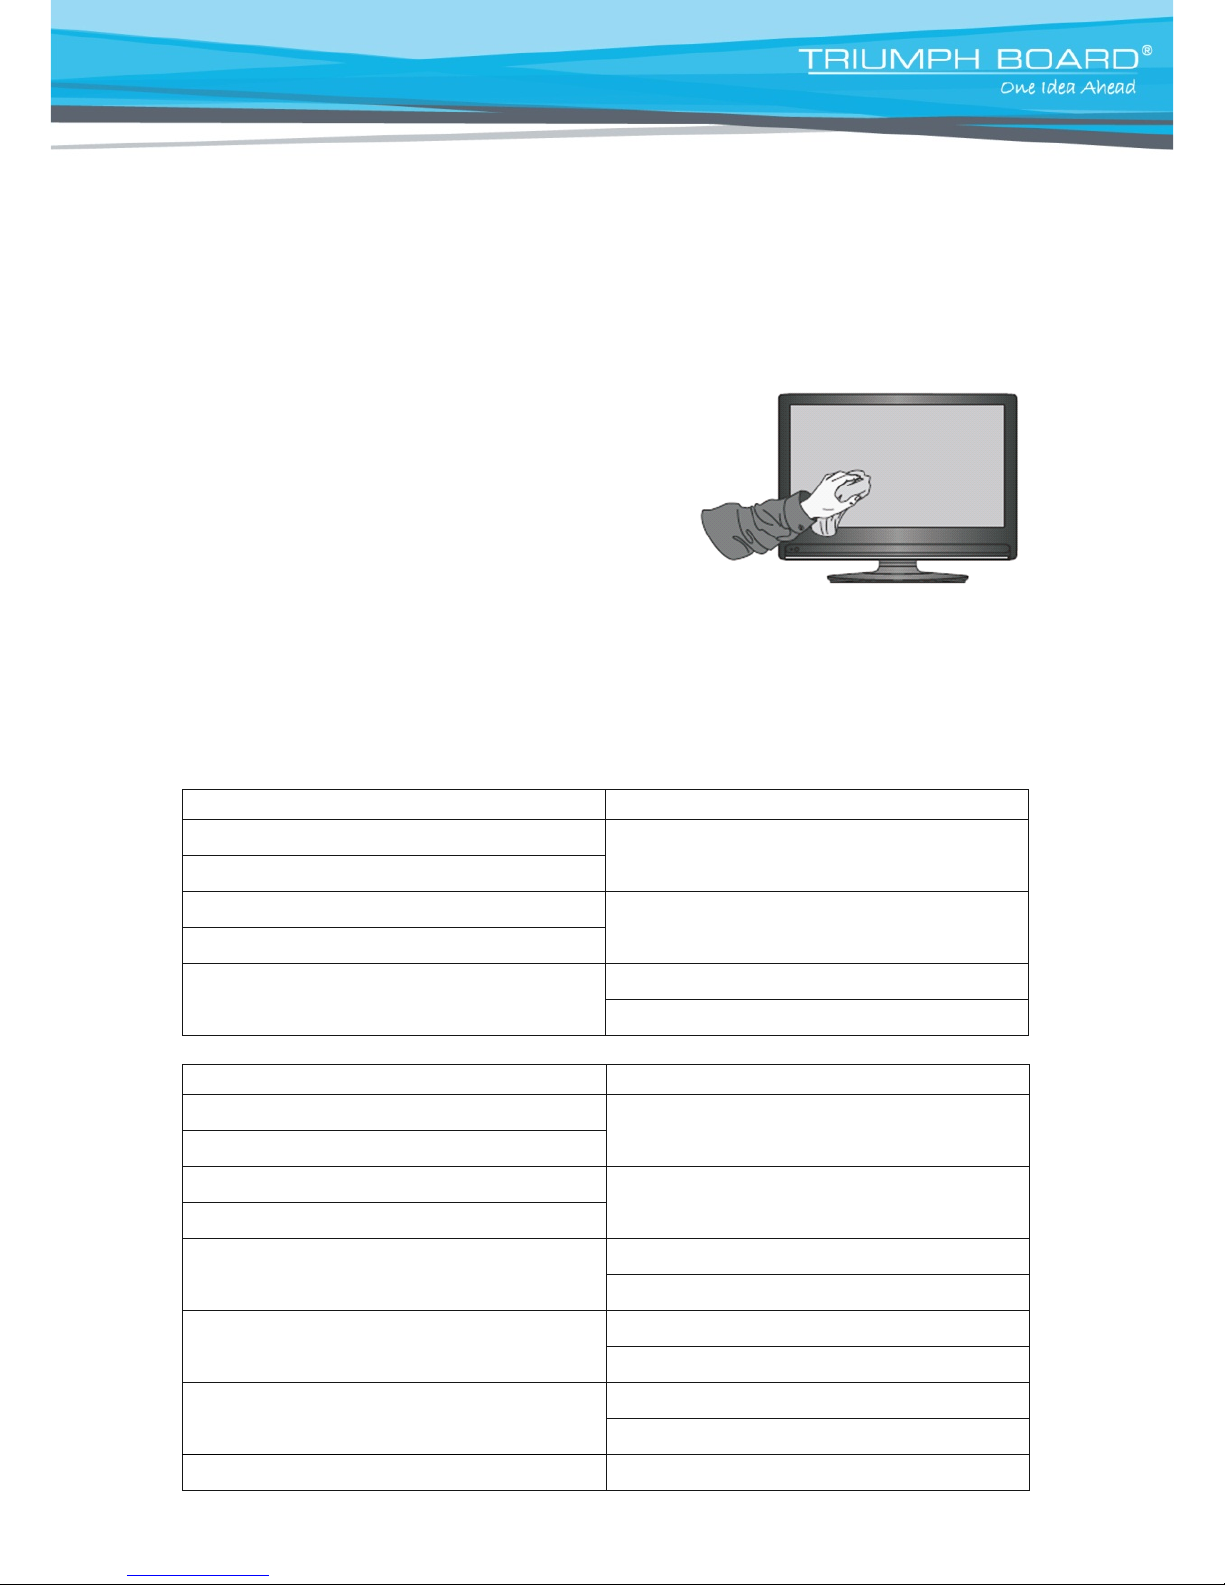
Clean screen
Mix a small amount of fabric softener or dishwashing detergent with
warm water. Dip a soft cloth into the mixture, and then wring to
a semi-dry state. Use this to wipe the screen of the device.
Repeat several times, being careful not to squeeze any liquid into
the device when wiping the device.
Clean front frame
Please use dry, soft, lint-free cloth to wipe front frame.
Device to remain unused for extended period
If the device will not be used for an extended period of time, such as during a vacation, please make
sure to unplug the cord to prevent any possible dangers caused by power surges from lightning.
For cleaning glass surface of your IFP, we recommended to use TRIUMPH Cleaning Pads
EAN:8592580083365.
16. Display Mode
1. VGA mode
Resolution / Display mode
Field frequency (Hz)
640x480
60
800x600
1024x768
60
1280x800
1920x1080
50
60
2. HDMI mode
Resolution / Display mode
Field frequency (Hz)
480p
60
480i
576p
50
576i
720p
50
60
1080i
50
60
1080p
50
60
2160p
30
Page 41
41
17. Repair Service and Contacts
Please contact your local supplier regarding warranty and technical service. You can find all warranty
conditions and service partners on our website
www.triumphboard.com/support/warranty. If you
have any questions please email us at [email protected]
TRIUMPH BOARD a.s.
Neklanova 122/15
128 00 Prague 2
Czech Republic
EU
Phone: +420 224 910 221
Fax: +420 224 910 218
E-mail: [email protected]
www.triumphboard.com
© TRIUMPH BOARD
Notices
Every effort has been made to ensure all information contained in this user guide is correct, but the
accuracy or completeness is not guaranteed. B efore using this product, you must evaluate it and
determine if it is suitable for your intended application. You assume all risks and l iability associated with
such use. Any statements related to this product not contained in this manual or any contrary statements
appearing on your purchase order shall have no force of effect unless expressly agreed upon, in writing,
with this company.
Reproduction or reprinting of this user guide or a ny part without permission is prohibited.
The content of this user manual is subject to change without prior notice.
 Loading...