

Page 1
User Manual
Fax System
P-C2665 MFP
P-C2665 MFP
Digital Multifunctional Colour System
Copy / Print / Scan / Fax
A4
EN
Page 2

Page 3
i
Safety Conventions in This Guide
Please read the Operation Guide before using the facsimile.
The sections of this handbook and parts of the facsimile marked with symbols are safety warnings meant to
protect the user, other individuals and surrounding objects, and ensure correct and safe usage of the facsimile.
The symbols and their meanings are indicated below.
WARNING: Indicates that serious injury or even death may result from insufficient attention to or
incorrect compliance with the related points.
CAUTION: Indicates that personal injury or mechanical damage may result from insufficient attention
to or incorrect compliance with the related points.
Symbols
The symbol indicates that the related section includes safety warnings. Specific points of attention are
indicated inside the symbol.
The symbol indicates that the related section includes information on prohibited actions. Specifics of the
prohibited action are indicated inside the symbol.
The
symbol indicates that the related section includes information on actions which must be performed.
Specifics of the required action are indicated inside the symbol.
Please contact your service representative to order a replacement if the safety warnings in this Operation Guide
are illegible or if the guide itself is missing. (fee required)
.... [General warning]
.... [Warning of high temperature]
.... [Warning of prohibited action]
.... [Disassembly prohibited]
.... [Alert of required action]
.... [Remove the power plug from the outlet]
....
[Always connect the machine to an outlet with a ground
connection]
Page 4

ii
<Note>
Due to performance updating, information in this Operation Guide is subject to change without notice.
Page 5

iii
Contents
1 Part Names and Functions
Operation Panel . . . . . . . . . . . . . . . . . . . . . . . . . . . . . . . . . . . . . . . . . . . . . . . . . . . . . . . . . . . . . 1-2
Machine . . . . . . . . . . . . . . . . . . . . . . . . . . . . . . . . . . . . . . . . . . . . . . . . . . . . . . . . . . . . . . . . . . . 1-4
2 Preparation Before Use
Selection of Telephone Line (Inch version only) . . . . . . . . . . . . . . . . . . . . . . . . . . . . . . . . . . . . 2-2
Selection of Transmit Terminal Identification (TTI) . . . . . . . . . . . . . . . . . . . . . . . . . . . . . . . . . . 2-3
Setting the TTI information . . . . . . . . . . . . . . . . . . . . . . . . . . . . . . . . . . . . . . . . . . . . . . . . . . . . 2-4
Date and Time Entry . . . . . . . . . . . . . . . . . . . . . . . . . . . . . . . . . . . . . . . . . . . . . . . . . . . . . . . . . 2-6
3 FAX Operation (Basic)
Automatic Send . . . . . . . . . . . . . . . . . . . . . . . . . . . . . . . . . . . . . . . . . . . . . . . . . . . . . . . . . . . . . 3-2
FAX Automatic Reception . . . . . . . . . . . . . . . . . . . . . . . . . . . . . . . . . . . . . . . . . . . . . . . . . . . . . 3-9
Cancelling Communication . . . . . . . . . . . . . . . . . . . . . . . . . . . . . . . . . . . . . . . . . . . . . . . . . . . 3-12
Using the Address Book . . . . . . . . . . . . . . . . . . . . . . . . . . . . . . . . . . . . . . . . . . . . . . . . . . . . . 3-15
Using One-touch Keys . . . . . . . . . . . . . . . . . . . . . . . . . . . . . . . . . . . . . . . . . . . . . . . . . . . . . . . 3-26
Dialing the Same Receiving System (Redial) . . . . . . . . . . . . . . . . . . . . . . . . . . . . . . . . . . . . . 3-29
4 FAX Operation (Advanced)
Delayed Transmission . . . . . . . . . . . . . . . . . . . . . . . . . . . . . . . . . . . . . . . . . . . . . . . . . . . . . . . . 4-2
Broadcast Transmission . . . . . . . . . . . . . . . . . . . . . . . . . . . . . . . . . . . . . . . . . . . . . . . . . . . . . . 4-4
Standby Transmission . . . . . . . . . . . . . . . . . . . . . . . . . . . . . . . . . . . . . . . . . . . . . . . . . . . . . . . . 4-6
Interrupt Send . . . . . . . . . . . . . . . . . . . . . . . . . . . . . . . . . . . . . . . . . . . . . . . . . . . . . . . . . . . . . . 4-7
Chain Dial . . . . . . . . . . . . . . . . . . . . . . . . . . . . . . . . . . . . . . . . . . . . . . . . . . . . . . . . . . . . . . . . . 4-8
Manual Send . . . . . . . . . . . . . . . . . . . . . . . . . . . . . . . . . . . . . . . . . . . . . . . . . . . . . . . . . . . . . . 4-10
Manual Reception . . . . . . . . . . . . . . . . . . . . . . . . . . . . . . . . . . . . . . . . . . . . . . . . . . . . . . . . . . 4-11
Remote Switch Function . . . . . . . . . . . . . . . . . . . . . . . . . . . . . . . . . . . . . . . . . . . . . . . . . . . . . 4-13
Printing/Forwarding Received Documents (Memory Forwarding) . . . . . . . . . . . . . . . . . . . . . . 4-15
Sub Address Communication . . . . . . . . . . . . . . . . . . . . . . . . . . . . . . . . . . . . . . . . . . . . . . . . . 4-29
Sub Address Box Function . . . . . . . . . . . . . . . . . . . . . . . . . . . . . . . . . . . . . . . . . . . . . . . . . . . 4-32
Program Dial . . . . . . . . . . . . . . . . . . . . . . . . . . . . . . . . . . . . . . . . . . . . . . . . . . . . . . . . . . . . . . 4-38
Polling Communication . . . . . . . . . . . . . . . . . . . . . . . . . . . . . . . . . . . . . . . . . . . . . . . . . . . . . . 4-40
Account Management . . . . . . . . . . . . . . . . . . . . . . . . . . . . . . . . . . . . . . . . . . . . . . . . . . . . . . . 4-48
Other Convenient Functions . . . . . . . . . . . . . . . . . . . . . . . . . . . . . . . . . . . . . . . . . . . . . . . . . . 4-52
5 Checking Transmission Results and Registration Status
Various Tools for Checking Transmission Results and Registration Status . . . . . . . . . . . . . . . . 5-2
Checking FAX Job History . . . . . . . . . . . . . . . . . . . . . . . . . . . . . . . . . . . . . . . . . . . . . . . . . . . . . 5-3
Printing Administrative Reports . . . . . . . . . . . . . . . . . . . . . . . . . . . . . . . . . . . . . . . . . . . . . . . . . 5-5
Reporting FAX Receipt Result by E-mail . . . . . . . . . . . . . . . . . . . . . . . . . . . . . . . . . . . . . . . . . 5-11
Confirmation Screen of Destinations . . . . . . . . . . . . . . . . . . . . . . . . . . . . . . . . . . . . . . . . . . . . 5-13
6 Setup and Registration
FAX/TEL Auto Switch Reception . . . . . . . . . . . . . . . . . . . . . . . . . . . . . . . . . . . . . . . . . . . . . . . . 6-2
FAX/Answering Machine Auto Switch Reception . . . . . . . . . . . . . . . . . . . . . . . . . . . . . . . . . . . 6-4
FAX Country Code . . . . . . . . . . . . . . . . . . . . . . . . . . . . . . . . . . . . . . . . . . . . . . . . . . . . . . . . . . . 6-6
Basic Operation Procedure . . . . . . . . . . . . . . . . . . . . . . . . . . . . . . . . . . . . . . . . . . . . . . . . . . . . 6-7
Page 6

iv
Volume Adjustment . . . . . . . . . . . . . . . . . . . . . . . . . . . . . . . . . . . . . . . . . . . . . . . . . . . . . . . . . . 6-9
Prohibiting FAX Printing at Specified Times (Unusable Time) . . . . . . . . . . . . . . . . . . . . . . . . . 6-10
DRD Reception . . . . . . . . . . . . . . . . . . . . . . . . . . . . . . . . . . . . . . . . . . . . . . . . . . . . . . . . . . . . 6-11
Retry Times . . . . . . . . . . . . . . . . . . . . . . . . . . . . . . . . . . . . . . . . . . . . . . . . . . . . . . . . . . . . . . . 6-13
ECM TX . . . . . . . . . . . . . . . . . . . . . . . . . . . . . . . . . . . . . . . . . . . . . . . . . . . . . . . . . . . . . . . . . . 6-13
TX Start Speed . . . . . . . . . . . . . . . . . . . . . . . . . . . . . . . . . . . . . . . . . . . . . . . . . . . . . . . . . . . . 6-13
Media Type for Print Output . . . . . . . . . . . . . . . . . . . . . . . . . . . . . . . . . . . . . . . . . . . . . . . . . . . 6-14
Rings . . . . . . . . . . . . . . . . . . . . . . . . . . . . . . . . . . . . . . . . . . . . . . . . . . . . . . . . . . . . . . . . . . . . 6-16
Receiving Mode . . . . . . . . . . . . . . . . . . . . . . . . . . . . . . . . . . . . . . . . . . . . . . . . . . . . . . . . . . . . 6-17
Reception Date/Time . . . . . . . . . . . . . . . . . . . . . . . . . . . . . . . . . . . . . . . . . . . . . . . . . . . . . . . . 6-18
2 in 1 Reception . . . . . . . . . . . . . . . . . . . . . . . . . . . . . . . . . . . . . . . . . . . . . . . . . . . . . . . . . . . . 6-19
Print all at once [Batch Print] . . . . . . . . . . . . . . . . . . . . . . . . . . . . . . . . . . . . . . . . . . . . . . . . . . 6-20
Encryption . . . . . . . . . . . . . . . . . . . . . . . . . . . . . . . . . . . . . . . . . . . . . . . . . . . . . . . . . . . . . . . . 6-21
Duplex Print Output . . . . . . . . . . . . . . . . . . . . . . . . . . . . . . . . . . . . . . . . . . . . . . . . . . . . . . . . . 6-27
ECM RX . . . . . . . . . . . . . . . . . . . . . . . . . . . . . . . . . . . . . . . . . . . . . . . . . . . . . . . . . . . . . . . . . . 6-28
RX Start Speed . . . . . . . . . . . . . . . . . . . . . . . . . . . . . . . . . . . . . . . . . . . . . . . . . . . . . . . . . . . . 6-29
Transmission Restriction . . . . . . . . . . . . . . . . . . . . . . . . . . . . . . . . . . . . . . . . . . . . . . . . . . . . . 6-30
Connection to PBX (Private Branch Exchange) (Europe only) . . . . . . . . . . . . . . . . . . . . . . . . 6-41
Remote Diagnostics . . . . . . . . . . . . . . . . . . . . . . . . . . . . . . . . . . . . . . . . . . . . . . . . . . . . . . . . 6-42
7 About Network FAX
What is Network FAX? . . . . . . . . . . . . . . . . . . . . . . . . . . . . . . . . . . . . . . . . . . . . . . . . . . . . . . . . 7-2
Setup . . . . . . . . . . . . . . . . . . . . . . . . . . . . . . . . . . . . . . . . . . . . . . . . . . . . . . . . . . . . . . . . . . . . . 7-4
8 Troubleshooting
Indicators During Sending/Receiving Operation . . . . . . . . . . . . . . . . . . . . . . . . . . . . . . . . . . . . 8-2
Responding to an ATTENTION Indicator Flashes . . . . . . . . . . . . . . . . . . . . . . . . . . . . . . . . . . . 8-2
Precautions When Turning Power OFF . . . . . . . . . . . . . . . . . . . . . . . . . . . . . . . . . . . . . . . . . . . 8-3
Error Messages . . . . . . . . . . . . . . . . . . . . . . . . . . . . . . . . . . . . . . . . . . . . . . . . . . . . . . . . . . . . . 8-4
Troubleshooting . . . . . . . . . . . . . . . . . . . . . . . . . . . . . . . . . . . . . . . . . . . . . . . . . . . . . . . . . . . . . 8-6
Appendix
Character Entry Method . . . . . . . . . . . . . . . . . . . . . . . . . . . . . . . . . . . . . . . . . . . . . . . . Appendix-2
Specifications (Fax function) . . . . . . . . . . . . . . . . . . . . . . . . . . . . . . . . . . . . . . . . . . . . . Appendix-6
Menu List . . . . . . . . . . . . . . . . . . . . . . . . . . . . . . . . . . . . . . . . . . . . . . . . . . . . . . . . . . . .Appendix-7
Received FAX Sizes and Paper Priority (Inch Model) . . . . . . . . . . . . . . . . . . . . . . . . . Appendix-10
Received FAX Sizes and Paper Priority (Metric Model) . . . . . . . . . . . . . . . . . . . . . . . Appendix-11
Error Code List . . . . . . . . . . . . . . . . . . . . . . . . . . . . . . . . . . . . . . . . . . . . . . . . . . . . . . Appendix-12
Index
Page 7

v
Safety Information
About this Operation Guide
This Operation Guide contains information on using the facsimile functions of this machine. Please read the
Operation Guide before you start using the machine.
During use, refer to the Operation Guide for your machine for information regarding the sections listed below.
• Caution Labels
• Installation Precautions
• Precautions for Use
• Loading Paper
• Toner Container and Waste Toner
Box Replacement
• Clearing Paper Jams
• Solving Malfunctions
• Cleaning
Page 8

vi
General Notice
Legal Notice
WE SHALL HAVE NO LIABILITY FOR LOSS, WHETHER OR PARTIAL, OF RECEIVED DOCUMENTS WHEN
SUCH LOSS IS CAUSED BY DAMAGES TO THE FAX SYSTEM, MALFUNCTIONS, MISUSE, OR EXTERNAL
FACTORS SUCH AS POWER OUTAGES; OR FOR PURELY ECONOMIC LOSSES OR LOST PROFITS
RESULTING FROM MISSED OPPORTUNITIES ATTRIBUTABLE TO MISSED CALLS OR RECORDED
MESSAGES RESULTING THEREFROM.
Trademark Information
• Adobe Acrobat, Adobe Reader and PostScript are trademarks of Adobe Systems, Incorporated.
All other company and product names in this Operation Guide are trademarks or registered trademarks of their
respective companies. The designations™ and ® are omitted in this guide.
IMPORTANT SAFETY INSTRUCTIONS
When using your telephone equipment, basic safety precautions should always be followed to reduce the risk
of fire, electric shock and injury to persons, including the following:
CAUTION: To reduce the risk of fire, use only No.26 AWG or larger UL listed or CSA certified
telecommunication line cord.
1 Do not use this product near water, for example, near a bath tub, wash bowl, kitchen sink or laundry tub,
in a wet basement or near a swimming pool.
2 Avoid using a telephone (other than a cordless type) during an electrical storm. There may be a remote
risk of electric shock from lightning.
3 Do not use the telephone to report a gas leak in the vicinity of the leak.
4 Use only the power cord and batteries indicated in this manual. Do not dispose of batteries in a fire. They
may explode. Check with local codes for possible special disposal instructions.
SAVE THESE INSTRUCTIONS
Page 9

vii
IMPORTANTES MESURES DE SECURITE
Certaines mesures de sécurité doivent être prises pendant l'utilisation de matériel téléphonique afin de réduire
les risques d'incendie, de choc électrique et de blessures. En voici quelques unes:
1 Ne pas utiliser l'appareil près de l'eau, p. ex., près d'une baignoire, d'un lavabo, d'un évier de cuisine, d'un
bac à laver, dans un sous-sol humide ou près d'une piscine.
2 Eviter d'utiliser le téléphone (sauf s'il s'agit d'un appareil sans fil) pendant un orage électrique. Ceci peut
présenter un risque de choc électrique causé par la foudre.
3 Ne pas utiliser l'appareil téléphonique pour signaler une fuite de gaz s'il est situé près de la fuite.
4 Utiliser seulement le cordon d'alimentation et le type de piles indiqués dans ce manuel. Ne pas jeter les
piles dans le feu: elles peuvent exploser. Se conformer aux règlements pertinents quant à l'élimination
des piles.
CONSERVER CES INSTRUCTIONS
Page 10

viii
Declarations to European Directives
DECLARATION OF CONFORMITY TO 2004/108/EC, 2006/95/EEC, 93/68/EEC, 1999/5/EC and 2009/125/EC
We declare under our sole responsibility that the product to which this declaration relates is in conformity with
the following specifications.
Limits and methods of measurement for immunity
characteristics of information technology
equipment
EN55024
Limits and methods of measurement for radio
interference characteristics of information
technology equipment
EN55022 Class B
Limits for harmonic currents emissions for
equipment input current 16A per phase
EN61000-3-2
Limitation of voltage fluctuations and flicker in lowvoltage supply systems for equipment with rated
current 16A
EN61000-3-3
Safety of information technology equipment,
including electrical business equipment
EN60950-1
Terminal Equipment (TE);
Attachment requirements for pan-European
approval for connection to the analogue Public
Switched Telephone Networks (PSTNs) of TE
(excluding TE supporting the voice telephony
service) in which network addressing, if provided,
is by means of Dual Tone Multi Frequency (DTMF)
signalling
TBR 21
Page 11

ix
Technical regulations for terminal equipment
This terminal equipment complies with:
• TBR21 • DE 08R00 National AN for D
• AN 01R00 AN for P • DE 09R00 National AN for D
• AN 02R01 AN for CH and N • DE 12R00 National AN for D
• AN 05R01 AN for D, E, GR, P and N • DE 14R00 National AN for D
• AN 06R00 AN for D, GR and P • ES 01R01 National AN for E
• AN 07R01 AN for D, E, P and N • GR 01R00 National AN for GR
• AN 09R00 AN for D • GR 03R00 National AN for GR
• AN 10R00 AN for D • GR 04R00 National AN for GR
• AN 11R00 AN for P • NO 01R00 National AN for N
• AN 12R00 AN for E • NO 02R00 National AN for N
• AN 16R00 General Advisory Note • P 03R00 National AN for P
• DE 03R00 National AN for D • P 04R00 National AN for P
• DE 04R00 National AN for D • P 08R00 National AN for P
• DE 05R00 National AN for D
Page 12

x
Network Compatibility Declaration
The manufacturer declares that the equipment has been designed to operate in the public switched telephone
networks (PSTN) in the following countries:
Austria France Liechtenstein Slovakia
Belgium Germany Lithuania Slovenia
Bulgaria Greece Luxembourg Spain
Cyprus Hungary Malta Sweden
Czech Iceland Norway Switzerland
Denmark Ireland Poland The Netherlands
Estonia Italy Portugal United Kingdom
Finland Latvia Romania
Page 13

xi
Introduction
About This Guide
This guide consists of the following chapters.
Chapter 1 - Part Names and Functions
Explains the parts of the machine and keys on the operation panel.
Chapter 2 - Preparation Before Use
Explains the settings required before using fax.
Chapter 3 - FAX Operation (Basic)
Explains general usage of the fax function such as sending originals and receiving originals.
Chapter 4 - FAX Operation (Advanced)
Explains convenient fax functions such as setting the transmission time, continuous sending of the same
originals to multiple recipients and scheduling the next transmission. Also explains advanced fax
communication such as limiting the destinations and systems from which you receive originals, as well as
forwarding, saving, and printing the received originals for each requirement. Furthermore, explains sub address
communication functions of the machine that are compatible with other makers’ systems and job accounting
functions convenient for checking the communication status of fax.
Chapter 5 - Checking Transmission Results and Registration Status
Explains how to check the status of recent transmissions on the message display. Also, explains how to print
administrative reports to check communication results and settings and registration status of the machine.
Chapter 6 - Setup and Registration
Explains various settings and registration pertaining to functions, such as adjusting the volume of the alarm
sound.
Chapter 7 - About Network FAX
Explains how to use Network FAX functions. Read the Network FAX Driver Operation Guide in the included DVD
(online manual) as well.
Chapter 8 - Troubleshooting
Explains how to respond to error indications and trouble.
Appendix
Explains character entry and the specifications of the machine.
Page 14
xii
Conventions in This Guide
The following conventions are used depending on the nature of the description.
Description of Operation Procedure
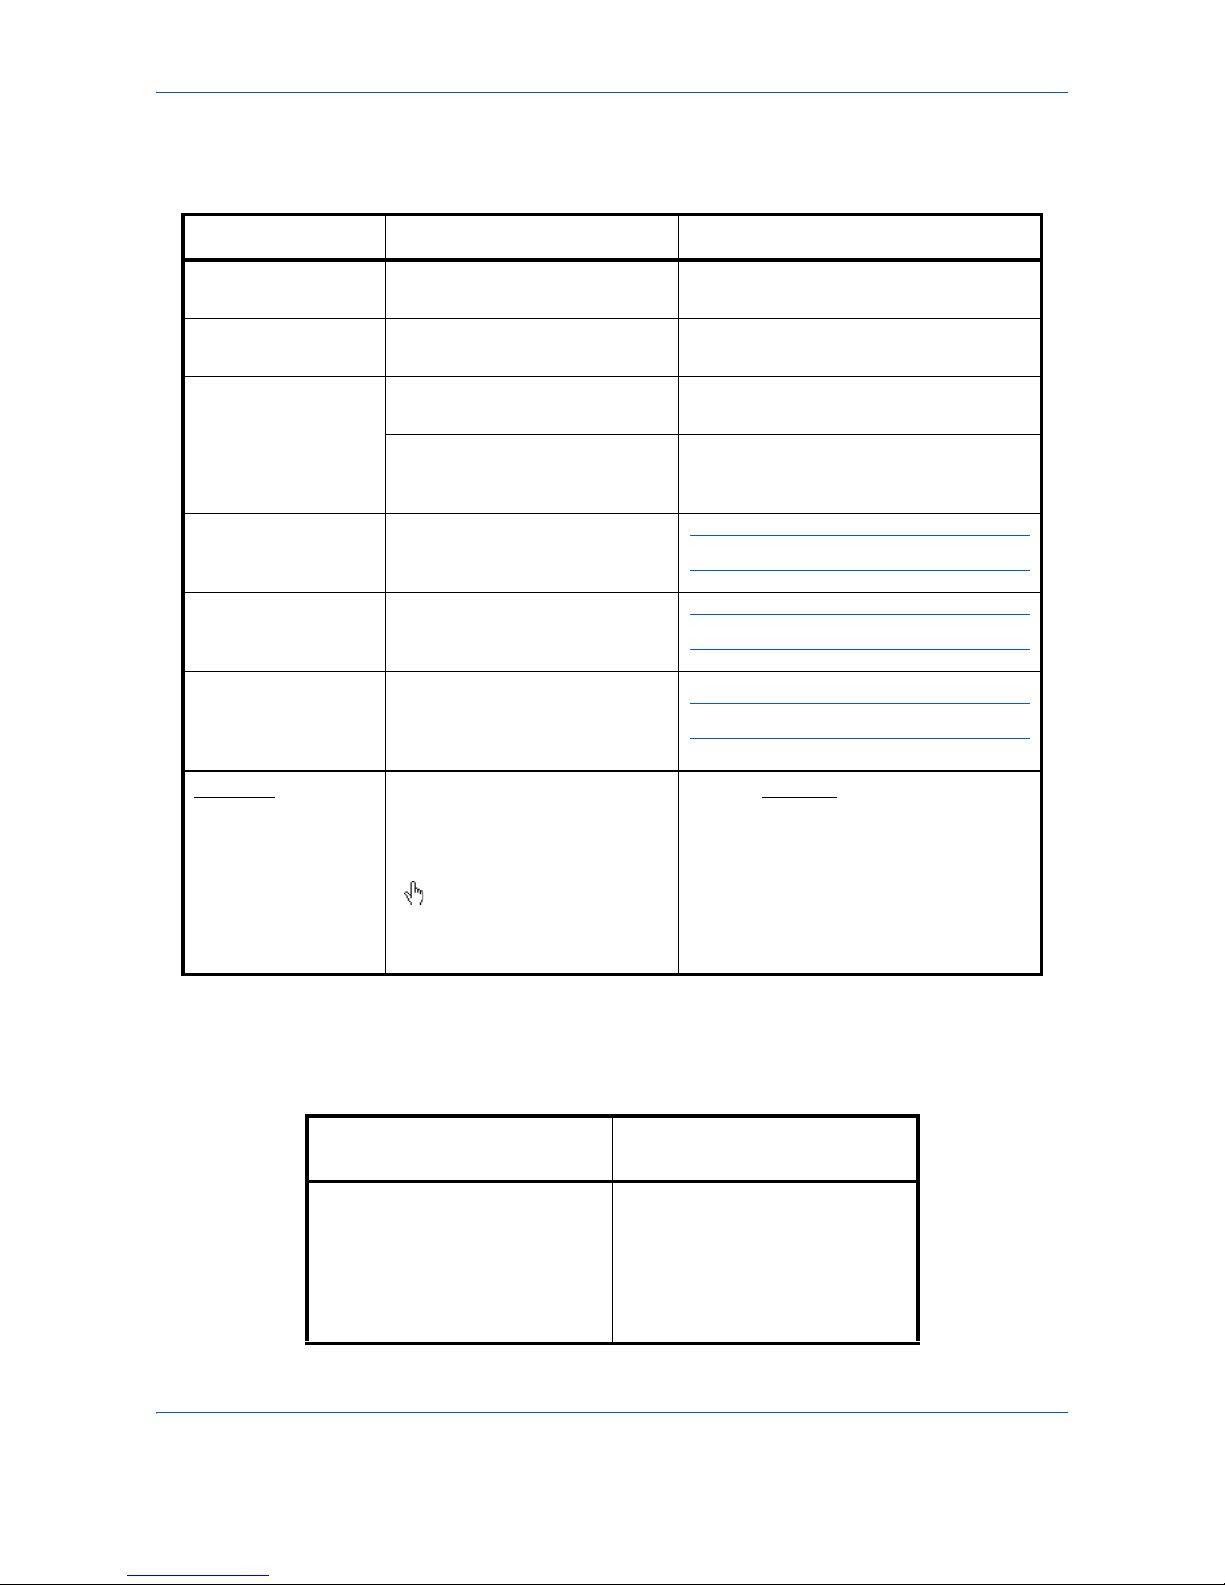
In this Operation Guide, the continuous operation of the keys on the message display is as follows:
Convention Description Example
Bold Indicates the operation panel
keys or a computer screen.
Press the Start key.
[Regular] Indicates a selection item on the
Message Display.
Select [System].
Italic Indicates a message displayed
on the Message Display.
Ready to copy is displayed.
Used to emphasize a key word,
phrase or references to
additional information.
For details, refer to the machine’s
Operation Guide.
Note Indicates supplemental
information or operations for
reference.
NOTE:
Important Indicates items that are required
or prohibited so as to avoid
problems.
IMPORTANT:
Caution Indicates what must be
observed to prevent injury or
machine breakdown and how to
deal with it.
CAUTION:
Underline A link function allows you to
jump to a related page. Position
the pointer over the underlined
text until the pointer changes to
a hand with appointing finger
( ). Then click the text. (In the
Contents, Index and Menu List,
the linked areas are not
underlined.)
Refer to Contents
.
Actual procedure
Description in this
Operation Guide
Press [FAX].
Press [Next] of Transmission.
Press [Next] of Basic.
Press [Change] of TTI.
Press [FAX], [Next] of
Transmission, [Next] of Basic, and
then [Change] of TTI.
Page 15

1-1
1
Part Names and Functions
This chapter explains the names of parts of the fax device.
For other parts, refer to the machine’s Operation Guide.
• Operation Panel........................................................................................................... 1-2
• Machine....................................................................................................................... 1-4
Page 16
Part Names and Functions
1-2
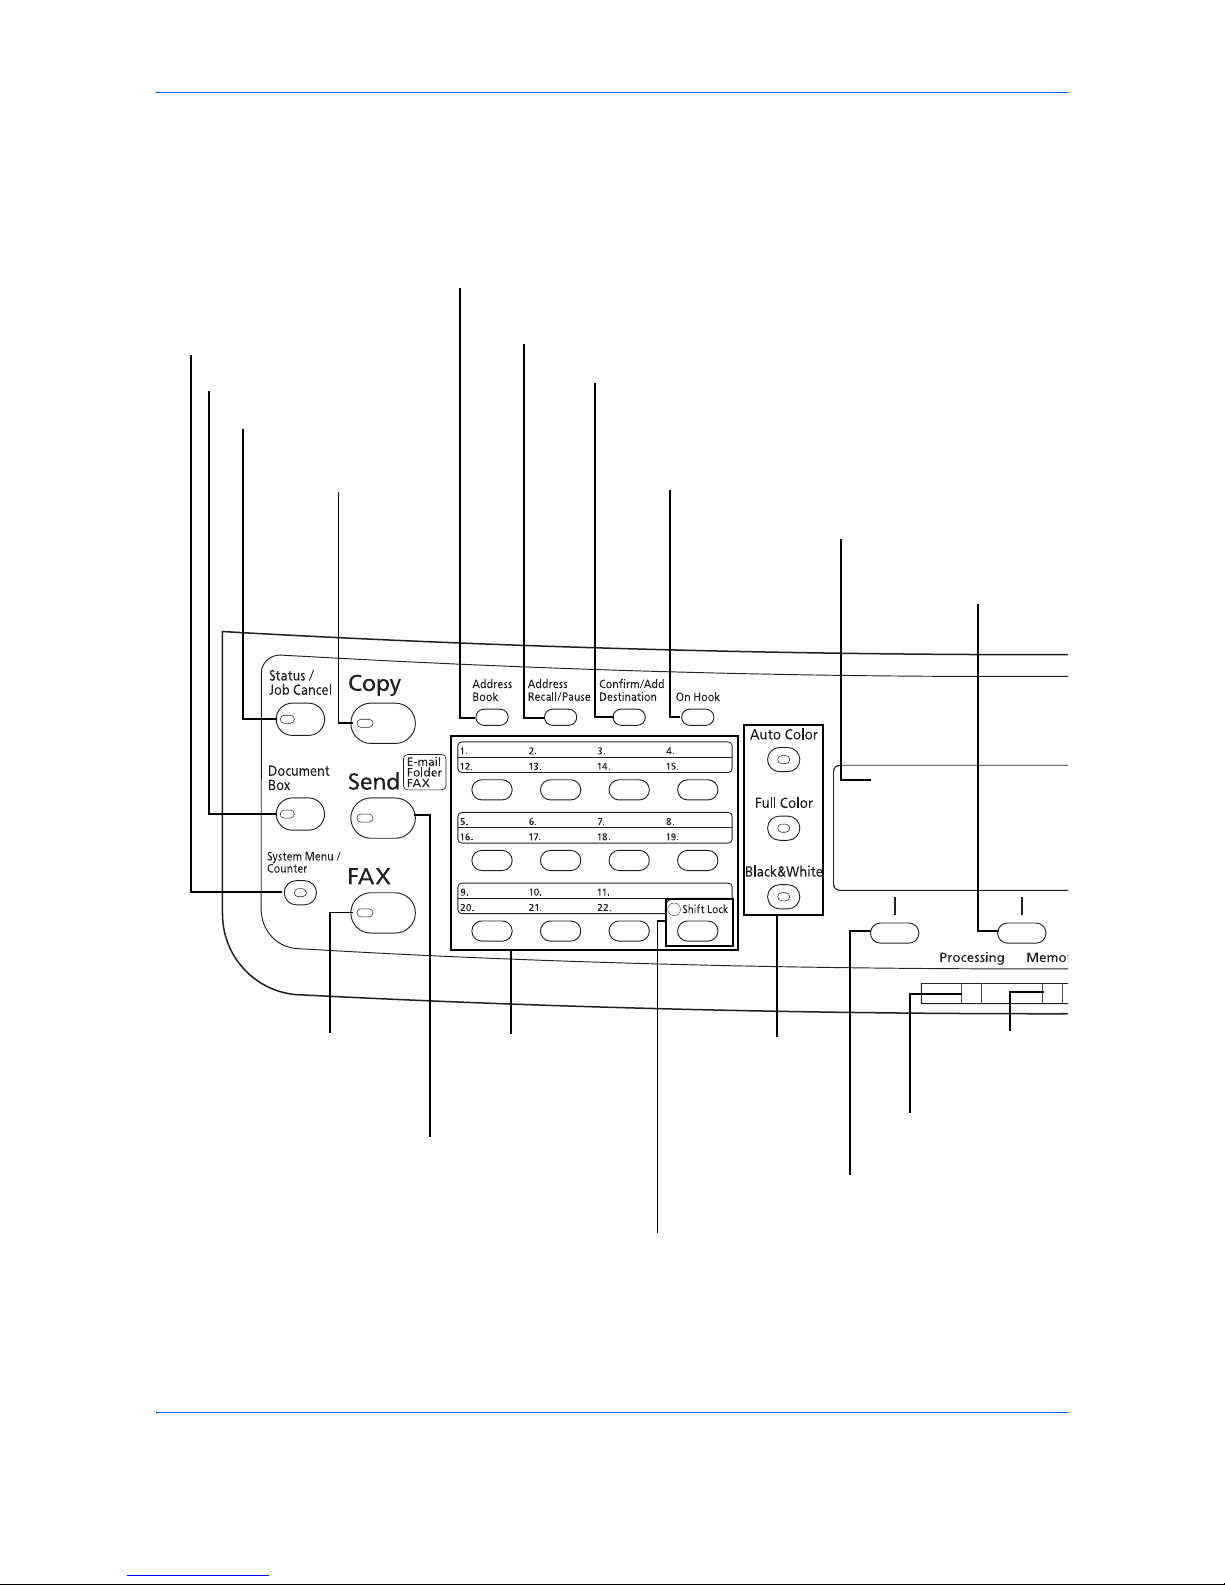
Operation Panel
For the names of keys and indicators required when functions other than FAX are used, refer to the machine’s
Operation Guide.
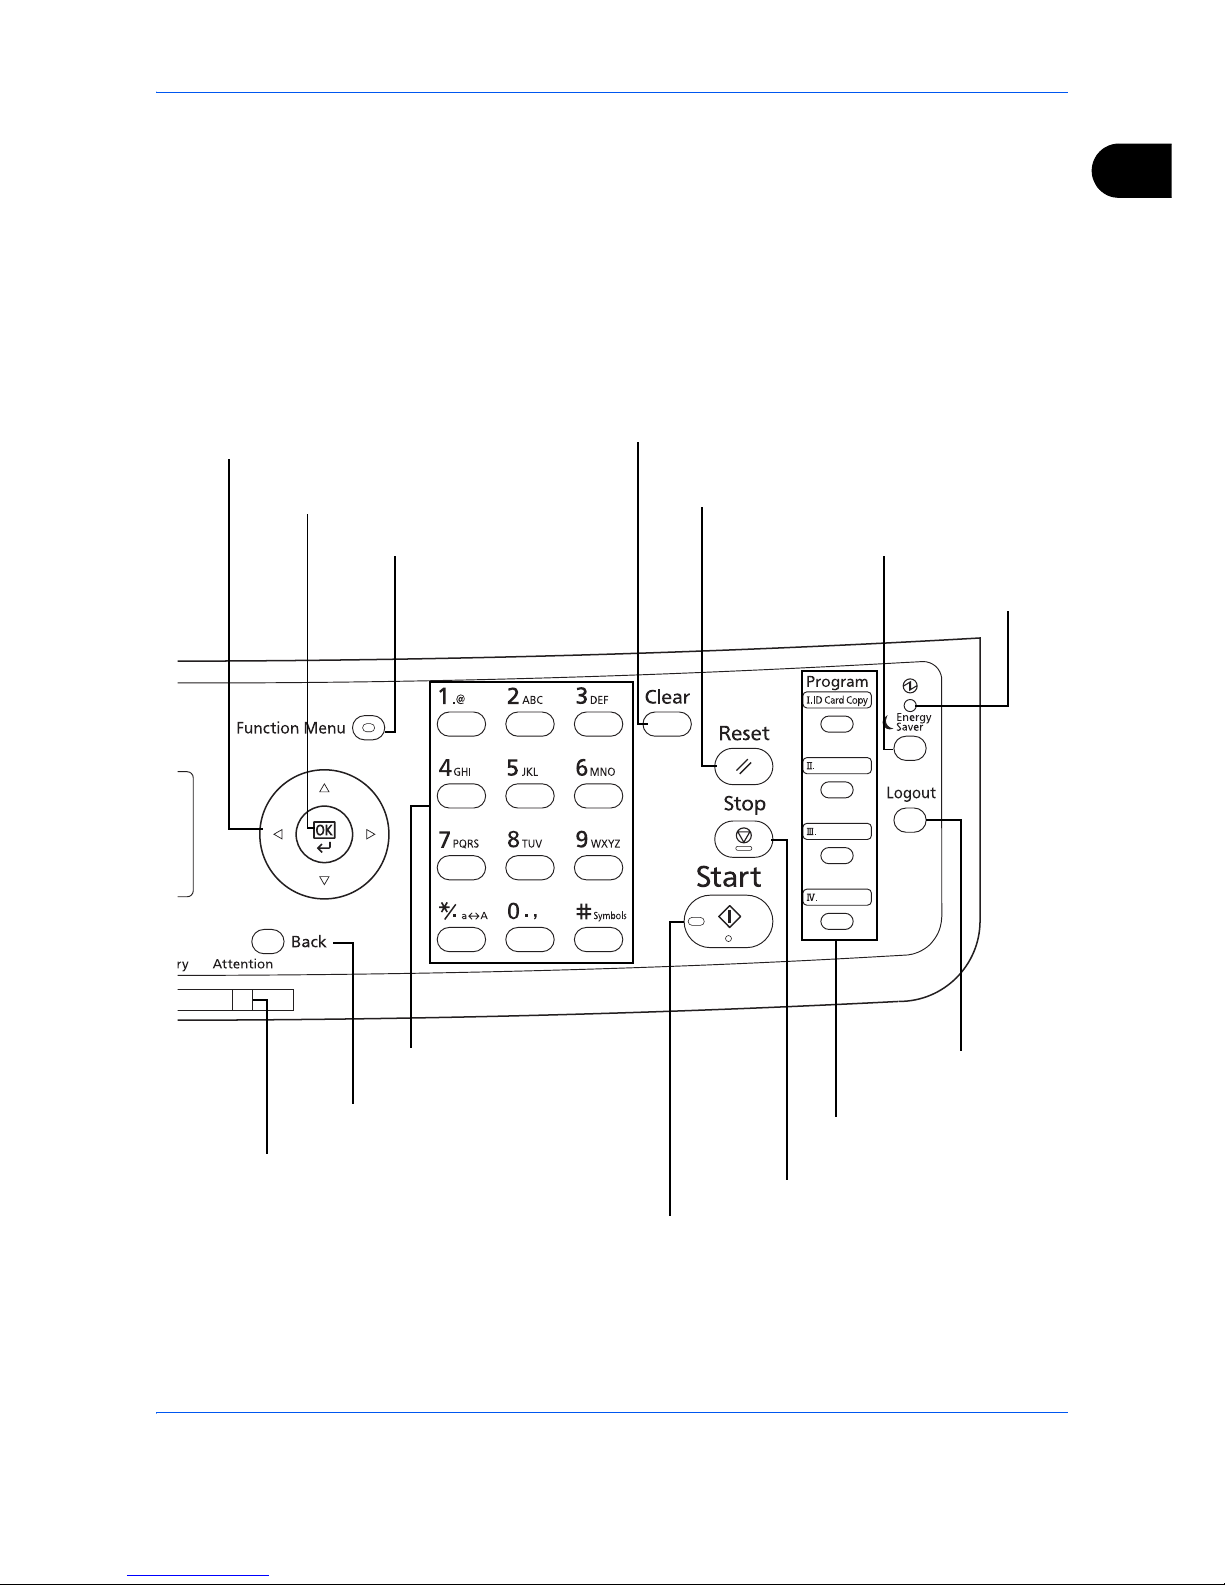
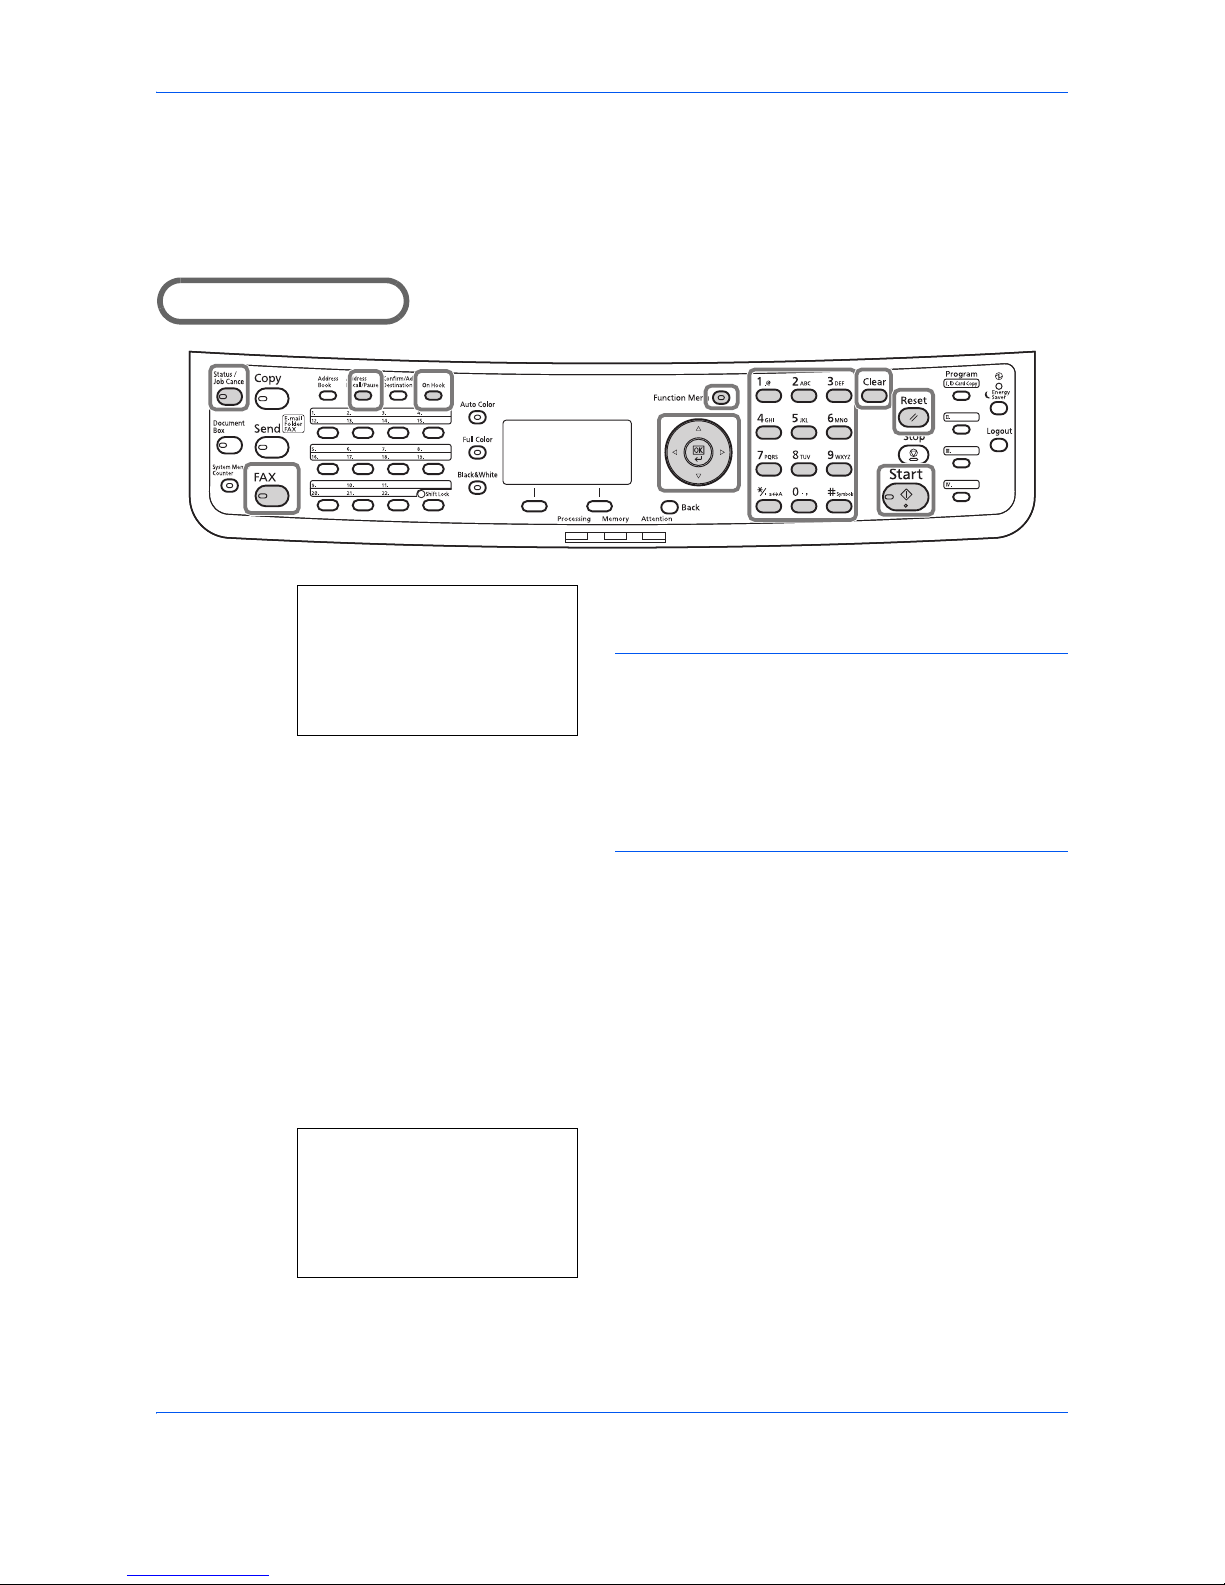
Blinks while the
machine is
accessing the
memory.
Message Display. Check what is shown
here while operating the machine.
Blinks during printing and
transmission/reception.
Selects the menu displayed
at the lower left in the
Message Display.
Selects the menu displayed
at the lower right in the
Message Display.
Switches between on-hook and off-hook when
manually sending a FAX.
Shifts to switch the one-touch key numbers
(1 to 11 and 12 to 22).
Lamp is lit while shifted (12 to 22).
Destinations can be checked and added.
Calls the previous destination. Also used to enter a
pause when entering a FAX number.
Displays the Address Book screen, where you can add destinations.
Used to call destinations
registered to the one-touch key
numbers (1 to 22).
Also used to register and
delete call destinations.
Displays the
Copy screen.
Displays the FAX screen.
Displays the Send screen.
Displays the Document Box screen.
Displays the Status/Job Cancel
screen.
Displays the System Menu/Counter
menu screen.
Not used in fax mode.
Page 17
Part Names and Functions
1-3
1
Lit when the machine's
main power is on.
Used to register or recall
programs.
Ends operation (logs out)
on the Administration
screen.
Puts the machine to sleep or wakes it up.
Cancels the printing job in progress.
Resets settings and displays the
basic screen.
Starts sending operations and processing for setting operations.
Clears entered numbers and characters.
Numeric keys.
Enter numbers and symbols.
Displays the function menu for FAX.
Used to select a menu item, move the cursor when
entering characters, change a value, etc.
Returns the Message Display to the
previous screen.
Lights or blinks when an error occurs.
Selects the chosen item or finalizes the
entered value.
Page 18
Part Names and Functions
1-4
Machine
This chapter explains the names of parts of the fax device.
For the parts required when functions other than FAX are used, refer to the machine’s Operation Guide.
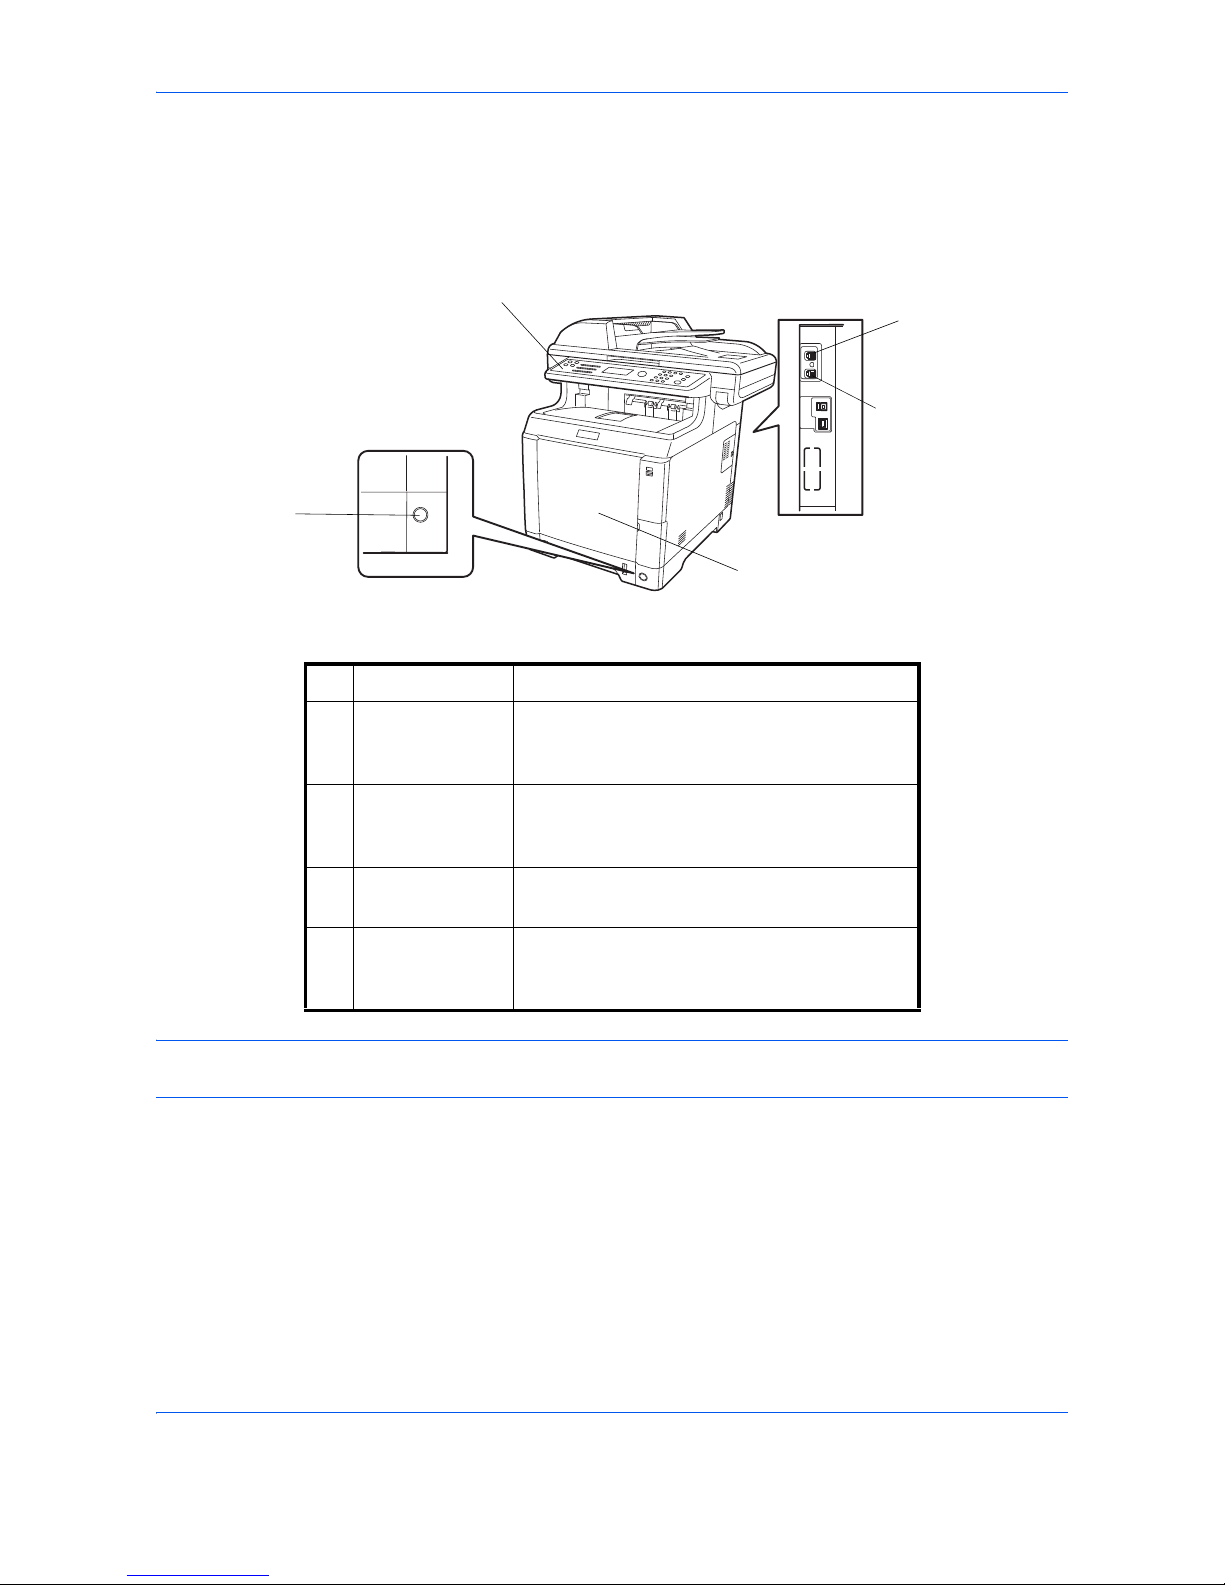
IMPORTANT: You cannot automatically receive a fax when the main power switch is turned off. To put the
machine to sleep, press the Energy Saver key on the operation panel.
1
2
3
4
5
1 Operation panel Perform the fax operation with this panel.
2 Main power
switch
Set this switch to ON when performing the fax
or copier operation. The message display
lights to enable operation.
3 MP (Multi
Purpose) tray
Set the paper in this tray when using a type of
paper other than the cassette (e.g., when
using special paper).
4 LINE connector Connect the modular cord for the telephone
line to this connector.
5 TEL connector When using a commercially available
telephone set, connect the modular cord to
this connector.
Page 19
Part Names and Functions
1-5
1
Document Processor
7
8
9
10
6
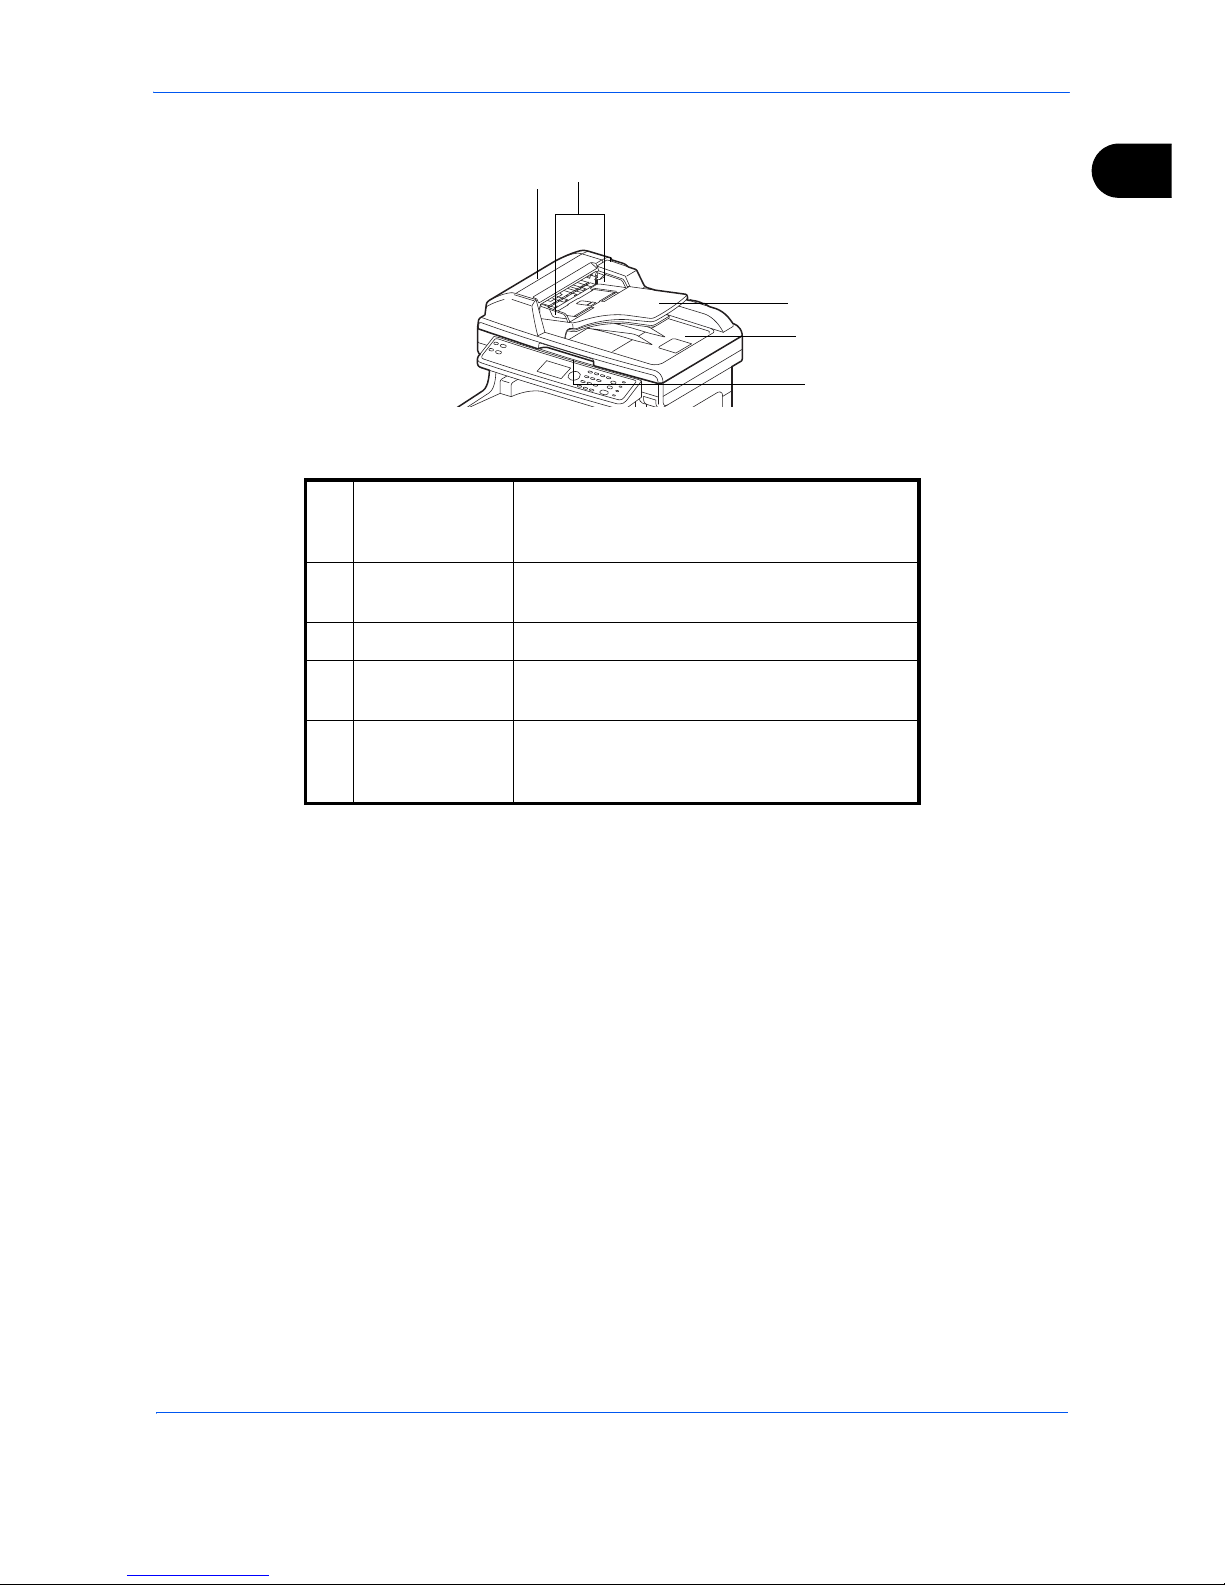
6 Document
Processor
Cover
Open this cover when the original jammed in
the Document Processor.
7 Original width
guides
Adjust these guides according to the original
width.
8 Original table Stack the sheet originals on this table.
9 Original eject
table
Read originals are ejected onto this table.
10 Document
Processor open/
close handle
Hold this handle when opening or closing the
Document Processor.
Page 20

Part Names and Functions
1-6
Page 21

2-1
2 Preparation Before Use
This chapter explains the preparation necessary before the machine is used.
There is no need for the customer to undertake this preparation if it has already been carried
out by a service representative.
• Selection of Telephone Line (Inch version only) .......................................................... 2-2
• Selection of Transmit Terminal Identification (TTI) ...................................................... 2-3
• Setting the TTI information .......................................................................................... 2-4
• Date and Time Entry.................................................................................................... 2-6
Page 22
Preparation Before Use
2-2
Selection of Telephone Line (Inch version only)
Select the telephone line according to the type you are contracted with. Please note that selecting a wrong
telephone line will prevent you from sending fax.
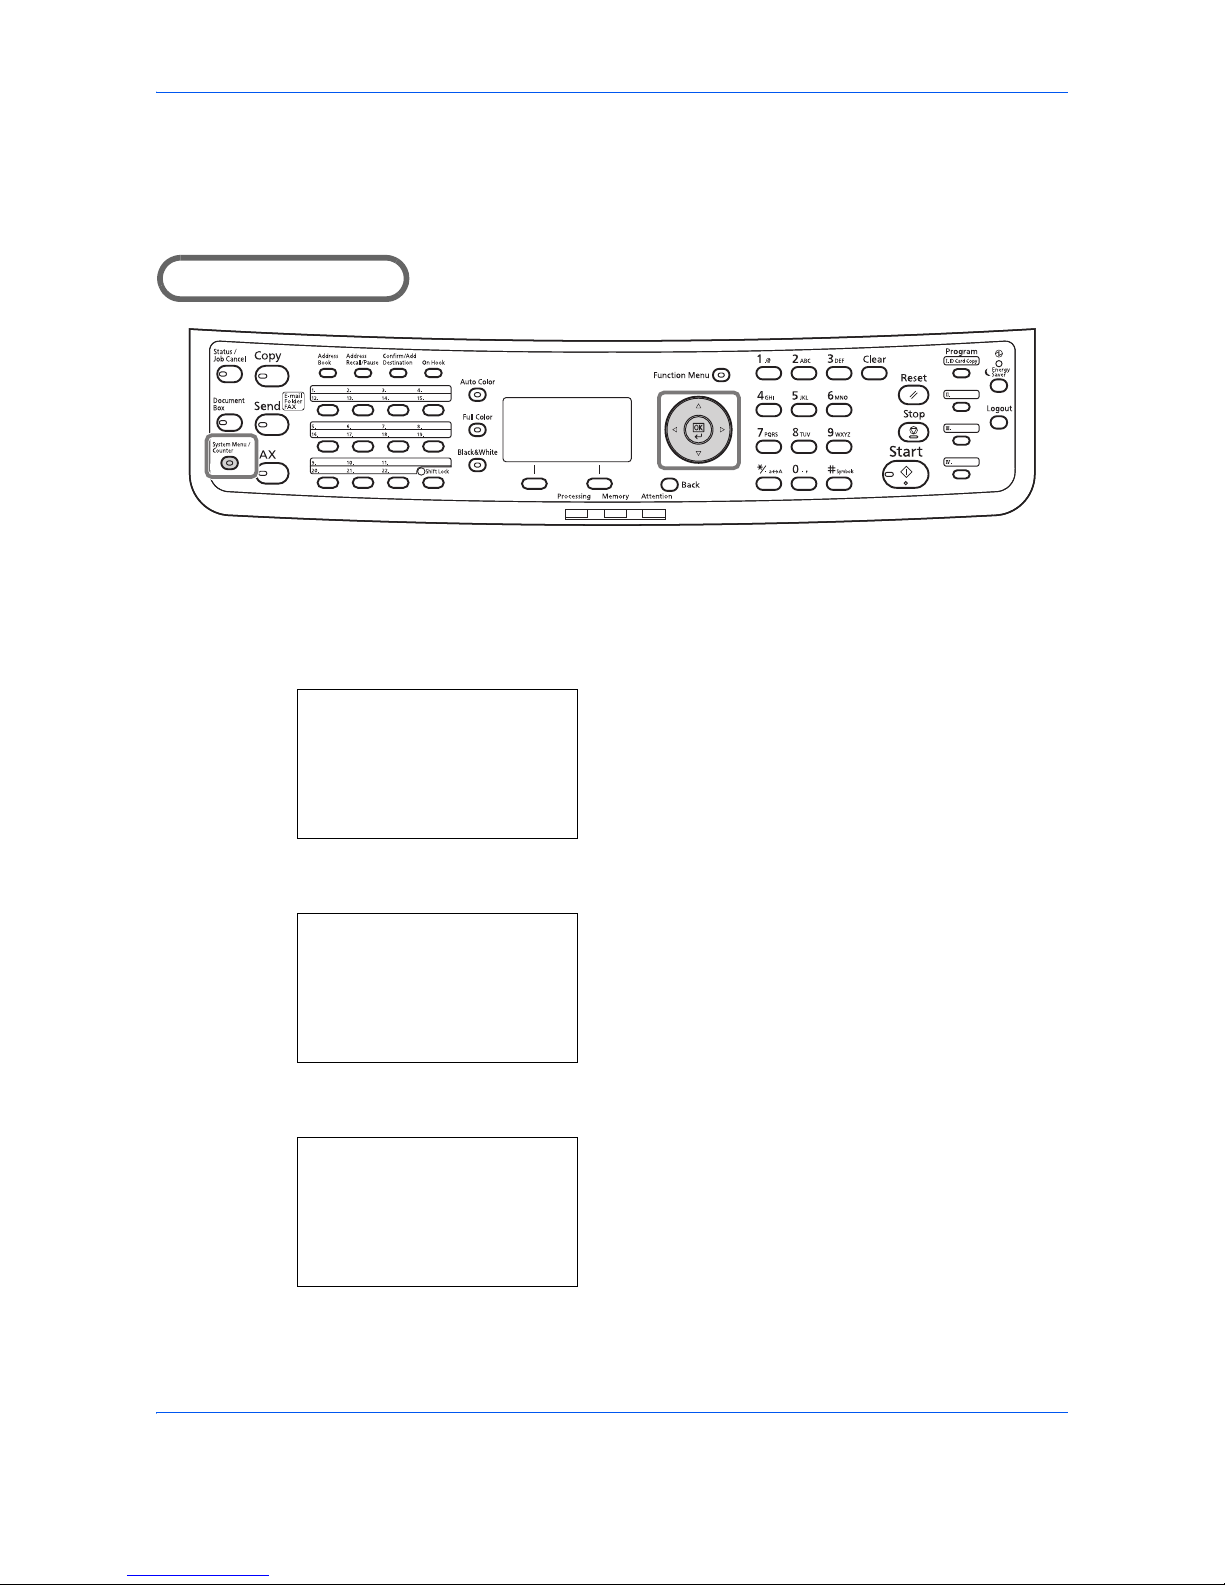
Part that is operated
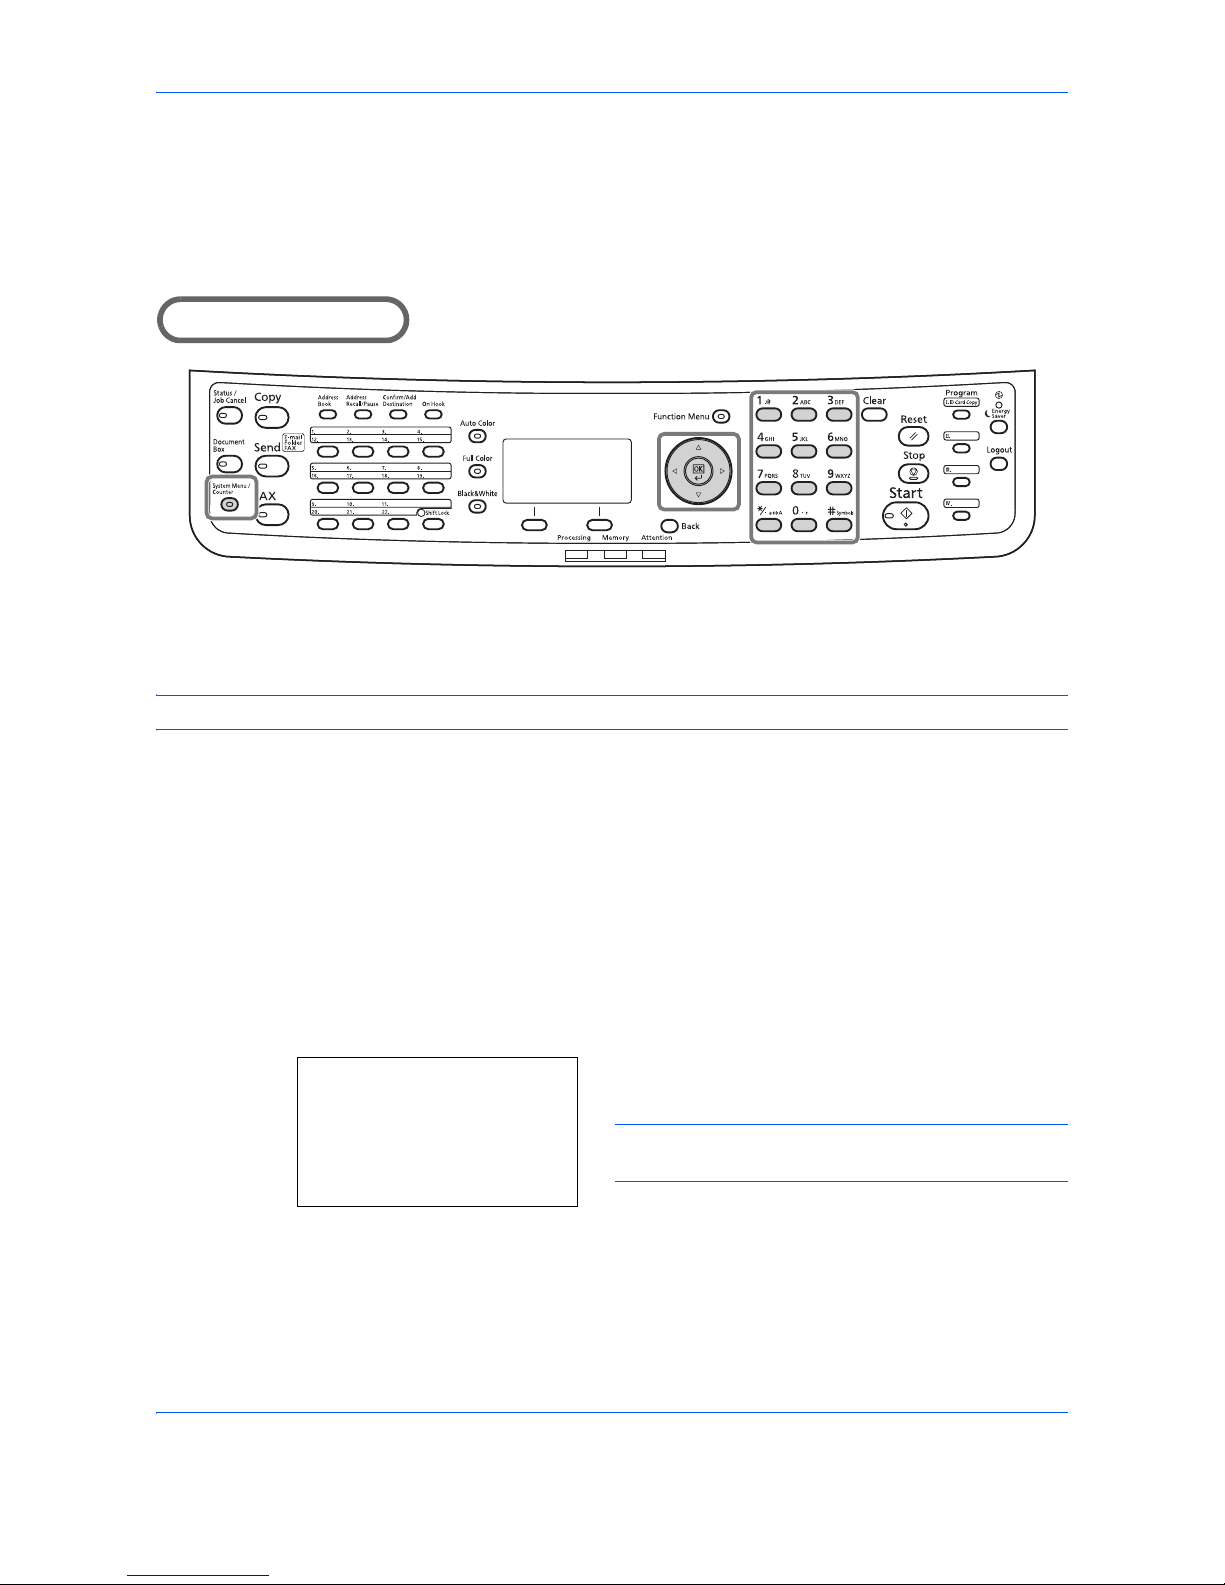
1 Press the System Menu/Counter key.
2 Press the or key to select [FAX].
3 Press the OK key.
4 Press the or key to select [Transmission].
5 Press the OK key.
6 Press the or key to select [FAX Dialing
Mode].
7 Press the OK key.
8 Press the or key to select [Tone(DTMF)] ,
[Pulse(10pps)] or [Pulse(20pps)] according to the
type of telephone line you are contracted with.
9 Press the OK key.
FAX:
a
b
1
TX/RX Common
*********************
3
Reception
[ Exit ]
2
Transmission
Transmission:
a
b
3
Local FAX ID
4
Local FAX Number
*********************
[ Exit ]
5
FAX Dialing Mode
FAX Dialing Mode:a b
*********************
2
Pulse(10pps)
3
Pulse(20pps)
1
*Tone(DTMF)
Page 23

Preparation Before Use
2-3
2
Selection of Transmit Terminal Identification (TTI)
The transmit terminal identification (TTI) is the information about the machine (transmit terminal) to be printed
out on the fax on the receiving system. The information includes transmission date and time, the number of
transmission pages, the Local FAX Name, and the Local FAX number/ID. This machine enables the user to
select if the TTI is printed out on the fax on the receiving system. Regarding the location of the information to
be printed, you can select inside or outside of the page image being sent.
NOTE: Normally, the Local FAX Name is printed in the transmit terminal identification (TTI). However, when
job accounting has been enabled, and you send originals after entering an Account ID, the Account Name is
printed.
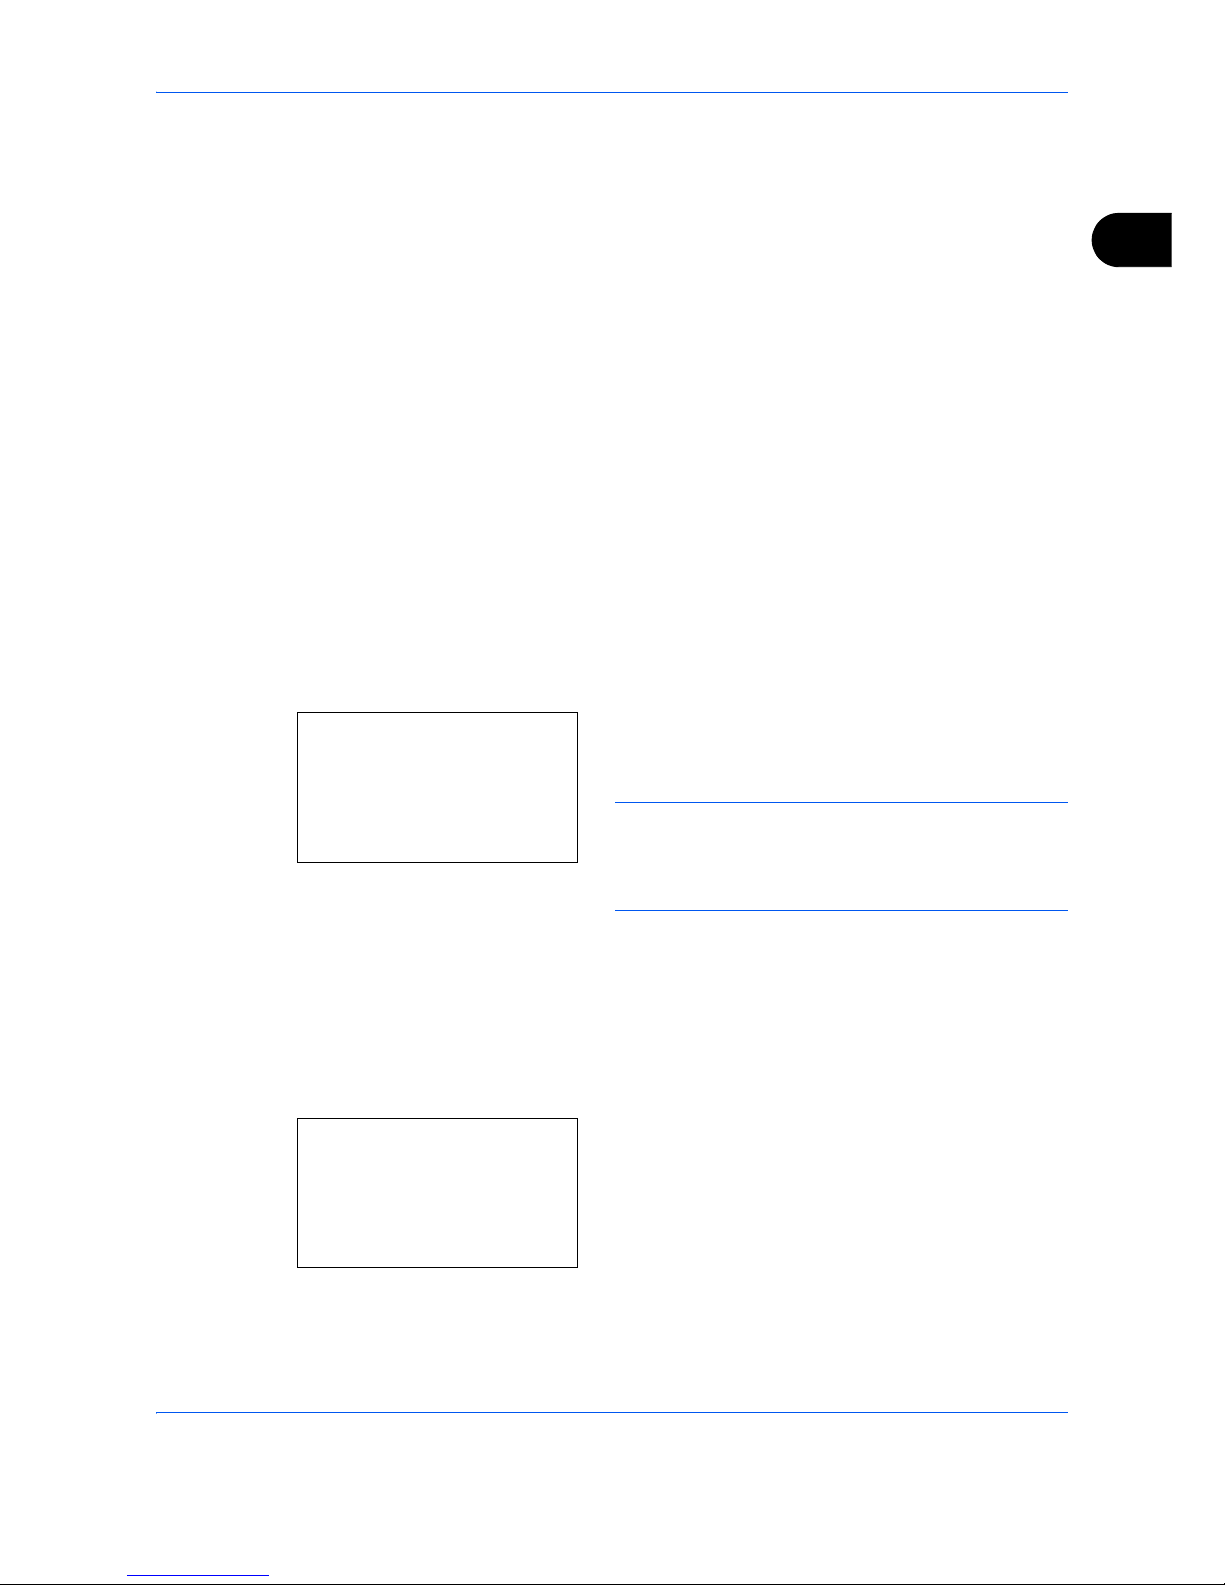
1 Press the System Menu/Counter key.
2 Press the or key to select [FAX].
3 Press the OK key.
4 Press the or key to select [Transmission].
5 Press the OK key.
6 Press the or key to select [TTI].
7 Press the OK key.
8 Press the or key to select the desired location
for printing the information or [Off] if you don't want
to print it.
9 Press the OK key.
TTI:
a
b
*********************
2
Outside
3
Inside
1
*Off
Page 24
Preparation Before Use
2-4
Setting the TTI information
Register the name (local FAX name), fax number, and local FAX ID printed in the transmit terminal identification
(TTI) area.
By registering the TTI data, the receiver can easily find out where the FAX came from.
Part that is operated
Local FAX Name Registration
Register the local FAX name printed on in the transmit terminal identification.
NOTE: To change the entry, follow the same operation.
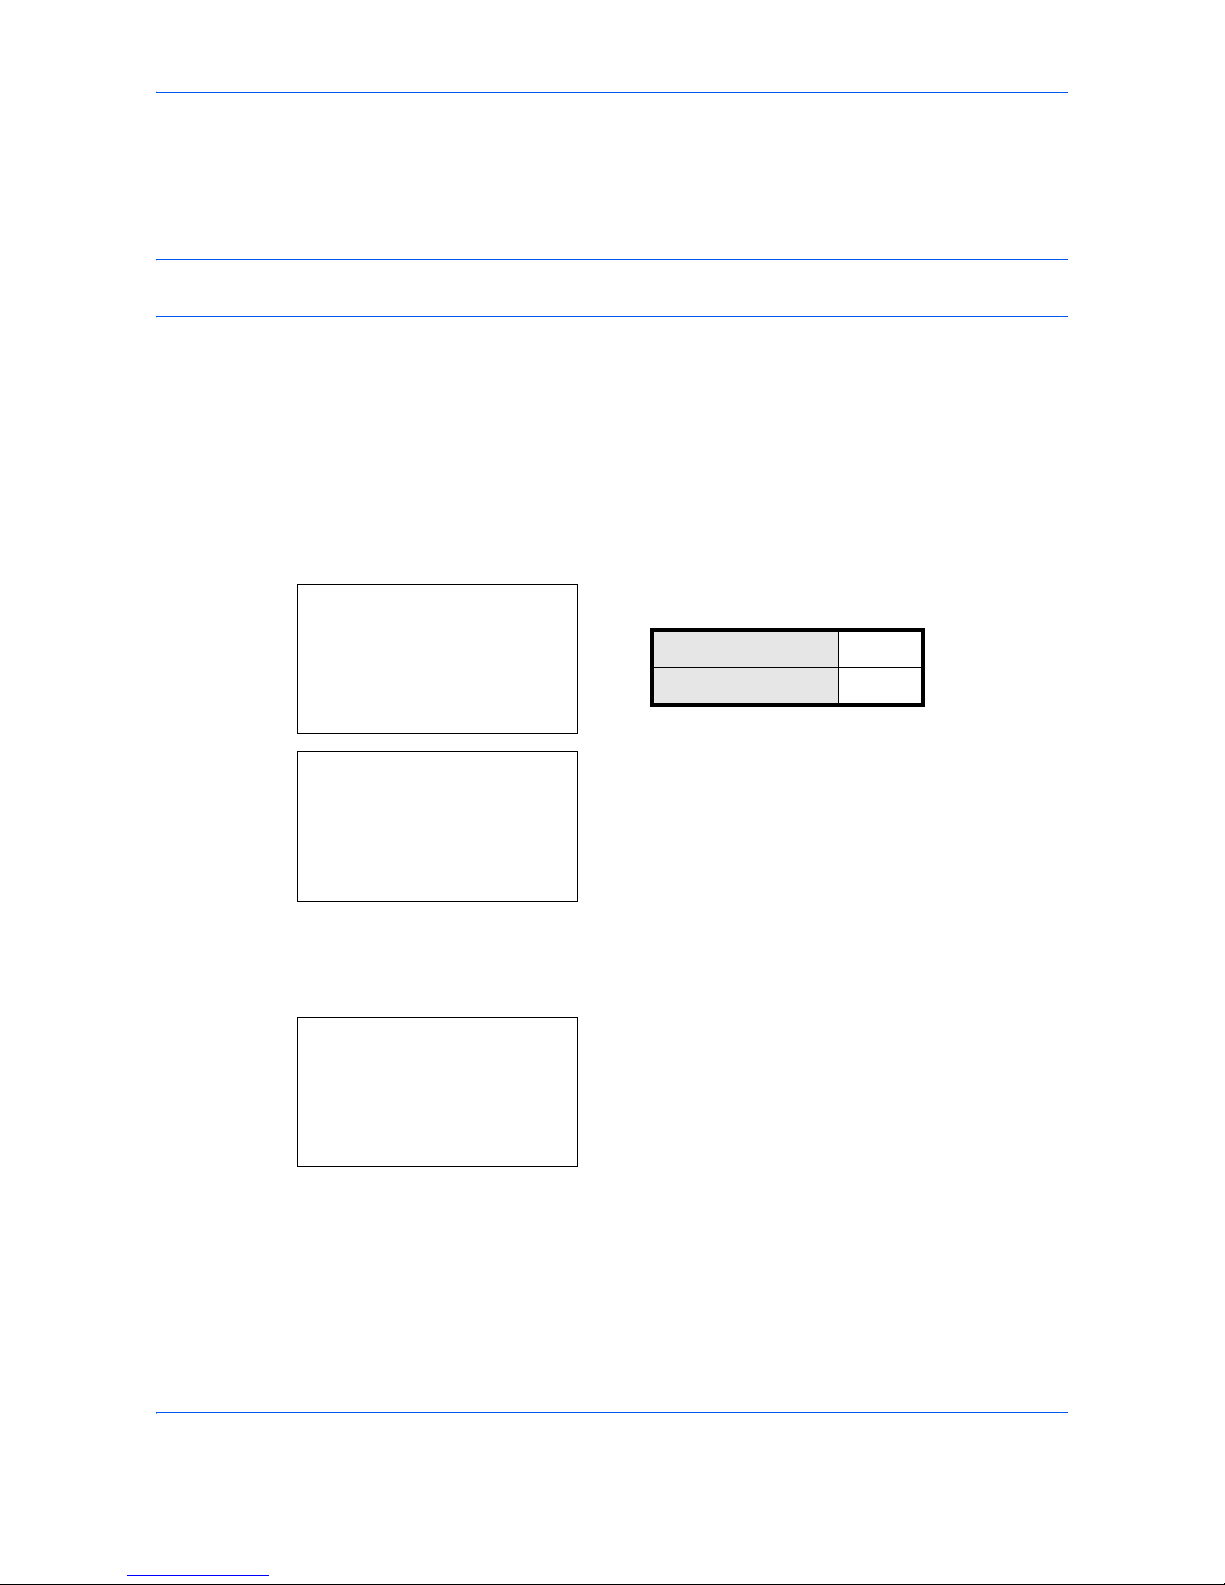
1 Press the System Menu/Counter key.
2 Press the or key to select [FAX].
3 Press the OK key.
4 Press the or key to select [Transmission].
5 Press the OK key.
6 Press the or key to select [Local FAX Name].
7 Press the OK key.
8 Enter the Local FAX Name to be registered. Up to
32 characters can be entered.
NOTE: For details on character entry, refer to
Specifications (Fax function) on Appendix-6.
9 Press the OK key.
Local FAX Name:
B
b
*
S
ABC
[ Text ]
Page 25
Preparation Before Use
2-5
2
Local FAX Information Entry
Register the local FAX information (local FAX number/ID) printed on in the transmit terminal identification (TTI)
area. The Local FAX ID is used for transmission limit purposes. (Refer to Transmission Restriction on page 6-
30.)
1 Press the System Menu/Counter key.
2 Press the or key to select [FAX].
3 Press the OK key.
4 Press the or key to select [Transmission].
5 Press the OK key.
When you register the Local FAX Number, go to
next step. When you register the Local FAX ID, go
to step 10.
Local FAX Number Entry
6 Press the or key to select [Local FAX
Number].
7 Press the OK key.
8 Use the numeric keys to enter the local FAX
number to be registered. Up to 20 digits can be
entered.
NOTE: Press the or key to move the cursor.
To correct the number, press the Clear key to delete the
digits one by one before reentering the number. To
return to the default screen, press the Reset key.
9 Press the OK key.
Local FAX ID Entry
10 Press the or key to select [Local FAX ID].
11 Press the OK key.
12 Use the numeric keys to enter the local FAX ID
number in 4 digits.
13 Press the OK key.
Local FAX Number:T b
*
S
Local Fax ID:
D
b
(0000 - 9999)
****1409*
Page 26
Preparation Before Use
2-6
Date and Time Entry
Register the date and time of the machine’s built-in clock. Because the FAX delayed transmission is conducted
based on the time registered here, be sure to register the correct date and time.
IMPORTANT: Correct the time displayed on the operation panel regularly. The time displayed may deviate from
the current time due to errors.
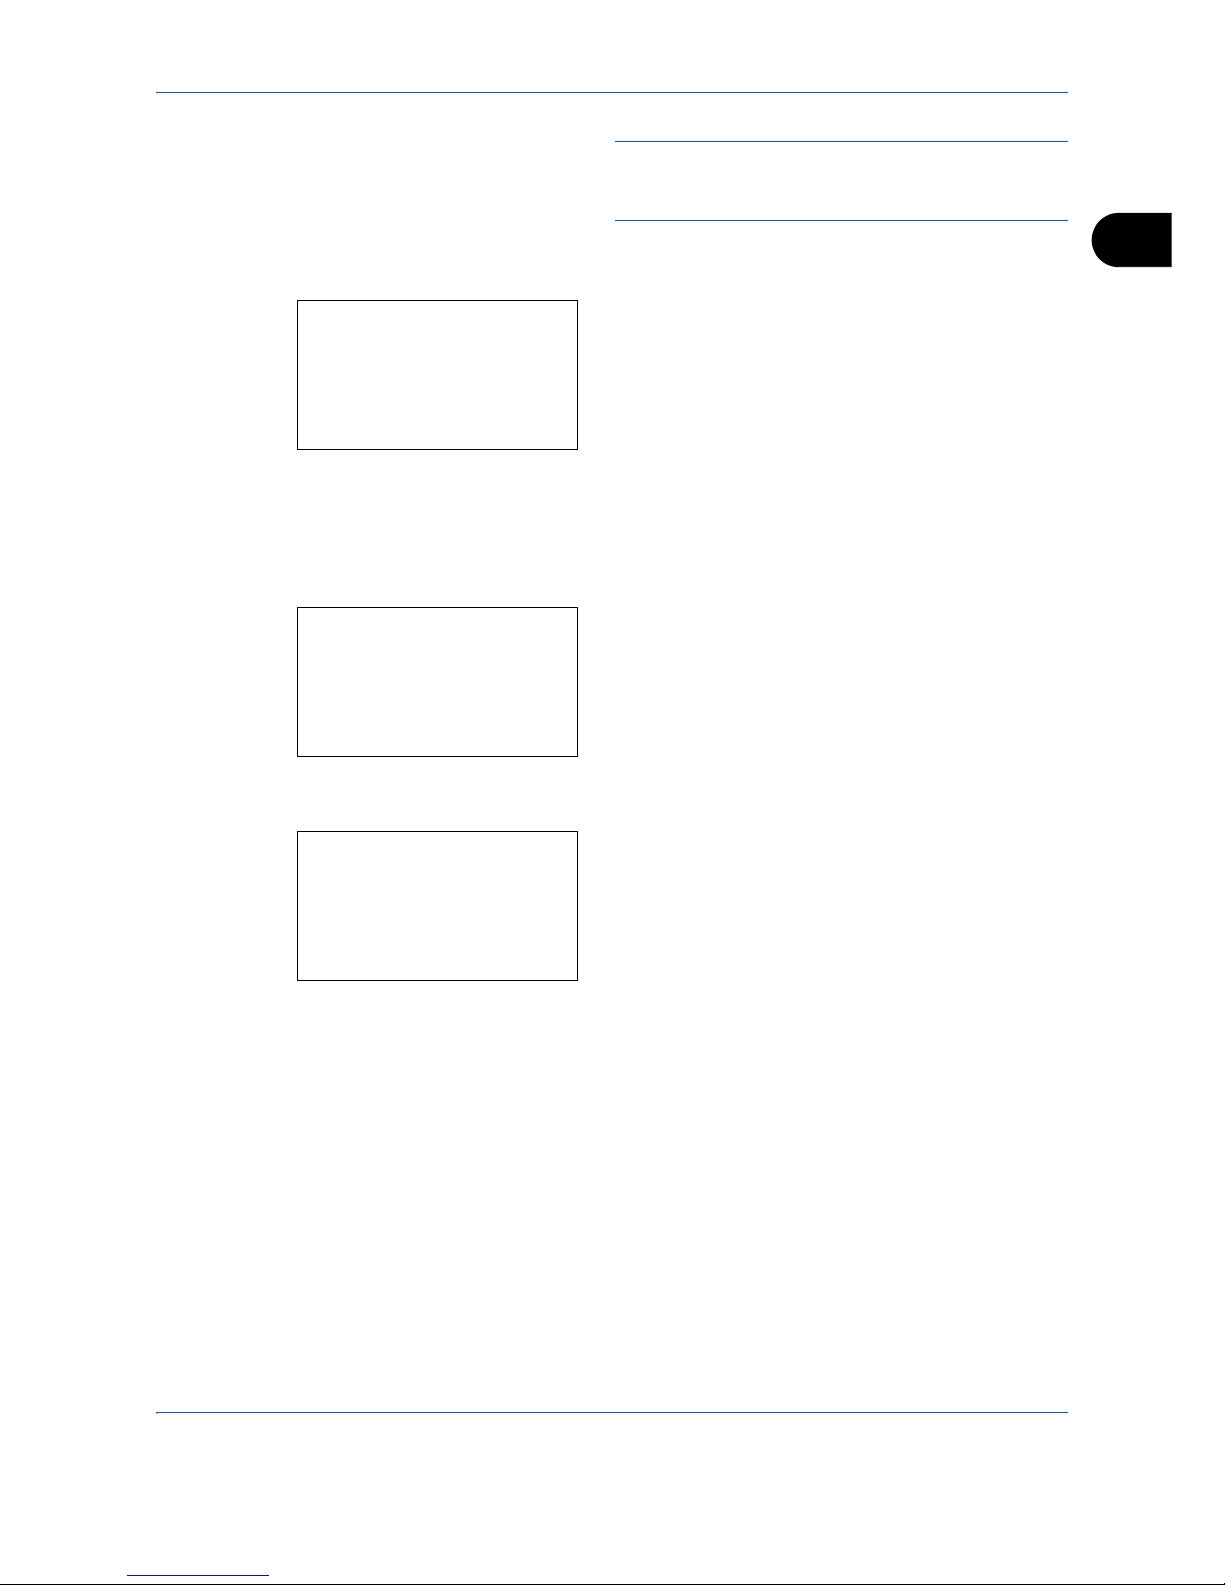
1 Press the System Menu/Counter key.
2 Press the or key to select [Common
Settings].
3 Press the OK key.
4 Press the or key to select [Date Setting].
5 Press the OK key.
6 A login screen will appear. Then, enter the Login
User Name and Login Password to log in.
7 Press [Login] (the Right Select key). The Date
Setting menu appears.
8 Press the or key to select [Time Zone].
9 Press the OK key.
10 Press the or key to select your region.
11 Press the OK key.
12 Press the or key to select [Summer Time].
Login User Name: L b
********************
Login Password:
[ Login ]
Login User Name 2600
Login Password 2600
Date Setting:
a
b
*********************
2
Date Format
3
Time Zone
[ Exit ]
1
Date/Time
Time Zone:
a
b
*********************
2
-11:00 Midway
3
-10:00 Hawaii
1
*-12:00 Internati
Page 27
Preparation Before Use
2-7
2
NOTE: If you select a region that does not utilize
summer time, the summer time setting screen will not
appear.
13 Press the OK key.
14 Press the or key to select [On] or [Off].
15 Press the OK key.
16 Press the or key to select [Date/Time].
17 Press the OK key.
18 Press the or key to move the cursor position,
enter year, month and day.
19 Press the OK key.
20 Press the or key to move the cursor position,
enter hours, minutes and seconds.
21 Press the OK key.
Summer Time:
a
b
*********************
2
On
1
*Off
Date/Time:
a
b
Year Month Day
*2010*
01 01
(Time Zone:Tokyo )
Date/Time:
a
b
Hour Min. Second
****11
: 45: 50
(Time Zone:Tokyo )
Page 28

Preparation Before Use
2-8
Page 29

3-1
3 FAX Operation (Basic)
This chapter explains the following basic operations.
• Automatic Send ........................................................................................................... 3-2
• FAX Automatic Reception............................................................................................ 3-9
• Cancelling Communication........................................................................................ 3-12
• Using the Address Book............................................................................................ 3-15
• Using One-touch Keys............................................................................................... 3-26
• Dialing the Same Receiving System (Redial)............................................................ 3-29
Page 30
FAX Operation (Basic)
3-2
Automatic Send
General transmission using the numeric keys is explained.
Switching to the Send Screen
Part that is operated
1 Press the FAX key. Check that the basic send
screen is displayed.
NOTE: Depending on the settings, the Address Book
screen may appear. In this event, press Reset to
display the basic screen for sending.
In addition to fax, you can include e-mail transmission
and/or folder (SMB/FTP) transmission in a single
transmission job (Multi Sending). Press the Send key to
select the destinations. For details, refer to Sending in
the Operation Guide for the machine.
Selection of Transmission Method
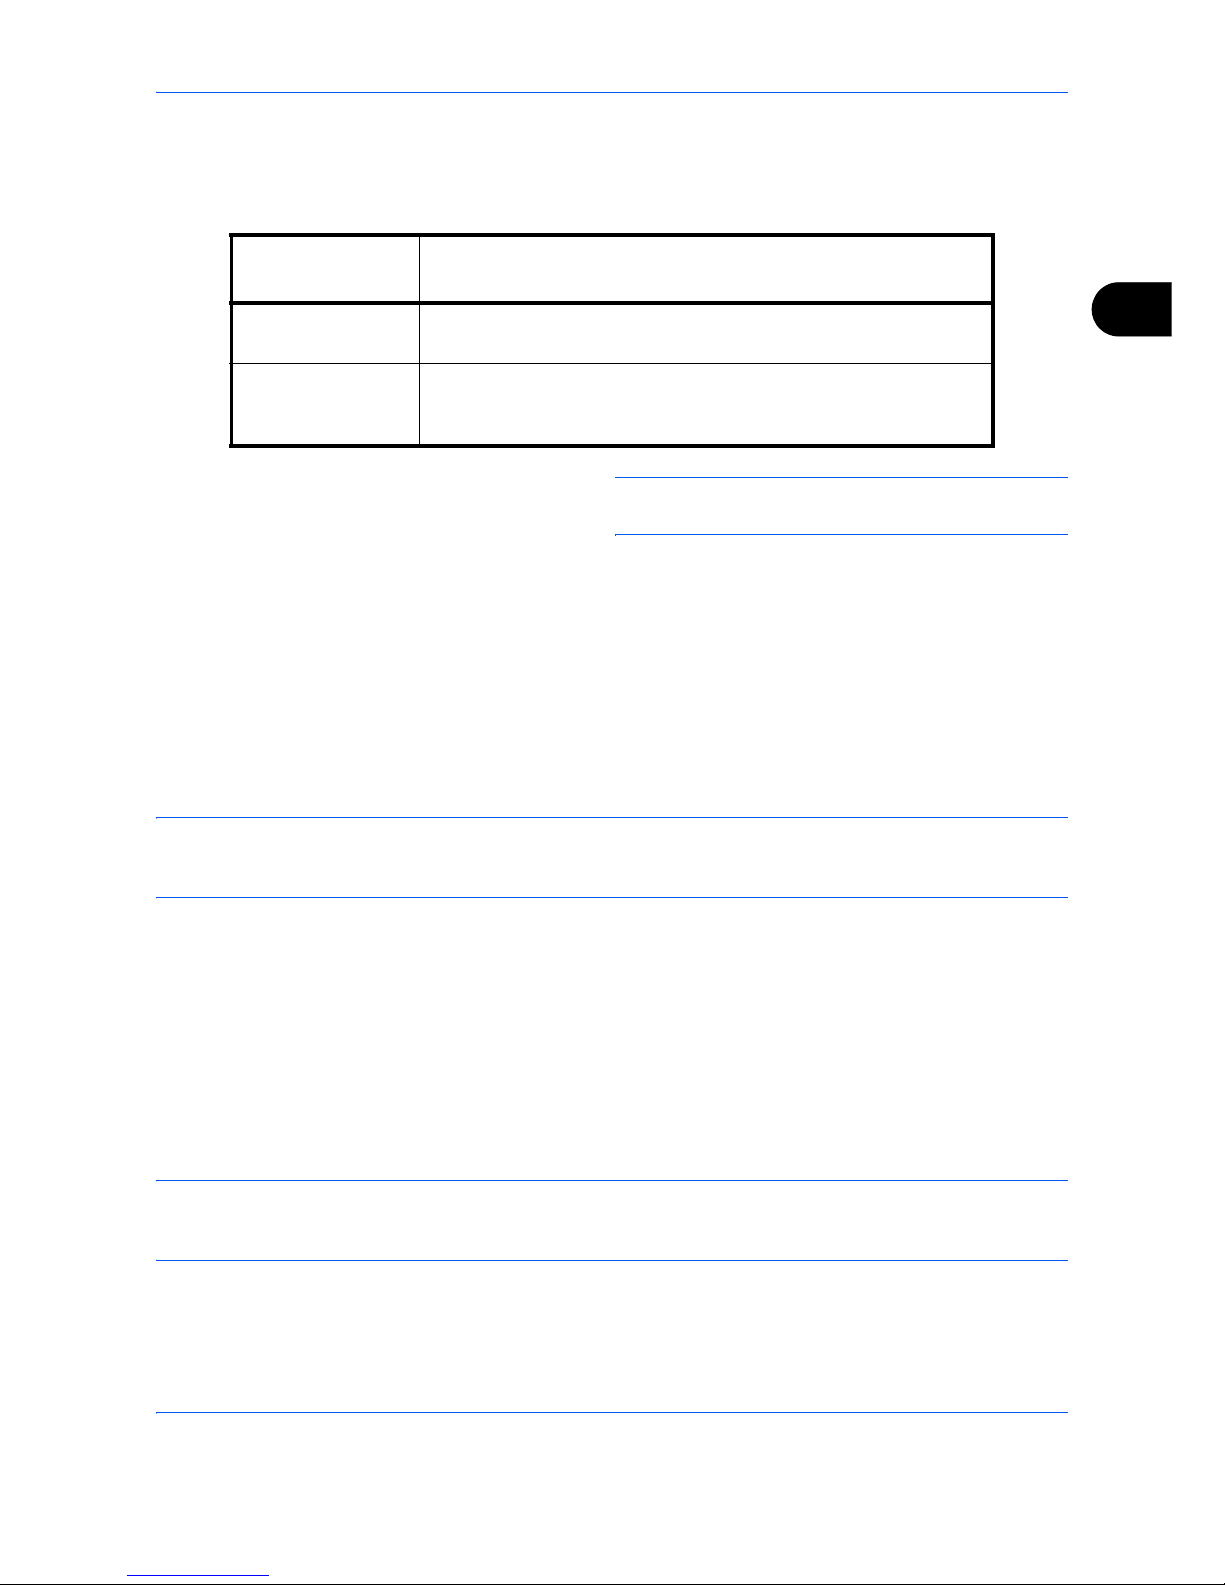
2 There are two transmission methods - memory
transmission and direct transmission. The default
is memory transmission.
To select direct transmission, use the following
procedure.
1 Press the Function Menu key.
2 Press the or key to select [FAX Direct
TX].
3 Press the OK key.
Ready to send.
2010/05/25 12:30
Text+Photo 200x100dpi
[Orig.Img] [FAX Res.]
Function Menu:
a
b
7
JobFinish Notice
8
FAX Delayed TX
*********************
[ Exit ]
9
FAX Direct TX
Page 31
FAX Operation (Basic)
3-3
3
4 Press the or key to select [On].
5 Press the OK key.
NOTE: In direct transmission, you can designate only
one destination for one transmission.
Memory Transmission (When originals are placed in the document processor)
After originals placed in the document processor are scanned and stored in the memory, the receiving system
is dialed. This method is very convenient because you can have originals returned to you without waiting for
sending of the originals to be completed. It is suitable for sending multiple-page sheet originals.
Memory Transmission (When originals are placed on the glass surface)
This method is suitable for sending book originals that cannot be placed in the document processor. After
originals placed on the glass surface are scanned and stored in the memory, the receiving system is dialed.
NOTE: When continuous scan is set, you can continue with scanning of a next original after an original on the
glass surface has been stored in memory. Every time one page is scanned, you perform an operation to allow
continued scanning, and after all the originals have been stored in memory, the receiving system is dialed.
Direct Transmission (When originals are placed in the document processor)
After the telephone line has connected with the receiving system, scanning of the originals placed in the
document processor starts. When multiple-page originals are placed, each page is scanned after the previous
one is sent.
Direct Transmission (When originals are placed on the glass surface)
This method is suitable for sending book originals that cannot be placed in the document processor. After the telephone
line has connected with the receiving system, the originals placed on the glass surface are scanned and sent.
NOTE: When continuous scan is set, you can continue with scanning of a next original after an original on the
glass surface has been sent. Every time one page is scanned, you perform an operation to allow continued
scanning.
Setting for Direct
transmission
Description
Off Starts memory transmission.
After originals are scanned into memory, the communication starts.
On Starts direct transmission.
Dials the receiving system, and after the communication has
started, originals are scanned.
Page 32
FAX Operation (Basic)
3-4
Placing Originals
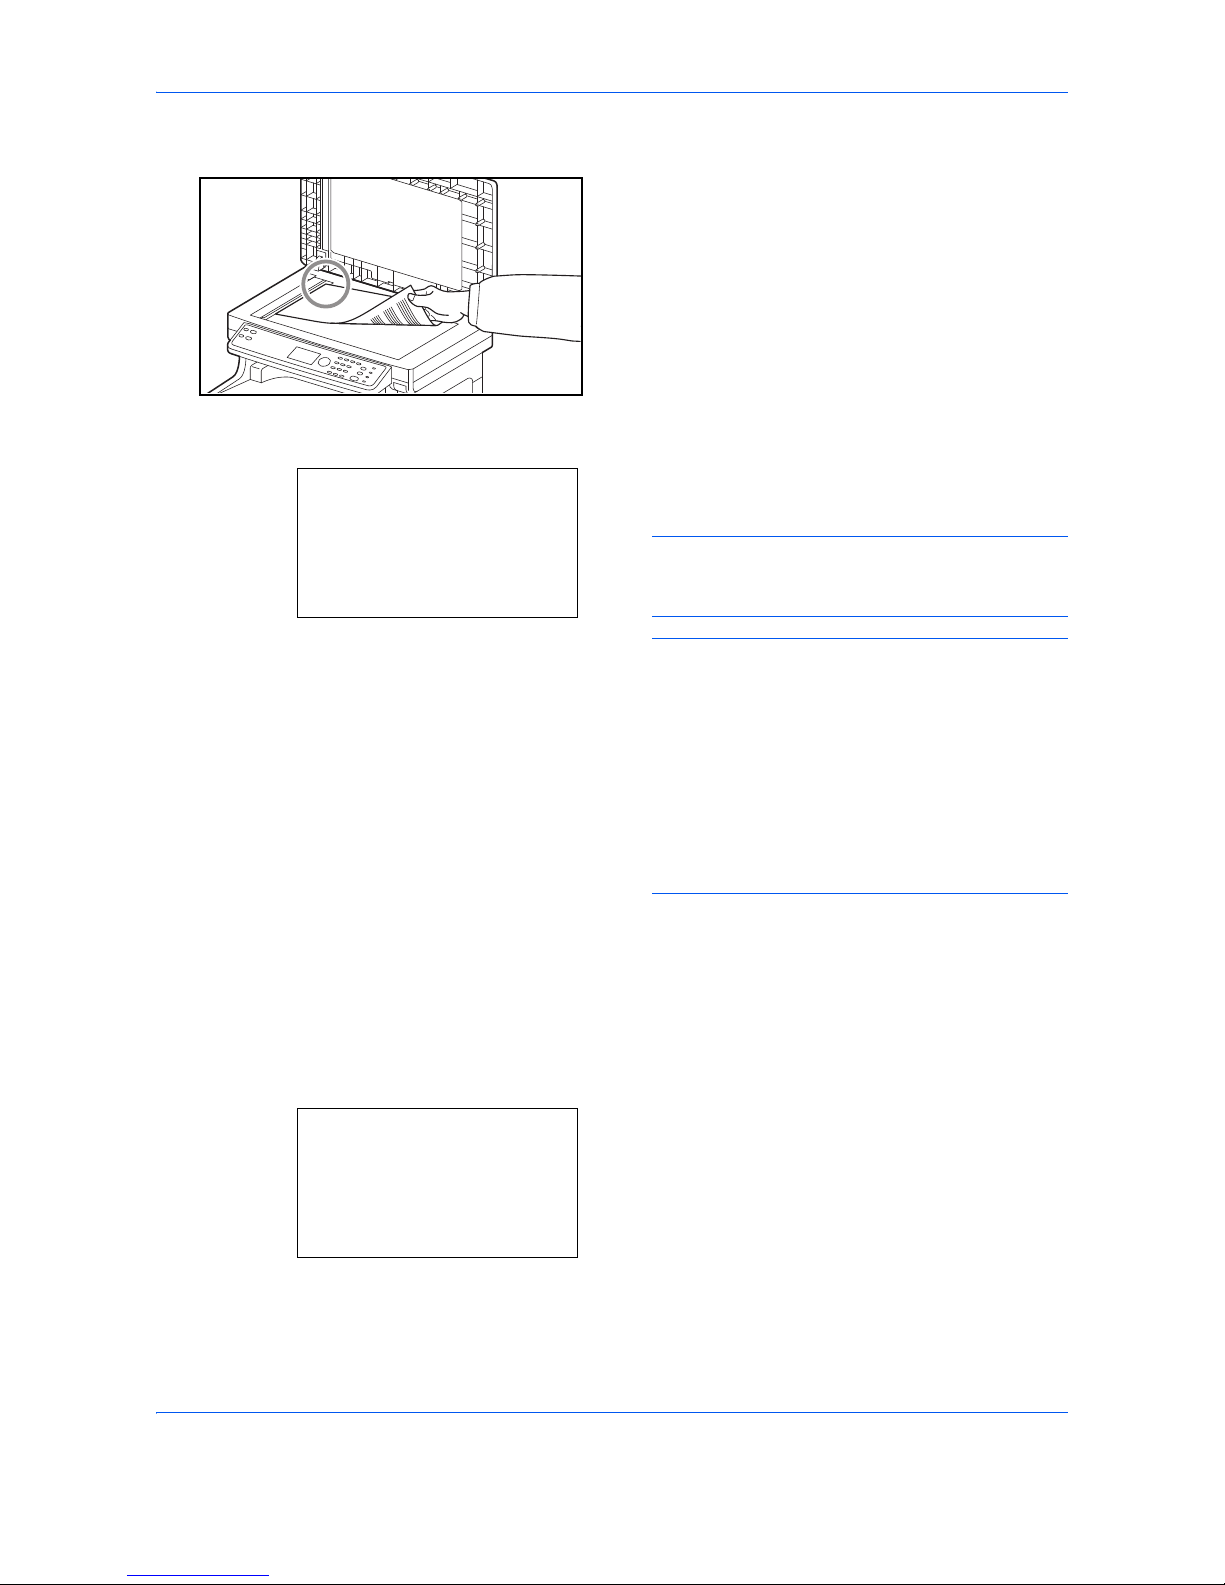
3 Place the originals on the glass surface or in the
document processor. Refer to the machine’s
Operation Guide for placing originals.
Dial the Receiving System
4 Enter the fax number of the receiving system using
the numeric keys.
NOTE: When you press the numeric keys to
enter numbers, the screen changes to the entry
screen for the fax number.
NOTE: Up to 64 digits can be entered as the fax
number of the receiving system.
Spaces will be automatically inserted if you use
at the end of the row to advance the cursor before
entering more characters.
Use or to move the cursor.
To correct the number, press the Clear key to
delete the digits one by one before reentering the
number. To delete all entered digits and return to
the default screen, press the Reset key.
Address Recall/Pause
Pressing this key adds about three seconds of
waiting time during dialing. For example, when
dialing the receiving system on an external line,
you can use this method to insert a pause before
resuming dialing after you dial a specific number.
Make detailed settings for sending as necessary.
Press [Detail] (the Right Select key) to display the
FAX Detail menu. Press the or key to select
[Sub Address], [Encrypted TX], [TX Start Speed] or
[ECM] and change settings, and then press the OK
key.
FAX No. Entry:
B
b
*
[ Chain ] [ Detail ]
FAX No. Entry:
A
b
0123456789
*
[ Chain ] [ Detail ]
Page 33
FAX Operation (Basic)
3-5
3
On Hook
Press this key to connect to the telephone line.
When the FAX number has been entered, the machine
starts dialing to the receiving system.
After pressing this key, you can dial the number of the
receiving system using the numeric keys. For details,
refer to Manual Send on page 4-10.
Dialing methods without using the numeric keys
• Using the Address Book
(Refer to page 3-15.)
• Using One-touch Keys
(Refer to page 3-26.)
• Manual Redial (Recall)
(Refer to page 3-29.)
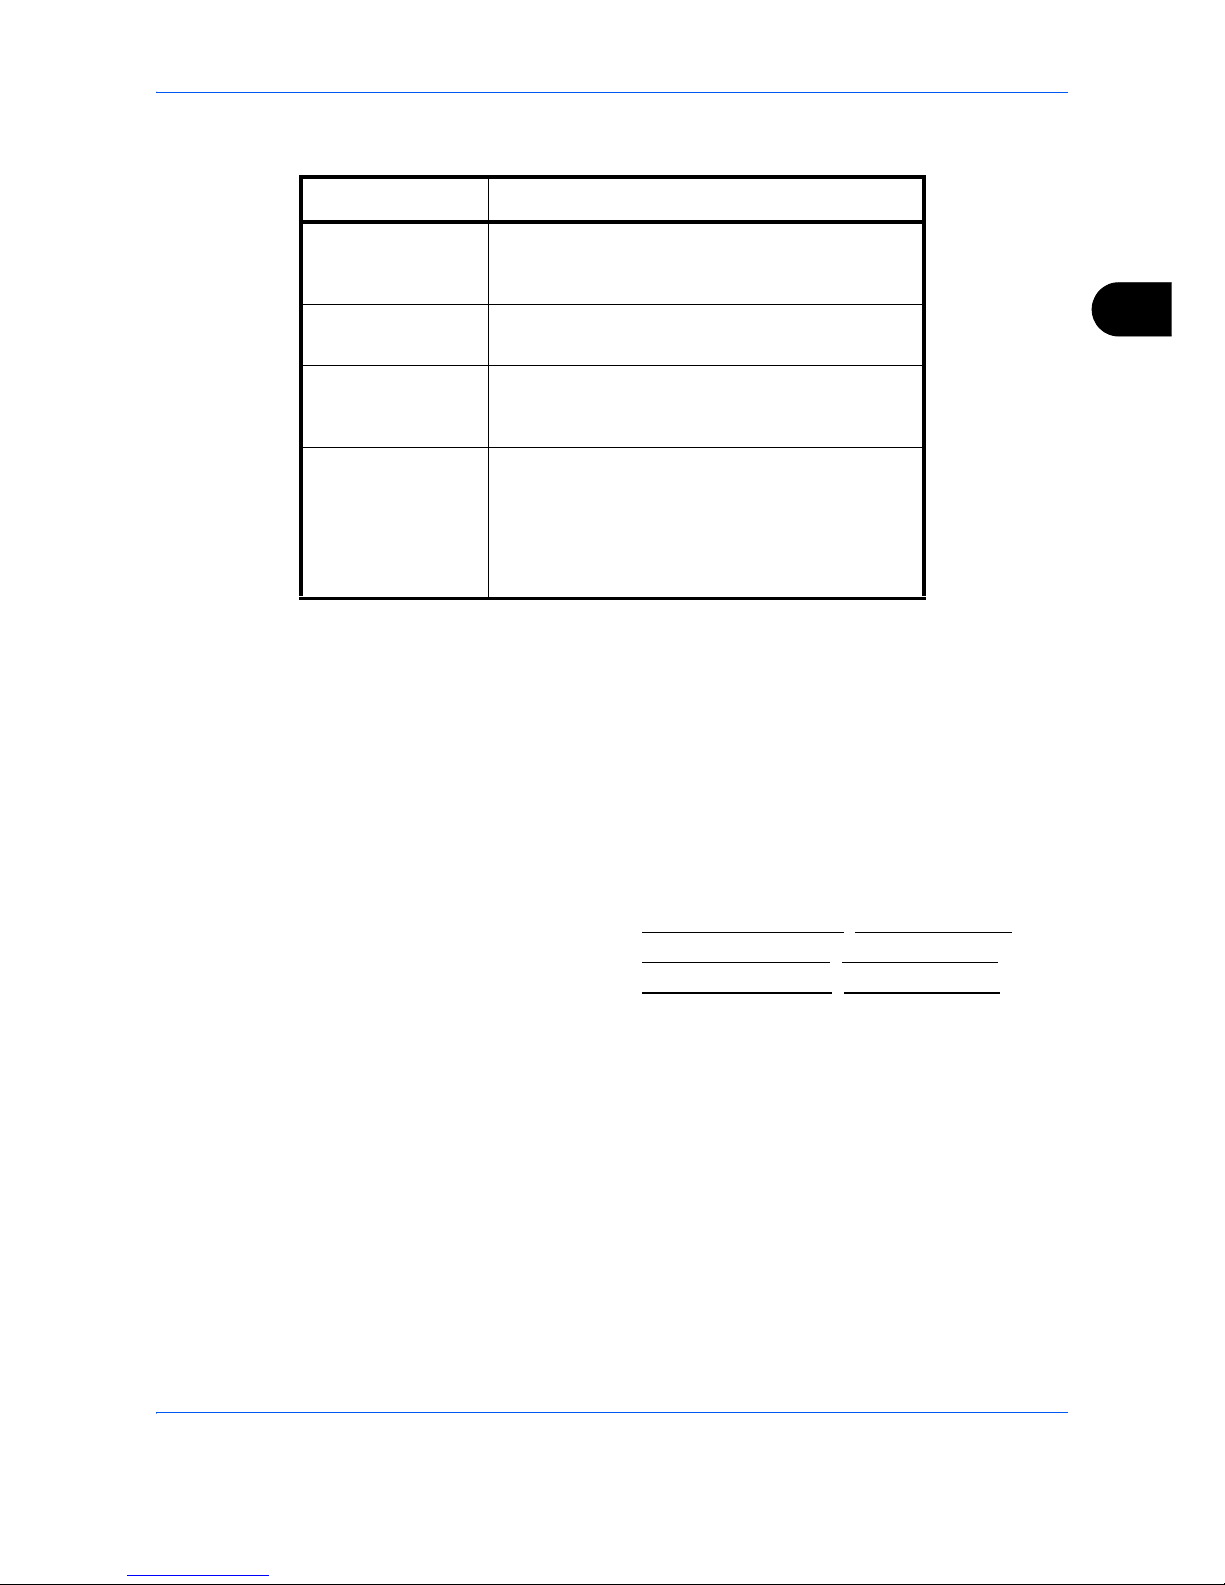
Key Description
Sub Address To communicate using the sub address, press
this key. For details, refer to Sub Address
Communication on page 4-29.
Encrypted TX To send faxes using encryption, press this key.
For details, refer to Encryption on page 6-21.
TX Start Speed If a communication error occurred, press this key
to change the TX Start Speed. Select the speed
from 33,600 bps, 14,400 bps, and 9,600 bps.
ECM ECM (error correction mode) is a function to
automatically resend an image that has not been
correctly sent or received due to the effects of
noise on the telephone line during transmission.
To change the ECM communication setting, press
this key.
Page 34

FAX Operation (Basic)
3-6
Selecting the Resolution
5 Select the resolution suitable for sending originals.
•200 × 100 dpi (Normal): when sending originals
with standard size characters
Typical character size: 10.5 point (example:
Resolution Resolution)
•200 × 200 dpi (Fine): when sending originals with
relatively small characters and thin lines
Typical character size: 8 point (example:
Resolution Resolution)
•200 × 400 dpi (Super Fine): when sending
originals with minute characters and lines
Typical character size: 6 point (example:
Resolution
Resolution)
•400 × 400 dpi (Ultra Fine): when sending
originals with minute characters and lines more
finely
Typical character size: 6 point (example:
Resolution
Resolution)
NOTE: The default setting is 200 × 100 dpi (Normal).
The higher the resolution, the clearer the image.
However, higher resolution also means longer send
times.
For Multi Sending, the scan resolution should be equal
to or higher than the fax resolution. If the selected
resolutions are not in this condition, the machine
automatically adjusts the resolution and changes the
selection.
1 Press the Function Menu key.
2 Press the or key to select [FAX
Resolution].
3 Press the OK key.
4 Press the or key to select the desired
resolution.
5 Press the OK key.
FAX Resolution:
a
b
*********************
2
200x200dpi Fine
3
200x400dpi S.Fin
1
*200x100dpi Norm.
Page 35
FAX Operation (Basic)
3-7
3
IMPORTANT:
•If you select a high resolution, the image
becomes clearer. However, the higher the
resolution is, the longer the send time is.
•When you send originals at a resolution of 200 ×
400 dpi (Super Fine) or higher, the fax machine
on the receiving system needs to be capable of
receiving the originals at such image quality.
When the receiving system does not have
such capability, originals are sent at an image
quality of 200 × 200 dpi (Fine).
Selecting the Density
6 Adjusting the density when scanning originals
-4 to +4: You can adjust the density using 9 levels.
1 Press the Function Menu key.
2 Press the or key to select [Density].
3 Press the OK key.
4 Press the or key to select the desired
density.
5 Press the OK key.
Send Start
7 Press the Start key. Transmission begins.
NOTE: When On is selected in Destination Check
before Send, a destination confirmation screen is
displayed when you press the Start key. For details,
refer to Confirmation Screen of Destinations on
page 5-13.
Checking the Send Status
1 Press the Status/Job Cancel key.
Density:
a
b
4 v
Lighter -1
*********************
6 y
Darker
+1
5 *w
Normal
0
Page 36

FAX Operation (Basic)
3-8
2 Press the or key to select [Send Job
Status].
3 Press the OK key. A list of send job statuses
appears.
Cancelling the Transmission
1 In the above screen for checking send jobs,
press the or key to select the job you
want to cancel.
2 Press [Cancel] (the Left Select key).
3 Press [Yes] (the Left Select key). This
cancels the transmission.
NOTE: Pressing the Stop key on the operation
panel while originals are being scanned cancels
the transmission.
Send Job Status:a b
*********************
0011 p Broadcast
0017 0324256345
[ Cancel ] [ Menu ]
0010 0667643333
r
Send Job Status:a b
0010 0667643333
r
0011 p Broadcast
*********************
[ Cancel ] [ Menu ]
0017 0324256345
Page 37
FAX Operation (Basic)
3-9
3
FAX Automatic Reception
When using this machine as a FAX-dedicated machine that does not receive telephone calls, set the machine
to FAX-dedicated reception. No special operation is required when receiving faxes.
NOTE: When you are receiving DRD service from a telephone company, change the reception method to
[Auto (DRD)]. For details, refer to DRD Reception on page 6-11.
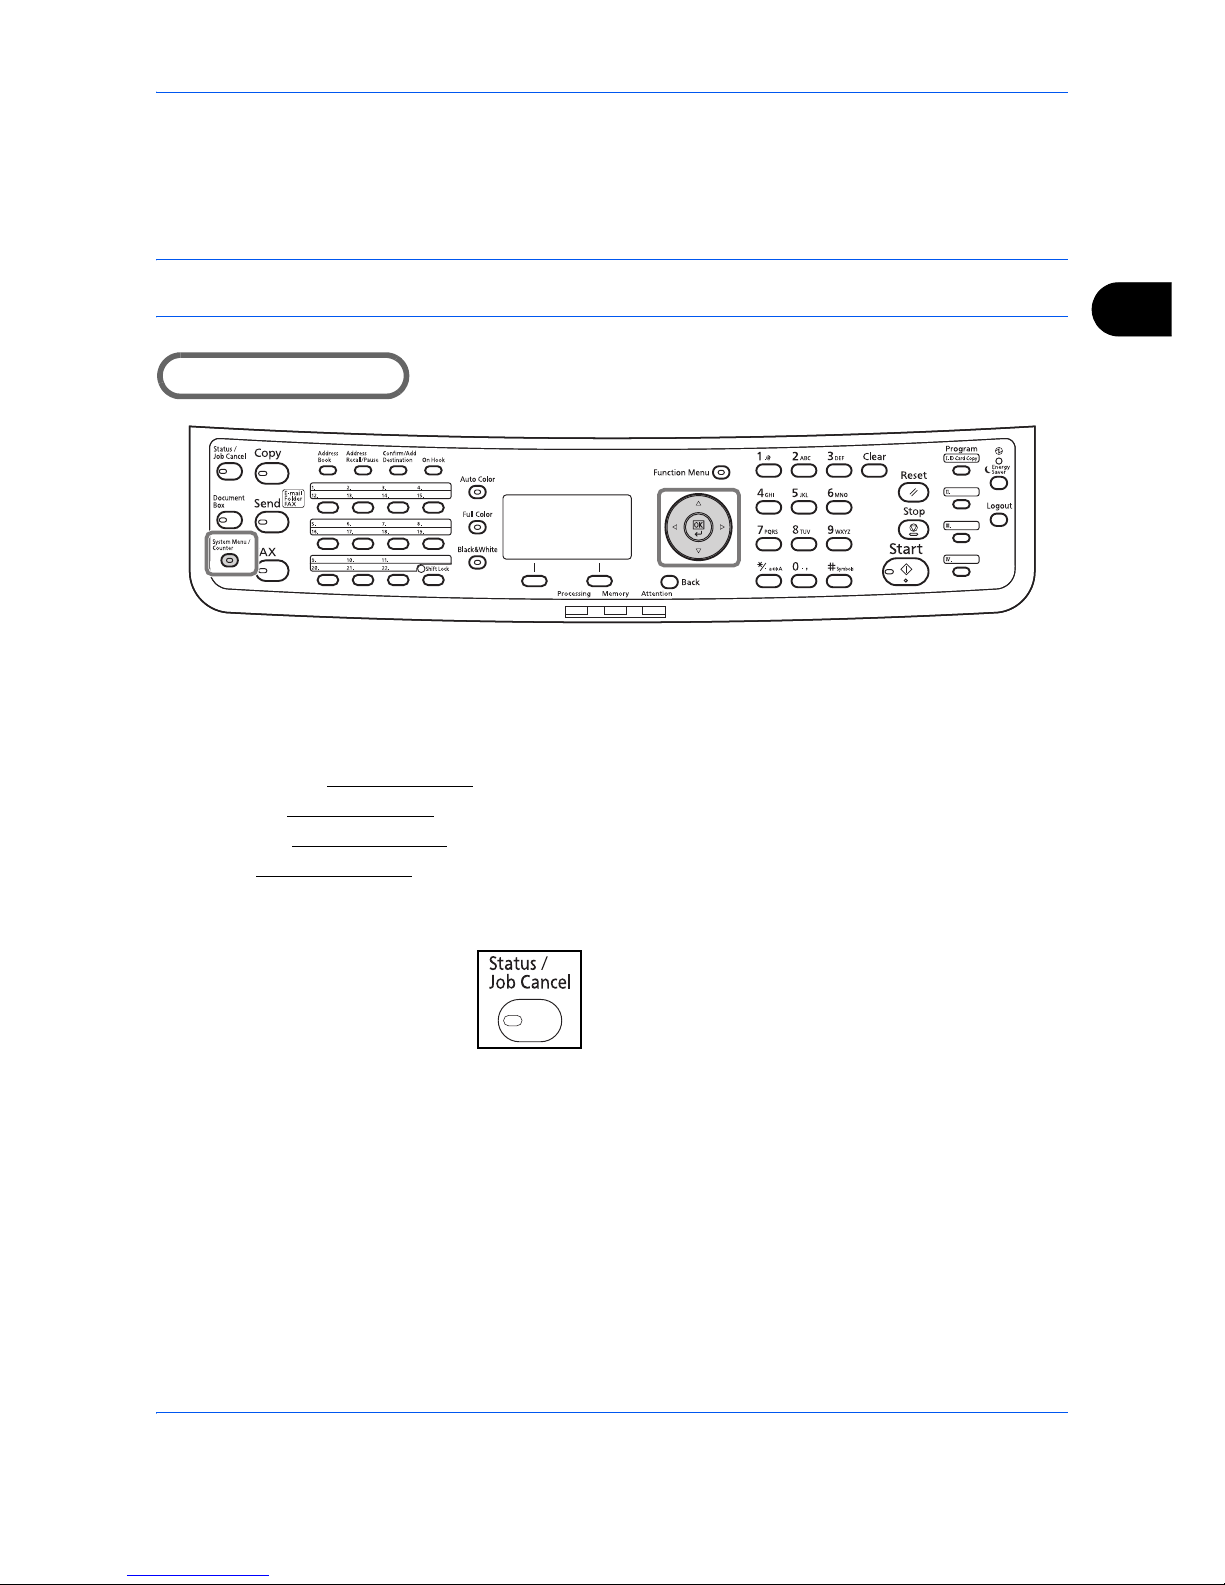
Part that is operated
Reception Method
This machine allows the following five reception methods.
• Auto (Normal)
• Auto (FAX/TEL) (Refer to page 6-2
.)
• Auto (TAD) (Refer to page 6-4
.)
• Auto (DRD) (Refer to page 6-11
.)
• Manual (Refer to page 4-11
.)
Checking and Changing the Reception Method
1 Press the System Menu/Counter key.
2 Press the or key to select [FAX].
3 Press the OK key.
4 Press the or key to select [Reception].
5 Press the OK key.
Page 38
FAX Operation (Basic)
3-10
6 Press the or key to select [RX Settings].
7 Press the OK key.
8 Press the or key to select [Auto(Normal)].
9 Press the OK key.
Reception Starts
1 When a fax has been sent to you, the machine
rings the registered number of times, and then
starts receiving the fax.
After reception has started, the Processing
indicator blinks.
NOTE: You can change the number of times the
ringing tone rings. (Refer to Rings on page 6-16.)
To cancel the reception, refer to Cancelling
Transmission (Disconnection of Communication) on
page 3-13.
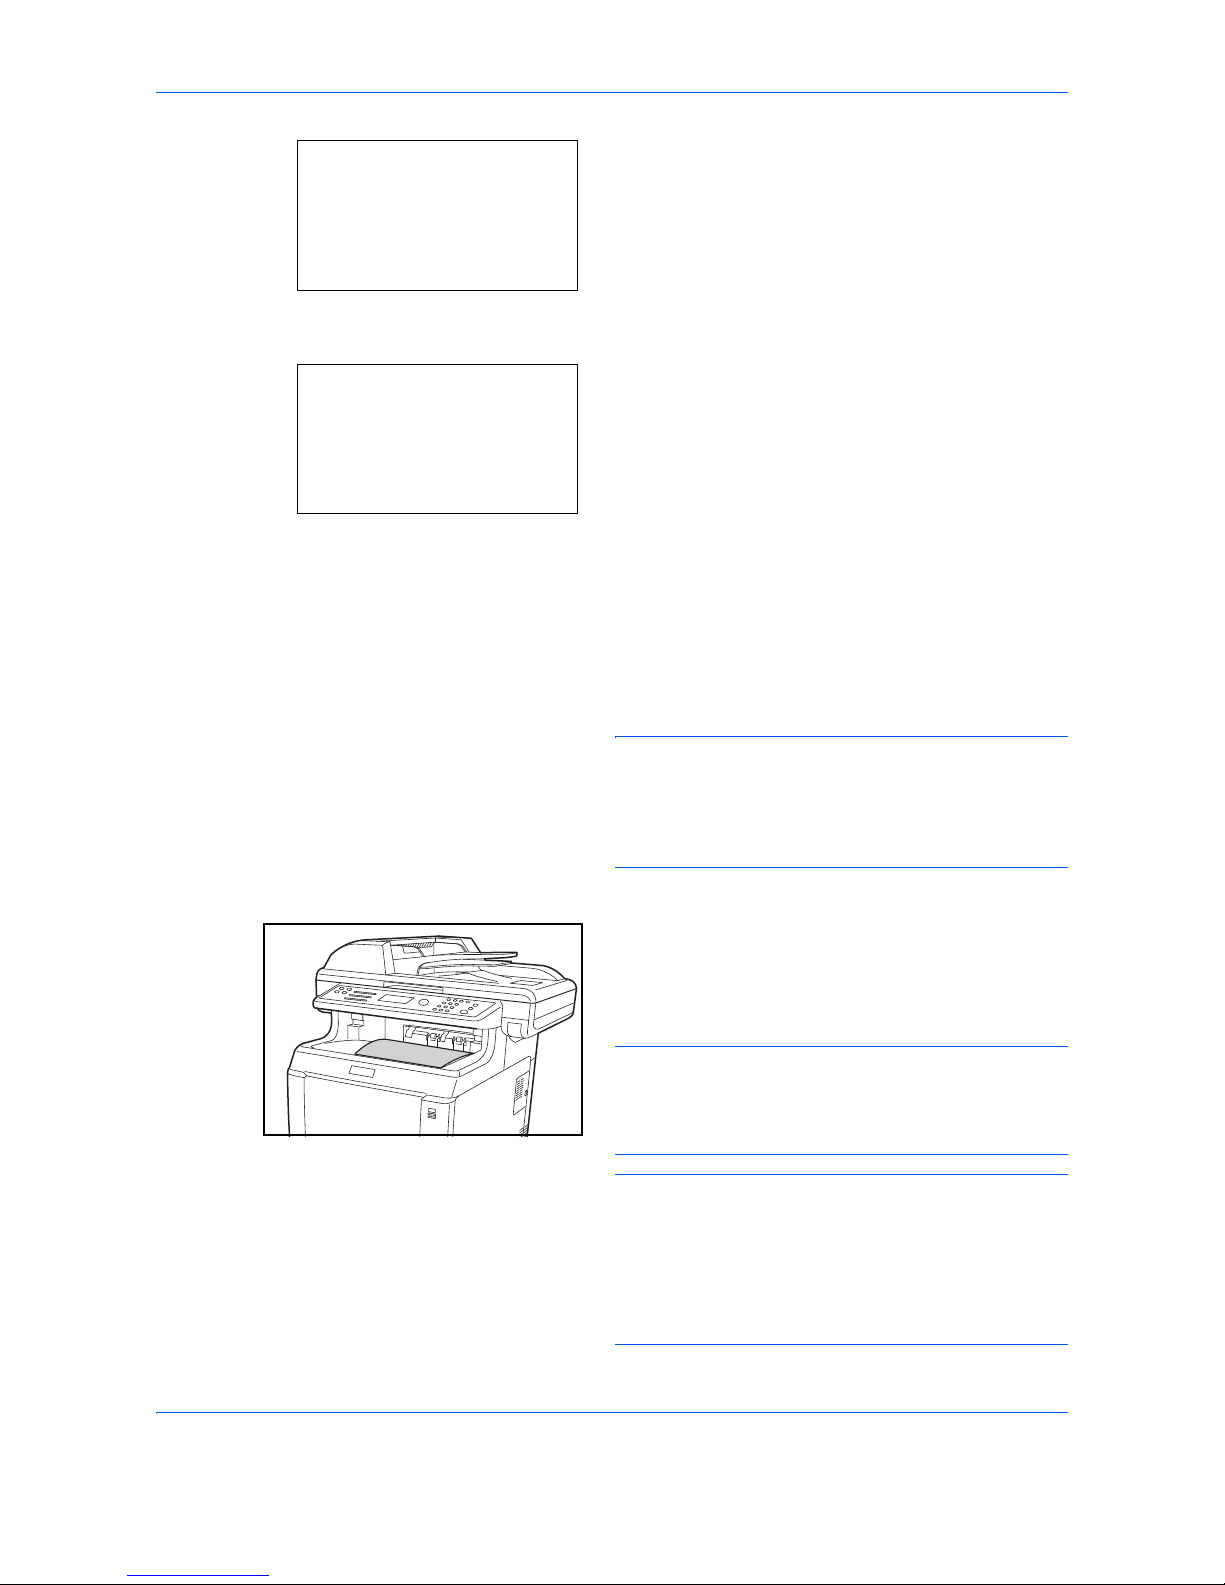
Reception Print
2 Received originals are output on the top tray with
the print side facing downward. Up to 150 sheets
of plain paper (80 g/m²) can be held on the top tray.
However, the number of sheets varies with the
condition of the paper to be used.
IMPORTANT:
When the number of sheets to be printed exceeds the
number of sheets that can be held, remove all the
paper on the top tray.
NOTE: When the original size is larger than A4 or
Letter at the sender, the send image size will be
reduced at the sender's machine to fit to your
supported paper size. In addition, when the send
image size is too long at the sender and your machine
cannot print the received image into one page, the
image will be divided into several sheets of paper.
Reception:
a
b
4
Rings(FAX/TEL)
5
Forward Settings
*********************
[ Exit ]
6
RX Settings
RX Settings:
a
b
*********************
2
Auto(FAX/TEL)
3
Auto(TAD)
1
*Auto(Normal)
Page 39

FAX Operation (Basic)
3-11
3
Memory Reception
When the machine cannot print a fax due to paper
running out or a paper jams, it temporarily stores
originals that have been sent in the image memory.
When the machine returns to the printable state,
printing starts.
During memory reception, FAX Reception Printing Jobs
are displayed on Printing Jobs of the Status screen. To
print the received originals, supply paper or remove
jammed paper.
NOTE: For the Status screen, refer to the machine’s
Operation Guide.
Page 40
FAX Operation (Basic)
3-12
Cancelling Communication
The method for cancelling communication with this machine differs depending on the transmission method
(memory transmission or direct transmission) and communication form. Methods of cancelling in various cases
are explained here.
Cancelling Memory Transmission (while originals are being scanned)
During memory transmission, to cancel scanning of
originals, press the Stop key on the operation panel.
Scanning of originals is canceled, and the originals are
ejected. When originals remain in the document
processor, take them out from the original output table.
Cancelling Memory Transmission (during communication)
During memory transmission, to cancel communication after it has started following the completed scanning of
originals, use the following procedure.
NOTE: If user management is set to On, the administrator or the user who performs the memory transmission
can be canceled the job.
You can cancel transmission by disconnecting the telephone line. For details, refer to Cancelling Transmission
(Disconnection of Communication) on page 3-13.
1 Press the Status/Job Cancel key.
2 Press the or key to select [Send Job Status].
3 Press the OK key.
4 Press the or key to select the job you want to
cancel.
5 Press [Cancel] (the Left Select key).
6 Press [Yes] (the Left Select key). Communication
is canceled.
NOTE: Canceling is also possible by pressing [Menu]
(the Right Select key), then selecting [Cancel Job]
and pressing the OK key.
Send Job Status:a b
0010 0667643333
r
0011 p Broadcast
*********************
[ Cancel ] [ Menu ]
0017 0324256345
Page 41
FAX Operation (Basic)
3-13
3
Cancelling and Sending Delayed Transmissions (Queued)
To cancel delayed transmissions that are queued, or to send delayed transmissions immediately rather than
waiting for the specified time, use the procedure below.
1 Press the Status/Job Cancel key.
2 Press the or key to select [Scheduled Job].
3 Press the OK key.
4 Press the or key to select the job you want to
cancel. Or, select the job you want to send
immediately.
5 Press [Menu] (the Right Select key).
6 Press the or key to select [Cancel Job]. Or,
select [Start Now] to send the job immediately.
7 Press the OK key.
8 Press [Yes] (the Left Select key). Communication
is canceled. Or, communication starts if sending
the job immediately.
Cancelling Direct Transmission
During direct transmission, to cancel communication during transmission, press the Stop key on the operation
panel. The originals that have been scanned are ejected, and the screen returns to the default screen for
sending. When originals remain in the document processor, take them out.
Cancelling Transmission (Disconnection of Communication)
When you cancel sending or receiving by disconnecting the telephone line during communication, use the
following procedure.
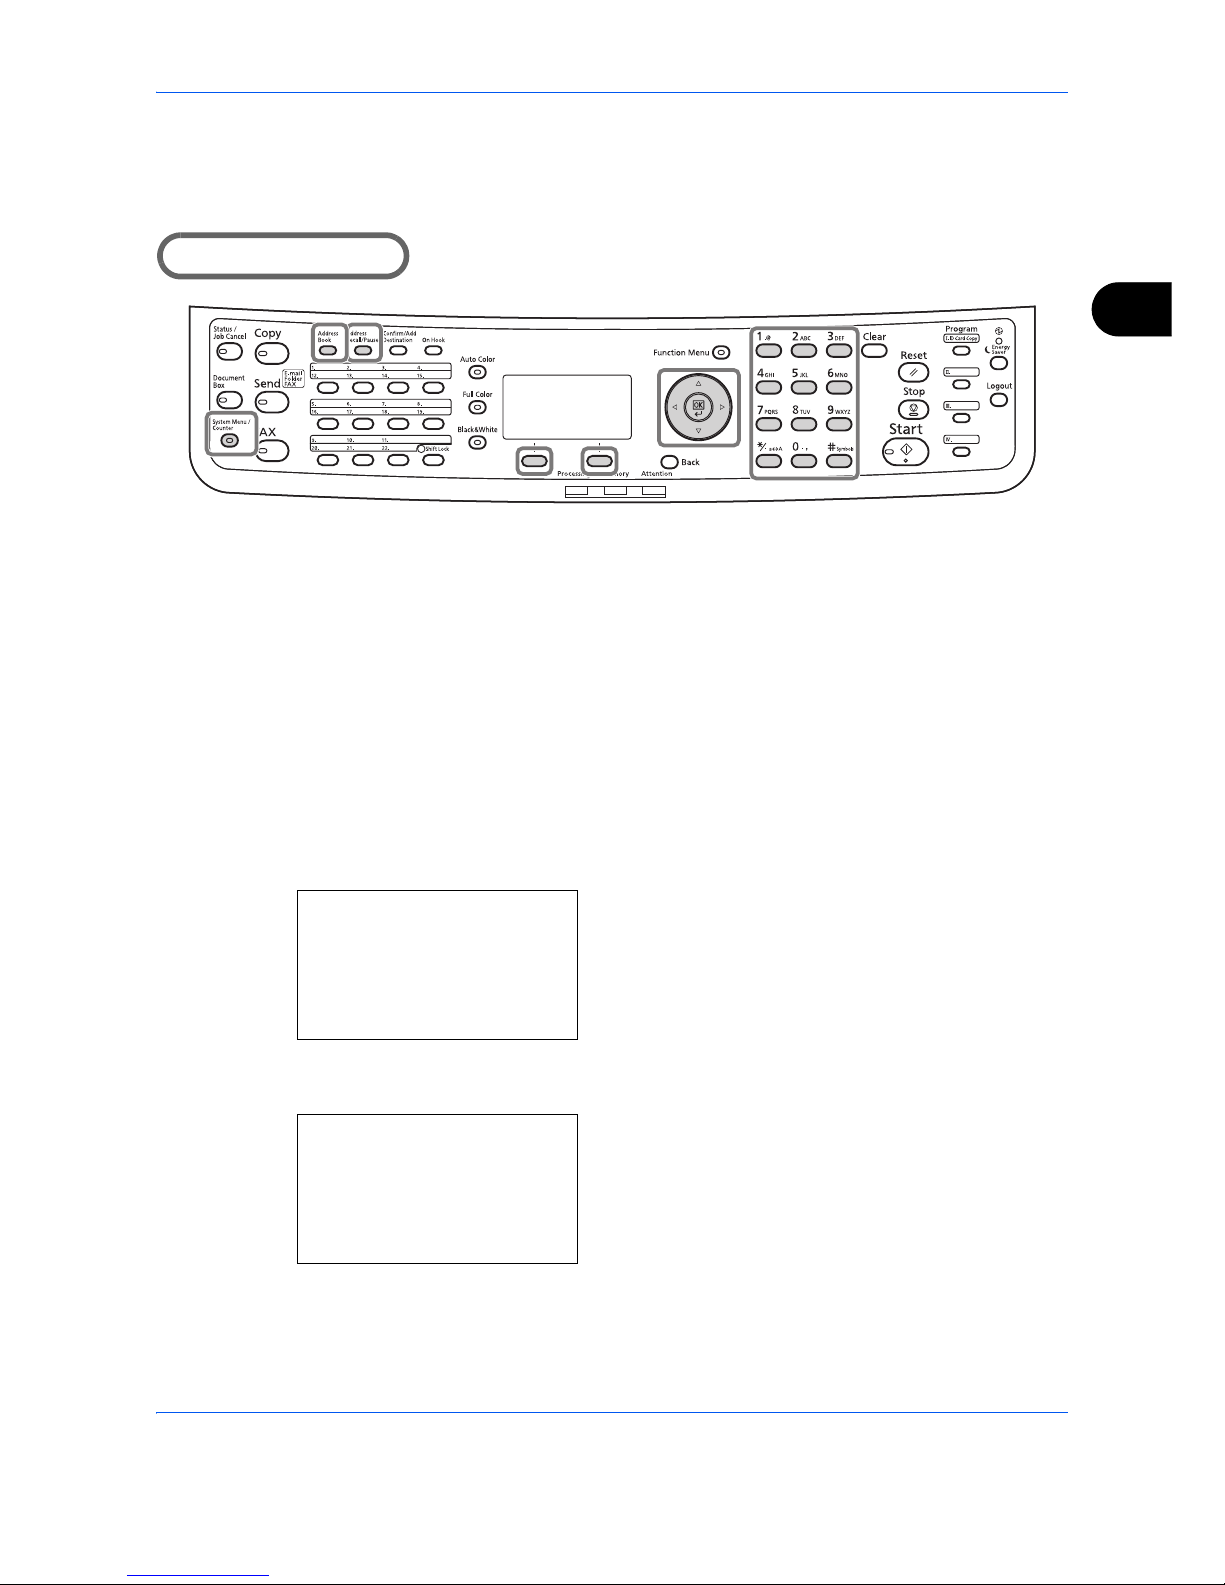
1 Press the Status/Job Cancel key.
2 Press the or key to select [FAX].
3 Press the OK key.
Scheduled Job:
a
b
0011 Broadcast
0017 0324256345
*********************
[ Cancel ] [ Menu ]
0018 0756545865
Page 42

FAX Operation (Basic)
3-14
4 Press [Line Off] (the Left Select key).
5 Press [Yes] (the Left Select key). This disconnects
the line in communication.
Cancelling Polling Transmissions
To cancel a polling transmission, delete the polling transmission original saved in the polling box. For
information on how to delete the saved original, refer to Deleting Originals in a Polling Box on page 4-46.
FAX: b
Sending...
[Line Off][ Log ]
Page 43
FAX Operation (Basic)
3-15
3
Using the Address Book
You can select the FAX destination from the Address Book.
Part that is operated
Registering a New Destination
You can register new destinations to the Address Book. There are two registration methods - contact
registration; and, group registration for registering several contact registrations as a unit.
Contact Registration (fax)
Up to 200 destinations can be registered. Destination name, fax number, sub address communication,
encryption, transmission start speed, and ECM communication can be registered for each destination.
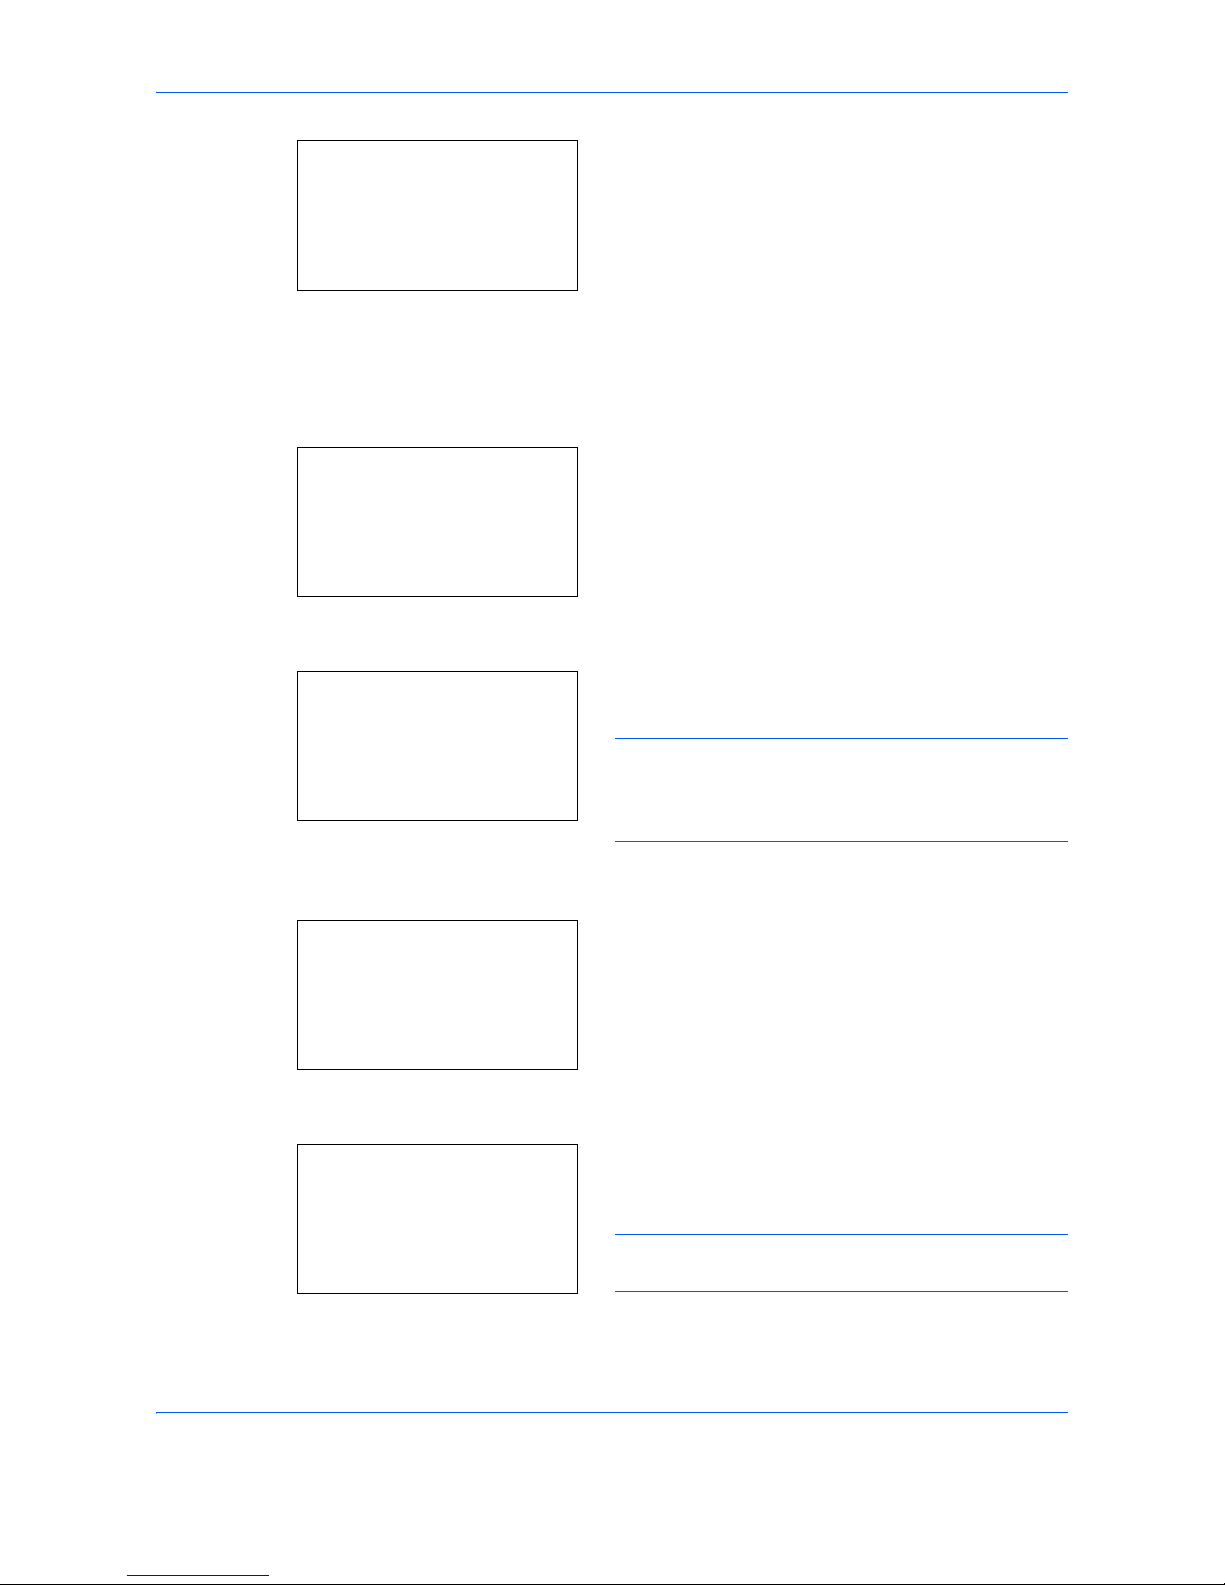
1 Press the System Menu/Counter key.
2 Press the or key to select [Edit Destination].
3 Press the OK key.
4 Press the or key to select [Address Book].
5 Press the OK key.
6 Press [Menu] (the Right Select key).
Edit Destination:a b
*********************
2
Print List
[ Exit ]
1
Address Book
Address Book:
a
b
*********************
l
Fiala
l
Maury
[ Menu ]
k
Design
Page 44
FAX Operation (Basic)
3-16
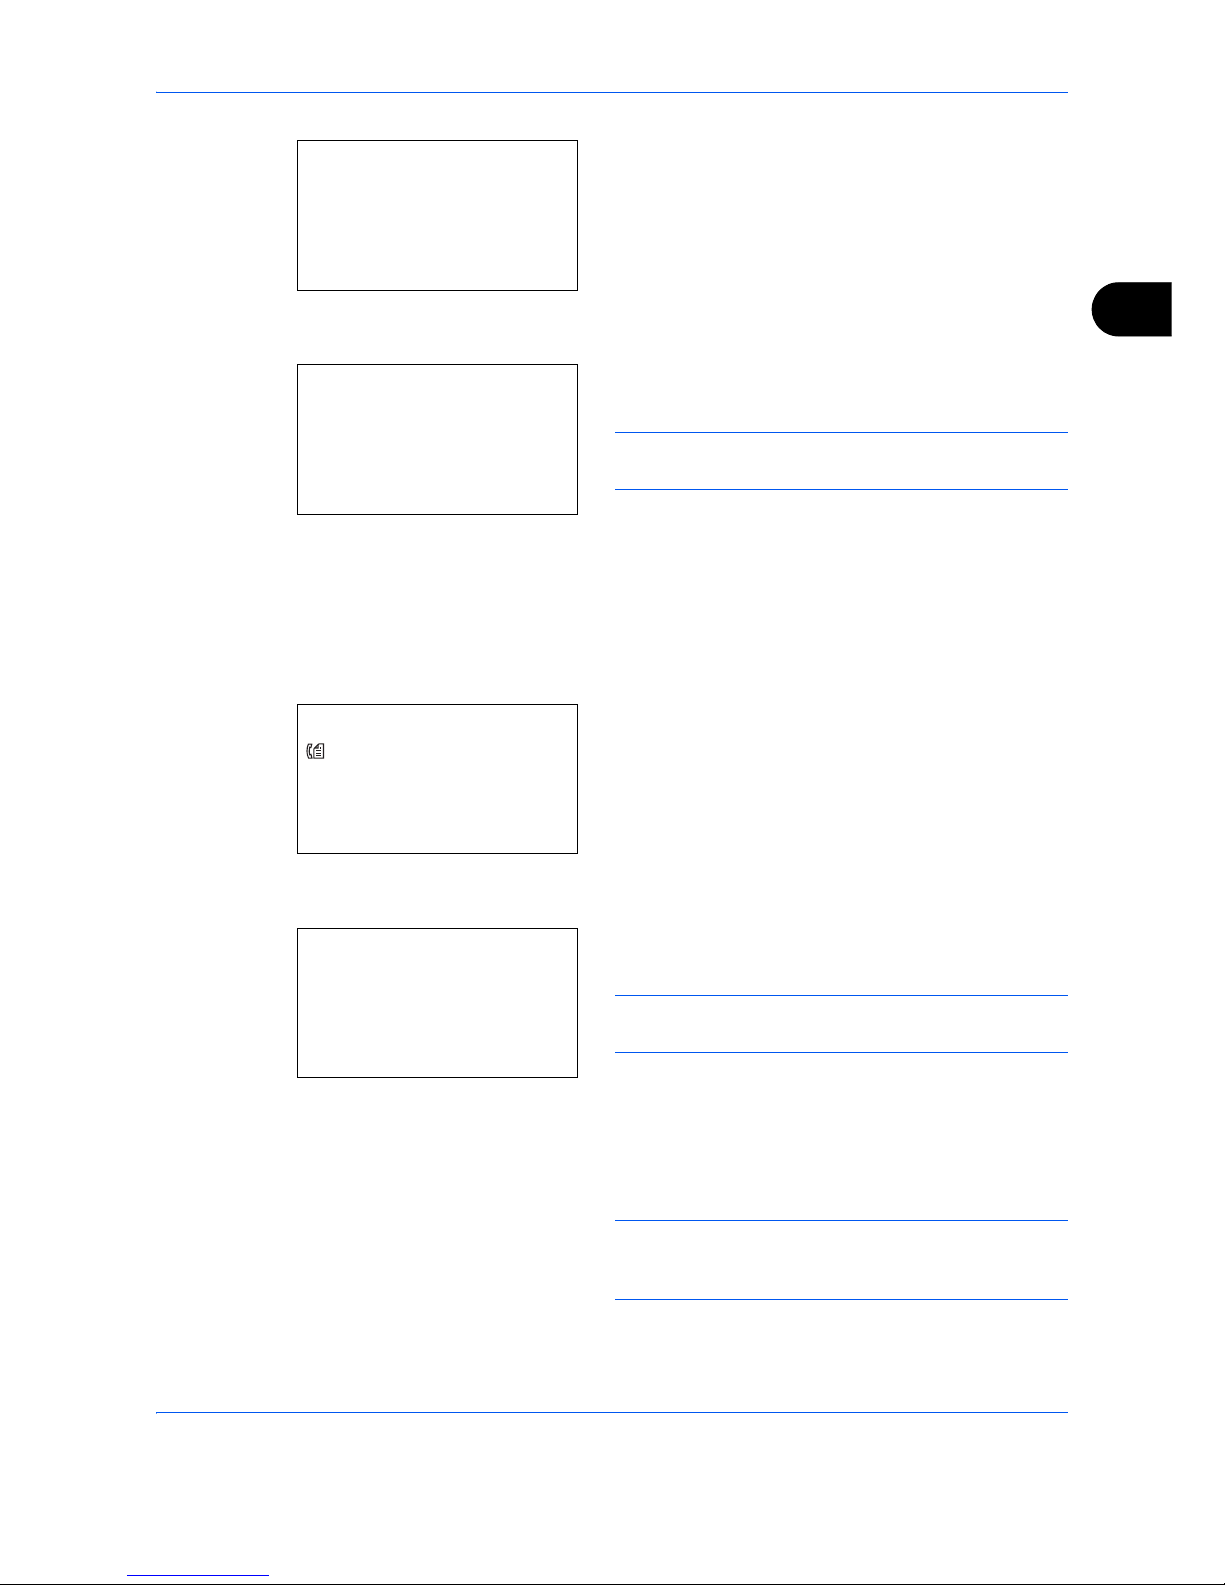
7 Press the or key to select [Add Address].
8 Press the OK key.
9 Press the or key to select [Contact].
10 Press the OK key.
11 Press the or key to select [Address Number].
12 Press [Edit] (the Right Select key).
13 Use the numeric keys to enter any address number
between 001 and 250.
NOTE: An address number is an identification
number for each destination. You can select any
available number out of 250 numbers - 200 for
individuals and 50 for groups.
14 Press the OK key.
15 Press the or key to select [Contact Name].
16 Press [Edit] (the Right Select key).
17 Use the numeric keys to enter the destination
name to be displayed in the Address Book. Up to
32 characters can be entered.
NOTE: For details on character entry, refer to
Specifications (Fax function) on Appendix-6.
18 Press the OK key.
Menu:
a
b
1
Detail/Edit
2
Delete
*********************
[ Exit ]
3
Add Address
Detail:
C
b
Address Number: 7/ 7
053
[ Edit ]
Address Number:
D
b
(001 - 250)
*****053*
Detail:
C
b
Contact Name 1/ 7
[ Edit ]
Contact Name:
A
b
Sally
*
S
ABC
[ Text ]
Page 45
FAX Operation (Basic)
3-17
3
19 Press the or key to select [FAX Number].
20 Press [Edit] (the Right Select key).
21 Use the numeric keys to enter the destination FAX
number. Up to 32 digits can be entered.
NOTE: For details on character entry, refer to
Specifications (Fax function) on Appendix-6.
Address Recall/Pause
Pressing this key adds about three seconds of waiting
time during dialing. For example, when dialing the
receiving system on an external line, you can use this
method to insert a pause before resuming dialing after
you dial a specific number.
22 Press [Detail] (the Right Select key) and then use
the or key to select [Sub Address]. If you do
not use Sub Address, proceed to step 28.
23 Press [Edit] (the Right Select key).
24 Use the numeric keys to enter the sub address. Up
to 20 digits can be entered.
NOTE: A sub address can be entered using numerals
from 0 to 9, spaces, and characters "#" and "*".
25 Press the OK key.
26 Use the numeric keys to enter the sub address
password. Up to 20 digits can be entered.
NOTE: A sub address password can be entered using
numerals from 0 to 9, alphabets, spaces, and
characters "#" and "*".
27 Press the OK key.
Detail:
C
b
b
FAX Number: 3/ 7
0667640000
[ Edit ]
FAX No. Entry:
A
b
0667640000
*
S
[ Detail ]
FAX Detail:
C
b
Sub Address: 1/ 4
1234567890123
OOOOOOOOOO
[ Edit ]
Sub Address:
C
b
1234567890123
V S
Page 46
FAX Operation (Basic)
3-18
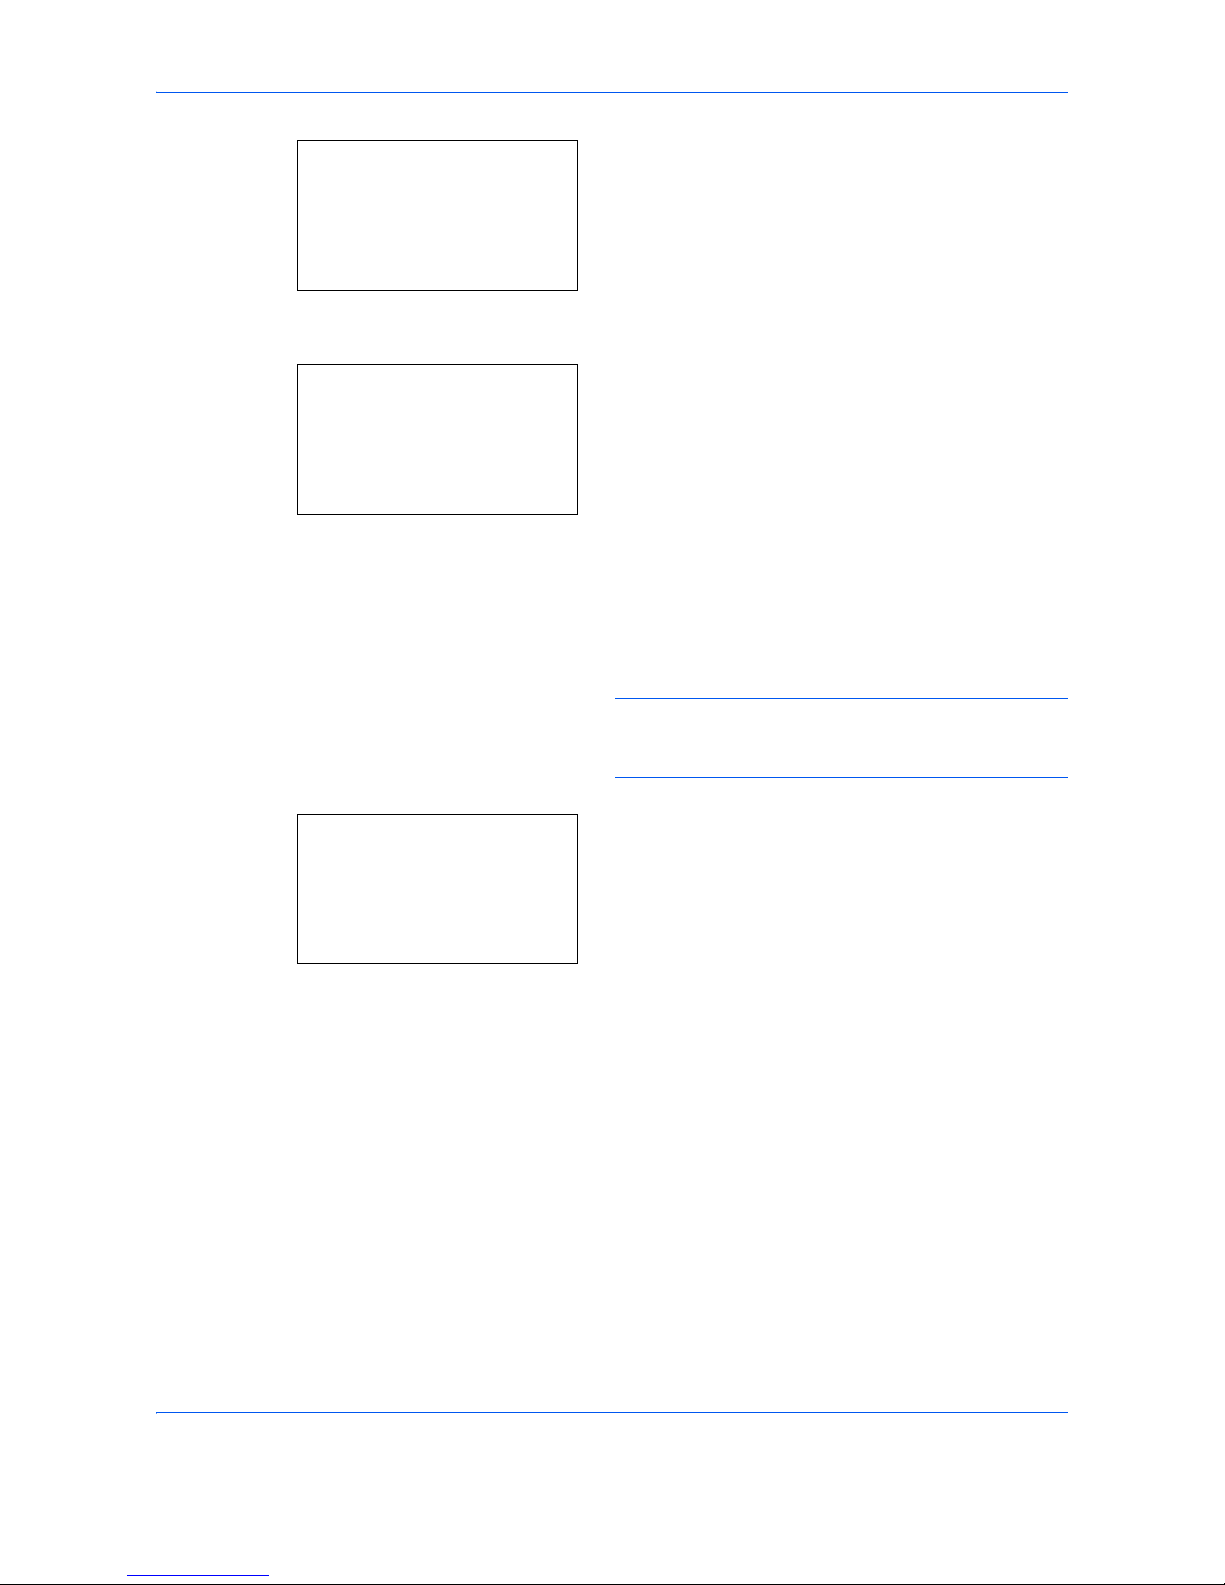
28 Use the or key to select [Encrypted TX]. If you
do not use Encrypted TX, proceed to step 38.
29 Press [Change] (the Right Select key).
30 Press the or key to select [On].
31 Press the OK key.
32 Press the or key to select the desired
encryption key number.
33 Press the OK key.
NOTE: Register the encryption key in advance. For
details, refer to Registering an Encryption Key on
page 6-22.
34 Press the or key to select [On] or [Off].
35 Press the OK key. Proceed to the next step or step
38 when [On] or [Off] is selected in step 34,
respectively.
36 Use the numeric keys to enter the encryption box
number (4 digits).
37 Press the OK key.
FAX Detail:
C
b
Encrypted TX: 2/ 4
Key 02
0000
[ Change ]
Encryption:
a
b
*********************
2
On
1
*Off
Encryption Box:
a
b
*********************
2
On
1
*Off
Page 47
FAX Operation (Basic)
3-19
3
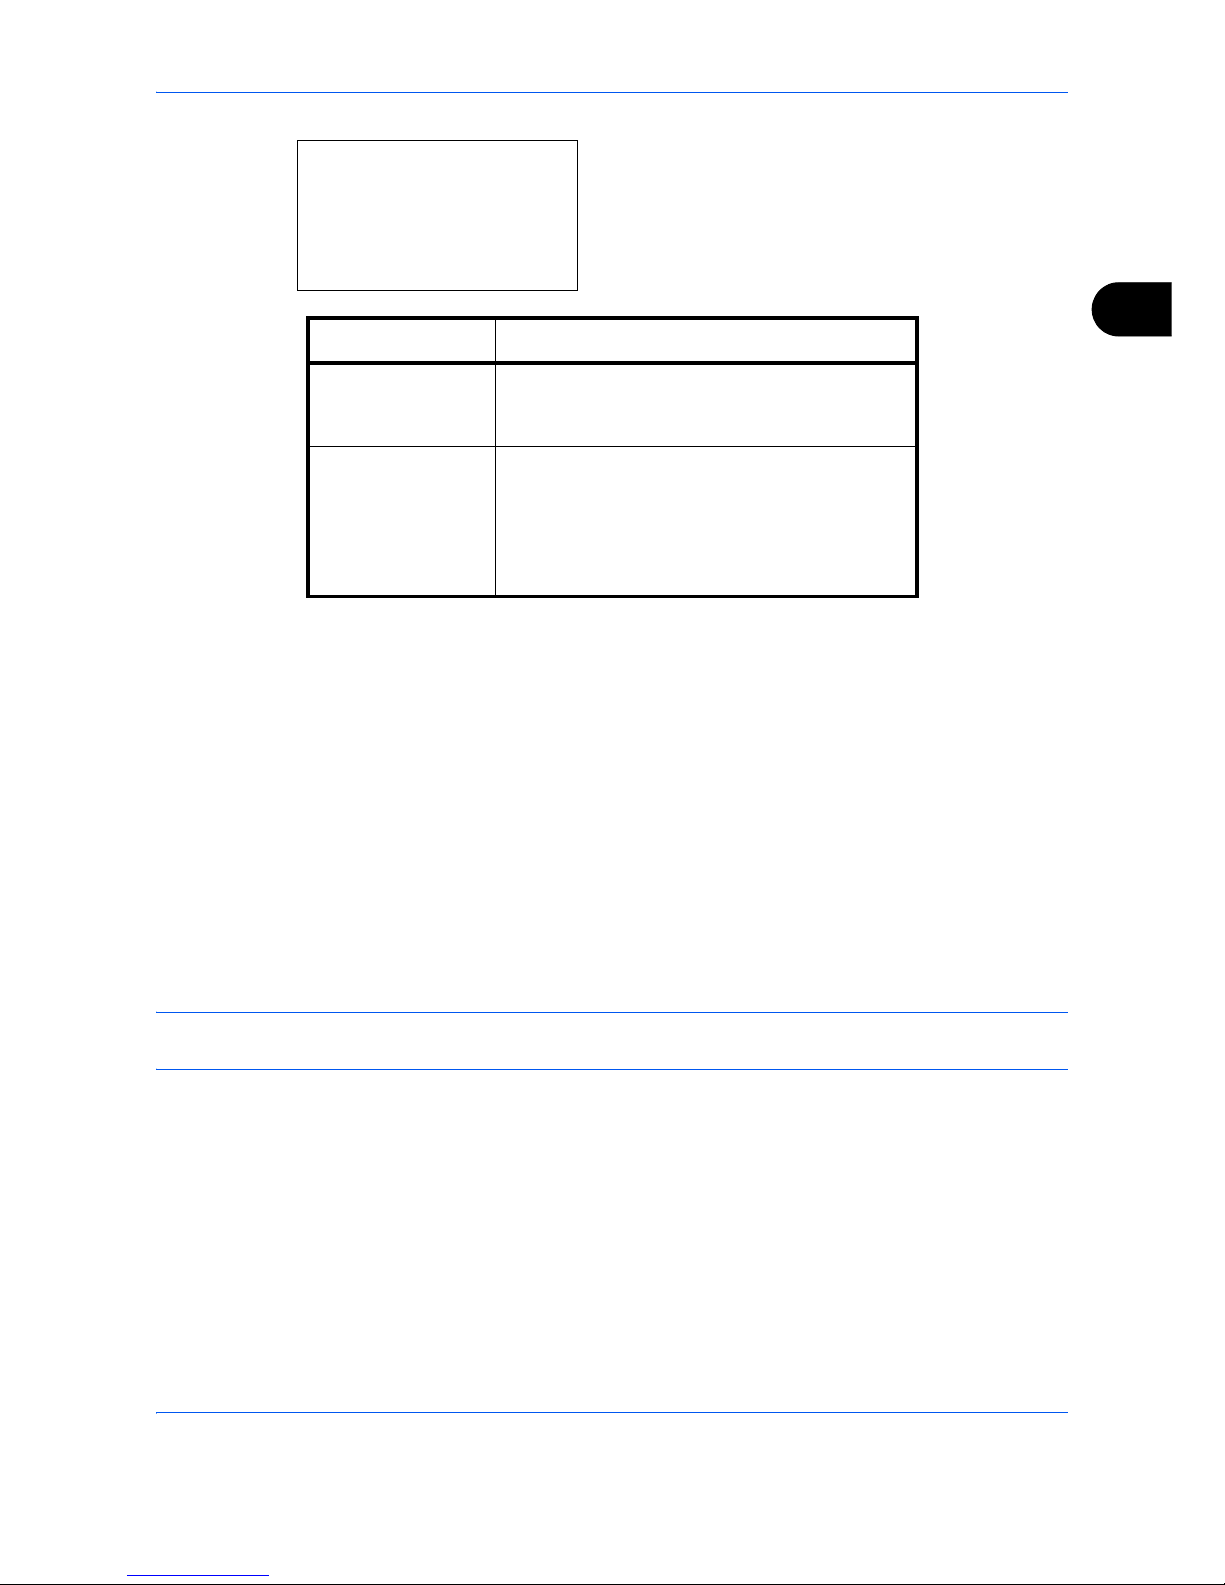
38 Use the or key to select [TX Start Speed] or
[ECM] and change settings as necessary, and then
press the OK key.
39 Use the or key to check if each item was
entered correctly.
40 Press the OK key.
41 Press the OK key again.
42 Use the or key to check if the destination was
set correctly.
43 Press the OK key. The destination is added to the
Address Book.
Group Registration
You can register several destinations that have been registered to be contacted as a unit. This method is
convenient because several destinations can be designated at one time. Up to 50 groups can be registered.
NOTE: Group registration requires destinations that have been registered as contact registration. Perform the
necessary contact registration in advance.
1 Press the System Menu/Counter key.
2 Press the or key to select [Edit Destination].
3 Press the OK key.
FAX Detail:
C
b
TX Start Speed: 3/ 4
33600bps
[ Change ]
Key Description
TX Start Speed To change the transmission start speed, press
this key. Select the speed from 33,600 bps,
14,400 bps, and 9,600 bps.
ECM ECM (error correction mode) is a function to
automatically resend an image that has not
been correctly sent or received due to the
effects of noise on the telephone line during
transmission. To change the ECM
communication setting, press this key.
Page 48
FAX Operation (Basic)
3-20
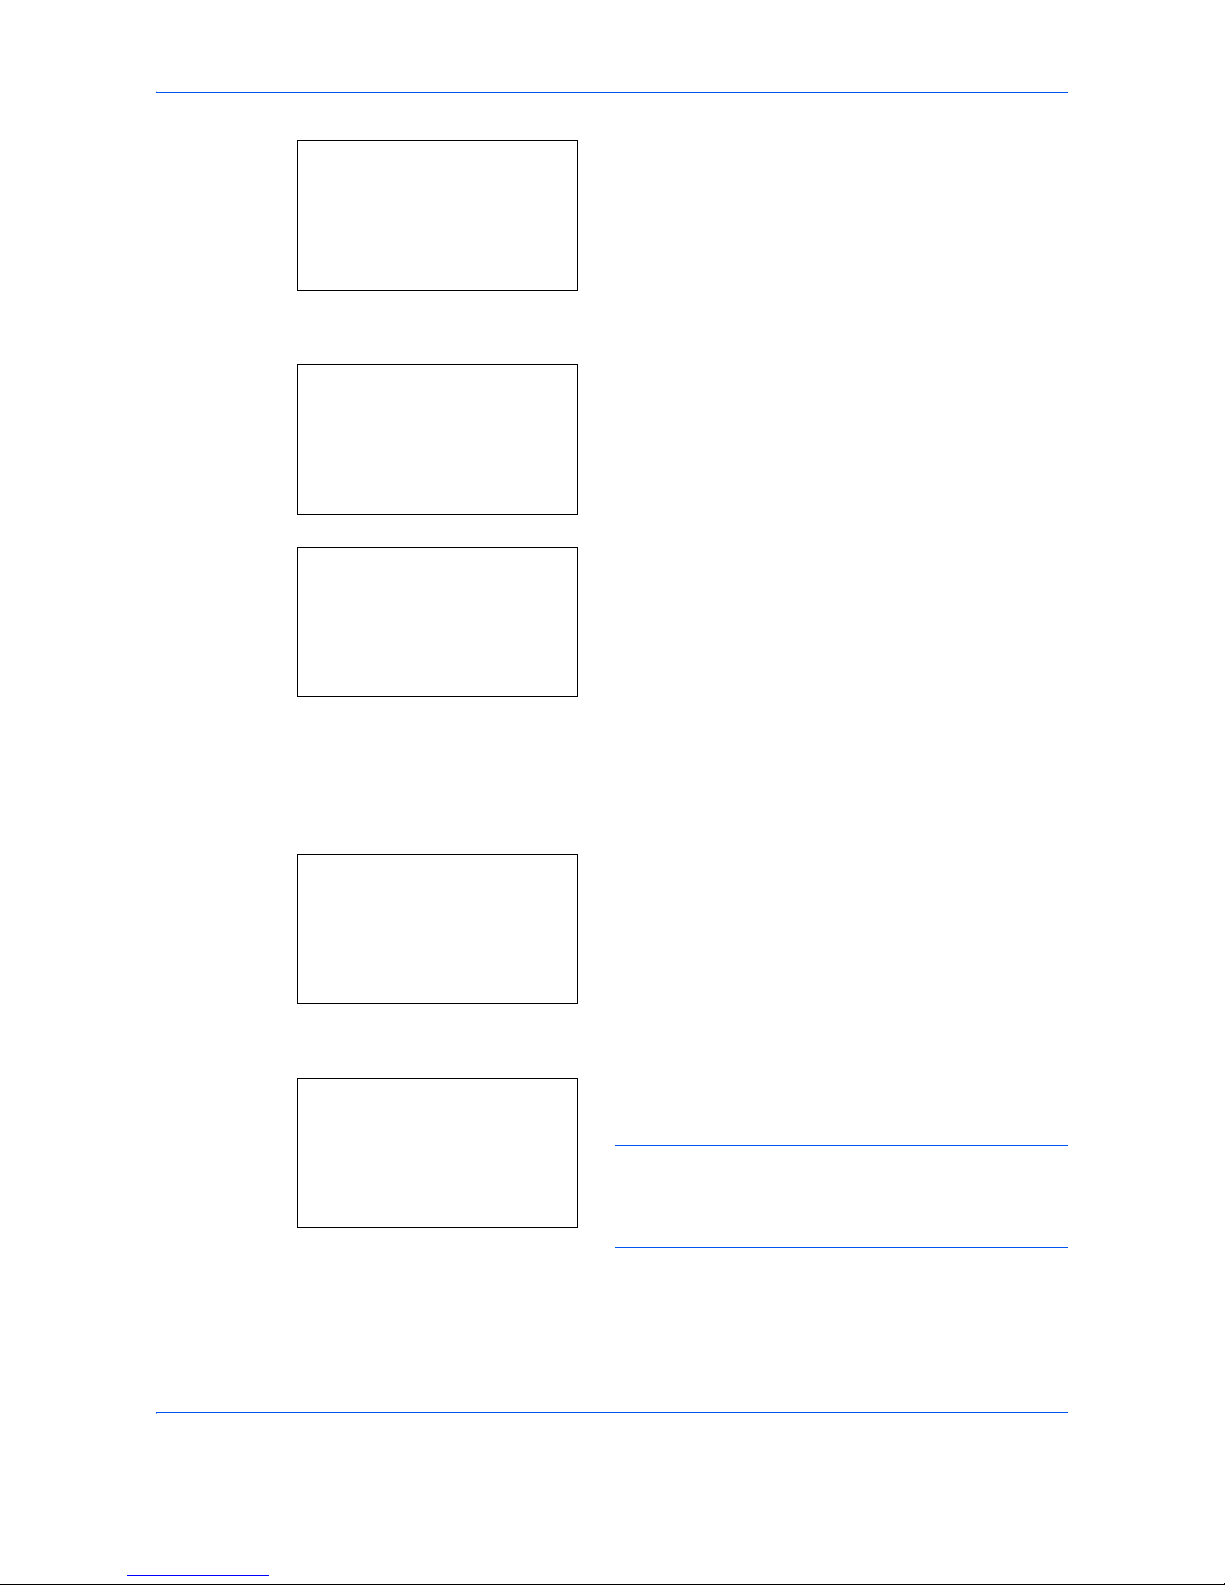
4 Press the or key to select [Address Book].
5 Press the OK key.
6 Press [Menu] (the Right Select key).
7 Press the or key to select [Add Address].
8 Press the OK key.
9 Press the or key to select [Group].
10 Press the OK key.
11 Press the or key to select [Address Number].
12 Press [Edit] (the Right Select key).
13 Use the numeric keys to enter any address number
between 001 and 250.
NOTE: An address number is an identification
number for each destination. You can select any
available number out of 250 numbers - 200 for
individuals and 50 for groups.
14 Press the OK key.
Edit Destination:a b
*********************
2
Print List
[ Exit ]
1
Address Book
Address Book:
a
b
*********************
l
Fiala
l
Maury
[ Menu ]
k
Design
Menu:
a
b
1
Detail/Edit
2
Delete
*********************
[ Exit ]
3
Add Address
Detail:
C
b
Address Number: 3/ 3
019
[ Edit ]
Address Number:
C
b
(001 - 250)
*****053*
Page 49
FAX Operation (Basic)
3-21
3
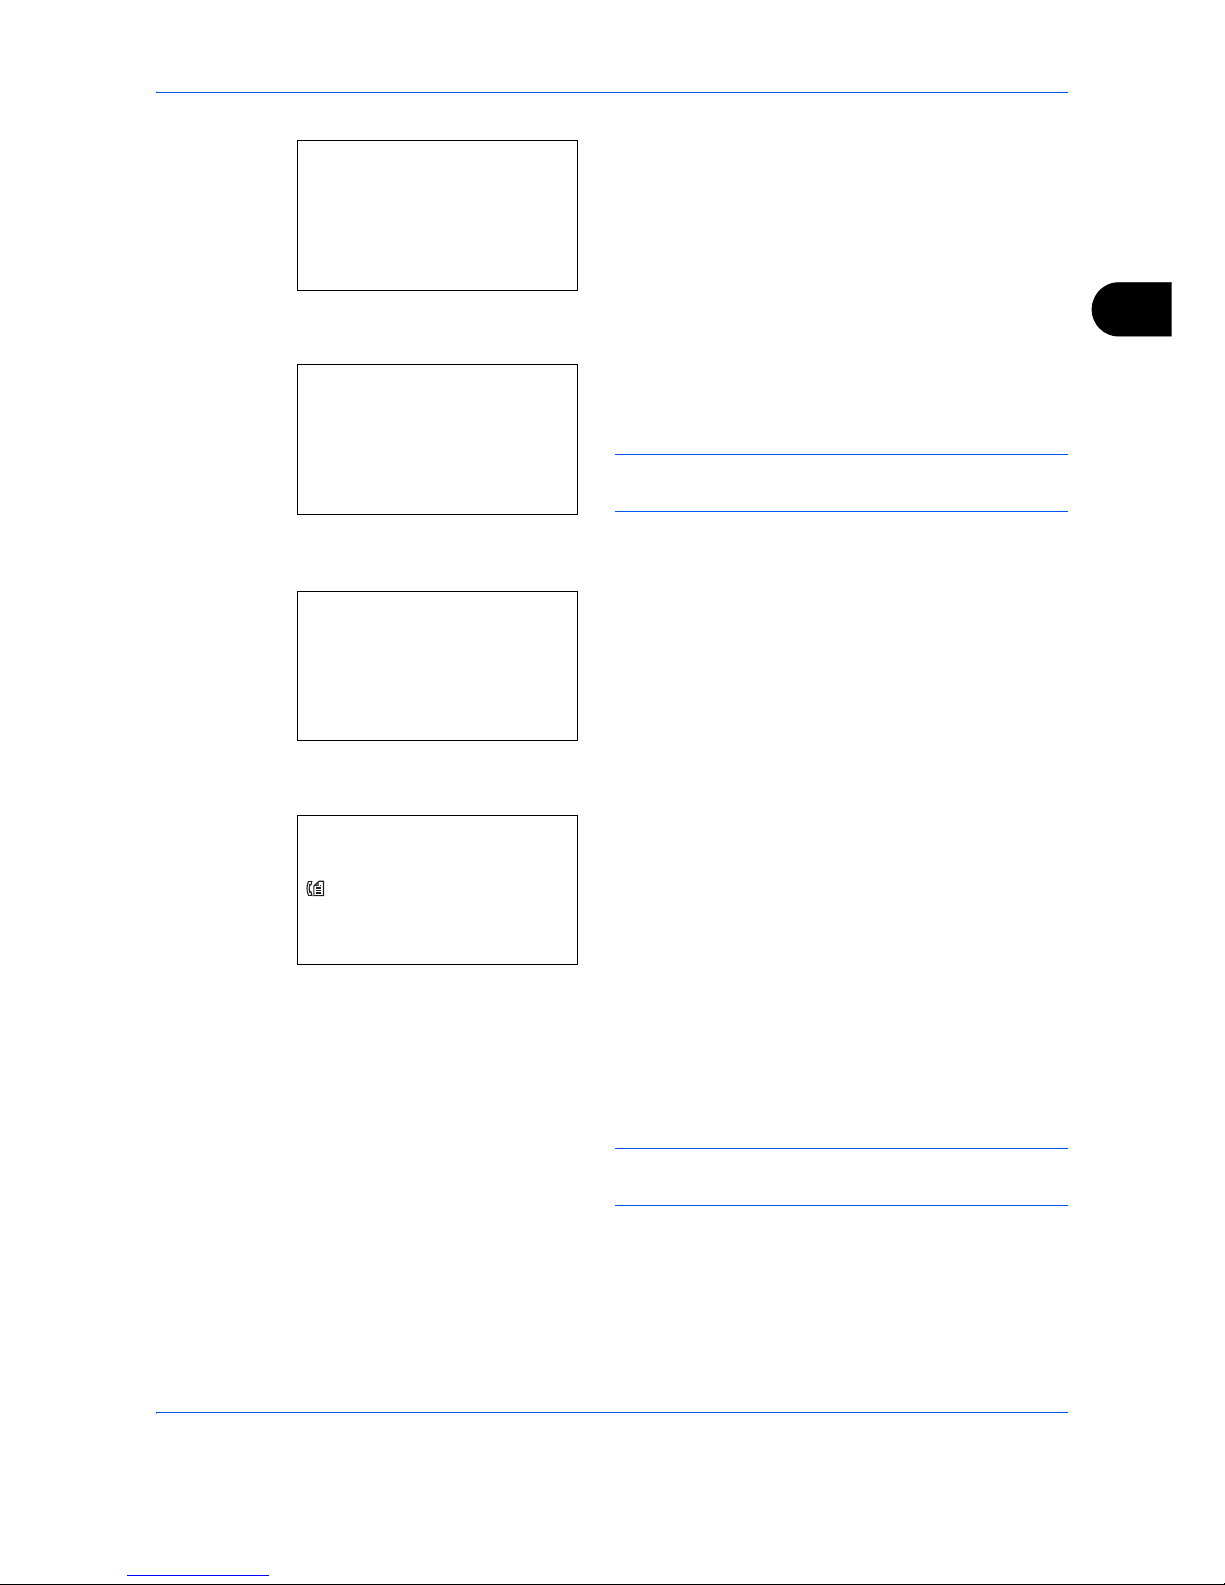
15 Press the or key to select [Group Name].
16 Press [Edit] (the Right Select key).
17 Use the numeric keys to enter the group name to
be displayed in the Address Book. Up to 32
characters can be entered.
NOTE: For details on character entry, refer to
Specifications (Fax function) on Appendix-6.
18 Press the OK key.
19 Press the or key to select [Group Member].
20 Press [Edit] (the Right Select key).
21 Press [Menu] (the Right Select key).
22 Press the or key to select [Add Member].
23 Press the OK key.
24 Press the or key to select the destination
(individual) you want to register to the group.
NOTE: You can search for a destination by
destination name.
25 Press the OK key.
26 Press the or key to select the destination.
27 Press [Menu] (the Right Select key).
Detail:
C
b
Group Name: 1/ 3
[ Edit ]
Group Name:
A
b
GUI Section
*
S
ABC
[ Text ]
Detail:
C
b
Group Member: 2/ 3
30
[ Edit ]
Group Member:
a
b
p
Morgan
Morgan
G
Sally
[ Menu ]
Page 50

FAX Operation (Basic)
3-22
28 Press the or key to select [Select].
29 Press the OK key.
30 To add more destinations, repeat steps 21 to 29.
31 Press the Back key.
32 Use the or key to check if the group was set
correctly.
33 Press the OK key. The group is added to the
Address Book.
Page 51
FAX Operation (Basic)
3-23
3
Selecting a Destination from the Address Book
Select a destination registered in the Address Book.
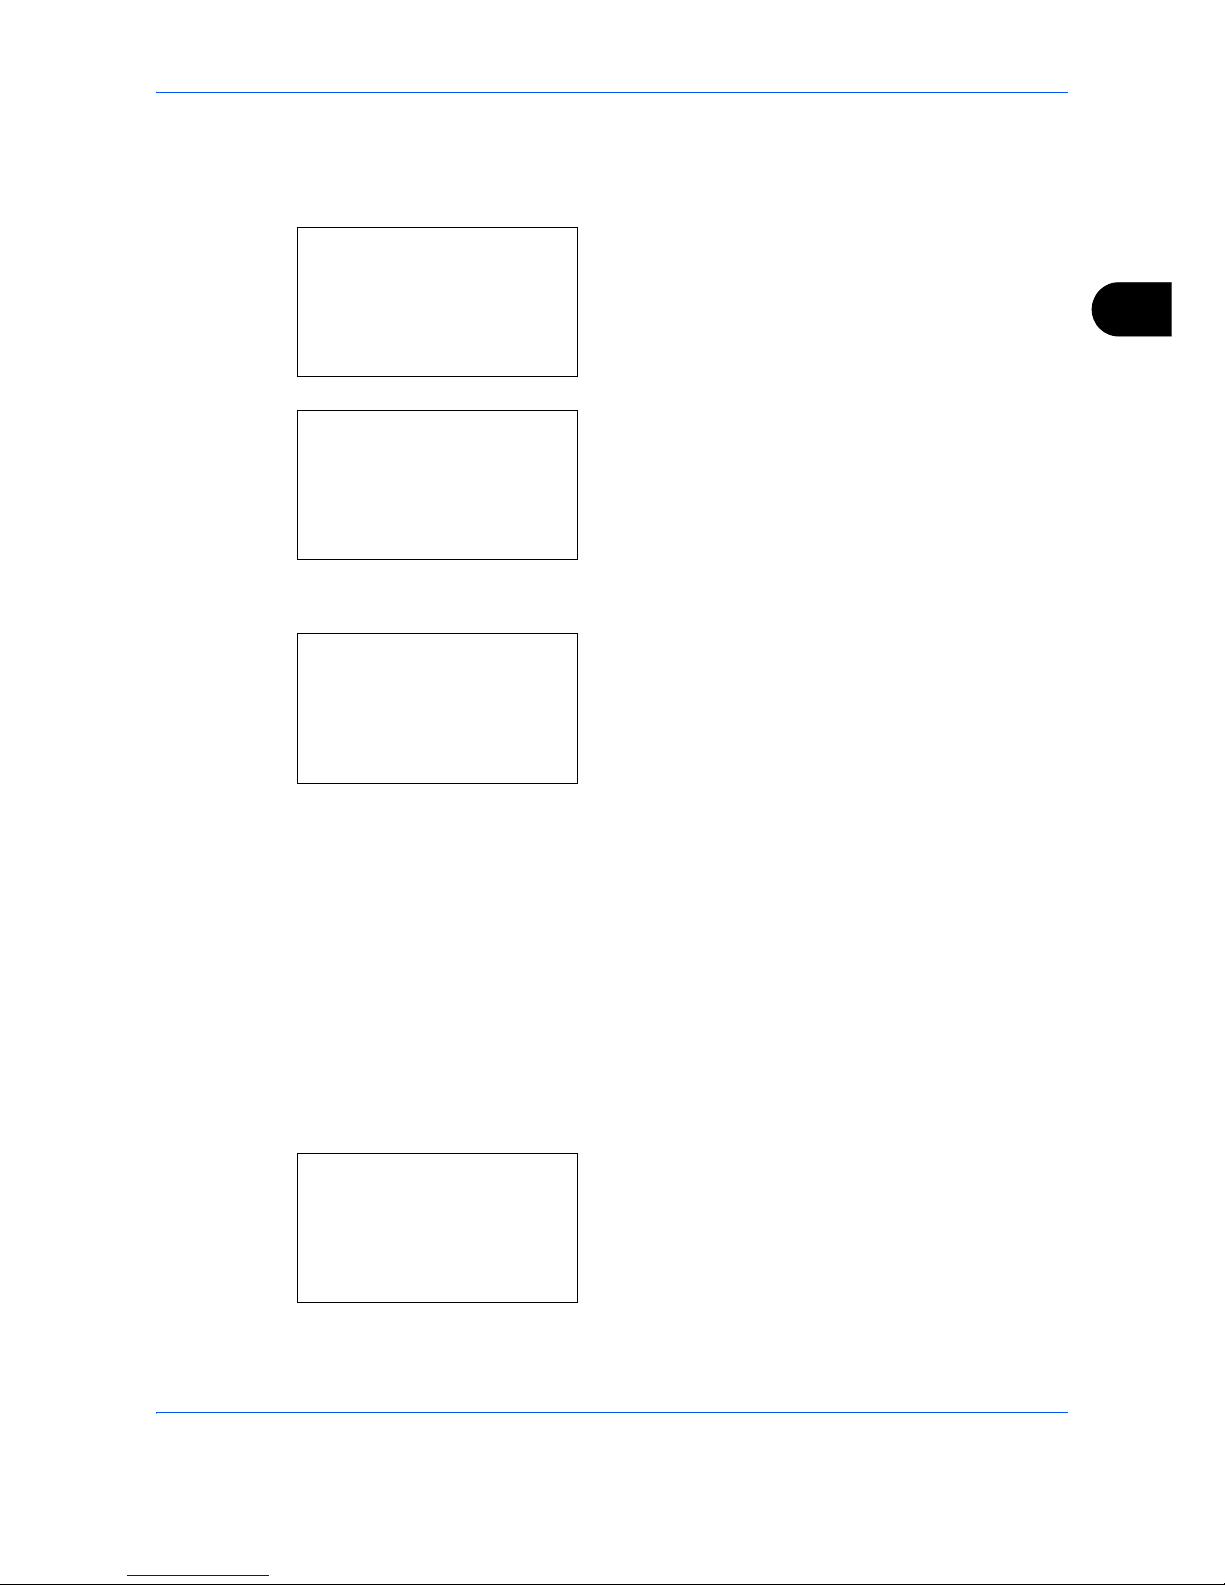
1 In the basic screen for sending, press the Address
Book key.
2 Press the or key to select [Address Book].
3 Press the OK key.
4 Press the or key to select the desired
destination.
5 Press the OK key. The selected destination is
registered in the destination list.
Searching for a Destination
You can search for a destination registered in the Address Book.
1 In the basic screen for sending, press the Address
Book key.
2 Press the or key to select [Address Book].
3 Press the OK key.
4 Press [Menu] (the Right Select key).
5 Press the or key to select [Search(Name)].
6 Press the OK key.
Ready to send.
2010/01/01 12:30
Text+Photo 200x100dpi
[Orig.Img] [FAX Res.]
Select Addr Book:a b
*********************
t
Ext Address Book
[ Exit ]
t
Address Book
Address Book:
a
b
*********************
l
Fiala
l
Maury
[ Menu ]
k
Design
Menu:
a
b
1
Select
2
Detail
*********************
3
Search(Name)
Page 52

FAX Operation (Basic)
3-24
7 Use the numeric keys to enter the destination
name for which you want to search.
NOTE: For details on character entry, refer to
Specifications (Fax function) on Appendix-6.
8 Press the OK key. The search result appears.
Changing/Deleting Registration Contents
You can change or delete the contents of destinations (contact) or groups.
1 Press the System Menu/Counter key.
2 Press the or key to select [Edit Destination].
3 Press the OK key.
4 Press the or key to select [Address Book].
5 Press the OK key.
6 Press the or key to select the destination or
group to edit.
7 Press [Menu] (the Right Select key).
8 When editing the destination of a contact
registration
1 Press the or key to select [Detail/Edit].
2 Press the OK key.
3 Change the contents of the destination. For
details, refer to steps 11 to 39 in Contact
Registration (fax).
When editing a group
1 Press the or key to select [Detail/Edit].
2 Press the OK key.
3 Change the contents of the group. For details,
refer to steps 11 to 18 in Group Registration.
When adding more destinations to the group,
refer to steps 19 to 29 in Group Registration.
Search(Name):
A
b
ma
*
S
ABC
[ Text ]
Address Book:
a
b
*********************
l
Fiala
l
Maury
[ Menu ]
k
Design
Page 53

FAX Operation (Basic)
3-25
3
When deleting the destination of a contact
registration or group
1 Press the or key to select [Delete].
2 Press the OK key.
3 Press [Yes] (the Left Select key). This deletes
the selected destination or group.
9 Press the OK key.
10 Press [Yes] (the Left Select key). The change or
deletion of the registration contents is reflected on
the Address Book.
Printing Address List
You can print the list of destinations registered in the Address Book.
You can sort the list in the order of names or address numbers of the destinations.
1 Press the System Menu/Counter key.
2 Press the or key to select [Edit Destination].
3 Press the OK key.
4 Press the or key to select [Print List].
5 Press the OK key.
6 Press the or key to select [FAX List(Index)] or
[FAX List(No.)].
7 Press the OK key.
8 Press [Yes] (the Left Select key). The list is
printed.
Page 54
FAX Operation (Basic)
3-26
Using One-touch Keys
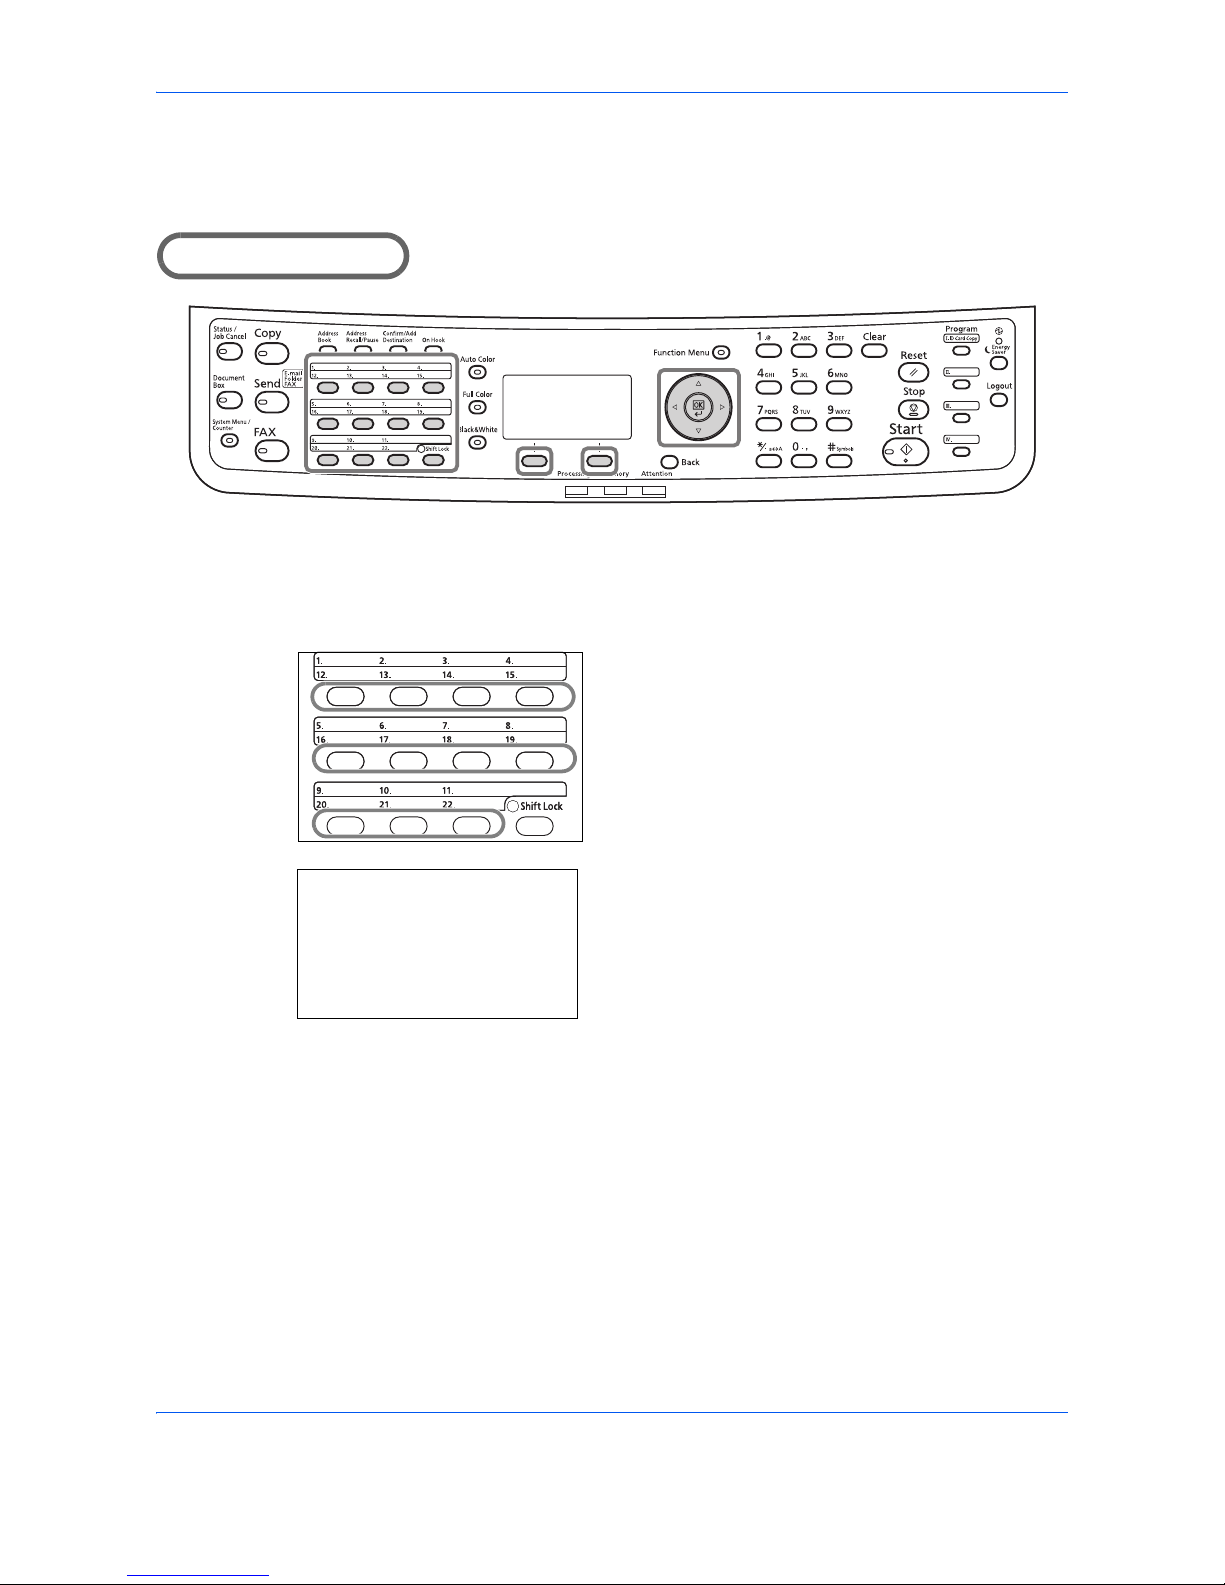
With One-touch keys on the operation panel, you can invoke the Address Book.
Part that is operated
Registering a New One-touch Key
You can register the destination (contact or group) in the Address Book to a One-touch key. Up to 22
destinations can be registered.
1 Press the One-touch key that you want to register
and hold it (2 seconds).
2 Press the or key to select the number to
which you want to register the destination.
Numbers 12 to 22 are the One-touch key numbers
when the Shift Lock key is pressed.
3 Press the OK key.
4 Press the or key to select the destination
(individual or group) you want to register to the
One-touch key from the Address Book.
5 Press the OK key. The destination is added to the
One-touch key.
Select Key No.:
a
b
*********************
2
No. 12
[ Exit ]
1
No. 1
Page 55
FAX Operation (Basic)
3-27
3
Selecting a Destination by One-touch Key
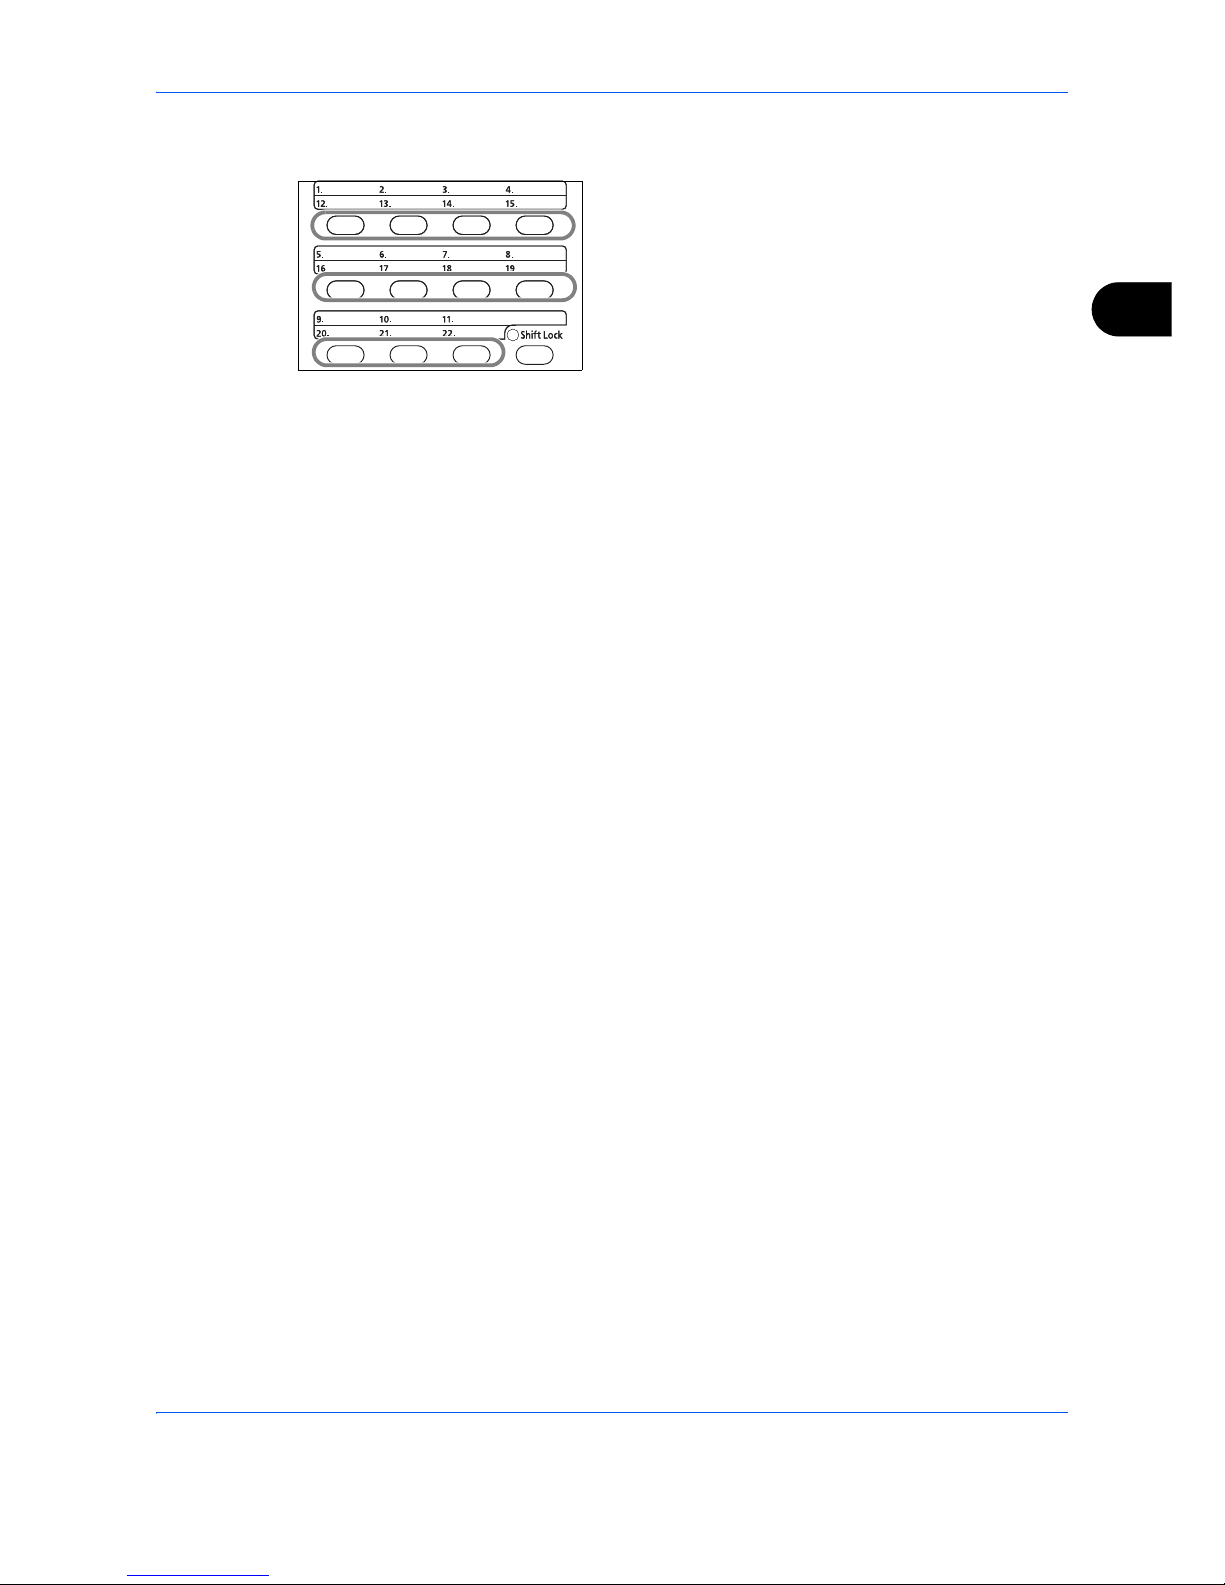
In the destination entry screen, press the One-touch
key where the destination is registered.
When recalling from One-touch keys 12 to 22, press
the Shift Lock key to turn on the lamp next to the keys,
and then press the One-touch key where the
destination is registered.
Page 56
FAX Operation (Basic)
3-28
Changing/Deleting Registration Contents
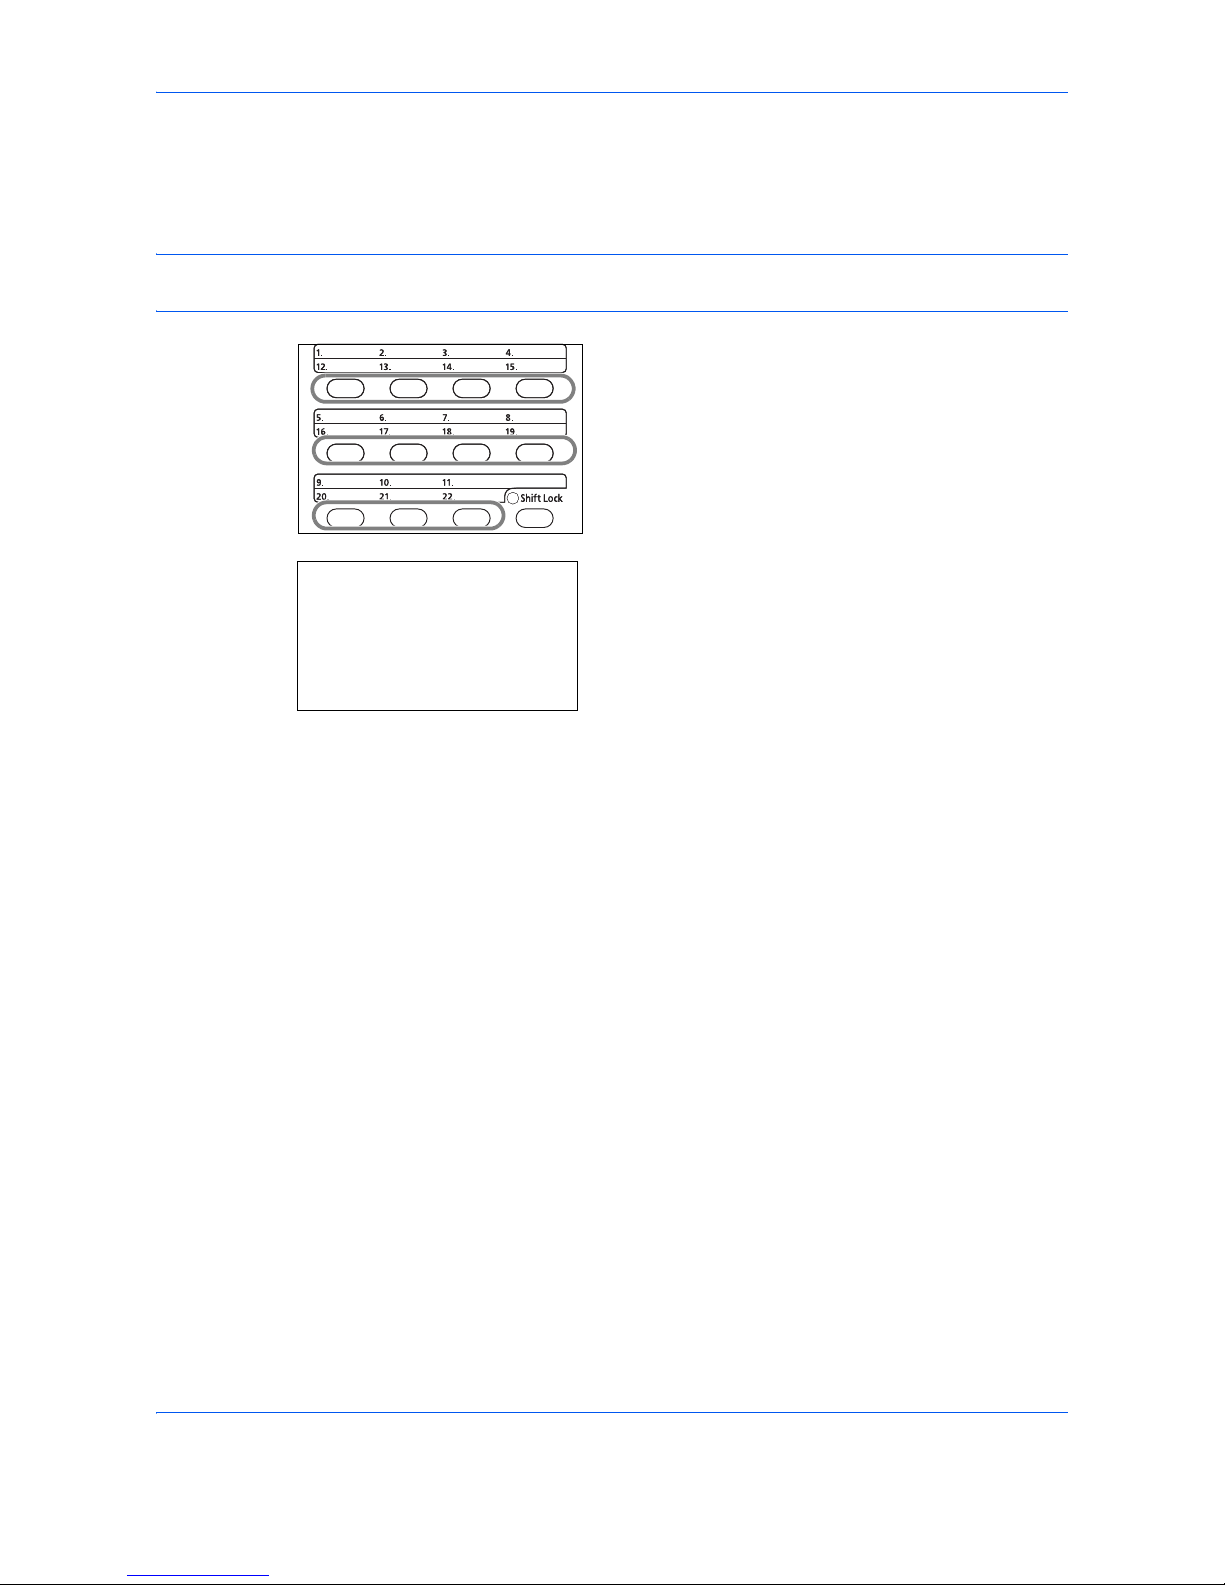
You can change the destination registered to a One-touch key to another destination, or delete the registration
contents of the One-touch key.
NOTE: When changing the destination information in the Address Book, the information registered to the
One-touch key is updated.
1 Press the One-touch key that you want to change
and hold it (2 seconds).
2 Press the or key to select the number you
want to edit.
Numbers 12 to 22 are the One-touch key numbers
when the Shift Lock key is pressed.
3 Press the OK key.
4 When changing the destination to another
destination
1 Press the or key to select [Edit].
2 Press the OK key.
3 Press the or key to select the new
destination (individual or group).
4 Press the OK key.
5 Press [Yes] (the Left Select key). The
destination is registered to the One-touch
key.
When deleting registration contents
1 Press the or key to select [Delete].
2 Press the OK key.
3 Press [Yes] (the Left Select key). This deletes
the content registered to the One-touch key.
5 Press [Exit] (the Right Select key).
Select Key No.:
a
b
*********************
2
No. 12
[ Exit ]
1
No. 1
Page 57
FAX Operation (Basic)
3-29
3
Dialing the Same Receiving System (Redial)
Redial is a function allowing you to dial the last entered number once again.
Automatic Redial
This function automatically redials a receiving system that does not respond when you try to send fax.
No particular setting is required for automatic redial. Because the machine redials repeatedly at a regular
interval, you do not need to worry even when the communication by the receiving system is prolonged.
NOTE: When using direct transmission, the machine does not automatically redial.
You can change the number of automatic redials from between 0 and 14. For details, refer to Retry Times on
page 6-13.
You cannot send delayed transmission immediately while the machine is waiting for redial.
Manual Redial (Recall)
Use this when the receiving system does not respond when you have tried to send a fax. When you want to
send the fax to the same receiving system, press the Address Recall/Pause key, and you can call the receiving
system you dialed on the destination list.
1 Press the Address Recall/Pause key. The
receiving system you dialed is displayed on the
destination list.
NOTE: When the last transmission included multi-
address transmissions and computers and e-mail
destinations, they are also displayed. If necessary, add
or delete the receiving system.
2 Press the Start key. The transmission will start.
NOTE: When On is selected in Destination Check
before Send, a destination confirmation screen is
displayed when you press the Start key. For details,
refer to Confirmation Screen of Destinations on
page 5-13.
Recall information is canceled in the following
conditions.
• When you turn the power off
• When you send a next fax (new recall information is
registered)
• When you log out
Ready to send.
Dest.: 1
:0987654321
Text+Photo 200x100dpi
[Orig.Img] [FAX Res.]
Page 58

FAX Operation (Basic)
3-30
Page 59

4-1
4 FAX Operation (Advanced)
This chapter explains the method to effectively use FAX.
• Delayed Transmission ................................................................................................. 4-2
• Broadcast Transmission .............................................................................................. 4-4
• Standby Transmission ................................................................................................. 4-6
• Interrupt Send.............................................................................................................. 4-7
• Chain Dial.................................................................................................................... 4-8
• Manual Send ............................................................................................................. 4-10
• Manual Reception.......................................................................................................4-11
• Remote Switch Function............................................................................................ 4-13
• Printing/Forwarding Received Documents (Memory Forwarding)............................. 4-15
• Sub Address Communication.................................................................................... 4-29
• Sub Address Box Function........................................................................................ 4-32
• Program Dial.............................................................................................................. 4-38
• Polling Communication.............................................................................................. 4-40
• Account Management................................................................................................ 4-48
• Other Convenient Functions...................................................................................... 4-52
Page 60

FAX Operation (Advanced)
4-2
Delayed Transmission
When you have set a transmission start time, this function automatically sends originals at the preset time. You
can use delayed transmission together with the broadcast transmission function, etc.
The method for sending originals to one destination after setting the start time is explained here.
IMPORTANT: If the current time is incorrect, the communication cannot be performed correctly at the specified
time. If the indicated current time is incorrect, adjust the time correctly. In this case, adjust the time. For details,
refer to Date and Time Entry on page 2-6.
NOTE: You cannot select direct transmission.
Set the time from between 00:00 and 23:59 in one-minute increments.
Together with standby transmission and interrupt send, you can set up to 30 destinations for delayed transmission.
When two or more delayed transmissions are set for the same time, the communication will start in the order
that the delayed transmissions have been set. When delayed transmissions have been set in reverse order,
however, sending of originals to be sent to the same destination is prioritized over the ones to be sent to different
destinations.
You can cancel a delayed transmission any time before the specified transmission time. You can also send a
delayed transmission before the specified time. (Refer to Cancelling and Sending Delayed Transmissions
(Queued) on page 3-13.)
You can change destinations of a delayed transmission any time before the specified transmission time. (Refer
to Checking Scheduled Job on page 4-3.)
Batch Transmission Function
When fax originals to be sent to the same destination are set to the same transmission start time with delayed
transmission, you can send up to 10 groups of originals using batch transmission. This function prevents
repeated communication to the same destination and reduces the communication cost.
NOTE: You cannot send originals as a batch transmission in the case of direct transmission.
You cannot select destinations using a combination of direct entry and One-touch keys.
In the case of broadcast transmission, when you have set two or more groups of originals to the same
transmission start time, and each group includes the same receiving system fax number, you cannot send the
originals as a batch transmission.
When the transmission start time has come, and there are fax originals waiting for redial to the same receiving
system, the waiting originals are also sent together as a batch transmission.
When job accounting is ON, only the originals with the same account ID set using delayed transmission are sent
as a batch transmission.
1 Press the FAX key.
2 Place the originals.
3 Press the Function Menu key.
4 Press the or key to select [FAX Delayed TX].
5 Press the OK key.
6 Press the or key to select [On].
Page 61
FAX Operation (Advanced)
4-3
4
7 Press the OK key.
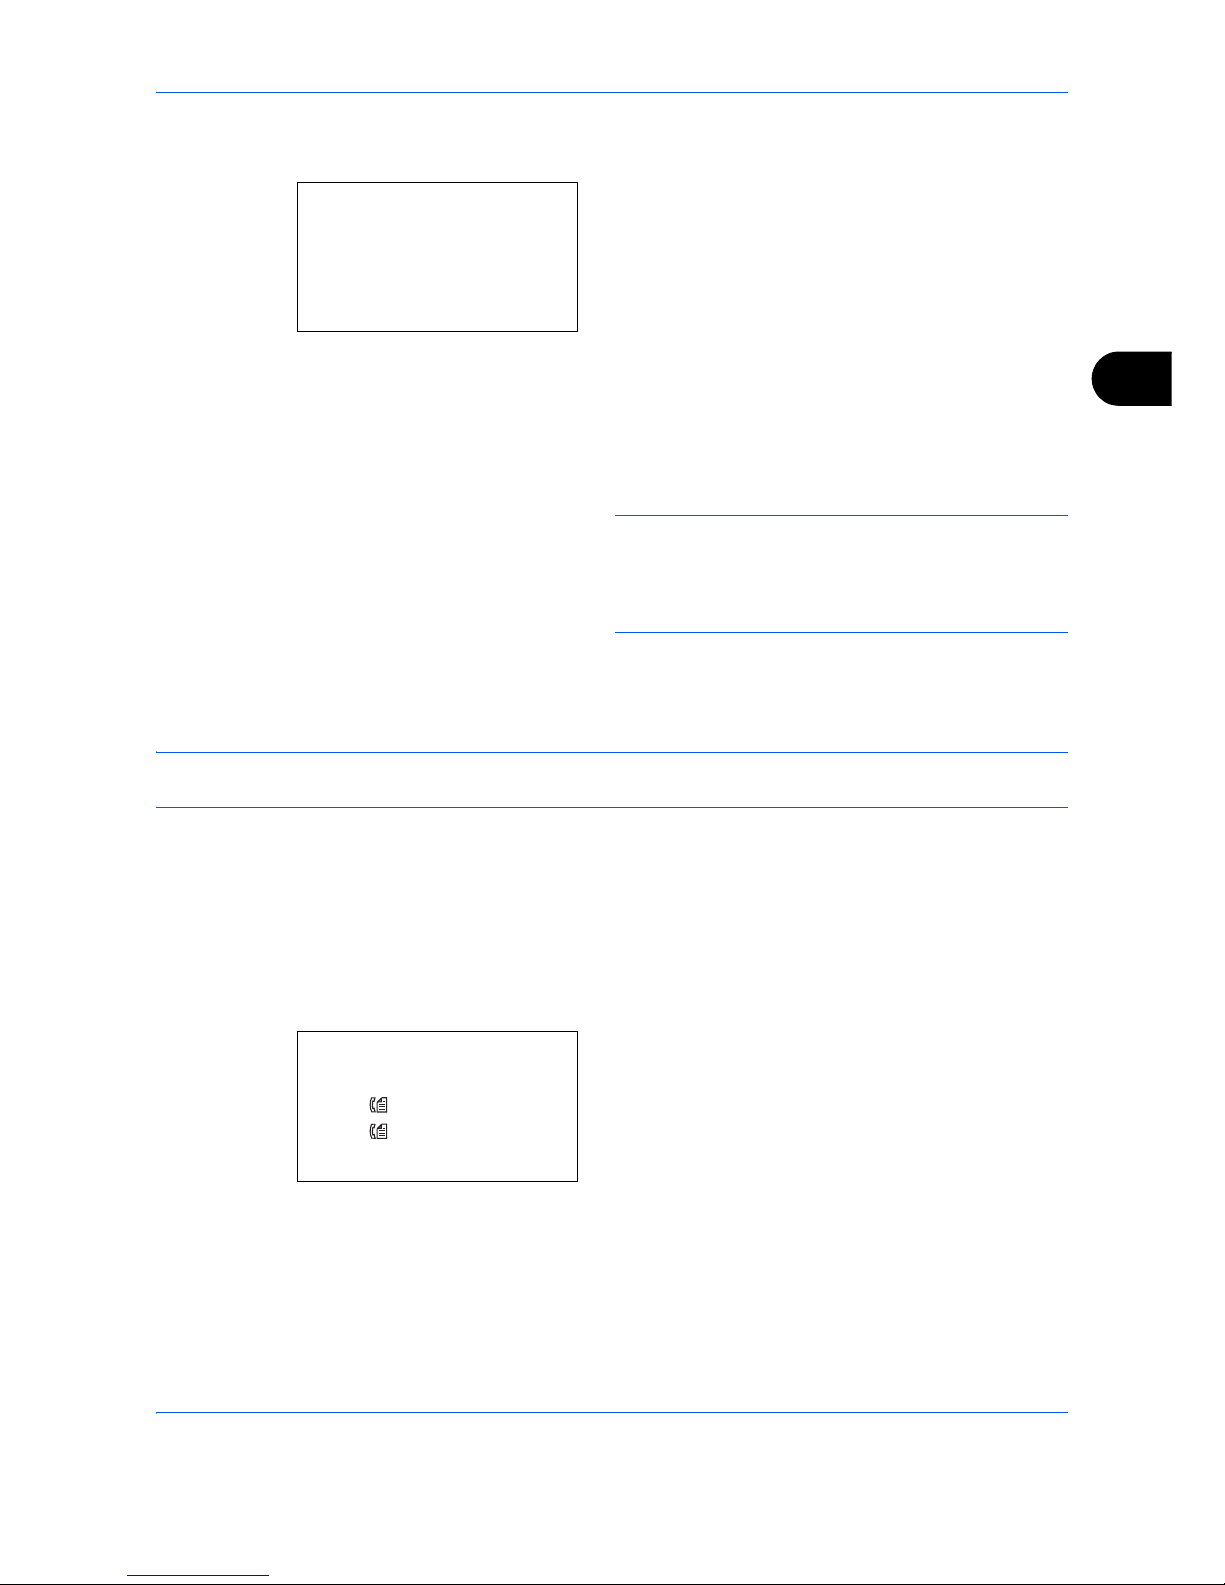
8 Press the or key to move the cursor position,
and enter hours and minutes.
9 Press the OK key.
10 Set the destination, and press the Start key.
Originals are scanned, and transmission begins at
the preset time.
NOTE: When On is selected in Destination Check
before Send, a destination confirmation screen is
displayed when you press the Start key. For details,
refer to Confirmation Screen of Destinations on
page 5-13.
Checking Scheduled Job
You can check the details of a scheduled job.
NOTE: For cancelling memory transmission or sending a scheduled job immediately, refer to Cancelling and
Sending Delayed Transmissions (Queued) on page 3-13.
1 Press the Status/Job Cancel key.
2 Press the or key to select [Scheduled Job].
3 Press the OK key.
4 Press the or key to select the job you want to
check.
5 Press [Menu] (the Right Select key).
6 Press the or key to select [Detail].
7 Press the OK key.
8
Press the or key to check the details of the job.
9 Press the OK key.
Start Time:
a
b
Hour Min.
***11*:
45
(Current Time 11:45)
Scheduled Job:
a
b
*********************
0017 0324256345
0018 0756545865
[ Cancel ] [ Menu ]
0011 Broadcast
Page 62

FAX Operation (Advanced)
4-4
Broadcast Transmission
This function allows you to send the same originals to several destinations in one operation. The machine stores
(memorizes) originals to send in memory temporarily, and automatically repeats dialing and transmission to the
set destination afterwards.
NOTE: You can send originals to up to 100 destinations in one operation.
You can use this function together with sub address communication and delayed transmission.
When direct transmission has been selected, it changes to memory transmission at the time of transmission.
In addition to fax, you can include e-mail transmission and/or folder (SMB/FTP) transmission in a single
transmission job (Multi Sending). Press the Send key to select the destinations. For details, refer to Sending in
the Operation Guide for the machine.
1 Press the FAX key.
2 Place the originals.
3 Select the destination.
Enter the fax number
1 Use the numeric keys to enter the fax number.
NOTE: When On is selected in Entry Check for
New Destination, a confirmation screen is
displayed for the entered FAX number. Re-enter
the same FAX number and press the OK key. For
details, refer to Destination confirmation screen
before transmission in the Operation Guide for the
machine.
2 Press the OK key. You can enter the next fax
number.
Select the destination from the Address Book
1 Press the Address Book key.
2 Press the or key to select [Address
Book].
3 Press the or key to select the desired
destination.
4 Press the OK key. You can select the
destination by pressing the Address Book
key.
Select the destination from the One-touch keys
Press all the One-touch keys to which necessary
destinations are registered.
Page 63

FAX Operation (Advanced)
4-5
4
NOTE: For details of the Address Book, refer to Using
the Address Book on page 3-15. For details of One-
touch keys, refer to Using One-touch Keys on page 3-
26.
You can select destinations using a combination of
direct entry, the Address Book and One-touch keys.
4 After selecting all the destinations, press the Start
key. Transmission begins.
NOTE: When On is selected in Destination Check
before Send, a destination confirmation screen is
displayed when you press the Start key. For details,
refer to Confirmation Screen of Destinations on
page 5-13.
Page 64

FAX Operation (Advanced)
4-6
Standby Transmission
During a communication, you can scan originals and schedule a next transmission. When the first
communication is completed, the machine automatically starts the scheduled next transmission. When using
standby transmission, you do not need to wait when a communication has prolonged due to broadcast
transmission.
NOTE: For the transmission method, use memory transmission. To select memory transmission, refer to
Selection of Transmission Method on page 3-2.
You can use other functions such as broadcast transmission.
Together with delayed transmission, up to 30 transmissions can be scheduled.
1 Press the FAX key.
2 Place the originals.
3 Select the destination, and set transmitting
functions if you want to use any.
4 Press the Start key. Scanning of the originals
starts, and the next transmission is scheduled.
NOTE: When On is selected in Destination Check
before Send, a destination confirmation screen is
displayed when you press the Start key. For details,
refer to Confirmation Screen of Destinations on
page 5-13.
5 When the communication is completed, the
scheduled transmission will begin.
Page 65

FAX Operation (Advanced)
4-7
4
Interrupt Send
During communication, when you scan originals by selecting direct transmission, you can use interrupt send.
Even when the communication is prolonged due to broadcast transmission or a next transmission being
scheduled, the machine will first send originals for which interrupt send has been set.
NOTE: When the number of standby transmissions and delayed transmissions has already reached 30, you
cannot use interrupt send.
Depending on the timing of the interruption, you may not be able to interrupt transmission immediately.
1 Press the FAX key.
2 Load the originals to be sent using Interrupt Send.
3 Press the Function Menu key.
4 Press the or key to select [FAX Direct TX].
5 Press the OK key.
6 Press the or key to select [On].
7 Press the OK key.
8 Set the destination, and press the Start key. The
panel display will switch to the standby screen, and
the transmission will start when transmission
becomes possible.
NOTE: When On is selected in Destination Check
before Send, a destination confirmation screen is
displayed when you press the Start key. For details,
refer to Confirmation Screen of Destinations on
page 5-13.
For operation of direct transmission, refer to Selection
of Transmission Method on page 3-2.
To cancel transmission while waiting for interrupt send,
press the Stop key on the operation panel. For details,
refer to Cancelling Communication on page 3-12.
9 When the interrupt send is completed, the
canceled communication and standby
transmission will automatically resume.
Page 66

FAX Operation (Advanced)
4-8
Chain Dial
Chain dial is a function that allows you to dial by linking fax numbers of the receiving systems with a chain
number created with a number common to several destinations. By setting a toll free number and an area code
to a chain number, you do not need to enter such numbers for each transmission.
NOTE: You can use the chain number at the head of the fax number of the receiving system.
As an example, when using ‘212’ as the chain number
1 Press the FAX key.
2 Place the originals.
3 Enter ’212’ using the numeric keys.
4 Press [Chain] (the Left Select key).
5 Enter the fax number to connect to the chain
number.
Use the numeric keys to enter a fax number
1 ’212’ is already entered, and then enter the
fax number.
NOTE: When On is selected in Entry Check for
New Destination, a confirmation screen is
displayed for the entered FAX number. Re-enter
the same FAX number and press the OK key. For
details, refer to Destination confirmation screen
before transmission in the Operation Guide for the
machine.
2 After entering all the destinations, press the
OK key.
Select fax number from the Address Book
1 Press the Address Book key.
2 Press the or key to select [Address
Book], and press the OK key.
Fax No. Entry:
A
b
212
*
[ Chain ] [ Detail ]
Page 67

FAX Operation (Advanced)
4-9
4
NOTE: If extended address book is not
registered, Address Book Selection screen is not
displayed. The list of destinations appears.
3 Press the or key to select the desired
destination.
4 Press the OK key. ’212’ is automatically
added to the destination.
Select fax number from One-touch key
Select the destination from One-touch keys. The
chain number ‘212’ is automatically added to the
destinations.
6 Press the Start key. Transmission begins.
NOTE: When On is selected in Destination Check
before Send, a destination confirmation screen is
displayed when you press the Start key. For details,
refer to Confirmation Screen of Destinations on
page 5-13.
Page 68

FAX Operation (Advanced)
4-10
Manual Send
This method allows you to send originals by pressing the Start key after confirming that the telephone line has
connected to the receiving system. Connecting a telephone set (commercially available product) to this machine
enables you to talk with the person at the receiving system before sending originals.
Using after Confirming the Connection to the Receiving System
You can send originals after confirming that the telephone line has connected to the receiving system.
1 Press the FAX key.
2 Set the originals.
3 Press the On Hook key.
4 Use the numeric keys to enter the number of the
receiving system.
NOTE: To cancel the operation, press On Hook key
or Reset key.
5 When you hear the fax tone, the telephone line has
connected to the receiving system. Press the Start
key. Transmission begins.
Using a Telephone to Send
When you want to talk to the person at the receiving system or the receiving system needs to switch to fax, use
this method to send originals.
1 Set the originals.
2 Lift the handset, and dial the number of the
receiving system.
3 Check if the telephone line has connected to the
fax of the receiving system.
When you hear the fax tone
The receiving system is on fax.
1 Press the FAX key.
2 Press the On Hook key.
3 Press the Start key. Transmission begins.
When you hear a voice from the receiving
system
The telephone line has connected to the telephone
of the receiving system. When the conversation is
over, follow steps 1 to 3 above.
4 When sending starts (when the Processing
indicator on the operation panel starts blinking),
return the handset to its original position.
Page 69
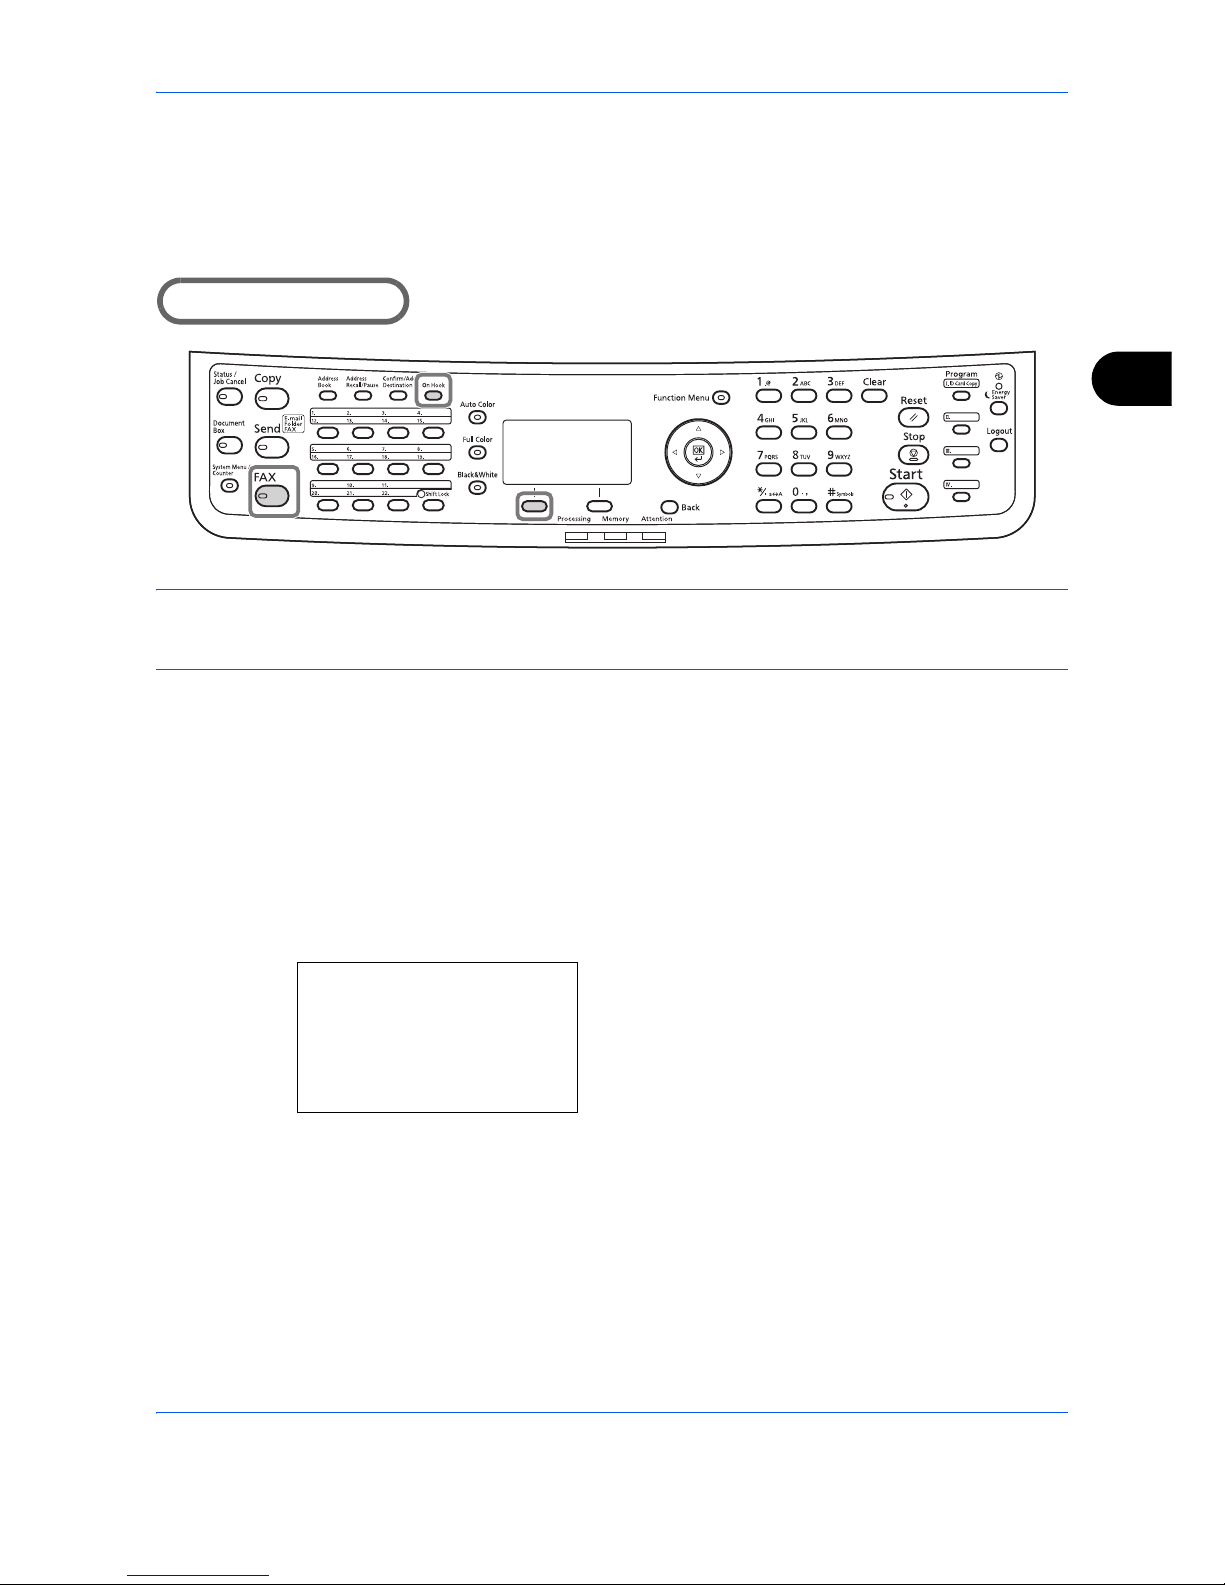
FAX Operation (Advanced)
4-11
4
Manual Reception
This method allows you to receive faxes by operating this machine after confirming that the telephone line has
connected to the sending system. Connecting a telephone set (commercially available product) to this machine
enables you to receive originals after talking to the person at the sending system.
Part that is operated
NOTE: FAX Automatic Reception has been preset for the receiving mode of this machine. To use Manual
Reception, you need to change the receiving mode to Manual Reception. To change to manual mode, refer to
Receiving Mode on page 6-17.
Receiving after Confirming Connection to the Sending System
You can receive originals after confirming by sound that the telephone line has connected to the sending
system.
1 When there is an incoming call, the machine
makes a ringing tone.
2 Press the FAX key.
3 Press the On Hook key.
4 Press [ManualRX] (the Left Select key).
5 After the sending side has started transmission,
the machine starts receiving the originals.
Using the Telephone to Receive
Use this method when you want to receive originals after talking to the person at the sending system.
1 When there is an incoming call, the telephone
connected to the machine makes a ringing tone.
On Hook:
*
[Manual RX]
Page 70

FAX Operation (Advanced)
4-12
2 Lift the handset of the telephone.
3 Check if the telephone line has connected to the
fax of the sending system.
When you hear the fax tone
The sending system is on fax.
1 Press the Status/Job Cancel key.
2 Press the On Hook key.
3 Press [ManualRX] (the Left Select key).
Reception will start.
NOTE: When using a telephone set that can
send tone signals, use the telephone to start the
reception of originals with the remote switch
function. (Refer to Remote Switch Function on
page 4-13.)
When you hear a voice from the receiving
system
The telephone line has connected to the telephone
of the sending system. When the conversation is
over, follow steps 1 to 2 above.
After the sending system has started transmission,
the machine starts receiving originals.
4 When reception starts (when the Processing
indicator on the operation panel starts blinking),
return the handset to its original position.
On Hook:
*
[Manual RX]
Page 71

FAX Operation (Advanced)
4-13
4
Remote Switch Function
You can start fax reception by operation from the connected telephone set. This function is convenient for using
this machine and a telephone set (commercially available product) in combination installed at places distant
from each other.
To start fax reception by operation from the connected telephone set, use the following operation.
NOTE: In order to use remote switch, it is necessary to connect the tone signal-sending telephone set
(commercially available product) to the machine. However, even if it is a tone signal-sending telephone set,
this function may not be used satisfactorily depending on the type of telephone set. For details, contact our
agent or the store where you purchased this machine.
How to Register Remote Switch Dial
Remote switch dial is set to 55 at the factory, but you can change the dial number.
1 Press the System Menu/Counter key.
2 Press the or key to select [FAX].
3 Press the OK key.
4 Press the or key to select [Reception].
5 Press the OK key.
6 Press the or key to select [Remote SW Dial].
7 Press the OK key.
8 Use the numeric keys to enter the number to be
newly registered (00 to 99).
9 Press the OK key.
Page 72
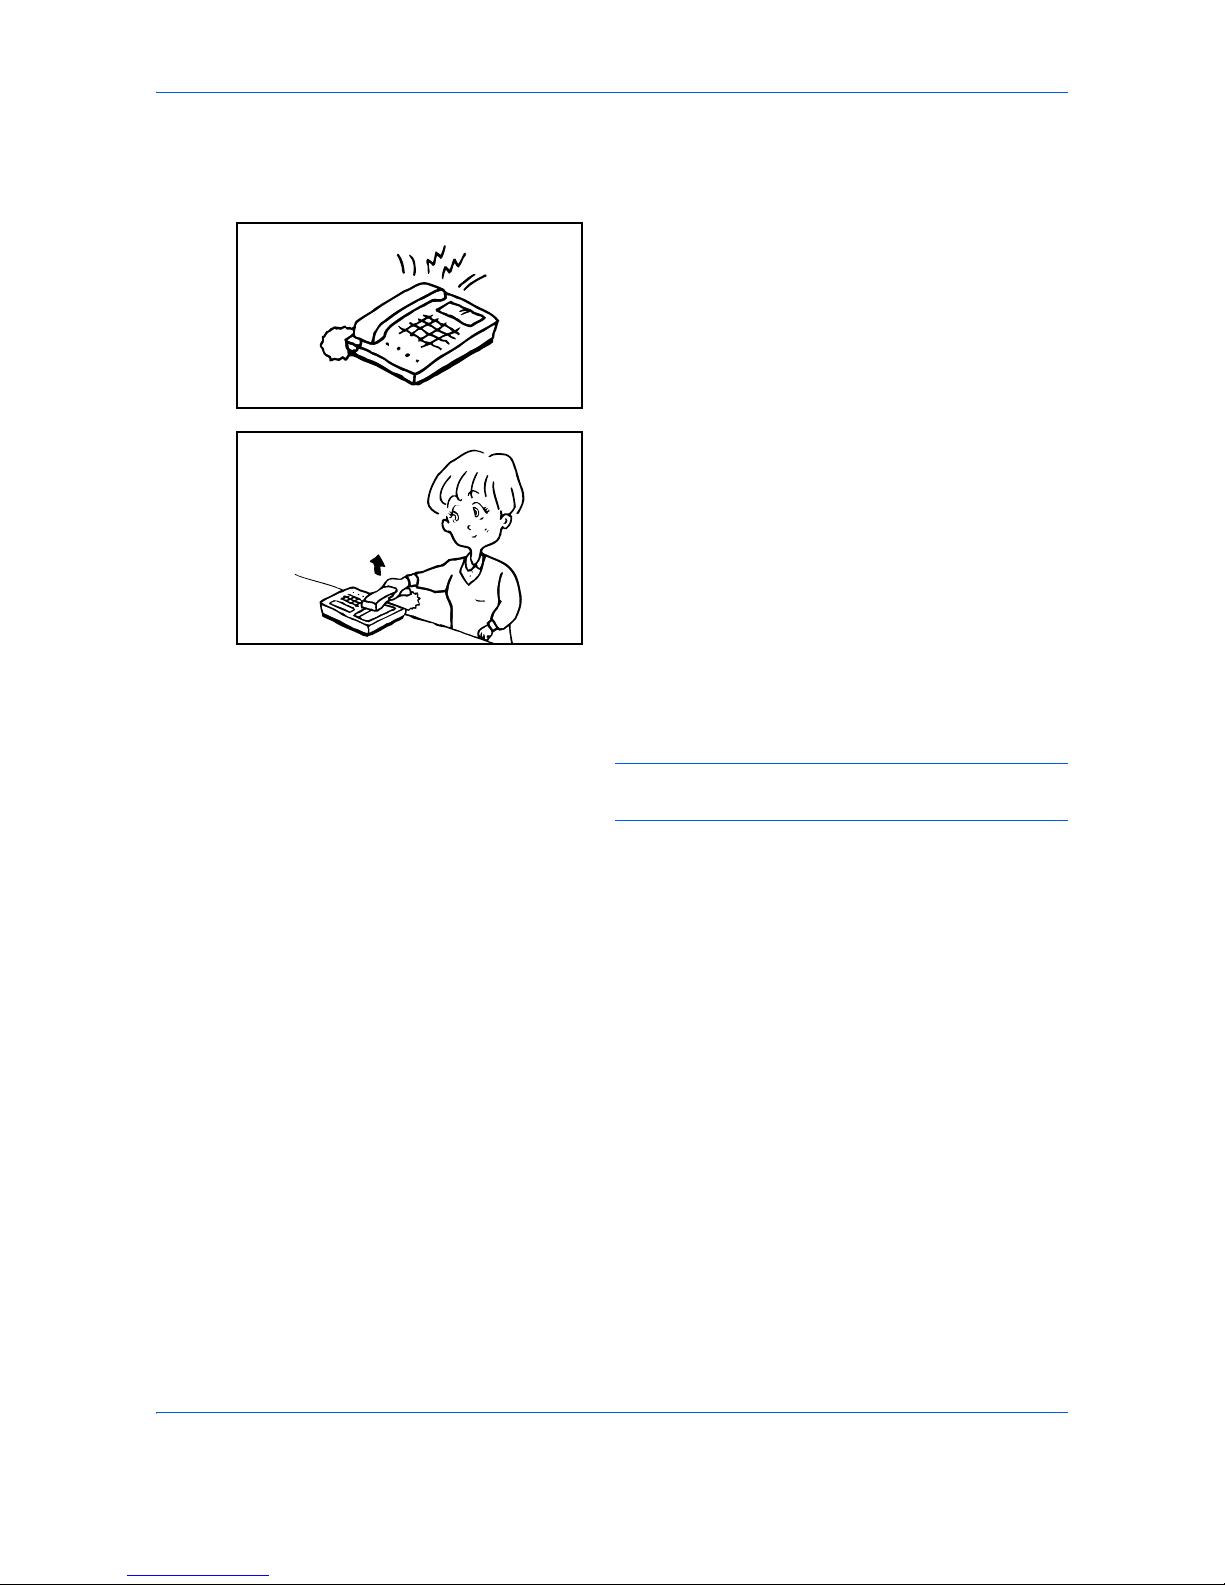
FAX Operation (Advanced)
4-14
Using the Remote Switch Dial
To start fax reception by operation from the connected telephone set, use the following operation.
1 The connected telephone set makes a ringing
tone.
2 Lift the handset of the telephone.
3 When you hear the fax tone from the handset,
enter the two-digit remote switch dial number using
the dial button on the telephone set.
NOTE: The remote switch dial is set to 55 at the
factory.
4 The telephone line switches to the machine, and
reception starts.
Page 73
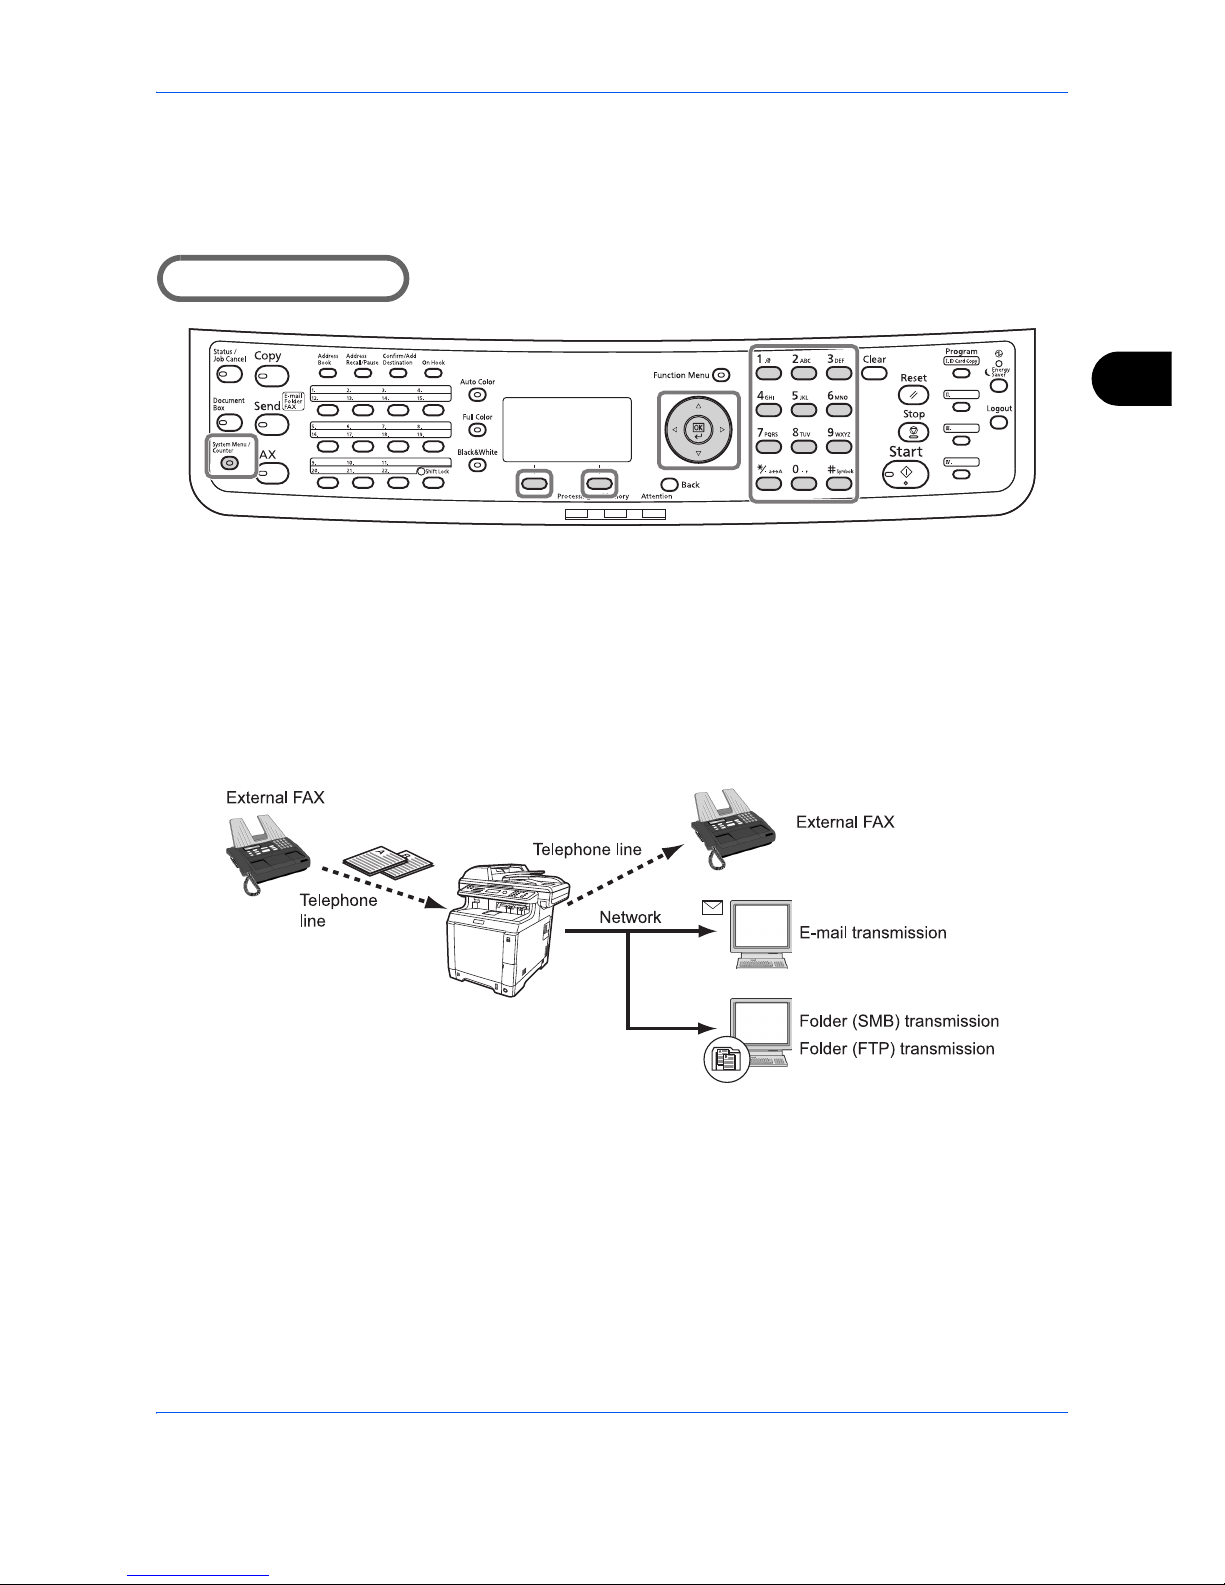
FAX Operation (Advanced)
4-15
4
Printing/Forwarding Received Documents (Memory Forwarding)
When you have received a fax, you can forward the received image to other fax machines and computers, or
print the image.
Part that is operated
Type of Forwarding Destination and Forwarding Requirements
Only one forwarding destination can be specified. When forwarding is set to [On], all received documents will
be forwarded to the specified destination.
Type of Forwarding Destination
You can forward the document to other fax machines or Sub Address Boxes, or for e-mail transmission or folder
(SMB or FTP) transmission.
Setting Forwarding
Use the procedure below to set forwarding.
1 Press the System Menu/Counter key.
2 Press the or key to select [FAX].
3 Press the OK key.
4 Press the or key to select [Reception].
Page 74
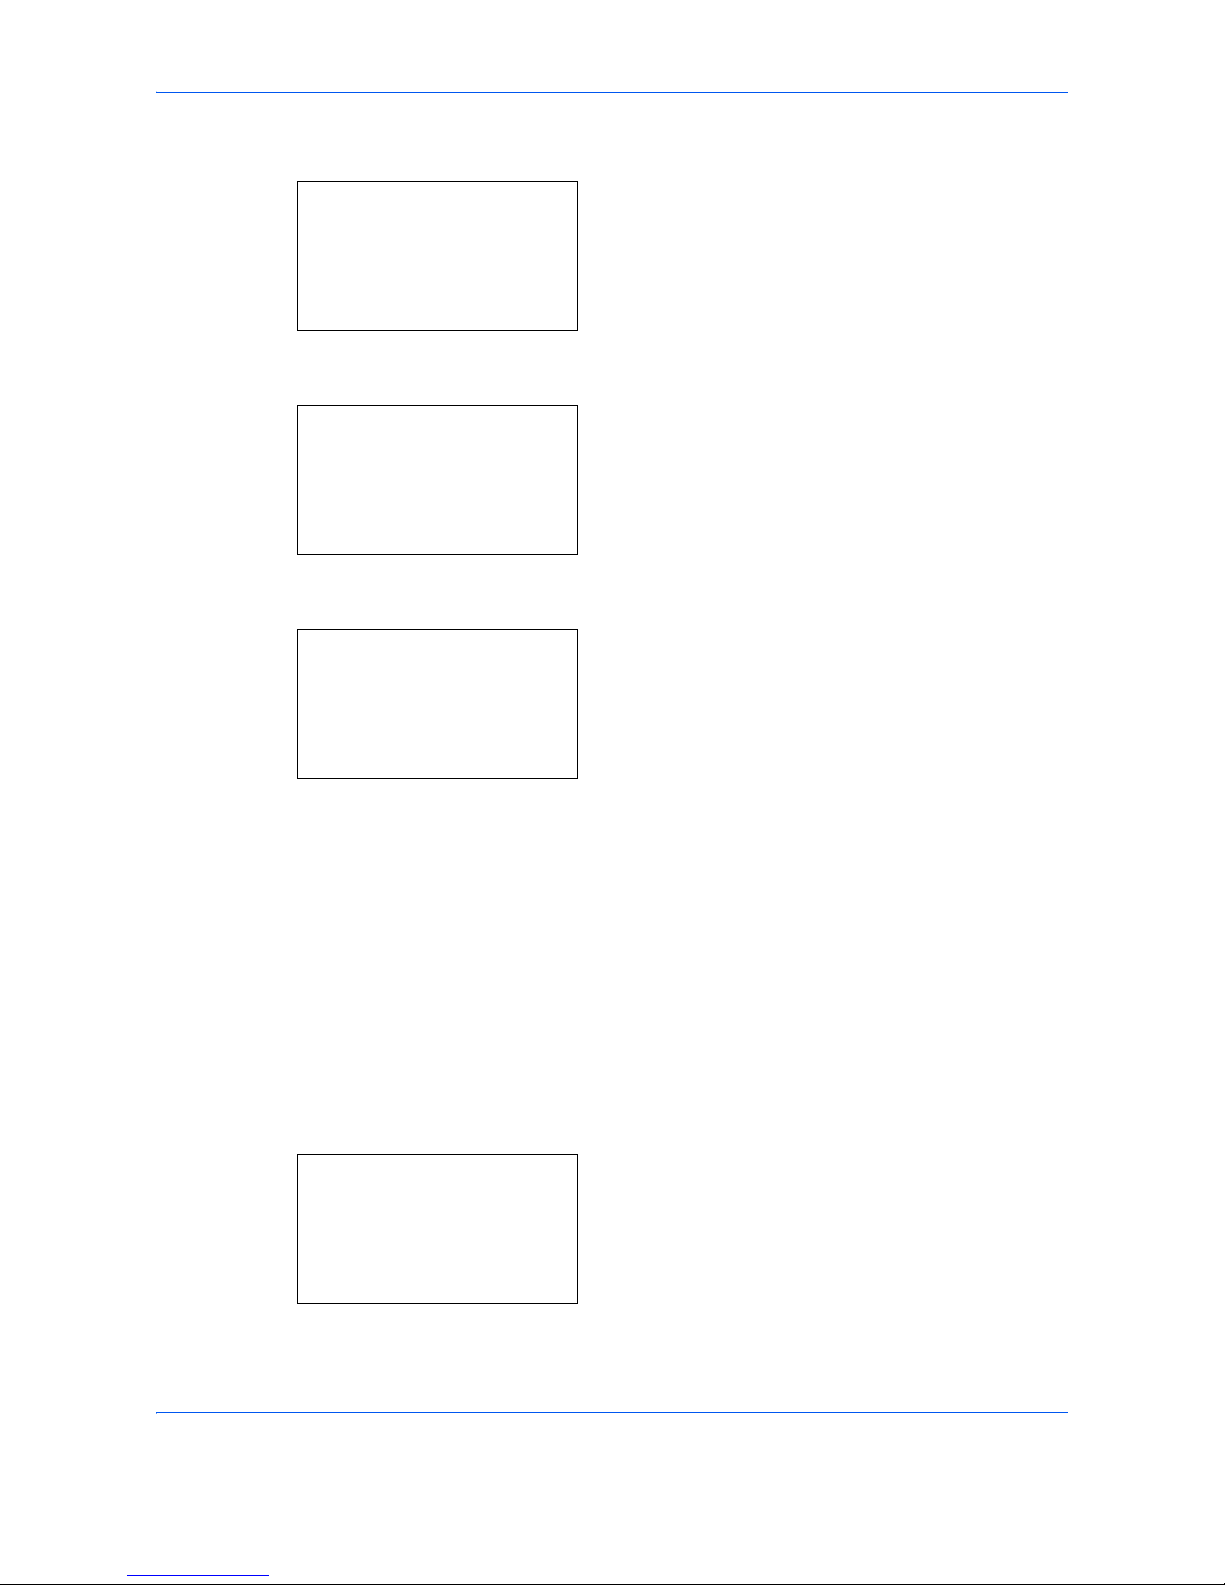
FAX Operation (Advanced)
4-16
5 Press the OK key.
6 Press the or key to select [Forward Settings].
7 Press the OK key.
8 Press the or key to select [Forwarding].
9 Press the OK key.
10 Press the or key to select [On] or [Off].
11 Press the OK key.
Registering Forwarding Destination
Use the procedure below to register a forwarding destination.
1 Press the System Menu/Counter key.
2 Press the or key to select [FAX].
3 Press the OK key.
4 Press the or key to select [Reception].
5 Press the OK key.
6 Press the or key to select [Forward Settings].
7 Press the OK key.
Reception:
a
b
3
Rings(TAD)
4
Rings(FAX/TEL)
*********************
[ Exit ]
5
Forward Settings
Forward Settings:a b
*********************
2
Forward Dest.
3
File Format
1
Forwarding
Forwarding:
a
b
*********************
2
On
1
*Off
Reception:
a
b
3
Rings(TAD)
4
Rings(FAX/TEL)
*********************
[ Exit ]
5
Forward Settings
Page 75
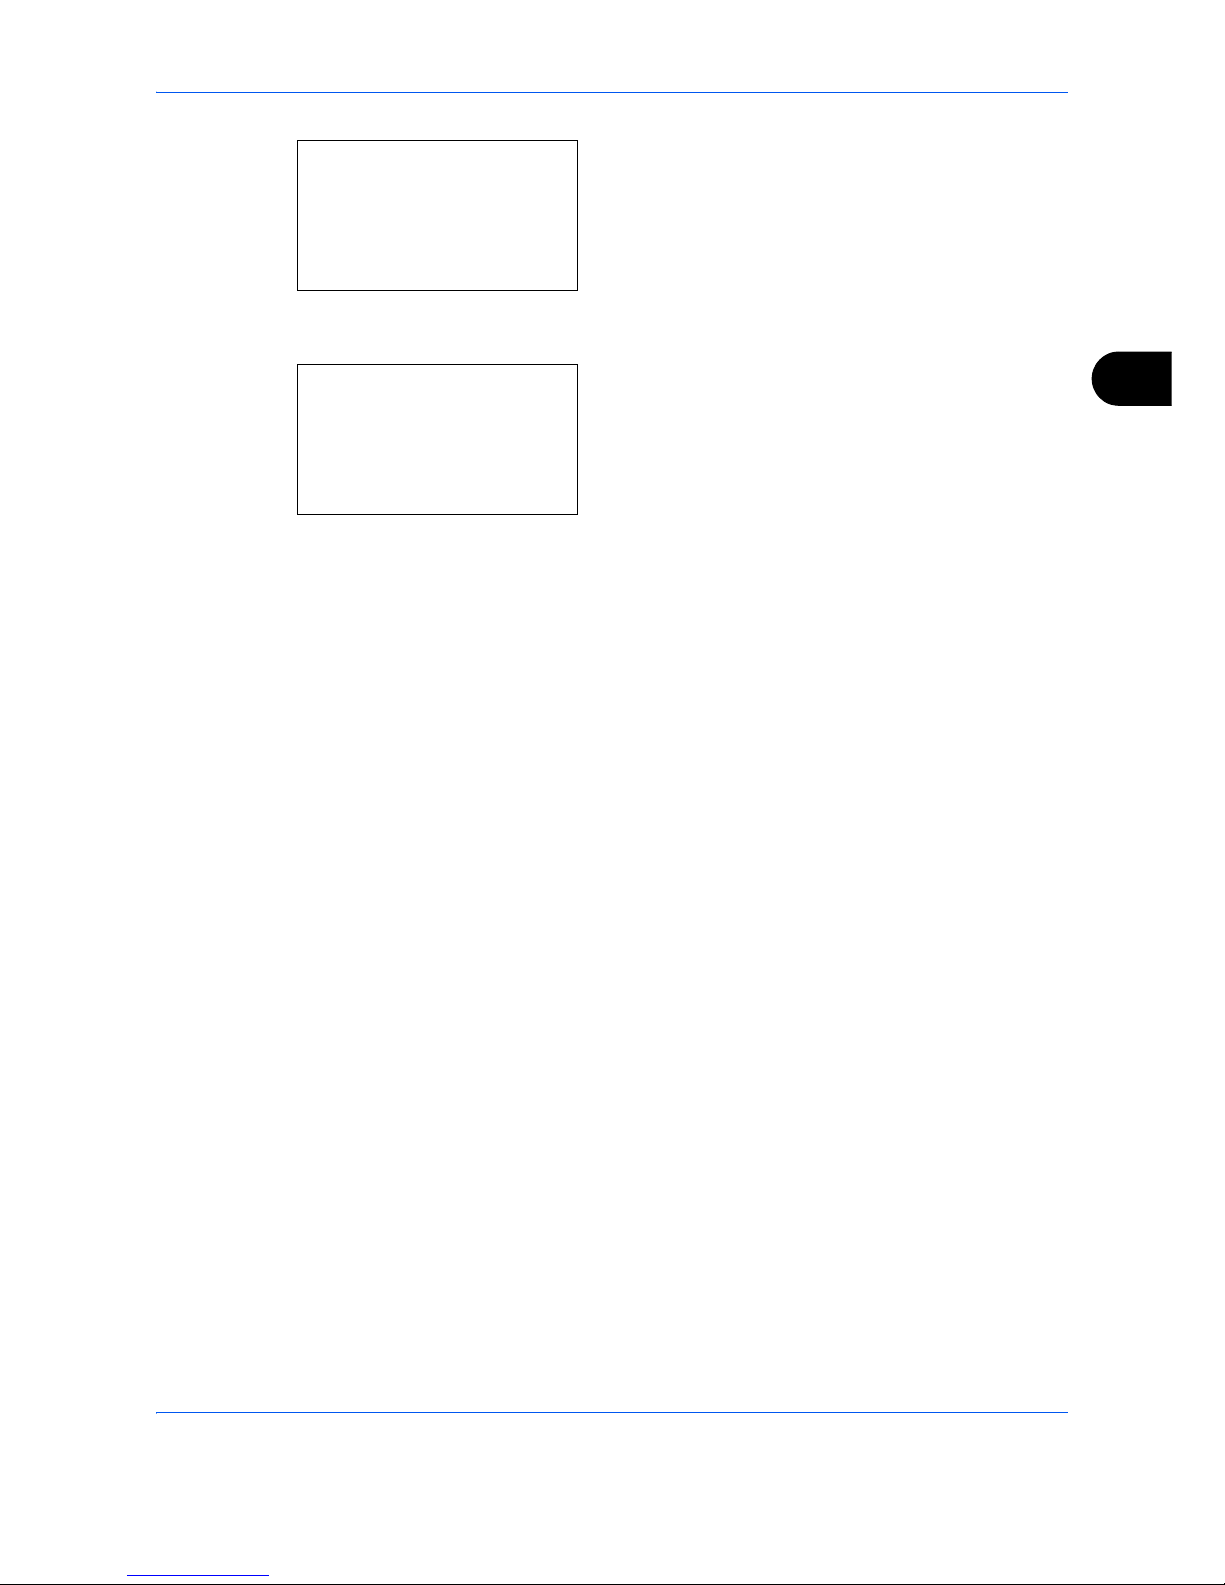
FAX Operation (Advanced)
4-17
4
8 Press the or key to select [Forward Dest.].
9 Press the OK key.
10 Press the or key to select [Register].
11 Press the OK key.
12 Selecting Forwarding Destination from
Address Book
1 Press the or key to select [Address
Book].
2 Press the OK key.
3 Press the or key to select [Address
Book] or [Ext Address Book].
4 Press the OK key.
5 Press the or key to select the destination
(individual) you want to register as a
forwarding destination.
6 Press the OK key.
7
Press the or key to select the destination.
8 Press the OK key.
Entering Forwarding Destination Directly
1 Press the or key to select [Address
Entry].
2 Press the OK key.
3 Press the or key to select [FAX], [E-
mail], [Folder(SMB)] or [Folder(FTP)].
4 Press the OK key.
5 Use the numeric keys to enter the address to
be registered as a forwarding destination. Up
to 128 characters can be entered for e-mail
transmission, up to 64 digits can be entered
for fax transmission, and up to 64 digits can
be entered for file (SMB/FTP) transmission.
Forward Settings:a b
1
Forwarding
*********************
3
File Format
[ Exit ]
2
Forward Dest.
Forward Dest.:
a
b
1
Confirmation
*********************
[ Exit ]
2
Register
Page 76
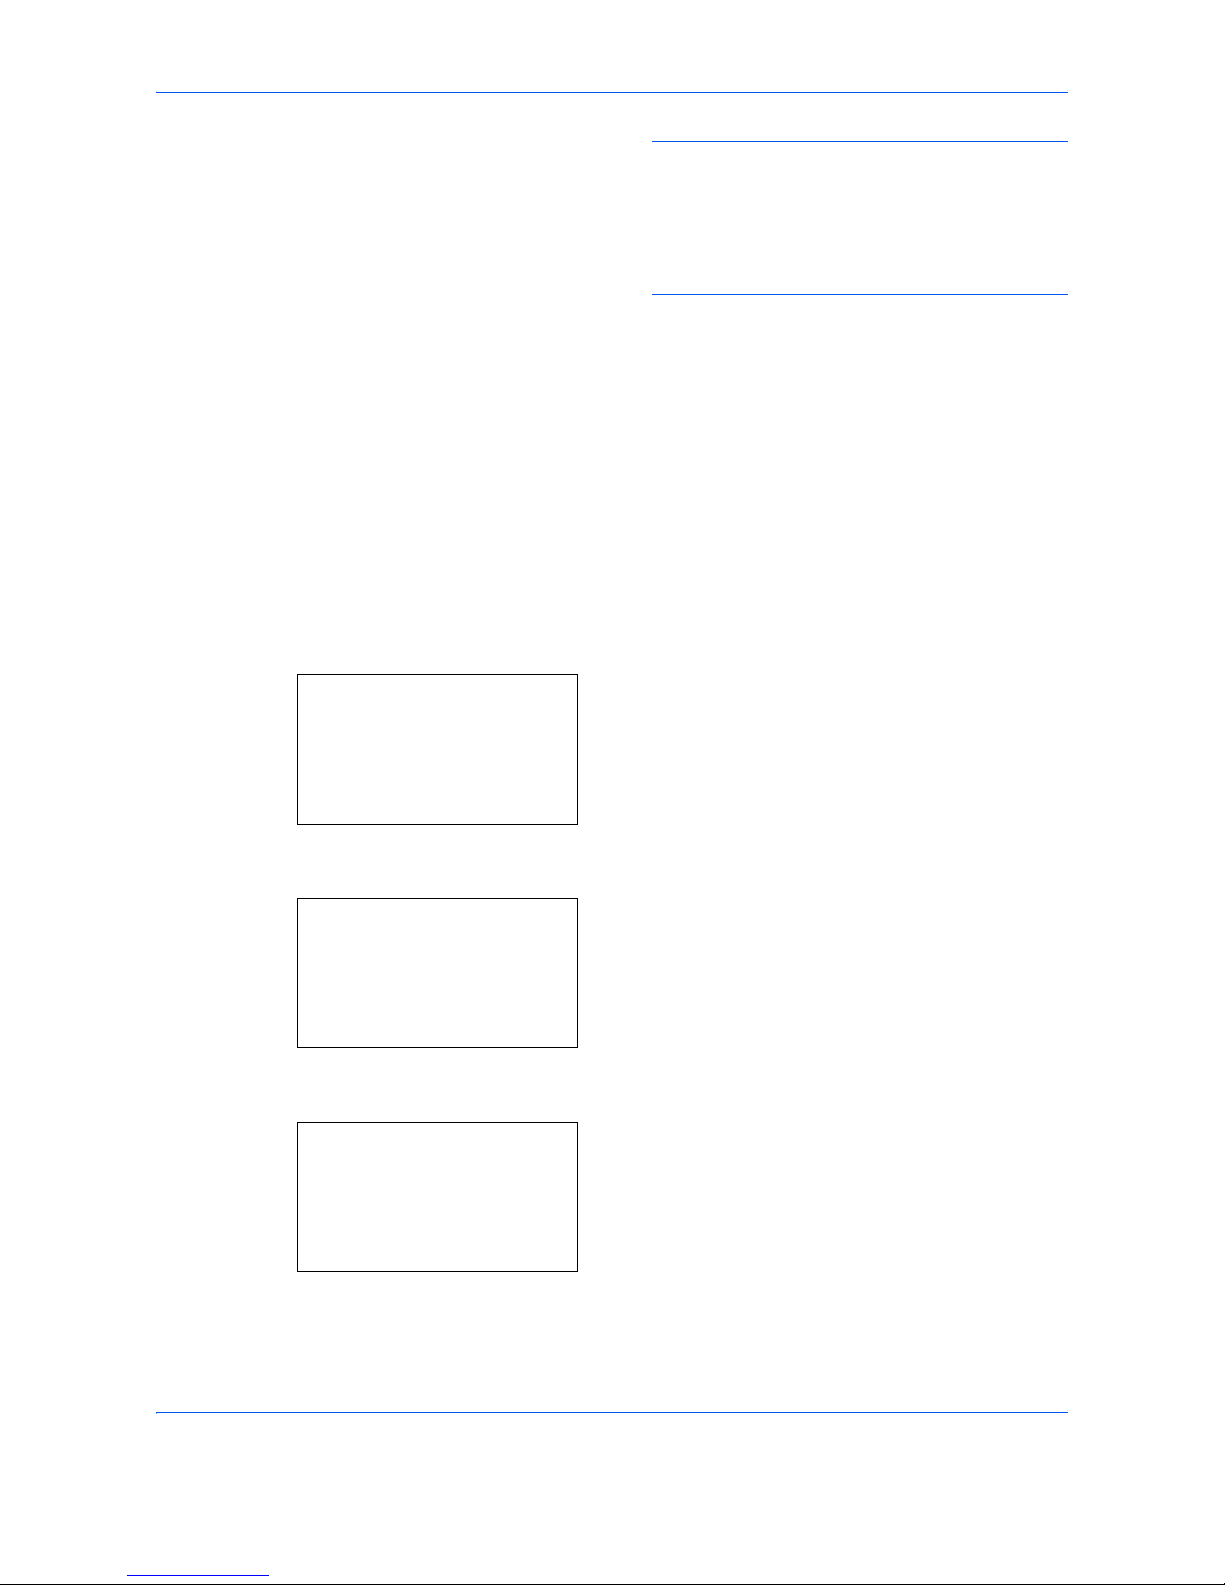
FAX Operation (Advanced)
4-18
NOTE: For details on character entry, refer to
Specifications (Fax function) on Appendix-6.
If you select [Folder(SMB)] or [Folder(FTP)], enter
the host name, path, login user name, login
password and encryption method of the forwarding
destination.
13 Press the OK key.
Changing and Deleting Registration Contents
Use the procedure below to change or delete registration contents.
1 Press the System Menu/Counter key.
2 Press the or key to select [FAX].
3 Press the OK key.
4 Press the or key to select [Reception].
5 Press the OK key.
6 Press the or key to select [Forward Settings].
7 Press the OK key.
8 Press the or key to select [Forward Dest.].
9 Press the OK key.
10 Press the or key to select [Confirmation].
11 Press the OK key.
Reception:
a
b
3
Rings(TAD)
4
Rings(FAX/TEL)
*********************
[ Exit ]
5
Forward Settings
Forward Settings:a b
1
Forwarding
*********************
3
File Format
[ Exit ]
2
Forward Dest.
Forward Dest.:
a
b
*********************
2
Register
[ Exit ]
1
Confirmation
Page 77
FAX Operation (Advanced)
4-19
4
12 Press the OK key again.
13 Changing Forwarding Destination
1 Press the or key to select [Edit].
2 Press the OK key.
3 Change the forwarding destination.
4 Press the OK key. The forwarding destination
is changed.
Deleting Forwarding Destination
1 Press the or key to select [Delete].
2 Press the OK key.
3 Press [Yes] (the Left Select key). The
forwarding destination is deleted.
14 Press [Exit] (the Right Select key).
Forwarding Time Setting
Register the start time and end time between which forwarding is enabled.
1 Press the System Menu/Counter key.
2 Press the or key to select [FAX].
3 Press the OK key.
4 Press the or key to select [Reception].
5 Press the OK key.
6 Press the or key to select [Forward Settings].
7 Press the OK key.
8 Press the or key to select [Forward Time].
9 Press the OK key.
Reception:
a
b
3
Rings(TAD)
4
Rings(FAX/TEL)
*********************
[ Exit ]
5
Forward Settings
Forward Settings:a b
4
Subject Add.Info
5
FTP Encrypted TX
*********************
[ Exit ]
6
Forward Time
Page 78

FAX Operation (Advanced)
4-20
10 Press the or key to select [All day] or [Preset
Time].
11 Press the OK key. Proceed to the next step if you
selected [Preset Time] in step 10.
12 Press the or key to move the cursor position,
and enter the hours and minutes of the start time.
13 Press the OK key.
14 Press the or key to move the cursor position,
and enter the hours and minutes of the end time.
15 Press the OK key.
NOTE: Enter the time on the 24 hours system.
File Format Setting (for Each Requirement)
If you are sending the file as an E-mail attachment or transferring it to a folder (SMB or FTP), select PDF, TIFF,
or XPS as the file format.
1 Press the System Menu/Counter key.
2 Press the or key to select [FAX].
3 Press the OK key.
4 Press the or key to select [Reception].
5 Press the OK key.
6 Press the or key to select [Forward Settings].
7 Press the OK key.
Forward Time:
a
b
*********************
2
Preset Time
1
*All day
Reception:
a
b
3
Rings(TAD)
4
Rings(FAX/TEL)
*********************
[ Exit ]
5
Forward Settings
Page 79
FAX Operation (Advanced)
4-21
4
8 Press the or key to select [File Format].
9 Press the OK key.
10 Press the or key to select [PDF], [TIFF] or
[XPS].
11 Press [Detail] (the Right Select key).
12 Press the or key to select [Off], [PDF/A-1a] or
[PDF/A-1b].
13 Press the OK key.
E-mail Subject Add. Info Setting
Specify whether any information will be added to the subject of the E-mail. When adding information, you can
select either Sender Name or Sender.
1 Press the System Menu/Counter key.
2 Press the or key to select [FAX].
3 Press the OK key.
4 Press the or key to select [Reception].
5 Press the OK key.
6 Press the or key to select [Forward Settings].
7 Press the OK key.
8 Press the or key to select [Subject Add.Info].
9 Press the OK key.
Forward Settings:a b
1
Forwarding
2
Forward Dest.
*********************
[ Exit ]
3
File Format
Reception:
a
b
3
Rings(TAD)
4
Rings(FAX/TEL)
*********************
[ Exit ]
5
Forward Settings
Forward Settings:a b
2
Forward Dest.
3
File Format
*********************
[ Exit ]
4
Subject Add.Info
Page 80
FAX Operation (Advanced)
4-22
10 Press the or key to select [Off], [Sender
Name] or [Sender FAX/Add.].
11 Press the OK key.
FTP Encrypted TX Setting
Specify whether to use FTP encryption when you send data.
1 Press the System Menu/Counter key.
2 Press the or key to select [FAX].
3 Press the OK key.
4 Press the or key to select [Reception].
5 Press the OK key.
6 Press the or key to select [Forward Settings].
7 Press the OK key.
8 Press the or key to select [FTP Encrypted
TX].
9 Press the OK key.
10 Press the or key to select [On] or [Off].
11 Press the OK key.
Print Setting
You can set whether the machine should print received originals when forwarding them.
1 Press the System Menu/Counter key.
2 Press the or key to select [FAX].
3 Press the OK key.
4 Press the or key to select [Reception].
5 Press the OK key.
Reception:
a
b
3
Rings(TAD)
4
Rings(FAX/TEL)
*********************
[ Exit ]
5
Forward Settings
Forward Settings:a b
3
File Format
4
Subject Add.Info
*********************
[ Exit ]
5
FTP Encrypted TX
Page 81
FAX Operation (Advanced)
4-23
4
6 Press the or key to select [Forward Settings].
7 Press the OK key.
8 Press the or key to select [Print].
9 Press the OK key.
10 Press the or key to select [On] or [Off].
11 Press the OK key.
File Name Registration
You can set the file name to be created when forwarding. You can append information such as the date/time
and the job number or fax number.
1 Press the System Menu/Counter key.
2 Press the or key to select [FAX].
3 Press the OK key.
4 Press the or key to select [Reception].
5 Press the OK key.
6 Press the or key to select [Forward Settings].
7 Press the OK key.
Reception:
a
b
3
Rings(TAD)
4
Rings(FAX/TEL)
*********************
[ Exit ]
5
Forward Settings
Forward Settings:a b
6
Forward Time
7
File Name Entry
*********************
[ Exit ]
8
Print
Reception:
a
b
3
Rings(TAD)
4
Rings(FAX/TEL)
*********************
[ Exit ]
5
Forward Settings
Page 82

FAX Operation (Advanced)
4-24
8 Press the or key to select [File Name Entry].
9 Press the OK key.
10 Use the numeric keys to enter the document name.
Up to 32 characters can be entered.
NOTE: For details on character entry, refer to
Specifications (Fax function) on Appendix-6.
Please note that when you have not add any additional
information, file names become the same, and,
therefore, old files are overwritten when received
originals are forwarded with folder (SMB) transmission
and folder (FTP) transmission.
11 Press the OK key.
12 When Not Appending Information to Document
Name
1 Press the or key to select [None].
2 Press the OK key.
3 Press the or key to select [On] or [Off]
for appending of sender information.
When Appending Information to Document
Name
1 Press the or key to select [Date], [Job
No.], [Job No. + Date] or [Date + Job No.].
2 Press the OK key.
3 Press the or key to select [None],
[Add.Info.+Sender] or [Sender+Add.Info.] for
appending of sender information.
13 Press the OK key.
Forward Settings:a b
5
FTP Encrypted TX
6
Forward Time
*********************
[ Exit ]
7
File Name Entry
Page 83
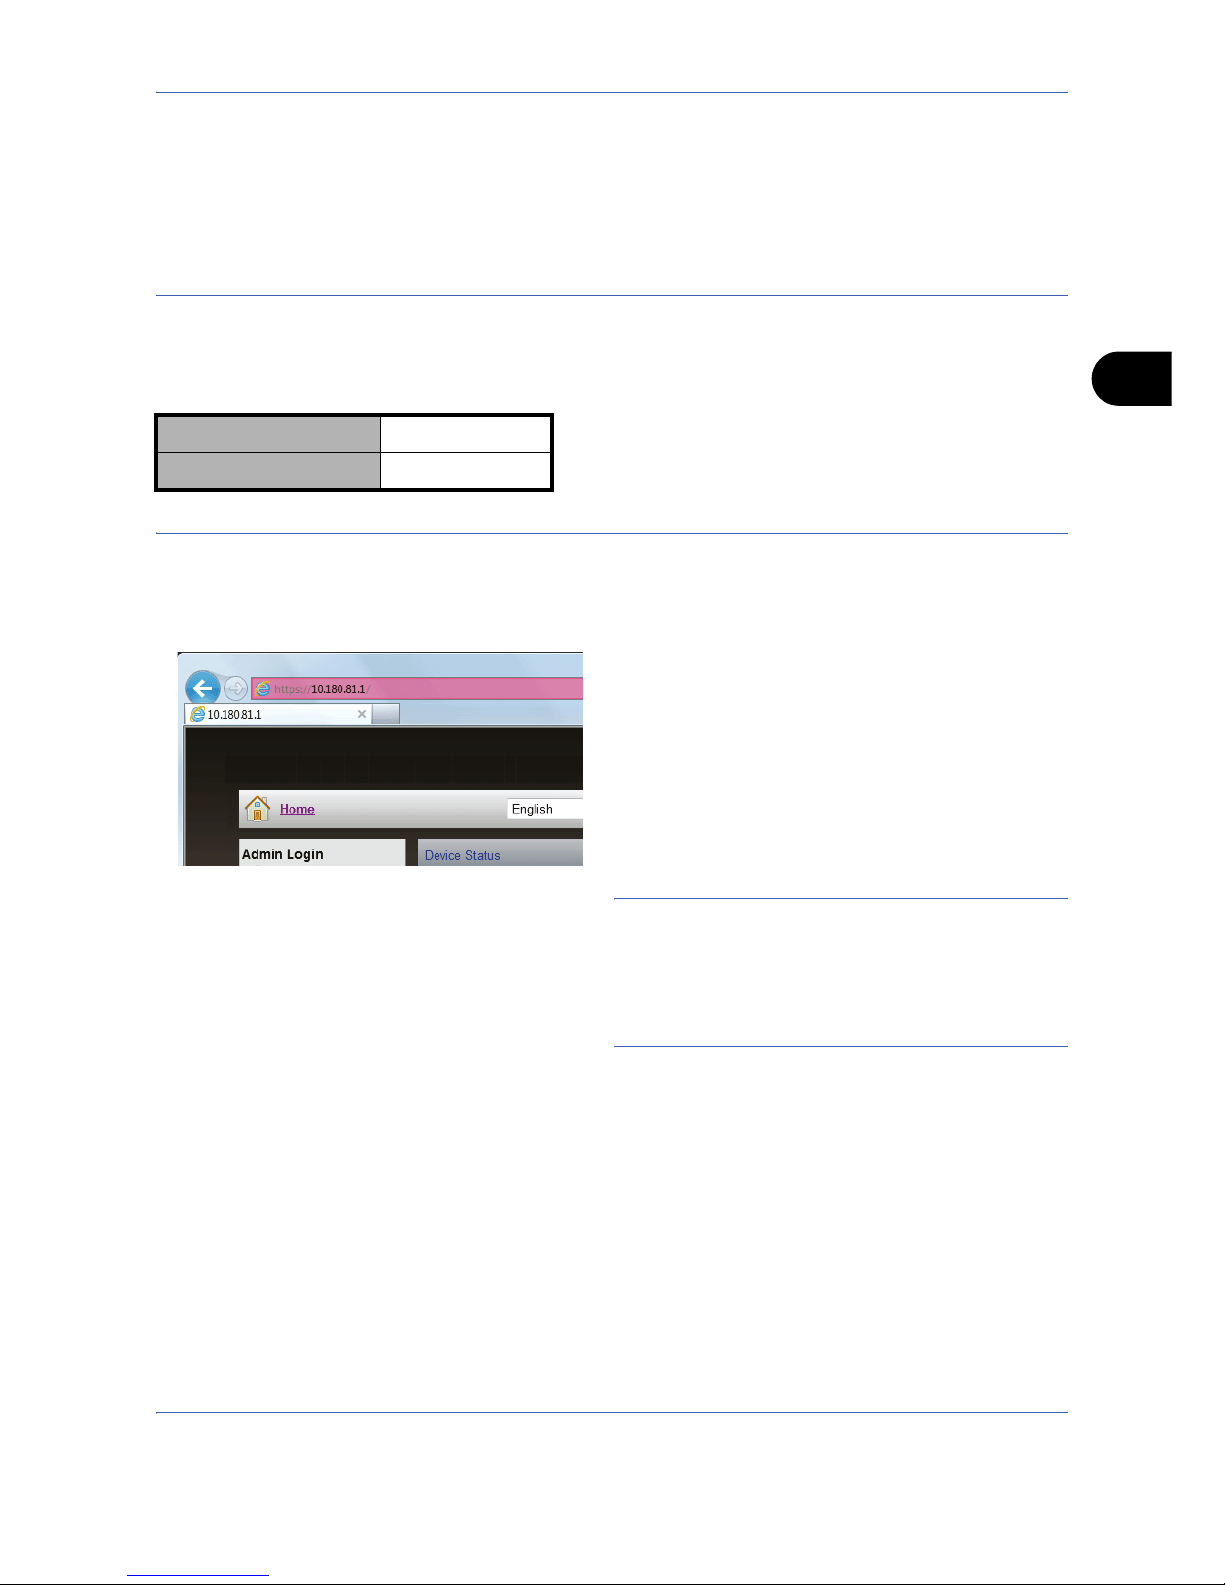
FAX Operation (Advanced)
4-25
4
Settings for Memory Forwarding from Embedded Web Server RX (Forward)
You can use Embedded Web Server RX on a computer connected to the network to specify the memory
forwarding settings on this machine.
Refer to the machine’s Operation Guide for information on the network settings.
NOTE: To fully access the features of the Embedded Web Server RX pages, enter the User Name and
Password and click [Login]. Entering the predefined administrator password allows the user to access all
pages, including Document Box, Address Book, and Settings on the navigation menu. The factory default
setting for the default user with administrator privileges is shown below.
† Upper case and lower case letters are distinguished (case sensitive).
Accessing Embedded Web Server RX
1 Launch your Web browser.
2 In the address or location bar, enter the machine's
IP address or the host name.
Examples:
https://10.180.81.1/ (for IP address)
https://MFP001 (if the host name is "MFP001")
The web page displays basic information about the
machine and Embedded Web Server RX as well
as their current status.
NOTE: If the screen “There is a problem with this
website's security certificate.” is displayed, configure
the certificate. For details on Certificates, refer to the
Embedded Web Server RX User Guide.
You can also continue the operation without
configuring the certificate.
3 Select a category from the navigation bar on the
left to view and set values for that particular
category.
Login User Name Admin
Login Password Admin
Page 84

FAX Operation (Advanced)
4-26
Forward Rules
Conditional forwarding is a function for automatically forwarding documents received by FAX to other FAX
machines, sending them as attachments to E-mail if they satisfy the specified conditions.
Enabling Forward Rules
To use the Forward Rules function, enable this setting.
1 Click Forward Rules under Function Settings on
the navigation menu. The Forward Rules
Settings page opens.
2 The following settings are available depending on
their status.
Forward Rules
Select On or Off for Forward Rules.
Schedule
Configure the schedule for the specified rule.
1 Schedule: Select All Day or Preset Time.
2 Start Time, End Time:
You can configure the setting when you select
Preset Time as Schedule. Specify the time
table from the drop-down list.
File Name
Configure the file name created when forwarding.
1 File Name: Enter the file name.
2 Additional Information:
Select the additional information on the file
name from the drop-down list.
Forward Settings
Configure the forward destination.Select the
destination on the list, and then click the Delete
icon.
1 Forwarding:
Select On and click the desired address
button to specify the forwarding destination.
2 Address Book:
Click Address Book button to open the
Addresses page. Select the desired Address
Book and click Submit button.
Page 85

FAX Operation (Advanced)
4-27
4
3E-mail:
Click E-mail button to open the E-mail page.
Enter E-mail Address and Email Address
(Confirmation), and then click Submit button.
4 Folder: Click Folder button to open the
Folder page.
Protocol: Select SMB or FTP.
Host Name:
Enter the host name. If you use the host name,
you must first specify the DNS server
information.
Port Number:
Enter the port number from 1 to 65535.
Path: Enter the path of the folder.
Login User Name: Enter the login user name.
Login Password: Enter the login password.
Connection Test:
Click Test button to confirm the connection to
the folder.
5FAX: Click FAX button to open the FAX page.
FAX Number: Enter the fax number.
Sub Address: Enter the sub address.
Password:
Enter the password for the sub address.
TX Start Speed:
Select 33600 bps, 14400 bps, or 9600 bps.
ECM: Select On to use ECM communication.
Encryption:
Select Off, Key 1 to Key 20. You can select
Key 1 to Key 20 when registering the
encryption key in FAX Settings page under
Function Settings.
Encryption Box:
Select On to use the encryption box. You can
configure this setting when registering the
encryption key.
Encryption Box No.:
Enter the box number (4 digits). You can
configure this setting when registering the
encryption key.
Page 86

FAX Operation (Advanced)
4-28
6 File Format:
Select PDF, TIFF, or XPS as the file format
from the drop-down list.
You can configure the setting if you select
PDF. Select Off, PDF/A-1a, or PDF/A-1b
from the drop-down list.
7 File Separation: Select Each Page or Off.
8 E-mail Subject Additional Info.:
Select the additional information from the
dropdown list.
9 FTP Encryption TX: Select On to use the
FTP encryption transmission function.
Print Settings
Configure the print settings for received
documents with rules.
Print:
Select On to print the received documents with
rules.
3 Click Submit button.
Page 87

FAX Operation (Advanced)
4-29
4
Sub Address Communication
Sub Address Communication
Sub address communication is communication in which data is sent and received with sub addresses and
passwords attached in conformance with the ITU-T (International Telecommunication Union)
recommendations. Sub addresses enable communication modes with third-party machines that were
previously only possible between our brand machines. These include confidential delivery (sending originals to
an original delivery box set up in the receiving system) and polling communication (reception of documents from
a source machine that is controlled from the receiving machine). Using sub address communication on this
machine also allows advanced communication functions such as storing received originals in Sub Address
Boxes.
NOTE: In order to conduct sub address communication, the other party’s system also needs to be equipped
with sub address communication functions of the same type.
Sub address-based communication can be used together with various kind of functional communication. When
registering a sub address and sub address password in the Address Book and One-touch keys, you can omit
their entry before transmission. For details, refer to the explanations in the procedure of each communication
method and registration method.
Sub Address
With the machine, sub address and sub address passwords are called sub address.
Sub Address
Use the numbers from 0 to 9, ‘ (space)’, and ‘#’ and ‘*’ characters to enter a sub address of up to 20 digits. When
the machine receives originals, the sub address is used as the forward requirement for memory forwarding.
Sub Address Password
Use the numbers from 0 to 9, alphabets, ‘ (space)’, and ‘#’ and ‘*’ characters to enter a sub address password
of up to 20 digits. When the machine receives originals, a sub address password is not used.
Sub Address Transmission
To use sub address transmission, follow the steps below.
NOTE: To use sub address transmission, check that a sub address and password have been set in the
receiving system in advance.
When sub address transmission is used, encryption cannot be used.
For the setting method when the machine receives originals, refer to Sub Address Box Function on page 4-32.
1 Press the FAX key.
2 Place the originals.
Page 88
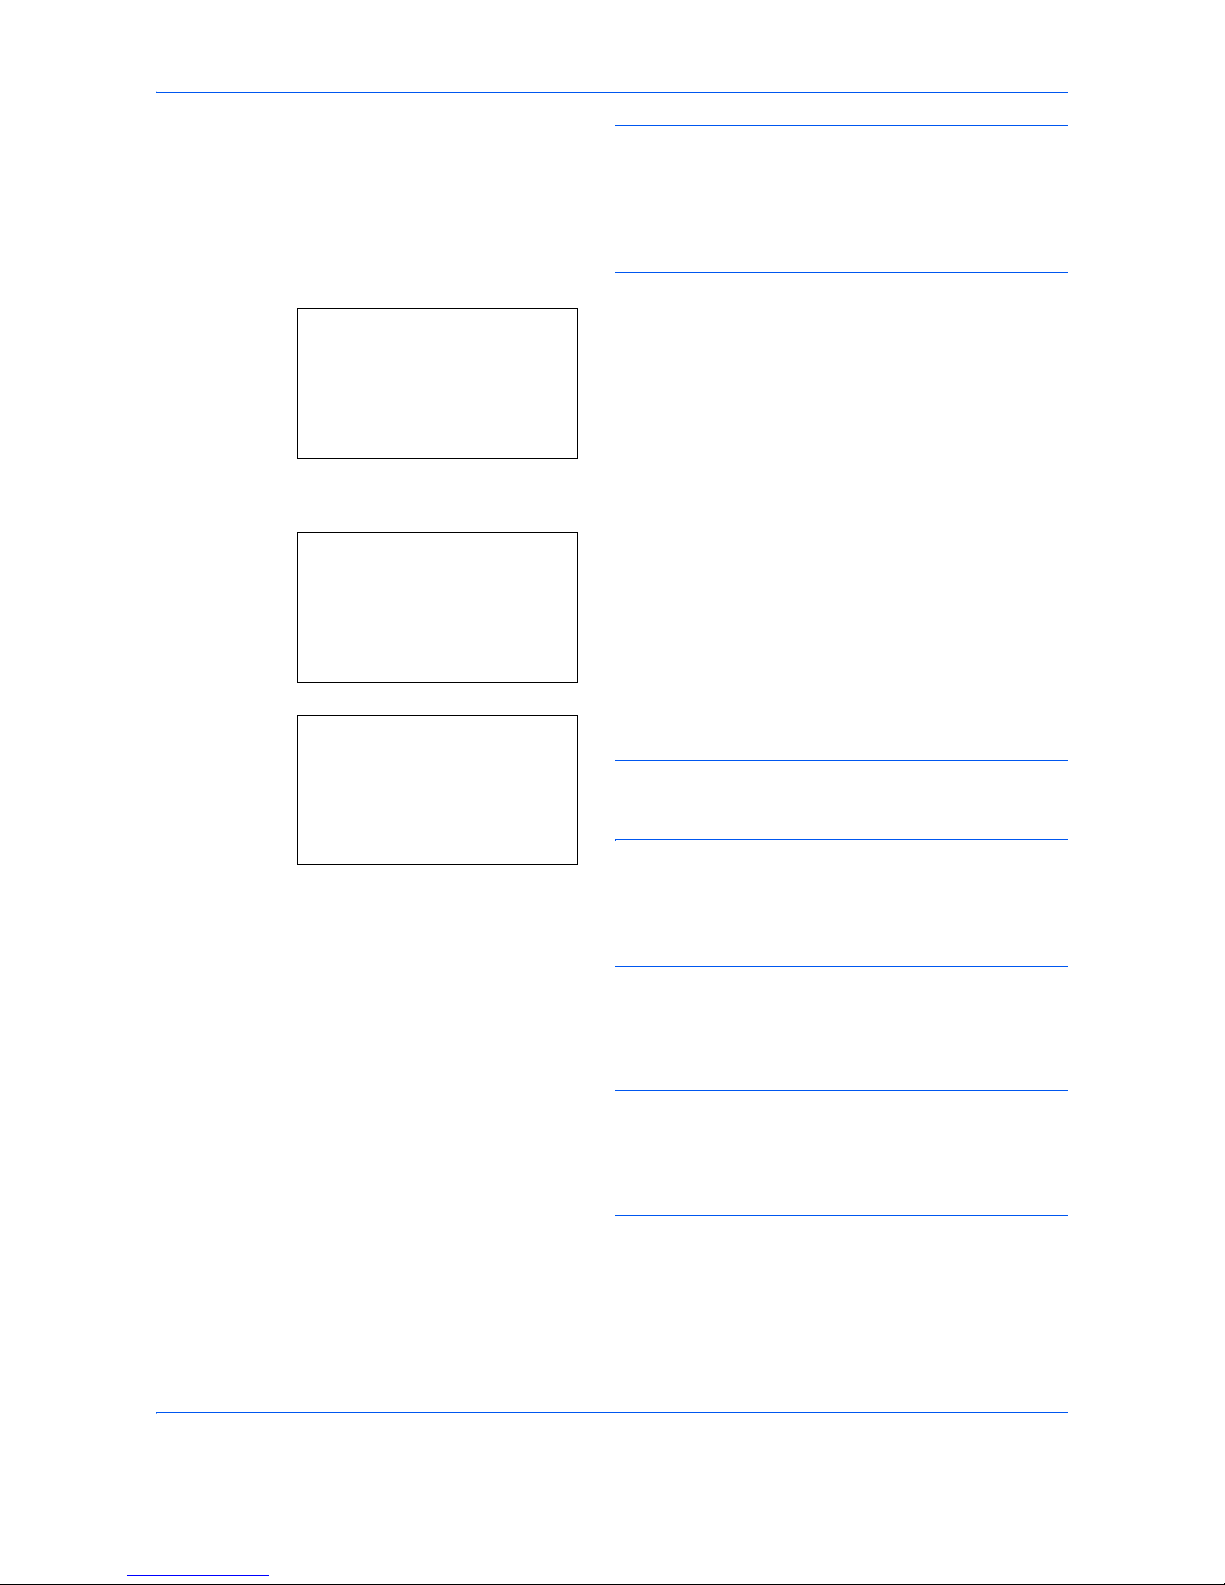
FAX Operation (Advanced)
4-30
NOTE: When a sub address has been registered to
the destination of the Address Book, you can use the
destination. When a sub address-registered
destination in the Address Book is used for a Onetouch key, you can also use the One-touch key. In this
case, go to step 10.
3 Use the numeric keys to enter the fax number of
the other party.
4 Press [Detail] (the Right select key).
5 Press the or key to select [Sub Address], and
press [Edit] (the Right Select key).
6 Enter the sub address using the numeric keys.
NOTE: You can use up to 20 digits including the
numbers from 0 to 9, ‘ (space)’, ‘#’ and ‘*’ characters to
enter a sub address.
7 Press the OK key and enter the sub address
password using the numeric keys.
NOTE: You can use up to 20 digits including the
numbers from 0 to 9, alphabets, ‘ (space)’, ‘#’ and ‘*’
characters to enter a sub address password. When the
machine receives originals, a sub address password is
not used.
8 Press the OK key.
9 Press the OK key again.
NOTE: When On is selected in Entry Check for New
Destination, a confirmation screen is displayed for the
entered FAX number. Re-enter the same FAX number
Fax No. Entry:
A
b
0123456789
*
[ Chain ] [ Detail ]
FAX Detail:
C
b
Sub Address: 1/4
OOOOOOOOOO
[ Edit ]
Sub Address:
C
b
1234567890123
*
S
Page 89

FAX Operation (Advanced)
4-31
4
and press the OK key. For details, refer to Destination
confirmation screen before transmission in the
Operation Guide for the machine.
10
Press the Start key. Transmission begins.
NOTE: When On is selected in Destination Check
before Send, a destination confirmation screen is
displayed when you press the Start key. For details,
refer to Confirmation Screen of Destinations on
page 5-13.
Page 90

FAX Operation (Advanced)
4-32
Sub Address Box Function
Sub Address Box
A Sub Address Box is a box for storing received originals on the machine to which the FAX System is to be
installed. Using sub address reception function, you can store received originals in a personal Sub Address Box.
Registering a Sub Address Box
Up to 20 Sub Address Boxes can be registered.
1 Press the System Menu/Counter key.
2 Press the or key to select [Document Box],
and press the OK key.
3 Press the or key to select [Sub Address Box],
and press the OK key.
4 Press the or key to select [Detail/Edit], and
press the OK key.
5 Press [Menu] (the Right Select key).
6 Press the or key to select [Add Box], and
press the OK key.
7 Use the numeric keys to enter the sub address.
NOTE: You can use up to 20 digits including the
numbers from 0 to 9, ‘ (space)’, ‘#’ and ‘*’ characters to
enter a sub address.
8 Press the OK key, and use the numeric keys to
enter the name of Sub Address Box.
NOTE: For details on character entry, refer to
Specifications (Fax function) on Appendix-6.
9 Press the OK key, and use the numeric keys to
enter the box number of Sub Address Box.
10 Press the OK key.
11 Press the or key to select [Exit], and press the
OK key.
Page 91

FAX Operation (Advanced)
4-33
4
Changing Sub Address Box
1 Follow steps 1 to 4 of Registering a Sub Address
Box on page 4-32.
2 Select the box to be changed, and press the OK
key.
3 Press the or key to move the item to be
changed, and press [Edit] or [Change] (the Right
Select key).
4 Use the numeric keys to edit the item.
Repeat the step 3 and 4 for the other items.
NOTE: When User Login authentication is enabled,
User setting menu and Permission menu appear.
Follow the steps to change the user name.
1 Press the or key to select [Local User],
[Network User] or [None].
2 When selecting [Local User], press the or
key to select user name form the Local
User List.
When selecting [Network User], use the
numeric keys to enter the login user name.
3 Press the OK key.
Follow the steps to change the permission of the
subaddress box.
1 Press the or key to select [Shared] or
[Private].
2 Press the OK key.
Follow the steps to change the setting of the
deletion after printing the originals.
1 Press the or key to select [On] or [Off] in
Del. afterPrint menu.
2 Press the OK key.
Deleting Sub Address Box
1 Follow steps 1 to 4 of Registering a Sub Address
Box on page 4-32.
2 Select the box to be deleted.
Page 92

FAX Operation (Advanced)
4-34
3 Press [Menu] (the Right Select key).
4 Press the or key to select [Delete].
5 When the deletion confirmation screen appears,
press [Yes] (the Left Select key).
Printing Originals from a Sub Address Box
To print the originals that have been sent to a Sub Address Box, use the following operation.
1 Press the Document Box key.
2 Press the or key to select [Sub Address Box],
and press the OK key.
3 Press the or key to select the Sub Address
Box.
4 Press [Menu] (the Right Select key).
5 Press the or key to select [Open], and press
the OK key.
NOTE: You must enter a box password in the
following situations:
• If user login is disabled
• If user login is enabled but the Sub Address Box
has been selected by another user when you login
with user privileges
6 Press the or key to select the document from
the list, press [Menu] (the Right Select key). The
selected original is indicated by a checkmark. To
cancel the selection, press [Select] (the Right
Select key) again.
7 Selecting Two or More Originals
Repeat steps 4 to 6.
Selecting/Cancelling All Originals
1 Press [Menu] (the Left Select key).
2 Press the or key to select [Select All] or
[Clear All].
3 Press the OK key.
Selecting the Originals
1 Press [Menu] (the Left Select key).
2 Press the or key to select [Search].
Page 93

FAX Operation (Advanced)
4-35
4
3 Press the OK key.
4 Use the numeric keys to enter the desired
original for which you want to search.
NOTE: For details on character entry, refer to
Specifications (Fax function) on Appendix-6.
5 Select the document from the list. To select
the document, follow the step 6.
NOTE: From a Sub Address Box, only printing is
available. Sending cannot be done.
8 Press the OK key.
9 Press the or key to select [Print].
10 Press the OK key.
11 Press the Start key. The print starts.
Deleting Originals after Printing from a Sub Address Box
To automatically delete the originals printed form the Sub Address Box, use the following operation.
1 Follow steps 1 to 4 in Printing Originals from a Sub
Address Box on page 4-34.
2 Press the OK key.
3 Press the or key to select the document from
the list, press [Select] (the Right Select key). The
selected original is indicated by a checkmark.
4 Press the OK key.
5 Press the or key to select [Print] .
6 Press the OK key.
7 Press the Function Menu key.
8 Press the or key to select [Del. afterPrint] .
9 Press the OK key.
10 Press the or key to select [On].
11 Press the OK key.
12 Press the Start key. The original is deleted after
printing.
Page 94

FAX Operation (Advanced)
4-36
Deleting Originals from a Sub Address Box
Use the procedure below to delete an original that you have forwarded to a Sub Address Box.
1 Follow steps 1 to 8 in Printing Originals from a Sub
Address Box on page 4-34.
2 Press the or key to select [Delete], and press
the OK key.
3 When the deletion confirmation screen appears,
press [Yes] (the Left Select key). The original is
deleted.
Checking Details and Renaming Files
You can use the procedure below to check the details of documents forwarded to a Sub Address Box. You can
also use this procedure to rename files.
1 Follow steps 1 to 5 in Printing Originals from a Sub
Address Box on page 4-34.
2 Press the or key to select the document,
press [Menu] (the Left Select key).
3 Press the or key to select [Detail/Edit], and
press the OK key.
4 Press the or key to move the item to be
changed, and press [Edit] (the Right Select key).
The details for the selected original are displayed.
5 Use the numeric keys to edit the item.
Repeat the step 4 and 5 for the other items.
6 Press the OK key.
Item Description
File Name File name of the original
Press [Edit] to rename the file.
Number of Pages Number of pages in the original
Resolution Resolution of the original
Date and Time The date and time the original was forwarded.
Page 95
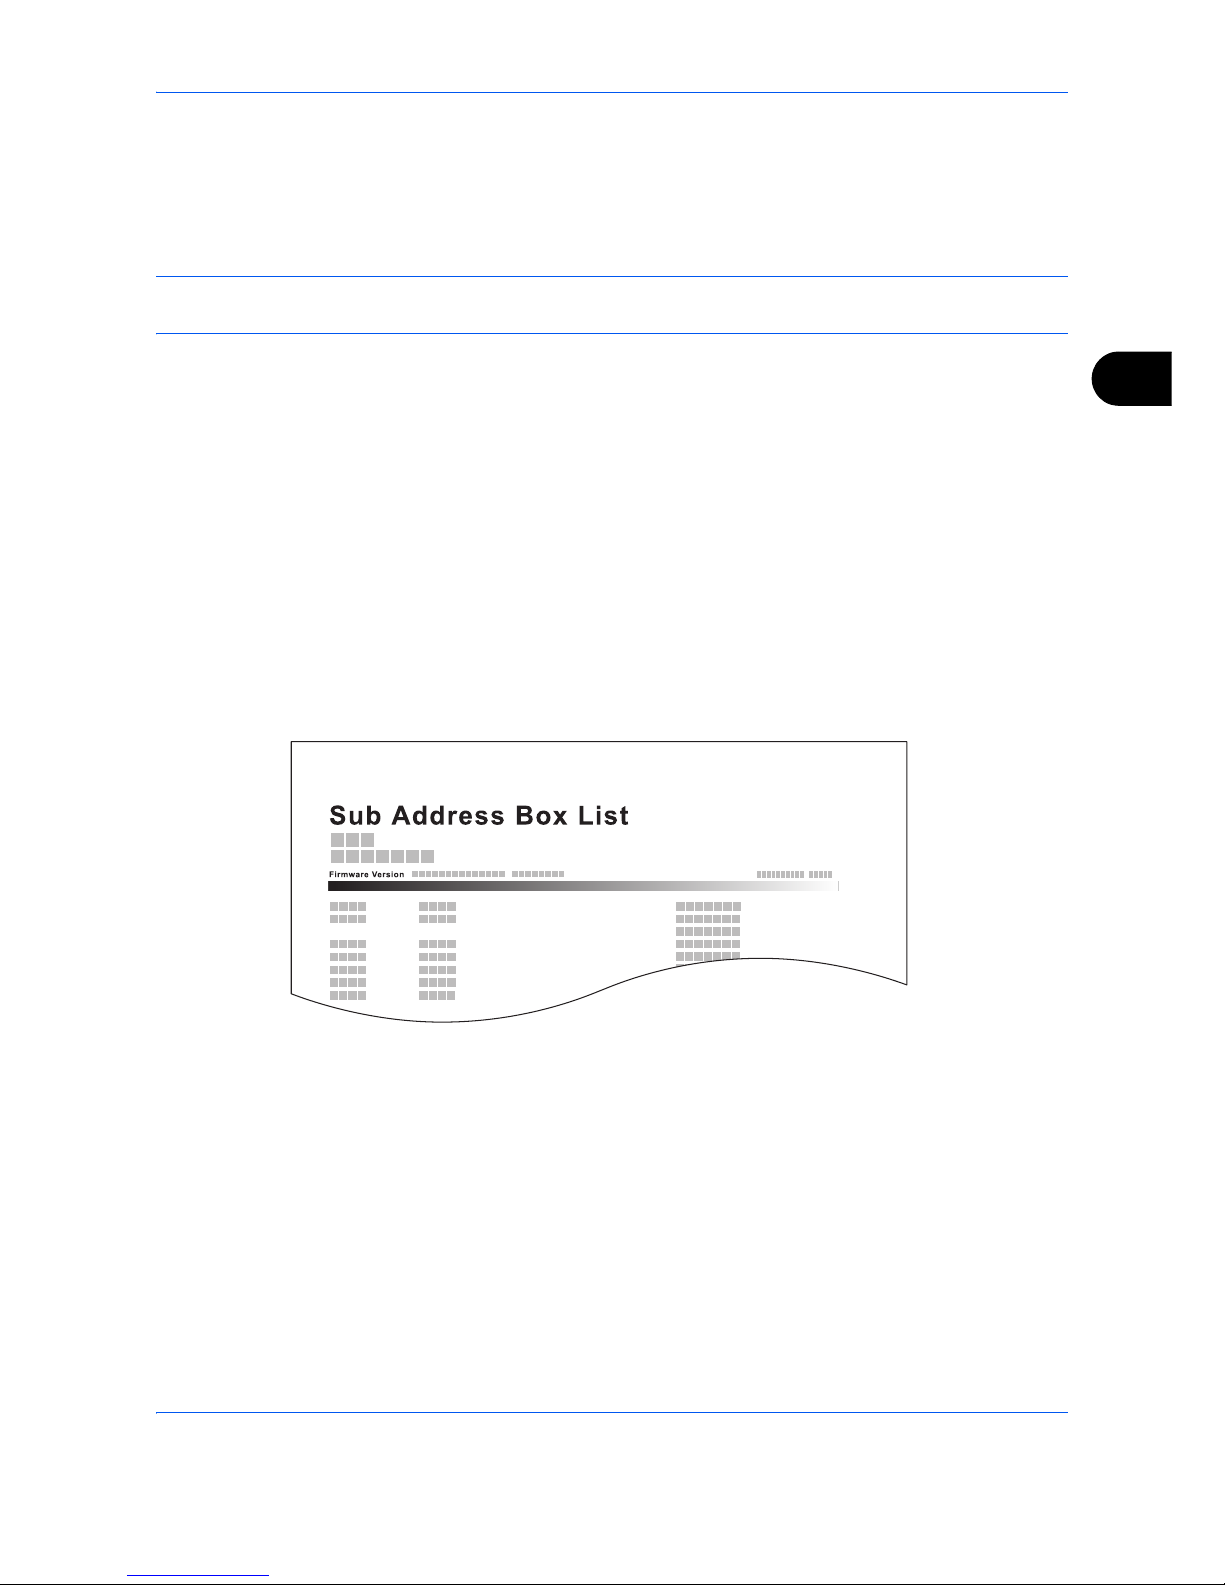
FAX Operation (Advanced)
4-37
4
Printing a Sub Address Box List
You can print the Sub Address Box list in which the list of Box No.’s and Box names of the registered Sub
Address Boxes are described. When there are originals in the Sub Address Boxes, the number of pages is
displayed.
NOTE: The list can be printed when user login has been enabled and the machine is logged in with
administrator privileges.
1 Press the System Menu/Counter key.
2 Press the or key to select [Document Box],
and press the OK key.
3 Press the or key to select [Sub Address Box],
and press the OK key.
4 Press the or key to select [SubAddr Box List],
and press the OK key.
5 When the printing confirmation screen appears,
press [Yes](the Left Select key). The machine
prints a list of the Sub Address Boxes.
Page 96

FAX Operation (Advanced)
4-38
Program Dial
You can register transmission requirements such as the other party to which you send originals and
transmission time as a program. After registration, you can recall transmission requirements only by pressing
the program number. Also, you can assign names to programs to make recalling programs easier and more
convenient.
NOTE: The copy function can be also registered to the program. Up to 4 programs including copying and
sending functions can be registered.
When user login has been enabled, only the administrator can register.
Registering Programs
1 With transmission requirements to be registered
are set, press the Program key and hold it (2
seconds). The program is registered to the key.
When you press a number where a program is
already registered, proceed to the next step.
2 Press the or key to select [Overwrite].
3 Press the OK key.
4 Press [Yes] (the Left Select key). The program is
registered, overwriting the previous one.
Deleting Registration Contents
1 Press the Program key where a program you want
to delete is registered, and hold it (2 seconds).
2 Press the or key to select [Delete].
3 Press the OK key.
4 Press [Yes] (the Left Select key). The program is
deleted.
Using Program Dial
1 Press the Program key.
2 Place the originals.
NOTE: You can also use the program you have called
up to change transmission requirements such as
changing the other party.
3 Press the Start key. Transmission begins.
Page 97

FAX Operation (Advanced)
4-39
4
NOTE: When On is selected in Destination Check
before Send, a destination confirmation screen is
displayed when you press the Start key. For details,
refer to Confirmation Screen of Destinations on
page 5-13.
Page 98

FAX Operation (Advanced)
4-40
Polling Communication
Polling communication is a communication mode in which the transmission of originals on the sending machine
is controlled by the receiving machine. This allows the receiving machine to tailor the reception of originals to
its own circumstances. This machine supports both polling transmission and polling reception.
IMPORTANT: Because the receiving machine dials the sending machine in polling communication, call
charges are normally borne by the recipient.
Polling Transmission
Originals to be used in polling transmissions should be stored in a Polling box. When a polling request is
received from the destination, the stored originals are sent automatically.
Once originals intended for polling transmission have been sent to the destination, they are automatically
deleted. However, if you set Delete TX File to [Off], the originals are stored in the Polling box until you delete
them. You can use polling transmission with the same originals as many times as you wish. (Refer to page 4-40
.)
NOTE: You can store up to 10 originals for polling transmission.
You can also add to or overwrite originals up until a polling request arrives from the destination. Refer to
Overwrite Setting on page 4-40.
Deleting Originals After Polling Transmission
Originals intended for polling transmission are automatically deleted after they have been sent to the
destination. To allow polling transmission of the same original to multiple destinations, set this option to [Off].
1 Press the System Menu/Counter key.
2 Press the or key to select [Document Box].
3 Press the OK key.
4 Press the or key to select [Polling Box].
5 Press the OK key.
6 Press the or key to select [Delete TX File].
7 Press the OK key.
8 Press the or key to select [On] or [Off].
9 Press the OK key.
Overwrite Setting
Use the procedure below to overwrite the existing document if the same name is added to the new file.
To allow overwriting, set this option to [Allowed].
1 Press the System Menu/Counter key.
2 Press the or key to select [Document Box].
Page 99
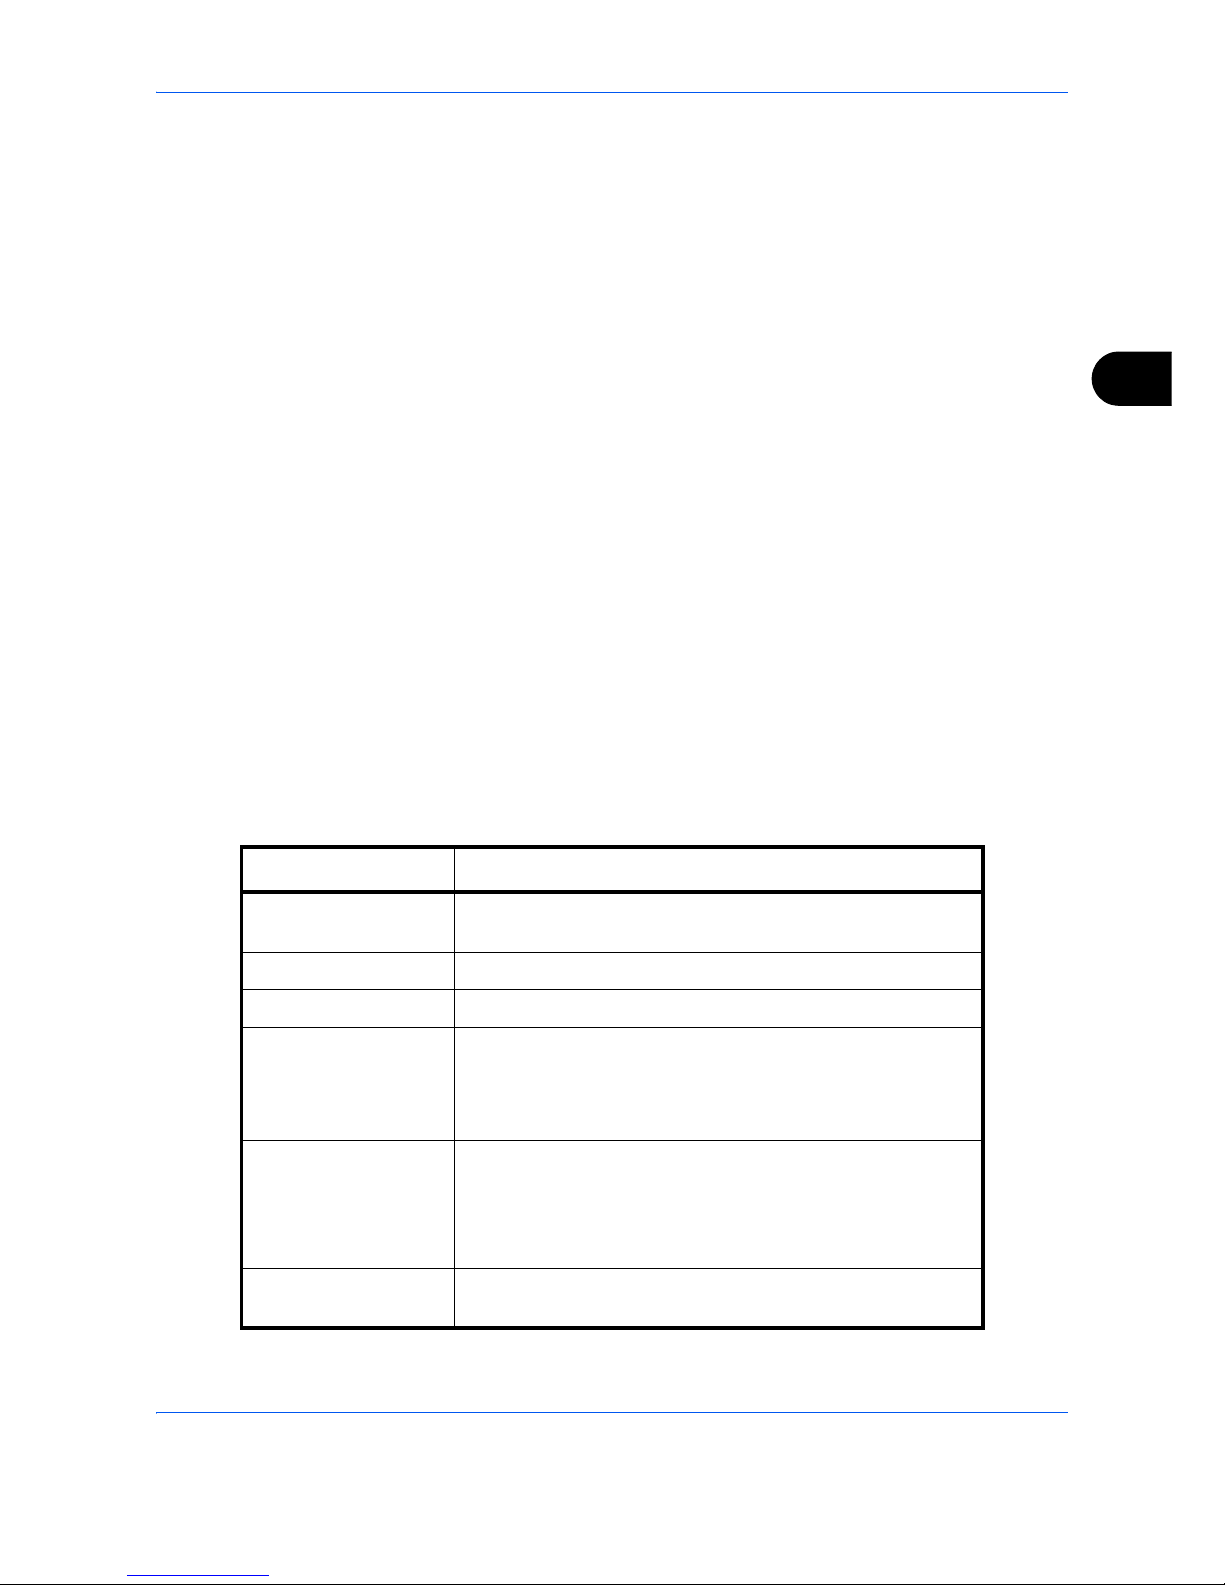
FAX Operation (Advanced)
4-41
4
3 Press the OK key.
4 Press the or key to select [Polling Box].
5 Press the OK key.
6 Press the or key to select [OverwriteSetting].
7 Press the OK key.
8 Press the or key to select [Allowed] or [Not
Allowed].
9 Press the OK key.
Using Polling Transmission
1 Press the Document Box key.
2 Place the originals.
3 Press the or key to select [Polling Box].
4 Press the OK key.
5 Press the or key to select [Store File].
6 Press the OK key.
7 Press the Function Menu key.
8 Change the required functions for the original to be
stored. For information on using the functions,
refer to the machine’s Operation Guide.
Function Description
Original Size Select the size of originals to be scanned. Be sure to select
the original’s size when using custom size originals.
Original Image Select image quality.
Scan Resolution Chooses the level of detail used for scanning originals.
Orig. Orientation
To ensure that the originals are stored in the correct orientation,
this indicates which end of the original is the top. To use the
following functions, select the orientation of the originals.
•Duplex
Continuous Scan Allows you to divide originals that cannot be placed in the
document processor at one time into multiple scans and then
store the result as a single file. With this function, originals
continue to be scanned until you press [END Scan] (the
Right Select key).
File Name Entry
Allows you to rename the files created from scanned originals.
You can also use this function to add the job number and/or date.
Page 100

FAX Operation (Advanced)
4-42
9 Press the Start key. The originals are scanned and
stored in the Polling box.
Job Finish Notice
Sends a notice by an e-mail when a transmission is complete.
Density Adjusts the density used for scanning originals.
Duplex Select the type and binding of originals.
Function Description
 Loading...