

Page 1

Instruction Handbook
LP 4118
Laser Printer b/w
Page 2

Page 3

Contents
1 Machine Overview . . . . . . . . . . . . . . . . . . . . . . . . . . . . . . . . . . . . . . . . . . . . . . . 1
Indicators . . . . . . . . . . . . . . . . . . . . . . . . . . . . . . . . . . . . . . . . . . . . . . . . . . . . . . . . . . . . . . . . . . . . 2
Key Status . . . . . . . . . . . . . . . . . . . . . . . . . . . . . . . . . . . . . . . . . . . . . . . . . . . . . . . . . . . . . . . . . . . 2
2 Loading Paper . . . . . . . . . . . . . . . . . . . . . . . . . . . . . . . . . . . . . . . . . . . . . . . . . . 3
Paper Specifications . . . . . . . . . . . . . . . . . . . . . . . . . . . . . . . . . . . . . . . . . . . . . . . . . . . . . . . . . . . 3
Prepare the Paper . . . . . . . . . . . . . . . . . . . . . . . . . . . . . . . . . . . . . . . . . . . . . . . . . . . . . . . . . . . . . 4
Loading Paper into a Cassette . . . . . . . . . . . . . . . . . . . . . . . . . . . . . . . . . . . . . . . . . . . . . . . . . . . . 4
Manual Feed Tray . . . . . . . . . . . . . . . . . . . . . . . . . . . . . . . . . . . . . . . . . . . . . . . . . . . . . . . . . . . . . 6
3 Connections . . . . . . . . . . . . . . . . . . . . . . . . . . . . . . . . . . . . . . . . . . . . . . . . . . . . 9
Connecting to Parallel Interface . . . . . . . . . . . . . . . . . . . . . . . . . . . . . . . . . . . . . . . . . . . . . . . . . . . 9
Connecting to USB Interface . . . . . . . . . . . . . . . . . . . . . . . . . . . . . . . . . . . . . . . . . . . . . . . . . . . . 10
Connecting to Power . . . . . . . . . . . . . . . . . . . . . . . . . . . . . . . . . . . . . . . . . . . . . . . . . . . . . . . . . . 10
4 Loading Software . . . . . . . . . . . . . . . . . . . . . . . . . . . . . . . . . . . . . . . . . . . . . . 13
5 Printing . . . . . . . . . . . . . . . . . . . . . . . . . . . . . . . . . . . . . . . . . . . . . . . . . . . . . . . 15
Printing a Document . . . . . . . . . . . . . . . . . . . . . . . . . . . . . . . . . . . . . . . . . . . . . . . . . . . . . . . . . . . 15
Manual Duplex . . . . . . . . . . . . . . . . . . . . . . . . . . . . . . . . . . . . . . . . . . . . . . . . . . . . . . . . . . . . . . . 16
6 Maintenance . . . . . . . . . . . . . . . . . . . . . . . . . . . . . . . . . . . . . . . . . . . . . . . . . . . 17
Toner Container . . . . . . . . . . . . . . . . . . . . . . . . . . . . . . . . . . . . . . . . . . . . . . . . . . . . . . . . . . . . . . 18
Cleaning the Printer . . . . . . . . . . . . . . . . . . . . . . . . . . . . . . . . . . . . . . . . . . . . . . . . . . . . . . . . . . . 20
Prolonged Non-Use and Moving the Printer . . . . . . . . . . . . . . . . . . . . . . . . . . . . . . . . . . . . . . . . 22
7 Troubleshooting . . . . . . . . . . . . . . . . . . . . . . . . . . . . . . . . . . . . . . . . . . . . . . . 23
General Guide . . . . . . . . . . . . . . . . . . . . . . . . . . . . . . . . . . . . . . . . . . . . . . . . . . . . . . . . . . . . . . . 23
Print Quality Problems . . . . . . . . . . . . . . . . . . . . . . . . . . . . . . . . . . . . . . . . . . . . . . . . . . . . . . . . . 24
Paper Jams . . . . . . . . . . . . . . . . . . . . . . . . . . . . . . . . . . . . . . . . . . . . . . . . . . . . . . . . . . . . . . . . . 24
8 Options . . . . . . . . . . . . . . . . . . . . . . . . . . . . . . . . . . . . . . . . . . . . . . . . . . . . . . . 29
9 Specifications . . . . . . . . . . . . . . . . . . . . . . . . . . . . . . . . . . . . . . . . . . . . . . . . . 31
OPERATION GUIDE i
Page 4

ii OPERATION GUIDE
Page 5

Legal and Safety
Information
FCC statement (for users in the United States)
This device complies with Part 15 of the FCC Rules. Operation is subject
to the following two conditions:
• This device may not cause harmful interference
• This device must accept any interference received, including
interference that may cause undesired operation.
This equipment has been tested and found to comply with the limits for a
Class B digital device, pursuant to Part 15 of the FCC Rules. These limits
are designed to provide reasonable protection against harmful interference
in a residential installation. This equipment generates, uses, and can
radiate radio frequency energy and, if not installed and used in accordance
with the instructions, may cause harmful interference to radio
communications. However, there is no guarantee that interference will not
occur in a particular installation. If this equipment does cause harmful
interference to radio or television reception, which can be determined by
turning the equipment off and on, the user is encouraged to try to correct
the interference by one or more of the following measures:
• Reorient or relocate the receiving antenna.
• Increase the separation between the equipment and receiver.
• Connect the equipment into an outlet on a circuit different from that to
which the receiver is connected.
• Consult the dealer or an experienced radio/TV technician for help.
Changes or modifications not expressly approved by the manufacturer for
compliance could void the user’s authority to operate the equipment.
Shielded circular cable should be used for interfacing with the computer.
Precautions for Use
Any modification without prior permission may cause harmful interference.
If any modification/change is introduced to this equipment without prior
permission, the manufacturer cannot guarantee compliance with FCC
rules. To use equipment which does not comply with FCC rules is
prohibited.
OPERATION GUIDE iii
Page 6

Legal and Safety Information
Interface connectors
Safety information
IMPORTANT: Ensure the printer is powered off before connecting or
disconnecting an interface cable to the printer.
IMPORTANT: For protection against static discharge which may be
applied to the printer's internal electronics through the interface
connector(s), keep any interface connector which is not in use capped
using the protective cap supplied.
NOTE: Use shielded interface cable.
Laser safety
This printer is certified as a Class 1 laser product under the U.S.
Department of Health and Human Services (DHHS) Radiation
Performance Standard according to Radiation Control for Health and
Safety Act of 1968. This means that the printer does not produce
hazardous laser radiation. Since radiation emitted inside the printer is
completely confined within protective housings and external covers, the
laser beam cannot escape from the printer during any phase of user
operation.
Laser notice
This printer is certified in the U.S. to conform to the requirements of DHHS
21 CFR, Chapter I, Subchapter for Class I (1) laser products, and
elsewhere is certified as a Class I laser product conforming to the
requirements of IEC 825.
DANGER: CLASS 3B INVISIBLE LASER RADIATION WHEN
OPEN. AVOID DIRECT EXPOSURE TO BEAM.
CAUTION: Use of controls or adjustments or performance of procedures
other than those specified herein may result in hazardous radiation
exposure.
iv OPERATION GUIDE
Page 7
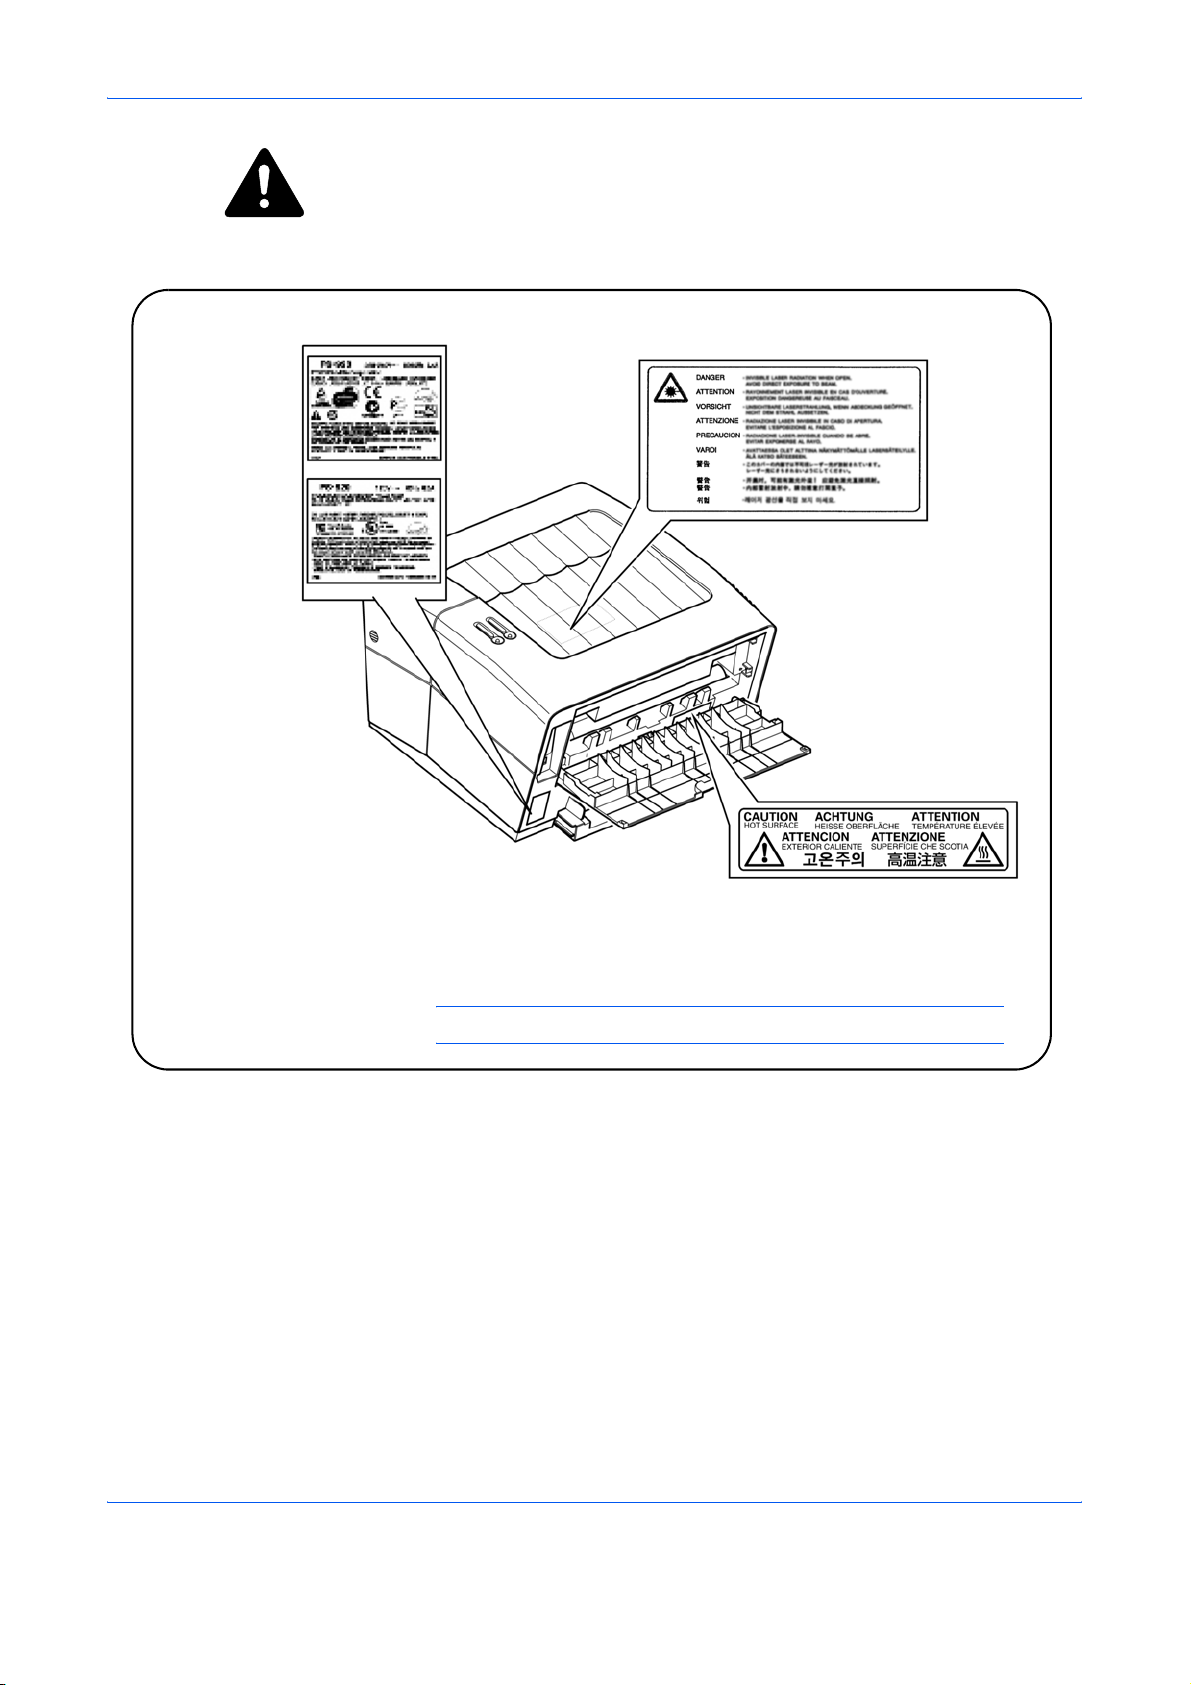
Label on the printer’s rear panel
European/
Asian/Pacific
countries
U.S.A./Canada
Legal and Safety Information
Caution Labels
Label inside the printer
(Laser radiation warning)
NOTE: Do not remove these labels.
CDRH Regulations
The Center for Devices and Radiological Health (CDRH) of the U.S. Food
and Drug Administration implemented regulations for laser products on
August 2, 1976. These regulations apply to laser products manufactured
after August 1, 1976. Compliance is mandatory for products marketed in
the United States. A label indicating compliance with the CDRH regulations
must be attached to laser products marketed in the United States.
Label inside the rear
OPERATION GUIDE v
Page 8

Legal and Safety Information
Ozone Concentration
IMPORTANT SAFEGUARDS
The printers generate ozone gas (O3) which may concentrate in the place
of installation and cause an unpleasant smell. To minimize concentration
of ozone gas to less than 0.1 ppm, we recommend the printer is not located
in a confined area where ventilation may be blocked.
1 Read all of these instructions and save these instructions for later
use.
2 Unplug this product from the wall outlet before cleaning.
3 Do not use this product near water.
4 Do not place this product on an unstable cart, stand, or table. The
product may fall, causing serious damage to the product.
5 Slots and openings in the cabinet and the back are provided for
ventilation to ensure reliable operation of the product and to protect it
from overheating, these openings must not be blocked or covered.
The openings should never be blocked by placing the product on a
bed, sofa, rug, or other similar surface. This product should never be
placed near or over a radiator or heat register. This product should
not be placed in a built-in installation unless proper ventilation is
provided.
6 This product is equipped with a 3-wire grounding type plug, a plug
having a third (grounding) pin. This plug will only fit into a groundingtype power outlet. This is a safety feature. If you are unable to insert
the plug into the outlet, contact your electrician to replace your
obsolete outlet. Do not defeat the purpose of the grounding-type
plug.
7 Do not allow anything to rest on the power cord. Do not locate this
product where persons will walk on the cord.
8 If an extension cord is used with this product, make sure that the total
of the ampere ratings on the products plugged into the extension
cord do not exceed the extension cord ampere rating.
9 Never push objects of any kind into this product through cabinet slots
as they may touch dangerous voltage points or short out parts that
could result in a risk of fire or electric shock. Never spill liquid of any
kind on the product.
10 Except as explained elsewhere in the Operation Guide, do not
attempt to service this product yourself. Removing covers may
expose you to dangerous voltage points or other risks. Refer all
servicing in those compartments to a service technician.
11 Unplug this product from the wall outlet and refer servicing to a
qualified service technician under the following conditions:
- When the power cord or plug is damaged or frayed.
- If liquid has been spilled into the product.
- If the product has been exposed to rain or water.
vi OPERATION GUIDE
Page 9

Legal and Safety Information
- If the product does not operate normally when the operating
instructions are followed. Adjust only those controls that are
covered by the operating instructions since improper adjustment
of other controls may result in damage and will often require
extensive work by a qualified technician to restore the product to
normal operation.
- If the product has been dropped or the cabinet has been damaged.
Canadian Department of Communications compliance statement
This Class B digital apparatus complies with Canadian ICES-003.
Avis de conformitè aux normes du ministère des
Communications du Canada
Cet appareil numèrique de à la classe B est conforme à la norme NMB-003
du Canada.
ISO 7779
Maschinenlärminformationsverordnung 3. GSGV, 18.01.1991: Der
höchste Schalldruckpegel beträgt 70 dB(A) oder weniger gemäß ISO
7779.
CE Marking Directive
According to Council Directive 89/336/EEC and 73/23/EEC
Manufacturer’s name: UTAX GmbH
Manufacturer’s address: Ohechaussee 235,
Declares that the product:
Product name: Page Printer
Model number: TA Triumph-Adler LP 4118
Conforms to the following product specifications:
- EN 55 022:1998 Class B
- EN 61 000-3-2:2000
- EN 61 000-3-3:1995+A1:2001
- EN 55 024:1998
- EN 60 950:2000
- EN 60 825-1:1994+A1+A2
22848 Norderstedt, Germany
OPERATION GUIDE vii
Page 10

Legal and Safety Information
The manufacturer and its merchandising companies retain the following
technical documentation in anticipation of the inspection that may be
conducted by the authorities concerned.
- User’s instruction that conforms to the applicable specifications.
- Technical drawings.
- Descriptions of the procedures that guarantee the conformity.
- Other technical information.
viii OPERATION GUIDE
Page 11

Legal and Safety Information
OPERATION GUIDE ix
Page 12
Legal and Safety Information
Energy Star Program
Initial Sleep Mode Setting Power Consumption in Sleep Mode
As an ENERGY STAR Partner, we have determined that this product
meets the ENERGY STAR guidelines for energy efficiency.
The basic objective of the ENERGY STAR Program is to reduce
environmental pollution by encouraging the manufacture and sale of
equipment that uses energy more efficiently.
This printer is equipped with a sleep timer function that conforms with the
standards of the ENERGY STAR Program. This function makes it possible
to reduce the amount of electrical power consumed by the printer. For
maximum power savings, turn off the printer's power supply when not
using the printer for extended periods of time.
For details on the sleep timer function and printer power consumption,
refer to the CD-ROM instruction manual provided with the printer.
5 minutes (15 minutes)
( ): ENERGY STAR program guideline
4.8W (20W) [220 to 240V, 50Hz/60Hz]
4.4W (20W) [120V, 60Hz]
Group for Energy Efficient Appliances (GEEA)
The goal of GEEA is efficient use of energy. This product has a highefficiency profile and meets the criteria for receiving the GEEA-Label.
Initial Sleep Mode Setting Power Consumption in Sleep Mode
5 minutes (15 minutes)
( ): GEEA criteria
4.8W (10W) [220 to 240V, 50Hz/60Hz]
4.4W (10W) [120V, 60Hz]
Regarding Trade Names
KPDL and KIR (Kyocera Image Refinement) are trademarks of Kyocera
Corporation. Hewlett-Packard, PCL, and PJL are registered trademarks of
Hewlett-Packard Company. Centronics is a trade name of Centronics Data
Computer Corp. PostScript is a registered trademark of Adobe Systems
Incorporated. Adobe and Acrobat are trademarks of Adobe Systems
Incorporated. ENERGY STAR is a U.S. registered mark. All other brand
and product names are registered trademarks or trademarks of their
respective companies.
x OPERATION GUIDE
Page 13

Legal and Safety Information
This product uses PeerlessPrintXL to provide the HP LaserJet compatible
PCL 6 language emulation. PeerlessPrintXL is a trademark of The
Peerless Group, Redondo Beach, CA 90278, U.S.A.
This product was developed using the Tornado™ Real Time Operating
System and Tools from Wind River Systems.
This product contains UFST™ and MicroType
Corporation.
Agfa Monotype License Agreement
1 "Software" shall mean the digitally encoded, machine readable,
scalable outline data as encoded in a special format as well as the
UFST Software.
2 You agree to accept a non-exclusive license to use the Software to
reproduce and display weights, styles and versions of letters,
numerals, characters and symbols ("Typefaces") solely for your own
customary business or personal purposes at the address stated on
the registration card you return to Agfa Japan. Under the terms of
this License Agreement, you have the right to use the Fonts on up to
three printers. If you need to have access to the fonts on more than
three printers, you need to acquire a multi-user license agreement
which can be obtained from Agfa Japan. Agfa Japan retains all
rights, title and interest to the Software and Typefaces and no rights
are granted to you other than a License to use the Software on the
terms expressly set forth in this Agreement.
3 To protect proprietary rights of Agfa Japan, you agree to maintain the
Software and other proprietary information concerning the Typefaces
in strict confidence and to establish reasonable procedures
regulating access to and use of the Software and Typefaces.
4 You agree not to duplicate or copy the Software or Typefaces, except
that you may make one backup copy. You agree that any such copy
shall contain the same proprietary notices as those appearing on the
original.
5 This License shall continue until the last use of the Software and
Typefaces, unless sooner terminated. This License may be
terminated by Agfa Japan if you fail to comply with the terms of this
License and such failure is not remedied within thirty (30) days after
notice from Agfa Japan. When this License expires or is terminated,
you shall either return to Agfa Japan or destroy all copies of the
Software and Typefaces and documentation as requested.
6 You agree that you will not modify, alter, disassemble, decrypt,
reverse engineer or decompile the Software.
®
fonts from Agfa MonoType
OPERATION GUIDE xi
Page 14

Legal and Safety Information
7 Agfa Japan warrants that for ninety (90) days after delivery, the
Software will perform in accordance with Agfa Japan-published
specifications, and the diskette will be free from defects in material
and workmanship. Agfa Japan does not warrant that the Software is
free from all bugs, errors and omissions.
THE PARTIES AGREE THAT ALL OTHER WARRANTIES,
EXPRESSED OR IMPLIED, INCLUDING WARRANTIES OF
FITNESS FOR A PARTICULAR PURPOSE AND
MERCHANTABILITY, ARE EXCLUDED.
8 Your exclusive remedy and the sole liability of Agfa Japan in
connection with the Software and Typefaces is repair or replacement
of defective parts, upon their return to Agfa Japan.
IN NO EVENT WILL AGFA JAPAN BE LIABLE FOR LOST
PROFITS, LOST DATA, OR ANY OTHER INCIDENTAL OR
CONSEQUENTIAL DAMAGES, OR ANY DAMAGES CAUSED BY
ABUSE OR MISAPPLICATION OF THE SOFTWARE AND
TYPEFACES.
9 New York, U.S.A. law governs this Agreement.
10 You shall not sublicense, sell, lease, or otherwise transfer the
Software and/or Typefaces without the prior written consent of Agfa
Japan.
11 Use, duplication or disclosure by the Government is subject to
restrictions as set forth in the Rights in Technical Data and Computer
Software clause at FAR 252-227-7013, subdivision (b)(3)(ii) or
subparagraph (c)(1)(ii), as appropriate. Further use, duplication or
disclosure is subject to restrictions applicable to restricted rights
software as set forth in FAR 52.227-19 (c)(2).
12 YOU ACKNOWLEDGE THAT YOU HAVE READ THIS
AGREEMENT, UNDERSTAND IT, AND AGREE TO BE BOUND BY
ITS TERMS AND CONDITIONS. NEITHER PARTY SHALL BE
BOUND BY ANY STATEMENT OR REPRESENTATION NOT
CONTAINED IN THIS AGREEMENT. NO CHANGE IN THIS
AGREEMENT IS EFFECTIVE UNLESS WRITTEN AND SIGNED
BY PROPERLY AUTHORIZED REPRESENTATIVES OF EACH
PARTY. BY OPENING THIS DISKETTE PACKAGE, YOU AGREE
TO ACCEPT THE TERMS AND CONDITIONS OF THIS
AGREEMENT.
xii OPERATION GUIDE
Page 15

IBM PROGRAM LICENSE AGREEMENT
THE DEVICE YOU HAVE PURCHASED CONTAINS ONE OR MORE
SOFTWARE PROGRAMS ("PROGRAMS") WHICH BELONG TO
INTERNATIONAL BUSINESS MACHINES CORPORATION ("IBM").
THIS DOCUMENT DEFINES THE TERMS AND CONDITIONS UNDER
WHICH THE SOFTWARE IS BEING LICENSED TO YOU BY IBM. IF YOU
DO NOT AGREE WITH THE TERMS AND CONDITIONS OF THIS
LICENSE, THEN WITHIN 14 DAYS AFTER YOUR ACQUISITION OF
THE DEVICE YOU MAY RETURN THE DEVICE FOR A FULL REFUND.
IF YOU DO NOT SO RETURN THE DEVICE WITHIN THE 14 DAYS,
THEN YOU WILL BE ASSUMED TO HAVE AGREED TO THESE TERMS
AND CONDITIONS.
The Programs are licensed not sold. IBM, or the applicable IBM country
organization, grants you a license for the Programs only in the country
where you acquired the Programs. You obtain no rights other than those
granted you under this license. The term "Programs" means the original
and all whole or partial copies of it, including modified copies or portions
merged into other programs. IBM retains title to the Programs. IBM owns,
or has licensed from the owner, copyrights in the Programs.
Legal and Safety Information
1 License
Under this license, you may use the Programs only with the device on
which they are installed and transfer possession of the Programs and the
device to another party. If you transfer the Programs, you must transfer a
copy of this license and any other documentation to the other party. Your
license is then terminated. The other party agrees to these terms and
conditions by its first use of the Program.
You may not:
- use, copy, modify, merge, or transfer copies of the Program except
as provided in this license;
- reverse assemble or reverse compile the Program; or
- sublicense, rent, lease, or assign the Program.
2 Limited Warranty
The Programs are provided "AS IS."
THERE ARE NO OTHER WARRANTIES COVERING THE PROGRAMS
(OR CONDITIONS), EXPRESS OR IMPLIED, INCLUDING, BUT NOT
LIMITED TO, THE IMPLIED WARRANTIES OF MERCHANTABILITY
AND FITNESS FOR A PARTICULAR PURPOSE.
Some jurisdictions do not allow the exclusion of implied warranties, so the
above exclusion may not apply to you.
SUPPLEMENT TO AGREEMENT FOR SOFTWARE BUNDLING AND
DISTRIBUTION FOR ALDC.
OPERATION GUIDE xiii
Page 16

Legal and Safety Information
3 Limitation of Remedies
IBM’s entire liability under this license is the following;
• For any claim (including fundamental breach), in any form, related in
any way to this license, IBM's liability will be for actual damages only
and will be limited to the greater of:
- the equivalent of U.S.$25,000 in your local currency; or
- IBM's then generally available license fee for the Program
This limitation will not apply to claims for bodily injury or damages to real
or tangible personal property for which IBM is legally liable. IBM will not be
liable for any lost profits, lost savings, or any incidental damages or other
economic consequential damages, even if IBM, or its authorized supplier,
has been advised of the possibility of such damages. IBM will not be liable
for any damages claimed by you based on any third party claim. This
limitation of remedies also applies to any developer of Programs supplied
to IBM. IBM's and the developer's limitations of remedies are not
cumulative. Such developer is an intended beneficiary of this Section.
Some jurisdictions do not allow these limitations or exclusions, so they may
not apply to you.
4 General
You may terminate your license at any time. IBM may terminate your
license if you fail to comply with the terms and conditions of this license. In
either event, you must destroy all your copies of the Program. You are
responsible for payment of any taxes, including personal property taxes,
resulting from this license. Neither party may bring an action, regardless of
form, more than two years after the cause of action arose. If you acquired
the Program in the United States, this license is governed by the laws of
the State of New York. If you acquired the Program in Canada, this license
is governed by the laws of the Province of Ontario. Otherwise, this license
is governed by the laws of the country in which you acquired the Program.
xiv OPERATION GUIDE
Page 17

1 Machine Overview
Top C o ver
Indicators
Cancel KeyGo Key
Output Tray
Rear Cover
Paper Stopper
Manual Feed Tray
OPERATION GUIDE 1
Parallel Interface USB InterfacePaper Cassette
Power Switch
Power Cord
Page 18

Machine Overview
Indicators
There are two indicators located on the top right of the printer. The
indicators are used to identify the status of the printer at any time. To
identify the printer status, check the indicators on the printer and then refer
to the table below.
Ready Indicator (green)
Indicator Action
Attention
Indicator
(red)
Fast
Lit
Flashing
Lit XXX
Fast
Flashing
Slow
Flashing
Off
X
XXX
On-line / Ready Off-line Data Processing Power is Off Sleeping
Warm Up
Slow
Flashing Off
Cover Open,
Toner Container
Empty, Developer
Unit or
Drum Unit missing
Paper Jam or
X
Waiting for Jam
Reset
Paper empty or
Paper Cassette is
not installed
(during printing)
Very Slow
Flashing
XX
XX
X
NOTE: For other combinations of the two indicators, call for service.
KM-NET for Clients (a software included in the CD-ROM) will provide
more detailed information about the printer status.
Key Status
Key Status Operation Function
Go At Ready Press momentarily Switches On-line / Off-line
Press for 3 to 10 seconds Prints the status page
Press for 10 seconds or more Prints the service status page
At Error Press momentarily Clears the error
After Power OnPress until Ready is lit Resets the toner counter after
replacing the toner container
Cancel Press momentarily Stops the audible alarm
Press for 1 second or more Cancels the data from the PC
Any
Indicator
Toner Low,
Add Paper
(during ready)
X
2 OPERATION GUIDE
Page 19

Manual Feed Tray
-1 sheet
- 60 to 163 g/m
- A4, B5 (JIS), A5, Letter,
Legal, Folio, Oficio II,
Statement, Executive, A6, B6, B5
(ISO), Envelope #10, Envelope #9,
Envelope Monarch, Envelope #6,
Envelope C5, Envelope DL and 16K
2 Loading Paper
2
Paper Cassette
- 250 sheets (80 g/m2)
- 60 to 105 g/m
- A4, B5 (JIS), A5, Letter,
Legal, Folio, Oficio II,
Executive, B5 (ISO),
Envelope C5, and 16K
2
Paper Specifications
The following table summarizes the basic paper specifications:
Item Specification
Weight Cassette: 60 - 105 g/m
Thickness 0.086 to 0.110mm (3.4 to 4.3 mils)
Dimensional Accuracy ±0.7 mm (±0.0276 inches)
Squareness of Corners 90° ±0.2°
Moisture Content 4% to 6%
Direction of Grain Long grain
Pulp Content 80% or more
NOTE: For further information about the sizes and types of media that
can be used, refer to Specifications, on page 31.
Manual Feed Tray: 60 - 163 g/m
2
(16 to 28 lb/ream)
2
(16 to 43 lb/ream)
OPERATION GUIDE 3
Page 20

Loading Paper
Prepare the Paper
Loading Paper into a Cassette
After removing paper from the
packaging, fan through the sheets
to separate them prior to loading.
If using paper that has been
folded or is curled, straighten it
prior to loading. Failure to do so
may result in a paper jam.
IMPORTANT: Ensure paper is not stapled and clips are removed.
Pull the cassette completely out of
1
the printer.
IMPORTANT: When pulling the
cassette out of the printer, ensure
it is supported and does not fall
out.
Press the release button and
2
adjust the paper length guide to
the paper size required.
Adjust the position of the width
3
guides located on the left and right
sides of the paper cassette. Press
the release button on the left
guide and slide the guides to the
paper size required.
NOTE: The paper sizes are marked on the cassette.
4 OPERATION GUIDE
Page 21

If using Folio or Oficio II paper,
remove the green stopper
the paper length guide and fix into
position on the paper length guide
d. Pull the paper length guide
towards the rear until it stops.
Load the paper in the cassette.
4
IMPORTANT: Always adjust the
paper length and width guides
before loading paper to avoid
skewed paper feed and/or a
paper jam.
Do not load paper above the
triangle mark located on the width
guide.
Loading Paper
c from
Ensure the side to be printed is
facing down and the paper is not
folded, curled, or damaged.
Push the cassette back into the
5
printer until it stops.
OPERATION GUIDE 5
Page 22

Loading Paper
Manual Feed Tray
Paper placed on the Manual Feed Tray is automatically fed and overrides
the paper cassette.
Pull out the cassette to access the
1
Manual Feed Tray.
Pull the Manual Feed Tray up and
2
out.
Pull out the front of the Manual
3
Feed Tray.
Push the cassette back into the
4
printer.
6 OPERATION GUIDE
Page 23

Adjust the paper width guides and
5
slide the paper into the tray as far
as it will go. The side to be printed
should be face up.
Ensure the paper width guides
are flush against the edge of the
paper.
Envelopes should be fed in the
face-up position, right edge first.
IMPORTANT: Load one sheet or
envelope at a time.
Loading Paper
NOTE: Prior to purchasing envelopes, print a sample to check quality
Start printing after loading the Manual Feed Tray.
After use, move the width guides fully outwards and close the Manual Feed
6
Tray.
NOTE: For further information about the sizes and types of media that
can be used, refer to Specifications on page 31.
Pull out the paper stopper.
7
OPERATION GUIDE 7
Page 24

Loading Paper
8 OPERATION GUIDE
Page 25

Parallel Interface
3 Connections
Power Switch
Power Cord
Connector
USB Interface
Connecting to Parallel Interface
Connect the printer cable (not
1
included) to the Parallel Interface
Connector.
NOTE: Use a parallel printer cable that complies with IEEE 1284
standards. For optimum performance, install the printer close to the
computer. The connection cable should be shielded and no longer than 3
meters (10 feet) long.
Close the clips on both sides to fix the connector in place.
2
Power Cord
Connect the other end of the printer cable to the computer’s parallel
3
interface connector.
OPERATION GUIDE 9
Page 26

Connections
Connecting to USB Interface
Connect the USB cable (not
1
included) to the USB Interface
Connector.
NOTE: Use a USB cable with a rectangular Type A plug and a square
Type B plug. The USB cable should be shielded and no longer than 5
meters (16 feet) long.
Connect the other end of the USB cable to the computer’s USB interface
2
connector.
Connecting to Power
Install the printer close to an AC wall outlet. If an extension cord is used,
the total length of the power cord plus extension should be 5 meters (16
feet) or less.
NOTE: Ensure the printer’s power switch is off. Only use the power cord
supplied with the printer.
Connect the power cord to the
1
Power Cord Connector at the rear
of the printer.
Connect the other end of the power cord to a power outlet.
2
10 OPERATION GUIDE
Page 27

Press the Power Switch to On
3
( | ).
The printer begins to warm up.
IMPORTANT: If you install the Toner Container and switch on the power,
two indicators will start fast flashing. When the printer is first switched on
after toner installation, there will be a delay of approximately 15 minutes
before the printer gets ready to print. Once the Ready indicator lights,
printer installation is complete.
Connections
OPERATION GUIDE 11
Page 28

Connections
12 OPERATION GUIDE
Page 29

4 Loading Software
Ensure the printer is plugged in and connected to the computer’s parallel
or USB port before installing software from the CD-ROM.
Switch on the PC and activate Windows.
1
NOTE: If the Welcome to the Found New Hardware Wizard dialog box
displays, select Cancel.
Insert the CD-ROM (Software Library) into the CD-ROM drive.
2
The installation program launches
3
and the License Agreement
displays.
Select View License Agreement to
read the information and select
Accept to proceed.
NOTE: If the installation program fails to launch, use Windows Explorer
to access the CD-ROM and select Setup.exe.
Select Install KX Driver and follow
4
the on-screen instructions to
complete the software installation.
Once the installation is complete, the Printer Installed Successfully dialog
5
box displays.
OPERATION GUIDE 13
Page 30

Loading Software
14 OPERATION GUIDE
Page 31

5Printing
Layout
Use to select Manual Duplex or to create
multiple pages on a single sheet of paper.
Also contains the scaling option.
Media
Use this tab to select
the page size and
orientation. The paper
source is also selected.
Prologue/Epilogue
This option
incorporates the
PRESCRIBE
commands into the
document.
Setting Information
Use this option to view
a summary of the
selected options in a
tree format.
Imaging
Select this tab to change the print quality,
and the font or graphic settings.
Output
Use to select the number of prints
and the collate option.
Profile
Use to save settings
selected on the
printer driver for
regularly run jobs.
Watermark
Use to set up and
add watermarks to
your output.
Advanced
Use to add covers or
page inserts to your
output. You can also
produce a set of
transparencies with a
blank or printed
sheet interleaved
using Transparency
Interleaving.
NOTE: For more detailed information about the printer driver options,
refer to the KX Printer Drivers guide.
Printing a Document
Ensure the paper required is loaded in the printer.
1
From the application File menu, select Print. The Print dialog box displays.
2
Select the drop down list of printer names. All the printers installed are
3
listed. Select the LP 3118/4118.
Select the options required, enter the number of copies required and if
4
printing more than one set, select Collate.
Select OK to start printing.
OPERATION GUIDE 15
Page 32

Printing
Manual Duplex
1
Use Manual Duplex if you require printing on both sides of the paper. The
even pages are printed first and then reloaded to print the odd pages. An
instruction sheet is available to assist with loading the sheets in the correct
orientation and order.
NOTE: Ensure Print Instructions is selected to receive the instruction
sheet. Continue to use the sheet until you are familiar with this feature.
Ensure Cassette 1 is selected as
the Source in the print Properties
dialog box.
Select the Layout tab and then
2
Print on Both Sides (Manual
Duplex).
Select Flip on Long Edge for
binding on the long edge or Flip
on Short Edge for binding on the
short edge.
Select Gutter Settings and enter
the value required in the Gutter
field. Gutter width range: 5.00 to 25.4 mm (0.20 to 1.00 inch).
Select OK to return to the Print dialog box and select OK to start printing.
3
A Manual Duplex instruction message box displays.
Remove all the even pages
4
(including the instruction sheet)
from the output tray and load them
into the paper cassette, with the
instruction sheet facing up and
the arrows pointing toward the
printer.
NOTE: Nothing will be printed on the instruction sheet. If the paper is
curled, straighten it out before loading the paper in the cassette.
Select OK on the Manual Duplex instruction message box. All the odd
5
pages will be printed.
16 OPERATION GUIDE
Page 33

6 Maintenance
Cleaning Tasks
The printer should be cleaned on a regular
basis to ensure optimum performance. Use
a clean, lint free cloth to clean dust and dirt
from the printer.
Toner Container
The toner container requires replacing when
empty. A starter toner container provides
approximately 3000 prints. A full toner
container is offered in two yield types, 2000
or 6000 pages (at 5% coverage).
Developer Unit
The developer unit should be removed to
allow for cleaning tasks every time the toner
container is replaced.
Maintenance task instructions are provided on the following pages.
Drum Unit
The drum unit should be removed to allow
for printer cleaning tasks. The charger wire
should be cleaned using the Charger
Cleaner every time the toner container is
replaced.
OPERATION GUIDE 17
Page 34

Maintenance
Toner Container
1
2
To replace the Toner Container use the instructions below.
CAUTION: Do not attempt to incinerate the Toner Container. Dangerous
sparks may cause burns. Do not attempt to force open or destroy the Toner
Container.
Open the Top Cover.
Turn Lock Lever A to the unlock
position, push Lock Lever B to the
right and pull out the Toner
Container.
B
Place the used Toner Container in
the plastic bag provided for
disposal.
Remove the packaging from the
3
new Toner Container.
Shake the container horizontally
to distribute the toner evenly.
Remove the label from the Toner
4
Container.
A
18 OPERATION GUIDE
Page 35

Install the new Toner Container in
5
the printer. Push firmly on the top
of the container at the positions
marked PUSH HERE, until you
hear a click.
Turn Lock Lever A to the lock
position and close the Top Cover.
Toner Container Capacity
There are two different Toner Container capacities available for this
product, one provides approximately 2000 prints and the other
approximately 6000 prints. If you change from one capacity to another,
perform the following steps to ensure the remaining amount of toner is
shown correctly on the status page Toner Gauge.
Install KM-NET for Clients using the CD-ROM supplied and run the
1
program.
Maintenance
A
Select the Menu button located on the left and then the Menu tab.
2
Select Toner and then Black.
3
Select Capacity. The Capacity dialog opens on the right.
4
In the Capacity drop down menu, select the appropriate capacity,
5
6000 pages and select OK.
OPERATION GUIDE 19
Page 36

Maintenance
Cleaning the Printer
To avoid print quality problems, the interior of the printer must be cleaned
with every Toner Container replacement.
Open the Top Cover.
1
Lift the Developer Unit together
2
with the Toner Container out of
the printer.
Using the green handles lift the
3
Drum Unit out of the machine.
NOTE: The Drum Unit is sensitive to light. Never expose the Drum Unit
to light for more than five minutes.
Place the Drum Unit flat on a
4
clean, level surface.
IMPORTANT: Do not place the
Drum Unit on end.
20 OPERATION GUIDE
Page 37

Use a clean, lint free cloth to clean
5
dust and dirt away from the metal
Registration Roller (metal)
IMPORTANT: Take care not to
touch the Transfer Roller (black)
d during cleaning.
Slide the Charger Cleaner (green)
6
back and forth 2 or 3 times to
clean the charger wire, then return
it to its original position.
When cleaning is complete, return
7
the Drum Unit to its position,
aligning the guides at both ends
with the slots in the printer.
c.
Maintenance
d
c
Insert the Developer Unit together
8
with the Toner Container, back
into the machine.
Close the Top Cover.
OPERATION GUIDE 21
Page 38

Maintenance
Prolonged Non-Use and Moving the Printer
Prolonged Non-use
If you ever leave the printer unused for a long period of time, remove the
power cord from the wall outlet.
We recommend you consult with your dealer about the additional actions
you should take to avoid possible damage that may occur when the printer
is used next time.
Moving the Printer
When you move the printer:
- Move it gently.
- Keep it as level as possible to avoid spilling toner inside the printer.
- Be sure to consult a service technician before attempting longdistance transportation of the printer.
WARNING: If you ship the printer, remove and pack the developer
unit and drum unit in a plastic bag and ship them separately from the
printer.
22 OPERATION GUIDE
Page 39

General Guide
Symptom Check Items Corrective Action
7 Troubleshooting
There are a number of printer problems which can be corrected by a user.
Use the table below to identify a problem and perform the corrective action.
The printer will not print from
the computer
Print quality is poor Refer to page 24 for
Paper is jammed Refer to page 24 for
The indicators are off and the
fan is not working
The printer prints a status
page but data from the
computer is not being
printed
Check the indicators Using the information on page
2 check if an error has
occurred and clear the error.
Check if a status page can be
printed.
Check the indicators display in
a recognised combination,
refer to page 2 for further
information.
Check the power cable Connect both ends of the
Check the power switch is in
the On (I) position.
Check program files and
application software
If the status page was printed
successfully, there may be a
problem with the connection to
the computer. Refer to page 9
and check the connection.
Turn the power switch Off (O)
and then On (|) again. Submit
the print job again.
information.
information on jam clearance.
power cable securely. Try
replacing the power cable.
Refer to page 9 for information.
Refer to page 10 for
information.
Try printing another file or
using another print command.
If the problem occurs with a
specific file or application,
check the printer settings for
that application.
If the problem persists or cannot be corrected, please contact your Service
Technician.
OPERATION GUIDE 23
Page 40

Troubleshooting
Print Quality Problems
The table below describes potential print quality problems and the
corrective action for each problem.
Printed Results Corrective Action
All black pages Contact your Service Technician.
Dropouts, horizontal streaks or
stray dots
Black or white vertical streaks Check the toner container and if
Faint or blurred printing Check the toner container and if
Gray background Check the toner container and if
Dirt on the top edge or back of the
paper
Clean the charger wire, refer to page
21 for information.
necessary replace. Refer to page 18
for information.
Clean the charger wire, refer to page
21 for information.
Check the charger cleaner is in its
original position. Refer to page 21 for
information.
necessary replace. Refer to page 18
for information.
Clean the charger wire, refer to page
21 for information.
necessary replace. Refer to page 18
for information.
Check the developer unit and drum
unit are installed correctly. Refer to
page 21 for information.
Check the registration roller is not
soiled with toner. Refer to page 21 for
information.
Paper Jams
The printer will stop when a paper jam occurs in the printer or if paper is
misfed. The printer will go offline and the Attention Indicator will fast flash.
Follow the instructions provided here to clear the jam. If paper jams occur
frequently, try using a different type of paper, replace the paper using a
new ream, or turn the paper over. Also, look for tiny pieces of paper which
may have been left in the printer.
If the problem persists, contact your local Service Technician for
assistance.
24 OPERATION GUIDE
Page 41

Output Tray and Rear Cover
If paper is not completely ejected
1
into the Output Tray, open the
Rear Cover and remove the
jammed paper by pulling it out.
Open and close the Top Cover to clear the error.
2
The printer warms up and resumes printing.
Paper Cassette
Pull out the cassette.
1
Troubleshooting
Remove any partially fed paper.
2
Check to see if paper is loaded
correctly. If not, reload the paper.
Push the cassette back in firmly.
3
Open and close the Top Cover to
clear the error.
The printer warms up and
resumes printing.
OPERATION GUIDE 25
Page 42

Troubleshooting
Manual Feed Tray
Remove the paper from the
1
Manual Feed Tray.
IMPORTANT: Do not try to
remove paper that has already
been partially fed, proceed to step
2.
Open the top cover and lift the
2
Developer Unit together with the
Toner Container out of the printer.
Using the green handles lift the
3
Drum Unit out of the machine.
NOTE: The Drum Unit is sensitive to light. Never expose the Drum Unit
to light for more than five minutes.
If the jammed paper appears to be
4
pinched by rollers, pull it along the
normal running direction of the
paper.
26 OPERATION GUIDE
Page 43

If it has not be fed as far as the
metal registration roller, remove
the paper from the Manual Feed
Tray side.
Return the Drum Unit to its
5
position, aligning the guides at
both ends with the slots in the
printer.
Insert the Developer Unit together
6
with the Toner Container, back
into the machine.
Troubleshooting
7
Printer
1
Close the Top Cover.
Reload the Manual Feed Tray.
The printer warms up and
resumes printing.
Open the top cover and lift the
Developer Unit together with the
Toner Container out of the printer.
OPERATION GUIDE 27
Page 44

Troubleshooting
Using the green handles lift the
2
Drum Unit out of the machine.
NOTE: The Drum Unit is sensitive to light. Never expose the Drum Unit
to light for more than five minutes.
Remove the paper from the
3
printer.
NOTE: If the jammed paper appears to be pinched by rollers, pull it along
the normal running direction of the paper.
Return the Drum Unit to its
4
position, aligning the guides at
both ends with the slots in the
printer.
Insert the Developer Unit together
5
with the Toner Container, back
into the machine.
Close the Top Cover.
The printer warms up and
resumes printing.
28 OPERATION GUIDE
Page 45

8 Options
Expansion Memory (DIMM) and Memory (CompactFlash) card can be
installed in this printer.
NOTE: Contact your dealer for information about purchasing the Memory
Card best suited for your printer.
The DIMM and Memory Card should be installed by an authorized dealer
or certified Service Technician.
To install the DIMM and Memory Card, switch off the printer’s power,
unplug the power cable and disconnect the printer from the PC. Hook the
finger to the concave portion and lift the side cover to release the latch
hook
c. Slide the side cover to the right with both hand d and remove it
from the printer
card (CompactFlash) in the slots provided
e. Install the expansion memory (DIMM) and memory
f.
Expansion Memory (DIMM) Slot
This slot is provided for expanding
the memory in your printer, to
allow for more complex printing.
The memory can be increased to
a maximum of 288 MB.
Memory (CompactFlash) Card Slot
A Memory Card is a microchip card that may
contain option fonts, macros, forms etc. The
printer reads the contents of the card into its
internal memory when switched on.
OPERATION GUIDE 29
Page 46

Options
30 OPERATION GUIDE
Page 47

9 Specifications
NOTE: Specifications are subject to change without notice.
Item Description
Printing Method Electrophotography using laser scan
Printing Speed A4 18 pages per minute / Letter 19 pages per minute
Paper Sizes
- Cassette A4, B5 (JIS), A5, Folio, 8
8
1/2 × 13" (Oficio II), Executive, B5 (ISO), Envelope C5, 16K,
Other 148 × 210 to 216 × 356 mm (5.8 × 8.3" to 8.5 × 14")
- Manual Feed Tray A4, B5 (JIS), A5, Folio, 8
8
1/2 × 13" (Oficio II), Statement, Executive, A6, B6, B5 (ISO),
Envelope #10, Envelope #9, Envelope Monarch, Envelope #6,
Envelope C5, Envelope DL, 16K, Other 70 × 148 to 216 × 356
mm (2.8 × 5.8" to 8.5 × 14")
Paper Types
- Cassette Plain paper, recycled paper, thick paper 60 to 105 g/m
(16 to 28 lbs)
- Manual Feed Tray Plain paper, recycled paper, thick paper 60 to 163 g/m
(16 to 43 lbs)
Transparency, adhesive backed labels, envelopes and post
cards supported
Paper Feed Source Capacity
- Cassette 250 sheets
- Manual Feed Tray 1 sheet
Output Tray Capacity 100 sheets (face-down)
Warm-up Time 16 seconds or less (power on), 12 seconds or less (sleep)
First Print 11 seconds or less
Resolution Fast 1200 mode: 1800 × 600 dpi (2400 × 600 dpi with KIR)
600 dpi mode: 600 × 600 dpi
Monthly Duty Average 2,000 pages, Maximum 15,000 pages
1/2 × 14" (Legal), 8 1/2 × 11" (Letter),
1/2 × 14" (Legal), 8 1/2 × 11" (Letter),
2
2
Controller PowerPC 405 (266 MHz)
OPERATION GUIDE 31
Page 48

Specifications
Item Description
Memory
- Standard 32 MB
- Additional Memory 288 MB
Interfaces
- Parallel
-USB 1
Operating Environment
- Temperature 10 - 32.5 °C
- Relative Humidity 20 - 80 %
- Altitude 2,000 m maximum
- Illumination 1,500 lux maximum
Dimensions
(W) × (H) × (D)
Weight Approx. 9.2 kg / 20.3 lbs
Operating noise
(in accordance with ISO 7779
[Bystander Position, sound
pressure level at the front])
1 (IEEE 1284)
380 × 245 × 390 mm
15 × 9.6 × 15.4"
During printing: LpA = 49 dB (A)
During standby: LpA = 28 dB (A)
During sleep mode: Immeasurably low
32 OPERATION GUIDE
Page 49

MEMO
A1
Page 50

UTAX GmbH, Ohechaussee 235, 22848 Norderstedt, Germany
 Loading...