

Page 1
INSTRUCTION HANDBOOK
LP 4018
Page 2

Page 3

Caution on Installation
NO LIABILITY IS ASSUMED FOR ANY DAMAGE CAUSED BY IMPROPER INSTALLATION.
Notice on Software
SOFTWARE USED WITH THIS PRINTER MUST SUPPORT THE PRINTER’S EMULATION MODE. The printer is factory-set to
emulate the PCL. The emulation mode can be changed by following the procedures described in Chapter 1.
Notice on This Guide
The information in this guide is subject to change without notification. Additional pages may be inserted in future editions. The user
is asked to excuse any technical inaccuracies or typographical errors in the present edition.
No responsibility is assumed if accidents occur while the user is following the instructions in this guide. No responsibility is assumed
for defects in the printer’s firmware (contents of its read-only memory).
This guide, any copyrightable subject matter sold or provided with or in connection with the sale of the page printer, are protected by
copyright. All rights are reserved. Copying or other reproduction of all or part of this guide, any copyrightable subject matter without
the prior written consent of Kyocera Corporation is prohibited. Any copies made of all or part of this guide, any copyrightable subject
must contain the same copyright notice as the material from which the copying is done.
Regarding Tradenames
PRESCRIBE is a registered trademark of Kyocera Corporation. KPDL and KIR (Kyocera Image Refinement) are trademarks of Kyocera Corporation.
Diablo 630 is a product of Xerox Corporation. IBM Proprinter X24E is a product of International Business Machines Corporation.
Epson LQ-850 is a product of Seiko Epson Corporation.
Hewlett-Packard, PCL, and PJL are registered trademarks of Hewlett-Packard Company. Centronics is a trade name of Centronics
Data Computer Inc. PostScript is a registered trade mark of Adobe Systems Incorporated. Macintosh is a registered trademark of Apple
computer, Inc. Microsoft, Windows, and Windows NT are registered trademarks of Microsoft Corporation. PowerPC and Microdrive
NERGY
are trademarks of International Business Machines Corporation. CompactFlash is a trademark of SanDisk Corporation. E
TAR
is a U.S. registered mark. All other brand and product names are registered trademarks or trademarks of their respective
S
companies.
This Kyocera Mita page printer uses PeerlessPrintXL to provide the HP LaserJet compatible PCL6 language emulation. PeerlessPrintXL is a trademark of The Peerless Group, Redondo Beach, CA 90278, U.S.A.
This product was developed using the Tornado™ Real Time Operating System and Tools from Wind River Systems.
™
This product contains UFST
and MicroType® from Agfa Corporation.
i
Page 4

IBM PROGRAM LICENSE AGREEMENT
THE DEVICE YOU HAVE PURCHASED CONTAINS ONE OR MORE SOFTWARE PROGRAMS ("PROGRAMS") WHICH BELONG
TO INTERNATIONAL BUSINESS MACHINES CORPORATION ("IBM"). THIS DOCUMENT DEFINES THE TERMS AND CONDITIONS UNDER WHICH THE SOFTWARE IS BEING LICENSED TO YOU BY IBM. IF YOU DO NOT AGREE WITH THE TERMS
AND CONDITIONS OF THIS LICENSE, THEN WITHIN 14 DAYS AFTER YOUR ACQUISITION OF THE DEVICE YOU MAY
RETURN THE DEVICE FOR A FULL REFUND. IF YOU DO NOT SO RETURN THE DEVICE WITHIN THE 14 DAYS, THEN YOU
WILL BE ASSUMED TO HAVE AGREED TO THESE TERMS AND CONDITIONS.
The Programs are licen sed not sold. IBM, or the applicable IBM count ry organization, grants you a license for the Programs only in the
country where you acquired the Programs. You obtain no rights other than those granted you under this license.
The term "Programs" means the original and all whole or partial copies of it, including modified copies or portions merged into other
programs. IBM retains title to the Programs. IBM owns, or has licensed from the owner, copyrights in the Programs.
1. License
Under this license, y ou may use the Programs only with the device on which they are installed and transfer possess ion of the Programs
and the device to another party.
If you transfer the Programs, you must transfer a copy of this license and any other documentation to the other party. Your license is
then terminated. The other party agrees to these terms and conditions by its first use of the Program.
Yo u m ay no t:
1) use, copy, modify, merge, or transfer copies of the Program except as provided in this license;
2) reverse assemble or reverse compile the Program; or
3) sublicense, rent, lease, or assign the Program.
2. Limited Warranty
The Programs are provided "AS IS."
THERE ARE NO OTHER WARRANTIES COVERING THE PROGRAMS (OR CONDITIONS), EXPRESS OR IMPLIED, INCLUDING, BUT NOT LIMITED TO, THE IMPLIED WARRANTIES OF MERCHANTABILITY AND FITNESS FOR A PARTICULAR PURPOSE.
Some jurisdictions do not allow the exclusion of implied warranties, so the above exclusion may not apply to you.
3. Limitation of Remedies
IBM’s entire liability under this license is the following;
1) For any claim (including fundamental breach), in any form, related in any way to this license, IBM’s liability will be for actual
damages only and will be limited to the greater of:
a) the equivalent of U.S.$25,000 in your local currency; or
b) IBM’s then generally available license fee for the Program
This limitation will not apply to claims for bodily injury or damages to real or tangible personal property for wh ich IBM is legally liable.
IBM will not be liable for any lost profits, lost savings, or any incidental damages or other economic consequential damages, even if
IBM, or its authorized supplier, has been advised of the possibility of such damages. IBM will not be liable for any damages claimed by
you based on any third party claim. This limitation of remedies also applies to any developer of Programs supplied to IBM. IBM’s and
the developer’s limitations of remedies are not cumulative. Such developer is an intended beneficiary of this Section. Some jurisdictions
do not allow these limitations or exclusions, so they may not apply to you.
4. General
You may terminate your license at any time. IBM may terminate your license if you fail to comply with the terms and conditions of this
license. In either event, you must destroy all your copies of the Program. You are responsible for payment of any taxes, including
personal property taxes, resulting from this license. Neither party may bring an action, regardless of form, more than two years after
the cause of action arose. If you acquired th e Program in the United States, this license is governed by the laws of the State of N ew York .
If you acquired the Program in Canada, this license is governed by the laws of the Province of Ontario. Otherwise, this license is
governed by the laws of the country in which you acquired the Program.
ii
Page 5

Typeface Trademark Acknowledgement
All resident fonts in this printer are licensed from Agfa Corporation.
Helvetica, Palatino and Times are registered trademarks of Linotype-Hell AG.
ITC Avant Garde Gothic, ITC Bookman, ITC ZapfChancery and ITC Zapf Dingbats are registered trademarks of International Typeface Corporation.
Agfa Japan License Agreement
1. “Software” shall mean the digitally encoded, machine readable, scalable outline data as encoded in a special format as well as the
UFST Software.
2. You agree to accept a non-exclusive license to use the Software to reproduce and display weights, styles and versions of letters,
numerals, characters and symbols (“Typefaces”) solely for your own customary business or personal purposes at the address stated
on the registration card you return to Agfa Japan. Under the terms of this License Agreement, you have the right to use the Fonts
on up to three printers. If you need to have access to the fonts on more than three printers, you need to acquire a multi-user license
agreement which can be obtained from Agfa Japan. Agfa Japan retains all rights, title and interest to the Software and Typefaces
and no rights are granted to you other than a License to use the Software on the terms expressly set forth in this Agreement.
3. To protect proprietary rights of Agfa Japan, you agree to maintain the Software and other proprietary information concerning the
Typefaces in strict confidence and to establish reasonable procedures regulating access to and use of the Software and Typefaces.
4. You agree not to duplicate or copy the Software or Typefaces, except that you may make one backup copy. You agree that any such
copy shall contain the same proprietary notices as those appearing on the original.
5. This License shall continue until the last use of the Software and Typefaces, unless sooner terminated. This License may be
terminated by Agfa Japan if you fail to comply with the terms of this License and such failure is not remedied within thirty (30)
days after notice from Agfa Japan. When this License expires or is terminated, you shall either return to Agfa Japan or destroy all
copies of the Software and Typefaces and documentation as requested.
6. You agree that you will not modify, alter, disassemble, decrypt, reverse engineer or decompile the Software.
7. Agfa Japan warrants that for ninety (90) days after delivery, the Software will perform in accordance with Agfa Japan-published
specifications, and the diskette will be free from defects in material and workmanship. Agfa Japan does not warrant that the
Software is free from all bugs, errors and omissions.
THE PARTIES AGREE THAT ALL OTHER WARRANTIES, EXPRESSED OR IMPLIED, INCLUDING WARRANTIES OF FITNESS FOR A PARTICULAR PURPOSE AND MERCHANTABILITY, ARE EXCLUDED.
8. Your exclusive remedy and the sole liability of Agfa Japan in connection with the Software and Typefaces is repair or replacement
of defective parts, upon their return to Agfa Japan.
IN NO EVENT WILL AGFA JAPAN BE LIABLE FOR LOST PROFITS, LOST DATA, OR ANY OTHER INCIDENTAL OR CONSEQUENTIAL DAMAGES, OR ANY DAMAGES CAUSED BY ABUSE OR MISAPPLICATION OF THE SOFTWARE AND TYPEFAC ES .
9. New York, U.S.A. law governs this Agreement.
10. You shall not sublicense, sell, lease, or otherwise transfer the Software and/or Typefaces without the prior written consent of Agfa
Japan.
11. Use, duplication or disclosure by the Government is subject to restrictions as set for th in the Rights in Technical Data and Computer
Software clause at FAR 252-227-7013, subdivision (b)(3)(ii) or subparagraph (c)(1)(ii), as appropriate. Further use, duplication or
disclosure is subject to restrictions applicable to restricted rights software as set forth in FAR 52.227-19 (c)(2).
12. YOU ACKNOWLEDGE THAT YOU HAVE READ THIS AGREEMENT, UNDERSTAND IT, AND AGREE TO BE BOUND BY ITS
TERMS AND CONDITIONS. NEITHER PARTY SHALL BE BOUND BY ANY STATEMENT OR REPRESENTATION NOT
CONTAINED IN THIS AGREEMENT. NO CHANGE IN THIS AGREEMENT IS EFFECTIVE UNLESS WRITTEN AND
SIGNED BY PROPERLY AUTHORIZED REPRESENTATIVES OF EACH PARTY. BY OPENING THIS DISKETTE PACKAGE,
YOU AGREE TO ACCEPT THE TERMS AND CONDITIONS OF THIS AGREEMENT.
Cautions for Toner Handling
• Do not incinerate toner and toner containers. Dangerous sparks may cause burn.
• Never open the toner container or waste toner box.
• Make sure not to inhale the toner, and not to rub your eyes or touch your mouth with the hands stained with the toner. And make
sure not to stick to your skin.
• For the disposal of old toner container and waste toner box, consult your dealer. Or dispose of the toner or toner containers in
accordance with Federal, state and Local rules and regulations.
• Keep away the toner container and the waste toner box from children.
iii
Page 6

Contents
Contents
Introduction ................................................................................................ ix
Features ........................................................................................................................................................... x
For More Information.................................................................................................................................... xii
Guide to the Operation Guide....................................................................................................................... xii
Chapter 1
Understanding the Operator Panel ............................................................................................................. 1-2
Message Display .................................................................................................................................... 1-2
Interface Indicator ................................................................................................................................. 1-3
Paper Size Indicator............................................................................................................................... 1-3
Paper Type Indicator ............................................................................................................................. 1-4
READY, DATA, and ATTENTION Indicators ...................................................................................... 1-4
Keys ........................................................................................................................................................ 1-5
Menu System Road Map........................................................................................................................ 1-6
Printing Test Pages .................................................................................................................................... 1-12
Menu Map ............................................................................................................................................ 1-12
Status Page........................................................................................................................................... 1-14
Service Status Page ............................................................................................................................. 1-18
Network Card Interface Status Page.................................................................................................. 1-19
Font Lists.............................................................................................................................................. 1-21
Received Data Dumping ...................................................................................................................... 1-23
Paper Handling........................................................................................................................................... 1-24
Setting the Paper Size ......................................................................................................................... 1-24
Setting the Paper Type ........................................................................................................................ 1-30
MP Tray Mode...................................................................................................................................... 1-37
Selecting the Paper Feed Source ......................................................................................................... 1-38
Output Stack ........................................................................................................................................ 1-39
Overriding A4 and Letter Size Difference .......................................................................................... 1-40
Using the Operator Panel ....................................................... 1-1
Setting the Paper Size in Paper Cassette ............................................................................ 1-24
Setting the Paper Size in MP Tray ....................................................................................... 1-28
Setting the Paper Type in Paper Cassette ........................................................................... 1-30
Setting the Paper Type in MP Tray ..................................................................................... 1-31
Custom Paper Type ............................................................................................................... 1-32
Resetting the Custom Paper Type ........................................................................................ 1-36
iv
Page 7

Contents
Pagination ................................................................................................................................................... 1-41
Emulation............................................................................................................................................. 1-41
Changing the Emulation ...................................................................................................... 1-41
Alternative Emulation for KPDL Emulation ...................................................................... 1-42
Printing KPDL Errors .......................................................................................................... 1-43
Font....................................................................................................................................................... 1-44
Default font ............................................................................................................................ 1-44
Default Font Size ................................................................................................................... 1-46
Changing Type for Courier/Letter Gothic ............................................................................ 1-47
Setting the Character Pitch for Courier/Letter Gothic ....................................................... 1-48
Code Set................................................................................................................................................ 1-49
Number of Copies................................................................................................................................. 1-50
Printing Orientation ............................................................................................................................ 1-51
KIR (Kyocera Image Refinement) ....................................................................................................... 1-52
Ecoprint ................................................................................................................................................ 1-54
Resolution............................................................................................................................................. 1-55
e-MPS .......................................................................................................................................................... 1-56
Quick Copy ........................................................................................................................................... 1-57
Proof and Hold ..................................................................................................................................... 1-59
Printing a Private Job ......................................................................................................................... 1-61
Storing a Print Job............................................................................................................................... 1-63
Printing a Code Job ............................................................................................................................. 1-65
Printing a List of Code Jobs ................................................................................................................ 1-67
Retrieving Jobs from Virtual Mailbox (VMB) .................................................................................... 1-68
Printing a List of VMB ........................................................................................................................ 1-69
e-MPS Configuration ........................................................................................................................... 1-70
Interface ...................................................................................................................................................... 1-74
Parallel Interface Mode ....................................................................................................................... 1-74
USB Interface Mode............................................................................................................................. 1-75
Serial Interface Parameters ................................................................................................................ 1-76
Network Interface Parameters............................................................................................................ 1-78
Operating the Storage Device .................................................................................................................... 1-81
Activating the RAM Disk .................................................................................................................... 1-81
Reading Data ....................................................................................................................................... 1-83
Writing Data......................................................................................................................................... 1-84
Deleting Data ....................................................................................................................................... 1-86
Reading Fonts from a CompactFlash Card ........................................................................................ 1-87
Formatting a Storage Device............................................................................................................... 1-88
Printing a List of Data Names ............................................................................................................ 1-89
v
Page 8

Contents
Configuration .............................................................................................................................................. 1-91
Page Protect Mode ............................................................................................................................... 1-91
Linefeed (LF) Action ............................................................................................................................ 1-92
Carriage-Return (CR) Action .............................................................................................................. 1-93
Wide A4 Pitch....................................................................................................................................... 1-94
Print Density........................................................................................................................................ 1-95
Total Printed Pages.............................................................................................................................. 1-96
Toner Counter Resetting ..................................................................................................................... 1-96
Message Language............................................................................................................................... 1-97
Automatic Form Feed Timeout............................................................................................................ 1-99
Sleep Timer Setting ........................................................................................................................... 1-100
Printer Resetting ............................................................................................................................... 1-102
Resource Protection ........................................................................................................................... 1-103
Alarm (Buzzer) Setting...................................................................................................................... 1-104
Auto Continue Setting ....................................................................................................................... 1-105
Chapter 2
General Guidelines ....................................................................................................................................... 2-2
Paper Availability .................................................................................................................................. 2-2
Paper Specifications............................................................................................................................... 2-2
Selecting the Right Paper...................................................................................................................... 2-3
Special Paper ................................................................................................................................................ 2-7
Transparency (Overhead Projection Film) ........................................................................................... 2-7
Adhesive-Backed Labels ........................................................................................................................ 2-8
Paper Type .................................................................................................................................................. 2-11
Chapter 3
Toner Container Replacement ..................................................................................................................... 3-2
Toner Container Replacement Interval ................................................................................................ 3-2
Replenishing Toner................................................................................................................................ 3-3
Waste Toner Box Replacement .................................................................................................................... 3-6
Replacing the Waste Toner Box............................................................................................................. 3-6
Cleaning ........................................................................................................................................................ 3-9
Cleaning the Charger Wire ................................................................................................................... 3-9
Cleaning the Charger Grid.................................................................................................................. 3-10
Paper Transfer Unit............................................................................................................................. 3-12
Paper Selection....................................................................... 2-1
Maintenance ........................................................................... 3-1
vi
Page 9

Contents
Chapter 4
General Guide............................................................................................................................................... 4-2
Print Quality Problems ................................................................................................................................ 4-3
Indicators and Messages .............................................................................................................................. 4-6
Indicators................................................................................................................................................ 4-6
Maintenance Messages .......................................................................................................................... 4-7
Error Messages .................................................................................................................................... 4-10
Correcting a Paper Jam.............................................................................................................................. 4-12
Jam at the Paper Cassette or Inside the Printer ............................................................................... 4-14
Paper Jam at the Option Duplexer ..................................................................................................... 4-16
Paper Jam at the Option Sorter .......................................................................................................... 4-18
Jam at the MP Tray............................................................................................................................. 4-20
Appendix A
Appendix B
Available Options ....................................................................................................................................... B-2
Expanding the Printer Memory.................................................................................................................. B-3
Troubleshooting ...................................................................... 4-1
Fonts ....................................................................................... A-1
Options .................................................................................... B-1
Installing Option Units ............................................................................................................................... B-9
PF-60 Paper Feeder............................................................................................................................... B-9
DU-60 Duplexer .................................................................................................................................. B-12
SO-60 Sorter........................................................................................................................................ B-15
EF-60 Envelope Feeder....................................................................................................................... B-21
PT-4/PT-60 Face-up Output Tray ...................................................................................................... B-25
Network Interface Card...................................................................................................................... B-26
Microdrive (Hard Disk)....................................................................................................................... B-28
CompactFlash (Memory) Card ........................................................................................................... B-30
Appendix C
Parallel Interface ......................................................................................................................................... C-2
Parallel Interface Communication Modes ........................................................................................... C-2
Interface Signals ................................................................................................................................... C-2
USB Interface .............................................................................................................................................. C-5
Specifications ........................................................................................................................................ C-5
Interface Signals .................................................................................................................................. C-5
Serial Interface (Option) ............................................................................................................................. C-6
RS-232C Interface................................................................................................................................. C-6
RS-422A Interface................................................................................................................................. C-7
Host Computer Interface ........................................................ C-1
vii
Page 10

Contents
RS-232C/RS-422A Protocol ......................................................................................................................... C-9
PRESCRIBE FRPO D0 Command..................................................................................................... C-10
RS-232C Cable Connection ....................................................................................................................... C-11
Obtain a Suitable RS-232C Cable...................................................................................................... C-11
Connecting the Printer to the Computer........................................................................................... C-11
Appendix D
Specifications ......................................................................... D-1
Glossary .......................................................................................Glossary-1
Index ................................................................................................. Index-1
viii
Page 11

Introduction
The Kyocera Mita page printer has many extremely desirable features. It was designed to
make a contribution to a cleaner environment as well as to represent the latest generation of
page printer technology.
This section contains the following subsections.
•Features
• For More Information...
• Guide to the Operation Guide
ix
Page 12

Features
Ultra long life modules
The drum, developer, and fuser have been designed for ultra long life.
Amorphous silicon drum
The drum has been developed using Kyocera’s unique ceramic technology
using amorphous silicon.
KIR (Kyocera Image Refinement)
This is Kyocera’s original smoothing function. It uses software to enhance
the printer’s resolution and produce high-quality printing. The default
setting is On.
Superb print quality
Using 1200 dpi resolution in Fast 1200 mode, the printout is close to
typeset quality. Also, with Kyocera Image Refinement (KIR) technology,
high quality printing can be achieved even at 300 dpi and 600 dpi.
Large paper capacity
Approximately 500 sheets can be loaded into the paper cassette, and about
100 sheets can be loaded into the MP tray.
Wide variety of print media
As well as standard paper, the printer will print on transparency, labels
and other types of special purpose media.
Sleep Mode
Conserves energy during the printer’s idle periods.
Ecoprint
Extends the toner yield by reducing the amount of toner used on the page.
USB (Universal Serial Bus) Interface
This printer supports USB Revision 1.1 standards. Connection to a
computer with a USB interface gives a higher communication speed than
parallel interface connection.
Standard Bi-directional Parallel Interface
Supports high-speed data exchange with the computer.
x
Page 13

Wide Variety of Available Fonts
The printer comes with 80 PCL/PS compatible fonts and a line printer
bitmap font installed.
PRESCRIBE Command Language
PRESCRIBE provides features including advanced graphics capabilities
that allow you to print any conceivable outline shape or solid form. Also
provided are a variety of special effects, such as patterned fills, gray-scale
shading, a user-accessible print image model, and multiple page
orientations and print directions within the same page.
Job Retention
Allows you to save print jobs onto the Microdrive installed in the printer. It
print them out later at the operator panel. The following four types of job
retention are available: quick copy, proof and hold, private printing, and
stored jobs.
Display of printer messages in any of five languages
English, French, German, Italian, or Spanish. As an option it is also
possible to download the messages in other languages. Please contact your
Kyocera Mita dealer.
Microdrive (hard disk unit) slot for various functions such as job
retention, VMB, and more
By saving print jobs onto the Microdrive, they can be printed out at the
operator panel when desired. The electronic sort function can be used for
much faster printing.
CompactFlash card slot for option fonts, macros, forms, etc.
Data in the CompactFlash card can be selectively read from the printer’s
operator panel.
PDF417 Two-dimensional Barcode
The printer includes a capability that allows the user to implement twodimensional stacked barcode symbology PDF417 (Portable Data File 417).
SNMP compliance
The printer complies with Simple Network Management Protocol (SNMP).
The SNMP is used for providing and transferring management information
(MIB) between the printer and the host computer.
Support for network printer monitor utility (KM-NET VIEWER)
Allows network wide management of printers. See the readme file in the
Kyocera Mita Digital Library CD-ROM (comes with the printer) for details.
xi
Page 14
For More Information...
Item Description
Installation Guide
(paper manual)
Operation Guide
(this guide)
Printer Driver Guide Describes how to install and set the printer driver.
PRESCRIBE Programming
Manual
PDF417 Two-Dimensional
Bar Code Implementation
Manual
Guide to the Operation Guide
Describes procedures from printer setup to printing
a test page.
Guides you through topics concerning the
operations and maintenance of the printer.
This manual is contained in the CD-ROM supplied
with the printer.
Describes how to use the PRESCRIBE commands
and their parameters in detail for experienced
users. This manual is contained in the CD-ROM
supplied with the printer.
Includes a PDF417 overview and explains
PRESCRIBE commands for use with
two-dimensional barcodes. This manual is
contained in the CD-ROM supplied with the
printer.
This Operation Guide has the following chapters:
Chapter 1 Using the Operator Panel
This chapter explains the message display, indicators and keys on the
operator panel, and how to make various settings from the operator panel.
Chapter 2 Paper Selection
This chapter explains the types of paper that can be used with the printer.
Chapter 3 Maintenance
This chapter explains how to replace the toner container, waste toner box,
and how to care for your printer.
Chapter 4 Troubleshooting
This chapter explains how to handle printer problems that may occur, such
as paper jams.
Appendix A Fonts
This appendix explains about fonts and lists the printer’s internal fonts.
xii
Page 15

Appendix B Options
This appendix explains how to expand the printer's memory and how to
install each option unit.
Appendix C Host Computer Interface
This appendix explains the pin assignment and specifications for the
printer’s parallel interface, USB interface, and optional serial interface.
Appendix D Specifications
This appendix lists the printer’s specifications.
Glossary
This glossary explains the terminology used in this guide.
The following symbols are used to attract your attention in this guide. The
symbols and their meanings are as follows:
Indicates tips or advice useful for operation.
Note
Caution
Warning
Option
Indicates situations that are potentially hazardous to the human body or
devices.
Indicates situations that are potentially extremely hazardous to the
human body or devices.
Indicates operations that can be performed or are effective only when the
required option unit is installed.
xiii
Page 16

Chapter 1
Using the Operator
Panel
1
This chapter explains the following topics:
• Understanding the Operator Panel
• Printing Test Pages
• Paper Handling
• Pagination
•e-MPS
•Interface
• Operating the Storage Device
• Configuration
1-1
Page 17
Understanding the Operator Panel
Understanding the Operator Panel
The operator panel has a LCD message display, three indicators, and eight
keys.
Messages that appear on the display and functions of indicators and keys
are explained in the sections that follows.
Message Display
The message display gives information in the form of short messages. The
eight messages listed below are displayed during normal warm-up and
printing.
Other messages that may appear when the printer needs the operator’s
attention are explained in Chapter 4.
Message Meaning
Self test
Please wait
Ready
Processing
Sleeping
Cancelling data
Waiting
FormFeed Time Out
The printer is self-testing after power-up.
The printer is warming up and is not ready. When
the printer is switched on for the first time after the
toner container is installed,
also appears.
The printer is ready to print.
The printer is receiving data, generating graphics,
reading a CompactFlash card/Microdrive, or
printing.
The printer is in sleep mode. The printer wakes
from sleep mode whenever the
operator panel is pressed, the cover is opened or
closed, or data is received. The printer then warms
up and goes online. The time that the printer takes
to enter sleep mode depends on the sleep timer
setting.
Jobs inside the printer are being canceled. To cancel
a job, see the table on page 1-5.
The printer is waiting for the end-of-job command
before printing the last page. Pressing the
allows you to obtain the last page immediately.
The printer is printing the last page after a waiting
period.
(Adding toner)
GO
key on the
GO
key
1-2
Page 18
Interface Indicator
Note
Paper Size Indicator
Understanding the Operator Panel
INTERFACE
The interface indicator shows the interface that is currently used. It uses
the following abbreviations:
PAR Standard bi-directional parallel interface
USB Standard USB interface
SER Option serial interface (RS-232C)
OPT Option network interface card
--- No interface is active.
Each interface has a timeout time of 30 seconds during which the other
interface should wait to receive a print job. Even a print job has been
complete on the interface, you should wait for this period until the other
interface begins printing the job.
SIZE
This indicator indicates the paper size of the current paper cassette. The
following abbreviations are used to indicate the paper sizes.
Message
Display
A4
A5
A6
B5
B6
LT
LG
MO
BU
DL
C5
b5
Paper Size Message
Display
ISO A4 (21 × 29.7 cm)
ISO A5 (14.8 × 21 cm)
ISO A6
(10.5 × 14.8 cm)
*
JIS B5 (18.2 × 25.6 cm)
JIS B6
(12.8 × 18.2 cm)
*
Letter
EX
#6
#9
O2
ST
FO
(8-1/2 × 11 inches)
Legal
HA
(8-1/2 × 14 inches)
Monarch
(3-7/8 × 7-1/2 inches)
Business
(4-1/8 × 9-1/2 inches)
ISO DL (11 × 22 cm)
ISO C5
(16.2 × 22.9 cm)
*
ISO B5 (17.6 × 25 cm)
OH
*
Y2
*
*
Y4
CU
*
Paper Size
Executive (7-1/4 × 10-1/2 inches)
Commercial 6-3/4
(3-5/8 × 6-1/2 inches)
Commercial 9
(3-7/8 × 8-7/8 inches)
Oficio II (8-1/2 × 13 inches)
*
*
*
Statement (5-1/2 × 8-1/2 inches)
Folio (210 × 330 mm)
*
Japanese Postcard (10 × 14.8 cm)
Return Postcard (20 × 14.8 cm)
Envelope (Youkei 2)
(114 × 162 mm)
Envelope (Youkei 4)
(105 × 235 mm)
*
*
*
Custom Size
(14.8 × 21 cm to 21.6 × 35.6 cm)
*
*
*
Note
* With only the MP tray feeding.
While the printer is processing data, the SIZE indicator indicates the
paper size selected by the application software.
1-3
Page 19
Understanding the Operator Panel
Paper Type Indicator
This shows the paper type defined for the current paper casette. Automatic
cassette switching is available according to the paper type.
The paper type can be specified at the operator panel. See Custom Paper
Type on page 1-32.
The following abbreviations are used to indicate the paper type.
Message Display Paper Type Message Display Paper Type
None Auto ROUGH Rough
PLAIN Plain LETTERHEA Letterhead
TRNSPRNCY Transparency* COLOR Color
PREPRINTE Preprinted PREPUNCH Prepunched
LABELS Labels* ENVELOPE Envelope*
BOND Bond CARDSTOCK Cardstock*
RECYCLED Recycled
VELLUM Ve ll um *
TYPE
CUSTOM1
(to 8)Custom 1 (to 8)
* With only the MP tray feeding.
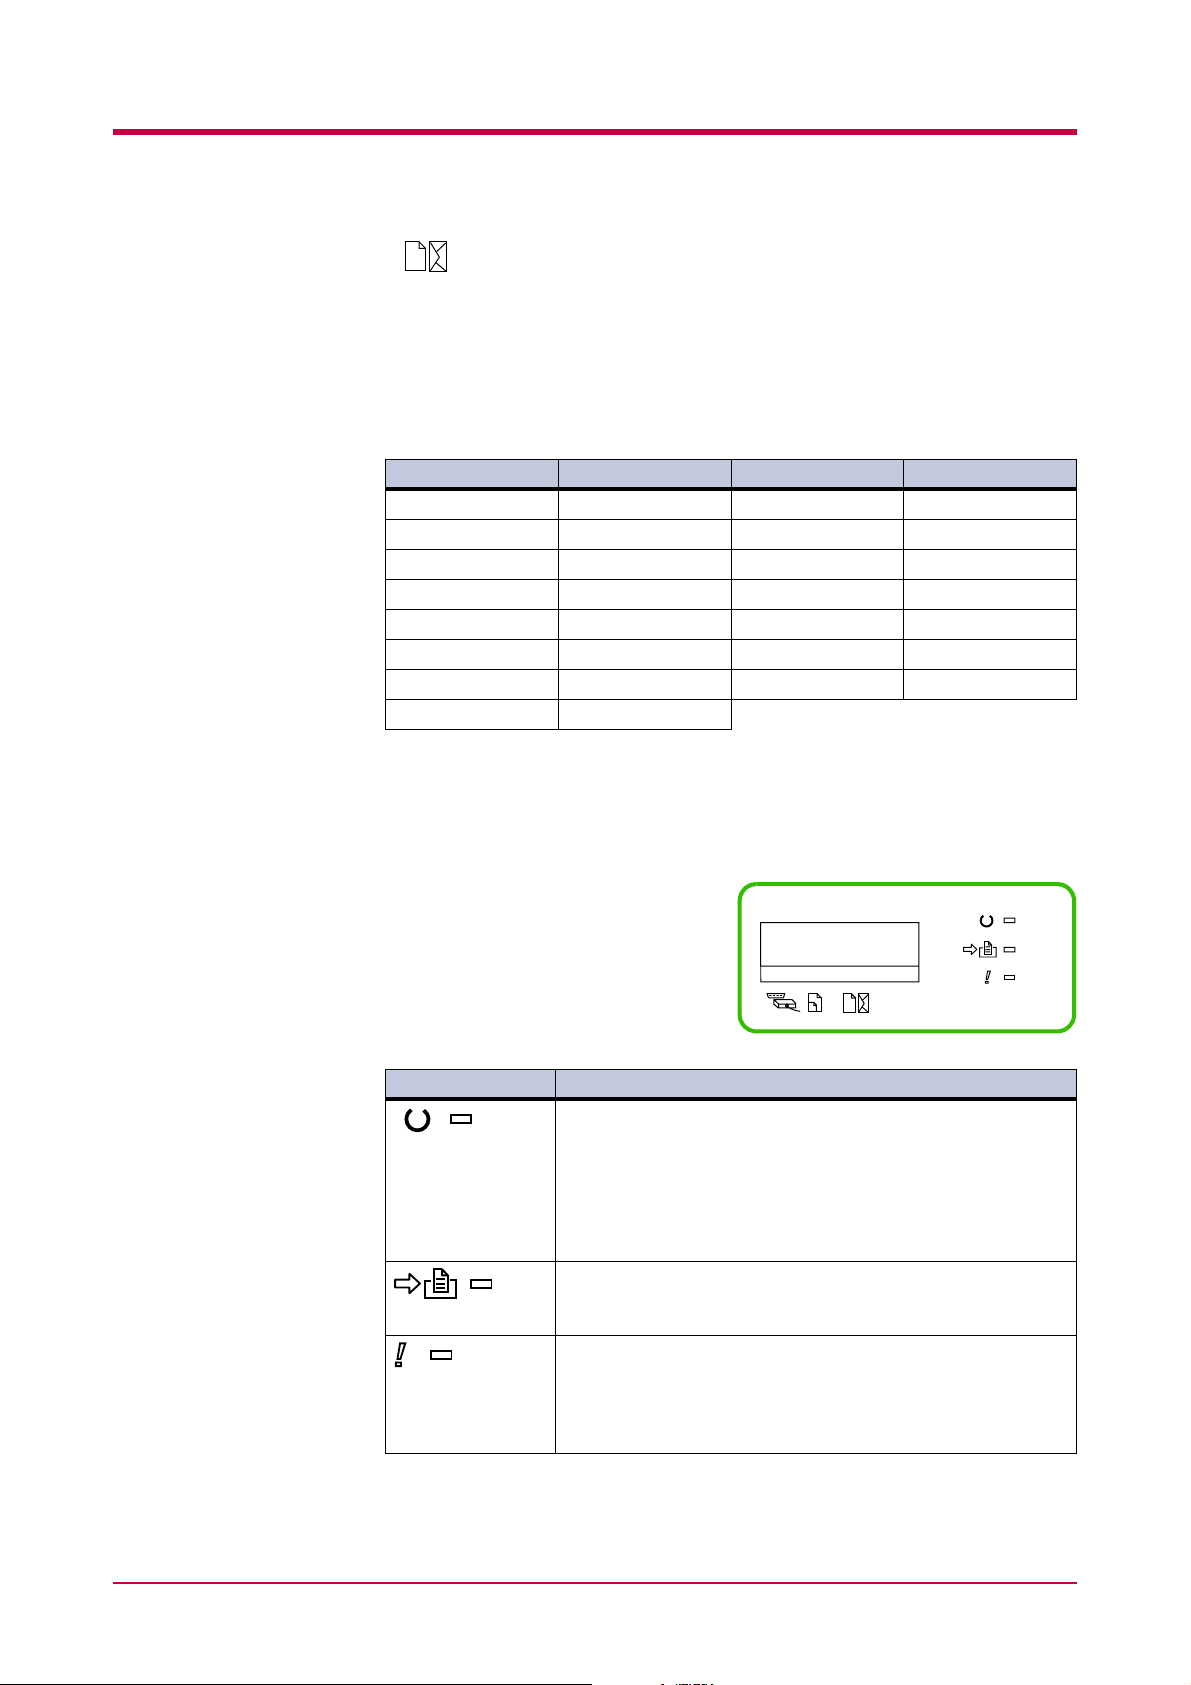
READY, DATA, and ATTENTION Indicators
The following indicators light during
normal operation and when the
printer needs attention.
Indicator Description
READY
ATTENTION
Flashing: Indicates when an error occurs that you can clear
by yourself.
Lit: Indicates that the printer is on-line.
The printer prints received data.
Off: Indicates that the printer is off-line. Data can be received
but will not be printed. Also indicates when printing is
automatically stopped due to occurrence of an error.
Flashing: Indicates data transfer is taking place.
DATA
Lit: Indicates either that data is being processed, or that data
is being written to the memory card.
Flashing: Indicates when the printer needs maintenance
attention or the printer is warming up (
Lit: Indicates when a problem or an error occurs that you can
clear by yourself.
(For example, paper jam occurs.)
INTERFACE SIZE TYPE
Please wait
READY
DATA
ATTENTION
).
1-4
Page 20
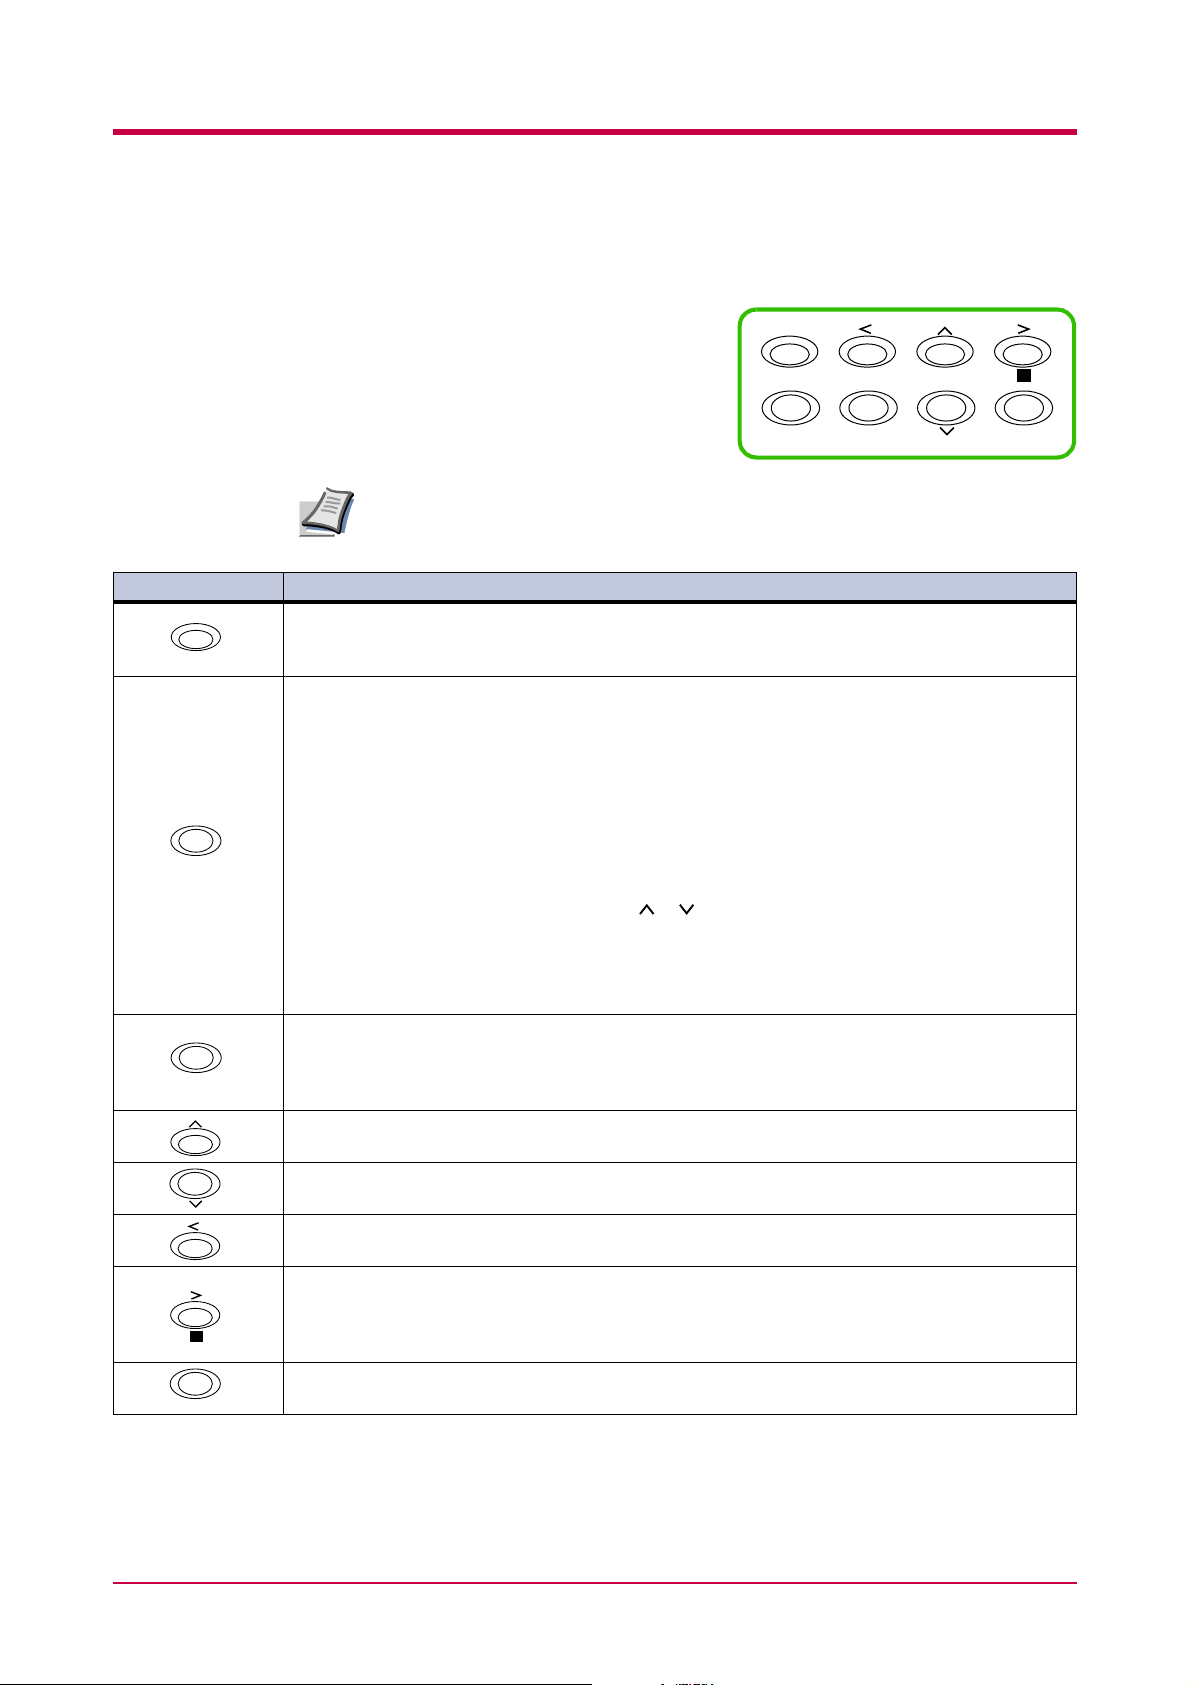
Keys
The operator panel keys are used to
configure the printer. Note the
certain keys have the secondary
function.
Settings made with these keys effect only the interface currently in use.
Note
Key Function
• Switches the printer on-line and off-line.
GO
• Prints and feed out one page.
• Cancels specific errors.
• Cancels a printing job.
To cancel, proceed as follows:
1 Check if
2 Press the
Print Cancel?
3
Processing
CANCEL
is displayed in the message display.
key.
appears in the message display and then interface to be canceled.
Parallel
USB
CANCEL
MENU
Serial
Option
Press the
4 Select the interface to cancel using
from the selected interface will stop.
and printing stops after the current page is printed.
• Resets numeric values, or cancels a setting procedure.
• Used to stop the sounding of the alarm buzzer an error occurs.
• When pressed during mode selection, terminates the setting and the printer returns to the
Ready
• Used to select the emulation, font, character code set; to read an CompactFlash card, and
more.
Used to access a desired item or enter numeric values. In some of the control procedures, the >
and < keys are used to enter or exit a sub item.
Used to access a desired item or enter of numeric values. In some of the control procedures, the
> and < keys are used to enter or exit a sub item.
Used as the < key in the mode selection function.
(appears only when an option serial interface board kit is installed)
(appears only when an option network interface card is installed)
CANCEL
key again if you wish to stop the cancellation of printing.
t
he or key and then press the
Cancelling data
condition.
Understanding the Operator Panel
GO
CANCEL MENU ENTER
ENTER
key. Printing
appears in the message display
?
?
ENTER
•Used as the > key in the mode selection function.
• Displays online help messages on the message display when paper jam errors occur. When
Ready
pressed in the
condition, displays explanations of online help messages. When pressed
while the online help is displayed, cancels the online help.
Finalizes numeric values and other selections.
1-5
Page 21
Understanding the Operator Panel
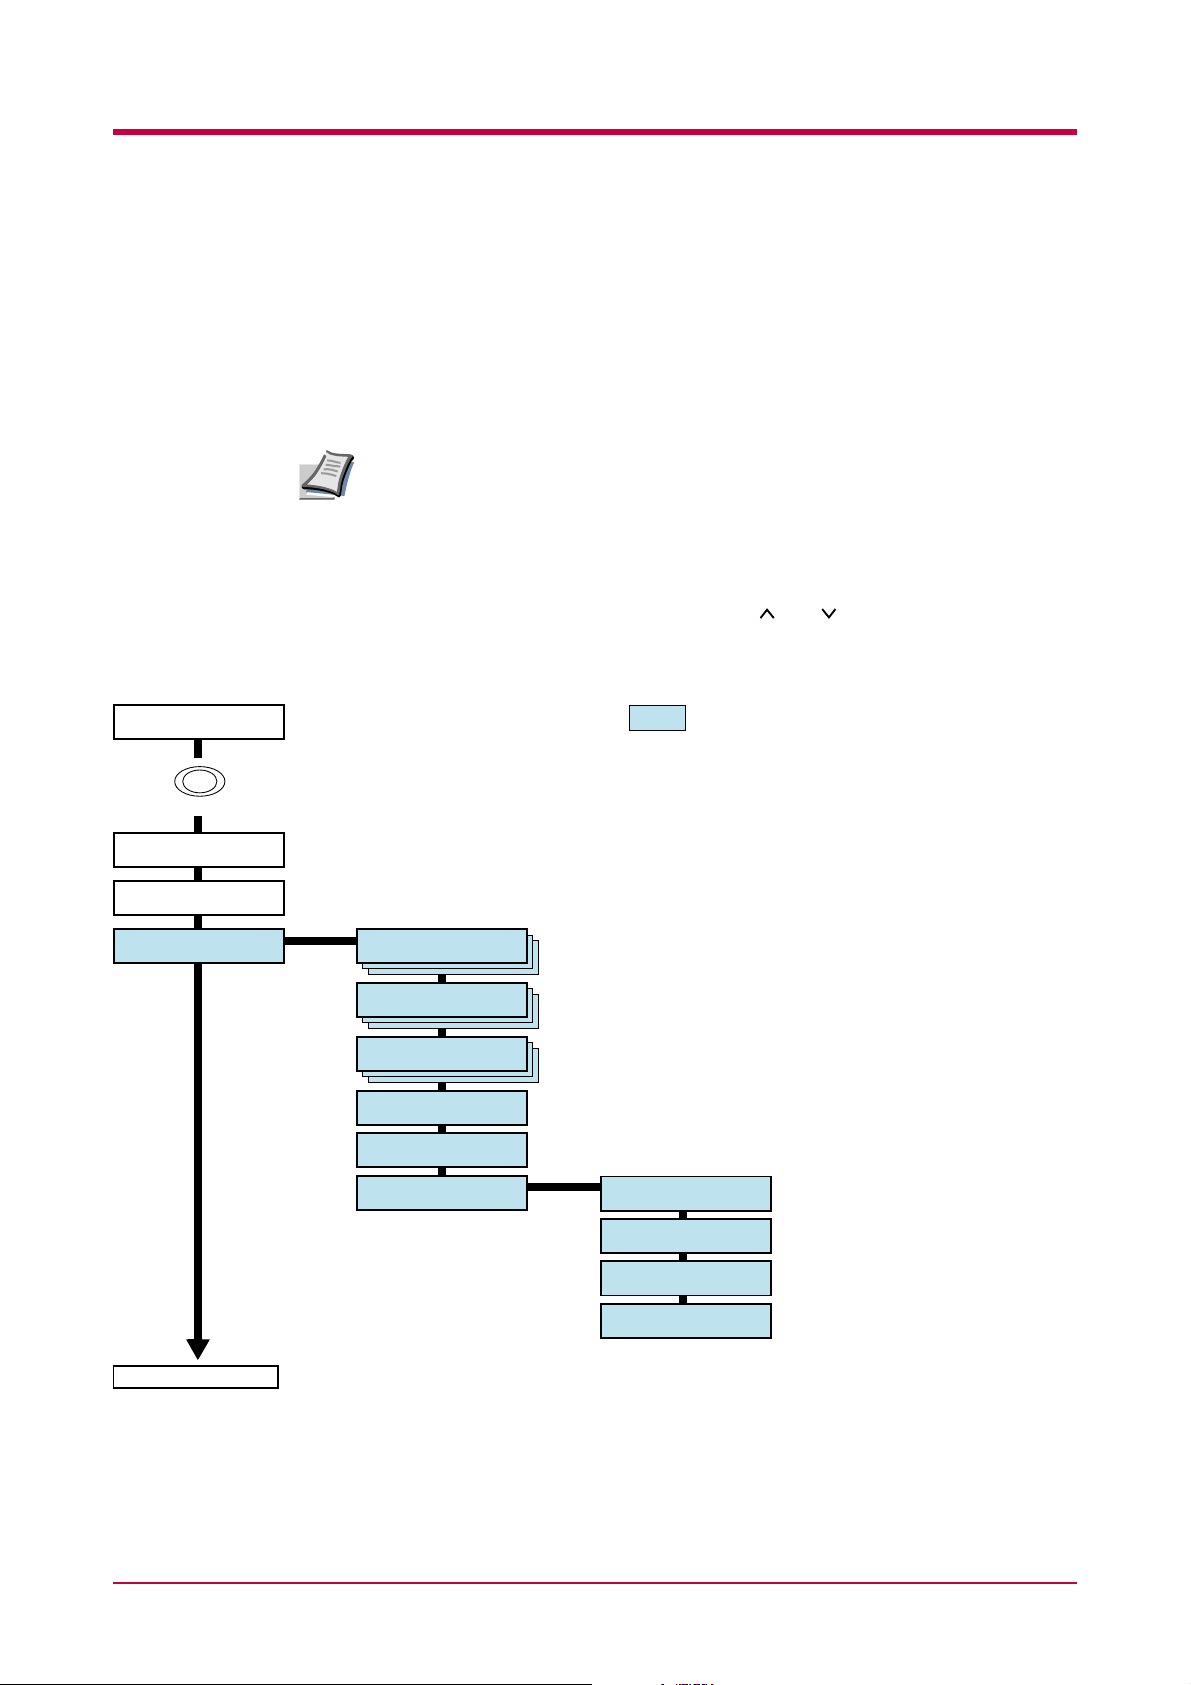
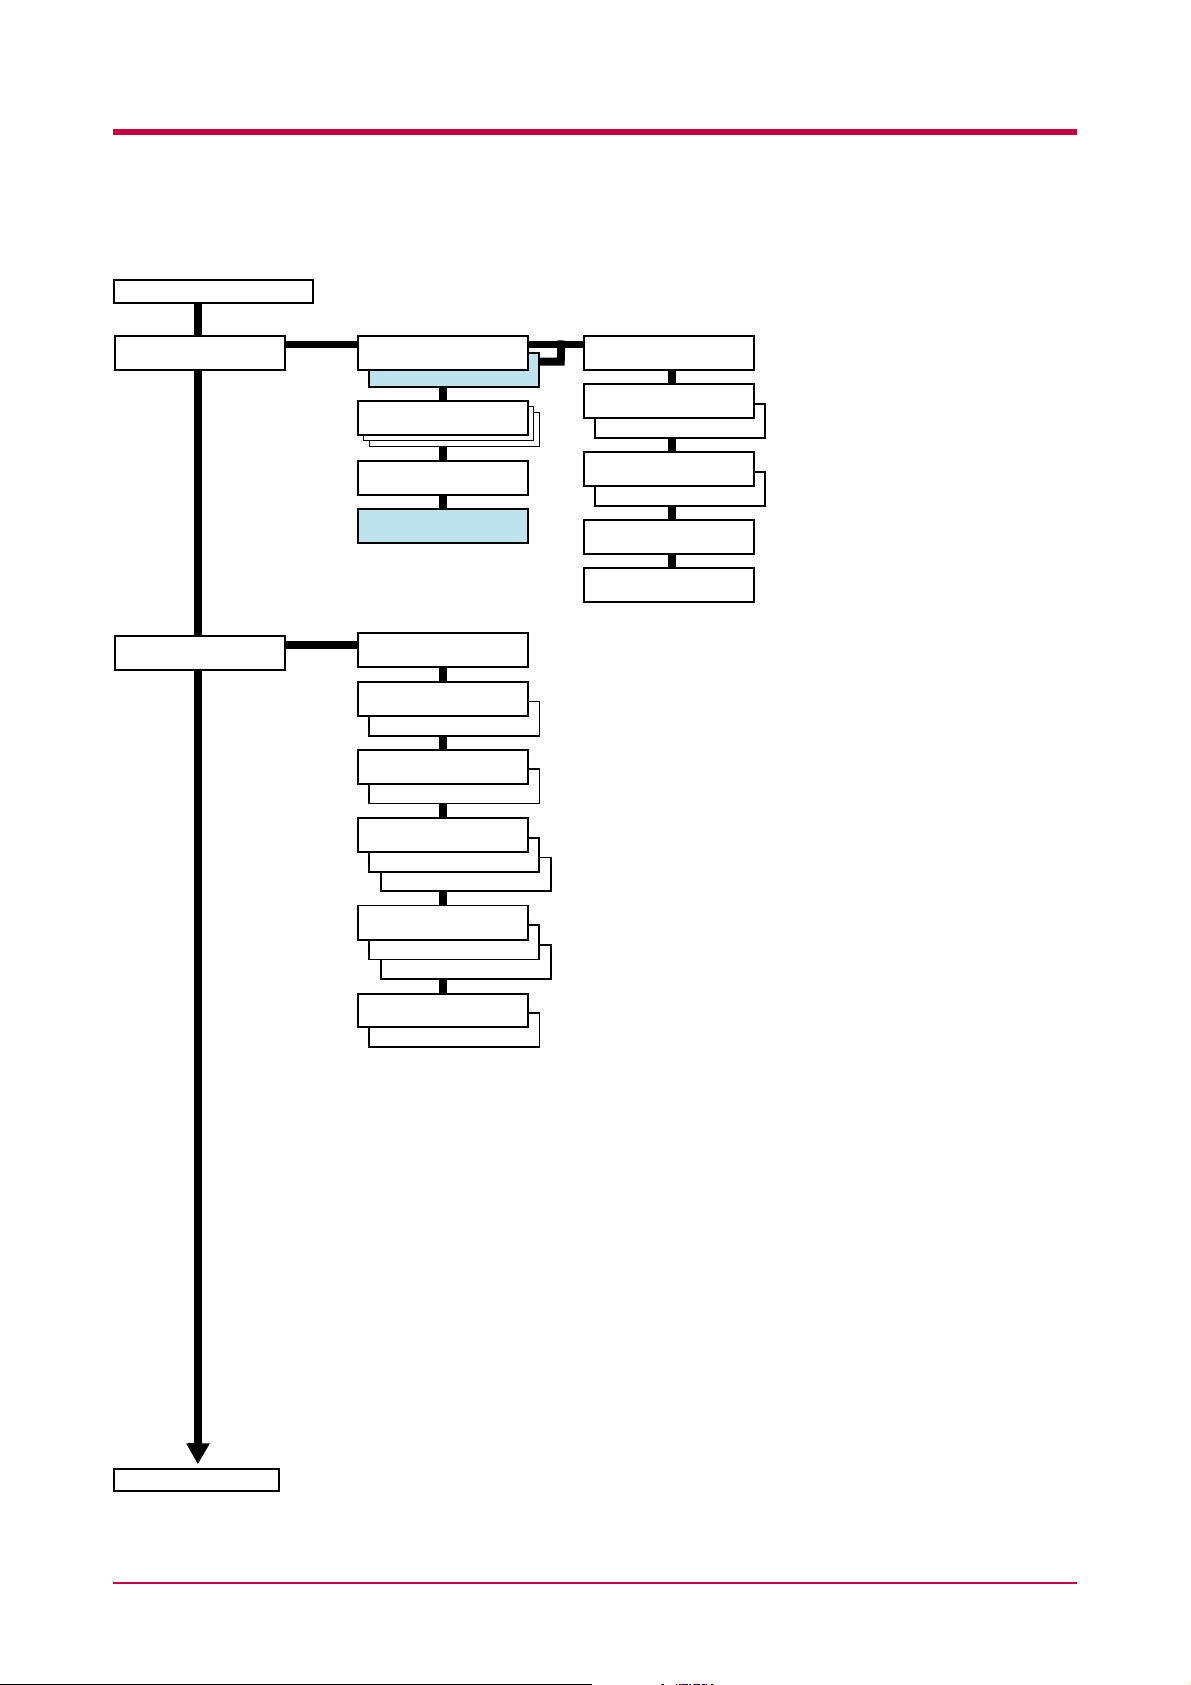
Menu System Road Map
This section explains how to use the menu selection system. The MENU key
on the operator panel allows you to use the menu to set or change the
printer environment such as the number of copies to make, emulation, etc.,
to your specific needs. Settings can be made when Ready is indicated on
the printer message display.
The printer obeys the most recently received printer settings sent from
the application software, or from the printer driver, which take priority
Note
over operator panel settings.
The following is the hierarchy diagram of the menu selection system of the
printer.
The vertical transition is made with the and keys and horizontal
transition is made with the > and < keys. To change or finalize
configuration on an item, use the ENTER key.
Ready
PAR A4 PLAIN
MENU
Print
Menu Map
Print
Status Page
e-MPS >
>Quick Copy
>Private/Stored
>Print VMB Data
>List of VMB
>List of
Code JOB
>e-MPS >
Configuration
These items will not appear unless the printer
is installed with the applicable option unit.
>>Quick Copy
>>Temp.Code JOB
Size
>>Perm.Code JOB
Size
>>VMB Size
Continued on next page
1-6
Page 22
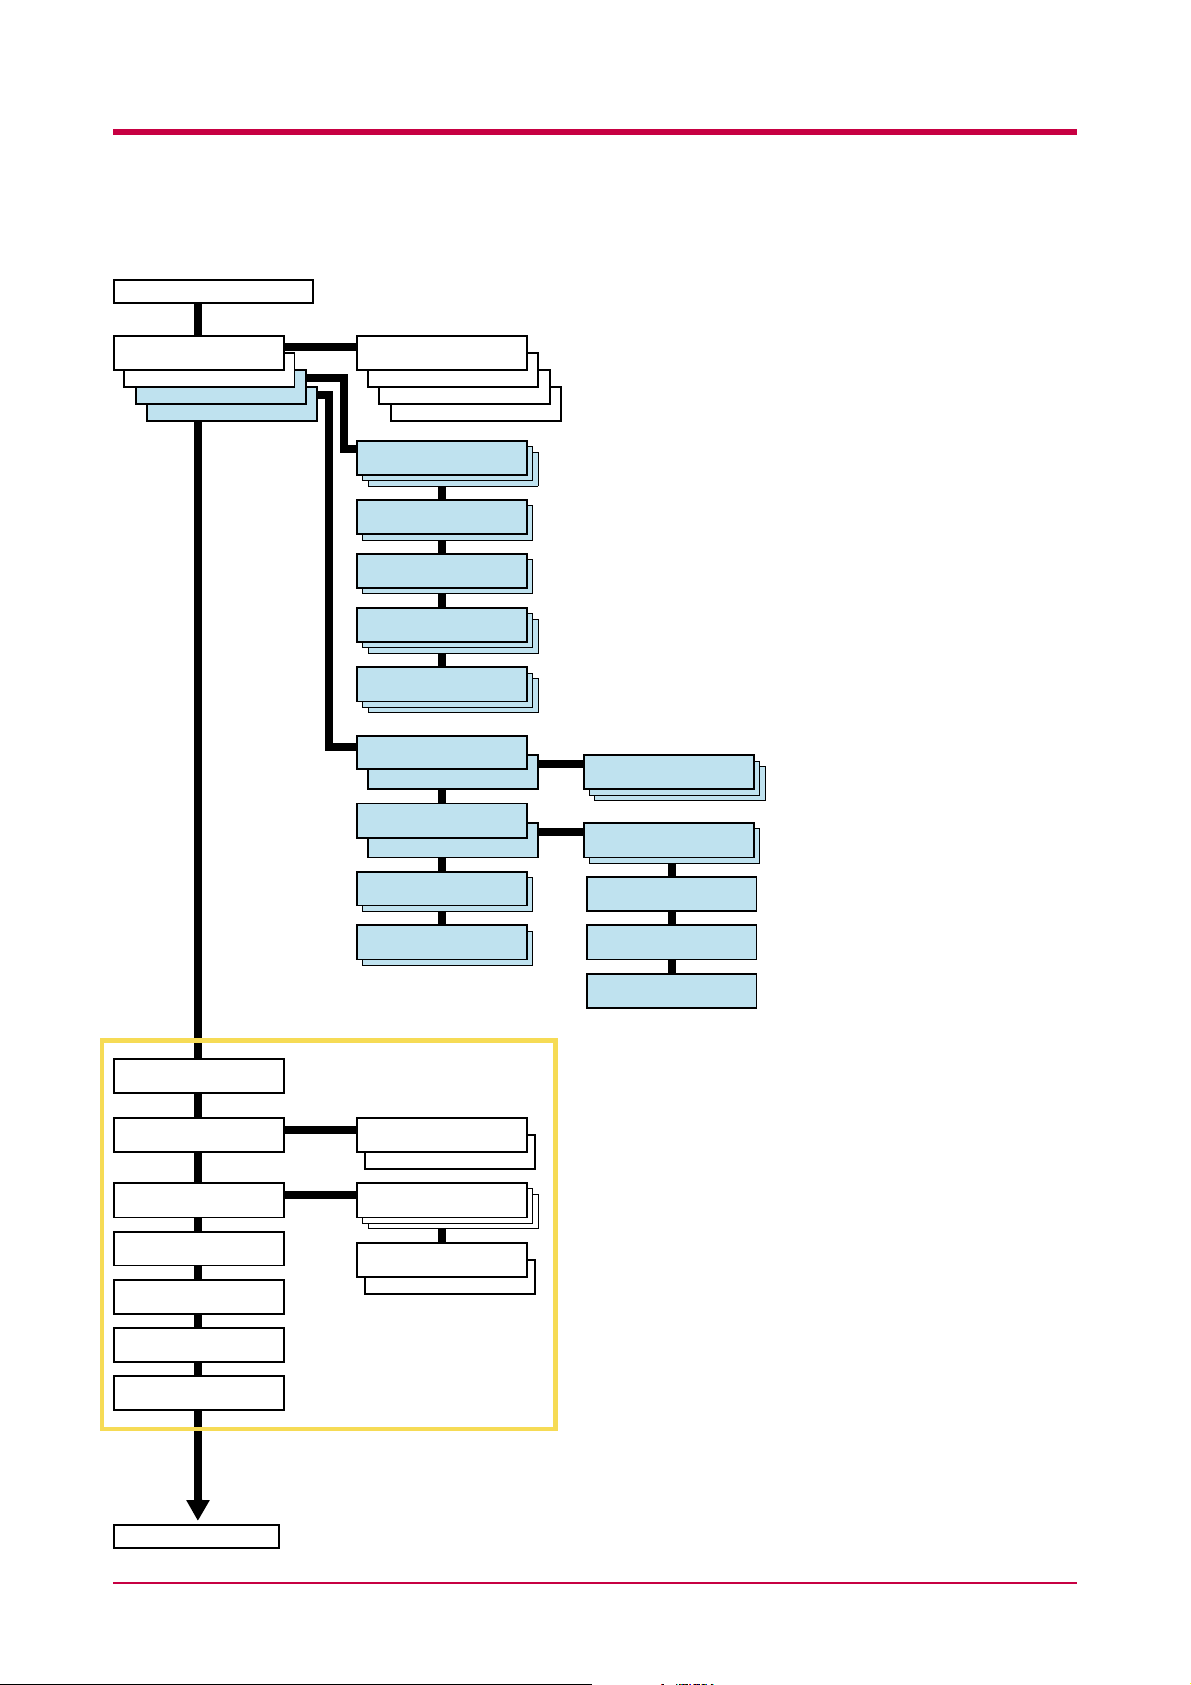
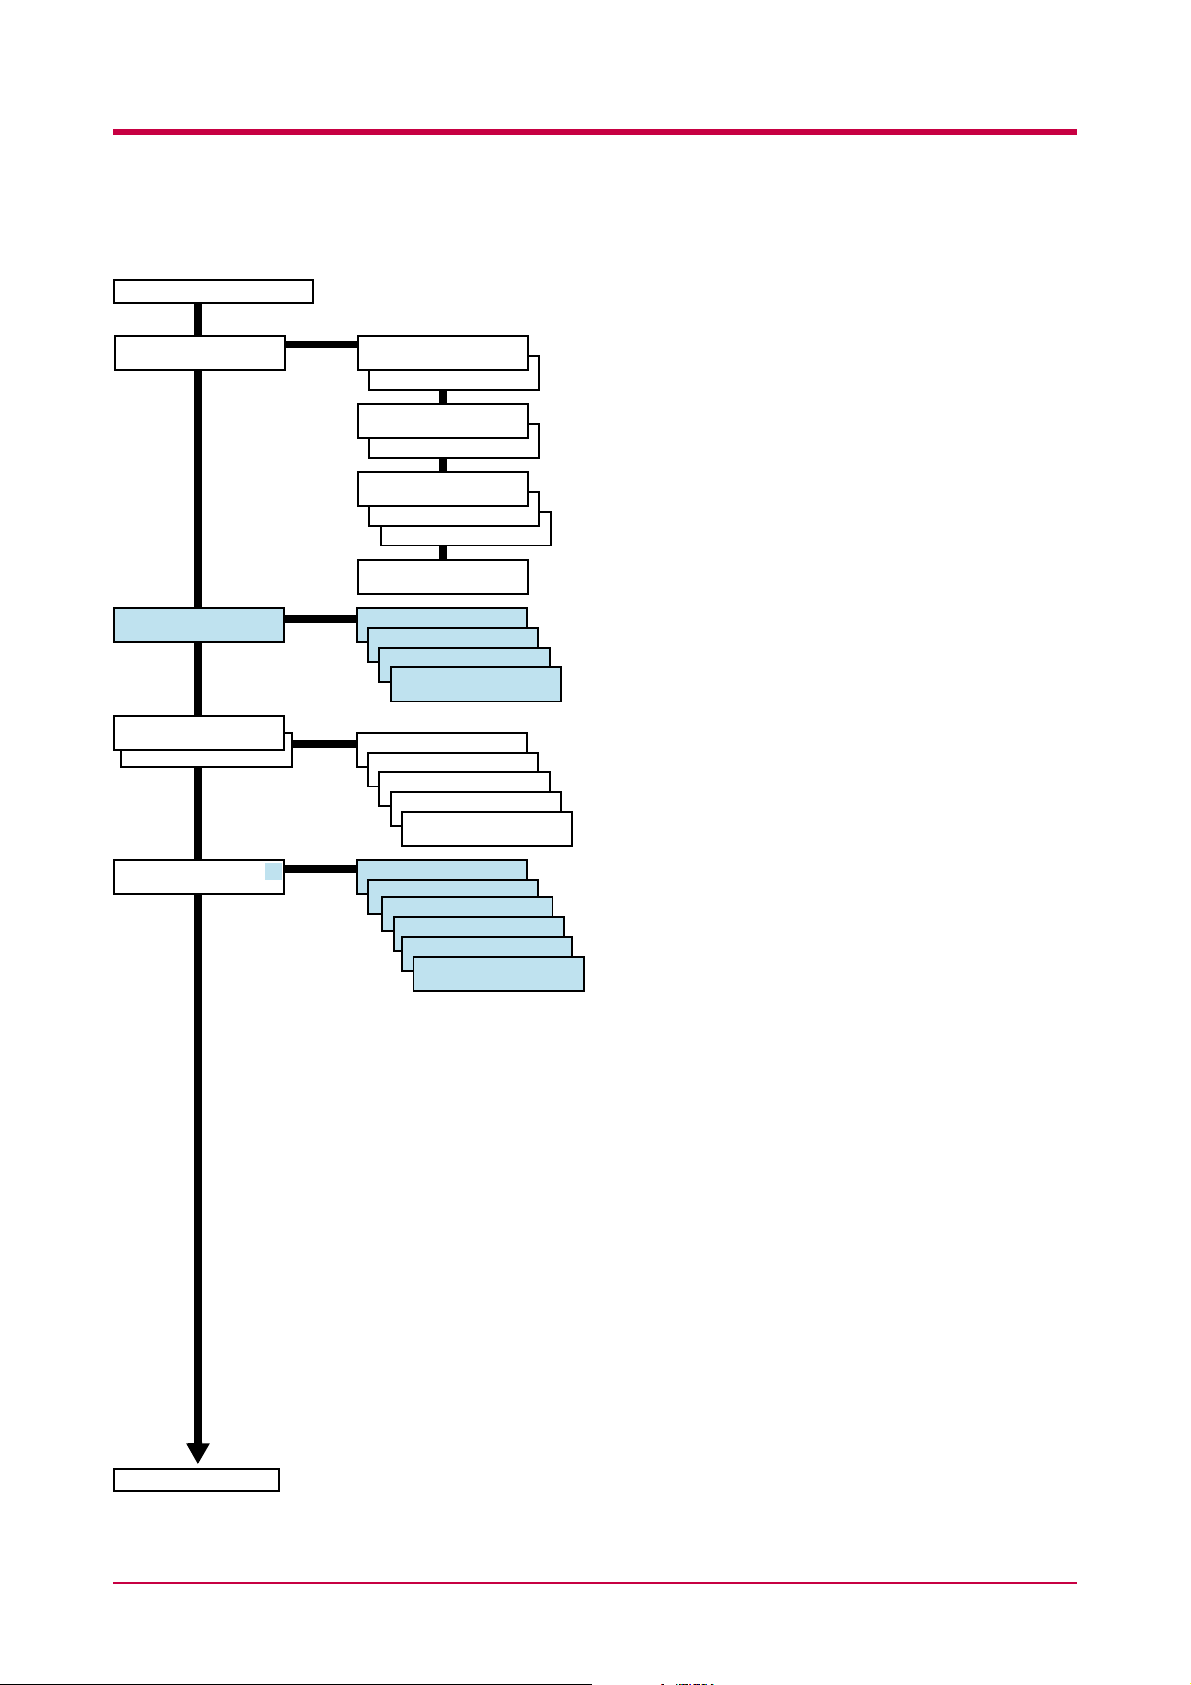
Continued from previous page
Understanding the Operator Panel
Interface >
Parallel
USB
Interface >
Serial
Interface >
Option
>Parallel I/F
Auto
Normal
High Speed
Nibble (high)
>Baud Rate
9600
>Data Bits
8
>Stop Bits
1
>Parity
None
>Protocol
DTR (pos.)&XON
>NetWare
Off
>NetWare >
On
>TCP/IP
Off
On
>Ether Talk
Off
>>NetWare Frame
Auto
>>DHCP
OFF
>>IP Address
Emulation
PCL 6
Emulation >
KPDL
Emulation >
KPDL (AUTO)
Emulation
Line Printer
Emulation
IBM Proprinter
Emulation
DIABLO 630
Emulation
EPSON LQ-850
>OPT. StatusPage
Off
>Print KPDL errs
Off
On
>Alt. Emulation
PCL 6
>Print KPDL errs
Off
On
>>Subnet Mask
>>Gateway
Continued on next page
1-7
Page 23
Understanding the Operator Panel
Continued from previous page
Font >
Page Set >
Font Select >
Internal
>
Option
>Code Set
IBM PC-8
>List of
Internal Fonts
>List of
Option Fonts
>Copies
001
>Orientation
Portrait
Landscape
>Page Protect
Auto
On
>LF Action
LF only
CR and LF
Ignore LF
>CR Action
CR only
CR and LF
Ignore CR
>Wide A4
Off
On
>> I000
>>Courier
Dark
Regular
>>Letter Gothic
Regular
Dark
>>Size
012.00
>>Pitch
10.00 cpi
Continued on next page
1-8
Page 24
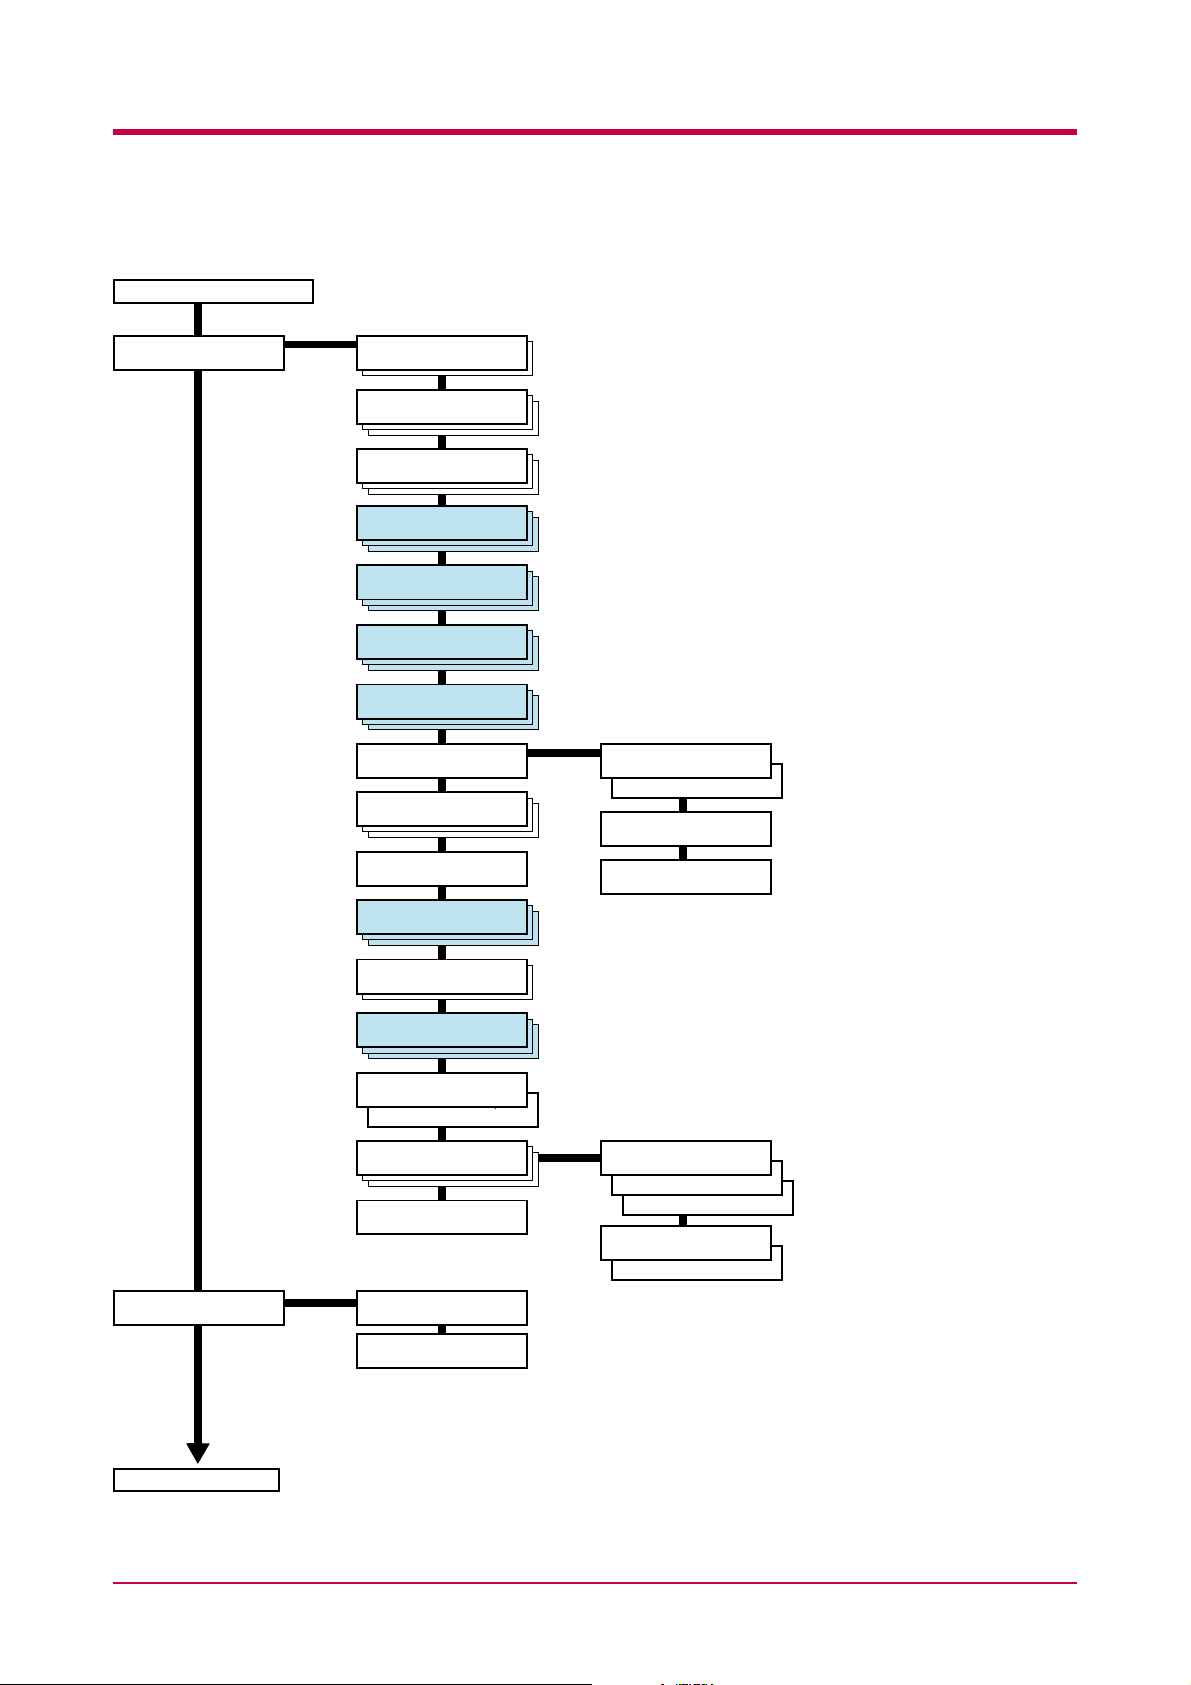
Continued from previous page
Understanding the Operator Panel
Print Quality >
>KIR Mode
On
Off
>Ecoprint Mode
Off
On
>Resolution
Fast 1200 mode
300 dpi
600 dpi
>Print Density
03
Hard Disk > >Read Data
>Write Data
>Delete Data
>List of
Partitions
RAM Disk Mode
Off
RAM Disk Mode
On
Memory Card >
>RAM Disk Size
>Read Data
>Write Data
>Delete Data
>List of
Partitions
>Read Fonts
>Read Data
>Write Data
>Delete Data
>Format
>List of
Partitions
Continued on next page
1-9
Page 25
Understanding the Operator Panel
Continued from Previous page
Paper Handling >
>MP Tray Mode
Cassette
>MP Tray Size
A4 or Letter
>MP Tray Type
Plain
>EF Size
DL or Business
>EF Type
Envelope
>BulkFeeder Size
>BulkFeeder Type
Plain
>Cassette Size >
>Cassette Type
Plain
>Feed Select
Cassette
>Duplex Mode
None
>>Unit
mm
inch
>>X Dimension
>>Y Dimension
Life Counters >
Continued on next page
>Stack Select
Face-down tray
>Sorter Mode
Sorter
>Override A4/LT
Off
>Override A4/LT
On
>Type Adjust >
Custom 1
>Reset Type
Adjust
>Total Print
0123456
>New Toner
Installed
>>Paper weight
Normal
Heavy (Thick)
Light (Thin)
>>Duplex Path
Enable
Disable
1-10
Page 26
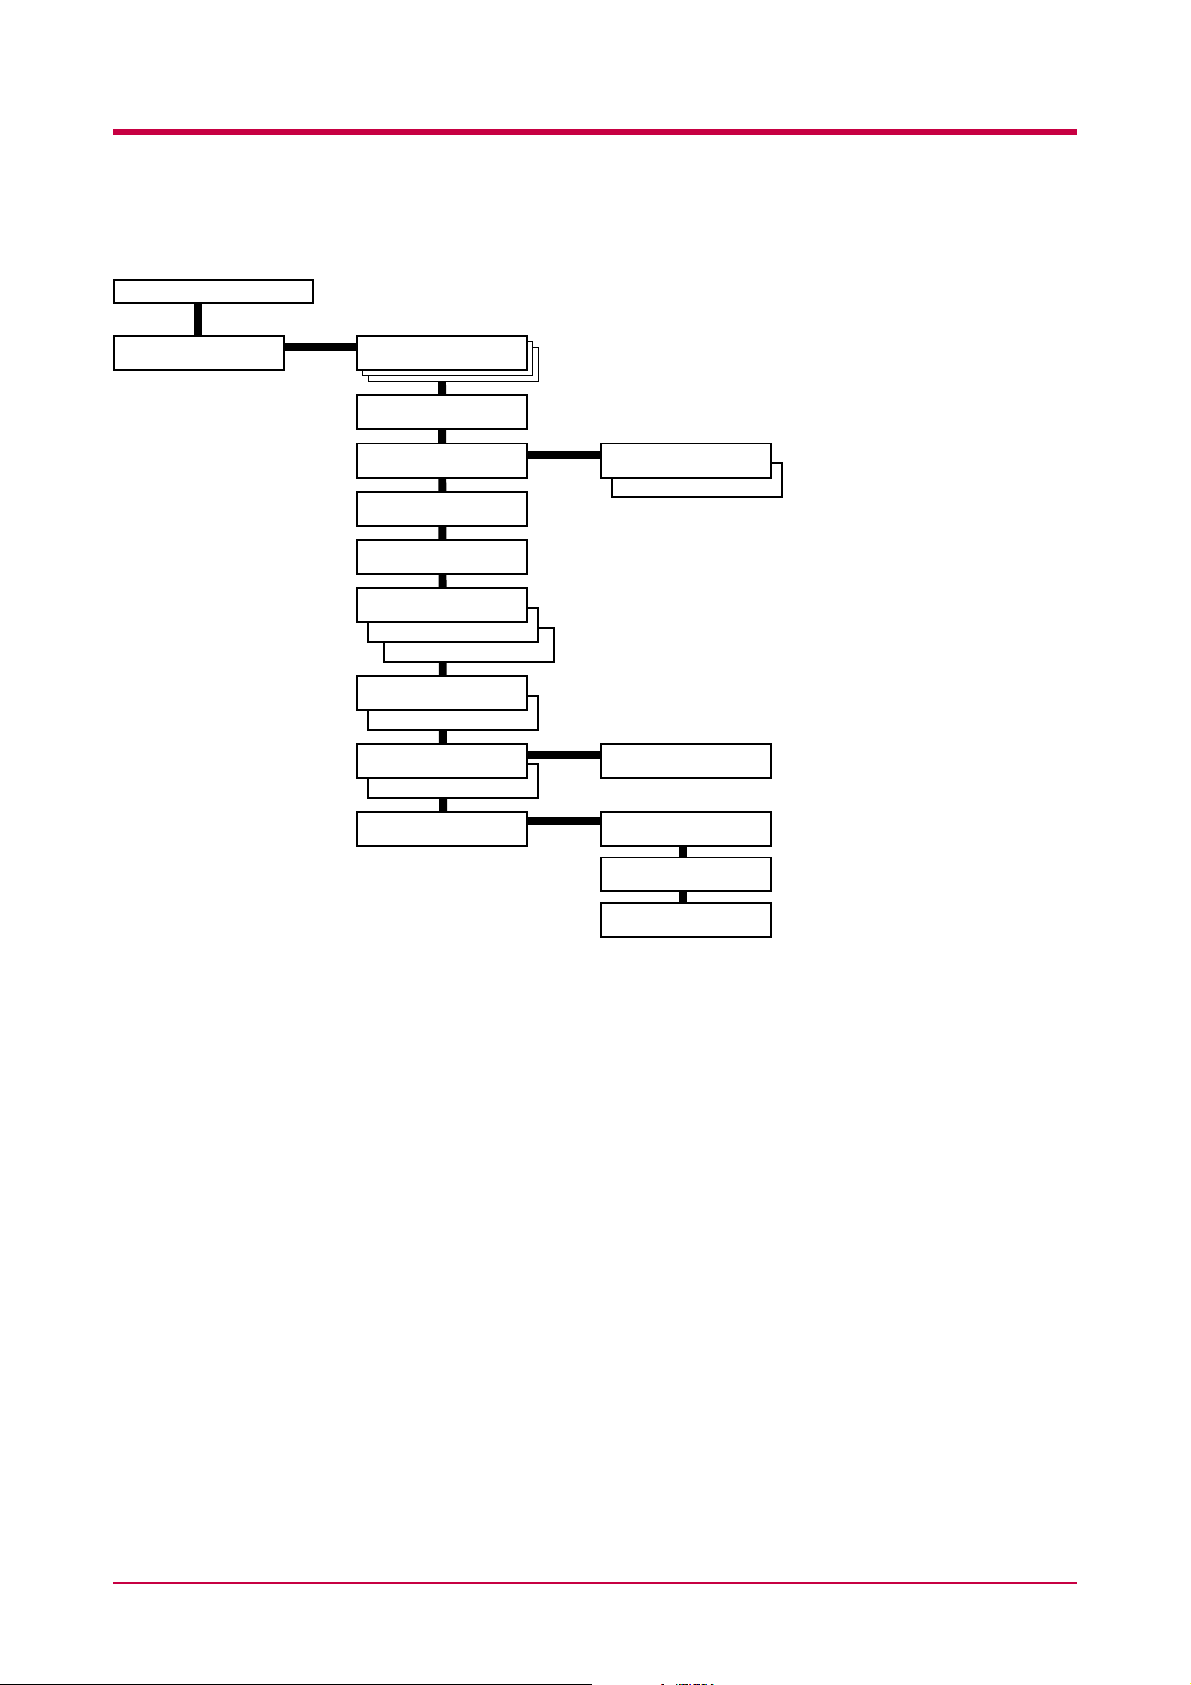
Continued from previous page
Understanding the Operator Panel
Others >
>MSG Language
English
>Form Feed
Time Out 030sec.
>Sleep Timer >
030 min.
>Print HEX-DUMP
>Printer Reset
>Resource Prot.
Off
Permanent
Perm / Temp
>Buzzer
On
Off
>Auto Continue
Mode On
Mode Off
>Service >
>>Sleep Mode
On
Off
>>Auto Continue
Timer 030sec.
>>Print
Status Page
>>Developer
>>Drum
*
*
* Since this menu is provided for service,
normally you need not use it.
1-11
Page 27
Printing Test Pages
Printing Test Pages
This section explains the procedure for printing the printer’s internal
information using the menu selection system. The menu map is usefull as a
reference to guide yourself through the menu selection system.
The status page is a list of parameters and settings for most basic printer
configurations. You may be required to produce a status page when
requesting service to the printer.
Menu Map
The printer prints a full list of menu selection system. Note that menus
indicated on the list may vary depending on which option units are
installed on the printer.
1
2
Press the MENU key.
Press the or key repeatedly until Print Menu Map appears.
Print
Menu Map
Press the ENTER key. A question mark (?) appears.
3
Print
Menu Map ?
Press the ENTER key again. The printer prints a menu map.
4
1-12
Page 28
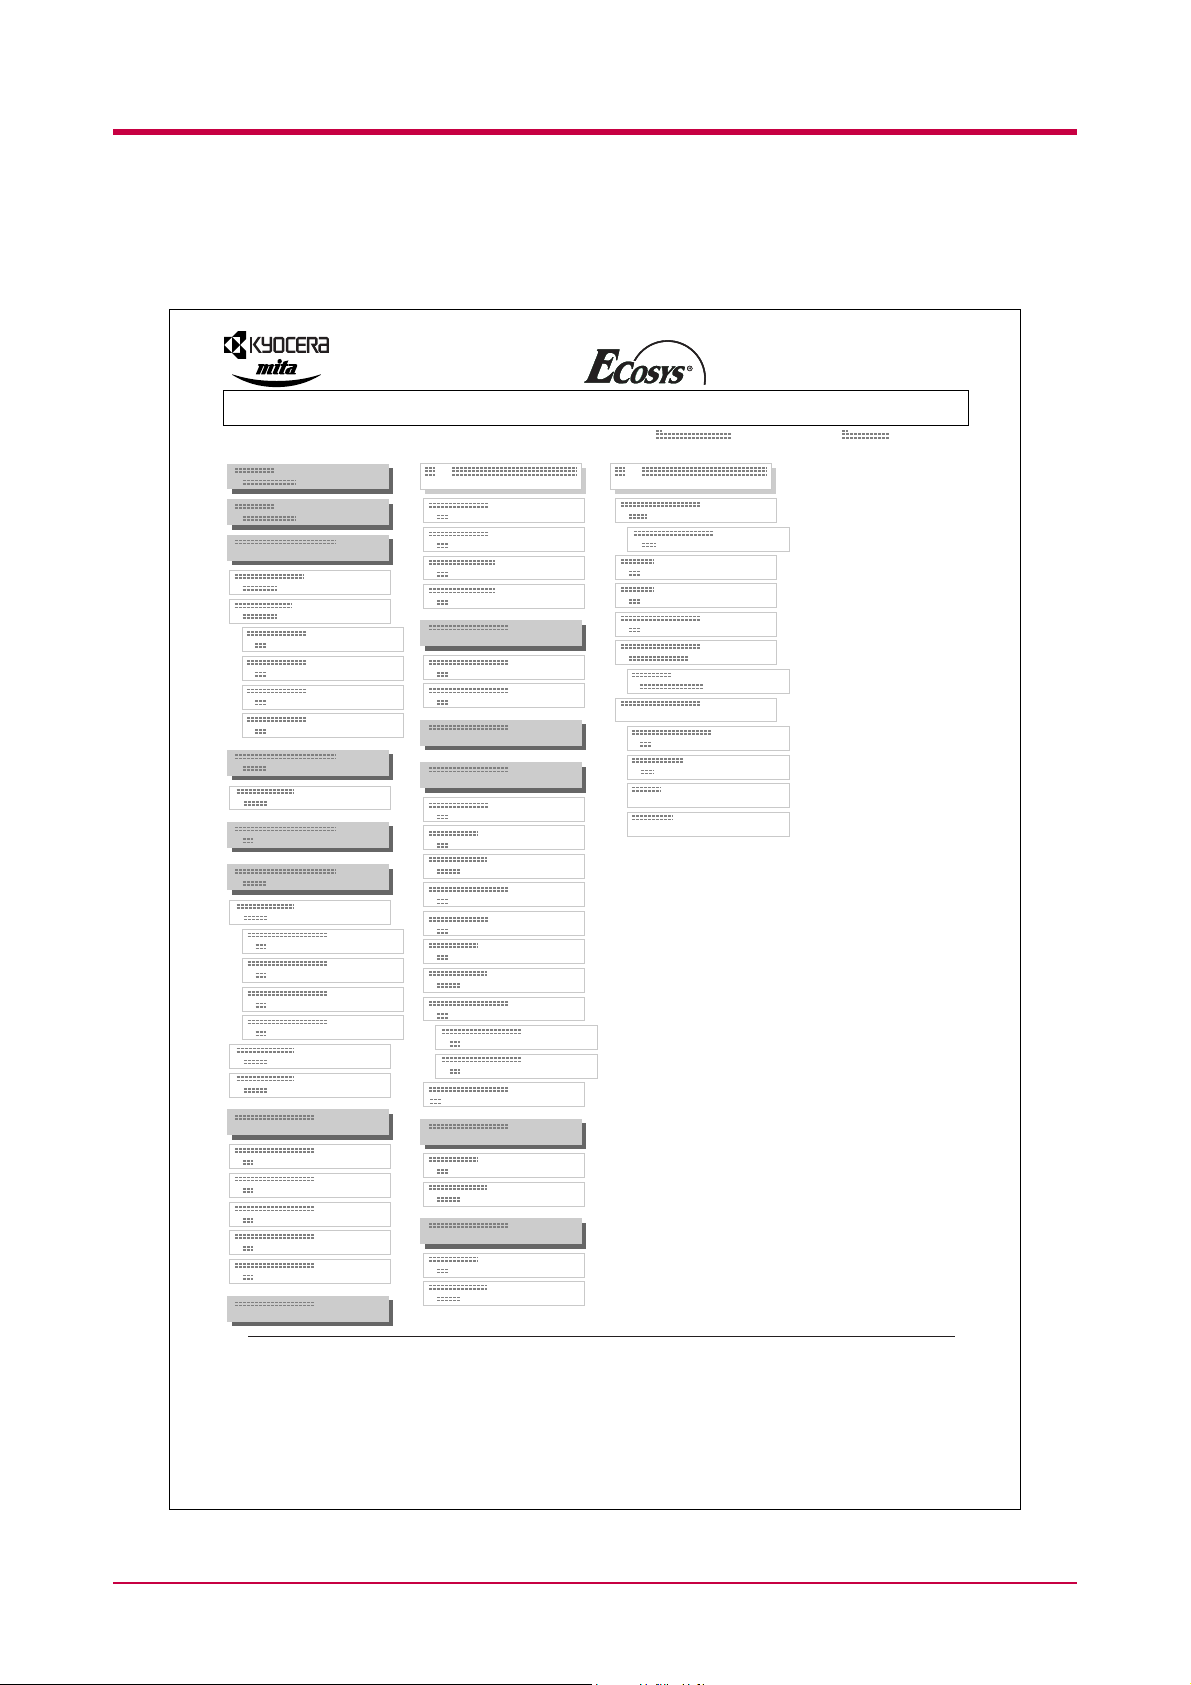
Sample MENU MAP
Printing Test Pages
FS-1900 Page Printer
MENU MAP
1-13
Page 29

Printing Test Pages
Status Page
If you want to check the printer's current status, including memory
available and option settings, you can find the information you need on the
status page.
Press the MENU key.
1
Press the or key repeatedly until Print Status Page appears.
2
Print
Status Page
Press the ENTER key. A question mark (?) appears.
3
Print
Status Page ?
Press the ENTER key again. The printer prints a status page.
4
For a full description of the status page, see the following pages.
1-14
Page 30
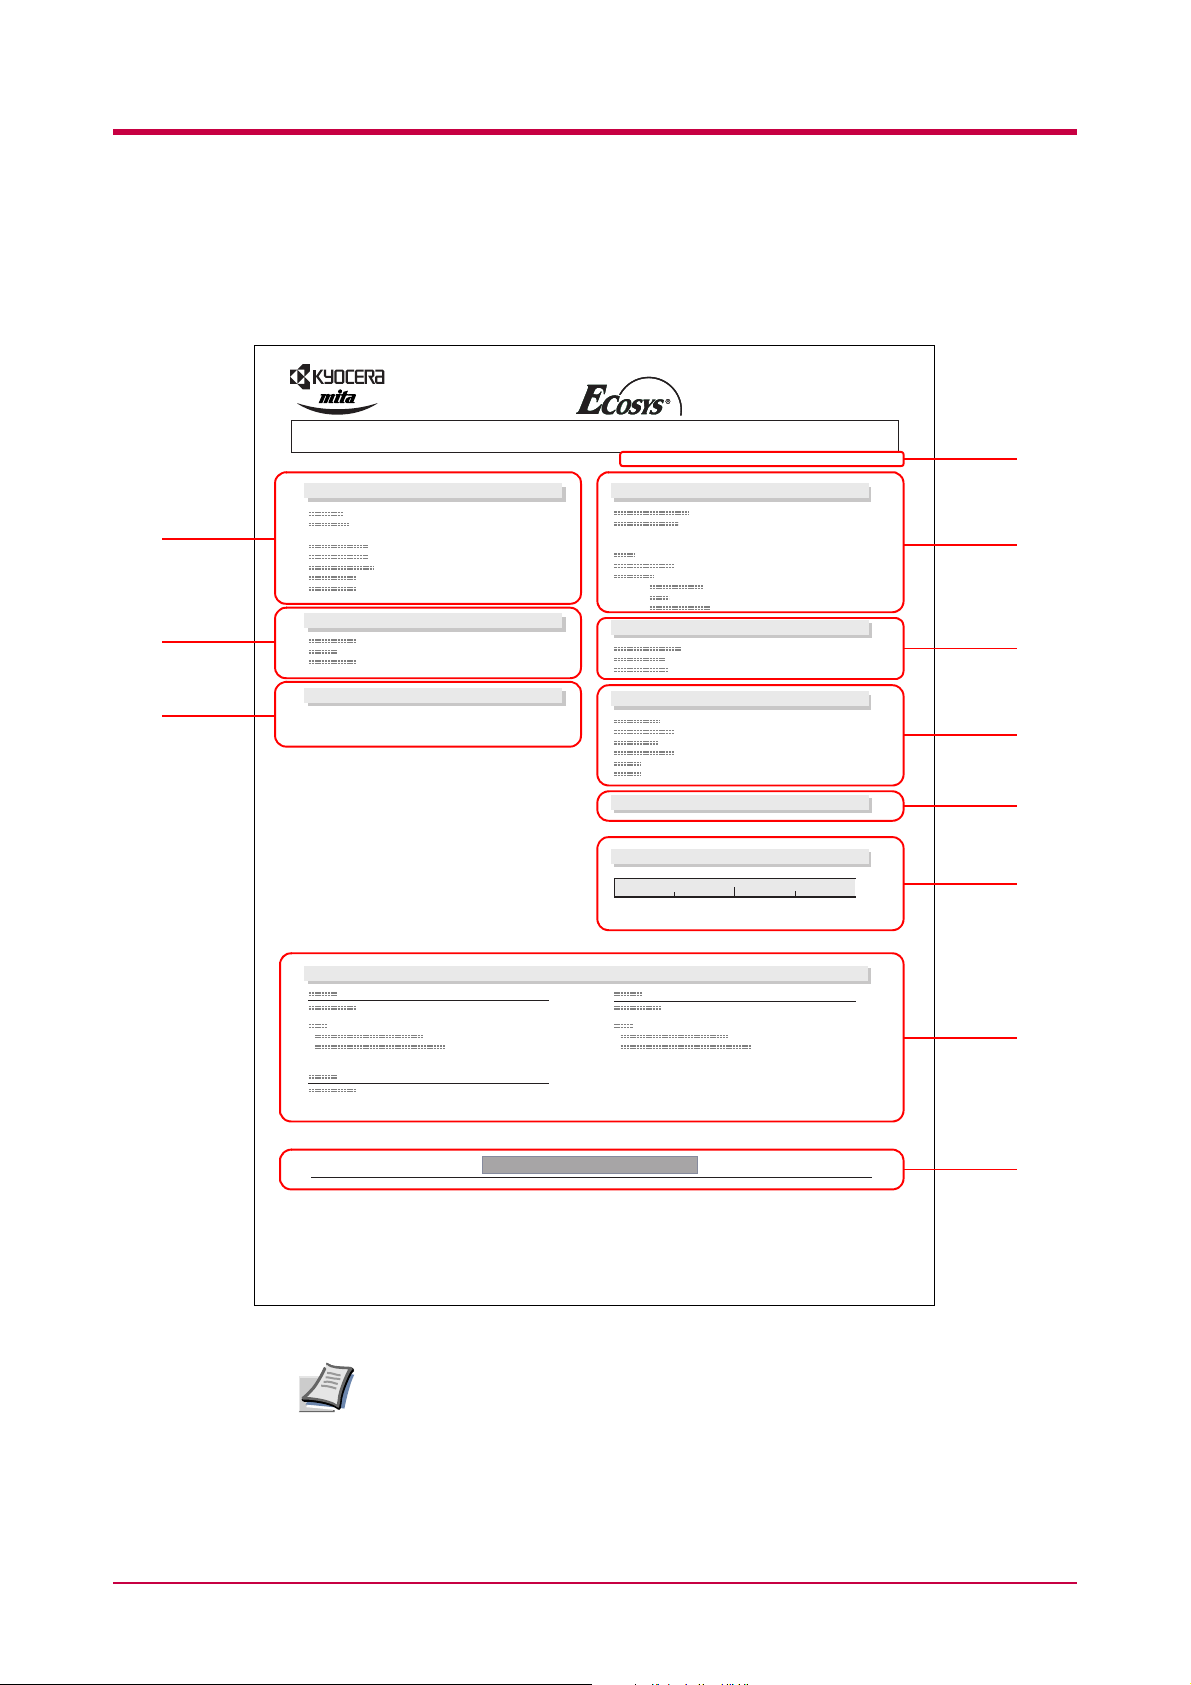
The following is a sample status page. The numbers below refer to the
contents explained on the following pages.
Hardware Information
STATUS PAGE
Firmware Version: Released:
Memory
Printing Test Pages
FS-1900 Page Printer
1
2
Page Information
Installed Options
4
Network Status
Emulation
3
5
6
7
Error Log
Toner Gauge
8
9
0
Interfaces
100
10
KIR Test pattern ON
Items and values on the status page may vary depending on the printer’s
firmware version.
Note
1-15
11
Page 31

Printing Test Pages
1 — Software Version
This information shows the firmware version and date of issue of the
printer.
2 — Hardware Information
This information shows various printer settings, such as the size and type
of the paper in the paper cassettes.
3 — Memory
This shows the amount of total memory installed in the printer, the
amount of currently available memory, and the current status of the RAM
disk. See Operating the Storage Device on page 1-81.
4 — Page Information
This shows the print resolution, number of copies, and the total page count.
5 — Installation Options
This shows the option(s) installed in the printer.
6 — Network Status
This shows the IP address, Subnet Mask address, and Default Gateway
address for the network interface card installed in the printer.
7 — Emulation
This shows all available emulations of the printer. The printer is shipped
from the factory with PCL 6 emulation selected as the default.
8 — Error Log
This shows the last three instances of the following four types of errors,
listing them in the order of their occurrence: KPDL Error Press GO;
Memory overflow Press GO; Print overrun Press GO; File not
found Press GO. The most recent error is displayed on the top line of the
Error Log. For error remedies, see section Error Messages on page 4-10.
Error information is cleared when the printer’s power is turned off.
9 — Toner Gauge
This shows the approximate level of remaining toner. When the value is
100, the toner container is full.
1-16
Page 32

Printing Test Pages
10 — Interface Information
This information shows the default font and the default emulation for all
interfaces installed in the printer.
11 — KIR Test Pattern
KIR is the Kyocera Mita’s original smoothing function. This test pattern
shows the effect of the KIR (Kyocera Image Refinement) system.
1-17
Page 33

Printing Test Pages
Service Status Page
The service status page contains printer settings information that is more
detailed than the standard status page and is therefore for mostly service
purposes. However, since there is a great deal of information available on
the service status page that may be helpful to you, the procedure for
printing it out is given below.
Press the MENU key.
1
Press the or key repeatedly until Others > appears.
2
Others >
Press the > key.
3
Press the or key repeatedly until >Service > appears.
4
>Service >
Press the > key.
5
Press the or key repeatedly until >>Print Status Page
6
appears.
>>Print
Status Page
Press the ENTER key. A question mark (?) appears.
7
>>Print
Status Page ?
Press the ENTER key again. The printer prints a service status page.
8
1-18
Page 34

Network Card Interface Status Page
To use this function, the network interface card must be installed on the
printer.
Printing Test Pages
Option
Note
You can print out a status page for the network interface. The network
interface card status page shows the firmware version, the network
addresses, and other information under various network protocols about
the network interface card. The default setting is On (print). If the setting
is changed to Off (not print) as follows, however, the network interface
status page will be printed when the printer status page is printed.
Printing out a network interface card status page may not be possible
with some network interface cards. For details, see the manual for the
network interface card.
Press the MENU key.
1
Press the or key repeatedly until Interface > appears.
2
Interface >
Parallel
Press the ENTER key. A blinking question mark (?) appears.
3
Interface
? Parallel
If you want to abandon the interface selection procedure, press the
CANCEL key. The interface remains unchanged.
Press the or key repeatedly until Option appears.
4
Interface
? Option
Press the ENTER key again. A > appears.
5
Interface >
Option
Press the > key and then press the or key repeatedly until the
6
message display indicates >Opt. StatusPage.
>Opt. StatusPage
On
1-19
Page 35

Printing Test Pages
The default setting is On. If it is set to Off, change it as follows.
7
Press the ENTER key. A blinking question mark (?) appears.
>Opt. StatusPage
? Off
Select On using the or key.
8
>Opt. StatusPage
? On
Press the ENTER key again.
9
>Opt. StatusPage
On
Press the MENU key. The message display returns to Ready.
10
1-20
Page 36

Font Lists
Printing Test Pages
To help in selecting fonts, you can print the lists of the fonts including
option fonts.
Press the MENU key.
1
Press the or key repeatedly until Font > appears.
2
Font >
Press the > key.
3
Press the or key repeatedly until > Font Select> appears.
4
>Font Select >
Internal
To print a list of the internal fonts, check that Internal is
5
displayed. To print a list of option fonts, press the ENTER key. Press
the or key repeatedly until the message display indicates
Option and press the ENTER key.
Press the or key repeatedly until >List of Internal Fonts
6
or >List of Option Fonts appears.
>List of
Internal Fonts
Press the ENTER key. A question mark (?) appears.
7
>List of
Internal Fonts?
Press the ENTER key again. Processing appears, then Ready. The
8
printer prints a list of fonts with a short sample and font ID
(number) for each font.
1-21
Page 37

Printing Test Pages
Font Lists
1-22
Page 38

Received Data Dumping
It is possible to print data received by the printer as hexadecimal code for
the purposes of debugging programs and files.
1
2
3
4
Printing Test Pages
Press the MENU key.
Press the or key repeatedly until Others > appears.
Others >
Press the > key.
Press the or key repeatedly until > Print HEX-DUMP appears.
>Print HEX-DUMP
Press the ENTER key. A question mark (?) appears.
5
>Print HEX-DUMP?
Press the ENTER key again. Processing appears for a second, and
6
then Waiting appears.
Processing
Waiting
Send data to be dumped to the printer. The message Processing
7
will be displayed during receiving the data.
Once the dumped data you require has been output, it is possible to
cancel the printing of any further dumped data by taking the printer
offline by pressing the GO key and then pressing the CANCEL key.
Once all data has been received, the message Waiting will appear.
8
Press the GO key to finish printing.
1-23
Page 39

Paper Handling
Paper Handling
This section explains how to use the operator panel to change the paper
size and type for each paper source, the mode for the MP (multi-purpose)
tray, and other settings regarding paper handling.
Setting the Paper Size
Set the paper sizes according to the sizes of paper to be set in the paper
cassette and the MP tray.
If they do not match, printing will not be made on the correct size paper
when automatic paper size selection is made by the application software
(printer driver).
Setting the Paper Size in Paper Cassette
To set the standard sizes A5, A4, B5, Letter, and Legal (for U. S. A. only)
size for the paper cassette, use the following procedure to set the paper size
dial of the paper cassette.
If you use a non-standard size, see Custom Paper Size on next page.
Properly set the paper into the paper cassette. For details about the
adjustment of the paper guides and paper stopper inside the paper
cassette, set the Installation Guide supplies with the printer.
Turn the paper size dial so that the size of the paper you are going to
1
use appears in the paper size window.
Paper Size Dial Paper Size Window
Adjust the paper guides and paper stopper inside the paper cassette
2
to the size of the paper to be used and load the paper into the
cassette.
The paper size setting for the paper cassette is completed.
1-24
Page 40

Paper Handling
Custom Paper Size
In addition to the standard sizes A5, A4, B5, Letter, and Legal (for U. S. A.
only) size for the paper cassette, paper of other sizes can be fed as custom
sizes. When placing paper of sizes other than A5, A4, B5, Letter, or Legal
(for U. S. A. only) into the paper cassette, set the size of the paper to be
used into the printer by following the procedure given below. If an option
paper feeder (PF-60) is installed, custom sizes for its paper cassette can be
set using the same procedure.
This menu appears when the paper size dial of the paper cassette is set to
CUSTOM.
Properly set the paper into the paper cassette. For details about the
adjustment of the paper guides and paper stopper inside the paper
cassette, see the Installation Guide supplied with the printer.
Setting Paper Size Dial
Use the following procedure to set the paper size dial to CUSTOM.
Pull out the paper cassette from the printer and turn the paper size
1
dial to CUSTOM. See step 1 in Setting the Paper Size in Paper
Cassette.
Adjust the paper guides and paper stopper inside the paper cassette
2
to the size of the paper to be used and load the paper into the
cassette.
When using non-standard size paper, read the next section to set the
paper size from the operator panel.
Setting a custom size from the Operator Panel
Set the size of the paper loaded in the paper cassette into the printer from
the printer operator panel.
Press the MENU key.
1
Press the or key repeatedly until Paper Handling > appears.
2
Paper Handling >
Press the > key.
3
1-25
Page 41

Paper Handling
Press the or key repeatedly until >Cassette Size > appears.
4
If option paper feeders are added, Cassette 1 Size will appear for
the standard paper cassette and Cassette 2 Size, Cassette 3
Size, and Cassette 4 Size will appear for the option paper
feeders.
>Cassette Size >
Set the unit of measurement as described in the next section.
Selecting the Unit of Measurement
Then, use the following procedure to set the unit of measurement.
Press the > key.
1
Press the or key repeatedly until >>Unit appears. The unit of
2
measurement can be selected between millimeters and inches. The
current unit of measurement is displayed (the default setting is mm).
>>Unit
mm
Press the ENTER key. A blinking question mark (?) appears.
3
>>Unit
? mm
Select mm or inch using the or key.
4
Press the ENTER key.
5
Set the dimensions of paper as described in the next section.
1-26
Page 42

Entering the Width and Length
Then, use the following procedure to set the paper size.
Enter the paper size for X Dimension and Y Dimension as
shown in the figure.
Y Dimension
148 to 216 mm
(5.83 to 8.5 inches)
X Dimension
Paper Handling
210 to 356 mm
(8.27 to 14.02 inches)
When the unit of measurement is set, press the key.
1
>>X Dimension appears as shown below (the paper width setting).
>>X Dimension
216 mm
Press the ENTER key. A blinking cursor ( ) appears.
2
>>X Dimension
216 mm
Press the or key to increase or decrease the value of the figure
3
where the cursor is blinking and display the desired width. The
width can be set between 148 and 216 mm (5.83 to 8.5 inches). You
can use the > and < keys to move the cursor right and left.
Display the paper width and press the ENTER key.
4
When the width is set, press the key. >>Y Dimension appears
5
(the paper length setting). Set the desired length in the same way as
the width. The length can be set between 210 and 356 mm (8.27 to
14.02 inches).
Display the paper length, press the ENTER key.
6
1-27
Page 43

Paper Handling
Press the MENU key. The message display returns to Ready.
7
To print using the custom size set above, define the same custom size
on the printer driver. For details, see Setting Custom Paper Size in
Printer Driver Guide.
Setting the Paper Size in MP Tray
When using the MP tray in the cassette mode, you should set the same
paper size to the MP tray as that is used to format the job to print. The
factory default setting is A4 or Letter.
This menu does not appears when the option envelope feeder is installed on
the printer.
For more details about the paper sizes that can be fed from the MP tray, see
Chapter 2.
Press the MENU key.
1
Press the or key repeatedly until Paper Handling > appears.
2
Paper Handling >
Press the > key.
3
Press the or key repeatedly until >MP Tray Size appears.
4
>MP Tray Size
A4
Press the ENTER key. A blinking question mark (?) appears.
5
>MP Tray Size
? A4
1-28
Page 44

Paper Handling
Press the or key to display the desired MP tray size. The display
6
changes as shown below.
A4
Executive
Letter
Legal
Custom
Oficio II
Statement
Folio
Youkei 2
Youkei 4
Hagaki
OufukuHagaki
Monarch
Business
Comm. #9
Comm. #6 3/4
DL
C5
A6
B6
A5
B5
ISO B5
When the desired paper size is displayed, press the ENTER key.
7
Press the MENU key. The message display returns to Ready.
8
The paper size setting for the MP tray is completed.
1-29
Page 45

Paper Handling
Setting the Paper Type
Set the paper types according to the paper to be set in the cassette and the
MP tray.
Setting the Paper Type in Paper Cassette
Make this setting to match the paper type fed from the paper cassette of
the printer. If the paper type is set correctly, you can perform printing
using the media type selection function from the application software
(printer driver). The factory default setting is Plain.
For more details about the paper types that can be fed from the paper
cassette, see Chapter 2.
Press the MENU key.
1
Press the or key repeatedly until Paper Handling > appears.
2
Paper Handling >
Press the > key.
3
Press the or key repeatedly until >Cassette Type appears.
4
>Cassette Type
Plain
Press the ENTER key. A blinking question mark (?) appears.
5
>Cassette Type
? Plain
Press the or key to display the desired cassette type. The display
6
changes as shown below.
Plain
Preprinted
Bond
Recycled
Rough
Letterhead
Color
Prepunched
Custom(1 to 8)
When the desired cassette type is displayed, press the ENTER key.
7
Press the MENU key. The message display returns to Ready.
8
1-30
Page 46

Setting the Paper Type in MP Tray
You can automatically select the paper cassette according to the selection
made by the application software (printer driver). The factory default
setting is Plain.
This menu does not appears when the option envelope feeder is installed on
the printer.
For more details about the paper types that can be fed from the MP tray,
see Chapter 2.
Press the MENU key.
1
Press the or key repeatedly until Paper Handling > appears.
2
Paper Handling >
Press the > key.
3
Press the or key repeatedly until >MP Tray Type appears.
4
Paper Handling
>MP Tray Type
Plain
Press the ENTER key. A blinking question mark (?) appears.
5
>MP Tray Type
? Plain
1-31
Page 47

Paper Handling
Press the or key to display the desired MP tray type. The display
6
changes as shown below.
Plain
Transparency
Preprinted
Labels
Bond
Recycled
Vellum
Rough
Letterhead
Color
Prepunched
Envelope
Cardstock
Custom (1 to 8)
When the desired MP tray type is displayed, press the ENTER key.
7
Press the MENU key and the message display returns to Ready.
8
Custom Paper Type
The following describes the procedure used to set a user-defined paper type
for the printer. Eight custom user settings may be registered. After having
been set, any of these may be called up when setting the paper type for a
paper source.
The paper weight and duplex path can be set (see Setting the Paper
Weight on page 1-34, and Setting the Duplex Path on page 1-35) after
selecting the paper type to be customized as follows. For how to reset the
customized settings, see Resetting the Custom Paper Type on page 1-36.
Press the MENU key.
1
Press the or key repeatedly until Paper Handling > appears.
2
Paper Handling >
Press the > key.
3
Press the or key repeatedly until >Type Adjust > appears.
4
>Type Adjust >
Custom 1
1-32
Page 48

Press the ENTER key. A blinking question mark (?) appears.
5
>Type Adjust >
? Custom 1
Press the or key to display the desired paper type. The display
6
changes as shown below.
Custom (1 to 8)
Plain
Transparency
Preprinted
Labels
Bond
Recycled
Vellum
Rough
Letterhead
Color
Prepunched
Envelope
Cardstock
Paper Handling
When the paper type to be customized is displayed, press the ENTER
7
key.
Press the > key and proceed to Setting the Paper Weight on the
8
following page.
Proceed to Setting the Paper Weight and Setting the Duplex Path
starting from the following page.
1-33
Page 49

Paper Handling
Setting the Paper Weight
You can set the paper thickness for your custom paper type to be
customized.
Display the custom paper type (see Custom Paper Type on page
1
1-32) and press the > key.
Press the or key repeatedly until >>Paper Weight appears.
2
>>Paper Weight
Normal
Press the ENTER key. A blinking question mark (?) appears.
3
>>Paper Weight
? Normal
Press the or key to display the desired paper thickness. The
4
display changes as shown below. For details of the default setting for
each paper type, see Paper Type on page 2-11.
Normal
Heavy (Thick)
Light (Thin)
When the desired paper thickness displayed, press the ENTER key.
5
Press the MENU key. The message display returns to Ready.
6
If the paper type is set to Custom and the option duplexer is installed
on the printer, duplex printing can be enabled and disabled. See
Setting the Duplex Path on the following page.
1-34
Page 50

Paper Handling
Setting the Duplex Path
To use this function, the duplexer must be installed on the printer.
Option
If the paper type is set to Custom and the option duplexer is installed on
the printer, you can set whether or not to enable duplex printing as follows.
The default setting is Enable.
Display the custom paper type (see Custom Paper Type on page
1
1-32) and press the > key.
Press the or key repeatedly until >>Duplex path appears.
2
>>Duplex path
Enable
Press the ENTER key. A blinking question mark (?) appears.
3
>>Duplex path
? Enable
Select Enable or Disable using the or key. For details of the
4
default setting for each paper type, see Paper Type on page 2-11.
Press the ENTER key.
5
Press the MENU key. The message display returns to Ready.
6
The custom paper type setting is completed.
1-35
Page 51

Paper Handling
Resetting the Custom Paper Type
Resets the settings of Custom 1 to 8 that are set in Custom Paper Type
on page 1-32.
Press the MENU key.
1
Press the or key repeatedly until Paper handling > appears.
2
Paper Handling >
Press the > key.
3
Press the or key repeatedly until >Reset Type Adjust
4
appears.
>Reset Type
Adjust
Press the ENTER key. A question mark (?) appears.
5
>Reset Type
Adjust ?
Press the ENTER key. All the customized paper weight and duplex
6
path settings will be reset to the default. The message display
returns to Ready.
1-36
Page 52

MP Tray Mode
Paper Handling
The MP tray can be used in either of two modes – first or cassette. The
MP tray feed paper differently depending on the mode:
•Cassette Mode
This is the default mode. The MP tray acts in the same manner as
other paper source. The printer can correctly feed paper from any paper
source as you command on the printer driver. The cassette mode
provides a faster printing speed than the first mode.
•First Mode
The MP tray automatically feeds paper placed on the MP tray
overriding another paper source that is selected on the printer driver.
After all paper sheets in the MP tray have been used up (approximately
100 sheets [A4 size, 0.11 mm thickness]), paper will be fed from the
paper source originally selected. This mode is convenient to feed paper
of special size or type without reloading the current paper source.
However, the MP tray must be kept empty if you desire to feed paper
from the intended paper source.
Note
This menu does not appears when the option envelope feeder is installed on
the printer.
The maximum capacity for the MP tray of 100 sheets is based on A4
paper. If you use Legal size paper on the MP tray, the number of paper
you use should be considerably smaller than 100 sheets to avoid
possible paper jam.
To switch the MP tray to First mode, proceed as follows:
Press the MENU key.
1
Press the or key repeatedly until Paper Handling > appears.
2
Paper Handling >
Press the > key.
3
Press the or key repeatedly until >MP Tray Mode appears.
4
>MP Tray Mode
Cassette
1-37
Page 53

Paper Handling
Press the ENTER key. A blinking question mark (?) appears.
5
>MP Tray Mode
? Cassette
Select First or Cassette using the or key.
6
Press the ENTER key.
7
Press the MENU key. The message display returns to Ready.
8
Selecting the Paper Feed Source
You can select from which paper source printing will be performed. If no
option units are installed, the only selections are the paper cassette and
MP tray of the printer. If option paper feeders are installed, they can also
be selected using the manner described below.
Press the MENU key.
1
Press the or key repeatedly until Paper Handling > appears.
2
Paper Handling >
Press the > key.
3
Press the or key repeatedly until >Feed Select appears.
4
>Feed Select
Cassette
Press the ENTER key. A blinking question mark (?) appears.
5
>Feed Select
? Cassette
Select MP tray or Cassette using the or key.
6
Press the ENTER key.
7
Press the MENU key. The message display returns to Ready.
8
1-38
Page 54

Output Stack
Paper Handling
The following procedure allows you to select whether printouts will be
received by the face-down output tray or to the face-up output tray. If an
option sorter is installed, it can also be selected using the manner
described below.
Press the MENU key.
1
Press the or key repeatedly until Paper Handling > appears.
2
Paper Handling >
Press the > key.
3
Press the or key repeatedly until >Stack Select appears.
4
>Stack Select
Face-down tray
Press the ENTER key. A blinking question mark (?) appears.
5
>Stack Select
? Face-down tray
Press the or key to display the desired destination. The output
6
tray changes as shown below.
Face-down tray (Printer’s face-down output tray) [Default]
Face-up tray (Printer’s face-up output tray) [Option face-up
tray required]
When the desired paper source displayed, press the ENTER key.
7
Press the MENU key. The message display returns to Ready.
8
1-39
Page 55

Paper Handling
Overriding A4 and Letter Size Difference
This selects whether to enable or disable the difference between A4 size
and Letter size. Under the default setting of Off, the paper size of the
paper source is matched to the paper size formatting the jobs. If these
differ, a corresponding error message is displayed. When this is set to On,
printing is performed even if the actual paper size differs from the paper
size formatting the jobs.
Press the MENU key.
1
Press the or key repeatedly until Paper Handling > appears.
2
Paper Handling >
Press the > key.
3
Press the or key repeatedly until >Override A4/LT appears.
4
>Override A4/LT
Off
Press the ENTER key. A blinking question mark (?) appears.
5
>Override A4/LT
? Off
Select On or Off using the or key.
6
Press the ENTER key.
7
Press the MENU key. The message display returns to Ready.
8
1-40
Page 56

Pagination
Emulation
Pagination
The items regarding pagination can be made from the operator panel. The
items that can be set are shown below.
•Emulation
•Font
• Code Set
•Number of Copies
• Printing Orientation
• KIR (Kyocera Image Refinement)
•Ecoprint
• Resolution
The following procedure allows you to select the printer’s emulation mode.
Changing the Emulation
To change the emulation mode, proceed as follows:
Press the MENU key.
1
Press the or key repeatedly until Emulation appears. One of
2
the emulation modes shown below appears, indicating the current
emulation.
PCL 6 (default)
KPDL
KPDL (AUTO)
Line Printer
IBM Proprinter
DIABLO 630
EPSON LQ-850
KPDL is the Kyocera’s implementation of the PostScript page
description language.
Press the ENTER key. A blinking question mark (?) appears.
3
Emulation
?PCL 6
Press the or key repeatedly until the desired emulation mode
4
appears.
1-41
Page 57

Pagination
Press the ENTER key.
5
Press the MENU key. The message display returns to Ready.
6
Alternative Emulation for KPDL Emulation
The auto KPDL (KPDL (AUTO)) emulation enables the printer to
automatically change the emulation mode according to the print job
received. The alternative emulation can be selected using the operator
panel. The default alternative emulation is PCL 6.
Press the MENU key.
1
Press the or key repeatedly until Emulation appears.
2
Emulation
PCL 6
Press the ENTER key. A blinking question mark (?) appears.
3
Emulation
?PCL 6
Press the or key repeatedly until the message display indicated
4
KPDL (AUTO) appears.
Emulation
?KPDL (AUTO)
Press the ENTER key.
5
Press the > key. When > Print KPDL Errs is displayed, press the
6
or key. The display cycles through the emulation in the following
order:
PCL 6 (default)
Line Printer
IBM Proprinter
DIABLO 630
EPSON LQ-850
Press the ENTER key. A blinking question mark (?) appears.
7
>Alt. Emulation
?PCL 6
1-42
Page 58

Printing KPDL Errors
Pagination
Press the or key repeatedly until the desired alternative
8
emulation appears.
Press the ENTER key.
9
Press the MENU key. The message display returns to Ready.
10
The printer can print error descriptions when printing error occurs during
KPDL emulation. The default is Off – the printer does not print KPDL
errors.
Press the MENU key.
1
Press the or key repeatedly until Emulation > appears.
2
Emulation
PCL 6
Press the ENTER key. A blinking question mark (?) appears.
3
Emulation
?PCL 6
Select KPDL or KPDL (AUTO) using the or key.
4
Emulation
?KPDL
Press the ENTER key.
5
Press the > key. The message display changes to that shown below. If
6
>Alt. Emulation is displayed when the KPDL (AUTO) emulation
is selected, press the or key to change it.
>Print KPDL Errs
Off
Press the ENTER key. A blinking question mark (?) appears.
7
>Print KPDL Errs
? Off
1-43
Page 59

Pagination
Font
Select On using the or key.
8
>Print KPDL Errs
? On
Press the ENTER key.
9
Press the MENU key. The message display returns to Ready.
10
You can select the default font for the current interface. In addition to the
internal fonts, all fonts that are downloaded to the printer memory, or fonts
stored on a CompactFlash card, Microdrive, or option ROM, can be selected
as the default font.
In this menu, you can also set the type and pitch for Courier and Letter
Gothic.
Default font
Press the MENU key.
1
Press the or key repeatedly until Font > appears.
2
Font >
Press the > key.
3
Press the or key repeatedly until >Font Select > appears.
4
>Font Select >
Internal
To select an internal font, check that Internal is displayed. If
5
Internal is not displayed, press the ENTER key. Press the or
key repeatedly until the message display indicates Internal and
press the ENTER key.
To select an option font, press the ENTER key. Press the or key
repeatedly until the message display indicates Option and press the
ENTER key. This operation is possible only when option fonts are
installed in the printer.
1-44
Page 60

Press the > key. The message display changes to that show below.
6
>> I000
The letter before the number indicates the type of font as shown
below:
Letter Description
I
S
M
H
O
Press the ENTER key. A blinking question mark (?) appears.
7
Internal font
Soft (down load) font
Fonts in an option CompactFlash card
Fonts in a RAM disk or option Microdrive.
Fonts in an option ROM
Pagination
>>?I000
Press the or key repeatedly until the desired font number
8
appears. For font numbers of the internal fonts, see List of Fonts on
page A-2.
When the desired font is displayed, press the ENTER key.
9
Press the MENU key. The message display returns to Ready.
10
1-45
Page 61

Pagination
Default Font Size
The following procedure determines the size of the default font. If the
default font is a fixed font such as Courier or Letter Gothic, the character
pitch can be changed instead of the font size.
Press the MENU key.
1
Press the or key repeatedly until Font > appears.
2
Font >
Press the > key.
3
Press the or key repeatedly until >Font Select > appears.
4
>Font Select >
Internal
Check that Internal is displayed and press the > key.
5
Press the or key repeatedly until >>Size appears.
6
>>Size
012.00 point(s)
Press the ENTER key. A blinking cursor ( _ ) appears.
7
>>Size
012.00 point(s)
Press the or key to increase or decrease the value of the figure
8
where the cursor is blinking. The font size can be set between 4 and
999.75 points, in 0.25-point increments. You can use the > or < key to
move the cursor right and left.
When the desired size is displayed, press the ENTER key.
9
Press the MENU key. The message display returns to Ready.
10
1-46
Page 62

Changing Type for Courier/Letter Gothic
Courier or Letter Gothic font type can be selected as Regular or Dark. For
example, to change the type of Courier, proceed as follows:
Press the MENU key.
1
Press the or key repeatedly until Font > appears.
2
Font >
Press the > key.
3
Press the or key repeatedly until >Font Select > appears.
4
>Font Select >
Internal
Pagination
Check that Internal is displayed and press the > key.
5
Press the or key repeatedly until >>Courier appears.
6
>>Courier
Regular
Press the ENTER key. A blinking question mark (?) appears.
7
>>Courier
? Regular
Select Regular or Dark using the or key.
8
Press the ENTER key.
9
Press the MENU key and the message display returns to Ready.
10
1-47
Page 63

Pagination
Setting the Character Pitch for Courier/Letter Gothic
The character pitch for fixed fonts is adjustable when the default font is
Courier or Letter Gothic.
Press the MENU key.
1
Press the or key repeatedly until Font > appears.
2
Font >
Press the > key.
3
Press the or key repeatedly until >Font Select > appears.
4
>Font Select >
Internal
Check that Internal is displayed and press the > key.
5
Press the or key repeatedly until >>Pitch appears.
6
>>Pitch
10.00 cpi
Press the ENTER key. A blinking cursor ( _ ) appears.
7
>Pitch
10.00 cpi
Press the or key to increase or decrease the value of the figure
8
where the cursor is blinking. The character pitch can be set between
0.44 and 99.99 characters per inch, in 0.01 character-per-inch
increments. You can use the > or < keys to move the cursor right and
left.
When the desired size is displayed, press the ENTER key.
9
Press the MENU key. The message display returns to Ready.
10
1-48
Page 64

Code Set
Pagination
You can change the character code set. Available character code sets vary
depending on the current font. (The default is IBM PC-8.)
Press the MENU key.
1
Press the or key repeatedly until Font > appears.
2
Font >
Press the > key. Press the or key until > Code Set appears.
3
>Code Set
IBM PC-8
Press the ENTER key. A blinking question mark (?) appears.
4
>Code Set
?IBM PC-8
Press the or key until the desired character code set appears.
5
Press the ENTER key.
6
Press the MENU key. The message display returns to Ready.
7
1-49
Page 65

Pagination
Number of Copies
You can set the number of copies to be printed of each page for the current
interface. The number of copies can be set between 1 and 999.
Press the MENU key.
1
Press the or key repeatedly until Page set > appears.
2
Page Set >
Press the > key.
3
Press the or key repeatedly until >Copies appears.
4
>Copies
001
Press the ENTER key. A blinking cursor ( _ ) appears.
5
>Copies
001
Press the or key to increase or decrease the value of the figure
6
where the cursor is blinking. It can be set between 1 and 999. You
can use the > and < keys to move the right and left.
When the desired size is displayed, press the ENTER key.
7
Press the MENU key. The message display returns to Ready.
8
1-50
Page 66

Printing Orientation
Pagination
The default orientation of the page can be selected from the portrait
(upright) and landscape (sideways) page orientation.
Portrait orientation
A A
Press the MENU key.
1
Press the or key repeatedly until Page Set > appears.
2
Page Set >
Press the > key.
3
Press the or key repeatedly until >Orientation appears.
4
>Orientation
Portrait
Landscape orientation
Paper feed direction
Press the ENTER key. A blinking question mark (?) appears.
5
>Orientation
? Portrait
Select Portrait or Landscape using the or key.
6
Press the ENTER key.
7
Press the MENU key. The message display returns to Ready.
8
1-51
Page 67

Pagination
KIR (Kyocera Image Refinement)
This printer incorporates the KIR (Kyocera Image Refinement) smoothing
function. This function provides high print quality by providing software
enhancement of print resolution.
Q
Status Page
KIR Checking
Lines
Note
STATUS PAGE
Firmware Version: Released:
Hardware Information
Page Information
Network Status
Interfaces
KIR Test pattern ON
Memory
Installed Options
Emulation
Error Log
Toner Gauge
0
With KIR
Off
With KIR On (default)
Set the print density to 3 when setting the KIR mode. For details on print
density, see page 1-95.
Look at the check line, the last line on a status page, to make the optimum
KIR mode setting.
FS-1900 Page Printer
100
Optimized stripes
The current KIR setting is optimal.
Dark vertical stripes
Set the KIR mode to
page again. If you still get dark vertical stripes,
adjust the print density control to a lighter setting.
Off
. Try printing the status
White vertical stripes
Set the KIR mode to On. Try printing the status
page again. If you still get white vertical stripes,
adjust the print density control to a darker setting.
1-52
Page 68

Press the MENU key.
1
Press the or key repeatedly until Print Quality > appears.
2
Print Quality >
Press the > key.
3
Press the or key repeatedly until >KIR Mode appears.
4
>KIR Mode
On
Press the ENTER key. A blinking question mark (?) appears.
5
>KIR Mode
? On
Pagination
Select On or Off using the or key.
6
Press the ENTER key.
7
Press the MENU key. The message display returns to Ready.
8
1-53
Page 69

Pagination
Ecoprint
The Ecoprint enables you to reduce the amount of toner consumed on the
page so as to save your printing costs. You can set to Ecoprint mode on, as
follows. (The factory default setting is Off.)
The Ecoprint setting has no effect on the print speed.
The Ecoprint mode setting is On when the printing image becomes lighter,
yet very readable.
Ecoprint setting is
(default).
Press the MENU key.
1
Press the or key repeatedly until Print Quality > appears.
2
Print Quality >
Press the > key.
3
Press the or key repeatedly until >Ecoprint Mode appears.
4
>Ecoprint Mode
Off
Press the ENTER key. A blinking question mark (?) appears.
5
>Ecoprint Mode
? Off
Off
Ecoprint setting is
On
Select On or Off using the or key.
6
Press the ENTER key.
7
Press the MENU key. The message display returns to Ready.
8
1-54
Page 70

Resolution
Pagination
Proceed as follows to set the default print resolution from four ways — 300
dpi, 600 dpi, and Fast 1200 mode. The clarity of printed characters
and graphics becomes sharper in this order.
Press the MENU key.
1
Press the or key repeatedly until Print Quality > appears.
2
Print Quality >
Press the > key.
3
Press the or key repeatedly until >Resolution appears.
4
>Resolution
Fast 1200 mode
Press the ENTER key. A blinking question mark (?) appears.
5
>Resolution
? Fast 1200 mode
Select Fast 1200 mode, 300 dpi or 600 dpi using the or key.
6
Press the ENTER key.
7
Press the MENU key. The message display returns to Ready.
8
1-55
Page 71

e-MPS
e-MPS
To use the e-MPS system, an option Microdrive must be installed in the
printer.
Option
e-MPS is an abbreviation for ‘enhanced-Multiple Printing System’ which
implements the following functions that are available from the printer
driver:
•Job Retention
• Job Storage
In either job mode, when printing a document, the print data is transferred
from the computer to the printer then stored on the printer’s Microdrive.
Since copies of the document are printed using the stored data, printing is
performed faster with less computer spooling time and less network traffic.
Job Retention
Job Retention has four modes as summarized below. These modes are
selected when you choose on the printer driver through the application
software:
Mode Quick Copy Proof and Hold Private Print Stored Job
Primary function To later print
additional copies
Storing started Printer driver Printer driver Printer driver Printer driver
Retrieved by Operator panel Operator panel Operator panel Operator panel
Default number of
copies printed at
retrieval
Maximum number of
jobs stored*
PIN security No No Yes Yes (Option)
Data after printing Stored Stored Stored Stored
Data at power off Deleted Deleted Deleted Stored
Microdrive
required**
Same as storing One less Same as storing One
32, expandable to 50 32, expandable to 50 Private jobs are
YesYesYesYes
To proof the first copy
before printing
multiple copies
To hold the document
in printer to prevent
unauthorized access
deleted
automatically once it
is retrieved.
To electronically
store documents
such as fax cover
pages
Depends on the
capacity of
Microdrive.
* Jobs in excess will cause the earlier ones to be deleted.
** RAM disk does not work for e-MPS.
1-56
Page 72

e-MPS
Job Storage
Job storage stores print jobs either temporarily or permanently, or in
virtual mailboxes, as you click an appropriate radio button on the printer
driver when printing from a computer.
Virtual Mailbox
Virtual mailbox is part of Job Storage, which stores print jobs on the
Microdrive without printing. It enables you to retrieve jobs later from the
operator panel, or the KM-NET Job Manager utility (in the CD-ROM).
Each mailbox may be used by an individual who desires to share the
printer in this mode. By default, each mailbox is numbered from ‘Tray 001,’
‘Tray 002,’... etc. To ‘post’ a job in one of these mailboxes, you assign a
numbered mailbox on the printer driver when printing.
To retrieve the stored job for printing, see Retrieving Jobs from Virtual
Mailbox (VMB) on page 1-68.
The virtual mailbox can be used in PCL 6 emulation only.
Quick Copy
Note
This mode enables you to print the requested number of copies of a job,
simultaneously storing the job on the Microdrive. When additional copies
are required, you can reprint the required number of copies from the
printer operator panel. To print a job as a quick copy job, see Printer
Driver Guide.
The default number of print jobs that can be stored on the Microdrive is 32.
This value can be increased to up to 50 from the e-MPS Configuration
menu. For details, see e-MPS Configuration on page 1-70. When the
number of jobs reaches the limit, the oldest job will be overwritten by the
new one.
When the printer is turned off, all stored jobs will be deleted.
Printing Additional Copies using Quick Copy
To print additional copies of a job stored in the printer:
Press the MENU key.
1
Press the or key repeatedly until e-MPS > appears.
2
e-MPS >
Press the > key.
3
1-57
Page 73

e-MPS
Press the or key repeatedly until >Quick Copy appears
4
followed by the user name (Harold, in this example). The user name
is assigned at printing using the printer driver.
>Quick Copy
Harold
Press the ENTER key. A blinking question mark (?) appears before
5
the user name.
>Quick Copy
?Harold
Press the or key to display the desired user name, Arlen, in this
6
example.
>Quick Copy
?Arlen
Press the ENTER key. The job name entered in the printer driver
7
(Report, in this example) appear with a blinking question mark (?)
before the letters.
>Arlen
?Report
Press the or key to scroll to the desired job title.
8
Press the ENTER key. The number of copies to be printed can be set.
9
To increase the copy count, press the key; to decrease the copy
count, press the key.
>Report
Copies 001
Press the ENTER key to finalize the copy count. The printer prints
10
the specified number of copies for the job.
1-58
Page 74

e-MPS
Deleting a Quick Copy Job
All quick copy jobs are automatically deleted when the printer is turned off.
If you desire to explicitly delete a stored quick copy job, proceed as follows:
Follow steps 1 through 8 in the above section to let the title of the job
1
displayed.
When the title of the job is displayed, e.g. Report, below, press the
2
ENTER key. The cursor below the copy count starts to blink.
>Report
Copies 001
Press the key repeatedly until Delete appears below the title.
3
>Report
Delete _
Proof and Hold
Press the ENTER key. The stored quick copy job is deleted.
4
When you print multiple copies, this mode first prints one copy so that you
can proof it before continuing to print the remaining copies. Since you can
proof the printouts before printing the remaining copies, wastage of paper
can be reduced.
The printer prints one copy and, at the same time, saves the print job on
the Microdrive. You can also change the number of copies when resuming
printing from the operator panel.
When the printer is turned off, all stored jobs will be deleted.
Printing Remaining Copies of a Proof and Hold Job
Printing a Proof and Hold job on the operator panel is similar to printing a
quick copy job. To print remaining copies of a job held in the printer:
Press the MENU key.
1
Press the or key repeatedly until e-MPS > appears.
2
e-MPS >
Press the > key.
3
1-59
Page 75

e-MPS
Press the or key repeatedly until >Quick Copy appears
4
followed by the user name (Harold, in this example). The user name
is assigned at printing using the printer driver.
>Quick Copy
Harold
Press the ENTER key. A blinking question mark (?) appears before
5
the user name.
>Quick Copy
?Harold
Press the or key to display the desired user name, Arlen, in this
6
example.
>Quick Copy
?Arlen
Press the ENTER key. The job name entered in the printer driver
7
(Report, in this example) appear with a blinking question mark (?)
before the letters.
>Arlen
?Report
Press the or key to scroll to the desired job title.
8
Press the ENTER key. The number of copies to be printed can be set.
9
To increase the copy count, press the key; to decrease the copy
count, press the key.
>Report
Copies 001
Press the ENTER key to finalize the copy count. The printer prints
10
the specified number of copies for the job.
1-60
Page 76

Printing a Private Job
e-MPS
In private printing, you can specify that a job is not printed until you
release the job from the operator panel. At sending the job from the
application software, you should specify a 4-digit access code in the printer
driver. The job is released for printing by entering the access code on the
operator panel. Thus, this function ensures confidentiality of the print job.
When the printer is turned off, all the print jobs will be deleted.
Releasing a Private Job
To print a private job through the operator panel:
Press the MENU key.
1
Press the or key repeatedly until e-MPS > appears.
2
e-MPS >
Press the > key.
3
Press the or key repeatedly until >Private/Stored appears.
4
The name entered in the printer driver (Harold, in this example)
also appears.
>Private/Stored
Harold
Press the ENTER key. A blinking question mark (?) before a user
5
name appears.
>Private/Stored
?Harold
Press the or key to display the desired user name (Arlen, in this
6
example).
>Private/Stored
?Arlen
Press the ENTER key. The user name and the job name (Agenda, in
7
this example) entered in the printer driver appear with a blinking
question mark (?).
>Arlen
?Agenda
1-61
Page 77

e-MPS
Press the or key to display the desired job title.
8
Press the ENTER key. The ID input line appears. Enter the four-digit
9
access code entered in the printer driver and press the ENTER key.
To enter the ID, press the < or > key to move the cursor to the
number to be changed and then enter the correct number by pressing
the or key.
>Agenda
ID 0000
You can set the number of copies to be printed. To increase the copy
10
count, press the key; to decrease the copy count, press the key.
>Agenda
Copies 001
Press the ENTER key to finalize the copy count. The printer prints
11
the specified number of copies for the job.
Deleting a Private Job
To delete a stored private job, proceed as follows:
Follow steps 1 through 8 in the above section.
1
When the title of the job to be printed is displayed (Agenda, in this
2
example), press the ENTER key. Enter the four-digit access code
entered in the printer driver and press the ENTER key.
>Agenda
Copies 001
Press the key repeatedly until Delete appears for the number of
3
copies.
>Agenda
Delete _
Press the ENTER key. The private job is deleted from the Microdrive.
4
1-62
Page 78

Storing a Print Job
e-MPS
The procedure below allows you to store print jobs to the Microdrive that
are frequently needed such as fax cover pages, check lists, and order forms,
for printing at any later time using the operator panel.
The print jobs will not be deleted when the printer is turned off.
Releasing a Stored Job
To print a stored job through the operator panel:
Press the MENU key.
1
Press the or key repeatedly until e-MPS > appears.
2
e-MPS >
Press the > key.
3
Press the or key repeatedly until >Private/Stored appears.
4
The name entered in the printer driver (Harold, in this example)
also appears.
>Private/Stored
Harold
Press the ENTER key. A blinking question mark (?) before a user
5
name appears.
>Private/Stored
?Harold
Press the or key to display the desired user name (Arlen, in this
6
example).
>Private/Stored
?Arlen
Press the ENTER key. The user name and the job name (Agenda, in
7
this example) entered in the printer driver appear with a blinking
question mark (?).
>Arlen
?Agenda
1-63
Page 79

e-MPS
Press the or key to display the desired job title.
8
Press the ENTER key. If you entered an access code for the printer
9
driver, the ID input line appears. Enter the four-digit access code
entered in the printer driver and press the ENTER key. To enter the
ID, press the < or > key to move the cursor to the number to be
changed and then enter the correct number by pressing the or
key.
>Agenda
ID 0000
You can specify the number of copies to print. To increase the copy
10
count, press the key; to decrease the key.
>Agenda
Copies 001
Press the ENTER key to finalize the copy count. The printer prints
11
the specified number of copies for the job.
Deleting a Stored Job
To delete a stored job, proceed as follows:
Follow steps 1 through 8 in the above section.
1
When the title of the job to be printed is displayed (Agenda, in this
2
example), press the ENTER key. If you entered an access code for the
printer driver, enter the four-digit access code and press the ENTER
key.
>Agenda
Copies 001
Press the key repeatedly until Delete appears for the number of
3
copies.
>Agenda
Delete _
Press the ENTER key. The stored job is deleted from the Microdrive.
4
1-64
Page 80

Printing a Code Job
Note
e-MPS
KM-NET Job Manager
Install the KM-NET Job Manager software from the Kyocera Mita Digital
Library CD-ROM supplied with the printer. To do this, from the CD-ROM
Main Menu, select Printer Utilities > Install KM-NET Job Manager.
Browse through Windows Start > Programs > KYOCERA MITA >
1
KM-Net > Job Manager.
Enter the password for the software. Job Manager will start.
2
Click the Add printer icon (below). Select the Local or Network port.
3
If you use the local parallel port to connect to the printer, make sure that
the printer driver is set to print to a local port. To check this out, click the
Details tab of the printer Properties, and note the Print to the following
port setting.
Add printer
icon
Follow the wizard until the Select printer dialog box is reached.
4
When the printer is found in the Printer List, click (highlight) it, then
Finish.
1-65
Page 81

e-MPS
Double click Model Name on the list. The jobs currently stored in the
5
printer are shown. To print the job, right click Job name and then
click Print on the drop down list that appears.
It is possible to select more than one job at a time by right clicking a
job one by one while pressing the Shift key on the computer
keyboard.
The job remains intact even after printing. To permanently delete the job
in the hard disk, right click the job name on Job Manager, then click Delete
on the drop down lost that appears.
1-66
Page 82

Printing a List of Code Jobs
If you select Permanent Job Storage on the printer driver, you can have a
List of Code Job printed using the operator panel.
Press the MENU key.
1
Press the or key repeatedly until e-MPS > appears.
2
e-MPS >
Press the > key.
3
Press the or key repeatedly until >List of Code JOB appears.
4
>List of
Code JOB
e-MPS
Press the ENTER key. A question mark (?) appears.
5
>List of
Code JOB ?
Press the ENTER key again. The printer prints a Code Job list.
6
1-67
Page 83

e-MPS
Retrieving Jobs from Virtual Mailbox (VMB)
To use this mode, an option Microdrive must be installed in the printer.
Option
To retrieve the jobs posted in the virtual mailbox, proceed as follows.
Press the MENU key.
1
Press the or key repeatedly until e-MPS > appears.
2
e-MPS >
Press the > key.
3
Press the or key repeatedly until >Print VMB Data appears.
4
The virtual mailbox number will also appear.
>Print VMB Data
Tray001
Press the ENTER key. A blinking question mark (?) appears.
5
>Print VMB Data
Tray001
Press the ENTER key. The document in the mailbox is printed and
6
automatically deleted from the mailbox.
:
?
1-68
Page 84

Printing a List of VMB
e-MPS
A Virtual Mailbox list includes the jobs currently stored in the mailboxes.
Press the MENU key.
1
Press the or key repeatedly until e-MPS > appears.
2
e-MPS >
Press the > key.
3
Press the or key repeatedly until >List of VMB appears.
4
>List of VMB
Press the ENTER key. A question mark (?) appears.
5
>List of VMB ?
Press the ENTER key again. The printer prints a list of jobs currently
6
posted in the virtual mailboxes.
1-69
Page 85

e-MPS
e-MPS Configuration
Option
Note
You can change the following parameters for e-MPS operation:
• Maximum number of Quick Copy/Proof and Hold jobs
• Maximum space assigned to temporary code jobs
• Maximum space assigned to permanent code jobs
• Maximum space assigned to virtual mailboxes
The total amount of storage areas specified must not exceed the total
size of the Microdrive. Otherwise, you may only be able to accommodate
print jobs of a smaller amount of print jobs than specified.
Changing the Maximum Number of Quick Copy/Proof and Hold
Jobs
This changes maximum number of Quick Copy/Proof and Hold jobs from 0
to 50. The default is 32.
Press the MENU key.
1
Press the or key repeatedly until e-MPS > appears.
2
e-MPS >
Press the > key.
3
Press the or key repeatedly until >e-MPS Configuration >
4
appears.
>e-MPS >
Configuration
Press the > key.
5
Press the or key repeatedly until >>Quick Copy appears.
6
>>Quick Copy
32
Press the ENTER key. A blinking cursor ( ) appears.
7
>>Quick Copy
32
1-70
Page 86

e-MPS
Press the or key to increase or decrease the value at the blinking
8
cursor. The value can be set between 0 and 50. Use the > and < keys
to move the cursor right and left.
When the desired maximum number of jobs is set, press the ENTER
9
key.
Press the MENU key. The message display returns to Ready.
10
Maximum Space Assigned to Temporary Code Jobs
This changes the Microdrive space that holds temporary code jobs. You can
change the maximum space from 0 to 9999 (megabytes). The actual
maximum size depends on the size of free hard disk space, however. The
default size is 50 MB.
Press the MENU key.
1
Press the or key repeatedly until e-MPS > appears.
2
e-MPS >
Press the > key.
3
Press the or key repeatedly until >e-MPS Configuration >
4
appears.
>e-MPS >
Configuration
Press the > key.
5
Press the or key repeatedly until >>Temp. Code JOB Size
6
appears.
>>
Temp. Code JOB
Size 050MB
To change the maximum disk space, press the ENTER key. A
7
blinking cursor (
) appears.
>>
Temp. Code JOB
Size 050MB
1-71
Page 87

e-MPS
Press the or key to increase or decrease, respectively, the value
8
at the blinking cursor. Use the > and < keys to move the cursor right
and left.
When the desired size is displayed, press the ENTER key.
9
Press the MENU key. The message display returns to Ready.
10
Maximum Space Assigned to Permanent Code Jobs
This changes the Microdrive space that holds permanent code jobs. You can
change the maximum space from 0 to 9999 (megabytes). The actual
maximum size depends on the size of free Microdrive space, however. The
default size is 50 MB.
Press the MENU key.
1
Press the or key repeatedly until e-MPS > appears.
2
e-MPS >
Press the > key.
3
Press the or key repeatedly until >e-MPS Configuration >
4
appears.
>e-MPS >
Configuration
Press the > key.
5
Press the or key repeatedly until >>Perm. Code JOB Size
6
appears.
>>Perm. Code JOB
Size 050MB
Press the ENTER key. A blinking cursor ( ) appears.
7
>>Perm. Code JOB
Size 050MB
Press the or key to increase or decrease, respectively, the value
8
at the blinking cursor. Use the > and < keys to move the cursor right
and left.
1-72
Page 88

e-MPS
When the desired size is displayed, press the ENTER key.
9
Press the MENU key. The message display returns to Ready.
10
Maximum Space Assigned to Virtual Mailboxes
This changes the Microdrive space for virtual mailboxes. You can change
the maximum space from 0 to 9999 (megabytes). The actual maximum size
depends on the size of free Microdrive space, however. The default size is
50 MB.
Press the MENU key.
1
Press the or key repeatedly until e-MPS > appears.
2
e-MPS >
Press the > key.
3
Press the or key repeatedly until >e-MPS Configuration >
4
appears.
>e-MPS >
Configuration
Press the > key.
5
Press the or key repeatedly until >>VMB Size appears.
6
>>VMB Size
050MB
Press the ENTER key. A blinking cursor ( ) appears.
7
>>VMB Size
050MB
Press the or key to increase or decrease, respectively, the value
8
at the blinking cursor. Use the > and < keys to move the cursor right
and left.
When the desired size is displayed, press the ENTER key.
9
Press the MENU key. The message display returns to Ready.
10
1-73
Page 89

Interface
Interface
The printer is equipped with both a parallel and USB interface. Option
serial interface board kit and network interface card can also be installed.
Various printing environment parameters such as the default emulation
can be changed indepently on different interfaces by using the printer’s
menu selection system. Before select the interface to apply the changes in
the procedure described below.
This interface selection described below does not select which interface
data will be received from. The printer automatically selects an interface
Note
Parallel Interface Mode
data is received.
The parallel interface mode of this printer supports a bi-directional/highspeed mode. Normally, this interface is used under the default setting
AUTO. For details, see Appendix C. After setting the interface, be sure to
reset the printer or turn the power off at least once. The new setting will be
enabled thereafter.
Press the MENU key.
1
Press the or key repeatedly until Interface > appears. One of
2
the interface names shown below appears, indicating the current
interface.
Parallel (default)
USB
Serial (when a serial interface board kit is installed)
Option (when a network interface card is installed)
Press the ENTER key. A blinking question mark (?) appears.
3
Interface
? Parallel
If Parallel is not displayed, press the or key repeatedly until it
is Parallel.
If you want to abandon the interface selection procedure, press the
CANCEL key. The interface remains unchanged.
Press the ENTER key again.
4
Press the > key. The message display changes to the communication
5
mode menu.
1-74
Page 90

USB Interface Mode
Press the ENTER key. A blinking question mark (?) appears.
6
>Parallel I/F
? AUTO
Press the or key to display the desired mode. The display
7
changes as shown below. Press the ENTER key.
AUTO (default)
Normal
High Speed
Nibble (high)
Press the MENU key. The message display returns to Ready.
8
Interface
About USB interface, for details, see Appendix C.
Press the MENU key.
1
Press the or key until Interface > appears. One of the
2
interface names shown below appears, indicating the current
interface.
Parallel (default)
USB
Serial (when a serial interface board kit is installed)
Option (when a network interface card is installed)
Press the ENTER key. A blinking question mark (?) appears.
3
Interface
? Parallel
Press the or key until USB appears.
4
Interface
? USB
Press the ENTER key.
5
Press the MENU key. The message display returns to Ready.
6
1-75
Page 91

Interface
Serial Interface Parameters
This section applies to the printers having the option serial interface
board kit (IB-10E) installed.
Option
The baud rate, data bits, stop bits, parity, and protocol for the serial
interface can be set as follows:
Press the MENU key.
1
Press the or key repeatedly until Interface > appears. One of
2
the interface names shown below appears, indicating the current
interface.
Parallel (default)
USB
Serial (when a serial interface board kit is installed)
Option (when a network interface card is installed)
Press the ENTER key. A blinking question mark (?) appears.
3
Interface
? Parallel
If you want to abandon the interface selection procedure, press the
CANCEL key. The interface remains unchanged.
Press the or key repeatedly until Serial appears.
4
Interface
? Serial
Press the ENTER key again.
5
1-76
Page 92

Press the > key. Each time the or key is pressed, the setting item
6
and current setting change as shown below.
Interface
>Baud Rate
9600
Definable baud rates:
9600
(default),
115200
Definable data bits: 7, 8 (default)
1200, 2400, 4800
19200, 38400, 57600
>Data Bits
8
>Stop Bits
Definable stop bits: 1 (default),
1
>Parity
Definable parity:
Ignore
None
(default),
None
>Protocol
DTR(pos.)&XON
Display the setting item to be changed and press the ENTER key. A
7
question mark (?) appears.
Definable protocol:
(default),
(negative), XON/XOFF, ETX/ACK
DTP(positive), DTR
DTR(pos.)&XON
,
2
Odd, Even
,
,
Note
The following example explains how to change the baud rate. The
settings for other items can be changed in a similar manner.
>Baud Rate
? 9600
Press the or key to display the desired setting. The setting
8
changes as shown below.
The baud rate can be selected from 1200, 2400, 4800, 9600 (default),
19200, 38400, 57600, and 115200.
Some computers may not be compatible with a baud rate of 115200 bps.
If you set the baud rate to 115200 and communication problems occur,
lower the baud rate.
Display the desired baud rate and press the ENTER key.
9
Press the MENU key. The message display returns to Ready.
10
1-77
Page 93

Interface
Network Interface Parameters
This section applies to the printers having the option network card
installed.
Option
To make your printer supports TCP/IP, Netware, and EtherTalk networks,
you will need to install the option network interface card in the printer and
make the proper settings as explained in this section.
Using the operator panel, you can:
•Activate or deactivate TCP/IP, NetWare, and EtherTalk
•Activate or deactivate DHCP
• Enter IP address, subnet mask address, and default gateway address
To confirm or change network card parameters, proceed as follows:
Press the MENU key.
1
Press the or key repeatedly until Interface > appears. One of
2
the interface names shown below appears, indicating the current
interface.
Parallel (default)
USB
Serial (when a serial interface board kit is installed)
Option (when a network interface card is installed)
Press the ENTER key. A blinking question mark (?) appears.
3
Interface
? Parallel
Press the or key repeatedly until Option appears.
4
Interface
? Option
Press the ENTER key again.
5
1-78
Page 94

Press the > key. Each time the or key is pressed, the display
6
changes as shown below.
Range
>NetWare >
On
Set this item to On when you connect to a
network using NetWare. In submenu (>),
frame mode can be selected from
Ethernet, 802.2
, and
802.3
.
Interface
Auto
,
>TCP/IP >
On
>EtherTalk
Set this item to On when you connect to a
network using TCP/IP. Submenu (>) has
items including DHCP, IP address, subnet
mask address, and gateway address.
EtherTalk must be activated (On) for
networking with Macintosh computers.
Off
>Opt. StatusPage
On
The following example explains how to activate TCP/IP protocol to
7
connect the printer in the network. You can select Netware or
EtherTalk in a similar manner.
When the item is set to On, the printer prints
out a network status page when it prints the
printer status. See page 1-19
>TCP/IP >
On
If TCP/IP is currently Off is displayed, select On using the or
key. Press the ENTER key again.
>TCP/IP
? On
>TCP/IP >
On
1-79
Page 95

Interface
Press the > key. Each time the or key is pressed, the item
8
changes as shown below.
>>DHCP
Off
>>IP Address
000.000.000.000
>>Subnet Mask
000.000.000.000
>>Gateway
000.000.000.000
Display the item to be set and press the ENTER key.
9
For DHCP, a question mark (?) appears. For IP Address, Subnet
Mask, and Gateway, the cursor (
For DHCP, select On or Off using the or key. For IP Address,
10
Subnet Mask, and Gateway addresses, press the or key to
change the number (000 to 255) where the cursor is blinking. You
can use the > and < key to move the cursor right and left.
To obtain these addresses, consult your network administrator.
Press the ENTER key.
11
Press the MENU key. The message display returns to Ready.
12
) blinks.
1-80
Page 96

Operating the Storage Device
The printer supports three types of storage devices: CompactFlash card,
Microdrive, and RAM disk.
The printer is equipped with a slot for a CompactFlash card and a
Microdrive. By inserting a CompactFlash card or Microdrive into the
printer, the following operations become available. For details about the
handling of the CompactFlash card and Microdrive, see Appendix B.
The following procedure assumes use of a CompactFlash card. The similar
procedure can be applied when using the Microdrive.
You can format the Microdrive using the operator panel when the first
time you installed a new Microdrive. About formatting a new Microdrive.
Note
Activating the RAM Disk
The RAM disk is a memory space shared within the printer memory that
can temporarily store print jobs for electronic sorting. The stored print job
can then be used to print multiple copies of the job reducing the total
amount of period required to print the whole job. It acts similar to the
option Microdrive except that the data is effective only during the printer
is powered up.
Operating the Storage Device
To set up the RAM disk, the option Microdrive must not be installed.
To use the RAM disk, activate and enter the desired size of the RAM disk
in the manner described below. The maximum RAM disk size can be
calculated as follows:
Maximum RAM size = Total printer memory - 9 MB
For example, if the total memory installed in your printer is 144 MB, you
can set 135 MB of RAM disk. If you attempt to set the RAM disk size
beyond this restriction, the printer automatically round it down so that the
size is always 9 MB less than the total printer memory. Once the RAM disk
size is set, the printer must be reset.
By default, the RAM disk is not activated (Off). To confirm the RAM disk
size or activate the RAM disk, proceed as follows:
Press the MENU key.
1
Press the or key repeatedly until RAM Disk Mode > appears.
2
RAM Disk Mode
Off
1-81
Page 97

Operating the Storage Device
The default setting is Off. Press the ENTER key. A blinking question
3
mark (?) appears. Select On using the or key, and then press the
ENTER key.
RAM Disk Mode
? On
Press the > key to display >RAM Disk Size.
4
>RAM Disk Size
0007 Mbyte
Press the ENTER key again, and change the RAM disk size using the
5
or key. It is not possible to make a setting that exceeds total
printer memory. The default value for the RAM disk is the total
printer memory minus 9 MB. This parameter may be set anywhere
from 0001 to 1024 depending on the available printer memory.
When the desired RAM disk size is displayed, press the ENTER key.
6
Press the MENU key and restart the printer. The setting will be
7
activated after restart.
1-82
Page 98

Reading Data
Operating the Storage Device
To read data on a CompactFlash card, Microdrive, or the RAM disk use the
following procedure:
Press the MENU key.
1
Press the or key repeatedly until Memory Card >, Hard Disk
2
> or RAM Disk Mode > appears.
Memory Card >
Press the > key.
3
Press the or key repeatedly until >Read Data appears. The
4
data name also appears.
>Read Data
data name
Press the ENTER key. A blinking question mark (?) appears before
5
the data name.
>Read Data
?data name
Press the or key to display the desired data name.
6
Press the ENTER key. Processing appears and the reading of data
7
from the storage device starts.
1-83
Page 99

Operating the Storage Device
Writing Data
Note
You can write data to a CompactFlash card, the Microdrive, or the RAM
disk using the operator panel. When writing data to the storage device, a
name is automatically assigned to the data. The CompactFlash card or the
Microdrive or the RAM disk must be formatted. Otherwise, the >Write
Data message explained below will not appear on the display. To format a
CompactFlash card or the Microdrive or the RAM disk, see Form atting a
Storage Device on page 1-88.
You can format the Microdrive or the RAM disk using the operator panel
when the first time you installed a new Microdrive or the RAM disk. About
formatting a new Microdrive.
After writing is complete, you can print a list of data stored in the storage
device for confirmation. See Printing a List of Data Names on page
1-89.
To write data to a CompactFlash card, the Microdrive or the RAM disk,
proceed as follows:
Press the MENU key.
1
Press the or key repeatedly until Memory Card >, Hard Disk
2
> or RAM Disk Mode > appears.
Memory Card >
Press the > key.
3
Press the or key repeatedly until >Write Data appears.
4
>Write Data
Press the ENTER key. A question mark (?) appears.
5
>Write Data ?
Press the ENTER key. Processing appears, then Waiting.
6
1-84
Page 100

Operating the Storage Device
In this state, send the file from the computer to the printer.
7
The file is written onto the storage device given a destination name
(also referred to as a partition name) which the printer automatically
assigns one after another as follows:
DataS001 (first data),
DataS002 (second data),
DataS003 (third data)...
In the example above, if the file TEST.TXT is the first data to be
written onto the storage device, the destination name will be
DataS001.
As the printer receives data, the message display changes to
Processing, then when the end of the data is received, the message
display changes to Waiting.
Check that the message display has changed to Waiting, then press
8
the GO key. This writes the file to the memory card and instructs the
printer to automatically print out a CompactFlash card write
information page as shown below.
FS-1900 Page Printer
WRITE INFORMATION
Partition Type. Type of data written (currently only type 2 is supported).
Partition Name. Name of data written.
Write Partition Length. Length (size) of the data written.
Others. Additional information, such as error information.
When the write information page is printed, the message display
returns to Ready.
If the writing was not completed successfully, an error code appears
on the message display. For details, see Error Messages on page
4-10. If this happens, press the GO key. The message display returns
to Ready.
1-85
 Loading...