

Triumph 3-in 1 Rotating Table, 45-6066 User Manual
Item # 45-6066
Meijer.com
84
3-in1 Rotating Table
Inch
BILLIARDS
AIR HOCKEY
3
TABLE TENNIS
WARNING:
Meijer.com
!
Rotating game should be done under adult supervision. Rotating table may
cause a pinching hazard for young children and pets. Please exercise caution.
At least two adults are needed to put this game table together.
1. Read all instructions: All the safety and operating instructions should be read carefully before this
table can be operated or played.
2. Caution: This is not a toy and is intended for use under the supervision of adults. Adults should
review safety guidelines with children to avoid possible risk of electric shock or other injuries.
3. Rotating the Table: Making sure there is no one in the way, begin the rotation by releasing the 4 lock
pins (#5), two on each leg panel. When the table top has been turned over, push in the lock pins until
they firmly snap in place.
4. Power Sources: This table should be operated only from 100-125V A.C. current.
5. Object and Liquid Entry: Never push objects of any kind into this game through openings as they may
result in electrical fire or shock.
6. Ventilation: The openings on the air blower are for the intake air. Keep clear of the air blower during
operation. Do not allow any other objects near the intake openings. To ensure reliable operation of the
game and protect it from overheating, these openings must not be blocked or covered.
7. Damage Requiring Service: Unplug the game from the wall receptacle. Do not attempt to service the
blower yourself as while opening and/or removing covers may expose you to dangerous voltage or
other hazards.
8. Grounding or Polarization: This game is equipped with a polarized alternating current line plug. If
you are unable to insert the plug fully into the outlet, try reversing the plug.
9. Storage Conditions: This product is made from wood based components and is sensitive to extreme
temperatures and moisture. Subject to these conditions will affect game play, cosmetics and longevity.
Tools Needed For Assembly:
Screwdriver
Alan wrench (included)
Level
Assembly Tips:
Some drawings or images in this manual may not look exactly like your product. Please read and understand the text before starting each assembly step.
If you are using an electric screw driver in assembly, please set at low torque and do not over tighten the
hardware. When assembling individual parts, loosely tighten screws until all screws are inserted, then
tighten completely.
If you have any problems with your new product, DO NOT RETURN IT TO THE STORE!
Please contact us at 1-866-815-4173, or e-mail us at customerservice@Triumphsportsusa.com
74
Meijer.com
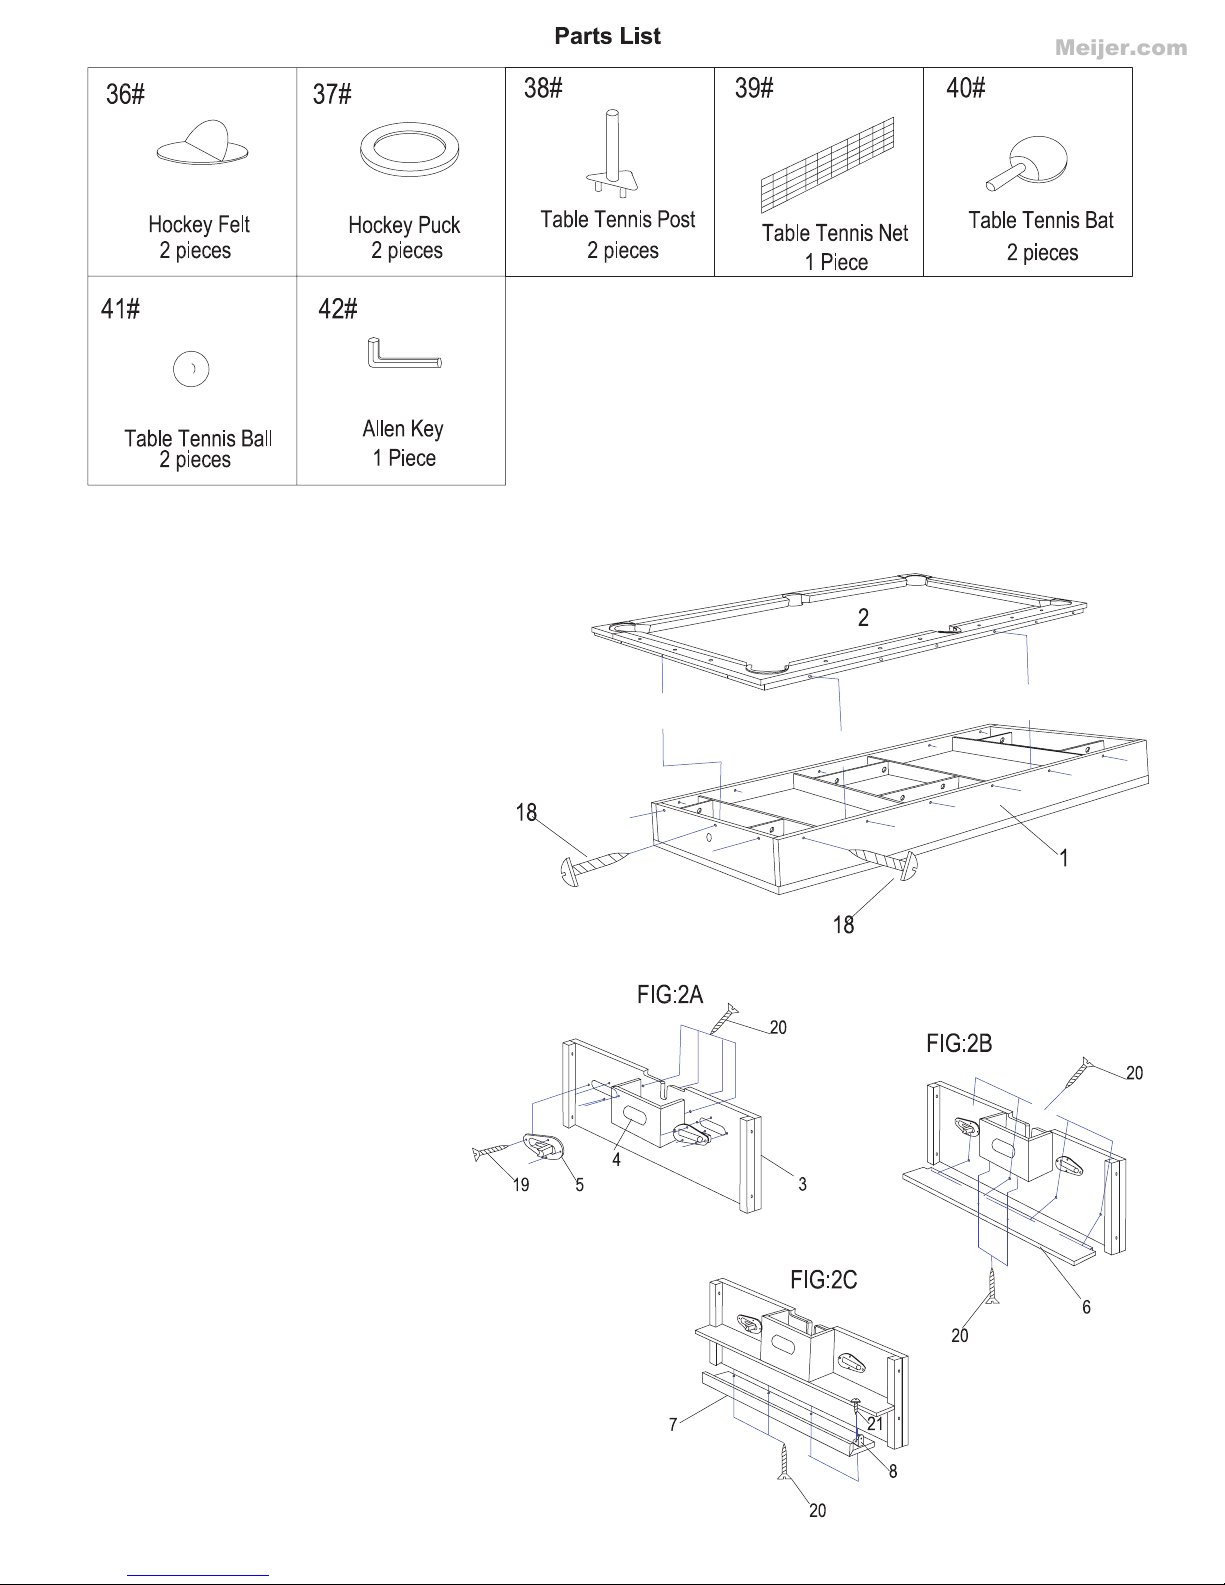
Step 1
Meijer.com
Remove all components from the carton.
NOTE: Parts are packed inside the table top.
Remove the pool table surface (#2), inside the
table top you will find all the parts needed to
assemble your table. When all the parts are
out of the table top, replace the pool table
surface. Attach the pool table surface by
using the screws (#18).
Step 2
FIG: 2A
Screw 2 lock pins (#5) into leg
pedestal (#3) predrilled holes with
screws (#19). Attach the catcher
box (#4) with screws (#20) into
predrilled holes.
FIG: 2B
Screw the ball below board-A (#6)
to the leg pedestal (#3) using
screws (#20) into predrilled holes.
FIG: 2C
Screw the steel bracket (#8) into the
ball below board-B (#7) using the
predrilled holes. Now attach the
ball below board-B (#7) to the leg
pedestal (#3) in the predrilled holes
using screw (#20). Repeat these
steps for the other end of the table.
 Loading...