

Triumph 400T Owner's Manual

TREADMILL OWNER’S MANUAL
MANUEL DU PROPRIÉTAIRE DU TAPIS ROULANT
MANUAL DEL PROPIETARIO DE LA CAMINADORA
Read the TREADMILL GUIDE before using this OWNER’S MANUAL.
Lire le GUIDE DU TAPIS ROULANT avant de se servir du présent MANUEL DU PROPRIÉTAIRE.
Lea la GUÍA DE LA CAMINADORA antes de usar este MANUAL DEL PROPIETARIO.
400T
400T-OM-rev1_1.indd 1 10/29/10 1:44 PM

2 3
3 ENGLISH
30 FRANÇAIS
58 ESPAÑOL
IMPORTANT PRECAUTIONS
SAVE THESE INSTRUCTIONS
When using an electrical product, basic precautions should always be followed, including the following: Read all instructions
before using this treadmill. It is the responsibility of the owner to ensure that all users of this treadmill are adequately informed of
all warnings and precautions. If you have any questions after reading this guide, contact Customer Tech Support at the number
listed on the back panel of the OWNER’S MANUAL.
This treadmill is intended for in-home use only. Do not use this treadmill in any commercial, rental, school or institutional setting.
Failure to comply will void the warranty.
400T-OM-rev1_1.indd 2-3 10/29/10 1:44 PM

4 5
TO REDUCE THE RISK OF BURNS, FIRE, ELECTRICAL SHOCK OR INJURY TO PERSONS:
• At NO time should pets or children under the age of 13 be closer to the treadmill than 10 feet.
• At NO time should children under the age of 13 use the treadmill.
• Children over the age of 13 or disabled persons should not use the treadmill without adult supervision.
• Use the treadmill only for its intended use as described in the treadmill guide and owner’s manual.
• Do not use other attachments that are not recommended by the manufacturer. Attachments may cause injury.
• Never operate the treadmill if it has a damaged cord or plug, if it is not working properly, if it has been dropped or damaged, or
immersed in water. Return the treadmill to a service center for examination and repair.
• Keep power cord away from heated surfaces. Do not carry this unit by its supply cord or use the cord as a handle.
• Never operate the treadmill with the air opening blocked. Keep the air opening clean, free of lint, hair, and the like.
• To prevent electrical shock, never drop or insert any object into any opening.
• Do not operate where aerosol (spray) products are being used or when oxygen is being administered.
• To disconnect, turn all controls to the off position, then remove plug from outlet.
• Do not use treadmill in any location that is not temperature controlled, such as but not limited to garages, porches, pool rooms,
bathrooms, car ports or outdoors. Failure to comply may void the warranty.
• This treadmill is intended for in-home use only. Do not use this treadmill in any commercial, rental, school or institutional setting.
Failure to comply will void the warranty.
• Do not remove the console covers unless instructed by Customer Tech Support. Service should only be done by an authorized
service technician
It is essential that your treadmill is used only indoors, in a climate controlled room. If your treadmill has been exposed to colder
temperatures or high moisture climates, it is strongly recommended that the treadmill is warmed up to room temperature before
first time use. Failure to do so may cause premature electronic failure.
TO REDUCE THE RISK OF BURNS, FIRE, ELECTRICAL SHOCK OR INJURY TO PERSONS:
• Never use the treadmill before securing the safety tether clip to your clothing.
• If you experience any kind of pain, including but not limited to chest pains, nausea, dizziness, or shortness of breath, stop
exercising immediately and consult your physician before continuing.
• When exercising, always maintain a comfortable pace.
• Do not wear clothes that might catch on any part of the treadmill.
• Always wear athletic shoes while using this equipment.
• Do not jump on the treadmill.
• At no time should more than one person be on treadmill while in operation.
• This treadmill should not be used by persons weighing more than specified in the OWNE R’S MANUAL WARRANTY SECTION.
Failure to comply will void the warranty.
• When lowering the treadmill deck, wait until rear feet are firmly on the floor before stepping on the deck.
• Disconnect all power before servicing or moving the equipment. To clean, wipe surfaces down with soap and slightly damp cloth
only; never use solvents. (See MAINTENANCE)
• The treadmill should never be left unattended when plugged in. Unplug from outlet when not in use, and before putting on or
taking off parts.
• Do not operate under blanket or pillow. Excessive heating can occur and cause fire, electric shock, or injury to persons.
• Connect this exercise product to a properly grounded outlet only.
WARNING
TO REDUCE THE RISK OF ELECTRICAL SHOCK:
Always unplug the treadmill from the electrical outlet immediately after using, before cleaning, performing maintenance and putting on or
taking off parts.
DANGER WARNING
400T-OM-rev1_1.indd 4-5 10/29/10 1:44 PM
6 7
ASSEMBLY
There are several areas during the assembly process that special attention must be paid. It is very important to follow the assembly
instructions correctly and to make sure all parts are firmly tightened. If the assembly instructions are not followed correctly, the
treadmill could have parts that are not tightened and will seem loose and may cause irritating noises. To prevent damage to the
treadmill, the assembly instructions must be reviewed and corrective actions should be taken.
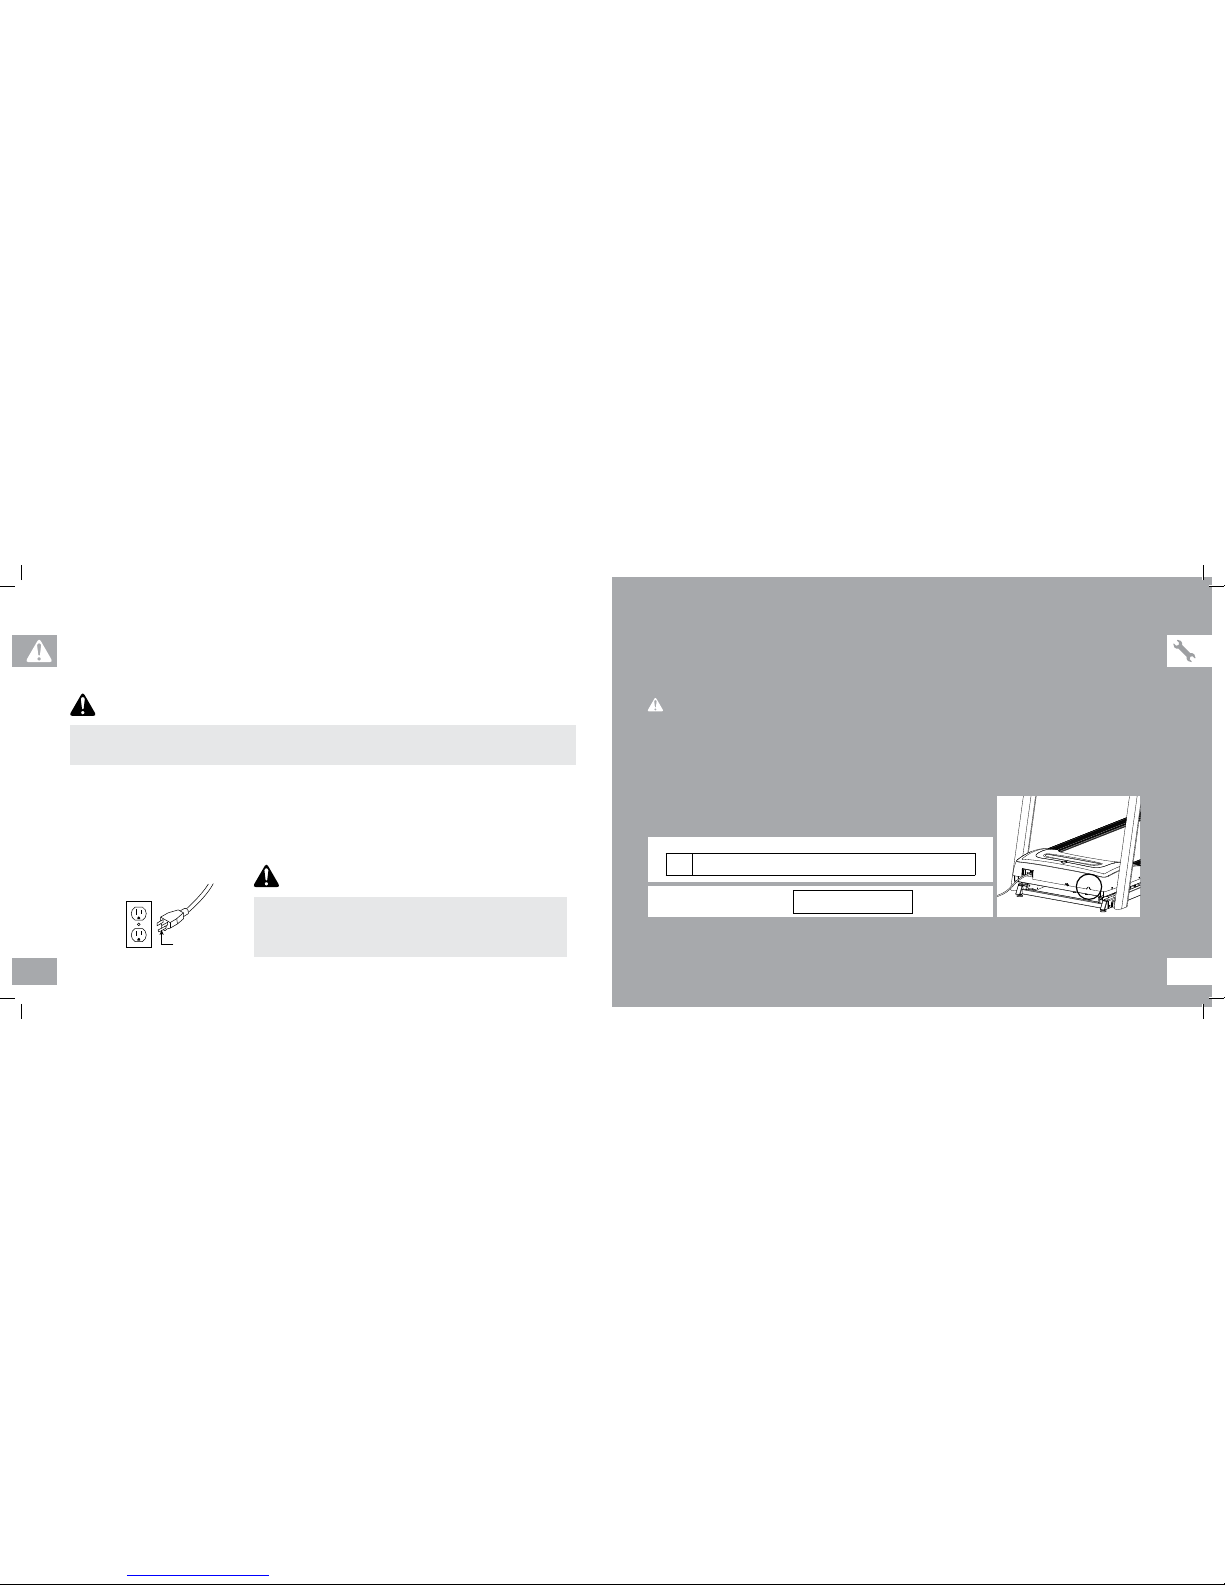
Before proceeding, find your treadmill’s serial number located on a white barcode sticker
near the on/off power switch and power cord and enter it in the space provided below.
ENTER YOUR SE RIAL NUMBE R AND MODEL NAME IN TH E BOXES BELOW:
» Refer to the SERIAL NU MBER and MODE L NAME when calling for service.
SERIAL NU MBER:
TM
MODEL NAME: TRIUMPH TREADMILL
WARNING
SERIAL NU MBER LOCATION
GROUNDING INSTRUCTIONS
This product must be grounded. If a treadmill should malfunction or breakdown, grounding provides a path of least resistance
for electrical current to reduce the risk of electrical shock. This product is equipped with a cord having an equipment-grounding
conductor and a grounding plug. The plug must be plugged into an appropriate outlet that is properly installed and grounded in
accordance with local codes and ordinances.
Connect this exercise product to a properly grounded outlet only.
Never operate product with a damaged cord or plug even if it is working
properly. Never operate any product if it appears damaged, or has been
immersed in water. Contact Customer Tech Support for replacement or repair.
3-POLE
GROUND ED
OUTLET
GROUND ING PIN
WARNING
DANGER
Improper connection of the equipment-grounding conductor can result in a risk of electric shock. Check with a qualified
electrician or serviceman if you are in doubt as to whether the product is properly grounded. Do not modify the plug provided
with the product. If it will not fit the outlet, have a proper outlet installed by a qualified electrician.
This product is for use on a nominal 110-120 Volt circuit and has a grounding plug that looks like the plug in the illustration. Make
sure that the product is connected to an outlet having the same configuration as the plug. No adapter should be used with this
product.
This product must be used on a dedicated circuit. To determine if you are on a dedicated circuit, shut off the power to that circuit
and observe if any other devices lose power. If so, move devices to a different circuit. Note: There are usually multiple outlets on
one circuit. This treadmill should be used with a minimum 15-amp circuit. Note: There are usually multiple outlets on one circuit. This
treadmill should be used with a minimum 15-amp circuit.
400T-OM-rev1_1.indd 6-7 10/29/10 1:44 PM

8 9
ON/O FF SWIT CH
CIRC UIT BRE AKER
TRAN SPORT WHEEL
POWE R CORD
READ ING R ACK
TOUCH PAD PAN EL
WATER B OTTLE H OLDER
CONS OLE
SAFE TY KEY PLACE MENT
RUNN ING BELT / RUNN ING DEC K
SIDE RAIL
ROLLE R END C AP
CONS OLE MAS T
HAND LEBARS
REAR ROLLE R
TENS ION/AL IGNME NT BOLTS
MOTOR COVER
DECK LOCK PI N
SUJETE LA LLAVE DE SEGURIDAD A SU ROPA ANTES DE COMENZAR. PARA EVITAR
LESIONES PÁRESE EN LO RIELES LATERALES ANTES DE PONER A FUNCIONAR LA
CAMINADORA. LEA Y SIGA LAS INSTRUCCIONES ANTES DE USAR ESTA
CAMINADORA. NO DEJE QUE LOS NIÑOS SE ACERQUEN A ESTE EQUIPO. CUANDO
NO LA ESTÉ USANDO, SAQUE LA LLAVE DE SEGURIDAD Y GUÁRDELA FUERA DEL
ALCANZE DE LOS NIÑOS. CONSULTE A UN MÉDICO ANTES DE USAR ESTE EQUIPO.
DEJE DE HACER EJERCICIO SI SIENTE DOLOR, DESMAYO, MAREO O SI LE FALTA EL
ALIENTO. ESTE EQUIPO ES SÓLO PARA EL USO DEL CONSUMIDOR.
ATTACHER LA PINCE DE LA CLÉ DE SÉCURITÉ AUX VÊTEMENTS AVANT DE METTRE L’APPAREIL
EN MARCHE. POUR ÉVITER TOUTE BLESSURE, METTRE LES PIEDS SUR LES RAILS LATÉRAUX
AVANT DE LANCER LE TAPIS ROULANT. LIRE ET SUIVRE TOUTES LES INSTRUCTIONS AVANT LA
MISE EN MARCHE. TENIR LES ENFANTS ÉLOIGNÉS DE L’APPAREIL. RETIRER LA CLÉ DE
SÉCURITÉ LORSQUE L’APPAREIL N’EST PAS UTILISÉ ET LA CONSERVER HORS DE PORTÉE DES
ENFANTS. CONSULTER UN MÉDECIN AVANT D’UTILISER CET APPAREIL. EN CAS DE
DOULEURS, DE NAUSÉES, DE VERTIGES OU D’ESSOUFFLEMENTS, ARRÊTER IMMÉDIATEMENT
TOUT EXERCICE. À L’USAGE DU CLIENT SEULEMENT.
ADVERTENCIA
AVERTISSEMENT
CAUTION ATTENTION PRECAUCIÓN
KEEP HANDS AND FEET
AWAY FROM THIS AREA.
GARDER LES MAINS ET LES
PIEDS LOIN DE CETTE REGION.
MANTENGA LAS MANOS Y LOS
PIES LEJOS DE ESTA ÁREA.
CAUTION ATTENTION PRECAUCIÓN
HOLD ONTO DECK WHEN
LATCH IS RELEASED.
TENIR LA PLATE-FORME LORSQUE LA
GOUPILLE DE VERROUILLAGE EST RETIRÉE.
SUJETE LA PLATAFORMA
CUANDO SUELTE EL SUJETADOR.
TOOLS INCLUDED:
F 4 mm Allen Wrench
F 5 mm L-Wrench/Screwdriver
F 6 mm T-Wrench
PARTS INCLUDED :
F 1 Safety Key
F 1 Console Assembly
F 2 Console Masts
F 2 Handlebars
F 2 End Caps
F 4 Hardware Bags
F 1 Bottle of Silicone Lubricant
(for 2 applications)
If you have questions or if
there are any missing parts,
contact Customer Tech
Support. Contact information
is located on the back panel
of this manual.
DO NOT ATTEMPT TO LIFT TH E TREADMILL! Do not move or lift treadmill
from packaging until specified to do so in the assembly instructions. You may
remove the plastic wrap from console masts.
WARNING
UNPACKING
Place the treadmill carton on a level flat surface. It is recommended that you place a
protective covering on your floor. Take CAUTION when handling and transporting this
unit. Never open box when it is on its side. Once the banding straps have been removed,
do not lift or transport this unit unless it is fully assembled and in the upright folded
position, with the lock latch secure. Unpack the unit where it will be used. Never grab
hold of any portion of the incline frame and attempt to lift or move the treadmill.
FAILURE TO FOLLOW THESE I NSTRUCTIONS COULD RESULT IN INJURY!
WARNING
NEED HELP?
NOTE: During each assembly step, ensure that ALL nuts and bolts are in place and
partially threaded in before completely tightening any ONE bolt.
NOTE: A light application of grease may aid in the installation of hardware. Any grease,
such as lithium bike grease is recommended.
PRE ASSEMBLY
400T-OM-rev1_1.indd 8-9 10/29/10 1:44 PM
10 11
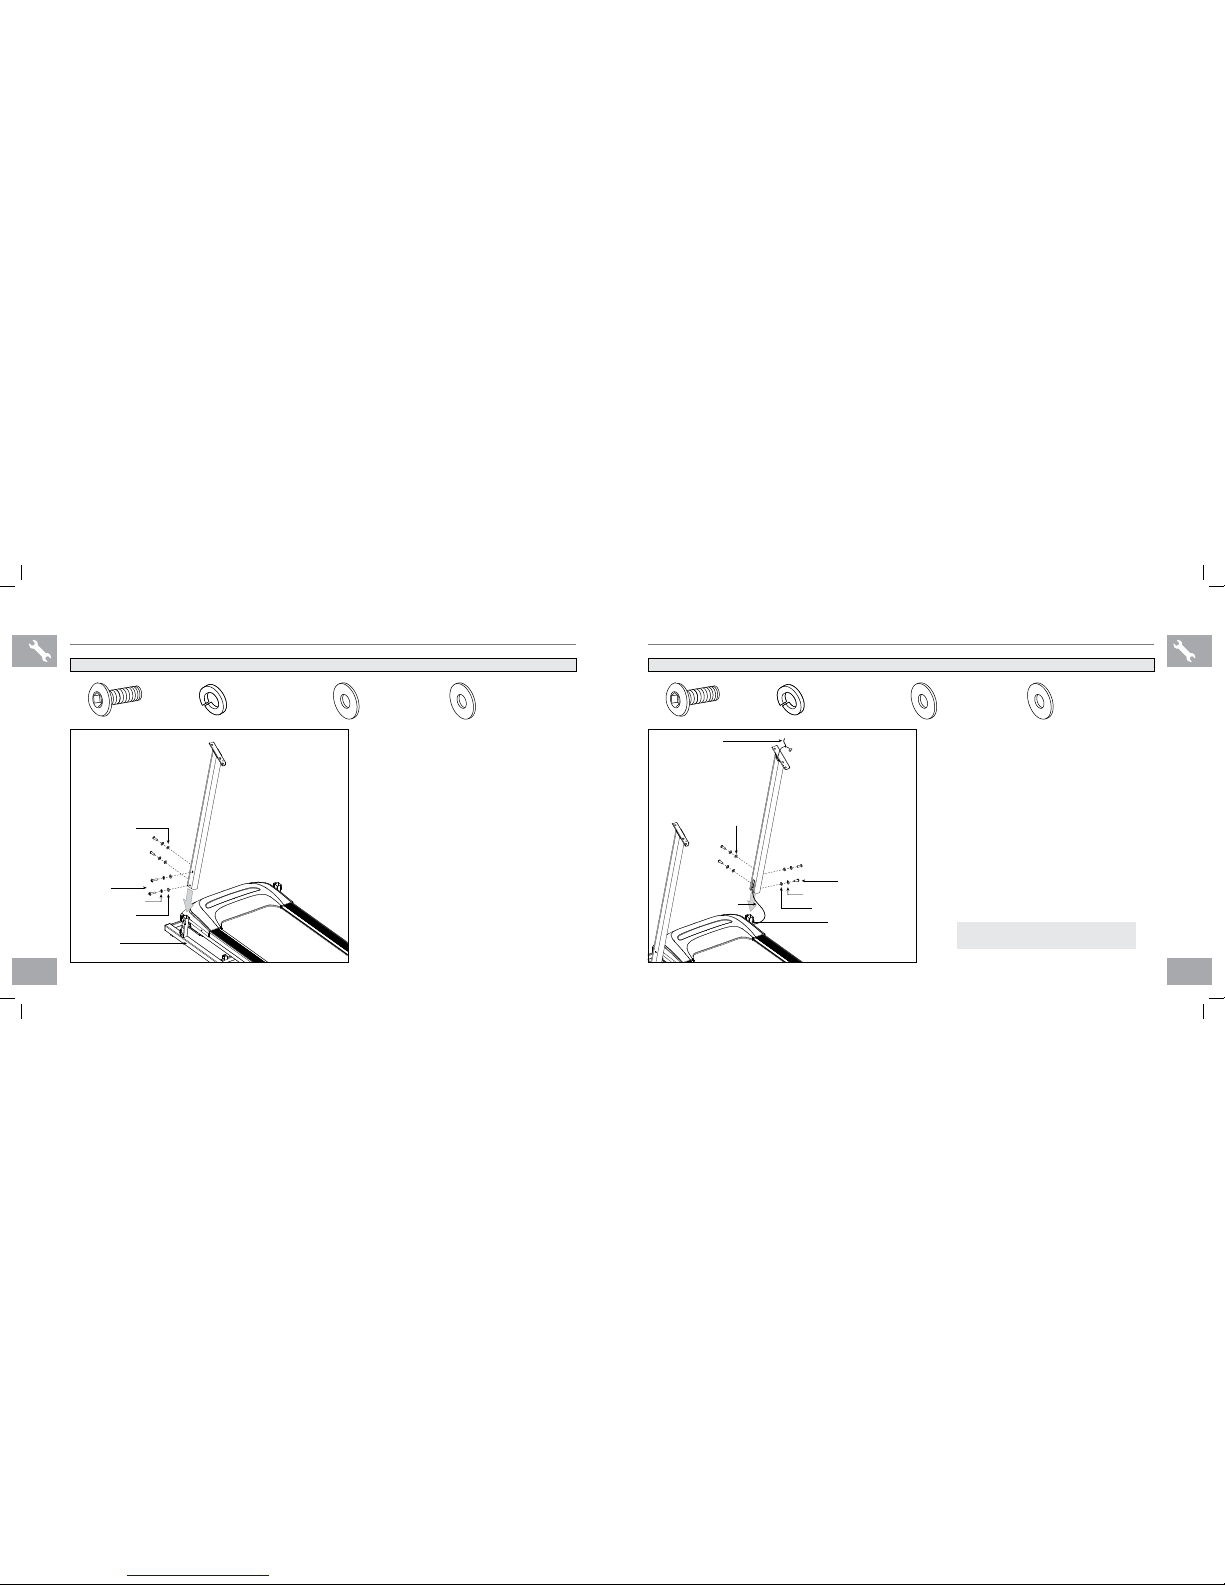
ASSEMBLY STEP 1
A Cut the yellow banding straps and lift the
runn ing deck upward and remove all
contents from underneath the running deck.
B Open hardware bag 1.
C With the ru nning deck lowered, attach
the left console mast to the base
frame using 2 bolts (a), 2 spring
washers (b) and 2 f lat washer s (c)
from the side and 2 bolts (a), 2 spring
washers (b) and 2 arc was hers (d)
from the rear.
BOLT (A)
20 mm
Qty: 4
SPRING WASH ER (B)
8 mm
Qty: 4
FLAT WASHER (C)
8 mm
Qty: 2
ARC WASHER (D)
8 mm
Qty: 2
HARDWARE BAG 1 CONTENTS :
BOLTS (A)
SPRING WASHER S (B)
715T PLUS
LEFT CONSOLE MAST
ARC WASHERS (D)
FLAT WASHERS (C)
BASE FRAME
ASSEMBLY STEP 2
BOLT (A)
20 mm
Qty: 4
SPRING WASH ER (B)
8 mm
Qty: 4
FLAT WASHER (C)
8 mm
Qty: 2
ARC WASHER (D)
8 mm
Qty: 2
HARDWARE BAG 2 CONTENTS :
BOLTS (A)
SPRING WASHER S (B)
715T PLUS
RIGHT CONSOLE MAST
ARC WASHERS (D)
CONSOLE CABLE
FLAT WASHERS (C)
BASE FRAME
LEAD WIRE
A Open hardware bag 2.
B Pull lead wire through right c onsole
mast. After pulling the lead wire through the
mast, the top of the console cable should
be located at the top of the mast. Detach and
discard the lead wire.
C With the ru nning deck lowered, attach
the right con sole mast to the base
frame using 2 bolts (a), 2 spring
washers (b) and 2 f lat washer s (c)
from the side and 2 bolts (a), 2 spring
washers (b) and 2 arc was hers (d)
from the rear.
NOTE: Be careful not to pinch any wires
while assembling the right console mast.
400T-OM-rev1_1.indd 10-11 10/29/10 1:44 PM

12 13
ASSEMBLY STEP 3
A Open hardware bag 3.
B Slide each handlebar into the console
and attach using 2 bolts (e), 2 spring
washers (f) and 2 arc was hers (g). Do
not completely tighten bolts until step D.
C Gently place the console on top of the
console masts. Attach the left si de first
using 2 bolts (h), 2 spring washe rs (b)
and 2 arc washers (d).
D Attach the right side of the c onsole using
2 bolts (h), 2 spring washe rs (b) and 2
arc washers (d). Completely tighten all bolts
from steps B–D.
BOLT (E)
15 mm
Qty: 4
BOLT (H)
55 mm
Qty: 4
SPRING
WASHER (F)
6 mm
Qty: 2
ARC
WASHER (G)
6 mm
Qty: 2
SPRING WASHE R (B)
8 mm
Qty: 4
ARC
WASHER (D)
8 mm
Qty: 4
HARDWARE BAG 3 CONTENTS :
ASSEMBLE
LEFT SIDE
FIRST
CONSOLE
CABLE
BOLTS (E)
SPRING WASHER S (F)
ARC WASHERS (G)
HANDLEBAR
CONSOLE
BOLTS (H)
SPRING WASHER S (B)
ARC WASHERS (D)
CONSOLE MAST
NOTE: be careful not to pinch any
wires while attaching the console.
CONSOLE
CABLE
CONSOLE
CABLE
COVER
PLASTIC CLIPS
BOLTS (E)
CONSOLE MAST
HANDLEBAR
CONSOLE
E Remove the console cable cover.
F Connect the con sole cable and secure the
cable in the 2 plastic clips. Carefully tuck
excess cable in the console mast to avoid
damage.
G Attach the console cable cover to secure
the console cable.
H Secure the handle bars to the console
masts by inserting 2 bolts (e) from below the
console.
ASSEMBLY STEP 3 CONTINUED
400T-OM-rev1_1.indd 12-13 10/29/10 1:44 PM
14 15
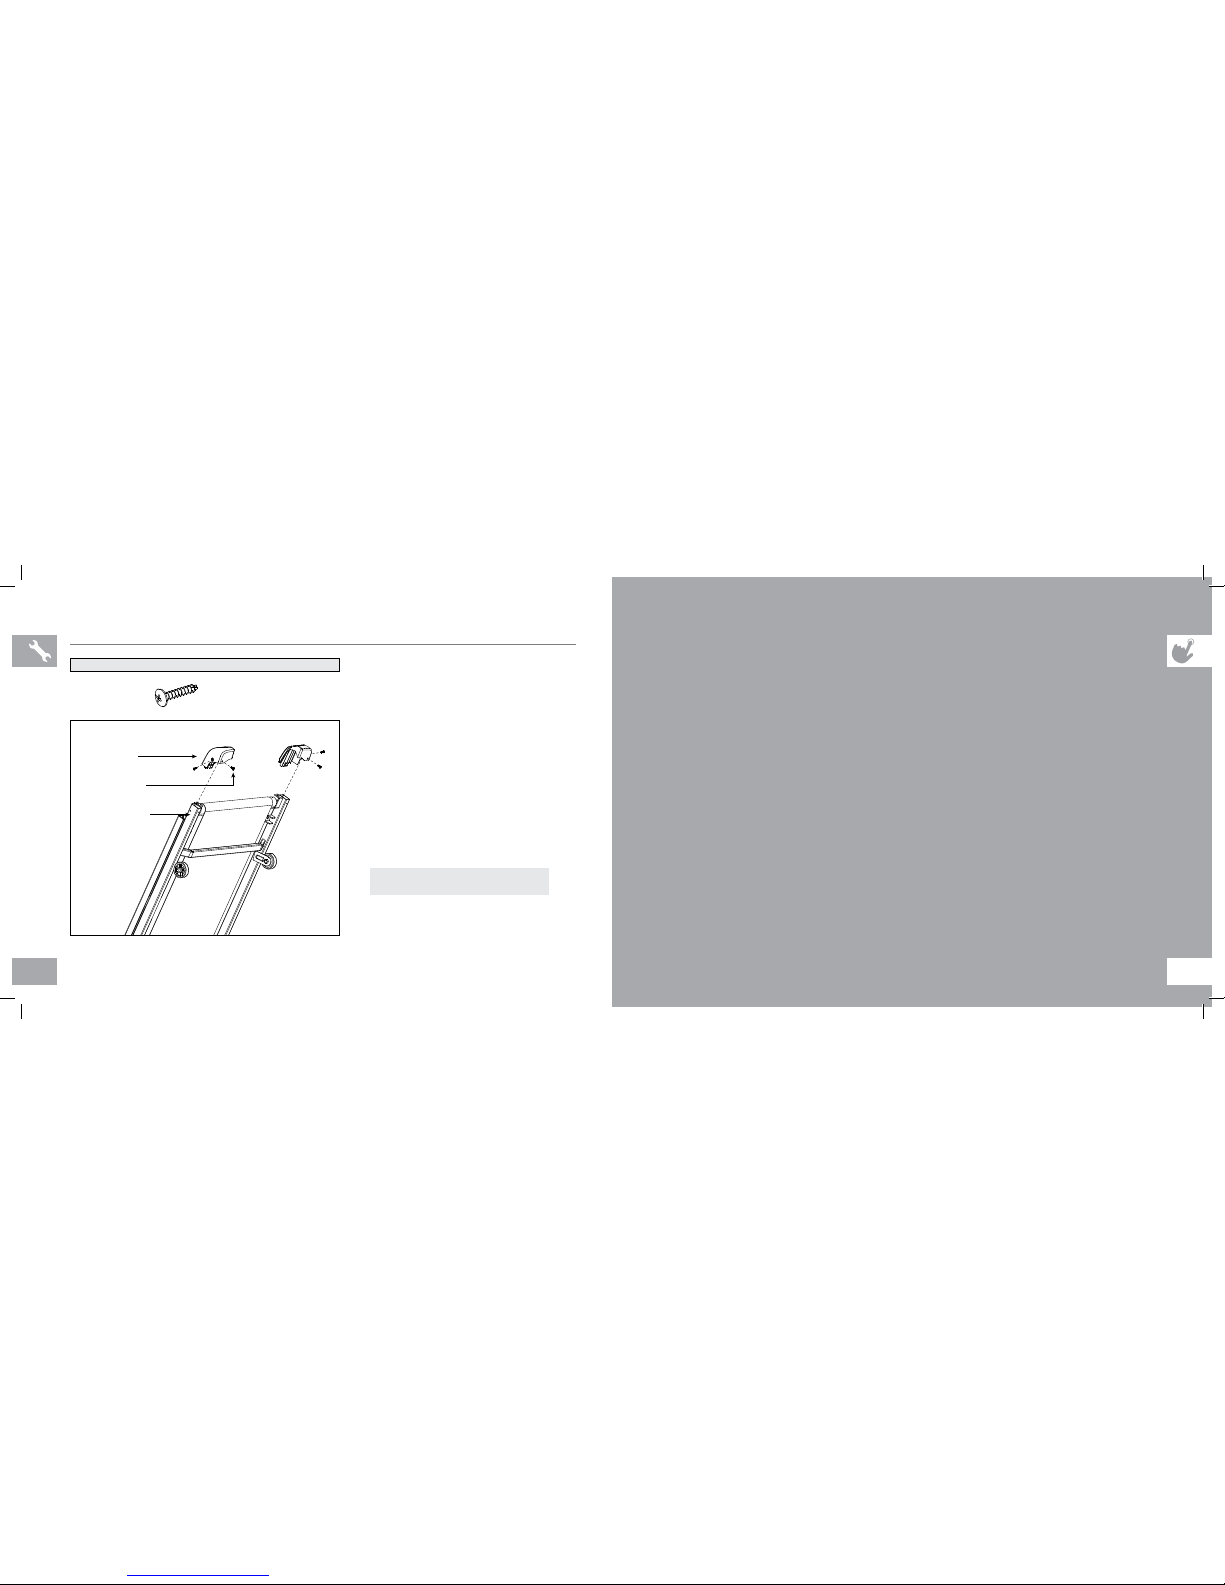
ASSEMBLY STEP 4
A Open hardware bag 4.
NOTE: lock latch must be securely engaged
before proceeding with assembly. (See folding
instructions in TREADMI LL GUIDE.)
B Attach the right e nd cap using 2 screws
(h). Repeat on the other side.
C Connect power cord to a power outlet. The
ON/OFF switch is located next to the power
cord. Flip this switch to the ‘ON’ position. You
will hear a beep and the console will turn on.
D Before the first use, lubricate the treadmill
deck by following the instructions in the
MAINTENANCE section in the TR EADMILL
GUID E.
SCREW (H)
12 mm
Qty: 4
HARDWARE BAG 4 CONTENTS :
END CAPS
SCREWS (H)
MAIN FRAME
YOU ARE FINISHED!
TREADMILL OPERATION
This section explains how to use your treadmill’s console and programming. The BASIC OPERATION section in the
TREADMILL G UIDE has instructions for the following:
• LOC ATION OF THE TREADMIL L
• US ING THE SAFETY KE Y
• FO LDING THE TREADM ILL
• MOV ING THE TREADMI LL
• LE VELING THE TREAD MILL
• TENSIONING THE RUN NING BELT
• C ENTERING THE RUN NING BELT
• US ING THE HEART RATE FU NCTION
400T-OM-rev1_1.indd 14-15 10/29/10 1:44 PM
16 17
A
F
G
HH
BC ED D
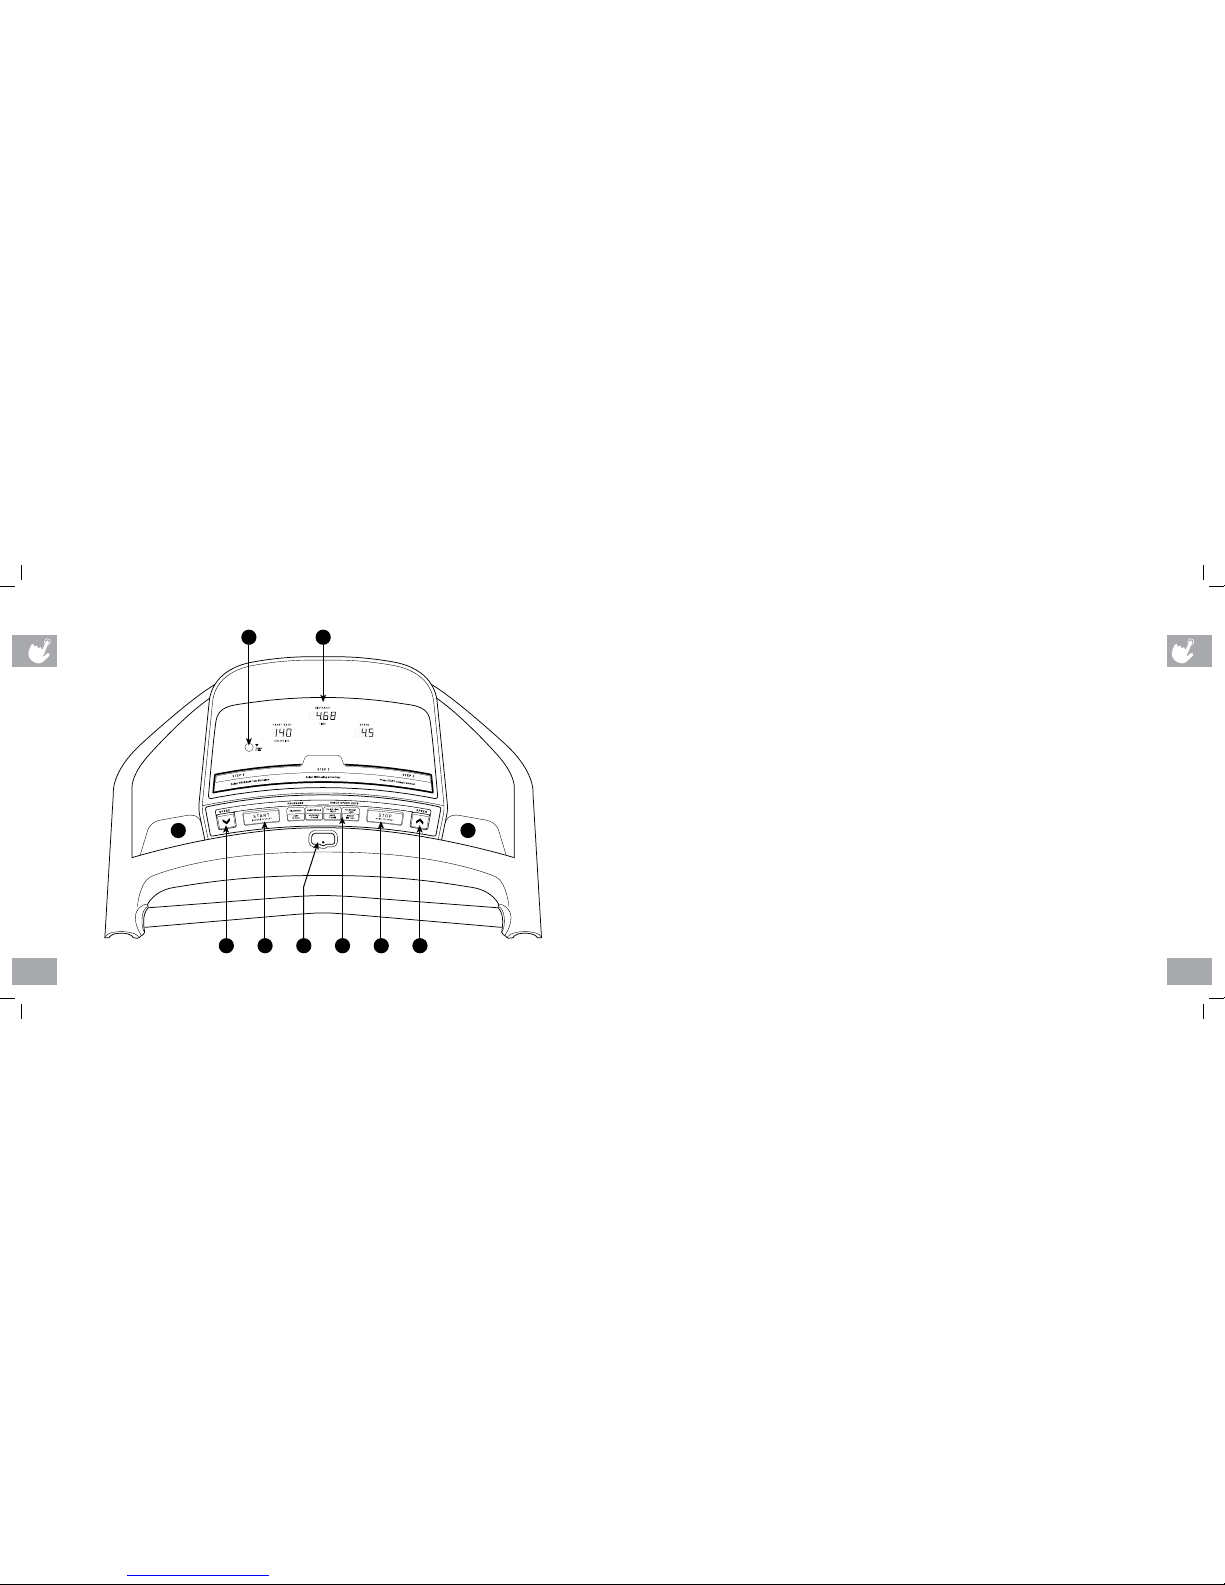
CONSOLE OPERATION
Note: There is a thin protective sheet of clear plastic on the overlay of the console that should be removed before use.
A) MONITOR DIS PLAY: Speed, Time, Heart Rate, Distance, and Calories.
B) STOP: Press to pause/end your workout. Hold for 3 seconds to reset the treadmill.
C) START: Simply press to begin exercising, starts your program and also changes the display.
D) SPEED ARR OW KEYS: Used to adjust speed in small increments (0.5 mph increments).
E) SAFETY KEY POSITI ON: Enables treadmill when safety key is engaged.
F) QUICK PR OGRAM & SPEED KEYS: Press key to select program. Once in a program, press key to select speed.
G) THUMB SE NSOR: Monitors heart rate.
H) WATER BOTTLE / CD / M P3 HOLDERS: Holds personal workout equipment.
Note: Thumb pulse may be inaccurate when used in low-light environments.
400T-OM-rev1_1.indd 16-17 10/29/10 1:44 PM

18 19
MONITOR DISPLAY
• S PEED: Shown as MPH. Indicates how fast your walking or running surface is moving.
• TI ME: Shown as minutes:seconds. View the time remaining or the time elapsed in your workout.
• PU LSE: Shown as beats per minute. Used to monitor your heart rate (displayed when contact is made with the pulse grips or
thumb pulse sensor).
• D ISTANCE: Shown as miles. Indicates distance traveled during your workout.
• CALORIE S: Total calories burned during your workout.
QUICK KEY OPERATION
Once you have started your program you can quickly change
your speed.
To change your speed, press one of the four quick speed
keys: EASY (3 mph), MODERATE (5 mph), HARD (7 mph) or
SPRINT (10 mph). The treadmill will adjust accordingly.
CLEAR CURRENT SELECTION
To clear the current program selection or screen, hold the
STOP button for 5 seconds.
CHANGE VIEWING SCREENS
Press the START button during your workout to change the
display between time/distance and heart rate/ calories.
TO RESET CONSOLE
Hold STOP key for 3 seconds.
FINISHING YOUR WORKOUT
When your workout is complete, the monitor display will flash
and beep. Your workout information will stay displayed on the
console for 30 seconds and then reset.
GETTING STARTED
1) Check to make sure no objects are placed on the belt that
will hinder the movement of the treadmill.
2) Plug in the power cord and turn the treadmill ON.
3) Stand on the side rails of the treadmill.
4) Attach the safety key clip to part of your clothing.
5) Insert the safety key into the safety keyhole in the console.
6) You have two options to start your workout:
A) QUICK START UP
Simply press the START key to begin working out. Or...
B) SELECT A PROGRAM
1. Press a PROGRAM key to select a program.
2. Use the ARROW KEYS to select time.
3. Press START to begin.
PROGRAMS
P1 MANUAL: Adjust your speed manually during your workout. Time-based goal.
P2 INTERVALS: Walk or run a series of alternating paced speed levels. Time-based goal.
WARM-UP WORKOUT SEGM ENTS – REPEAT COOL-DOWN
TIME 4 minutes Each segment is 60 seconds 4 minutes
SEGME NT 1 2 3 4 5 6 7 8 9 10 11 12 13 14 15 16 17 18 19 20
SPEED 2 2 2 3 2 5 2 5 3 5 3 5 2 4 2 4 2 2 2 2
P3 ROLLING H ILLS: Creates the feel of walking or running over hills. Time-based goal.
WARM-UP WORKOUT SEGM ENTS – REPEAT COOL-DOWN
TIME 4 minutes Each segment is 60 seconds 4 minutes
SEGME NT
1 2 3 4 5 6 7 8 9 10 11 12 13 14 15 16 17 18 19 20
SPEED 2 2 2 2 2 3 4 5 4 3 2 3 4 5 4 3 3 2 2 2
400T-OM-rev1_1.indd 18-19 10/29/10 1:44 PM
20 21
LIMITED HOME-USE WARRANTY
PROGRAMS CONTINUED
P4 WEIG HT LOSS: Keeps user in their optimal fat burning zone.
WARM-UP WOR KOUT SEGMENTS - R EPEAT COOL-DOWN
TIME 4 minutes Each segment is 60 seconds 4 minutes
SEGME NT 1 2 3 4 5 6 7 8 9 10 11 12 13 14 15 16 17 18 19 20
SPEED 2 2 2 3 2 3 3 4 4 3 3 4 4 3 3 4 3 3 2 2
NOTE: While program is running the program keys become QUICK SPEE D KEYS: easy (3 mph), moderate
(5 mph), hard (7 mph), and sprint (10 mph).
400T-OM-rev1_1.indd 20-21 10/29/10 1:44 PM
 Loading...