

Page 1
Item # 45-6066
Meijer.com
84
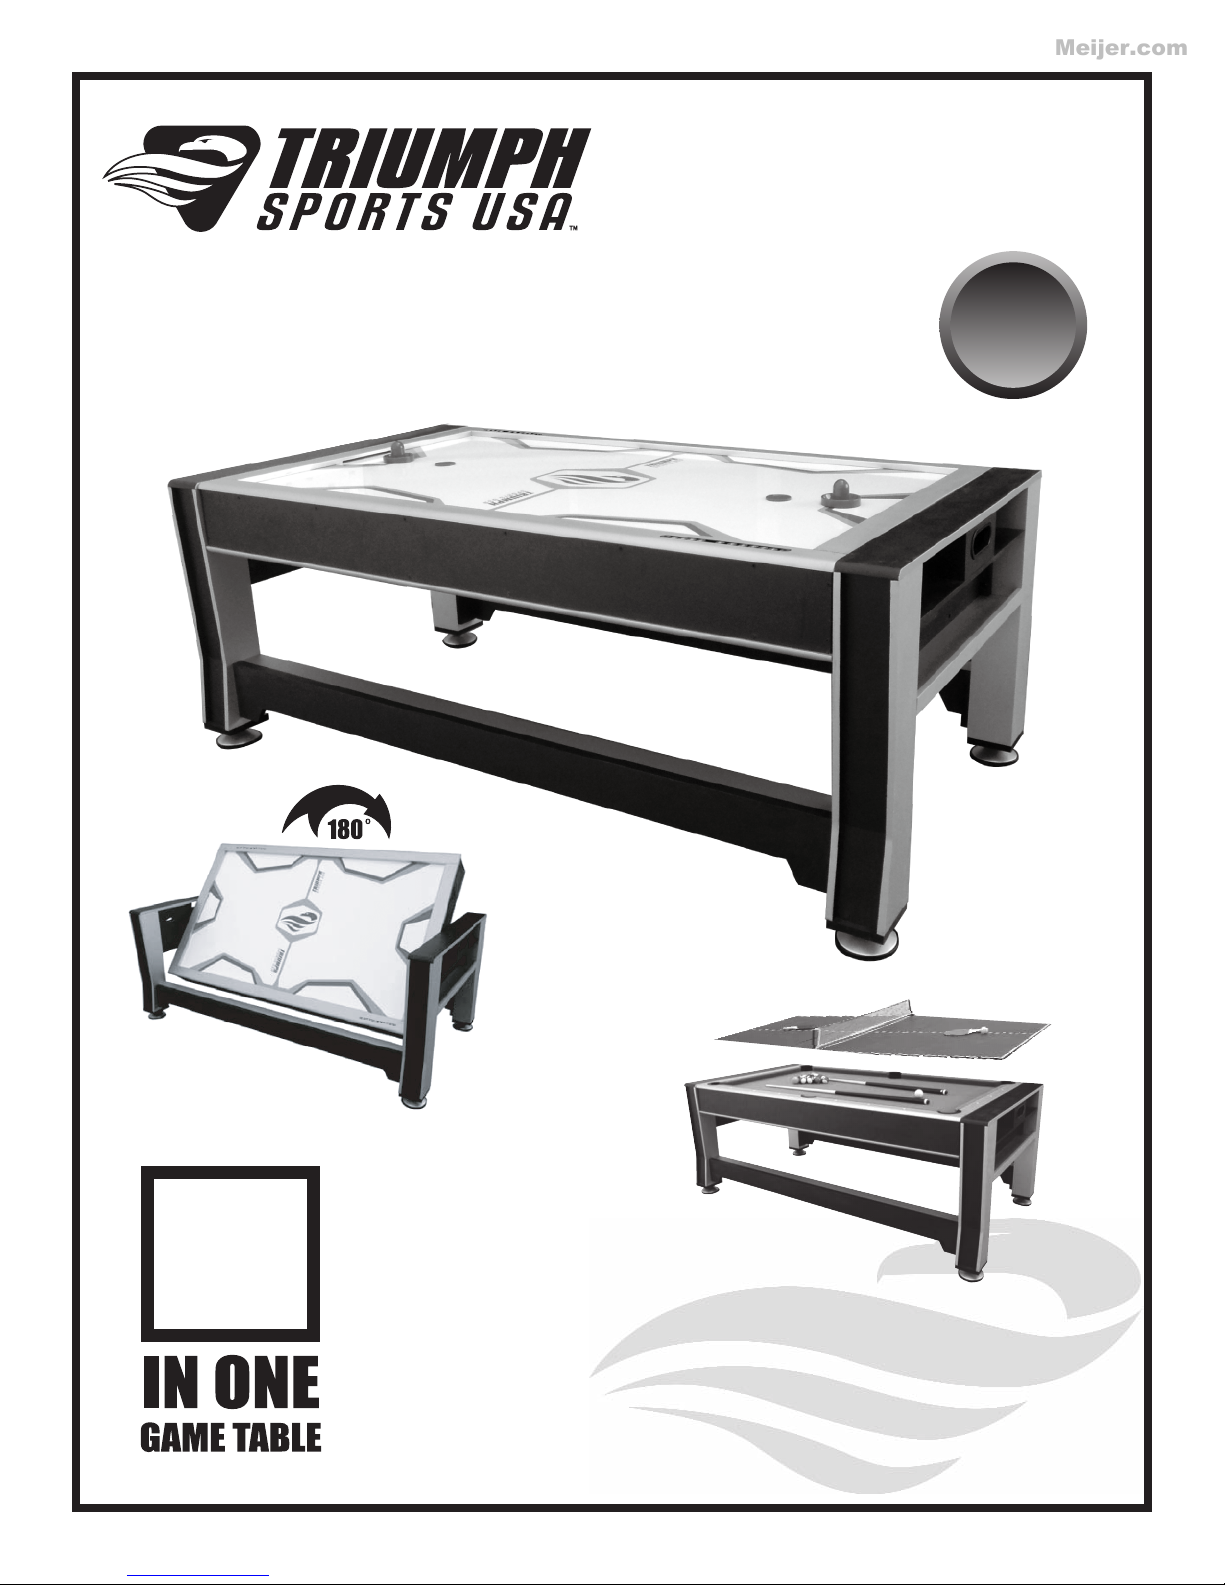
3-in1 Rotating Table
Inch
BILLIARDS
AIR HOCKEY
3
TABLE TENNIS
Page 2
WARNING:
Meijer.com
!
Rotating game should be done under adult supervision. Rotating table may
cause a pinching hazard for young children and pets. Please exercise caution.
At least two adults are needed to put this game table together.
1. Read all instructions: All the safety and operating instructions should be read carefully before this
table can be operated or played.
2. Caution: This is not a toy and is intended for use under the supervision of adults. Adults should
review safety guidelines with children to avoid possible risk of electric shock or other injuries.
3. Rotating the Table: Making sure there is no one in the way, begin the rotation by releasing the 4 lock
pins (#5), two on each leg panel. When the table top has been turned over, push in the lock pins until
they firmly snap in place.
4. Power Sources: This table should be operated only from 100-125V A.C. current.
5. Object and Liquid Entry: Never push objects of any kind into this game through openings as they may
result in electrical fire or shock.
6. Ventilation: The openings on the air blower are for the intake air. Keep clear of the air blower during
operation. Do not allow any other objects near the intake openings. To ensure reliable operation of the
game and protect it from overheating, these openings must not be blocked or covered.
7. Damage Requiring Service: Unplug the game from the wall receptacle. Do not attempt to service the
blower yourself as while opening and/or removing covers may expose you to dangerous voltage or
other hazards.
8. Grounding or Polarization: This game is equipped with a polarized alternating current line plug. If
you are unable to insert the plug fully into the outlet, try reversing the plug.
9. Storage Conditions: This product is made from wood based components and is sensitive to extreme
temperatures and moisture. Subject to these conditions will affect game play, cosmetics and longevity.
Tools Needed For Assembly:
Screwdriver
Alan wrench (included)
Level
Assembly Tips:
Some drawings or images in this manual may not look exactly like your product. Please read and understand the text before starting each assembly step.
If you are using an electric screw driver in assembly, please set at low torque and do not over tighten the
hardware. When assembling individual parts, loosely tighten screws until all screws are inserted, then
tighten completely.
If you have any problems with your new product, DO NOT RETURN IT TO THE STORE!
Please contact us at 1-866-815-4173, or e-mail us at [email protected]
Page 3
74
Meijer.com
Page 4
Step 1
Meijer.com
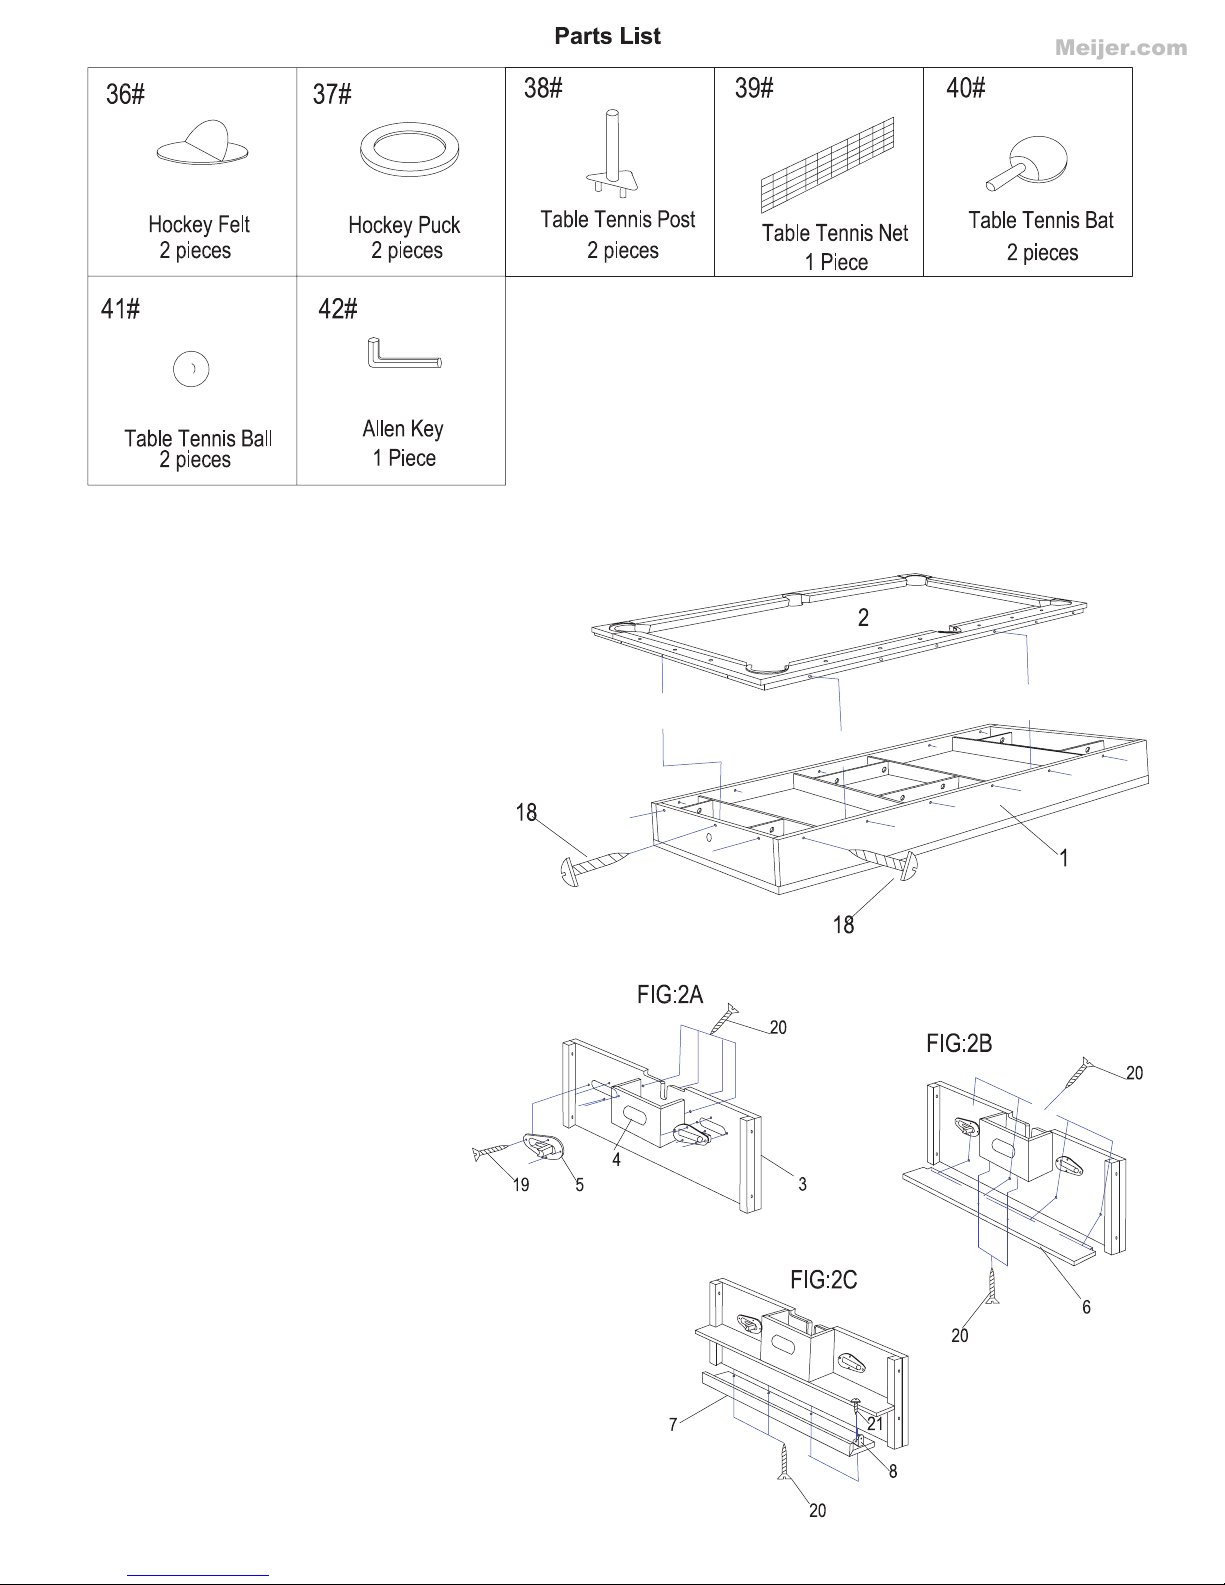
Remove all components from the carton.
NOTE: Parts are packed inside the table top.
Remove the pool table surface (#2), inside the
table top you will find all the parts needed to
assemble your table. When all the parts are
out of the table top, replace the pool table
surface. Attach the pool table surface by
using the screws (#18).
Step 2
FIG: 2A
Screw 2 lock pins (#5) into leg
pedestal (#3) predrilled holes with
screws (#19). Attach the catcher
box (#4) with screws (#20) into
predrilled holes.
FIG: 2B
Screw the ball below board-A (#6)
to the leg pedestal (#3) using
screws (#20) into predrilled holes.
FIG: 2C
Screw the steel bracket (#8) into the
ball below board-B (#7) using the
predrilled holes. Now attach the
ball below board-B (#7) to the leg
pedestal (#3) in the predrilled holes
using screw (#20). Repeat these
steps for the other end of the table.
Page 5
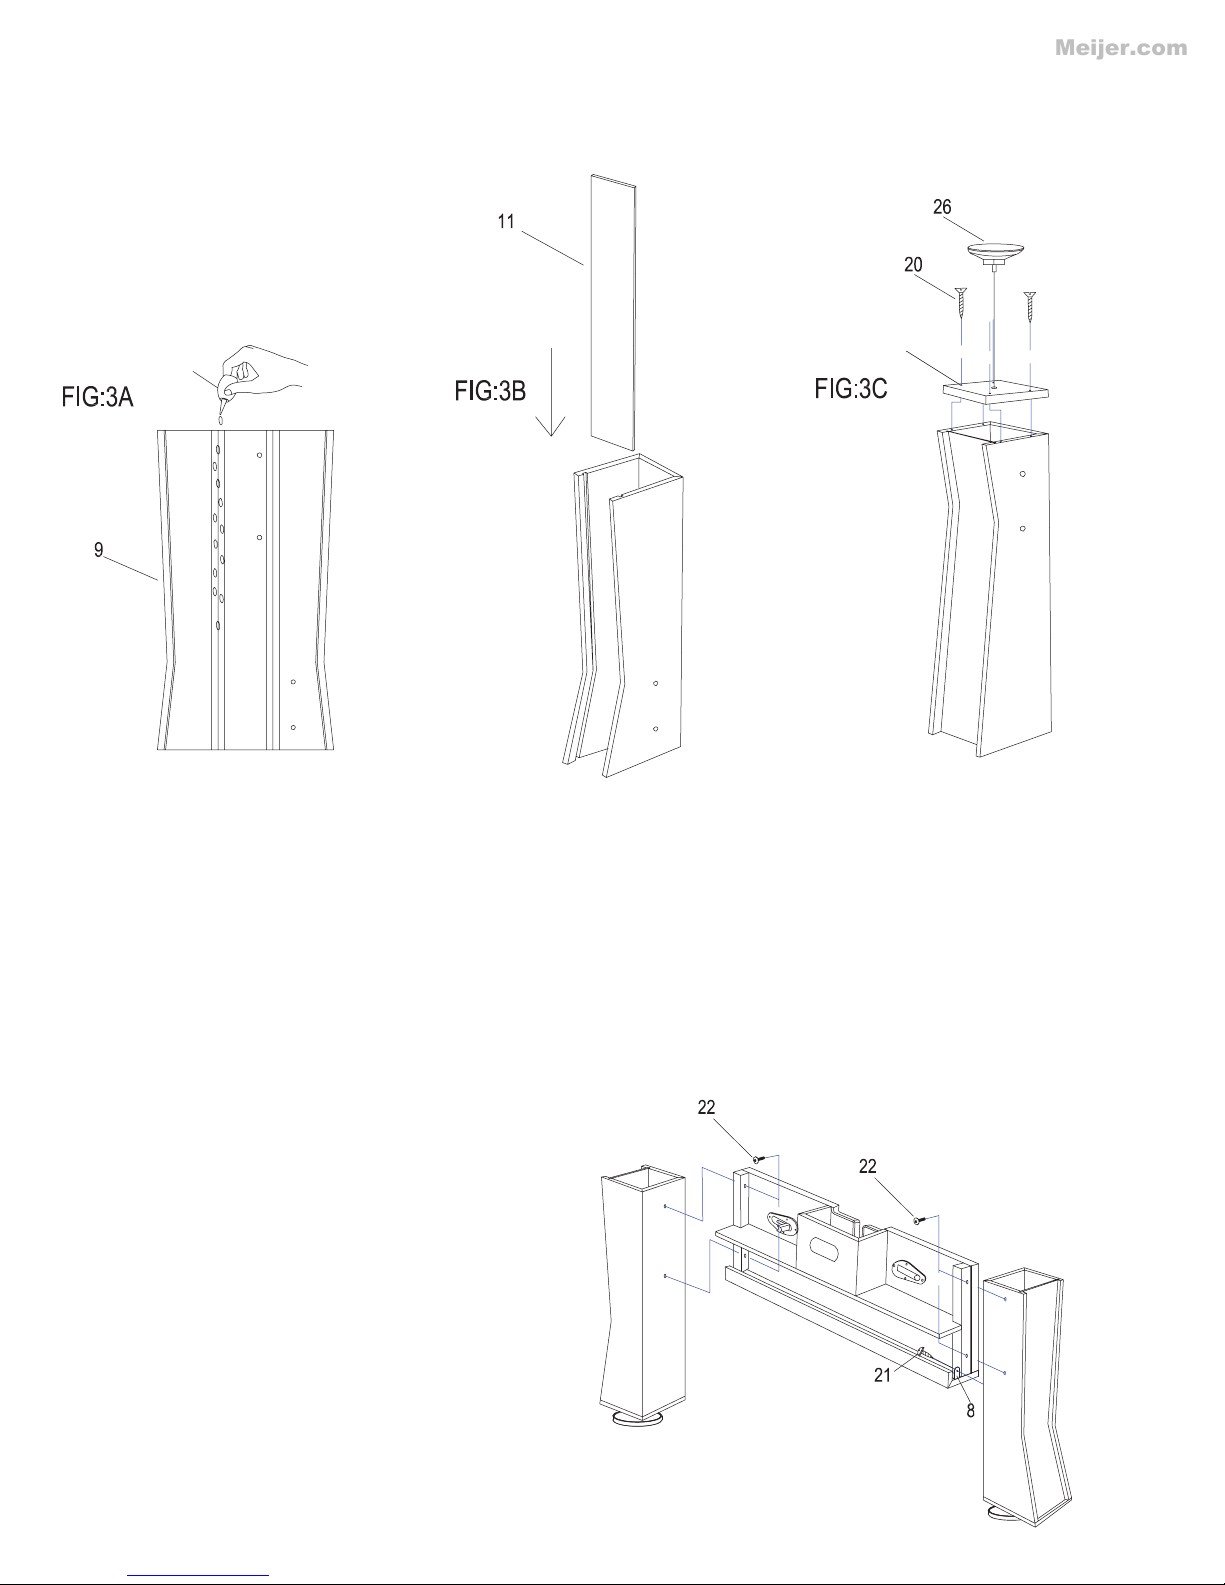
Step 3
Meijer.com
Identify part (#12), leg base to FIG: 3C, add glue drops to both sides of image.
27
12
FIG: 3A
Assemble the legs (#9). Run a bead of glue (#27) in the groves on the inside edges of the leg (#9).
FIG: 3B
Slide leg brace (#11) into glued groves on leg (#9).
FIG: 3C
Screw leg base (#12) to bottom end of leg using screws (#20). Screw leg leveler (#26) into leg base
(#12).
Repeat this step for all 4 legs, 2 of (#9) & 2 of (#10).
Step 4
Attach the leg pedestal (#3) to the
legs (#9) & (#10). Align the screw
holes on each side of the leg pedestal (#3) to each leg (#9 & #10) using
screw (#22). Now screw the steel
bracket (#8) to the predrilled hole
in the leg using screw (#21).
Page 6
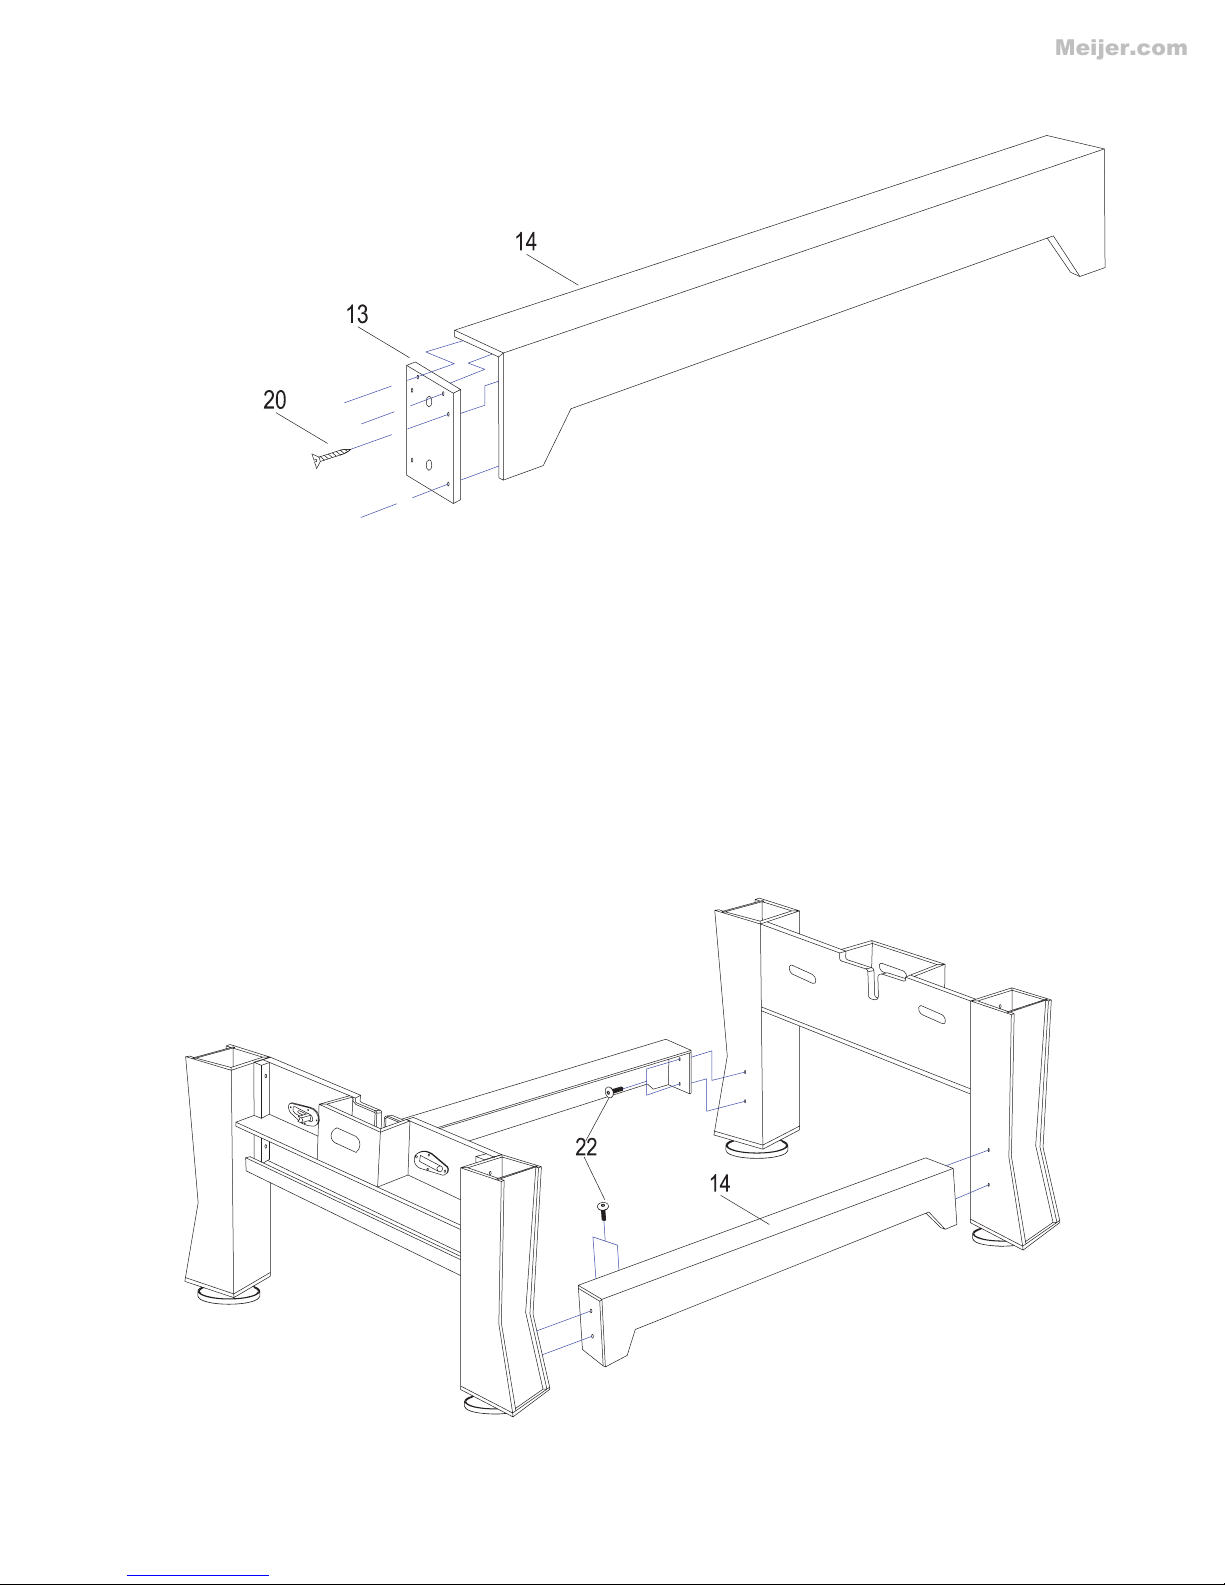
Step 5
Meijer.com
Assemble the outside rails (#14) by screwing the apron-end board
(#13) to each end of the outside rail (#14) with screw (#20).
Step 6
With the help of another person attach the outside rails (#14) (flat side up) to the assembled leg pedestals by aligning the holes in the outside rails (#14) with the predrilled holes in the leg using screw (#22).
Page 7
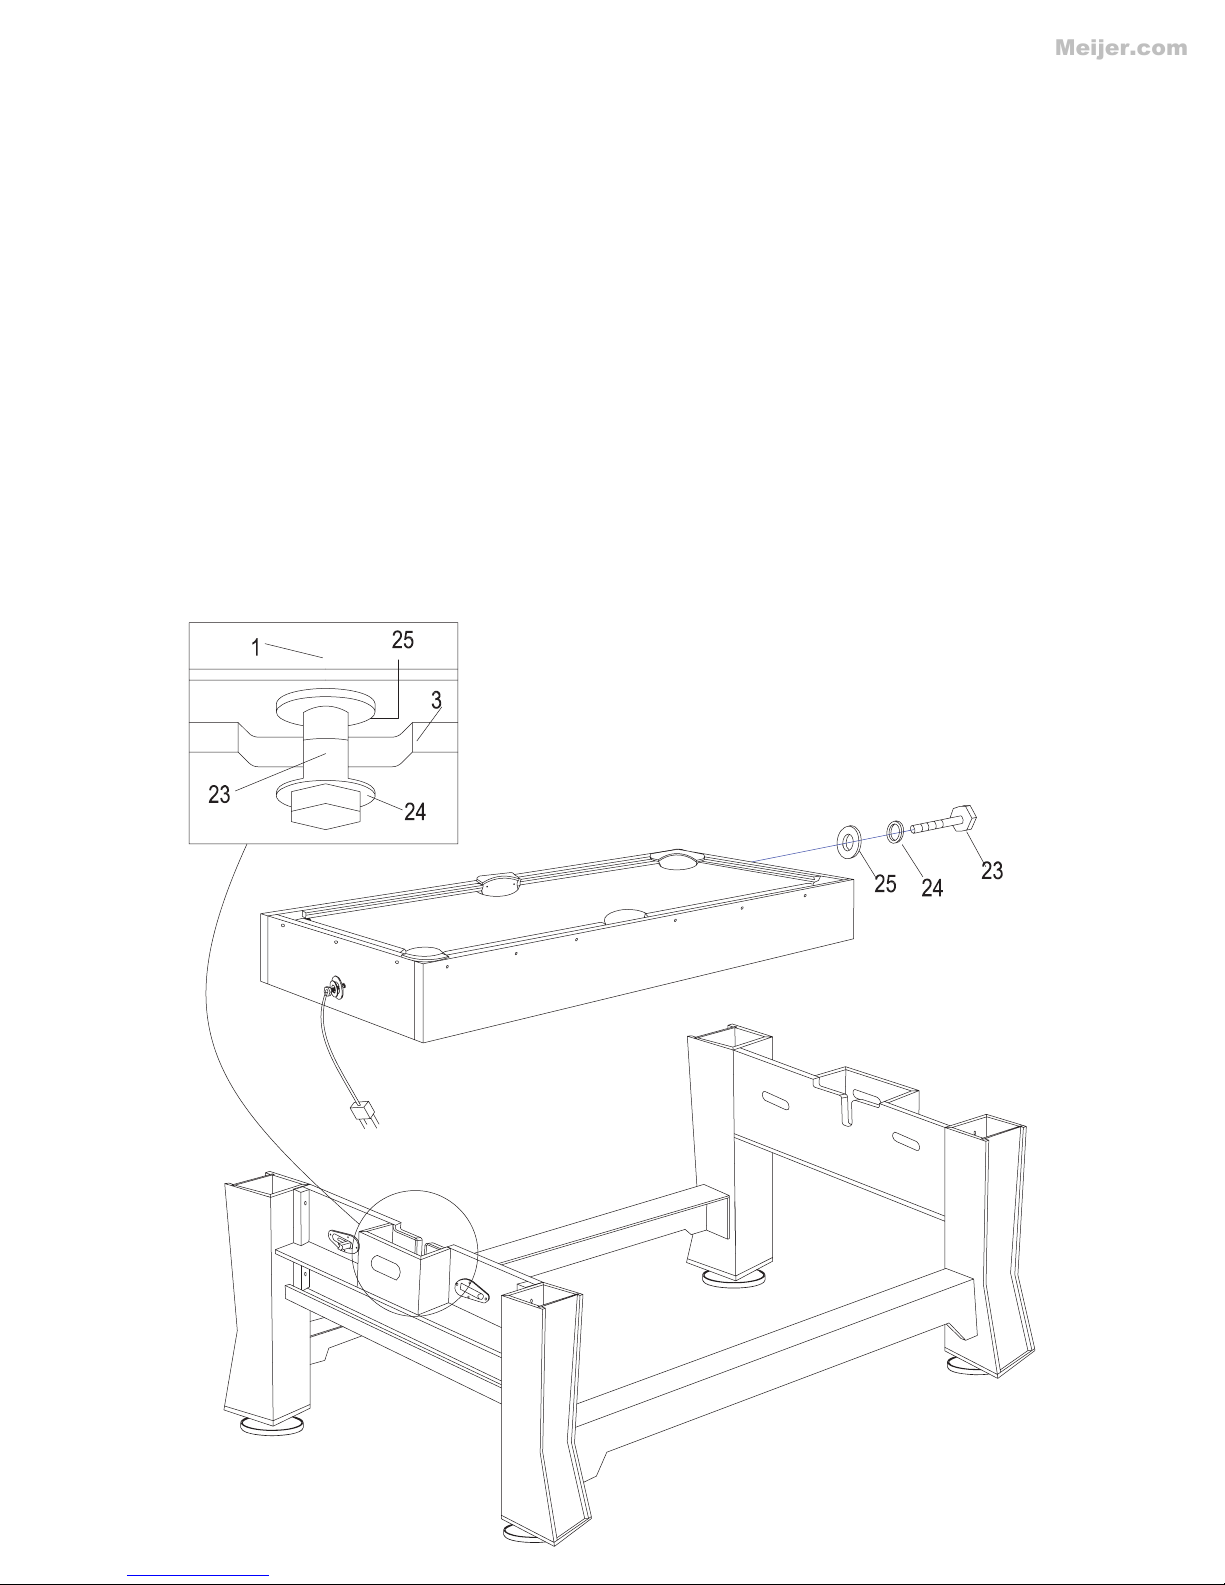
Step 7
Meijer.com
Preparing the table top for mounting.
The threaded shaft in the cabinet-hockey (#1) cannot be removed, be sure to pull it out as far as possible, about 2 to 3 inches on the end with the electric plug. On the opposite end, slide ½” washer (#24)
and ½” plastic washer (#25) onto the ½” hex bolt (#23). Insert the ½” hex bolt (#23) into the threaded
shaft. Screw the bolt into the shaft leaving about 2 to 3 inches of the hex bolt exposed when the bolt is
secured into the threaded shaft.
Attaching the table top to the base frame.
You are now ready to place the table top (#1) onto the base frame. With the help of a few friends, have
two people on each side of the table top, and the other on the end to help guide the hex bolt (#23) into
the slot on the on the leg pedestal. Once in place make sure the head of the hex bolt (#23) and the 1/2”
washer (#24) are sticking out past the leg panel. Make sure the plastic washer (#25) is against the
cabinet-hockey (#1) as it will act as the spacer for the table to rotate.
To securer the table top to the leg panel use the wrench (#28) provided. Tighten each of the 1/2” hex
bolts (#23) on each side of the leg panel towards each other, firmly tighten. This will lock the table top
to the base frame, and still allow the table top to spin freely. When complete, engage all 4 lock pins.
Page 8
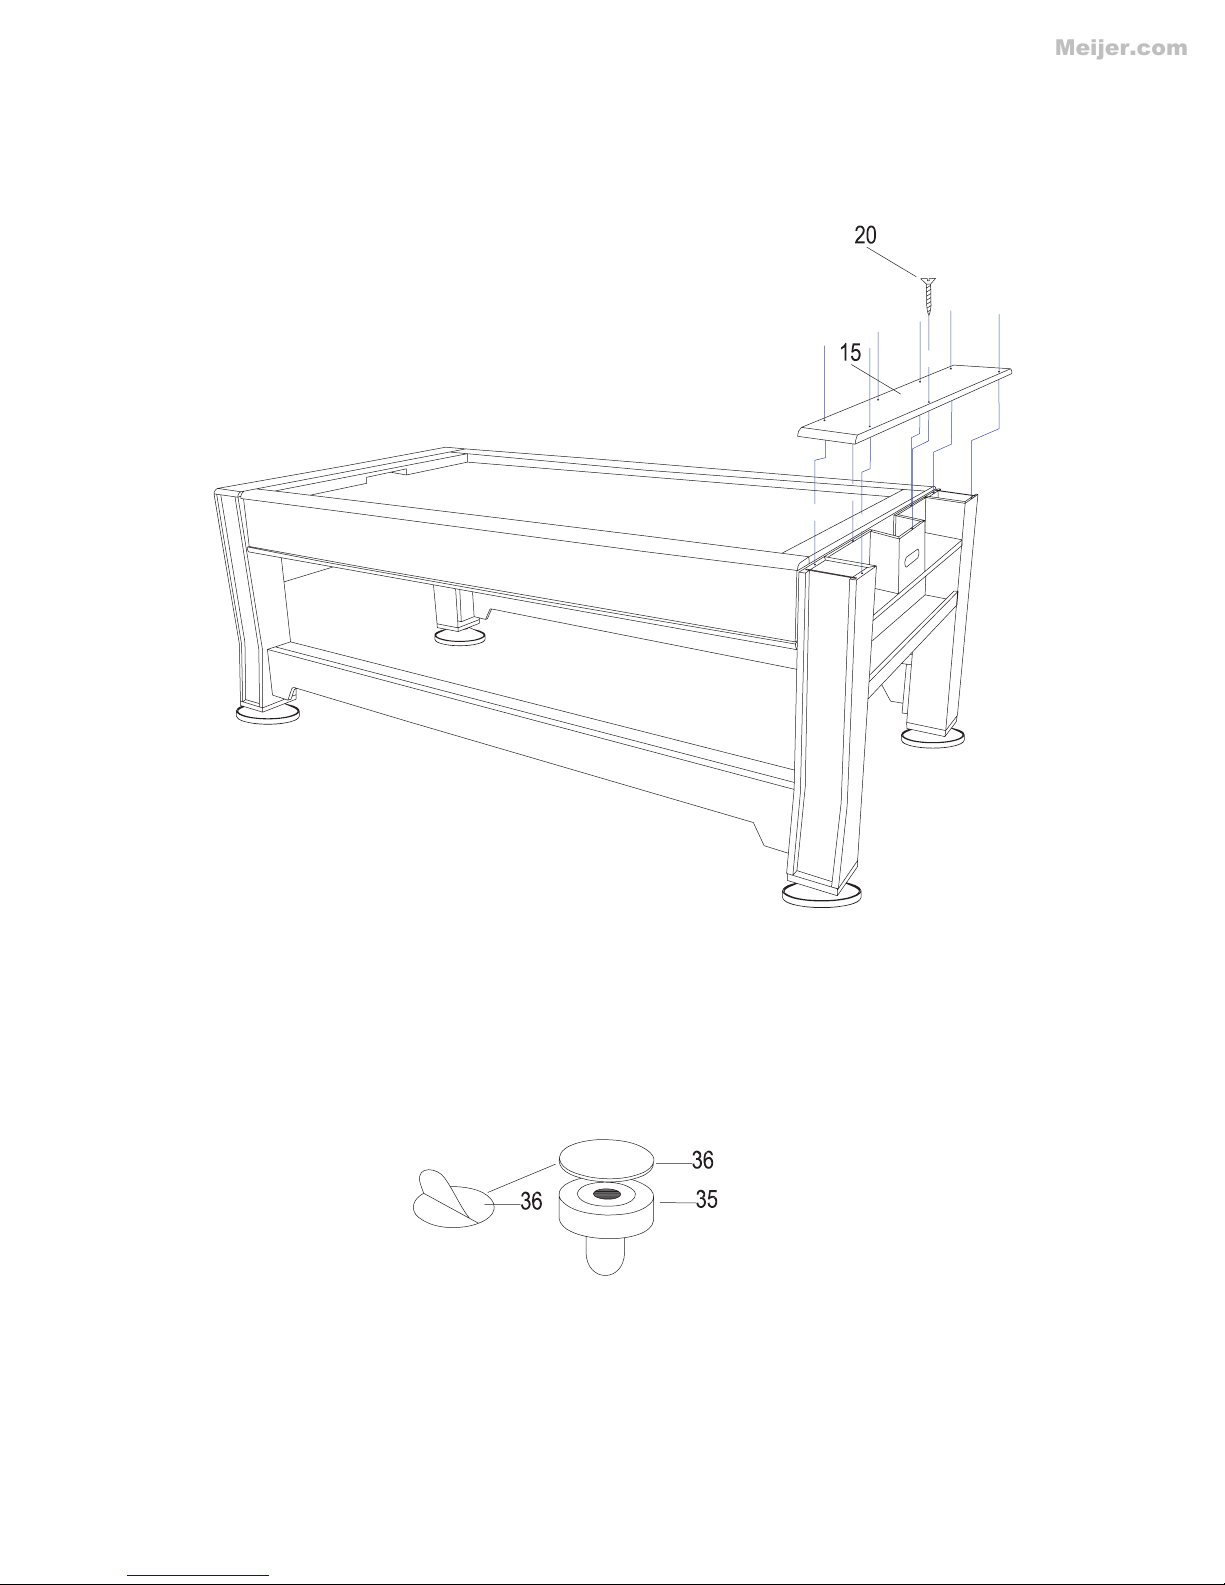
Step 8
Meijer.com
Attach top side panel (#15) to the assembled leg pedestal (#3) by aligning the holes in the side panel
(#15) with the predrilled holes in the top of the leg pedestal (#3) with screw (#20).
Step 9
Assemble the hockey striker (#35) by attaching the hockey felt (#36) by removing the protective paper
and adhering the hockey felt (#36) to the striker (#35).
Page 9
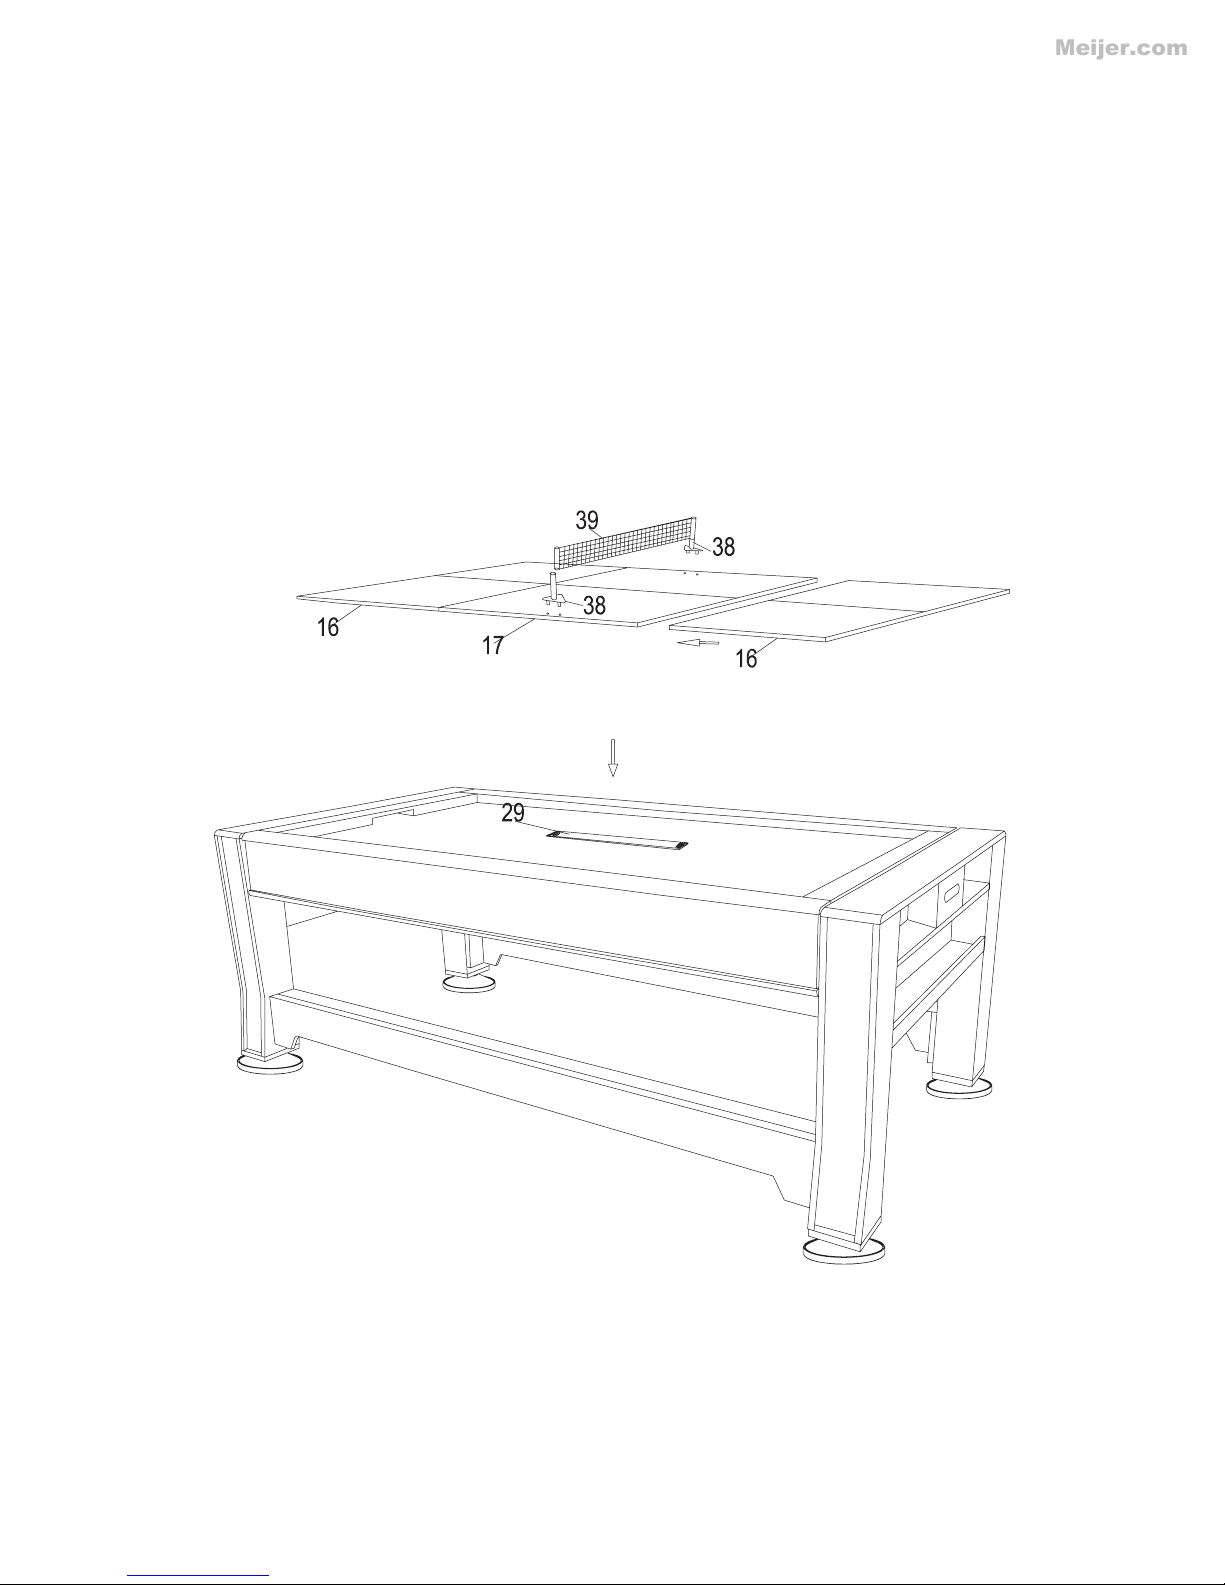
Step 10
Meijer.com
Place the tennis top-support (#29) in the center of the table. Unfold the tennis surface-B (#17) and
tennis surface-A (#16) and place on the table surface.
WARNING: Tennis top must be removed before rotating table top!
Trouble Shooting:
If the pool table side is not level first try to level by using the leg levelers on each leg. Most of the
time the table can be easily leveled using this method. If the tennis top surface still needs adjustments shims may be used on the cross supports to bring up the low spots.
Page 10

BILLIARDS:
Meijer.com
After the break, regardless of whether any balls were pocketed on the break, the table is Open, with
the choice of stripes or solids determined by the next legally pocketed ball.
In the course of play, a player must call each shot in advance, by indicating the ball to be made and
the pocket into which it will be made. It is not necessary to indicate details such as cushions, banks,
caroms, etc. Failure to make the shot as called results in a loss of turn. If the shot is made as called,
then any other balls pocketed remain pocketed. However, if the called shot is not made and any
other balls are pocketed, then the shooter's ball(s) that were pocketed would be spotted and any of
the opponent's balls would remain pocketed.
In order to execute a Legal Shot, the first ball hit must be one of the balls in the shooter's group
(stripes or solids) and the object ball must be pocketed or the cue ball or any object ball must come
into contact with a rail. (Note: It is legal for the shooter to bank the cue ball off a rail before hitting
the object ball.) A player who legally pockets a ball continues play until missing or committing a
Foul. Once a player's ball group (stripes or solids) is pocketed, the player may play the 8 ball. Again,
the player must clearly indicate the intended pocket, even if it appears obvious. A player who legally
pockets all of his ball group and the 8 ball is the winner.
FOULS
1. Failure to execute a legal shot as defined above.
2. A scratch shot (shooting the cue ball into a pocket or off the table)
3. Moving or touching any ball by means other than legal play.
4. Shooting an intentional jump shot over another ball by scooping the cue stick under the cue ball.
A jump shot executed by striking the cue ball above center is legal.
5. Using the 8 ball first in a combination shot when the table is not open.
HOCKEY:
1) This game is designed to be played with two (2) players, one at each end, or with four (4) players,
two at each end of the game table.
2) Play begins when the puck is placed on the playing surface. Players must hit the puck with the
hand-held pushers and attempt to shoot into the opponent’s goal.
3) One point is given when a puck is shot into the opponent’s goal.
4) Winning: the winning goal is accomplished by being the first player to reach a predetermined
score or by being the player to score the most points within a given period.
Page 11

TABLE TENNIS:
Meijer.com
In singles, the server first makes a good service and then the receiver makes a good return. Thereafter, server and receiver alternately each make a good return. In doubles, the server first makes a good
service and the receiver returns the ball. Then the partner of the server makes a good return,
followed by the partner of the receiver returning the ball. Thereafter, each player alternately in that
sequence makes a good return.
Serving
After hitting it, the ball must first touch the server's own court and pass directly over the net or
around the net assembly, then touching the receiver's court. In doubles, the ball must first touch the
server's right half-court or center line, pass over the net, and then touch the receiver's right half-court
or center line. If, in attempting to serve, a player fails to strike the ball while it is in play, he loses a
point. Return After the ball is served or returned in play, it is struck so that it passes directly over the
net and its assembly and touches the opponent's court. A returned ball which touches the net or its
supports on the way over to the other side, is considered a good return. The ball is in play from the
last moment at which it is stationary on the palm of the server's free hand before being projected in
service until:
-- a point is scored.
-- it touches the same court twice consecutively.
-- it has been volleyed.
-- it touches a player, or anything he wears or carries, other than his racket or his racket hand
below his wrist.
-- it touches any object other than the net or its support (referred to above).
-- it is struck by a player more than once consecutively.
-- it touches, in a doubles service, the left half-court of the server or receiver.
-- it is struck, in doubles, by a player out of sequence, except where there has been a genuine
error in playing order.
Page 12

Be sure to check out all the exciting games has to offer.
Visit our web site at:
Triumph Sports USA
Aurora, IL 60504
www.triumphsportsusa.com
©2008 Triumph Sports USA. All Rights Reserved.
90 day TSU Game Warranty
www.triumphsportsusa.com
Meijer.com
All TSU games have a 90 day from date of purchase warranty. This warrants the retail purchaser for any of the TSU games
purchased to be free from any defects in materials and construction for 90 days from date of purchase. Normal play wear
and usage is not covered under the warranty or improper use of any TSU game. This will void any and all TSU warranty.
 Loading...