

Page 1

User guide | Bedienungsanleitung | Guide d’utilisation | Manuale d’uso | Manual del usario
eclipsetouch.com
Page 2

Page 3

contents:
Before you start...........................................................................................................................
Vor der Inbetriebnahme | Avant de commencer | Prima di cominciare | Antes de empezar
Set up and pairing.......................................................................................................................
Einrichten und Verbinden | Installation et connexion | Impostazione & Sintonizzazione | Conguración y pareado
Power saving...............................................................................................................................
Stromsparfunktion | Economie d’énergie | Risparmio di energia | Ahorro de energía
Troubleshooting.........................................................................................................................
Fehlerbehebung | Dépannage | Risoluzione dei problemi | Solución de problemas
4
6
8
11
Page 4
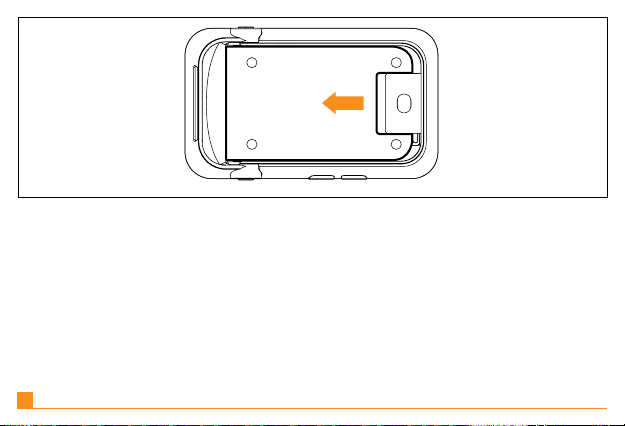
Before you start | Push the battery cover of the back of the mouse. Insert the battery in the
EN |
direction shown and remove the wireless receiver.
Vor der Inbetriebnahme | Entfernen Sie die Batterieabdeckung, indem Sie auf die
DE |
Mausunterseite drücken. Legen Sie die Batterie in der angezeigten Richtung ein und entfernen Sie den drahtlosen Empfänger.
Avant de commencer | Retirez (en le poussant) le couvercle du compartiment à pile, situé
FR |
sous la souris. Insérez la pile dans le sens indiqué et retirez le récepteur sans l.
Prima di cominciare | Rimuovere il coperchio della batteria nella parte inferiore del mouse.
IT |
Inserire la batteria nella direzione indicata e rimuovere la ricevente wireless.
ES |
Cuestiones preliminares | Empuje la tapa de la pila del fondo del ratón. Ponga la pila en la
dirección indicada y extraiga el receptor inalámbrico.
4
Page 5
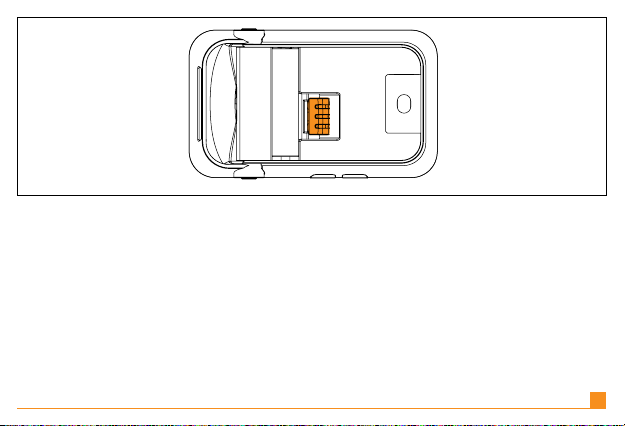
EN |
Plug the wireless USB receiver into a USB port on your computer.
Verbinden Sie den drahtlosen USB-Empfänger mit einem freien USB-Port auf Ihrem Com-
DE |
puter.
FR |
Branchez le récepteur sans l USB sur l’un des ports USB libres de votre ordinateur.
IT |
Collegare la ricevente USB wireless ad una delle entrate USB libere nel computer.
ES |
Enchufe el receptor USB inalámbrico a un puerto USB que esté libre en su ordenador.
5
Page 6

Setup & Pairing
EN |
Turn on the mobilemouse™ by pressing the side button for 3 seconds.
Einrichten und Verbinden | Schalten Sie die mobilemouse™ ein, indem Sie 3 Sekunden
DE |
lang die seitliche Taste mit dem ON/OFF Logo gedrückt halten.
FR |
Installation et connexion | Allumez la mobilemouse™ en appuyant pendant 3 secondes sur
le bouton ON/OFF, situé sur le côté.
Impostazione & Sintonizzazione | Accendere il mobilemouse™ tenendo premuto il tasto
IT |
laterale con il logo ON/OFF per 3 secondi.
ES |
Conguración y pareado | Encienda el mobilemouse™; para ello, pulse 3 segundos el
botón lateral con el rótulo ON/OFF (ENCENDIDO/APAGADO).
6
Page 7

When a link is established the blue LED will illuminate.
EN |
DE |
Sobald eine Verbindung hergestellt wurde, leuchtet die blaue LED auf.
FR |
Lorsqu’une connexion a été établie, le voyant LED bleu s’allume.
IT |
Quando viene stabilito un collegamento si accenderà la LED blu.
ES |
Cuando se realice la conexión pertinente, el diodo electroluminescente (DEL) se iluminará en
azul.
7
Page 8

Power saving | To save battery life when not using the mobilemouse™, press the connec-
EN |
tion button on the side of the mouse once to switch it off.
DE |
Stromsparfunktion | Wenn Sie die mobilemouse™ nicht verwenden, halten Sie zur Verlän-
gerung der Batterielebensdauer die seitliche Taste 3 Sekunden lang gedrückt.
FR |
Economie d’énergie | Pour économiser sur la durée de vie de la pile lorsque vous n’utilisez
pas la mobilemouse™, appuyez sur le bouton situé sur le côté pendant 3 secondes.
Risparmio di energia | Per risparmiare l’energia della batteria quando non si utilizza il mobi-
IT |
lemouse™, tenere premuto il tasto laterale per 3 secondi.
ES |
Ahorro de energía | Para no malgastar la pila cuando no esté usando el mobilemouse™,
pulse 3 segundos el botón lateral.
8
Page 9

Software installation
EN |
Insert the CD to install the software, this enables horizontal scrolling.
DE |
Installation der Software | Zur Installation der Software legen Sie die CD ein und befolgen
Sie die Anweisungen auf der Anzeige. Nach der Installation ist die horizontale Scrollingfunktion aktiviert. Die Geschwindigkeit dafür kann über das Windows Maus-Applet angepasst
werden.
Installation du logiciel | Insérez le CD pour installer le logiciel, puis suivez les instructions.
FR |
Une fois l’installation effectuée, le délement horizontal sera activé. La vitesse de délement
peut être ajustée avec l’applet « souris » de Windows.
Installazione del software | Inserire il CD per installare il software e seguire le istruzioni
IT |
che compaiono sullo schermo. Una volta installato il software sarà possibile effettuare lo
scorrimento orizzontale. La velocità può essere regolata attraverso l’applet del mouse di
Windows.
Instalación del software | Inserte el CD para instalar el software y siga las instrucciones que
ES |
aparezcan en la pantalla. Una vez instalado el CD, podrá desplazarse en horizontal. Puede
ajustar la velocidad en la miniaplicación para ratón por defecto de Windows.
9
Page 10

EN |
The red LED will ash when the battery is running low on power; the blue LED will also turn off.
DE |
Die rote LED blinkt, wenn die Batterie nachlässt; die blaue LED schaltet sich ebenfalls ab.
FR |
Le voyant LED rouge clignotera et le voyant LED bleu s’éteindra si la pile commence à être
déchargée.
IT |
Quando la batteria inizia a scaricarsi, la LED rossa lampeggerà e si spegnerà anche la LED
blu.
ES |
Un DEL parpadeará en rojo cuando la batería tenga poca carga; el DEL azul se apagará.
10
Page 11

1
2
EN |
Troubleshooting | If the mouse does not work:
1. Check the batteries have not expired and are inserted properly.
2. Make sure the mouse is switched on by pressing the side button, the blue LED will illuminate.
Fehlerbehebung | Wenn die Maus nicht funktioniert:
DE |
1 Überprüfen Sie, ob die Batterie aufgeladen und richtig eingelegt ist.
2 Stellen Sie sicher, dass die Maus eingeschaltet ist, indem Sie die seitliche Taste drücken;
die blaue LED leuchtet auf.
Dépannage | Si la souris ne fonctionne pas :
FR |
1 Vériez que la pile n’est pas déchargée et qu’elle est correctement insérée.
2 Assurez-vous que la souris est bien allumée en appuyant sur le bouton situé sur le côté (le
voyant LED bleu doit s’allumer).
11
Page 12

IT |
Risoluzione dei problemi | Se il mouse non funziona:
1 Controllare che la batteria non sia scaduta e che sia inserita correttamente.
2 Assicurarsi che il mouse sia acceso premendo il tasto laterale: dovrebbe accendersi la
LED blu.
Solución de problemas | En caso de que el ratón deje de funcionar, haga lo siguiente:
ES |
1 Asegúrese de que la pila no esté caducada y de que esté insertada correctamente.
2 Asegúrese de que el ratón esté encendido; para ello, pulse el botón lateral y el DEL azul
se iluminará.
12
Page 13

Further Information
EN |
For further product information, updated drivers and FAQ’s visit www.eclipsetouch.com
DE |
Weitere Produktinformationen
Für weitere Produktinformationen, aktualisierte Treiber und Häug gestellte Fragen besuchen
Sie www.eclipsetouch.com
Informations complémentaires
FR |
Pour plus d’informations sur le produit, pour les mises à jour de pilote et pour consulter
notre foire aux questions, visitez notre site à l’adresse
www.eclipsetouch.com
Ulteriori informazioni
IT |
Per ulteriori informazioni sul prodotto, sui driver aggiornati e per trovare le risposte alle
domande più frequenti, visitare il sito web www.eclipsetouch.com
Más información
ES |
Si desea más información acerca del producto, controladores actualizados y preguntas más
frecuentes (FAQ), visite el sitio web www.eclipsetouch.com
13
Page 14

Page 15

Page 16

www.madcatz.com
© 2010 Mad Catz Interactive Asia Limited (MCIA). Eclipse, mobilemouse™, the Eclipse logo, Mad Catz and the Mad Catz logo are trademarks or registered
trademarks of Mad Catz, Inc and/or its afliated companies. The shape and design of this product are a trade dress of Mad Catz and/or MCIA. All other trademarks
or registered trademarks are the property of their respective owners. Made in China. All rights reserved. Product features, appearance and specications may be
subject to change without notice. Please retain this information for future reference.
© 2010 Mad Catz Interactive Asia Limited (MCIA). Eclipse, mobilemouse™, le logo Eclipse, Mad Catz et le logo Mad Catz sont des marques decommerce ou des
marques déposées de Mad Catz, Inc., et/ou ses sociétés afliées. . La forme et le design de ce produit sont caractéristiques de la marque Mad Catz et/ou MCIA.
Toutes les autres marques ou marques déposées sont la propriété de leurs propriétaires respectifs. Fabriqué en Chine. Tous droits réservés. L’aspect, les fonctionnalités et les spécications du produit peuvent changer sans préavis. Veuillez conserver cette notice pour référence ultérieure.
© 2010 Mad Catz Interactive Asia Limited (MCIA). Eclipse, mobilemouse™ y el logotipo de Eclipse, Mad Catz y el logotipo de Mad Catz son marcas comerciales
o marcas comerciales registradas de Mad Catz, Inc., y/o sus compañías aliadas. La forma y el diseño de este producto es la imagen de marca de Mad Catz y/o
MCIA. Todas las demás marcas o marcas registradas son propiedad de sus respectivos propietarios. Fabricado en China. Reservados todos los derechos. Las
características, el aspecto y las especicaciones del producto pueden ser objeto de modicación sin previo aviso. Por favor guarde esta información para su
consulta en el futuro.
Mad Catz is a publicly traded company on the TSX/AMEX, symbol MCZ.
Les actions de Mad Catz sont cotées en bourse sur le TSX/AMEX sous le symbole MCZ.
 Loading...