

Page 1
1English Language User Ma
(VP6240)
Page 2

Index
1. Overview of Panels & keys ..
2 Using the Device .......................................
2-1 Starting up ......................................
-Charge Batteries ......................................................
-Power On /Off ..........................................................
-Driver Installation .....................................................
2-2 USB Connection
2-3 Downloading or Editing the files on PC ...................
2-4 Foreign Character Setting
3. Setting for your Device
3-1 System / Display setting
3-2 Card Selection
3-3 Your Media files
4. JukeBox
5. Photo Play Mode
6. Video Play Mode
7. Music Play Mode
8. File and Folder Operations
9. Battery recharge
10. If an erroneous display / operation occurs
11. Care for the Hard Drive and unit
12. Troubleshooting
Page 3

FCC Certifications
This equipment has been tested and found to comply with the limits for a
Class B digital device, pursuant to Part 15 of the FCC Rules. These limits
are designed to provide reasonable protection against harmful interference
in a residential installation.
This equipment generates, uses and can radiate radio frequency energy
and, if not installed and used in accordance with the instructions, may
cause harmful interference to radio communications.
However, there is no guarantee that interference will not occur in a
particular installation. If this equipment does cause harmful interference to
radio or television reception, which can be determined by turning the
equipment off and on, the user is encouraged to try to correct the
interference by one or more of the following measures:
• Reorient or relocate the receiving antenna.
• Increase the separation between the equipment and receiver.
• Connect the equipment into an outlet on a circuit different from that to
which the receiver is connected.
• Consult the dealer or an experienced technician for help.
Page 4

CAUTION
Under no circumstances should you try to repair the system yourself, as this
will invalidate the warranty. Do not open the system as there is a risk of
electronic shock.
IMPORTANT WARRANTY INFORMATION
To reduce the risk of fire or shock hazard, do not expose this equipment to rain ,
any liquid or moisture.
Company shall have no obligation to repair ,replace or refund until the customer
returns the defective product to Company.
The repairs and replacement service will not apply to PRODUCT units that were
misused, repaired without authorization or by other reasons beyond the range of
intended use.
Any replacement product may be either new or like –new, provided that it has
functionality at least equal to that of the product being replaced.
Company is not responsible for any data stored on returned products, please backup
any data prior to shipping the unit.
The limited warranty for accessories (included battery ) is only valid for 6 months from
the date of purchasing..
All OUT OF WARRANTY repairs maybe subject to a normal repair fee.
Please contact your dealer for current charges.
Package Checklist
Main unit
Earphone
A/V cables
USB cable
Remote Control
English user's guide
Setup CD-ROM
Power Adapter (100-240V auto switched )
Page 5

Video playback MPEG1 in dat & MPG file format
Motion JPEG in AVI and MOV file format
MPEG 4/ DivX 5.xx (720x480@25fps/ 640x480@30fps)
Video resolution 352 x 240 pixels @ 30 fps
Audio playback - MP3 (MPEG1 Audio Layer I/II/III & 2.5),32Kbps ~ 320kbps CBR.
- WMA
- 32Kbps ~ 192Kbps, CBR
- Audio CD
- Un-compressed WAV in MS-RIFF file format
Stereo/Mono
Frequency(Hz):8000/11025/12000/16000/22050/24000/32000/44100/48000
Bit rate: 64kbps~1536kbps
Photo viewer JPEG (Baseline format) up to 16M pixels
TIFF: 1 and 8 bits grayscale, 8 bits indexed-color, 8 and 16 bits true color
BMP: Monochrome, 8 bits indexed-color, RGB, RLE8
RAW: Support following camera models
Canon: 1Ds Mark-II, 1Ds, 1D-II, 1D, 20D, 10D, 300D(Di
g
ital Rebel, Kiss
Digital), D30, Power Shot G2
Nikon: D100, D70, D1X, D1
Fujifilm: S2 Pro
Olympus: E-1
Kodak: DSC Pro SLR/c, DSC Pro SLR/n, DSC Pro 14n
Zoom IN/Out
Rotate by 90 degree
Exif data
Slideshow with background music
Support Memory Card
nterfaces
Compact FlashTM Card type I/type II (CF)
Smart Media TM Card (SM)
Memory Stick® (MS)
Secure Digital Card (SD)
MultiMedia Card (MMC)
IBM ®MicroDrive
Mini-SD (with adapter)
RS-MMC (with adapter)
MS Duo (with adapter),
MS Pro Duo (with adapter).
Specifications
Page 6

Hard Disk Size 2.5 inch
Hard Disk Capacity Unlimited ( Any 9.5mm 2.5" HDD )
AV device Analog AV-OUT composite RCA jack
Stereo earphone jack
Display 2" LTPS TFT high resolution LCD
Interface
USB 2.0
(compatible USB 1.1)
Power supplier
5V/2.5A DC IN, Li-ion 3.7V 1800 mAh battery
Model : FUJIFILM NP-120
Video playback 4 hours for video playback
TV system PAL / NTSC
Remote Control
IrDA, (Lithium Battery CR2025 3V x1)
Dimensions (WxLxH) 135x 86 x 35mm
Weight 332 gr ( Included 2.5” HDD & battery pack )
System OS
Windows98/98SE with driver
Win 2000 SP3 above without driver
Linux Kernel version 2.4 or above without driver
Mac OS 10.01 above without driver
Note: DEVICE doesn’t support Windows SP1 , SP2 ,
please upgrade to SP3 or above.
Page 7
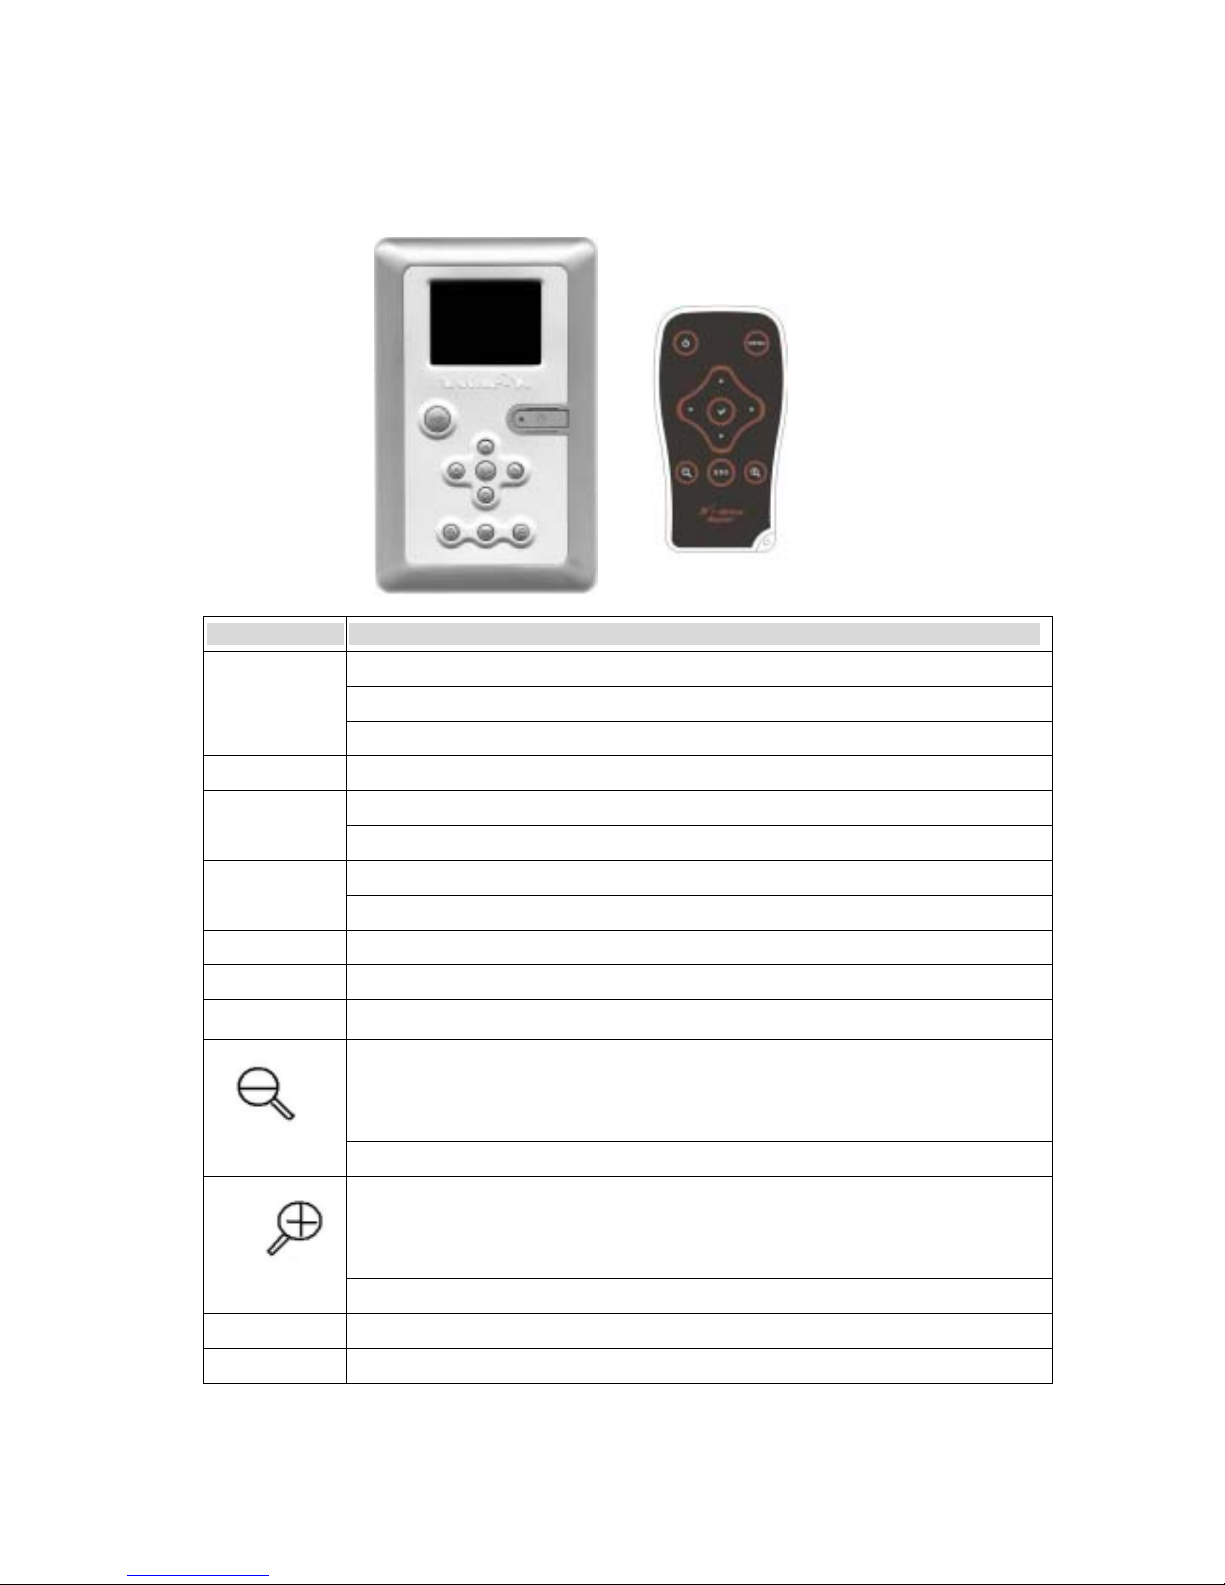
1. Overview of Panels & Keys :
Top Panel:
keypad Function Description
Ente : takes you to execute the current selection
Rotate : This function will effect under Photo Playback Mode.
Pause :
This function will effect under Music & Video Playback Mode.
MENU Play modes selection
Direction button to move cursor on the screen
Fast Backward :This function will effect under Music & Video Playback Mode.
Direction button to move cursor on the screen
Fast Forward :This function will effect under Music & Video Playback Mode.
Direction button to move cursor on the screen
Direction button to move cursor on the screen
ESC Takes you go back to previous mode
Allows you to zoom out the photo
This function will effect under Photo Playback Mode.
Allows you to decrease the volume
Allows you to zoom in the photo
This function will effect under Photo Playback Mode.
Allows you to increase the volume
Here is a look at the features which also available on the IR remote control included in the box .
Page 8
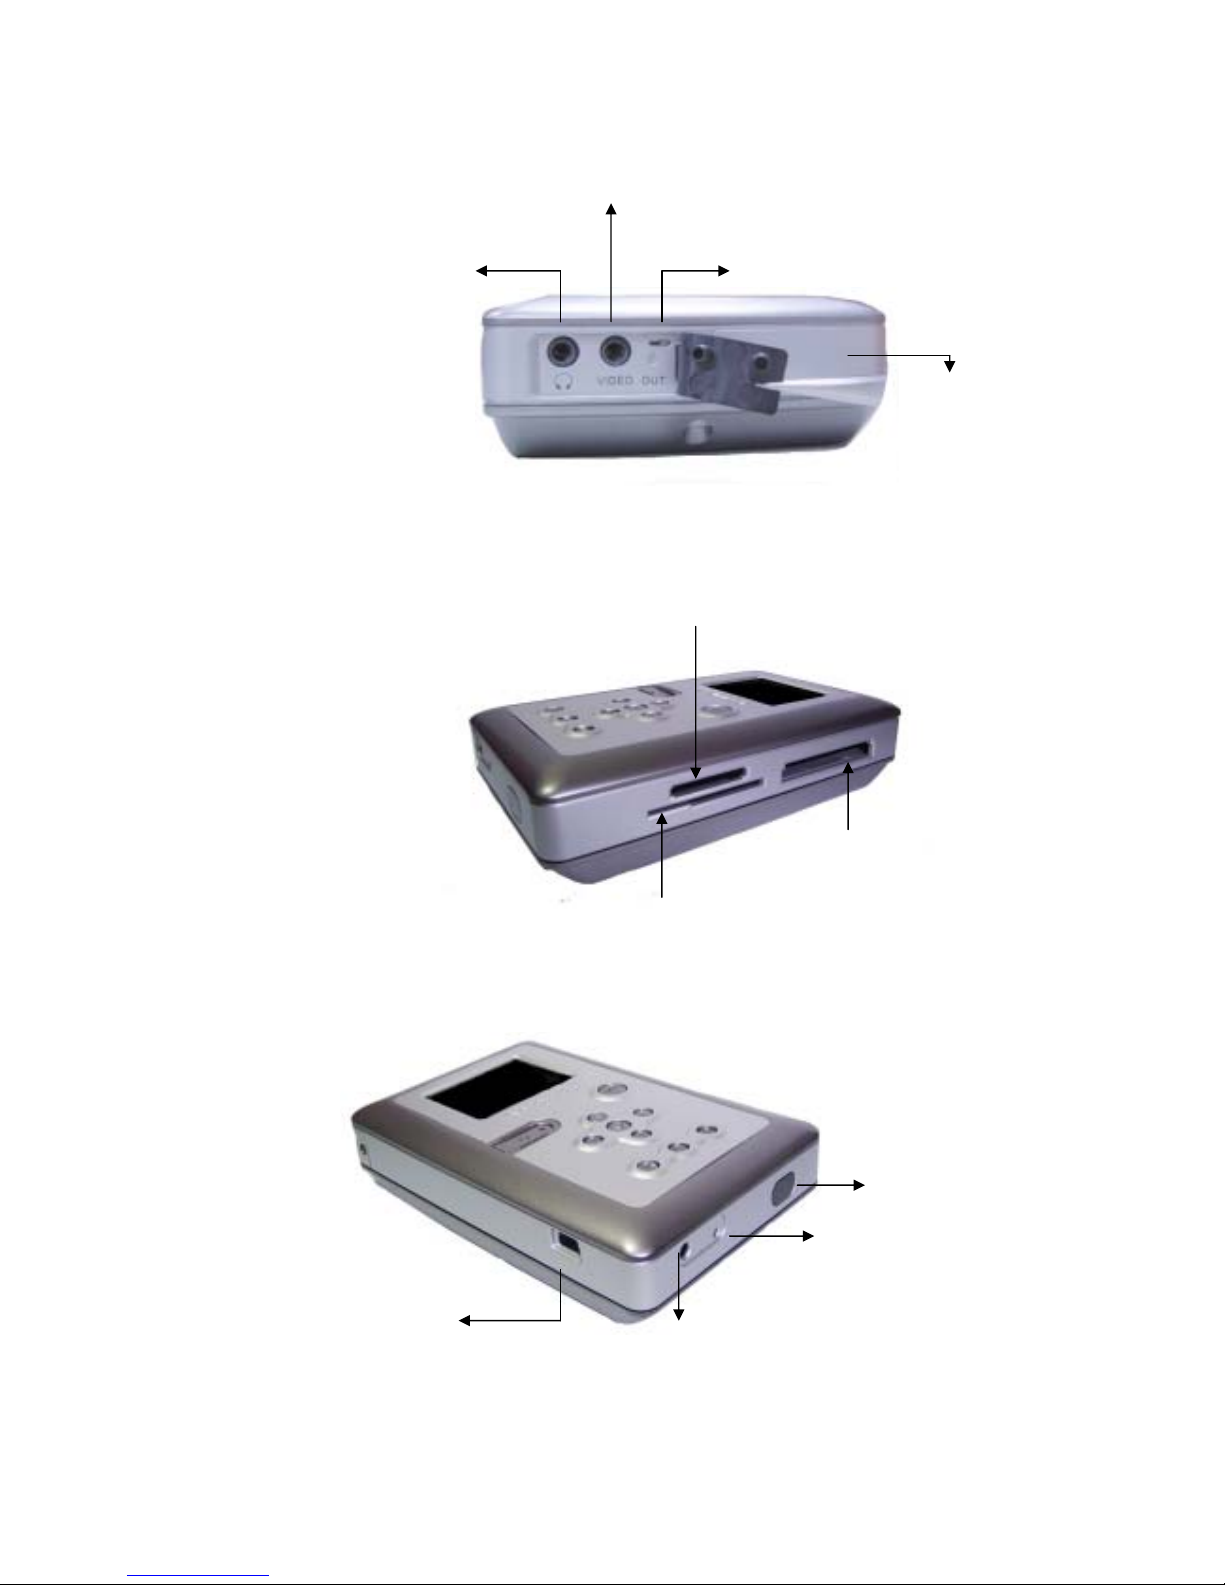
Right Panel :
Left and Bottom Panel :
Memory Stick / Memory Stick Pro ,
MMC/SD card slot
Compact Flash Type I/II
IBM MicroDrive Slot
Smartmedia Card Slot
Earphone Jack
Video Out
KeyLock
DC In :
Insert AC adapter jack
RESET
USB port:
Insert USB cord mini jack
Remote Sensor
Battery Compartment
Page 9

Under Windows 98 , the 4 removable disk drives look like drives F,G,H and I in the
following figure.
2. Using the Device
2-1. Starting up
_________________________________________________________________
1) Charge the batteries
Before using for the first time, charge the batteries for a full 8 hours.
2) Power On /Off
Long press the Power button for 2 seconds.
The red light will go on and the operating system will boot up.
To shut off the unit, long press the power button for 2 seconds.
3) Driver installation
Windows Me and Windows XP HomeEdition and Professional Edition
,Win2000 Professional SP 3 above
Windows 98/98 SE
Windows Me and Windows XP HomeEdition and Professional Edition, Win2000 Professional SP 3
above users do not need to install any drivers .Windows will automatically detect your device as a "
removable disc ".
Macintosh MacOS 9.x
Restart your computer after installation is complete
Browse your CD-ROM drive and run "setup.exe "to begin driver installation. Press "Next"
and follow the installation instructions.
2
Insert your driver Installation into your CD-ROM drive and double click on "My computer".
1
3
4
Page 10

Follow the installation instructions to being installing drives.
2
Insert your driver Installation into your CD-ROM drive and double click on "My computer"
Browse your CD-ROM drive to "MacOS Installer".
1
Res Restart your computer after installation is complete
3
Page 11

2-2 . USB CONNECTION :
When DEVICE begins connecting to the computer, the " USB Mode" message will appear in the bottom
of the screen. During file transfer in the PC mode
DO NOT :
1. Plug out the USB cable
2. Remove memory card(s) from the card slot,
otherwise, there may be a chance of lost or corrupt data.
Note: 1) Keep it plugged into the AC adapter/charge while connected to your computer.
2) To safely disconnect the DEVICE from computer, click on the system tray
remove icon
and wait until you get a message saying
that you can safely unplug the device before disconnecting the USB cable.
2- 3. Downloading or Editing the files on PC:
Power on the Device
Connect the Device Super and PC with the provided USB cable
Double Click the " My computer" icon , the operating system will
display 4 "Removeable Disks " icons identifying the media types
correspondingly.
You can then read ,write,copy ,delete and remove data on the PC.
2- 4. Foreign Character Setting :
DEVICE is able to display your file names, folder names, and MP3 ID3 tags in
various character sets (ex: Korean, Simplified Chinese, etc.).
Please follow the instructions.
Power on the device
Connect the device and PC with the provided USB cable
Find the file , Gdfont.gd3 on the included CD-ROM.
Load it into the self-contained Hard Drive on theDevice Pro
Remember to save Gdfont.gd3 in the root not in the sub-directory.
Page 12

3. Settings for your Device
3-1.To enter your setup screen , click “ OPTIONS “ then “ SYSTEM “
1) File Viewer Mode :
Press “ “ and ” ”,you can change the file viewer mode
at graphic icons or lists view.
2) Power Off Idle Timer :
Press “ “ and “ ” to adjust the setting, this setting can be changed from
one to 30 minutes .
3) Language :
The Device can be set to English only.
To set up your Screen Display , click “ OPTIONS “ then “ DISPLAY” .
Page 13

1) Screen Save Idle Timer:
There is an auto screen-off timer to save battery power, you can change
this setting by pressing “
” and “ ” .
This setting can be changed from 0 to 180 seconds.
2) TV Standward :
- NTSC (Taiwan ,US, Japan , etc )
- PAL (European countries )
You can change this setting by pressing “
” and “ ”.
3) NTSC simultaneous LCD / TV
This will disable or activate the LCD of the DEVICE while connects to your TV.
You can change this setting by pressing “
” and “ ”..
3-2. Card Selection
The Path A1 indicates the internal storage of 2.5” Hard Disk .
The Path B1 indicates Compact FlashTM Card type I/type II (CF) and MicroDrive.
The Path C1 indicates Smart Media TM Card (SM)
The Path D1 indicates , MultiMedia Card (MMC),Secure Digital Card (SD),
Mini-SD (with adapter),RS-MMC (with adapter),
The Path E1 indicates Memory Stick® (MS),MS Duo (with adapter),MS Pro Duo (with adapter).
Page 14

Press “ MENU “ to select the play modes .As you finish the selection ,
just press " " ,
3-3. Your Media files
To being playing MPEG , MP3 and JPEG files,
you must first import them to the internal storage of Hard disk
by USB Accession or just insert your memory card(s).
To keep a neat and orderly file structure. We suggest that on
the first level of your file structure, you include the folders:
Music, Playlists, Photo, Video, and Data . .
4.JukeBox
Under the main screen, click the “ MENU “ button and select“ Jukebox” Mode,
you will be sent directly to the Music Playback. If you hear nothing at first,
make sure you have adjusted the volume control on the headphone .
( To know more about the music playback, please refer to 7. Music Play Mode )
5. PHOTO PLAY MODE
Page 15

Icon View / List View
Copy File
Use the UP and down buttons to find the file you want to copy.
Press “ MENU “ to select “ COPY FILE “mode, then press “ 3” button
The message “ Source File is Marked “ will pop on the screen , then press “ 3” button.
Use the ESC, UP and down buttons to find the folder or Path you want to paste.
Press “ MENU “ to select “Paste File “mode, then press “ 3” button
It will ask “ Are You Sure to Paste? Use the “3” button to reply Yes or No.
Click “ Yes” , the copy fucntion will be performed
Icon View : The screen will display thumbnail of all
the JPEG pictures in group of 8.
List View : The screen will display all the JPEG
pictures in list of 8 .
Page 16

Delete File
Use the UP and down buttons to find the file you want to delete.
Press “ MENU “ to select “ Delete File “mode, then press “ 3” button
It will ask “Delete this File ? “ , Use the “ 3” button to reply Yes or No..
Other Functions
Exif info: Click the specific JPG file you want to view and press “ Menu”
Button to show file information such as shutter speed,
flash condition, focal length, and other image information.
Slide Show
Press “ MENU” to select “ Slide Show “mode, then press “ 3” button
Press "
" or " " button to select slideshow interval time .
ZOOM IN / OUT DISPLAY
You can press "
" button to zoom in the picture and press " " button again
to zoom out .
Press the " c " ,"d " , " e ", " f " keys to pan right or left , up and down .
ROTATE DISPLAY
You can press " 3 " button to to rotate the picture in un-clockwise direction.
Page 17

Press “ MENU “ to select the play modes .As you finish the selection ,
just press " 3 " button.
6. Video Play Mode
Press “ “ button to fast forward the videos.
Long press “” button to rewind and find the specific part of movie you want to play.
Long press “” button to fast forward and find the specific part of movie you want to play.
To pause or start/resume playback, press “3 “button.
7. Music Play Mode
Playlist
Playlist is a list of songs that the DEVICE will automatically play one after the other.
To create Playlists, you can simply copy , delete , paste the files to the folder
you want.
Repeat ON /OFF
Press “ MENU “ button to select the Repeat Mode.
Press “ 3 “button to set the “Repeat ON “.
Note : The Repeat Function only works on all track.
Page 18

Shuffle ON /OFF
To shuffle the music in a random order, you can scroll to “ Shuffle “ , then
Press “3 “ button.
Equalizer
There are 6 EQ modes ( Bass, Classic, Dance, Live, Rock , Treble ) for your
selection.
KeyLock
To lock all the DEVICE buttons from being accidentally pressed,
scroll to “ KeyLock “mode and press “3 “ button.
Press “ MENU “and “ESC “ buttons to effect the buttons again.
Hide
This allows you to switch to other modes , like to see the photos simultaneously when the music is
playing.
Other funcations
Long press “ ” button to rewind and find the specific part of music you want to play.
Long press “ ” button to fast forward and find the specific part of music you want to play.
8. File and Folder Operations
1) Copying , Pasting and Deleting Files and Folders
Under the screen Browser mode, you can copy, paste or delete files from
one location in the file structure to another. Simply Press “ MENU “ to select the modes .
As you finish the selection , just press " 3 " button.
2) Full Backup
Under the main screen browser mode, you can backup the whole folder
(including it's subfolder and files) from Path B1 , C1, D1, to Path A1.
Simply scroll to the Path you want to backup , then press “ MENU “
to select the “ Full Backup mode .As you finish the selection , just press "
Page 19

3) DCF (Design rule for Camera File system ) Backup.
The DCF file structure requires a folder named DCIM on the Memory Card(s).
Inside the DCIM folder should be a folder named 100xxxxx or 101xxxxx,
where the x represents the digital camera brand name.
The image file must be stored in one of these two folders.
The DCF Backup allows you to quickly search the digital images by
saving the subfolder ( 100xxxxx ) only. Under the main screen browser mode,
you can backup the your subfolder from Path B1 , C1, D1, to Path A1.
Simply scroll to the Path you want to backup , then press “ MENU “ to
select the “ DCF Backup mode .As you finish the selection , just press " ” buttons.
When the same card was inserted and copied twice, two different folders were created, DEVICE
won't overwrite the folder.
All files transfered from each memory card are stored onto the Backup folder
in numerically, under the name " B10000 " , " B10001" , "C10000" , "C10001".
To stop the data transfer , just depress the “ESC “ button or “ 3” buttons.
If an erroneous display , please re-format the memory card(s) first ,
It may be due to the bad sectors.
4) Navigating the Directory Structure
Just below the top status bar, you can see the path to the directory you are
currently viewing.
Page 20

9. Battery Recharge:
1) To charge the batteries, please connect the plug of the AC adapter to DC 5V jack of
the main unit. When the Power LED indicator goes off , it indicates that the batteries are fully
charged.
2) Please use only the FUJIFILM NP-120 1800mAh 3.7V rechargeable Li-ion battery
3) For additional battery packs, please contact your dealer or you can purchase
it at Digital Camera Stores.
10. If an erroneous display /operation occurs :
1) When the device error message pop on screen , there
may be a chance of corrupt data or the memory card is damaged , you can change another memory
card .
2) If any shut dowm caused by erroneous operation , you can depress the [ reset]
button located on the bottom to switch off the main unit .
3) If the unit operated via USB on to PC while the batteries are low, erroneous
display /operation may occur, if this happens ,unplug the USB cable, and press
the [ reset] button .
11. Care for the Hard Drive and unit :
1) If the computer or DEVICE can not detect the Hard Drive, check the suggested solutions:
Check the flat connector is plugged securely or not
Driver is not install -then reinstall
Don’t formatted the 32G above Hard Disk under Windows 2000 or
Windows XP
Note: Win 2K/ Win XP can not support Format Disk for 30G above Hard Drive.
2) Please don't use force when connecting the flat cable with the unit and
Hard Drive .
3) To keep your hard drive in better operating performance , we recommend to
periodically run Scan Disk and Disk Defragmenter .
4) Hard Drive must be formatted to the FAT or FAT-32 format, NTFS format is not
compatible with this function .
5) Please carefully insert and remove the memory card from each slot .
6) Do not drop, jar , bump , shock the unit , or expose to severe vibration
while data is being transmitted .
7) To reduce the risk of electronic shock , do not remove cover (or back )
8) To reduce the risk of fire or shock hazard, do not expose this equipment to rain ,any liquid or moisture.
Page 21

9) Keep it plugged into the AC adapter/charge while connected to your computer .
12.Troubleshooting.
WARNING
Under no circumstances should you try to repair the system yourself, as this will
Invalidate the warranty. Do not open the system as there is a risk of electronic shock.
If a fault occurs, first check the points listed below before taking the system for repair.
If you are unable to remedy a problem by following these hints ,consult Your dealer or
service center.
Problem
USB Connection issues
Under Windows 98SE, the DEVICE should not be connected to the system before
the driver has been installed.
If using a USB port in the front of your computer, try a USB port in the back. Front
USB ports are often from non-powered.
If using a laptop computer and a docking station, try connecting without the
docking station.
Solutions
If you cannot see the files on the device after copied files to DEVICE via USB from
computer , You must properly remove ( un-mount) your DEVICE from the computer
before disconnecting the USB cable to avoid loss of data or freezing the computer
and DEVICE .
Problem
Macintosh
TM
OS issues
MacOS 10.0.x does not adequately support FAT volumes. Upgrading to 10.1 or
later is mandatory
The FAT-32 format made by MacOS X´s Disk Utility is incorrect. Formatting must
be done under MacOS 9.
Solutions
The FAT volumes do not appear or disappear until after the mouse is being moved.
Problem Corrupt data , General Error , Can’t open Source File
Due to file allocation table (FAT) has been corrupted, the data in memory card
transferred into DEVICE may be looks faulty, please backup the data and run
ScanDisk , Dsik Defragmenter or reformat the memory card.
Solutions
The browser will show a ? icon indicating that it is not one of the standard file types
that it can play.
Problems Formatting, and partitioning
Page 22

To work in the stand-alone mode, both the disk and the memory cards must be
formated to the FAT or FAT-32 file systems.
Note: Win 2K/ Win XP can not support Format Disk for 32G above Hard Drive.
Solutions
Windows 2000 can not format the new Hard Disk that doesn't have Partition
Table , please use the Application Program which included in the CD-ROM to
format the Hard Disk .
Problems Video Playback
Solutions
The un-synchronization may be that the original video was encoded at an NTSC
frame rate and your DEVICE is set to display the output as PAL (see the system
display settings) or vice versa. Try changing this to the other setting.
Frequently Asked Questions
Problem Solution
Why can't I hear music? -If the player says it is playing a video or music and you don't
hear anything, then there may be h a problem with your
speakers, headphones or your. If you can hear other sounds
through your speaker then there might be a problem with our
feed.
If you feel the latter to be the case, then please contact us and
provide us with as much information as you can .
The system does not react
when buttons are press.
Remove and reconnect the AC adapter plug and switch on the
system again
The remote control does not
function properly
-Reduce the distance between the remote control and the
system
- Insert the batteries with their polarties (+/- signs) aligned as
indicated .
-Replace the batteries
- Point the remote control directly toward IR sensor on the front
of the system.
How can I get a battery
replacement for my DEVICE
If the unit is within the warranty , it needs to be sent to Company
for replacement with your warranty card.
If it is out off warranty , you can get it from digital camera
dealers . please note only use the Li-ion 3.7V 1800 mAh
battery Model : FUJIFILM NP-120
Can my DEVICE view TIFF
No, the DEVICE can only view JPG files
Page 23

or RAW files?
How do I browse my files on
the DEVICE while I am playing
a music file?
You can browse your files while listening to a MP3 or
WMA ,WAV music file only. While your music is playing,
press the “MENU” button to enter the “Hide “ mode.
Note: This feature only available during Music playback
When I playback videos on
my TV, the picture image
has no color and/or is
distorted,why?
Televisions in USA and Europe use different systems to display
the video signal. The NSTC standard is used in the USA and the
PAL standard is used on European televisions.
To check that your DEVICE is set to the correct standard,
Enter the OPTIONS and go into “DISPLAY “, and set the TV
standard to the setting required for your country.
Page 24

Hard Disk Assembly Chart
1. Remove the screw .
2.
Insert the HDD into the unit and place screws 1 ~ 4 .
To avoid bending the pins , the Hard Disk must be held in 180
°
angle.
Page 25

Thank you for choosing this product.
If you experience problems with Device
And cannot find answer in the previous troubleshooting
sections , please contact your dealer.
or check the updated firmware at
www.Company.com.tw
or mail to
service@Company.com.tw
 Loading...