

Page 1
INSTALLATION GUIDE
All product or company names are trademarks or registered trademarks of their respective holders.
DVD PRO I
Page 2

To Better Assist You:
When contacting Technical Support please have the following information ready.
First and Last Name
Phone #
Address
Model # of product
Serial # of product
Date of purchase
Computer information (Processor, Ram, Windows 98/ME/XP/2000)
T-# (T-# is given to you after you have initially called in for support. Please retain this number)
Model DVD PRO I (Internal)
Tritton reserves the right to make improvements in the products described in this
manual at any time without prior notice.
Tritton makes no representation or warranties with respect to the contents hereof
and specifically disclaims any implied warranties of merchantability or fitness for
any particular purpose. Further, Tritton Technologies Corp. reserves the right to revise this manual
and to make changes in its content without obligation to notify any person or
organization of such revision or change.
This manual is copyrighted, all rights reserved. It may not be copied, photocopied,
translated, or reduced to any electronic medium or machine-readable form without
Tritton’s prior permission.
Manual copyright ©2002 Tritton Technologies.
Licenses and Trademarks
All licenses and trademarks are property of their respective owners.
FCC NOTICE
This equipment has been tested and found to comply with the limits for a Class B digital device, pursuant
to Part 15 of the FCC Rules. These limits are designed to provide reasonable protection against harmful
interference in a residential installation. This equipment generates, uses, and can radiate radio frequency
energy, and, if not installed and used in accordance with the instructions, may cause harmful interference
to radio communications. However, there is no guarantee interference will not occur in a particular
installation. If this equipment causes harmful interference to radio or television reception, which can be
determined by turning the equipment off and on, the user is encouraged to try to correct the interference
by one or more of the following measures:
Page 3

. Reorient or relocate the receiving antenna.
. Increase the separation between the equipment and receiver.
. Connect the equipment into an outlet on a circuit different from that to which the receiver is
connected.
. Consult the dealer or an experienced radio/TV technician for help.
Any changes or modifications should be approved by the party responsible for compliance of FCC Rules;
otherwise, the user loses authority to operate the equipment.
CAUTION: Use of controls or adjustments or performance of procedures other than those
specified herein may result in hazardous radiation exposure.
The laser beam emitted from the optical pickup is invisible. Accordingly:
. Do not open the optical pickup housing.
. Obtain service only from Triton’s-authorized personnel.
CAUTION: To disconnect the CD drive from an electrical current, pull out the power plug.
Table of Contents
1. Getting Started ................................................................................................. 1
About this Manual.............................................................................................. 1
DVD PRO I Introduction...................................................................... 1
What the DVD PRO I 2.4x 12x10x32 Does ........................................................... 1
Minimum System requirements …………………………… ........................... 2
What's included in the kit.................................................................................... 3
DVD PRO I Drive Features and Controls ............................................................ 4
Front Panel ..................................................................................................... 4
Rear Panel ...................................................................................................... 5
Precautions ......................................................................................................... 7
2. Installing Your DVD PRO I .. …………………………………………. ........... 9
Quick Start Installation—For Experienced PC Users Only............................. 9
Open the Computer and Prepare for Installation ................................................ 9
Determine Your Existing IDE Configuration..................................................... 10
Set the Drive’s Mode Jumper............................................................................. 11
Changing the Mode Jumper on Your Internal Tritton Drive …………………11
Select an IDE Configuration .............................................................................. 12
About Cable Select............................................................................................. 15
Identifying Whether Y our System Uses Cable Select .................................... 16
Locating the Master Position on a Cable Select Cable................................... 16
Set the DMA Jumper.......................................................................................... 16
Install the Drive ............................................................................... 17
Record the Serial Number .............................................................................. 17
Mount the DVD Writer Drive in the Computer ................................................ 17
Using Sound Boards and Audio Cables ............................................................. 22
Choosing and Connecting Audio Cables........................................................ 22
Make Sure the Drive Is Recognized................................................................... 23
Enable DMA ...................................................................................................... 24
What Media to Use ............................................................................................ 29
Tray Loading and Operation .............................................................................. 30
Handling CD/DVD Media ......................................... .............................................. 30
Cleaning Discs ............................................................................................... 31
Playing Audio CDs............................................................................................. 31
Page 4

1. Getting Started
Congratulations! Thank you for purchasing the Tritton DVD PRO I, a reliable,
High-performance CD writer, CD rewriter, CD player, DVD writer, DVD rewriter
And DVD Player. We appreciate the
Confidence you have show n in us. Our goal is to make technology simple to use.
About this Manual
Please read this manual carefully and keep it handy for easy reference. Use the
Manual for installation, operation and troubleshooting. See your dealer or call
Tritton’s Technical Support Department should your drive require service.
In this manual you should find all the information you need to successfully install,
operate and troubleshoot your drive. If you run into a problem that doesn't seem to be
covered, however, please contact us. (See “Appendix B: Technical Support” for the
different ways you can contact us.) You will be connected to our friendly, helpful
band of tech support engineers who are Microsoft Certified. What might seem like an
uncooperative drive to you could very well be a 30-second fix to them. But we will
never know unless you contact us.
Meet Your Tritton DVD PRO I
The Tritton DVD PRO I is a DVD ReWritable drive that provides professional
quality DVD/CD performance for writing, rewriting and reading.
What the Tritton DVD PRO I Does
The Tritton DVD PRO I:
. Writes to DVD+R (recordable DVD) media at up to 2.4X
. Writes to DVD+RW (rewritable DVD) media at up to 2.4x
. Writes to CD -R (recordable CD) media at up to 12X speed.
. Writes CD-DA (digital audio) discs at a maximum of 24X for highest quality.
. Writes to high-speed CD-RW (rewritable CD) media at up to 10X speed.
(Naturally, the drive can also write to conventional CD -RW media at 4X speeds.)
. Reads all CD-ROM and CD-R media at a maximum of 32X speed with an
average access time of less than 120 milliseconds. (Maximum read speed of CDRW
media is 32X.) and reads DVD at up to 8X speeds
Reliable writing is virtually guaranteed, thanks to” Just link ” Buffer Management which
automatically detects the type of media being recorded and adjusts the DVD PRO I
to provide the optimum laser power and length of burn—which means the
highest quality playback. The DVD PRO I has an EIDE interface that
Page 5

Supports the ATAPI-5 command set, including special commands for DVD+R, DVD+RW, CD-R and
CDRW.
Section 1. Getting Started
2 DVD PRO I Installation and Users Manual
The DVD PRO I is fully MMC-compliant, supporting writing features
such as Disc -at-Once, Track-at-Once, Session-at-Once, and Multi-Session, as well as
variable and fixed packet writing. It also supports the UDF file system implemented
through packet writing and all DVD formats .
Minimum Configuration to Use the T
. Computer : Pentium II 300-MHz CPU or faster.
. Minimum RAM: 64 MB.
. Hard disk size: 1 GB of free space.
. ATAPI settings: In Windows, Direct Memory Access (DMA) should be set to
ON. The IDE controller should be set to “Auto” or “PIO Mode4/DMA Mode2”
in the motherboard BIOS. (Don’t worry, we’ll show you how to set this up.)
What You Can Do with the DVD PRO I
Just look at some of the things you can do with your DVD PRO I:
. Record data or audio onto writable or rewritable CD /DVD media.
. Play music CDs.
Play DVD’s
. Save photos and other images on rewritable or writable CDs/DVDs.
. Create a “CD /DVD sneakernet” to share information with colleagues—just use
software such as DLA to drag and drop files onto CD-R, CD-RW, DVD+R or
DVD + RW media, then continue adding files and sharing the same CD/DVD disc.
. Archive images and video to DVD.
. Master new software programs on CD /DVD.
Section 1. Getting Started
What's in the Box?
. DVD PRO I
. 40-pin IDE ribbon cable
. 4 mounting screws
. 1 piece of approved hi gh-speed
media
. Tritton CD with bundled premastering
packet writing, Authoring, Label making,
and DVD playing software plus bonus software.
DVD PRO I Features and Controls
Before proceeding, become familiar with the controls and features of your
DVD PRO I drive. Match the parts of your drive to the illustrations below.
Page 6
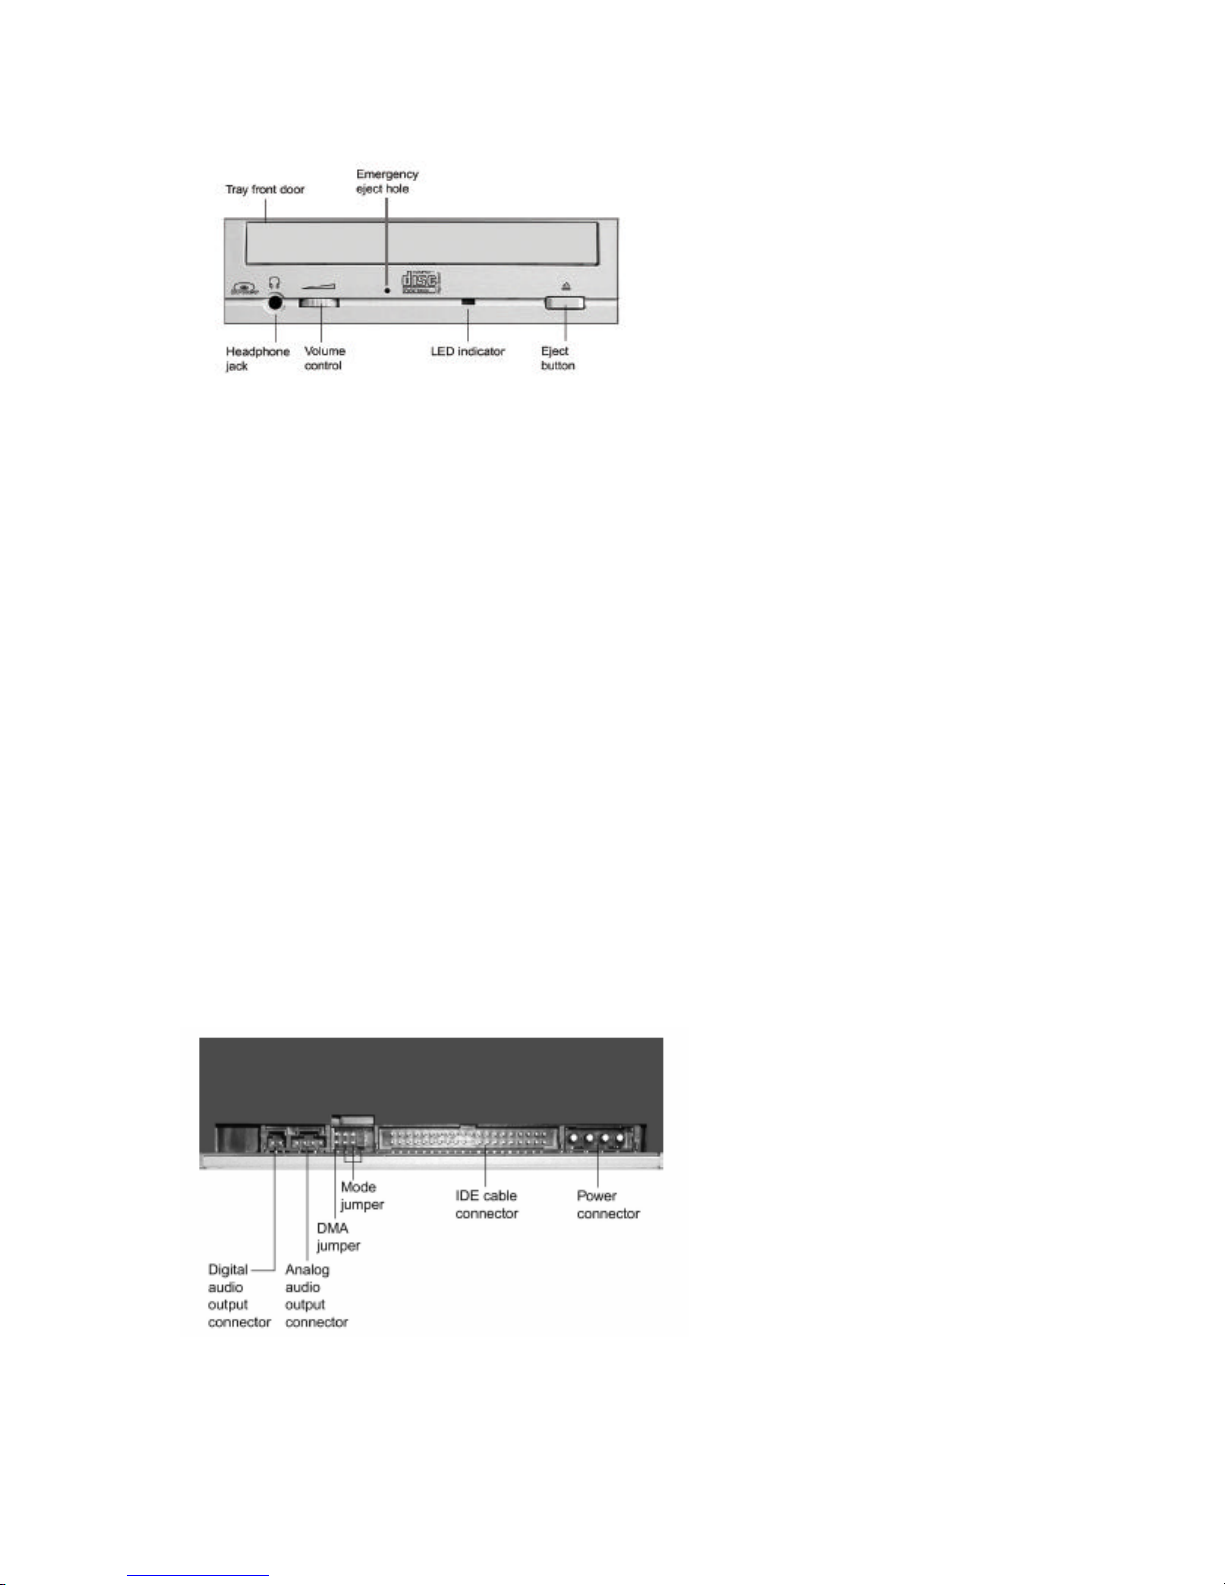
Front Panel
Figure 1: Front Panel of the DVD PRO I Drive
. Tray front door: Attached to tray drawer.
. Headphone jack : Stereo mini-jack for headphones and powered speakers.
. Volume control: Controls volume of headphone jack.
. LED indicator: Illuminated green during disc loading and when Just Link is
operational. Illuminated yellow when a disc is being read. Illuminated amber
when writing a DVD+R, DVD+RW, CD-R or CD-RW disc. The indicator changes
its blinking interval to indicate different writing speeds.
. Eject button : Push once to eject tray. Push again to insert the tray back into the
DVD PRO I. To prevent wear on the drive, always use the eject button to insert the
tray.
. Emergency eject hole: If the automatic eject button does not work, insert
emergency eject stick, paper clip, or other thin, rigid object in this hole to eject
tray. Turn OFF power before using this feature.
Section 1. Getting Started
DVD PRO I 40/12/40A Installation and Users Manual 5
Rear Panel
Figure 2: Rear Panel of the DVD PRO I Internal Drive
. Digital audio output connector: Outputs digital stereo signal. For connecting to
Page 7

a sound board that supports Sony/Philips di gital interface (SPDIF) or Digital-In.
. Analog audio output connector: Outputs analog stereo signal. Use to connect to
sound board or audio amplifier. Use standard MPC-3 type, 4-pin connector.
. DMA jumper: Use the DMA jumper to convert between Ultra DMA Mode 0-2
(no jumper, default) and Multiword DMA Mode 0-2 (with jumper installed). In
general, leave this jumper at its factory setting, which is Ultra DMA (that is, no
jumper installed).
. Mode jumper: Use the mode jumper to select operation as an IDE master or
slave, or for cable select. In general, leave this jumper at its factory setting, which
is master.
. IDE cable connector: Connects to IDE (ATAPI) interface using 40-pin IDE flat
ribbon cable.
Precautions
Like the rest of your computer system, your DVD PRO I require reasonable care in
its installation and use.
. Keep the area around your drive clean from dust, smoke, and other contaminants.
. Do not allow moisture or liquids, including water or cleaning fluids, to touch the
drive. Thinner, benzene, or alcohol -based solvents can mar your drive’s surface.
. Do not drop or jolt the drive.
. Do not attempt to open the drive and service it yourself. Removing the cover may
expose you to harmful electrical voltages or the laser beam. For your safety,
entrust service to Tritton-authorized service personnel only.
. Keep your Media free of dirt or other contaminants, by storing them in jewel cases.
Use only industry- standard discs. Do not insert dirty, warped, poorly balanced, or
cracked discs into the drive.
. Do not clean discs using a circular motion. Instead, use a radial motion: start at
the center of the disc and proceed to the outer edge.
CAUTION: Install your DVD PRO I horizontally. Tritton does not guarantee the drives
performance in a vertical position.
2. Installing Your DVD PRO I
This chapter explains how to
physically install your DVD PRO I in
your computer. The steps you'll need
to do are as follows:
1. Turn OFF your computer system.
2. Set the jumper for your new
DVD PRO I drive, if necessary.
3. Mount the DVD PRO I drive into
an available drive bay inside the
computer system.
4. Make all necessary cabling
connections: IDE cable, power
cable and audio cable.
5. Turn your computer system ON.
The following pages give more
details for this procedure
.
Page 8

Open the Computer
and Prepare for
Installation
To determine whether your
DVD PRO I will be a Master or a
Slave, open your computer and
examine the IDE connections to the
motherboard.
To open the computer:
1. Before proceeding, make sure the
power to your computer and any
external peripherals is OFF and
your computer is UNPLUGGED
from its power source.
2. Remove your computer’s cover,
following the directions provided
by your computer’s manufacturer. Typically, this involves loosening or removing
severa l screws on the back panel of your computer and sliding off the cover. See
Figure 3 for an example.
Quick Start Installation—For
Experienced PC Users Only
If you’ve installed computer peripherals
before, you’re in luck with the
DVD PRO I drive. Use this Quick Start
installation to get up and running
quickly.
Typical Scenario 1: You have a PC
with an IDE interface installed, you
have Windows 95, 98, ME, XP, or
2000, and you have nothing installed on
the secondary IDE port.
What to do: Leave the DVD PRO I jumper set to Master, attach it to the
secondary IDE port and go. Windows
will recognize the drive automatically.
Typical Scenario 2: You have a PC
with an IDE interface installed, you
have Windows 95, 98, ME, XP, or
2000, the primary IDE port already has
two devices connected and you have a
CD-ROM installed on the secondary
IDE port.
What to do: Change the CD-ROM to
Slave; leave the DVD PRO I’s jumper set
to Master and attach the DVD PRO I to
the secondary IDE port. Windows
recognizes the new drive automati cally.
If neither of these situations applies to
you or you’re not comfortable with
IDE installation, read the rest of this
chapter for more detailed installation
instructions.
Page 9

Figure 3: Removing a Typical Computer's Cover
Determine Your Existing IDE Configuration
With your computer open, determine the existing IDE configuration. You can do this
by looking at the 40 -pin IDE ribbon cable (or cables—there may be two) and seeing
what is connected to them?
One end of the IDE cable is connected to a port on the computer’s motherboard; and
the other end is connected to one or two peripheral devices (such as a hard disk or
CD-ROM drive). If there are two devices, one is configured as Master and the other
the Slave, as indicated by the position of jumpers on the back of the drive. (This is
also true for the Cable Select bus.) If there are two IDE ports, one is for the primary
IDE bus and the other are for the secondary bus.
Before you install your DVD PRO I, your computer’s IDE configuration is usually
one of the following:
. Configuration A: Hard disks connected as Master and Slave devices on primary
IDE port; CD -ROM drive connected as Master device on secondary IDE port.
. Configuration B: Hard disk connected as Master device and DVD or CD-ROM
drive connected as Slave on the primary IDE port; nothing connected to
secondary IDE port.
. Configuration C: Hard disk connected as Master device on primary IDE port;
nothing connected to secondary IDE port.
. Configuration D: System uses special “Cable Select” cables; all devices are
jumpered for Cable Select.
Section 2. Installing Your DVD PRO I
Set the Drive’s Mode Jumper
You specify your drive's Master or Slave setting before installing it. You do this by
changing the position of a jumper on the mode jumper block at the rear of the drive.
Your drive ships from our factory with its mode jumper set to operate the DVD PRO I
as a Master. This will work in most custom system configurations. If your computer
is from a large OEM system manufacturer such as IBM, Hewlett Packard, Gateway
or Compaq, you will need to pay particular attention to whether the computer uses a
Cable Select scheme.
Changing the Mode Jumper on Your Internal DVD PRO I Drive
The DVD PRO I drive arrives from the factory with its mode jumper set to Master. (A
function is ON if the jumper is installed and OFF if the jumper is removed.)
Page 10

Figure 4: Factory Settings for Mode Jumper at the Rear of the Drive
Changing to a Master, Slave, or Cable Select
The Master/Slave setting for the drive is determined by the mode jumper. To change
the drive from Master to Slave or to Cable Select, you must move the jumper.
For example, to change the DVD PRO I drive to be a Slave, move the jumper to the
middle set of pins, leaving the other pins uncovered. To change the drive for Cable
Select, move the jumper to the left set of pins. (Note that if any device is jumpered as
Cable Select, then both devices connected to that cable must be jumpered as Cable
Select.)
Changing Jumper Settings
. To remove a jumper, pull it off with your fingers or a pair of needle-nose pliers.
. To install a jumper, push it onto the jumper pins.
CAUTION: Ensure power to the drive is OFF before installing or removing a jumper.
Figure 5: Install the Mode Jumper Across Vertical Pairs of Pins
CAUTION: Install the mode jumper across the pins as shown (vertically). Do not
connect one pin switch to another by installing the jumper lengthwise (horizontally).
Doing so could result in damage to the drive.
Select an IDE Configuration
Set the jumper according to the desired configuration, as shown in the tables and
illustrations on the next few pages.
NOTE: For best CD-RW performance, try to connect the DVD PRO I to the IDE port
that is not connected to the hard disk drive or to a CD-ROM drive. In most cases, this
will be the secondary IDE port.
NOTE: For best results, set the DVD PRO I to be the Master, if possible. Also, direct
memory access (DMA) must be enabled in your computer’s operating system to
achieve the drive’s maximum writing speed. (This is a separate setting from the DMA
Page 11

jumper.)
Before DVD PRO I Installation How to Install the DVD PRO I
A Hard disks connected as Master and
Slave devices on primary IDE port;
CD-ROM connected as Master
device on secondary IDE port.
Remove the CD-ROM drive, change
it to Slave, and re-connect it to the
secondary IDE port.
Set the DVD PRO I mode jumper to
Master, and connect the DVD PRO I
as Master device to the secondary
IDE port.
NOTE: Configuration A can make it very difficult to write from the
CD-ROM to the DVD PRO I at 12X using “on-the-fly” copying. System
configuration and performance will make a big difference. Depending on how
fast the CD-ROM drive can stream data to the DVD PRO I, it may not be fast
enough to constantly have the buffer full. In this case, the buffer may become
empty and a buffer underrun error may happen. With the BURN-Proof
technology of your DVD PRO I you could still make successful copies if you use
software that supports BURN-Proof. If you still have
problems writing with this configuration, use the image writing method or record
at lower speed for best results. We also recommend that DMA be enabled on
your computer, if your system supports it.
Figure 6. How to Install the DVD PRO I If Your Computer Is Originally Set Up in
Configuration A
Before DVD PRO I Installation How to Install the DVD PRO I
B Hard disk connected as Master
device, and CD-ROM or DVD-ROM
drive connected as Slave on the
primary IDE port; nothing connected
to secondary IDE port.
Set the DVD PRO I’s mode jumper to
Master, and connect the DVD PRO
as Master to secondary IDE port.
Page 12

Figure 7. How to Install the DVD PRO I If Your Computer Is Originally Set Up in
Configuration B
Before DVD PRO I Installation How to Install the DVD PRO I
C Hard disk connected as Master
device on primary IDE port; nothing
connected to secondary IDE port.
Set the DVD PRO I’ s mode jumper to
Master, and connect the DVD PRO I
as Master to secondary IDE port.
Figure 8. How to Install the DVD PRO I If Your C omputer Is Originally Set Up in
Configuration C
Before DVD PRO I Installation How to Install the DVD PRO I
D System uses special Cable Select
cables; all devices are jumpered for
Cable Select.
Set the DVD PRO I’ s mode jumper to
CSEL, and connect it to the end of
the cable from the computer’s IDE
interface connector.
Figure 9: How to Install the DVD PRO I If Your Computer Is Originally Set Up in
Configuration D
About Cable Select
The Cable Select jumper position sets the DVD PRO I drive to use the CSEL signal
from the IDE interface for configuration purposes. This signal automatically selects
the correct Master/Slave setting for the DVD PRO I. To use CSEL, you must have:
. A computer that supports CSEL.
. A special CSEL cable for IDE.
Figure 10: Using the CSEL Signal to Configure the DVD PRO I Drive
NOTE: The IDE cable supplied by Tritton does not support CSEL. To use CSEL and
Cable Select, you’ll have to purchase a CSEL cable, or use one that may be supplied
with your CSEL-configured system.
Page 13

Identifying Whether Your System Uses Cable Select
If you are unsure whether or not your system has a Cable Select cable installed,
either look at the cable or look at the jumpers on the CD-ROM drive. If any device is
jumpered as Cable Select, then both devices on that cable should be jumpered the
same.
Locating the Master Position on a Cable Select Cable
With Cable Select, Master and Slave are determined not by jumpers, but by the
connectors on the Cable Select cable. The connectors are identified as Master or
Slave.
Set the DMA Jumper
Your DVD PRO I ships from the factory with no DMA jumper installed. (The pins are
empty.) The empty pins mean the drive is set to Ultra DMA. This setting should
work in most cases, so you don’t have to do anything more.
With some personal computers, the computer may “hang” or crash with the
DVD PRO I set to the default Ultra DMA setting. If this happens, change the
DVD PRO I to Multiword DMA mode by installing the DMA jumper across the two
pins just to the left of the mode jumper.
Install the DVD PRO I Drive
Before proceeding to install the DVD PRO I drive in your personal computer, doublecheck
your jumper setting.
Record the Serial Number
Record the ser ial number and TLA code of your drive on the inside front cover of
this manual.
Mount the DVD PRO I Drive in the Computer
You can mount your internal DVD PRO I drive in any available bay. You must
remove the small panel that covers the bay that you want to use.
CAUTION: Install your DVD PRO I horizontally. DVD PRO I does not guarantee the drive’s
performance in a vertical position.
If you don’t have an empty bay, remove the existing IDE CD -ROM drive and install
the DVD PRO I.
You must make a minimum of two cable connections to your DVD PRO I . The two
cable connections that you must make are:
. IDE cable
. Power cable
There are also two optional cable connections:
. An analog audio cable connection if you are using a sound board in your
computer and plan to connect the DVD PRO I audio output to the audio
connector on the sound board.
. A digital audio cable connection if the sound board is equipped with SPDIF or
Digital -In and you wish to use the digital audio output from your DVD PRO I r.
Do You Need Another IDE Ribbon Cable?
The IDE cable is a standard 40-pin flat -ribbon cable, usually with three connectors.
One end connects to the IDE port on your computer’s motherboard, and the other
two connectors are free for attaching peripherals such as a hard disk, CD -ROM
drive, or a DVD PRO I drive.
You may need to install another IDE ribbon cable in your computer. You can use the
extra IDE cable supplied with your DVD PRO I. (Just remember, if you want to use
CSEL and Cable Select settings, this Tritton-supplied cable won’t work—you’ll
have to purchase a special cable for Cable Select.)
Page 14

Figure 12: Internal IDE Ribbon Cable
CAUTION: The length of any IDE cable cannot exceed 18 inches.
Do You Need a Power Cable?
In most computers, you will find free power connectors in the computer ready for
your use. When you open the computer, check the cable runni ng from your power
supply to your hard disk and see if it has extra connectors on it. If so, you can plug
one of these into the power connector found on the rear panel of the DVD PRO I .
If you do not find any additional connectors (either because they were not supplied
or they are all in use), you will have to buy a “splitter” or a “Y-connector.” These
can also be found at most retail and mail-order computer stores.
To mount the DVD PRO I drive:
1. Make sure the power to your computer and any external peripherals is turned
OFF and your computer is UNPLUGGED from its power source.
2. If you haven't already removed the cover from your computer, remove it now,
following the directions provided by your computer’s manufacturer. Typically,
this involves loosening or removing several screws on the back panel of your
computer and sliding off the cover. See Figure 3 for details.
3. Remove the cover panel from the bay that will hold the DVD PRO I drive. To
remove the cover panel, pop it out by pressing outward lightly. (In some older
computers, you may have to remove screws that hold the panel in place.)
Figure 13: Removing the Cover Panel from a Bay
4. Determine if you must install mounting rails on the sides of your drive. To do so,
insert the drive into the open bay. If the drive fits tightly with little or no
clearance on either side of the drive, you will not have to use mounting rails. The
drive can be mounted directly into your computer. Go to step 6.
NOTE: Tritton does not provide rails. If you need rails, you can obtain them from the
computer manufacturer or from a computer supply retail or mail-order store.
5. If you must use mounting rails, fasten the rails to the lower pair of holes as
shown in Figure 14. (In some instances, you may need to fasten the rails to the
upper set of holes.) After fastening the rails, check their positioning by sliding the
drive into the bay before you mount the drive or connect any cables.
Page 15

Figure 14: Installing Mounting Rails (if Needed)
6. Plug one connector of the IDE cable into the IDE connector on the rear panel of
the drive before you insert the drive into your computer. Then thread the cable
through the front of the open bay and back toward the motherboard. The drive
should slide smoothly into the bay. If it does not, check for obstructions in the
bay and ensure the side rails are attached properly.
7. If not already connected, attach the other end of the IDE ribbon cable to the
connector on the motherboard.
Figure 15: Connecting the IDE Ribbon Cable
CAUTION: It is easy to accidentally plug your IDE ribbon cable upside down into both
your drive and the motherboard. Be sure you match the red stripe along one side of
the IDE cable to Pin 1 on the motherboard and Pin 1 on the drive. (Pin 1 on the drive
is closest to the power connector.) Each connector on most ribbon cables has a “key”
in the middle. This key should fit into a slot in the middle of each connector of the
motherboard, your DVD PRO I, and any other internal IDE peripheral s.
8. Double -check your work. You must ensure the side of the IDE cable with the red
stripe is matched to Pin 1 on the interface board and on the drive.
CAUTION: In the case of only one IDE device, you must make certain that one
end of the cable is always connected to the IDE connector on the motherboard.
The other end of the connector must be connected to a device. The end
Page 16

connector of the cable should never be left unconnected.
9. Connect a power cable from the computer to the DC INPUT connector of the
DVD PRO I drive. In most computers, you will find free power connectors that are
ready for your use.
Check the cable running from your power supply to your hard disk and see if it
has extra connectors on it. If so, you can plug one of these into the power
connector found on the rear panel of the DVD PRO I.
10. Connect the analog audio cable if you want to use a sound board in your system.
This cable runs from the four -pin analog audio output connector on the rear panel
of your DVD PRO I drive to your sound board. See “Using Sound Boards and
11. Connect a digital audio cable if your sound board is equipped with the
Sony/Philips digital interface (SPDIF) or Digital-In, and you wish to use the
digital audio output from your DVD PRO I. This cable runs from the digital audio
output connector pins on the back panel to the sound board. (This cable is not
supplied by DVD PRO I .)
12. Mount the DVD PRO I drive in the computer using the four screws that were
supplied with your drive. Use only these screws.
CAUTION: Do not mount your drive in your computer using screws other than those
supplied by Tritton. You may damage the drive if you insert screws that are too long
or the wrong thread type.
Using Sound Boards and Audio Cables
Whichever category your sound board falls into, you will find that the best source of
information about installing the sound board in your computer is the board's manual.
Once you have successfully installed the sound board in your computer, you can
continue below for a description of the different cable connections that need to be
made.
Required
How to Connect It
MPC audio source MPC-compliant
audio cable
Connect to MPC audio
source, and to analog audio
output connector at the rear
of the DVD PRO I.
Sound Blaster or
compatible sound board
Sound Blastercompatible
analog audio
cable
Connect to Sound Blastercompatible
audio board and
to analog audio output
DVD PRO I.
Digital audio output Cable that’s
compatible with
SPDIF or
Digital-In.
Connect to SPDIF or DigitalIn connector on sound board
(if sound board supports
digital audio) and to digital
audio output connector at the
Page 17

rear of the DVD PRO I.
Make Sure the Drive Is Recognized
After installation, make sure DVD PRO I drive and other IDE peripherals are
recognized by your computer. To check whether they are recognized:
To see if the drive is recognized in Windows:
1. Turn the computer ON. After the computer boots up, you should see the
Windows display.
2. Open Windows Explorer or My Computer and ensure there is an icon for the
DVD PRO I, the hard disk, and other CD-ROM drives, if present. The DVD PRO I
may be D: or E: or another designator.
3. If the DVD PRO I drive is not recognized in Windows, reboot the computer and
use your computer’s setup program to program the BIOS to recognize it.
NOTE: Refer to the computer’s documentation for information on how to run the
motherboard BIOS setup program.
4. Use the motherboard BIOS setup program to set up IDE Master and Slave
designations, as needed for your configuration, on the primary or secondary IDE
bus. If the IDE interface is disabled on your computer, you will need to enable it.
If a Master or Slave device is set to “disable” or “none” or a similar designation,
change it as appropriate to “enable” or “auto” (or something similar, depending
on your setup program).
5. Save and exit your CMOS setup to restart your computer with the new settings.
6. In Windows 95, 98, or ME, once the system comes up click the Start button, then
Settings, then Control Panel, then double-click on System icon, then click on
Device Manager tab. Click the + sign next to the CD-ROM heading and look at
the RW5125A entry underneath.
7. If you do not see this drive listed as one of the devices, or if it has a yellow
diamond with an exclamation point (!), contact your PC or motherboard
manufacturer for support and to troubleshoot your IDE controller or driver
compatibility or conflicts. It may just be a matter of obtaining the latest IDE
controller driver, or a motherboard BIOS update, from the manufacturer.
Enable DMA
To achi eve top speeds for reading and writing with your DVD PRO I drive, direct
memory access (DMA) must be enabled for the drive.
To enable DMA in Windows 95, 98, or ME:
1. In Windows 95, 98, or ME, click the Start button, then Settings, then Control
Panel, then double-click on System icon, then click on Device Manager tab. You
will see a list of devices in your system.
2. Double -click the CD-ROM icon and choose the RW5125a drive by clicking on
it once. Then click on the Properties button and select the Settings tab. You will
see the drive properties for the DVD PRO I.
3. Ensure the DMA box is checked ON.
4. Click on OK button and then click the Close button to exit the System Properties
window.
5. When prompted if you want to restart your computer now, select Yes for this
change to be enabled and saved.
To enable DMA for Windows 2000 or XP:
1. Right-click My Computer and select Properties.
2. Select the Hardware tab when the systems properties window appears.
3. In the Hardware tab, select the Device Manager button.
4. Double -click IDE ATA/ATAPI Controllers to expand the options.
5. Under IDE ATA/ATAPI Controllers, double-click on the listing to bring up the
Page 18

property dialog box for the Primary IDE channel.
6. Click on the Advanced settings tab.
7. If available, set Transfer Mode for Device 0 and 1 to DMA. Then select OK.
8. Your computer asks if you would like to reboot at this point. Select NO.
9. Repeat steps 5–8 for the Secondary IDE channel.
10. This time, when you are prompted, select Reboot.
 Loading...